1
Fast Scintillation Detector and Pulse
Processing Unit
Operating & Service Manual
FMB OXFORD
Unit 1 Ferry Mills,
Osney Mead
Oxford,
OX2 0ES
UK
Tel: +44 (0) 1865 320 300
Fax: +44 (0) 1865 320 301
http://www.oxford-danfysik.com
FMB Oxford - USER MANUAL
Page 1 of 22
07/04/2008
1. Table of Contents
1. TABLE OF CONTENTS.......................................................................................................2
2. WARRANTY.........................................................................................................................4
3. FMB OXFORD SOFTWARE LICENCE AGREEMENT AND LIMITED WARRANTY ........5
3.1 LICENCE AGREEMENT ...........................................................................................................5
3.2 LIMITED WARRANTY ..............................................................................................................5
4. FAST SCINTILLATION DETECTOR...................................................................................6
LETHAL VOLTAGE CAUTION & OPERATION
WARNINGS…………………………………………………6
4.1 SCINTILLATOR .......................................................................................................................6
4.2 PHOTOMULTIPLIER ................................................................................................................6
4.3 HOUSING ..............................................................................................................................7
4.4 CONNECTORS .......................................................................................................................7
4.5 VOLTAGE DIVIDER .................................................................................................................7
4.6 PREAMPLIFIER ......................................................................................................................7
4.7 POWER REQUIREMENT ..........................................................................................................7
4.8 CABLES ................................................................................................................................7
5. SCINTILLATOR ...................................................................................................................8
5.1 PROCEDURE FOR CHANGING A SCINTILLATOR.........................................................................8
6. PULSE PROCESSING UNIT .............................................................................................10
LETHAL VOLTAGE CAUTION & OPERATION
WARNINGS…………………………………………………10
6.1 DIMENSIONS .......................................................................................................................10
6.2 SHAPING AMPLIFIER ............................................................................................................10
6.3 SINGLE CHANNEL ANALYSER ...............................................................................................11
6.4 HIGH VOLTAGE SUPPLY .......................................................................................................12
6.5 PHOTOTUBE PREAMPLIFIER POWER .....................................................................................13
6.6 CURRENT CONSUMPTION ....................................................................................................13
6.7 MISCELLANEOUS .................................................................................................................13
6.8 OPTIONS ............................................................................................................................15
6.9 TYPICAL SETTINGS ..............................................................................................................15
FMB Oxford – User manual
Page 2 of 22
April 2008
7. FRONT PANEL DESCRIPTION ........................................................................................17
7.1 HIGH VOLTAGE ...................................................................................................................17
7.2 PREAMPLIFIER AND SHAPING AMPLIFIER...............................................................................17
7.3 SINGLE CHANNEL ANALYSER (SCA) ....................................................................................17
8. COMMUNICATION BOARD..............................................................................................18
8.1 GENERAL CONSTRUCTION ...................................................................................................18
9. REMOTE CONTROL SOFTWARE FOR PULSE PROCESSING ELECTRONIC ............19
9.1 INTRODUCTION ....................................................................................................................19
9.2 DESCRIPTION ......................................................................................................................19
9.3 COMMANDS LIST .................................................................................................................20
9.4 SYNTAX RULES....................................................................................................................21
9.5 CONNECTING WITH A HOST COMPUTER ................................................................................21
9.6 NETWORK CONFIGURATION .................................................................................................22
FMB Oxford – User manual
Page 3 of 22
April 2008
2. Warranty
1.
FMB OXFORD warrants that the Equipment shall be free from defects by reason of faulty design,
workmanship or materials and that if within the guarantee period set out in sub-clause 3 the Equipment proves
defective for such reason FMB OXFORD shall adjust, repair or replace it as it sees fit free of charge, provided
that:
1.1
The Equipment has been used solely for the purpose for which FMB OXFORD understands it is to be used
and in accordance with the operating instructions;
1.2
The defect has not been caused by fire, accident, misuse, neglect, incorrect installation by the customer, its
customers, agents or servants or unauthorised repair or maintenance or by use of sub-standard consumables;
1.3
The defect has not arisen from any design, specification, component or material supplied by the customer;
1.4
No part of the Equipment has been replaced with a part not supplied by FMB OXFORD or approved as
suitable by it;
1.5
Payment in full of all sums due in respect of the Equipment has been made;
1.6
The customer shall be liable for any costs incurred by FMB OXFORD in responding to claims made in respect
of erroneous results caused by operator error or incorrect application;
1.7
Upon the customer making a claim under sub-clause 1 it shall accord sufficient access to the Equipment to
enable FMB OXFORD staff to inspect and adjust, repair, remove or replace the Equipment;
1.8
FMB OXFORD will co-operate with the customer in the assessment of reported defects but the final decision
regarding the applicability of this guarantee shall rest with FMB OXFORD.
2.
FMB OXFORD shall decide if the Equipment should be repaired pursuant to sub-clause 1 at its site or
returned.
3.
The applicable guarantee period shall be 12 months after delivery save where the Equipment is installed
and/or commissioned by or under the supervision of FMB OXFORD in which case it shall be 12 months from
the date of the installation certificate or 18 months after the date of delivery, whichever is the earlier.
FMB Oxford – User manual
Page 4 of 22
April 2008
3. FMB Oxford Software Licence Agreement and
Limited Warranty
3.1 Licence Agreement
As part of the sales package for the FMB OXFORD pulse processing units, the customer will receive from
FMB OXFORD a licence to use the accompanying software subject to the following terms and conditions;
•
The software package may be used, without time limit, on one personal computer or workstation.
•
A separate licence agreement and fee is required for each additional personal computer or workstation on
which the package is used.
•
The software package may not be duplicated or copied except for archive purposes or to replace defective
media, and each copy made must bear the copyright notices carried on the original. The software package
may not be transferred in any event to a third party unless written consent is obtained from FMB OXFORD.
•
This software package is protected under copyright law and FMB OXFORD reserves the right to terminate
this licence upon any violation of these laws. In the event of termination, the customer will be required to
return all copies of the software package to FMB OXFORD.
•
Some parts of the software package are specially protected in order to be read or modified only by FMB
OXFORD engineers. Under no circumstances will FMB OXFORD be under obligation to disclose
information relating to these parts of the software.
3.2 Limited Warranty
The standard software is fully tested and under normal use is guaranteed to be free of bugs and defects on
pulse processing units.
This insurance is not valid for special software adaptations on non-standard pulse processing units. In this
case, FMB OXFORD agrees to correct at its own expense, during a one year warranty period, any defect
arising during the use of the modified software package.
In no event will FMB OXFORD be liable for any direct or indirect incidental or consequential damages
arising from a software failure.
FMB Oxford – User manual
Page 5 of 22
April 2008
4. Fast Scintillation Detector
Caution :
LETHAL VOLTAGE PRESENT INSIDE DEVICE
WHEN OPERATED:
1250 VOLTS MAXIMUM High Voltage supply .
USER MUST DISCONNECT DEVICE BEFORE
OPENING HOUSING FOR ANY REASON.
Please note that permanent damage to the phototube can occur if
rated High Voltage supply value (above) is exceeded.
Disturbing ground loops warning : In order to avoid unwanted effects,
the body of the phototube should always be electrically isolated from
the experiment where it is installed.
Shielding ground warning : In order to obtain the best signal shielding,
the body of the phototube must always be electrically connected to the
ground of the pulse processing electronics used .
4.1 Scintillator
Type
Various scintillation crystals* are available with a variety of
thicknesses (minimum 1 mm). The current selection includes: NaI,
YAP, LaCl3, BGO, BaF2, CsI, CsI(TI), CsF,
* crystals are easily interchangable
Detector aperture
A full suite of dimensions are available – please see the FMB Oxford
catalogue for the full range. Standard heads have a Φ 32 mm active
area.
Energy
Window
up to 50 KeV - NaI(TI), 10 MeV - BGO
Beryllium, 0.2 mm thickness, Kapton or aluminium, depending on
the crystal
Background
< 0.2 cps at 5 KeV - NaI(TI)
4.2 Photomultiplier
Diameter
This varies depending on head type. Standard units with a Φ 32 mm
scintillator have 38 mm tubes.
Photocathode
Bialkali adapted to most of scintillator emission wavelength
(NaI(TI), YAP, BGO …)
Structure
10 dynodes
Gain
106 typical
FMB Oxford – User manual
Page 6 of 22
April 2008
Anode signal
Rise time 2.8 ns.
4.3 Housing
Precisely machined from aluminium alloy and can be opened for easy access to every component
External dimensions (standard unit only)
Φ 48 mm, L 138 mm
O rings for light tightness
µ metal shielding
4.4 Connectors
High voltage
Lemo ERA size zero
Signal and low voltage
Amphénol 17DMW (or Lemo depending on head)
Other connectors on customer request
4.5 Voltage Divider
Principle
Passive dynode chain (active on request)
Impedance
1.8 MΩ
4.6 Preamplifier
For low noise and improved speed this is directly attached to the dynode chain
Output impedance
50 Ω
Gain bandwidth product
300 MHz
Slew rate
2000 V/µs
Driving capability
Short circuit protected
4.7 Power Requirement
High voltage supply
+ 1250 V maximum
High voltage current
0.7 mA
Preamplifier supply
NIM standard ± 12 V
Current required
35 mA on the + 12 V
35 mA on the - 12 V
4.8 Cables
High voltage, signal, preamplifier supply
standard 5 metre length
Other cable lengths available
FMB Oxford – User manual
Page 7 of 22
April 2008
5. Scintillator
A large range of scintillators is available and the procedure for changing crystals is relatively straight
forward..
5.1 Procedure for Changing a Scintillator
•
Disconnect the detector from its cables.
•
Remove the two M 2.5 screws. Labelled “back screw” on the detector drawing.
•
The connector plate is pushed externally by a spring situated inside the detector. Disengage the connector
back plate from the detector body. Do not twist and break the connecting cables, these are Teflon wires and
welding points are fragile.
•
Holding the front scintillator housing steady in one hand, unscrew the detector body. During this operation the
disengaged connector back plate must not rotate.
•
When unscrewed, slide the scintillator along the front face of the phototube to a position where it touches the
scintillator housing internal thread.
•
The phototube is coupled to the scintillator window by optical grease. This coupling must be broken, for this
operation, grasp the detector body in one hand and the scintillator housing in the other and apply a constant
gentle force, after some seconds the optical coupling will disconnect. Pull out backwards the phototube from
the housing.
•
Clean the phototube and the scintillator windows with alcohol. Store them in a safe, dry and dark place.
•
Thread the new scintillator on to the detector body.
•
On the centre of the phototube window apply ¼ cm3 of optical grease, do not spread this. We recommend the
thixotropic product from Dow Corning, Q2-3067. Never use a non-thixotropic grease.
•
Re-insert the phototube assembly inside the detector body and tighten the M 2.5 back screws on the connector
plate, being careful not to wear the threads. The internal spring will gently squeeze the silicon optical
couplant.
•
After five - ten hours the detector will be ready to use.
FMB Oxford – User manual
Page 8 of 22
April 2008
Detector Drawing
FMB Oxford – User manual
Page 9 of 22
April 2008
6. Pulse Processing Unit
Caution :
LETHAL VOLTAGE PRESENT INSIDE DEVICE
WHEN OPERATED:
1250 VOLTS MAXIMUM High Voltage supply
USER MUST DISCONNECT DEVICE BEFORE OPENING
HOUSING FOR ANY REASON
Please note that permanent damage to the phototube can occur if
rated High Voltage supply value (above) is exceeded.
Disturbing ground loops warning : In order to avoid unwanted effects,
the body of the phototube should always be electrically isolated from
the experiment where it is installed.
Shielding ground warning : In order to obtain the best signal shielding,
the body of the phototube must always be electrically connected to the
ground of the pulse processing electronics used .
6.1 Dimensions
External
double NIM unit, 6.86 cm x 22.13 cm
or 19 inches - 3U Europe-standard rack.
6.2 Shaping Amplifier
•
Advantages
fast speed dc-coupling
•
Gain
adjustable by a front panel scroll key
•
Shaping constant
adjustable by a front panel scroll key
peaking time of 50 ns, 100 ns, 300 ns or 1000 ns gaussian
•
Dead time correction
smooth and predictable counting loss leading to an easy dead time
correction up to 3.106 cps (peaking time
50 ns).
•
Base line restorer
innovative base line restorer, virtually no base line shift at high
counting rate, active even on undershoot of high energy saturating
pulse.
•
BNC pulse output
unipolar pulses output available on the front panel. Can be
connected to a multi-channel analyser.
•
Output level
•
Display
maximum output voltage of 4 volts.
1 ns override recovery time.
LCD 2 lines * 8 characters displays gain and shaping constant
FMB Oxford – User manual
Page 10 of 22
April 2008
6.3 Single Channel Analyser
1) Independant upper and lower adjustments by front panel scroll keys
−
Lower level
adjustable between 0 V and 4 V
•
Precision of the reading
± 10 mV
•
Linearity error
± 10 mV
•
Thermal drift
0.1 mV/0C over the range of 10 to 500C
−
Upper level
adjustable between 0 V and 4 V
•
Precision of the reading
± 10 mV
•
Linearity error
± 10 mV
•
Thermal drift
0.1 mV/0C over the range of 10 to 500C
•
Display
LCD 2 lines * 8 characters displays upper and lower
adjustments
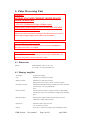
2) BNC output signal – CBY02202 single channel units
•
protection
every output is short circuit protected
•
standard signal
TTL or NIM signal through jumper selection (SW105, SW106
and SW107) are available to synchronise external counter
acquisition system
TTL output positive going 4 ns rise time
zero: 300 mV; logical 1:2 volts minimum into a 50 Ω load
NIM output negative going; logical 1:2 volts minimum into a
50 Ω load
•
front panel
upper level, lower level and window output
•
current NIM pulses
available on the BNC output through a jumper selection for
location of this jumper refer to 6.7.
logical 1 between - 36 mA and - 12 mA
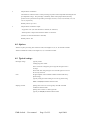
typical single channel analyser
3,5
TTL output
3
Amplitude [V]
2,5
2
1,5
1
0,5
-2,E-07
-1,E-07
-8,E-08
-4,E-08
0
0,E+00
4,E-08
8,E-08
1,E-07
2,E-07
Time [s]
FMB Oxford – User manual
Page 11 of 22
April 2008
typical single channel analyser
1
NIM output
Amplitude [V]
0,5
-2,E-07
-1,E-07
-8,E-08
-4,E-08
0
0,E+00
4,E-08
8,E-08
1,E-07
2,E-07
-0,5
-1
-1,5
-2
-2,5
Time [s]
3) LEMO ERN 00250 RTL output signal (CBY-2206 module)
•
protection
every output is short circuit protected
•
standard signal
TTL output positive going 4 ns rise time
•
rear panel
Window, LL or UL LEMO output through a jumper selection for
“discri. out”
location of this jumper refer to 6.7.
current NIM pulses
available on the LEMO output through a jumper selection for
zero: 300 mV; logical 1:2 volts minimum into a 50 Ω load
•
location of this jumper refer to 6.7.
logical 1 between - 36 mA and - 12 mA
6.4 High Voltage Supply (CBY02202 units only)
•
display
LCD 2 lines * 8 characters
•
Output voltage
adjustable by a front panel scroll key between 1 V and 1250 V
•
Output current
1.2 mA
•
Ripple
5 mV
•
Thermal drift
50 ppm of the full scale per degree celcius
•
Protection
short circuit protected
•
Output
on the rear panel one SHV high voltage socket
•
Current consumption
250 mA maximum on the + 24 V line
•
Protection
if for any reason the bias voltage exceeds 1250 V:
the bias voltage is set to 1V and a message ‘HV FAIL’ is
displayed
the electronics will not respond neither by the front panel nor
by RS232 communication
to reset the electronics send the reset RS232 command line
(*RSTad) or switch off and on the module
FMB Oxford – User manual
Page 12 of 22
April 2008
6.5 Phototube Preamplifier Power
Rear panel NIM standard 9 pins sub D female connector
6.6 Current Consumption of NIM version
240 mA on the + 6 V
130 mA on the - 6 V
220 mA on the + 12 V
20 mA on the - 12 V
120 mA on the + 24 V
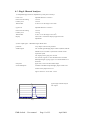
6.7 Miscellaneous
Saturation ouput signal, for actuating a beam shutter (CBY02202 only):
•
NPN open collector
•
30 V maximum voltage, 500 mA available when ON
•
Available on a rear panel BNC connector
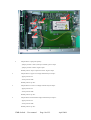
Saturation is detected when a percentage of pulses (6.25%, 12.5%, 25% and 50% according to the jumper
selection, see picture next page for location) reach an amplitude which saturates the first pre-amplification
stage. If the saturation output is connected to a relay proceed as shown below:
+5V
+30V max
Jumper on bottom
1
1K
3
2
4
position
SW102
Diode mandatory
protection of the
2N2222 NPN
2N2222 transistor
Saturation output
Ic max 200 mA
FMB Oxford – User manual
Page 13 of 22
April 2008
•
Jumper SW101 / input pulse polarity:
- jumpers positions 1 and 3 (from top to bottom): positive input
- jumpers positions 2 and 4: negative input
Default position: straps on positions 2 and 4: negative input
•
Jumper SW105 / Upper Level Single channel analyser output :
- upper position: TTL
- lower position: NIM
Default position: top TTL
•
Jumper SW106 / Lower Level Single channel analyser output :
- upper position: TTL
- lower position: NIM
Default position: top TTL
•
Jumper SW107/ Discrimination Single channel analyser output :
- upper position: TTL
- lower position: NIM
Default position: top TTL
FMB Oxford – User manual
Page 14 of 22
April 2008
•
Jumper SW103 / Saturation :
The saturation is detected when a certain percentage of pulses reach an amplitude saturating the first
pre-amplification stage. The percentage is defined by means of the jumper SW104, the strap
position from top to bottom corresponds to percentages of 6.25%, 12.5%, 25% and 50% (1/16, 1/8,
1/4, 1/2) respectively.
Default position: top 6.25%
•
Jumper SW102 / Saturation output:
- top position: TTL (0V when saturation is detected, 5V otherwise)
- bottom position: output connected to the emitter of a transistor
(transistor on when the saturation is detected)
Default position: TTL
6.8 Options
- Detector to pulse processing unit connection cable, total lengths of 5,10, 15, 20 and 22m available.
- RS232 communication cable, total lengths of 5, 10, 15 and 20m available.
6.9 Typical settings
•
Bias high voltage
typically 1000V
working range 900-1100V
above 1100V bias voltage the gain is large but the signal noise is
too large
below 900V bias voltage the gain is low and the signal is too low to
be correctly observed
•
Gain
the gain depends on the scintillation detector head and the X-ray
photon energy
typically 100% gain when looking at 5 keV X-ray photon using
LaCl3 or NaI(Tl) scintillation detector heads
•
Shaping constant
peaking time of 50 ns or 100 ns typically for YAP or LaCl3
scintillation detector heads
peaking time of 300 ns or 1000 ns gaussian
typically for NaI(Tl) scintillation detector head
FMB Oxford – User manual
Page 15 of 22
April 2008
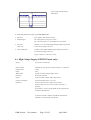
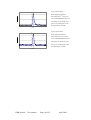
Typical signal output
4
3,5
Pulse height measurement
3
performed with a 109Cd (22 kev)
2,5
source and NaI(Tl) detector head.
2
1,5
The settings of the X2000 were:
1
gain of 70, peaking time of 300
0,5
0
-3,E-06
-2,E-06
-2,E-06
-8,E-07
0,E+00
8,E-07
2,E-06
2,E-06
3,E-06
nS, high voltage of 1000V.
T i me [ s ]
Typical signal output
0,5
0,4
Pulse height measurement
0,3
performed with a 55Fe (5.9 kev)
source and NaI(Tl) detector head.
0,2
The settings of the X2000 were:
0,1
gain of 100, peaking time of 300
0
-3,E-06
-2,E-06
-2,E-06
-8,E-07
0,E+00
8,E-07
2,E-06
2,E-06
3,E-06
-0,1
nS, high voltage of 1000V.
T i me [ s ]
FMB Oxford – User manual
Page 16 of 22
April 2008
7. Front panel Description
7.1 High Voltage (CBY02202 only)
Four digit display indicates the value of the set voltage. Voltage can vary between 1 and 1250 V (other ranges
on request).
When high voltage is increased, gain of the phototube increases but natural noise increases also. When a low
noise is required at low energy, the best trade off must be found between gain of the preamplifier and
magnitude of the high voltage.
Normal condition for the photomultiplier is between 800 and 1000 V.
7.2 Preamplifier and Shaping Amplifier
The preamplifier gain scroll key adjusts the amplitude of the shaped pulses available on the signal out of the
BNC front panel socket. These pulses are 4V maximum amplitude.
This signal can be directly sent to a multichannel analyser, it is a positive signal without negative undershoot.
The peaking time scroll key adjusts the shaping constant. Instead of this not “directly measurable parameter”
the peaking time is indicated. This is the time elapsed between the arrival of an X or γ photon inside the
scintillator and the peak value of the signal out pulse.
Peaking time of 50, 100, 300 and 1000 ns are obtained by four different 5th order filters. Coefficient of these
filters were selected for minimum delay and ringing.
7.3 Single Channel Analyser (SCA)
Upper level and lower level adjustment is available on the front panel. The mode of selection is provided
through a jumper selection. For location of this jumper refer to 6.7.
Range of Variation
Front Panel BNC Logic Output
Lower level
0 to 4 V
out when leading edge of the shaped pulse
crosses lower level voltage
Upper level
0 to 4 V
out when leading edge of the shaped pulse
crosses upper level voltage
Window BNC
output
/
out when falling edge of the shaped pulse
crosses lower level only
The TTL or negative current fast NIM logic is jumper selected. For location of these jumpers refer to 6.7.
FMB Oxford – User manual
Page 17 of 22
April 2008
8. Communication Board
Enables RS232 communication, allowing cascading of up to 16 units.
For each unit, the following parameters can be independently controlled:
- Phototube high voltage
- Preamplifier gain
- Single channel analyser lower and upper levels
- Shaping constant
Windows™ operated software is supplied.
8.1 General Construction
The communication board is designed around a C programmable miniature controller, Hitachi AE3048.
If a user requires a special operating algorithm it can be programmed with the integrated C development
environment, which can be supplied.
FMB Oxford – User manual
Page 18 of 22
April 2008
9. Remote Control Software for Pulse Processing
Electronic
9.1 Introduction
The pulse processing units can be remotely controlled by a host computer (PC or workstation) through a serial
link (RS232). A network of up to 16 units can be built, requiring only one serial port on the host computer.
The communication protocol is a subset of the SCPI (Standard Commands for Programmable Instruments)
language.
A communication software example is provided showing various possible command lines. This can help users
to develop their own remote control interface software.
CONTROL software is also provided, which enables users to immediately setup a complete run-time interface
link between a Windows™ PC and one or more X2000 units.
Both pieces of software can be installed on the same computer (just run Setup.exe from the floppy disc).
9.2 Description
The pulse processing unit holds a C programmable miniature controller. The program is factory stored in its
EPROM. This program is able to drive the unit, by controlling the gain, the peaking time and the single channel
analyser upper and lower levels. The high voltage power supply (CBY02202 units only) can also be controlled.
Saturation threshold detection is also provided.
When turning on the power the unit is reset and a message "Init OK" is displayed. The high voltage, the gain,
the peaking time and the single channel analyser upper and lower levels are set to the saved values. These
values are stored into the EPROM every time one is modified. Do not forget to increase the gain in order to get
a signal.
Every unit has an address given by DIP switches 1 through 4 (SW1 on the front panel communication board)
where switch 1 corresponds to address bit 0, and switch 4 corresponds to bit 3. A switch setting of OFF
determines a bit value of 1 and a setting of ON determines a value of 0.
Factory address setting is 0. Always switch the unit off before changing its address. A unit address 7
corresponds to switches 1 OFF, 2 OFF, 3 OFF, 4 ON.
9.3 Commands List
Commands list for the CBY-2206 module
Syntax
Meaning
*RSTad
reset the electronics
:INPad:GAIN x
set channel X gain value to x
:SENSad:SCA:UPP x
set single channel analyser (SCA) of channel X
upper level to x
FMB Oxford – User manual
Page 19 of 22
April 2008
set single channel analyser (SCA) of channel X
:SENSad:SCA:LOW x
lower level to x value
:SENSad:PKT x
set peaking time of channel X to x value
:SENSad:SATX?
reply ‘1’ if saturation is detected, on channel X, “0”
otherwise
Commands list for the CBY-2202 module
Syntax
Meaning
*RSTad
reset the electronics
:INPad:GAIN x
set gain to x value
:SENSad:SCA:UPP x
set single channel analyser (SCA)
upper level to x value
set single channel analyser (SCA)
:SENSad:SCA:LOW x
lower level to x value value
:SENSad:PKT x
set peaking time to x value
:SOURad:VOLT x
set high voltage to x value (if the power supply
option is installed)
:SENSad:SAT?
reply ‘1’ if saturation is detected, ‘0’ otherwise
:SENSad:HVFAIL?
reply ‘1’ if high voltage failure is detected, ‘0’
otherwise
ad (unit address): an integer value from 0 to 15. It may be left out of the command when unit is set to address
0. For example, *RST and *RST0 are both valid commands.
Values range for x parameter
High voltage (CBY02202 only)
from 0 V to 1249 V
Gain
from 0% to 100%
Peaking time
50 ns, 100 ns, 300 ns or 1000 ns
SCA upper level
from SCA lower level to 4 V
SCA lower level
from 0 V to SCA upper level
Examples
:INPO:GAIN 12.5
:SENS0:SCA:LOW 1.5
These commands set the gain at 12.5% and the SCA lower level at 1.5 V (the address of the unit being 0)
:INP15:GAIN 12.5
:SENS15:SCA:LOW 1
Same command with a different address (15)
FMB Oxford – User manual
Page 20 of 22
April 2008
All commands but consist of two distinct parts; a header and a value. They have an additional query form, in
which a question mark replaces the value (do not insert a space character between header and question mark).
When a query form is received, the program sends the current value associated with the command. Query
responses do not include the command header.
Examples
:INP0:GAIN?
query from the host computer
12.5
value sent to the host computer
Warning: The program waits for strings ending with a special character
(ASCII code = 10). This character must be transmitted by the host computer. When the program sends a
current value, it also sends this character after the value.
Every time this special character is acknowledged, the program sends a single character (ASCII code = 6) to
the host.
9.4 Syntax rules
Upper and lower case characters are accepted.
At least one space character is mandatory before a decimal data or before ON and OFF.
9.5 Connecting with a Host Computer
This unit can be connected to a RS232 port of a host computer. Only three wires are needed. The RS232
connector is located on the rear panel of the unit. Standard RS232 pinout is used: ground signal is pin 5, receive
signal pin 2 and transmit signal pin 3.
If the host computer is a PC, pins 4, 6 and 8 must be tied together on the cable connector (PC side).
The following protocol is supported by the unit:
- baud rate
9600
- data format
8 bits ASCII data and 1 stop bit
- parity
none
CTS, RTS signals are disabled.
9.6 Network Configuration
These units are designed to operate in a network. Up to 16 units can be linked together using only one RS232
port of the host computer.
When a unit is linked to the network, its address must not be already in use by any of the other units.
The wiring for a network (including two units) connected to a PC, is detailed hereafter.
FMB Oxford – User manual
Page 21 of 22
April 2008
PC connector
Unit A connector
Unit B connector
2 (RX)
}- - - - -{
3 (TXO)
3 (TX)
} cable 1 {
2 (RXO)
5 (ground)
}- - - - {
5 (ground)
}- - - - {
5 (ground)
7 (RX1)
} cable 2 {
3 (TX0)
8 (TX1)
}- - - - {
2 (RX0)
When the unit B is disconnected, pins 2 and 3 of the connector located at the end of cable 2 must be grounded
with a 1000 Ω resistor.
When a unit is in local mode, it does not stop communication with other units in remote or forced remote
mode.
For example, if unit A is in local mode and unit B is in remote mode, the PC can send commands to unit B and
receive data from unit B.
FMB Oxford – User manual
Page 22 of 22
April 2008