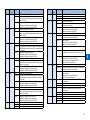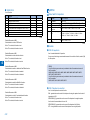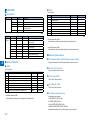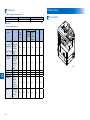
1
imageRUNNER 2545/2535 Series
Service Manual Digest
Periodical Service
Adjustment
Error Code
Service Mode
Parts Replacement and Cleaning
Product Overview
Version Upgrading
1
2
3
4
5
6
7
Contents
Safety Precautions
CDRH Act------------------------------------------------------------------------0-2
Laser Safety---------------------------------------------------------------------0-2
Handling of Laser System---------------------------------------------------0-2
Turn power switch ON--------------------------------------------------------0-3
Power Supply-------------------------------------------------------------------0-3
Safety of Toner------------------------------------------------------------------0-4
About Toner-------------------------------------------------------------------------- 0-4
Toner on Clothing or Skin--------------------------------------------------------- 0-4
Notes When Handling the Lithium and Ni-MH Batteries-------------0-4
Notes Before it Works Serving----------------------------------------------0-4
1 Periodical Service
Consumable Parts and Cleaning Parts-----------------------------------1-2
Cleaning Parts------------------------------------------------------------------1-4
2 Adjustment
Outline----------------------------------------------------------------------------2-2
Adjustment when replacing parts----------------------------------------------- 2-2
Image position adjustment-------------------------------------------------------- 2-2
Adjustment when replacing parts------------------------------------------2-3
Scanning System------------------------------------------------------------------- 2-3
Action to Take after Replacing the CCD Unit----------------------------------------- 2-3
Action to Take after Replacing the Platen Glass------------------------------------- 2-4
Action to Take after Replacing the ADF Scan Glass-------------------------------- 2-4
Controller System------------------------------------------------------------------- 2-5
Action to Take after Replacing theMain Controller PCB--------------------------- 2-5
Action to Take when Replacing the DC Controller PCB--------------------------- 2-5
Action to Take after Replacing the RAM----------------------------------------------- 2-5
Laser Exposure System----------------------------------------------------------- 2-5
Action to Take after Replacing the Laser Scanner Unit---------------------------- 2-5
Image position adjustment---------------------------------------------------2-6
Margin Along the Leading Edge------------------------------------------------Left Image Margin-----------------------------------------------------------------Leading Edge Non-Image Width-----------------------------------------------Left Non-Image Width-------------------------------------------------------------
2-6
2-6
2-6
2-7
3 Error Code
Overview-------------------------------------------------------------------------3-2
Outline--------------------------------------------------------------------------------- 3-2
Error Code-----------------------------------------------------------------------3-2
Error Code Details------------------------------------------------------------------ 3-2
FAX Error Code--------------------------------------------------------------------- 3-9
Outline------------------------------------------------------------------------------------------ 3-9
User Error Code----------------------------------------------------------------------------- 3-9
Service Error Code-------------------------------------------------------------------------- 3-9
Jam Code---------------------------------------------------------------------- 3-11
Main Unit----------------------------------------------------------------------------- 3-11
DADF-AA1---------------------------------------------------------------------------3-12
Inner Finisher-B1-------------------------------------------------------------------3-13
Alarm Code-------------------------------------------------------------------- 3-14
Alarm Code Details----------------------------------------------------------------3-14
4 Service Mode
Outline----------------------------------------------------------------------------4-2
Outline of Service Mode----------------------------------------------------------- 4-2
Using the Mode---------------------------------------------------------------------- 4-3
Setting of Bit Switch---------------------------------------------------------------- 4-3
Outline------------------------------------------------------------------------------------------ 4-3
Details of Service Mode------------------------------------------------------4-4
#SSSW-------------------------------------------------------------------------------- 4-4
SSSW Composition------------------------------------------------------------------------- 4-4
Details------------------------------------------------------------------------------------------ 4-4
#MENU-------------------------------------------------------------------------------4-12
Menu Switch Composition----------------------------------------------------------------4-12
Deatails----------------------------------------------------------------------------------------4-12
#NUMERIC--------------------------------------------------------------------------4-13
Numerical Parameter Composition----------------------------------------------------4-13
Details-----------------------------------------------------------------------------------------4-14
#SCAN--------------------------------------------------------------------------------4-18
Setting of Scanner Functions (SCANNER)------------------------------------------4-18
Numeric Parameter Functional configuration----------------------------------------4-21
READER--------------------------------------------------------------------------------------4-22
#PRINT-------------------------------------------------------------------------------4-30
Numerin Parameter Settings (Numeric Prama.)------------------------------------4-30
Service Soft Switch Settings (PRINTER)---------------------------------------------4-31
List of Functions-----------------------------------------------------------------------------4-32
List of Functions(PRINT CST)-----------------------------------------------------------4-36
#NETWORK-------------------------------------------------------------------------4-37
Confirmation of contents of CA certificate--------------------------------------------4-37
#CODEC-----------------------------------------------------------------------------4-37
Configuration---------------------------------------------------------------------------------4-37
Details-----------------------------------------------------------------------------------------4-37
#SYSTEM----------------------------------------------------------------------------4-38
Configuration---------------------------------------------------------------------------------4-38
Details of Bit Switch------------------------------------------------------------------------4-38
Details of System Numeric---------------------------------------------------------------4-38
#ACC----------------------------------------------------------------------------------4-39
Configuration---------------------------------------------------------------------------------4-39
#COUNTER-------------------------------------------------------------------------4-39
Counters--------------------------------------------------------------------------------------4-39
Clearing Counters--------------------------------------------------------------------------4-40
#LMS----------------------------------------------------------------------------------4-40
Configuration---------------------------------------------------------------------------------4-40
Outline-----------------------------------------------------------------------------------------4-41
Details-----------------------------------------------------------------------------------------4-41
Method of confirming license option---------------------------------------------------4-41
Inactivity of the transmitted license----------------------------------------------------4-42
Erasing a License--------------------------------------------------------------------------4-43
#E-RDS-------------------------------------------------------------------------------4-44
Configuration---------------------------------------------------------------------------------4-44
#REPORT----------------------------------------------------------------------------4-44
Configuration---------------------------------------------------------------------------------4-44
Details-----------------------------------------------------------------------------------------4-45
#DOWNLOAD----------------------------------------------------------------------4-49
Download-------------------------------------------------------------------------------------4-49
#CLEAR------------------------------------------------------------------------------4-49
Configuration---------------------------------------------------------------------------------4-49
#DISPLAY----------------------------------------------------------------------------4-50
Configuration---------------------------------------------------------------------------------4-50
#ROM---------------------------------------------------------------------------------4-50
Configuration---------------------------------------------------------------------------------4-50
#TEST MODE----------------------------------------------------------------------4-50
Outline-----------------------------------------------------------------------------------------4-50
Configuration---------------------------------------------------------------------------------4-51
Details-----------------------------------------------------------------------------------------4-51
5 Parts Replacement and Cleaning
List of Parts----------------------------------------------------------------------5-2
List of Covers------------------------------------------------------------------------ 5-2
List of Main Units / Parts---------------------------------------------------------- 5-4
List of PCBs-------------------------------------------------------------------------- 5-5
List of Solenoids--------------------------------------------------------------------- 5-6
List of Sensors----------------------------------------------------------------------- 5-7
List of Motors------------------------------------------------------------------------- 5-9
List of Fans--------------------------------------------------------------------------5-10
List of Switches--------------------------------------------------------------------- 5-11
List of Clutches---------------------------------------------------------------------5-12
Other----------------------------------------------------------------------------------5-13
6 Product Overview
Specifications-------------------------------------------------------------------6-2
Specifications-----------------------------------------------------------------------Weight / Size------------------------------------------------------------------------Productivity (Print speed)--------------------------------------------------------Paper type----------------------------------------------------------------------------
6-2
6-3
6-3
6-4
Pickup------------------------------------------------------------------------------------------ 6-4
Product Lineup------------------------------------------------------------------6-4
Host machine------------------------------------------------------------------------ 6-4
Host machine configuration--------------------------------------------------------------- 6-5
Model type------------------------------------------------------------------------------------- 6-5
Option---------------------------------------------------------------------------------- 6-5
Pickup delivery / image reading options----------------------------------------------- 6-5
Function expanding option---------------------------------------------------------------- 6-6
Basic Configuration------------------------------------------------------------6-7
Functional Configuration---------------------------------------------------------- 6-7
Basic sequence------------------------------------------------------------------------------ 6-8
7 Version Upgrading
Upgrading Targets and Procedure-----------------------------------------7-2
Outline--------------------------------------------------------------------------------- 7-2
Procedure----------------------------------------------------------------------------- 7-3
Safety Precautions
■ CDRH Act
■ Laser Safety
■ Handling of Laser System
■ Turn power switch ON
■ Points to Note About
Turning Off the Main
Power Switch
■ Safety of Toner
■ Notes When Handling a
Lithium Battery
■ Notes Before it Works
Serving
imageRUNNER 2545/2535
Series
CDRH Act
Handling of Laser System
The Center for Devices and Radiological Health of the US Food and Drum Administration put
When servicing the area around the laser assembly, be sure to turn off the main power.
into force regulations concerning laser products on August 2, 1976. These regulations apply
The machine's covers that can reflect laser light are identified by means of a warning label
to laser products manufactured on and after August 1, 1976, and the sale of laser products
(Figure). If you must detach a cover showing the label, be sure to take extra caution during
not certified under the regulations is banned within the Untied States. The label shown here
the work.
indicates compliance with the CDRH regulations, and its attachment is required on all laser
products that are soled in the United States.
CANON INC.
0
30-2,SHIMOMARUKO,3-CHOME,OHTA-KU,TOKYO,JAPAN
MANUFACTURED:
THIS PRODUCT CONHORMS WITH DHHS RADIATION
PERFORMANCE STANDARD 21CFR CHAPTER 1
SUBCHAPTER J.
F-0-1
A different description may be used for a different product.
F-0-2
Laser Safety
When servicing the area around the laser assembly, be sure to turn off the main power.
The machine's covers that can reflect laser light are identified by means of a warning label
(Figure). If you must detach a cover showing the label, be sure to take extra caution during
the work.
0-2
Turn power switch ON
Power Supply
The machine is equipped with 2 power switches: main power switch and control panel power
switch.
The machine goes on when the main power switch is turned on (i.e., other than in low power
mode, sleep mode).
1. As a general rule, do not use extension cords. Using an extension cord may
result in a fire or electrical shock. If an extension cord must be used, however,
use one for local rated voltage and over, untie the cord binding, and insert
the power plug completely into the extension cord outlet to ensure a firm
connection between the power cord and the extension cord.
2. The socket-outlet shall be installed near the equipment and shall be easily
accessible.
Control panel
power switch
0
Main power switch
F-0-3
F-0-4
0-3
Safety of Toner
Notes Before it Works Serving
About Toner
The machine's toner is a non-toxic material made of plastic, iron, and small amounts of dye.
Do not throw toner into fire. It may cause explosion.
0
Toner on Clothing or Skin
• If your clothing or skin has come into contact with toner, wipe it off with tissue; then, wash it
off with water.
• Do not use warm water, which will cause the toner to jell and fuse permanently with the
fibers of the cloth.
• Tonner is easy to react with plastic material, avoid contact with plastic.
Notes When Handling the Lithium and Ni-MH
Batteries
RISK OF EXPLOSION IF BATTERY IS REPLACED BY AN INCORRECT TYPE.
DISPOSE OF USED BATTERIES ACCORDING TO THE INSTRUCTIONS.
The following warnings are given to comply with Safety Principles (EN60950).
Wenn mit dem falschen Typ ausgewechselt, besteht Explosionsgefahr.
Gebrauchte Batterien gemäß der Anleitung beseitigen.
0-4
At servicing, be sure to turn OFF the power source according to the specified steps and
disconnect the power plug.
1
Periodical Service
■ Consumable Parts and Cleaning Parts
1
Consumable Parts and Cleaning Parts
: Replaced (consumables)
No.
Interval
FM3-9276
1
DRBL-1
WST-TNR Defined by 6% document
-
1
80,000
sheets
120,000
sheets
150,000
sheets
150,000
sheets
DRBL-1
DVG-CYL Wipe with dry cloth.
DRBL-1
TR-ROLL
DRBL-1
SP-SC-EL
500,000
sheets
120,000
sheets
DRBL-1
DVG-CYL
DRBL-1
FX-UNIT
FX-UNIT
Counter
3
Transfer roller
FC9-0693
1
4
Separation static charge
eliminator
Developing unit
FM3-9296
1
FM3-9263
1
-
1
FM4-3363 (120V)
FM3-9302 (230V)
1
240,000
sheets
DRBL-1
FB6-3405
FC7-9381 (For CHN)
*1
120,000
sheets
DRBL-1
FC6-7083
FC7-9502 (For CHN)
*1
120,000
sheets
DRBL-1
5
6
Fixing
system
7
8
Pickup
feed
system
Fixing inlet guide
Fixing unit
(For iR2545/2535)
Cassette pickup roller
Wipe with dry cloth. If dirt
cannot come off, wipe it with
alcohol.
C1-PU-RL, *: Quantity indicates number
C2-PU-RL, of cassette.
C3-PU-RL,
C4-PU-RL
Replace with cassette
separation pad.
*: Quantity indicates number
of cassette.
C1-SP-RL, *: Quantity indicates number
C2-SP-RL, of cassette.
C3-SP-RL,
C4-SP-RL
*: Quantity indicates number
of cassette.
9
Cassette transfer roller
10
Cassette separation roller
FC6-6661
*1
120,000
sheets
DRBL-1
11
FU3-0280
*1
120,000
sheets
DRBL-1
12
Cassette idler gear
(Only for China)
Manual feed pickup roller
FL3-1352
1
DRBL-1
M-PU-RL
13
Manual feed separation pad
FL3-3469
1
150,000
sheets
150,000
sheets
DRBL-1
M-SP-PD
1-2
Remarks
500,000 sheets
240,000 sheets
150,000 sheets
142,000 sheets
Life
120,000 sheets
Q'ty
80,000 sheets
1
Image Waste toner container
formation
system Transfer guide
Parts No.
iR2545/2535
40,000 sheets
2
Items
7,000 sheets
1
System
: Cleaned
[1]
[1]
[2]
[3]
[4]
[5]
[6]
[7]
[8]
[9]
[10]
[11]
[12]
[2]
[6]
[4]
Transfer roller
Separation static eliminator
Waste toner container
Drum unit
Developing assembly
Manual feed pickup roller
Manual feed separation pad
Fixing unit
Cassette pickup roller
Cassette transfer roller
Cassette separation roller
Idler gear (for China)
1
[7]
[8]
[12]
[10]
[11]
[5]
[3]
[9]
F-1-1
1-3
Cleaning Parts
1
Fixing
guide
Transfer
guide
F-1-2
1-4
2
Adjustment
■ Outline
■ Adjustment when replacing parts
■ Image position adjustment
2
Outline
Category
Item
Left Image MarginSingle-sided copy: 2.5 ± 1.5 (mm)
Double-sided copy: 2.5 ± 2.0 (mm)
Adjustment when replacing parts
Reference
"Left Image
Margin"(page 2-6).
2.5+/-1.5mm
(2nd side of double-sided copy:
2.5+/-2.0mm)
This section describes adjustment required in field service works when replacing parts.
The parts are classified by function into the following 3 blocks.
Category
Scanning
System
Replacing parts
CCD unit
"Action to Take after Replacing the CCD Unit"(page 2-3).
Copyboard glass
"Action to Take after Replacing the Platen Glass"(page 2-4).
"Action to Take after Replacing the ADF Scan Glass"(page
2-4).
"Action to Take after Replacing theMain Controller
PCB"(page 2-5).
"Action to Take when Replacing the DC Controller
PCB"(page 2-5).
"Action to Take after Replacing the RAM"(page 2-5).
"Action to Take after Replacing the Laser Scanner
Unit"(page 2-5).
ADF reading glass
Controller
System
2
0
Reference
Main controller PCB
DC controller PCB
RAM PCB
Laser Exposure Laser scanner unit
System
2
4
5
6
8
10
Leading Edge
Single-sided copy: 2.5 ± 1.5 (mm)
Non-Image Width Double-sided copy: 2.5 ± 1.5 (mm)
2.5+/-1.5mm
(2nd side of double-sided copy:
2.5+/-1.5mm)
T-2-1
"Leading Edge
Non-Image
Width"(page 2-6).
Image position adjustment
This section describes procedures when adjusting basic image position (image margins,
nonimage area, etc).
Category
Item
Margin Along the Single-sided copy: 2.5 ± 1.5 (mm)
Leading Edge
Double-sided copy: 2.5 ± 2.0 (mm)
2.5+/-1.5mm
(2nd side of double-sided copy
: 2.5+/-2.0mm)
0
Reference
"Margin Along
the Leading
Edge"(page 2-6).
Left Non-Image
Width
2
456
8 10 12 14 16 18 20
Single-sided copy: 2.5 ± 1.5 (mm)
Double-sided copy: 2.5 ± 1.5 (mm)
"Left Non-Image
Width"(page 2-7).
2.5+/-1.5mm
(2nd side of double-sided copy:
2.5+/-1.5mm)
0
2
4
0
2
456
8 10 12 14 16 18 20
5
6
8
10
T-2-2
2-2
Adjustment when replacing parts
glass for stream reading.)(Read both sides of the chart.)
6-3) Place a sheet of paper that the user usually uses on the platen glass, enter the
service mode, and then select SCAN > READER > FUNCTION > CCD > DFWLVL3.
Scanning System
Read the white level in the BOOK mode. (Check the transparency of the glass for
BOOK mode.)
■ Action to Take after Replacing the CCD Unit
6-4) Place a sheet of paper that the user usually uses on the DF, enter the service mode,
Perform the following procedure after replacing the CCD unit:
and then select SCAN > READER > FUNCTION > CCD > DF-WLVL4.
1) Install the new CCD unit.
Read the white level in the DF mode (stream reading). (Check the transparency of the
2) Turn on the power to cause the error “E248”.
glass for stream reading.)(Read both sides of the chart.)
3) Enter the service mode and perform the following:
SCAN > READER > FUNCTION > CLEAR > R-CON (RCON RAM clearing)
7) Enter the service mode, and then select the following:
4) Turn OFF and then ON the main power switch.
SCAN > READER > FUNCTION > INSTALL > STRD-POS CCD (stream reading position
5) Enter the following items according to the service data list output in advance.
adjustment).
8) Enter the values recorded on the label affixed to the CCD unit in the following service
SCAN> READER> ADJUST> ADJ-XY>
SCAN> READER> ADJUST> PASCAL> OFST-P-K
SCAN> READER> ADJUST> CCD>
SCAN> FEEDER> ADJUST>
SCAN> READER> OPTION> BODY>
mode. (Two items below)
ADJ-X
ADJ-Y
ADJ-S
ADJ-Y-DF
ADJ-X-MG
SCAN > READER > ADJUST > CCD > MTF3-M1/M2/M3/M4/M5/M6/M7/M8/M9
2
Next, finalize the setting in the following mode:
SCAN > READER > ADJUST > CCD > CCD-CHNG
50_RG
50_GB
100_RG
100_GB
50DF_RG
50DF_GB
100DF_RG
100DF_GB
W-PLT-X
W-PLT-Y
W-PLT-Z
DOCST
LA-SPEED
SENS-CNF
MODELSZ2
KSIZE-SW
SCAN> READER> ADJUST> CCD>
T-2-3
6) Perform the following in the service mode:
SCAN> READER> FUNCTION> CCD> DF-WLVL1/2/3/4 (DF white level adjustment)
6-1) Place a sheet of paper that the user usually uses on the platen glass, enter the
service mode, and then select SCAN > READER > FUNCTION > CCD > DFWLVL1.
Read the white level in the BOOK mode. (Check the transparency of the glass for
F-2-1
9) Transcribe the above correction values on the service label at the inside of the rear cover
(right).
BOOK mode.)
6-2) Place a sheet of paper that the user usually uses on the DF, enter the service mode,
and then select SCAN > READER > FUNCTION > CCD > DF-WLVL2.
Read the white level in the DF mode (stream reading). (Check the transparency of the
2-3
■ Action to Take after Replacing the Platen Glass
■ Action to Take after Replacing the ADF Scan Glass
1.Enter the service mode, and then select the following:
CAUTION:
SCAN > READER > FUNCTION > CCD > DF-WLVL1/2/3/4 (DF white level adjustment)
Be sure to make the white plate data adjustment before ADF white level
adjustment.
1) Place a sheet of paper that the user usually uses on the platen glass, enter the
service mode, and then select SCAN > READER > FUNCTION > CCD > DFWLVL1.
Read the white level in the BOOK mode. (Check the transparency of the glass for
BOOK mode.)
W-PLT-X
W-PLT-Y
2) Place a sheet of paper that the user usually uses on the DF, enter the service mode,
W-PLT-Z
and then select SCAN > READER > FUNCTION > CCD > DF-WLVL2.
F-2-2
1.Enter the value indicated on the platen glass in the following service mode:
2
SCAN > READER > ADJUST > CCD > W-PLT-X/Y/Z (Input of standard white plate data)
2.Enter the service mode, and then select the following:
SCAN > READER > FUNCTION > CCD > DF-WLVL1/2/3/4 (DF white level adjustment)
1) Place a sheet of paper that the user usually uses on the platen glass, enter the
service mode, and then select SCAN > READER > FUNCTION > CCD > DFWLVL1.
Read the white level in the BOOK mode. (Check the transparency of the glass for
BOOK mode.)
2) Place a sheet of paper that the user usually uses on the DF, enter the service mode,
and then select SCAN > READER > FUNCTION > CCD > DF-WLVL2.
Read the white level in the DF mode (stream reading). (Check the transparency of the
glass for stream reading.)(Read both sides of the chart.)
3) Place a sheet of paper that the user usually uses on the platen glass, enter the
service mode, and then select SCAN > READER > FUNCTION > CCD > DFWLVL3.
Read the white level in the BOOK mode. (Check the transparency of the glass for
BOOK mode.)
4) Place a sheet of paper that the user usually uses on the DF, enter the service mode,
and then select SCAN > READER > FUNCTION > CCD > DF-WLVL4.
Read the white level in the DF mode (stream reading). (Check the transparency of the
glass for stream reading.)(Read both sides of the chart.)
2-4
Read the white level in the DF mode (stream reading). (Check the transparency of the
glass for stream reading.)(Read both sides of the chart.)
3) Place a sheet of paper that the user usually uses on the platen glass, enter the
service mode, and then select SCAN > READER > FUNCTION > CCD > DFWLVL3.
Read the white level in the BOOK mode. (Check the transparency of the glass for
BOOK mode.)
4) Place a sheet of paper that the user usually uses on the DF, enter the service mode,
and then select SCAN > READER > FUNCTION > CCD > DF-WLVL4.
Read the white level in the DF mode (stream reading). (Check the transparency of the
glass for stream reading.)(Read both sides of the chart.)
Controller System
■ Action to Take after Replacing theMain Controller PCB
After replacing the main controller PCB with a new one, take the following action:
• Download the latest firmware with the UST.
• Enter all values recorded on the service label affixed to the rear cover.
■ Action to Take when Replacing the DC Controller PCB
■ Action to Take after Replacing the RAM
CAUTION:
The ADRAM is powered from the secondary battery unit to back up the image memory
even after the main power switch is turned OFF and the power plug is removed from
the outlet.
If the SW3 on the main controller PCB is pressed with the image backed up, the entire
data stored in the memory is cleared. Be sure to output the data stored in the memory
Before Replacement/RAM Clearing
Print the service data list in the service mode.
REPORT > REPORT OUTPUT > SERVICE DATA LIST
Action to Take after Replacement/RAM Clearing
1) Clear the DC controller settings and counters.
Enter the service mode, and Then select the following:
Laser Exposure System
■ Action to Take after Replacing the Laser Scanner Unit
When replacing the laser unit, enter the values recorded on the label affixed to the laser unit
to be replaced for the following in the service mode:
CLEAR > ENGINE > ENGINE BKRAMCLK (Clearing of the RAM on the DC controller
PCB)
2) Turn OFF and then ON the main power switch. (Turning OFF/ON the main power switch
clears the RAM.)
3) If uploading of backup data fails before replacement due to the damage to the DC
controller PCB, enter the values of service mode items recorded on the service label.
Since the values recorded on the service label may be outdated, check the service mode
SW No.
145
146
147
136 148
149
150
item list (#SERVICE DATA LIST) printed out in advance, and then enter the latest values.
4) Turn OFF and then ON the main power switch. (Turning OFF/ON the main power switch
allows the values entered for the service mode items to take effect.)
F-2-3
• PRINT > Bitswitch > 136 Laser horizontal scanning direction write position adjustment(A)
• PRINT > Bitswitch > 145 Laser horizontal scanning direction magnification ratio
adjustment(A-B)
• PRINT > Bitswitch > 146 Laser horizontal scanning direction magnification ratio
adjustment(A-C)
• PRINT > Bitswitch > 147 Laser horizontal scanning direction magnification ratio
adjustment(A-D)
• PRINT > Bitswitch > 148 Laser horizontal scanning direction write position adjustment(A-B)
• PRINT > Bitswitch > 149 Laser horizontal scanning direction write position adjustment(A-C)
• PRINT > Bitswitch > 150 Laser horizontal scanning direction write position adjustment(A-D)
2-5
2
Image position adjustment
Left Image Margin
Copy 10 sheets from each pickup position to check that the image margin and non-image
Service mode> PRINT> PRINT NUMERIC> 056
area is within the standard.
Image left edge
• Each cassette
• Pickup tray
If it is not within the standard, go through the following procedures to adjust it.
Decrease the value.
(a decrease of '10' will
decrease the margin
width by 1 mm)
Increase the value.
(an increase of '10' will
increase the margin
width by 1 mm)
1st side of copy: 2.5+/-1.5mm
CAUTION:
If changing the value of service mode item in this adjustment, enter the changed value
in the service label.
0
2
2
4
5
6
Margin Along the Leading Edge
8
Service mode> PRINT> PRINT NUMERIC> 053
1st side of copy: 2.5+/-1.5mm
10
Decrease the value.
(a decrease of '10' will
increase the margin by 1 mm)
F-2-5
Leading Edge Non-Image Width
Paper
leading edge
Increase the value.
(an increase of '10' will
increase the margin by 1 mm)
0 2 4 5 6 8 10 12 14 16 18 20
F-2-4
Service mode> SCAN> READER> ADJUST> ADJ-XY> ADJ-X
Decrease the value.
(a decrease of '10' will decrease
the non-image width by 1 mm)
1st side of copy: 2.5+/-1.5mm
Image leading
edge
0 2 4 5 6 8 10 12 14 1618 20
Increase the value.
(an increase of '10' will
increase the non-image
width by 1 mm)
F-2-6
2-6
Left Non-Image Width
Service mode> SCAN> READER> ADJUST> ADJ-XY> ADJ-Y
Image edge
Decrease the value.
(a decrease of '10' will
decrease the non-image
width by 1 mm)
Increase the value.
(an increase of '10' will
increase the non-image
width by 1 mm)
1st side of copy: 2.5+/-1.5mm
0
2
4
5
6
2
8
10
F-2-7
2-7
3
Error Code
■ Over View
■ Error Code
■ Jam Code
■ Alarm Code
3
Overview
Error Code
Outline
Error Code Details
This chapter describes various codes which are displayed when a failure occurs on the
Ecode
product. These are classified into 3 codes as follows.
Code type
Explanation
Error code
This code is displayed when an error occurs on the machine.
Jam code
This code is displayed when a jam occurs inside the machine.
Alarm code
This code is displayed when a function of the machine is
malfunctioned.
Reference
E000
Detail
Code
0001
Refer to
page 3-2
Refer to
page 3-11
Refer to
page 3-14
Item
Title
Description
Remedy
T-3-1
E001
0000
3
Title
Description
Remedy
E001
0001
Title
Description
Remedy
E001
0002
Title
Description
Remedy
3-2
Description
Fixing temperature abnormal rise
The temperature detected by the main thermistor does not
rise to the specified value during startup control.
1.Go through the following to clear the error: CLEAR >
ENGIN > ERRCLR; and then turn OFF and then ON the
power.
2.Check connection of the Connectors (Thermistor Connector
and AC Connector).
3.Replace the Fixing Main Thermistor (Film Unit).
4.Replace the Fixing Assembly.
5.Replace the DC Controller PCB (PCB4).
Fixing unit temperature rise detection
The reading of the main thermistor is 250 deg C or more
continuously for 200 msec.
1.Go through the following to clear the error: CLEAR >
ENGIN > ERRCLR; and then turn OFF and then ON the
power.
2.Check connection of the Connectors (Thermistor Connector
and AC Connector).
3.Replace the Fixing Main Thermistor (Film Unit).
4.Replace the Fixing Assembly.
5.Replace the DC Controller PCB (PCB4).
Fixing unit temperature rise detection
The hardware circuit detects overheating of the main or sub
thermistor for 200 msec.
1.Go through the following to clear the error: CLEAR >
ENGIN > ERRCLR; and then turn OFF and then ON the
power.
2.Replace the DC Controller PCB (PCB4).
Fixing unit temperature rise detection
The reading of the sub thermistor is 295 deg C or more
continuously for 200 msec.
1.Go through the following to clear the error: CLEAR >
ENGIN > ERRCLR; and then turn OFF and then ON the
power.
2.Check connection of the Connectors (Thermistor Connector
and AC Connector).
3.Replace the Fixing Main Thermistor (Film Unit).
4.Replace the Fixing Assembly.
5.Replace the DC Controller PCB (PCB4).
Ecode
E002
Detail
Code
0000
Item
Title
Description
Remedy
E003
0000
Title
Description
Remedy
E004
0000
Title
Description
Remedy
E010
0001
Title
Description
Remedy
E010
0002
Title
Description
Remedy
Description
Fixing unit temperature insufficient rise
1.The reading of the main thermistor is less than 115 deg C
continuously for 400 msec 1.3 sec after it has indicated 100
deg C.
2.The reading of the main thermistor is less than 150 deg C
continuously for 400 msec 1.3 sec after it has indicated 140
deg C.
1.Go through the following to clear the error: CLEAR >
ENGIN > ERRCLR; and then turn OFF and then ON the
power.
2.Check connection of the Connectors (Thermistor Connector
and AC Connector).
3.Replace the Fixing Main Thermistor (Film Unit).
4.Replace the Fixing Assembly.
5.Replace the DC Controller PCB (PCB4).
Low fixing temperature detection after standby
The reading of the main thermistor is less than 140 deg C
continuously for 400 msec or more.
1.Go through the following to clear the error: CLEAR >
ENGIN > ERRCLR; and then turn OFF and then ON the
power.
2.Check connection of the Connectors (Thermistor Connector
and AC Connector).
3.Replace the Fixing Main Thermistor (Film Unit).
4.Replace the Fixing Assembly.
5.Replace the DC Controller PCB (PCB4).
Thermistor disconnection detection error
When disconnection is detected with connector (J214) for 30
sec continuously.
1.Check connection of the Connector (J214).
2.Replace the Film Unit.
3.Replace the Fixing Assembly.
4.Replace the DC Controller PCB (PCB4).
Unstable rotation of the Main Motor (M1)
Detection is executed every 100 msec after the start of motor
rotation; however, the drive detection signal is absent for 2
sec.
1.Replace the Main Motor (M1).
2.Replace the DC Controller PCB (PCB4).
Unstable rotation of the Main Motor (M1)
During motor rotation, detection is executed every 100 msec;
however, the drive signal is absent 5 times in sequence.
1.Replace the Main Motor (M1).
2.Replace the DC Controller PCB (PCB4).
Ecode
E014
Detail
Code
0001
Item
Title
Description
Remedy
E014
0002
Title
Description
Remedy
E019
0000
Title
Description
Remedy
E020
0000
Title
Description
Remedy
E024
0000
Title
Description
Remedy
Description
Unstable rotation of the Fixing Motor (M2)
Detection is executed every 100 msec after the start of motor
rotation; however, the drive detection signal is absent for 2
sec.
1.Replace the Fixing Motor (M2).
2.Replace the DC Controller PCB (PCB4).
Unstable rotation of the Fixing Motor (M2)
During motor rotation, detection is executed every 100 msec;
however, the drive signal is absent 5 times in sequence.
1.Replace the Fixing Motor (M2).
2.Replace the DC Controller PCB (PCB4).
Error in Waste Toner Sensor (S17)
Warning when the sensor goes on for 2000 consecutive
sheets, and error when the sensor goes on for 100
consecutive sheets.
* Error occurs after the delivery if a paper in passage exists.
1.Replace the Waste Toner Sensor (S17).
2.Replace the DC Controller PCB (PCB4).
The path between the sub hopper and the developing
assembly is clogged with toner.
The Developing Assembly Toner Sensor (TS1) detects the
absence of toner,while the Sub Hopper Toner Sensor (TS2)
detects the presence of toner.
With the Developing Cylinder Clutch (CL3) turned on,
the hopper feedscrew motor (M7) is rotated for 1 sec
intermittently 194 times; still, theDeveloping Assembly Toner
Sensor (TS1) does not detect the presence of toner.
* Error occurs after the delivery if a paper in passage exists.
1.Check the rotation of hopper motor gear. (If rotating, false
detection by the sensor is doubted. Feed the toner to the
developing unit in service mode: CLEAR>ENGIN>TNRINST.)
2.Replace the Developing Assembly Toner Sensor (TS1).
3.Replace the Sub Hopper Toner Sensor (TS2).
4.Replace the DC Controller PCB (PCB4).
The connector (J207) of Developing Assembly Toner Sensor
(TS1) is disconnected.
The Developing Assembly Toner Sensor (TS1) connection
detection signal is absent for 100 msec 10 times in sequence.
* Error occurs after the delivery if a paper in passage exists.
1.Check connection of the Connector (J207).
2.Replace the Developing Assembly Toner Sensor (TS1).
3.Replace the DC Controller PCB (PCB4).
3-3
3
Ecode
E024
Detail
Code
0001
Item
Title
Description
Remedy
E025
0000
Title
Description
3
Remedy
E025
0001
Title
Description
Remedy
E110
0001
Title
Description
Remedy
Description
The Developing Assembly Toner Sensor (TS1) is
disconnected.
<At LOW SPEED>
- The developing assembly toner sensor (TS1) ON counter
is checked every 2.5 seconds, and the counter increments
1 count every 25 times when the sensor goes on, and 300
counts are reached.
<At HIGH SPEED>
- The developing assembly toner sensor (TS1) ON counter
is checked every 1.5 seconds, and the counter increments
1 count every 15 times when the sensor goes on, and 300
counts are reached.
1.Check connection of the Connector (J207).
2.Correct the cable.
3.Replace the Developing Assembly Toner Sensor (TS1).
The connector (J207) of Sub Hopper Toner Sensor (TS2) is
disconnected.
The Sub Hopper Toner Sensor (TS2) connection detection
signal is absent for 100 msec 10 times in sequence.
* Error occurs after the delivery if a paper in passage exists.
1.Check connection of the Connector (J207).
2.Replace the Sub Hopper Toner Sensor (TS2).
3.Replace the DC Controller PCB (PCB4).
Failure of the Bottle Motor (M6)
The bottle motor (M6) is unlocked when it goes on for 12
consecutive times at 0.1 sec. intervals.
* Error occurs after the delivery if a paper in passage exists.
1.Replace the Bottle Motor (M6).
2.Replace the DC Controller PCB (PCB4).
Failure of the Scanner Motor (M21)
The Scanner Motor (M21) speed lock signal does not indicate
a locked state a specific period of time after the Scanner
Motor (M21) has been started.
* The same condition is detected after the error retry is
performed.
1.Check the cable.
2.Replace the Laser Scanner Unit.
3.Replace the DC Controller PCB (PCB4).
Ecode
E110
Detail
Code
0002
Item
Title
Description
Remedy
E110
0003
Title
Description
Remedy
E196
0000
E197
0000
E197
0001
Title
Description
Remedy
E202
0000
Title
Description
Title
Description
Remedy
Title
Description
Remedy
Remedy
3-4
Description
Failure of the Scanner Motor (M21)
The speed lock signal indicates a deviation 10 times in
sequence at intervals of 100 msec after the signal has
indicated a locked state.
* The same condition is detected after the error retry is
performed.
1.Check the cable.
2.Replace the Laser Scanner Unit.
3.Replace the DC Controller PCB (PCB4).
Failure of the Scanner Motor (M21)
The scanner motor (M21) speed lock signal does not indicate
a locked state for 6.5 sec. after a switchover is made from
low to normal speed or for 8 sec. after a switchover is made
from normal to low speed.
* The same condition is detected after the error retry is
performed.
1.Check the cable.
2.Replace the Laser Scanner Unit.
3.Replace the DC Controller PCB (PCB4).
Error in EEPROM access
20 retries failed after error occurred during communication
with EEPROM.
* Error occurs after the delivery if a paper in passage exists.
1.Replace the DC Controller PCB (PCB4).
Error in communication of Laser Driver PCB (PCB14)
Communication error 1 with image PCB
1.Check the cable.
2.Replace the Laser Scanner Unit.
3.Replace the DC Controller PCB (PCB4).
Error in communication of Laser Driver PCB (PCB14)
Communication error 2 with image PCB
1.Check the cable.
2.Replace the Laser Scanner Unit.
3.Replace the DC Controller PCB (PCB4).
There is an error in the detection of the CCD home position.
1.The attempt to detect the home position fails when the CCD
is moved forward.
2.The attempt to detect the home position fails when the CCD
is moved back.
1.Disconnect and then connect the flexible cable(Relay PCB
(PCB2)-Main Controller PCB (PCB1) 64pin).
2.Replace the flexible cable.
3.Replace the CCD HP sensor (S22).
4.Replace the Scanner Motor (M21).
5.Replace the Relay PCB (PCB2).
6.Replace the Main Controller PCB (PCB1).
Ecode
E225
Detail
Code
0000
Item
Title
Description
Remedy
E227
0000
Title
Description
Remedy
E240
0000
Title
Description
Remedy
E240
0001
Title
Description
Remedy
E246
0000
E247
0000
Title
Description
Remedy
Title
Description
Remedy
Description
The light intensity of the CCD is faulty.
The light intensity of the CCD during shading is under the
specified level.
"1.Disconnect and then connect the flexible cable.
2.Replace the flexible cable.
3.Replace the CCD Unit.
4.Replace the Relay PCB (PCB2).
5.Replace the Main Controller PCB (PCB1)."
The reader unit power supply (24V) is faulty.
1.At time of power-on, the 24V port is off.
2.At the start of a job, the 24V port is off.
3.At the end of a job, the 24V port is off.
4.When a load is being driven, the 24V port is off.
1.Disconnect and then connect the power supply harness
connector.
2.Replace the Power Supply PCB (PCB3).
Error in controller communication
The serial communication error such as parity error or
overrun error is constantly detected.
1.Check the Connectors.
2.Replace the DC Controller PCB (PCB4).
Error in controller communication
The serial communication error such as parity error or
overrun error is detected while printing.
1.Check the Connectors.
2.Replace the DC Controller PCB (PCB4).
Writing to the counter PCB (FRAM) failed
Mismatched checksum between the Flash Rom and the
FRAM
-
Ecode
E248
Detail
Code
0000
Item
Title
Description
Remedy
E261
0000
Title
Description
Remedy
E280
0000
Title
Description
Remedy
E350
0000
E354
0000
E355
0000
Title
Description
Remedy
Title
Description
Remedy
Title
Description
Remedy
Description
EEPROM error
1.An error has occurred at power-on.
2.An error has occurred during write operation.
3.An error has occurred during read operation following write
operation.
1.Disconnect and then connect the flexible cable(Relay PCB
(PCB2)-Main Controller PCB (PCB1) 50pin).
2.Disconnect and then connect the flexible cable(CCD unitRelay PCB (PCB2)).
3.Disconnect and then connect the power supply harness
connector.
4.Replace the flexible cable.
5.Replace the CCD Unit.
6.Replace the Relay PCB (PCB2).
7.Replace the Power Supply PCB (PCB3).
8.Replace the Main Controller PCB (PCB1).
Error in Zero Cross
Zero Cross failed to be detected for 500ms or more while the
relay was ON.
* The same condition is detected after the error retry is
performed.
1.Check the Connectors.
2.Replace the DC Controller PCB (PCB4).
Reading unit communication error
Reading error after writing.
1.Disconnect and then connect the flexible cable(Relay PCB
(PCB2)-Main Controller PCB (PCB1) 50pin).
2.Disconnect and then connect the flexible cable(Relay PCB
(PCB2)-Main Controller PCB (PCB1) 64pin).
3.Disconnect and then connect the flexible cable(CCD unitRelay PCB (PCB2)).
4.Replace the flexible cable.
5.Replace the Relay PCB (PCB2).
6.Replace the Main Controller PCB (PCB1).
SOFT-ID PCB error
Mismatched serial number for the SOFT-ID PCB
Mismatched serial number between the SOFT-ID, the Flash
Rom and the FRAM
-
3-5
3
Ecode
E355
Detail
Code
0004
E355
0005
E413
0000
Item
Title
Description
Remedy
Title
Description
Remedy
Title
Description
Remedy
E500
3
0000
E505
0001
E520
0001
Title
Description
Remedy
Title
Description
Remedy
Title
Description
Remedy
E520
0002
Title
Description
Remedy
E531
8001
Title
Description
Remedy
Description
System information error
System information error
Release Motor (M2) error
The sensing level of the release motor HP sensor (SR11)
does not change within a specified period when the release
motor (M2) is driven.
1.Replace the Release Motor HP Sensor (SR11).
2.Replace the Release Motor (M2).
3.Replace the ADF Driver PCB.
Communication error
The communication with the host machine is interrupted.
1.Check the cable.
2.Replace the Finisher Controller PCB (PCB1).
3.Replace the DC Controller PCB.
EEPROM error
The checksum for the EEPROM data has an error.
1.Replace the Finisher Controller PCB (PCB1).
Shift Motor (M4) error
The shift roller does not leave the shift roller home position
when the Shift Motor (M4) has been driven for 1.2 seconds.
1.Replace the Shift Roller HP Sensor (S2).
2.Replace the Shift Motor (M4).
3.Replace the Finisher Controller PCB (PCB1).
Shift Motor (M4) error
The shift roller does not return to the shift roller home position
when the Shift Motor (M4) has been driven for 1.2 seconds.
1.Replace the Shift Roller HP Sensor (S2).
2.Replace the Shift Motor (M4).
3.Replace the Finisher Controller PCB (PCB1).
Stapler Motor (M10) error
The stapler does not leave the staple home position when the
Staple Motor (M10) has been driven for 0.5 sec.
1.Check the wiring between the Finisher Controller PCB and
Stapler.
2.Replace the Stapler.
3.Replace the Finisher Controller PCB (PCB1).
Ecode
E531
Detail
Code
8002
Item
Title
Description
Remedy
E532
0001
Title
Description
Remedy
E532
0002
Title
Description
Remedy
E540
0001
Title
Description
Remedy
E540
0005
Title
Description
Remedy
E542
0001
Title
Description
Remedy
E542
0005
Title
Description
Remedy
3-6
Description
Stapler Motor (M10) error
The stapler does not return to the staple home position when
the Stapler Motor (M10) has been driven for 0.5 sec.
1.Check the wiring between the Finisher Controller PCB and
Stapler.
2.Replace the Stapler.
3.Replace the Finisher Controller PCB (PCB1).
STP Move Motor (M1) error
The stapler does not leave the stapler move home position
when the STP Move Motor (M1) has been driven for 0.25 sec.
1.Replace the Stapler Move HP Sensor (S10).
2.Check the wiring between the Finisher Controller PCB and
the STP Move Motor.
3.Check the stapler shift base.
4.Replace the STP Move Motor (M1).
5.Replace the Finisher Controller PCB (PCB1).
STP Move Motor (M1) error
The stapler does not return to the stapler move home position
when the STP Move Motor (M1) has been driven for 2.8 sec.
1.Replace the Stapler Move HP Sensor (S10).
2.Check the wiring between the Finisher Controller PCB and
the STP Move Motor.
3.Check the stapler shift base.
4.Replace the STP Move Motor (M1).
5.Replace the Finisher Controller PCB (PCB1).
Tray Lift Motor (M11) time out error
The stack tray does not move within a specified time period.
1.Replace the Tray Lift Motor (M11).
2.Replace the Finisher Controller PCB (PCB1).
Tray Lift Motor (M11) closing detect switch error
The FG input cannot be detected when the Tray Lift Motor
(M11) has been driven for 0.1 second.
1.Replace the Stack Tray Clock Sensor (S13).
2.Replace the Tray Lift Motor (M11).
3.Replace the Finisher Controller PCB (PCB1).
Additional Tray Lift Motor (M12) time out error
The stack tray does not move within a specified time period.
1.Replace the Additional Tray Lift Motor (M12).
2.Replace the Finisher Controller PCB (PCB1).
Additional Tray Lift Motor (M12) closing detect switch error
The FG input cannot be detected when the Additional Tray
Lift Motor (M12) has been driven for 0.1 second.
1.Replace the Additional Tray Clock Sensor (S23).
2.Replace the Additional Tray Lift Motor (M12).
3.Replace the Finisher Controller PCB (PCB1).
Ecode
E567
Detail
Code
0001
Item
Title
Description
Remedy
E567
0002
Title
Description
Remedy
E571
0001
Title
Description
Remedy
E571
0002
Title
Description
Remedy
E575
0001
Title
Description
Remedy
E575
0002
Title
Description
Remedy
E602
0001
Title
Description
Remedy
Description
Shift Roller Release Motor (M5) error
The shift roller does not leave the shift roller release home
position when the Shift Roller Release Motor (M5) has been
driven for 0.1 sec.
1.Replace the Shift Roller Release Sensor (S3).
2.Replace the Shift Roller Release Motor (M5).
3.Replace the Finisher Controller PCB (PCB1).
Shift Roller Release Motor (M5) error
The shift roller does not return to the shift roller release home
position when the Shift Roller Release Motor (M5) has been
driven for 0.06 sec.
1.Replace the Shift Roller Release Sensor (S3).
2.Replace the Shift Roller Release Motor (M5).
3.Replace the Finisher Controller PCB (PCB1).
Gripper Open/Close Motor (M7) error
The gripper unit does not leave the gripper unit home position
when the Gripper Open/Close Motor (M7) has been driven for
0.25 seconds.
1.Replace the Grip Arm Sensor (S13).
2.Replace the Gripper Open/Close Motor (M7).
3.Replace the Finisher Controller PCB (PCB1).
Gripper Open/Close Motor (M7) error
The gripper unit does not return to the gripper unit home
position when the Gripper Open/Close Motor (M7) has been
driven for 0.15 seconds.
1.Replace the Grip Arm Sensor (S13).
2.Replace the Gripper Open/Close Motor (M7).
3.Replace the Finisher Controller PCB (PCB1).
Gripper Unit Move Motor (M2) error
The gripper unit does not leave the gripper unit home position
when the Gripper Unit Move Motor (M2) has been driven for
3.8 seconds.
1.Replace the Gripper Unit HP Sensor (S7).
2.Replace the Gripper Unit Move Motor (M2).
3.Replace the Finisher Controller PCB (PCB1).
Gripper Unit Move Motor (M2) error
The gripper unit does not return to the gripper unit home
position when the Gripper Unit Move Motor (M2) has been
driven for 0.1 seconds.
1.Replace the Gripper Unit HP Sensor (S7).
2.Replace the Gripper Unit Move Motor (M2).
3.Replace the Finisher Controller PCB (PCB1).
The built-in SD card is not detected
-
Ecode
E602
Detail
Code
1105
E711
0001
Item
Title
Description
Remedy
Title
Description
Remedy
E713
0000
Title
Description
Remedy
E716
0000
Title
Description
Remedy
E716
0010
Title
Description
Remedy
E719
E719
E736
0000
Title
0002
Description
Remedy
Title
0000
Description
Remedy
Title
Description
Remedy
Description
Access to the built-in SD card failed
Error in UFDI communication
The communication system error (such as reception timeout
or checksum error) occurred.
1.Check and Replace the cable.
2.Replace the DC Controller PCB (PCB4).
3.Replace the Finisher Controller PCB.
Erroneous communication with finisher
The communication does not restart by the error retry after
the communication failure with the finisher.
1.Check the cable.
2.Replace the DC Controller PCB (PCB4).
3.Replace the Finisher Controller PCB.
Erroneous communication with optional cassette or 2-way
unit
After the presence of a cassette pedestal or a 2-way unit has
been detected, the communication fails to be normal for 5
sec.
1.Check the cable.
2.Replace the DC Controller PCB (PCB4).
3.Replace the Cassette Pedestal Driver PCB.
4.Replace the 2-way unit driver PCB.
Failure of the communication with the 2-way unit
When the communication with the 2-way unit is faulty after
detecting the connection with the finisher.
1.Install the 2-way unit.
2.Check the cable.
3.Replace the DC Controller PCB (PCB4).
4.Replace the 2-way unit driver PCB.
Erroneous communication with New Card Reader (serial
communication)
Erroneous communication with Coin Vendor (serial
communication)
Erroneous communication between CCU and controller.
-
3-7
3
Ecode
E744
Detail
Code
0001
E744
0002
E744
0003
E744
0004
E804
0000
3
Item
Title
Description
Remedy
Title
Description
Remedy
Title
Description
Remedy
Title
Description
Remedy
Title
Description
Remedy
E804
0001
Title
Description
Remedy
E805
0000
Title
Description
Remedy
3-8
Description
Mismatched version between the language file and the
Bootable
Oversized language file in HDD
Mismatched version between the language file and the
Bootable
Language file reading error
Failure of the Power Supply Cooloing Fan (FAN6)
When lock signal is detected for 5 sec while the Power
Supply Cooloing Fan (FAN6) is stopped.
* The same condition is detected after the error retry is
performed.
1.Disconnect and then connect the connector (J205) on the
DC Controller PCB (PCB4).
2.Replace the Power Supply Cooloing Fan (FAN6).
3.Replace the DC Controller PCB (PCB4).
Unstable rotation of the Power Supply Cooloing Fan (FAN6)
When lock signal failed to be detected for 5 sec while the
Power Supply Cooloing Fan (FAN6) is driven.
* The same condition is detected after the error retry is
performed.
1.Disconnect and then connect the connector (J205) on the
DC Controller PCB (PCB4).
2.Replace the Power Supply Cooloing Fan (FAN6).
3.Replace the DC Controller PCB (PCB4).
Failure of the Exhaust Fan (Rear) (FAN3)
"When lock signal is detected for 5 sec while the Exhaust Fan
(Rear) (FAN3) is stopped.
* The same condition is detected after the error retry is
performed."
1.Disconnect and then connect the connector (J206) on the
DC Controller PCB (PCB4).
2.Replace the Exhaust Fan (Rear) (FAN3).
3.Replace the DC Controller PCB (PCB4).
Ecode
E805
Detail
Code
0001
Item
Title
Description
Remedy
E805
0002
Title
Description
Remedy
E805
0003
Title
Description
Remedy
Description
Unstable rotation of the Exhaust Fan (Rear) (FAN3) or
Finisher Fan 1 (M8) or Finisher Fan 2 (M9)
1.When lock signal failed to be detected for 5 sec while the
Exhaust Fan (Rear) (FAN3) is driven.
2.When lock signal failed to be detected for 5 sec while the
Finisher Fan 1 (M8) is driven.
3.When lock signal failed to be detected for 5 sec while the
Finisher Fan 2 (M9) is driven.
* The same condition is detected after the error retry is
performed.
1.Disconnect and then connect the connector (J206) on the
DC Controller PCB (PCB4).
2.Replace the Exhaust Fan (Rear) (FAN3).
3.Replace the Finisher Fan 1 (M8).
4.Replace the Finisher Fan 2 (M9).
5.Replace the DC Controller PCB (PCB4).
Failure of the Exhaust Fan (Front) (FAN4)
When lock signal is detected for 5 sec while the Exhaust Fan
(Front) (FAN4) is stopped.
* The same condition is detected after the error retry is
performed.
1.Disconnect and then connect the connector (J206) on the
DC Controller PCB (PCB4).
2.Replace the Exhaust Fan (Front) (FAN4).
3.Replace the DC Controller PCB (PCB4).
Unstable rotation of the Exhaust Fan (Front) (FAN4)
When lock signal failed to be detected for 5 sec while the
Exhaust Fan (Front) (FAN4) is driven.
* The same condition is detected after the error retry is
performed.
1.Disconnect and then connect the connector (J206) on the
DC Controller PCB (PCB4).
2.Replace the Exhaust Fan (Front) (FAN4).
3.Replace the DC Controller PCB (PCB4).
T-3-2
FAX Error Code
■ Service Error Code
● Service Error Code
■ Outline
No.
##0100
[Tx]
##0101
##0102
##0103
##0104
##0106
[Tx/Rx]
[Tx]
[Rx]
[Tx]
[Rx]
##0107
##0109
[Rx]
[Tx]
##0111
##0114
##0200
##0201
##0224
##0228
##0232
##0237
##0261
##0280
[Tx/Rx]
[Rx]
[Rx]
[Tx/Rx]
[Tx]
[Rx]
[Tx]
[Rx]
[Tx/Rx]
[Tx]
##0281
[Tx]
■ User Error Code
##0282
[Tx]
● User Error Code
##0283
[Tx]
##0284
##0285
##0286
##0287
##0288
[Tx]
[Tx]
[Tx]
[Tx]
[Tx]
##0289
[Tx]
##0290
[Tx]
##0670
[Tx]
● Error Code Outline
An error code is used to indicate a fault in a machine, and is indicated in the machine's LCD
or reports, showing the nature (symptoms) of the fault. Using the errorcode, the user or the
service man can readily find out how to correct the fault by simply referring to the User's
Manual or service manual. An error code may be either of the following two types:
• User Error Codes
A fault indicated as a user error code is one that can easily be corrected by the user, as by
operating the machine. It takes the form of "# + number."
• Service Error Codes
If a fault calls for a service man for correction, it is indicated as a service man error code in
the form of "## + number" or "SYSTEM ERROR E + number."
MEMO:
- A service error code expressed in the form of "## + number" will not appear on the
LCD, Error Tx Report, or Activity Report while the machine remainsin factory default
state. To check a service error code, shift bit 0 of service soft switch #1 SSSW SW01
to '1'.
- For the causes and countermeasures of error codes, refer to the separate G3/G4
Facsimile Error Code List.
No.
#0001
#0003
#0005
#0009
#0012
#0018
#0037
#0059
#0995/0099
Tx/Rx
[Tx]
[Tx/Rx]
[Tx/Rx]
[Rx]
[Tx]
[Tx/Rx]
[Rx]
[Tx]
[Tx/Rx]
Description
An original has jammed.
Time-out for copying or sending/receiving a single page has occurred.
Time-out for initial identification (T0/T1) has occurred.
Recording paper has jammed or is absent.
Recording paper is absent at the other party.
Auto call initiation has failed.
Image memory overflow at time of reception has occurred.
The number you dial and connected number (CSI) does not match.
A memory communication reservation has been cancelled.
T-3-3
Tx/Rx
Description
At time of transmission, the procedural signal has been transmitted more than
specified.
The modem speed does not match that of the other party.
At time of transmission, fall-back cannot be used.
At time of reception, EOL cannot be detected for 5 sec (15 sec if CBT).
At time of transmission, RTN or PIN is received.
At time of reception, the procedural signal is received for 6 sec while in wait for
the signal.
At time of reception, the transmitting party cannot use fall-back.
At time of transmission, a signal other than DIS, DTC, FTT, CFR, or CRP is
received, and the procedural signal has been sent more than specified.
Memory error has occurred.
At time of reception, RTN is transmitted.
At time of reception, no image carrier is detected for 5 sec.
DCN is received outside the normal parity procedure.
Communication protocol signal error.
Abnormal management information of image data.
Encoding error has occurred.
Decoding error has occurred.
System error has occurred.
At time of transmission, the procedural signal has been transmitted more than
specified.
At time of transmission, the procedural signal has been transmitted more than
specified.
At time of transmission, the procedural signal has been transmitted more than
specified.
At time of transmission, the procedural signal has been transmitted more than
specified.
At time of transmission, DCN is received after transmission of TCF.
At time of transmission, DCN is received after transmission of EOP.
At time of transmission, DCN is received after transmission of EOM.
At time of transmission, DCN is received after transmission of MPS.
After transmission of EOP, a signal other than PIN, PIP, MCF, RTP, or RTN
has been received.
After transmission of EOM, a signal other than PIN, PIP, MCF, RTP, or RTN
has been received.
After transmission of MPS, a signal other than PIN, PIP, MCF, RTP, or RTN
has been received.
At time of V.8 lAte start, the V.8 ability of DIS front the receiving party is
expected to be detected, and the CI signal is expected to be transmitted in
response; however, the procedure fails to advance, and the line is released
because of T1 time-out.
3-9
3
3
No.
##0671
[Rx]
##0672
[Tx]
##0673
[Rx]
##0674
[Tx]
##0675
[Rx]
##0750
[Tx]
##0752
[Tx]
##0753
[Tx]
##0754
[Tx]
##0755
[Tx]
##0757
[Tx]
##0758
[Tx]
##0759
[Tx]
##0762
[Tx]
##0763
[Tx]
##0764
[Tx]
##0765
[Tx]
##0767
##0768
[Tx]
[Tx]
3-10
Tx/Rx
Description
At time of V.8 arrival, procedure fails to move to phase 2 after detection of CM
signal from caller, causing T1 time-out and releasing line.
At time of V.34 transmission, a shift in procedure from phase 2 to phase 3
and the reafter stops, causing the machine to release the line and suffer T1
timeout.
At time of V.34 reception, a shift in procedure from phase 2 to phase 3 and
thereafter stops, causing the machine to release the line and suffer T1 timeout.
At time of V.34 transmission, a shift in procedure from phase 3 and phase 4 to
the control channel and thereafter stops, causing the machine to release the
line and suffer T1 timeout.
At time of V.34 reception, a shift in procedure from phase 3 and phase 4 to the
control channel and thereafter stops, causing the machine to release the line
and suffer T1 timeout.
At time of ECM transmission, no meaningful signal is received after
transmission of PPS-NULL, causing the procedural signal to be transmitted
more than specified.
At time of ECM transmission, DCN is received after transmission of PPSNULL.
At time of ECM transmission, the procedural signal has been transmitted more
than specified after transmission of PPS-NULL, or T5 time-out (60 sec) has
occurred.
At time of ECM transmission, the procedural signal has been transmitted more
than specified after transmission of PPS-NULL..
At time of ECM transmission, no meaningful signal is received after
transmission of PPS-MPS, causing the procedural signal to be transmitted
more than specified.
At time of ECM transmission, DCN is received after retransmission of PPSMPS.
At time of ECM transmission, the procedural signal has been transmitted more
than specified after transmission of PPS-MPS, or T5 time-out (60 sec) has
occurred.
At time of ECM transmission, the procedural signal has been transmitted more
than specified after transmission of PPS-MPS.
At time of ECM transmission, DCN is received after transmission of PPSEOM.
At time of ECM transmission, the procedural signal has been transmitted more
than specified after transmission of PPS-MPS, or T5 time-out (60 sec) has
occurred.
At time of ECM transmission, the procedural signal has been transmitted more
than specified after transmission of PPS-EOM.
At time of ECM transmission, no meaningful signal is received after
transmission of PPS-EOP, causing the procedural signal to be transmitted
more than specified.
At time of ECM transmission, DCN is received after transmission of PPS-EOP.
At time of ECM transmission, the procedural signal has been transmitted more
than specified after transmission of PPS-EOP, or T5 time-out (60 sec) has
occurred.
No.
##0769
[Tx]
Tx/Rx
##0770
[Tx]
##0772
[Tx]
##0773
[Tx]
##0774
[Tx]
##0775
[Tx]
##0778
[Tx]
##0779
[Tx]
##0780
[Tx]
##0782
[Tx]
##0783
[Tx]
##0784
[Tx]
##0787
##0788
[Tx]
[Tx]
##0789
##0790
##0791
[Tx]
[Rx]
[Tx]
##0792
[Rx]
##0793
[Rx]
##0794
##0795
[Tx]
[Tx/Rx]
Description
At time of ECM transmission, the procedural signal has been transmitted more
than specified after transmission of PPS-EOP, or T5 time-out (60 sec) has
occurred.
At time of ECM transmission, no meaningful signal is received after
transmission of EOR-NULL, causing the procedural signal to be transmitted
more than specified.
At time of ECM transmission, DCN is received after transmission of EORNULL..
At time of ECM transmission, the procedural signal has been transmitted more
than specified after transmission of EOR-NULL, or T5 time-out (60 sec) has
occurred.
At time of ECM transmission, ERR is received after transmission of EORNULL..
At time of ECM transmission, no meaningful signal is received after
transmission of EOR-MPS, causing the procedural signal to be transmitted
more than specified.
At time of ECM transmission, the procedural signal has been transmitted
more than specified after transmission EOR-MPS, or T5 time-out (60 sec) has
occurred.
At time of ECM transmission, ERR is received after transmission of EORMPS.
At time of ECM transmission, no meaningful signal is received after
transmission of EOR-EOM, causing the procedural signal to be transmitted
more than specified.
At time of ECM transmission, DCN is received after transmission of EOREOM.
At time of ECM transmission, the procedural signal has been transmitted more
than specified after transmission of EOR-EOM, or T5 time-out (60 sec) has
occurred.
At time of ECM transmission, no meaningful signal is received after
transmission of EOR-EOP, causing the procedural signal to be transmitted
more than specified.
At time of ECM transmission, DCN is received after transmission of EOR-EOP.
At time of ECM transmission, the procedural signal has been transmitted more
than specified after transmission of EOR-EOP, or T5 time-out (60 sec) has
occurred.
At time of ECM transmission, ERR is received after transmission of EOR-EOP.
At time of ECM reception, ERR is transmitted after transmission of EOR-Q.
While ECM mode procedure is under way, a signal other than a meaningful
signal is received.
At time of ECM reception, PPS-NULL cannot be detected over partial page
processing.
At time of ECM reception, no effective frame is received while high-speed
signal reception is under way, thus causing time-out.
At time of ECM reception, PPR with all 0s is received.
A fault has occurred in code processing for communication.
T-3-4
Jam Code
Main Unit
S40
S42
S12
S19
S7
S5
S1
F-3-1
ACC ID
3
3
3
3
3
3
3
3
3
3
3
3
3
3
3
3
3
3
3
3
3
3
3
3
3
3
3
3
3
3
3
3
3
3
3
3
3
3
3
3
3
3
3
Jam Code
0101
0102
0103
0104
0105
0107
0108
0109
010A
010D
0201
0202
0203
0204
0205
0207
0208
0209
020A
020D
0A01
0A02
0A03
0A04
0A05
0A07
0A08
0A09
0A0A
0A0D
0B00
0CF1
0D91
FF00
FF01
FF02
FF03
FF04
FF05
FF07
FF08
FF09
FF0A
Type
Delay jam
Delay jam
Delay jam
Delay jam
Delay jam
Delay jam
Delay jam
Delay jam
Delay jam
Delay jam
Stationary jam
Stationary jam
Stationary jam
Stationary jam
Stationary jam
Stationary jam
Stationary jam
Stationary jam
Stationary jam
Stationary jam
Power-on jam
Power-on jam
Power-on jam
Power-on jam
Power-on jam
Power-on jam
Power-on jam
Power-on jam
Power-on jam
Power-on jam
Door open jam
Other jams
Wrong size specified
Unknown jam
Unknown jam
Unknown jam
Unknown jam
Unknown jam
Unknown jam
Unknown jam
Unknown jam
Unknown jam
Unknown jam
Sensor Name
Cassette 1 pickup sensor
Cassette 2 pickup sensor
Cassette 3 pickup sensor
Cassette 4 pickup sensor
Pre-registration sensor
Fixing outlet sensor
No. 1 delivery sensor
No. 2 delivery sensor
Reversal sensor
Duplex feed sensor
Cassette 1 pickup sensor
Cassette 2 pickup sensor
Cassette 3 pickup sensor
Cassette 4 pickup sensor
Pre-registration sensor
Fixing outlet sensor
No. 1 delivery sensor
No. 2 delivery sensor
Reversal sensor
Duplex feed sensor
Cassette 1 pickup sensor
Cassette 2 pickup sensor
Cassette 3 pickup sensor
Cassette 4 pickup sensor
Pre-registration sensor
Fixing outlet sensor
No. 1 delivery sensor
No. 2 delivery sensor
Reversal sensor
Duplex feed sensor
Pre-registration sensor
-
Sensor ID
S1
SR2
SR4
SR8
S5
S19
S12
S42
S40
S7
S1
SR2
SR4
SR8
S5
S19
S12
S42
S40
S7
S1
SR2
SR4
SR8
S5
S19
S12
S42
S40
S7
S5
-
3
3-11
ACC ID
3
3
3
Jam Code
Type
FF0D Unknown jam
FF91
Unknown jam
FFF1 Unknown jam
Sensor Name
-
Sensor ID
-
DADF-AA1
SR11
SR5
T-3-5
SR1
SR3
SR2
SR5
SR6
3
SR2
SR3
SR1
F-3-2
3-12
ACC ID
4
4
4
4
4
4
4
Jam Code
0003
0004
0005
0006
0007
0008
0044
4
0045
4
0046
4
0047
4
0048
4
4
4
0071
0073
0090
4
0091
4
4
4
0092
0093
0094
4
0095
Type
Delay jam
Stationary jam
Delay jam
Stationary jam
Delay jam
Stationary jam
Stationary jam
(first document)
Delay jam (first
document)
Stationary jam
(first document)
Delay jam (first
document)
Stationary jam
(first document)
Timing error
Release NG
ADF open jam
Sensor Name
Sensor ID
Registration sensor
Registration sensor
Read sensor
Read sensor
Delivery reversal sensor
Delivery reversal sensor
Registration sensor
SR1
SR1
SR2
SR2
SR3
SR3
SR1
Read sensor
SR2
Read sensor
SR2
Delivery reversal sensor
SR3
Delivery reversal sensor
SR3
Release motor HP sensor
Copyboard cover open/closed
Sensor 0
User ADF open jam Copyboard cover open/closed
Sensor 0
ADF cover open jam Cover open/closed sensor
User cover open jam Cover open/closed sensor
Initial stationary jam Registration sensor or Read sensor
or Delivery reversal sensor
Document set sensor
Pickup NG
Inner Finisher-B1
S22
S15
S2
S16
SR11
S21
S1
S6
S18
S19
S20
3
S21
SR6
SR6
SR1,SR2,SR3
SR5
T-3-6
S10
S7
S13
S9
S12
S11
F-3-3
3-13
ACC ID
5
5
5
5
Jam Code
1001
1101
1102
1300
Type
Delay jam
Stationary jam
Stationary jam
Power-on jam
5
5
1400
1500
Door open jam
STP jam
5
5
5
5
5
5
1C20
1C32
1C40
1C42
1C67
1C6F
Error jam
Error jam
Error jam
Error jam
Error jam
Error jam
5
5
5
1C71
1C75
1F00
Error jam
Error jam
Other jams
Sensor Name
Entrance sensor
Entrance sensor
Processing tray sensor
Entrance sensor, Processing tray
sensor
Front cover switch
Stapler HP sensor, Stapler edging
sensor
Shift roller HP sensor
Stapler move HP sensor
Stack tray clock sensor
Additional tray clock sensor
Shift roller release sensor
Entrance roller release /stopper HP
sensor
Grip arm sensor
Gripper unit HP sensor
Entrance sensor
Sensor ID
S1
S1
S6
S1, S6
Alarm Code
Alarm Code Details
Alarm Code
Title
85 - 0001 E355 clear
SW1
S18, S19
S2
S10
S14
S23
S3
S5
S13
S7
S1
T-3-7
85
-
0002
85
-
0003
85
-
0004
85
-
0005
3
A. Movement /B. Cause /C. Measures
A. Movement
Clear process is performed due to E355 error.
B. Cause
Mismatch between the serial numbers of Soft-ID, Flash
ROM, and FRAM
C. Measures
None
Auto-restore caused
A. Movement
by SoftID (Service)
Automatic data restore is performed after Soft-ID PCB
replacement
replacement is detected.
B. Cause
Soft-ID PCP is replaced.
C. Measures
None
Auto-restore caused
A. Movement
by FRAM (Service)
Automatic data restore is performed after FRAM PCB
replacement
replacement is detected.
B. Cause
FRAM PCB is replaced.
C. Measures
None
Auto-restore caused
A. Movement
by SRAM (Service)
Automatic data restore is performed after SRAM PCB
replacement
replacement is detected.
B. Cause
SRAM PCB is replaced.
C. Measures
None
Auto-restore caused by
A. Movement
SRAM (used) replacement Automatic data restore is performed after SRAM PCB
is replaced.
B. Cause
SRAM PCB (used) is replaced.
C. Measures
None
T-3-8
3-14
4
Service Mode
■ Overview
■ Details of Service Mode
4
Outline
Outline of Service Mode
The items that follow may be checked/set using the machine's service mode, which is
designed the way the service mode used in fax machines is designed in terms of contents
and operation.
#SSSW
Use it to register/set basic fax functions (e.g., error control, echo remedy, communication
error correction). Use it to make settings related counter functions.
#MENU
Use it to register/set items related to functions needed at time of installation (e.g., NL
equalizer, transmission level).
#NUMERIC
These setting items are for inputting numeric parameters such as the various conditions for
the RTN signal transmission.
#SPECIAL
4
These setting items are for telephone network control functions. Do not use.
#NCU
These setting items are for telephone network control functions such as the selection signal
transmission conditions and the detection conditions, for the control signals sent from the
exchange.
#FAX
Do not use.
#SCAN
These setting items are for image adjustment in scanning.
#PRINT
These setting items are for image adjustment in printer assembly and for special mode for the
field-related measures.
#NETWORK
Use it to confirm the contents of the installed CA certificates.
4-2
#CODEC
This is a setting items related to CODEC.
#SYSTEM
This is a setting items related to SYSTEM.
#ACC
Register the accessories.
#COUNTER
Use it to check estimates for maintenance/parts replacement.
#LMS
Use it to set the inactivity of the transmitted license and the license inactivity without
transmitting.
#E-RDS
This is a setting items related to e-RDS (Embedded RDS).
#REPORT
Use it to generate reports on various service data.
#DOWNLOAD
Use it to download firmware to the ROM of a PCB in question.
#CLEAR
Use it to reset various data to initial settings.
#DISPLAY
The error and detailed code which have happened now are displayed.
Display the engine speed of the main controller PCB.
#ROM
Displays ROM information, such as version numbers and checksums.
#TEST MODE
Makes various status checks, such as contact sensor, sensor and print status.
Using the Mode
<Operation at the time of Bit SW>
1) Selecting Service Mode
>2>8>
Bit Switch Composition
1) Selecting Service Mode
The items registered and set by each of these switches comprise 8-bit switches. The figure
below shows which numbers are assigned to which bits. Each bit has a value of either 0 or 1.
000000000
3) Selecting a Menu Item
Press [OK].
000000000
4) Selecting a Bit Switch
Select the bit using the
[left arrow]/[right arrow] on
the touch panel.
#SSSW
033
000000000
5) Registering/Setting Data
Enter data using the keypad,
and press the [OK].
#SSSW
033
000000001
6) Press the [Stop]/[Additional
functions]/[Reset] key to end
the service mode.
Bi
t7
Bi
t6
Bi
t5
Bi
t4
Bi
t3
Bi
t2
Bi
t1
Bi
t0
#SSSW
2) Press [OK] on the
touch panel.
#SSSW
033
■ Outline
<Operation at the time of Parameter>
>2>8>
#SSSW
#SSSW
001
Setting of Bit Switch
2) Selecting a Menu Item
Select the Menu item using the
[left arrow]/[right arrow] on the
touch panel.
#NUMERIC
#SSSW
001
0
0
0
0
0
0
0
0
F-4-2
3) Press [OK].
#NUMERIC
001
CAUTION:
0
Do not change service data identified as "not used"; they are set as initial settings.
4) Selecting a Prarameter
Select the Prarameter using the
[left arrow]/[right arrow].
4
#NUMERIC
002
0
5) Registering/Setting Data
Enter data using the keypad,
and then press [OK].
#NUMERIC
002
10
6) Press the [Stop]/[Additional
functions]/[Reset] key to end
the service mode.
F-4-1
4-3
Details of Service Mode
■ Details
● SSSW-SW01
#SSSW
List of Functions
■ SSSW Composition
NOTE:
This document describes the default settings for the system for USA.
The default settings used in the service mode vary depending on the shipping
destination and model.
4
No.
SW01
SW02
SW03
SW04
SW05
SW06
SW7-SW11
SW12
SW13
SW14
SW15
SW16
SW17
SW18
SW19-21
SW22
SW23-24
SW25
SW26-27
SW28
SW29
SW30
SW31
SW32
SW33
SW34
SW35
SW36 - SW50
Initial setting
00000000
00010000
00000000
00000000
00000000
10010000
00000010
00000000
00000001
00000000
00000011
00000000
00000000
00000000
00000000
00000000
00000000
00000000
00000011
00001000
Function
error/copy control
network connection setting
echo remedy setting
communication fault remedy setting
standard function (DIS signal) setting
read condition setting
not used
page timer setting
meter/inch resolution setting
inch/meter resolution setting
dial-in FAX/TEL switch-over function
settings for a No Paper display
not used
remedies for communication faults (2)
not used
fault remedy setting
not used
report indication resolution setting
not used
V.8/V.34 protocol settings
not used
Assigning a New Dial Tone Detection Method
not used
not used
counter function settings
waste toner full display setting
e-RDS function settings
not used
Function
1
0
0
1
2
3
4
5
6
7
service error code
not used
not used
not used
not used
not used
not used
not used
output
-
not output
T-4-2
Detailed Discussions of Bit 0
Selects whether or not service error codes are output. When output is selected, service error
codes is report.
● SSSW-SW02
List of Functions
Bit
Function
1
0
0
1
2
3
4
5
6
7
not used
not used
not used
not used
not used
not used
not used
F network silent termination service
Compatible
Not compatible
T-4-3
Detailed Discussions of Bit 7
Select whether or not the machine is compatible with the F network (facsimile communication
network) silent termination service. When "Compatible" is selected, the machine automatically
receives a fax upon detection of the FC signal (1300 Hz tonal signal) without generating a
ringtone.
T-4-1
4-4
Bit
● SSSW-SW03
MEMO:
Any of the following error code may be indicated because of an echo at time of
reception
##0005, ##0101, ##0106, ##0107, ##0114, ##0200, ##0201, ##0790
List of Functions
Bit
Function
1
0
0
1
2
3
4
5
6
7
TCF criteria
Echo protect tone for high-speed transmission
not used
not used
not used
not used
not used
Tonal signal before CED signal transmission
Loose
Transmitted
Transmitted
Normal
Not transmitted
Not transmitted
● SSSW-SW04
List of Functions
T-4-4
Detailed Discussions of Bit 0
Select whether to make the TCF criteria loose when the system with a V.34 modem receives
an image using the V.17 protocol.
When "Loose" is selected, fallback hardly occurs when an image is received using the V.17
protocol.
However, since the transmission speed is fast, erroneous lines can be generated after start
Bit
Function
1
0
0
1
2
3
not used
Check CI frequency
the number of final flag sequences of protocol signals
Reception mode after CFR signal transmission
Yes
2
high speed
4
the length of the period of ignoring low speed signals
after CFR output
Frequency of CI signal is checked when PBX is set.
CNG signal for manual transmission
CED signal for manual reception
1500ms
No
1
high speed/low
speed
700ms
5
6
7
Yes
No
Not transmitted Transmitted
Not transmitted Transmitted
of image reception or the communication time can become long due to retransmission of
erroneous frames.
T-4-5
Detailed Discussions of Bit 1
In automatic recieving, CI frequency check can be selected. If ‘Yes’ is selected, the upper and
Detailed Discussions of Bit 1
lower limits of the CI frequency are checked, and automatic recieving can only go ahead if
Selects whether or not the echo protect tone is transmitted for high-speed transmission
both values meet German regulations.
(9600 or 7200 bps).
If errors due to line conditions occur frequently during fax transmission, select “Transmitted”.
Detailed Discussions of Bit 2
When “Transmitted” is selected, a non-modulated carrier is transmitted as a synchronization
Use it to select the number of last flag sequences for a protocol signal (transmission speed at
signal before the image transmission.
300 bps). Select '2' if the other party fails to receive the protocol signal properly.
MEMO:
Codes for errors that can occur during transmission because of line conditions:
##100, ##104, ##281, ##282, ##283, ##750, ##755, ##760,##765
MEMO:
Any of the following error codes may be indicated at time of transmission
##0100, ##0280, ##0281, ##0750, ##0753, ##0754, ##0755, ##0758, ##0759, ##0760,
##0763 ##0764, ##0765, ##0768, ##0769,##0770, ##0773, ##0775, ##0778,
##0780, ##0783, ##0785, ##0788
Detailed Discussions of Bit 7
Use it to enable/disable transmission of a 1080-Hz tonal signal before transmission of the
CED signal.
Select 'transmit' if errors occur frequently because of an echo when reception is from
overseas.
Detailed Discussions of Bit 3
Use it to select an appropriate reception mode after transmission of the CFR signal.
If errors occur frequently at time of reception because of the condition of the line, select 'high
speed' for reception mode and, at the same time, selects 'do not receive' for 'ECM reception.'
4-5
4
MEMO:
Any of the following error codes may be indicated at time of reception because of line
condition
##0107, ##0114, ##0201
Be sure to change bit 4 before changing this bit; if errors still occur, change this bit.
When 'high speed' is selected, only high-speed signals (images) will be received after
transmission of the CFR signal.
Bit
Function
1
0
7
not used
-
T-4-6
Detailed Discussions of Bit 1
Use it to enable/disable millimeter/inch conversion in sub scanning direction for images read
in text mode.
Scanning direction in conversion follows the Bit 2 setting of SW14.
Detailed Discussions of Bit 2
Detailed Discussions of Bit 4
Use it to select the time length during which low-speed signals are ignored after transmission
of the CFR signal.
If the condition of the line is not good and, therefore, the reception of image signals is difficult,
select '1500 ms.'
in text/photo mode while bit 1 is set to '1'.
Scanning direction in conversion follows the Bit 2 setting of SW14.
Detailed Discussions of Bit 3
Use it specify whether or not to transmit bit 33 and thereafter for the DIS signal.
Detailed Discussions of Bit 5
In the countries that need approval of CI signal frequency check, no checking on frequency
set at PBX when changing the frequency to PSTN setting and PBX
setting for frequency checks.
4
Use it to enable/disable millimeter/inch conversion in sub scanning direction for images read
If ‘prohibit’ is selected, Super Fine reception from a non-Canon machine can no longer be
used.
CAUTION:
If ‘prohibit’ is selected, Super Fine reception from a non-Canon machine
Detailed Discussions of Bit 6
Selects whether or not to transmit CNG signal during manual transmission.
can no longer be used.
In manual transmitting to a fax with the FAX/TEL switching mode, if there are frequent errors
due to failure to switch to fax mode, select "Transmitted" for the CNG signal.
Selects whether or not the recording paper length declared in the DIS signal is A4 size.
Detailed Discussions of Bit 7
Selects whether or not to transmit CED signals during manual reception. If the other fax does
not transmit even when you start manual reception, select "Transmitted" for the CED signal.
● SSSW-SW05
List of Functions
Bit
Function
1
0
0
1
2
3
4
not used
Conversion from mm to inch (text mode)
Conversion from mm to inch (text/photo mode)
transmit bit 33 and thereafter for DIS signal
Recording paper length availability declared in
DIS signal
not used
not used
execute
execute
prohibit
A4 /B4 size
do not execute
do not execute
do not prohibit
Arbitrary size
-
-
5
6
4-6
Detailed Discussions of Bit 4
When receiving documents made up of long pages, to have the document divided into two
pages at the transmitting fax, select “A4 size”.
MEMO:
When “A4 size” is selected, this fax uses the DIS signal to tell the transmitting
fax that it is equipped with A4 size recording paper.
The transmitting fax that receives this DIS signal divides long pages into A4 size pages
before transmitting it to the receiving fax.
Some fax models do not so divide long documents.
● SSSW-SW06
Time-Out Length for Transmission/reception
List of Functions
Bit7
Bit6
Bit5
Bit4
Bit3
Bit2
Bit1
Bit0
Bit
Function
1
0
8min.
0
*
*
*
*
*
0
0
0
1
2
3
4
5
6
7
not used
not used
not used
FAX stamp display setting
original read width
not used
not used
not used
Displayed
LTR
-
Not displayed
A4
-
16min.
0
*
*
*
*
*
0
1
32min.
0
*
*
*
*
*
1
0
64min.
0
*
*
*
*
*
1
1
T-4-9
Time-Out Length for Transmission (text mode)
Bit7
Bit6
Bit5
Bit4
Bit3
Bit2
Bit1
Bit0
8min.
1
*
*
*
*
*
0
0
Select whether to display the stamp menu in the user menu after installation of the optional
16min.
1
*
*
*
*
*
0
1
stamp unit.
32min.
1
*
*
*
*
*
1
0
64min.
1
*
*
*
*
*
1
1
Detailed Discussions of Bit 3
T-4-7
Detailed Discussions of Bit 4
T-4-10
Use it to select a read width for originals.
Time-Out Length for Transmission (image mode other than text mode)
If ‘LTR’ is selected, the machine will read LTR originals at LTR width (214mm).
Bit7
Bit6
Bit5
Bit4
Bit3
Bit2
Bit1
Bit0
● SSSW-SW012
8min.
1
*
*
*
0
0
*
*
List of Functions
16min.
1
*
*
*
0
1
*
*
1
*
*
*
1
0
*
*
1
*
*
*
1
1
*
*
Bit
Function
1
0
32min.
0
1
1-page time-out length for transmission
not used
1-page time-out length for transmission (HT
transmission)
not used
1-page time-out length for reception
not used
not used
page timer setting by transmission/reception
1
-
0
-
64min.
1
0
Time-Out Length for Reception
1
set
0
do not set
2
3
4
5
6
7
T-4-11
T-4-8
The machine will stop the ongoing communication if the transmission/reception of a single
original page takes 32 min or more. To use the timer for a purpose other than this function,
refer to the tables that follow, and select an appropriate time length.
Bit7
Bit6
Bit5
Bit4
Bit3
Bit2
Bit1
Bit0
8min.
1
*
0
0
*
*
*
*
16min.
1
*
0
1
*
*
*
*
32min.
1
*
1
0
*
*
*
*
64min.
1
*
1
1
*
*
*
*
T-4-12
● SSSW-SW013
List of Functions
When 'do not enable' is selected using bit 7, the time-out length for a single page for all
modes will depend on the setting of bit 0 and bit 1.
4
Bit
Function
1
0
0
1
not used
not used
-
-
4-7
Bit
Function
1
0
Bit
Function
1
0
2
Convert "inch" into "mm" when transmitting the
received image data
not used
not used
not used
not used
not used
convert
do not convert
-
-
0
1
not used
timing for storing polarity in memory
Reception of call through caller ID display line
(main unit line)
not used
not used
not used
Detection of continuous signal at fax/tel
switchover
not used
telephone line
after CI detection
Yes
No
Yes
No
-
-
3
4
5
6
7
2
T-4-13
Detailed Discussions of Bit 2
3
4
5
6
7
It converts "inch" into "mm" when transmitting the received image data.
T-4-15
Scanning direction in conversion follows the Bit 2 setting of SW14.
Detailed Discussions of Bit 1
When a dial-in fax/tel switch-cover takes place, the polarity of the telephone line is stored in
● SSSW-SW014
memory for detection of reversal of the polarity of the telephone line. The timing may be set
List of Functions
4
so that it is either after detection of CI or after release of the telephone line.
Bit
Function
1
0
1
not used
not used
2
direction of scanning for inch/mm conversion
3
4
5
6
7
not used
inch-configuration resolution declaration
not used
not used
not used
both main and sub sub scanning
scanning directions direction only
declare
do not declare
-
Some switchboards are known to wrongly store the polarity, which can further cause
0
the machine to enter standby state when the telephone line is released, thus disabling
communication with the other party. If such is the case, be sure to select ‘after release of
telephone line’.
CAUTION:
If the switch is set to ‘after release of telephone line’, the reversal of the polarity cannot
be detected from when CI is detected to when the telephoneline is released.
T-4-14
Detailed Discussions of Bit 2
Detailed Discussions of Bit 2
Use it to specify whether to convert or not convert an inch-configuration resolution into a
When a machine which is not compatible with the caller ID display/modem dial-in service is
millimeter-configuration resolution for image read in G3 transmission:
connected to the subscriber line which is compatible with that service, the "main unit line" is
either in sub scanning direction only or in both main and sub scanning directions. The setting
made ready for receiving the incoming call.
is valid only when bit 1 of SW05 of #SSSW is set to '1'.
Detailed Discussions of Bit 6
Select whether to detect a continuous ROT signal at FAX/TEL switchover.
Detailed Discussions of Bit 4
Use it to specify whether to declare or not declare an inch-configuration resolution to the other
machine for G3 communication: if 'declare' is selected, the machine will indicate that it reads
and records at an inch-configuration resolution using the DIS, DCS, or DTC signal.
● SSSW-SW15
List of Functions
4-8
● SSSW-SW16
List of Functions
Bit
Function
1
0
No Paper display conditions
Same size fax paper
1
Check side cassette paper at No Paper display Do not check
0
Either one All fax
paper
Check
Bit
Function
1
0
● SSSW-SW22
2
3
4
5
6
7
not used
not used
not used
not used
not used
not used
-
-
List of Functions
T-4-16
Detailed Discussions of Bit 0
Selects a No Paper display for when; either the fax paper cassette or multitray is empty, or for
when the same size paper is all used up.
Bit
Function
1
0
0
1
2
3
4
5
6
7
not used
not used
not used
Prohibit manual polling
not used
not used
not used
not used
Yes
-
No
T-4-18
Detailed Discussions of Bit 1
Detailed Discussions of Bit 3
Selects whether to check the side cassette when checking if the same size paper is all used
Selects whether to prohibit by manual polling (off hook key + start key).
up.
● SSSW-SW25
● SSSW-SW18
List of Functions
List of Functions
Bit
Function
1
0
Bit
0
1
2
detection of carrier between DCS and TCF
wait time for carrier between DCS and TCF
not used
detect
600msec
-
do not detect
300msec
-
0
3
4
5
6
7
not used
not used
not used
not used
not used
-
-
1
2
T-4-17
3
4
5
6
7
Function
1
Transmission telephone numbers displayed on reports
from CSI
not used
If void CSI has been received, handle as non-received
CSI.
Menu display of message language
not used
not used
not used
not used
Other fax
number
-
0
Called number
-
Yes
No
Display
-
Do not display
-
Detailed Discussions of Bit 0
T-4-19
For reception, the absence of the carrier between DCS and TCF may be detected. If the
Detailed Discussions of Bit 0
machine returns FTT while the other party (PC-FAX in particular) is sending TCF to cause a
Selects the transmission telephone number displayed on reports after the completion of
reception error, be sure to set the bit to ‘1’. If the error still occurs, set bit 1 of #1 SSSW SW18
transmission.
to ‘1’. This function is valid only when the machine uses an R288F modem.
When “Called number” is selected, the telephone number the fax called is displayed on
reports.
Detailed Discussions of Bit 1
When “Other fax number” is selected, the telephone number sent from the other fax (the CSI
For reception, the length of time during which the absence of the carrier is detected between
signal data) is displayed on reports.
DCS and TCF may be set. This bit is valid when ‘1’ is set to bit 0 of #1 SSSW SW18.
Detailed Discussions of Bit 2
At "1" on this Bit, ignore the void CSI if received and if the dial has been made at this point,
4-9
4
the dialed number will be indicated on the LCD/ Report screen.
At "0" on this Bit, even though the dialed number is acknowledged, LCD/Report screen will
Detailed Discussions of Bit 4
indicate nothing.
Select whether the receiver falls back during V.34 reception. If 'Prohibit' is selected, the
receiver does not fall back.
Detailed Discussions of Bit 3
When “Display” is selected, adds a Message Language menu to the user data “System
Detailed Discussions of Bit 5
Setting”. This allows selecting different languages which to show displays and reports.
Select whether the transmitter falls beck during V.34 transmission. If 'Prohibit' is selected, teh
transmitter does not fall back.
● SSSW-SW28
● SSSW-SW30
List of Functions
Bit
Function
1
0
0
1
2
3
4
5
6
7
Caller V.8 protocol
Called party V.8 protocol
Caller V.8 protocol late start
Called party V.8 protocol late start
V.34 reception fallback
V.34 transmission fallback
not used
not used
No
No
No
No
Prohibited
Prohibited
-
Yes
Yes
Yes
Yes
Not prohibited
Not prohibited
-
List of Functions
T-4-20
4
Detailed Discussions of Bit 0
Bit
Function
1
0
0
1
2
3
4
5
not used
not used
not used
not used
not used
New dial tone detection method
6
7
not used
not used
Detect with the new
method.
-
Detect with the
existing method.
T-4-21
Select whether to use the V.8 protocol when calling. If NO is selected, the V.8 protocol is
Detailed Discussions of Bit 5
inhibited at calling and the V.21 protocol is used
When "Detect with the new method" is selected, tone is detected for 3.5 seconds before call
origination in order to discriminate between dial tone and voice. If dial tone is detected and
Detailed Discussions of Bit 1
the time since line seizure is 3.5 seconds or longer, call origination takes place immediately. If
Select whether to use the V.8 protocol when called. If NO is selected, the V8 protocol is
the time since line seizure is less than 3.5 seconds,
inhibited when called and the V.21 protocol is used.
call origination takes place after waiting for 1 second. (If the time since line seizure reaches
3.5 seconds during the 1-second waiting period, call origination takes place immediately. By
Detailed Discussions of Bit 2
default, "Detect with a new method" is assigned for this SW.
If ANSam signal is not received during transmission, select whether to use the V.8 protocol
when the other fax machine declares the V.8 protocol in DIS signal. If NO is selected, the CI
signal is not transmitted and the V.8 protocol is not used even if the DIS that specifies the V.8
● SSSW-SW32
List of Functions
protocol is received.
The V.8 late start is not executed during manual transmission regardless of this setting.
Detailed Discussions of Bit 3
Select whether to declare the V.8 protocol in DIS signal for reception. If NO is selected, the V.8
protocol cannot be used because it is not declared in DIS signal.
The V.8 late start is not executed during manual reception regardless of this setting.
4-10
Bit
Function
1
0
0
1
2
3
4
not used
not used
not used
not used
not used
-
-
Bit
Function
1
0
5
6
7
not used
not used
not used
-
-
When "1" is selected, the counter is displayed.
When "0" is selected, the counter is not displayed.
T-4-22
● SSSW-SW33
List of Functions
Bit
Function
1
0
0
1
2
3
4
5
6
7
count B4 (Print) as large size
not used
count B4 (Scan) as large size
the counter display type change in Japan and USA
not used
Toner cartridge replacement counter display
not used
not used
Yes
Yes
Yes
Yes
-
No
No
No
No
-
Use it to specify whether B4 paper (Print) should be counted as large-size paper.
If 'yes' is selected, B4 paper will be counted as large-size paper.
If 'no' is selected, on the other hand, B4 paper will be counted as small-size paper.
Bit
Function
1
0
Display the waste toner full warning
1
Switch the waste toner full warning
2
3
4
5
6
7
User drum replacement menu display
not used
not used
not used
not used
not used
Yes
No
Drum replacement required
E019 displayed on
message displayed on an
an service call
operator call
Yes
No
-
0
Detailed Discussions of Bit 0
You can select whether a waste toner full warning is to be displayed.
When "1" is selected, a waste toner full warning is displayed.
When "0" is selected, a waste toner full warning is not displayed.
4
Detailed Discussions of Bit 1
Detailed Discussions of Bit 2
Use it to specify whether B4 paper (Scan) should be counted as large-size paper.
If 'yes' is selected, B4 paper will be counted as large-size paper.
If 'no' is selected, on the other hand, B4 paper will be counted as small-size paper.
Select whether to display the waste toner full warning as a drum replacement required
message or as E019 displayed on an operator call. Select 1 to display a rum replacement
required message on an operator call. Select 0 to display E019 on an service call.
Detailed Discussions of Bit 2
Detailed Discussions of Bit 3/4
Select whether to switch the counter display type in effect in Japan and USA to the
conventional or new type. Select "Yes" to display counters in the new type.
Select "No" to display counters in the conventional type.
Conventional type(type1)
New type(type2)
New type(type3)
New type(type4)
List of Functions
T-4-25
T-4-23
Detailed Discussions of Bit 0
● SSSW-SW34
Bit4
Bit3
0
0
1
1
0
1
0
1
Select whether to display the user drum replacement menu.
When "1" is selected, the menu is displayed.
When "0" is selected, the menu is not displayed.
T-4-24
Detailed Discussions of Bit 5
Select whether to display the toner cartridge replacement counter.
4-11
#MENU
● SSSW-SW35
List of Functions
Bit
Function
1
0
0
1
2
3
4
5
6
7
e-RDS function ON/OFF
Call button function ON/OFF
ScanToMeia function enable/disable
MediaPrint function enable/disable
IC card authentication management function ON/OFF
not used
not used
not used
Yes
Yes
enable
enable
Yes
-
No
No
disable
disable
No
-
■ Menu Switch Composition
No.
Function
Range of settings
005
006
007
NL equalizer
Telephone line monitor
Transmission level (ATT)
V.34 modulation speed
upper limit
V34 data speed upper
limit
1: ON, 0: OFF
0: DIAL, 1: SERVICEMAN [1], 2: SERVICEMAN [2], 3: OFF
From 0 to 15 (ex: 15= -15 dBm)
008
009
T-4-26
Detailed Discussions of Bit 0
Select whether to set the e-RDS function.
When "1" is selected, the function is set.
When "0" is selected, the function is not set.
Detailed Discussions of Bit 1
4
010
0: 3429, 1: 3200, 2: 3000, 3: 2800, 4: 2743, 5: 2400
0: 33.6kbs, 1: 31.2kbs, 2: 28.8kbs, 3: 26.4kbs, 4: 24.0kbs
5: 21.6kbs, 6: 19.2kbs, 7: 16.8kbs, 8: 14.4kbs, 9: 12.0kbs
10: 9.6kbs, 11: 7.2kbs, 12: 4.8kbs, 13: 2.4kbs
Frequency of pseudoring
0: 50Hz, 1: 25Hz, 2: 17Hz
signal
T-4-27
■ Deatails
● <005: NL equalizer>
Use it to enable-disable the NL equalizer.
Select whether to set the call button function.
If errors occur often during communication because of the condition of the line, enable (ON)
When "1" is selected, the function is set.
the NL equalizer.
When "0" is selected, the function is not set.
Detailed Discussions of Bit 2
Select whether to enable or disable the ScanToMeia function.
When "1" is selected, the function is enabled.
When "0" is selected, the function is disabled.
Detailed Discussions of Bit 3
Select whether to enable the MediaPrint function.
MEMO:
Any of the following error codes may be indicated at time of transmission because of
the line condition:
##100, ##101, ##102, ##104, ##201, ##281, ##282, ##283, ##750, ##755, ##765,
##774, ##779, ##784, ##789
Any of the following error codes may be indicated at time of transmission because of
the line condition:
##103, ##107, ##114, ##201, ##790, ##793
When "1" is selected, the function is enabled.
When "0" is selected, the function is disabled.
Detailed Discussions of Bit 4
Select whether to set the IC card authentication function.
When "1" is selected, the function is set.
When "0" is selected, the function is not set.
● <006: Telephone line monitor>
Use it to s the telephone line monitor function:
DIAL: generate the monitor sound of the telephone line using the speaker from the start of
transmission to DIS.
SERVICEMAN [1]: generate the monitor sound of the telephone line using the speaker
from the start of communication to the end of it.
SERVICEMAN [2]: generate the monitor sound of the telephone line2 (Option).
OFF: do not generate the monitor sound of the telephone line using the speaker.
4-12
#NUMERIC
● <007: ATT transmission level>
Use it to set the transmission level (ATT).
Raise the transmission level if errors occur frequently at time of communication because of
■ Numerical Parameter Composition
the condition of the line. (It means close to 8)
No.
Item
Range of settings
002
003
004
005
006
010
011
013
015
016
017
018
019
020
021
022
023
024
RTN transmission condition(1)
RTN transmission condition (2)
RTN transmission condition (3)
NCC pause time length (pre-ID code)
NCC pause time length (post-ID code)
line condition identification time length
T.30T1 timer (for reception)
T.30 EOL timer
hooking detection time length
time length to first response at time of fax/tel switchover
pseudo RBT signal pattern ON time length
pseudo RBT signal pattern OFF time length (short)
pseudo RBT signal pattern OFF time length (long)
pseudo CI signal pattern ON time length
pseudo CI signal pattern OFF time length (short)
pseudo CI signal pattern OFF time length (long)
CNG detection level at time of fax/tel switchover
pseudo RBT transmission level at time of fax/tel switchover
025
027
051
053
054
055
056
057
058
059
060
061
074
075
Answering machine connection function signal detection time
preamble detection time length for V21 low-speed flag
Hooking detection threshold
Setting of DTMF call origination count at remote reception of fax
Setting of busy tone output time when handset is used
acquisition period of environmental log data
display the type of soft counter 1
Display the type of soft counter 2
Display the type of soft counter 3
Display the type of soft counter 4
Display the type of soft counter 5
Display the type of soft counter 6
e-RDS RGW port number
Interval of transmission for e-RDS 3rd party
1% to 99%
2 to 99 item
1 to 99 lines
1 to 60 sec
1 to 60 sec
0 to 9999 (10 msec)
0 to 9999 (10 msec)
500 to 3000 (10 msec)
0 to 999
0 to 9
0 to 999
0 to 999
0 to 999
0 to 999
0 to 999
0 to 999
0 to 7
10 to 20
0 to 20 (120/230V)
0 to 999
20 (x 10ms)
MEMO:
Any of the following error codes may be indicated at time of transmission because of
the line condition:
##100, ##101, ##102, ##104, ##201, ##280, ##281, ##282, ##283, ##284, ##750,
##752, ##754, ##755, ##757, ##759, ##760, ##762, ##764, ##765,
##767, ##769, ##770, ##772, ##774, ##775, ##777, ##779, ##780, ##782, ##784,
##785, ##787, ##789
Any of the following error codes may be indicated at time of reception because of the
line condition:
##103, ##106, ##107, ##201, ##793
##103, ##106, ##107, ##201, ##793
● <008: V.34 modulation speed upper limit>
Use it to set an upper limit to the modulation speed (baud rate) for the V.34 primary
channel.
● <009: V.34 data speed upper limit>
Use it to set an upper limit to the data transmission speed for the V.34 primary channel
between 2.4K and 33.6K bps in increments of 2400 bps. (0: 2.4K to 13:33.6K bps).
● <010: Frequency of the pseudo CI signal>
You may select a frequency for the pseudo CI signal.
Some types of external telephones do not ring when the fax/tel switch-over function is ON.
To sound the ring, change the pseudo CI signal.
0 to 480 (60min)
101 (Fixed)
0 to 999
0 to 999
0 to 999
0 to 999
0 to 999
T-4-28
4-13
4
■ Details
● <002:RTN transmission condition (1)><003: RTN transmission
condition (2)><004: RTN transmission condition (3)>
Use it to set RTN signal transmission conditions. Raise these parameters for more lenient
conditions if errors occur frequently at time of reception because of transmission of the
MEMO:
Any of the following error codes may be indicated because of the condition of the line
##0005, ##0018
The line condition identification time is between when the dial signal is transmitted and
when the line condition is cut for the transmitting party, while it is between
when the DIS signal is transmitted and when the line is cut for the receiving party.
RTN signal.
MEMO:
Any of the following error codes may be indicated at time of reception because of RTN
signal transmission
##0104, ##0107, ##0114, ##0201
RTN signal transmission condition (1) affects the ratio of error lines to the total number
of lines per single page of received images.
RTN signal transmission condition (2) affects the standard value (*2) of burst errors (*1).
RTN signal condition (3) affects the number of errors not reaching the standard value
of burst errors.
*1: transmission error occurring cover several lines.
*2: for instance, if '15' is set, a single burst error will represent an error occurring
continuously cover 15 lines.
If any of these lines is detected while an image signal is being received, the RTN signal
will be transmitted after receiving the protocol signal of the transmitting
party. Higher parameters restrict the transmission of the RTN signal.
4
● <005:NCC pause length (pre-ID code)>
Use it to set the length of the pause automatically entered between access code and ID
code when the NCC (New Common Carrier) line is used for dialing.
● <006:NCC pause length (post-ID code)>
Use it to set the length of the pause automatically entered between ID code and telephone
number of the other party when the NCC (New Common Carrier) line is used for dialing.
● <010: line connection identification length>
Use it to set the time for identifying the line connection. Raise this parameter if errors occur
frequently at time of communication because of the condition of the line.
● <011: T.30 T1 timer (for reception)>
Set the T1 timer for the receiver (wait time after DIS transmission starts until a significant
signal is received).
● <013:T.30 EOL timer>
Set it so that the 1-line transmission time is longer for reception to prevent reception errors
caused by a long data length per line (e.g., computer FAX).
● <016: time length to first response at time of fax/tel switchover>
Allows setting of the time from seizing the line till pseudo RBT is sent, when the Fax/ Tel
switching function is operating.
● <017: pseudo RBT signal pattern ON time length/018: pseudo RBT
signal pattern OFF time length (short)/019: pseudo RBT signal pattern
OFF time length (long)>
Use it to set the pattern of the pseudo RBT signal transmitted at time of a fax/tel switchover.
● <020: pseudo CI signal pattern ON time length/021: pseudo CI signal
pattern OFF time length (short)/022: pseudo CI signal pattern OFF
time length (long)>
Use it to set the pseudo CI signal pattern transmitted at time of a fax/tel switchover.
● <023:CNG detention level for fax/tel switchover>
Use it to set the CNG detention level for a fax/tel switchover.
● <024:pseudo RBT transmission level at time of fax/tel switchover>
Use it to set the pseudo transmission level for a fax/tel switchover.
4-14
● <025: Answering machine connection function signal detection time>
Sets the signal detection time for the answering machine connection function operation.
When the answering machine connection function is operating, if the function does not
operate normally because the fax does not detect CNG signal sent from the line, raise this
parameter to increase the signal detection time.
● <027:V.21 low-speed flag preamble identification length>
Use it to detect the time of detection after which command analysis is started after
detecting V.21 low-speed command preambles continuously for a specific period of time.
900s: transmitted scan
Guide to the Table
- 1:Count sheets of all sizes by one.
- 2:Count sheets of the large size by two.
- C:full color
- Bk:black mono
- L:large size (larger than A4/LTR)
- S:small size (A4/LTR or smaller)
● <056 - 061: Count type select >
MEMO:
To make a change so that B4 papers (for print) will be counted as large-size, use
service mode: make the following selections, and change bit 0 to '1': #SSSW>SW33.
Use it to confirm the count type indicated on the Counter Check screen, which appears in
response to a press on the Counter key.
When '0' is selected, count type will not be indicated.
To make a change so that B4 papers (for scan) will be counted as large-size, use
service mode: make the following selections, and change bit 2 to '1': #SSSW>SW33.
056:Use it to indicate the type of software counter 1 of the control panel. The type of soft
counter 1 cannot be changed.
700s: received file print
800s: report pint
1
1
1
1
1
1
1
1
1
2
1
1
2
1
1
2
1
1
2
1
1
1
1
1
1
1
1
1
1
1
1
1
1
1
1
1
1
2
1
1
2
1
1
2
1
1
2
1
2
1
2
1
1
1
1
1
1
1
1
1
1
1
1
1
1
1
Report print
500s: scan
1
2
1
FAX print
400s: copy + print
1
2
1
1
2
1
PDL print
300s: print
1
2
1
1
2
1
Local copy
200s: copy
1
2
1
1
2
1
Report print
100s: total
FAX print
The soft counters are classified a follows in terms of input numbers:
PDL print
<Soft Counter Specifications>
Report print
*:The default type settings of soft counter is different from models.
FAX print
user.
Total1
Total2
Total (L)
Total (S)
Total (Bk1)
Total (Bk2)
Total (Bk/L)
Total (Bk/S)
Total1 (2-sided)
Total2 (2-sided)
L (2-sided)
S (2-sided)
TotalA1
TotalA2
TotalA (L)
TotalA (S)
TotalA (Bk1)
TotalA (Bk2)
PDL print
user.
061:Use it to change the type of soft counter 6* of the control panel to suit the needs of the 101
102
103
104
108
109
112
113
114
115
116
117
126
127
128
129
132
133
Bk 2-sided S
Local copy
060:Use it to change the type of soft counter 5* of the control panel to suit the needs of the Bk 2-sided L
Report print
user.
Bk 1-sided S
FAX print
user.
059:Use it to change the type of soft counter 4* of the control panel to suit the needs of the Bk 1-sided L
PDL print
058:Use it to change the type of soft counter 3* of the control panel to suit the needs of the Print system
Local copy
user.
Serial Counter type
No. on
counter
check
screen
Local copy
057:Use it to change the type of soft counter 2* of the control panel to suit the needs of the 1
2
1
1
1
1
1
1
1
1
1
1
1
1
1
4-15
4
1
2
1
1
2
1
1
2
1
1
1
1
1
1
1
1
1
1
1
1
1
1
1
1
1
1
1
1
1
355
356
Report print
1
1
2
1
1
1
FAX print
1
1
PDL print
1
2
1
Local copy
1
2
1
Report print
1
2
1
301
302
303
304
305
306
307
308
313
314
319
320
329
330
331
332
333
334
339
340
345
346
FAX print
1
PDL print
1
294
Local copy
1
293
Report print
1
1
1
2
1
FAX print
1
1
1
1
Bk 2-sided S
PDL print
1
1
1
1
Bk 2-sided L
Local copy
1
1
1
Bk 1-sided S
Report print
1
1
1
1
CopyA (Bk2)
CopyA (Bk/L)
CopyA (Bk/S)
CopyA (Bk/L/2-sided)
CopyA (Bk/S/2-sided)
Local copy(Bk1)
Local copy(Bk2)
Local copy(Bk/L)
Local copy(Bk/S)
Local copy(Bk/L/2sided)
Local copy(Bk/S/2sided)
Print (Total1)
Print (Total2)
Print (L)
Print (S)
PrintA (Total1)
PrintA (Total2)
PrintA (L)
PrintA (S)
Print (Bk1)
Print (Bk2)
Print (Bk/L)
Print (Bk/S)
Print (Bk/L
Print (Bk/S/2-sided)
PDLprint (Total1)
PDL print (Total2)
PDL print (L)
PDL print (S)
PDL print (Bk1)
PDL print (Bk2)
PDL print (Bk/L)
PDL print (Bk/S)
PDL print (Bk/L/2sided)
PDL print (Bk/S)
Bk 1-sided L
FAX print
1
2
1
1
1
1
1
250
255
256
265
266
277
278
283
284
Print system
PDL print
1
2
1
1
2
1
1
1
Serial Counter type
No. on
counter
check
screen
Local copy
1
2
1
1
2
1
1
2
1
Report print
1
2
1
1
2
1
FAX print
1
2
1
PDL print
Local copy
1
Report print
1
FAX print
Report print
1
Bk 2-sided S
PDL print
FAX print
1
PDL print
1
Local copy
Report print
1
Bk 2-sided L
Local copy
Bk 1-sided S
FAX print
4-16
TotalA (Bk/L)
TotalA (Bk/S)
TotalA1 (2-sided)
TotalA2 (2-sided)
L A (2-sided)
S A (2-sided)
TotalB1
TotalB2
TotalB (L)
TotalB (S)
TotalB (Bk1)
TotalB (Bk2)
TotalB (Bk/L)
TotalB (Bk/S)
TotalB1 (2-sided)
TotalB2 (2-sided)
LB (2-sided)
SB (2-sided)
Copy(Total1)
Copy(Total2)
Copy(L)
Copy(S)
CopyA (Total1)
CopyA (Total2)
CopyA (L)
CopyA (S)
Local copy(Total1)
Local copy(Total2)
Local copy(L)
Local copy(S)
Copy(Bk1)
Copy(Bk2)
Copy(Bk/L)
Copy(Bk/S)
Copy(Bk/L/2-sided)
Copy(Bk/S/2-sided)
CopyA (Bk1)
Bk 1-sided L
PDL print
4
136
137
138
139
140
141
150
151
152
153
156
157
160
161
162
163
164
165
201
202
203
204
205
206
207
208
209
210
211
212
221
222
227
228
237
238
249
Print system
Local copy
Serial Counter type
No. on
counter
check
screen
1
1
1
1
1
2
1
1
1
1
1
1
1
2
1
1
2
1
1
2
1
1
2
1
1
2
1
1
2
1
1
1
1
1
1
1
1
1
1
1
1
1
1
1
1
1
1
1
1
1
1
1
2
1
1
2
1
1
1
1
1
1
1
1
1
1
930
945
Total scan
929
E-mail FileShare DB BOX
scan
922
FileShare DB scan
921
E-mail FileShare DB scan
1
Bk 2-sided S
FileShare DB scan
918
Bk 2-sided L
E-mail scan
1
Total scan
917
1
1
2
1
Total scan
916
E-mail FileShare DB Box
915
FileShare DB BoxF scan
1
Bk 1-sided S
E-mail FileShare DB scan
1
Scan (Total1)
Bk scan (Total1)
Bk scan (Total2)
Bk scan (L)
Bk scan (S)
C scanTotal (1)
C scanTotal (2)
C scan (L)
C scan (S)
Transmission scan
total2 (C)
Transmission scan
total2 (Bk)
Transmission scan
total3 (C)
Transmission
scanTotal3 (Bk)
Transmission
scanTotal5 (C)
Transmission
scanTotal5 (Bk)
Transmission
scanTotal6 (C)
Transmission
scanTotal6 (Bk)
Transmission scan/
E-mail (C)
FileShare DBscan
1
501
505
506
507
508
509
510
511
512
Scan system
Bk 1-sided L
E-mail scan
1
Serial Counter type
No. on
counter
check
screen
Total scan
1
Report print
1
FAX print
1
1
1
PDL print
1
1
1
Local copy
1
1
1
Report print
1
1
1
FAX print
1
1
1
Bk 2-sided S
PDL print
2
1
1
1
1
Bk 2-sided L
Local copy
2
1
1
Report print
2
1
1
FAX print
2
1
1
PDL print
1
Local copy
801
802
803
804
809
810
815
816
825
826
1
2
1
Report print
726
Bk 1-sided S
1
2
1
FAX print
725
Copy+Print (Bk/L)
Copy+Print (Bk/S)
Copy+Print (Bk2)
Copy+Print (Bk1)
Copy+Print (L)
Copy+Print (S)
Copy+Print (2)
Copy+Print (1)
Copy+Print (Bk/L)
Copy+Print (Bk/S)
Recieved print (Total1)
Recieved print (Total2)
Recieved print (L)
Recieved print (S)
Recieved print (Bk1)
Recieved print (Bk2)
Recieved print (Bk/L)
Recieved print (Bk/S)
Recieved print (Bk/L/2sided)
Recieved print (Bk/S/2sided)
Report print (Total1)
Report print (Total2)
Report print (L)
Report print (S)
Report print (Bk1)
Report print (Bk2)
Report print (Bk/L)
Report print (Bk/S)
Report print (Bk/L)
Report print (Bk/S)
Bk 1-sided L
PDL print
403
404
405
406
411
412
413
414
421
422
701
702
703
704
709
710
715
716
Print system
Local copy
Serial Counter type
No. on
counter
check
screen
1
1
1
1
1
2
1
1
1
1
1
4
1
1
1
1
1
1
1
1
T-4-30
1
1
T-4-29
4-17
#SCAN
Item1
■ Setting of Scanner Functions (SCANNER)
Item1
No.
#SCAN SW
#SCAN
001: - 032:
033:
NUMERIC
4
Initial
Range of settings
setting
50
034:
50
035: - 046:
047:
50
048:
50
049: - 192:
193:
0
194:
0
195:
0
196: - 290:
0: LEGAL
1: FOOLSCAP
2: M_OFICIO
3: A_FOOLSCAP
4: FOLIO
5: G_LEGAL
6: A_OFICIO
7: B_OFICIO
8: OFICIO
9: E_OFICIO
0: LTR
1: G_LTR
2: A_LTR
0: LTR_R
1: FOOLSCAP
2: OFFICIO
3: E_OFFICIO
4: G_LTR_R
5: A_LTR_R
READER DISPLAY
Item3
Item4
CCD
TARGET-B
Function
Initial Appropriate
setting guideline
TARGET-R
Vertical scan magnification correction
(scanning on BOOK)
Horizontal scan magnification
correction (scanning on BOOK)
Not used
Vertical scan magnification correction
(scanning on ADF)
Horizontal scan magnification
correction (scanning on ADF)
Not used
ADF special paper, standardized size:
LGL
misidentification-ready
OFST
OFST-B
Adjustment value of offset
level on CCD (blue)
Adjustment value of offset
level on CCD (green)
Adjustment value of offset
level on CCD (red)
Adjustment value of offset
level in odd bit on CCD
Adjustment value of offset
level in even bit on CCD
Not used
OFST-G
OFST-R
OFST-O
OFST-E
GAIN
GAIN-B
GAIN-G
GAIN-R
GAIN-O
ADF special paper, standardized size:
LTR
misidentification-ready
ADF special paper, standardized size:
LTR_R
misidentification-ready
GAIN-E
IO
R-CON
FEEDER
ADJUST
Description
Target value of shading for
blue
Target value of shading for
green
Target value of shading for
red
Not used
TARGET-G
Not used
ADJ-XY ADJ-X
20
1 to 211,
1=0.1mm
ADJ-Y
79
1 to 254,
1=0.1mm
ADJ-S
121
25 to 500,
1=0.1mm
ADJ-Y-DF
79
1 to 254,
1=0.1mm
Not used
T-4-31
4-18
Item2
Adjustment value of gain
level on CCD (blue)
Adjustment value of gain
level on CCD (green)
Adjustment value of gain
level on CCD (red)
Adjustment value of gain
level in odd bit on CCD
Adjustment value of gain
level in even bit on CCD
Firmware version of reader
controller PCB
ROM version of DADF
controller PCB
Adjustment of scanning
system image lead edge
position (image's scan-start
position in vertical scanning
direction)
Adjustment value of
image scan-start position
<Y-direction>
Adjustment of CCD/CIS
scan-start cell position
(image scan-start position
in horizontal scanning
direction)
Adjustment of horizontal
scanning position at feeder
mode
Item1
Item2
READER ADJUST
Item3
Item4
Initial Appropriate
setting guideline
CCD
STRD-POS
100
1 to 200
ADJ-X-MG
0
-10 to +10,
1=0.1%
W-PLT-X
8271
1 to 9999
W-PLT-Y
8735
1 to 9999
W-PLT-Z
9418
1 to 9999
SH-TRGT
1136
1 to 2047
50_RG
0
-256 to 256
50_GB
0
-256 to 256
100_RG
0
-256 to 256
100_GB
50DF_RG
50DF_GB
100DF_RG
100DF_GB
DFTAR-R
0
0
0
0
0
1159
-256 to 256
-256 to 256
-256 to 256
-256 to 256
-256 to 256
1 to 2047
Description
Item1
Item2
Adjustment of CCD/CIS
scan position at streamreading mode with DF
Fine adjustment of
magnification ration in
vertical scanning when
scanning with reader
copyboard
White label data entry with
standard white plate
White label data (Y) entry
with standard white plate
White label data (Z) entry
with standard white plate
Shading target value of
the standard white plate
(backup)
Color displacement (G-R)
offset value display at
BOOK mode/50% scanning
Color displacement (G-B)
offset value display at
BOOK mode/50% scanning
Color displacement
(G-R) offset value display
at BOOK mode/100%
scanning
Color displacement
(G-B) offset value display
at BOOK mode/100%
scanning
Color displacement (G-R)
offset value display at ADF
mode/50% scanning
Color displacement (G-B)
offset value display at ADF
mode/50% scanning
Color displacement (G-R)
offset value display at ADF
mode/100% scanning
Color displacement (G-B)
offset value display at ADF
mode/100% scanning
Shading target value
(RED) entry when using DF
(normal document scanning
position)
READER ADJUST
Item3
Item4
Initial Appropriate
setting guideline
CCD
DFTAR-G
1189
1 to 2047
DFTAR-B
1209
1 to 2047
CCD-CHNG
0 to 1
DFTAR-K
1189
1 to 2047
MTF3-M1
55
20 to 80
MTF3-M2
55
20 to 80
MTF3-M3
55
20 to 80
MTF3-M4
55
20 to 80
MTF3-M5
55
20 to 80
MTF3-M6
55
20 to 80
MTF3-M7
55
20 to 80
MTF3-M8
55
20 to 80
MTF3-M9
55
20 to 80
MTF3-M10
55
20 to 80
MTF3-M11
55
20 to 80
MTF3-M12
55
20 to 80
Description
Shading target value
(GREEN) entry when using
DF (normal document
scanning position)
Shading target value
(BLUE) entry when using
DF (normal document
scanning position)
CCD replacement flag
Black shading target value
when using DF
MTF setting value for R
in horizontal scanning
direction (front)
MTF setting value for R
in horizontal scanning
direction (center)
MTF setting value for R
in horizontal scanning
direction (rear)
MTF setting value for G
in horizontal scanning
direction (front)
MTF setting value for G
in horizontal scanning
direction (center)
MTF setting value for G
in horizontal scanning
direction (rear)
MTF setting value for B
in horizontal scanning
direction (front)
MTF setting value for B
in horizontal scanning
direction (center)
MTF setting value for B
in horizontal scanning
direction (rear)
MTF setting value for K
in horizontal scanning
direction (front)
MTF setting value for K
in horizontal scanning
direction (center)
MTF setting value for K
in horizontal scanning
direction (rear)
4-19
4
Item1
Item2
READER ADJUST
4
4-20
Item3
Item4
Initial Appropriate
setting guideline
CCD
MTF3-S1
55
20 to 80
MTF3-S2
55
20 to 80
MTF3-S3
55
20 to 80
MTF3-S4
55
20 to 80
MTF3-S5
55
20 to 80
MTF3-S6
55
20 to 80
MTF3-S7
55
20 to 80
MTF3-S8
55
20 to 80
MTF3-S9
55
20 to 80
MTF3-S10
55
20 to 80
MTF3-S11
55
20 to 80
MTF3-S12
55
20 to 80
MTF4-M1
55
20 to 80
MTF4-M2
55
20 to 80
MTF4-M3
55
20 to 80
MTF4-M4
55
20 to 80
Description
Item1
Item2
MTF setting value for R in
vertical scanning direction
(front)
MTF setting value for R in
vertical scanning direction
(center)
MTF setting value for R in
vertical scanning direction
(rear)
MTF setting value for G in
vertical scanning direction
(front)
MTF setting value for G in
vertical scanning direction
(center)
MTF setting value for G in
vertical scanning direction
(rear)
MTF setting value for B in
vertical scanning direction
(front)
MTF setting value for B in
vertical scanning direction
(center)
MTF setting value for B in
vertical scanning direction
(rear)
MTF setting value for K in
vertical scanning direction
(front)
MTF setting value for K in
vertical scanning direction
(center)
MTF setting value for K in
vertical scanning direction
(rear)
MTF specified value for
R in horizontal scanning
direction (front)
MTF specified value for
R in horizontal scanning
direction (center)
MTF specified value for
R in horizontal scanning
direction (rear)
MTF specified value for
G in horizontal scanning
direction (front)
READER ADJUST
Item3
Item4
Initial Appropriate
setting guideline
CCD
MTF4-M5
55
20 to 80
MTF4-M6
55
20 to 80
MTF4-M7
55
20 to 80
MTF4-M8
55
20 to 80
MTF4-M9
55
20 to 80
MTF4-M10
55
20 to 80
MTF4-M11
55
20 to 80
MTF4-M12
55
20 to 80
MTF4-S1
55
20 to 80
MTF4-S2
55
20 to 80
MTF4-S3
55
20 to 80
MTF4-S4
55
20 to 80
MTF4-S5
55
20 to 80
MTF4-S6
55
20 to 80
MTF4-S7
55
20 to 80
MTF4-S8
55
20 to 80
Description
MTF specified value for
G in horizontal scanning
direction (center)
MTF specified value for
G in horizontal scanning
direction (rear)
MTF specified value for
B in horizontal scanning
direction (front)
MTF specified value for
B in horizontal scanning
direction (center)
MTF specified value for
B in horizontal scanning
direction (rear)
MTF specified value for
K in horizontal scanning
direction (front)
MTF specified value for
K in horizontal scanning
direction (center)
MTF specified value for
K in horizontal scanning
direction (rear)
MTF specified value for R in
vertical scanning direction
(front)
MTF specified value for R in
vertical scanning direction
(center)
MTF specified value for R in
vertical scanning direction
(rear)
MTF specified value for
G in vertical scanning
direction (front)
MTF specified value for
G in vertical scanning
direction (center)
MTF specified value for
G in vertical scanning
direction (rear)
MTF specified value for B in
vertical scanning direction
(front)
MTF specified value for B in
vertical scanning direction
(center)
Item1
Item2
Item3
READER FUNCTION CCD
PSCAL
Item4
Initial Appropriate
setting guideline
MTF4-S9
55
20 to 80
MTF4-S10
55
20 to 80
MTF4-S11
55
20 to 80
MTF4-S12
55
20 to 80
OFST-P-K
0
-128 to 128
INSTALL STRD-POS
CCD
CCD-ADJ
DF-WLVL1
DF-WLVL2
MTF-CLC
DF-WLVL3
DF-WLVL4
CLEAR
R-CON
MISC-R SCANLAMP
OPTION
BODY
SENS-CNF
MODELSZ2
0-1
SZDT-SW
DFDST-L1
0-1
0
0 - 16383
Description
Item1
MTF specified value for B in
vertical scanning direction
(rear)
MTF specified value for K in
vertical scanning direction
(front)
MTF specified value for K in
vertical scanning direction
(center)
MTF specified value for K in
vertical scanning direction
(rear)
Density adjustment at test
print scanning
Auto adjustment of CCD/
CIS reading position in
stream reading
Gain adjustment of analog
processor block.
ADF white level adjustment
(platen board cover scan/
stream reading scan)
ADF white level adjustment
(platen board cover scan/
stream reading scan)
not used
FEEDER ADJUST
ADF white level adjustment
(platen board cover scan)
ADF white level adjustment
(DF scan)
Clearing of the backup area
for the reader in the main
controller.
Executing activation of the
scanning lamp
Setting of the document
detection sensor placement
Setting of global support
for document size detection
while the copyboard cover
use
Switching mode from CCD
size detection to photo size
detection during platen
document size detection.
Dirt detection level
adjustment (between
documents) during ADF use
Item2
Item3
USER
Item4
Initial Appropriate
setting guideline
DFDST-L2
0
0 to 16383
KSIZE-SW
0
0 to 1
SIZE-DET
1
0 to 1
DOCST
-50 to 50
LASPEED
-30 to 30
DOCLNGH
-100 to 100
FUNCTION FEEDCHK
CL-CHK
Description
Dirt detection level
adjustment (upon job
completion) during ADF use
Switch supporting Chinese
paper (K sizes)
Document size detection
function ON/OFF setting
Adjusting the original stop
position for ADF pickup
(original tray pickup)
Adjusting the original
feeding speed in stream
reading
Correcting the paper
length in extra length/
indeterminate mode with
ADF
Checking the passage of
paper for ADF
Checking the DF clutch
CL-ON
Starting the clutch operation
FAN-CHK
FAN-ON
Checking the ADF cooling
fan
Starting the fan operation
SL-CHK
Checking the ADF solenoid
SL-ON
Starting the solenoid
operation
Starting the motor operation
MTR-ON
ROLLCLN
FEEDON
ADF roller cleaning mode
Checking the passage of
paper with ADF
T-4-32
■ Numeric Parameter Functional configuration
● <033: Vertical scan magnification correction>
Correct the magnification of vertical scanning of a book. The larger the adjustment value, the
more the image stretches in the vertical scanning direction.
● <034: Horizontal scan magnification correction>
Correct the magnification of horizontal scanning of a book. The larger the adjustment value,
the more the image stretches in the horizontal scanning direction.
● <047: Vertical scan magnification correction (when scanning on a
4-21
4
document fed from ADF)>
Correct the magnification of vertical scanning of a document fed from the ADF. The larger the
2: OFFICIO
adjustment value, the more the image stretches in the vertical scanning direction.
3: E_OFFICIO
● <048: Horizontal scan magnification correction (when scanning on a
document fed from ADF)>
5: A_LTR_R
Correct the magnification of horizontal scanning of a document fed from the ADF. The smaller
2: OFFICIO
the adjustment value, the more the image stretches in the horizontal scanning direction.
● <193: ADF special standard-sized paper: LGL misidentificationready>
"Set to use special standard-sized paper that is not otherwise identifiable to the ADF (because
it is misidentified as "LEGAL").
0 : LEGAL
1 : FOOLSCAP
2 : M_OFICIO
3 : A_FOOLSCAP
4 : FOLIO
4
1: FOOLSCAP
5 : G_LEGAL
6 : A_OFICIO
4: G_LTR_R
0: LTR_R
1: FOOLSCAP
3: E_OFFICIO
4: G_LTR_R
5: A_LTR_R
■ READER
● (#SCAN> READER> DISPLAY> CCD> TARGET-B)
Target value of shading for blue
If the scanned image has some failure, check the target value of shading for blue.
If the machine continues to display 0 (minimum) or FFFF (maximum), there may be some
problem on CCD unit.
Appropriate guideline :1 to 2047
7 : B_OFICIO
● (#SCAN> READER> DISPLAY> CCD> TARGET-G)
8 : OFICIO
Target value of shading for green
9 : E_OFICIO
If the scanned image has some failure, check the target value of shading for green.
If the machine continues to display 0 (minimum) or FFFF (maximum), there may be some
● <194: ADF special standard-sized paper: LTR misidentificationready>
Set to use special standard-sized paper that is not otherwise identifiable to the ADF (because
it is misidentified as "LTR").
0: LTR
1: G_LTR
problem on CCD unit.
Appropriate guideline :1 to 2047
● (#SCAN> READER> DISPLAY> CCD> TARGET-R)
Target value of shading for red
If the scanned image has some failure, check the target value of shading for red.
2: A_LTR
If the machine continues to display 0 (minimum) or FFFF (maximum), there may be some
● <195: ADF special standard-sized paper: LTR_R misidentificationready>
Appropriate guideline :1 to 2047
Set to use special standard-sized paper that is not otherwise identifiable to the ADF (because
it is misidentified as "LTRR").
0: LTR_R
4-22
problem on CCD unit.
● (#SCAN> READER> DISPLAY> CCD> OFST-B)
Adjustment value of offset level on CCD (blue)
● (#SCAN> READER> DISPLAY> CCD> OFST-G)
Adjustment value of offset level on CCD (green)
● (#SCAN> READER> DISPLAY> CCD> OFST-R)
● (#SCAN> READER> I/O> R-CON> P001)
The P001 port indication of the reader relay PCB
Display the I/O state of the sensor of the reader unit.
Adjustment value of offset level on CCD (red)
● (#SCAN> READER> DISPLAY> CCD> OFST-O)
Adjustment value of offset level in odd bit on CCD
● (#SCAN> READER> DISPLAY> CCD> OFST-E)
Adjustment value of offset level in even bit on CCD
To judge if this adjustment value is correct when an image fault attributed to CCD occurs.
Appropriate guideline: 0 to 255
● (#SCAN> READER> DISPLAY> CCD> GAIN-B)
Adjustment value of gain level on CCD (blue)
Bit
Name
Bit0
Bit1
Copyboard cover open/closed 1: Open
sensor 1 (S26)
CCD HP sensor (S22)
1: HP
Bit2
Not used.
1: Open
Bit3
Copyboard cover open/closed
sensor 0 (S21)
Sub scanning original size
sensor 0 (S24/29)
Sub scanning original size
sensor 1 (S25/28)
Sub scanning original size
sensor 2 (S23)
Sub scanning original size
sensor 3 (S27)
Not used.
1: Document present
Bit4
Bit5
Bit6
Bit7
Bit8 - 15
Display contents
Remarks
ADF open angle: 15
degrees
1: Document present
ADF open angle: 25
degrees or 5 degrees
1: Document present
1: Document present
1: Document present
Sensor for market-related
measures
Sensor for market-related
measures
● (#SCAN> READER> DISPLAY> CCD> GAIN-G)
Adjustment value of gain level on CCD (green)
● (#SCAN> READER> DISPLAY> CCD> GAIN-R)
Adjustment value of gain level on CCD (red)
● (#SCAN> READER> DISPLAY> CCD> GAIN-O)
Adjustment value of gain level in odd bit on CCD
● (#SCAN> READER> DISPLAY> CCD> GAIN-E)
Adjustment value of gain level in even bit on CCD
To judge if this adjustment value is correct when an image fault attributed to CCD occurs.
Appropriate guideline: 0 to 255
T-4-33
● (#SCAN> READER> I/O> FEEDER> P001)
The P001 port indication of the ADF driver PCB
4
Display the I/O state of the sensor of the ADF unit.
Bit
Name
Display contents
Bit0
Bit1
Bit2
Bit3
Bit4
Bit5
Bit6
Bit7
Bit8
Bit9
Bit10
Bit11
Bit12
Bit13
Document tray width sensor 2 (PS2)
Document tray width sensor 1 (PS1)
Not used.
ADF fan (FM1) motor lock detection
Delivery reversal sensor (SR3)
Read sensor (SR2)
Timing sensor (SR4)
Registration sensor (SR1)
Document length sensor 2 (SR8)
Document length sensor 1 (SR7)
Release motor HP sensor (SR11)
Cover open/closed sensor (SR6)
Last document detection sensor (SR7)
Document set sensor (SR5)
1: Document present
1: Document present
Remarks
1: Locked
1: Document present
1: Document present
1: Document present
1: Document present
1: Document present
0: relaease
0: Open
1: Document present
0: Document present
T-4-34
● (#SCAN> READER> ADJUST> ADJ-XY> ADJ-X)
Adjustment of scanning system image lead edge position (image's scan-start position in
4-23
vertical scanning direction)
0.1mm shift of image scan-start position toward the trail edge direction by 1-increment in the
setting.
Note:
Be sure to enter the value on service label when replacing the CCD unit.
If changing the setting value of this item, be sure to Note the changed value on the
service label.
Note:
Be sure to enter the value on service label when replacing the CCD unit.
If changing the setting value of this item, be sure to Note the changed value on the
service label.
● (#SCAN> READER> ADJUST> ADJ-XY> STRD-POS)
Adjustment of CCD/CIS scan position at stream-reading mode with DF
This item must not be normally used.
● (#SCAN> READER> ADJUST> ADJ-XY> ADJ-Y)
Adjustment value of image scan-start position <Y-direction>
0.1mm shift of image scan-start position toward the trail edge direction by 1-increment in the
Note:
Be sure to enter the value on service label when replacing the CCD unit.
If changing the setting value of this item, be sure to Note the changed value on the
service label.
setting.
Note:
Be sure to enter the value on service label when replacing the CCD unit.
If changing the setting value of this item, be sure to Note the changed value on the
service label.
● (#SCAN> READER> ADJUST> ADJ-XY> ADJ-X-MG)
Fine adjustment of magnification ration in vertical scanning when scanning with reader
copyboard
Execute fine adjustment of vertical scanning magnification ratio when scanning with reader
copyboard.
4
● (#SCAN> READER> ADJUST> ADJ-XY> ADJ-S)
Adjustment of CCD/CIS scan-start cell position (image scan-start position in horizontal
scanning direction)
Adjust the position to measure data for shading correction with standard white plate. This item
must not be normally used.
Note:
Be sure to enter the value on service label when replacing the CCD unit.
If changing the setting value of this item, be sure to Note the changed value on the
service label.
0.1mm shift of image scan-start position toward the front direction by 1-increment in the
setting value.
Note:
Be sure to enter the value on service label when replacing the CCD unit.
If changing the setting value of this item, be sure to Note the changed value on the
service label.
● (#SCAN> READER> ADJUST> CCD> W-PLT-X)
White label data entry with standard white plate
● (#SCAN> READER> ADJUST> ADJ-XY> ADJ-Y-DF)
● (#SCAN> READER> ADJUST> CCD> W-PLT-Y)
Adjustment of horizontal scanning position at feeder mode.
White label data (Y) entry with standard white plate
0.1mm shift of image scan-start position toward the front direction by 1-increment in the
setting value.
● (#SCAN> READER> ADJUST> CCD> W-PLT-Z)
White label data (Z) entry with standard white plate
This item must not be normally used.
4-24
Note:
Be sure to enter the value on service label when replacing the CCD unit.
Be sure to enter the numeric value on copyboard glass when replacing the copyboard
glass.
If changing the setting value of this item, be sure to write down the changed value on
the service label.
● (#SCAN> READER> ADJUST> CCD> SH-TRGT)
Shading target value of the standard white plate (backup)
This item must not be normally used.
● (#SCAN> READER> ADJUST> CCD> 50_RG)
Color displacement (G-R) offset value display at BOOK mode/50% scanning
● (#SCAN> READER> ADJUST> CCD> 50_GB)
Color displacement (G-B) offset value display at BOOK mode/50% scanning
● (#SCAN> READER> ADJUST> CCD> 100_RG)
Color displacement (G-R) offset value display at BOOK mode/100% scanning
● (#SCAN> READER> ADJUST> CCD> 100_GB)
Color displacement (G-B) offset value display at BOOK mode/100% scanning
This item must not be normally used.
Note:
Be sure to enter the value on service label when executing RAM clear of the reader
controller PCB/replacing the reader controller PCB.
If changing the setting value of this item, be sure to write down the changed value on
the service label.
Color displacement (G-R) offset value display at ADF mode/100% scanning
● (#SCAN> READER> ADJUST> CCD> 100DF_GB)
Color displacement (G-B) offset value display at ADF mode/100% scanning
This item must not be normally used.
Note:
Be sure to enter the value on service label when executing RAM clear of the reader
controller PCB/replacing the reader controller PCB.
If changing the setting value of this item, be sure to write down the changed value on
the service label.
● (#SCAN> READER> ADJUST> CCD> DFTAR-R)
Shading target value (RED) entry when using DF (normal document scanning position)
● (#SCAN> READER> ADJUST> CCD> DFTAR-G)
Shading target value (GREEN) entry when using DF (normal document scanning position)
● (#SCAN> READER> ADJUST> CCD> DFTAR-B)
Shading target value (BLUE) entry when using DF (normal document scanning position)
This item must not be normally used.
● (#SCAN> READER> ADJUST> CCD> CCD-CHNG)
CCD replacement flag
Set this mode when CCD replacement is completed.
● (#SCAN> READER> ADJUST> CCD> DFTAR-K)
Black shading target value when using DF
This item must not be normally used.
In case of image fault (due to chart soil, etc) after executing: SCAN > READER > FUNCTION
● (#SCAN> READER> ADJUST> CCD> 50DF_RG)
Color displacement (G-R) offset value display at ADF mode/50% scanning
● (#SCAN> READER> ADJUST> CCD> 50DF_GB)
Color displacement (G-B) offset value display at ADF mode/50% scanning
● (#SCAN> READER> ADJUST> CCD> 100DF_RG)
> CCD > DFWLVL1/ DF-WLVL2; enter the factory measurement value using this mode.
● (#SCAN> READER> ADJUST> CCD> MTF3-M1)
MTF setting value for R in horizontal scanning direction (front)
● (#SCAN> READER> ADJUST> CCD> MTF3-M2)
MTF setting value for R in horizontal scanning direction (center)
4-25
4
MTF setting value for K in horizontal scanning direction (rear)
● (#SCAN> READER> ADJUST> CCD> MTF3-M3)
MTF setting value for R in horizontal scanning direction (rear)
● (#SCAN> READER> ADJUST> CCD> MTF3-M4)
MTF setting value for G in horizontal scanning direction (front)
This item must not be normally used.
● (#SCAN> READER> ADJUST> CCD> MTF3-S1)
MTF setting value for R in vertical scanning direction (front)
● (#SCAN> READER> ADJUST> CCD> MTF3-S2)
MTF setting value for R in vertical scanning direction (center)
● (#SCAN> READER> ADJUST> CCD> MTF3-M5)
MTF setting value for G in horizontal scanning direction (center)
● (#SCAN> READER> ADJUST> CCD> MTF3-S3)
MTF setting value for R in vertical scanning direction (rear)
● (#SCAN> READER> ADJUST> CCD> MTF3-M6)
MTF setting value for G in horizontal scanning direction (rear)
● (#SCAN> READER> ADJUST> CCD> MTF3-S4)
MTF setting value for G in vertical scanning direction (front)
● (#SCAN> READER> ADJUST> CCD> MTF3-M7)
MTF setting value for B in horizontal scanning direction (front)
● (#SCAN> READER> ADJUST> CCD> MTF3-S5)
MTF setting value for G in vertical scanning direction (center)
● (#SCAN> READER> ADJUST> CCD> MTF3-M8)
MTF setting value for B in horizontal scanning direction (center)
4
● (#SCAN> READER> ADJUST> CCD> MTF3-S6)
MTF setting value for G in vertical scanning direction (rear)
● (#SCAN> READER> ADJUST> CCD> MTF3-M9)
MTF setting value for B in horizontal scanning direction (rear)
● (#SCAN> READER> ADJUST> CCD> MTF3-S7)
This item must not be normally used.
MTF setting value for B in vertical scanning direction (front)
Note:
Be sure to enter the value on service label when executing RAM clear of the CCD unit
/ replacing the CCD unit.
If changing the setting value of this item, be sure to write down the changed value on
the service label.
● (#SCAN> READER> ADJUST> CCD> MTF3-S8)
MTF setting value for B in vertical scanning direction (center)
● (#SCAN> READER> ADJUST> CCD> MTF3-S9)
MTF setting value for B in vertical scanning direction (rear)
● (#SCAN> READER> ADJUST> CCD> MTF3-M10)
MTF setting value for K in horizontal scanning direction (front)
● (#SCAN> READER> ADJUST> CCD> MTF3-M11)
MTF setting value for K in horizontal scanning direction (center)
● (#SCAN> READER> ADJUST> CCD> MTF3-M12)
4-26
● (#SCAN> READER> ADJUST> CCD> MTF3-S10)
MTF setting value for K in vertical scanning direction (front)
● (#SCAN> READER> ADJUST> CCD> MTF3-S11)
MTF setting value for K in vertical scanning direction (center)
● (#SCAN> READER> ADJUST> CCD> MTF3-S12)
MTF setting value for K in vertical scanning direction (rear)
MTF specified value for K in horizontal scanning direction (rear)
This item must not be normally used.
This item must not be normally used.
● (#SCAN> READER> ADJUST> CCD> MTF4-M1)
● (#SCAN> READER> ADJUST> CCD> MTF4-S1)
MTF specified value for R in horizontal scanning direction (front)
MTF specified value for R in vertical scanning direction (front)
● (#SCAN> READER> ADJUST> CCD> MTF4-M2)
● (#SCAN> READER> ADJUST> CCD> MTF4-S2)
MTF specified value for R in horizontal scanning direction (center)
MTF specified value for R in vertical scanning direction (center)
● (#SCAN> READER> ADJUST> CCD> MTF4-M3)
● (#SCAN> READER> ADJUST> CCD> MTF4-S3)
MTF specified value for R in horizontal scanning direction (rear)
MTF specified value for R in vertical scanning direction (rear)
● (#SCAN> READER> ADJUST> CCD> MTF4-M4)
● (#SCAN> READER> ADJUST> CCD> MTF4-S4)
MTF specified value for G in horizontal scanning direction (front)
MTF specified value for G in vertical scanning direction (front)
● (#SCAN> READER> ADJUST> CCD> MTF4-M5)
● (#SCAN> READER> ADJUST> CCD> MTF4-S5)
MTF specified value for G in horizontal scanning direction (center)
MTF specified value for G in vertical scanning direction (center)
● (#SCAN> READER> ADJUST> CCD> MTF4-M6)
● (#SCAN> READER> ADJUST> CCD> MTF4-S6)
MTF specified value for G in horizontal scanning direction (rear)
MTF specified value for G in vertical scanning direction (rear)
● (#SCAN> READER> ADJUST> CCD> MTF4-M7)
● (#SCAN> READER> ADJUST> CCD> MTF4-S7)
MTF specified value for B in horizontal scanning direction (front)
MTF specified value for B in vertical scanning direction (front)
● (#SCAN> READER> ADJUST> CCD> MTF4-M8)
● (#SCAN> READER> ADJUST> CCD> MTF4-S8)
MTF specified value for B in horizontal scanning direction (center)
MTF specified value for B in vertical scanning direction (center)
● (#SCAN> READER> ADJUST> CCD> MTF4-M9)
● (#SCAN> READER> ADJUST> CCD> MTF4-S9)
MTF specified value for B in horizontal scanning direction (rear)
MTF specified value for B in vertical scanning direction (rear)
● (#SCAN> READER> ADJUST> CCD> MTF4-M10)
● (#SCAN> READER> ADJUST> CCD> MTF4-S10)
MTF specified value for K in horizontal scanning direction (front)
MTF specified value for K in vertical scanning direction (front)
● (#SCAN> READER> ADJUST> CCD> MTF4-M11)
● (#SCAN> READER> ADJUST> CCD> MTF4-S11)
MTF specified value for K in horizontal scanning direction (center)
MTF specified value for K in vertical scanning direction (center)
● (#SCAN> READER> ADJUST> CCD> MTF4-M12)
● (#SCAN> READER> ADJUST> CCD> MTF4-S12)
4
4-27
MTF specified value for K in vertical scanning direction (rear)
This item must not be normally used.
● (#SCAN> READER> ADJUST> PASCAL> OFST-P-K)
● (#SCAN> READER> FUNCTION> CCD> MTF-CLC)
Calculating the MTF filter count to be set in ASICS based on the MTF value
Set the following item; SCAN>READER>ADJUST>CCD>CCD-CHN (new item) when
replacing the CCD.
Density adjustment at test print scanning
Execute offset adjustment for test print scanning signal in PASCAL control at auto gradation
correction. (full correction)
● (#SCAN> READER> FUNCTION> INSTALL> STRD-POS)
Auto adjustment of CCD/CIS reading position in stream reading
● (#SCAN> READER> FUNCTION> CCD> DF-WLVL3)
ADF white level adjustment (platen board cover scan)
MEMO:
Scan a blank sheet on the platen and adjust the white level.
When installing the DF, or removing the ADF and reinstalling it.
● (#SCAN> READER> FUNCTION> CCD> CCD-ADJ)
Gain adjustment of analog processor block.
When installing the DF, or removing the ADF and reinstalling it.
Reflect the LED lamp beam on the standard white plate to correct CCD shading.
● (#SCAN> READER> FUNCTION> CCD> DF-WLVL4)
ADF white level adjustment. (DF scan)
MEMO:
Scan a blank sheet in stream reading mode and adjust the white. level.
Execute this after replacing the CCD unit.
4
● (#SCAN> READER> FUNCTION> CCD> DF-WLVL1)
● (#SCAN> READER> FUNCTION> CLEAR> R-CON)
ADF white level adjustment (platen board cover scan/stream reading scan)
Clearing of the backup area for the reader in the main controller.
Clear the backup area for the reader in the main controller.
● (#SCAN> READER> FUNCTION> CCD> DF-WLVL2)
ADF white level adjustment (platen board cover scan/stream reading scan)
● (#SCAN> READER> FUNCTION> MISC-R> SCANLAMP)
1) Place a paper that users normally use on the copyboard glass and execute the following
The test checks to see if the scanning lamp is on or not.
item;
Execute the when replacing the scanning lamp.
SCAN > READER > FUNCTION > CCD > DFWLVL1/ DF-WLVL2
: Read the white level in BOOK mode. (Check the transparency of the glass for BOOK mode.)
2) Set a paper that users normally use and execute the following item;
SCAN > READER > FUNCTION > CCD > DFWLVL1/ DF-WLVL2
: Read the white level in DF mode (stream reading). (Check the transparency of the glass for
stream reading.)
(Read the both sides of chart.)
Reading the face: Calculate DFTAR-R
Note:
Be sure to execute these two items (DF-WLVL1/DF-WLVL2) simultaneously.
● (#SCAN> READER> OPTION> BODY> SENS-CNF)
Setting of the document detection sensor placement.
The setting of document detection size is selected in accordance with the document sensor
placement.
0: AB type
1: Inch type
● (#SCAN> READER> OPTION> BODY> MODELSZ2)
Setting of global support for document size detection while the copyboard cover use.
This item is used when supporting individual users (mixed stacking of AB/Inch type
documents). Turn ON/OFF the global support for document size detection while the
4-28
copyboard cover is being used.
OFF.
This item must not be normally used. When both AB and Inch type documents are stacked
together, a separate document size sensor (photosensor) is required for the document size to
be detected properly.
When the item is set to '1', the document size is not detected while the platen is opened or
closed. (The document lighting lamp does not light.)
0: Normal (detection operation by detected size for each destination)
1: Detection of stacking of both AB and Inch type documents
● (#SCAN> READER> OPTION> BODY> SZDT-SW)
Switching mode from CCD size detection to photo size detection during platen document size
detection.
When the scanning lamp is dazzling, switch the size detection mode of the CCD unit to the
photo sensor detection mode. A photo sensor must be installed separately.
● (#SCAN> READER> OPTION> BODY> DFDST-L1)
Dirt detection level adjustment (between documents) during ADF use.
● (#SCAN> READER> OPTION> BODY> DFDST-L2)
Dirt detection level adjustment (upon job completion) during ADF use.
Increase the value when dirt fails to be detected, resulting in black streaks. However, if the
value is increased too much, even small-sized dirt of the kind which does not appear on the
image will also be detected, and the cleaning instruction screen may appear frequently.
Reduce the value if users complain because the cleaning instruction screen which appears
when dirt is detected is displayed frequently. Conversely, if the value is reduced too much,
black streaks may appear on the images.
When '0' is set, the correction control function used when dirt is detected is canceled.
● (#SCAN> READER> OPTION> BODY> KSIZE-SW)
Switch supporting Chinese paper (K sizes)
This item is used when K size paper is used. Detect and display Chinese paper (8K, 16K).
0: K size paper is not supported.
1: K size paper is supported.
● (#SCAN> READER> OPTION> USER> SIZE-DET)
Document size detection function ON/OFF setting
This item is used when the user asks for the item to be provided (as a means to remedy the
● (#SCAN> READER> OPTION> USER> SIZE-DET)
Document size detection function ON/OFF setting
When requested by the user (the scanning lamp is dazzling). Turn ON/OFF the document
size detection function.
● (#SCAN> FEEDER> ADJUST> DOCST)
Adjusting the original stop position for ADF pickup (original tray pickup)
Delivering the original enables the setting. Be sure to press the OK key to deliver the original.
When changing the setting, input the setting on the main station service label.
The larger the value, the smaller the leading edge margin.
● (#SCAN> FEEDER> ADJUST> LA-SPEED)
Adjusting the original feeding speed in stream reading
Use this mode to adjust the original feeding speed in stream reading mode.
The larger the setting, the faster the speed (the image reduced).
● (#SCAN> FEEDER> ADJUST> DOC-LNGH)
Correcting the paper length in extra length/indeterminate mode with ADF
Use this mode when installing the ADF. (to correct errors in detecting the paper length in extra
length/indeterminate mode with ADF)
● (#SCAN> FEEDER> FUNCTION> MTR-CHK)
Operation check for the ADF motor, etc.
Specify a motor to perform an operation check. Select #SCAN> FEEDER> FUNCTION>
MTR-ON to execute this.
0:Pickup/ Feed motor (M1)
1:Release motor (M2)
● (#SCAN> FEEDER> FUNCTION> FEED-CHK)
Checking passage of paper by the ADF
Specify a paper feed mode to check the DF for paper passage. Select #SCAN> FEEDER>
FUNCTION> FEED-ON to execute this.
0:1-sided
1:2-sided
glare from the document lighting lamp). Set the document size detection function to ON and
4-29
4
#PRINT
● (#SCAN> FEEDER> FUNCTION>CL-CHK)
Checking the DF clutch
DSpecify a clutch to perform a clutch check. Select #SCAN>FEEDER > FUNCTION > CL-ON
■ Numerin Parameter Settings (Numeric Prama.)
to execute this.
Item
● (#SCAN> FEEDER> FUNCTION> CL-ON)
Starting the clutch operation
Selecting 1 starts clutch operation.
● (#SCAN> FEEDER> FUNCTION> FAN-CHK)
Checking the ADF cooling fan
Specify a fan to perform a fan check. Select #SCAN> FEEDER> FUNCTION> FAN-ON to
execute this.
● (#SCAN> FEEDER> FUNCTION> FAN-ON)
Starting the fan operation
Selecting 1 starts fan operation.
● (#SCAN> FEEDER> FUNCTION> SL-CHK)
4
Checking the ADF solenoid
Specify a solenoid to perform a solenoid check. Select #SCAN>FEEDER > FUNCTION > SLON to execute this.
0: Pressure solenoid (SL1)
1: Stamp solenoid (SL2)
● (#SCAN> FEEDER> FUNCTION> MTR-ON)
Starting the motor operation
Selecting 1 starts motor operation.
● (#SCAN> FEEDER> FUNCTION> ROLL-ON)
No.
Default
Setting range
#PRINT
SW01- SW13
00000100
NUMERIC SW14:
SW15: SW17
SW18:
00000100
SW19: - 50
#PRINT
01: - 30
100
-128 to 127, one
NUMERIC 34:
unit = 0.1 mm
35:
100
-128 to 127, one
unit = 0.1 mm
36:
100
-128 to 127, one
unit = 0.1 mm
37:
100
-128 to 127, one
unit = 0.1 mm
38:
100
-128 to 127, one
unit = 0.1 mm
39: - 52:
53:
25
0 to 9999, one
unit = 0.1 mm
54:
25
0 to 9999, one
unit = 0.1 mm
55:
25
0 to 9999, one
unit = 0.1 mm
56:
25
0 to 9999, one
unit = 0.1 mm
57:
58:
145
-128 to 127, one
unit = 0.1 mm
59:
163
-128 to 127, one
unit = 0.1 mm
60:
61:
145
-128 to 127, one
unit = 0.1 mm
62:
7
0 to 14
ADF roller cleaning mode
63:
7
0 to 14
Rotate the roller with the motor and attach a lint-free paper moistened with alcohol to the
64:
2
0 to 4
65:
66:
67:- 135:
136:
0
0
0 to 2
0 to 3
1000
-512 to 512
roller to clean it.
● (#SCAN> FEEDER> FUNCTION> FEED-ON)
Checking the passage of paper with ADF
Selecting 1 starts checking passage of paper by the ADF.
4-30
137:- 139:
Function
Not used
Special mode setting
Not used
Special mode setting
Not used
Not used
Left-end registration adjustment (manual
feed tray)
Left-end registration adjustment (cassette 1)
Left-end registration adjustment (cassette 2)
Left-end registration adjustment (cassette 3)
Left-end registration adjustment (cassette 4)
Not used
Adjustment of margin at leading edge of
copy
Adjustment of margin at trailing edge of
copy
Adjustment of margin at right edge of copy
Adjustment of margin at left edge of copy
Not used
Adjustment of the registration loop volume
(Manual tray)
Adjustment of the registration loop volume
(Cassette)
Not used
Adjustment of the registration loop volume
(Duplex unit)
Temperature adjustment UP/DOWN mode
(For normal paper)
Temperature adjustment UP/DOWN mode.
(For thick paper)
Mode for preventing the end temperature
rise
Mode for reducing sand image
Temperature/ Humidity sensor fixed mode
Not used
Adjustment of the point to start writing in
main scanning direction (A)
Not used
Item
Default
Setting range
Function
#PRINT
140:
NUMERIC
141:
No.
100
142:
100
143:
100
144:
100
-128 to 127, one
unit = 0.1 mm
-128 to 127, one
unit = 0.1 mm
-128 to 127, one
unit = 0.1 mm
-128 to 127, one
unit = 0.1 mm
-128 to 127, one
unit = 0.1 mm
-512 to 511
Left-end registration adjustment (doublesided small)
Left-end registration adjustment (doublesided large)
Adjustment of margin at leading edge at
normal speed (230mm/sec)
Adjustment of margin at leading edge at half
speed (137mm/sec)
Laser trail edge OFF adjustment
100
145:
1000
146:
147:
148:
1000
1000
1000
149:
150:
151:
152:
153:
154:
1000
1000
100
100
100
100
155:
100
156:
100
157:
158:-164:
165:
166:
7
167: 172:
173:
0
7
7
174:
175:-177:
178:
179:
0
180:
7
1
7
Adjustment of the magnification to write
image in main scanning direction (A-B)
-512 to 511
Not used
-512 to 511
Not used
-512 to 511
Adjustment of the point to start writing in
main scanning direction (A-B)
-512 to 511
Not used
-512 to 511
Not used
-128 to 127
Developing bias offset for DC
-128 to 127
Primary charge offset for DC
-128 to 127
Primary charge offset for AC
-128 to 127, one Adjustment of the registration loop volume
unit = 0.1 mm
(Thick paper)
-128 to 127, one Adjustment of the registration loop volume
unit = 0.1 mm
(Special paper)
-128 to 127, one Adjustment of the registration loop volume
unit = 0.1 mm
(Envelop cassette pickup)
0 to 14
Pickup timing adjustment
Not used
0 to 3
Fixing auto cleaning frequency setting
0 to 14
Temperature adjustment UP/DOWN mode
(Plain paper, manual feed tray)
Not used
0 to 14
Temperature adjustment UP/DOWN mode
(2nd page of double-sided printing)
0 to 1
Reduction in FCOT
Not used
0 to 1
Not used
0 to 14
Temperature adjustment UP/DOWN mode
(Envelop/Postcard)
0 to 14
Temperature adjustment UP/DOWN mode
(Special mode N)
T-4-35
Item1
Item2
#PRINT CAS1
CST
Item3
Default Setting range
CAS1-U1 0
CAS1-U2 0
CAS1-U3 0
CAS2
CAS1-U4 0
CAS2-U1 0
CAS2-U2 0
CAS2-U3 0
CAS3
CAS2-U4 0
CAS3-U1 0
CAS3-U2 0
CAS3-U3 0
CAS4
CAS3-U4 0
CAS4-U1 0
CAS4-U2 0
CAS4-U3 0
CAS4-U4 0
Function
26: OFI, 27: E-OFI, 37: M-OFI, Cassette 1paper size
36: A-OFI, 24: FLSP, 25: A-FLSP, group special, standard30: A-LTRR, 42: FA4, 34: G-LGL size paper entry
0: default
32: G-LTR-R, 34: G-LGL, 23:
K-LGL-R, 0: default
22: K-LGL, 31: G-LTR, 29: A-LTR,
0: default
28: B-OFI, 0: default
26: OFI, 27: E-OFI, 37: M-OFI, Cassette 2 paper size
36: A-OFI, 24: FLSP, 25: A-FLSP, group special, standard30: A-LTRR, 42: FA4, 34: G-LGL size paper entry
0: default
32: G-LTR-R, 34: G-LGL, 23:
K-LGL-R, 0: default
22: K-LGL, 31: G-LTR, 29: A-LTR,
0: default
28: B-OFI, 0: default
26: OFI, 27: E-OFI, 37: M-OFI, Cassette 3paper size
36: A-OFI, 24: FLSP, 25: A-FLSP, group special, standard30: A-LTRR, 42: FA4, 34: G-LGL size paper entry
0: default
32: G-LTR-R, 34: G-LGL, 23:
K-LGL-R, 0: default
22: K-LGL, 31: G-LTR, 29: A-LTR,
0: default
28: B-OFI, 0: default
26: OFI, 27: E-OFI, 37: M-OFI, Cassette 4 paper size
36: A-OFI, 24: FLSP, 25: A-FLSP, group special, standard30: A-LTRR, 42: FA4, 34: G-LGL size paper entry
0: default
32: G-LTR-R, 34: G-LGL, 23:
K-LGL-R, 0: default
22: K-LGL, 31: G-LTR, 29: A-LTR,
0: default
28: B-OFI, 0: default
T-4-36
■ Service Soft Switch Settings (PRINTER)
● SSSW-SW14
List of Functions
Bit
Function
1
0
0
1
2
3
4
Transfer bias pressure reduction mode
not used
Black belt addition mode
Post-rotation reduction mode
Flicker reduction mode
Enable
Enable
Enable
Enable
Disable
Disable
Disable
Disable
4-31
4
Bit
Function
1
0
● SSSW-SW18
5
6
7
not used
not used
not used
-
-
List of Functions
T-4-37
Detailed Discussions of Bit 0
Select whether to enable or disable transfer bias pressure reduction mode.
Select "Enable" to avoid image defects (black spots) produced by transfer bias leaks
occurring in a low-pressure region, such as one at a high altitude. This setting regulates the
transfer bias to keep it from exceeding a predetermined level during printing.
Bit
Function
1
0
0
1
2
3
4
5
6
7
not used
not used
Thin postcard mode
not used
not used
not used
not used
not used
Enable
-
Disable
-
Detailed Discussions of Bit 2
Select whether to enable or disable black belt addition mode. If the user uses paper that causes
Detailed Discussions of Bit 2
fixed toner on paper to be fused and adhered to drum, selecting "Yes" will clean the drum by
When the postcard size is selected, "Thin postcard" can be selected in addition to "Postcard",
forming a black band on the drum surface during the reverse rotation which is performed after
"Return postcard", and "4 on 1card". Selecting "Enable" allows you to specify "Thin postcard".
printing on 50 sheets.
4
T-4-38
■ List of Functions
Caution:
● <034: Left-end registration adjustment (manual feed tray)>
Implementation of this mode could result in a drum life falling short of its life
expectancy.
adjustment value, the wider the left-end margin of the image becomes.
Detailed Discussions of Bit 3
Select whether to enable or disable post-rotation reduction mode. Selecting "Enable" will
reduce the noise caused by the polygon motor by stopping the motor immediately after postrotation.
Discussions of Bit 4
Select whether to enable or disable flicker reduction mode. Select "Enable" and enter a count
to modify fusing temperature control to cancel fluorescent flicking during printing.
Adjust the left-end registration margin of paper picked from a manual feed tray. The larger the
● <035: Left-end registration adjustment (cassette 1)>
Adjust the left-end registration margin of paper picked from cassette 1. The larger the
adjustment value, the wider the left-end margin of the image becomes.
● <036: Left-end registration adjustment (cassette 2)>
Adjust the left-end registration margin of paper picked from cassette 2. The larger the
adjustment value, the wider the left-end margin of the image becomes.
● <037: Left-end registration adjustment (cassette 3)>
Adjust the left-end registration margin of paper picked from cassette 3. The larger the
Cauition:
Implementation of this mode would degrade the throughput.
adjustment value, the wider the left-end margin of the image becomes.
● <038: Left-end registration adjustment (cassette 4)>
Adjust the left-end registration margin of paper picked from cassette 4. The larger the
adjustment value, the wider the left-end margin of the image becomes.
4-32
● <053: Margin adjustment at the leading edge of the copy>
Adjust the margin at the leading edge of the copy. Increasing the value makes the margin at
the leading edge larger.
3 - 11: +12 to -15˚C (in steps of 3˚C)
12- 14: -15˚C
● <063: Temperature adjustment UP/DOWN mode. (For rough paper)>
The temperature adjustment offset relative to the target fixing temperature of thick paper can
● <054: Margin adjustment at the trailing edge of the copy>
Adjust the margin at the trailing edge of the copy. Increasing the value makes the margin at
be changed in steps of 3˚C. Use this parameter when the fixing performance is low or when it
is necessary to prevent the paper from slipping or being curled.
the trailing edge larger.
Thick paper: Thick paper mode, thick paper H mode, bond mode
● <055: Margin adjustment at the right edge of the copy>
3 - 11: +12 to -15˚C (in steps of 3˚C)
Adjust the margin at the right edge of the copy. Increasing the value makes the margin at the
right edge larger.
● <056: Margin adjustment at the left edge of the copy>
Adjust the margin at the left edge of the copy. Increasing the value makes the margin at the
left edge larger.
● <058: Adjustment of the registration loop volume (Manual feed tray)>
If there is a registration loop noise and abrasion while feeding the paper from the manual feed
tray, registration loop noise and abrasion could be reduced by adjusting the volume of the
registration loop. By making the value larger, loop volume will become bigger.
● <059: Adjustment of the registration loop volume. (Cassette)>
If there is a registration loop noise and abrasion while feeding the paper from the cassette,
registration loop noise and abrasion could be reduced by adjusting the volume of the
registration loop. By making the value larger, loop volume will become bigger.
● <061: Adjustment of the registration loop volume. (Duplex unit)>
0 - 2: +15˚C
12 - 14: -15˚C
● <064: Mode for preventing the temperature rise of the end>
User this parameter to reduce the frequency of entering the throughput down mode, suppress
edge temperature rise, or prevent soiling due to the high temperature offset.
Add/subtract the threshold of the difference in detection temperature between the sub
thermistor 1 (2) that starts the full speed operation of the end cooling fan and the sub
thermistor 1 (2) that starts the down sequence to/from default threshold temperature.
0 - 4: +20 to -20˚C (in steps of 10˚C)
● <065: Mode for reducing sand image>
Set when sand image *1 has occurred on the print image.
Restraining the scatter of the toner by increasing the electric current of the AC electrification;
the sand image could be reduced.
Sand image *1: Multiple black dots and white dots appear on half tone. Or multiple black dots
appear on white background.
0: Normal.
1 to 3: Reducing mode. (Same operation to set 1 to 3)
2: Make the print density lower. Set the initial rotation time for fixing to 3 seconds. Does not
If there is a registration loop noise and abrasion while feeding the paper from the duplex
do it if the initial rotation elongation time has been set to 3 seconds or longer in another
unit, registration loop noise and abrasion could be reduced by adjusting the volume of the
service mode.
registration loop. By making the value larger, loop volume will become bigger.
● <062:Temperature adjustment UP/DOWN mode. (For plain paper)>
● <066: Temperature/ Humidity sensor fixed mode>
Changing to high-pressure environment by using the temperature/ humidity sensor. But when
The temperature adjustment offset relative to the target fixing temperature of plain paper can
there is an image trouble at the point of changing the environment,
be changed in steps of 3˚C. Use this parameter when the fixing performance is low or when it
fix the temperature and the humidity and do not allow the change of the high-pressure output.
is necessary to prevent the paper from slipping or being curled.
0: Normal
Plain paper: Plain paper mode, thin paper mode, S thin paper mode, OHP mode
1: Fixed environment of LL. (Temperature of 18 deg C and humidity of 20%)
0 - 2: +15˚C
2. Fixed environment of NN. (Temperature of 18-28 deg C and humidity of 20-75%)
4-33
4
3. Fixed environment of HH. (Temperature of 28 deg C and humidity of 80%)
2: Make the print density lower. Set the forward rotation time for fixing to 3 seconds. Does not
do it if the forward rotation elongation time has been set to 3 seconds or longer in another
service mode.
● <136: Adjustment of the point to start writing in laser's main scanning
direction (A)>
When replacing the laser unit, enter the unit-specific delay value shown on the label affixed to
the unit.
● <140: Left-end registration adjustment (double-sided small) >
Adjust the left-end registration margin needed when the duplex feeding unit picks up paper
(small paper). Incrementing the value by 1 increases the left-end margin of the image by 0.1
mm.
● <141: Left-end registration adjustment (double-sided large)>
Adjust the left-end registration margin needed when the duplex feeding unit picks up paper
(large paper). Incrementing the value by 1 increases the left-end margin of the image by 0.1
mm.
4
● <142: Adjustment of margin at leading edge at normal speed (230mm/
sec)>
Adjust the margin at the leading edge (registration roller clutch ON timing) at normal speed.
Adjust the leading-edge registration margin needed at pickup. Increasing the value makes the
margin at the leading edge of the copy larger.
● <143: Adjustment of margin at leading edge at half speed (137mm/
sec)>
Adjust the margin at the leading edge (registration roller clutch ON timing) at half speed.
Adjust the leading-edge registration margin needed at pickup (large paper). Increasing the
value makes the margin at the leading edge of the copy larger.
● <145: Adjustment of the magnification to write image in laser's main
scanning direction (A-B)>
Magnification between lasers A and B
Amount of adjustment of the magnification of laser B of the laser scanner unit. Adjust the
magnification of laser B with reference to that of laser A. If the input value is inappropriate, the
image quality is degraded.
● <146: Adjustment of the magnification to write image in laser's main
scanning direction (A-C)>
Magnification between lasers A and C
Amount of adjustment of the magnification of laser D of the laser scanner unit. Adjust the
magnification of laser C with reference to that of laser A. If the input value is inappropriate,
the image quality is degraded.
● <147: Magnification between lasers A and D>
Magnification between lasers A and D
Amount of adjustment of the magnification of laser C of the laser scanner unit. Adjust the
magnification of laser D with reference to that of laser A. If the input value is inappropriate,
the image quality is degraded.
● <148: Adjustment of the point to start writing in main scanning
direction (A-B)>
When replacing the laser, enter the delay value (laser main scanning adjustment).
● <149: Adjustment of the point to start writing in main scanning
direction (A-C)>
When replacing the laser, enter the delay value (laser main scanning adjustment).
● <150: Adjustment of the point to start writing in main scanning
direction (A-D)>
*This mode is effective only when paper is fed from the manual feed tray of iR2545/2535.
When replacing the laser, enter the delay value (laser main scanning adjustment).
● <144: Laser trail edge OFF adjustment>
● <151: Developing bias offset for DC>
Laser trail edge OFF adjustment (input only).
Enter the developing bias offset for DC.
When a fault in image occurs (foggy image or light density), enter the developing bias offset
for DC. Increasing the value makes the image darker.
4-34
● <152: Primary charge offset for DC>
Enter the value to adjust the primary offset 1 for DC.
● <153: Primary charge offset for AC>
Enter the value to adjust the primary offset 1 for AC.
● <166: Temperature adjustment UP/DOWN mode (Plain paper, manual
feed tray)>
The temperature adjustment offset relative to the target fixing temperature of plain paper fed
from the manual feed paper can be changed in steps of 3˚C. Use this parameter when the
fixing performance is low or when it is necessary to prevent the paper from slipping or being
curled.
Plain paper: Plain paper mode, thin paper mode, S thin paper mode, OHP mode
● <154: Adjustment of the registration loop volume (Thick paper)>
Incrementing the value by 1 feeds the paper 0.1 mm further and increases the registration
0 - 2: +15˚C
3 - 11: 12 to -15˚C (in steps of 3˚C)
loop volume.
12 - 14: -15˚C
● <155: Adjustment of the registration loop volume (Special paper)>
Incrementing the value by 1 feeds the paper 0.1 mm further and increases the registration
● <173: Temperature adjustment UP/DOWN mode (2nd page of
double-sided printing)>
loop volume.
The temperature adjustment offset relative to the target fixing temperature of the second page
of double-sided printing can be changed in steps of 3˚C. Use this parameter when the fixing
● <156: Adjustment of the registration loop volume (Envelop cassette
pickup)>
Incrementing the value by 1 feeds the paper 0.1 mm further and increases the registration
loop volume.
● <157: Pickup timing adjustment>
This setting is applied to the pickup permission temperature at job start irrespective of
the fixing mode. The pickup permission temperature is raised or lowered from the default
temperature according to the setting value.
Use this parameter to reduce the FCOT or warm-up time.
0 - 2˚C+15˚C
3 - 11: 12 to -15˚C (in steps of 3˚C)
12 - 14: -15˚C
● <165: Fixing auto cleaning frequency setting>
Use this parameter to increase the fixing auto cleaning frequency. Incrementing the value
increases the fixing auto cleaning frequency.
Add the threshold of the difference in detection temperature between the main thermistor (that
triggers fixing auto cleaning) and the sub thermistor 1 (2) to the default threshold.
0 - 3: 0 - +15˚C (in steps of 5˚C)
*Set "Fixing auto cleaning setting" (#PRINT> BitSwitch 178) to 1 (= ON).
performance is low or when it is necessary to prevent the paper from slipping or being curled.
Plain paper: Plain paper mode, thin paper mode, S thin paper mode, OHP mode
0 - 2: +15˚C
3 - 11: 12 to -15˚C (in steps of 3˚C)
4
12 - 14: -15˚C
● <174: Reduction in FCOT>
Set the pickup permission temperature (temperature adjustment for the fist page of printing)
to -40˚C before fixing.
Use this parameter to reduce the FCOT.
0:OFF
1:ON
● <178: Fixing auto cleaning setting >
Set this parameter to determine whether to perform fixing auto cleaning.
● <179: Temperature adjustment UP/DOWN mode (Envelop/Postcard)>
The temperature adjustment offset relative to the target fixing temperature of the envelope/
postcard can be changed in steps of 3˚C. Use this parameter when the fixing performance is
low or when it is necessary to prevent the paper from slipping or being curled.
Envelop/postcard: Postcard mode, S postcard mode, Envelop mode
0 - 2: +15˚C
4-35
3 - 11: 12 to -15˚C (in steps of 3˚C)
12 - 14: -15˚C
● <180: Temperature adjustment UP/DOWN mode (Special mode N)>
The temperature adjustment offset relative to the target temperature of fixing in special mode
N can be changed in steps of 3˚C. Use this parameter when the fixing performance is low or
when it is necessary to prevent the paper from slipping or being curled.
0 - 2: +15˚C
3 - 11: 12 to -15˚C (in steps of 3˚C)
12 - 14: -15˚C
■ List of Functions(PRINT CST)
● <#CST> CAS1> CAS1-U1>,<#CST> CAS2> CAS1-U1>,<#CST>
CAS3> CAS1-U1>,<#CST> CAS4> CAS1-U1>
Setting of paper name used for paper size group 'U1'
When setting the following special size paper for U1, U2, U3, and U4 which are specified for
the paper name to be used in paper size group, it becomes possible to treat the paper size in
U1, U2, U3, and U4 as special size paper in universal size cassettes.
4
Settings 26: OFI, 27: E-OFI, 37: M-OFI, 36: A-OFI, 24: FLSP, 25: A-FLSP, 30: A-LTRR, 42:
FA4, 34: G-LGL 0: default
● <#CST> CAS1> CAS1-U2>,<#CST> CAS2> CAS1-U2>,<#CST>
CAS3> CAS1-U2>,<#CST> CAS4> CAS1-U2>
Setting of paper name used for paper size group 'U2'
When setting the following special size paper for U1, U2, U3, and U4 which are specified for
the paper name to be used in paper size group, it becomes possible to treat the paper size in
U1, U2, U3, and U4 as special size paper in universal size cassettes.
Settings 32: G-LTR-R, 34: G-LGL, 23: K-LGL-R, 0: default
● <#CST> CAS1> CAS1-U3>,<#CST> CAS2> CAS1-U3>,<#CST>
CAS3> CAS1-U3>,<#CST> CAS4> CAS1-U3>
Setting of paper name used for paper size group 'U3'
When setting the following special size paper for U1, U2, U3, and U4 which are specified for
the paper name to be used in paper size group, it becomes possible to treat the paper size in
U1, U2, U3, and U4 as special size paper in universal size cassettes.
Settings 22: K-LGL, 31: G-LTR, 29: A-LTR, 0: default
4-36
● <#CST> CAS1> CAS1-U4>,<#CST> CAS2> CAS1-U4>,<#CST>
CAS3> CAS1-U4>,<#CST> CAS4> CAS1-U4>
Setting of paper name used for paper size group 'U4'
When setting the following special size paper for U1, U2, U3, and U4 which are specified for
the paper name to be used in paper size group, it becomes possible to treat the paper size in
U1, U2, U3, and U4 as special size paper in universal size cassettes.
Settings 228: B-OFI, 0: defaul
#NETWORK
■ Confirmation of contents of CA certificate
Selecting the service mode "#NETWORK>#CERTIFICATE>#CA-CERTIFICATE" enables
confirmation of the contents of the installed CA certificate.
#CODEC
■ Configuration
Item
No.
#BitSwitch
#Numeric
SW01- SW09
01: - 05:
06:
2
0-3
07:
4
1-7
08: - 50:
Default
Setting range Description
Not used
Not used
Control of attribute flag addition
function at reception and printing of
color JPEG or E-mail image
Adjustment of black color recognition
level at black text processing
Not used
T-4-39
■ Details
4
● 06: Control of attribute flag addition function at reception and printing
of color JPEG or E-mail image
Set the type of the attribute flag to be added at reception of a color JPEG or E-mail image.
0: For PDL_text mode
1: For PDL_photo mode
2: For scan_text mode
3: For scan_photo mode
● 07: Adjustment of black color recognition level at black text processing
Adjust the black color recognition level at black text processing. To improve chanses that
the text color is judged as black, increase the setting value.
4-37
#SYSTEM
● SW10
List of Functions
■ Configuration
Item
No.
#SYSTEM SW SW01- SW04
SW05
SW06- SW09
SW10
Default
Bit
Description
Not used
Inhibition of export of password in address book
Not used
PS data protocol menu display/nondisplay
Extra length setting
Not used
11001000
00000000
SW11 - SW50
T-4-40
Item
No.
#SYSTEM
NUMERIC
01: - 38:
39:
40:
41:
42:
43: - 56:
57:
58: - 100:
Default
4
0-5
1
0
0
0 or 1
0-60
0-60
0
0-4
1
Display
ON
-
Nondisplay
OFF
-
Function
Inhibition of export of password in address book
• Detailed Discussions of Bit 0
Select whether to inhibit export of the password in the address book.
• Detailed Discussions of Bit 1
Select whether to set the extra length (expand the user-defined size range).
■ Details of System Numeric
● 39: Change of default of LDAP advanced search condition
● 40: eLA card touch sound
List of Functions
1
Inhibited
The eLA card touch sound can be set.
0
Not inhibited
T-4-42
• Detailed Discussions of Bit 7
Select whether to inhibit export of the password in the address book.
● 41: PS mode 1(8bit)
The PS mode 1 (8bit) can be set.
● 42: ePS mode 1(8bit)
The PS mde 2 (8bit) can be set.
● 57: Setting of paper size group
A paper size group can be set.
1: AB (PAPER_SIZE_GROUP_AB)
2: A (PAPER_SIZE_GROUP_A)
3: INCH (PAPER_SIZE_GROUP_INCH)
4: AB/INCH (PAPER_SIZE_GROUP_AB_INCH)
Initialization takes place when the following service mode is executed:
4-38
0
Change of the default of the LDAP advanced search condition can be set.
● SW05
0
1
2
3
4
5
6
7
PS data protocol menu display/nondisplay
Extra length setting
T-4-43
Not used
Change of default of LDAP advanced
search condition
eLA card touch sound
PS mode 1 (8bit)
PS mode 2 (8bit)
Not used
Setting of paper size group
Not used
■ Details of Bit Switch
Bit
Function
Setting range Description
T-4-41
4
0
1
2
3
4
5
6
7
#COUNTER
(CLEAR>ALL, TYPE, SERVICE DATA, TEL & USER DATA)
■ Counters
#ACC
This copier is furnished with a maintenance/supplies counter set (DRBL-1), which can be
■ Configuration
used to gain rough measures of when to replace supplies. The counter set increments by
one on counting each sheet of small-sized paper (up to A4/LTR) and by two on counting each
The table below gives summary description of the accessories available.
Item1
#ACC
Item2
CARD
CC-SPSW
COIN
CONTROL
sheet of large-sized paper (larger than A4/LTR).
Explanation
Card reader installation setting
Enter a card number to use.
(0 to 9999. One hundred cards are registered with the department
ID beginning from the input card number in sequence.)
*1:1,000 cards if option ROM is mounted.
When a card number is entered, the following kinds of management
information are initialized:
- Card name (department ID), beginning from the input card number.
- Password associated with the card
Control card I/F support setting
Set whether to support the control card I/F (CC-V) or not.
0: Do not support.
1: Support.
Coin vendor change
Set the control card set display appearing on the operator station for
vendor use.
0: Control card use
1: Coin vendor use
Set the PDL printer output control where the control card I/F (CC-V)
is supported.
0: Enable printing without a card mounted.
1: Enable printing with a card mounted in position.
T-4-44
Maintenance counter list
Item
TOTAL (Total counter)
Counter
SERVICE1
SERVICE2
TTL
COPY
PDL-PRT
FAX-PRT
MEDIA-PRT
RPT-PRT
2-SIDE
SCAN
PICK-UP (Paper pickup counter)
C1
C2
C3
C4
MF
2-SIDE
FEEDER (Feeder related counters) FEED
DFOP-CNT
SORTER (Finisher related counters) SORT
SADDLE
SDL-STPL
JAM (Jam counters)
TTL
FEEDER
SORTER
2-SIDE
MF
C1
C2
C3
C4
MISC (Other required counter)
WST-TNR
Explanation
Service total counter 1
Service total counter 2
Total counter
Total copy counter
PDL print counter
Fax print counter
Media print counter
Report print counter
Double-sided copy/print counter
Scan counter
Cassette 1 jam counter
Cassette 2 jam counter
Cassette 3 jam counter
Cassette 4 jam counter
Manual feed tray pickup total counter
Double-sided paper pickup total counter
Feeder pickup total counter
ADF open/close hinge counter
Finisher sort path counter
Finisher saddle operation counter
Finisher saddle staple operation counter
Unit total jam count
Feeder total jam count
Finisher total jam count
Duplex unit jam counter
Manual feed tray jam counter
Cassette 1 jam counter
Cassette 2 jam counter
Cassette 3 jam counter
Cassette 4 jam counter
Waste toner counter
4
T-4-45
4-39
#LMS
Parts counter list
Item
Counter
Explanation
DRBL-1 (Unit TR-ROLL
Transfer roller high-voltage ON count
supplies)
SP_SC_EL Separation static charge eliminator highvoltage ON count
DV-UNT-C Developing assembly rotation count
M-PU-RL
Manual feed tray pickup roller paper pass
count
M-SP-PD
Manual tray separation pad paper pass count
FX-UNIT
Fixing assembly paper pass count
PT-DRM
WST-TNR
C1-PU-RL
4
Photosensitive drum rotation count
Waste toner count
Cassette1 pickup roller paper pass count
C2-PU-RL
C1-SP-RL
C1-SP-PD
Cassette2 pickup roller paper pass count
Cassette1 separation roller paper pass count
Cassette1 separation pad paper pass count
C2-SP-RL
OZ-FIL1
DRBL-2 (Unit DF-PU-RL
supplies)
DF-SP-PD
C3-PU-RL
C4-PU-RL
C3-SP-RL
C4-SP-RL
FIN-STPR
Cassette2 separation roller paper pass count
not used
ADF pickup roller paper pass count
ADF separation pad paper pass count
Cassette3 pickup roller paper pass count
Cassette4 pickup roller paper pass count
Cassette3 separation roller paper pass count
Cassette4 separation roller paper pass count
Stapler assembly drive count
Service life
■ Configuration
150,000
150,000
Group
INACTIVE
500,000
150,000
150,000
iR2545/2535: 240,000
iR2530/2525/2520:
150,000"
80,000
250-sheet 1st cassette
type: 150,000
250-sheet 1st cassette
type: 120,000
150,000
120,000
120,000 (250-sheet 1st
cassette type only)
120,000
80,000
80,000
120,000
120,000
120,000
120,000
500,000
■ Clearing Counters
• Maintenance/parts counter all clear
Execute service mode > CLEAR > COUNTER to clear all maintenance/parts counters.
• Counter clear on parts replacement
Press the numeric keypad key 0 after displaying the counter for a part just replaced, and
4-40
Default
Setting range Description
0-1
TR-SEND
T-4-46
the counter will be cleared individually.
Item
ST-SEND 0
ST-BRDIM 0
0-1
TR-BRDIM
ST-ERDS 0
0-1
TR-ERDS
ST-PCL
0
0-1
0
0-1
0
0-1
ST-SPDF 0
0-1
TR-PCL
ST-EAM
TR-EAM
ST-ELA
TR-ELA
TR-SPDF
ST-PS
TR-PS
0
0-1
To display installation state of SEND function
when transfer is displayed.
The 24 digits of license transfer numbers are
displayed.
To display installation state of BarDIMM when
transfer is disabled.
The 24 digits of license transfer numbers are
displayed.
To display installation state of third party
expansion function of E-RDS when transfer is
disabled.
The 24 digits of license transfer numbers are
displayed.
To display installation state of PCL function
when transfer is disabled.
The 24 digits of license transfer numbers are
displayed.
To display installation state of EAM function
when transfer is disabled.
The 24 digits of license transfer numbers are
displayed.
To display installation state of ELA function
when transfer is disabled.
The 24 digits of license transfer numbers are
displayed.
To display installation state of transmission
function for SEND searchable PDF when
transfer is disabled.
The 24 digits of license transfer numbers are
displayed.
To display installation state of PS function when
transfer is disabled
The 24 digits of license transfer numbers are
displayed.
Group
ERASE
Item
Default
B] is called a slave option of [Function A]. Installation of the slave option fails when it is
Setting range Description
SEND
0
0-1
BRDIM
0
0-1
ERDS
0
0-1
PCL
0
0-1
EAM
0
0-1
ELA
0
0-1
SPDF
0
0-1
PS
0
0-1
To display installation state of SEND function
when non-transfer is displayed.
To display installation state of BarDIMM when
non-transfer is disabled.
To display installation state of third party
expansion function of E-RDS when non-transfer
is disabled.
To display installation state of PCL function
when non-transfer is disabled.
To display installation state of EAM function
when non-transfer is disabled.
To display installation state of ELA function
when non-transfer is disabled.
To display installation state of transmission
function for SEND searchable PDF when nontransfer is disabled.
To display installation state of PS function when
non-transfer is disabled
found that the master option is not validated as a result of verification of the dependent
relationship.
7. Decoding and verifying a license key
Decode an entered license key and examine the validity of the license information obtained.
When an error occurs during verification, the error information is sent back to the local UI,
which displays an error message based on the information.Verification errors are assumed
to occur in the following cases.
- When a license is installed in a non-licensed device
- When an optional function included in the license does not exist in the target device
- When an optional function included in the license is a slave option and a master option is
not validated
- When an incorrect license key is entered
- When a license key is illegally altered
T-4-47
■ Outline
1. Validate an optional function which has been installed but has not been validated based on
■ Method of confirming license option
Confirmation could be made whether the license option is active or not in the SACTIBAT
FUNCTION item by outputting the SPEC REPORT from the service mode.
the license key issued by a license issue server (hereinafter called "LMS").
4
Output method:
2. Invalidate the function for which a license has been already set up.
(1) Enter the service mode.
Push [Additional Functions] Key > push 2, 8 Key > push [Additional Functions] Key.
■ Details
1. Validate a license by entering the license issued by LMS via the local UI.
2. The license key issued by LMS cannot be entered via the remote UI.
3. Invalidate a license (Set the function to OFF) via the service mode.
4. Validate a license via the service mode.
5. A license with restriction (with an expiration date, restriction in the number of licenses) is
not supported. (Restriction information is not read.)
6. Some optional functions installed are in dependent relationship with each other. For
example, when using [Function A], [Function B] should be available. In this case, [Function
(2) Push cursors, and display [#REPORT].
Then press [OK].
(3) Push cursors, and display [#REPORT OUT PUT].
Then press [OK].
(4) Push cursors, and display [#SPEC LIST].
Then press [OK]. The 'SPEC REPORT' will be printed out.
(5) Check the items displayed under ACTIBAT FUNCTION in SPEC REPORT.
ACTIBAT FUNCTION >
- BW-SEND
- CL-SEND
Items for which ON/ON is displayed are validated.
A license option confirmation example
To check the validation of license option, see the SPEC REPORT. The details according to
the list shown below.
4-41
Item Name
Color Universal SEND KIT
License Name
BW-SEND
CL-SEND
Status/Optional Setting
#SEND
ON/ON
ON/ON
T-4-48
■ Inactivity of the transmitted license
001
Inactivity of the transmitted license
1
Press '2' from the numeric
keypad and press 'OK'.
OK
Situation of using this service mode
This service mode is used to invalidate a license under the assumption that, when a device is
exceptionally replaced with another one due to a trouble (caused by the device), the license
F-4-3
(6) Press 2 using the numeric key and press the OK key.
is transferred to another device. This operation is called "invalidating transfer of a license".
Since it is possible to select the same device as a destination of the transfer, this service
mode can be also used to invalidate a function on a temporary basis. Careful attention,
however, is required because, if you invalidate a function by mistake, you need to contact a
The 24 digits of license transfer numbers are displayed, so you take the memo.
sales company for recovery.
Because it cannot maintain the number displaying with the thing of this place limit.
Take utmost precaution when inactivating the license
If you do not take the memo, the indication contents are not held when you do OFF of
the main power, it is impossible for license transfer.
When invalidating transfer of a license, it is necessary to invalidate the license by entering the
service mode and issue a function invalidation certificate key, which certifies that the license
4
has been invalidated. This operation can be executed for each optional function. At the point
Even if you push the reset key and clear the indication, the indication is never display
again.
when a function invalidation certificate key is issued, the function is invalidated and becomes
unavailable. When you report this function invalidation certificate key, the serial number of
License transfer example:
the transfer origination device, the serial number of the transfer destination device, and the
reason why you need to perform the transfer to a sales company, a new license key is issued
0743 5306 1326
8106 5575 0721
for installation for the transfer destination device. Be sure to write down the new license key
when you receive it and, when it is registered in the transfer destination device successfully,
inform the user of the new license key and explain him/her to keep it at hand.
OK
Operation Procedure
(1) Enter the service mode and display the following service mode. (Press one key at once to
enter the service mode in the order of "Main, 2, 8, Main".)
When you have entered the service mode, use the left and right arrow keys to display
items,and press the OK key to fix the setting.
(2) Display [#LMS].
(3) Press the OK key and display [#LMS INACTIVE].
(4) Display [ST-SEND].
(5) Press the OK key.
F-4-4
(7) Turn OFF/ON the power of the main unit.
For Reference:
When a license option is displayed in Procedure (4), 001 1 is displayed. The last "1" shows
that the license is validated by license authentication.
After the license is transferred, the last number is changed to "2".
When the option is standard, the last number shows "3" which means disable for license
4-42
transfer.
When a license option is displayed in Procedure (4), 001 1 is displayed. The last "1" shows
that the license is validated by license authentication.
Details about the last number:
After the license is erased, the last number is changed to "2".
1: The function is validated.
2: The function is invalidated, or the license is transferred.
When the option is standard, the last number shows "3" which means disable for license
3: The function is invalidated, or the license does not exist.
transfer.
Details about the last number:
(8) When you contact the contact section of the sales company and report a function
1: The function is validated.
invalidation certificate key required for license transfer, the serial number of the transfer
2: The function is invalidated, or a license is transferred.
origination device, and the serial number of the transfer destination device, a new license
3: The function is invalidated, or the license does not exist.
key that can be registered to the transfer destination device is issued.
(9) Register the new license key to the transfer destination device and make sure that the
function is validated.
■ Erasing a License
Erasing a License
When you invalidate a license option on a temporary basis or when you do not use it for a
long period of time, you can invalidate the function by erasing the license.
The license can be validated by registering the license number again.
4
Procedure to erase a license
You can erase a license by entering the service mode.
Operation Procedure:
(1) Enter the service mode and display the following service mode.
When you have entered the service mode, use the right and left arrow keys to display
items,and press the OK key to fix the setting.
(2) Display [#LMS].
(3) Press the OK key and display [#LMS ERASE].
(4) Display [SEND].
(5) Press the OK key.
(6) Turn OFF/ON the power of the main unit.
For Reference:
There is no function to display the license registration numbers in the main unit. Therefore,
when there is a possibility to restore the license after erasing it, make sure that a user has
written down the license registration number.
4-43
#E-RDS
#REPORT
■ Configuration
■ Configuration
Settings related to e-RDS are described below.
Item
Default
Setting range
E-RDS
SWITCH
0
RGWADDRESS
URL of UGW Character string
length:129byte
(including NULL,
one-byte codes only)
RGW-PORT 443
0 or 1
1-65535
CNT-DATE
4
CNT-INTV
COM-TEST
COM-LOG
SCALLCMP
24
1-168 (on a weekly
basis)
The table below lists the kinds of reports that are supported.
Description
e-RDS OFF/ON setting (0:OFF / 1:ON)When
used (ON), the counter information and error
information are sent to UGW.Default: 0 (OFF)
URL of UGWDefault: URL of actual
UGWCharacter string length: 129 bytes (including
NULL, one-byte codes only)
Port No. of UGW Default: 443Setting range: 1 to
65535
Setting of the date of sending the counter
information to the server (Valid after input of
license).
Set the start date of the schedule to send the
counter information to the server using a third
party expansion function of E-RDS.
Refer to the user mode date setting.
(12 digits: YYYYMMDDHHMM)
YYYY: Year MM: Month DD: Day
HH: Hour MM: Minute
Setting of the interval of sending the counter
information to the server (Valid after input of
license).
Set the interval of sending the counter information
to the server using a third party expansion
function of E-RDS.
Execution of communication test An attempt
is made to connect to UGW, judges whether
connection is successful, and displays "COMTEST OK" or "COMTEST NG" as the judgment
result.
Details of communication test result. The log of
errors in communication with UGW is displayed.
The error information includes the error occurrence
time, error code, and details of the error.Maximum
log count: 5Error information length: Max. 128
characters (excluding NULL)
Repair completion process (call button function)
Used when the service personnel has completed
the requested repair.
T-4-49
4-44
Item
Explanation
SERVICE DATA LIST
"Service mode service soft switch output (SSSW, MENU, NUMERIC
Param., SPECIAL, NCU, SCAN, PRINT, SYSTEM, ROM,
start date)"
"Service mode service soft switch output (SSSW, MENU, NUMERIC
Param., SPECIAL, NCU, SCAN, PRINT, SYSTEM, ROM,
start date) System dump list output"
Transmission count, reception count, record chart count, error count
and other outputs
Counter output
Jam and error history output
Type setting, print speed, memory size, ROM indication, adjustment
data and other outputs
Output of an entry format for the service label affixed to the rear cover
as shipped
Output of communication error log information related to e-RDS
SYSTEM DATA LIST
SYSTEM DUMP LIST
COUNTER LIST
ERROR LOG LIST
SPEC LIST
SERVICE LABEL
ERDS COM LOG LIST
T-4-50
■ Details
● System Dump List
Use it to check the history of communications, both successful and error.
● System Data List
Use it to check the settings associated with the service soft switch and service parameters.
16/10 2009 14:10
001
******************************
*** SYSTEM DATA LIST ***
******************************
#MENU
01:
02:
03:
04:
05:
---------------------------------------------------------------------------------------------------------------------------------------------------------------------------------------------------------
00000000
10000000
00000000
10000000
00000000
10000000
00000000
00000000
00000000
00000000
00000000
00000011
00000000
00000000
00000000
00000000
00000000
00000000
00011000
00000000
00000000
00000000
00000000
00000000
00000000
00100000
00000000
00000000
00000000
00000000
00000000
00000000
00000000
00000000
00000000
00000000
00000000
00000000
00000000
00000000
00000000
00000000
00000000
00000000
00000000
00000000
00000000
00000000
00000000
00000000
---------------------
0
0
0
0
0
0001
CLEAR DATE
10/16/2009
[1]
[3]
#SSSW
SW01
SW02
SW03
SW04
SW05
SW06
SW07
SW08
SW09
SW10
SW11
SW12
SW13
SW14
SW15
SW16
SW17
SW18
SW19
SW20
SW21
SW22
SW23
SW24
SW25
SW26
SW27
SW28
SW29
SW30
SW31
SW32
SW33
SW34
SW35
SW36
SW37
SW38
SW39
SW40
SW41
SW42
SW43
SW44
SW45
SW46
SW47
SW48
SW49
SW50
10/16 2009 13:00
[2]
[3]
[4]
[5]
[6]
[7]
TX
A4
RX
A4
33600
21600
9600
14400
14400
9600
STD
MH
G3
PRINT
[8]
READ
#000
[9]
=
=
=
=
=
=
=
=
=
=
=
=
=
7
0
0
7
0
0
0
0
0
7
2
0
0
TTL
C-S-TTL
K-S-TTL
SCAN
=
=
=
=
0
0
0
B4
=
0
A3
=
0
B4
31200
19200
7200
12000
12000
7200
FINE
MR
ECM
=
=
=
=
=
=
=
=
=
=
0
0
0
0
0
0
0
5
0
7
A3
28800
16800
4800
TC9600
=
=
=
=
=
0
0
0
0
0
LTR
26400
14400
2400
TC7200
=
=
=
=
=
0
0
0
0
0
4800
SUPER
MMR
=
=
=
0
0
7
2400
ULTRA
JBIG
=
=
=
0
0
0
63
0
51
43
/
/
/
/
0
0
0
LGL
24000
12000
=
=
=
0
0
0
JPEG
=
0
63
0
51
43
0
0
0
0
0
0
0
0
0
0
0
0
0
0
0
0
0
0
0
0
0
0
0
0
0
0
0
0
0
0
0
0
0
0
0
4
F-4-6
*1: TX, number of total pages transmission.
*2: Total number of pages transmitted/received according to original size.
*3: RX, number of total pages reception.
*4: Total number of pages transmitted and received for each modem speed.
*5: Total number of pages transmitted/received in connection with different modem speeds
(Standard, Fine, Super Fine, Ultra Fine).
*6: Total number of pages transmitted and received for each coding method.
F-4-5
*7: Total number of pages transmitted and received in each mode.
*8: Total number of pages printed/scanned.
*9: Total number of occurrences for error code.
4-45
• Indication sample
##280
*1: service error code.
1
7
3
##280number of errors ##280number of errors ##280number of errors
0
*2: START TIME, date and time (in 24-hr notation).
0
*3: OTHER PARTY, telephone number sent by the other party.
T-4-51
*4: MAKER CODE, manufacturer code.
*5: MACHINE CODE, model code.
It provides error information on the 3 most recent communications.
*6: bit 1 through bit 96 of DIS, DCS, or DTC that has been received.
*7: bit 1 through bit 96 of DIS, DCS, or DTC that has been transmitted.
2003 09/02 TUE 12:00
*1
0001
FAX
#1 LATEST
*2
*3
*4
*5
START TIME
OTHER PARTY
MAKER CODE
MACHINE CODE
RCV V.8 FRAME
SYMBOL RATE
DATA RATE
TX LVL REDUCTION
ERR ABCODE
ERR SECTXB
ERR SECRXB
Rx : ( bit
( bit
Tx : ( bit
( bit
*6
*7
1)
57 )
1)
57 )
*8
Rx : NSF CSI DIS
*8
Tx :
09/02 10:00
12345678
10001000
0100001 00000000
E0 81 85 D4 90 7E 00 00
3429 baud
28.8
0
0
0
0
00000100
00000001
00000000
00000001
01110111 01011111
00000001 00000100
01000010 00011111
00000001 00000100
Tx :
Explanation: Maintenance/supplies counter output.
(For more detailed information about the maintenance/supplies counter output, refer to "#COUNTER"(page 4-39).)
MCF
PIX-288 PPS-NUL
MCF
PIX-288 PPS-NUL
#2
● Counter List
00100011 00000001 10101001 00000001 ( bit
00000000 00000000
( bit
00100001 00000001 00000001 00000001 ( bit
00000000 00000000
( bit
CFR
NSS TSI DCS
Rx : MCF
56 )
96 )
56 )
96 )
MCF
PIX-288 PPS-NUL
PIX-288 PPS-NUL
MCF
PIX-288 PPS-EOP
DCN
#000
4
START TIME
OTHER PARTY
MAKER CODE
MACHINE CODE
RCV V.8 FRAME
SYMBOL RATE
DATA RATE
TX LVL REDUCTION
ERR ABCODE
ERR SECTXB
ERR SECRXB
Rx : ( bit
( bit
Tx : ( bit
( bit
1)
57 )
1)
57 )
09/02 09:30
12345678
10001000
0100001 00000000
E0 81 85 D4 90 7E 00 00
3429 baud
28800 bps [V. 34]
0
00
00
00
00000100
00000001
00000000
00000001
Rx : NSF CSI DIS
Tx :
01110111 01011111
00000001 00000100
01000010 00011111
00000001 00000100
00100011 00000001 10101001 00000001 ( bit
00000000 00000000
( bit
00100001 00000001 00000001 00000001 ( bit
00000000 00000000
( bit
CFR
NSS TSI DCS
Rx : MCF
Tx :
MCF
PIX-288 PPS-NUL
MCF
PIX-288 PPS-NUL
#3 OLDEST
56 )
96 )
56 )
96 )
MCF
PIX-288 PPS-NUL
PIX-288 PPS-NUL
MCF
PIX-288 PPS-EOP
DCN
#000
START TIME
OTHER PARTY
MAKER CODE
MACHINE CODE
RCV V.8 FRAME
SYMBOL RATE
DATA RATE
TX LVL REDUCTION
ERR ABCODE
ERR SECTXB
ERR SECRXB
09/02 09:00
12345678
10001000
0100001 00000000
E0 81 85 D4 90 7E 00 00
3429 baud
28800 bps [V. 34]
0
00
00
00
F-4-7
4-46
*8: RX, procedural signal received; TX, procedural signal transmitted.
#000
● Error Log List
Jam history description (JAM)
07/12/2005 13:07 FAX
001
***************************************
*** JAM/ERR LOG REPORT ***
***************************************
[1] [2] [3]
[4] [5] [6]
[7]
[8] [9] [10]
JAM
01 04/12 12:17 20:03 4
20 04/12 12:17 20:03 4
1
1
0012
0012
000026 1 A4
Item
Explanation
[1]
[2]
[3]
[4]
[5]
[6]
[7]
[8]
[9]
Number
Jam date
Jam time
Jam recovery time
Location
Occurrence category
Jam code
Total counter display
Pickup stage position
The larger the number of a jam, the more recently it has occurred.
Date of jam occurrence
[10]
Paper size
3: Host machine, 4: ADF, 5: Finisher
0: Host machine, 1: ADF, 2: Finisher
For a definition of the code, see the "Jam Code"(page 3-11).
0: Manual feed tray, 1: Cassette 1, 2: Cassette 2, 3: Cassette 3, 4:
Cassette 4
T-4-52
000026 1 A4
Error history description (ERR)
[1] [2] [3]
[4] [5]
[6]
[7]
[8]
ERR
01 04/12 12:17 15:36 3
20 04/12 12:17 15:36 3
0010 0000 000691
0010 0000 000691
Item
Explanation
[1]
Number
[2]
[3]
[4]
[5]
[6]
Error date
Error time
Error recovery time
Location
Error code
The larger the number of an error, the more recently it has
occurred.
Date of error occurrence
[7]
Detail code
[8]
Total counter display
3: Main unit, 5: Finisher
Error code (4-digit code; for a definition of the code, see the "Error
Code"(page 3-2).)
Detail code of the error code (4-digit code; for a definition of the
code, see the )
T-4-53
Alarm history description(ALARM)
[1]
F-4-8
Item
Explanation
Number
The larger the number of a alarm, the more recently it has
occurred.
Date of alarm occurrence
[2]
[3]
[4]
[5]
[6]
Alarm date
Alarm time
Alarm recovery time
Location
Alarm code
[7]
Detail code
Alarm code (4-digit code; for a definition of the code, see the
"Alarm Code"(page 3-14).)
Detail code of the alarm code (8-digit code; for a definition of the
code, see the "Error Code" Chapter.)
T-4-54
4-47
4
● Spec List
07/12/2005 13:07 FAX
2009 10/09 16:31
[1]
[2]
[3]
[4]
0001
*****************************
*** SPEC REPORT ***
*****************************
TYPE
LBP SPEED
TOTAL MEMORY
MAIN
OPTION
BOOT
LANG
LANG LIBRARY
LANG FILE
VIENTNAMESE
CHINESE(TRAD. )
TURKISH
SWEDISH
[6]
_____
_____
_____
_____
_____
_____
_____
_____
JAPAN
45cpm
256MB
WLaa-07-09
_____
_____
_____
_____
00000010
00000010
00000010
00000010
BOOT-V0023
00000010
[7]
4
[5]
002
BULGARIAN
ECONT
OPT-CAS 1
OPT-CAS 2
OPT-CAS 3
OPT-DUP
OPT-FIN
MEDIA
ACTIBAT FUNCTION
BDL-IMAGE (1200)
FAX
NETWORK
PCL
PC-SCAN
BW-SEND
CL-SEND
PAF
BDL-IMAGE (600)
E-RDS
BAR-DIMM
SERCHABLE PDF
eAM
eLA
PS
_____
_____
_____
_____
_____
_____
_____
_____
00000010
0303
0000
0000
0000
0000
0000
0000
_____
_____
_____
_____
_____
_____
_____
_____
_____
_____
_____
_____
_____
_____
_____
OFF
ON
ON
ON
ON
OFF
OFF
OFF
OFF
OFF
OFF
OFF
OFF
OFF
OFF
[8]
[9]
[10]
[11]
[12]
[13]
F-4-9
PARAM
TYPE
OPTION/ENABLE SW
BDL-IMAGE (1200)
FAX
NETWORK
PCL
PC-SCAN
BW-SEND
CL-SEND
PAF
BDSS
BDL-IMAGE (600)
COUNTER
E-RDS
BAR-DIMM
SERCHABLE PDF
eAM
eLA
PS
BODY No.
ENGINE CODE
SIZE TYPE
PRODUCT NAME
TOTAL
TTL
COPY
FAX-PRT
PDL-PRT
RPT-PRT
MEDIA-PRT
PICT-PRT
TONER-YELLOW
TONER-MAGENTA
TONER-CYAN
TONER-BLACK
OPTYION ROM
USB MEMORY
SD CARD
USB SERIAL No.
MAC ADDRESS
NUMBER OF LOGS
ACTIVITY (FAX)
ACTIVITY
PRINTJOB ACCOUNT
COPY
PDL PRINT
RX PRINT
REPORT
MEDIA/PICT BRIDGE
JAM
SERVICE CALL
ENVIROMENT
ALARM
COUNTER
_____
1 : JP
_____
_____
_____
_____
_____
_____
_____
_____
_____
_____
OFF / OFF
OFF / OFF
OFF / OFF
ON / OFF
ON / OFF
ON / OFF
ON / OFF
ON / OFF
ON / OFF
ON / OFF
ON / OFF
ON / OFF
ON / OFF
ON / OFF
ON / OFF
ON / OFF
ON / OFF
FUYxxxxx
20080042
1 : AB
XXX
_____
_____
_____
_____
_____
_____
_____
_____
_____
_____
_____
_____
_____
_____
_____
_____
_____
_____
_____
_____
_____
_____
_____
_____
000688
000685
000000
000000
000000
000000
000000
000000
000000
000000
000000
0MB
OFF
0MB
00XXXXXXXX
00 00 85 51 60 1C
_____
_____
0
0
_____
_____
_____
_____
_____
_____
_____
_____
_____
_____
0
0
0
0
0
3
0
0
0
ON
[14]
F-4-10
[1]
[2]
[3]
[4]
[5]
[6]
[7]
[8]
4-48
Type setting
Print speed
Memory size
ROM version (MAIN/BOOT/LANG*1(language liblary/language file version)ECONT/option
cassette/duplex unit/finisher)
Activation function ON/OFF
Not used
Total counter (TOTAL/COPY/FAX/PDL/REPORT record counts)
Option ROM availability
[9]
[10]
[11]
[12]
[13]
[14]
USB memory availability
SD card volume
USB serial number
MAC address
output the number of histories (communication history, copy/print/report/JOB history of the
reception print, jam history, E code history, humidity log)
Counter ON/OFF
#DOWNLOAD
■ Download
The following parts of this unit can be upgraded by executing download mode using the
service support tool (UST)
(for more information, see the "Upgrading Targets and Procedure"(page 7-2).):
Main unit
ROM mounted on the main controller PCB (BOOT+PROGRAM)
ROM mounted on the DC controller PCB (DCON)
Accessory
ROM mounted on the finisher controller PCB(FIN_CON)
#CLEAR
■ Configuration
Group
Item
Description
TEL & USER DATA
Clears all user-registered and -set areas of telephone
registration data and user data.
(Telephone registration refers to the registration of
codes on one-touch dialing, abbreviated dialing, and
group dialing.)
SERVICE DATA
Clears theservice data. User data is not cleared.
COUNTER
Clears the maintenance counter, parts counter
and mode-specific counters. Initializes the counter
(numerator) in the system dump list.
SOFT-CNT
Not used
TYPE
Initializes user data and service data to suit specified
destination settings.
HST
ACTIVITY
Initializes the activity report
ACCOUNT
Clears print histories.
JAM
Clears the jam history.
ERR
Clear the error (error code) history.
ALARM
Clears the alarm history.
ENVIROMENT
Initializes the enviroment log data.
CARD
Clears department management information held in
the controller before the card reader is demounted.
ERR
E719
Clears card reader errors.
PWD
Clears the system administrator's password.
FILE SYSTEM
Not used
FORMAT
USB MEMORY
Format the USB memory. (This mode is used when
the USB memory error is damaged and E744 occurs.)
LICENSE DRIVE Clears the drive for license file.
FMT-SD
512
Format the 512MB SD card.
1024
Format the 1204MB SD card.
2048
Format the 2048MB SD card.
CA-KEY
Initializes an installed CA certification. (Displayed only
after activation of the e-RDS function.)
ERDS-DAT
The settings related to e-RDS are cleared to the
factory settings. (Displayed only after activation of the
e-RDS function.)
DEPT_USER_CLEAR
Turns off the department-based ID management and
user management functions.
SYSTEM_INFO_CLEAR
Clears the system management identification number.
ENGIN
ERRCLR
Clears the engine errors.
BKRAMCLR
Clears the engine backup RAM.
TNRINST
Supplies toner from the toner cartridge to the
developing assembly.
EAM-DAT
Initializes the EAM Flash/SRAM data.
4-49
4
Group
Item
ELA-DAT
ALL
Initializes the ELA Flash/SRAM data.
Clears user and service data (except for some scan
parameters and print parameters), and the counter
setting/registration data in the system dump list,
except for the print count.
T-4-55
#DISPLAY
An error code is displayed when a service error has occurred. The E code is displayed in the
upper step, and the detail code is displayed the bottom step.
Group
Item
Description
DISPLAY
ERR
The E code and detail code of the current system error are displayed.
(Multiple codes can be displayed with the left and right buttons. )
<Display example>
SYSTEM ERROR
xxx: Eyyy-zzzz Example) 001:E602-1105
xxx: History number
yyy: E Code
zzzz: Detail code
The current JAM code is displayed.
(Multiple JAM codes can be displayed with the left and right buttons.)
<Display example>
JAM ERROR
xxx:y-z-vvvv-wwww
xxx: History number
y: Description of position (3: Main unit (including the pickup assembly), 4:
ADF, 5: Finisher)
z: Cassette level (01: Manual feed tray, 1: Cassette 1, 2: Cassette 2, 3;
Cassette 3,4: Cassette 4, 7: Double-sided)
vvvv: JAM code
wwww: paper size
Display of engine speed type on controller PCB
<Display example>
SPDTYPE (Line 1)
45cpm (Line 2)
4
SPDTYPE
T-4-56
4-50
■ Configuration
The table below lists the items of ROM display mode that are supported.
Group
Item
Description
ROM
MAIN (Bootable)
Displays the version number of the PROGRAM ROM mounted on
the main controller PCB.
Displays the version of the ROM (BOOT) mounted on the main
controller PCB.
Not used
Displays the version number of the ROM mounted on the DC
controller PCB.
Not used
Not used
Not used
Not used
Displays the version number of the Inner finisher
Not used
MAIN2 (Boot)
■ Configuration
JAM
#ROM
Description
OPROM
ECONT
OPTION CAS1
OPTION CAS2
OPTION CAS3
DUPLEX
FINISHER
READER
T-4-57
#TEST MODE
■ Outline
Test mode must be executed by keeping track the flow of menu items appearing on the LCD.
Menu items in test mode are organized into seven blocks as described below.
Numerals enclosed in parentheses denote a numeric keypad key to be pressed each.
1. D-RAM test <(1) D-RAM TEST>
Checks to see if data can be correctly written to and read from D-RAM.
2. PG output <(3) PG>
Used to generate service test patterns.
3. MODEM test <(4) MODEM TEST>
Performs relay actuation, modem DTMF and tonal signal transmission/reception tests.
4. FUNCTION test <(6) FUNCTION TEST>
Used to verify the operations of microswitches, sensors, speakers and ADF functions.
■ Configuration
Group
Numerals enclosed in parentheses denote a numeric keypad key to be pressed each.
Group
subgroup Item 1
Item2
TEST MODE [1] - [9]
(1) DRAM [1] - [2]
(1) D-RAM TEST
(2) D-RAM TEST
(3) PG
SELECT NO.01
SELECT NO.02
SELECT NO.03
SELECT NO.04
SELECT NO.05
SELECT NO.06
SELECT NO.07
SELECT NO.08
SELECT NO.09
(4) MODEM TEST [1] - [9]
(1) RELAY TEST [1] - [2]
(1) RELAY TEST 1
(2) RELAY TEST 2
Item3
Explanation
D-RAM data check
Write/read check
Read check
Grid
HT
All-black output
All-white output
Composite solid white + Solid black
4dot-6space (vertical)
dot-6space (horizontal)
Ghost
16 gray levels (monochromatic)
NCU relay (and switch) ON/OFF test
230 V common NCU test
Frequency test
(2) FREQ TEST [0] - [6]
(0) FREQ TEST 462Hz
(1) FREQ TEST 1100Hz
(2) FREQ TEST 1300Hz
(3) FREQ TEST 1500Hz
(4) FREQ TSST 1650Hz
(5) FREQ TEST 1850Hz
(6) FREQ TEST 2100Hz
G3 signal transmission test
(4) G3 SIGNAL TX TEST [0] - [8]
(0) G3 SIGNAL TX TEST 300bps
(1) G3 SIGNAL TX TEST 2400bps
(2) G3 SIGNAL TX TEST 4800bps
(3) G3 SIGNAL TX TEST 7200bps
(4) G3 SIGNAL TX TEST 9600bps
(5) G3 SIGNAL TX TEST TC7200bps
(6) G3 SIGNAL TX TEST TC9600bps
(7) G3 SIGNAL TX TEST 12000bps
(8) G3 SIGNAL TX TEST 14400bps
DTMF transmission test
(5) DTMF TEST [0] - [9], * , #
(0) G3 SIGNAL TX TEST 300bps
(1) G3 SIGNAL TX TEST 2400bps
(2) G3 SIGNAL TX TEST 4800bps
subgroup Item 1
Item2
Item3
Explanation
(3) G3 SIGNAL TX TEST 7200bps
(4) G3 SIGNAL TX TEST 9600bps
(5) G3 SIGNAL TX TEST TC7200bps
(6) G3 SIGNAL TX TEST TC9600bps
(7) G3 SIGNAL TX TEST 12000bps
(8) G3 SIGNAL TX TEST 14400bps
(9) G3 SIGNAL TX TEST TC9600bps
(*) G3 SIGNAL TX TEST 12000bps
(#) G3 SIGNAL TX TEST 14400bps
Tonal sign reception test
(6) MODEM TEST
V34 G3 signal transmission test
(8) G3 V.34 Tx TEST
(6) FUNCTION TEST [1] - [9]
G3 4800 bps signal transmission test
(1) FUNCTION TEST G3 4800bps
Sensor checks
(2) SENS/SW CHECK
Sensor check with flag
FLAG
Cassette check
CST
Reader sensor check
READER
A/D
Analog/digital computation output
sensor
Copy confirmation sensor
COPY
ADF sensor check
ADF
cardreader test
(3) NCR sts
Line signal reception test
(9) LINE TEST [1] - [3]
T-4-58
■ Details
● D-RAM Test <(1) D-RAM>
Press the numeric keypad key 1 on the test mode menu to select the D-RAM test.
Press numeric keypad keys 1 and 2 during the D-RAM test to carry out the individual tests
described below.
• Numeric keypad key 1
Checks to see if data can be correctly written to and read from all areas of D-RAM (SDRAM).
If an error occurs making this check, the test is aborted, with an error appearing on the
touch panel (LCD).
4-51
4
• Numeric keypad key 2
Procedure
Checks to see if data can be correctly read from all areas of D-RAM (SDRAM). If an error
1) Enter the PG number with numeric keys, then press the START key.
occurs making this check, the test is aborted, with an error appearing on the touch panel
2) Select single-sided (SGL: 0) or double-sided (DBL: 1), then press the START key.
(LCD).
3) Enter the number of prints to be output (PG COUNT), then press the START key.
4) Specify the paper drawer (main unit), then press the START key.
D-RAM TEST
[1] - [2]
Main unit cassette (ST_C: 0), 2nd cassette (OP_C: 1), Manual feed tray (MLT: 2)
5) Specify the paper eject slot, then press the START key.
Press numeric keypad key 1
Tray 1 (1_OUT: 0), Tray2 (2_OUT: 1)
6) Select a paper type, then press the OK key.
D-RAM TEST 29888KB
*******......
Plain paper (PLN: 0), Thick paper (TCK: 1),Thin paper (OHP: 2)
29888KB:Total size of D-RAM memory (byte)
*:Size of written to memory
:Size of read from memory
7) A test pattern is output.
Nomal end
D-RAM TEST 29888KB
complete (no error)
● MODEM Test <(4) MODEM TEST>
These tests test modem and NCU transmission and reception. The modem tests check
Press numeric keypad key 2
whether signals are sent correctly from the modem by comparing the sound of the signals
D-RAM TEST 29888KB
......
from the speaker with the sounds from a normal modem.
End this test by pressing the Stop key.
29888KB:Total size of D-RAM memory (byte)
:Size of read from memory
4
Keypad Type
F-4-11
● PG Output <(3) PG>
2
Press the numeric keypad key 3 on the test mode menu to select the PG output.
Press numeric keypad keys during the print test to generate test patterns as described below.
Nine kinds of service test patterns are available. Other test patterns are reserved for factory/
development purposes.
No.
SELECT NO.01
SELECT NO.02
SELECT NO.03
SELECT NO.04
SELECT NO.05
SELECT NO.06
SELECT NO.07
SELECT NO.08
SELECT NO.09
Test pattern
Grid
HT
All-black output
All-white output
Composite solid white + Solid black
4dot-6space (vertical)
dot-6space (horizontal)
Ghost
16 gray levels (monochromatic)
T-4-59
4-52
1
4
5
6
8
Description
Relay Test
Use it to turn on/off a selected relay to execute a switchover test.
Frequency test
The modem sends tonal signals from the modular jack
and the speaker.
G3 signal transmission test
The modem sends G3 signals from the modular jack
and the speaker.
DTMF signal reception test
Use it to generate the DTMF signal coming from the
modem using the
telephone line terminal and the speaker.
Tonal signal reception test
Use it to monitor a specific frequency and the DTMF
signal received from the telephone line terminal by
causing them to be indicated on the LCD (i.e., the
presence/absence as detected). The reception signal is
generated by the speaker.
V.34 G3 signal transmission test The modem sends V.34 G3 signals from the modular
jack and the speaker.
T-4-60
Relay Test
Press '1'or '2' on the keypad on the Modem test menu to select relay test mode. Use the
keypad to operate the various relays of the NCU. '2' on the keypad is used for 230V machine.
• Numeric keypad key 1
Frequency Test
The input key and relay are shown below:
A press on '2' on the keypad from the MODEM test menu selects the frequency test.
[1]
In this test, signals of the following frequencies from the modem are transmitted using the
[2]
telephone line terminal and the speaker. To select a different frequency,
Keypad
RELAY TEST1 OFF OFF
OFF OFF OFF OFF
[3]
[4]
[5]
1
2
3
4
5
6
7
[6]
[1] [2]
Relay CML P
Keypad 0
1
[3]
S
2
[4]
H
3
[5]
D
4
[6]
R
5
462Hz
1100Hz
1300Hz
1500Hz
1650Hz
1850Hz
2100Hz
T-4-61
F-4-12
• Numeric keypad key 2
MEMO:
The frequency and the output level of individual frequencies are in keeping with the
output level set in service mode.
The input key and relay are shown below:
[1]
[2]
RELAY TEST2 OFF OFF
OFF OFF OFF OFF OFF
[3]
Frequency
[4]
[5]
[6]
G3 Signal Transmission Test
A press on '4' on the keypad from the MODEM test menu selects the G3 signal transmission
test. In this test, the following G3 signals from the modem are transmitted using the telephone
[7]
[1] [2] [3]
[4]
[5]
[6]
[7]
Relay CITS2 C1 NORG DCSEL DCLIM IPSEL1 IPSEL2
Keypad 0
1
2
3
4
5
6
F-4-13
CAUTION:
The touch panel (LCD) is turned on or off in relation to the transmission of the relay
operation signal as is operated on the keypad; for this reason, you cannot use the
touch panel (LCD) to check a fault on a single relay.
line terminal and the speaker. To select a different transmission speed, use the keypad.
Keypad
0
1
2
3
4
5
6
7
8
4
Transmission speed
300bps
2400bps
4800bps
7200bps
9600bps
TC7200bps
TC9600bps
12000bps
14400bps
T-4-62
MEMO:
The output level of individual signals is in keeping with the setting made in service
mode.
A press on '5' on the MODEM test menu selects the DTMF signal transmission test. In the
test, the following DTMF signals from the modem are transmitted using the telephone line
terminal and the speaker. The number pressed on the keypad selects a specific DTMF signal.
4-53
Left/right arrow key Transmission speed
MEMO:
The output level of individual signals is in keeping with the setting made in service
mode.
<
>
Tonal/DTMF Signal Reception Test
A press on '6' on the keypad from the MODEM test menu selects the tonal signal/DTMF signal
reception 0 test. In this signal, the tonal signal/DTMF signal received from the telephone line
terminal can be checked to find out if it was detected by the modem.
Tonal signal reception test
MODEM TEST
OFF OFF OFF
2400bps
4800bps
7200bps
9600bps
12000bps
14400bps
16800bps
19200bps
21600bps
24000bps
26400bps
28800bps
31200bps
33600bps
T-4-64
OFF OFF OFF
changes from '0' to '1' in response to detection of a signal of 462±25Hz.
changes from '0' to '1' in response to detection of a signal of 1100±30Hz.
changes from '0' to '1' in response to detection of a signal of 2100±25Hz.
4
DTMF signal reception test
MODEM TEST
OFF OFF OFF 5
The received DTMF signals are indicated starting
from the right using the 2nd character of the display.
F-4-14
V.34 G3 Signal Transmission Test
A press on '8' on the keypad from the MODEM test menu selectes the V.34 G3 signal
transmission test. The V.34 G3 signals below are sent from the modem using the modular
● FUNCTION Test <(6) FUNCTION TEST>
Press the numeric keypad key 6 on the test mode menu to select the function test.
Press numeric keypad keys 1 to 4 and 9 during the function test to enter the menus listed
below.
Keypad
Type
Description
1
G3 signal transmission test
2
3
4
5
6
7
8
9
Sensor test
Accessory
ADF test
Not used
Not used
Not used
Not used
Line signal reception test
Transmits 4800-bps G3 signals to a telephone line and
speaker
Sensor actuation test
jack and the speaker by pressing the start key. The Baud rate can be changed with the
keypad, and the Speed can be changed with the left/right arrow key.
Keypad
Baud rate
0
3429baud
1
3200baud
2
3000baud
3
2800baud
4
2743baud
5
2400baud
NCU board signal sensor and frequency counter
operation test
T-4-65
G3 signal transmission test (6-1: G3 480 bps Tx)
Press numeric keypad key 1 on the FUNCTION TEST menu to select the G3 signal
transmission test.
This test transmits 4800-bps G3 signals from the telephone line connection terminal and
speaker.
T-4-63
4-54
ADF operation test
Sensor test (6-2: SENSOR)
This mode is used to verify the status of the unit sensors from the touch panel (LCD)
Group
Item
READER
indications.
Press numeric keypad key 3 on the FUNCTION TEST menu to select the sensor test.
To select a minor item, press the START key.
The touch panel (LCD) indications change as the associated sensors turn on and off.
Group
Item
Description
(2) SENS/SW CHECK
FLAG
Sensor check CT: Waste Toner Full
with flag
Sensor(S17)
(manual check) TC: Toner Cover
Open/Closed Sensor
(S16)
MW: Manual Feeder
Paper Size Sensor
(S8)
DO: Front Cover
Open/Closed Sensor
(S18)
F1: No.1 Delivery Full
Sensor (S11)
F2: No. 2 Delivery
Full Sensor (S41)
CST
Cassette check S: Cassette 1 Pickup
Sensor (S1)
SU: Cassette 1 Paper
Sensor (S2)
PE: Cassette 1 Paper
Level Sensor A (S3)
ZA: Cassette 1 Paper
Level Sensor B(S4)
S1: Cassette Size
Detection Switch 1
(Width) (SW6)
S2: Cassette Size
Detection Switch 2
(Length) (SW7)
Detail
0/Full, 1/Available
1/Cover open, 0/Cover closed
0/Document presence, 1/Document
absenc
1/Cover open, 0/Cover closed
0/Document presence, 1/Document
absenc
0/Document presence, 1/Document
absenc
0/Document presence, 1/Document
absenc
0/Document presence, 1/Document
absenc
0/Document presence, 1/Document
absenc
0/Document presence, 1/Document
absenc
0/Document presence, 1/Document
absenc
0/Document presence, 1/Document
absenc
A/D
Description
Reader sensor C0: Copyboard Cover
check
Open/Closed Sensor
0 (S21)
C1: Copyboard Cover
Open/Closed Sensor
11 (S26)
HP: iR2545/2535:
CCD Hp Sensor
(S22)
iR2530/2525/2520:
CIS Hp Sensor (S31)
SIZE: Document size:
Paper size indicated
in a mix of document
size sensors
Document size
sensor 0/1/2/3
Analog/digital HOP: Developing unit
computation
toner sensor (TS1)
output sensor output value
DEV: Sub hopper
toner sensor (TS2)
output value
TEP: Temperature
output value
HUM: Humidity output
value
MTH: Fixing main
thermistor (TH3)
output value
STH1: Fixing sub
Thermistor (rear)
(TH1) output value
STH2: Fixing sub
thermistor (front)
(TH2) output value
Detail
0/Document presence, 1/Document
absenc
0/Document presence, 1/Document
absenc
1/HP, 0/besides HP
0/Document presence, 1/Document
absenc
4
4-55
Group
Item
COPY
ADF
4
Copy
confirmation
sensor
ADF sensor
check
Card reader test <6-3: NCR sts>
Description
Detail
MP: Manual Feeder
Paper Sensor (S9)
RE: Pre-Registration
Sensor (S5)
RP: Loop Sensor (S6)
0/Document presence, 1/Document
absenc
0/Document presence, 1/Document
absenc
0/Document presence, 1/Document
absenc
0/Document presence, 1/Document
absenc
0/Document presence, 1/Document
absenc
FX: Fixing Outlet
Sensor (S19)
D1/2:No.1 Delivery
Sensor(S12)/No. 2
Delivery Sensor(S42)
TU: Reversal Sensor
(S40)
DL: Duplex Feed
Sensor (S7)
W1: Document width
sensor 1
W2: Document width
sensor 2
L1: Document length
sensor 1
L2: Document length
sensor 2
LT: Last document
detection sensor
EX: Delivery reversal
sensor
DR: Read sensor
0/Document presence, 1/Document
absenc
0/Document presence, 1/Document
absenc
0/Document presence, 1/Document
absenc
0/Document presence, 1/Document
absenc
0/Document presence, 1/Document
absenc
0/Document presence, 1/Document
absenc
0/Document presence, 1/Document
absenc
0/Document presence, 1/Document
absenc
0/Document presence, 1/Document
absenc
RG: Registration
0/Document presence, 1/Document
paper sensor
absenc
CV: Cover open/close 1/Cover open, 0/Cover closed
sensor
DS: Document set
0/Document presence, 1/Document
snsor
absenc
RK: Release motor
1/HP, 0/besides HP
HP sensor
TM: Timing sensor
0/Document presence, 1/Document
absenc
T-4-66
Press numeric keypad key 3 on the FACULTY menu to select the card reader test. In this test,
verify the successful operations of the card reader.
Press numeric keypad key 3
[1]
NCR Sts:12345678
DPT MGN OK RDY 1234
[2]
[3] [4] [5]
[6]
[1] Card reader and card availability indication
Card available: Eight-digit card ID
No card: Card None
No card reader available: NCR None
[2] Card type and card reader status indication
DPT: Department card
PRC: Unit pricing card
MAX: Upper limit setting card
ERS: Erased card
SRV: Service card
(No indication): No card
[4] Can status
OK: Normal scan
ERR: Scan error
NG: Nonstandard error
(No indication): No card
[5] Equipment status
IN: Initialization in progress
RDY: Ready
[6] Card reader version indication
Four-digit number
[3] Card type
MGN: Magnetic card
OPT: Optical card
F-4-15
Line signal reception test <6-9: LINE DETECT>
Press numeric keypad key 9 on the FACULTY menu to select the line signal reception test. In
this test, verify the successful operations of the NCU signal sensor and the frequency counter.
Menu 1 detects the CI state, while menu 3 detects the CNG signal.
• Test menu 1
Press numeric keypad key 1 on the LINE DETECT menu to select test menu 1. When CI is
detected on the telephone line connection terminal, the touch panel (LCD) display changes
from OFF to ON, indicating the received frequency. The touch panel (LCD) also displays
the on-hook or off-hook state of an external telephone set as detected. The touch panel
(LCD) displays, from left to right, CI, CI frequency, hook port and FC with indications of 1:
ON and 0:OFF.
• Test menu 2
Press numeric keypad key 2 on the LINE DETECT menu to select test menu 2. When the
CNG signal is detected on the telephone line connection terminal, the touch panel (LCD)
4-56
display changes from OFF to ON, indicating the received frequency. The touch panel
(LCD) displays the status of CML, CNG and FED detection, from left to right, with ON/OFF
indications. Numeric keypad key 2 turns on the CML relay to detect CNG.
• Test menu 3
Press numeric keypad key 3 on the LINE DETECT menu to select test menu 3. When the
CNG signal is detected on the telephone line connection terminal, the touch panel (LCD)
display changes from OFF to ON, indicating the received frequency. The touch panel
(LCD) displays the status of CML, CNG and FED detection, from left to right, with ON/OFF
indications. Numeric keypad key 3 turns off the CML relay to detect CNG.
4
4-57
5
Parts Replacement and Cleaning
■ List of Parts
5
List of Parts
Symbol
List of Covers
[2]
[4]
[5]
[6]
[14]
[13]
[7]
[12]
[8]
[11]
[9]
[10]
F-5-1
5-2
Reader Left Cover
DADF (Optional or Standard)
Reader Front Cover
Control Panel
[5]
[6]
[7]
[8]
[9]
Support Cover
Delivery Tray
Front Cover
Cassette 1
Cassette 2 (Only for the Cassette 2
standard model)
Lower Left Cover
Left Cover
Inside Base Cover
Rear Left Cover
Toner Supply Cover
[3]
[1]
5
Part name
[1]
[2]
[3]
[4]
[10]
[11]
[12]
[13]
[14]
Part number
FC8-6197
FC9-0491
FM3-9356 (TW)
FM3-9354 (UL,AU)
FM3-9355 (CN)
FM3-9357 (KR)
FM3-9358 (EUR)
FC9-0513
FM3-9256
FC9-0506
FM3-9338
FC9-0520
FC9-0523
FC9-0571, FC9-0568
Symbol
[16]
[15]
[17]
Part name
[15]
[16]
Reader Right Cover
Platen Glass
[17]
[18]
[19]
[20]
[21]
[22]
[23]
Reader Rear Cover
Rear Cover (Right)
Rear Cover (Left)
Right Cover (Upper Rear)
Right Cover (Lower Rear)
Manual Feed Pickup Tray
Right Cover
[24]
[25]
Lower Rear Cover
Cassette 2 Rear Cover
[23]
Part number
FC8-6198
A SIZE: FL2-9839
A/INCH SIZE: FL2-9840
AB/INCH SIZE: FL2-9841
FC9-0492
FC9-0525
FC9-0524
FC9-0572
FC9-0527
FM3-9285
FM3-9284 (With No.2 Deleivery Unit)
FM3-9380 (Without No.2 Deleivery Unit)
FC9-0507
FC9-4682
[18]
5
[22]
[24]
[20]
[19]
[21]
[25]
F-5-2
5-3
List of Main Units / Parts
Symbol
[6]
[5]
[1]
[4]
[3]
[8]
[2]
[7]
5
F-5-3
5-4
Part name
[1]
[2]
[3]
[4]
[5]
[6]
CCD Unit
Pickup Unit
Laser Scanner Unit
No.2 Deleivery Unit
Toner Supply Unit
Right Cover Unit
[7]
Platen Glass
[8]
ADF scan glass
Part number
FM3-9435
FM3-9277
FM3-9407
FM3-9314
FM3-9428
FM3-9284 (With No.2 Deleivery Unit)
FM3-9380 (Without No.2 Deleivery Unit)
A SIZE: FL2-9839
A/INCH SIZE: FL2-9840
AB/INCH SIZE: FL2-9841
FL2-9843
List of PCBs
Symbol
PCB5d
PCB5c
PCB5a
PCB5b
PCB18
PCB19
PCB2
PCB4
PCB1
PCB6
PCB14
PCB15
PCB16
Part name
PCB1
Main Controller PCB
PCB2
PCB3
Reader Relay PCB
Power Supply PCB
PCB4
PCB5a
PCB5b
PCB5c
PCB5d
PCB6
PCB7
DC Controller PCB
LCD Unit
1/4 Inverter PCB
Control Panel CPU PCB
Key Top PCB Assembly
HVT PCB
Option Power Supply PCB
PCB10
Heater PCB
PCB11
PCB12
PCB13
PCB14
PCB15
PCB16
NCU PCB
Modular PCB
Pseudo-CI PCB
Laser Driver PCB
BD PCB
RAM PCB
PCB18
PCB20
No.2 Delivery Reversal PCB
CCD PCB
Part number
iR2535: FM4-6218
iR2545: FM4-6219"
FM4-2859
120V: FM4-4195
230V: FM3-9258
FM4-2863
FL3-3204
FM2-2753
FM4-2854
FM4-2855
FM4-2871
120V: FK2-9187
230V: FK2-9188
120V: FM4-2857
230V: FM4-2858
FM4-3343
FM4-3346
FM2-7753
FM4-2547
FM2-4022
256MB: FM4-3349
512MB: FM4-3350
FM4-2886
FM3-9435
5
PCB3
PCB7
PCB10
F-5-4
5-5
List of Solenoids
Symbol
SL1
SL2
SL5
SL4
SL2
SL1
5
F-5-5
5-6
Part name
Pickup Solenoid
Manual Feed Pickup Solenoid
Part number
FK2-0408
FK2-1410
List of Sensors
S25
S26
S12
S29
S24
S28
S41
S21 S22
S42
S40
S11
S10
S9
TS2
S7
S19
S6
S8
S1
TS1
S2
S16
S4
S5
5
S3
HU1
S18
S17
F-5-6
F-5-7
5-7
Symbol
S1
S2
S3
S4
S5
S6
S7
S8
S9
S10
S11
S12
S16
S17
S18
S19
S21
S22
S24
S25
S26
S28
S29
S40
S41
S42
HU1
TS1
TS2
5
5-8
Part name
Cassette 1 Pickup Sensor
Cassette 1 Paper Sensor
Cassette 1 Paper Level Sensor A
Cassette 1 Paper Level Sensor B
Pre-Registration Sensor
Loop Sensor
Duplex Feed Sensor
Manual Feeder Paper Size Sensor
Manual Feeder Paper Sensor
Shutter Hp Sensor
No.1 Delivery Full Sensor
No.1 Delivery Sensor
Toner Cover Open/Closed Sensor
Waste Toner Full Sensor
Front Cover Open/Closed Sensor
Fixing Outlet Sensor
Copyboard Cover Open/Closed Sensor 0
Ccd Hp Sensor
Original Size Sensor 0 (AB/INCH)
Original Size Sensor 1 (AB/INCH)
Copyboard Cover Open/Closed Sensor 1
Original Size Sensor 1 (A/INCH)
Original Size Sensor 0 (A/AB)
Reversal Sensor
No. 2 Delivery Full Sensor
No. 2 Delivery Sensor
Enviorment Sensor
Developing Unit Toner Sensor
Sub Hopper Toner Sensor
Part number
WG8-5836
WG8-5836
WG8-5836
WG8-5836
WG8-5836
WG8-5836
WG8-5836
WG8-5836
WG8-5836
WG8-5836
WG8-5836
WG8-5836
WG8-5836
WG8-5836
WG8-5836
WG8-5836
WG8-5776
WG8-5776
FH7-7569
FH7-7569
WG8-5776
FH7-7569
FH7-7569
WG8-5836
WG8-5836
WG8-5836
WP2-5264
WP2-5282
WP2-5282
List of Motors
Symbol
M1
M2
M3
M4
M6
M7
M8
M9
M21
M21
M10
M2
M9
Part name
Main Motor
Fixing Motor
Cassette 1 Pickup Motor
Duplex Feed Motor
Bottle Motor
Hopper Motor
Shutter Hp Sensor
No.1 Delivery Motor
Scanner Motor
Part number
FK2-9141
FK2-9145
FK2-7327
FK2-9149
FK2-9147
FK2-9147
FK2-9148
FK2-9151
FK2-6919
M4
M6
M1
M8
M7
M3
5
F-5-8
5-9
List of Fans
Symbol
FAN1
FAN2
FAN3
FAN4
FAN6
FAN3
FAN4
FAN1
FAN2
FAN6
5
F-5-9
5-10
Part name
Paper Edge Cooling Fan (Rear)
Paper Edge Cooling Fan (Front)
Exhaust Fan (Rear)
Exhaust Fan (Front)
Power Supply Cooling Fan
Part number
FK2-0360
FK2-0360
FK2-0360
FK2-0360
FK2-0360
List of Switches
Symbol
SW2
SW4
SW6
SW7
Part name
Front Door Switch
Enviorment Switch
Cassette Size Detection Switch 1
Cassette Size Detection Switch 2
Part number
WC4-5242
FM4-2876
WC2-5680
WC2-5680
SW2
SW4
5
SW6
SW7
F-5-10
5-11
List of Clutches
Symbol
CL1
CL2
CL3
CL3
CL2
CL1
5
F-5-11
5-12
Part name
Registration Clutch
Manual Feed Pickup Clutch
Developing Cylinder Clutch
Part number
FK2-9154
FK2-9154
FK2-9154
Other
Symbol
H6
H5
Part name
TH1
Fixing Sub Thermistor (Rear)
TH2
TH3
H1
H2
SP1
H3
H4
H5
Fixing Sub Thermistor (Front)
Fixing Main Thermistor
Fixing Heater 1
Fixing Heater 2
Speaker (Option)
Cassette Heater (Option)
Drum Heater (Option)
Reader Heater (Option)
Part number
120V: FM4-3363
230V: FM3-9302
FK2-9442
FM3-8915
FK2-9157
120V: FK2-9468
230V: FK2-0228
TH1
TH2
TH3
H1
H2
SP1
H4
5
H3
F-5-12
5-13
6
Product Overview
■ Specifications
■ Product lineups
■ Basic Configuration
6
Specifications
Item
Paper type
(Manual feed pickup tray)
Specifications
Item
Copyboard
Body
Light source type
Photosensitive medium
Image reading method
Reproduction method
Exposure method
Charging method
Development method
Transfer method
Separation method
Pickup method
6
Fixing method
Delivery method
Reproduction ratio
Drum cleaning method
Toner type
Toner replenish method
Toner level detection function
Top margin
Left margin
Non-image width
(leading edge)
Non-image width
(left edge)
Warm-up time
Number of gradations
Reading resolution
Writing resolution
First print time
Paper type
(Cassette 1/3/4)
Paper type (Cassette 2)
6-2
Specifications
Stream reading, original fixed reading
Desktop
LED (white)
OPC drum (30 mm dia)
CCD
Indirect electrostatic method
Laser exposure system
Roller charge
Dry single component projection developing
By transfer roller
Curvature and static eliminator
Cassette: Retard separation method
Manual feed pickup tray: Pad separation method
On demand
Face down delivery (in-body delivery)
25% to 400%
By cleaning blade
Magnetic negative charge toner
Toner cartridge
Yes
2.5 -/+ 1.5 mm
2.5 -/+ 1.5 mm
2.5 -/+ 1.5 mm
Paper size
(Cassette 1/3/4)
Paper size (Cassette 2)
2.5 -/+ 1.5 mm
* Using the feeder: 2.5 -/+ 2.0 mm
Dimensions (W x D x H)
At power ON: 30 sec or less
256 gradations
600 dpi x 600 dpi
1200 dpi x 1200 dpi
3.9 sec or less
Weight: 64 g/m2 to 90 g/m2
Type: Plain, Recycled, Color (64 g/m2 to 80 g/m2), 3-hole punch
Weight
Weight: 64 g/m2 to 90 g/m2
Type: Plain, Recycled, Color (64 g/m2 to 80 g/m2), 3-hole punch,
Envelopes* (No.10 (COM10), ISO-B5, Monarch, ISO-C5, DL)
* The optional Envelope Feeder Attachment-D1 is required.
Paper size
(Manual feed pickup tray)
Pickup capacity
Duplex method
Acoustic noise
Ozone
Power supply rating
Maximum power consumption
Specifications
Weight: 64 g/m2 to 128 g/m2
Type: Plain, Recycled, Color (64 g/m2 to 80 g/m2), 3-hole punch,
Bond (75 g/m2 to 90 g/m2), Heavy Paper 1 (81 g/m2 to 90 g/m2),
Heavy Paper 2 (91 g/m2 to 105 g/m2), Heavy Paper 3 (106
g/m2 to 128 g/m2), Transparencies, Labels, Envelopes (No.10
(COM10), ISO-B5, Monarch, ISO-C5, DL)
Standard size (A4, A4R, A3, A5R, B4, B5, B5R, LTR, LTTR, LG,
11" x 17", STMTR)
Standard size (A4, A4R, A3, A5R, B4, B5, B5R, LTR, LTTR, LG,
11"" x 17"", STMTR)
Envelopes* (No.10 (COM10), ISO-B5, Monarch, ISO-C5, DL)
* The optional Envelope Feeder Attachment-D1 is required.
Standard size (A4, A4R, A3, A5R, B4, B5, B5R, LTR, LTTR, LG,
11"" x 17"", STMTR)
Free size (99 mm x 297 mm to 148 mm x 432 mm)
Envelopes (No.10 (COM10), ISO-B5, Monarch, ISO-C5, DL)
Cassette: 550 sheets (80g/m2)
Manual feed pickup tray: 100 sheets (80g/m2)
Through path duplex
imageRUNNER 2545i/2545:
operation: 74.75 dB or less *1 / stand-by: 53.00 dB or less
imageRUNNER 2535i/2535:
operation: 71.25 dB or less *1 / stand-by: 53.00 dB or less
*1 Except for china model. China model: 71.00 dB or less
(operation)
Max: 0.035 ppm or less
imageRUNNER 2545i/2545/2535i/2535 (US):
120 - 127 V AC, 50Hz/60Hz, 9.3 A
imageRUNNER 2545i/2545/2535i/2535 (Except US):
220 - 240 V AC, 50Hz/60Hz, 4.2 A
120 - 127 V model: Approx. 1.690 kW
220 - 240 V model: Approx. 1.827 kW
565mm x 680mm x 806mm (with the platen cover)
565mm x 689mm x 907mm (with the feeder)
Max (with the feeder, double cassette and 2 way unit):
Approx. 78.8 kg
Min (with the platen cover and double cassette):
Approx 69.5 kg
T-6-1
Weight / Size
Product name
imageRUNNER 2545i/2545/
2535i/2535
(with the platen cover)
imageRUNNER 2545i/2545/
2535i/2535
(with the feeder)
DADF-AA1
Inner Finisher-B1
2 Way Unit-B1
CST. Feeding Unit-AE1
Inner 2Way Tray-G1
Card Reader-E1
Productivity (Print speed)
Width
(mm)
Depth
(mm)
Height
(mm)
Weight
Approx. (kg)
565
680
806
69.5
* with the double cassette
565
689
907
78.8
* with the double cassette
and 2 way unit
565
416
444
565
426
88
540
554
550
680
413
100
137
350
236
248
109
32
Size
Mode
Paper
type
Paper
basis
weight
(g/m2)
A4
1-sided
Plain paper
Heavy Paper
Plain paper
Heavy Paper
45
44
-
30
30
28
29
-
35
34
-
30
30
28
29
-
Plain paper
Heavy Paper
64-90
91-105
106-128
31
-
21
-
24
-
21
-
A3
2-sided
(with the 2 way
unit)
2-sided
(without the 2
way unit)
1-sided
64-90
91-105
106-128
64-90
91-105
106-128
Plain paper
Heavy Paper
64-90
91-105
106-128
64-90
91-105
106-128
22
21
-
15
14
14
14
-
22
21
-
15
14
14
14
-
64-90
91-105
106-128
15
-
10
-
15
-
10
-
7.9
12.5
2.5
24
0.6
0.295
T-6-2
2-sided
(with the 2 way
unit)
2-sided
(without the 2
way unit)
Plain paper
Heavy Paper
Plain paper
Heavy Paper
imageRUNNER
2545i/2545
2535i/2535
Cassette Manual Cassette Manual
feed
feed
pickup
pickup
tray
tray
T-6-3
6
6-3
Product Lineup
Paper type
For free size paper, refer to the table below.
Type
Feeding direction (mm)
Width direction (mm)
Free size
148 to 432
99 to 297
■ Pickup
Host machine
T-6-4
Usable paper types are shown.
Paper type
(g/m2)
- Plain (64 to 90)
- Color (64 to 90)
- Recycled (64 to
90)
- Bond (75 to 90)
6
Size
A4, A4R, A3,
A5R, B4, B5,
B5R, LTR,
LTTR, LGL,
11" x 17",
STMTR
- Heavy Paper
A4, A4R, A3,
(91 to 128)"
A5R, B4, B5,
B5R, LTR,
LTTR, LGL,
11" x 17",
STMTR
- Labels
A4, B4, LTR
- Transparencies A4, LTR
- 3-hole punch
LTR
- Envelopes
No.10
(COM10),
ISO-B5,
Monarch,
ISO-C5, DL
- Free size
99 mm x 297
mm to 148
mm x 432
mm
Manual
feed
pickup
tray
Cassette
Cassette 2
Cassette Cassette
with the without
1
3
4
envelope
the
feeder envelope
feeder
Yes
Yes
No
Yes
Yes
Yes
Yes
No
No
No
No
No
F-6-1
Yes
Yes
Yes
No
No
Yes
No
No
Yes
No
No
Yes
No
No
Yes
No
No
Yes
Yes
No
Yes
No
No
No
Yes
No
No
No
No
No
T-6-5
6-4
Option
■ Host machine configuration
Host machine configuration
■ Pickup delivery / image reading options
Reader + DADF (standard or optional) + Printer
T-6-6
[19]
■ Model type
[6]
imageRUNNER 2545
Print Speed
Positioning
imageRUNNER 2535
[7]
[2]
45ppm
35ppm
Target machine: imageRUNNER 3235/3225/2030/2025 Series
T-6-7
[5]
imageRUNNER 2545 / 2535
Underlined (2-digit) numeric figures indicate print speed (ppm: print per minute).
[14]
F-6-2
[17]
[16]
[1]
[18]
[4]
[3]
[15]
[13]
[12]
[11]
6
[10]
[8]
[9]
F-6-3
6-5
No.
Product name
1
2
3
4
imageRUNNER 2545i/2545/2535i/2535
DADF-AA1
Inner Finisher Additional Tray-B1
Inner Finisher-B1
5
6
7
8
9
10
11
12
13
14
15
16
17
18
19
Reader Heater Unit-H1
Platen Cover Type Q
Document Tray-J1
FL Cassette-AJ1
FL Cassette-AK1
Cassette Heater Unit-37
CST. Feeding Unit-AE1
Envelope Feeder Attachment-D1
Inner 2Way Tray-G1
Cst Heater Kit-J1
Drum Heater-C1
Power Supply Unit-U1
ADF Access Handle-A1
2 Way Unit-B1
Stamp Unit-B1
■ Function expanding option
Remarks and condition
[1]
[2]
Built-in finisher
Power Supply Unit-U1 is required.
Cst Heater Kit-J1 is required.
[4]
Cst Heater Kit-J1 is required.
For host machine delivery additional tray.
Cst Heater Kit-J1 is required.
[7]
[9]
[10]
[11]
[12]
[13]
[6]
[5]
T-6-8
[8]
[3]
F-6-4
6
6-6
No.
1
2
3
4
5
6
7
8
9
10
11
12
13
Product name
Card Reader-E1
Card Reader Attachment-D3
Super G3 Fax Board-AG1
USB Application 3-Port Interface Kit-A1
Serial Interface Kit-J2
System Upgrade RAM-C1
System Upgrade SD Card-A1
Copy Control Interface Cable-A1
Barcode Printing Kit-B1
PCL Printer Kit-AF1
PS Printer Kit-AF1
Color Send Kit-Y1
Color Send Searchable PDF Kit-C1
Remarks and condition
Card Reader Attachment-D3 is required.
Basic Configuration
Functional Configuration
The machine may broadly be divided into the following functional system blocks; document
exposure system block, controller system block, laser exposure system block, image
formation system block, fixing system block and pickup/feed system block.
PCL Printer Kit-AF1 is required.
System Upgrade RAM-C1 is required.
System Upgrade RAM-C1 is required.
System Upgrade RAM-C1 is required.
System Upgrade RAM-C1 is required.
T-6-9
Document exposure system
Reader relay PCB
Exposure lamp
CCD
Controller system
Option
board
Main
controller
DC
controller
Delivery
Fixing
system
Fixing
Laser exposure system
Laser scanner unit
Transfer
Image
formation
system
Cassette 1
Flow of paper
Flow of signal
Laser beam
Duplexing
feed
Pickup
6
Pickup/feed
system
Cassette 2
F-6-5
6-7
■ Basic sequence
● Sequence at Power-On
• Reader
ON
Scanner motor
STBY
Backwarding
Forwarding
LED
Light-ON
ON
CCD HP sensor
CCD adjustment
F-6-6
● Print sequence
• Reader (Book mode, 1 original)
Copy start
Scanner motor
Backwarding
LED
CCD HP sensor
End
In reading
Forwarding
Backwarding
Forwarding
Light-ON
ON
ON
Shading correction
White board duct detection control
6
F-6-7
6-8
7
Version Upgrading
■ Upgrading Targets and Procedure
7
Upgrading Targets and Procedure
Host machine
Target
Category
PCB
Main iR2545/iR2535
controller
PCB
Outline
There are two methods to upgrade the system software.
1. Upgrading system software for host machine: Use the PC (UST).
2. Upgrading system software for inner finisher: Use the PC (SST) and downloader PCB
Host machine
CPU
Flash ROM
USB cable
Program
System
software
Remarks
USTUPDATE_iR2545_35_ There are two types
BOOT_vXXXX
of main controllers.
USTUPDATE_iR2545_35_ Note: When upgrading
bootable_lang_WLaaXXXX two types of firmware,
USTUPDATE_iR2530_25_ Boot and Bootable
20_BOOT_vXXXX
lang, at the same time,
USTUPDATE_iR2530_25_ upgrade Boot first.
20_bootable_lang_WLaaX
XXX
USTUPDATE_iR2530_25_
20_DCON_vXXXX
Inner finisher
Target PCB
Target system
software
FIN_CON
Finisher
controller PCB
Downloader
PCB
Finisher controller PCB
USTUPDATE_iR2545_35_ There are three types
DCON_vXXXX
of DC controllers.
USTUPDATE_iR2530_25_
DCON_vXXXX
T-7-1
RS232C
straight cable
Inner finisher
DCON
1st cassette,
550-sheet type
iR2530/2525/2520
1st cassette,
250-sheet type
UST or SST
Description
on SST
IFN_B1
Remarks
For the detailed procedure, refer to the service
manual for the finisher.
T-7-2
FY9-2034
CPU
CN22
F-7-1
7-2
Program
iR2530/2525/2520 Boot
iR2545/iR2535
DC
controller
iR2530/2525
PCB
J8104
Flash ROM
Boot
File type
PC
Main controller PCB
7
Target system
software
Procedure
6) Click [Next] following the instruction shown on the screen.
MEMO:
The procedure for upgrading Boot is described below as a typical example. Use the
same procedure for other firmware.
1) Turn ON the power switch of the PC and start up the UST.
2) When the power switch is turned ON, a Found New Hardware Wizard appears. Click
[Cancel].
F-7-3
7) Click [Next] following the instruction shown on the screen.
F-7-2
3) Enter the service mode. (
key > 2 Key > 8 Key >
key)
4) Select [DOWNLOAD] by pressing the arrow key, then press the [OK] key.
7
MEMO:
You can also enter the download mode from the following user mode:
> System Settings > Firmware Upgrade > Yes
5) When “USB DOWNLOAD AVAILABLE” is displayed, start up the UST.
F-7-4
7-3
8) Click [Next] following the instruction shown on the screen.
9) Click [Start] following the instruction shown on the screen.
F-7-5
MEMO:
If firmware for a wrong model is selected, “Specify by printer name” is not displayed.
F-7-7
10) Click [Yes] following the instruction shown on the screen.
F-7-8
11) The following screen appears. “UPDATING FIRMWARE” is displayed on the control panel
of this machine.
7
F-7-6
F-7-9
7-4
CAUTION:
Do Not Turn off the Power during Download/Write Operation in progress
Do not turn OFF the power while the system software is being downloaded or
written. The machine may fail to start when the power is turned ON.
12) When upgrade is complete, the following screen appears. Turn OFF then ON the main
power switch to complete the procedure.
F-7-10
7
7-5