1
Motorola Firmware for
PowerPC™
User’s Guide
Release 3.05
PPCMFWA/UG2
Notice
While reasonable efforts have been made to assure the accuracy of this document,
Motorola, Inc. assumes no liability resulting from any omissions in this document,
or from the use of the information obtained therein. Motorola reserves the right to
revise this document and to make changes from time to time in the content hereof
without obligation of Motorola to notify any person of such revision or changes.
No part of this material may be reproduced or copied in any tangible medium, or
stored in a retrieval system, or transmitted in any form, or by any means, radio,
electronic, mechanical, photocopying, recording or facsimile, or otherwise,
without the prior written permission of Motorola, Inc.
It is possible that this publication may contain reference to, or information about
Motorola products (machines and programs), programming, or services that are
not announced in your country. Such references or information must not be
construed to mean that Motorola intends to announce such Motorola products,
programming, or services in your country.
Restricted Rights Legend
If the documentation contained herein is supplied, directly or indirectly, to the U.S.
Government, the following notice shall apply unless otherwise agreed to in
writing by Motorola, Inc.
Use, duplication, or disclosure by the Government is subject to restrictions as set
forth in subparagraph (c)(1)(ii) of the Rights in Technical Data and Computer
Software clause at DFARS 252.227-7013.
Motorola, Inc.
Computer Group
2900 South Diablo Way
Tempe, Arizona 85282
Preface
The Motorola Firmware for PowerPC User’s Guide is designed to complement
Motorola Firmware’s user-friendly interface by describing each task and providing
details on circumstances under which particular tasks are necessary. This guide
also provides information on the Motorola Firmware utilities, and lists supported
peripheral devices.
This manual includes the following chapters:
Chapter 1 provides an overview of Motorola Firmware.
Chapter 2 provides an overview of the Motorola Firmware user interface and shows
functional group organization.
Chapter 3 describes user-accessible functionality, such as booting an operating
system and setting the boot password.
Chapter 4 discusses how to administer the system using Motorola Firmware. The
procedures described in this section should only be used by system administrators
or similarly qualified personnel.
Chapter 5, describes the Motorola Firmware FDOS utility and lists commands.
Chapter 6 provides system administrators with firmware installation instructions.
Motorola® and the Motorola symbol are registered trademarks of Motorola, Inc.
PowerStack™ is a trademark of Motorola, Inc.
PowerPC™ and the PowerPC logo are trademarks of IBM Corp.
AIX® and IBM® are registered trademarks of International Business Machines Corporation
Windows®, Windows NT®, and MS-DOS® are registered trademarks of Microsoft
Corporation
The software and documentation are copyrighted materials. Making unauthorized
copies is prohibited by law. No part of the software or documentation may be
reproduced, transmitted, transcribed, stored in a retrieval system, or translated
into any language or computer language, in any form or by any means without the
prior written permission of Motorola, Inc.
DISCLAIMER OF WARRANTY
Unless otherwise provided by written agreement with Motorola, Inc., the software
and the documentation are provided on an “as is” basis and without warranty.
This disclaimer of warranty is in lieu of all warranties whether express, implied, or
statutory, including implied warranties of merchantability or fitness for any
particular purpose.
© Copyright Motorola, Inc.
All Rights Reserved
Printed in the United States of America
November 1996
Contents
CHAPTER 1
Introduction to Motorola PowerPC Firmware
Overview1-1
Supported Standards1-1
Motorola Firmware Features1-2
Supported Operating Systems1-3
Supported Computer Systems1-3
Supported Peripherals1-4
Conventions1-4
CHAPTER 2
User Interface Diagram and Key Usage Definitions
Mouse Operation2-3
CHAPTER 3
Using Motorola Firmware
Booting an Operating System3-2
Managing Boot Passwords3-2
Getting Help3-4
Keyboard Shortcuts3-4
Environment Variable Defaults3-5
EDO Memory Configuration3-6
CHAPTER 4
System Setup
Environment Setup4-2
Environment Variables4-3
Resetting the Default Environment4-4
Editing and Creating Environment Variables4-5
International Keyboard Selection4-7
Display Environment Descriptions4-8
Managing Boot Selections4-8
Windows NT Boot Selections4-9
Adding a Boot Selection4-9
Deleting a Boot Selection4-12
Editing a Boot Selection4-13
Testing Boot Selections4-14
PR*P Operating System (OS) Boot Selections4-16
Managing Boot and System Passwords4-17
Motorola Firmware for PowerPC v
Enabling/Disabling Boot and System Passwords.................................4-18
Setting Boot and System Passwords........................................................4-19
Configuring the Desktop..................................................................................4-19
Setting Up the Screen Saver .............................................................................4-21
Enabling/Disabling Autoboot ................................................................................4-22
Setting the System Time and Date..........................................................................4-24
Running Programs....................................................................................................4-25
File Extensions ...................................................................................................4-25
Express Setup ............................................................................................................4-27
Configuring Hard Disk Partitions..........................................................................4-27
PowerPC Partition Support .............................................................................4-28
Creating PowerPC Boot Partitions...........................................................4-29
Updating PowerPC Boot Partitions.........................................................4-29
Deleting PowerPC Boot Partitions...........................................................4-30
File Allocation Table (FAT) Partition Support ...............................................4-30
Creating FAT Partitions.............................................................................4-30
Deleting FAT Partitions.............................................................................4-31
Designating System Partitions.........................................................................4-31
Show Partitions ..................................................................................................4-32
Running the FDOS Utility .......................................................................................4-33
CHAPTER 5
FDOS Utility
FDOS Description .......................................................................................................5-1
Command Prompt...............................................................................................5-1
Command Editing and Command History Buffers .......................................5-2
Command Aliases ...............................................................................................5-2
Wildcards ..............................................................................................................5-2
Command Options ..............................................................................................5-2
Filenames and Pathnames..................................................................................5-3
Output Redirection..............................................................................................5-3
Virtual Volumes ...................................................................................................5-3
Help .......................................................................................................................5-3
FDOS Commands .......................................................................................................5-4
ATTRIB..................................................................................................................5-6
BATCH ..................................................................................................................5-8
CHDIR.................................................................................................................5-10
CLS.......................................................................................................................5-11
CNFG...................................................................................................................5-12
COPY ...................................................................................................................5-13
COPYDIR............................................................................................................5-15
DATE ...................................................................................................................5-17
vi
Motorola Firmware for PowerPC
DIR ...................................................................................................................... 5-18
ECHO.................................................................................................................. 5-20
ERASE................................................................................................................. 5-22
EXIT .................................................................................................................... 5-23
FLASH ................................................................................................................ 5-24
HELP................................................................................................................... 5-26
MEMORY ........................................................................................................... 5-27
MKDIR................................................................................................................ 5-28
MOUNT.............................................................................................................. 5-29
MOVE ................................................................................................................. 5-30
PART ................................................................................................................... 5-32
PAUSE................................................................................................................. 5-33
READB................................................................................................................ 5-34
READH............................................................................................................... 5-35
READW .............................................................................................................. 5-36
REGEDIT ............................................................................................................ 5-37
REM .................................................................................................................... 5-38
RESTART ............................................................................................................ 5-39
RMDIR................................................................................................................ 5-40
SET ...................................................................................................................... 5-41
SUBST ................................................................................................................. 5-43
SYSTEM.............................................................................................................. 5-44
TREE ................................................................................................................... 5-45
TYPE ................................................................................................................... 5-46
VERSION ........................................................................................................... 5-47
WRITEB .............................................................................................................. 5-48
WRITEH ............................................................................................................. 5-49
WRITEW ............................................................................................................ 5-50
CHAPTER 6
Evaluating and Installing Motorola Firmware
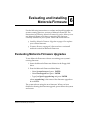
Evaluating Motorola Firmware Upgrades ............................................................. 6-1
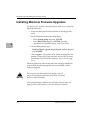
Installing Motorola Firmware Upgrades ................................................................ 6-2
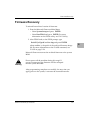
Firmware Recovery.................................................................................................... 6-3
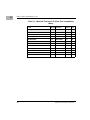
APPENDIX A
Video Card Compatibility Chart
Motorola Firmware for PowerPC
vii
FIGURES
Figure 2-1. User Interface Hierarchy........................................................................2-1
TABLES
Table 2-1. Command Line Keystrokes .....................................................................2-2
Table 5-1. FDOS Commands .....................................................................................5-4
Table A-1. Motorola Firmware 3.05 Video Test Compatibility Matrix ..............A-1
viii
Motorola Firmware for PowerPC
1Introduction to Motorola
PowerPC Firmware
1
Overview
Firmware, as the term suggests, has attributes of both hardware
and software. As a hardware component, firmware is the part
installed in each hardware platform that identifies and checks
system board components to ensure that the manufactured system
is functional and ready for use. In its software role, firmware
provides a method for describing the hardware platform to an
operating system (OS) so that the OS can make full use of each
hardware component and feature.
Motorola Firmware allows you to perform a variety of tasks on
your PowerPC system. These tasks range from performing system
setup and additional hardware installation before booting an
operating system to booting one of the three currently supported
operating systems.
Supported Standards
Hardware and software standards are supported in Motorola
Firmware as a response to innovations in systems, add-on cards,
and operating system software. Motorola Firmware supports the
following major hardware and software specifications:
❏
PowerPC Reference Platform (PR*P) Specification
The PR*P specification, introduced by the
Apple-IBM-Motorola (AIM) Alliance, describes the standards
for PowerPC hardware platforms. Operating systems
currently adhering to the PR*P specification include IBM
AIX®.
❏
Windows NT Portable Boot Loader Specification
The Windows NT Portable Boot Loader specification
describes the requirements for booting the Microsoft
Motorola Firmware for PowerPC
1-1
1
Introduction to Motorola PowerPC Firmware
Windows NT operating system on all RISC computing
platforms.
Motorola Firmware Features
Motorola Firmware provides a wide range of features from
hardware and peripheral support to unique utilities and
OS-specific installation assistance. Specific features include:
1-2
❏
Support for PowerPC 603, 603e,603ev, 604 and 604e
microprocessors
❏
486 real-mode emulation for video option ROM (int10
support)
❏
Core logic, library and porting source, including chipset, port
and platform modules
❏
Power On Self-Tests (POST)
❏
60% ROM image compression
❏
FDOS command interpreter shell utility
❏
Convenient window-based user interface
❏
Full implementation of the Windows NT Portable Boot
Loader Specification
❏
Full implementation of PR*P v1.1 conventional firmware,
including residual data, nonvolatile random access memory
(NVRAM), and OS booting
❏
Installation support to create and format FAT (File Allocation
Table) partitions, and to create and populate PR*P partitions
❏
Windows NT boot and installation
❏
Windows NT setup user interface
❏
IBM AIX boot and installation
Motorola Firmware for PowerPC
Motorola Firmware Features
Supported Operating Systems
Motorola Firmware currently supports and boots the following
operating systems:
❏
Microsoft Windows NT
❏
IBM AIX
Supported Computer Systems
Motorola Firmware is supported on the following PowerStackII
products:
❏
PowerStackII Pro4000/166 and 4000/200
❏
PowerStackII Net4000/166 and 4000/200
❏
PowerStackII Pro2000/200 and 3000/200
❏
Series E and Series EX
❏
RISC PC and RISC PC+
Motorola Firmware for PowerPC
1-3
1
1
Introduction to Motorola PowerPC Firmware
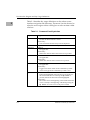
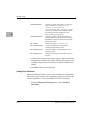
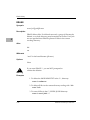
Supported Peripherals
Motorola Firmware supports the following peripherals:
Peripheral
Description and Capacity
Hard Drives
2Gb, 4Gb, 9Gb
CD-ROM
600
Floppy Drive
1.44 Mb 3.5” AT
Mb
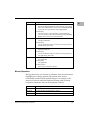
Conventions
Unless otherwise noted, command syntax and code examples use
the following.
1-4
Case
Commands and reserved words typically appear in uppercase
letters. Unless the manual states otherwise, you can enter these
items using uppercase, lowercase, or both. For example, you can
type MYPROG, myprog, or MYprog.
variable
Words appearing in italics are variables that you must replace with
appropriate values, as in filename.
output
Words appearing in the courier font represent output.
input
Words formatted as bold represent commands to be input.
[]
Square brackets enclose optional information, as in [option]. If
information is not enclosed in square brackets, it is required.
|
A vertical bar indicates an “either-or” choice of information to enter,
as in the command:
echo [[.]|[on]|[off]|[message]]
Motorola Firmware for PowerPC
2User Interface Diagram and Key
Usage Definitions
2
✔
Main Menu
✔
Boot
Environment
Setup
Set
Autoboot
Define
Environment
Variables
Time
Main
and
Menu
Date
Reset
Environment
Variables
*
✔
Setup
Run Program
Password
Help
Hard Disk
Setup
Express Setup
Configure
Partitions
Edit
Environment
Variables
Run FDOS
Create
PowerPc
Boot Partition
Update
PowerPc
Boot Partition
Exit
Select
Keyboard
Language
Create FAT
Partition
Display
Environment
Descriptions
Manage
NT Startup
Add
a Boot
Selection
PR*P OS
Boot Setup
Delete
a Boot
Selection
Manage
Passwords
Configure
Desktop
Delete
Partition
Designate
System
Partition
Show
Partitions
Exit
Edit
a Boot
Selection
Test
Boot
Selections
User-accessible
functionality
System administrator
functionality
Setup
Screen Saver
✔
May be Boot
Password protected
*
May be System
Password protected
11625.00 9610
Figure 2-1. User Interface Hierarchy
Motorola Firmware for PowerPC
2-1
User Interface Diagram and Key Usage Definitions
Table 2-1 describes key usage definitions as they relate to userinterface navigation and data entry. The mouse can also be used to
select the active region within a dialog box or select an item within
a list box.
2
Table 2-1. Command Line Keystrokes
2-2
Key
Usage
<ENTER>
In Menus:
Invokes the selected menu or action.
In Data Entry:
Saves and terminates data entry from the keyboard.
<ESC>
Escape from the current menu to the parent menu
Backspace
In Menus:
Not applicable.
In Data Entry:
Deletes the character before the current cursor position.
Delete
In Menus:
Not applicable.
In Data Entry:
Deletes the character at the current cursor position.
Insert
In Menus:
Not applicable.
In Data Entry:
Toggles insert mode. Insert mode is indicated by a black
cursor. Overtype mode is indicated by a white cursor.
Up Arrow
In Menus:
Rotates the highlighted menu selection up one position; if
the current menu item is on the top and Up Arrow is
pressed, the bottom menu item will be highlighted.
In Data Entry:
Moves the cursor to the beginning of the current field. If the
cursor is already at the beginning of the field, pressing the
Up Arrow moves the cursor to the previous field.
Motorola Firmware for PowerPC
Key
Usage
Down Arrow
In Menus:
Rotates the highlighted menu selection down one position;
if the current menu item is on the bottom and Down Arrow
is pressed, the top menu item will be highlighted.
In Data Entry:
Moves the cursor to the end of the current field. If the
cursor is already at the end of the field, pressing the Down
Arrow moves the cursor to the next field.
Left Arrow
In Menus:
Collapses submenus.
In Data Entry:
Used to nondestructively move the cursor one position to
the left during data entry.
Right Arrow
In Menus:
Expands submenus.
In Data Entry:
Used to nondestructively move the cursor one position to
the right during data entry.
Tab
In Menus:
Not applicable.
In Data Entry:
Not applicable.
In Dialog Boxes:
Move to the next field in the box.
2
Mouse Operation
Moving the mouse over a menu or submenu item causes the menu
highlight bar to change position. Movement of the mouse
occasionally interferes with keyboard input. For example, if the
mouse is in motion while the keyboard is being used for menu
navigation, submenus may not be displayed correctly.
Action
Description
Right Click
No action.
Left Click
Invokes the selected menu item or action.
Middle Click
No action.
Motorola Firmware for PowerPC
2-3
User Interface Diagram and Key Usage Definitions
2
2-4
Motorola Firmware for PowerPC
3Using Motorola Firmware
3
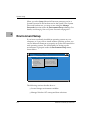
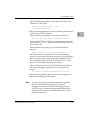
When you power on your PowerPC system, the firmware initializes
the hardware and performs Power-On Self Test (POST) routines.
The POST routine failures are displayed in the DEBUG window.
When the POST routines have completed, the DEBUG window is
automatically minimized and the Motorola Firmware window is
restored.
Wednesday,
Boot
Setup
2-29-1996
Password
4:18:35
Help
Press ’H’ for help, or ’M’ for menu.
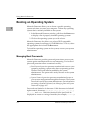
The following sections describe the menu choices Boot, Password,
and Help. The Setup menu should be accessible only to the System
Administrator or similarly qualified personnel. For more
information on system administration functionality, see System
Setup on page 4-1.
Motorola Firmware for PowerPC
3-1
Using Motorola Firmware
Booting an Operating System
Motorola Firmware allows you to choose a specific operating
system each time you start your computer. To boot any operating
system that is currently installed on the system:
3
1. In the Motorola Firmware window, pull down the Boot menu
to display a list of properly installed operating systems.
2. Click on the operating system you wish to boot.
Motorola Firmware also allows you to boot PR*P-compatible
operating systems from floppy or CD-ROM drives. To do so, select
the appropriate device from the Boot menu.
To install an operating system on the system, contact your system
administrator.
Managing Boot Passwords
Motorola Firmware provides password protection to secure your
system against unauthorized access and tampering. Two levels of
password protection allow customized security:
❏
Boot Password protection prevents unauthorized access to your
system by requiring a password to boot an operating system.
The Boot Password must be enabled by the system
administrator. The password is set by the user or the system
administrator.
❏
System Password protection prevents unauthorized access to
your system configuration through the firmware. The System
Password is set by the system administrator. For information
on setting a System Password, see Managing Boot and System
Passwords on page 4-17.
Passwords are limited to 8 characters. Valid characters include all
alpha-numeric characters, !, @, #, $, %, ^, &, *, (, ), -, +, _, =, {, }, [, ],
\, :, ;, ”, ’, and SPACE. Characters entered for the password are
displayed on screen as a string of asterisks (for example, ********).
3-2
Motorola Firmware for PowerPC
Booting an Operating System
From the Motorola Firmware menu, you can set or change a boot
password as follows:
1. Select Password from the menu bar in the Motorola Firmware
window. The following dialog box is displayed:
Boot Password
OK
Enter
Cancel
New Boot Password:
Verify New Boot Password:
2. In the Boot Password dialog box, enter and confirm the new
boot password.
3. Click OK when you are finished, or Cancel to dismiss the
dialog box without changing the boot password.
Note
The boot password must be enabled by the system
administrator as described in Managing Boot and System
Passwords on page 4-17.
Motorola Firmware for PowerPC
3-3
3
Using Motorola Firmware
Getting Help
The Help menu allows you to access information about keyboard
shortcuts and environment variable default values.
3
Keyboard Shortcuts
A list of keyboard shortcuts is provided in the Motorola Firmware
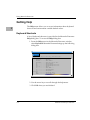
Help dialog box. To access the Help dialog box:
1. From the Help menu in the Motorola Firmware window,
select Keyboard. Motorola Firmware brings up the following
dialog box:
Help
OK
Use the cursor keys to view help, press OK to exit.
Key Assignments:
ALT-ESC/M...............
Menubar.
ALT-TAB...................
Next window.
ALT-SPACE...............
Open the control menu.
F1.............................
Clear window.
F8/-.........................
Change background color.
F9/+.........................
Change foreground color.
F10/?/H...................
Help.
B...............................
Boot menu.
P...............................
Password menu.
S...............................
Setup menu.
Menu keys:
ESC...........................
Close one level.
ENTER.......................
Select menu item.
2. Use the arrow keys to scroll through the help menu.
3. Click OK when you are finished.
3-4
Motorola Firmware for PowerPC
Environment Variable Defaults
Environment Variable Defaults
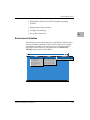
The Display Environment Defaults dialog box provides a brief
description of each environment variable and indicates how it is
treated when it is reset.
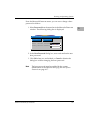
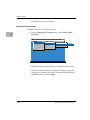
To access the Display Environment Defaults dialog box:
1. From the Help menu in the Motorola Firmware window,
select Display Environment Defaults.
Motorola Firmware brings up the following dialog box:
Wednesday,
Boot
Setup
2-29-1996
Password
Environment setup
Set Autoboot
Time and Date
Run Program
Express setup
Hard disk Setup
Run Fdos
4:18:35
Help
Define env. variablesReset environment variable
Manage NT startup
Edit environment variables
PR*P OS boot setup
Display Environment Defaul
Manage passwords
Configure desktop
Press ’H’ for help, or ’M’ for menu.
2. Use the arrow keys or mouse to select an environment
variable category from the categories list box.
3. Use the arrow keys or mouse to select an environment
variable.
4. Click OK when you are finished.
Motorola Firmware for PowerPC
3-5
3
Using Motorola Firmware
The Reset Action field of the dialog box indicates how the selected
environment variable is treated when it is reset to its default value.
Possible values for this field are:
3
Normal
If the environment variable exists, reset it to its default value.
If it does not exist, do not create it.
Default
If the environment variable exists, reset it to its default value.
If it does not exist, create it and set it to its default value.
Some combinations of environment variables may prevent the
system from booting. If there is a fatal error during system boot, the
firmware tries to recover by resetting some environment variables
to their default values. The Last Boot Fail Action field of the dialog
box indicates how the selected environment variable is treated
following a boot failure.
Possible values for this field are:
None
Do not change the environment variable.
Default Value
Reset the environment variable to its default value.
Delete
If the environment variable exists, delete it.
The reset action and last boot fail action are both stored ROM. They
cannot be changed through the firmware.
EDO Memory Configuration
For the Pro2000/200 and Pro3000/200 systems supporting EDO,
Motorola Firmware must be configured to use the timing values for
EDO memory. The default state of the EDODRAM environment
variable is set to true.
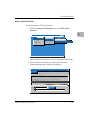
To verify or set the EDODRAM environment variable:
1. From the Environment Setup menu, select Define env.
Variables, then select Edit Environment Variables.
Motorola Firmware displays a dialog box.
2. Click on the Add button.
3-6
Motorola Firmware for PowerPC
EDO Memory Configuration
3. Use the TAB key or mouse to select the name field, type in
EDODRAM.
4. Use the TAB key or mouse to select the value field, set the
value to Y (true) or N (false).
3
5. Click on the Save button.
6. Click on the Exit button.
7. Reset the system to use the new value.
If nonEDO memory is added, refer to the System Installation Guide.
Motorola Firmware for PowerPC
3-7
Using Motorola Firmware
3
3-8
Motorola Firmware for PowerPC
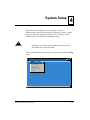
4System Setup
4
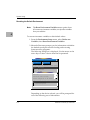
Motorola Firmware allows you to perform a variety of
administrative tasks before booting an operating system. System
Setup functionality should be reserved for use only by system
administrators or similarly qualified personnel.
!
Warning
Improper use of these system administrator functions
can render the system unusable.
These system administrator functions are grouped under the Setup
menu.
Wednesday,
Boot
Setup
2-29-1996
Password
4:18:35
Help
Environment setup
Set Autoboot
Time and Date
Run Program
Express setup
Hard disk setup
Run Fdos
Press ’H’ for help, or ’M’ for menu.
Motorola Firmware for PowerPC
4-1
System Setup
When you select Setup, Motorola Firmware prompts you for a
System Password if one has been set for the system. If no System
Password has been set, you may set one using the Manage
Passwords function under the Environment Setup submenu. For
details, see Managing Boot and System Passwords on page 4-17.
4
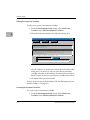
Environment Setup
If you have not already installed an operating system on your
computer, or if you wish to install another operating system, you
can use Motorola Firmware to properly set up the environment for
each operating system. The functionality for setting up the
environment is grouped under the Environment Setup menu,
shown below.
Wednesday,
Boot
Setup
2-29-1996
Password
Environment setup
Set Autoboot
Time and Date
Run Program
Express setup
Hard disk setup
Run Fdos
4:18:35
Help
Define env. variables
Manage NT startup
PR*P OS boot setup
Manage passwords
Configure desktop
Setup Screen Saver
Press ’H’ for help, or ’M’ for menu.
The following sections describe how to:
4-2
❏
Set and change environment variables
❏
Manage Windows NT startup and boot selections
Motorola Firmware for PowerPC
Environment Setup
❏
Manage boot selections for PR*P-compliant operating
systems
❏
Manage password protection
❏
Configure the desktop
❏
Set up the screen saver
4
Environment Variables
The following sections describe how to use Motorola Firmware to
reset environment variables to their default values, edit existing
environment variables, and create new ones. The functionality
required for these actions is grouped under the Define env.
Variables menu option shown below.
Wednesday,
Boot
Setup
2-29-1996
Password
Environment setup
Set Autoboot
Time and Date
Run Program
Express setup
Hard disk setup
Run Fdos
4:18:35
Help
Define env. variables Reset environment variable
Manage NT startup
Edit environment variables
PR*P OS boot setup
Manage passwords
Configure desktop
Setup Screen Saver
Press ’H’ for help, or ’M’ for menu.
Motorola Firmware for PowerPC
4-3
System Setup
Resetting the Default Environment
Note
The Reset Environment Variables menu option clears
all current environment variables, not just the variables
that you redefine.
4
To reset environment variables to their default values:
1. From the Environment Setup menu, select Define env.
Variables, then Reset Environment Variables.
2. Motorola Firmware prompts you for information to initialize
the default search path used for loading and executing
firmware utility programs.
The following dialog box is displayed. Use the mouse or the
arrow keys to select a device from the list presented.
Reset Environment Variables
OK
Cancel
Select media for default search path:
Scsi
Floppy
Ide
Scsi
Hard Disk
Disk
Hard Disk
CD-ROM
SCSI ID:
0
Partition (must be FAT):
0
Select categories to be saved.
Windows NT Boot Options
System Variables
Platform Options
Depending on the device selected, you will be prompted for
one of the following sets of information:
4-4
Motorola Firmware for PowerPC
Environment Setup
SCSI Hard Disk
SCSI ID:
Partition (must be FAT):
Floppy Disk
Drive (0/1):
IDE Hard Disk
Drive (pri. = 0/1, sec. = 2/3):
4
Partition (must be FAT):
SCSI CD-ROM
SCSI ID:
ATAPI CD-ROM
Drive (pri. = 0/1, sec. = 2/3):
3. Enter the correct information for the device selected.
4. Motorola Firmware gives you the option of saving sets of
environment variables. To save a set of environment
variables, click on its name in the category list box. A check
mark appears next to the name of each set which will be
saved. To determine which variables comprise each set, see
Environment Variable Defaults on page 3-5.
5. Click OK when you are finished.
Editing and Creating Environment Variables
If you wish to edit or add to the system environment variables
without completely resetting all variables, use the Edit
Environment Variables menu option as described in the next two
sections.
The Edit Environment Variables dialog box cannot be used to edit
environment variables with values greater than 255 characters in
length. When several Windows NT boot selections are present on
the same machine, for example five boot selections, the firmware
automatically appends information to the OSLOADER
environment variable until it exceeds this length.
If you are working with many Windows NT boot selections, use the
Edit a Boot Selection dialog box to edit Windows NT boot
variables.
Motorola Firmware for PowerPC
4-5
System Setup
Editing Environment Variables
To edit your system environment variables:
1. From the Environment Setup menu, select Define env.
Variables, then Edit Environment Variables.
2. Motorola Firmware displays the following dialog box:
4
Edit environment variables
Exit
Add
Delete
Use Arrow keys to select a variable.
FWSEARCHPATH=multi()scsi()disk(0)rdisk()partition(1)
A=multi(1)disk(0)fdisk(0)
LOADIDENTIFIER=Windows NT
OSLOADOPTIONS=nodebug
SYSTEMPARTITION=multi()scsi()disk(0)rdisk()partition(2)
OSLOADER=multi()scsi()disk(0)rdisk()partition(2)\os\winnt351\osloader.exe
OSLOADPARTITION=multi()scsi()disk(0)rdisk()partition(2)
OSLOADFILENAME=\winnt351
Edit environment variable, press SAVE to save.
Name:
OSLOADOPTIONS
Save
Value: n odebug
3. Use the TAB key or the mouse to select the active field in the
dialog box. Use the arrow keys to select the environment
variable to be edited, then modify the value field and click on
Save. Proceed to the next environment variable to be edited.
4. Click Exit when you are finished.
Uses of the Arrow keys and the Delete, Tab, and Backspace keys are
listed in Table 2-1 on page 2-2.
Creating Environment Variables
To create a new environment variable:
1. From the Environment Setup menu, select Define env.
Variables, then Edit Environment Variables.
4-6
Motorola Firmware for PowerPC
Environment Setup
2. Motorola Firmware displays the same dialog box shown in
Editing Environment Variables on page 4-6
3. Click Add to clear the name and value fields.
4. Enter a name and value for the new environment variable
and click on Save. Motorola Firmware adds the name and
value of the new environment variable to the list of current
variables.
5. Click Exit when you are finished.
Deleting Environment Variables
To delete an environment variable:
1. From the Environment Setup menu, select Define env.
Variables, then Edit Environment Variables.
2. Motorola Firmware displays the same dialog box shown in
Editing Environment Variables on page 4-6.
3. Use the arrow keys to select an environment variable from the
list.
4. Click Delete.
5. Click OK when you are finished.
International Keyboard Selection
Motorola Firmware provides support for the United States, Kanji,
and some European style keyboards.
To modify the international keyboard:
1. From the Setup menu, select Environment Setup, then
Define env. Variables.
2. Choose Select keyboard language.
Motorola Firmware displays a list of available languages.
3. Use the arrow key or mouse to select the desired language.
Motorola Firmware for PowerPC
4-7
4
System Setup
4. Click on OK.
5. You are then prompted to reset the system so the new
variable takes effect. Click on Yes.
The system automatically resets and that country’s keyboard is
immediately activated. It remains as the set variable whenever the
system is powered up.
4
Display Environment Descriptions
To view an environment variable description:
1. From the Environment Setup menu, select Define env.
Variables, then Display Environment Description.
Motorola Firmware displays a list of the following categories:
Windows NT Boot Options, System Variables, and
Platform Options.
2. Use the arrow key or mouse to select the appropriate
category.
The lower window displays a list of the environment
variables and descriptions for that selection.
3. Click OK when you are finished.
Managing Boot Selections
!
Improper use of these system administrator functions
can render the system unusable.
Warning
The following sections describe how to manage boot selection using
Motorola Firmware. The functionality required to manage
Windows NT boot selections is grouped under the Manage NT
Startup menu option. The functionality required to manage PR*P
OS boot selections is grouped under the PR*P OS Boot Setup menu
option.
4-8
Motorola Firmware for PowerPC
Environment Setup
Add a boot selection
OK
Cancel
Select a system partition:
Select location of OS partition:
Ide
Hard Disk
Scsi
CD-ROM
ATAPI CD-ROM
Scsi Hard Disk 0 Partition 1
Ide
Hard Disk
Scsi
CD-ROM
ATAPI CD-ROM
Scsi Hard Disk 0 Partition 1
0
0
1
1
4
Is OS partition same as the OS loader?
\ os\winnt351\osloader.exe
Enter the osloader directory and name:
\ os\winnt35
Enter the operating system root directory:
Windows NT
Enter a name for this boot selection:
Initialize the debugger at boot time?
Windows NT Boot Selections
The Windows NT boot selection is set by Windows NT during the
installation process. Each installation of Windows NT requires its
own boot selection. Under normal circumstances, you should not
need to modify the boot selection except in cases in which the
system configuration has been changed, for example:
❏
When the SCSI ID of the current Windows NT installation has
been changed
❏
In cases of NVRAM failure and loss of information
To add, delete, edit, or check a Windows NT boot selection, first
select Setup (enter a System Password, if required), select
Environment Setup, then Manage NT Startup. Follow the
instructions listed in the following sections for each operation.
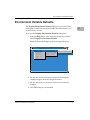
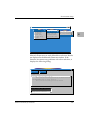
Adding a Boot Selection
In cases of NVRAM loss or changes to the system configuration,
you may wish to add a Windows NT boot selection.
Motorola Firmware for PowerPC
4-9
System Setup
To add a Windows NT boot selection:
1. From the Manage NT Startup menu, select Add a Boot
Selection. Motorola Firmware brings up the following dialog
box:
Add a boot selection
4
OK
Cancel
Select a system partition:
Select location of OS partition:
Ide
Hard Disk
Scsi
CD-ROM
ATAPI CD-ROM
Scsi Hard Disk 0 Partition 1
Ide
Hard Disk
Scsi
CD-ROM
ATAPI CD-ROM
Scsi Hard Disk 0 Partition 1
0
0
1
1
Is OS partition same as the OS loader?
\ os\winnt351\osloader.exe
Enter the osloader directory and name:
\ os\winnt35
Enter the operating system root directory:
Windows NT
Enter a name for this boot selection:
Initialize the debugger at boot time?
2. Use the arrow keys to select a system partition and an
operating system (OS) partition. Using the list presented, you
may select from existing partitions or define a new partition.
The list of existing partitions is generated using the
FWSEARCHPATH and SYSTEMPARTITION environment
variables.
3. To define a new partition select a device from the list.
Motorola Firmware uses the input areas below the list boxes
to prompt you for any further information that is needed to
completely specify the partition.
4. To choose an OS partition other than the system partition,
find the prompt which reads:
Is OS partition same as OS loader?
Deselect the corresponding button (the check mark
disappears).
4-10
Motorola Firmware for PowerPC
Environment Setup
Motorola Firmware prompts for the path and name of the
Windows NT OS loader:
Enter the osloader directory and name:
\os\winnt351\osloader.exe
5. Keep the default pathname or enter a different pathname for
the Windows NT Boot Loader.
Motorola Firmware prompts for the OS root directory:
Enter the operating system root directory: \winnt351
If you installed Windows NT using default settings keep the
default value, \winnt351. Otherwise, enter the base directory
for Windows NT.
Motorola Firmware prompts you to name the OS boot
selection:
Enter a name for this boot selection: WINDOWS NT
The firmware uses the pathname to boot the operating
system, not the name of the boot selection, so you may name
the boot selection to describe the specific installation. If you
have installed multiple versions of Windows NT, you may
choose to customize the boot selection names.
Motorola Firmware asks if it should initialize the Windows
NT internal debugger whenever it boots the operating
system:
Do you want to initialize the debugger at boot time:
6. Select the corresponding button (a check mark appears) to
initialize the debugger at boot time.
Note
For user-level systems, system administrators typically
should not initialize the Windows NT internal
debugger at boot time. The internal debugger should
only be used for troubleshooting system problems and
should only be used by system administrators or other
qualified personnel.
Motorola Firmware for PowerPC
4-11
4
System Setup
7. Click OK when you are finished.
Deleting a Boot Selection
To delete a Windows NT boot selection:
1. From the Manage NT Startup menu, select Delete a Boot
Selection.
4
Wednesday,
Boot
Setup
2-29-1996
Password
Environment setup
Set Autoboot
Time and Date
Run Program
Express setup
Hard disk setup
Run Fdos
4:18:35
Help
Define env. variables
Manage NT startup
Add a boot selection
PR*P OS boot setup
Delete a boot selection Windows NT
Manage passwords
Edit a boot selection
Configure desktop
Test boot selections
Setup Screen Saver
Press ’H’ for help, or ’M’ for menu.
Motorola Firmware presents a list of existing boot selections.
2. Click on the boot selection to be deleted. A dialog box pops up
asking you to confirm your choice. To delete the boot selection
click OK. Otherwise click Cancel.
4-12
Motorola Firmware for PowerPC
Environment Setup
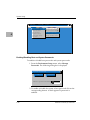
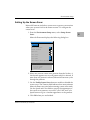
Editing a Boot Selection
To edit a Windows NT boot selection:
1. From the Manage NT Startup menu, select Edit a Boot
Selection.
Wednesday,
Boot
Setup
2-29-1996
Password
Environment setup
Set Autoboot
Time and Date
Run Program
Express setup
Hard disk setup
Run Fdos
4
4:18:35
Help
Define env. variables
Manage NT startup
Add a boot selection
PR*P OS boot setup
Delete a boot selection
Manage passwords
Edit a boot selection Windows NT
Configure desktop
Test boot selections
Setup Screen Saver
Press ’H’ for help, or ’M’ for menu.
Motorola Firmware presents a list of existing boot selections.
2. Click on the boot selection you wish to edit. Motorola
Firmware brings up the following dialog box:
Edit a boot selection
Exit
Delete
Use Arrow keys to select a variable.
LOADIDENTIFIER=Windows NT
SYSTEMPARTITION=multi()scsi()disk(0)rdisk()partition(2)
OSLOADER=multi()scsi()disk(0)rdisk()partition(2)\os\winnt351\osloader.exe
OSLOADPARTITION=multi()scsi()disk(0)rdisk()partition(2)
OSLOADFILENAME=\winnt351
OSLOADOPTIONS=nodebug
Edit environment variable, press SAVE to save.
Name:
OSLOADOPTIONS
Save
Value: n odebug
Motorola Firmware for PowerPC
4-13
System Setup
LOADIDENTIFIER
Contains an ASCII string used to associate the
values contained in SYSTEMPARTITION,
OSLOADER, OSLOADPARTITION,
OSLOADFILENAME, and OSLOADOPTIONS. The
value of this variable can be modified to better
describe the particular installation of the
Windows NT operating system.
SYSTEMPARTITION
Contains the path for the system partition. A
system partition is typically located on a hard
disk (IDE or SCSI) and must be formatted with
the FAT file system.
OSLOADER
Contains the path for OSLOADER.EXE.
OSLOADPARTITION
Contains the pathname for the partition
containing the operating system.
OSLOADFILENAME
Contains the directory and pathname of the
operating system.
OSLOADOPTIONS
Contains any load options defined for the boot
selection.
4
3. Use the arrow keys or the mouse to choose the boot selection
environment variable to be edited. Edit the information, click
on Save, and proceed to the next environment variable to be
edited.
4. Click Exit when you are finished.
Testing Boot Selections
Motorola Firmware allows you to verify whether the current boot
selections for the Windows NT operating system are valid for the
current installation. To test the Windows NT boot selections:
1. From the Manage NT Startup menu, select Test Boot
Selections.
4-14
Motorola Firmware for PowerPC
Environment Setup
Wednesday,
Boot
Setup
2-29-1996
Password
Environment setup
Set Autoboot
Time and Date
Run Program
Express setup
Hard disk setup
Run Fdos
4:18:35
Help
Define env. variables
Manage NT startup
Add a boot selection
PR*P OS boot setup
Delete a boot selection
Manage passwords
Edit a boot selection
Configure desktop
Test boot selections
Setup Screen Saver
Press ’H’ for help, or ’M’ for menu.
Motorola Firmware tests each defined boot selection. Results
are displayed in the Motorola Firmware window. If the
firmware encounters any problems with a boot selection, it
displays the following dialog:
. were found with boot selection 0.
Problems
OK
Cancel
Problems found:
OSLOADER cannot be found, value is:
multi()scsi()disk(0)rdisk()partition(1)\os\winnt351\osloader.exe
OSLOADFILENAME cannot be found, value is:
multi()scsi()disk(0)rdisk()partition(1)\winnt35
Choose an action:
Ignore problems with this boot selection
Delete this boot selection
Change this boot selection
Motorola Firmware for PowerPC
4-15
4
System Setup
2. Use the arrow keys to select an action from the list at the
bottom of the dialog window. If you wish to edit the existing
boot selection, select Change this Boot Selection and follow
the instructions in Editing a Boot Selection on page 4-13 to
correct the problem. Then, retest the Windows NT boot
selections.
4
PR*P Operating System (OS) Boot Selections
Motorola Firmware boots PR*P-compliant operating systems such
as IBM AIX. To add a PR*P-compliant operating system to the Boot
menu:
1. From the Environment Setup menu, select Manage PR*P OS
Boot Selection.
If Motorola Firmware finds a PR*P-compliant operating
system, it identifies the operating system by its address and
displays the following dialog box:
OS name
OK
Cancel
Found PR*P OS at multi(0)scsi(0)disk(0)rdisk(0)partition(1)
Enter Name for OS:
2. Type the name of the boot selection (for example, AIX) and
click OK.
If no PR*P-compliant operating system can be located, Motorola
Firmware takes no action.
4-16
Motorola Firmware for PowerPC
Environment Setup
Managing Boot and System Passwords
Motorola Firmware provides password protection to secure your
system against unauthorized access and tampering. Two levels of
password protection allow you customize security:
❏
Boot Password protection prevents unauthorized access to your
system by requiring a password to boot an operating system.
The Boot Password must be enabled by the system
administrator. The password is set by the user or system
administrator. For information on setting a boot password,
see Managing Boot Passwords on page 3-2.
❏
System Password protection prevents unauthorized access to
your system configuration through the firmware. The system
password is set by the system administrator.
Passwords are limited to eight characters. Valid characters include
all alpha-numeric characters, !, @, #, $, %, ^, &, *, (, ), -, +, _, =, {, },
[, ], \, :, ;, ”, ’, and SPACE. Characters entered for the password are
displayed on screen as a string of asterisks (e.g., ********).
Motorola Firmware does not ask you to confirm password settings.
The functionality required for these actions is grouped under the
Manage Passwords menu option shown below.
Motorola Firmware for PowerPC
4-17
4
System Setup
Wednesday,
Boot
Setup
2-29-1996
Password
4:18:35
Help
Environment setup
Set Autoboot
Time and Date
Run Program
Express setup
Hard disk setup
Run Fdos
4
Define env. variables
Manage NT startup
PR*P OS boot setup
Manage passwords
Configure desktop
Setup Screen Saver
Press ’H’ for help, or ’M’ for menu.
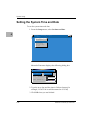
Enabling/Disabling Boot and System Passwords
To enable or disable boot passwords and system passwords:
1. From the Environment Setup menu, select Manage
Passwords. The following dialog box is displayed.
System Password
OK
Cancel
Enter System Password:
2. To enable or disable the system or boot password click on the
corresponding button. A check appears if password is
enabled.
4-18
Motorola Firmware for PowerPC
Environment Setup
Setting Boot and System Passwords
To set or change boot passwords and system passwords:
1. From the Environment Setup menu, select Manage
Passwords.
Motorola Firmware displays the same screen shown in
Enabling/Disabling Boot and System Passwords on page 4-18.
2. Enter and verify the new boot and or system password
3. Click OK when you are finished.
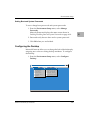
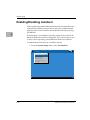
Configuring the Desktop
Motorola Firmware allows you to change the look of the desktop by
assigning new colors to existing desktop attributes. To configure
the desktop:
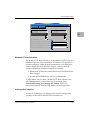
1. From the Environment Setup menu, select Configure
Desktop.
Wednesday,
Boot
Setup
2-29-1996
Password
Environment setup
Set Autoboot
Time and Date
Run Program
Express setup
Hard disk setup
Run Fdos
4:18:35
Help
Define env. variables
Manage NT startup
PR*P OS boot setup
Manage passwords
Configure desktop
Setup Screen Saver
Press ’H’ for help, or ’M’ for menu.
Motorola Firmware for PowerPC
4-19
4
System Setup
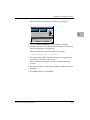
Motorola Firmware brings up the following dialog box:
Configure desktop
OK
Cancel
4
Desktop Attributes
Active Border
Inactive Border
Active Icon Border
Icon Background
Active title
Inactive title
Menu text
Menu highlight
BG: 0
FG: 7
Desktop
Enable bit map:
2. Select from the Desktop Attributes list, and use the scroll
bars at the right to change the colors.
3. Use the Enable Bit Map button to display a bitmap as the
backdrop.
4. Click OK when you are finished.
4-20
Motorola Firmware for PowerPC
Environment Setup
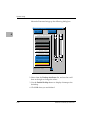
Setting Up the Screen Saver
Motorola Firmware includes a screen saver to protect your monitor
when your system is left in the firmware state. To configure the
screen saver:
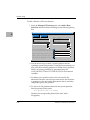
1. From the Environment Setup menu, select Setup Screen
Saver.
4
Motorola Firmware displays the following dialog box:
:
Setup Screen Saver
OK
Enable Screen Saver
Timeout (minutes)
3
Speed (1-4)
1
Color (0-15)
8
Cycle Color
Cycle Speed
Press SPACE to Select patterns:
Radar.
Big X.
Criss Cross.
Horizontal Wiper
Vertical Wiper
Checker 64.
2. Select one or more screen saver patterns from the list box. A
check mark appears next to each pattern which is selected. If
more than one pattern is selected, Motorola Firmware cycles
through the patterns.
3. Use the Enable Screen Saver button to enable or disable the
screen saver. The Timeout field indicates how many minutes
Motorola Firmware waits before entering screen saver mode.
Use the Speed and Color fields to specify the appearance of
the screen saver patterns, or use the Cycle Color and Cycle
Speed buttons to give a random appearance to the patterns.
4. Click OK when you are finished.
Motorola Firmware for PowerPC
4-21
System Setup
Enabling/Disabling Autoboot
With autobooting enabled, Motorola Firmware automatically boots
a preselected operating system after waiting for a predetermined
period of time. Users can abort the autoboot function by pressing
the ESC key.
4
If autobooting is not enabled, when the system is powered on the
Motorola Firmware window is displayed. The system waits for you
to select which operating system Motorola Firmware will boot.
To enable Motorola Firmware’s autoboot feature:
1. From the System Setup menu, select Set Autoboot.
Wednesday,
Boot
Setup
2-29-1996
Password
4:18:35
Help
Environment setup
Set Autoboot
Time and Date
Run Program
Express setup
Hard disk setup
Run Fdos
Press ’H’ for help, or ’M’ for menu.
4-22
Motorola Firmware for PowerPC
Enabling/Disabling Autoboot
Motorola Firmware displays the following dialog box:
Set Autoboot
OK
Cancel
Enable autoboot:
4
Enter Countdown Value (in seconds):
5
Select OS to autoboot:
Windows NT 3.51
FLOPPY
CD-ROM
2. Use the Enable Autoboot button to enable or disable
autoboot. Autoboot is enabled when the button is selected (a
check mark appears in the button).
Motorola Firmware issues the following prompt:
Enter Countdown value (in seconds):5
3. Use the default value (5 seconds) or type in an appropriate
countdown value (for example, 10).
Motorola Firmware displays a list of installed operating
systems.
4. Use the arrow keys to select the operating system you wish to
autoboot.
5. Click OK when you are finished.
Motorola Firmware for PowerPC
4-23
System Setup
Setting the System Time and Date
To set the system time and date:
1. From the Setup menu, select Set time and date.
4
Wednesday,
Boot
Setup
2-29-1996
Password
4:18:35
Help
Environment setup
Set Autoboot
Time and Date
Run Program
Express setup
Hard disk setup
Run Fdos
Press ’H’ for help, or ’M’ for menu.
Motorola Firmware displays the following dialog box:
Time and Date
OK
Date
Cancel
(mm-dd-yy): 3 -01-1996
Time (hh:mm:ss):
4 :7:44
2. Type the new date and the time in 24-hour format (for
example, 3:15:45 P.M. would be entered as 15:15:45)
3. Click OK when you are finished.
4-24
Motorola Firmware for PowerPC
Running Programs
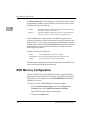
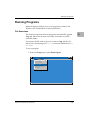
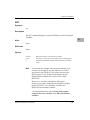
Running Programs
Motorola Firmware allows you to run programs written to the
Windows NT Portable Boot Loader Specification.
File Extensions
The firmware functions that run programs automatically append
.img and .exe to files that are not found, and retries to use the
extended names.
If you enter the file with a type such as .exe or .img and the file
doesn’t exist, the message Name too long is returned rather than File
not Found.
To run a program:
1. From the Setup menu, select Run Program.
Wednesday,
Boot
Setup
2-29-1996
Password
4:18:35
Help
Environment setup
Set Autoboot
Time and Date
Run Program
Express setup
Hard disk setup
Run Fdos
Press ’H’ for help, or ’M’ for menu.
Motorola Firmware for PowerPC
4-25
4
System Setup
Motorola Firmware displays the following dialog box:
Run Program
OK
Cancel
4
Program to run:
2. Enter the name of the program you wish to run.
Motorola Firmware requires a full path in order to run a
program. You can enter this path in one of three ways
depending on the value of the FWSEARCHPATH and A
environment variables:
❏
FDOS.EXE
Motorola Firmware appends the filename FDOS.EXE to
the FWSEARCHPATH environment variable to obtain the
full pathname. If the file, FDOS, is not found, .EXE is
appended to the filename and Motorola Firmware
attempts to execute this file.
❏
A:FDOS.EXE
Motorola Firmware appends the filename FDOS.EXE to
the A environment variable to obtain the full pathname.
❏
multi(1)disk()fdisk()\FDOS.EXE
This is the full pathname to the file FDOS.EXE located on
a floppy drive. This example is identical to A:FDOS.EXE
if the A environment variable is set to
multi(1)disk()fdisk().
3. Click OK when you are finished.
4-26
Motorola Firmware for PowerPC
Express Setup
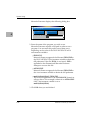
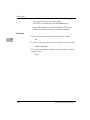
Express Setup
The Express Setup feature is the quickest way to get Windows NT
running on your system. Express Setup searches all installed SCSI
and EIDE CD-ROM devices for the Windows NT installation
program and attempts to run it.
4
To access Express Setup:
1. From the Setup menu, select Express Setup.
Motorola Firmware invokes the Windows NT installation
program if it is available.
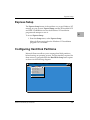
Configuring Hard Disk Partitions
Motorola Firmware allows you to manage hard disk partitions
before booting an operating system. The functionality required for
these actions is grouped under the Hard Disk Setup menu option
as shown in the following diagram.
Wednesday,
Boot
Setup
2-29-1996
Password
4:18:35
Help
Environment setup
Set Autoboot
Time and Date
Run Program
Express setup
Hard disk setup
Run Fdos
Press ’H’ for help, or ’M’ for menu.
Motorola Firmware for PowerPC
4-27
System Setup
This menu option allows you to:
4
!
❏
Create, update, and delete PowerPC Boot Partitions
❏
Create and delete FAT Partitions
❏
Designate System Partitions
❏
Show Partitions
Improper use of these system administrator functions
can render the system unusable.
Warning
PowerPC Partition Support
PowerPC PR*P-compliant operating systems create their own
specialized boot partitions during the OS installation procedure.
However, for programmers with special needs, Motorola Firmware
provides the ability to create, update, and delete these partitions.
!
Warning
In nearly all cases, there is no need to alter the PR*P boot
partition. Improper use of this system administrator
function renders the system inoperable. Do not alter
PR*P boot partitions unless there is a specific need and
you are fully aware of the ramifications of modifying the
PR*P boot partition created during the OS installation
procedure.
If you have a special need to create or modify a PR*P boot partition,
the instructions in the following sections describe how to create,
update, and delete the PowerPC boot partitions.
4-28
Motorola Firmware for PowerPC
Configuring Hard Disk Partitions
Creating PowerPC Boot Partitions
To create a new PowerPC boot partition:
1. From the Hard Disk Setup menu, select Create PowerPC
Boot Partition and press ENTER.
Motorola Firmware presents a list of devices.
4
2. Select the device on which you would like to create the new
partition and press ENTER.
3. Enter the size of the partition to be created in megabytes.
Partitions may be any size from 1 Mb to the remaining
available disk space.
4. Press ENTER to proceed.
Motorola Firmware then creates and formats the new
partition.
Updating PowerPC Boot Partitions
To update an existing PowerPC boot partition:
1. From the Hard Disk Setup menu, select Update PowerPC
Boot Partition and press ENTER.
Motorola Firmware presents a list of devices.
2. Select the device on which the partition resides and press
ENTER.
Motorola Firmware presents a list of existing PR*P boot
partitions.
3. Select the partition to update and press ENTER.
Motorola Firmware issues the following prompt:
The selected partition is going to be updated.
Are you sure (y/n)?
4. Type y to update the partition or n to abort the operation
and press ENTER.
Motorola Firmware for PowerPC
4-29
System Setup
Motorola Firmware prompts you for the pathname for the
PowerPC firmware image.
5. Enter the pathname and press ENTER.
Deleting PowerPC Boot Partitions
4
To delete an existing PowerPC partition:
1. From the Hard Disk Setup menu, select Delete Partition and
press ENTER.
Motorola Firmware presents a list of devices.
2. Select the device on which the partition resides and press
ENTER.
Motorola Firmware presents a list of existing partitions.
3. Select the partition to be deleted and press ENTER.
Motorola Firmware issues the following prompt:
Are you sure (y/n)?
4. Type y to delete the partition or n to abort the operation
and press ENTER.
Motorola Firmware then deletes the partition.
File Allocation Table (FAT) Partition Support
The following sections describe how to create and delete FAT
partitions.
Creating FAT Partitions
To create a new hard disk partition:
1. From the Hard Disk Setup menu, select Create FAT Partition
and press ENTER.
Motorola Firmware presents a list of devices.
2. Select the device on which you would like to create the new
partition and press ENTER.
4-30
Motorola Firmware for PowerPC
Configuring Hard Disk Partitions
3. Enter the size of the partition to be created in megabytes.
Partitions may be any size from 1 Mb to the remaining
available disk space.
4. Press ENTER to proceed.
Motorola Firmware then creates and formats the new
partition.
4
Deleting FAT Partitions
To delete an existing FAT partition:
1. From the Hard Disk Setup menu, select Delete Partition and
press ENTER.
Motorola Firmware presents a list of devices.
2. Select the device on which the partition resides and press
ENTER.
Motorola Firmware presents a list of existing partitions.
3. Select the partition to be deleted and press ENTER.
Motorola Firmware issues the following prompt:
Are you sure (y/n)?
4. Type y to delete the partition or n to abort the operation
and press ENTER.
Motorola Firmware then deletes the partition.
Designating System Partitions
A system partition is a partition that has been formatted with the
FAT file system whose pathname is contained in the environment
variable SYSTEMPARTITION. The SYSTEMPARTITION
environment variable may have multiple values. Each value is
associated with a boot selection and is separated by a semicolon.
Motorola Firmware for PowerPC
4-31
System Setup
To designate an existing partition as a system partition:
1. From the Hard Disk Setup menu, select Designate System
Partition and press ENTER.
Motorola Firmware presents a list of devices.
2. Select the device on which the partition resides and press
ENTER.
4
Motorola Firmware presents a list of existing partitions.
3. Select the partition that will be a system partition and press
ENTER.
Motorola Firmware sets the SYSTEMPARTITION
environment variable to the selected partition. If a system
partition has already been designated and no boot selections
exist, Motorola Firmware issues the following prompt:
A system partition has already been defined, overwrite
(y/n)?
4. Type y to make the selected partition the system partition or
type n to abort the operation and press ENTER.
If boot selections exist, Motorola Firmware issues the
following prompt:
Boot selections exist, use the Manage Windows NT Startup
menu to change the system partition.
Press any key to continue...
The Manage Windows NT Startup menu must be used to
modify the value or values of the system partition variable.
Show Partitions
To display all available partitions, including their size, device tree
element, and type (PowerPC Boot Partition, FAT, NTFS, and
CDFS):
1. From the Hard Disk Setup, select Show Partitions.
Motorola Firmware presents a list of partitions.
2. Click OK when you are finished.
4-32
Motorola Firmware for PowerPC
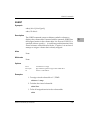
Running the FDOS Utility
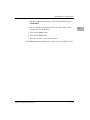
Running the FDOS Utility
Wednesday,
Boot
Setup
2-29-1996
Password
4:18:35
Help
Environment setup
Set Autoboot
Time and Date
Run Program
Express setup
Hard disk setup
Run Fdos
4
Press ’H’ for help, or ’M’ for menu.
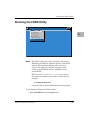
Notes The FDOS utility may not be included in the system
ROM, but provided on a diskette instead. If the FDOS
utility is provided on a diskette, refer to Running
Programs on page 4-25. The following discussion
assumes that the FDOS utility is embedded in the
system ROM.
FDOS returns a “command not found” error when a
drive letter is included in the path to a batch file. For
example,
a:\command\date.cmd
Copy batch files to the local disk before executing them.
To run Motorola Firmware’s FDOS utility:
1. Select Run FDOS from the Setup menu.
Motorola Firmware for PowerPC
4-33
System Setup
The FDOS utility executes and presents a standard command
prompt within the ARC window. The Motorola Firmware
window is automatically minimized while FDOS is running.
FDOS determines the type and number of configured storage
devices and assigns drive letters to each device or partition as
shown below:
4
Drive A, B
floppy disk drives
Drive C ... ?
hard disk partitions ... CD-ROM drive
Refer to FDOS Utility on page 5-1 or enter help or ? at the
FDOS prompt to see a list of all available commands.
2. To exit FDOS, type exit at the FDOS prompt and press
ENTER.
4-34
Motorola Firmware for PowerPC
Running the FDOS Utility
4
Motorola Firmware for PowerPC
4-35
5FDOS Utility
5
FDOS Description
The Motorola Firmware FDOS utility is a Windows NT Portable
Boot Loader program that allows you to issue selected commands
before booting an operating system. FDOS is useful for a wide
variety of operations, like accessing the FAT file system on your
hard disk, checking system memory usage, rebooting the system,
and flashing or writing new firmware images into the system’s
ROM.
The following sections provide a general discussion of basic FDOS
input requirements and navigation techniques.
Command Prompt
The FDOS command prompt always displays the current FAT file
system working directory and volume, whether it is a physical or a
virtual volume. For a discussion of virtual volumes see Virtual
Volumes on page 5-3. Command options must be separated by
space.
If FDOS cannot find a FAT file system that can be opened it operates
in memory mode. You still have access to all FDOS commands that
do not require an open file system. In this case the command
prompt reads Memory Mode>.
Motorola Firmware for PowerPC
5-1
FDOS Utility
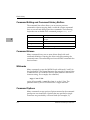
Command Editing and Command History Buffers
The command line editor allows you re-execute previous
commands without retyping them, to edit the current command
line, or to recall and change previous commands. The following
keystrokes are available at the command prompt Memory Mode>.
5
Keystroke
Description
ENTER
Use to execute a command from the command
prompt.
F3
Use to recall the last command entered.
Backspace
Use to delete character to the left of cursor.
Up Arrow/Down Arrow
Use to cycle through the last 10 commands entered.
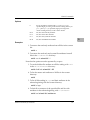
Command Aliases
Many commands have one or more aliases listed with each
command definition. Entering the alias works like entering the
command name. The online help text for each FDOS command also
lists its aliases.
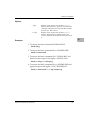
Wildcards
Many commands accept the MS-DOS-style wildcards (* and ?) in
the specified FAT file system filenames. An asterisk (*) entered after
a command acts as a wildcard for any alpha-numeric character or
character string. For example, the command,
copy a:*.exe c:\bin
copies all executable (.exe) files from A: to the C:\bin. The
question mark (?) acts as a wildcard for a single character.
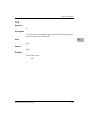
Command Options
Many commands accept options. Options entered at the command
prompt are case-insensitive. Options that are specified as single
characters are preceded by a forward slash (for example, /S).
5-2
Motorola Firmware for PowerPC
FDOS Description
Filenames and Pathnames
FAT file system filenames are specified in DOS standard “eightdot-three” format (up to eight characters before the period which
demarcates the beginning of the three character suffix).
FDOS accepts standard MS-DOS-style pathnames, including both
absolute and relative pathnames.
Output Redirection
5
Output redirection is only available when executing batch
command files, see BATCH on page 5-8. The log file may be opened
in create/overwrite or create/append mode. FDOS uses the
following redirection symbols:
>
redirect stdout to log file
>>
append stdout to log file
>?
redirect errout to log file
>/
append errout to log file
Virtual Volumes
A virtual volume is a symbolic method of referring to an existing
volume:path string. They are typically used for brevity on the
command line when entering path names.
Help
To access the FDOS online help file:
❏
Enter HELP to display all FDOS internal commands and
redirection symbols
❏
Enter HELP followed by a specific command name to display
details for that command
Motorola Firmware for PowerPC
5-3
FDOS Utility
❏
Enter the command name followed by /? to display details
for that command
The following sections describe each FDOS command.
FDOS Commands
Figure 5-1 lists all FDOS functions and briefly describes each.
5
Table 5-1. FDOS Commands
Function
5-4
Description
ATTRIB
Set file attributes
BATCH
Execute named batch command files
CHDIR
Change to a new working directory
CLS
Clear the screen
CNFG
Displays and allows editing of Board Information Block
COPY
Copy a file
COPYDIR
Copy a directory or directory tree
DATE
Display date and time
DIR
List directory contents
ECHO
Set command echo flag, display message
ERASE
Delete files
EXIT
Quit FDOS
FLASH
Archive/load new firmware image into ROM memory
HELP
Display all commands or syntax for a given command
MEMORY
Display firmware physical memory map
MKDIR
Create a directory
MOUNT
Display firmware component table named nodes
MOVE
Move a file
PART
Show all disk partitions
PAUSE
Cause FDOS to wait for keyboard input
READB
Read one or more bytes from a memory location
READH
Read one or more half-words from a memory location
READW
Read one or more words from a memory location
REGEDIT
Displays and allows editing of processor registers
Motorola Firmware for PowerPC
FDOS Commands
Table 5-1. FDOS Commands
Function
Description
REM
Mark a line in a batch file as a comment line
RESTART
Reboot or reset system
RMDIR
Delete a directory
SET
Set/display FDOS function/key environment variables
SUBST
Display a volume table or define a virtual user volume
SYSTEM
Display vendor and product IDs
TREE
Display directory tree
TYPE
Display files on screen
VERSION
Display the FDOS version number
WRITEB
Write one or more bytes starting at a specific memory
location
WRITEH
Write one or more half-words starting at a specific
memory location
WRITEW
Write one or more words starting at a specific memory
location
>
Redirect stdout to log file
>>
Append stdout to log file
>?
Redirect errout to log file
>/
Append errout to log file
Motorola Firmware for PowerPC
5
5-5
FDOS Utility
ATTRIB
Synopsis
attrib [options] [vol:][path][filename]
Description
The ATTRIB command displays and/or sets file and directory
attributes. The attributes are as noted above under “Options.” A
group of files may be operated upon by including an appropriate
wildcard in filename. If no operands are specified, then by default
ATTRIB operates upon all files (*.*) in the current working
directory.
5
If no attribute options are specified then by default ATTRIB lists all
files (with their attributes) found which match vol:path\filename.
These default actions of ATTRIB may be used to search an entire
subtree for occurrences of a specific file or files. ATTRIB pauses
listing when the screen is full of data and wait for a keystroke before
continuing.
Alias
None
Wildcards
* and ? in the base filename (filename)
5-6
Motorola Firmware for PowerPC
FDOS Commands
Options
/S
Process all subtrees found under [path]. If no [path] is
specified begin processing in the current working directory on
[vol:]. If no [vol:] is specified, begin processing in the
current working directory on the current volume.
+R/-R
Set/clear the read-only attribute
+A/-A
Set/clear the archive attribute
+S/-S
Set/clear the system file attribute
+H/-H
Set/clear the hidden file attribute
5
Examples
1. To remove the read-only attribute from all files in the current
dir:
attrib -r
2. To remove the read-only and system file attributes from all
files in the c:\winnt351 directory:
attrib -r -s c:\winnt351\*.*
Note that the options must be separated by a space.
3. To set the hidden file attribute on all files ending with .dll
in the d:\os\winnt351 directory:
attrib +h d:\os\winnt351\*.dll
4. To list the names and attributes of all files in the current
directory:
attrib
5. To list all files ending in .sys and their attributes in the
subtree beginning with the current directory:
attrib /s *.sys
6. To find all occurrences of the specified file and list with
attributes in the subtree beginning with c:\winnt351:
attrib /s c:\winnt\351\readme.txt
Motorola Firmware for PowerPC
5-7
FDOS Utility
BATCH
Synopsis
batch [vol:][path]filename[.cmd] [option]
Description
BATCH executes batch command files which have a .bat or .cmd
extension. If no extension is specified in filename, BATCH appends
.bat to the filename and searches for it.
5
BATCH command files consist of command line commands and
associated arguments. Anything that can be typed at the command
line can be in a batch command file. Echo may be turned off while
executing batch command files (see ECHO on page 5-20) and
comment lines are provided by typing rem at the start of the line
(see REM on page 5-38).
Batch command files may be nested. If a wildcard is used to specify
the batch command file, only the first occurrence matching the
wildcard will be executed. Wildcards in logfile are an error.
A batch file can also be executed by entering its name on the
command line without the BATCH command.
Alias
call
sh
Wildcards
* and ? in the base filename (filename)
5-8
Motorola Firmware for PowerPC
FDOS Commands
Options
> logfile
Redirect screen output to the specified logfile
filename. If the file exists, open it in overwrite mode
and begin writing from the start of the file. If the file
does not exist, then create it.
>> logfile
Redirect screen output to the specified logfile
filename. If the file exists, append output to the
current contents. If the file does not exist, then create
it.
5
Examples
1. To execute the batch command file DOLOG.BAT:
batch dolog
2. To execute the batch command file A:\RUNME.CMD:
batch a:\runme.cmd
3. To execute the batch command file C:\DOLOG.BAT and
redirect screen output to the logfile c:\DOLOG.LOG:
batch c:\dolog > c:\dolog.log
4. To execute the batch command file A:\RUNME.CMD and
append output to the logfile c:\LOG\RUNME.LOG:
batch a:\runme.cmd >> c:\log\runme.log
Motorola Firmware for PowerPC
5-9
FDOS Utility
CHDIR
Synopsis
chdir [vol:][path]
Description
The CHDIR command changes and displays the current working
directory. CHDIR moves the current working directory to the one
specified by vol:path. If CHDIR is entered with no arguments, then
FDOS returns a list of all current working directories sorted by
volume.
5
Alias
cd
Wildcards
None
Options
None
Examples
1. To make C:\WINNT\SYSTEM32 the current working
directory:
cd c:\winnt\system32
2. To list all current working directories by volume:
cd
5-10
Motorola Firmware for PowerPC
FDOS Commands
CLS
Synopsis
cls
Description
CLS clears the current display and positions the command prompt
in the top-left corner of the screen.
5
Alias
clear
Options
None
Example
To clear the screen:
cls
Motorola Firmware for PowerPC
5-11
FDOS Utility
CNFG
Synopsis
cnfg [options]
Description
CNFG displays the contents of the NVRAM Board Information
Block and allows it to be edited. With the /I option, CNFG resets
each field of the Board Information Block to its default value. The
/M option allows you to view each field of the Board Information
Block individually and change it if necessary. As each field is
presented, press ENTER to keep the current value or type in a new
value at the prompt. Press ESC at any time to exit.
5
!
Warning
This command should only be used by developers who
know that their system has a Board Information Block. If
it does not, this command could overwrite a section of
NVRAM and render the system unusable.
Alias
none
Options
5-12
/I
Initialize the Board Information Block
/R
Display the Board Information Block (default)
/M
Modify the Board Information Block
Motorola Firmware for PowerPC
FDOS Commands
COPY
Synopsis
copy [vol:][path]filename [destination]
Description
COPY copies files or groups of files to the specified location. If no
destination is specified, then COPY copies the specified files to the
current working directory preserving the file names.
COPY always preserves file attributes (see ATTRIB on page 5-6). If
a destination file is specified, then COPY copies the source file to the
destination under the specified destination filename. FDOS returns
an error if you attempt to copy a file to itself.
Overwriting of existing files may be suppressed with the /X option
switch. The /N option switch suppresses listing items as they are
being copied.
Alias
cp
Wildcards
* and ? in the base filename (filename)
Options
/N
Do not list copied items
/X
Do not overwrite existing files
destination
A [vol:][path][filename] specifying where the copy
is to be placed.
Examples
1. To copy A:\README.TXT to the current working directory
on drive C:
copy a:\readme.txt c:
Motorola Firmware for PowerPC
5-13
5
FDOS Utility
2. To copy all files in the C:\OS\WINNT351 directory to the
D:\BACKUP directory:
copy c:\os\winnt351\*.* d:\backup
3. To copy the file C:\USERS\DEFAULT\AUTOEXEC.CMD to
drive A: and rename it AUTOEXEC.BAK in the process:
copy c:\users\default\autoexec.cmd a:autoexec.bak
5
5-14
Motorola Firmware for PowerPC
FDOS Commands
COPYDIR
Synopsis
copydir [options] [vol:][path]source [destination]
Description
The COPYDIR command copies the directory contents from source
to destination. If destination is not specified then the current working
directory is assumed. If destination exists, then copydir merges the
contents of source into destination, overwriting any existing files in
destination with files of the same name from source. Overwriting of
existing files may be suppressed with the /X option switch. If
destination does not exist, then it is created and the contents of
source are copied to it. Only one level of directory is created. If the
path to the last directory level of a specified destination does not
exist, it is an error. The /S option switch copies the entire subtree
structure starting at source. The /N option switch suppresses listing
the contents of source as they are being copied. It is an error if source
and destination resolve to the same directory.
Alias
dircopy
cpd
Wildcards
None
Options
/S
Copy all subdirectory trees
/N
Do not list copied items
/X
Do not overwrite existing files
destination
A [vol:][path] specifying the target directory.
Motorola Firmware for PowerPC
5-15
5
FDOS Utility
Examples
1. To copy the contents of directory A:\TEST to drive C:\TEST
(C:\TEST does not exist):
copydir a:\test c:\test
2. To copy the contents of directory C:\USERS\DEFAULT to
C:\USERS\WILMA and suppress listing the entries copied
(C:\USERS\WILMA exists):
5
copydir /n c:\users\default c:\users\wilma
3. To copy the contents of directory C:\USERS\DEFAULT to
C:\USERS\WILMA and prevent overwriting any existing
files (C:\USERS\WILMA exists):
copydir /x c:\users\default c:\users\wilma
4. To copy the entire subtree starting at C:\IMAGES to the
current working directory on drive D: and suppress listing
the entries copied (D:\IMAGES does not exist):
copydir /s /n c:\images d:\images
5. To copy the entire contents of the floppy in drive A: into the
current working directory:
copydir /s a:\
5-16
Motorola Firmware for PowerPC
FDOS Commands
DATE
Synopsis
date
Description
DATE displays the current date and time stored in the CMOS realtime clock.
5
Alias
time
Options
None
Example
To output the current system date and time:
date
Motorola Firmware for PowerPC
5-17
FDOS Utility
DIR
Synopsis
dir [options] [vol:][path][filename]
Description
The DIR command lists the contents of directories. By default, file
sizes are included but this may be suppressed by using the /Z
option (recommended on floppy drive listings). If no directory is
specified, then the current working directory is listed. If filename is
specified, then only matching entries are listed.
5
All listings include the file attributes (see ATTRIB on page 5-6 for an
explanation of file attributes).
DIR pauses when the screen is full of data and waits for a keystroke
before continuing.
Alias
ls
Wildcards
* and ? in the base filename (filename)
Options
/Z
Suppresses output of file sizes in the listing (makes some listings
go faster)
/S
Lists contents of specified directory and all subdirectories
Examples
1. To list the current working directory:
dir
2. To list everything on the floppy mounted in drive A:, while
suppressing file size listings:
dir /s /z a:\
5-18
Motorola Firmware for PowerPC
FDOS Commands
3. To list all files in directory C:\WINNT\SYSTEM32 that have
a .dll extension:
dir c:\winnt\system32\*.dll
5
Motorola Firmware for PowerPC
5-19
FDOS Utility
ECHO
Synopsis
echo [[.]|[on]|[off]|[message]]
Description
ECHO displays the current setting of the echo flag, changes the
setting of the echo flag, or outputs a message to screen output. The
echo flag controls whether or not commands, command prompts,
and output from command execution are sent to the screen (echo
on) or not (echo off). It can also be used with redirection to create
batch or text files.
5
If ECHO is off, the only data output to the screen is messages
prefaced with echo. The ECHO command preserves the integrity
of blanks preceding and imbedded in the message string. ECHO
searches for an ECHO option keyword. If it does not find one, it
treats the entire line as a message string.
FDOS requires one blank space between echo and message.
Additional blanks are considered part of the message string.
ECHO is typically used within batch files to make them execute in
"quiet" mode (echo off), and to output informative or diagnostic
messages from them.
Alias
None
5-20
Motorola Firmware for PowerPC
FDOS Commands
Options
.
Causes a blank line to be output to screen (no space between echo and
.)
on
Sets the command echo flag on (requires a space between echo and
on)
off
Sets the command echo flag off (requires a space between echo and
off)
message
Text to output to screen (requires a space between echo and message)
5
Examples
1. To check on the current setting of the echo flag:
echo
2. To turn command echoing off:
echo off
3. To output a blank line:
echo.
4. To output the text string "Error - file not found!" to the
screen:
echo Error - file not found!
Motorola Firmware for PowerPC
5-21
FDOS Utility
ERASE
Synopsis
erase [vol:][path]filename
Description
ERASE deletes files. If wildcards are used, a group of files may be
deleted, or a whole directory may be emptied of its files. If vol:path
are not specified then ERASE operates on files in the current
working directory.
5
Alias
del
rm
Wildcards
* and ? in the base filename (filename)
Options
None
!
If you enter ERASE *.*, you are NOT prompted to
confirm the deletion.
Warning
Examples
1. To delete the file README.TXT in the C:\ directory:
erase c:\readme.txt
2. To delete all files in the current directory ending with *.bak:
erase *.bak
3. To erase all files in the C:\USERS\JOHN directory:
erase c:\users\john\*.*
5-22
Motorola Firmware for PowerPC
FDOS Commands
EXIT
Synopsis
exit
Description
EXIT quits the FDOS command shell and returns to the Motorola
Firmware Main Menu.
5
Alias
None
Options
None
Example
To quit FDOS:
exit
Motorola Firmware for PowerPC
5-23
FDOS Utility
FLASH
Synopsis
flash source archive
flash /A archive
flash /R source
5
Description
FLASH saves (archives) the image currently in ROM into the
specified archive file, reprograms the flash ROM with the specified
source image file, or both.
If the source image is larger than the size of the ROM, FLASH issues
a warning, pauses, and asks if you really want to continue. In this
case, continuing is not recommended as the ROM (and therefore,
the system) will most likely be in an unusable state. FLASH also
warns if archive already exists and will be overwritten.
Alias
None
Wildcards
None
Options
/A
Archive only, save ROM image to file
/R
Flash only, reprogram ROM with specified image
source
Source image filename
archive
Archive filename
Examples
1. To save the contents of flash ROM into the file,
ROMFILE.IMG:
flash /a romfile.img
5-24
Motorola Firmware for PowerPC
FDOS Commands
2. To reprogram flash ROM with the source image,
A:\NEWROM.IMG:
flash /r a:\newrom.img
3. To save the current flash ROM image and reprogram with the
new image, A:\NEWROM.IMG:
flash a:\newrom.img a:\archive.img
5
Motorola Firmware for PowerPC
5-25
FDOS Utility
HELP
Synopsis
help [command]
Description
The HELP command lists all commands and redirection symbols
and displays command help
5
Entered with no operands, HELP displays a list of all FDOS internal
commands. Entering HELP with a valid FDOS internal command
name as an operand displays help for that command.
Alias
?
Options
command
The name of an FDOS internal command
Examples
1. To list all FDOS internal commands:
help
2. To display help for the command COPYDIR:
help copydir
3. To display help for the HELP command:
help help
5-26
Motorola Firmware for PowerPC
FDOS Commands
MEMORY
Synopsis
memory
Description
KEY prints out a formatted list of the function key bindings. It also
includes the bindings for special keys such as the arrow keys.
5
Alias
None
Options
None
Description
MEMORY displays the current firmware physical memory map.
Example
To display the current firmware memory map:
memory
Motorola Firmware for PowerPC
5-27
FDOS Utility
MKDIR
Synopsis
mkdir [vol:][path]directory
Description
MKDIR creates the specified directory. If no path is specified, the
new directory is created in the current working directory. If a path
is specified, the new directory is created there. Only one directory
level is created. If path is specified and it does not exist, FDOS issues
an error message and aborts the command.
5
Alias
md
Wildcards
None
Options
None
Examples
1. To create the directory TEMP in the current working
directory:
mkdir temp
2. To create the directory \TEMP on drive D:
mkdir d:\temp
5-28
Motorola Firmware for PowerPC
FDOS Commands
MOUNT
Synopsis
mount
Description
MOUNT displays the named nodes (loosely synonymous with
mount points) in the firmware component table.
5
Alias
None
Options
None
Example
To display firmware component table named nodes:
mount
Motorola Firmware for PowerPC
5-29
FDOS Utility
MOVE
Synopsis
move [vol:][path]source [vol:][path]target
Description
MOVE moves a file or files from one directory location to another.
The file(s) are copied to the new location and deleted from the old
location.
5
If a wildcard is specified in the source filename, then MOVE moves
a group of files in the source directory to the target directory. If a
source vol:path are not specified, then the current working
directory is assumed. If a target vol:path is not specified, the current
working directory is assumed. If a target filename is specified, then
MOVE moves the file, renaming it in the process.
If the source and the target both resolve to the same
vol:path\filename, FDOS returns an error.
Alias
mv
Wildcards
* and ? in the source filename if target is not specified
Options
None
!
If source and target are both files and target exists, FDOS
overwrites target without issuing a prompt.
Warning
5-30
Motorola Firmware for PowerPC
FDOS Commands
Examples
1. To move the file README.TXT from the current working
directory to the A:\DOCS directory:
move readme.txt a:\docs
2. To move all files in the root directory of drive A: into the
current working directory:
move a:\*.*
3. To rename the file LOG.OUT to LOG001.TXT in the current
working directory:
move log.out log001.txt
4. To move all files in the current working directory with a .sys
extension to the parent directory:
move *.sys ..
Motorola Firmware for PowerPC
5-31
5
FDOS Utility
PART
Synopsis
part
Description
The PART command displays all disk partitions for the installed
hard disk, CD-ROM drive, and the floppy drive, if found.
5
Alias
None
Wildcards
None
5-32
Motorola Firmware for PowerPC
FDOS Commands
PAUSE
Synopsis
pause
Description
The PAUSE command halts execution while FDOS waits for
keyboard input. Pressing ESC at the pause aborts the command
sequence. This command is intended primarily for batch command
files when processing must stop while the user reads a message
which has been issued, and then choose whether to abort by
pressing ESC or whether to continue by pressing any other key.
Alias
None
Options
None
Example
To pause until a key is pressed:
pause
Motorola Firmware for PowerPC
5-33
5
FDOS Utility
READB
Synopsis
readb Address [option]
Alias
rb
5
Description
READB reads the byte found at Address and displays its
hexadecimal value on the screen. If /Ln is specified then n
consecutive bytes are read starting at Address. If /Ln is not specified
then by default READB reads one byte. Bytes are printed to the
screen sixteen per line, preceded by the starting address for that line
and followed by the printable character for each byte. If a byte’s
ASCII value is not a printable character then a period (.) is printed.
Address is assumed to be a virtual hexadecimal address.
Entering a nonmapped address causes an exception to occur.
Options
/Ln
Length option, the integer n following indicates how many
consecutive bytes to read
Examples
1. To read the byte found at memory location 8000ADD0:
rb 8000add0
2. To read the 15 bytes starting at memory location 80008080:
rb 80008080 /L15
5-34
Motorola Firmware for PowerPC
FDOS Commands
READH
Synopsis
readh Address [option]
Description
READH reads the half-word found at Address and displays its
hexadecimal value on the screen. If /Ln is specified then n
consecutive half-words are read starting at Address. If /Ln is not
specified, then by default READH reads one half-word. Half-words
are printed to the screen eight per line, preceded by the starting
address for that line. These are in Little-Endian format. Address is
assumed to be a virtual hexadecimal address.
Entering a nonmapped address causes an exception to occur.
READH issues an error message and abort if Address is not aligned
on a half-word boundary.
Alias
rh
Options
/Ln
Length option, the integer n following indicates how many
consecutive half-words to read
Examples
1. To read the half-word found at memory location 8000ADD0:
rh 8000add0
2. To read the 15 half-words starting at memory location
80008080:
rh 80008080 /L15
Motorola Firmware for PowerPC
5-35
5
FDOS Utility
READW
Synopsis
readw Address [option]
Description
READW reads the word found at Address and displays its
hexadecimal value on the screen. If /Ln is specified then n
consecutive words are read starting at Address. If /Ln is not specified
then by default READW reads one word. Words are printed to the
screen four per line, preceded by the starting address for that line.
These are in Little-Endian format. Address is assumed to be a virtual
hexadecimal address.
5
Entering a nonmapped address causes an exception to occur.
READW issues an error message and abort if Address is not wordaligned.
Alias
rw
Options
/Ln
Length option, the integer n following indicates how many
consecutive words to read
Examples
1. To read the word found at memory location 8000ADD0:
rw 8000add0
2. To read the 15 words starting at memory location 80008080:
rw 80008080 /L15
5-36
Motorola Firmware for PowerPC
FDOS Commands
REGEDIT
Synopsis
regedit [options]
!
Warning
This command should only be used by developers who
know that their system has a Board Information Block. If
it does not, this command could overwrite a section of
NVRAM and render the system unusable.
5
Description
REGEDIT displays the contents of the PowerPC processor registers
and allows them to be edited. With the /S option, REGEDIT also
displays the contents of the segment registers. The /M option allows
you to view each of the registers individually and change it if
necessary. As each field is presented, press ENTER to keep the
current value or type in a new value at the prompt. Press ESC at any
time to save your modifications and exit.
Alias
reg
Options
/R
Display the contents of the processor registers (default)
/S
Include the contents of the segment registers
/M
Modify the processor registers
Motorola Firmware for PowerPC
5-37
FDOS Utility
REM
Synopsis
rem [comment line]
Description
The REM command marks comment lines in batch command files
(see BATCH on page 5-8). The optional text string following REM
must be separated from it by at least one space. REM does not have
to appear in column one of the line, but it must be the first word on
the line.
5
Alias
remark
Options
comment line
text string following REM
Example
To mark a comment line in a batch command file:
rem THIS IS A COMMENT LINE
5-38
Motorola Firmware for PowerPC
FDOS Commands
RESTART
Synopsis
restart option
Description
The RESTART command reboots or halts the system. This
command requires that you specify one of the options listed above.
5
Alias
None
Options
powerdown
halt and, if possible, remove power
reboot
power-on boot with previous boot parameters
restart
resume using valid restart block else power on boot of the restart
block or autoload environment variable
halt
halt the system
Examples
1. To reboot the system:
restart reboot
2. To halt the system:
restart halt
3. To halt the system and powerdown (if powerdown available
on this system):
restart powerdown
Motorola Firmware for PowerPC
5-39
FDOS Utility
RMDIR
Synopsis
rmdir [vol:]path
Description
RMDIR removes the specified directory if it is empty. If it contains
files, use the ERASE command to delete the files before removing
the directory. See ERASE on page 5-22 for a description of the
command.
5
If only a directory name is specified, then RMDIR assumes the
specified directory is a child of the current working directory. It is
an error to attempt to remove the current directory, the parent
directory, or any ancestor directory of the current working
directory.
Alias
rd
Wildcards
None
Options
None
Examples
1. To remove the empty directory C:\TEMP:
rmdir c:\temp
2. To remove the empty directory GROK which is a child of the
current working directory:
rmdir grok
3. To remove the empty directory OBJ which is a child of the
parent directory:
rmdir ..\obj
5-40
Motorola Firmware for PowerPC
FDOS Commands
SET
Synopsis
set
Description
The SET command displays or sets the FDOS keys and environment
variables.
5
Alias:
None
Wildcards
None
Options
<variable>
FDOS function key or environment variable
<value>
Text string or character value which must be in single quotes
/I
Initialize user-defined variables and function keys to default
value
Note
If you make any changes using the set command, such
as shown in example 2, you are asked if you wish to
save them in the FDOS.CFG file when you leave the
FDOS session. If you respond with Yes, the newlydefined FDOS variables are saved in a file called
FDOS.CFG.
However, to use those variables in subsequent
sessions, you need to delete the environment variable
named FDOSCFG=none (default). To delete the
FDOSCFG environment variable:
1. From the Main menu, select Setup, Environment
setup, Define env. variables, then Edit environment
variables.
Motorola Firmware for PowerPC
5-41
FDOS Utility
2. Using the arrow key or mouse, select
FDOSCFG=None and then click the Delete button.
This enables FDOS to search for the FDOS.CFG file that
contains the newly-defined environment variables.
Examples
1. To view all user-defined and system-defined variables:
5
set
2. To define a function key to perform a clear screen command:
set F4=’clear line’
3. To reset all user-defined variables and function keys to their
original value:
set /i
5-42
Motorola Firmware for PowerPC
FDOS Commands
SUBST
Synopsis
subst [drive1: [drive2:]path];
subst /D drive1:
Description
The SUBST command creates or deletes symbolic volumes or
displays the volume table. If entered with no operands, SUBST lists
the assigned entries in the volume table. It is an error if DRIVE2: is
specified without a path (a \ is a sufficient path declaration). Only
virtual volumes can be deleted with the /D option. It is an error to
attempt to assign a volume that is already assigned.
Alias
None
Wildcards
None
Options
drive1:
virtual drive to assign
drive2:path
physical drive/path to assign to the virtual drive
/D
remove a virtual drive
Examples
1. To assign virtual volume M: to C:\TEMP:
subst m: c:\temp
2. To delete the virtual volume M:
subst /d m:
3. To list all assigned entries in the volume table:
subst
Motorola Firmware for PowerPC
5-43
5
FDOS Utility
SYSTEM
Synopsis
system
Description
The SYSTEM command displays the vendor and product ID
strings.
5
Alias
sys
Options
None
5-44
Motorola Firmware for PowerPC
FDOS Commands
TREE
Synopsis
tree [option] [vol:][path]
Description
The TREE command displays a directory tree structure, and
optionally lists the files contained in it. It is a “pseudo-graphical”
directory listing showing the parent and child relationships. TREE
pauses when the screen is full of data and waits for a keystroke
before continuing. If no PATH is specified then TREE displays the
structure of the subtree beginning with the current working
directory.
Alias
None
Wildcards
None
Options
/F
display the names of the files in each directory
Examples
1. To display the entire directory structure on drive C:
tree c:\
2. To display the subdirectory structure and all files beginning
with the current working directory:
tree /f
Motorola Firmware for PowerPC
5-45
5
FDOS Utility
TYPE
Synopsis
type [vol:][path]filename
Description
The TYPE command prints the contents of text files to the console.
If filename contains a wildcard then all matching files are printed to
the screen in the order in which they are found in the directory.
5
TYPE pauses when the screen is full of data and waits for a
keystroke before continuing.
Alias
cat
more
Wildcards
* and ? in the base filename (filename)
Options
None
Examples
1. To print the contents of the text file A:\README.TXT to the
screen:
type a:\readme.txt
2. To print out the contents of all text files with a .txt
extension in the current working directory:
type *.txt
5-46
Motorola Firmware for PowerPC
FDOS Commands
VERSION
Synopsis
version
Description
The VERSION command displays the FDOS version number.
Alias
5
ver
Options
None
Example
To display the FDOS version number:
version
Motorola Firmware for PowerPC
5-47
FDOS Utility
WRITEB
Synopsis
writeb Address databyte [databyte]...
Description
WRITEB writes one or more bytes to the specified virtual memory
location (Address). At least one databyte is required, and more
may be optionally listed on the command line separated by a space.
Databyte values are assumed to be in hexadecimal form. If a Databyte
value is specified which is larger than a byte, an error message is
issued and the write is aborted. Address is assumed to be a virtual
mapped hexadecimal address. Specifying a nonmapped address is
an error and causes an exception to occur.
5
Alias
wb
Options
databyte
A list of consecutive databytes to be written
Examples
1. To write the byte FF to virtual memory location 8000ADD0:
wb 8000add0 ff
2. To write three bytes AA BB DD starting at memory location
80008080:
wb 80008080 aa bb dd
5-48
Motorola Firmware for PowerPC
FDOS Commands
WRITEH
Synopsis
writeh Address data [data]...
Description
WRITEH writes a half-word or half-words to the specified virtual
memory location (Address). At least one halfword must be specified,
and more may be optionally listed on the command line separated
by a space. Data values are assumed to be in hexadecimal form. If a
Data value is specified which is larger than a half-word, an error
message is issued and the write is aborted. Address is assumed to be
a virtual mapped hexadecimal address. If Address is not aligned on
a half-word boundary then an error message is issued and the write
operation is aborted. Specifying a nonmapped address is an error
and causes an exception to occur. Remember that this is a LittleEndian environment.
Alias
wh
Options
data
A list of consecutive halfwords to be written
Examples
1. To write the half-word FF00 to virtual memory location
8000ADD2:
wh 8000add2 ff00
2. To write three half-words AAFF BB00 DD11 starting at
virtual memory location 80008084:
wh 80008084 aaff bb00 dd11
Motorola Firmware for PowerPC
5-49
5
FDOS Utility
WRITEW
Synopsis
writew Address data [data]...
Description
WRITEW writes one or more words to the specified virtual memory
location (Address). At least one word of data must be specified, and
more may be optionally listed on the command line separated by a
space. Data values are assumed to be in hexadecimal form. If a Data
value is specified which is larger than a word, an error message is
issued and the write is aborted. Address is assumed to be a virtual
mapped hexadecimal address. If Address is not aligned on a word
boundary then an error message is issued and the write is aborted.
Specifying a nonmapped address is an error and causes an
exception to occur. Remember that this is a Little-Endian
environment.
5
Alias
ww
Options
data
A list of consecutive words to be written
Examples
1. To write the word FF00FF00 to virtual memory location
8000ADD4:
ww 8000add4 ff00ff00
2. To write two words AAFF0000 0000FFFF starting at virtual
memory location 80008080:
ww 80008080 aaff0000 0000ffff
5-50
Motorola Firmware for PowerPC
FDOS Utility
5
5-51
Motorola Firmware for PowerPC
6Evaluating and Installing
Motorola Firmware
6
Use the following instructions to evaluate and install upgrades on
systems running previous versions of Motorola Firmware. The
instructions in Evaluating Motorola Firmware Upgrades, allows you to
run Motorola Firmware without overwriting the firmware
currently installed on your system. Follow the instructions in:
❏
Installing Motorola Firmware Upgrades on page 6-2 to replace
your current firmware.
❏
Firmware Recovery on page 6-3 discusses how to reinstall
archived versions of Motorola Firmware.
Evaluating Motorola Firmware Upgrades
To run Motorola Firmware without overwriting your system’s
existing firmware:
1. Insert the Motorola Firmware diskette in the floppy disk
drive.
2. From the Motorola Firmware Main Menu:
– Select System Setup and press ENTER
– Select Run Program and press ENTER
– Type: [vol:]path\upgrade.img and press ENTER
where upgrade.img is the name of the firmware upgrade to
be evaluated.
The system reboots using the new firmware. When you have
finished evaluating the firmware upgrade, power down the system
and restart.
Motorola Firmware for PowerPC
6-1
Evaluating and Installing Motorola Firmware
Installing Motorola Firmware Upgrades
To replace your system’s current firmware with a new version of
Motorola Firmware:
1. Insert the Motorola Firmware diskette in the floppy disk
drive.
2. From the Motorola Firmware Main Menu:
– Select System Setup and press ENTER.
– Select Run FDOS and press ENTER. For more
information on the FDOS utility, see FDOS Utility.
6
3. At the FDOS prompt, type:
flash [vol:]path\upgrade.img [vol:]path\archive.img and
press ENTER
where upgrade is the prefix of the firmware image file and
archive is the prefix of the firmware archive file. For more
information on the FLASH command, see FLASH on page
5-24.
Motorola Firmware archives the firmware currently installed in
system ROM and then reprograms the system ROM with the
firmware upgrade.
!
Warning
Do not power off the machine during this stage! If
power is interrupted, the firmware will be corrupted
and the system unusable.
After programming completes successfully, the next time you
apply power to the system, it executes the new firmware.
6-2
Motorola Firmware for PowerPC
Firmware Recovery
Firmware Recovery
To reinstall an archived version of firmware:
1. From the Motorola Firmware Main Menu:
– Select System Setup and press ENTER.
– Select Run FDOS and press ENTER. For more
information on the FDOS utility, see FDOS Utility.
2. After FDOS loads, at the FDOS prompt, type:
flash /R [vol:]path\archive.img and press ENTER
where archive is the prefix of the archived firmware image
file. For more information on the FLASH command, see
FLASH on page 5-24.
Motorola Firmware restores the archived firmware to the system
ROM.
!
Warning
Do not power off the machine during this stage! If
power is interrupted, the firmware will be corrupted
and the system unusable.
After programming completes successfully, the next time you
apply power to the system, it executes the restored firmware.
Motorola Firmware for PowerPC
6-3
6
Evaluating and Installing Motorola Firmware
6
6-4
Motorola Firmware for PowerPC
AVideo Card Compatibility Chart
A
The following table provides video test compatibilities for Motorola
Firmware.
Table A-1. Motorola Firmware 3.05 Video Test Compatibility
Matrix
Card
ROM Silicon
Driver Bus
MCG Blackhawk onboard video
N/A
Cirrus 5434
Cirrus
OB
STB Horizon
1.1
Cirrus 5429
Cirrus
ISA
Diamond Speedster 64
2.00
Cirrus 5434
Cirrus
ISA
(MCG) Prolink Alpine
N/A
Cirrus 5434
Cirrus
PCI
Diamond Speedstar Pro SE
1.00
Cirrus 5430
Cirrus
PCI
Orchid Kelvin
1.1
Cirrus 5434
Cirrus
PCI
STB Nitro 64
1.0
Cirrus 5436
Cirrus
PCI
Diamond Stealth Video
1.01
S3 868
S3
PCI
Diamond Stealth SE
1.02
S3 732
S3
PCI
Diamond Stealth 64 DRAM
2.02
S3 764
S3
PCI
Diamond Stealth 64 VRAM
1.01
S3 968
S3
PCI
Diamond Stealth 64 VRAM
1.05H
S3 964
S3
PCI
#9 GXE
1.15.20
S3 928
S3
PCI
#9 GXE64 Pro
1.03
S3 964
S3
PCI
#9 GXE64
1.02.09
S3 864
S3
PCI
#9 Motion 531 9FX
2.04.02
S3 868
S3
PCI
Leadtech Winfast S240
N/A
S3 764
S3
PCI
Leadtech Winfast S400
None
S3 964
S3
PCI
Spea Mirage P-64 V
1.00
S3 868
S3
PCI
Spea Mirage P-64 V
1.01
S3 968
S3
PCI
STB Power Graph 64
1.0
S3 764
S3
PCI
Hercules Graphite Terminator 64
N/A
S3 964
S3
PCI
IBM
None
S3 928
S3
PCI
Paradise / Western Digital
N/A
S3 864
S3
PCI
Motorola Firmware for PowerPC
A-1
A
Video Card Compatibility Chart
Table A-1. Motorola Firmware 3.05 Video Test Compatibility
Matrix
Card
A-2
ROM Silicon
Driver Bus
S3 Pro Lightening
N/A
S3 864
S3
PCI
Paradise Accelerator 24
N/A
WDC 90C31
N/A
ISA
Diamond Speedstar 24
5.00
Tseng ET4000
N/A
ISA
Hercules Dynamite Pro ISA
N/A
Tseng ET4000
N/A
ISA
ISA Trident 8900
N/A
Trident 8900
N/A
ISA
PCI Trident 9440
A5.1
Trident 9440
N/A
PCI
Hercules Dynamite Power PCI
N/A
Tseng ET4000
N/A
PCI
Diamond Viper Pro
1.05
Weitek 9100
Weitek9
PCI
ATI Gfx Expression
1.02
ATI Mach 64
ATI
PCI
ATI CHRP (FCODE & x86 BIOS)
1.00
ATI Mach 64
ATI
PCI
Matrox MGA Impression Plus
3.6
MGA 64-bit
N/A
PCI
Matrox MGA Millennia
N/A
MGA Storm R2 Matrox
PCI
Motorola Firmware for PowerPC
Index
When using this index, keep in mind that a page number indicates only where
referenced material begins. It may extend to the page or pages following the page
referenced.
A
AIX 1-1, 4-16
ARC window 4-34
archived firmware, restoring 6-3
autobooting 4-22
B
boot PR*P compatible operating systems 3-2
boot selections
PR*P operating systems 4-16
Windows NT 4-9
adding 4-9
deleting 4-12
editing 4-13
testing 4-14
booting, fatal error 3-6
C
command line keystrokes 2-2
configure desktop 4-19
configure memory 3-6
configure screen saver 4-21
countdown value 4-23
customize screen saver patterns 4-21
D
DEBUG window 3-1
deleting boot selections 4-12
desktop configuration 4-19
disable/enable autoboot 4-22
E
editing boot selections 4-13
EDODRAM 3-6
EIDE CD-ROM device 4-27
enabling boot password 3-3
environment setup 4-2
Motorola Firmware for PowerPCIN-1
environment variables
A: 4-26
creating 4-6
deleting 4-7
display 4-8
editing 4-5, 4-6
EDO memory 3-6
FWSEARCHPATH 4-10, 4-26
LOADIDENTIFIER 4-14
OSLOADER 4-14
OSLOADFILENAME 4-14
OSLOADOPTIONS 4-14
OSLOADPARTITION 4-14
resetting 4-4
saving sets of 4-5
SYSTEMPARTITION 4-10, 4-14, 4-31
viewing defaults 3-5
express setup 4-27
F
FDOS
command aliases 5-2
command history buffers 5-2
command options 5-2
command prompt 5-1
commands
ATTRIB 5-6 to 5-7
BATCH 5-8 to 5-9
CHDIR 5-10
CLS 5-11
CNFG 5-12
COPY 5-13 to 5-14
COPYDIR 5-15 to 5-16
DATE 5-17
DIR 5-18 to 5-19
ECHO 5-20 to 5-21
Index
commands (continued)
ERASE 5-22
EXIT 5-23
FLASH 5-24 to 5-25
HELP 5-26
MEMORY 5-27
MKDIR 5-28
MOUNT 5-29
MOVE 5-30 to 5-31
PART 5-32
PAUSE 5-33
READB 5-34
READH 5-35
READW 5-36
REGEDIT 5-37
REM 5-38
RESTART 5-39
RMDIR 5-40
SET 5-41
SUBST 5-43
SYSTEM 5-44
TREE 5-45
TYPE 5-46
VERSION 5-47
WRITEB 5-48
WRITEH 5-49
WRITEW 5-50
executing FDOS from user interface 4-33
memory mode 5-1
online help 5-3
output redirection 5-3
wildcards in filenames 5-2
file extensions 4-25
firmware initialization 3-1
H
Help 3-4
I
N
D
E
X
I
initialize debugger 4-11
K
keyboard shortcuts 3-4
M
menu navigation 2-1 to 2-3
menus
IN-2
Boot 3-2
Configure desktop 4-19
Define Environment Variables 4-3, 4-4,
4-6, 4-7, 4-8
Environment Setup 4-2 to 4-19
Express Setup 4-27
Hard Disk Setup 4-27 to 4-32
Help 3-4
Manage Passwords 4-17
Manage PR*P OS Boot Selection 4-8, 4-16
Manage Windows NT Startup 4-8 to 4-16
Run FDOS 4-33
Run Program 4-25
Set Autoboot 4-22
Set Time and Date 4-24
Setup Screen Saver 4-21
System Setup 4-1
mouse operation 2-3
O
osloader.exe 4-11
P
partitions
FAT partition 4-30
creating 4-30
deleting 4-31
size 4-31
hard disk partitions 4-27
PR*P boot partition
creating 4-29
deleting 4-30
size 4-29
updating 4-29
system partition
defined 4-31
designating 4-32
passwords
boot password 3-2, 4-17, 4-18, 4-19
enabling and disabling 4-18
protection 3-2, 4-17
system password 4-2, 4-17, 4-18, 4-19
Power-On Self Test (POST) 3-1
PowerPC Reference Platform (PR*P) specification 1-1
Motorola Firmware for PowerPC
R
recover firmware image 6-3
restoring archived firmware 6-3
running programs 4-25
S
screen saver 4-21
supported operating systems 1-2
supported standards
PowerPC Reference Platform (PR*P) 1-1
Windows NT Portable Boot Loader specification 1-1
system partition 4-31
T
testing boot selections 4-14
time and date 4-24
timing values for EDO memory 3-6
U
upgrades
evaluating 6-1
installing 6-2
user interface 4-34
system administrator functionality 4-34
user functionality 3-2 to 3-3
user interface, hierarchy 2-1
V
video test compatibilities A-1
virtual volume 5-3
W
Windows NT internal debugger 4-11
Windows NT Portable Boot Loader specification 1-1
I
N
D
E
X
Motorola Firmware for PowerPC
IN-3
Index
I
N
D
E
X
IN-4
Motorola Firmware for PowerPC