1
CodeWarrior™
Development Studio
8/16-Bit IDE User’s Guide
Revised: 27 September 2005
Freescale, the Freescale logo, and CodeWarrior are trademarks or registered trademarks of Freescale in the United
States and/or other countries. All other trade names and trademarks are the property of their respective owners.
Copyright © 2005 by Freescale Semiconductor company. All rights reserved.
No portion of this document may be reproduced or transmitted in any form or by any means, electronic or mechanical, without prior written permission from Freescale. Use of this document and related materials is governed by the license agreement that accompanied the product to which this manual pertains. This document may
be printed for non-commercial personal use only in accordance with the aforementioned license agreement. If
you do not have a copy of the license agreement, contact your Freescale representative or call 1-800-377-5416 (if
outside the U.S., call +1-512-996-5300).
Freescale reserves the right to make changes to any product described or referred to in this document without further
notice. Freescale makes no warranty, representation or guarantee regarding the merchantability or fitness of its products
for any particular purpose, nor does Freescale assume any liability arising out of the application or use of any product
described herein and specifically disclaims any and all liability. Freescale software is not authorized for and has not
been designed, tested, manufactured, or intended for use in developing applications where the failure, malfunction, or any inaccuracy of the application carries a risk of death, serious bodily injury, or damage to tangible
property, including, but not limited to, use in factory control systems, medical devices or facilities, nuclear facilities, aircraft navigation or communication, emergency systems, or other applications with a similar degree of
potential hazard.
How to Contact Freescale
Corporate Headquarters
Freescale Corporation
7700 West Parmer Lane
Austin, TX 78729
U.S.A.
World Wide Web
http://www.freescale.com/codewarrior
Technical Support
http://www.freescale.com/support
Table of Contents
I Introduction
1
8/16-Bit IDE User’s Guide Overview
13
Release Notes . . . . . . . . . . . . . . . . . . . . . . . . . . . . . . . . . . . . . . . . . . . . . . . . . . . 13
Licensing. . . . . . . . . . . . . . . . . . . . . . . . . . . . . . . . . . . . . . . . . . . . . . . . . . . . . . . 13
CodeWarriorU.com . . . . . . . . . . . . . . . . . . . . . . . . . . . . . . . . . . . . . . . . . . . . . . . 14
Manual Conventions . . . . . . . . . . . . . . . . . . . . . . . . . . . . . . . . . . . . . . . . . . . . . . 15
Figure Conventions . . . . . . . . . . . . . . . . . . . . . . . . . . . . . . . . . . . . . . . . . . . . 15
Keyboard Conventions . . . . . . . . . . . . . . . . . . . . . . . . . . . . . . . . . . . . . . . . . 16
2
CodeWarrior IDE Overview
17
Development Cycle. . . . . . . . . . . . . . . . . . . . . . . . . . . . . . . . . . . . . . . . . . . . . . . 17
CodeWarrior IDE Advantages . . . . . . . . . . . . . . . . . . . . . . . . . . . . . . . . . . . . . . 19
IDE Tools Overview . . . . . . . . . . . . . . . . . . . . . . . . . . . . . . . . . . . . . . . . . . . . . . 20
II Projects
3
Working with Projects
25
About Projects. . . . . . . . . . . . . . . . . . . . . . . . . . . . . . . . . . . . . . . . . . . . . . . . . . . 25
Project Manager . . . . . . . . . . . . . . . . . . . . . . . . . . . . . . . . . . . . . . . . . . . . . . 25
Build Targets . . . . . . . . . . . . . . . . . . . . . . . . . . . . . . . . . . . . . . . . . . . . . . . . . 27
Managing Projects . . . . . . . . . . . . . . . . . . . . . . . . . . . . . . . . . . . . . . . . . . . . . . . 29
Advanced Projects . . . . . . . . . . . . . . . . . . . . . . . . . . . . . . . . . . . . . . . . . . . . . . . 32
Custom Project Stationery. . . . . . . . . . . . . . . . . . . . . . . . . . . . . . . . . . . . . . . 32
Subprojects . . . . . . . . . . . . . . . . . . . . . . . . . . . . . . . . . . . . . . . . . . . . . . . . . . 33
Strategies . . . . . . . . . . . . . . . . . . . . . . . . . . . . . . . . . . . . . . . . . . . . . . . . . . . . 34
4
Project Window
37
About the Project Window . . . . . . . . . . . . . . . . . . . . . . . . . . . . . . . . . . . . . . . . . 37
8/16-bit IDE User’s Guide
3
Table of Contents
Project Window Pages. . . . . . . . . . . . . . . . . . . . . . . . . . . . . . . . . . . . . . . . . . . . .39
Files Page. . . . . . . . . . . . . . . . . . . . . . . . . . . . . . . . . . . . . . . . . . . . . . . . . . . .39
Link Order Page. . . . . . . . . . . . . . . . . . . . . . . . . . . . . . . . . . . . . . . . . . . . . . .43
Targets Page. . . . . . . . . . . . . . . . . . . . . . . . . . . . . . . . . . . . . . . . . . . . . . . . . .43
File, Group, Layout, and Target Management . . . . . . . . . . . . . . . . . . . . . . . . . .44
Build-Target Management. . . . . . . . . . . . . . . . . . . . . . . . . . . . . . . . . . . . . . . . . .48
5
Working with Files
51
Managing Files . . . . . . . . . . . . . . . . . . . . . . . . . . . . . . . . . . . . . . . . . . . . . . . . . .51
6
Dockable Windows
57
About Dockable Windows . . . . . . . . . . . . . . . . . . . . . . . . . . . . . . . . . . . . . . . . .57
Working with Dockable Windows . . . . . . . . . . . . . . . . . . . . . . . . . . . . . . . . . . .59
Dock Bars . . . . . . . . . . . . . . . . . . . . . . . . . . . . . . . . . . . . . . . . . . . . . . . . . . . . . .63
7
Workspaces
67
About Workspaces. . . . . . . . . . . . . . . . . . . . . . . . . . . . . . . . . . . . . . . . . . . . . . . .67
Using Workspaces . . . . . . . . . . . . . . . . . . . . . . . . . . . . . . . . . . . . . . . . . . . . . . . .67
III Editor
8
The CodeWarrior Editor
73
Editor Window . . . . . . . . . . . . . . . . . . . . . . . . . . . . . . . . . . . . . . . . . . . . . . . . . .73
Editor Toolbar . . . . . . . . . . . . . . . . . . . . . . . . . . . . . . . . . . . . . . . . . . . . . . . . . . .75
Interfaces Menu . . . . . . . . . . . . . . . . . . . . . . . . . . . . . . . . . . . . . . . . . . . . . . .76
Functions Menu . . . . . . . . . . . . . . . . . . . . . . . . . . . . . . . . . . . . . . . . . . . . . . .76
Markers Menu . . . . . . . . . . . . . . . . . . . . . . . . . . . . . . . . . . . . . . . . . . . . . . . .76
Document Settings Menu . . . . . . . . . . . . . . . . . . . . . . . . . . . . . . . . . . . . . . .76
Version Control System Menu. . . . . . . . . . . . . . . . . . . . . . . . . . . . . . . . . . . .77
Other Editor Window Components . . . . . . . . . . . . . . . . . . . . . . . . . . . . . . . . . . .77
Path Caption . . . . . . . . . . . . . . . . . . . . . . . . . . . . . . . . . . . . . . . . . . . . . . . . .77
File Modification Icon . . . . . . . . . . . . . . . . . . . . . . . . . . . . . . . . . . . . . . . . . .77
Text Editing Area. . . . . . . . . . . . . . . . . . . . . . . . . . . . . . . . . . . . . . . . . . . . . .78
4
8/16-bit IDE User’s Guide
Table of Contents
Line and Column Indicator . . . . . . . . . . . . . . . . . . . . . . . . . . . . . . . . . . . . . . 78
Pane Splitter Controls . . . . . . . . . . . . . . . . . . . . . . . . . . . . . . . . . . . . . . . . . . 78
9
Editing Source Code
81
Text Manipulation. . . . . . . . . . . . . . . . . . . . . . . . . . . . . . . . . . . . . . . . . . . . . . . . 81
Symbol Editing Shortcuts . . . . . . . . . . . . . . . . . . . . . . . . . . . . . . . . . . . . . . . 83
Punctuation Balancing . . . . . . . . . . . . . . . . . . . . . . . . . . . . . . . . . . . . . . . . . . . . 84
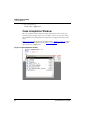
Code Completion . . . . . . . . . . . . . . . . . . . . . . . . . . . . . . . . . . . . . . . . . . . . . . . . 85
Code Completion Configuration . . . . . . . . . . . . . . . . . . . . . . . . . . . . . . . . . . 86
Code Completion Window . . . . . . . . . . . . . . . . . . . . . . . . . . . . . . . . . . . . . . 88
10 Navigating Source Code
95
Finding Interface Files, Functions, and Lines. . . . . . . . . . . . . . . . . . . . . . . . . . . 95
Finding Interface Files . . . . . . . . . . . . . . . . . . . . . . . . . . . . . . . . . . . . . . . . . 95
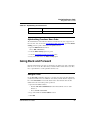
Locating Functions . . . . . . . . . . . . . . . . . . . . . . . . . . . . . . . . . . . . . . . . . . . . 96
Going Back and Forward . . . . . . . . . . . . . . . . . . . . . . . . . . . . . . . . . . . . . . . . . . 97
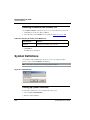
Using Markers. . . . . . . . . . . . . . . . . . . . . . . . . . . . . . . . . . . . . . . . . . . . . . . . . . . 98
Remove Markers Window. . . . . . . . . . . . . . . . . . . . . . . . . . . . . . . . . . . . . . . 98
Symbol Definitions . . . . . . . . . . . . . . . . . . . . . . . . . . . . . . . . . . . . . . . . . . . . . . 100
11 Finding and Replacing Text
103
Single-File Find . . . . . . . . . . . . . . . . . . . . . . . . . . . . . . . . . . . . . . . . . . . . . . . . 103
Single-File Find and Replace . . . . . . . . . . . . . . . . . . . . . . . . . . . . . . . . . . . . . . 105
Multiple-File Find and Replace . . . . . . . . . . . . . . . . . . . . . . . . . . . . . . . . . . . . 108
In Folders. . . . . . . . . . . . . . . . . . . . . . . . . . . . . . . . . . . . . . . . . . . . . . . . . . . 111
In Projects . . . . . . . . . . . . . . . . . . . . . . . . . . . . . . . . . . . . . . . . . . . . . . . . . . 112
In Symbolics . . . . . . . . . . . . . . . . . . . . . . . . . . . . . . . . . . . . . . . . . . . . . . . . 115
In Files. . . . . . . . . . . . . . . . . . . . . . . . . . . . . . . . . . . . . . . . . . . . . . . . . . . . . 117
Search Results Window . . . . . . . . . . . . . . . . . . . . . . . . . . . . . . . . . . . . . . . . . . 118
Text-Selection Find . . . . . . . . . . . . . . . . . . . . . . . . . . . . . . . . . . . . . . . . . . . . . . 120
Regular-Expression Find . . . . . . . . . . . . . . . . . . . . . . . . . . . . . . . . . . . . . . . . . 122
Using the Find String in the Replace String . . . . . . . . . . . . . . . . . . . . . . . . 125
Remembering Sub-expressions . . . . . . . . . . . . . . . . . . . . . . . . . . . . . . . . . . 125
Comparing Files and Folders . . . . . . . . . . . . . . . . . . . . . . . . . . . . . . . . . . . . . . 126
Comparison Setup . . . . . . . . . . . . . . . . . . . . . . . . . . . . . . . . . . . . . . . . . . . . 126
8/16-bit IDE User’s Guide
5
Table of Contents
File Comparison . . . . . . . . . . . . . . . . . . . . . . . . . . . . . . . . . . . . . . . . . . . . .130
Folder Comparison . . . . . . . . . . . . . . . . . . . . . . . . . . . . . . . . . . . . . . . . . . .132
IV Browser
12 Using the Browser
137
Browser Database . . . . . . . . . . . . . . . . . . . . . . . . . . . . . . . . . . . . . . . . . . . . . . .137
Browser Data . . . . . . . . . . . . . . . . . . . . . . . . . . . . . . . . . . . . . . . . . . . . . . . .137
Browser Symbols . . . . . . . . . . . . . . . . . . . . . . . . . . . . . . . . . . . . . . . . . . . . . . .140
Browser Contextual Menu. . . . . . . . . . . . . . . . . . . . . . . . . . . . . . . . . . . . . .140
13 Using Class Browser Windows
143
Class Browser window . . . . . . . . . . . . . . . . . . . . . . . . . . . . . . . . . . . . . . . . . . .143
Classes pane . . . . . . . . . . . . . . . . . . . . . . . . . . . . . . . . . . . . . . . . . . . . . . . . . . .149
Member Functions pane . . . . . . . . . . . . . . . . . . . . . . . . . . . . . . . . . . . . . . . . . .151
Data Members pane. . . . . . . . . . . . . . . . . . . . . . . . . . . . . . . . . . . . . . . . . . . . . .151
Source pane . . . . . . . . . . . . . . . . . . . . . . . . . . . . . . . . . . . . . . . . . . . . . . . . . . . .152
Status Area . . . . . . . . . . . . . . . . . . . . . . . . . . . . . . . . . . . . . . . . . . . . . . . . . . . .153
14 Using Other Browser Windows
155
Multiple-Class Hierarchy Window . . . . . . . . . . . . . . . . . . . . . . . . . . . . . . . . . .155
Single-Class Hierarchy Window . . . . . . . . . . . . . . . . . . . . . . . . . . . . . . . . . . . .158
Browser Contents window . . . . . . . . . . . . . . . . . . . . . . . . . . . . . . . . . . . . . . . .159
Symbols window . . . . . . . . . . . . . . . . . . . . . . . . . . . . . . . . . . . . . . . . . . . . . . . .160
Symbols toolbar . . . . . . . . . . . . . . . . . . . . . . . . . . . . . . . . . . . . . . . . . . . . . .162
Symbols pane. . . . . . . . . . . . . . . . . . . . . . . . . . . . . . . . . . . . . . . . . . . . . . . .162
Source pane . . . . . . . . . . . . . . . . . . . . . . . . . . . . . . . . . . . . . . . . . . . . . . . . .162
15 Using Browser Wizards
163
The New Class Wizard . . . . . . . . . . . . . . . . . . . . . . . . . . . . . . . . . . . . . . . . . . .163
The New Member Function Wizard . . . . . . . . . . . . . . . . . . . . . . . . . . . . . . . . .168
The New Data Member Wizard . . . . . . . . . . . . . . . . . . . . . . . . . . . . . . . . . . . .169
6
8/16-bit IDE User’s Guide
Table of Contents
V Compilers and Linkers
16 Compilers
175
Choosing a Compiler . . . . . . . . . . . . . . . . . . . . . . . . . . . . . . . . . . . . . . . . . . . . 175
Compiling Projects . . . . . . . . . . . . . . . . . . . . . . . . . . . . . . . . . . . . . . . . . . . . . . 175
17 Linkers
179
Choosing Linkers . . . . . . . . . . . . . . . . . . . . . . . . . . . . . . . . . . . . . . . . . . . . . . . 179
Linking Projects . . . . . . . . . . . . . . . . . . . . . . . . . . . . . . . . . . . . . . . . . . . . . . . . 180
VI Preferences and Target Settings
18 Customizing the IDE
183
Customizing IDE Commands . . . . . . . . . . . . . . . . . . . . . . . . . . . . . . . . . . . . . . 183
Commands Tab . . . . . . . . . . . . . . . . . . . . . . . . . . . . . . . . . . . . . . . . . . . . . . 185
Pre-defined Variables in Command Definitions . . . . . . . . . . . . . . . . . . . . . 188
Customize Toolbars . . . . . . . . . . . . . . . . . . . . . . . . . . . . . . . . . . . . . . . . . . . . . 192
Kinds of Toolbars . . . . . . . . . . . . . . . . . . . . . . . . . . . . . . . . . . . . . . . . . . . . 193
Toolbar Elements. . . . . . . . . . . . . . . . . . . . . . . . . . . . . . . . . . . . . . . . . . . . . 193
Modify a Toolbar. . . . . . . . . . . . . . . . . . . . . . . . . . . . . . . . . . . . . . . . . . . . . 193
Customize Key Bindings . . . . . . . . . . . . . . . . . . . . . . . . . . . . . . . . . . . . . . . . . 196
19 Working with IDE Preferences
201
IDE Preferences Window . . . . . . . . . . . . . . . . . . . . . . . . . . . . . . . . . . . . . . . . . 201
General Panels . . . . . . . . . . . . . . . . . . . . . . . . . . . . . . . . . . . . . . . . . . . . . . . . . 203
Build Settings . . . . . . . . . . . . . . . . . . . . . . . . . . . . . . . . . . . . . . . . . . . . . . . 203
Concurrent Compiles. . . . . . . . . . . . . . . . . . . . . . . . . . . . . . . . . . . . . . . . . . 204
IDE Extras . . . . . . . . . . . . . . . . . . . . . . . . . . . . . . . . . . . . . . . . . . . . . . . . . . 205
Plugin Settings. . . . . . . . . . . . . . . . . . . . . . . . . . . . . . . . . . . . . . . . . . . . . . . 207
Shielded Folders . . . . . . . . . . . . . . . . . . . . . . . . . . . . . . . . . . . . . . . . . . . . . 208
Source Trees . . . . . . . . . . . . . . . . . . . . . . . . . . . . . . . . . . . . . . . . . . . . . . . . 210
Editor Panels . . . . . . . . . . . . . . . . . . . . . . . . . . . . . . . . . . . . . . . . . . . . . . . . . . . 213
8/16-bit IDE User’s Guide
7
Table of Contents
Code Completion . . . . . . . . . . . . . . . . . . . . . . . . . . . . . . . . . . . . . . . . . . . . .213
Code Formatting . . . . . . . . . . . . . . . . . . . . . . . . . . . . . . . . . . . . . . . . . . . . .215
Editor Settings . . . . . . . . . . . . . . . . . . . . . . . . . . . . . . . . . . . . . . . . . . . . . . .217
Font & Tabs . . . . . . . . . . . . . . . . . . . . . . . . . . . . . . . . . . . . . . . . . . . . . . . . .219
Text Colors. . . . . . . . . . . . . . . . . . . . . . . . . . . . . . . . . . . . . . . . . . . . . . . . . .221
20 Working with Target Settings
225
Target Settings Window . . . . . . . . . . . . . . . . . . . . . . . . . . . . . . . . . . . . . . . . . .225
Target Panels . . . . . . . . . . . . . . . . . . . . . . . . . . . . . . . . . . . . . . . . . . . . . . . . . . .227
Target Settings . . . . . . . . . . . . . . . . . . . . . . . . . . . . . . . . . . . . . . . . . . . . . . .227
Access Paths . . . . . . . . . . . . . . . . . . . . . . . . . . . . . . . . . . . . . . . . . . . . . . . .229
Build Extras . . . . . . . . . . . . . . . . . . . . . . . . . . . . . . . . . . . . . . . . . . . . . . . . .232
File Mappings . . . . . . . . . . . . . . . . . . . . . . . . . . . . . . . . . . . . . . . . . . . . . . .234
Source Trees . . . . . . . . . . . . . . . . . . . . . . . . . . . . . . . . . . . . . . . . . . . . . . . .237
Editor Panels . . . . . . . . . . . . . . . . . . . . . . . . . . . . . . . . . . . . . . . . . . . . . . . . . . .237
Custom Keywords . . . . . . . . . . . . . . . . . . . . . . . . . . . . . . . . . . . . . . . . . . . .237
21 Preference and Target Settings Options
239
A . . . . . . . . . . . . . . . . . . . . . . . . . . . . . . . . . . . . . . . . . . . . . . . . . . . . . . . . .239
B. . . . . . . . . . . . . . . . . . . . . . . . . . . . . . . . . . . . . . . . . . . . . . . . . . . . . . . . . .241
C. . . . . . . . . . . . . . . . . . . . . . . . . . . . . . . . . . . . . . . . . . . . . . . . . . . . . . . . . .242
D . . . . . . . . . . . . . . . . . . . . . . . . . . . . . . . . . . . . . . . . . . . . . . . . . . . . . . . . .244
E. . . . . . . . . . . . . . . . . . . . . . . . . . . . . . . . . . . . . . . . . . . . . . . . . . . . . . . . . .245
F . . . . . . . . . . . . . . . . . . . . . . . . . . . . . . . . . . . . . . . . . . . . . . . . . . . . . . . . . .249
G-I . . . . . . . . . . . . . . . . . . . . . . . . . . . . . . . . . . . . . . . . . . . . . . . . . . . . . . . .250
K-L. . . . . . . . . . . . . . . . . . . . . . . . . . . . . . . . . . . . . . . . . . . . . . . . . . . . . . . .252
O . . . . . . . . . . . . . . . . . . . . . . . . . . . . . . . . . . . . . . . . . . . . . . . . . . . . . . . . .254
P . . . . . . . . . . . . . . . . . . . . . . . . . . . . . . . . . . . . . . . . . . . . . . . . . . . . . . . . . .254
R. . . . . . . . . . . . . . . . . . . . . . . . . . . . . . . . . . . . . . . . . . . . . . . . . . . . . . . . . .255
S . . . . . . . . . . . . . . . . . . . . . . . . . . . . . . . . . . . . . . . . . . . . . . . . . . . . . . . . . .256
T. . . . . . . . . . . . . . . . . . . . . . . . . . . . . . . . . . . . . . . . . . . . . . . . . . . . . . . . . .259
U . . . . . . . . . . . . . . . . . . . . . . . . . . . . . . . . . . . . . . . . . . . . . . . . . . . . . . . . .260
V . . . . . . . . . . . . . . . . . . . . . . . . . . . . . . . . . . . . . . . . . . . . . . . . . . . . . . . . .263
W-Z . . . . . . . . . . . . . . . . . . . . . . . . . . . . . . . . . . . . . . . . . . . . . . . . . . . . . . .263
8
8/16-bit IDE User’s Guide
Table of Contents
VII Menus
22 IDE Menus
267
Windows Menu Layout. . . . . . . . . . . . . . . . . . . . . . . . . . . . . . . . . . . . . . . . . . . 267
File Menu . . . . . . . . . . . . . . . . . . . . . . . . . . . . . . . . . . . . . . . . . . . . . . . . . . 267
Edit Menu . . . . . . . . . . . . . . . . . . . . . . . . . . . . . . . . . . . . . . . . . . . . . . . . . . 269
View Menu . . . . . . . . . . . . . . . . . . . . . . . . . . . . . . . . . . . . . . . . . . . . . . . . . 270
Search Menu . . . . . . . . . . . . . . . . . . . . . . . . . . . . . . . . . . . . . . . . . . . . . . . . 271
Project Menu . . . . . . . . . . . . . . . . . . . . . . . . . . . . . . . . . . . . . . . . . . . . . . . . 272
Window Menu . . . . . . . . . . . . . . . . . . . . . . . . . . . . . . . . . . . . . . . . . . . . . . . 274
Help Menu. . . . . . . . . . . . . . . . . . . . . . . . . . . . . . . . . . . . . . . . . . . . . . . . . . 275
23 Menu Commands
277
A . . . . . . . . . . . . . . . . . . . . . . . . . . . . . . . . . . . . . . . . . . . . . . . . . . . . . . . . . 277
B . . . . . . . . . . . . . . . . . . . . . . . . . . . . . . . . . . . . . . . . . . . . . . . . . . . . . . . . . 278
C . . . . . . . . . . . . . . . . . . . . . . . . . . . . . . . . . . . . . . . . . . . . . . . . . . . . . . . . . 280
D . . . . . . . . . . . . . . . . . . . . . . . . . . . . . . . . . . . . . . . . . . . . . . . . . . . . . . . . . 283
E . . . . . . . . . . . . . . . . . . . . . . . . . . . . . . . . . . . . . . . . . . . . . . . . . . . . . . . . . 284
F. . . . . . . . . . . . . . . . . . . . . . . . . . . . . . . . . . . . . . . . . . . . . . . . . . . . . . . . . . 285
G . . . . . . . . . . . . . . . . . . . . . . . . . . . . . . . . . . . . . . . . . . . . . . . . . . . . . . . . . 287
H . . . . . . . . . . . . . . . . . . . . . . . . . . . . . . . . . . . . . . . . . . . . . . . . . . . . . . . . . 288
I . . . . . . . . . . . . . . . . . . . . . . . . . . . . . . . . . . . . . . . . . . . . . . . . . . . . . . . . . . 289
K-L . . . . . . . . . . . . . . . . . . . . . . . . . . . . . . . . . . . . . . . . . . . . . . . . . . . . . . . 289
M-N . . . . . . . . . . . . . . . . . . . . . . . . . . . . . . . . . . . . . . . . . . . . . . . . . . . . . . . 289
O . . . . . . . . . . . . . . . . . . . . . . . . . . . . . . . . . . . . . . . . . . . . . . . . . . . . . . . . . 291
P-Q . . . . . . . . . . . . . . . . . . . . . . . . . . . . . . . . . . . . . . . . . . . . . . . . . . . . . . . 292
R . . . . . . . . . . . . . . . . . . . . . . . . . . . . . . . . . . . . . . . . . . . . . . . . . . . . . . . . . 293
S. . . . . . . . . . . . . . . . . . . . . . . . . . . . . . . . . . . . . . . . . . . . . . . . . . . . . . . . . . 296
T-U. . . . . . . . . . . . . . . . . . . . . . . . . . . . . . . . . . . . . . . . . . . . . . . . . . . . . . . . 299
V-Z. . . . . . . . . . . . . . . . . . . . . . . . . . . . . . . . . . . . . . . . . . . . . . . . . . . . . . . . 302
Index
8/16-bit IDE User’s Guide
305
9
Table of Contents
10
8/16-bit IDE User’s Guide
I
Introduction
This section contains these chapters:
• 8/16-Bit IDE User’s Guide Overview on page 13
• CodeWarrior IDE Overview on page 17
8/16-bit IDE User’s Guide
11
12
8/16-bit IDE User’s Guide
1
8/16-Bit IDE User’s Guide
Overview
This chapter of the CodeWarrior™ Development Studio 8/16-Bit IDE User’s Guide is a
high-level description of documentation and training resources for learning to use the IDE.
• “CodeWarriorU.com” on page 14—free, Internet-based instruction for CodeWarrior
products. Use this resource to learn more about the CodeWarrior Integrated
Development Environment (IDE) and computer programming.
• “Manual Conventions” on page 15—some common typographical conventions used
in this manual and other Freescale documentation.
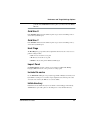
Release Notes
Please read the release notes. They contain important last-minute additions to the
documentation. The Release Notes folder is located on the CodeWarrior CD.
Licensing
Web-based licensing is available. It is a server licensing solution that generates FlexLM
v8 or later based license keys automatically over the world wide web through a
registration/activation process. You can register and activate permanent, node-locked
license keys.
Freescale products are shipped to customers with registration cards that contain a unique
registration number. Products that ship with a one year annual support certificate will also
have a unique registration number.
The registration website can be reached by selecting the Help > Register Product menu
command from the IDE’s main menu. Registration from the website collects the
registration code and verifies it against the correct product and gathers contact
information.
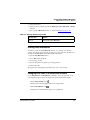
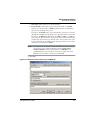
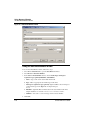
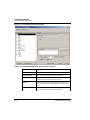
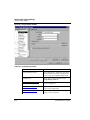
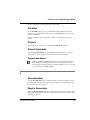
An email will be sent to you with the License Authorization Code and instructions. In the
IDE you can select Help > License Authorization... to display the License
Authorization dialog box. Figure 1.1 on page 14 shows the License Authorization dialog
box.
8/16-bit IDE User’s Guide
13
8/16-Bit IDE User’s Guide Overview
CodeWarriorU.com
Figure 1.1 License Authorization
Enter the License Authorization Code and select an ethernet address from the Node lock
ID for license dropdown list, if one exists. After entering the authorization code, the
CodeWarrior IDE will make an HTTP call to the Freescale licensing server with the
activation code and generate the permanent license keys. The resulting license keys are
automatically updated into the license.dat text file of the CodeWarrior product executing
the authorization. You can also manually edit the license.dat file per instructions provided
in the License_Install.txt file in the root folder of your CodeWarrior installation path. If
the IDE evaluation period expires prior to activation, you will have to manually edit the
license.dat file.
CodeWarriorU.com
CodeWarriorU.com offers a wide range of free, Internet-based courses in a wide variety of
computer programming topics. Use this supplement to the CodeWarrior documentation to
acquire more experience using CodeWarrior products.
14
8/16-bit IDE User’s Guide
8/16-Bit IDE User’s Guide Overview
Manual Conventions
CodeWarriorU.com courses include:
• Text-based instruction
• Expert instructors
• A variety of self-assessment and study materials
• Interactive message boards for communicating with instructors and students
CodeWarriorU offers many courses, such as:
• Learn Programming in C
For beginning programmers.
• Introduction to Java
For beginning and experienced programmers. Take this course to learn how to create
Java software.
• Introduction to C++
For beginning and experienced programmers. Take this course to learn how to create
C++ software.
• Intermediate C++
For programmers who completed the Introduction to C++ course and have basic C++
programming knowledge. Take this course to learn the foundation needed to create
more sophisticated C++ software.
To find out more, visit this web site:
http://www.CodeWarriorU.com/
Manual Conventions
This section explains conventions in the 8/16-Bit IDE User’s Guide.
Figure Conventions
The CodeWarrior IDE employs a virtually identical user interface across multiple hosts.
For this reason, illustrations of common interface elements use images from any host.
However, some interface elements are unique to a particular host. In such cases, clearly
labelled images identify the specific host.
8/16-bit IDE User’s Guide
15
8/16-Bit IDE User’s Guide Overview
Manual Conventions
Keyboard Conventions
The CodeWarrior IDE accepts keyboard shortcuts, or key bindings, for frequently used
operations. For each operation, this manual lists corresponding key bindings by platform.
Hyphens separate multiple keystrokes in each key binding.
16
8/16-bit IDE User’s Guide
2
CodeWarrior IDE Overview
The CodeWarrior™ Integrated Development Environment (IDE) provides an efficient and
flexible software-development tool suite. This chapter explains the advantages of using
the CodeWarrior IDE and provides brief descriptions of the major tools that make up the
IDE.
This chapter contains these sections:
• “Development Cycle” on page 17
• “CodeWarrior IDE Advantages” on page 19
• “IDE Tools Overview” on page 20
Development Cycle
A software developer follows a general development process:
• Begin with an idea for new software
• Implement new idea in source code
• Have the IDE compile source code into machine code
• Have the IDE link machine code and form an executable file
• Correct errors (debug)
• Compile, link, and release a final executable file.
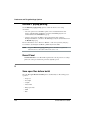
The stages of the development cycle correspond to one or more chapters in this manual.
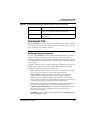
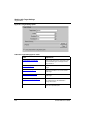
Figure 2.1 on page 18 depicts the development cycle as a flowchart. Table 2.1 on page 19
details the different stages and their corresponding sections in this manual.
8/16-bit IDE User’s Guide
17
CodeWarrior IDE Overview
Development Cycle
Figure 2.1 The Development Cycle diagram
Start
Create
Edit
Yes
Compile
Compile
Errors?
Yes
No
Link
Link Errors?
Yes
No
Debug
Debug Errors?
No
Legend
Release
Start or End of the
process
Development Cycle stage
End
Decision stage
Process flow
18
8/16-bit IDE User’s Guide
CodeWarrior IDE Overview
CodeWarrior IDE Advantages
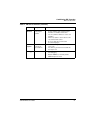
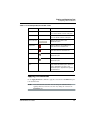
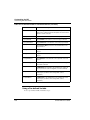
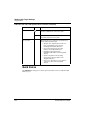
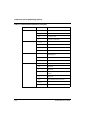
Table 2.1 Stage descriptions and related sections in the IDE User’s Guide
Stage
Description
Create
Create the initial project, source
files, and build targets.
Related Sections
• “Projects” on page 23
• “Preferences and Target
Settings” on page 181
• “Menus” on page 265
Edit
Transform your project into
working source code, organize
interface elements, and correct
errors.
• “Editor” on page 71
• “Browser” on page 135
Compile
Compile the source code into
machine format that operates on
the target host.
“Compilers and Linkers” on page 173
Link
Link the separate compiled
modules into a single binary
executable file.
“Compilers and Linkers” on page 173
Release
Release for public use.
Beyond the scope of this manual.
CodeWarrior IDE Advantages
• Multiple-language support
Choose from multiple programming languages when developing software. The IDE
supports high-level languages, such as C, C++, and Java, as well as in-line
assemblers for most processors.
• Consistent development environment
Port software to new processors without having to learn new tools or lose an existing
code base. The IDE supports many common desktop and embedded processor
families.
• Plug-in tool support
Extend the capabilities of the IDE by adding a plug-in tool that supports new
services. The IDE currently supports plug-ins for compilers, linkers, pre-linkers,
post-linkers, preference panels, version controls, and other tools. Plug-ins make it
possible for the CodeWarrior IDE to process different languages and support
different processor families.
8/16-bit IDE User’s Guide
19
CodeWarrior IDE Overview
IDE Tools Overview
IDE Tools Overview
The CodeWarrior IDE is a tool suite that provides sophisticated tools for software
development. This section explains the standard tools available in the IDE:
• a project manager
• an editor
• a search engine
• a source browser
• a build system
• a debugger
Table 2.2 on page 20 explains the purpose of these tools and lists corresponding
CodeWarrior IDE features.
Table 2.2 IDE tools and features
Tool
Purpose
Project
Manager
Manipulate items
associated with
a project
CodeWarrior IDE Features
• Handles top-level file management for the
software developer
• Organizes project items by major group, such
as files and targets
• Tracks state information (such as filemodification dates)
• Determines build order and files to be
included in each build
• Coordinates with plug-ins to provide versioncontrol services
Editor
Create and
modify source
code
• Uses color to differentiate programminglanguage keywords
• Allows definition of custom keywords for
additional color schemes
• Automatically verifies parenthesis, brace, and
bracket balance
• Allows use of menus for navigation to any
function or into the header files used by the
program
Search
Engine
Find and
replace text
• Finds a specific text string
• Replaces found text with substitute text
• Allows use of regular expressions
• Provides file-comparison and differencing
functionality
20
8/16-bit IDE User’s Guide
CodeWarrior IDE Overview
IDE Tools Overview
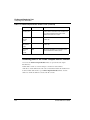
Table 2.2 IDE tools and features (continued)
Tool
Purpose
Source
Browser
Manage and
view program
symbols
CodeWarrior IDE Features
• Maintains a symbolics database for the
program. Sample symbols include names
and values of variables and functions.
• Uses the symbolics database to assist code
navigation
• Links every symbol to other locations in the
code related to that symbol
• Processes both object-oriented and
procedural languages
Build
System
Debugger
Convert source
code into an
executable file
• Uses compiler to generate object code from
source code
Resolve errors
• Uses symbolics database to provide sourcelevel debugging
• Uses linker to generate final executable file
from object code
• Supports DWARF (1.1 and 2.0) and the
HIWAVE object file format
8/16-bit IDE User’s Guide
21
CodeWarrior IDE Overview
IDE Tools Overview
22
8/16-bit IDE User’s Guide
II
Projects
This section contains these chapters:
• Working with Projects on page 25
• Project Window on page 37
• Working with Files on page 51
• Dockable Windows on page 57
• Workspaces on page 67
8/16-bit IDE User’s Guide
23
24
8/16-bit IDE User’s Guide
3
Working with Projects
This chapter explains how to work with projects in the CodeWarrior™ IDE. Projects
organize several file types associated with a computer program:
• Text files—files that contain any kind of text. Sample text files include Read Me
files and source files.
• Source files—files that contain source code only. Sample source files include C++
files and assembler files.
• Library files—files that contain special code designed to work together with a
particular programming language or operating environment.
• Generated files—files created by the IDE while building or debugging the project.
This chapter contains these sections:
• “About Projects” on page 25
• “Managing Projects” on page 29
• “Advanced Projects” on page 32
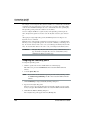
About Projects
The IDE uses build targets and a Project Manager to organize source code and support
files. This section explains both components.
Project Manager
The IDE gathers source, library, resource, and other files into a project. The Project
Manager manipulates the information stored in the project.
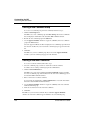
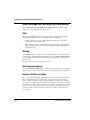
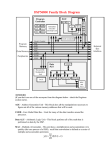
Figure 3.1 on page 26 diagrams Project Manager interactions with IDE tools. Table 3.1 on
page 26 explains the interactions.
8/16-bit IDE User’s Guide
25
Working with Projects
About Projects
Figure 3.1 Project Manager
Search
Engine
Editor
Source
Browser
Symbolics Information
Compiler
Linker
The build system generates symbolics information for a program.
The debugger generates a database
from the symbolics information.
Debugger
Build System
Legend
Main IDE tool
Development flow
Support tool
IDE internal data flow
Information that the
IDE generates
Additional information
Table 3.1 Project Manager interactions
IDE Tool
Editor
Project Manager Interactions
• Coordinates internal data flow among editor windows, search
engine, and source browser
• Matches find-and-replace results between related header files
and source files
• Associates functions and variables with corresponding source
code
Compiler
• Synchronizes a symbolics database of program functions,
variables, and values with source code
• Coordinates internal data flow between symbolics database
and source browser
• Determines files to include in build process
26
8/16-bit IDE User’s Guide
Working with Projects
About Projects
Table 3.1 Project Manager interactions (continued)
IDE Tool
Project Manager Interactions
Linker
• Sends compiled object code to linker for conversion to
executable code
• Sets the link order for processing compiled object code
Debugger
• Matches debugging data to source code
• Updates symbolics database to reflect changing values during
a debug session
Build Targets
For any given build, the project manager tracks:
• files and libraries
• link order
• dependencies
• compiler, linker, and other settings
The IDE stores this information in a build target. As the project changes, the project
manager automatically updates the build target. The project manager also coordinates
program builds, using the build-target information to call the appropriate tools in the
correct order with the specified settings.
For example, the project manager directs the build system to compile only those source
files that rely on information in a modified file.
Note that all of this operation happens automatically. The software developer does not
need to remember makefile syntax or semantics, and never has to debug makefile syntax
errors. The IDE simplifies the process, making it easier to develop software.
The project manager also supports multiple build targets within the same project file. Each
build target can have its own unique settings, and even use different source and library
files. For example, it is common to have both debug and release build targets in a project.
Figure 3.2 on page 28 shows a sample project with debug and release build targets.
8/16-bit IDE User’s Guide
27
Working with Projects
About Projects
Figure 3.2 Project with multiple build targets
Project
Build Target - Debug
File #1
File #2
File #3
Object Code
Settings
Browser Data
Note that both build targets share
File #1 and File #2.
Build Target - Release
File #2
File #4
Object Code
Settings
Browser Data
...
File #1
28
8/16-bit IDE User’s Guide
Working with Projects
Managing Projects
Managing Projects
Use these tasks to manage projects:
• Create a new project
• Open existing project
• Save project
• Close project
• Inspect an open project
• Print an open project
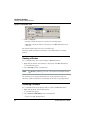
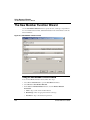
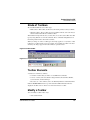
Creating New Projects using Wizard
Use the project wizard provided with the IDE to quickly create new projects. The wizard
creates everything needed for a minimal, ready-to-run project. Use the created project as a
foundation upon which to add features for each new project.
1. Choose File > New.
2. Click the Project tab and select New Project Wizard.
3. Enter a project name in the Project Name field and set the Location for the new
project.
4. Click OK.
5. Select the appropriate derivative.
6. Click Next and continue with desired selections for your project.
On the last screen cllick Finish to create a new project.
Opening Projects
Use the IDE to open previously saved projects. CodeWarrior projects normally end in the
Freescale CodeWarrior Project extension of .mcp. Open projects to add, remove, or
modify files to enhance the capabilities of the final executable file.
1. Choose File > Open.
2. Find and select the project to open.
3. Click Open.
The IDE opens the project and displays its Project window.
8/16-bit IDE User’s Guide
29
Working with Projects
Managing Projects
NOTE
The IDE prompts you for confirmation to update projects created in older
CodeWarrior versions.
Opening Projects Created on Other Hosts
CodeWarrior projects whose names end in .mcp are cross-platform. However, the object
code stored inside each project folder is not cross-platform. Use these procedures to
properly open the project on a different host computer.
1. If not present, add the .mcp filename extension to the project name.
2. Copy the project folder from the original host to the new host.
3. Delete the Data folder inside the newly copied project folder.
4. Open the newly copied project on the new host IDE.
5. Recompile the project to generate new object code.
Saving Projects
The IDE automatically saves projects and updates project information after performing
these actions:
• Closing the project
• Applying or saving a preference or target-setting option
• Adding, deleting, or compiling a file
• Editing group information
• Removing or compacting object code
• Quitting the IDE
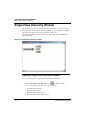
Inspecting Project Files
Use the Project Inspector command to review and configure source-file attributes and
target information in the Project Inspector window.
1. Select a file in the Project window.
2. Select View > Project Inspector to open the Project Inspector window.
3. Examine the source-file attributes and target settings.
• Click the Attributes tab to view the file attributes.
30
8/16-bit IDE User’s Guide
Working with Projects
Managing Projects
• Click the Targets tab to view the build targets that use the file.
Printing Projects
The Project Manager can print a complete listing of the Files, Designs, Link Order, or
Targets tab currently displayed in the Project window.
1. Select the Project window.
2. Click the Files, Designs, Link Order, or Targets tab.
3. Choose File > Print.
4. Set the print options in the print dialog.
5. Print the Project window contents.
The IDE prints the contents of the selected tab.
Choosing a Default Project
The IDE allows multiple open projects at the same time. However, a given source file can
belong to more than one open project, making it ambiguous as to which project a sourcefile operation applies.
To resolve ambiguity, choose the default project to which the IDE applies operations.
1. If only one project is open, it automatically becomes the default project.
2. If more than one project is open, choose Project > Set Default Project to select the
desired default project.
In ambiguous situations, the IDE applies operations to the selected default project.
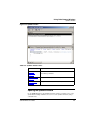
Exporting Projects to XML Files
The IDE can export a project to an Extensible Markup Language (XML) file. Use this
capability to store projects in text-oriented environments, such as a version control system.
1. Bring the project to export forward (in focus).
2. Choose File > Export Project.
3. Name the exported XML file and save it in the desired location.
The IDE converts the project to an XML file.
8/16-bit IDE User’s Guide
31
Working with Projects
Advanced Projects
Importing Projects Saved as XML Files
The IDE can import a project previously saved in Extensible Markup Language (XML)
format. Use this capability to recreate projects stored in text-oriented environments, such
as a version control system.
1. Choose File > Import Project.
2. Create a new folder in which to save the converted project and all of its generated files.
3. Find the XML file that you want to import.
4. Save the XML file in the newly created folder.
The IDE converts the XML file to a project.
Closing Projects
Use the Close command to close a CodeWarrior project file at the end of a programming
session. The IDE automatically saves changes to a closed project.
1. Select the Project window to close.
2. Close the project.
• Choose File > Close.
• Click the close box in the Project window.
Advanced Projects
Advanced projects deal with these topics:
• Custom project stationery—modified project stationery tailored to advanced
programming needs.
• Subprojects—projects within projects.
• Strategies—obtaining the maximum benefit from advanced projects.
Custom Project Stationery
Use custom project stationery to develop streamlined templates to meet advanced
programming needs.
• Pre-configure new project stationery to include often-used files, libraries, and source
code
• Configure build targets and options to any desired state
32
8/16-bit IDE User’s Guide
Working with Projects
Advanced Projects
• Set up a reusable template to use for creating projects
NOTE
Custom project stationery requires in-depth knowledge about project structure
and operation. Before creating custom stationery, be sure to fully understand
existing project stationery included with the CodeWarrior product.
Creating Custom Project Stationery
Use custom project stationery to develop a convenient template for creating new projects.
An efficient way to develop custom stationery is to modify existing project stationery and
save it under a new name in the Stationery or Project Stationery folder.
1. Follow the usual process for creating a project from project stationery.
See “Creating New Projects using Wizard” on page 29 for more information.
2. Choose File > Save A Copy As.
3. Find the Project Stationery folder in the CodeWarrior installation.
4. Create a folder inside the Project Stationery folder to store the newly created project.
5. Save the project to its new folder. Use a descriptive project name with the .mcp
extension.
6. Customize the newly saved project so that it becomes a template for creating other
projects:
• Add source files to the project. Save these files in the same folder as the project
itself.
• Add build targets for building the project with frequently used settings.
• Configure other project preferences as desired.
7. Close the customized project to save it.
8. Open the customized project folder inside the Project Stationery folder.
9. Find and delete the _Data folder.
The IDE now treats the customized project as project stationery. The descriptive name
appears in the Project tab of the New window.
Subprojects
A subproject is a project nested inside a parent project. Subprojects organize source code
for the IDE to build prior to building the parent project. For example, the IDE builds
subprojects for an application’s plug-ins before building the parent project for the
application itself.
8/16-bit IDE User’s Guide
33
Working with Projects
Advanced Projects
Adding Subprojects to a Project
Use a subproject to organize a separate set of source files and build targets inside a parent
project.
1. Open the parent project in which to add a subproject.
2. Click the Files tab in the Project window.
3. If the parent project has more than one build target, use the build-target list box in the
Project window toolbar to choose the desired build target.
4. Add a separate project to the Project window:
• Drag and drop the .mcp file of the separate project into the Project window, or
• Choose Project > Add Files to add the .mcp file of the separate project.
The IDE treats the added project as a subproject. The subproject appears in the Files
view of the parent Project window.
Opening Subprojects
The IDE can open a subproject from the parent Project window. Use this feature to more
conveniently open the subproject.
1. Double-click the subproject in the Files view of the parent Project window.
2. The IDE opens the subproject in its own Project window.
Strategies
Projects can organize files into build targets or subprojects. Each of these structures has its
own advantages. Choose the structure best suited to the programming need.
Build Targets
Build targets organize collections of files inside a project. Build targets have these
advantages:
• Using multiple build targets inside a single project allows access to all source code
for that project.
• Build targets organize different collections of build settings for a single project.
• Each project accommodates up to 255 build targets.
• Exception: HC08 supports only one build target.
34
8/16-bit IDE User’s Guide
Working with Projects
Advanced Projects
Subprojects
Subprojects incorporate separate, standalone projects into parent projects. Subprojects
have these advantages:
• Subprojects separate distinct parts of a complex program, such as an application and
its various plug-ins.
• Using subprojects streamlines a complicated build. For example, create a project that
builds all plug-ins for an application. Add this project as a subproject of the main
application. The IDE then builds all plug-ins before building the main application.
• Use subprojects to break down a complicated project that approaches the 255 buildtarget limit. Organize related build targets into different subprojects to improve build
speed.
8/16-bit IDE User’s Guide
35
Working with Projects
Advanced Projects
36
8/16-bit IDE User’s Guide
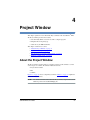
4
Project Window
This chapter explains how to work with the Project window in the CodeWarrior™ IDE.
The Project window provides these features:
• view and modify all files created for use with a computer program.
• manipulate files arranged by type.
• control the way the IDE handles files.
This chapter contains these sections:
• “About the Project Window” on page 37
• “Project Window Pages” on page 39
• “File, Group, Layout, and Target Management” on page 44
• “Build-Target Management” on page 48
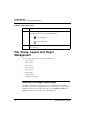
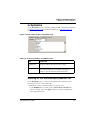
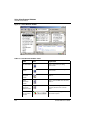
About the Project Window
The Project window organizes files in a computer program. Use this window to control
various aspects of each file. The window includes these items:
• Project window toolbar
• Tabs
• Columns
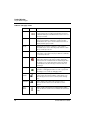
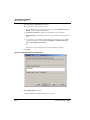
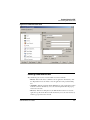
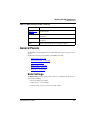
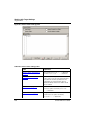
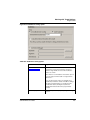
Figure 4.1 on page 38 shows a sample Project window. Table 4.1 on page 38 explains the
items in the Project window.
NOTE
The number and names of the tabs in the Project window depend on the current
build target and on the installed IDE plug-ins.
8/16-bit IDE User’s Guide
37
Project Window
About the Project Window
Figure 4.1 Project window
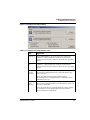
Table 4.1 Project window—items
Item
38
Icon
Explanation
Current
Connection
Use to specify the connection to your
MCU.
Change MCU/
Connection
Use to select a device and connection.
Target
Settings
Click to view and edit the settings for the
current build target. You can also display
settings for a target selected in Targets
tab.
Synchronize
Modification
Dates
Click to check the modification dates of
each project file and mark those files that
need compilation.
Make
Click to compile and link all modified and
manually selected (touched) project files.
Debug
Click to debug the current build target.
8/16-bit IDE User’s Guide
Project Window
Project Window Pages
Table 4.1 Project window—items (continued)
Item
Icon
Explanation
Run
Click to compile and link the current build
target, then run the program.
Project
Inspector
Click to view project information and edit
file-specific information.
Files
Click to display the Files page. This page
shows a list of files in the project and their
associated properties.
Link Order
Click to display the Link Order page. This
page shows the link order of files in the
current build target.
Targets
Click to display the Targets page. This
page shows a list of all build targets, subprojects, and target-linking information.
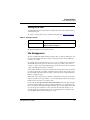
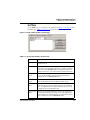
Project Window Pages
The Project window uses pages to organize items:
• Files
• Link Order
• Targets
Files Page
The Files page shows information about individual files in a project. The Files page shows
information about these file types:
• Text files—files that contain any type of text. Sample text files include Read Me files
and source files.
• Source files—files that contain source code only. Sample source files include C++
files and assembler files.
• Library files—files that contain special code designed to work together with a
particular programming language or operating environment.
Table 4.2 on page 40 explains the items in the Files page.
8/16-bit IDE User’s Guide
39
Project Window
Project Window Pages
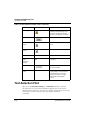
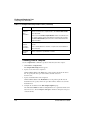
Table 4.2 Files page—items
Item
Icon
Explanation
Touch
Indicates the touch status of each file. Click in this column to
toggle touching a file. Touching a file manually selects it for
compilation during the next build. Click the Touch icon to sort
files by touch status.
File
Displays a hierarchical view of the file and group names used
by the project. Click the column title to sort files by name.
Double-click a file to open it. Use the hierarchical controls to
display and hide group contents.
Code
Displays the size, in bytes or kilobytes, of the compiled
executable object code for files and groups. Click the column
title to sort files by code size.
Data
Displays the size, in bytes or kilobytes, of non-executable data
in the object code for files in the project. Click the column title
to sort files by data size.
Target
Indicates whether each file belongs to the current build target.
Click in this column to toggle inclusion status. A black dot
indicates that a file is included with current build target. Click
the Target icon to sort files by inclusion status. The Target
column appears only when the project has more than one
build target.
Debug
Displays debugging status. Click in this column to toggle
generation of debugging information for a file or group. Click
the Debug icon to sort files by debugging status.
Checkout
Status
Displays icons representing the current file status in a versioncontrol system. The Checkout Status column appears only
when the project uses a version-control system to manage
files.
Interfaces
Click to display a list of files inside a group or a list of
#include files inside a source file. Choose a file to
open it.
Sort
Order
40
Click to toggle sorting between ascending and descending
order for the active column. The icon indicates the current sort
order.
8/16-bit IDE User’s Guide
Project Window
Project Window Pages
Viewing a File Path
To distinguish between two files that have identical names but reside in different folders,
examine the file path.
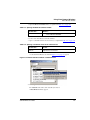
To view the complete path of a file, perform the task explained in Table 4.3 on page 41.
Table 4.3 Viewing a file path
On this host…
Do this…
Windows
Right-click the filename and select
Open in Windows Explorer
The File Path submenu shows the path to the file.
File Management
The project window lists all files found for all targets. If access paths are different for each
target and a file with the same name exists in each path, the project window will list the
occurrence of each file.
For example, if two header files named example.h are used with two targets (TargetA
and TargetB) and exist in separate locations for each target, you will see two entries of
example.h in the project window. If both targets use the same file in one location, then
a single entry will appear in the project window.
Select a file in the Files tab of the project window and view the Project Inspector window
to reveal the path for the selected file, and which targets use the file. You can also select a
file and click the right mouse button to display a context menu. Select Open in Windows
Explorer to display the path.
If a black dot is present in the target column for a listed file, then it is in the current target.
You can select this dot to toggle whether or not to include this file with the current target.
Double-click a source file to open it in the editor.
If you enable the Save project entries using relative paths option in the Target Settings
panel, file locations will be stored using a relative path from the access paths defined in
the Access Paths panel. If disabled, the IDE remembers project entries only by name. This
can cause unexpected results if two or more files share the same name. In this case, researching for files by selecting the Project > Re-search for Files menu command could
cause the IDE to find the file in a different access path.
8/16-bit IDE User’s Guide
41
Project Window
Project Window Pages
NOTE
If you use source files with the same name in different locations, you should
enable the Save project entries using relative paths option.
Duplicate file names can also appear in the Files tab of the project window if a file is not
found on one of the access paths. This can happen if an access path has been removed
from the User Paths group in the Access Paths target settings panel. When the access path
is removed, a duplicate appears in the project window. The duplicate entry remains
displayed until the access path is restored.
If a project with several targets (for example Debug and Release target) uses the same file,
that file is shown as a single entry. If you remove the access path for that file, then a
duplicate entry will appear in the file list. This duplicate represents a missing file for the
current target. The second file entry is still avaiable for the other target. Restore the access
path and choose Project > Re-search for Files to remove the duplicate entry in the list.
The Project > Re-search for Files command speeds up builds and other project
operations. The IDE caches the location of project files after finding them in the access
paths. Re-search for Files forces the IDE to forget the cached locations and re-search for
them in the access paths. This command is useful if you moved several files and you want
the IDE to find the files in their new locations.
If the Save project entries using relative paths option is enabled, the IDE does not reset
the relative-path information stored with each project entry, so re-searching for files looks
for source files in the same location. If the files are not there, the IDE only re-searches for
header files. To force the IDE to also re-search for source files, choose the Project >
Reset Project Entry Paths menu command. If the Save project entries using relative
paths option is disabled, the IDE re-searches for both header files and source files.
The Reset Project Entry Paths command resets the location information stored with each
project entry and forces the IDE to re-search for project entries in the access paths. This
command does nothing if the Save project entries using relative paths option is
disabled.
NOTE
42
If the IDE is unable to locate or resolve the location of project files, a Rescued
items folder will appear. The IDE trys to locate the missing files and creates
new references. This can happen when project data information, access paths,
or other location settings in target settings panels are missing or have been
compromised, for example, if the location of a project and related data
directory have changed. One way this can happen is if a project has been
committed to a source repository by one person and checked out to a different
location by another person and a new project data folder is created.
8/16-bit IDE User’s Guide
Project Window
Project Window Pages
Link Order Page
The Link Order page shows information about the order in which the IDE links
project files. Manipulate the files in this page to change the link order. For example,
if file B depends on file A in order to function, move file B below file A in the
Link Order page.
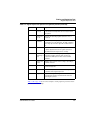
Table 4.4 on page 43 explains the items in the Link Order page.
Table 4.4 Link Order page—items
Item
Explanation
Synchronize
Modification
Dates
To update the modification dates of files stored in a project, click the
checkmark icon.
Use the Synchronize Modification Dates command to update files
modified outside of the CodeWarrior IDE, perhaps by a third-party
editor that cannot notify the CodeWarrior IDE of changes.
Synchronize
Status
To update version-control status information, click the Pencil icon.
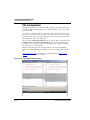
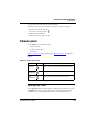
Targets Page
The Targets page presents information about the build targets in a project. Use this page to
create, manage, or remove build targets. Different build targets can store different IDE
settings. For example, two build targets can handle the same project. One build target
handles debugging the software, while the other build target handles building the software
for final release.
Table 4.5 on page 44 explains items in the Targets page.
8/16-bit IDE User’s Guide
43
Project Window
File, Group, Layout, and Target Management
Table 4.5 Targets page—items
Item
Explanation
Targets
Displays all build targets and subprojects that the IDE processes to create
a binary file. These icons denote build-target status:
Link
•
active build target
•
inactive build target
Indicates the dependencies between build targets
and subprojects.
File, Group, Layout, and Target
Management
Use these tasks to manage files, groups, layouts, and targets:
• Create an item.
• Delete an item.
• Move an item.
• Rename an item.
• Touch an item.
• Manage items.
• Set default items.
• Configure item settings.
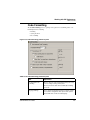
Removing Files/Groups/Layouts/Targets
The Remove command deletes files, groups, layouts, and build targets from the Project
window. Removing files from the Files tab removes them from the project itself and from
all build targets that use the files. Removing a file from the Link Order, Segments, or
Overlays tab only removes the file from the current build target.
44
8/16-bit IDE User’s Guide
Project Window
File, Group, Layout, and Target Management
Removing files/groups/layouts/targets from a
project
1. Click the Files, Designs, or Targets tab in the Project window.
2. Select the item to remove.
3. Remove the selected item from the project, as explained in Table 4.6 on page 45.
Table 4.6 Removing a selected item from a project
On this host…
Do this…
Windows
Select Edit > Delete
The IDE removes the selected item from the project. For deleted files, the IDE updates all
build targets that formerly used the file. For deleted build targets, the IDE deletes buildtarget information and leaves files intact.
Removing files from a build target
1. Click the Link Order, Segments, or Overlays tab in the Project window.
2. Select the item to remove.
3. Remove the selected item from the active build target, as explained in Table 4.7 on
page 45.
Table 4.7 Removing a selected item from the active build target
On this host…
Do this…
Windows
Select Edit > Delete
The IDE removes the file from the build target, but leaves the file itself intact. The file can
be reassigned to other build targets in the project.
Moving Files/Groups/Layouts/Targets
Reposition files, groups, layouts, or build targets in the Files, Design, Link Order, or
Targets pages with the cursor.
8/16-bit IDE User’s Guide
45
Project Window
File, Group, Layout, and Target Management
1. Select one or more files, groups, layouts, or build targets to move with the pointer.
2. Drag the selected items to a new position in the current page, using the focus bar as a
guide.
3. Release the mouse button.
The IDE repositions the selected files, groups, layouts, or build targets to the new location.
NOTE
In the Link Order page, repositioning files changes the link order that the
Make command uses to build the final executable file.
Renaming Files/Groups/Targets
The Rename command renames files, groups, or build targets in the project.
Rename files
1. Open the file to rename.
2. Choose File > Save As.
3. Type a new filename in the Name text box.
4. Click Save.
The IDE saves the file under the new name. The new filename appears in the Project
window. Subsequent modifications affect the renamed file, leaving the original file intact.
Rename one or more groups
1. Click the Files tab in the Project window.
2. Select the group(s) to rename.
3. Press the Enter key.
4. Type a new name into the Enter Group Name text box of the Rename Group
window.
5. Click OK.
The IDE renames the group. For selections of more than one group, the Rename
Group window appears for each group.
Rename build targets
1. Click the Targets tab in the Project window.
2. Choose Edit > targetname Settings.
46
8/16-bit IDE User’s Guide
Project Window
File, Group, Layout, and Target Management
3. Select Target Settings in the Target Settings Panels list.
4. Type a new name in the Target Name text box.
5. Click Save.
The Project window displays the new build target name.
Touching Files and Groups
The Touch command manually selects source files or groups for compilation during the
next Bring Up To Date, Make, Run, or Debug operation. A red check mark in the Touch
column of the Project window indicates a touched file.
1. Click the Files tab in the Project window.
2. Touch a source file or group for compilation.
Click the Touch column next to the file or group name.
OR
Choose Touch from the Interface menu for the file or group.
A red check mark appears in the Touch column next to the file or group name.
Touch all project files for recompiling
1. Perform the task explained in Table 4.8 on page 47.
Table 4.8 Touching all project files for recompiling
On this host…
Do this…
Windows
Alt-click the Touch column.
2. Red check marks appear next to all files and groups.
Untouching Files and Groups
The Untouch command manually excludes source files or groups from compilation
during the next Bring Up To Date, Make, Run, or Debug operation.
8/16-bit IDE User’s Guide
47
Project Window
Build-Target Management
1. Click the Files tab in the Project window.
2. Untouch a source file or group to remove it from the compilation list.
Click the red check mark in the Touch column next to the file or group name.
OR
Choose Untouch from the Interface menu for the file or group.
The red check mark disappears from the Touch column next to the file or group name.
Untouch all project files
1. Perform the task explained in Table 4.9 on page 48.
Table 4.9 Untouching all project files
On this host…
Do this…
Windows
Alt-click a red checkmark in the Touch column.
2. The red checkmarks next to all files and groups disappear.
Build-Target Management
These tasks help you manage build targets:
• Create a build target.
• Remove a build target.
• Set the default build target.
• Rename a build target.
• Configure build-target settings.
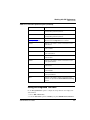
Creating Build Targets
The Create Target command adds new build targets to a project.
1. Open the Project window.
2. Click the Targets tab in the Project window.
3. Choose Project > Create Target.
4. Type a name in the Name text box of the New Target window.
5. Select the Empty target or Clone Existing Target radio button as desired.
48
8/16-bit IDE User’s Guide
Project Window
Build-Target Management
• Empty Target—create a new build target from scratch.
• Clone Existing Target—duplicate an existing build target in the New Target
window.
6. Click OK.
The IDE adds the new build target to the project.
Removing Build Targets from a Project
You can remove unneeded build targets from the Project window.
1. Click the Targets tab in the Project window.
2. Select the item to remove.
3. Remove the selected build target, as explained in Table 4.10 on page 49.
Table 4.10 Removing the selected build target
On this host…
Do this…
Windows
Select Edit > Delete
The IDE removes the build target.
Setting the Default Build Target
The CodeWarrior Project Manager can handle up to 255 build targets in a single project.
One build target must be defined as the default target when more than one project is open.
The default target is the target affected by project commands, such as Make and Run.
The Project menu
1. Choose Project > Set Default Target > buildtarget.
2. A checkmark indicates the default target.
Using the Project window toolbar
1. Enable the Project window.
2. Choose the build-target name from the Current Target pop-up menu.
8/16-bit IDE User’s Guide
49
Project Window
Build-Target Management
The Targets page
1. Enable the Project window.
2. Click the Targets tab.
3. Click the desired build-target icon.
The icon changes to indicate that the build target is now the default.
Renaming Build Targets
The Rename command renames build targets in a project.
1. Click the Targets tab in the Project window.
2. Choose Edit > targetname Settings.
3. Select Target Settings in the Target Settings Panels list.
4. Type a new name in the Target Name text box.
5. Save the new name.
The new build-target name appears in the Project window.
Configuring Build Target Settings
The Target Settings panel options determine:
• The compiler used to process the project and produce object code
• The linker used to combine object code and produce a binary file
• The pre-linker and post-linker options that further process the object code
• The name assigned to a build target
Follow these steps to configure build-target settings.
1. Choose Edit > targetname Settings.
2. Select Target Settings from the Target Setting Panels list.
3. Specify target options as desired.
4. Save the new options
The panels available in the Target Settings Panels list update to reflect the choices in
the Target Settings panel.
50
8/16-bit IDE User’s Guide
5
Working with Files
This chapter explains how to work with files in the CodeWarrior™ IDE. Most computer
programs use these file types:
• Text files—files that contain any type of text. Example text files include Read Me
files and source files.
• Source files—files that contain source code only. Example source files include C++
files and assembler files.
Managing Files
These tasks manage files:
• Create a new file.
• Open an existing file.
• Save a file.
• Close a file.
• Print a file.
• Revert a file to a previously saved state.
Creating Text Files
The New command opens a window from which you create new text files. You can use
new text files as source files in a project or as plain-text files.
1. Select File > New.
The New window appears.
2. Click the File tab in the New window.
3. Select Text File in the list.
4. Type a filename in the File name text box.
5. Click Set to specify the location to save the new file.
6. Click OK.
The IDE creates the new text file and displays its contents in a new editor window.
8/16-bit IDE User’s Guide
51
Working with Files
Managing Files
TIP
Use the Customize IDE Commands window to add the New Text File menu
command to the File menu. Adding this menu command reduces the process of
creating a new text file to one step: select File > New Text File. See “Customizing
the IDE” on page 183 for more information about using the Customize IDE
Commands window.
Opening Source Files
The Open command opens one or more editable source files. Each open file appears in its
own editor window.
NOTE
The CodeWarrior editor cannot open files that prohibit editing. For example,
the editor cannot open library files.
From the File menu
1. Choose File > Open.
2. Windows: Use the Files of type pop-up menu to select All Files.
3. Select a file.
4. Click Open.
The IDE displays the file in an editor window.
From the Project window
1. Perform one of these:
• Double-click a filename in the Files tab of the Project window, or
• Select an interface filename from the Interface menu.
2. The IDE finds, opens, and displays the selected source file in an editor window.
From an editor window
1. Select an interface filename from the Interface menu.
2. The IDE selects, opens, and displays the source file in an editor window.
NOTE
52
The menu does not show files that do not contain source code or are not yet
compiled.
8/16-bit IDE User’s Guide
Working with Files
Managing Files
Using Find and Open Files
1. In an editor window, select the name of an interface file, for example stdio.h.
2. Choose File > Find and Open File.
The IDE finds, opens, and displays the source file in an editor window.
To open a recent file or project
1. Choose File > Open Recent > recentfilename | recentprojectname.
2. The IDE finds and opens the selected source file or project.
Saving Files
Use the Save command to save source files to ensure their continued existence between
development sessions.
1. Choose File > Save.
NOTE
If the file has no title, a save dialog appears. Type a filename and specify a
location for the file, then click Save.
2. The IDE saves the file.
Saving All Modified Files
Use the Save All command to save the contents of all modified files. This command is
useful for saving all files at the same time, rather than saving each file individually.
1. Save all currently opened and modified files, as explained in Table 5.1 on page 53.
Table 5.1 Saving all currently opened and modified files
On this host…
Do this…
Windows
Select File > Save All
2. The IDE saves the files.
8/16-bit IDE User’s Guide
53
Working with Files
Managing Files
Saving File Copies
Use the Save a Copy As command to save a back-up copy of a project or file before
modifying the original. Working on a copy of the original file provides a way to return to
the original copy should modifications fail.
1. Choose File > Save A Copy As.
2. Type a new filename in the Name text box.
3. Click Save.
The IDE creates a copy of the file under the new name, leaving the original file
unchanged.
Closing Files
The Close command closes open source files. Close editor windows to close a file.
1. Select an editor window to close.
2. Close the file window.
• Choose File > Close, or
• Click the close box.
NOTE
The IDE displays an alert if the file is modified. The alert asks whether to save
changes to the file.
Closing All Files
The Close All command closes all currently open files. This command is useful for
closing all files at the same time, rather than closing each file individually.
1. Close all currently open files, as explained in Table 5.2 on page 54.
Table 5.2 Closing all currently open files
On this host…
Do this…
Windows
Select Window > Close All or
Window > Close All Editor Windows.
2. The IDE closes the files.
54
8/16-bit IDE User’s Guide
Working with Files
Managing Files
Printing Source Files
The Print command prints the entire contents of a selected file window.
1. Activate the desired editor window to print.
2. Choose File > Print.
3. Set print options in the Print dialog.
4. Click OK or Print to print the file.
The IDE prints the selected file.
NOTE
Use the same process to print the contents of a window, such as a Project
window.
Printing Source-File Selections
The Print command prints the currently selected contents in an editor window.
1. Activate the desired editor window to print.
2. Select the portion of text to print.
3. Choose File > Print.
4. Set print options in the Print dialog.
5. Click OK or Print
The IDE prints the selected text in the file.
Reverting Files
Use the Revert command to replace the current file with its previously saved version.
1. Choose File > Revert.
2. Click OK in the Revert changes to file dialog.
8/16-bit IDE User’s Guide
55
Working with Files
Managing Files
56
8/16-bit IDE User’s Guide
6
Dockable Windows
This chapter explains how to work with dockable windows in the Windows-hosted
CodeWarrior™ IDE.
Use dockable windows to do these tasks:
• Organize—attach, or dock, various windows to the edges of the screen for quick
access.
• Group—dock windows of the same type to create a single window with multiple
tabs, where each tab represents one of the original docked windows.
NOTE
The dockable windows feature is available in Multiple Document Interface
(MDI) mode only. This feature is not available in Floating Document Interface
(FDI) mode. Toggle the Use Multiple Document Interface on page 261
option in the IDE Extras on page 205 preference panel to change between
these two modes.
This chapter contains these sections:
• “About Dockable Windows” on page 57
• “Working with Dockable Windows” on page 59
• “Dock Bars” on page 63
About Dockable Windows
You can dock certain windows to the edges of the main frame window of the IDE. Table
6.1 on page 58 explains possible states for dockable windows. Figure 6.1 on page 58
shows the different window states.
In MDI mode, the IDE occupies a main window frame, or client area. IDE windows
normally appear within this client area as you work. These windows are called child
windows of the IDE’s client area.
8/16-bit IDE User’s Guide
57
Dockable Windows
About Dockable Windows
Table 6.1 Window states
State
Characteristics
Docked
• Attached to the left, right, top, or bottom edge of the client
area
• restricted to the client area
• resizable
• has a dock bar instead of a title bar
Floating
• Rests above all docked windows and MDI child windows
• movable outside the client area, like a floating palette
• has a thin title bar
• does not have Minimize or Maximize buttons
MDI Child
• Normal child window of the client area, when running in
MDI mode
• restricted to the client area
Figure 6.1 Window states
Docked window
58
MDI child window
8/16-bit IDE User’s Guide
Dockable Windows
Working with Dockable Windows
Table 6.2 on page 59 explains the difference between dockable windows and nondockable windows. In this table, the term non-modal refers to a window that does not
require your attention before allowing the IDE to proceed with other operations.
Table 6.2 Differences between dockable and non-dockable windows
Window Type
Required Criteria
Dockable
All of these:
Sample Windows
• Thread
• non-modal
• Project
• resizable
• Component Catalog
• maximizable
Non-dockable
Any of these:
• IDE Preferences
• modal
• Find
• non-resizable
• About Box
• non-maximizable
NOTE
The default setting for project windows is to dock to an edge of the client area.
You can undock these windows.
Compound windows that have more than one pane dock as a group. You
cannot separately dock individual panes from these windows. For example,
you can dock the Thread Window, but you cannot dock the Stack Crawl pane
separately from the Thread Window.
Working with Dockable Windows
You can dock windows in one of two ways:
• dragging a floating window to a docking position
• using a contextual menu to dock a window
You can resize docked windows and undock them to floating windows or MDI child
windows.
This section explains how to perform tasks with dockable windows.
8/16-bit IDE User’s Guide
59
Dockable Windows
Working with Dockable Windows
Docking a Window By Using a Contextual Menu
Use a contextual menu to dock a floating window or MDI child window to one of the four
edges of the client area.
1. Right-click the window title bar.
A contextual menu appears.
2. Choose Docked from the contextual menu.
NOTE
The Docked command appears in the contextual menu for dockable windows
only.
The window docks to an edge of the client area. You can resize the docked window or
move it to a different edge of the client area.
Docking a Window By Using Drag and Drop
You can drag a docked window or a floating window to one of the four edges of the client
area to dock it.
1. Drag the window to one edge of the client area.
Drag a floating window by its title bar. Drag a docked window by its dock bar.
2. A window outline appears near the client-area edge, showing the final position after
you release the window.
Use the outline as a visual cue that the IDE will dock the window. If an outline does
not appear, you cannot dock the window.
3. Release the window to dock it to the edge.
The window appears in the position indicated by the window outline.
Docking Windows of the Same Kind
You can dock two or more windows of the same kind inside a single docked window. In
this arrangement, tabs inside the single docked window represent each of the original
docked windows. You can undock each tab individually from the single docked window.
1. Dock the first of two or more windows of the same kind to an edge of the client area.
2. Dock the second window to the same edge as the first window.
Use the window outline that appears as a visual cue that the IDE will dock the second
window to the same edge as the first window.
60
8/16-bit IDE User’s Guide
Dockable Windows
Working with Dockable Windows
3. Dock subsequent windows to the same edge as the first window.
Each additional docked window appears as a tab inside the first docked window. Click
a tab to view its contents. The frontmost tab appears in bold font.
Figure 6.2 on page 61 shows two projects represented as tabs in a single docked window.
Figure 6.2 Two projects in a single docked window
Undocking a Window
Use a contextual menu to undock a window from an edge of the client area to a floating
window or MDI child window.
1. Right-click the tab inside the docked window that represents the window you want to
undock.
A contextual menu appears.
8/16-bit IDE User’s Guide
61
Dockable Windows
Working with Dockable Windows
Figure 6.3 Contextual menu
2. Choose Floating or MDI Child from the contextual menu.
• Floating—undock the window so that it becomes a floating window
• MDI child—undock the window so that it becomes an MDI child window of the
client area
The window undocks and becomes the chosen window type.
Alternately, double-click the tab to undock the corresponding window to a floating
window.
Floating a Window
Use a contextual menu to float a docked window or MDI child window.
1. Right-click the tab in the docked window or the title bar of the MDI child window.
A contextual menu appears.
2. Choose Floating from the contextual menu.
NOTE
The Floating command appears in the contextual menu for floatable windows
only.
The window becomes a floating window (that you can drag outside the client area).
Alternately, double-click the tab in a docked window to float its corresponding window.
Unfloating a Window
Use a contextual menu to dock a floating window or make it an MDI child window.
1. Right-click the title bar of the floating window.
A contextual menu appears.
2. Choose Docked or MDI Child from the contextual menu.
• Docked—dock the floating window
62
8/16-bit IDE User’s Guide
Dockable Windows
Dock Bars
• MDI child—unfloat the window so that it becomes an MDI child window
The window unfloats and becomes the chosen window type.
Alternately, drag the floating window to an edge of the client area to dock it.
Making a Window an MDI Child
Use a contextual menu to make a docked window or floating window an MDI child
window.
1. Right-click the tab in the docked window or the title bar of the floating window.
A contextual menu appears.
2. Choose MDI Child from the contextual menu.
The docked window or floating window becomes an MDI child window.
Suppressing Dockable Windows
Suppress dockable windows to drag a window to any location onscreen without docking it
to an edge of the client area.
1. Hold down the Ctrl key while dragging or floating an MDI child window.
The thin window outline that normally indicates docked-window placement becomes a
heavy window outline. Use this heavy outline as a visual cue that the IDE suppresses
dockable windows.
2. Release the window at its final position.
The window appears in the position indicated by the heavy window outline.
3. Release the Ctrl key.
Dock Bars
A docked window has a dock bar instead of a title bar. Use the dock bar to perform these
tasks:
• move the docked window to a different edge of the client area
• collapse or expand view of the docked window
• close the docked window
Figure 6.4 on page 64 shows a dock bar.
8/16-bit IDE User’s Guide
63
Dockable Windows
Dock Bars
Figure 6.4 Dock Bar
Collapsing a Docked Window
If two or more distinct docked windows occupy the same edge of the client area, you can
collapse one docked window to view contents of other docked windows.
1. Dock two or more windows to the same edge of the client area.
The windows’ contents must appear in separate docked windows, not as tabs in a
single docked window.
2. Click the collapse button
on the dock bar of the docked window that you want
to collapse.
3. The docked window collapses to hide its contents.
Expanding a Docked Window
If you previously collapsed a docked window, you can expand it and view its contents.
1. Click the expand button on the dock bar:
2. The docked window expands to restore its original view.
Moving a Docked Window
Use the gripper in a docked window’s dock bar to move the docked window to a different
edge of the client area.
1. Drag the docked window by the gripper in its dock bar:
2. Release the docked window at its new position.
Closing a Docked Window
Close a docked window directly from its dock bar.
64
8/16-bit IDE User’s Guide
Dockable Windows
Dock Bars
1. Click the close button on the dock bar:
2. The docked window closes.
Re-opening the window restores its docked position.
8/16-bit IDE User’s Guide
65
Dockable Windows
Dock Bars
66
8/16-bit IDE User’s Guide
7
Workspaces
This chapter explains how to work with workspaces in the CodeWarrior™ IDE. Use
workspaces to do these tasks:
• Organize—save the state of all windows onscreen for later reuse
• Migrate across computers—transfer your workspace from one computer to another
This chapter contains these sections:
• “About Workspaces” on page 67
• “Using Workspaces” on page 67
About Workspaces
A workspace stores information about the current state of the IDE. This information
consists of the size, location, and the docked state (Windows) of IDE windows. If you
save a workspace during an active debugging session, the workspace also stores
information about the state of debugging windows.
The IDE can use a default workspace, or it can use a workspace that you create. The IDE
works with one workspace at a time. You can save and re-apply a workspace from one
IDE session to the next.
Using Workspaces
Use menu commands to perform these workspace tasks:
• save a new workspace
• open an existing workspace
• close the current workspace
Using the Default Workspace
Use the default workspace to preserve IDE state from one session to the next. The IDE
saves and restores the default workspace automatically.
8/16-bit IDE User’s Guide
67
Workspaces
Using Workspaces
1. Choose Edit > Preferences.
The IDE Preferences window opens.
2. Select IDE Extras in the IDE Preference Panels list.
The IDE Extras preference panel appears.
3. Enable the Use default workspace on page 260 option.
• Checked—the IDE saves its state at the time you quit, then restores that state the
next time you launch the IDE
• Unchecked—the IDE always launches with the same default state: no windows
visible
Saving a Workspace
Save a workspace to store information about the current state of onscreen windows, recent
items, and debugging.
1. Arrange your workspace.
Move windows to your favorite positions and start or finish a debugging session.
2. Choose File > Save Workspace.
A Save dialog box appears.
3. Enter a name for the current workspace
NOTE
Add the extension .cww to the end of the workspace name, for example,
myworkspace.cww. This extension helps you readily identify the
workspace file. The Windows-hosted IDE requires this extension to recognize
the file as a CodeWarrior workspace.
4. Save the workspace to a location on your hard disk.
The IDE now uses your saved workspace. In subsequent programming sessions, you can
open the workspace.
Opening a Workspace
Open a workspace to apply its settings to the IDE.
1. Choose File > Open Workspace.
An Open dialog box appears.
68
8/16-bit IDE User’s Guide
Workspaces
Using Workspaces
2. Open the workspace.
Use this dialog box to navigate your hard disk and select a workspace file. These files
end in the .cww extension.
The IDE opens the selected workspace and applies its settings.
Saving a Copy of a Workspace
Save a copy of a current workspace under a different name.
1. Open an existing workspace.
2. Choose File > Save Workspace As.
A Save As dialog box appears.
3. Enter a name for the copy of the current workspace
NOTE
Add the extension .cww to the end of the workspace name, for example,
myworkspace.cww. This extension helps you readily identify the
workspace file. The Windows-hosted IDE requires this extension to recognize
the file as a CodeWarrior workspace.
4. Save the workspace to a location on your hard disk.
The IDE saves a copy of the current workspace under the name you specified.
Closing a Workspace
Close the current workspace after you finish working with it.
1. Choose File > Close Workspace.
2. The IDE closes the current workspace.
NOTE
You cannot close the default workspace, however, the IDE Extras preference
panel contains an option that determines whether the IDE uses the default
workspace.
You can now open a different workspace or quit the IDE.
8/16-bit IDE User’s Guide
69
Workspaces
Using Workspaces
Opening a Recent Workspace
You can list recently used workspaces in the Open Recent submenu. The IDE Extras
preference panel contains an option that determines the number of recent workspaces
that the submenu will list.
1. Choose File > Open Recent.
A submenu appears. This submenu lists recently opened projects, files, and
workspaces. A checkmark appears next to the active workspace.
2. Choose a recent workspace from the Open Recent submenu.
The IDE applies the workspace that you select.
70
8/16-bit IDE User’s Guide
III
Editor
This section contains these chapters:
• The CodeWarrior Editor on page 73
• Editing Source Code on page 81
• Navigating Source Code on page 95
• Finding and Replacing Text on page 103
8/16-bit IDE User’s Guide
71
72
8/16-bit IDE User’s Guide
8
The CodeWarrior Editor
This chapter explains how to work with the editor in the CodeWarrior™ IDE. Use the
editor to perform these tasks:
• Manage text files—the editor includes common word-processing features for
creating and editing text files. Sample text files include Read Me files and release
notes.
• Manage source files—the editor includes additional features for creating and editing
source files. The IDE processes source files to produce a program.
This chapter contains these sections:
• “Editor Window” on page 73
• “Editor Toolbar” on page 75
• “Other Editor Window Components” on page 77
Editor Window
Use the editor window to create and manage text files or source files. The window
contains these major parts:
• Editor toolbar
• Text-editing area
• Line and column indicator
• Pane splitter controls
Figure 8.1 on page 74 shows the editor window. Table 8.1 on page 74 explains the items
in the editor window.
8/16-bit IDE User’s Guide
73
The CodeWarrior Editor
Editor Window
Figure 8.1 Editor window
Table 8.1 Editor window—items
Item
74
Icon
Explanation
Interfaces
Menu on
page 76
Displays a list of referenced interface
files or header files for the source file.
Functions
Menu on
page 76
Displays a list of functions defined in the
source file.
Markers
Menu on
page 76
Displays a list of markers defined in the
file.
Document
Settings
Menu on
page 76
Displays file-format options and a
syntax-coloring toggle.
8/16-bit IDE User’s Guide
The CodeWarrior Editor
Editor Toolbar
Table 8.1 Editor window—items (continued)
Item
Icon
Explanation
Version Control
System
Menu on
page 77
Displays a list of available Version
Control System (VCS) commands.
Choose a command to apply to the
source file.
Path Caption on
page 77
Displays the complete path to the file.
File Modification
Icon on page 77
This icon indicates an unchanged file
since the last save.
This icon indicates a file with
modifications not yet saved.
Text Editing
Area on
page 78
Shows the text or source-code content
of the file.
Line and
Column
Indicator on
page 78
Displays the current line and column
number of the text-insertion cursor
Pane Splitter
Controls on
page 78
Drag to split the window into panes.
Editor Toolbar
Use the editor toolbar to complete these tasks:
• Open interface and header files
• Find function definitions
• Set and clear markers
• Modify file formats
• Control syntax coloring
• Execute version-control operations
• Determine a file’s save state
8/16-bit IDE User’s Guide
75
The CodeWarrior Editor
Editor Toolbar
This section explains how to expand and collapse the toolbar, and how to perform each
toolbar task.
Expanding and Collapsing the Editor Window Toolbar
To expand the editor window toolbar, click this icon in the right-hand top corner
of the editor window.
To collapse the Editor Window Toolbar, click this icon in the right-hand top
corner of the Editor window.
Interfaces Menu
The Interfaces menu lists the source files included in the current source file.
See “Finding Interface Files” on page 95 for information on navigating source code with
the Interfaces menu.
Functions Menu
The Functions menu lists the functions (routines) defined in the current file.
See “Locating Functions” on page 96 for information on navigating source code with the
Functions pop-up.
Markers Menu
The Marker menu lists markers placed in the current file. Use markers to scroll to specific
items in source code and find code segments by intuitive names.
See “Using Markers” on page 98 for information on navigating source code with Markers.
Document Settings Menu
The Document Settings menu shows whether the IDE applies syntax coloring to the
window text, as well as the format in which the IDE saves the file.
To toggle syntax coloring
• Choose Document Settings > Syntax Coloring.
The editor window updates to display the new syntax color setting.
76
8/16-bit IDE User’s Guide
The CodeWarrior Editor
Other Editor Window Components
To specify the EOL format for the file
• Choose the EOL format for the file.
The IDE applies the specified EOL format to the file the next time it gets saved.
Version Control System Menu
In editor windows, the version control pop-up menu lists options provided by a version
control system (VCS) compatible with the IDE. Use a VCS to manage multiple versions
of files. VCS packages are available separately for use with the IDE.
Using the Version Control System Menu
Use the Version Control System (VCS) pop-up menu to access version control
commands related to the editor window’s file. If a version control system is not enabled
for a project, the only item on the VCS menu is No Version Control Available.
• Choose VCS > VCScommand
The IDE executes the VCS command.
Other Editor Window Components
Use other editor window components to perform these tasks:
• Determine the path to a file.
• Determine the modification status of a file.
• Edit text or source code.
• Find the text-insertion point.
This section explains these additional editor window components.
Path Caption
The Path caption shows the path to the active file.
File Modification Icon
The File Modification icon indicates the save status of the file:
• The
8/16-bit IDE User’s Guide
icon indicates an unchanged file since the last Save.
77
The CodeWarrior Editor
Other Editor Window Components
• The
icon indicates a file with modifications not yet saved.
Text Editing Area
The text editing area behaves the same way as it does in a word processor. Enter text or
source code, perform edits, and copy or paste selections.
Line and Column Indicator
The Line and Column indicator shows the current position of the text-insertion point.
Click the indicator to specify a line to scroll into view.
Pane Splitter Controls
Use the pane splitter controls to perform these tasks:
• Add panes to editor windows.
• Adjust pane size.
• Remove panes from editor windows.
This section explains how to perform each task.
Adding Panes to an Editor Window
Use the Pane Splitter controls to add additional view panes in an editor window and view
two or more sections of a source file at the same time.
1. Click and drag a Pane Splitter control to add a view pane.
2. The IDE adds a new view pane to the editor window.
Resizing Panes in an Editor Window
Use the Pane Resize controls to resize the panes in an editor window.
1. Click and drag a vertical or horizontal Pane Resize control.
2. The IDE resizes the selected view pane.
78
8/16-bit IDE User’s Guide
The CodeWarrior Editor
Other Editor Window Components
Removing Panes from an Editor Window
Use the Pane Resize controls to remove additional view panes from an editor window.
1. Remove an editor window pane.
• Double-click the Pane Resize control to remove the pane, or
• Click and drag the Pane Resize control to the left or top edge of the editor window.
2. The IDE removes the view pane from the editor window.
8/16-bit IDE User’s Guide
79
The CodeWarrior Editor
Other Editor Window Components
80
8/16-bit IDE User’s Guide
9
Editing Source Code
This chapter explains how to edit source code in the CodeWarrior™ IDE. The IDE
provides these features to help you edit source code:
• Select and indent text—the editor can select text by line, routine, or rectangular
selection. The editor also handles text indentation.
• Balance punctuation—the editor can find matching pairs of parentheses, brackets,
and braces. Most programming languages, such as C++, produce syntax errors for
punctuation that lacks a counterpart.
• Complete code—the IDE can suggest ways to complete the symbols you enter in a
source file
This chapter contains these sections:
• “Text Manipulation” on page 81
• “Punctuation Balancing” on page 84
• “Code Completion” on page 85
Text Manipulation
Use these tasks to manipulate text files:
• Select text
• Overstrike text
• Use virtual space
• Indent text
This section explains how to perform each task.
Selecting Text in Editor Windows
The editor lets you select text in several ways while you edit source files.
NOTE
Enable the Left margin click selects line option in the Editor Settings
preference panel to use the right-pointing arrow cursor.
8/16-bit IDE User’s Guide
81
Editing Source Code
Text Manipulation
Lines
Follow these steps to select a line of text:
• Triple-click anywhere on a line, or
• Click the right-pointing cursor in the left margin of the line.
Multiple lines
Follow these steps to select multiple lines of text:
• Drag the cursor over several lines of text and release, or
• Position the cursor at the beginning of a selection range, then Shift-click the end of
the selection range to select all text between the two points, or
• Drag the right-pointing cursor to select lines of text.
Rectangular text selections
Table 9.1 on page 82 explains how to select rectangular portions of text.
Table 9.1 Selecting a rectangular portion of text
On this host...
Do this...
Windows
Alt-drag the cursor over the portion of text.
Entire routines
Follow these steps to select an entire routine:
1. Hold down the Shift key.
2. Choose a function name from the Function list menu.
Overstriking Text
Use the Overstrike command to toggle between text insertion and text overwriting mode
when entering text. Press the Ins key to toggle overstrike mode.
Using Virtual Space
Use the Virtual Space feature to place the cursor anywhere in the white space of a line of
source code and enter text at that position.
82
8/16-bit IDE User’s Guide
Editing Source Code
Text Manipulation
For example, consider the line of C++ code shown in Listing 9.1 on page 83.
Listing 9.1 Sample C++ source code
void aFunction (const char * inMessage)
virtualspace
Toggling virtual space changes the cursor behavior:
• enabled—clicking in the virtualspace places the cursor at the location that you
clicked. You can enter text at that location.
• disabled—clicking in the virtualspace places the cursor after the last character on the
line (in the example, after the closing parenthesis). To place the cursor beyond this
character, you must repeatedly press the space bar on your keyboard.
To use virtual space, follow these steps:
1. Select Edit > Preferences.
The IDE Preferences window opens.
2. Select Editor Settings in the IDE Preference Panels list.
The Editor Settings preference panel appears.
3. Select the Enable Virtual Space option:
4. Click Apply or Save to save your changes to the preference panel.
5. Close the IDE Preferences window.
Indenting and Unindenting Text Blocks
Use the Shift Left and Shift Right commands to shift a selected block of text to the left or
right. You can indent or unindent one or more lines using these commands. The Tab Size
option specifies the amount of indentation.
1. Select the text to be shifted.
2. Indent or unindent the selected text.
• To unindent text: Choose Edit > Shift-Left.
• To indent text: Choose Edit > Shift-Right.
Symbol Editing Shortcuts
You can use the browser contextual menu to enhance source-code editing in the IDE. Use
this menu to streamline text entry in editor windows. You can enter the first few letters of
a function name, then use the browser contextual menu to complete the entry.
The IDE also provides these keyboard shortcuts with the browser enabled:
8/16-bit IDE User’s Guide
83
Editing Source Code
Punctuation Balancing
• Find symbols with prefix—find symbols matching the selected prefix
• Find symbols with substring—find symbols matching the selected substring
• Get next symbol—obtain the next symbol from the browser database
• Get previous symbol—obtain the previous symbol from the browser database
Punctuation Balancing
Balance punctuation to ensure that each opening parenthesis, bracket, or brace has a
corresponding closing counterpart. This section explains how to balance punctuation.
Balancing Punctuation
Use the Balance option when editing source code to make sure that every parenthesis (( )),
bracket ([ ]), and brace ({ }) has a mate.
1. Position the cursor between the suspect punctuation.
2. Check for the matching punctuation.
• Choose Edit > Balance
OR
• Double-click the parenthesis, bracket, or brace character to check for a matching
character.
From a text insertion point, the editor searches forward until it finds a parenthesis, bracket,
or brace, then it searches in the opposite direction until it finds the matching punctuation.
When double-clicking on a parenthesis, bracket, or brace, the editor searches in the
opposite direction until it finds the matching punctuation.
When it finds a match, it highlights the text between the matching characters. If the
insertion point is not enclosed or if the punctuation is unbalanced, the computer beeps.
Toggling Automatic Punctuation Balancing
Use the Editor Settings to enable or disable the punctuation balancing feature.
84
8/16-bit IDE User’s Guide
Editing Source Code
Code Completion
Figure 9.1 Editor Settings (Balance While Typing)
To toggle automatic punctuation balancing, follow these steps:
1. Select Edit > Preferences.
This opens the IDE Preferences window.
2. In the IDE Preference Panels list, select Editor Settings.
3. In the Other Settings area of Editor Settings, select or clear the Balance While
Typing checkbox.
Code Completion
Use code completion to have the IDE automatically suggest ways to complete the symbols
you enter in a source file. By using code completion, you avoid referring to other files to
remember available symbols.
C/C++ Code Completion will function more effectively when “Language Parser” is
selected for the “Generate Browser Data From” option in the Build Extras target settings
panel for a project. Java Code Completion is not affected by this setting.
8/16-bit IDE User’s Guide
85
Editing Source Code
Code Completion
Code Completion Configuration
You can activate, deactivate, and customize code-completion operation. These tasks are
associated with code completion:
• Activate automatic code completion
• Trigger code completion from the IDE menu bar
• Trigger code completion from the keyboard
• Deactivate automatic code completion
Activating Automatic Code Completion
Activate automatic code completion to have the IDE display a Code Completion window
that helps you complete the symbols you enter in source code. The Code Completion
preference panel configures the Code Completion window behavior.
1. Choose Edit > Preferences.
The IDE Preferences window appears.
2. Select the Code Completion preference panel in the IDE Preference Panels list.
3. Select the Automatic Invocation on page 240 option.
Selecting this option configures the IDE to automatically open the Code Completion
window.
4. Enter a delay in the Code Completion Delay on page 242 field.
This delay determines how long the IDE waits between the time you type a trigger
character and the time the Code Completion window appears. If you perform any
action during this delay time, the IDE cancels the Code Completion operation.
5. Save your preferences.
Click the Save or Apply button.
The Code Completion window now appears automatically to help you complete code in
editor windows.
Triggering Code Completion from the IDE Menu
Trigger code completion from the main menu to open the Code Completion window.
1. Bring forward an editor window.
2. Begin typing or place insertion point at end of source code that you want to complete.
86
8/16-bit IDE User’s Guide
Editing Source Code
Code Completion
3. Choose Edit > Complete Code
The Code Completion window appears. Use it to complete the symbol at the insertion
point.
Triggering Code Completion from the Keyboard
To open code completion from the keyboard:
1. Bring forward an editor window.
2. Begin typing or place insertion point at end of source code to complete.
3. Press the appropriate code completion shortcut key combination.
Table 9.2 on page 87 lists the default code completion key bindings. Use the
Customize IDE Commands panel to change these key bindings.
Table 9.2 Code Completion key bindings
Host
Get Next
Completion
Get Previous
Completion
Complete Code
Windows
Alt-/
Alt-Shift-/
Alt-.
Deactivating Automatic Code Completion
Deactivate automatic code completion to prevent the IDE from displaying the Code
Completion window as you edit source code. The Code Completion preference panel
configures Code Completion window behavior.
You can still manually trigger code-completion functionality from the keyboard or from
the main menu.
NOTE
To dismiss the Code Completion window after it automatically opens, press the
Esc key or click outside the active editor window.
1. Choose Edit > Preferences.
2. Select the Code Completion preference panel in the IDE Preference Panels list.
3. Disable the Automatic Invocation on page 240 option.
Clearing this option prevents the IDE from automatically opening the Code
Completion window.
8/16-bit IDE User’s Guide
87
Editing Source Code
Code Completion
4. Save your preferences.
Click the Save or Apply button.
Code Completion Window
The Code Completion window displays possible symbols based on the context of the
insertion point. For example, in Java you can complete code for any Java class, method,
and variable from any package that has been imported or is being used elsewhere in the
project.
Figure 9.2 on page 88 shows the Code Completion window. Table 9.3 on page 89 explains
the items in the Code Completion window. Table 9.4 on page 89 explains the icons that
appear in the Code Completion list.
Figure 9.2 Code Completion window
88
8/16-bit IDE User’s Guide
Editing Source Code
Code Completion
Table 9.3 Code Completion window—items
Item
Icon
Explanation
Code
Completion list
Lists available variables and methods or
functions along with their corresponding return
types or parameters. This list changes based
on the context of the insertion point in the active
editor window. Icons help distinguish items in
the list.
Disclosure
Triangle
Click to toggle display of Documentation pane
for programming languages that support it.
Resize Bar
Drag to resize the Code Completion list and the
Documentation pane.
Documentation
pane
Displays summary information or
documentation for the selected item in the
Code Completion list. This pane appears only
for programming languages that support
summary information or documentation.
Table 9.4 Code Completion window—icons
Icon
Code Type
Icon
Code Type
Class
Method
Function
Namespace
Global Variable
None
Language
Keyword
Package
Local Variable
Variable
Constant
8/16-bit IDE User’s Guide
89
Editing Source Code
Code Completion
Navigating the Code Completion Window
Navigate the Code Completion window by mouse or keyboard. You can perform these
tasks:
• Resize the window
• Navigate the window by keyboard
• Refine the Code Completion list by keyboard
1. Bring forward an editor window.
2. Place the insertion point at the end of the source code to complete.
3. Choose Edit > Complete Code or use keyboard shortcut.
The Code Completion window appears.
4. Use the mouse to resize the Code Completion window (Mac and Windows).
The new window size remains in effect until you refine the Code Completion list or
close the Code Completion window. You refine the Code Completion list by typing
additional characters in the active editor window.
5. Use the keyboard to navigate the Code Completion list.
Table 9.5 on page 90 explains how to navigate the Code Completion list by keyboard.
Table 9.5 Navigating the Code Completion list by keyboard
Key
Action
Up Arrow
Select the previous item
Down Arrow
Select the next item
Page Up
Scroll to the previous page
Page Down
Scroll to the next page
6. Use the keyboard to refine the Code Completion list.
The Code Completion list updates as you add or delete characters in the active editor
window. Continue adding characters to narrow the list, or delete existing characters to
broaden the list. Press the Backspace key to delete characters.
90
8/16-bit IDE User’s Guide
Editing Source Code
Code Completion
Selecting an Item in the Code Completion Window
Select an item in the Code Completion window to have the IDE enter that item in the
active editor window at the insertion point.
1. Bring forward an editor window.
2. Place the insertion point at the end of the source code to complete.
3. Choose Edit > Complete Code.
4. Select an item in the Code Completion list.
5. Enter the item into the active editor window.
Press the Return or Enter keys on the keyboard or double-click the item to have the
IDE insert that item into the editor window.
Completing Code for Data Members and Data Types
Complete code for data members for programming languages that support it. For a list of
data members type the period (.) character and activate the code completion window.
Figure 9.3 on page 92 shows an example of helping you select the correct data type
depending on what code has been typed in the source file.
8/16-bit IDE User’s Guide
91
Editing Source Code
Code Completion
Figure 9.3 Code Completion List of Data Types
Completing Code for Parameter Lists
Complete code for parameter lists for programming languages that support it. For
example, you can complete code for parameter lists by typing the open parenthesis(
character.
1. Bring forward an editor window.
2. Place the insertion point at the end of the function or method to complete.
3. Type an open parenthesis to trigger a parameter-list.
4. The Code Completion window appears.
The upper portion of this window lists different (overloaded) versions of the function
or method. The lower portion shows possible parameter lists for the selected function
or method in the top portion. Use this window to complete the parameter list for the
function or method.
92
8/16-bit IDE User’s Guide
Editing Source Code
Code Completion
Figure 9.4 Code Completion for Parameter Lists
Completing Code for Pragmas
You can display a list of pragmas in the code completion window.
1. Bring forward an editor window.
2. In your source file, type #pragma followed by a space.
3. Activate the code completion window (Alt .).
The code completion window will display a list of pragmas.
Figure 9.5 Code Completion for Pragmas
8/16-bit IDE User’s Guide
93
Editing Source Code
Code Completion
94
8/16-bit IDE User’s Guide
10
Navigating Source Code
This chapter explains how to navigate source code in the CodeWarrior™ IDE. Navigate
source code to accomplish these tasks:
• Find specific items—the editor finds interface files, functions, and lines of source
code.
• Go to a specific line—the editor can scroll to a specific line of source code.
• Use markers—the editor allows labelling of specific items of text. These labels, or
markers, provide intuitive navigation of text.
Read this chapter to learn more about typical tasks for navigating source code.
This chapter contains these sections:
• “Finding Interface Files, Functions, and Lines” on page 95
• “Going Back and Forward” on page 97
• “Using Markers” on page 98
• “Symbol Definitions” on page 100
Finding Interface Files, Functions, and
Lines
Find interface files, functions, and lines of source code to expedite programming. You can
find these types of items:
• interface files
• functions
• lines of source code
Finding Interface Files
Find interface (header) files referenced by the current source code. Some programming
languages, such as C++, use interface files in conjunction with source code. Interface files
typically define functions or objects used in the source code. Interface files also separate
function or object declarations from implementations. This section explains how to find
interface files.
8/16-bit IDE User’s Guide
95
Navigating Source Code
Finding Interface Files, Functions, and Lines
Using the Interface Menu
Use the Interface menu in editor windows to open interface or header files referenced by
the current file. The project file must be open for the Interface menu to operate.
1. Click the Interface menu.
2. Select the filename of the interface file that you want to open.
If found, the file is opened in an editor window. If not found, an alert sounds.
NOTE
Only source code interface files can be opened. Libraries and pre-compiled
header files can not be opened.
Locating Functions
Find functions to expedite source-code editing. Most source files contain several functions
that divide a complicated task into a series of simpler tasks. The editor allows scrolling to
individual functions within the current source file. This section explains how to find
functions.
Using the Functions Menu
Use the Functions menu in editor windows to quickly navigate to specific functions or
routines in the current source file.
1. Click the Functions menu.
2. Select the function name to view.
The editor scrolls to display the selected function.
Alphabetizing Functions Menu with the Mouse and Keyboard
The default behavior of the Functions menu is to list functions in order of appearance in
the source file. You can use the mouse and keyboard to list functions in alphabetical order.
Table 10.1 on page 97 Alphabetizing the Functions list on page 97 explains how to use the
mouse and keyboard to alphabetize functions in the Functions menu.
96
8/16-bit IDE User’s Guide
Navigating Source Code
Going Back and Forward
Table 10.1 Alphabetizing the Functions list
On this host...
Do this...
Windows
Ctrl-click the Functions menu.
Alphabetizing Functions Menu Order
The default behavior of the Functions menu is to list functions in order of appearance in
the source file. You can select the Sort function popup on page 258 option in the Editor
Settings preference panel to list functions in alphabetical order.
1. Open the IDE Preferences window.
Choose Edit > Preferences.
2. Select the Editor Settings preference panel.
3. Select the Sort function popup on page 258 option.
4. Save your modifications to the Editor Settings panel.
Going Back and Forward
Go back and forward in source files to edit existing code. Most source files contain more
than one screen of code. The editor always counts the number of lines in the source files.
Go to a particular line to scroll a particular item into view.
Going to a Line
Use the Goto Line command to navigate to a specific source line in an editor window if
you know its number. Lines are numbered consecutively, with the first line designated as
line 1. The Line Number control at the bottom of the editor window shows the line
number where the text insertion point is positioned.
1. Open the Line Number window.
• Click the Line and Column Indicator control in bottom left corner of editor
window, or
• Choose Search > Go To Line
2. Type a line number in the Line Number text box.
3. Click OK.
8/16-bit IDE User’s Guide
97
Navigating Source Code
Using Markers
NOTE
If a line number does not exist, the insertion point jumps to the last line of the
source file.
Using Markers
Markers behave like labels in the editor, identifying specific parts of source code. Use
these tasks to work with markers:
• Add markers to a source file
• Navigate to a marker
• Remove some or all markers from a source file
Remove Markers Window
Use the Remove Markers window to manage the use of destination markers in source
files. Figure 10.1 on page 98 shows the Remove Markers window. Table 10.2 on page 99
explains the items in the window.
Figure 10.1 Remove Marker window
98
8/16-bit IDE User’s Guide
Navigating Source Code
Using Markers
Table 10.2 Remove Markers window—items
Item
Explanation
Markers list
Displays a list of all markers in the current source file.
Remove button
Click to remove all selected markers.
Cancel button
Click to close the Remove Markers window without applying
changes.
Done button
Click to close the Remove Markers window and apply changes.
Adding Markers to a Source File
Use the Add Marker command to add a marker to a file to identify specific line locations
by name.
1. Position the cursor on a line.
2. Click on Marker icon and select Add Marker.
3. Type a name for the new marker.
4. Click Add.
The IDE adds the marker to the file.
Navigating to a Marker
Once you add a marker, you can use the Marker menu to return to it later.
1. Select the marker name from the Marker menu.
2. The editor window scrolls to display the selected marker.
Removing a Marker from a Source File
Use the Remove Marker command to remove one or more markers from a source file.
1. Click Marker icon and select Remove Markers
2. Select the marker name to remove from the list.
3. Click Remove.
The IDE removes the selected marker.
8/16-bit IDE User’s Guide
99
Navigating Source Code
Symbol Definitions
Removing All Markers from a Source File
Use the Remove Marker command to remove one or more markers from a source file.
1. Click Marker icon and select Remove Markers
2. Select all markers in the Markers list, as explained in Table 10.3 on page 100.
Table 10.3 Selecting all markers in the Markers list
On this host…
Do this…
Windows
Shift-click each marker name in the list.
3. Click Remove.
The IDE removes all markers.
Symbol Definitions
You can find a symbol definition in your project’s source code. Supported online
reference viewers include HTMLHelp for Windows.
TIP
You can also use the browser to look up symbol definitions.
Figure 10.2 Find Definition
Looking Up Symbol Definitions
To look up the definition of a selected symbol, follow these steps:
1. Choose Search > Find Definition
2. Enter the symbol definition.
100
8/16-bit IDE User’s Guide
Navigating Source Code
Symbol Definitions
3. Click OK.
CodeWarrior searches all files in your project for the symbol definition.
If CodeWarrior finds a definition, it opens an editor window and highlights the
definition for you to examine.
TIP
To return to your original location after viewing a symbol definition, press ShiftCtrl B. This key binding is equivalent to the Go Back menu command.
8/16-bit IDE User’s Guide
101
Navigating Source Code
Symbol Definitions
102
8/16-bit IDE User’s Guide
11
Finding and Replacing Text
This chapter explains how to work with the find-and-replace features in the
CodeWarrior™ IDE.
This chapter contains these sections:
• “Single-File Find” on page 103
• “Single-File Find and Replace” on page 105
• “Multiple-File Find and Replace” on page 108
• “Search Results Window” on page 118
• “Text-Selection Find” on page 120
• “Regular-Expression Find” on page 122
• “Comparing Files and Folders” on page 126
Single-File Find
Use the Find window to search for text within a single file:
• The Find operation returns a single instance of matching text.
• The Find All operation returns all instances of matching text.
Figure 11.1 on page 103 shows the Find window. Table 11.1 on page 104 explains the
items in the Find window.
Figure 11.1 Find window
8/16-bit IDE User’s Guide
103
Finding and Replacing Text
Single-File Find
Table 11.1 Find window—items
Item
Explanation
Find text/list box
Enter a search string. Click the arrow symbol to select a
search string that you entered previously.
Find button
Click to start a search operation using the string in the Find
text/list box.
Find All button
Click to search for all matches in the active editor window.
Cancel button
Click to close the Find window without performing a search.
Match whole word
checkbox
Check to search for whole-word matches only, ignoring
matches within words.
Clear to search for all matches of the search string, including
matches within words.
Case sensitive
checkbox
Check to consider text case during the search. The search
operation distinguishes between a capital letter and the same
letter in lower case.
Clear to disregard text case during the search. The search
operation does not distinguish between a capital letter and the
same letter in lower case.
Regular expression
checkbox
Check to treat the search string as a regular expression.
Clear to treat the search string as plain text.
Stop at end of file
checkbox
Check to stop a search at the end of a file and not wrap
around to the beginning of the file.
Clear to wrap around to the beginning of the file and continue
a search. The search stops at the first match or at the current
cursor position.
Search up
checkbox
Check to perform a search operation back from the
current selection.
Clear to perform a search operation forward of the
current selection
104
8/16-bit IDE User’s Guide
Finding and Replacing Text
Single-File Find and Replace
Table 11.1 Find window—items (continued)
Item
Explanation
Search selection only
checkbox
Check to search only the currently selected text and not the
entire file.
Clear to search the entire file.
All text
option button
Select to search all text in the file.
Code only
option button
Select to search only source code in the file.
Comments only
option button
Select to search only comments in the file.
Searching Text in a Single File
Use the Find command to search for text in the active editor window.
1. Click Search > Find.
The Find window appears.
2. Enter search text into Find text/list box.
3. Set search options.
4. Click the Find or Find All button to start the search.
The IDE searches the current file until it finds a match or reaches the end of the search. A
single match appears highlighted in the editor window, or multiple matches appear in a
Search Results window. The IDE beeps if it does not find any matching text.
TIP
If you clicked the Find button to start the search, click Search >
Find Next to find the next match in the file.
Single-File Find and Replace
Use the Find and Replace window to perform these tasks:
• Search a single file.
• Replace found text in a single file.
8/16-bit IDE User’s Guide
105
Finding and Replacing Text
Single-File Find and Replace
Figure 11.2 on page 106 shows the Find and Replace window. Table 11.2 on page 106
explains the items in the Find and Replace window.
Figure 11.2 Find and Replace window
Table 11.2 Find and Replace window—items
Item
Explanation
Find text/list box
Enter a search string. Click the arrow symbol to select a
search string that you entered previously.
Replace with
text/list box
Enter the replacement string. Click the arrow symbol to select
a replacement string that you entered previously.
Find button
Click to start a search operation using the string in the Find
text/list box.
Replace button
Click to replace the current match with the replacement string.
Replace All button
Click to replace all matches with the replacement string.
Cancel button
Click to close the Find and Replace window without
performing
a search.
Match whole word
checkbox
Check to search for whole-word matches only, ignoring
matches
within words.
Clear to search for all matches of the search string, including
matches within words.
106
8/16-bit IDE User’s Guide
Finding and Replacing Text
Single-File Find and Replace
Table 11.2 Find and Replace window—items (continued)
Item
Explanation
Case sensitive
checkbox
Check to consider text case during the search. The search
operation distinguishes between a capital letter and the same
letter in lower case.
Clear to disregard text case during the search. The search
operation does not distinguish between a capital letter and the
same letter in lower case.
Regular expression
checkbox
Check to treat the search string as a regular expression.
Stop at end of file
checkbox
Check to stop a search at the end of a file and not wrap
around to the beginning of the file.
Clear to treat the search string as plain text.
Clear to wrap around to the beginning of the file and continue
a search. The search stops at the first match or at the current
cursor position.
Search up
checkbox
Check to perform a search operation back from the
current selection.
Clear to perform a search operation forward of the
current selection
Search selection only
checkbox
Check to search only the currently selected text and not the
entire file.
Clear to search the entire file.
All text
option button
Select to search all text in the file.
Code only
option button
Select to search only source code in the file.
Comments only
option button
Select to search only comments in the file.
Replacing Text in a Single File
Use the Replace command to replace matching text.
1. Click Search > Replace or Search > Find and Replace.
The Find window appears.
8/16-bit IDE User’s Guide
107
Finding and Replacing Text
Multiple-File Find and Replace
2. Enter search text into the Find text/list box.
3. Enter replacement text into the Replace with text/list box.
4. Set search options.
5. Find and replace text:
a. Click the Find button to search for matching text.
The IDE searches the current file until it finds a match or reaches the end of the
search. A single match appears highlighted in the editor window. The IDE beeps if
it does not find any matching text.
b. Click the Replace or Replace All button to replace the matching text.
Click the Replace button to replace the current match. Click the Replace button
repeatedly to replace subsequent matches. Click the Replace All button to replace
all matching text in the file.
To replace consecutive matches, click the Find button to find the first match, then
repeatedly click the Replace button. To replace one match at a time, or to replace nonconsecutive matches, click the Find button to find a match, then click the Replace button
as needed.
TIP
If you clicked the Find button to start the search, click Search >
Find Next to find the next match in the file.
Multiple-File Find and Replace
Use the Find in Files window to perform these tasks:
• Search several files.
• Replace found text in multiple files, folders, symbolics files, or projects.
• Replace found text in files within a specific build target.
Figure 11.3 on page 109 shows the Find in Files window. Table 11.3 on page 109 explains
the items in
the window.
108
8/16-bit IDE User’s Guide
Finding and Replacing Text
Multiple-File Find and Replace
Figure 11.3 Find in Files window
Table 11.3 Find in Files window—items
Item
Explanation
Find text/list box
Enter a search string. Click the arrow symbol to select a search
string that you entered previously.
Replace with
text/list box
Enter the replacement string. Click the arrow symbol to select a
replacement string that you entered previously.
Find button
Click to start a search operation using the string in the Find text/
list box.
Find All button
Click to search for all matches in the selected items.
Replace button
Click to replace the current match with the replacement string.
Replace All button
Click to replace all matches with the replacement string.
Stop button
Click to stop the current operation.
8/16-bit IDE User’s Guide
109
Finding and Replacing Text
Multiple-File Find and Replace
Table 11.3 Find in Files window—items (continued)
Item
Explanation
Match whole word
checkbox
Check to search for whole-word matches only, ignoring matches
within words.
Clear to search for all matches of the search string, including
matches within words.
Case sensitive
checkbox
Check to consider text case during the search. The search
operation distinguishes between a capital letter and the same
letter in lower case.
Clear to disregard text case during the search. The search
operation does not distinguish between a capital letter and the
same letter in lower case.
110
Regular
expression
checkbox
Check to treat the search string as a regular expression.
All text
option button
Select to search all text in the selected items.
Code only
option button
Select to search only source code in selected items.
Comments only
option button
Select to search only comments in selected items.
In Folders on
page 111 tab
Click to bring forward the In Folders page. Use this page to
search specific folders in the host file system.
In Projects on
page 112 tab
Click to bring forward the In Projects page. Use this page to
search active projects and build targets.
In Symbolics on
page 115 tab
Click to bring forward the In Symbolics page. Use this page to
search files containing symbolics (debugging and browsing)
information generated by the IDE.
In Files on
page 117 tab
Click to bring forward the In Files page. Use this page to search
files contained in custom file sets.
Clear to treat the search string as plain text.
8/16-bit IDE User’s Guide
Finding and Replacing Text
Multiple-File Find and Replace
In Folders
Use the In Folders page to search folder contents for matching text. Figure 11.4 on
page 111 shows the In Folders page. Table 11.4 on page 111 explains the items in the
page.
Figure 11.4 Find in Files window—In Folders page
Table 11.4 Find in Files window—In Folders items
Item
Explanation
Search in
text/list box
Enter the path to the folder that you want to search. Click the
arrow symbol to select a path that you entered previously.
Browse button
Click to open a dialog box that lets you pick the folder that you
want to search.
Search sub-folders
checkbox
Check to search sub-folders of the selected folder.
Clear to search the selected folder only, ignoring any subfolders it may contain.
By type
text/list box
Enter the filename extensions of the files that you want to
search. Click the arrow symbol to select a set of filename
extensions.
The search ignores files whose filename extensions do not
appear in this text/list box.
Searching for Text Across Multiple Folders
Use the In Folders page to search for text in folder contents.
8/16-bit IDE User’s Guide
111
Finding and Replacing Text
Multiple-File Find and Replace
1. Click Search > Find in Files.
The Find in Files window appears.
2. Enter search text into the Find text/list box.
3. Enter replacement text into the Replace with text/list box.
4. Set general search options.
5. Set the In Folders page search options:
a. Enter a folder path into the Search in text/list box, or click the Browse button to
select a folder.
b. Check or clear the Search sub-folders checkbox.
c. Enter filename extensions into the By type text/list box.
6. Find and replace text:
a. Click the Find or Find All button to search for matching text.
The IDE searches the specified folder contents until it finds a match or reaches the
end of the search. A single match appears highlighted in an editor window, or
multiple matches appear in a Search Results window. The IDE beeps if it does not
find any matching text.
b. Click the Replace or Replace All button to replace the matching text.
Click the Replace button to replace the current match. Click the Replace button
repeatedly to replace subsequent matches. Click the Replace All button to replace
all matching text.
To replace consecutive matches, click the Find button to find the first match, then
repeatedly click the Replace button. To replace one match at a time, or to replace nonconsecutive matches, click the Find button to find a match, then click the Replace button
as needed.
TIP
If you clicked the Find button to start the search, click Search >
Find Next to find the next match.
In Projects
Use the In Projects page to search active projects and build targets for matching text.
Figure 11.5 on page 113 shows the In Projects page. Table 11.5 on page 113 explains the
items in the page.
112
8/16-bit IDE User’s Guide
Finding and Replacing Text
Multiple-File Find and Replace
Figure 11.5 Find in Files window—In Projects page
Table 11.5 Find in Files window—In Projects items
Item
Explanation
Project list box
Specify the projects that you want to search.
Target list box
Specify the build targets that you want to search.
Project sources
checkbox
Check to search the source-code files of selected projects.
Project headers
checkbox
Check to search the header files of selected projects.
System headers
checkbox
Check to search system header files.
Search cached subtargets checkbox
Check to search sub-targets that the IDE cached for the
selected build targets.
Clear to ignore source-code files of selected projects.
Clear to ignore header files of selected projects.
Clear to ignore system header files.
Clear to ignore the sub-targets that the IDE cached for the
selected build targets.
File list
8/16-bit IDE User’s Guide
This list shows files that the IDE will search. To remove a file
from this list, select it and press Backspace or Delete. To
open a file in this list, double-click its name.
113
Finding and Replacing Text
Multiple-File Find and Replace
Searching for Text Across Multiple Projects
Use the In Projects page to search for text in active projects and build targets.
1. Click Project > Make.
The IDE updates the project data to correctly list source-code files, header files, and
build targets in the In Projects page of the Find in Files window.
2. Click Search > Find in Files.
The Find in Files window appears.
3. Enter search text into the Find text/list box.
4. Enter replacement text into the Replace with text/list box.
5. Set general search options.
6. Set the In Projects page search options:
a. Use the Project list box to specify the projects that you want to search.
b. Use the Target list box to specify the build targets that you want to search.
c. Check or clear the checkboxes to refine your search criteria.
d. Remove files from the File list as needed.
7. Find and replace text:
a. Click the Find or Find All button to search for matching text.
The IDE searches the specified projects and build targets until it finds a match or
reaches the end of the search. A single match appears highlighted in an editor
window, or multiple matches appear in a Search Results window. The IDE beeps if
it does not find any matching text.
b. Click the Replace or Replace All button to replace the matching text.
Click the Replace button to replace the current match. Click the Replace button
repeatedly to replace subsequent matches. Click the Replace All button to replace
all matching text.
To replace consecutive matches, click the Find button to find the first match, then
repeatedly click the Replace button. To replace one match at a time, or to replace nonconsecutive matches, click the Find button to find a match, then click the Replace button
as needed.
TIP
114
If you clicked the Find button to start the search, click Search >
Find Next to find the next match.
8/16-bit IDE User’s Guide
Finding and Replacing Text
Multiple-File Find and Replace
In Symbolics
Use the In Symbolics page to search files containing symbolics information for matching
text. Figure 11.6 on page 115 shows the In Symbolics page. Table 11.6 on page 115
explains the items in the page.
Figure 11.6 Find in Files window—In Symbolics page
Table 11.6 Find in Files window—In Symbolics items
Item
Explanation
Symbolics list
box
Specify the symbolics files that you want to search.
Symbolics list
This list shows the symbolics files that the IDE will search. To
remove a file from this list, select it and press Backspace or
Delete. To open a file in this list, double-click its name.
Searching for Text Across Multiple Symbolics Files
Use the In Symbolics page to search for text in symbolics files. You must generate
browser data in order to search symbolics files.
1. Enable browser data for the build targets that you want to search.
Use the Build Extras target settings panel to Generate Browser Data From a
compiler or language parser, then Apply or Save your changes. Configuring this
option enables browser data.
8/16-bit IDE User’s Guide
115
Finding and Replacing Text
Multiple-File Find and Replace
2. Click Project > Debug.
Starting a debugging session causes the IDE to generate browser data for
the project.
NOTE
The IDE does not generate browser data for some files, such
as libraries.
3. Click Debug > Kill.
The debugging session ends.
4. Click Search > Find in Files.
The Find in Files window appears.
5. Enter search text into the Find text/list box.
6. Enter replacement text into the Replace with text/list box.
7. Set general search options.
8. Set the In Symbolics page search options:
a. Use the Symbolics list box to specify the symbolics files that you want
to search.
b. Remove symbolics files from the Symbolics list as needed.
9. Find and replace text:
a. Click the Find or Find All button to search for matching text.
The IDE searches the specified symbolics files until it finds a match or reaches the
end of the search. A single match appears highlighted in an editor window, or
multiple matches appear in a Search Results window. The IDE beeps if it does not
find any matching text.
b. Click the Replace or Replace All button to replace the matching text.
Click the Replace button to replace the current match. Click the Replace button
repeatedly to replace subsequent matches. Click the Replace All button to replace
all matching text.
To replace consecutive matches, click the Find button to find the first match, then
repeatedly click the Replace button. To replace one match at a time, or to replace nonconsecutive matches, click the Find button to find a match, then click the Replace button
as needed.
TIP
116
If you clicked the Find button to start the search, click Search >
Find Next to find the next match.
8/16-bit IDE User’s Guide
Finding and Replacing Text
Multiple-File Find and Replace
In Files
Use the In Files page to search file sets for matching text. Figure 11.7 on page 117 shows
the In Files page. Table 11.7 on page 117 explains the items in the page.
Figure 11.7 Find in Files window—In Files page
Table 11.7 Find in Files window—In Files items
Item
Explanation
File Set list box
Specify the file set that you want to search. Select New File Set to
create a new set.
File Set list
This list shows the files that the IDE will search. To remove a file
from this list, select it and press Backspace or Delete. To add files
to this list, click the Add Files button, or drag and drop files and
folders into the list. To open a file in this list, double-click its name.
Add Files
button
Click to open a dialog box that lets you add files to the current file
set. To enable this button, select from the File Set list box an
existing file set or the New File Set option.
Clear List
button
Click to clear the current File Set list. To enable this button, select
from the File Set list box a file set that has at least one file.
Save This Set
button
Click to save the current file set under a specific name. The file set
must have at least one file. The name appears in the File Set list
box. To enable this button, modify the current file set or select an
existing file set from the File Set list box.
Remove a Set
button
Click to open a dialog box that lets you remove file sets that you
created previously. The removed file sets no longer appear in the
File Set list box. To enable this button, select from the File Set list
box an existing file set or the New File Set option.
8/16-bit IDE User’s Guide
117
Finding and Replacing Text
Search Results Window
Searching for Text Across Multiple Files
Use the In Files page to search for text in file sets.
1. Click Search > Find in Files.
The Find in Files window appears.
2. Enter search text into the Find text/list box.
3. Enter replacement text into the Replace with text/list box.
4. Set general search options.
5. Set the In Files page search options:
a. Use the File Set list box to specify the file set that you want to search.
b. Use the buttons to manage the File Set list as needed.
c. Remove files from the File Set list as needed.
6. Find and replace text:
a. Click the Find or Find All button to search for matching text.
The IDE searches the specified files until it finds a match or reaches the end of the
search. A single match appears highlighted in an editor window, or multiple
matches appear in a Search Results window. The IDE beeps if it does not find any
matching text.
b. Click the Replace or Replace All button to replace the matching text.
Click the Replace button to replace the current match. Click the Replace button
repeatedly to replace subsequent matches. Click the Replace All button to replace
all matching text.
To replace consecutive matches, click the Find button to find the first match, then
repeatedly click the Replace button. To replace one match at a time, or to replace nonconsecutive matches, click the Find button to find a match, then click the Replace button
as needed.
TIP
If you clicked the Find button to start the search, click Search >
Find Next to find the next match in the file.
Search Results Window
Use the Search Results window to explore multiple matches that the IDE finds. The IDE
opens this window automatically after it finds multiple matches. Also use this window to
stop searches in progress.
118
8/16-bit IDE User’s Guide
Finding and Replacing Text
Search Results Window
Figure 11.8 on page 119 shows the Search Results window. Table 11.8 on page 119
explains the items in the window.
Figure 11.8 Search Results window
Table 11.8 Search Results window—items
Item
Icon
Explanation
Result Count text
box
Shows the total number of search
results.
Search Criteria
text box
Shows the search criteria.
8/16-bit IDE User’s Guide
119
Finding and Replacing Text
Text-Selection Find
Table 11.8 Search Results window—items (continued)
Item
Icon
Explanation
Warnings button
Click to display complier and linker
warnings in the Results pane. The
text box to the right of this button
shows the total number of warnings.
Stop button
Click to stop the search in progress.
Previous Result
button
Click to select the previous search
result.
Next Result
button
Click to select the next search result.
Results pane
Lists individual search results.
Source Code
pane
disclosure
triangle
Click to show or hide the Source
Code pane.
Pane resize bar
Drag to resize the Results and
Source Code panes.
Source Code
pane
Shows the source code
corresponding to the selected item
in the Results pane. This pane
operates the same as an editor
window without pane-splitter
controls.
Text-Selection Find
After you use the Find, Find and Replace, or Find in Files windows to perform a
successful search, you can use menu commands to apply the same search criteria to
additional searches. This way, you do not have to open the windows again to use the same
search criteria. You select text in the active editor window to define the
search string.
120
8/16-bit IDE User’s Guide
Finding and Replacing Text
Text-Selection Find
Using the Find Next Command
When searching for text, you can use the Find Next command to have the IDE find the
next match:
1. Start a search with the Find, Find and Replace, or Find in Files windows.
2. After the IDE finds a match, click Search > Find Next to find a
subsequent match.
NOTE
Find Next always searches forward and ignores the Search up checkbox.
Using the Find Previous Command
When searching for text, you can use the Find Previous command to have the IDE find
the previous match. You must enable the Find Previous command in the Customize IDE
Commands window.
1. Click Edit > Commands & Key Bindings.
The Customize IDE Commands window opens.
2. Click the Commands tab in the Customize IDE Commands window.
3. Expand the Search item in the Commands pane tree structure.
4. Select the Find Previous item in the expanded list.
Scroll as needed in order to see the Find Previous item. After you select the Find
Previous item, its settings appear in Details pane.
5. Check the Appears in Menus checkbox.
The Find Previous command will appear in the Search menu in the main IDE menu
bar.
6. Click Save to confirm your changes.
7. Close the Customize IDE Commands window.
You can now select the Find Previous command in the Search menu. You can also use
the key binding associated with the command.
Changing the Find String
Use the Enter Find String command to change the current find string.
8/16-bit IDE User’s Guide
121
Finding and Replacing Text
Regular-Expression Find
1. Select the text that you want to use as the new find string.
2. Click Search > Enter Find String.
The selected text replaces the find string that you specified in the Find, Find and
Replace, or Find in Files windows.
You can now use the new find string to perform find and replace operations.
Searching with a Text Selection
Use the Find Selection command to search the active editor window for selected text.
1. Select the text that you want to use as the search string.
2. Click Search > Find Selection.
The IDE searches the active editor window until it finds a match or reaches the end of the
search. A single match appears highlighted in the editor window. The IDE beeps if it does
not find any matching text.
You can also use the Find Next and Find Previous commands to search for additional
matching text.
Regular-Expression Find
Use regular expressions to search text according to sophisticated text-matching rules. A
regular expression is a text string used as a mask for matching text in a file. To use regular
expressions, select Regular expression in the Find, Find and Replace, or Find in Files
windows. Certain characters are operators with special meanings in a regular expression.
TIP
For an in-depth description of regular expressions, refer to Mastering Regular
Expressions by Jeffrey E.F. Friedl, published by O’Reilly & Associates, Inc.
Table 11.9 on page 122 explains the regular-expression operators that the IDE recognizes.
Table 11.9 Regular-expression operators recognized by the IDE
122
Operator
Name
Explanation
.
match any
Matches any single printing or non-printing character
except newline and null.
*
match zero
or more
Replaces the smallest/preceding regular expression
with a sub-expression.
8/16-bit IDE User’s Guide
Finding and Replacing Text
Regular-Expression Find
Table 11.9 Regular-expression operators recognized by the IDE (continued)
Operator
Name
Explanation
+
match one
or more
Repeats the preceding regular expression at least
once and then as many times as necessary to match
the pattern.
?
match zero
or one
Repeats the preceding regular expression once or
not at all.
\n
back
reference
Refers to a specified group (a unit expression enclosed
in parentheses) in the find string. The digit n identifies
the nth group, from left to right, with a number from 1 to
9.
|
alternation
Matches one of a choice of regular expressions. If this
operator appears between two regular expressions,
the IDE matches the largest union of strings.
^
match
beginning of
line
Matches items from the beginning of a string or
following a newline character. This operator also
represents a NOT operator when enclosed within
brackets.
$
match end
of line
Matches items from the end of a string or preceding a
newline character.
[...]
list
Defines a set of items to use as a match. The IDE does
not allow empty lists.
(...)
group
Defines an expression to be treated as a single unit
elsewhere in the regular expression.
-
range
Specifies a range. The range starts with the character
preceding the operator and ends with the character
following the operator.
Table 11.10 on page 124 shows various examples of using regular expressions to match
particular text in a text sample.
8/16-bit IDE User’s Guide
123
Finding and Replacing Text
Regular-Expression Find
Table 11.10 Examples of using regular expressions
Example
Type
This regular
expression...
...matches this
text...
...in this text
sample:
Matching simple
expressions
ex
ex
sample text
[(][.]stack[)
]
(.stack)
ADDR(.stack)
var.
var1
cout << var1;
var2
cout << var2;
cut
cin >> cutF;
cot
cin >> cotG;
ion
information
ssion
the session
sion
confusion
ssion
the session
ris
ris
surprise
r( i)s
r is
theVar is
[bls]ag
sag bag lag
sagging bag
lagged
[[aeiou][0-9]
[2 u9
cout << a[2]
<< u9;
[^bls]ag
rag
sagging rag
lagged
[-ab]V
aV -V
aVal-Val;
Matching any
character
c.t
Repeating
expressions
s*ion
s+ion
Grouping
expressions
Choosing one
character from
many
124
8/16-bit IDE User’s Guide
Finding and Replacing Text
Regular-Expression Find
Table 11.10 Examples of using regular expressions (continued)
Example
Type
This regular
expression...
...matches this
text...
...in this text
sample:
Matching line
beginnings and
endings
^([\t]*cout)
cout
cout << "no
tab";
cout
cout <<
"tab";
(l*;)$
l;
a-ct; a =
battLvl;
;
b-ct;
Using the Find String in the Replace String
Use the & operator to incorporate matching text into a replacement string. The IDE
substitutes the matching text for the & operator. Use \& to indicate a literal ampersand in
the replacement string.
Table 11.11 on page 125 shows examples of using the find string in the replace string of
regular expressions.
.
Table 11.11 Examples of using the find string in the replace string
Find string
Replace string
Matching text
After replacement
var[0-9]
my_&
var1
my_var1
tgt
\&target
tgt
&target
Remembering Sub-expressions
Use the \n construct to recall sub-expressions from the find string in the replacement
string. The digit n ranges from 1 to 9 and represents the nth sub-expression in the find
string, counting from left to right. Enclose each sub-expression in parentheses.
Consider these sample definitions:
• Find string: \#define[ \t]+(.+)[ \t]+([0-9]+);
• Replace string: const int \1 = \2;
• Sub-expression \1: (.+)
• Sub-expression \2: ([0-9]+)
8/16-bit IDE User’s Guide
125
Finding and Replacing Text
Comparing Files and Folders
These definitions show a replacement operation that recalls two sub-expressions. Table
11.12 on page 126 shows the result of applying these sample definitions to some text.
Table 11.12 Remembering sub-expressions
Before replacement
\1
matches
this text
\2
matches
this text
After replacement
#define var1 10;
var1
10
const int var1 = 10;
#define a 100;
a
100
const int a = 100;
Comparing Files and Folders
The IDE can compare files or folder contents and graphically show you the differences
between them. You can perform these tasks:
• Compare two files.
• Compare the contents of two folders.
You perform the comparison by specifying a source item and a destination item. You can
apply or unapply the changes in the source item to the destination item.
Comparison Setup
You use the Compare Files Setup window to enter information about the files or folders
that you want to compare. Figure 11.9 on page 127 shows the Compare Files Setup
window. Table 11.13 on page 127 explains items in the window.
126
8/16-bit IDE User’s Guide
Finding and Replacing Text
Comparing Files and Folders
Figure 11.9 Compare Files Setup window
Table 11.13 Compare Files Setup window—items
Item
Explanation
Source box
Click the Choose button to specify the source file or folder for the
comparison, or drag and drop a file or folder into the box. Click the
selector to the left of the Choose button to specify a file in an open editor
window.
Destination
box
Click the Choose button to specify the destination file or folder for the
comparison, or drag and drop a file or folder into the box. Click the
selector to the left of the Choose button to specify a file in an open editor
window.
Case
sensitive
checkbox
Check to consider text case during the compare operation.
The comparison distinguishes between a capital letter and the same
letter in lower case.
Clear to disregard text case during the compare operation.
The comparison does not distinguish between a capital letter and the
same letter in lower case.
Ignore extra
space
checkbox
Check to consider extra spaces and tabs during the compare operation.
The comparison distinguishes differences in the number of spaces and
tabs in the compared files.
Clear to disregard extra spaces and tabs during the compare operation.
The comparison does not distinguish differences in the number of
spaces and tabs in the compared files.
8/16-bit IDE User’s Guide
127
Finding and Replacing Text
Comparing Files and Folders
Table 11.13 Compare Files Setup window—items (continued)
Item
Explanation
Only show
different
files
checkbox
Check to have the Folder Compare Results window show only the
differences between the compared folders. The Files in Both Folders
pane stays blank.
Compare
text file
contents
checkbox
Check to identify differences in terms of a byte-by-byte comparison of
the files.
Compare
button
Click to compare the specified files or folders.
Clear to have the Folder Compare Results window show all files from
the compared folders as well as the differences between those folders.
The Files in Both Folders pane shows the common files between the
compared folders.
Clear to identify differences in terms of only the sizes and modification
dates of the files.
Choosing Files to Compare
Use the Compare Files command to specify two files that you want to compare.
1. Click Search > Compare Files.
The Compare Files Setup window appears.
2. Specify a source file for the comparison.
Click the Choose button in the Source box or drag and drop the file into the Source
box. To specify a file in an open editor window, click the selector in
the Source box.
3. Specify a destination file for the comparison.
Click the Choose button in the Destination box or drag and drop the file into the
Destination box. To specify a file in an open editor window, click the selector in the
Destination box.
4. Configure the checkboxes in the Text Compare Options group.
Check the Case sensitive checkbox to distinguish between a capital letter and the same
letter in lower case. Check the Ignore extra space checkbox to disregard extra spaces
or tabs in the files.
128
8/16-bit IDE User’s Guide
Finding and Replacing Text
Comparing Files and Folders
5. Click the Compare button.
The IDE performs the file comparison. The File Compare Results
window appears.
Choosing Folders to Compare
Follow these steps to specify two folders that you want to compare:
1. Click Search > Compare Files.
The Compare Files Setup window appears.
2. Specify a source folder for the comparison.
Click the Choose button in the Source box or drag and drop the folder into the Source
box.
3. Specify a destination folder for the comparison.
Click the Choose button in the Destination box or drag and drop the folder into the
Destination box.
4. Configure the checkboxes in the Text Compare Options group.
These options apply to the files inside the compared folders. Check the
Case sensitive checkbox to distinguish between a capital letter and the same letter in
lower case. Check the Ignore extra space checkbox to disregard extra spaces or tabs
in the files.
5. Configure the checkboxes in the Folder Compare Options group.
These options apply to the contents of the compared folders. Check the
Only show different files checkbox to have the Folder Compare Results window
show only the files that differ between the source folder and destination folder. Check
this option to have the Files in Both Folders pane of the Folder Compare Results
window stay blank.
Check the Compare text file contents checkbox to have the IDE perform a contentbased comparison of the text files in the compared folders. Check this option to have
the Folder Compare Results window show differences in terms of file content instead
of file sizes and modification dates.
6. Click the Compare button.
The IDE performs the folder comparison. The Folder Compare Results
window appears.
CAUTION
8/16-bit IDE User’s Guide
The compare operation ignores folders matching the criteria that you
specify in the Shielded Folders preference panel.
129
Finding and Replacing Text
Comparing Files and Folders
File Comparison
The IDE file-comparison feature identifies additions, changes, and deletions between two
text files. In addition, this feature allows you to apply the differences in the source file to
the destination file.
You can also use this feature to merge changes between two versions of the same text file.
Specify one version of the text file as the source file and the other version of the text file as
the destination file. Then you can apply changes from the source file to the destination file.
The destination file becomes the merged file.
After you use the Compare Files Setup window to specify two files for comparison, click
the Compare button. The File Compare Results window appears. This window shows
the differences between the source file and destination file. You can apply or unapply
those differences to the destination file.
The File Compare Results window shows file differences in the form of highlighted
portions of text. The highlighting tracks with the text as you scroll through the compared
files.
Figure 11.10 on page 130 shows the File Compare Results window. Table 11.14 on
page 131 explains the items in the window.
Figure 11.10 File Compare Results window
130
8/16-bit IDE User’s Guide
Finding and Replacing Text
Comparing Files and Folders
Table 11.14 File Compare Results window—items
Item
Icon
Explanation
Source pane
N/A
Shows the contents of the source file.
You cannot edit the contents of this pane.
Destination pane
N/A
Shows the contents of the destination file.
You can edit the contents of this pane.
Pane resize bar
Drag to resize the Source and
Destination panes.
Apply button
Click to apply the selected Differences
pane items to the destination file.
Unapply button
Click to unapply the selected Differences
pane items from the destination file.
Undo button
Click to undo your last text edit in the
Destination pane.
Redo button
Click to redo your last text edit in the
Destination pane.
Differences
pane
N/A
Shows the differences between the Source
pane and the Destination pane. Select an
item to highlight it in the Source and
Destination panes. Applied items appear in
an italicized font
Applying File Differences
Use the Apply Difference command to apply the selected items in the Differences pane
to the destination file.
NOTE
You cannot alter the source file. You can change the destination file by
applying differences from the source file or by editing the contents of the
Destination pane.
8/16-bit IDE User’s Guide
131
Finding and Replacing Text
Comparing Files and Folders
1. Select the items in the Differences pane that you want to apply to the
destination file.
2. Click Search > Apply Difference or click the Apply button in the File Compare
Results window.
The Destination pane updates to reflect the differences that you applied to the
destination file. The applied items in the Differences pane change to an
italicized font.
TIP
Use the Customize IDE Commands window to assign a key binding to the Apply
Difference command. This way, you can use the keyboard to apply differences.
Unapplying File Differences
Use the Unapply Difference command to unapply the selected items in the Differences
pane from the destination file.
NOTE
You cannot alter the source file. You can change the destination file by
unapplying differences from the source file or by editing the contents of the
Destination pane.
1. Select the items in the Differences pane that you want to unapply from the
destination file.
Items that you can unapply appear in an italicized font.
2. Click Search > Unapply Difference or click the Unapply button in the File
Compare Results window.
The Destination pane updates to reflect the differences that you unapplied from the
destination file. The unapplied items in the Differences pane no longer appear in an
italicized font.
TIP
Use the Customize IDE Commands window to assign a key binding to the
Unapply Difference command. This way, you can use the keyboard to unapply
differences.
Folder Comparison
The IDE folder-comparison feature identifies the differences between the contents of two
folders. It reports the files in both folders, the files only in the source folder, and the files
only in the destination folder.
132
8/16-bit IDE User’s Guide
Finding and Replacing Text
Comparing Files and Folders
You can also use this feature to analyze the differences between two different releases of a
folder of software. Specify one release of the software folder as the source folder and the
other release of the software folder as the destination folder. Then you can analyze the
differences between the source and destination folders.
After you use the Compare Files Setup window to specify two folders for comparison,
click the Compare button. The Folder Compare Results window appears and shows the
differences between the source folder and destination folder.
The Folder Compare Results window shows folder differences in the form of
three panes. Italicized items in these panes indicate non-text files.
Figure 11.11 on page 133 shows the Folder Compare Results window. Table 11.15 on
page 133 explains the items in the window.
Figure 11.11 Folder Compare Results window
Table 11.15 Folder Compare Results window—items
Item
Icon
Explanation
Pane Expand
box
Click to enlarge the pane to fill the window.
Pane
Collapse box
Click to reduce an expanded pane to its
original size.
Pane resize
bar
Drag to resize the panes on either side of the
bar.
8/16-bit IDE User’s Guide
133
Finding and Replacing Text
Comparing Files and Folders
Table 11.15 Folder Compare Results window—items (continued)
Item
Icon
Explanation
Files in Both
Folders pane
N/A
Shows the items that are in both the source
folder and the destination folder. A bullet next
to an item indicates that the item content
differs between the two folders.
Files Only in
Source
pane
N/A
Shows the items that are in the source
folder only.
Files Only in
Destination
pane
N/A
Shows the items that are in the destination
folder only.
Selected
item
group
N/A
Shows file and difference information for the
selected item in the window panes.
Examining Items in the Folder Compare Results Window
You can use the Folder Compare Results window to open text files and compare
file differences.
Double-click a text file to view and change its contents in an editor window.
A file whose contents differ between the source and destination folders has a bullet next to
its name. Double click the file to open a File Comparison Results window. Use this
window to examine the differences between the file contents.
134
8/16-bit IDE User’s Guide
IV
Browser
This section contains these chapters:
• Using the Browser on page 137
• Using Class Browser Windows on page 143
• Using Other Browser Windows on page 155
• Using Browser Wizards on page 163
8/16-bit IDE User’s Guide
135
136
8/16-bit IDE User’s Guide
12
Using the Browser
This chapter explains how to work with the browser in the CodeWarrior™ IDE. Use the
browser to perform these tasks:
• Generate a browser database—the browser stores collected symbol information in a
browser database for the project. You can generate browser data from the compiler
or the language parser.
• Collect symbol information—symbols include functions, variables, and objects.
Enable the browser to collect information about the symbols in a project.
Read this chapter to learn more about typical tasks for working with the browser.
This chapter contains these sections:
• “Browser Database” on page 137
• “Browser Symbols” on page 140
Browser Database
The browser database contains information about symbols in a program, which include
(depending on program language) global variables, functions, classes, and type
declarations, among others.
Some IDE windows require that the project contain a browser database. For example, the
Class Hierarchy window only displays information for a project that contains a browser
database. This section explains how to configure a project to generate its browser
database.
NOTE
Generating a browser database increases the project’s size. To minimize the
project’s size, generate the browser database only for targets you frequently
use.
Browser Data
Browser data contains symbolic and relationship information about the project code. The
browser uses this data to access the code information.
8/16-bit IDE User’s Guide
137
Using the Browser
Browser Database
Use the Generate Browser Data From menu (Figure 12.1 on page 138) in the Build
Extras target settings panel to enable and disable browser data generation. This dropdown menu provides these options, which determine how the IDE generates browser data:
• None—The IDE does not generate browser data. Use None to disable browser data.
Select None to generate faster compiles (with no browser features).
• Compiler—The Compiler generates the browser data. While it compiles more
slowly, the compiler generates the most accurate browser data.
• Language Parser—The Code Completion plug-in associated with the project’s
programming language generates the browser data.
Figure 12.1 Generate Browser Data From menu
Generating Browser Data
You can select an option in the Generate Browser Data From drop-down menu to
establish what the IDE uses to generate browser data for a project file.
To generate browser data, follow these steps:
1. Choose Edit > Target Settings.
2. From the Target Settings Panels list, select Build Extras.
3. Choose Compiler or Language Parser from the Generate Browser Data From
menu.
NOTE
Some compilers do not generate browser data.
a. Compiler—The compiler generates browser data and the following associated
item appears.
If you enable Dump internal browse information after compile, the generated
browser data appears in a log window after you compile a file.
138
8/16-bit IDE User’s Guide
Using the Browser
Browser Database
b. Language Parser—The Code Completion plug-in associated with the project’s
programming language generates the browser data. Browser data and the #include
pop-up window update as you edit.
NOTE
Choose Language Parser for C/C++ code completion.
The Prefix and Macro files (Figure 12.2 on page 139) are applicable to C/C++
Code Completion.
Figure 12.2 Generate browser data from language parser
• Prefix file—Similar to that used in the C/C++ Language Settings panel, the
Prefix file contains header files that help the C/C++ Code Completion plug-in
parse code. The Prefix file should only include text files (not pre-compiled
header files).
• Macro file—Contains C/C++ macro files that help the Code Completion plug-in
resolve any #ifdefs found in the source code or in the header files.
4. If you selected Compiler, choose Project > Bring Up To Date or Make.
The IDE generates browser data for the project.
If you selected Language Parser, the IDE generates browser data in the background.
Disabling Browser Data
Select None to disable browser data and stop the IDE from generating browser
information for the project.
1. Choose Edit > Target Settings.
2. Select Build Extras from the Target Settings Panels list.
3. In the Generate Browser Data From drop-down menu, select None.
4. Click Save.
5. Choose Project > Make.
The IDE stops generating browser information.
8/16-bit IDE User’s Guide
139
Using the Browser
Browser Symbols
Browser Symbols
Navigate browser symbols to open browser views, find symbol definitions, and examine
inheritance.
You can navigate browser symbols in these ways:
• Use the Browser contextual menu to open various browser windows for a selected
symbol.
• Double-click a symbol name in the Class Browser window to open the file that
contains the declaration of that symbol.
• Use the class hierarchy windows to determine the ancestors or descendants of a
selected symbol.
Browser Contextual Menu
Use the IDE’s browser contextual menu to enhance source-code editing in the IDE. Use
this menu to streamline text entry in editor windows. You can enter the first few letters of
a function name, then use the browser contextual menu to complete the entry.
Using the Browser Contextual Menu
1. Open the browser contextual menu, as explained in Table 12.1 on page 140.
Table 12.1 Opening a browser contextual menu
On this host...
Do this...
Windows
Right-click a symbol name.
2. Select a command from the contextual menu.
Identifying Symbols in the Browser Database
As a shortcut, you can use browser coloring to help recognize if a symbol resides in the
browser database. When you activate a browser, you can see browser-database symbols
because they appear in the editor and browser windows according to the colors you select.
TIP
140
The default color setting is identical for all eight types of browser-database
symbols. You can choose a different color for each symbol type.
8/16-bit IDE User’s Guide
Using the Browser
Browser Symbols
To change the browser symbol colors the editor uses, follow these steps:
1. Choose Edit > Preferences.
2. Select the Text Colors panel from the IDE Preference Panels list.
3. Select the Activate Syntax Coloring option.
4. Select the Activate Browser Coloring option.
5. Click the color swatch next to the symbol name to set that symbol's color.
6. Click Save.
8/16-bit IDE User’s Guide
141
Using the Browser
Browser Symbols
142
8/16-bit IDE User’s Guide
13
Using Class Browser
Windows
This chapter explains how to work with the Class Browser windows in the CodeWarrior™
IDE. Use the Class Browser to perform these tasks:
• View browser data—the class browser collects information about the elements of a
computer program. Such elements include functions, variables, and classes. The
class browser displays these elements in organized lists.
• Show data relationships—the class browser shows the relationships between classes,
data members, and methods. The class browser also updates the display to reflect
changes in class scope.
Read this chapter to learn more about typical tasks for working with Class Browser
windows.
This chapter contains these sections:
• “Class Browser window” on page 143
• “Classes pane” on page 149
• “Member Functions pane” on page 151
• “Data Members pane” on page 151
• “Source pane” on page 152
• “Status Area” on page 153
Class Browser window
Use the Class Browser window to view information about the elements of a computer
program. This section explains how to use the Class Browser window to view browser
data.
Figure 13.1 on page 144 shows the Class Browser window. Table 13.1 on page 144
explains the items in the window. Table 13.2 on page 146 explains the options in the
Browser Access Filters list box.
8/16-bit IDE User’s Guide
143
Using Class Browser Windows
Class Browser window
Figure 13.1 Class Browser window
Table 13.1 Class Browser window—items
Item
144
Icon
Explanation
Go Back button
Click to return to the preceding
browser view.
Go Forward
button
Click to move to the succeeding
browser view.
Browser
Contents
button
Click to open the Browser Contents
window.
Class
Hierarchy
button
Click to open the Multi-class Hierarchy
window.
Single Class
Hierarchy
Window button
Click to open the Single-class
Hierarchy window for the selected
class.
Browser
Access Filters
list box
Select filters for displaying items in
class-browser panes.
8/16-bit IDE User’s Guide
Using Class Browser Windows
Class Browser window
Table 13.1 Class Browser window—items (continued)
Item
Icon
Explanation
Show Inherited
Select to show inherited items in the
Member Functions pane on page 151
and Data Members pane on page 151.
Clear to hide inherited items from
these panes.
Classes
pane on
page 149
Lists all classes in the project browser
database.
Member
Functions
pane on
page 151
Lists all member functions defined in
the currently selected class.
Data Members
pane on
page 151
Lists all data members defined in the
selected class.
Source
pane on
page 152
Displays source code for the currently
selected item.
Status Area on
page 153
Displays various status messages and
other information.
Display toggle
buttons
Alphabetical
Toggles the Classes display between
alphabetical and hierarchical listings.
Hierarchical
New Item
button
Opens wizards to create new items
(e.g., classes, data members, member
functions).
Pane Expand
box
Expands the pane to the width of the
full window.
Pane Collapse
Box
Collapses the pane to its original size.
Classes Pane
button
Lists all classes in the project browser
database.
8/16-bit IDE User’s Guide
145
Using Class Browser Windows
Class Browser window
Table 13.1 Class Browser window—items (continued)
Item
Icon
Explanation
Class
Declaration
button
Opens a window that shows
declarations for all classes in the
project.
Open File
button
Opens the current source file in a new
editor window.
VCS list pop-up
With a version control system enabled,
choose the version-control command
to execute on the displayed source file.
Table 13.2 Browser access filters
Filter
Icon
Show items with this access:
Public
Private
Protected
View as implementor
•
•
•
View as subclass
•
View as user
•
Show public
•
•
Show protected
Show private
•
•
Viewing Class Data from Browser Contents Window
To view class data for a project in the Browser Contents window, follow these steps:
146
8/16-bit IDE User’s Guide
Using Class Browser Windows
Class Browser window
1. Open the Browser Contents window, as explained in Table 13.3 on page 147.
Table 13.3 Opening the Browser Contents window
On this host…
Do this…
Windows
Select View > Browser Contents.
2. Select a class in the Browser Contents window.
3. Open a contextual menu for the selected class, as explained in Table 13.4 on page 147.
Table 13.4 Opening a contextual menu for the selected class
On this host…
Do this…
Windows
Right-click the selected class.
A contextual menu like the one shown in Figure 13.2 on page 147 appears.
Figure 13.2 Browser Contents window—contextual menu
4. Select Open browser for class classname from the contextual menu.
The classname is the name of the class that you selected.
A Class Browser window appears.
8/16-bit IDE User’s Guide
147
Using Class Browser Windows
Class Browser window
Viewing Class Data from Hierarchy Windows
To view class data from a hierarchy window, follow these steps:
1. Open a Single-Hierarchy or Multi-Class Hierarchy window:
a. Click the Single Class Hierarchy Window button
in the browser toolbar,
or
b. Click the Class Hierarchy button
in the browser toolbar.
2. In the Single- or Multi-Class Hierarchy window, double-click a class name.
A Class Browser window appears.
Expanding Browser Panes
Click the Pane Expand box (just above the scroll bar in the upper right-hand corner of the
pane) to expand the Classes, Function Members, Data Members, or Source panes in a
Browser window.
1. Click the Pane Expand box
to expand a pane.
This pane expands to fill the Browser window.
2. Use the enlarged pane to view data.
Alternately, you can use the resize bar between the panes to enlarge each pane.
1. Rest the cursor over the resize bar.
The cursor icon changes to this:
2. Hold down the mouse button.
3. Drag the resize bar to enlarge or shrink the pane.
Collapsing Browser Panes
Click the Pane Collapse box (just above the scroll bar in the upper right-hand corner of
the pane) to collapse the Classes, Function Members, Data Members, or Source panes in a
Browser window.
1. Click the Pane Collapse box
to collapse a pane.
The chosen pane collapses to its original size.
148
8/16-bit IDE User’s Guide
Using Class Browser Windows
Classes pane
2. You can now view other panes in a Browser window.
Alternately, you can use the resize bar between the panes to collapse each pane.
1. Rest the cursor over the resize bar.
The cursor icon changes to this:
2. Hold down the mouse button.
3. Drag the resize bar to collapse the pane.
Classes pane
Use the Classes pane to perform these tasks:
• Create a new class
• Toggle viewing of classes
• Sort classes
Figure 13.1 on page 144 shows the Classes pane. Table 13.5 on page 149 explains the
items in
the pane.
Table 13.5 Classes pane—items
Item
Icon
Explanation
New Item
Click to create a new class using the New Class Wizard.
Sort
Alphabetical
Click to sort the Classes list in alphabetical order.
Sort
Hierarchical
Click to sort the Classes list in hierarchical order.
Creating a New Class
Use the New Class wizard to specify the name, declaration, and location for a new class.
Click Finish in any screen to apply default values to any remaining parameters and
complete the process. The New Class wizard creates the files that define the class.
8/16-bit IDE User’s Guide
149
Using Class Browser Windows
Classes pane
1. From the Classes pane, click the New Item button
.
2. Enter the Name and Location in the New Class window.
3. To create a more complex class, click Next (optional).
Follow the on-screen directions to further define the class.
4. Click Finish to complete the New Class process.
Showing the Classes Pane
Use the Show Classes button to expand the Classes pane.
1. Click the Show Classes button:
2. The Classes pane appears in the Class Browser window.
Hiding the Classes Pane
Use the Hide Classes button to collapse the Classes pane.
1. Click the Hide Classes button:
2. The Classes pane disappears from the Class Browser window.
Sorting the Classes List
Use the Sort Alphabetical and Sort Hierarchical commands to specify the sort order of
classes in the Classes pane. The displayed icon always represents the alternate sort order.
For example, when the Classes list appears in alphabetical order, the Sort Hierarchical
icon is visible.
• Click the Sort Alphabetical icon
.
The IDE sorts the Classes list in alphabetical order.
• Click the Sort Hierarchical icon
.
The IDE sorts the Classes list in hierarchical order.
150
8/16-bit IDE User’s Guide
Using Class Browser Windows
Member Functions pane
Member Functions pane
Use the Member Functions pane to perform these tasks:
• Create a new member function
• Determine the inheritance type of a member function
Table 13.6 Member Function and Data Member identifier icons
Meaning
Icon
The member is…
static
a static member
virtual
a virtual function that can be overridden, or an override
of an inherited function
pure virtual
or abstract
a member function that must be overridden in a
subclass to create instances of that subclass
Creating a New Member Function
Use the New Member Function wizard to specify the name, return type, and parameters
for a new member function. Click Finish in any screen to apply default values to any
remaining parameters and complete the process.
1. Click the New Item button
in the Member Functions pane.
2. Enter the Member Function Declarations in the New Member Function window.
3. Click Next.
4. Enter Member function file locations and Include Files information.
5. Click Finish.
6. Review the settings summary, then click Generate.
The IDE adds the new member function to the class declaration.
Data Members pane
Use the Data Members pane to create a new data member. This section explains how to
create the data member.
8/16-bit IDE User’s Guide
151
Using Class Browser Windows
Source pane
Click the New Item button in the Data Members pane to open the New Data Member
wizard. See Table 13.6 on page 151 for a complete list of identifier icons that appear in the
Data Members pane.
Creating a New Data Member
Use the New Data Member wizard to specify the name, type, and initializer for the new
data member. Specify other options to further refine the data member. Click Finish in any
screen to apply default values to any remaining parameters and complete the process.
1. From the Data Members pane, click the New Item button:
2. Enter the Data Member Declarations in the New Data Member window.
3. Click Next.
4. Enter Data Member file locations and #include files information.
5. Click Finish.
6. Review the settings summary, then click Generate.
The IDE adds the new data member to the class declaration.
Source pane
Use the Source pane to view the source code that corresponds to the selected class,
member function, or data member. This section explains the items in the
Source pane.
Figure 13.1 on page 144 shows the Source pane. Table 13.7 on page 152 explains the
items in
the pane.
For information on editing source code, see “Editing Source Code” on page 81.
Table 13.7 Source pane—items
Item
152
Icon
Explanation
Open File
Click to open the current source file in a new editor window.
VCS menu
Enable a version-control system in order to activate this
menu. Use this menu to select and execute a versioncontrol command on the source file.
8/16-bit IDE User’s Guide
Using Class Browser Windows
Status Area
Status Area
Use the status area to perform these tasks:
• Toggle viewing of the Classes pane
• View class declarations
• View classes according to public, private, or protected access
Figure 13.1 on page 144 shows the status area. Table 13.8 on page 153 explains items in
the status area.
Table 13.8 Status area—items
Item
Icon
Explanation
Show Classes Pane
Click to display the Classes pane in the Class
Browser window.
Hide Classes Pane
Click to hide the Classes pane in the Class
Browser window.
Class Declaration
Click to show the declaration of the
current class.
Access Filter Display
Displays the access state of the current class.
8/16-bit IDE User’s Guide
153
Using Class Browser Windows
Status Area
154
8/16-bit IDE User’s Guide
14
Using Other Browser
Windows
This chapter explains how to work with the Class Hierarchy windows in the
CodeWarrior™ IDE. Use Class Hierarchy windows to perform these tasks:
• View hierarchical browser data—the class hierarchy window shows a graphical
representation of hierarchical structure. Object-oriented languages, such as C++ and
Java, allow hierarchical relationships between classes.
• Analyze inheritance structure—the class hierarchy window shows the inheritance
structure of classes. This structure reveals the data-handling capabilities of a
particular class.
Read this chapter to learn more about typical tasks for working with Class Hierarchy
windows.
This chapter contains these sections:
• on page 158“Multiple-Class Hierarchy Window” on page 155
• “Single-Class Hierarchy Window” on page 158
• “Browser Contents window” on page 159
• “Symbols window” on page 160
Multiple-Class Hierarchy Window
Use the Multi-Class Hierarchy window to visually examine the structure of every class in
the browser database. Each class name appears in a box, and lines connect boxes to
indicate related classes. The left-most box is the base class, and subclasses appear to the
right.
Figure 14.1 on page 156 shows the Multi-Class Hierarchy window. Table 14.1 on
page 156 explains the items in the window.
8/16-bit IDE User’s Guide
155
Using Other Browser Windows
Multiple-Class Hierarchy Window
Figure 14.1 Multi-Class Hierarchy window
Table 14.1 Multi-class hierarchy window—items
Item
Icon
Explanation
Hierarchy Control
Click to expand or collapse the subclasses
displayed for a specific class.
Ancestor menu
Click and hold on class or subclass box to display a
menu. Select a class from menu to display that
class.
Line button
Click to toggle the lines that connect classes
between diagonal and straight lines.
Viewing Browser Data by Inheritance
Use a Hierarchy window to view data in graphical form and better understand class
relationships. Use the expand and collapse arrows to enlarge or shrink the class views.
156
8/16-bit IDE User’s Guide
Using Other Browser Windows
Multiple-Class Hierarchy Window
1. Activate the browser.
2. Update the browser database by using the Bring Up To Date, Make, Run, or Debug
command.
3. Open a graphical Hierarchy window, as explained in Table 14.2 on page 157.
Table 14.2 Opening the Hierarchy window
On this host…
Do this…
Windows
Select View > Class Hierarchy
Printing Class Hierarchies
To print the contents of a Class Hierarchy window, save an image of the window
contents, then print the image file from a graphics-processing application. The IDE saves
the image in the EMF (Enhanced Metafile) graphics-file format.
1. Open the Class Hierarchy window.
2. Choose File > Save a Copy As.
3. Save the image to a file.
4. Open the image file in an graphics-processing application.
5. Print the image file.
The graphics-processing application prints the image of the class hierarchy.
Changing Line Views in a Hierarchical Window
Use the Diagonal Line and Straight Line commands to change the appearance of the
connecting lines between classes and subclasses in a hierarchical window display.
• Click the Diagonal Line icon
.
The Hierarchical window display updates to use diagonal lines.
• Click the Straight Line icon
.
The Hierarchical window display updates to use straight lines.
8/16-bit IDE User’s Guide
157
Using Other Browser Windows
Single-Class Hierarchy Window
Single-Class Hierarchy Window
Use the Single-Class Hierarchy window to examine the structure of a single class in the
browser database. The Single-Class Hierarchy window operates identically to the MultiClass Hierarchy window, but restricts the display to a single class.
The Single-Class Hierarchy window contains the same components as the Multi-Class
Hierarchy window.
Figure 14.2 Single-Class Hierarchy window
Opening a Single-Class Hierarchical window
Use one of these methods to open a Single-Class Hierarchical window:
• Click the Show Single-Class Hierarchy icon
in a Browser toolbar.
• Use the Browser Contextual menu in one of these windows:
– New Class Browser window
– Browser Contents window
– Multi-Class Hierarchical window
A Single-Class Hierarchical window appears
158
8/16-bit IDE User’s Guide
Using Other Browser Windows
Browser Contents window
Browser Contents window
Use the Browser Contents window to view browser data sorted by category into an
alphabetical list. This section explains how to use the Browser Contents window to view
browser data.
Figure 14.3 on page 159 shows the Browser Contents window. Table 14.3 on page 159
explains the items in the window.
Figure 14.3 Browser Contents window
Table 14.3 Browser Contents window—items
Item
Icon
Explanation
Symbols list box
Select the type of symbol to display
in the Symbols list.
Symbols list
Double-click a symbol name to
display the source file in a new editor
window that defines the symbol.
8/16-bit IDE User’s Guide
159
Using Other Browser Windows
Symbols window
Viewing Browser Data by Contents
Use the Browser Contents window to display symbol information stored in the browser
database, listed in alphabetical order. You can choose from these categories:
• classes
• constants
• enumerations
• functions
• global variables
• macros
• function templates
• type definitions
1. Activate the browser.
2. Use the Bring Up To Date, Make, Run, or Debug command to update the browser
database.
3. Select View > Browser Contents to open the Browser Contents window.
4. Select a category from the Category list pop-up.
The symbol information for the selected category appears in alphabetical order in the
Symbols list.
Symbols window
The Symbols window displays information from project browser databases. With the
browser enabled, the IDE generates a browser database for a project during the build
process.
The Symbols window displays symbols that have multiple definitions in the browser
database. For example, the window displays information about multiple versions of
overridden functions in object-oriented code.
Figure 14.4 on page 161 shows the Symbols window.
160
8/16-bit IDE User’s Guide
Using Other Browser Windows
Symbols window
Figure 14.4 Symbols window
Table 14.4 Symbols window—items
Item
Explanation
Symbols
toolbar on
page 162
Provides one-click access to common browser commands and
class-filtering commands.
Symbols pane on
page 162
Displays a list of all symbols with multiple declarations.
Source pane on
page 162
Displays the source code for the currently selected item.
Opening the Symbols Window
Use the Symbols window to list all implementations, whether overridden or not, of any
symbol that has multiple definitions. You can access the Symbols window by using a
contextual menu.
8/16-bit IDE User’s Guide
161
Using Other Browser Windows
Symbols window
1. Right-click the symbol name to open a contextual menu.
2. Select Find all implementations of from the contextual menu that appears.
3. The Symbols window opens.
Symbols toolbar
Most of the Symbol toolbar items are identical to those in the Class Browser window on
page 143.
Symbols pane
The Symbols pane lists symbols with multiple definitions in the browser database. Select
a symbol from the list to view its definition in the Source pane.
Source pane
The Source pane used in the Symbols window is identical to the one used by the Class
Browser window on page 143. See “Source pane” on page 152 for more details.
162
8/16-bit IDE User’s Guide
15
Using Browser Wizards
When you create a new class, member function, or data member in the IDE, you use
browser wizards. These wizards provide the steps to help you complete the process.
This chapter provides information on these wizards:
• “The New Class Wizard” on page 163
• “The New Member Function Wizard” on page 168
• “The New Data Member Wizard” on page 169
NOTE
Most wizard pages contain default settings. To accept all current settings in the
wizard, click Finish in any screen. The wizard displays a summary of all
current settings for the new project. Click Generate to accept the current
settings and create the new item, or click Cancel to return to the wizard to
modify settings.
The New Class Wizard
Use the New Class wizard to specify the name, declaration, and location for a new class.
Click Finish in any screen to apply default values to remaining parameters to complete the
process. The New Class wizard creates the files that define the class.
8/16-bit IDE User’s Guide
163
Using Browser Wizards
The New Class Wizard
Figure 15.1 New Class wizard—Name and Location
Using the New Class Wizard
To use the New Class Wizard, follow these steps:
1. Select View > Class Browser to open the Class Browser window.
2. Select Browser > New Class.
NOTE
You can also click the New Item icon
create a new class.
in the Class Browser window to
3. In the New C++ Class wizard, enter Name and Location information:
164
8/16-bit IDE User’s Guide
Using Browser Wizards
The New Class Wizard
a. Class Name—Enter a name for the class in this field.
b. Declaration File—This menu lets you specify whether the file is a New File,
which is a new declaration file, or Relative to class, which is a declaration that
depends on an existing file in the project.
If you choose the New File option, type in the path where you want to save the file.
Alternatively, click Set next to the field to choose the path in which to save the file.
If you choose the Relative to class option, select Before or After to establish the
order of the new class in relation to existing classes. In the field next to the Before
and After drop-down selection, type the name of the class you want to relate to the
new class. Alternatively, click Set next to this field, type the name of a class in the
window that opens, and then click Select.
NOTE
If you want to use a separate file to define the members of the new class, type
the path to the separate file in the field below the Use separate file for
member definitions checkbox. Alternatively, choose Existing to use a
standard dialog box to select the file. To create a new, separate file, choose
New and save the new file to a location on your hard disk.
4. Click Next.
Figure 15.2 New Class wizard—Base Class and Methods
8/16-bit IDE User’s Guide
165
Using Browser Wizards
The New Class Wizard
5. Enter Base Classes and Methods information.
Enter a list of base classes for the new class:
a. Access—From this drop-down menu, choose an access type, Public, Protected, or
Private, for the constructor and destructor.
b. Constructor parameters—Enter a list of parameters for the constructor.
c. Virtual destructor—Click this checkbox to create a virtual destructor for the new
class.
d. As an option, you can enter the required namespaces for the base classes and the
constructor parameters in the field labeled Namespaces required for the base
classes and constructor parameters.
Or,
If needed, you can specify the base classes and constructor parameters.
6. Click Next.
Figure 15.3 New Class wizard—Include Files
7. Enter Include Files information.
Specify additional header #include files for the new class:
166
8/16-bit IDE User’s Guide
Using Browser Wizards
The New Class Wizard
a. Include files that will automatically be added for base classes—This field
shows you a list of #include files that the IDE automatically adds to find the base
classes.
b. Additional header include files—Enter a list of other include files for the new
class in addition to those in the previous field. Separate each file in the list with a
comma.
8. Click Next.
Figure 15.4 New Class wizard—Targets
9. Enter Targets information:
Select the checkbox next to the build target’s name in the list to add the class files to a
specific build target.
10. Click Finish.
Review the settings summary.
11. Click Generate.
8/16-bit IDE User’s Guide
167
Using Browser Wizards
The New Member Function Wizard
The New Member Function Wizard
Use the New Member Function wizard to specify the name, return type, and parameters
for a new member function. Enter additional information in the wizard fields to refine the
function definition.
Figure 15.5 New Member Function wizard
Using the New Member Function Wizard
To use the New Member Function wizard, follow these steps:
1. Select View > Class Browser to open the Class Browser window.
2. Select Browser > New Member Function.
3. In the New C++ Member Function window, enter the Member Function
Declaration.
a. Name—Type a name for the member function.
b. Return Type—Enter an appropriate function return type.
c. Parameters—Type a list of function parameters.
168
8/16-bit IDE User’s Guide
Using Browser Wizards
The New Data Member Wizard
d. Namespaces required for parameters (optional)—Type a list of namespaces
required for parameters.
4. Click Next.
Figure 15.6 New Member Function wizard—File Locations
5. Enter Member Function File Locations and Include Files information.
6. Click Finish.
7. Review settings summary, then click Generate.
The New Data Member Wizard
Use the New Data Member wizard to define the new data-member declaration, and to
specify new data member file locations. The wizard offers additional options to further
define the function.
8/16-bit IDE User’s Guide
169
Using Browser Wizards
The New Data Member Wizard
Figure 15.7 New Data Member wizard
Using the New Data Member Wizard
To use the New Data Member wizard, follow these steps:
1. Select View > Class Browser to open the Class Browser window.
2. Select Browser > New Data Member.
3. In the New C++ Data Member window, enter the Name, Type, Namespaces
required for type (optional), Initializer, and Modifiers.
a. Name—Type a name for the data member in this field.
b. Type—Enter an appropriate data-member type in this field.
c. Namespaces required for type (optional)—(Optional) Enter a list of namespaces
required for the type in the Type field. A sample namespace
is std.
d. Initializer—(Optional) Enter an initial value for the data member in this field.
Sample initializers are 100 and inConstructorParameterName.
e. Modifiers—Select the access level and type for the new data member.
4. Click Next.
170
8/16-bit IDE User’s Guide
Using Browser Wizards
The New Data Member Wizard
5. Specify Data Member File Locations.
This section lets you specify file locations associated with the new member functions,
including these fields: Declaration, Definition, Include file automatically added for
member type, and Additional header include files.
a. Declaration—This field shows you the data member’s declaration file location.
b. Definition—This field is not available in this wizard.
c. Include file automatically added for member type—This field indicates whether
an include file will be automatically added for the data-member type.
d. Additional header include files—Enter in this field a list of other include files for
the new data member, in addition to the file listed in the previous field. Example
files are <string> and YourHeader.h.
6. Click Finish.
7. Review settings summary, then click Generate.
8/16-bit IDE User’s Guide
171
Using Browser Wizards
The New Data Member Wizard
172
8/16-bit IDE User’s Guide
V
Compilers and Linkers
This section contains these chapters:
• Compilers on page 175
• Linkers on page 179
8/16-bit IDE User’s Guide
173
174
8/16-bit IDE User’s Guide
16
Compilers
This chapter explains how to work with compilers in the CodeWarrior™ IDE. The IDE
uses compilers to complete these tasks:
• Generate object code—the compiler translates source code into object code. Sample
source code includes C++ files and Java files. Object code represents the same
source instructions in a language that the computer directly understands.
• Flag syntax errors—the compiler highlights source code that generates syntax errors.
Syntax errors result from failing to follow valid structure in a programming
language. In C++, a common syntax error is forgetting to end a statement with a
semicolon.
Read this chapter to learn more about typical tasks for working with compilers.
This chapter contains these sections:
• Choosing a Compiler on page 175
• Compiling Projects on page 175
Choosing a Compiler
Choose a compiler to determine how the IDE interprets source code. The IDE uses a plugin compiler architecture. This architecture provides these features:
• Modularity—the IDE associates a specific compiler plug-in with a particular
programming language or environment. For example, a compiler plug-in exists for
C++ source code, and another compiler plug-in exists for Java source code.
• Flexibility—as new programming languages develop, the IDE can use new compiler
plug-ins.
The IDE associates common filename extensions with various plug-in compilers. For
example, most Java files have the filename extension .java. The IDE associates these
files with the Java compiler. The File Mappings panel provides control over such
associations.
Compiling Projects
Compile projects to process the source files that comprise a program and generate object
code. The compiler flags syntax errors in the source files.
8/16-bit IDE User’s Guide
175
Compilers
Compiling Projects
Use these tasks to compile projects:
• Compile source files.
• Set the build order or link order.
• Update a project or its files.
• Create an executable file from a project.
• Run an application created from the project.
• Remove object code.
This section explains how to perform each task.
Compiling Source Files
Use the Compile commands to compile source files into binary files. The IDE can
compile a single file, multiple files, or all files in an open project.
1. Enable the Project window that contains the desired files to be compiled.
2. Select one or more files.
3. Choose Project > Compile.
The IDE compiles the selected files.
NOTE
The Project menu contains most commands for compiling and linking
projects. However, depending on the project type, some commands might be
disabled or renamed.
Setting the Build and Link Order of Files
Use the Link Order view in the Project window to specify the order in which the
compiler and linker process files. Establishing the proper link order prevents link errors
caused by file dependencies. The Link Order view is sometimes called the Segments
view or Overlays view, depending on the target.
1. Click the Link Order tab in a Project window.
2. Click and drag files into the desired link order.
The IDE changes the link order. The build begins at the top of the link order, processes
each file, and concludes at the bottom of the link order.
NOTE
176
The IDE uses the new link order during subsequent Update, Make, Run, and
Debug operations.
8/16-bit IDE User’s Guide
Compilers
Compiling Projects
Updating Projects
Use the Bring Up To Date command to compile, but not link, the newly added, modified,
and touched files in a project. Unlike the Make and Run commands, the Bring Up To
Date command does not produce a binary file.
1. Select the project to update.
2. Choose Project > Bring Up To Date.
The IDE compiles all uncompiled project files.
Making Executable Files
Use the Make command to compile the newly-added, modified, and touched files in a
project, then link them into a binary file. Unlike the Run command, the Make command
does not execute the binary file. The Make command is useful for creating dynamic link
libraries (DLLs), shared libraries, code resources, or tools.
1. Select the project to make.
2. Choose Project > Make.
The IDE processes the project and creates a binary file.
Running Application Projects
Use the Run command to perform these tasks:
• Compile and link a project (if necessary).
• Create a standalone application.
• Change project settings (if required).
• Save the application.
• Run the application.
Note, the Run command is not available if the project creates a non-executable file like a
dynamic linked library (DLL), shared library, library, code resource, or tool.
1. Select the project to run.
2. Choose Project > Run.
8/16-bit IDE User’s Guide
177
Compilers
Compiling Projects
Synchronizing File Modification Dates
Use the Synchronize Modification Dates command to update the modification dates of
all files stored in a project. This command is useful for handling files from a third-party
editor that does not share file-status information with the IDE.
1. Select the project window.
2. Choose Project > Synchronize Modification Dates.
The IDE checks the file-modification dates and marks modified files for recompilation.
Removing Object Code
Use the Remove Object Code command to remove binary object code stored in the
project file and reduce project size.
1. Open the desired project.
2. Choose Project > Remove Object Code.
3. Set compaction options as desired.
• Select Recurse subprojects to remove object code from all subprojects in the
project file.
• Select Compact targets to remove these items:
Target data files with the .tdt extension.
Browser data.
Dependency information.
Additional data cached by the IDE.
4. Select the method by which the IDE removes the object code.
• Click All Targets to remove object code from all build targets.
• Click Current Target to remove object code only from the active build target.
The IDE removes the specified object code from the project.
178
8/16-bit IDE User’s Guide
17
Linkers
This chapter explains how to work with linkers in the CodeWarrior™ IDE. The IDE uses
linkers to complete these tasks:
• Combine code—the linker combines source-file object code with object code from
library files and other related files. The combined code represents a complete
computer program.
• Create a binary file—the linker processes the complete program and generates a
binary file. Sample binary files include applications and shared libraries.
Read this chapter to learn more about typical tasks for working with linkers.
This chapter contains these sections:
• Choosing Linkers on page 179
• Linking Projects on page 180
Choosing Linkers
Choose a linker to determine the binary file type produced by the IDE. This list describes
common binary files:
• Applications—applications, or executable files, represent a wide body of computer
programs. Common applications include word processors, web browsers, and
multimedia players.
• Libraries—libraries contain code for use in developing new computer programs.
Libraries simplify programming tasks and enhance re-usability.
• Specialized files—files designed for highly efficient operation in a specific context.
Such files usually support a particular combination of hardware and software to
perform tasks.
The IDE provides various linkers for software development. The Target Settings panel
contains an option for selecting a linker. The IDE maps to each linker a group of
recognized filename extensions. These mappings determine how the IDE interprets each
file.
8/16-bit IDE User’s Guide
179
Linkers
Linking Projects
Linking Projects
Link projects to process object code and generate a binary file. Refer to the CodeWarrior
Targeting documentation for more information about linkers for specific computer
systems. This section explains general-purpose linker tasks.
Generating Project Link Maps
Use the Generate Link Map command to create a link-map file that contains function and
cross-section information about the generated object code. The link map reveals the files,
libraries, and functions ignored by the IDE while producing the binary output.
The IDE stores the link-map file in the project folder. The file uses the same name as the
build target, with a .MAP or .xMAP extension.
1. Select the project window.
2. Choose Edit > targetname Settings...
3. Select the linker panel in the Target Settings Panels list.
4. Select the Generate Link Map option.
5. Click Save.
6. Choose Project > Make.
The IDE generates the link-map file.
180
8/16-bit IDE User’s Guide
VI
Preferences and Target
Settings
This section contains these chapters:
• Customizing the IDE on page 183
• Working with IDE Preferences on page 201
• Working with Target Settings on page 225
• Preference and Target Settings Options on page 239
8/16-bit IDE User’s Guide
181
182
8/16-bit IDE User’s Guide
18
Customizing the IDE
The CodeWarrior™ IDE enables you to customize menus, toolbars, and key bindings to
suit your programming preferences. Use the Customize IDE Commands window—
which consists of the Commands, Toolbar Items, and Key Bindings tabs—to build your
customizations.
This chapter contains these sections:
• “Customizing IDE Commands” on page 183
• “Customize Toolbars” on page 192
• “Customize Key Bindings” on page 196
Customizing IDE Commands
You can customize the menu commands in the IDE’s menu bar, as well as control the
appearance of specific menu commands, create new command groups to distinguish menu
commands, and associate a command line with a new menu command. The customized
menu commands you create have access to IDE information, such as the current editor
selection, the frontmost window, and the current project and its output file.
Select Edit > Commands & Key Bindings to access the Customize IDE Commands
window. Figure 18.1 on page 184 shows the Customize IDE Commands window. Table
18.1 on page 184 explains each button in the window. See the tasks in this chapter for
more detailed information.
8/16-bit IDE User’s Guide
183
Customizing the IDE
Customizing IDE Commands
Figure 18.1 Customize IDE Commands window
Table 18.1 Customize IDE Commands window—button overview
184
Button name
Explanation
New Group
Click to add a new command group to the Commands list.
New Command
Click to add a new command setting within a group.
Factory Settings
Click to restore default options for the current Customize IDE
Commands (Commands and Toolbar Items) lists.
Revert
Click to restore the most recently saved options for the current
Customize IDE Commands (Commands and Toolbar Items)
lists.
Export
Click to save a file that contains commands and key bindings
to use later in the Customize IDE Commands lists.
8/16-bit IDE User’s Guide
Customizing the IDE
Customizing IDE Commands
Table 18.1 Customize IDE Commands window—button overview (continued)
Button name
Explanation
Import
Click to open a file that contains commands and key bindings
to use in the current Customize IDE Commands lists.
Save
Click to save customizations to the Customize IDE
Commands list.
Commands Tab
Click the Commands tab at the top of the Customize IDE Commands window to display
the commands view. Use this view to modify existing menu commands, and to create and
remove command groups and menu commands.
Modifying Existing Commands
You can use the Commands tab of the Customize IDE Commands window to examine
and modify existing command groups and menu commands. This view includes a
Commands list. This hierarchical list organizes individual menu commands into command
groups. Click the hierarchical control next to a command group to expand that group and
view its contents.
To examine a particular item, select it in the Commands list. Information for the selected
item appears on the right-hand side of the Customize IDE Commands window. This
window provides this information for each selected item:
• Name—This field shows the name of the selected item. If the IDE does not permit
you to change the name of the selected items, this field is grayed out.
• Appears in Menus—Enable this checkbox to display the selected item in the
specified position in the CodeWarrior menu bar. For example, enabling this
checkbox for a menu command allows that menu command to appear under the
related command group in the menu bar. Disabling the checkbox prevents the menu
command from appearing in the menu bar under the command group.
• Action—This section shows information about the action the selected item performs.
For default menu commands, this section shows the command type, such as
Command or Hierarchical Menu. For customized menu commands that you create,
this section lets you specify a command line that runs after you choose the
customized menu command.
• Key Bindings—This area consists of the Key Bindings list, the New Binding button,
and the Auto Repeat checkbox.
8/16-bit IDE User’s Guide
185
Customizing the IDE
Customizing IDE Commands
Creating a New Command Group
To create a new command group for menu commands, follow these steps:
1. Click the New Group button.
The IDE creates a new command group called New Group, adds it to the Commands
list, and displays its information in the Customize IDE Commands window.
2. Rename the new command group in the Name field.
3. Use the Appears in Menus checkbox to toggle the availability of the new command
group in the IDE menu bar.
Select the Appears in Menus checkbox to display the new command group in the menu
bar. Clear the checkbox if you do not want the command group to appear in the menu
bar.
4. Click Save.
The IDE saves your new command group. If you selected the Appears in Menus
checkbox, your new command group appears in the menu bar.
Creating a New Menu Command
To create a new menu command, follow these steps:
1. Select the command group you want to contain the new menu command.
You must select an existing command group in the Commands list.
2. Click the New Command button.
The IDE creates a new menu command named New Command and places it within
the selected command group. The information for the new menu command appears in
the Customize IDE Commands window.
3. Enter a name for the new menu command.
You can change the default name of New Command. Enter a new name in the Name
field of the Customize IDE Commands window.
4. Use the Appears in Menus checkbox to toggle the availibility of the new command
within its command group.
5. Define the desired Action for the new menu command.
6. Click Save.
The IDE saves your new menu command. If you enabled the Appears in Menus
checkbox, the new menu command appears within the selected command group.
186
8/16-bit IDE User’s Guide
Customizing the IDE
Customizing IDE Commands
Figure 18.2 Command action fields
Defining Command Actions
These fields help you associate an action with the new menu command:
• Execute—Enter in this field a command to run an application. Alternatively, click
the ellipsis button next to the field to select the application using a standard dialog
box.
• Arguments—Enter the arguments that the IDE must pass to the application specified
in the Execute field. Alternatively, choose the desired arguments from the pop-up
menu next to the field.
• Directory—Enter the working directory the IDE should use when it executes the
application specified in the Execute field. Alternatively, choose the desired directory
from the pop-up menu next to the field.
8/16-bit IDE User’s Guide
187
Customizing the IDE
Customizing IDE Commands
Pre-defined Variables in Command
Definitions
The IDE provides pre-defined variables to associate actions with commands. When you
create a new command, you can use these pre-defined variables in command definitions to
provide additional arguments that the IDE passes to the application (which is specified in
the Execute field).
NOTE
You can use variables that end with Dir as both argument and directory
names.
Figure 18.3 Pre-defined Arguments
188
8/16-bit IDE User’s Guide
Customizing the IDE
Customizing IDE Commands
Figure 18.4 Pre-defined Directory variables
Table 18.2 on page 189 explains the pre-defined variables for command-line arguments.
Table 18.2 Pre-defined variables in command definitions
Variable
Command-line output
%sourceFilePath
sourceFilePath is the frontmost editor window's full path.
%sourceFileDir
sourceFileDir is the frontmost editor window's directory.
%sourceFileName
sourceFileName is the frontmost editor window's filename.
%sourceLineNumber
sourceLineNumber is the line number of the insertion point
in the front window.
%sourceSelection
sourceSelection is the path to a temporary file containing the
currently selected text.
8/16-bit IDE User’s Guide
189
Customizing the IDE
Customizing IDE Commands
Table 18.2 Pre-defined variables in command definitions (continued)
Variable
Command-line output
%sourceSelUpdate
sourceSelUpdate is like sourceSelection, except the IDE
waits for the command to finish and updates the selected text
with the contents of the file.
%projectFilePath
projectFilePath is the full path of the front project window.
%projectFileDir
projectFileDir is the directory of the front project window.
%projectFileName
projectFileName is the filename of the front project window.
%projectSelectedFiles
projectSelectedFiles passes the selected filenames in the
project window.
%targetFilePath
targetFilePath is the full path of the output file of the front
project.
%targetFileDir
targetFileDir is the directory of the output file of the front
project.
%targetFileName
targetFileName is the filename of the output file of the front
project.
%currentTargetName
currentTargetName passes the name of the current target of
the frontmost window.
%symFilePath
symFilePath is the full path to the symbolics file of the front
project (can be the same as targetFile, such as CodeView).
%symFileDir
symFileDir is the full directory to the symbolics file of the
front project (can be the same as targetFile, such as
CodeView)
%symFileName
symFileName is the full filename to the symbolics file of the
front project (can be the same as targetFile, such as
CodeView)
Using a Pre-defined Variable
To use a pre-defined variable, follow these steps:
190
8/16-bit IDE User’s Guide
Customizing the IDE
Customizing IDE Commands
1. Create a new menu command.
The IDE creates a new menu command named New Command and places it within
your selected command group. The information for the new menu command appears
in the Customize IDE Commands window.
2. Enter a name for the new menu command.
3. Use the Appears in Menus checkbox to toggle the availability of the new command
within its command group.
4. Define the Action for the new menu command.
a. Enter in the Execute field a command line to run an application.
b. Next to the Arguments field, click on the arrow icon and select an argument listed
in the pop-up menu.
c. Next to the Directory field, click on the arrow icon and select a directory listed in
the pop-up menu.
5. Click Save.
The IDE saves your new menu command with the pre-defined variables. If you enabled
the Appears in Menus checkbox, the new menu command appears within the selected
command group.
Deleting Command Groups and Menu Commands
You can delete the command groups and menu commands that you create for the IDE.
Once removed, the command groups no longer appear in the IDE’s menu bar, and the
menu commands no longer activate their associated command lines or applications.
NOTE
If you need to temporarily remove your customized command groups and
menu commands, consider exporting your settings. If you export your settings,
you do not need to reconstruct them if you want them in the future.
To delete a command group or menu command, follow these steps:
1. Select the command group or menu command you wish to delete.
If necessary, click the hierarchical control next to a group to expand and view its
contents.
2. Click Delete.
After clicking the Delete button, the selected command group or menu command
disappears from the Commands list.
3. Click Save.
8/16-bit IDE User’s Guide
191
Customizing the IDE
Customize Toolbars
Clicking the Save button confirms the deletion. The IDE removes deleted command
groups from its menu bar. Deleted menu commands disappear from their respective
command groups.
Customize Toolbars
You can customize your IDE toolbars to contain frequently used commands. The IDE
toolbars contain a series of elements. Each element typically represents a menu command.
After you click the element, the IDE executes the associated menu command. The toolbar
can also contain elements that execute actions other than menu commands.
Figure 18.5 Toolbar Items tab
This section explains these topics:
• “Kinds of Toolbars” on page 193
• “Toolbar Elements” on page 193
• “Modify a Toolbar” on page 193
192
8/16-bit IDE User’s Guide
Customizing the IDE
Customize Toolbars
Kinds of Toolbars
The CodeWarrior IDE uses two toolbar types:
• Main toolbar—This toolbar, also known as the floating toolbar, is always available.
• Window toolbars—These toolbars appear in particular windows, such as the Project
window toolbar and the Browser window toolbar.
This distinction is important because you show, hide, clear, and reset the different toolbar
types by using different sets of menu commands. These commands distinguish between
the floating toolbar and the other window toolbars.
When you change one of these toolbar types, that change applies to every instance of that
toolbar type you subsequently create. For example, if you modify the toolbar in an editor
window, your changes appear in all editor windows opened thereafter.
Figure 18.6 Main toolbar
Figure 18.7 Project window toolbar
Toolbar Elements
A toolbar can contain these elements:
• Commands—buttons that you click to execute IDE menu commands
• Controls—menus, such as Document Settings, Functions, Header Files, Markers,
Version Control, and Current Target
• Miscellaneous—other elements, such as the File Dirty Indicator and File Path field
Click the Toolbar Items tab at the top of the Customize IDE Commands window to
display the Toolbar view. Use this view to add new elements to a toolbar.
Modify a Toolbar
You can modify a toolbar in these ways:
• Add a toolbar element
8/16-bit IDE User’s Guide
193
Customizing the IDE
Customize Toolbars
• Remove a toolbar element
• Clear all elements on a toolbar
• Reset a toolbar
In certain circumstances there are restrictions on which elements you can add or remove
from a toolbar. For example, you cannot add a second instance of an element to the
toolbar.
After you modify a toolbar, the changes apply to every instance of that toolbar. For
example, if you customize the Project window toolbar, those changes will affect every
Project window that you open, not just the toolbar in the active Project window. Your
changes do not affect windows that are already open.
TIP
To display a ToolTip that names a toolbar element, rest the cursor over the
element.
Adding a Toolbar Element
You add an element to a toolbar by dragging and dropping it from the Toolbar Items list
onto a toolbar. This list is in the Toolbar Items view in the Customize IDE Commands
window.
To add an element to a toolbar, follow these steps:
1. From the Toolbar Items list, select the icon next to the element that you want to add to
a toolbar.
Make sure that the destination toolbar is visible.
2. Drag the element’s icon from the Toolbar Items list to the destination toolbar.
If the destination toolbar accepts the element, a framing bracket appears in the toolbar.
This framing bracket shows you where the new element will appear after you release
the cursor. If the destination toolbar does not accept the element, the framing bracket
does not appear.
3. Release the element at the desired position.
After you release the element, the IDE inserts the element into the
destination toolbar.
The toolbar might not accept an element for these reasons:
• The toolbar is full.
• The element already exists in the toolbar.
• The window does not support that element.
194
8/16-bit IDE User’s Guide
Customizing the IDE
Customize Toolbars
• The following elements can only be added to the editor window toolbar: Document
Settings, Functions, Header Files, Markers, Version Control menus, File Dirty
Indicator, and File Path field.
• The Current Target menu element can only be added to the Project window toolbar.
Removing a Toolbar element
To remove an element from a toolbar, follow these steps:
1. Right-click a toolbar button to display a contextual menu for the button that you want
to remove.
2. Select the Remove Toolbar Item command from the contextual menu.
The IDE removes the button from the toolbar.
Clearing All Buttons on Toolbars
You can clear all elements from a toolbar and build your own toolbar from scratch. Table
18.3 on page 195 explains how to clear the main (floating) toolbar and window toolbars.
Table 18.3 Clearing toolbars
On this
host…
Do this to clear the
main toolbar…
Do this to clear the
window toolbar…
Windows
Select View > Toolbars >
Clear Main Toolbar.
Select View > Toolbars >
Clear Window Toolbar.
Reset Toolbars
Reset a toolbar to restore its default button set. Table 18.4 on page 195 explains how to
reset the main (floating) toolbar and window toolbar by using menu commands.
Table 18.4 Resetting a toolbar by using menu commands
On this host…
Do this to reset the
main toolbar…
Do this to reset the
window toolbar…
Windows
Select View > Toolbars >
Reset Main Toolbar.
Select View > Toolbars >
Reset Window Toolbar.
8/16-bit IDE User’s Guide
195
Customizing the IDE
Customize Key Bindings
Alternatively, you can use a contextual menu to reset the main toolbar or a window
toolbar. Once you reset the toolbar, the IDE restores the default toolbar button set. Table
18.5 on page 196 explains how to reset the main (floating) toolbar and window toolbar.
Table 18.5 Resetting a toolbar by using a contextual menu
On this
host…
Do this to reset the
main toolbar…
Do this to reset the
window toolbar…
Windows
Right-click the toolbar and
select Reset Toolbar.
Reset Toolbar.
Right-click the toolbar and select
Customize Key Bindings
You can customize the keyboard shortcuts, known as key bindings, for various commands
in the CodeWarrior IDE. You can bind a set of keystrokes to virtually any command. To
activate the command, type its associated key binding. Use the Customize IDE Commands
window to change IDE key bindings.
You can also use the Customize IDE Commands window to look up default key bindings
for specific commands, as well as change existing key bindings to better suit your needs.
Click the Commands tab at the top of the Customize IDE Commands window to display
the Commands view. Use this view to configure key bindings for menu commands, editor
actions, and other actions. You can also specify prefix keys.
This section has these topics:
• Modifying key bindings
• Adding key bindings
• Deleting key bindings
• Setting Auto Repeat for key bindings
• Exporting commands and key bindings
• Importing commands and key bindings
• Quote key prefix
196
8/16-bit IDE User’s Guide
Customizing the IDE
Customize Key Bindings
Figure 18.8 Customize IDE Commands—Key Bindings
Adding Key Bindings
Use the Customize IDE Commands window to specify additional key bindings for a
particular command.
To add a key binding, follow these steps:
1. From the Commands list, select the command to which you want to add a new key
binding.
Click the hierarchical controls next to the command categories to expand them as
necessary so that you can see individual commands. Select the individual command
you wish to modify.
NOTE
If you want to use your keyboard’s numeric keypad as part of the new key
binding, enable the Numeric Keypad Bindings checkbox in the Customize
IDE Commands window.
8/16-bit IDE User’s Guide
197
Customizing the IDE
Customize Key Bindings
2. Click New Binding.
After clicking this button, the Edit Key Binding dialog box appears.
Figure 18.9 Edit Key Bindings
3. Create the key combination you would like to use for the selected command.
For example, to add the key combination Ctrl-8, hold down the Ctrl key and press the
8 key, then release both keys at the same time.
If you decide against the key combination that you just entered, or if you make a
mistake, click Cancel in the Edit Key Binding dialog box. The IDE discards changes
and returns you to the Customize IDE Commands window.
4. Click OK in the Edit Key Binding dialog box.
The new key binding appears in the Key Bindings list in the Customize IDE
Commands window.
5. Click Save in the Customize IDE Commands window to save your changes.
The new key binding is now available for use in the IDE.
Exporting Commands and Key Bindings
You can export to a file the custom commands and key bindings that you use with the
IDE. You can then import the file into another IDE running on a different computer in
order to transfer all of your custom commands and key bindings. This process simplifies
your setup on the other computer because you do not have to recreate your custom
commands and key bindings manually.
NOTE
After you import your custom commands and key bindings into another
computer, the IDE running on that computer first sets all its commands and key
bindings to their default values, then imports your custom commands and key
bindings.
To export your custom commands and key bindings, follow these steps:
1. Click Export in the Customize IDE Commands window.
After you click this button, a standard Save dialog box appears.
198
8/16-bit IDE User’s Guide
Customizing the IDE
Customize Key Bindings
2. Select a location in which to save the Commands&KeyBindings.mkb file.
This file contains information about your custom commands and key bindings.
3. Click Save.
The IDE saves the Commands&KeyBindings.mkb file at the selected location.
TIP
You can rename the Commands&KeyBindings.mkb file, but remember to
preserve the .mkb extension. This extension identifies the file as a Freescale
Key Bindings file. Furthermore, the Windows-hosted version of the
CodeWarrior IDE uses this extension to properly recognize the commands and key
bindings file.
Importing Commands and Key Bindings
You can import custom commands and key bindings from a previously exported file.
Commands&KeyBindings.mkb is the default name of an exported file for custom
commands and key bindings.
NOTE
After you import your custom commands and key bindings into another
computer, the IDE running on that computer first sets all its commands and key
bindings to their default values, then imports your custom commands and key
bindings.
To import commands and key bindings, follow these steps:
1. Click Import in the Customize IDE Commands window.
After you click this button, a standard Open dialog box appears.
2. Use the dialog box to find and open the Commands&KeyBindings.mkb file that
you want to import.
The IDE adds the custom commands and key bindings to the Customize IDE
Commands window.
Quote Key prefix
The Quote Key is a special prefix key that lets you use any character (such as a-z) as a
command key without a modifier key, and still retain the ability to use that character
normally, as in editor windows.
In typical use, a key equivalent involves two keys: a modifier key (such as the Ctrl key)
combined with a printing key. However, the IDE does not require a modifier key.
8/16-bit IDE User’s Guide
199
Customizing the IDE
Customize Key Bindings
For example, you can assign the 2 key (with no modifier) to a command. If you make this
assignment, you can no longer type a 2 into your source code in the editor. This conflict
occurs because the IDE now interprets the 2 as a command key instead of a printing key.
The Quote Key prefix provides the solution to such conflicts.
You can configure the IDE to recognize any key as the Quote Key prefix. Despite its
name, the Quote Key prefix does not have to be the key that creates the quote character
(").
After typing an assigned Quote Key prefix, the IDE interprets the next keypress as a
keystroke, not as a command.
Returning to the earlier example, assume that you assign the 2 key to a command and the
tilde key (~) to be your Quote Key prefix. To execute the command, you would type the 2
key. To enter the character 2 into source code, you would type the tilde key first, then the
2 key. To enter the tilde character into source code, you would press the tilde key twice.
WARNING!
The Quote Key only affects the next key or key combination that you
type. You must use the Quote Key once for each bound key or key
combination for which you want to type.
Assigning the Quote Key prefix
To assign the Quote Key prefix:
1. Click the expand control next to the Miscellaneous command group.
Miscellaneous is part of the Commands list in the Customize IDE Commands
window.
2. Select the Quote Key item.
NOTE
If you want to use the numeric keypad as part of the new key binding, enable
the Numeric Keypad Bindings checkbox in the Customize IDE Commands
window.
3. Click New Binding to display the Edit Key Bindings dialog box.
4. Type the desired Quote Key prefix.
The keys you type appear in the dialog box. If you make a mistake or decide against
the keys you typed, click Cancel to return to the Customize IDE Commands window.
5. Click OK in the Edit Key Binding dialog box.
The new Quote Key prefix appears in the Key Bindings list.
200
8/16-bit IDE User’s Guide
19
Working with IDE
Preferences
This chapter explains core CodeWarrior™ IDE preference panels and provides basic
information on global- and project-level preference options. Consult the Targeting
documentation for information on platform-specific preference panels.
This chapter contains these sections:
• “IDE Preferences Window” on page 201
• “General Panels” on page 203
• “Editor Panels” on page 213
Abbreviated descriptions appear in this chapter. See “Preference and Target Settings
Options” on page 239 for more information on preference-panel options.
IDE Preferences Window
The IDE Preferences window lists global IDE options. These preferences, unless
superseded by a Target Settings option, apply to every open project file. Select Edit >
Preferences to open the IDE Preferences window.
The IDE Preferences window lists preferences by group:
• General—configures overall IDE preferences, such as project builds, recent items,
and third-party tools
• Editor—configures editor preferences, such as fonts, tabs, and syntax coloring
• Debugger—configures debugger preferences, such as window hiding during
debugging sessions, low-level interactions, and variable highlighting
8/16-bit IDE User’s Guide
201
Working with IDE Preferences
IDE Preferences Window
Figure 19.1 IDE Preferences window
Table 19.1 IDE Preferences window
202
Item
Explanation
IDE Preference
Panels list
Lists preference panels, organized by group. Click the hierarchical
control next to a group name to show or hide individual
preference panels.
Preference panel
Shows options for the selected item in the IDE Preference Panels
list.
Factory
Settings on
page 249
Click to restore the default options for the current preference panel.
Revert Panel on
page 256
Click to restore the most recently saved options for the current
preference panel.
Export Panel on
page 246
Click to save an XML file that contains options for the current
preference panel.
8/16-bit IDE User’s Guide
Working with IDE Preferences
General Panels
Table 19.1 IDE Preferences window (continued)
Item
Explanation
Import Panel on
page 251
Click to open an XML file that contains options for the current
preference panel.
OK
Click to save modifications to all preference panels and close
the window.
Cancel
Click to discard modifications to all preference panels and close
the window.
Apply
Click to confirm modifications to all preference panels.
General Panels
The General section of the IDE Preference Panels defines basic options assigned to a new
project.
The General preference panels available on most IDE hosts include:
• “Build Settings” on page 203
• “Concurrent Compiles” on page 204
• “IDE Extras” on page 205
• “Plugin Settings” on page 207
• “Shielded Folders” on page 208
• “Source Trees” on page 210
Build Settings
The Build Settings preference panel provides options for customizing various aspects of
project builds, including:
• file actions during project builds
• memory usage to accelerate builds
• local data storage of projects stored on read-only volumes
8/16-bit IDE User’s Guide
203
Working with IDE Preferences
General Panels
Figure 19.2 Build Settings preference panel
Table 19.2 Build Settings preference panel
Item
Explanation
Build before running on
page 242
Choose to always build the project before running it,
never build the project before running it, or ask for the
desired action.
Save open files before
build on page 256
Select to automatically save the contents of all editor
windows before starting a build.
Show message after
building up-to-date
project on page 258
Select to have the IDE display a message after
successfully building a project.
Compiler thread stack on
page 243
Enter the kilobytes of memory to allocate to the stack for
execution of the IDE compiler thread. Increase the size
when compiling heavily optimized code.
Use Local Project Data
Storage on page 261
Select to specify a location to save project data if the
project is on a read-only volume. Click Choose to select
the location.
Concurrent Compiles
The Concurrent Compiles preference panel controls execution of simultaneous IDE
compilation processes. The IDE lists this panel in the IDE Preference Panels list when the
active compiler supports concurrency.
204
8/16-bit IDE User’s Guide
Working with IDE Preferences
General Panels
The IDE uses concurrent compiles to compile code more efficiently. The IDE improves its
use of available processor capacity by spawning multiple compile processes, which allow
the operating system to perform these tasks as needed:
• optimize resource use
• use overlapped input/output
For those compilers that support concurrency, concurrent compiles improve compile time
on both single- and multiple-processor systems.
Figure 19.3 Concurrent Compiles preference panel
Table 19.3 Concurrent Compiles preference panel
Item
Explanation
Use Concurrent Compiles
Select to have the IDE run multiple compilation
processes simultaneously.
Recommended on
page 255
Select to allow the number of concurrent compiles
suggested by
the IDE.
User Specified on
page 263
Select to stipulate the number of concurrent compiles.
IDE Extras
The IDE Extras preference panel provides options for customizing various aspects of the
IDE, including:
• menu-bar layout
• the number of recent projects, document files, and symbolics files to remember
• use of a third-party editor
8/16-bit IDE User’s Guide
205
Working with IDE Preferences
General Panels
Figure 19.4 IDE Extras preference panel
Table 19.4 IDE Extras preference panel
206
Item
Explanation
Menu bar layout
Choose a layout that organizes IDE menus into a
typical host-platform menu bar. Restart the IDE in
order for menu-bar layout changes to take effect.
Projects on page 255
Enter the number of recently opened projects for
the IDE to display in the Open Recent submenu.
Enter zero to disable this feature.
Documents on page 245
Enter the number of recently opened documents
for the IDE to display in the Open Recent
submenu. Enter zero to disable
this feature.
Symbolics on page 259
Enter the number of recently opened symbolics
files for the IDE to display in the Open Recent
submenu. Enter zero to disable
this feature.
Workspaces on page 264
Enter the number of recently opened workspaces
for the IDE to display in the Open Recent
submenu. Enter zero to disable this feature.
Use Third Party Editor on
page 262
Select to use a third-party text editor to edit
source files.
8/16-bit IDE User’s Guide
Working with IDE Preferences
General Panels
Table 19.4 IDE Extras preference panel (continued)
Item
Explanation
Launch Editor on page 252
Enter a command-line expression that runs the
desired third-party text editor.
Launch Editor w/ Line # on
page 253
Enter a command-line expression that runs the
desired third-party text editor and passes to that
editor an initial line of text to display.
Use Multiple Document
Interface on page 261
Select to have the IDE use the Multiple
Document Interface (MDI). Clear to have the IDE
use the Floating Document Interface (FDI).
Restart the IDE in order for interface changes to
take effect.
Use default workspace on
page 260
Select this option to have the IDE use the default
workspace to save and restore state information.
Clear this option to have the IDE always start in
the same state.
Show Code and Data Sizes on
page 257
Displays or hides Code and Data columns in
project manager.
Plugin Settings
The Plugin Settings preference panel contains options for troubleshooting third-party IDE
plug-ins.
Figure 19.5 Plugin Settings preference panel
8/16-bit IDE User’s Guide
207
Working with IDE Preferences
General Panels
Table 19.5 Plugin Settings preference panel
Item
Explanation
Level on page 253
Choose the plug-in diagnostics level the IDE
generates the next time it loads plug-ins. Restart the
IDE in order for diagnostic-level changes to take
effect. Options are None, Errors Only, and All Info.
Disable third party COM
plugins on page 244
Select to prevent the IDE from loading third-party
Common Object Model (COM) plug-ins.
Shielded Folders
The Shielded Folder preference panel enables the IDE to ignore specified folders during
project operations and find-and-compare operations. The IDE ignores folders based on
matching names with regular expressions defined in the preference panel.
NOTE
If the Access Paths settings panel in the Target Settings window contains a
path to a shielded folder, the IDE overrides the shielding and includes the
folder in project operations and find-and-compare operations.
Figure 19.6 Shielded Folders preference panel
208
8/16-bit IDE User’s Guide
Working with IDE Preferences
General Panels
Table 19.6 Shielded Folders preference panel
Item
Icon
Explanation
Shielded folder list
Lists folders that match the specified
regular expression. The IDE skips these
folders during project operations, findand-compare operations, or both.
Regular Expression on
page 255
Enter the regular expression used to
shield folders from selected operations.
Project operations on page 255
Select to have the IDE skip folders
during project operations. A bullet
appears in the corresponding column of
the shielded folder list.
Find and compare
operations on page 249
Select to have the IDE skip folders
during find-and-compare operations. A
bullet appears in the corresponding
column of the shielded folder list.
Add
Click to add the current Regular
Expression field entry to the shielded
folder list.
Change
Click to replace the selected regular
expression in the shielded folder list with
the current Regular Expression field
entry.
Remove
Click to delete the selected regular
expression from the shielded folder list.
Table 19.7 Default regular expressions in Shielded Folders panel
Regular Expression
Explanation
\(.*\)
Matches folders with names that begin and end
with parentheses, such as the
(Project Stationery) folder.
8/16-bit IDE User’s Guide
209
Working with IDE Preferences
General Panels
Table 19.7 Default regular expressions in Shielded Folders panel (continued)
Regular Expression
Explanation
CVS
Matches folders named CVS. With this regular
expression, the IDE skips Concurrent Versions
System (CVS) data files.
.*[_]Data
Matches the names of folders generated by the
IDE that store target data information, such as a
folder named MyProject_Data.
Source Trees
Use the Source Trees panel to add, modify, and remove source trees (root paths) used in
projects. Use source trees to define common access paths and build-target outputs to
promote sharing of projects across different hosts. Source trees have these scopes:
• Global source trees, defined in the IDE Preferences window, apply to all projects.
• Project source trees, defined in the Target Settings window for a particular project,
apply only to files in that project. Project source trees always take precedence over
global source trees.
Except for the difference in scope, global and project source trees operate identically.
210
8/16-bit IDE User’s Guide
Working with IDE Preferences
General Panels
Figure 19.7 Source Trees panel
Table 19.8 Source Trees panel
Item
Explanation
Source Tree list
Contains the Name and Path of currently defined source trees.
Name
Enter a name for a new source tree or modify the name of a
selected source tree.
Type on page 260
Choose the source-tree path type.
Choose
Click to select or modify a source-tree path.
Add
Click to add a new source-tree path to the Source Tree list.
Change
Click to modify the selected source-tree name or path.
Remove
Click to delete the selected source tree from the Source Tree
list.
8/16-bit IDE User’s Guide
211
Working with IDE Preferences
General Panels
Adding Source Trees
Add source trees that define root paths for access paths and build-target output.
1. Choose Edit > Preferences.
The IDE Preferences window appears.
2. Select the Source Trees panel from the IDE Preference Panels list.
3. Enter in the Name field a name for the new source tree.
4. Choose the source tree Type:
• Absolute Path—defines a path from the root level of the hard drive to a desired
folder, including all intermediate folders
• Environment Variable— defines an environment variable in the operating
environment
• Registry Key— defines a key entry in the operating-environment registry
5. Enter the source-tree definition:
• For Absolute Path—Click Choose to display a subordinate dialog box. Use the
dialog box to select the desired folder. The absolute path to the selected folder
appears in the Source Trees preference panel.
• For Environment Variable—Enter the path to the desired environment variable.
• For Registry Key—Enter the path to the desired key entry in the registry.
6. Click Add.
The IDE adds the new source tree to the Source Trees list.
7. Click OK, Apply, or Save.
The IDE saves the source-tree changes.
Changing Source Trees
Change a source tree to update path information for a project. The IDE must be able to
resolve source trees before building the project.
1. Choose Edit > Preferences.
2. Select the Source Trees panel from the IDE Preference Panels list.
3. Select the desired source tree in the Source Trees list.
4. If needed, enter a new name for the selected source tree.
5. If needed, choose a new path type for the selected source tree.
212
8/16-bit IDE User’s Guide
Working with IDE Preferences
Editor Panels
6. Click Change.
The IDE updates the source tree and displays changes in the Source Trees list. A
reminder message to update source-tree references in the project appears.
7. Click OK, Apply, or Save.
The IDE saves the source-tree changes.
Removing Source Trees
Remove source trees that the project no longer uses. The IDE must be able to find the
remaining source trees before building the project.
1. Choose Edit > Preferences.
2. Select the Source Trees panel from the IDE Preference Panels list.
3. Select the source tree from the Source Trees list.
4. Click Remove.
The IDE updates the Source Trees list. A reminder message to update source-tree
references in the project appears.
5. Click OK, Apply, or Save.
The IDE saves the source-tree changes.
Editor Panels
The Editor section of the IDE Preference Panels list defines the editor settings assigned to
a new project.
The Editor preference panels available on most IDE hosts include:
• “Code Completion” on page 213
• “Code Formatting” on page 215
• “Editor Settings” on page 217
• “Font & Tabs” on page 219
• “Text Colors” on page 221
Code Completion
The Code Completion preference panel provides options for customizing the IDE codecompletion behavior, including:
• automatic invocation and indexing
8/16-bit IDE User’s Guide
213
Working with IDE Preferences
Editor Panels
• window positioning and appearance delay
• case sensitivity
Figure 19.8 Code Completion preference panel
Table 19.9 Code Completion preference panel
214
Item
Explanation
Automatic Invocation on
page 240
Select to automatically open the Code Completion
window to complete programming-language
symbols. Clear to manually open the window.
Window follows insertion point on
page 263
Select to have the Code Completion window follow
the insertion point as you edit text. Clear to leave
the window in place.
Display deprecated items on
page 244
Select to have the Code Completion window
display obsolete items in gray text. Clear to have
the window hide obsolete items.
Case sensitive on page 242
Select to have the IDE consider case when
completing code. Clear to have the IDE ignore
case.
Code Completion Delay on
page 242 (ticks)
Enter the number of ticks to wait before opening
the Code Completion window. A tick is 1/60 of a
second.
8/16-bit IDE User’s Guide
Working with IDE Preferences
Editor Panels
Code Formatting
The Code Formatting preference panel provides options for customizing editor codeformatting behavior, including:
• indenting
• syntax placement
• brace handling
Figure 19.9 Code Formatting preference panel
Table 19.10 Code Formatting preference panel
Item
Explanation
Use Automatic Code
Formatting
Check to have the editor automatically format your source
code according to settings in this panel.
Clear to prevent the editor from automatically formatting
your code.
Language Settings
8/16-bit IDE User’s Guide
Use to specify the language type that you want to format.
Your selection changes the other options in this panel to
their default states for the selected language.
215
Working with IDE Preferences
Editor Panels
Table 19.10 Code Formatting preference panel (continued)
Item
Explanation
Format braces
Check to have the editor automatically insert a closing
brace when you type an opening brace. The editor places
the cursor between the opening brace that you typed and
the closing brace that it inserts.
Clear to prevent the editor from automatically inserting a
closing brace when you type an opening brace.
Place opening brace on
separate line
Check to have the editor place on the next line an opening
brace that you type.
Clear to prevent the editor from placing on the next line an
opening brace that you type.
Indent braces
Check to have the editor indent braces by one tab stop
from the previous line.
Clear to prevent the editor from indenting braces by one
tab stop from the previous line.
Place “else” on same line
as closing brace
Check to have the editor place else and else if text
on the same line as the closing brace of the if or else
if statement.
Clear to prevent the editor from placing else and else
if text on the same line as the closing brace of the if or
else if statement.
Indent code within braces
Check to have the editor indent code by one tab stop from
the braces.
Clear to prevent the editor from indenting code by one tab
stop from the braces.
216
8/16-bit IDE User’s Guide
Working with IDE Preferences
Editor Panels
Table 19.10 Code Formatting preference panel (continued)
Item
Explanation
Indent “case” within
“switch” statement
Check to have the editor indent case statements by one
tab stop inside a switch statement.
Clear to prevent the editor from indenting case
statements by one tab stop inside a switch statement.
Close braces, brackets,
and parentheses
Check to have the editor automatically insert the
corresponding closing character when you type an
opening brace, bracket, or parenthesis. The editor places
the cursor between the opening character and the closing
character.
Clear to prevent the editor from automatically inserting the
corresponding closing character when you type an
opening brace, bracket, or parenthesis.
Editor Settings
The Editor Settings preference panel provides options for customizing the editor,
including:
• fonts, window locations, and insertion-point positions
• contextual menus
• additional editor-window features
8/16-bit IDE User’s Guide
217
Working with IDE Preferences
Editor Panels
Figure 19.10 Editor Settings preference panel
Table 19.11 Editor Settings preference panel
218
Item
Explanation
Font preferences on
page 250
Select to retain font settings for each source file. Clear
to apply default font settings each time the IDE displays
the source file.
Selection position on
page 257
Select to retain the text-insertion position in each
source file.
Window position and size on
page 264
Select to retain the location and dimensions of each
editor window.
Edit Commands on
page 245
Select to add Edit menu commands to contextual
menus.
Browser Commands on
page 242
Select to add Browser menu commands to contextual
menus. Also select in order to use the Insert Template
Commands option.
Project Commands on
page 255
Select to add Project menu commands to contextual
menus.
8/16-bit IDE User’s Guide
Working with IDE Preferences
Editor Panels
Table 19.11 Editor Settings preference panel (continued)
Item
Explanation
VCS Commands on
page 263
Select to add VCS (Version Control System) menu
commands to contextual menus.
Balance while typing on
page 241
Select to flash the matching (, [, or { after typing ), ],
or } in an editor window.
Use multiple undo on
page 262
Select to allow multiple undo and redo operations while
editing text.
Relaxed C popup parsing on
page 256
Select to allow the C parser to recognize some nonstandard function formats and avoid skipping or
misinterpreting some definition styles.
Drag and drop editing on
page 245
Select to allow drag-and-drop text editing.
Left margin click selects
line on page 253
Select to allow selection of an entire line of text by
clicking in the left margin of the editor window.
Sort function popup on
page 258
Select to sort function names by alphabetical order in
menus. Clear to sort function names by order of
appearance in the source file.
Enable Virtual Space on
page 246
Select to allow moving the text-insertion point beyond
the end of a source-code line. Entering new text
automatically inserts spaces between the former end of
the line and the newly entered text.
Balance Flash Delay on
page 241
Enter the number of ticks to flash a balancing
punctuation character. A tick is1/60 of a second.
Default file format
Choose the default end-of-line format used to save
files.
Font & Tabs
The Font & Tabs preference panel provides options for customizing settings used by the
editor, including:
• font and font size used in editor windows
• auto indentation and tab size
• tabs on selections and replacing tabs with spaces
8/16-bit IDE User’s Guide
219
Working with IDE Preferences
Editor Panels
Figure 19.11 Font & Tabs preference panel
Table 19.12 Font & Tabs preference panel
220
Item
Explanation
Font on page 249
Choose the typeface displayed in editor windows.
Size on page 258
Choose the font size displayed in editor windows.
Script on page 257
Choose the IDE script system. The script system maps
keyboard keys to characters of an alphabet.
Tab indents
selection on page 259
Select to indent each line of selected text after pressing Tab.
Clear to replace selected text with a tab character after
pressing Tab.
Tab Size on page 259
Enter the number of spaces to substitute in place of a tab
character. This number applies to the Tab Inserts Spaces
option.
Auto Indent on
page 240
Select to automatically apply the indentation level from the
previous line of text to each new line created by pressing Enter
or Return.
Tab Inserts
Spaces on page 259
Select to insert spaces instead of a tab character after
pressing Tab. The Tab Size option determines the number of
inserted spaces.
8/16-bit IDE User’s Guide
Working with IDE Preferences
Editor Panels
Setting the Text Font
To set the text font, follow these steps:
1. Choose Edit > Preferences.
2. Select the Font & Tabs panel in the Editor group in the IDE Preference Panels list.
3. In the Font Settings area of the IDE Preferences window, select a font type in the
drop-down menu in the Font field.
4. Click OK to save your font in the IDE Preferences window.
The foreground text changes to the new font.
Setting the Text Size
To set the text size, follow these steps:
1. Choose Edit > Preferences.
2. Select the Font & Tabs panel in the Editor group in the IDE Preference Panels list.
3. In the Font Settings area of the IDE Preferences window, select the Size drop-down
menu and choose a text point size (from 2 to 24 points).
4. Click OK to save your text size in the IDE Preferences window.
The foreground text changes to the new size.
Text Colors
The Text Colors preference panel customizes colors applied to elements of source code
displayed in editor windows, such as:
• default foreground and background in editor windows
• standard comments, keywords, and strings in source code
• custom-defined keywords
• browser symbols
Default settings provide a simple scheme of at least four source-code colors. If four colors
do not provide sufficient detail, modify this preference panel to create more sophisticated
color schemes.
8/16-bit IDE User’s Guide
221
Working with IDE Preferences
Editor Panels
Figure 19.12 Text Colors preference panel
Table 19.13 Text Colors preference panel
222
Item
Explanation
Foreground on page 250
Click the color swatch to display a dialog box. Use the
dialog box to set the foreground color used in editor
windows for text.
Background on page 241
Click the color swatch to set the background color used
in editor windows.
Activate Syntax Coloring on
page 239
Select to apply custom colors to comments, keywords,
strings, and custom keywords in text. Clear to use the
Foreground color for all text.
Comments on page 243
Click the color swatch to set the color used for sourcecode comments.
Keywords on page 252
Click the color swatch to set the color used for sourcecode language keywords.
Strings on page 258
Click the color swatch to set the color used for sourcecode string literals.
8/16-bit IDE User’s Guide
Working with IDE Preferences
Editor Panels
Table 19.13 Text Colors preference panel (continued)
Item
Explanation
Set 1, Set 2, Set 3, Set 4
Click a color swatch to set the color used for the
corresponding custom-keyword set.
Edit
Click to add, modify, or remove keywords from the
corresponding custom-keyword set.
Activate Browser
Coloring on page 239
Select to apply custom colors to browser symbols in text.
Clear to use the Foreground color for all text.
Classes
Click the color swatch to set the color used for sourcecode classes.
Constants
Click the color swatch to set the color used for sourcecode constants.
Enums
Click the color swatch to set the color used for sourcecode enumerations.
Functions
Click the color swatch to set the color used for sourcecode functions.
Globals
Click the color swatch to set the color used for sourcecode global variables.
Macros
Click the color swatch to set the color used for sourcecode macros.
Templates
Click the color swatch to set the color used for sourcecode templates.
TypeDefs
Click the color swatch to set the color used for sourcecode type definitions.
Other
Click the color swatch to set the color used for other
symbols not specified in the Activate Browser Coloring
section.
Setting the Foreground Text Color
Use the Foreground Color option to configure the foreground text color displayed in
editor windows.
1. Choose Edit > Preferences.
2. Select the Text Colors panel in the Editor group in the IDE Preference Panels list.
8/16-bit IDE User’s Guide
223
Working with IDE Preferences
Editor Panels
3. Click the Foreground color box to set the editor’s foreground color.
4. Pick color.
5. Click OK in the Color Picker window.
6. Click OK or Save
The foreground text color changes to the new color.
Setting the Background Text Color
Use the Background Color option to configure the background color displayed by all
editor windows.
1. Choose Edit > Preferences.
2. Select the Text Colors panel in the Editor group in the IDE Preference Panels list.
3. Click the Background color box to set the editor’s background color.
4. Pick color.
5. Click OK in the Color Picker window.
6. Click OK or Save
The background text color changes to the new color.
Activate Syntax and Browser Coloring
Use the Activate Syntax Coloring and Activate Browser Coloring options to configure
the syntax and browser colors that all editor windows display.
1. Choose Edit > Preferences.
2. Select the Text Colors panel in the Editor group in the IDE Preference Panels list.
3. Select the checkbox next to the Activate Syntax Coloring or the Activate Browser
Coloring option.
4. Click on the colored box next to the option.
5. Pick color.
6. Click OK in the Color Picker window.
7. Click OK or Save
224
8/16-bit IDE User’s Guide
20
Working with Target
Settings
This chapter explains core CodeWarrior™ IDE target settings panels and provides basic
information on target settings options for the current project’s build targets. Consult the
Targeting documentation for information on platform-specific target settings panels.
This chapter contains these sections:
• Target Settings Window on page 225
• Target Panels on page 227
• Editor Panels on page 237
Abbreviated descriptions appear in this chapter. See “Preference and Target Settings
Options” on page 239 for more information on target settings panel options.
Target Settings Window
The Target Settings window lists settings for the current project’s build targets. These
target settings supersede global preferences defined in the IDE Preferences window.
The Target Settings window lists settings by group:
• Target—configures overall build target settings, such as names, browser caching,
file mappings, and access paths
• Language Settings—configures programming language settings. Consult the
Targeting documentation for more information about these settings panels
• Code Generation—configures processor, disassembler, and optimization settings
for generating code
• Linker—configure linker settings for transforming object code into a final
executable file. Consult the Targeting documentation for more information about
these settings panels.
• Editor—configure custom keyword sets and colors
• Debugger—configure settings for executable files, program suspension, and remote
debugging
8/16-bit IDE User’s Guide
225
Working with Target Settings
Target Settings Window
Figure 20.1 Target Settings window
Table 20.1 Target Settings window
226
Item
Explanation
Target Settings Panels list
Lists settings panels, organized by group. Click
the hierarchical control next to a group name to
show or hide a list of individual settings panels.
Settings panel
Shows options for the selected item in the
Target Settings Panels list.
Factory Settings on page 249
Click to restore the default options for the
current settings panel.
Revert Panel on page 256
Click to restore the most recently saved options
for the current settings panel.
Export Panel on page 246
Click to save an XML file that contains set
options for the current panel.
8/16-bit IDE User’s Guide
Working with Target Settings
Target Panels
Table 20.1 Target Settings window (continued)
Item
Explanation
Import Panel on page 251
Click to open an XML file that contains settings
for the current panel.
OK
Click to save modifications to all settings panels
and close the window.
Cancel
Click to discard modifications to all settings
panels and close the window.
Apply
Click to confirm modifications to all settings
panels.
Opening the Target Settings Window
Use the Target Settings window to modify build target options for the current project.
Choose Edit > targetname Settings to display the Target Settings window.
Target Panels
The Target group of the Target Settings Panels defines general target settings assigned to
a new project.
The panels available on most IDE hosts include:
• Target Settings on page 227
• Access Paths on page 229
• Build Extras on page 232
• File Mappings on page 234
• Source Trees on page 237
Target Settings
The Target Settings panel provides options for:
• setting the name of the current build target
• setting the linker, pre-linker, and post-linker for the build target
• specifying the project output directory for the final output file
8/16-bit IDE User’s Guide
227
Working with Target Settings
Target Panels
Figure 20.2 Target Settings panel
Table 20.2 Target Settings panel—items
228
Item
Explanation
Target Name on page 260
Enter a name (26 or fewer characters) for the
selected build target as it will appear in the
project window.
Linker on page 254
Select the linker to use on the current build
target.
Pre-linker on page 255
Select the pre-linker to use on the current
build target.
Post-linker on page 254
Select the post- linker to use on the current
build target.
Output Directory on page 254
Shows the location where the IDE creates
the output binary file. Click Choose to
change this location.
Choose
Click to select the directory in which the IDE
saves the output binary file.
8/16-bit IDE User’s Guide
Working with Target Settings
Target Panels
Table 20.2 Target Settings panel—items (continued)
Item
Explanation
Clear
Click to delete the current Output Directory
path.
Save project entries using relative
paths on page 257
Select to save project file entries using a
relative path from a defined access path.
This option is helpful if the project has
multiple files with the same name.
Access Paths
The Access Paths settings panel defines the search paths for locating and accessing a
build target’s system files and header files.
NOTE
The Access Paths settings panel displays either User Paths or System Paths,
depending on the selected radio button.
8/16-bit IDE User’s Guide
229
Working with Target Settings
Target Panels
Figure 20.3 Access Paths settings panel
Table 20.3 Access Paths settings panel
230
Item
Explanation
Always Search User Paths on
page 239
Select to treat #include <...> statements
the same as #include "..." statements.
Source relative includes on
page 258
Select to search for dependent files in the same
location as the source file. If the dependent file is
not found in this location, specified User and
System paths are searched. If this option is
enabled, the Always Search User Paths should
also be enabled.
User Paths on page 262
The User Paths list shows currently defined userlevel access paths searched by #include
"..." statements.
System Paths on page 259
The System Paths list shows currently defined
system-level access paths searched by
#include <...> statements.
8/16-bit IDE User’s Guide
Working with Target Settings
Target Panels
Table 20.3 Access Paths settings panel (continued)
Item
Explanation
Add Default on page 239
Click to restore the default user- and system-level
access paths.
Host Flags on page 251 list popup
Choose the host platforms that can use the
selected access path.
Add
Click to add a user- or system-level access path.
Change
Click to modify the selected user- or system-level
access path.
Remove
Click to remove the selected user- or system-level
access path.
The User Paths and System Paths lists display columns with status icons for each access
path. There are different types of access paths. Table 20.4 on page 231 explains these
items.
Table 20.4 User Paths and System Paths list columns
Name
Search status
Icon
Explanation
A checkmark icon indicates an active access path that
the IDE searches.
No checkmark icon indicates an inactive access path
that the IDE does not search.
8/16-bit IDE User’s Guide
231
Working with Target Settings
Target Panels
Table 20.4 User Paths and System Paths list columns (continued)
Name
Icon
Recursive search
Explanation
A folder icon indicates that the IDE recursively
searches subdirectories of the access path.
No folder icon indicates that the IDE does not
recursively search the access path.
Access path
Shows the full access path to the selected directory.
Access paths have these types:
• Absolute—the complete path, from the root
level of the hard drive to the directory,
including all intermediate directories
• Project—the path from the project file
relative to the designated directory
• CodeWarrior—the path from the
CodeWarrior IDE relative to the designated
directory
• System—the path from the operating
system’s base directory relative to the
designated directory
• Source tree—the path from a user-defined
source tree relative to the designated
directory
Build Extras
The Build Extras settings panel contains options that define how the CodeWarrior IDE
builds a project.
232
8/16-bit IDE User’s Guide
Working with Target Settings
Target Panels
Figure 20.4 Build Extras settings panel
Table 20.5 Build Extras settings panel
Item
Explanation
Use modification date
caching on page 261
Select to have the IDE cache modification date
information and use that information each time it
builds a target. Builds are faster if file modification
dates are cached.
Note that it is recommended to uncheck this option if
you are using an external editor or using mounted
directories.
For one-time changes to files (for example, those
updated by a VCS tool outside of the IDE or editing a
file with an external editor), you should check the
modification date by clicking the “Synchronize
Modification Dates” button in the project window
toolbar.
Cache Subprojects
8/16-bit IDE User’s Guide
Select to improve multi-project updating and linking
speed.
233
Working with Target Settings
Target Panels
Table 20.5 Build Extras settings panel (continued)
Item
Explanation
Generate Browser Data
From on page 250
Choose whether the IDE generates browser data for
the project, and the method by which the IDE
generates that data.
Dump internal browse
information after compile on
page 245
Select to have the IDE dump raw browser information
for viewing. This option appears after selecting
Compiler from the Generate Browser Data From on
page 250 pop-up menu.
Prefix file
Enter the path to your project’s prefix file. This options
appears after selecting Language Parser from the
Generate Browser Data From on page 250 pop-up
menu.
Macro file
Enter the path to your project’s macro file. This
options appears after selecting Language Parser
from the Generate Browser Data From on page 250
pop-up menu.
Application on page 240
Click Browse to select the external debugger
application. Alternatively, enter the path to the
external debugger.
Arguments on page 240
Enter any program arguments to pass to the external
debugger when the IDE transfers control.
Initial directory on page 251
Click Browse to select an initial directory for the
external debugger. Alternatively, enter the path to the
initial directory.
File Mappings
The File Mappings settings panel associates filename extensions with a CodeWarrior
plug-in compiler. These associations determine whether the IDE recognizes a source file
by its filename extension or file type. Use the settings panel to add, change, and remove
file mappings.
234
8/16-bit IDE User’s Guide
Working with Target Settings
Target Panels
Figure 20.5 File Mappings settings panel
Table 20.6 File Mappings settings panel
Item
Icon
Explanation
File Mappings list
Displays a list of currently defined mappings between
filename extensions and plug-in compilers.
File Type on
page 249
Enter a file type (such as TEXT) for the file mapping.
Alternatively, click Choose to set the file type by
selecting an example file. This file type also appears
in the corresponding column of the File Mappings list.
Extension on
page 246
Enter the filename extension (such as .cpp) for the
file mapping. This filename extension also appears in
the corresponding column of the File Mappings list.
Resource File flag
A bullet in this column denotes a resource file. The
IDE includes these resource files when building the
final output file. Use the Flags pop-up menu to toggle
this flag.
8/16-bit IDE User’s Guide
235
Working with Target Settings
Target Panels
Table 20.6 File Mappings settings panel (continued)
Item
236
Icon
Explanation
Launchable flag
A bullet in this column denotes a launchable file. The
IDE opens launchable files with the application that
created them. Double-click launchable files from the
Project window. Use the Flags pop-up menu to
toggle this flag.
Precompiled File
flag
A bullet in this column denotes a precompiled file.
The IDE builds precompiled files before building
other files. Use the Flags pop-up menu to toggle this
flag.
Ignored By Make
flag
A bullet in this column denotes a file ignored by the
compiler during builds. For example, use this option
to ignore text (.txt) files or document (.doc) files.
Use the Flags pop-up menu to toggle this flag.
Compiler on
page 243
Choose from this list the plug-in compiler to
associate with the selected file mapping. This
compiler selection also appears in the corresponding
column of the File Mappings list.
Flags
Choose from this pop-up menu the desired flags for
the selected file mapping. A checkmark indicates an
active flag. Bullets appear in the corresponding
columns of the File Mappings list to reflect flag
states.
Edit Language on
page 245
Choose from this list the desired language to
associate with the selected file mapping. The IDE
applies the appropriate syntax coloring for the
selected language.
Add
Click to add the current File Type, Extension, Flags,
Compiler, and Edit Language entries to the File
Mappings list.
Change
Click to change the selected item in the File
Mappings list to reflect the current File Type,
Extension, Flags, Compiler, and Edit Language
entries.
Remove
Click to remove the selected item in the File
Mappings list.
8/16-bit IDE User’s Guide
Working with Target Settings
Editor Panels
Source Trees
The Source Trees settings panel in the Target Settings window defines project-specific
root paths. These project-specific paths override the global root paths defined in the
Source Trees preference panel of the IDE Preferences window. Refer to “Source Trees”
on page 210 for information on adding, changing, or removing paths.
Editor Panels
The Editor group of the Target Settings Panels provides a single core panel for
configuring custom keywords within a project.
Custom Keywords
The Custom Keywords panel configures as many as four keyword sets, each with a list of
keywords and syntax coloring for a project. These project-specific settings supersede the
global settings defined in the Text Colors preference panel of the IDE Preferences
window.
Figure 20.6 Custom Keywords settings panel
Table 20.7 Custom Keywords settings panel—items
Item
Explanation
Keyword set 1,
Keyword set 2,
Keyword set 3,
Keyword set 4
Click a color swatch to set the color used for the
corresponding custom-keyword set.
Edit
Click to add, modify, or remove keywords from the
corresponding custom-keyword set.
Adding a Keyword to a Keyword Set
To add a keyword to a keyword set, follow these steps:
8/16-bit IDE User’s Guide
237
Working with Target Settings
Editor Panels
1. Click Edit next to the desired keyword set.
A dialog box appears. This dialog box lists the current collection of keywords in the
keyword set.
2. Enter the new keyword into the field at the top of the dialog box.
3. Click Add.
The new keyword appears in the keyword list.
4. Select Case Sensitive as desired.
When selected, the IDE treats the case of each keyword in the keyword set as
significant. When cleared, the IDE ignores the case of each keyword in the keyword
set.
5. Click Done.
The IDE saves the modified keyword set.
Removing a Keyword from a Keyword Set
To remove a keyword from a keyword set, follow these steps:
1. Click Edit next to the desired keyword set.
A dialog box appears. This dialog box lists the current collection of keywords in the
keyword set.
2. Select the obsolete keyword in the Custom Keywords list.
3. Press Backspace key.
4. Click Done.
The IDE saves the modified keyword set.
238
8/16-bit IDE User’s Guide
21
Preference and Target
Settings Options
Use this chapter to look up CodeWarrior™ IDE preference panel or target setting options
and learn more about their capabilities. Option names are arranged in alphabetical order.
NOTE
This chapter covers options for the core IDE preference or target setting panels
described in this manual.
A
Activate Browser Coloring
Select this option to activate coloring of browser symbols in editor windows. Clear the
option to apply the default text color to all symbols. Click the color swatch next to a
symbol to modify its color.
Activate Syntax Coloring
Select this option to activate coloring of Comments, Keywords, Strings, and Custom
Keyword Sets symbols in editor windows. Clear the option to apply the default text color
to all symbols. Click the color swatch next to a symbol to modify its color.
Add Default
Click this button to restore the default user path or system path to the Access Paths panel.
Always Search User Paths
This option controls the search criteria the IDE uses to find system and user files.
• selected—the IDE treats searching for system files (such as #include <...>) the
same as user files (#include "...").
8/16-bit IDE User’s Guide
239
Preference and Target Settings Options
• disabled—the IDE treats system paths differently from user paths.
Application
In this field enter the path to the external debugger that the IDE uses in place of the
CodeWarrior debugger. Alternatively, click Browse to open a dialog box. Use the dialog
box to select the external debugger.
Arguments
In this field enter command-line arguments to pass to the external debugger at the
beginning of a debugging session.
Attempt to show the dynamic runtime type of
objects
Select this option to display runtime types for C++, Object Pascal, and SOM objects. Clear
the option to display static types.
Auto Indent
Select this option to apply automatically the same indentation as the previous line for each
new line of text created by pressing Enter or Return. Clear the option to always return to
the left margin for each new line of text.
Auto Target Libraries
Select this option to have the IDE attempt to debug dynamically linked libraries (DLLs)
loaded by the target application. The IDE debugs the DLLs that have symbolics
information.
This option applies to non-project debugging sessions, such as debugging an attached
process.
NOTE
Selecting this option may slow IDE performance. Clear the option to improve
speed.
Automatic Invocation
Select this option to have the Code Completion window automatically open after typing
specific programming-language characters in the active editor window. Clear the option to
manually open the Code Completion window.
240
8/16-bit IDE User’s Guide
Preference and Target Settings Options
The specific characters that trigger opening of the Code Completion window depend on
the programming language that you use. For example, typing a period after a Java class
opens the Code Completion window, allowing you to complete the class invocation.
You can change the time it takes for the Code Completion window to appear after you
type a trigger character. If you perform any activity during this delay time, the Code
Completion window is canceled.
See also:
• “Code Completion Delay” on page 242
B
Background
Click this color swatch to configure the background color of editor windows.
Balance Flash Delay
In this field enter the time, in ticks, to highlight a matching punctuation character during a
Balance while typing check. Each tick represents 1/60th of a second (16.67 milliseconds).
Sample tick values include:
• 0 (zero)—disables balance flashing
• 30—the default flash value (1/2 of a second)
• 999—the maximum-flash delay value
Balance while typing
Select this option to have the editor check for balanced parentheses, brackets, and braces
in editor windows. For each closing parenthesis, bracket, or brace, the editor attempts to
find the opening counterpart.
The IDE behaves differently, depending on whether it finds the counterpart:
• Found—the editor window scrolls to display the matching character, then returns to
the insertion point. The Balance Flash Delay option determines how long the editor
displays the matching character.
• Not found—the IDE beeps.
8/16-bit IDE User’s Guide
241
Preference and Target Settings Options
Browser Commands
Select this option to add Browser menu commands to contextual menus. Clear the option
to remove commands from the contextual menus.
Browser Path
In this field enter a path to the browser to use for viewing IDE online help. The Netscape
Navigator® browser is the default application. The PATH environment variable specifies
the path to the browser.
To change the default setting, or if the IDE cannot find Netscape Navigator, in the
Browser Path field enter a path to an alternate browser. Alternatively, click Set to select
the path.
Build before running
Choose from this pop-up menu the way in which the IDE handles project builds before
running the compiled application:
• Always—always build projects before running them.
• Never—never build projects before running them.
• Ask—ask each time how to proceed.
C
Case sensitive
Select this option to have the IDE consider case when completing code. Clear the option to
have the IDE ignore case.
The IDE can determine possible symbol matches according to case. For example, if you
clear the Case sensitive option and type str in the active editor window, the IDE
displays both string and String as possible matches. Selecting the option causes the
IDE to display only string as a possible match.
Code Completion Delay
In this field enter the number of ticks to have the IDE wait from the time you type a trigger
character to the time the Code Completion window opens. A tick is 1/60 of a second.
242
8/16-bit IDE User’s Guide
Preference and Target Settings Options
Performing any activity during this delay time cancels opening of the Code Completion
window.
See also:
• “Automatic Invocation” on page 240
Collapse non-debugging windows
Select this option to collapse non-debugging windows when starting a debugging session.
At the end of the debugging session, the IDE automatically restores the collapsed
windows.
Comments
Select the Activate Syntax Coloring option in order to configure this option. Use this
option to configure the color of C, C++, and Java comments displayed in editor windows.
The IDE then uses the chosen color for comments placed between /* and */ or from //
to the end of a line.
Click the color swatch next to Comments to set the color.
Compiler
Choose from this list pop-up the desired compiler for the selected File Type in the File
Mappings list. Select None to not associate the selected file type with any compiler.
Compiler thread stack
In this field enter the maximum kilobytes of stack size for the IDE to allocate to compiling
and linking thread support.
The IDE threads all build processes, with compiling and linking occurring on a thread
separate from the main application thread. This setting controls the compiler-thread stack
size.
To avoid frequent compiler crashes, such as when building very large or complex projects,
increase the default compiler-thread-stack size.
Confirm invalid file modification dates
Select this option to keep track of source-file modification dates in a project. The IDE
displays a warning message if the modification dates do not match. The message warns of
possible discrepancies between object code and source code. Clear the option to prevent
the IDE from displaying the warning message.
8/16-bit IDE User’s Guide
243
Preference and Target Settings Options
Context popup delay
In this field enter the minimum time, in ticks, to hold down the mouse button before IDE
contextual menus appear. Each tick represents 1/60 of a second (16.67 milliseconds).
Sample tick values include:
• 0 (zero)—disables appearance of contextual menus
• 40—default popup delay value (2/3 of a second)
• 240—maximum popup delay value
D
Disable third party COM plugins
Select this option to prevent the IDE from loading third-party Component Object Model
(COM) plugins. Clear the option to have the IDE load the plugins at start-up time.
Use this option to help troubleshoot problems with the IDE. If the problem goes away
after disabling the plug-ins, then a conflict exists between the third-party plugins and the
IDE plugins.
Display deprecated items
Select this option to have the Code Completion window display obsolete programminglanguage items. Clear the option to have the window hide the obsolete items.
Deprecated items appear in gray text in the Code Completion window.
Do nothing
Select this option to leave all windows in place during a debugging session.
Do nothing to project windows
Select this option to prevent the IDE from manipulating project windows when starting a
debugging session. Use this option to help debug multiple build targets or multiple
projects.
244
8/16-bit IDE User’s Guide
Preference and Target Settings Options
Documents
In this field enter the number of recent documents to display in the Open Recent
submenu.
Drag and drop editing
Select this option to allow dragging and dropping of text in editor windows. Clear the
option to disable drag-and-drop text editing.
Dump internal browse information after compile
Select this option to view the raw browser information that a plug-in compiler or linker
provides for the IDE. Use this option to help develop plug-ins for use with the IDE.
NOTE
After enabling the Dump internal browse information after compile option,
compile only single files or small files. Compiling an entire project can create
huge internal browser information for the IDE to display.
E
Edit Commands
Select this option to add Edit menu commands to IDE contextual menus. Clear the option
to remove the commands from the contextual menus.
Edit Language
Choose from this pop-up menu the programming language to associate with the selected
file mapping. The selected language determines the syntax-color scheme. For example,
choose C/C++ to apply the appropriate syntax-color scheme for C or C++ programminglanguage components.
Enable automatic Toolbar help
Select this option to display Balloon Help after resting the cursor over a toolbar button.
Clear the option to prevent Balloon Help from appearing.
8/16-bit IDE User’s Guide
245
Preference and Target Settings Options
Enable Virtual Space
Use this option to configure the editor for handling spaces in different ways.
• selected—the editor allows moving the text-insertion point past the end of a line of
text, using either the arrow keys or the mouse. After moving to the desired position,
begin entering text. The editor automatically inserts spaces between the former end
of the line and the newly entered text.
• cleared—the editor requires manual insertion of spaces to move past the end of a line
of text.
Environment Settings
Use this section to specify environment variables to pass to your program as part of the
environment parameter in your program’s main() function, or as part of environment
calls. These environment variables are only available to the target program. When your
program terminates, the settings are no longer available.
NOTE
The Environment Settings section appears only when you develop code for a
Windows build target. The section does not appear for any other build target.
Export Panel
Click this button to save to an Extensible Markup Language (XML) file the current state
of the active preference or settings panel.
Extension
In this field enter a filename extension, such as the .c or .h , for a selected File Type in
the File Mappings list. Table 21.1 on page 247 lists default filename extensions.
246
8/16-bit IDE User’s Guide
Preference and Target Settings Options
Table 21.1 Default filename extensions
Type
Extension
Explanation
Minimum CodeWarrior
Installation
.iSYM
CodeWarrior Intel® Symbols
.mch
CodeWarrior Precompiled Header
.mcp
CodeWarrior Project File
.SYM
CodeWarrior Mac OS 68K Debug
Symbols
.xSYM
CodeWarrior Mac OS PPC Debug
Symbols
.dbg
CodeWarrior Debug Preferences
.exp
Exported Symbol File
.iMAP
CodeWarrior Link Map
.MAP
CodeWarrior Link Map
.a
Assembly Source File
.asm
Assembly Source File
.dump
CodeWarrior Disassembled File
.c++
C++ Source File
.cc
C++ Source File
.hh
C++ Header File
.hpp
C++ Header File
.i
C Inline Source File
.icc
C++ Inline Source File
.m
Object C Source File
.mm
Object C++ Source File
Assembly
C and C++
8/16-bit IDE User’s Guide
247
Preference and Target Settings Options
Table 21.1 Default filename extensions (continued)
Type
Extension
Explanation
Default C and C++
.c
C Source File
.cp
C++ Source File
.cpp
C++ Source File
.h
C and C++ Header File
.class
Java Class File
.jar
Java Archive File
.jav
Java Source File
.java
Java Source File
.JMAP
Java Import
Mapping Dump
.jpob
Java Constructor File
.mf
Java Manifest File
.a
(Static) Archive Library
.lib
Library File
.o
Object File
.o
Object (Relocatable) Library or Kernel
Module
.obj
Object File
.pch
Precompiled Header Source File
.pch++
Precompiled Header Source File
Default Java
Java
Library
248
8/16-bit IDE User’s Guide
Preference and Target Settings Options
F
Factory Settings
Click this button to change all modified options to their default values in the current
preference or settings panel.
Failure
Choose from this pop-up menu a sound to play after a Bring Up To Date or Make
operation fails.
File Type
Enter in this field the four-character file type for the selected file mapping in the File
Mappings list.
Find and compare operations
A bullet in the Find and compare operations column, whose label appears at left,
indicates that the IDE ignores matching folders for find-and-compare operations.
Such operations include dragging a folder into fields in the Find window, or
comparing folder contents.
Find Reference using
Choose from the Find Reference using options, an online browser application to look up
references and definitions.
For example, use this option to look up documentation for language keywords:
1. Select an online browser application with the Find Reference using option.
2. Select a language keyword, such as boolean, in the source code.
3. Choose the Find Reference menu command. The IDE looks up reference
information for the boolean keyword in the documentation.
Font
Choose from the Font options the typeface to use for displaying text in editor windows.
This setting behaves in two different ways, depending on the current IDE state:
8/16-bit IDE User’s Guide
249
Preference and Target Settings Options
• No editor windows open—the setting modifies the default font. All editor windows
take on the default font.
• Editor windows open—the setting modifies the font displayed in the frontmost editor
window only. Other editor windows remain unaffected. The default font remains
unchanged.
Font preferences
Select the Font preferences option to remember font settings for each file in a project.
Clear the option to use the default font settings every time the IDE opens each file. The
Font & Tabs preference panel defines the default settings.
Foreground
Use the Foreground option to configure the color of any text not affected by the Activate
Syntax Coloring or Activate Browser Coloring options.
Click the color swatch to change the current color.
G-I
Generate Browser Data From
Choose from this pop-up menu whether the IDE generates browser data, and from what
source it generates that data.
Choose from these possibilities:
• None—Disable browser-data generation. Certain IDE features that use browser data
will be unable to work with the project, but the project’s size will be smaller.
• Compiler—Have the IDE use the compiler to generate browser data. If you choose
this option, you must Make the project in order to generate the browser data. The
IDE uses the compiler assigned to the project to generate browser data during the
build process.
• Language Parser—Have the IDE use the language parser to generate the browser
data. Certain IDE features, such as C/C++ Code Completion, function more
effectively if you choose this option. The IDE uses the language parser assigned to
the project to generate browser data.
NOTE
250
If you choose the Language Parser option, you can also have the IDE take
into account your custom macro definitions. To do so, enter the path to your
8/16-bit IDE User’s Guide
Preference and Target Settings Options
prefix file in the Prefix file field and the path to your macro file in the Macro
file field.
Grid Size X
In the Grid Size X field enter the number of pixels to space between markings on the xaxis of the Layout Editor grid.
Grid Size Y
In the Grid Size Y field enter the number of pixels to space between markings on the yaxis of the Layout Editor grid.
Host Flags
The Host Flags list pop-up defines the host platforms which can use the selected access
path. The settings include:
• None–no host can use this access path.
• All–all hosts can use this access path.
• Windows–only use this path for Windows build targets.
Import Panel
Click Import Panel to load the contents of a previously saved Extensible Markup
Language (XML) file into the active preference or settings panel.
Include file cache
Use the Include file cache option to specify the upper limit of kilobytes of memory used
by the IDE for caching #include files and precompiled headers. The larger the value
entered, the more memory the IDE uses to accelerate builds.
Initial directory
In this field enter the initial directory for use with the external debugger. Alternatively,
click Browse to open a dialog box. Use the dialog box to select the initial directory.
8/16-bit IDE User’s Guide
251
Preference and Target Settings Options
Insert Template Commands
Select the Insert Template Commands option to display the Insert Template submenu
in contextual menus. The submenu displays source-defined function templates. Clear to
remove the submenu from the contextual menus.
NOTE
Select the Browser Commands option in order to select the Insert Template
Commands option. Otherwise, the Insert Template Commands state has no
effect.
Interpret DOS and Unix Paths
This option determines how the IDE treats filenames for interface files:
• Selected—the IDE treats the backslash (\) and the forward slash (/) characters as
subfolder separator characters. In the example
#include "sys/socks.h"
the IDE searches for a subfolder called sys that contains a socks.h file.
• Cleared—the IDE treats both the backslash and forward slash characters as part of
the filename. Using the same example, the IDE now searches for a sys/socks.h
filename.
K-L
Keywords
Use the Keywords option to configure the color of C, C++, and Java programming
language’s keywords displayed in editor windows when the Activate Syntax Coloring
option is enabled. Coloring does not include macros, types, variables defined by system
interface files, or variables defined in source code. Click the color swatch next to
Keywords to set the color.
Launch Editor
Enter in the Launch Editor field a command-line expression that specifies the third-party
text editor that the CodeWarrior IDE runs to edit text files.
252
8/16-bit IDE User’s Guide
Preference and Target Settings Options
The IDE expands the %file variable of the command-line expression into the full file
path. For example, to run the Emacs text editor to edit text files, enter this command-line
expression:
runemacs %file
Consult the documentation provided with the third-party text editor for more information
about using command lines.
Launch Editor w/ Line #
Enter in the Launch Editor w/ Line # field a command-line expression that specifies the
third-party text editor that the IDE runs to edit text files, and an initial line of text that the
third-party editor displays upon running.
The IDE expands the %line variable of the command-line expression into an initial line
of text for the third-party text editor to display. For example, to run the Emacs text editor
to edit a text file, and to have the Emacs editor display the line provided to it by the IDE,
enter this command-line expression:
emacs %file %line
Consult the documentation provided with the third-party text editor for more information
about using command lines.
Left margin click selects line
Select the Left margin click selects line option to use a right-pointing cursor,
shown at left, to select entire lines of text from the left margin. Clear the option to
disable use of the right-pointing cursor.
With the right-pointing cursor active, click in the left margin to select the current
line, or click and drag along the left margin to select multiple lines.
Level
Choose from the Level options the amount of information reported for IDE plug-ins in
development. This information is useful for diagnosing plug-in behavior or for viewing
information about the properties of installed plug-ins.
Choose one of these levels of plug-in diagnostic information:
• None (default)—The IDE does not activate plug-in diagnostics or produce output.
• Errors Only—The IDE reports problems encountered while loading plug-ins. These
problems appear in a new text file after the IDE starts up
• All Info—The IDE reports information for each installed plug-in, such as problems
with plug-in loading, optional plug-in information, and plug-in properties. This
information appears in a new text file after the IDE starts up. The text file also
8/16-bit IDE User’s Guide
253
Preference and Target Settings Options
contains a complete list of installed plug-ins and their associated preference panels,
compilers, and linkers.
The IDE allows saving and printing the text file. Use the file as an error reference for
troubleshooting plug-ins. The text file also provides suggestions for correcting general
plug-in errors.
Linker
Use the Linker option menu to select the linker to use with the project. The choices
available are always dependent on the plug-in linkers that are available to the
CodeWarrior IDE.
To learn more about the linkers, see the appropriate Targeting manual.
O
Output Directory
Use the Output Directory caption to show the location the IDE places a final linked
output file. The default location is the directory that contains your project file. Select
Choose to specify the location path.
P
Play sound after ‘Bring Up To Date’ & ‘Make’
Select the Play sound after ‘Bring Up To Date’ & ‘Make’ option to play a sound after a
build operation completes. Choose different sounds for successful and unsuccessful builds
using the Success and Failure pop-up options, respectively.
See also:
• “Failure” on page 249
• “Success” on page 259
Post-linker
Use the Post-linker option to select a post-linker that performs additional work (such as
format conversion) on the final executable file.
254
8/16-bit IDE User’s Guide
Preference and Target Settings Options
For more information see the appropriate Targeting manual.
Pre-linker
Use the Pre-linker option to select a pre-linker that performs additional work on the
object code in a project. This work takes place before the IDE links the object code into
the final executable file.
For more information about the pre-linkers available, see the build targets Targeting
manual.
Projects
Enter the number of recent projects to display in the Open Recent submenu.
Project Commands
Select the Project Commands option to add Project menu commands to contextual
menus. Clear the option to remove the commands from the contextual menus.
Project operations
A bullet in the Project operations column, whose label appears at left, indicates
that the IDE ignores matching folders for project operations. Such operations
include dragging a folder into the Project window, building a project, or searching
access paths after choosing File > Open.
R
Recommended
Select the Recommended option to allow the number of concurrent compiles suggested
by the IDE. This suggestion takes into account the number of active Central Processing
Units (CPUs) on the host computer.
Regular Expression
Enter in the Regular Expression field a text pattern to match against folder names. The
IDE excludes matching folders and their contents from selected project operations or findand-compare operations.
8/16-bit IDE User’s Guide
255
Preference and Target Settings Options
Relaxed C popup parsing
Use the Relaxed C popup parsing option to control the strictness of C coding
conventions:
• Select the option to have the IDE recognize some non-standard functions that
interfere with Kernighan-and-Ritchie conventions. The IDE displays the nonstandard functions in the Routine list pop-up.
• Clear the option to have the IDE recognize only functions that conform to
Kernighan-and-Ritchie conventions. The IDE displays only the standard functions in
the Routine list pop-up.
For more information, refer to “Reference Manual,” of The C Programming Language,
Second Edition, by Kernighan and Ritchie, published by Prentice Hall.
NOTE
Toggle the Relaxed C popup parsing option to maximize recognition of
functions, macros, and routine names in the source code.
Revert Panel
Click Revert Panel to revert all modified options in the current preference or settings
panel to the values present when the panel was originally opened.
S
Save open files before build
Select the Save open files before build option to automatically save files during project
operations:
• Preprocess
• Precompile
• Compile
• Disassemble
• Bring Up To Date
• Make
• Run
256
8/16-bit IDE User’s Guide
Preference and Target Settings Options
Save project entries using relative paths
Use the Save project entries using relative paths option to store the location of a file
using a relative path from one of the access paths. The settings include:
• enabled–the IDE stores extra location information to distinctly identify different
source files with the same name. The IDE remembers the location information even
if it needs to re-search for files in the access paths.
• disabled–the IDE remembers project entries only by name. This setting can cause
unexpected results if two or more files share the same name. In this case, researching for files could cause the IDE to find the project entry in a different access
path.
Script
Choose from the Scripts options the script system (language) used to display text in editor
windows. This setting behaves in two different ways, depending on the current IDE state:
• No editor windows open—the setting modifies the default script system. All editor
windows take on the default script system.
• Editor windows open—the setting modifies the script system displayed in the
frontmost editor window only. Other editor windows remain unaffected. The default
script system remains unchanged.
Selection position
Select the Selection position option to remember these items for each editor window:
• visible text
• insertion-point location
• selected text
Clear the option to open each editor window according to default settings and place the
insertion point at the first line of text.
NOTE
The IDE must be able to write to the file in order to remember selection
position.
Show Code and Data Sizes
Enable this option in the IDE Extras panel of the IDE preferences panels to display the
Code and Data columns in the project manager window.
8/16-bit IDE User’s Guide
257
Preference and Target Settings Options
Show message after building up-to-date project
Select the Show message after building up-to-date project option to have the IDE
display a message after building an up-to-date project.
Size
Choose from the Size options the font size used to display text in editor windows. This
setting behaves in two different ways, depending on the current IDE state:
• No editor windows open—the setting modifies the default font size. All editor
windows take on the default font size.
• Editor windows open—the setting modifies the font size displayed in the frontmost
editor window only. Other editor windows remain unaffected. The default font size
remains unchanged.
Strings
Use the Strings option to configure the color of anything that is not a comment, keyword,
or custom keyword and displayed in editor windows when the Activate Syntax Coloring
option is enabled. Sample strings include literal values, variable names, routine names,
and type names.
Click the color swatch next to Strings to set the color.
Sort function popup
Select the Sort function popup option to sort function names by alphabetical order in list
pop-ups. Clear the option to sort function names by order of appearance in the source file.
Source relative includes
Select to search for dependent files in the same location as the source file. If the dependent
file is not found in this location, specified User and System paths are searched. If this
option is enabled, the Always Search User Paths should also be enabled. For example, if
the compiler is currently scanning the main source file and discovers an include header file
statement, the header file is searched for in the same location as the main file. If not found,
the specified access paths will be searched. If the header file declared in the main file also
contains an include statement for another header file, it too will be searched for in the
same sequence.
258
8/16-bit IDE User’s Guide
Preference and Target Settings Options
Success
Choose from the Success options a sound to play after a Bring Up To Date or Make
operation succeeds.
Symbolics
Enter the number of recent symbolics files to display in the Open Recent submenu.
System Paths
Click the System Paths radio button to display the System Paths pane in the Access Paths
preference panel.
T
Tab indents selection
Use the Tab indents selection option to control how the editor inserts tabs into the
currently selected lines of text:
• Select the option so that pressing Tab causes the editor to insert tab characters in
front of each selected line of text. The editor thereby indents the selected text.
• Clear the option so that pressing Tab causes the editor to replace selected text with a
tab character. The editor thereby overwrites the selected text.
Tab Inserts Spaces
Select the Tab Inserts Spaces option to have the editor insert spaces instead of tab
characters into text. Clear the option to have the editor use tab characters.
The Tab Size option determines the number of spaces inserted by the editor.
Tab Size
Enter in the Tab Size field the number of spaces to substitute in place of a tab character in
text. This number applies to the Tab Inserts Spaces option.
8/16-bit IDE User’s Guide
259
Preference and Target Settings Options
Target Name
Use the Target Name text box to set or modify the name of the current build target. This
name appears in the Targets view in the Project window. This name is not the name
assigned to the final output file, that is set in the Linker panel for the build target.
Type
Choose from the Type options the desired source-tree path type:
• Absolute Path—This source-tree type is based on a file path.
• Environment Variable—This source-tree type is based on an existing environmentvariable definition.
• Registry Key—This source-tree type is based on an existing Windows registry key
entry.
U
Use default workspace
Select this option to have the IDE use the default workspace. The IDE uses the default
workspace to save and restore window and debugging states from one session to the next.
For example, if you select this option and close the IDE with a project window visible
onscreen, that project window reappears the next time you start the IDE.
Clear this option to have the IDE start with the same default state for each new session: no
windows visible onscreen.
For example, if you clear this option and close the IDE with a project window visible
onscreen, that project window does not appear the next time you start the IDE. Instead, the
IDE always starts without opening any windows.
Use External Editor
Select the Use External Editor option to use an external text editor to modify text files in
the current project. Clear the option to use the text editor included with the IDE.
260
8/16-bit IDE User’s Guide
Preference and Target Settings Options
Use Local Project Data Storage
Select the Use Local Project Data Storage option to store (on the host computer) data
associated with a project file on a read-only volume. Clear the option to store project data
inside the same folder as the project file itself.
After loading a project file, the IDE creates or updates an associated project data folder.
The IDE stores intermediate project data in this folder. When building or closing a project,
the IDE uses the information in the project data folder to update the project file.
By default, the IDE places the project data folder within the same folder as the project file.
However, the IDE cannot create or update a project data folder in a location that grants
read-only privileges.
If you are creating one project to be accessed by multiple users that are running
CodeWarrior on separate machines, then each user should select this option to create a
local data storage folder for the shared project. The folder containing the project file
should be set to read-only. This will cause the target information to be stored locally on
each user’s machine, instead of inside a folder next to the project file.
Use modification date caching
Use the Use modification date caching option to determine whether the IDE checks the
modification date of each project file prior to making the project. The settings include:
• enabled–the IDE caches the modification dates of the files in a project. At
compilation time, the IDE refers to this cache to determine whether a specific file
should be recompiled. This can shorten compilation time significantly for large
projects.
• disabled–the IDE checks every file at each recompile of the project. Use this setting
if using third-party editors to ensure that the IDE checks every file at compilation
time.
Use Multiple Document Interface
Toggle this option to change the IDE interface:
• Selected—The IDE uses MDI (Multiple Document Interface). In this interface, the
IDE uses a main application window with a gray background. IDE windows appear
inside the main application window. The gray background obscures your view of the
desktop.
• Cleared—The IDE uses FDI (Floating Document Interface). In this interface, the
IDE does not use a main application window. You can see through the IDE user
interface to your desktop. IDE windows appear above the desktop.
8/16-bit IDE User’s Guide
261
Preference and Target Settings Options
Use multiple undo
Select the Use multiple undo option to remember several undo and redo operations in
editor windows. Clear the option to remember only the most recent undo or redo action.
The IDE stores undo and redo actions on a stack in first-in last-out (FILO) order, however,
the stack size and capability are limited. For example, assume there are five undo actions
on the stack (ABCDE). If the IDE redoes two actions (ABC), then performs a new action
(ABCF), the undo events (DE) are no longer available.
Use Script menu
Select the Use Script menu option to display the Scripts menu in the IDE menu bar.
Clear the option to remove the Scripts menu from the menu bar. The Scripts menu
provides convenient access to IDE scripts.
For more information about scripting the IDE, refer to the CodeWarrior Scripting
Reference.
Use Third Party Editor
Select the Use Third Party Editor option to use a third-party text editor to modify text
files. Clear the option to use the text editor included with the IDE.
Enter in the Launch Editor and Launch Editor w/ Line # fields command-line
expressions that specify information that the IDE passes to the third-party editor.
Consult the documentation provided with the third-party text editor for more information
about using command lines.
See also:
• “Launch Editor” on page 252
• “Launch Editor w/ Line #” on page 253
Use ToolServer menu
Select the Use ToolServer menu option to display the ToolServer menu in the IDE menu
bar. Clear the option to remove the ToolServer menu from the menu bar.
User Paths
Click this radio button to display the User Paths pane in the Access Paths preference
panel.
262
8/16-bit IDE User’s Guide
Preference and Target Settings Options
User Specified
Select the User Specified option to stipulate the number of concurrent compiles to allow
in the IDE. Enter the desired number in the text box beside the option.
NOTE
The IDE accommodates a maximum of 1024 concurrent compiles. However,
there is a point where the host system becomes compute-bound, and allowing
more processes only adds overhead. For a single-processor system, the
practical limit is approximately 12 concurrent compiles.
V
Value
The Value text box defines the value of the variable defined in the Variable text box that
will be passed to a host application when control is transferred to it by the IDE.
Variable
The Variable text box defines the name of a variable to be passed to a host application
when control is transferred to it by the IDE.
VCS Commands
Select the VCS Commands option to add VCS menu commands to contextual menus.
Clear the option to remove the commands from the contextual menus.
Refer to the documentation that came with the version control system to learn about using
it with the CodeWarrior IDE.
W-Z
Window follows insertion point
Select this option to have the Code Completion window follow the insertion point as you
edit text in the active editor window. Clear the option to leave the Code Completion
window in place.
8/16-bit IDE User’s Guide
263
Preference and Target Settings Options
Window position and size
Select the Window position and size option to remember the location and dimensions of
each editor window. Clear the option to open each editor window according to default
settings.
NOTE
The IDE must be able to write to the file in order to remember window position
and size.
Working Directory
Enter the path to the default directory to which the current project has access.
Workspaces
Enter the number of recent workspace files to display in the Open Recent submenu.
Zoom windows to full screen
Use the Zoom windows to full screen option to configure the behavior of the zoom box in
the upper right-hand corner of all editor windows:
• Select the option to have the IDE resize a zoomed window to fill the entire screen.
• Clear the option to have the IDE resize a zoomed window to its default size.
264
8/16-bit IDE User’s Guide
VII
Menus
This section contains these chapters:
• IDE Menus on page 267
• Menu Commands on page 277
8/16-bit IDE User’s Guide
265
266
8/16-bit IDE User’s Guide
22
IDE Menus
This chapter provides an overview of CodeWarrior™ IDE menus and their commands.
This chapter lists the IDE menus under each menu layout. For each menu, a table shows
this information:
• Menu command—the name of each command in the menu.
• Description—a short description of each command.
This chapter has these sections:
• “Windows Menu Layout” on page 267
Windows Menu Layout
This section provides an overview of the menus and menu commands available in the
Windows menu layout.
File Menu
The File menu contains commands for opening, creating, saving, closing, and printing
source files and projects. The File menu also provides different methods for saving edited
files.
Table 22.1 File menu commands
Menu command
Explanation
New Text File on
page 291
Creates new empty text file.
New on page 290
Creates new projects using the New Project wizard or
project stationery files.
Open on page 291
Opens source and project files for editing and project
modification operations.
Find and Open File on
page 286
Opens the file specified in the Find and Open File dialog or
from the selected text in the active window.
Close on page 281
Closes the active window.
8/16-bit IDE User’s Guide
267
IDE Menus
Windows Menu Layout
Table 22.1 File menu commands (continued)
268
Menu command
Explanation
Save on page 296
Saves the active file using the editor window’s filename.
Save All on page 296
Saves all open editor windows.
Save As on page 296
Saves a copy of the active file under a new name and
closes the original file.
Save A Copy As on
page 296
Saves a copy of the active file without closing the file.
Revert on page 296
Discards all changes made to the active file since the last
save operation.
Open Workspace on
page 291
Opens a workspace that you previously saved.
Close Workspace on
page 281
Closes the current workspace. (You cannot close the
default workspace.)
Save Workspace on
page 297
Saves the current state of onscreen windows, recent
items, and debugging.
Save Workspace As on
page 297
Saves an existing workspace under a different name.
Import Components on
page 289
Imports the components from another catalog into the
current catalog.
Close Catalog on
page 281
Closes the current catalog and its associated Catalog
Components window and Component Palette.
Import Project on
page 289
Imports a project file previously saved in extensible
markup language format (XML) and converts it into project
file format.
Export Project on
page 285
Exports the active project file to disk in extensible markup
language (XML) format.
Page Setup on page 292
Displays the Page Setup dialog for setting paper size,
orientation, and other printer options.
Print on page 292
Displays the Print dialog for printing active files, and the
contents of Project, Message, and Errors & Warning
window contents.
8/16-bit IDE User’s Guide
IDE Menus
Windows Menu Layout
Table 22.1 File menu commands (continued)
Menu command
Explanation
Open Recent on
page 291
Displays a submenu of recently opened files and projects
that can be opened in the IDE.
Exit on page 284
Quits the CodeWarrior IDE.
Edit Menu
The Edit menu contains all customary editing commands, along with some CodeWarrior
additions. This menu also includes commands that open the Preferences and Target
Settings windows.
Table 22.2 Edit menu commands
Menu command
Explanation
Undo on page 302
Undoes the last cut, paste, clear, or typing operation.
If you cannot undo the action, this command changes to
Can’t Undo.
Redo on page 293
Redoes the action of the last Undo operation.
If you cannot redo the action, this command changes to
Can’t Redo.
Cut on page 283
Removes the selected text and places a copy of it on the
Clipboard.
Copy on page 282
Copies the selected text and places a copy of it on the
Clipboard.
Paste on page 292
Places the contents of the Clipboard at current insertion
point or replaces the selected text.
Delete on page 283
Removes the selected text without placing a copy on the
Clipboard.
Select All on page 297
Selects all text in current editor window or text box for cut,
copy, paste, clear, or typing operations.
Balance on page 278
Selects text between the nearest set of parenthesis,
braces, or brackets.
Shift Left on page 297
Moves selected text one tab stop to the left.
8/16-bit IDE User’s Guide
269
IDE Menus
Windows Menu Layout
Table 22.2 Edit menu commands (continued)
Menu command
Explanation
Shift Right on page 298
Moves selected text one tab stop to the right.
Get Previous
Completion on page 287
Shortcut for selecting the previous item that appears in
the Code Completion window.
Get Next Completion on
page 287
Shortcut for selecting the next item that appears in the
Code Completion window.
Complete Code on
page 282
Opens the Code Completion window.
Preferences on page 292
Opens the IDE Preferences window where you can set
general IDE, editor, and layout options.
Target Settings on
page 299
Opens the project’s Target Settings window where you
can set target, language, code generation, linker, and
editor options.
(the name changes, based
on the name of the active
build target)
Version Control
Settings on page 302
Opens the VCS Settings window to enable activation of a
version control system and its relevant settings.
Commands & Key
Bindings on page 281
Opens the Customize IDE Commands window where you
can create, modify, remove menus, menu commands,
and key bindings.
View Menu
The View menu contains commands for viewing toolbars, the class browser, the Message
window, and other windows.
Table 22.3 View menu commands
270
Menu command
Explanation
Toolbars on page 301
Use the Toolbars menu to show, hide, reset, and clear
window and main toolbars.
Project Inspector on
page 292
Opens or brings to the front a Project Inspector window.
Browser Contents on
page 279
Opens or brings to the front a Browser Contents window.
8/16-bit IDE User’s Guide
IDE Menus
Windows Menu Layout
Table 22.3 View menu commands (continued)
Menu command
Explanation
Class Browser on page 280
Opens or brings to the front a New Class Browser
window.
Class Hierarchy or Class
Hierarchy Window on
page 280
Opens or brings to the front a Class Hierarchy window.
Build Progress or Build
Progress Window on
page 279
Opens the Build Progress window.
Errors & Warnings or Errors
& Warnings Window on
page 284
Opens or brings to the front an Errors & Warnings
window.
Processes or Processes
Window
Opens or brings to the front a Processes window.
Expressions or
Expressions Window
Opens or brings to the front an Expressions window. Use
to view, create, modify, and remove expressions.
Global Variables or Global
Variables Window
Opens or brings to the front a Global Variables window.
Search Menu
The Search menu contains commands for finding text, replacing text, comparing files,
and navigating code.
Table 22.4 Search menu commands
Menu command
Explanation
Find on page 285
Opens the Find and Replace window for performing
searches in the active editor window.
Replace on page 293
Opens the Find and Replace window for replacing text in
the active editor window.
Find in Files on page 286
Opens the Find in Files window for performing searches in
the active editor window.
Find Next on page 286
Finds the next occurrence of the find string in the active
editor window.
8/16-bit IDE User’s Guide
271
IDE Menus
Windows Menu Layout
Table 22.4 Search menu commands (continued)
Menu command
Explanation
Find In Next File on
page 286
Finds the next occurrence of the find string in the next file
listed in the Find window’s File Set.
Enter Find String on
page 284
Replaces the Find text box string with the selected text.
Find Selection on
page 287
Finds the next occurrence of the selected text in the active
editor window.
Replace Selection on
page 294
Replaces the replace string in the Replace text box with
the selected text.
Replace and Find Next on
page 294
Replaces the selected text with the Replace text box
string, then performs a Find Next operation.
Replace All on page 294
Finds all matches of the Find text box string and replaces
them with the Replace text box string.
Find Definition on
page 285
Searches for definition of the routine name selected in the
active editor window using the project’s source files.
Go Back on page 287
Returns to the previous CodeWarrior browser view.
Go Forward on page 288
Moves to the next CodeWarrior browser view.
Go to Line on page 288
Opens the Go To Line dialog where you can specify by
line number where to position the text insertion point.
Compare Files on
page 282
Opens the Compare Files Setup window where you can
choose to compare folders or files and merge their
contents.
Apply Difference on
page 278
Adds, removes, or changes the selected text in the
destination file to match the selected text in the source
file.
Unapply Difference on
page 302
Reverses the modifications made to the destination file by
the Apply Difference command.
Project Menu
The Project menu contains commands for manipulating files, handling libraries,
compiling projects, building projects, and linking projects.
272
8/16-bit IDE User’s Guide
IDE Menus
Windows Menu Layout
Table 22.5 Project menu commands
Menu command
Explanation
Add Window on page 277
Adds the active window to the project.
Add Files on page 277
Opens a dialog box that you can use to add multiple files
to the active project.
Create Group on page 283
Opens the Create Group dialog box that you can use to
add a new file group to the active project. The new file
group appears below the selected file or group.
Create Target on
page 283
Opens the Create Target dialog box that you can use to
add a new build target to the active project. The new build
target appears below the selected build target.
Check Syntax on
page 280
Checks the active editor window or selected files in the
project window for compilation errors.
Preprocess on page 292
Preprocesses the active editor window or selected files in
the project window and displays results in a new editor
window.
Precompile on page 292
Precompiles the active editor window or selected files in
the project window and stores results in a new header file.
Compile on page 282
Compiles the active editor window or selected files in the
project window.
Disassemble on page 283
Disassembles the active editor window or selected files in
the project window and displays results in a new editor
window.
Bring Up To Date on
page 279
Compiles all marked or modified files in the current build
target of the active project.
Make on page 289
Compiles and links all marked or modified files in the
current build target of the active project, saving the
executable file.
Stop Build on page 298
Stops the current compile and linking operation and
cancels the remainder of the build process.
Remove Object Code on
page 293
Removes object code from one or more build targets in
the project.
Re-search for Files on
page 294
Resets the cached locations of source files using the
project access paths, and stores them for faster builds
and project operations.
8/16-bit IDE User’s Guide
273
IDE Menus
Windows Menu Layout
Table 22.5 Project menu commands (continued)
Menu command
Explanation
Reset Project Entry
Paths on page 295
Resets the location of all source files in the active project
using the project access paths.
Synchronize Modification
Dates on page 299
Updates the modification dates of all source files in the
active project.
Run
Compiles and links all marked or modified files in the
current build target of the active window, then runs the
built executable file.
Set Default Project on
page 297
Uses the Set Default Project menu to choose the default
project when more than one project is open in the IDE.
Set Default Target on
page 297
Uses the Set Default Target menu to choose the default
build target when more than one build target is present in
the project file.
Window Menu
The Window menu contains commands that manipulate IDE windows.
The menu lists the names of all open file and project windows. A checkmark appears
beside the active window, and an underline indicates a modified and unsaved file.
Table 22.6 Window menu commands
274
Menu command
Explanation
Close on page 281
Closes the active window.
Close All on page 281
Closes all non-project windows.
Cascade on page 280
Arranges all editor windows so that only the title bar is
visible.
Tile Horizontally on
page 299
Tiles all editor windows horizontally on the screen so
none overlap.
Tile Vertically on page 300
Tiles all editor windows vertically on the screen so none
overlap.
Save Default Window on
page 297
Saves the active browser windows settings and applies it
to other browser windows as they are opened.
8/16-bit IDE User’s Guide
IDE Menus
Windows Menu Layout
Help Menu
The Help menu contains commands for accessing the IDE’s online help.
Table 22.7 Help menu commands
Menu command
Explanation
CodeWarrior Help on page 282
Launches a help viewer to display the online help.
Click on a link to view a specific IDE topic.
Index
Launches a help viewer to display a glossary of
common terms used in the CodeWarrior help and
manuals.
Search
Launches a help viewer to a page for searching the
CodeWarrior help and manuals.
Freescale Website on page 289
Launches a browser and automatically points you to
the Freescale web site.
About Freescale
CodeWarrior on page 277
Displays the CodeWarrior IDE version and build
number information.
8/16-bit IDE User’s Guide
275
IDE Menus
Windows Menu Layout
276
8/16-bit IDE User’s Guide
23
Menu Commands
This section presents an alphabetical listing of all available menu commands in the
CodeWarrior™ IDE. Menu commands that appear only on certain host platforms are
documented. A menu command that has no host information is available on all hosts.
Use this listing as a reference to find information about a specific menu command.
A
About Freescale CodeWarrior
This command displays the CodeWarrior IDE version and build number information.
TIP
Click the Installed Products button in this window to view and save information
about installed products and plug-ins for the CodeWarrior IDE. You can also use
this window to enable or disable plug-in diagnostics.
Add Files
The Add Files command opens a dialog which allows one or more files to be added to the
project.
Add Window
The Add Window command adds the file in the active Editor window to the open project.
The name of the menu command changes, based on the name of the active window. For
example, if the name of the active window is MyFile, the name of the menu command
changes to Add MyFile to Project.
Align
Reveals the Align submenu with component alignment commands like Right Edges,
Vertical Centers, and others.
See also:
8/16-bit IDE User’s Guide
277
Menu Commands
• “Bottom Edges” on page 278
• “Horizontal Center” on page 288
• “Left Edges” on page 289
• “Right Edges” on page 296
• “To Grid” on page 300
• “Top Edges” on page 301
• “Vertical Center” on page 302
All Exceptions
The All Exceptions command of the Java submenu tells the debugger to break every time
an exception occurs. This behavior includes exceptions thrown by the virtual machine,
your own classes, the debugger, classes in classes.zip, and so on. Java programs
throw many exceptions in the normal course of execution, so catching all exceptions
causes the debugger to break often.
Anchor Floating Toolbar
The Anchor Floating Toolbar command attaches the floating toolbar beneath the menu
bar. Once attached, the anchored toolbar can not be moved again until it is unanchored.
See also: “Unanchor Floating Toolbar” on page 301
Apply Difference
The Apply Difference command applies the selected difference from the source file into
the destination file.
B
Balance
The Balance command selects all text starting at the current insertion point and enclosed
in parentheses (), brackets [], or braces {},
Bottom Edges
The Bottom Edges command of the Align submenu aligns the bottom edges of the
selected components.
278
8/16-bit IDE User’s Guide
Menu Commands
Break
The Break command temporarily suspends execution of the target program and returns
control to the debugger.
See also: “Stop” on page 298.
Break on C++ Exception
The Break on C++ Exception command tells the debugger to break at __throw() each
time a C++ exception occurs.
Break on Java Exceptions
The Break on Java Exceptions command reveals the Java Exceptions submenu.
See also:
• “Exceptions in Targeted Classes” on page 284
Bring To Front
The Bring To Front command moves the selected objects so that they are displayed in
front of all other objects.
Bring Up To Date
The Bring Up To Date command updates the current build target in the active project by
compiling all of the build target’s modified and touched files.
Browser Contents
The Browser Contents command opens the Browser Contents window. This command is
not available if the Enable Browser option is not activated.
Build Progress or Build Progress Window
These commands open the Build Progress window. Use it to monitor the IDE’s status as it
compiles a project.
8/16-bit IDE User’s Guide
279
Menu Commands
C
Cascade
The Cascade command arranges open editor windows one on top of another, with their
window titles visible.
Check Syntax
The Check Syntax command checks the syntax of the source file in the active Editor
window or the selected files in the open project window. If the IDE detects one or more
errors, a Message window appears and shows information about the errors.
The Check Syntax command is not available if the active Editor window is empty or no
project file is open.
Check Syntax does not generate object code.
Press Esc key to abort the syntax-checking process.
Class Browser
The Class Browser command opens a Class Browser window. This command is
unavailable if the Enable Browser option is not enabled.
Class Hierarchy or Class Hierarchy Window
These commands open a Multi-Class Browser window. This command is unavailable if
the Enable Browser option is not enabled.
Clear
The Clear command removes the selected text. This menu command is equivalent to
pressing the Backspace or Delete key.
Clear Floating Toolbar
The Clear Floating Toolbar command removes all shortcut icons from the floating
toolbar. Once the toolbar is cleared, drag shortcut icons from the Commands and Key
Bindings window to the toolbar to create a custom floating toolbar.
280
8/16-bit IDE User’s Guide
Menu Commands
Clear Main Toolbar
The Clear Main Toolbar command removes all shortcut icons from the main toolbar.
Once the toolbar is cleared, drag shortcut icons from the Commands and Key Bindings
window to the toolbar to create a custom main toolbar.
Clear Window Toolbar
The Clear Window Toolbar command removes all shortcut icons from the window
toolbar. Once the toolbar is cleared, drag shortcut icons from the Commands and Key
Bindings window to the toolbar to create a custom window toolbar.
Close
The Close command closes the active window.
Close All
The Close All command closes all open windows of a certain type. The name of this menu
command changes, based on the type of item selected. For example, select one of several
open editor windows, the menu command changes its name to Close All Editor
Documents.
Close Catalog
The Close Catalog command closes the current catalog and removes the catalog from the
Component Catalog window and the Component Palette.
Close Workspace
This command closes the current workspace.
You cannot close the default workspace, but you can choose whether to use it by toggling
the Use default workspace on page 260 option in the IDE Extras on page 205
preference panel.
Commands & Key Bindings
The Commands and Key Bindings command opens the Customize IDE Commands
window.
8/16-bit IDE User’s Guide
281
Menu Commands
Complete Code
The Complete Code command opens the Code Completion window. Use this window to
help you automatically complete programming-language symbols as you type them in the
active editor window.
CodeWarrior Glossary
The CodeWarrior Glossary command opens and displays a list of vocabulary terms used
by the CodeWarrior manuals and online help.
CodeWarrior Help
This command opens the online help for the CodeWarrior IDE.
Collapse Window
The Collapse Window command collapses the active window so that only its title is
visible.
Compare Files
The Compare Files command opens the Compare Files Setup window. Use it to choose
two files or folders for comparison and merging. After choosing the items, a comparison
window appears that shows differences between the items.
Compile
The Compile command compiles selected source files into binary files. The IDE compiles
source files that are:
• part of the current project and open in the active Editor window, or
• selected files, segments, or groups in a project window.
Copy
The Copy command copies selected text to the system Clipboard. If the Message Window
is active, the Copy command copies all text in the Message Window to the Clipboard.
Copy to Expression
The Copy to Expression command copies the variable selected in the active pane to the
Expressions window.
282
8/16-bit IDE User’s Guide
Menu Commands
Create Design
This command creates a new design in the current project. The new design appears in the
Design tab of the project window. You cannot create a design if each build target in the
project already belongs to a design.
Create Group
The Create Group command creates a new group in the current project. This command is
active when the Files view is visible in the project window.
Create Target
The Create Target command creates a new build target in the current project. This
command is active when the Targets view is visible in the project window.
Cut
The Cut command copies the selected text to the system Clipboard, replacing the previous
Clipboard contents, and removes it from the current document or text box.
D
Delete
The Delete command removes selected text without placing it on the system clipboard.
This menu command is equivalent to pressing the Backspace or Delete key.
Disassemble
The Disassemble command disassembles the compiled source files selected in the project
window. After disassembling a file, the IDE creates a .dump file that contains the file’s
object code. The .dump file appears in a new window after the IDE completes the
disassembly process.
Display Grid
The Display Grid command toggles the visibility of grid lines in the layout window.
When checked, the grid lines appear, otherwise, no grid is visible.
8/16-bit IDE User’s Guide
283
Menu Commands
E
Enter Find String
The Enter Find String command copies selected text in the active window directly into
the target search string. It will then appear in the Find text box of both the Find and
Replace and Find in Files windows. Once done, use any of the find commands to search
for matches without opening any Find-related windows.
Enter Replace String
The Enter Replace String command copies the selected text in the active window
directly into the target search string. It will then appear in the Replace with text box of
both the Find and Replace and Find in Files windows. Once done, use any of the find
commands to search for matches without opening any Find-related windows.
Errors & Warnings or Errors & Warnings Window
These commands open the Errors and Warnings window.
Exceptions in Targeted Classes
The Exceptions in Targeted Classes command of the Java submenu instructs the
debugger to break on exceptions thrown by your own classes in the project. Choose this
command to break on exceptions thrown by your classes, rather than exceptions that Java
programs throw in the normal course of execution.
Exit
The Exit command exits the CodeWarrior IDE immediately, provided that:
• all changes to the open editor files are already saved, or
• the open editor files are not changed.
If a Project window is open, the IDE saves all changes to the project file before exiting. If
an Editor window is open and changes are not saved, the CodeWarrior IDE asks if you
want to save your changes before exiting.
284
8/16-bit IDE User’s Guide
Menu Commands
Expand Window
The Expand Window command expands a collapsed window (a window with only its
title visible). Only available when a collapsed window is currently active.
Export Project
The Export Project command exports a CodeWarrior project to a file in XML format.
The IDE prompts for a name and location to save the new XML file.
F
Find
The Find command opens the Find and Replace window to perform find operations within
the active file.
Find Definition & Reference
The Find Definition & Reference command searches for the definition of the selected
routine name in the active Editor window. Searching starts within the source files
belonging to the open project. If the IDE does not find a definition, a system beep sounds.
If the IDE does not find the routine definition within the project files, searching continues,
using the online help system specified in the IDE Extras preference panel.
Find Definition
The Find Definition command searches for the definition of the selected routine name in
the active window. Searching occurs in the source files belonging to the open project. If
the IDE finds the definition, the source file that contains the definition appears in an Editor
window, and the routine name appears highlighted.
If the IDE finds more than one definition, a Message window appears warning of multiple
definitions. If the IDE does not find a definition, a system beep sounds.
NOTE
Select the Activate Browser option in the Build Extras target settings panel
and re-compile the project in order to use the Find Definition command.
8/16-bit IDE User’s Guide
285
Menu Commands
Find in Files
The Find in Files command opens the Find in Files window. This window allows you to
perform find-and-replace operations across multiple files using specified search criteria.
Find In Next File
The Find in Next File command searches for the next occurrence of the Find text box
string in the next file listed in the Find in Files window.
Find In Previous File
This command searches for the next occurrence of the Find text box string in the previous
file listed in the Find in Files window.
Find Next
The Find Next command searches for the next occurrence of the Find text box string in
the active window.
Find and Open File
The Find and Open File command opens the Find and Open File dialog. Enter a
filename, click OK, and the IDE searches the current project access paths as specified in
the Access Paths panel of the Target Settings window.
Find and Open ‘Filename’
The Find and Open ‘Filename’ command opens an existing text file, using the currently
selected text in the Editor window as the filename.
Find Previous
The Find Previous command searches for the previous occurrence of the user defined
string in the active window.
Find Previous Selection
The Find Previous Selection searches for the previous occurrence of the selected text in
the active editor window.
286
8/16-bit IDE User’s Guide
Menu Commands
Find Reference
The Find Reference command searches for the definition of the selected routine name in
the active Editor window, using the online help system specified in the IDE Extras
preference panel.
If the IDE does not find a definition, a system beep sounds.
Find and Replace
The Find and Replace command opens the Find and Replace window. Use this window
to perform find-and-replace operations within the active file.
Find Selection
The Find Selection command searches for the next occurrence of the selected text in the
active Editor window.
G
Get Next Completion
The Get Next Completion command acts as a shortcut that bypasses using the Code
Completion window. Instead of scrolling through the Code Completion window to select
the next symbol from the one currently selected, use this command to insert that next
symbol directly into the active editor window.
Get Previous Completion
The Get Previous Completion command acts as a shortcut that bypasses using the Code
Completion window. Instead of scrolling through the Code Completion window to select
the previous symbol from the one currently selected, use this command to insert that
previous symbol directly into the active editor window.
Go Back
The Go Back command returns to the previous view in the CodeWarrior browser.
8/16-bit IDE User’s Guide
287
Menu Commands
Go Forward
The Go Forward command moves to the next view in the CodeWarrior Browser (after
you select Go Back command to return to previous view).
Go to Line
The Go to Line command opens the Line Number dialog box. Enter a specific line
number to move the text-insertion point. If the line number specified exceeds the number
of lines in the file, the text-insertion point moves to the last line in the file.
H
Hide Floating Toolbar
The Hide Floating Toolbar command conceals the IDE’s floating toolbar. After
concealing the floating toolbar, the command changes to Show Floating Toolbar.
Hide Main Toolbar
The Hide Main Toolbar command conceals the IDE’s main toolbar. After concealing the
main toolbar, the command changes to Show Main Toolbar.
Hide Window Toolbar
The Hide Window Toolbar command conceals the toolbar in the active window. After
concealing the window toolbar, the command changes to Show Window Toolbar.
Horizontal Center
The Horizontal Center command of the Align submenu aligns the horizontal centers of
the selected components.
288
8/16-bit IDE User’s Guide
Menu Commands
I
Import Components
The Import Components command imports components from another catalog for use
with the current catalog.
Import Project
The Import Project command imports project files previously saved in a XML file with
the Export Project command.
K-L
Left Edges
The Left Edges command of the Align submenu aligns the left edges of the selected
components.
M-N
Make
The Make command builds the selected project by compiling and linking its modified and
touched files. The results of a successful build depends on the selected project type.
Maximize Window
Windows equivalent of Expand Window.
See also: “Expand Window” on page 285
Freescale Website
The Freescale Website command launches a web browser and displays the Freescale web
site.
8/16-bit IDE User’s Guide
289
Menu Commands
Minimize Window
Windows equivalent of Collapse Window.
See also: “Collapse Window” on page 282
New
The New command opens the New window. Use the New window to create new projects,
files, components, and objects.
New Class
The New Class command opens the New Class wizard. Use this wizard to help create new
classes in a project.
New Class Browser
The New Class Browser command opens a Browser window. The IDE grays out this
menu command if the CodeWarrior browser is not activated. This menu command is
equivalent to the Class Browser menu command.
New Data Member
The New Data Member command opens the New Data Member wizard. Use this wizard
to help create new data members for a class.
New Event
The New Event command opens the New Event window. Use this window to help create
new events for a selected class in a project.
New Event Set
The New Event Set command opens the New Event Set window to create a new event set
for a selected class in a project.
New Member Function
The New Member Function command opens the New Member Function wizard. Use this
wizard to help create new member functions for a class.
290
8/16-bit IDE User’s Guide
Menu Commands
New Method
The New Method command opens the New Method window. Use this window to create a
new method for a selected class in a project.
New Property
The New Property command opens the New Property window. Use this window to create
a new property for a selected class in a project.
New Text File
The New Text File command creates a new editable text file and opens an editor window.
O
Open
The Open command opens an existing project or source file.
Open Recent
The Open Recent menu item reveals a submenu of recently opened projects and files.
Choose a file from the submenu to open that item.
If two or more files in the submenu have identical names, the submenu shows the full
paths to those files in order to distinguish between them.
Open Scripts Folder
This command opens the (Scripts) folder. This command is only available if the Use
Scripts menu option is enabled.
Open Workspace
This command opens a workspace file that you previously saved.
8/16-bit IDE User’s Guide
291
Menu Commands
P-Q
Page Setup
The Page Setup command sets the options used for printing CodeWarrior IDE files.
Paste
The Paste command replaces the selected text with contents of the system clipboard into
the active Editor window or text box. If no text is selected, the IDE places the clipboard
contents at the text-insertion point.
The Paste command is unavailable if the Message window is active.
Precompile
The Precompile command precompiles the text file in the active Editor window into a
precompiled header file.
Preferences
The Preferences command opens the IDE Preferences window. Use this window to
change the global preferences used by the CodeWarrior IDE.
Preprocess
This command preprocesses selected source files in any language that has a preprocessor,
such as C, C++, and Java.
Print
The Print command prints CodeWarrior IDE files, as well as Project, Message, and Errors
and Warnings window contents.
Project Inspector
Opens the Project Inspector window so that you can view information about your project.
You can also use this window to manipulate file-specific information.
292
8/16-bit IDE User’s Guide
Menu Commands
R
Redo
After undoing an operation, you can redo it. For example, after choosing the Undo
Typing command to remove some text that you typed, you can choose Redo Typing to
override the undo and restore the text.
You can enable the Use multiple undo option in the Editor Settings preference panel to
allow greater flexibility with regard to Undo and Redo operations. After enabling this
option, you can choose Undo multiple times to undo multiple actions, and you can Redo
multiple times to redo multiple actions.
Refresh All Data
This command updates the data that appears in all windows.
Remove Object Code
The Remove Object Code command shows the Remove Object Code dialog box. Use
this dialog box to remove binary object code from the active project, or to mark the
project’s files for re-compilation.
Remove Object Code & Compact
This command removes all binaries from the project and compacts it. Compacting the
project removes all binary and debugging information and retains only the information
regarding the files that belong to the project and project settings.
Remove Selected Items
The Remove Selected Items command removes the currently selected items from the
Project window.
CAUTION
You cannot undo this command.
Replace
The Replace command opens the Find and Replace dialog box. Use this dialog box to
perform find-and-replace operations within the active file.
8/16-bit IDE User’s Guide
293
Menu Commands
Replace All
The Replace All command finds all occurrences of the Find string and replaces them with
the Replace string. If no text is selected in the active Editor window and there is no text in
the Find text box, the IDE dims this menu command.
Replace and Find Next
This command substitutes selected text with text in the Replace text box of the Find
window, and then performs a Find Next operation. If no text is selected in the active
Editor window and there is no text in the Find field of the Find window, the IDE grays out
this menu command.
Replace and Find Previous
This command substitutes selected text with the text in the Replace text box of the Find
window, and then performs a Find Previous operation. If no text is selected in the active
Editor window and there is no text in the Find field of the Find window, the IDE grays out
this menu command.
Replace Selection
The Replace Selection command substitutes the selected text in the active window with
the text in the Replace text box of the Find window. If no text is selected in the active
Editor window, the IDE grays out the menu command.
This menu command replaces one instance of a text string without having to open the Find
window. Suppose that you replaced all occurrences of the variable icount with
jcount. While scrolling through your source code, you notice an instance of the variable
icount misspelled as icont. To replace this misspelled variable with jcount, select
icont and the Replace Selection menu command.
Re-search for Files
The Project > Re-search for Files command speeds up builds and other project
operations, the IDE caches the location of project files after finding them in the access
paths. Re-search for Files forces the IDE to forget the cached locations and re-search for
them in the access paths. This command is useful if you moved several files and you want
the IDE to find the files in their new locations.
If the Save project entries using relative paths option is enabled, the IDE does not reset
the relative-path information stored with each project entry, so re-searching for files finds
the source files in the same location (the exception is if the file no longer exists in the old
location). In this case, the IDE only re-searches for header files. To force the IDE to also
294
8/16-bit IDE User’s Guide
Menu Commands
re-search for source files, choose the Project > Reset Project Entry Paths menu
command.
If the Save project entries using relative paths option is disabled, the IDE re-searches
for both header files and source files.
Reset
The Reset command resets the program and returns control to the IDE.
Reset Floating Toolbar
The Reset Floating Toolbar command restores the default state of the floating toolbar.
Use this command to return the floating toolbar to its original default settings.
Reset Main Toolbar
The Reset Main Toolbar command restores the default state of the main toolbar. Use this
command to return the main toolbar to its original default settings.
Reset Project Entry Paths
The Reset Project Entry Paths command resets the location information stored with each
project entry and forces the IDE to re-search for the project entries in the access paths.
This command does nothing if the Save project entries using relative paths option is
disabled.
Reset Window Toolbar
The Reset Window Toolbar command restores the default state of the toolbar in the
active window. Use this command to return the toolbar to its original default settings.
Resize
The Resize command reveals the Resize submenu.
See also:
• “To Largest Height” on page 300
• “To Largest Width” on page 300
• “To Smallest Height” on page 301
• “To Smallest Width” on page 301
8/16-bit IDE User’s Guide
295
Menu Commands
Restart
The Restart command terminates the current debugging session, then starts a new
debugging session.
Restore Window
The Restore Window command restores a minimized window (a window reduced to an
item in the task bar).
Revert
The Revert command restores the last saved version of the active Editor window.
Right Edges
The Right Edges command of the Align submenu aligns the right edges of the selected
components.
S
Save
The Save command saves the contents of the active window to disk.
Save A Copy As
The Save A Copy As command saves the active window to a separate file. This command
operates in different ways, depending on the active window.
Save All
The Save All command saves all currently open editor files.
Save As
The Save As command saves the contents of the active window to disk under a different
name.
296
8/16-bit IDE User’s Guide
Menu Commands
Save Default Window
This command saves the window settings, such as position and size, of the active Browser
or Search Results window. The IDE applies the saved settings to subsequently opened
windows.
Save Workspace
This command saves the current state of onscreen windows and recent items. Use the
dialog box that appears to name the workspace and navigate to a location in which to store
the workspace file.
Save Workspace As
This command saves a copy of an existing workspace. Use this command to save the
workspace under a different name.
Select All
The Select All command selects all text in the active window or text box. This command
is usually used in conjunction with other Edit menu commands such as Cut, Copy, and
Clear.
Send To Back
The Send To Back command moves the selected window behind all other windows.
Set Default Project
The Set Default Project command sets a particular project as the default project when
more than one project is open. This is the project that all commands are directed.
Set Default Target
The Set Default Target command allows you to specify a different build target within the
current project. Choose the build target to work with from the submenu. This menu
command is useful for switching between multiple build targets in a project and
performing a build for each target.
Shift Left
The Shift Left command shifts the selected source code one tab to the left. The amount of
shift is controlled by the Tab Size option.
8/16-bit IDE User’s Guide
297
Menu Commands
Shift Right
The Shift Right command shifts the selected source code one tab to the right. The amount
of shift is controlled by the Tab Size option.
Show Floating Toolbar
The Show Floating Toolbar command displays the IDE’s floating toolbar. After
displaying the floating toolbar, the command changes to Hide Floating Toolbar.
Show Main Toolbar
The Show Main Toolbar command displays the IDE’s main toolbar. After displaying the
main toolbar, the command changes to Hide Main Toolbar.
Show Types
The Show Types command displays the data types of all local and global variables that
appear in the active variable pane or variable window.
Show Window Toolbar
The Show Window Toolbar command displays the toolbar in the active window. After
displaying the window toolbar, the command changes to Hide Window Toolbar.
Stack Editor Windows
The Stack Editor Windows command arranges open editor windows one on top of
another, with their window titles visible.
Stop
This command temporarily suspends execution of the target program.
Stop Build
The Stop Build command halts the build currently in progress.
Switch to Monitor
This command transfers control from the CodeWarrior debugger to an external third-party
debugger.
298
8/16-bit IDE User’s Guide
Menu Commands
Synchronize Modification Dates
The Synchronize Modification Dates command updates the modification dates stored in
the project file. The IDE checks the modification date of each file in the project and marks
(for recompiling) those files modified since the last successful compile process.
T-U
Target Settings
The Target Settings command displays the Target Settings window. This window
contains settings panels used by the active build target. The name of the menu command
changes, based on the name of the current build target. For example, if the name of the
current build target is ReleaseTarget, the name of the menu command changes to
ReleaseTarget Settings.
Tile Editor Windows
The Tile Editor Windows command arranges and resizes all open editor windows so that
none overlap on the monitor.
Figure 23.1 Tile Editor windows—example
Tile Editor Windows Vertically
The Tile Editor Windows Vertically command resizes all open editor windows to be
vertically long, and arranged horizontally across the monitor so that all are viewable.
Tile Horizontally
This command arranges open editor windows horizontally so that none overlap.
8/16-bit IDE User’s Guide
299
Menu Commands
Figure 23.2 Tile horizontally—example
Tile Vertically
This command resizes open editor windows vertically and arranges them so that none
overlap.
Figure 23.3 Tile vertically—example
To Grid
The To Grid command of the Align submenu aligns selected components to a grid in the
layout. You can display or hide the on screen grid.
To Largest Height
The To Largest Height command of the Resize submenu resizes the selected components
to match the height of the component with the largest height.
To Largest Width
The To Largest Width command of the Resize submenu resizes the selected components
to match the width of the component with the largest width.
300
8/16-bit IDE User’s Guide
Menu Commands
Toolbars
The Toolbars command reveals the Toolbars submenu.
See also:
• “Show Window Toolbar” on page 298
• “Hide Window Toolbar” on page 288
• “Reset Window Toolbar” on page 295
• “Clear Window Toolbar” on page 281
• “Show Main Toolbar” on page 298
• “Hide Main Toolbar” on page 288
• “Reset Main Toolbar” on page 295
• “Clear Main Toolbar” on page 281
• “Hide Floating Toolbar” on page 288
• “Show Floating Toolbar” on page 298
• “Reset Floating Toolbar” on page 295
• “Clear Floating Toolbar” on page 280
Top Edges
The Top Edges command of the Align submenu aligns the top edges of the selected
components.
To Smallest Height
The To Smallest Height command of the Resize submenu resizes the selected
components to match the height of the component with the smallest height.
To Smallest Width
The To Smallest Width command of the Resize submenu resizes selected components to
match the width of the component with the smallest width.
Unanchor Floating Toolbar
The Unanchor Floating Toolbar command detaches the floating toolbar from beneath
the menu bar.
8/16-bit IDE User’s Guide
301
Menu Commands
Unapply Difference
The Unapply Difference command reverses the action of the Apply Difference
command in a file-comparison window.
Undo
The Undo command reverses the last action. The name of this menu command changes
based upon the editor settings as well as the most recent action. For example, after typing
text in an open Editor window, the Undo command changes its name to Undo Typing.
Choose the Undo Typing command to remove the typed text.
By default, only one undo or redo action is allowed. If the Use multiple undo option is
enabled, undo and redo can act upon multiple actions.
Ungroup
The Ungroup command separates a selected group so that you can move each component
independently.
V-Z
Version Control Settings
The Version Control Settings command opens the VCS Settings window.
Vertical Center
The Vertical Center command of the Align submenu aligns the vertical centers of the
selected components.
View As Default
The View As Default command displays the selected variable in its default format, based
on the variable’s type.
View As Hexadecimal
The View As Hexadecimal command displays the selected variable as a hexadecimal
value.
302
8/16-bit IDE User’s Guide
Menu Commands
View Disassembly
This command changes the data view to show language disassembly.
View Memory
The View Memory command displays the contents of memory as a hexadecimal/ASCII
character dump.
View Memory As
The View Memory As command displays the memory that a selected variable occupies or
the memory to which a selected register points.
View Mixed
This command changes the data view to show source code intermixed with assembly
code.
View Raw Data
This command changes the data view to show raw data (instead of formatting that data as
source code, disassembly, or another format).
View Source
This command changes the data view to show source code.
View Variable
The View Variable command creates a separate window to display a selected variable.
Zoom Window
The Zoom Window command expands the active window to its previously set size.
Choose Zoom Window a second time to return the window to its original size.
8/16-bit IDE User’s Guide
303
Menu Commands
304
8/16-bit IDE User’s Guide
Index
Symbols
#include files, caching 251
%file command-line string 253
%line command-line string 253
(Scripts) folder 291
.*[_]Data 210
.mcp 29
\(.*\) 209
__throw() 279
A
about
dockable windows 57
Files page in Project window 39
markers 98
projects 25
workspaces 67
About CodeWarrior menu command 277
Absolute Path option
in Source Trees preference panel 260
in Type list box 260
abstract, icon for 151
Access Filter display 153
Access Paths settings panel 208, 229
columns
Recursive Search 232
Search Status 231
options
Add 231
Add Default 231
Always Search User Paths 230
Change 231
Host Flags 231
Remove 231
System Paths 259
User Paths 262
Action option 185
Activate Browser Coloring option 239
in Text Colors panel 250
Activate Browser option
in Build Extras panel 285
8/16-bit IDE User’s Guide
Activate Syntax Coloring option 239, 243
in Text Colors panel 250, 252, 258
activating automatic code completion 86
Add button 231
Add Default button 239
Add Files button 117
Add Files menu command 277
Add Window menu command 277
adding
gray background behind IDE. See Use
Multiple Document Interface, turning on.
source trees 212
advanced topics
for projects 32
Align submenu 277, 278, 288, 289, 296, 300, 301,
302
Horizontal Center command 288
Left Edges command 289
Vertical Center command 296, 300, 301, 302
All Exceptions command 278
All Info option, in Plugin Diagnostics 253
All Text option button 105, 107, 110
alphabetical sorting of Functions list pop-up 96,
97
Always Search User Paths option 239
Ancestor pop-up 156
Anchor Floating Toolbar command 278
Appears in Menus 185, 186
Appears in Menus checkbox 121
Application field 240
Apply button 131
Apply Difference command 131, 278, 302
Arguments field 240
assigning
Quote Key prefix 200
Attempt To Use Dynamic Type of C++, Object
Pascal And SOM Objects option 240
Auto Indent option 240
Auto Repeat 185
Auto Target Libraries option 240
auto-complete code. See code completion.
Automatic Invocation option 240
305
Auto-target Libraries option 240
B
Background option 241
background, desktop
removing from behind IDE. See Use
Multiple Document Interface, turning on.
seeing behind IDE. See Use Multiple
Document Interface, turning off.
Balance Flash Delay option 241
Editor Settings panel 241
Balance menu command 278
Balance While Typing option 241
balancing punctuation 84
toggling 84
Balloon Help 245
Base Classes field 166
Bottom Edges command 278
boxes
Destination 127
Pane Collapse 133
Pane Expand 133
Source 127
Break menu command 279
Break On C++ Exception menu command 279
Break on Java Exceptions command 279
Bring To Front menu command 279
Bring Up To Date
menu command 47
Bring Up To Date menu command 249, 279
Browse button 111
browser 140
Class Browser window 143
Classes pane 149
collapsing panes 148
creating new classes 149, 163, 164
creating new data members 170
creating new member functions 168, 169
expanding panes 148
hierarchy windows 156
Member Functions pane 151
overview 21
printing class hierarchies 157
purpose of 137
306
setting options 137
Source pane 152
status area 153
viewing data by contents 160
viewing data by inheritance 156
working with 137
Browser Access Filters 144
Browser Commands option 242
Editor Settings panel 252
Browser Contents 144
Browser Contents command 279
Browser Contents window 159
Symbols list 159
browser database
defined 137
Browser menu 242
Browser Path option 242
Browser Wizard 163
Build Before Running option 242
Build Extras panel
options
Initial Directory field 251
Use modification date caching 261
Build Extras settings panel 232
options
Application 234
Arguments 234
Cache Subprojects 233
Dump internal browse information after
compile 234
Generate Browser Data From 234
Initial directory 234
Use modification date caching 233
Build Extras target settings panel 285
Build Progress menu command 279
Build Progress Window menu command 279
Build Settings panel
options
Include file cache 251
Play sound after ‘Bring Up To Date’ &
‘Make’ 254
Save open files before build 256
Show message after building up-to-date
project 258
8/16-bit IDE User’s Guide
Success 259
Use Local Project Data Storage 261
Build Settings preference panel 203
options
Build before running 204
Compiler thread stack 204
Save open files before build 204
Show message after building up-to-date
project 204
Use Local Project Data Storage 204
build system
overview 21
build targets 27
configuring 50
creating 48
management 44
managing 48
moving 45
removing 44, 49
renaming 46, 50
setting default 49
strategies for 34
Button
Delete 191
Export 198
Import 199
New Binding 198
Save 192
buttons
Add 231
Add Default 239
Add Files 117
Apply 131
Browse 111
Cancel 104, 106
Change 231
Clear List 117
Compare 128
Edit 223
Export Panel 246
Factory Settings 249
Find 104, 106, 109
Find All 104, 109
Installed Products 277
8/16-bit IDE User’s Guide
Next Result 120
Previous Result 120
Redo 131
Remove 231
Remove a Set 117
Replace 106, 109
Replace All 106, 109
resetting in toolbars 195
Save This Set 117
Stop 109, 120
Unapply 131
Undo 131
Warnings 120
By Type text/list box 111
C
caching
#include files 251
precompiled headers 251
Can’t Redo menu command 269
Can’t Undo menu command 269
Cancel button 104, 106
Cancel button, in Remove Markers window 99
Cascade menu command 280
Case Sensitive checkbox 104, 107, 110, 127
Case Sensitive option 242
Change button 231
changing
find strings 121
line views in a hierarchical window 157
source trees 212
Check Syntax command 280
Checkbox
Numeric Keypad Bindings 197
checkboxes
Appears in Menus 121
Case sensitive 104, 107, 110, 127
Compare text file contents 128
Ignore extra space 127
Match whole word 104, 106, 110
Only show different files 128
Project headers 113
Project sources 113
Regular expression 104, 107, 110
307
Search cached sub-targets 113
Search selection only 105, 107
Search sub-folders 111
Search up 104, 107
Stop at end of file 104, 107
System headers 113
Checkout Status column
in Files view of Project window 40
child windows, defined 57
choosing
a default project 31
linkers 179
one character from many in regular
expressions 124
class browser
purpose of windows 143
working with windows 143
Class Browser menu command 280
Class Browser window 143
Classes pane 145
Data Members pane 145
Member Functions pane 145
Status area 145
class data
viewing from hierarchy windows 148
Class Declaration 153
Class Hierarchy 144
Class Hierarchy menu command 280
Class Hierarchy Window menu command 280
class hierarchy windows
purpose of 155
working with 155
classes
creating 149, 163, 164
hiding pane for 150
showing pane for 150
sorting list of 150
Classes option 223
Classes pane 149
in Class Browser window 145
classes.zip 278
Clear Floating Toolbar command in Toolbar
submenu 280
Clear List button 117
308
Clear Main Toolbar menu command 281
Clear menu command 280
Clear Window Toolbar command in Toolbar
submenu 281
client area, defined 57
Clone Existing Target option 49
Close All command 54
Close All Editor Documents menu command 281
Close All menu command 281
Close Catalog menu command 281
Close command 32, 54
Close menu command 281
Close Workspace menu command 281
closing
all files 54
dockable windows 64
files 54
projects 32
workspaces 69
code
adding markers to 99
completing 85
locating 95
navigating 95
Code column
in Files view of Project window 40
code completion
activating automatic behavior 86
configuration 86
deactivating automatic behavior 87
for data members 91
for parameter lists 92
navigating window 90
selecting items 91
triggering by keyboard 87
triggering from IDE menu bar 86
Code Completion Delay option 242
Code Completion preference panel 213
options
Automatic Invocation 214
Case sensitive 214
Code Completion Delay 214
Display deprecated items 214
Window follows insertion point 214
8/16-bit IDE User’s Guide
Code Completion window 88
code completion, triggering from IDE menu
bar 86
Code Formatting preference panel 215
options
Close Braces, Brackets, And
Parentheses 217
Format Braces 216
Indent Braces 216
Indent Case Within Switch
Statement 217
Indent Code Within Braces 216
Language Settings 215
Place Else On Same Line As Closing
Brace 216
Place Opening Brace On Separate
Line 216
Use Automatic Code Formatting 215
Code Only option button 105, 107, 110
CodeWarrior
menu reference 267
overview 17
CodeWarrior Glossary command 282
CodeWarrior Help menu command 282
CodeWarrior IDE
Edit menu 269
File menu 267
Help menu 275
Project menu 272
Search menu 271
Window menu 270, 274
CodeWarriorU.com 14
Collapse Non-debugging Windows option 243
Collapse Window menu command 282
collapsing
browser panes 148
dockable windows 64
COM 244
Command Actions
Arguments 187
Defining (Windows) 187
Directory 187
Execute 187
Command Group
8/16-bit IDE User’s Guide
Delete 191
Command Groups 191
Delete 191
Commands
Import 199
Modify 185
commands 150
About CodeWarrior 277
Add Files 277
Add Window 277
Apply Difference 131, 278
Balance 278
Bottom Edges 278
Break 279
Break On C++ Exception 279
Break on Java Exceptions 279
Bring To Front 279
Bring Up To Date 279
Browser Contents 144, 279
Build Progress 279
Build Progress Window 279
Can’t Redo 269
Can’t Undo 269
Cascade 280
Check Syntax 280
Class Browser 280
Class Declaration 153
Class Hierarchy 144, 280
Class Hierarchy Window 280
Clear 280
Clear Main Toolbar 281
Close 32, 281
Close All 281
Close All Editor Documents 281
Close Catalog 281
Close Workspace 281
CodeWarrior Glossary 282
CodeWarrior Help 282
Collapse Window 282
Commands & Key Bindings 281
Compare Files 128, 282
Compile 282
Complete Code 282
Copy 282
309
Copy To Expression 282
Create Design 283
Create Group 283
Create Target 283
Cut 283
Delete 283
Diagonal Line 157
Disassemble 283
Display Grid 283
Enter Find String 121, 284
Enter Replace String 284
Errors And Warnings 284
Errors And Warnings Window 284
Exit 284
Expand Window 285
Export Project 31, 285, 289
Find 105, 285
Find and Open ‘Filename’ 286
Find and Open File 286
Find And Replace 287
Find Definition 285
Find Definition & Reference 285
Find In Files 286
Find In Next File 286
Find In Previous File 286
Find Next 121, 286
Find Previous 121, 286
Find Previous Selection 286
Find Reference 287
Find Selection 122, 287
Freescale Website 289
Get Next Completion 287
Get Previous Completion 287
Go Back 144, 287
Go Forward 144, 288
Go To Line 288
Hide Classes 150
Hide Classes pane 153
Hide Window Toolbar 288
Import Components 289
Import Project 32, 289
Make 289
Maximize Window 289
Minimize Window 290
310
New 290
New Class 290
New Class Browser 290
New Data 290
New Event 290
New Event Set 290
New Item 149
New Member Function 290
New Method 291
New Property 291
New Text File 291
Open 291
Open File 152
Open In Windows Explorer 41
Open Recent 291
Open Scripts Folder 291
Open Workspace 291
Page Setup 292
Pane Collapse 148
Pane Expand 148
Precompile 292
Preferences 292
Print 292
Project Inspector 30
Redo 293
Refresh All Data 293
Remove Object Code 293
Remove Object Code & Compact 293
Remove Toolbar Item 195
Replace 107, 293, 294
Replace All 294
Replace and Find Next 294
Revert 296
Save Default Window 297
Save Workspace 297
Save Workspace As 297
Select All 297
Send To Back 297
Set Default Project 31, 297
Set Default Target 297
Shift Right 297, 298
Show Classes 150
Show Classes pane 153
Show Inherited 145
8/16-bit IDE User’s Guide
Show private 146
Show protected 146
Show public 146
Show Types 298
Show Window Toolbar 288
Single Class Hierarchy Window 144
Sort Alphabetical 149, 150
Sort Hierarchical 149
Stack Editor Windows 298
Stop Build 298
Straight Line 157
Switch To Monitor 298
Synchronize Modification Dates 299
Unapply Difference 132
View as implementor 146
View as subclass 146
View As Unsigned Decimal 302
View as user 146
View Disassembly 303
View Mixed 303
View Source 303
View Variable 303
Zoom Window 303
Commands & Key Bindings menu command 281
Commands tab 183, 185, 196
Commands&KeyBindings.mkb file 199
Comments Only option button 105, 107, 110
Comments option 243
Compare button 128
Compare Files command 128
Compare Files menu command 282
Compare Files Setup window 126
Case Sensitive checkbox 127
Compare button 128
Compare Text File Contents checkbox 128
Destination box 127
Ignore Extra Space checkbox 127
Only Show Different Files checkbox 128
Source box 127
Compare Text File Contents checkbox 128
comparing files
differences, applying 131
differences, unapplying 132
overview 126
8/16-bit IDE User’s Guide
setup 126, 128
comparing files, explained 130
comparing folders
examining results 134
overview 126
setup 126, 129
comparing folders, explained 132
comparison
destination item 126
source item 126
Compile menu command 282
compiler
avoiding crashes 243
Compiler option 243
Compiler option, in Generate Browser Data From
menu 250
compiler thread stack
and avoiding compiler crashes 243
Compiler Thread Stack field 243
Complete Code menu command 282
completing code 85
Component Object Model. See COM.
Concurrent Compiles panel
options
Use Concurrent Compiles 255
User Specified 263
Concurrent Compiles preference panel 204
options
Recommended 205
Use Concurrent Compiles 205
User Specified 205
configuring
build targets 50
code completion 86
targets 50
Confirm Invalid File Modification Dates When
Debugging option 243
Constants option 223
Context Popup Delay option 244
contextual menus
Open In Windows Explorer command 41
using to dock a window 60
conventions
figures 15
311
for manual 15
keyboard shortcuts 16
Copy menu command 282
Copy To Expression command 282
Create Design menu command 283
Create Group menu command 283
Create Target command 48
Create Target menu command 283
creating
a new data member 152
build targets 48
custom project stationery 33
files (Windows) 51
member functions 151
new classes 149, 163, 164
new data member 169
new data members 170
new member function 168
new member functions 168
projects using stationery 29
subprojects 34
targets 48
cross-platform migration, and opening
projects 30
Current Target list pop-up 38
Current Target menu 195
custom project stationery 32
Customize IDE Commands window 121, 183,
196, 197
Action 185
Appears in Menus 185, 186
Appears in Menus checkbox 121
Auto Repeat 185
Key Bindings 185
Name field 185
New Binding 185
New Group 186
Numeric Keypad Bindings checkbox 200
Cut command 283
CVS 210
D
Data column
in Files view of Project window 40
312
data members
completing code 91
creating 152, 170
identifier icons 151
Data Members pane 151
in Class Browser window 145
database
navigation for browser 140
deactivating automatic code completion 87
Debug column
in Files view of Project window 40
Debug command 47
debugger
overview 21
Declaration File field 165
default filename extensions 247
default projects 31
default size and position of windows, setting 297
default target, setting 49
default workspace
definition of 67
using 67
definition
of child windows 57
of client area 57
of default workspace 67
of dock 57
of IDE 13
of non-modal 59
of project 25
of regular expression 122
of symbols 100
of touch 40
of workspace 67
Delete menu command 283
Design view 45
Designs view 31
desktop background
removing from behind IDE. See Use
Multiple Document Interface, turning on.
seeing behind IDE. See Use Multiple
Document Interface, turning off.
Destination box 127
destination item, for comparison 126
8/16-bit IDE User’s Guide
Destination pane 131
development-process cycle for software 17
diagnostics
disabling for plug-ins 277
enabling for plug-ins 277
Diagonal Line 157
difference from Single-Class Hierarchy
window 158
Differences pane 131
Disable Third Party COM Plugins option 244
disabling
plug-in diagnostics 277
Disassemble menu command 283
disclosure triangles
Source Code pane 120
Display Deprecated Items option 244
Display Grid menu command 283
DLL 240
Do Nothing option 244
Do Nothing To Project Windows option 244
dock bars 63
dock, defined 57
dockable windows 57, 59
about 57
closing 64
collapsing 64
dock bars 63
docking windows of the same kind 60
expanding 64
moving 64
suppressing 63
turning off 63
types 58
Document Settings list pop-up 76
Documents option
IDE Extras panel 245
Done button, in Remove Markers window 99
drag and drop
using to dock a window 60
Drag And Drop Editing option 245
Dump Internal Browse Information After
Compile option 245
dump memory 303
8/16-bit IDE User’s Guide
E
Edit button 223
Edit Commands option 245
Edit Language option 245
Edit menu 245, 269
editing
source code 81
symbols, shortcuts for 83
editor 73
overview 20
third-party support 262
Editor section, of IDE preference panels 213
Editor Settings panel
options
Balance Flash Delay 241
Browser Commands 252
Font Preferences 250
Insert Template Commands 252
Left margin click selects line 253
Project Commands 255
Relaxed C popup parsing 256
Selection position 257
Sort function popup 258
Use multiple undo 262
VCS Commands 263
Window position and size 264
Editor Settings preference panel 217
options
Balance Flash Delay 219
Balance while typing 219
Browser Commands 218
Default file format 219
Drag and drop editing 219
Edit Commands 218
Enable Virtual Space 219
Font preferences 218
Left margin click selects line 219
Project Commands 218
Relaxed C popup parsing 219
Selection position 218
Sort function popup 219
Use multiple undo 219
VCS Commands 219
Window position and size 218
313
editor toolbar 75
editor window 73
adding panes to 78
collapsing toolbar in 76
expanding toolbar in 76
line and column indicator 78
pane splitter controls 78
removing panes from 79
resizing panes 78
text editing area 78
editor windows
other 77
selecting text in 81
Emacs text editor 253
Empty Target option 49
Enable Automatic Toolbar Help option 245
Enable Browser option 279
Enable Virtual Space option 246
enabling
plug-in diagnostics 277
enlarging panes, in browser 148
Enter Find String command 121
Enter Find String menu command 284
Enter Replace String menu command 284
Enums option 223
Environment Settings option 246
Environment Variable option
of Source Trees preference panel 260
Environment Variable option, in Type pop-up
menu 260
Errors And Warnings menu command 284
Errors And Warnings Window menu
command 284
Errors Only option
of Plugin Diagnostics 253
Exceptions In Targeted Classes command in Java
Exceptions submenu 284
Exit menu command 284
Expand Window menu command 285
expanding
browser panes 148
dockable windows 64
Export 198
Export Panel button 184, 202, 246
314
Export Project command 31
Export Project menu command 285, 289
exporting
projects to XML files 31
Extension field 246
external editor support 262
F
Factory Settings button 249
Failure option 249
FDI 207, 261
and dockable windows 57
fields
Application 240
Arguments 240
Base Classes 166
Compiler thread stack 243
Declaration File 165
Extension 246
File Type 249
Relative to class 165
figure conventions 15
File
Commands&KeyBindings.mkb 199
File column
in Files view of Project window 40
%file command-line string 253
File Compare Results window 130
Apply button 131
Destination pane 131
Differences pane 131
pane resize bar 131
Redo button 131
Source pane 131
Unapply button 131
Undo button 131
File list 113
file management 44
File Mappings list 243
File Mappings settings panel 234
options
Add 236
Change 236
Compiler 236
8/16-bit IDE User’s Guide
Edit Language 236
Extension 235
File Mappings list 235
File Type 235
Flags 236
Ignored By Make flag 236
Launchable flag 236
Precompiled File flag 236
Remove 236
Resource File flag 235
File menu 267
file modification icon 77
file paths
viewing 41
File Set list 117
File Set list box 117
File Type field 249
File Type option 243
filename extensions
default settings 247
files
close all 54
closing 54
comparing 130
creating (Windows) 51
destination (for a comparison) 126
inspecting 30
moving 45
opening 52
print selections 55
printing 55
renaming 46
replacing text in 107
reverting 55
save all 53
saving 53
saving copies 54
searching (multiple) 118
searching (single) 105
source (for a comparison) 126
touching 47
touching all 47
untouching 47
untouching all 48
8/16-bit IDE User’s Guide
working with 51
Files In Both Folders pane 134
Files Only In Destination pane 134
Files Only In Source pane 134
Files page, about 39
Files tab 44
Files view 31, 45, 48
Checkout Status column 40
Code column 40
Data column 40
Debug column 40
File column 40
Interfaces list pop-up 40
Sort Order button 40
Target column 40
Touch column 40
files, tasks for managing 51
Find
by text selection 120
single-file 103
Find All button 104, 109
Find and compare operations option
Shielded Folders panel 249
Find And Open ‘Filename’ menu command 286
Find and Open File command 286
Find and Replace
multiple-file 108
single-file 105
Find And Replace menu command 287
Find and Replace window
All Text option button 107
Cancel button 106
Case Sensitive checkbox 107
Code Only option button 107
Comments Only option button 107
Find button 106
Find text/list box 106
Match Whole Word checkbox 106
Regular Expression checkbox 107
Replace All button 106
Replace button 106
Replace With text/list box 106
Search Selection Only checkbox 107
Search Up checkbox 107
315
Stop At End Of File checkbox 107
Find button 104, 106, 109
Find command 105, 285
Find Definition & Reference menu command 285
Find Definition menu command 285
Find In Files menu command 286
Find in Files window
All Text option button 110
Case Sensitive checkbox 110
Code Only option button 110
Comments Only option button 110
Find All button 109
Find button 109
Find text/list box 109
In Files page 117, 118
Add Files button 117
Clear List button 117
File Set list 117
File Set list box 117
Remove A Set button 117
Save This Set button 117
In Files tab 110
In Folders page 111
Browse button 111
By Type text/list box 111
Search In text/list box 111
Search Sub-Folders checkbox 111
In Folders tab 110
In Projects page 112, 114
File list 113
Project Headers checkbox 113
Project list box 113
Project Sources checkbox 113
Search Cached Sub-Targets
checkbox 113
System Headers checkbox 113
Target list box 113
In Projects tab 110
In Symbolics page 115
Symbolics list 115
Symbolics list box 115
In Symbolics tab 110
Match Whole Word checkbox 110
Regular Expression checkbox 110
316
Replace All button 109
Replace button 109
Replace With text/list box 109
Stop button 109
Find In Next File menu command 286
Find In Previous File menu command 286
Find Next
using 121
Find Next command 121
Find Next menu command 286
Find Previous
using 121
Find Previous command 121
enabling in the Customize IDE Commands
window 121
Find Previous menu command 286
Find Previous Selection menu command 286
Find Reference menu command 287
Find Reference using option
IDE Extras panel 249
Find Selection command 122
Find Selection menu command 287
Find symbols with prefix 84
Find symbols with substring 84
Find text/list box 104, 106, 109
Find window
All Text option button 105
Cancel button 104
Case Sensitive checkbox 104
Code Only option button 105
Comments Only option button 105
Find All button 104
Find button 104
Find text/list box 104
Match Whole Word checkbox 104
Regular Expression checkbox 104
Search Selection Only checkbox 105
Search Up checkbox 104
Stop At End Of File checkbox 104
finding text
overview 103
Flags pop-up menu 236
Ignored By Make flag 236
Launchable flag 236
8/16-bit IDE User’s Guide
Precompiled File flag 236
Resource File flag 235
floating a window 62
Floating Document Interface. See FDI.
floating window type 58
focus bar 46
Folder Compare Results window 132
Files In Both Folders pane 134
Files Only In Destination pane 134
Files Only In Source pane 134
Pane Collapse box 133
Pane Expand box 133
pane resize bar 133
Selected Item group 134
folders
comparing 132
searching (multiple) 111
Font & Tabs panel 221
options
Font 249
Scripts 257
Size 258
Tab indents selection 259
Tab Inserts Spaces 259
Tab Size 259
Font & Tabs preference panel 219, 221
options
Auto Indent 220
Font 220
Script 220
Size 220
Tab indents selection 220
Tab Inserts Spaces 220
Tab Size 220
Font option
Font & Tabs panel 249
Font Preferences option
Editor Settings panel 250
Font Settings 221
Foreground option
Text Colors panel 250
Freescale Website command 289
function
New Data Member 152
8/16-bit IDE User’s Guide
functions
creating new member 151
locating 95, 96
Functions list pop-up 76
sorting alphabetically 96, 97
using 96
Functions option 223
G
General section, of IDE preference panels 203
Generate Browser Data From option 250
Compiler 250
Language Parser 250
Language Parser, Macro file 251
Language Parser, Prefix file 251
None 250
Generate Constructor and Destructor 166
Get Next Completion menu command 287
Get next symbol 84
Get Previous Completion menu command 287
Get previous symbol 84
Globals option 223
Go Back 144
Go Back menu command 287
Go Forward 144
Go Forward menu command 288
Go To Line menu command 288
going back 97
going forward 97
going to a particular line 97
gray background, adding behind IDE. See Use
Multiple Document Interface, turning on.
gray background, removing from behind IDE. See
Use Multiple Document Interface, turning off.
Grid Size X option
Layout Editor panel 251
Grid Size Y option
Layout Editor panel 251
group management 44
grouping
regular expressions 124
groups
moving 45
removing 44
317
renaming 46
Selected Item 134
touching 47
touching all 47
untouching 47
untouching all 48
H
headers
caching precompiled headers 251
Help menu 275
Hide Classes 150
Hide Classes pane 153
Hide Floating Toolbar command 288
Hide Main Toolbar command in Toolbar
submenu 288
Hide Window Toolbar command 288
hiding
classes pane 150
Hierarchy Control 156
hierarchy window 156
hierarchy windows
changing line views 157
using to view class data 148
Horizontal Center command 288
how to
activate automatic code completion 86
add a keyword to a keyword set 237
add markers to a source file 99
add panes to an editor window 78
add source trees 212
adding subprojects to a project 34
alphabetize Functions list pop-up order 96,
97
apply file differences 131
balance punctuation 84
change line views in a hierarchical
window 157
change source trees 212
change the find string 121
choose a default project 31
choose files to compare 128
choose folders to compare 129
close a docked window 64
318
close a workspace 69
close projects 32
collapse a docked window 64
collapse browser panes 148
collapse the editor window toolbar 76
complete code for data members 91
complete code for parameter lists 92
create a new class 149, 163, 164
create a new data member 169, 170
create a new data members 152
create a new member function 151, 168
create custom project stationery 33
create new projects using project
stationery 29
deactivate automatic code completion 87
dock a window by using a contextual
menu 60
dock a window by using drag and drop 60
dock windows of the same kind 60
examine items in the Folder Compare
Results window 134
expand a docked window 64
expand browser panes 148
expand the editor window toolbar 76
export projects to XML files 31
float a window 62
generate project link maps 180
go to a particular line 97
hide the classes pane 150
import projects saved as XML files 32
indent text blocks 83
look up symbol definitions 100
make a window an MDI Child 63
move a docked window 64
navigate browser data 140
navigate Code Completion window 90
navigate to a marker 99
open a recent workspace 70
open a single-class hierarchical window 158
open a workspace 68
open projects 29
open projects created on other hosts 30
open subprojects 34
open the symbols window 161
8/16-bit IDE User’s Guide
open the Target Settings window 227
overstrike text (Windows) 82
print class hierarchies 157
print projects 31
remove a keyword from a keyword set 238
remove a marker from a source file 99
remove all markers from a source file 100
remove panes from an editor window 79
remove source trees 213
replace text in a single file 107
resize panes in an editor window 78
save a copy of a workspace 69
save a workspace 68
save projects 30
search a single file 105
search for text across multiple files 118
search for text across multiple folders 111
search for text across multiple projects 114
search for text across multiple symbolics
files 115
search with a text selection 122
select entire routines 82
select item in Code Completion window 91
select lines 82
select multiple lines 82
select rectangular portions of lines 82
select text in editor windows 81
show the classes pane 150
sort the classes list 150
suppress dockable windows 63
toggle automatic punctuation balancing 84
trigger code completion by keyboard 87
trigger code completion from IDE menu
bar 86
unapply file differences 132
undock a window 61
unfloat a window 62
unindent text blocks 83
use the default workspace 67
use the Find Next command 121
use the Find Previous command 121
use the Functions list pop-up 96
use the Interfaces list pop-up 96
use the VCS pop-up 77
8/16-bit IDE User’s Guide
use virtual space 82
view a file path 41
view browser data by contents 160
view browser data by inheritance 156
view class data from hierarchy window 148
I
icons
file modification 77
for data members 151
for member functions 151
IDE
and threading 243
Code Completion window 88
defined 13
Edit menu 269
editing source code 81
editor 73
File menu 267
Help menu 275
linkers 179
menu reference 267
preferences, working with 201
project manager and build targets 25
Project menu 272
Search menu 271
target settings, working with 225
tools overview 20
User’s Guide overview 13
Window menu 270, 274
workspaces 67
IDE Extras panel
options
Documents 245
Find Reference using 249
Launch Editor 252
Launch Editor w/ Line # 253
Projects 255
Symbolics 259
Use Default Workspace’ 260
Use External Editor 260
Use Multiple Document Interface 261
Use Script menu 262
Use ToolServer menu 262
319
Workspaces 264
Zoom windows to full screen 264
IDE Extras preference panel 205
options
Documents 206
Launch Editor 207
Launch Editor w/ Line # 207
Menu bar layout 206
Projects 206
Recent symbolics 206
Use Default workspace 207
Use Multiple Document Interface 207
Use Third Party Editor 206
Use Third Party Editor option 262
IDE Preference Panels list 202
IDE Preference Panels, Font & Tabs 221
IDE Preference Panels, Font Settings 221
IDE preferences
Activate Browser Coloring 223
Activate Syntax Coloring 222
Add 209, 211
Auto Indent 220
Automatic Invocation 214
Background 222
Balance Flash Delay 219
Balance while typing 219
Browser Commands 218
Build before running 204
Case sensitive 214
Change 209, 211
Choose 211
Classes 223
Close Braces, Brackets, And
Parentheses 217
Code Completion Delay 214
Comments 222
Compiler thread stack 204
Constants 223
Default file format 219
Disable third party COM plugins 208
Display deprecated items 214
Documents 206
Drag and drop editing 219
Edit 223
320
Edit Commands 218
Enable Virtual Space 219
Enums 223
Find and compare operations 209
Font 220
Font preferences 218
Foreground 222
Format Braces 216
Functions 223
Globals 223
Indent Braces 216
Indent Case Within Switch Statement 217
Indent Code Within Braces 216
Keywords 222
Language Settings 215
Launch Editor 207
Launch Editor w/ Line # 207
Left margin click selects line 219
Level 208
Macros 223
Menu bar layout 206
Name 211
Other 223
Place Else On Same Line As Closing
Brace 216
Place Opening Brace On Separate Line 216
Project Commands 218
Project operations 209
Projects 206
Recent symbolics 206
Recommended 205
Regular Expression 209
Relaxed C popup parsing 219
Remove 209, 211
Save open files before build 204
Script 220
Selection position 218
Set 1, Set 2, Set 3, Set 4 223
Shielded folder list 209
Show message after building up-to-date
project 204
Size 220
Sort function popup 219
Source Tree list 211
8/16-bit IDE User’s Guide
Strings 222
Tab indents selection 220
Tab Inserts Spaces 220
Tab Size 220
Templates 223
Type 211
TypeDefs 223
Use Automatic Code Formatting 215
Use Concurrent Compiles 205
Use Default workspace 207
Use Local Project Data Storage 204
Use Multiple Document Interface 207
Use multiple undo 219
Use Third Party Editor 206
User Specified 205
VCS Commands 219
Window follows insertion point 214
Window position and size 218
IDE Preferences window 184, 201, 202
Apply button 203
Cancel button 203
Factory Settings button 184, 202
IDE Preference Panels list 202
Import Panel 251
Import Panel button 185, 203
OK button 203
Revert Panel button 184, 202
Save button 185
Ignore Extra Space checkbox 127
Ignored By Make File flag 236
Import button 199
Import Commands 199
Import Components menu command 289
Import Panel 251
Import Project command 32
Import Project menu command 289
importing
projects saved as XML files 32
In Files page 117, 118
In Files tab 110
In Folders page 111
In Folders tab 110
In Projects page 112, 114
In Projects tab 110
8/16-bit IDE User’s Guide
In Symbolics page 115
In Symbolics tab 110
Include file cache option
Build Settings panel 251
Include Files 169
Include files 166
#include files, caching 251
indenting
text blocks 83
Initial Directory field
Build Extras panel 251
Initializer 170
Insert Template Commands option
Editor Settings panel 252
inspecting
project files 30
Installed Products button 277
Integrated Development Environment. See IDE.
interface files
locating 95
Interface menu 47
Interfaces list pop-up
in Files view of Project window 40
using 96
interfaces list pop-up 76
J
Java Exceptions submenu
All Exceptions command 278
Exceptions In Targeted Classes
command 284
Java submenu 278, 284
K
Key Bindings 183, 185
Add 197
Customize 196
key bindings 101
keyboard conventions 16
keyboard shortcuts
Find symbols with prefix 84
Find symbols with substring 84
Get next symbol 84
Get previous symbol 84
321
keys
Quote Key prefix 199
keywords
adding to a keyword set 237
removing from a keyword set 238
Keywords option
Text Colors panel 252
L
Language Parser option, in Generate Browser
Data From menu 250
Launch Editor option
IDE Extras panel 252
Launch Editor w/ Line # option
IDE Extras panel 253
Launchable flag 236
Layout Editor panel
options
Grid Size X 251
Grid Size Y 251
layout management 44
layouts
moving 45
removing 44
renaming 46
Left Edges command 289
Left margin click selects line option
Editor Settings panel 253
Level option
Plugin Settings panel 253
line
going to in source code 97
line and column indicator, in editor window 78
%line command-line string 253
Line Display 156
lines, selecting 82
lines, selecting multiple 82
lines, selecting rectangular portions of 82
link maps
generating for projects 180
Link Order page 43
Link Order tab 44
Link Order view 31, 45, 46
Linker option
322
Target Settings panel 254
linkers 179
choosing 179
linking projects 180
list
of symbols in Browser Contents
window 159
list boxes
File Set 117
Project 113
Symbolics 115
Target 113
list menus
document settings 76
functions 76
interfaces 76
markers 76
VCS 77
list pop-up menus
Current Target 38
list pop-ups
Ancestor 156
Browser Access Filters 144
document settings 76
functions 76
interfaces 76
markers 76
Symbols 159
VCS 146
lists
File 113
File Mappings 243
File Set 117
Symbolics 115
locating functions 95, 96
locating interface files 95
locating source code 95
looking up symbol definitions 100
M
Mac OS
QuickHelp 100
QuickView 100
8/16-bit IDE User’s Guide
Macro file option, in Generate Browser Data
From menu 251
Macros option 223
Make command 46, 47
Make menu command 289
Make option 249
Make toolbar button 38
managing
build targets 48
projects 29
targets 48
managing files, tasks 51
manual conventions 15
markers 98
adding to a source file 99
navigating to 99
removing all from source files 100
removing from source files 99
Markers list pop-up 76
Markers list, in Remove Markers window 99
Match Whole Word checkbox 104, 106, 110
matching
any character with regular expressions 124
replace strings to find strings with regular
expressions 125
with simple regular expressions 124
Maximize Window menu command 289
.mcp 29
MDI 207, 261
and dockable windows 57
making a window an MDI child 63
Member Function Declaration 168
member functions
creating 151, 168
identifier icons 151
Member Functions pane 151
in Class Browser window 145
memory dump 303
Menu
Current Target 195
menu
Search 100
menu commands
About CodeWarrior 277
8/16-bit IDE User’s Guide
Add Files 277
Add Window 277
Apply Difference 131, 278
Balance 278
Bottom Edges 278
Break 279
Break On C++ Exception 279
Break on Java Exceptions 279
Bring To Front 279
Bring Up To Date 279
Browser Contents 279
Build Progress 279
Build Progress Window 279
Can’t Redo 269
Can’t Undo 269
Cascade 280
Check Syntax 280
Class Browser 280
Class Hierarchy 280
Class Hierarchy Window 280
Clear 280
Close 281
Close All 281
Close All Editor Documents 281
Close Catalog 281
Close Workspace 281
CodeWarrior Help 282
Collapse Window 282
Commands & Key Bindings 281
Compare Files 128, 282
Compile 282
Complete Code 282
Copy 282
Copy To Expression 282
Create Design 283
Create Group 283
Create Target 283
Delete 283
Disassemble 283
Display Grid 283
Enter Find String 121, 284
Enter Replace String 284
Errors And Warnings 284
Errors And Warnings Window 284
323
Exit 284
Expand Window 285
Export Project 285, 289
Find 105, 285
Find and Open ‘Filename’ 286
Find and Open File 286
Find And Replace 287
Find Definition 285
Find Definition & Reference 285
Find In Files 286
Find In Next File 286
Find In Previous File 286
Find Next 121, 286
Find Previous 121, 286
Find Previous Selection 286
Find Reference 287
Find Selection 122, 287
Freescale Website 289
Get Next Completion 287
Get Previous Completion 287
Go Back 287
Go Forward 288
Go To Line 288
Hide Window Toolbar 288
Import Components 289
Import Project 289
Make 289
Maximize Window 289
Minimize Window 290
New 290
New Class 290
New Class Browser 290
New Data 290
New Event 290
New Event Set 290
New Member Function 290
New Method 291
New Property 291
New Text File 291
Open 291
Open Recent 291
Open Scripts Folder 291
Open Workspace 291
Page Setup 292
324
Precompile 292
Preferences 292
Print 292
Redo 293
Refresh All Data 293
Remove Object Code 293
Remove Object Code & Compact 293
Remove Toolbar Item 195
Replace 107, 293, 294
Replace All 294
Replace and Find Next 294
Revert 296
Save Default Window 297
Save Workspace 297
Save Workspace As 297
Select All 297
Send To Back 297
Set Default Project 297
Set Default Target 297
Shift Right 297, 298
Show Types 298
Show Window Toolbar 288
Stack Editor Windows 298
Stop Build 298
Switch To Monitor 298
Synchronize Modification Dates 299
Unapply Difference 132
View As Unsigned Decimal 302
View Disassembly 303
View Mixed 303
View Source 303
View Variable 303
Zoom Window 303
menu layouts
Windows 267
menu reference
for IDE 267
menus 144
VCS 152
Minimize Window menu command 290
moving
build targets 45
dockable windows 64
files 45
8/16-bit IDE User’s Guide
groups 45
layouts 45
targets 45
Multi-Class Hierarchy window 155, 158
Multiple Document Interface. See MDI.
multiple files, searching 118
multiple folders, searching 111
multiple projects, searching 114
multiple Redo 293
multiple symbolics files, searching 115
multiple Undo 293
multiple-file Find and Replace window 108
N
Name field 185
navigating
browser data 140
Code Completion window 90
to markers 99
navigating data 140
navigating source code 95
New Binding 185, 198
New C++ Class window 164
New C++ Data Member window 170
New C++ Member Function window 168
New Class Browser menu command 290
New Class menu command 290
New Class wizard 149, 163, 164
New Command 186
New command 51
New Command Group
Create 186
New Data Member 152, 168, 170
new data member functions
creating 169
New Data Member wizard 152, 169, 170
New Data menu command 290
New Event menu command 290
New Event Set menu command 290
New Group 186
New Item 149
New Member Function menu command 290
New Member Function wizard 151, 168
new member functions
8/16-bit IDE User’s Guide
creating 168
New Menu Command
Create 186, 190
New menu command 290
New Method menu command 291
New Property menu command 291
New Text File menu command 291
Next Result button 120
None option
of Plugin Diagnostics 253
None option, in Generate Browser Data From
menu 250
non-modal, defined 59
notes
for the latest release 13
Numeric Keypad Bindings 197
Numeric Keypad Bindings checkbox
of Customize IDE Commands window 200
O
Only Show Different Files checkbox 128
Open command 52
Open File 152
Open In Windows Explorer command 41
Open menu command 291
Open Recent menu command 291
Open Scripts Folder menu command 291
Open Workspace menu command 291
opening 161
a recent workspace 70
a single-class hierarchical window 158
files 52
projects 29
projects from other hosts 30
subprojects 34
symbols window 161
workspaces 68
opening last project (default workspace) 260
opening last project, preventing (default
workspace) 260
option buttons
All text 105, 107, 110
Code Only 105, 107, 110
Comments Only 105, 107, 110
325
options
Access Paths settings panel 208, 229
Activate Browser 285
Activate Browser Coloring 239
Activate Syntax Coloring 239, 243
Add Default 239
Always Search User Paths 239
Application 240
Arguments 240
Attempt to use dynamic type of C++, Object
Pascal and SOM objects 240
Auto Indent 240
Auto Target Libraries 240
Automatic Invocation 240
Auto-target Libraries 240
Background 241
Balance Flash Delay 241
Balance while typing 241
Bring Up To Date 249
Browser Commands 242
Browser Path 242
Build before running 242
Build Extras settings panel 232
Build Settings preference panel 203
Case Sensitive 242
Classes 223
Code Completion Delay 242
Code Completion preference panel 213
Code Formatting preference panel 215
Collapse non-debugging windows 243
Comments 243
Compiler 243
Compiler thread stack 243
Concurrent Compiles preference panel 204
Confirm invalid file modification dates when
debugging 243
Constants 223
Context popup delay 244
Disable third party COM plugins 244
Display Deprecated Items 244
Do nothing 244
Do nothing to project windows 244
Drag and drop editing 245
326
Dump internal browse information after
compile 245
Edit Commands 245
Edit Language 245
Editor preference panels 213
Editor Settings preference panel 217
Enable automatic Toolbar help 245
Enable Virtual Space 246
Enums 223
Environment Settings 246
Failure 249
File Mappings settings panel 234
File Type 243
Font & Tabs preference panel 219, 221
Functions 223
General preference panels 203
Generate Browser Data From 250
Globals 223
IDE Extras preference panel 205
Import Panel 251
Macros 223
Make 249
Other 223
Plugin Settings preference panel 207
Set 1, Set 2, Set 3, Set 4 223
setting for browser 137
Shielded Folders preference panel 208
Source Trees preference panel 210
Target Settings panel 227
Templates 223
TypeDefs 223
Use Multiple Document Interface 57
Window Follows Insertion Point 263
other editor windows 77
Other option 223
Output Directory option
Target Settings panel 254
Overlays tab 44
overstrike 82
overstriking text (Windows) 82
overtype. See overstrike.
overview
of browser 21
of build system 21
8/16-bit IDE User’s Guide
of CodeWarrior 17
of debugger 21
of editor 20
of IDE project manager and build targets 25
of IDE tools 20
of IDE User’s Guide 13
of project manager 20
of search engine 20
P
Page Setup command 292
pages
In Files 117
In Folders 111
in project window 39
In Projects 112
In Symbolics 115
Pane Collapse 148
Pane Collapse box 133
Pane Expand 148
Pane Expand box 133
Pane resize bar 120, 131, 133
pane resize bar
in File Compare Results window 131
in Folder Compare Results window 133
pane splitter controls, in editor window 78
panels
Font & Tabs 221
panes
adding to editor window 78
Destination 131
Differences 131
Files in Both Folders 134
Files Only in Destination 134
Files Only in Source 134
removing from editor window 79
resizing in an editor window 78
Results 120
Source 131
Source Code 120
parameter lists
completing code 92
path caption 77
8/16-bit IDE User’s Guide
Play sound after ‘Bring Up To Date’ & ‘Make’
option
Build Settings panel 254
Plugin Diagnostics
All Info option 253
Errors Only option 253
None option 253
plug-in diagnostics
disabling 277
enabling 277
Plugin Settings panel
options
Level 253
Plugin Settings preference panel 207
options
Disable third party COM plugins 208
Level 208
plug-ins
saving information about those installed in
IDE 277
viewing those installed in IDE 277
pop-up menus
document settings 76
functions 76
interfaces 76
markers 76
VCS 77
pop-ups
Ancestor 156
Browser Access Filters 144
Symbols 159
VCS 146
Post-linker option
Target Settings panel 254
Precompile menu command 292
Precompiled File flag 236
precompiled headers
caching 251
preference panels
Build Settings 203
Code Completion 213
Code Formatting 215
Concurrent Compiles 204
Editor Settings 217
327
Font & Tabs 219, 221
IDE Extras 205
Plugin Settings 207
reverting 256
Shielded Folders 208
Source Trees 210
preferences
Activate Browser Coloring 223
Activate Syntax Coloring 222
Add 209, 211
Apply button 203
Auto Indent 220
Automatic Invocation 214
Background 222
Balance Flash Delay 219
Balance while typing 219
Browser Commands 218
Build before running 204
Cancel button 203
Case sensitive 214
Change 209, 211
Choose 211
Classes 223
Close Braces, Brackets, And
Parentheses 217
Code Completion Delay 214
Comments 222
Compiler thread stack 204
Constants 223
Default file format 219
Disable third party COM plugins 208
Display deprecated items 214
Documents 206
Drag and drop editing 219
Edit 223
Edit Commands 218
Editor 213
Enable Virtual Space 219
Enums 223
Export Panel button 184, 202
Factory Settings button 184, 202
Find and compare operations 209
Font 220
Font preferences 218
328
for IDE 201
Foreground 222
Format Braces 216
Functions 223
General 203
Globals 223
IDE Preference Panels list 202
IDE window 201
Import Panel button 185, 203
Indent Braces 216
Indent Case Within Switch Statement 217
Indent Code Within Braces 216
Keywords 222
Language Settings 215
Launch Editor 207
Launch Editor w/ Line # 207
Left margin click selects line 219
Level 208
Macros 223
Menu bar layout 206
Name 211
OK button 203
Other 223
Place Else On Same Line As Closing
Brace 216
Place Opening Brace On Separate Line 216
Project Commands 218
Project operations 209
Projects 206
Recent symbolics 206
Recommended 205
Regular Expression 209
Relaxed C popup parsing 219
Remove 209, 211
Revert Panel button 184, 202
Save button 185
Save open files before build 204
Script 220
Selection position 218
Set 1, Set 2, Set 3, Set 4 223
Shielded folder list 209
Show message after building up-to-date
project 204
Size 220
8/16-bit IDE User’s Guide
Sort function popup 219
Source Tree list 211
Strings 222
Tab indents selection 220
Tab Inserts Spaces 220
Tab Size 220
Templates 223
Type 211
TypeDefs 223
Use Automatic Code Formatting 215
Use Concurrent Compiles 205
Use Default workspace 207
Use Local Project Data Storage 204
Use Multiple Document Interface 207
Use multiple undo 219
Use Third Party Editor 206
User Specified 205
VCS Commands 219
Window follows insertion point 214
Window position and size 218
Preferences menu command 292
Prefix file option, in Generate Browser Data From
menu 251
prefix keys
Quote Key 199
Pre-linker option
Target Settings panel 255
Previous Result button 120
print
file selections 55
Print command 55, 292
printing
class hierarchies 157
files 55
projects 31
process cycle
of software development 17
products
saving information about those installed in
IDE 277
viewing those installed in IDE 277
Project Commands option
Editor Settings panel 255
project data folder 261
8/16-bit IDE User’s Guide
Project Headers checkbox 113
Project Inspector command 30
Project list box 113
project manager 25
overview 20
Project menu 255, 272
Remove Object Code command 273
Stop Build command 273
Project operations option
Shielded Folders panel 255
Project Sources checkbox 113
project stationery
creating 33
custom 32
Project window
about Files page 39
Current Target list pop-up 38
Files view
Checkout Status column 40
Code column 40
Data column 40
Debug column 40
File column 40
Interfaces list pop-up 40
Sort Order button 40
Target column 40
Touch column 40
Make toolbar button 38
Synchronize Modification Dates toolbar
button 38
Target Settings toolbar button 38
project window 37
Link Order page 43
pages 39
Targets page 43
project window, about 37
project, defined 25
projects
about subprojects 33
advanced topics 32
choosing default 31
closing 32
creating custom stationery 33
creating subprojects 34
329
creating using stationery 29
data folder 261
exporting to XML files 31
generating link maps for 180
importing XML versions of 32
inspecting files 30
linking 180
managing 29
opening 29
opening from other hosts 30
printing 31
project window 37
project window pages 39
project window, about 37
reopening last one used (default
workspace) 260
reopening last one used, preventing (default
workspace) 260
saving 30
searching (multiple) 114
strategies for 34
subprojects, strategies for 35
working with 25
Projects option
IDE Extras panel 255
punctuation balancing, toggling 84
punctuation, balancing 84
pure virtual
icon for 151
purpose
of Browser Contents window 159
of Classes pane in browser 149
of Data Members pane 151
of Member functions pane 151
of Multi-Class Hierarchy window 155
of Single-Class Hierarchy window 158
of Source pane 152
of status area in browser 153
of Symbols window 160
Q
QuickHelp (Mac OS) 100
QuickView 100
Quote Key prefix 199
330
assigning 200
R
Recursive Search column, in Access Paths
panel 232
Redo button 131
Redo menu command 293
reference information
for IDE menus 267
Refresh All Data menu command 293
Registry Key option
of Source Trees preference panel 260
Registry Key option, in Type pop-up menu 260
Regular Expression checkbox 104, 107, 110
Regular Expression option
Shielded Folders panel 255
regular expressions 122
.*[_]Data 210
\(.*\) 209
choosing one character from many 124
CVS 210
defined 122
grouping 124
matching any character 124
matching simple expressions 124
using the find string in the replace string 125
Relative to class field 165
Relaxed C popup parsing option
Editor Settings panel 256
release notes 13
remembering last project (default
workspace) 260
remembering last project, turning off (default
workspace) 260
Remove A Set button 117
Remove button 231
Remove button, in Remove Markers window 99
Remove command 44
Remove Markers window 98
Cancel button 99
Done button 99
Markers list 99
Remove button 99
8/16-bit IDE User’s Guide
Remove Object Code & Compact menu
command 293
Remove Object Code menu command 293
Remove Toolbar Item 195
removing
build targets 44, 49
desktop background from behind IDE. See
Use Multiple Document Interface, turning
on.
files 44
gray background from behind IDE. See Use
Multiple Document Interface, turning off.
groups 44
layouts 44
source trees 213
targets 44, 49
Rename command 46, 50
renaming
build targets 46, 50
files 46
groups 46
layouts 46
targets 46, 50
reopening last project used
in default workspace 260
suppressing in the default workspace 260
Replace All button 106, 109
Replace All menu command 294
Replace and Find Next menu command 294
Replace and Find Previous command 294
Replace button 106, 109
Replace command 107
Replace menu command 293, 294
Replace With text/list box 106, 109
replacing
text in a single file 107
text, overview 103
Reset Window Toolbar command in Toolbar
submenu 42, 295
resetting
toolbars 195
resize bars
Pane 120
Resize submenu
8/16-bit IDE User’s Guide
To Smallest Height command 301
To Smallest Width command 301
resizing
panes in an editor window 78
Resource File flag 235
Restore Window command (Windows) 296
Result Count text box 119
results
of multi-item search 118
Results pane 120
Revert command 55
Revert menu command 296
reverting
files 55
preference panels 256
settings panels 256
revision control 263
routine, selecting entirely 82
Run command 47
Runtime Settings panel
options
Working Directory 264
S
Save a Copy As command 54
Save All command 53
Save command 53
Save Default Window menu command 297
Save open files before build option
Build Settings panel 256
Save project entries using relative paths option
Target Settings panel 41, 42, 257
Save This Set button 117
Save Workspace As menu command 297
Save Workspace menu command 297
saving
a copy of a workspace 69
all files 53
file copies 54
files 53
information about installed plug-ins 277
information about installed products 277
projects 30
workspaces 68
331
(Scripts) folder 291
Scripts option
Font & Tabs panel 257
search
single characters with regular
expressions 124
using finds strings in replace strings with
regular expressions 125
Search Cached Sub-Targets checkbox 113
Search Criteria text box 119
search engine
overview 20
Search In text/list box 111
Search menu 100, 271
Search Results window 118
Next Result button 120
Pane resize bar 120
Previous Result button 120
Result Count text box 119
Results pane 120
Search Criteria text box 119
setting default size and position of 297
Source Code pane 120
Source Code Pane disclosure triangle 120
Stop button 120
Warnings button 120
Search Selection Only checkbox 105, 107
Search Status column, in Access Paths panel 231
Search Sub-Folders checkbox 111
Search Up checkbox 104, 107
searching
choosing one character from many in regular
expressions 124
grouping regular expressions 124
multiple files 118
multiple folders 111
multiple projects 114
multiple symbolics files 115
single characters with regular
expressions 124
single files 105
using finds strings in replace strings with
regular expressions 125
using regular expressions 122
332
with simple regular expressions 124
seeing desktop background behind IDE. See Use
Multiple Document Interface, turning off.
Segments tab 44
Select All menu command 297
Selected Item group 134
selecting
Code Completion window items 91
text in editor windows 81
selecting entire routines 82
selecting lines 82
selecting multiple lines 82
selecting rectangular portions of lines 82
Selection position option
Editor Settings panel 257
selections
searching (text) 122
Send To Back menu command 297
Set 1, Set 2, Set 3, Set 4 223
Set Default Project command 31
Set Default Project menu command 297
Set Default Target menu command 297
setting
browser options 137
setting default size and position of windows 297
settings
Add 211, 231, 236
Add Default 231
Always Search User Paths 230
Application 234
Apply button 227
Arguments 234
Cache subprojects 233
Cancel button 227
Change 211, 231, 236
Choose 211, 228
Clear 229
Compiler 236
Dump internal browse information after
compile 234
Edit Language 236
Export Panel button 226
Extension 235
Factory Settings button 226
8/16-bit IDE User’s Guide
File Mappings list 235
File Type 235
Flags 236
Generate Browser Data From 234
Host Flags 231
IDE window 225
Ignored By Make flag 236
Import Panel button 227
Initial directory 234
Launchable flag 236
Linker 228
Name 211
OK button 227
Output Directory 228
Post-linker 228
Precompiled File flag 236
Pre-linker 228
Remove 211, 231, 236
Resource File flag 235
Revert Panel button 226
Save project entries using relative paths 229
Source Tree list 211
Target Name 228
Target Settings Panels list 226
Type 211
Use modification date caching 233
settings panels
Access Paths 208, 229
Build Extras 232, 285
File Mappings 234
reverting 256
Source Trees 210
Target Settings 227
setup
code completion 86
Shielded Folders panel
options
Find and compare operations 249
Project operations 255
Regular Expression 255
Shielded Folders preference panel 208
options
Add 209
Change 209
8/16-bit IDE User’s Guide
Find and compare operations 209
Project operations 209
Regular Expression 209
Remove 209
Shielded folder list 209
Shift Right menu command 297, 298
shortcut conventions 16
Show Classes 150
Show Classes pane 153
Show Floating Toolbar command 288
Show Floating Toolbar command in Toolbar
submenu 298
Show Inherited 145
Show Main Toolbar command 288
Show message after building up-to-date project
option
Build Settings panel 258
Show private 146
Show protected 146
Show public 146
Show Types menu command 298
Show Window Toolbar command 288
Show Window Toolbar command in Toolbar
submenu 298
showing
classes pane 150
shrinking panes, in browser 148
Single Class Hierarchy Window 144
single files, searching 105
single-class hierarchical window
opening 158
Single-Class Hierarchy window 158
difference from Multi-Class Hierarchy
window 158
single-file Find and Replace window 105
single-file Find window 103
Size option
Font & Tabs panel 258
software
development process cycle 17
Sort Alphabetical 149, 150
Sort function popup option
Editor Settings panel 258
Sort Hierarchical 149, 150
333
Sort Order button
in Files view of Project window 40
sorting
classes list 150
Functions list pop-up (alphabetically) 96, 97
Source box 127
source code
editing 81
going to a particular line 97
locating 95
Source Code pane 120
Source Code Pane disclosure triangle 120
source code, navigating 95
source file
adding markers to 99
source files
removing all markers from 100
removing markers from 99
source item, for comparison 126
Source pane 131, 152
in Symbols window 162
source relative includes 258
source trees
adding 212
changing 212
removing 213
Source Trees panel
options
Add 211
Change 211
Choose 211
Name 211
Remove 211
Source Tree list 211
Type 211, 260
Source Trees preference panel 210
Absolute Path option 260
Environment Variable option 260
Registry Key option 260
Source Trees settings panel 210
Stack Editor Windows menu command 298
static
icon for 151
stationery
334
creating for projects 33
creating projects 29
custom 32
Status area
in Class Browser window 145
status area 153
Stop At End Of File checkbox 104, 107
Stop Build menu command 298
Stop button 109, 120
Stop command 298
Straight Line 157
strategies
for build targets 34
for projects 34
for subprojects 35
Strings option
Text Colors panel 258
submenus
Align 277, 278
subproject, defined 33
subprojects
creating 34
opening 34
strategies for 35
Success option
Build Settings panel 259
Switch To Monitor menu command 298
symbol definitions 100
symbol definitions, looking up 100
symbol implementations
viewing all 161
symbol-editing shortcuts 83
symbolics files
searching (multiple) 115
Symbolics list 115
Symbolics list box 115
Symbolics option
IDE Extras panel 259
symbols
shortcuts for editing 83
viewing all implementations 161
Symbols list
in Browser Contents window 159
Symbols pane 162
8/16-bit IDE User’s Guide
Symbols pop-up 159
Symbols window 160
Source pane 162
Symbols pane 162
toolbar 162
symbols window 161
Synchronize Modification Dates command 43
Synchronize Modification Dates menu
command 299
Synchronize Modification Dates toolbar
button 38
System Headers checkbox 113
System Paths list
Recursive Search column 232
Search Status column 231
System Paths option
Access Paths panel 259
T
Tab indents selection option
Font & Tabs panel 259
Tab Inserts Spaces option
Font & Tabs panel 259
Tab Size option
Font & Tabs panel 259
tabs
In Files 110
In Folders 110
In Projects 110
In Symbolics 110
Target column
in Files view of Project window 40
Target list box 113
target management 44
Target Name option
Target Settings panel 260
target settings
Add 211, 231, 236
Add Default 231
Always Search User Paths 230
Application 234
Apply button 227
Arguments 234
Cache subprojects 233
8/16-bit IDE User’s Guide
Cancel button 227
Change 211, 231, 236
Choose 211, 228
Clear 229
Compiler 236
Dump internal browse information after
compile 234
Edit Language 236
Export Panel button 226
Extension 235
Factory Settings button 226
File Mappings list 235
File Type 235
Flags 236
for IDE 225
Generate Browser Data From 234
Host Flags 231
Ignored By Make flag 236
Import Panel button 227
Initial directory 234
Launchable flag 236
Linker 228
Name 211
OK button 227
Output Directory 228
Post-linker 228
Precompiled File flag 236
Pre-linker 228
Remove 211, 231, 236
Resource File flag 235
Revert Panel button 226
Save project entries using relative paths 229
Source Tree list 211
Source Trees 210
Target Name 228
Target Settings Panels list 226
Type 211
Use modification date caching 233
Target Settings command 299
Target Settings panel 50, 227
options
Choose 228
Clear 229
Linker 228, 254
335
Output Directory 228, 254
Post-linker 228, 254
Pre-linker 228, 255
Save project entries using relative
paths 41, 42, 229, 257
Target Name 228, 260
target settings panels
Access Paths 229
Build Extras 232, 285
File Mappings 234
Target Settings 227
Target Settings Panels list 226
Target Settings toolbar button 38
Target Settings window 225
Apply button 227
Cancel button 227
Export Panel button 226
Factory Settings button 226
Import Panel button 227
OK button 227
opening 227
Revert Panel button 226
Target Settings Panels list 226
targets 27
configuring 50
creating 48
files 44
managing 48
moving 45
removing 44, 49
renaming 46, 50
setting default 49
strategies for 34
Targets page 43
Targets tab 50
Targets view 31, 45, 48
tasks
activating automatic code completion 86
adding a keyword to a keyword set 237
adding markers to a source file 99
adding panes to an editor window 78
adding source trees 212
adding subprojects to a project 34
336
alphabetizing Functions list pop-up
order 96, 97
applying file differences 131
balancing punctuation 84
changing line views in a hierarchical
window 157
changing source trees 212
changing the find string 121
choosing a default project 31
choosing files to compare 128
choosing folders to compare 129
closing a docked window 64
closing a workspace 69
closing projects 32
collapsing a docked window 64
collapsing browser panes 148
collapsing the editor window toolbar 76
completing code for data members 91
completing code for parameter lists 92
creating a new class 149, 163, 164
creating a new data member 152, 169, 170
creating a new member function 151, 168
creating custom project stationery 33
creating new projects using project
stationery 29
deactivating automatic code completion 87
docking a window by using a contextual
menu 60
docking a window by using drag and
drop 60
docking windows of the same kind 60
examining items in the Folder Compare
Results window 134
expanding a docked window 64
expanding browser panes 148
expanding the editor window toolbar 76
exporting projects to XML files 31
floating a window 62
for managing files 51
generating project link maps 180
going to a particular line 97
hiding the classes pane 150
importing projects saved as XML files 32
indenting text blocks 83
8/16-bit IDE User’s Guide
looking up symbol definitions 100
making a window an MDI child 63
moving a docked window 64
navigating browser data 140
navigating Code Completion window 90
navigating to a marker 99
opening a recent workspace 70
opening a single-class hierarchical
window 158
opening a workspace 68
opening projects 29
opening projects created on other hosts 30
opening subprojects 34
opening the symbols window 161
opening the Target Settings window 227
overstriking text (Windows) 82
printing class hierarchies 157
printing projects 31
removing a keyword from a keyword
set 238
removing a marker from a source file 99
removing all markers from a source file 100
removing panes from an editor window 79
removing source trees 213
replacing text in a single file 107
resizing panes in an editor window 78
saving a copy of a workspace 69
saving a workspace 68
saving projects 30
searching a single file 105
searching for text across multiple files 118
searching for text across multiple
folders 111
searching for text across multiple
projects 114
searching for text across multiple symbolics
files 115
searching with a text selection 122
selecting entire routines 82
selecting item in Code Completion
window 91
selecting lines 82
selecting multiple lines 82
selecting rectangular portions of lines 82
8/16-bit IDE User’s Guide
selecting text in editor windows 81
showing the classes pane 150
sorting the classes list 150
suppressing dockable windows 63
toggling automatic punctuation balancing 84
triggering code completion by keyboard 87
triggering code completion from IDE menu
bar 86
unapplying file differences 132
undocking a window 61
unfloating a window 62
unindenting text blocks 83
using the default workspace 67
using the Find Next command 121
using the Find Previous command 121
using the Functions list pop-up 96
using the Interfaces list pop-up 96
using the VCS pop-up 77
using virtual space 82
viewing a file path 41
viewing browser data by contents 160
viewing browser data by inheritance 156
viewing class data from hierarchy
windows 148
Templates option 223
text
changing a find string 121
find by selecting 120
finding 103
overstriking (Windows) 82
replacing 103
searching with a selection 122
text blocks, indenting 83
text blocks, unindenting 83
text boxes
Result Count 119
Search Criteria 119
Text Colors panel
options
Activate Browser Coloring 250
Activate Syntax Coloring 250, 252, 258
Foreground 250
Keywords 252
Strings 258
337
Text Colors preference panel
options
Activate Browser Coloring 223
Activate Syntax Coloring 222
Background 222
Classes 223
Comments 222
Constants 223
Edit 223
Enums 223
Foreground 222
Functions 223
Globals 223
Keywords 222
Macros 223
Other 223
Set 1, Set 2, Set 3, Set 4 223
Strings 222
Templates 223
TypeDefs 223
text editing area, in editor window 78
text/list boxes
By Type 111
Find 104, 106, 109
Replace With 106, 109
Search in 111
text-selection Find 120
THINK Reference 100
third-party editor support 262
third-party text editors
Emacs 253
threading in IDE 243
__throw() 279
Tile Editor Windows command 299
Tile Editor Windows Vertically command 299
Tile Horizontally command 299
Tile Vertically command 300
To Smallest Height command in Resize
submenu 301
To Smallest Width command in Resize
submenu 301
toolbar
collapsing in editor window 76
expanding in editor window 76
338
Toolbar (Editor Window) Elements
Document Settings 195
File Dirty Indicator 195
File Path field 195
Functions 195
Header Files 195
Markers 195
Version Control Menus 195
toolbar buttons
Browser Contents 144
Class Hierarchy 144
Go Back 144
Go Forward 144
Make 38
Single Class Hierarchy Window 144
Synchronize Modification Dates 38
Target Settings 38
Toolbar Items 183, 194
Toolbar submenu
Anchor Floating Toolbar command 278
Clear Floating Toolbar command 280
Clear Main Toolbar command 281
Clear Window Toolbar command 281
Hide Floating Toolbar command 288
Hide Main Toolbar command 288
Reset Window Toolbar command 42, 295
Show Floating Toolbar command 288, 298
Show Main Toolbar command 288
Show Window Toolbar command 298
Toolbars
Add element 193, 194
Clear Elements 195
Customize 192
Elements 192, 193
Icons 194
Instances of 193
Main (floating) 193
Modify 193
Project and Window 193
Remove single element 194
Toolbar Items tab 193
Types 193
toolbars
editor 75
8/16-bit IDE User’s Guide
for Symbols window 162
resetting 195
tools
browser 21
build system 21
debugger 21
editor 20
project manager 20
search engine 20
ToolServer menu 262
ToolTip 194
touch
defined 40
Touch column 47, 48
in Files view of Project window 40
Touch command 47
touching
all files 47
all groups 47
files 47
groups 47
triggering
code completion by keyboard 87
code completion from IDE menu bar 86
Type list box
Absolute Path option 260
Type option
Source Trees panel 260
Type pop-up menu
Environment Variable option 260
Registry Key option 260
TypeDefs option 223
untouching
a file 47
a group 47
all files 48
all groups 48
Use Concurrent Compiles option 255
Use Default Workspace option 260
Use External Editor option 260
Use Local Project Data Storage option 261
Use modification date caching option 261
Use Multiple Document Interface option 57, 261
turning off 207
turning on 207
Use multiple undo option 302
in Editor Settings panel 262
Use Script menu option 262
Use Third Party Editor option 262
Use ToolServer menu option
IDE Extras panel 262
User Paths list
Recursive Search column 232
Search Status column 231
User Paths option 262
User Specified option 263
using
Find Next command 121
Find Previous command 121
Functions list pop-up 96
Interfaces list pop-up 96
VCS pop-up 77
virtual space 82
V
U
Unanchor Floating Toolbar command 301
Unapply button 131
Unapply Difference command 132, 302
Undo button 131
Undo command 302
undocking windows 61
unfloating windows 62
Ungroup command 302
unindenting text blocks 83
Untouch command 47
8/16-bit IDE User’s Guide
VCS 77
list pop-up 146
pop-up 77
VCS Commands option
Editor Settings panel 263
VCS menu 152, 263
VCS pop-up
using 77
version control 263
Version Control Settings command 302
Version Control System. See VCS.
339
Vertical Center command in Align submenu 296,
300, 301, 302
View as implementor 146
View as subclass 146
View As Unsigned Decimal menu command 302
View as user 146
View Disassembly menu command 303
View Memory As command 303
View Memory command 303
View Mixed menu command 303
View Source menu command 303
View Variable menu command 303
viewing
all symbol implementations 161
browser data by contents 160
browser data by inheritance 156
file paths 41
viewing installed plug-ins 277
viewing installed products 277
virtual
icon for 151
virtual space, using 82
W
Warnings button 120
window
Customize IDE Commands 196
Window Follows Insertion Point option 263
Window menu 270, 274
Restore Window command (Windows) 296
Window position and size option
Editor Settings panel 264
window types
docked 58
floating 58
MDI child 58
Windows
creating files 51
windows
Browser Contents 159
Class Browser 143
Code Completion 88
Compare Files Setup 126
Customize IDE Commands 121
340
dock bars in dockable windows 63
dockable 57
dockable, about 57
dockable, turning off 63
dockable, working with 59
docking the same kind of 60
docking with a contextual menu 60
docking with drag and drop 60
editor 73
editor, other 77
File Compare Results 130
Find (single-file) 103
Find and Replace (multiple-file) 108
Find and Replace (single-file) 105
floating 62
Folder Compare Results 132
hierarchy 156
IDE Preferences 201
making MDI children of 63
New C++ Class 164
New C++ Data Member 170
New C++ Member Function 168
project window 37
remembering size and position of 297
Remove Markers 98
saving default size and position of 297
Search results 118
Target Settings 225
undocking 61
unfloating 62
Windows menu layout 267
WinHelp (Windows) 100
Wizards
Browser 163
wizards
New Class 149, 163, 164
New Data Member 152, 169, 170
New Member Function 168
New Member Functions 151
working
with IDE preferences 201
with IDE target settings 225
Working Directory option
Runtime Settings panel 264
8/16-bit IDE User’s Guide
working with 59
browser 137
class browser windows 143
class hierarchy windows 155
working with dockable windows 59
working with files 51
working with projects 25
workspace, defined 67
workspaces 67
closing 69
opening 68
opening recent 70
saving 68
saving copies of 69
using default 67
Workspaces option
IDE Extras panel 264
workspaces, about 67
X
XML
exporting projects 31
importing projects 32
Z
Zoom Window menu command 303
Zoom windows to full screen option
IDE Extras panel 264
8/16-bit IDE User’s Guide
341
342
8/16-bit IDE User’s Guide