1
Oracle® Application Express
Application Builder User’s Guide
Release 3.2
E11947-01
July 2009
Oracle Application Express Application Builder User's Guide, Release 3.2
E11947-01
Copyright © 2003, 2009, Oracle and/or its affiliates. All rights reserved.
Primary Author: Terri Jennings
Contributors: Marco Adelfio, Carl Backstrom, Christina Cho, Michael Hichwa, Christopher Jones, Joel
Kallman, Sharon Kennedy, Syme Kutz, Sergio Leunissen, Anne Romano, Kris Rice, Marc Sewtz, Scott
Spadafore, Scott Spendolini, Jason Straub, Simon Watt, and Steve Fogel
This software and related documentation are provided under a license agreement containing restrictions on
use and disclosure and are protected by intellectual property laws. Except as expressly permitted in your
license agreement or allowed by law, you may not use, copy, reproduce, translate, broadcast, modify, license,
transmit, distribute, exhibit, perform, publish, or display any part, in any form, or by any means. Reverse
engineering, disassembly, or decompilation of this software, unless required by law for interoperability, is
prohibited.
The information contained herein is subject to change without notice and is not warranted to be error-free. If
you find any errors, please report them to us in writing.
If this software or related documentation is delivered to the U.S. Government or anyone licensing it on
behalf of the U.S. Government, the following notice is applicable:
U.S. GOVERNMENT RIGHTS Programs, software, databases, and related documentation and technical data
delivered to U.S. Government customers are "commercial computer software" or "commercial technical data"
pursuant to the applicable Federal Acquisition Regulation and agency-specific supplemental regulations. As
such, the use, duplication, disclosure, modification, and adaptation shall be subject to the restrictions and
license terms set forth in the applicable Government contract, and, to the extent applicable by the terms of
the Government contract, the additional rights set forth in FAR 52.227-19, Commercial Computer Software
License (December 2007). Oracle USA, Inc., 500 Oracle Parkway, Redwood City, CA 94065.
This software is developed for general use in a variety of information management applications. It is not
developed or intended for use in any inherently dangerous applications, including applications which may
create a risk of personal injury. If you use this software in dangerous applications, then you shall be
responsible to take all appropriate fail-safe, backup, redundancy, and other measures to ensure the safe use
of this software. Oracle Corporation and its affiliates disclaim any liability for any damages caused by use of
this software in dangerous applications.
Oracle is a registered trademark of Oracle Corporation and/or its affiliates. Other names may be trademarks
of their respective owners.
This software and documentation may provide access to or information on content, products, and services
from third parties. Oracle Corporation and its affiliates are not responsible for and expressly disclaim all
warranties of any kind with respect to third-party content, products, and services. Oracle Corporation and
its affiliates will not be responsible for any loss, costs, or damages incurred due to your access to or use of
third-party content, products, or services.
Contents
Preface ............................................................................................................................................................... xv
Topic Overview ......................................................................................................................................... xv
Audience..................................................................................................................................................... xvi
Documentation Accessibility ................................................................................................................... xvi
Related Documents .................................................................................................................................. xvii
Conventions ............................................................................................................................................. xviii
What’s New in Oracle Application Express ............................................................................... xix
Oracle Application Express Release 3.2 New Features........................................................................
Highlights of Oracle Application Express Release 3.1.........................................................................
1
xix
xx
Quick Start
What is Oracle Application Express? ................................................................................................... 1-1
About Oracle Application Express Architecture ................................................................................ 1-5
Understanding Application Express User Roles................................................................................ 1-6
Logging In to Oracle Application Express .......................................................................................... 1-6
About Browser Requirements .......................................................................................................... 1-7
Configuring Your Oracle Application Express Environment ..................................................... 1-7
Logging In to Oracle Application Express as a Developer .......................................................... 1-8
About the Workspace Home Page...................................................................................................... 1-12
Navigation Alternatives ....................................................................................................................... 1-13
Using Online Help ................................................................................................................................ 1-14
2
Running a Demonstration Application
Installing a Demonstration Application..............................................................................................
Running an Installed Demonstration Application............................................................................
Running an Application from Demonstration Applications .......................................................
Running an Application from the Application Home Page ........................................................
Understanding Sample Application.....................................................................................................
About the Home Page .......................................................................................................................
About the Customers Page ...............................................................................................................
About the Products Page...................................................................................................................
About the Orders Page ......................................................................................................................
About the Charts Page.......................................................................................................................
About the Admin Page......................................................................................................................
2-1
2-2
2-3
2-3
2-3
2-4
2-5
2-6
2-7
2-8
2-8
iii
Viewing Pages in Printer Friendly Mode ....................................................................................... 2-8
Modifying a Demonstration Application............................................................................................ 2-8
About the Developer Toolbar........................................................................................................... 2-8
Editing a Demonstration Application ............................................................................................. 2-9
Viewing Underlying Database Objects ............................................................................................ 2-10
Viewing the Database Object Dependencies Report.................................................................. 2-10
Viewing Database Objects in Object Browser ............................................................................. 2-10
3
Application Builder Concepts
What Is a Page? ......................................................................................................................................... 3-1
Understanding Page Processing and Page Rendering ...................................................................... 3-2
How the Application Express Engine Renders and Processes Pages......................................... 3-2
Understanding Conditional Rendering and Processing .............................................................. 3-2
Verifying User Identity...................................................................................................................... 3-4
Controlling Access to Controls and Components ......................................................................... 3-4
Understanding Session State Management ........................................................................................ 3-4
What Is a Session? .............................................................................................................................. 3-5
Understanding Session IDs............................................................................................................... 3-5
Viewing Session State ........................................................................................................................ 3-5
Understanding URL Syntax ................................................................................................................... 3-6
Understanding the URL that Displays for a Page ......................................................................... 3-7
Using f?p Syntax to Link Pages........................................................................................................ 3-7
Calling a Page Using an Application and Page Alias ................................................................... 3-9
Calling a Page from a Button URL .................................................................................................. 3-9
Facilitating Bookmarks by Using Zero as the Session ID............................................................. 3-9
Managing Session State Values .......................................................................................................... 3-11
Referencing Session State............................................................................................................... 3-11
Setting Session State........................................................................................................................ 3-11
Clearing Session State..................................................................................................................... 3-12
About Bind Variable Syntax .......................................................................................................... 3-14
Understanding Substitution Strings ................................................................................................. 3-15
Using Substitution Strings ............................................................................................................. 3-15
About Built-in Substitution Strings .............................................................................................. 3-15
4
Using Application Builder
Accessing Application Builder .............................................................................................................. 4-1
About the Application Builder Home Page ........................................................................................ 4-2
Configuring Developer Preferences ................................................................................................ 4-3
About the Application Home Page ....................................................................................................... 4-4
About the Action Bar ......................................................................................................................... 4-6
About Application Attributes ................................................................................................................ 4-8
Configuring the Application Definition ......................................................................................... 4-8
Configuring Security Attributes ................................................................................................... 4-15
Configuring Globalization Attributes .......................................................................................... 4-19
iv
5
Working with Application Pages
About the Page Definition...................................................................................................................... 5-1
Accessing a Page Definition ............................................................................................................. 5-2
Understanding the Page Definition................................................................................................. 5-2
Using the View List on the Page Definition ....................................................................................... 5-4
Accessing the View List on the Page Definition ............................................................................ 5-4
About Page Events ............................................................................................................................. 5-5
About Database Object Dependencies ............................................................................................ 5-5
About History ..................................................................................................................................... 5-5
About Export ...................................................................................................................................... 5-6
About Groups ..................................................................................................................................... 5-6
About Referenced............................................................................................................................... 5-6
Editing a Page Definition ....................................................................................................................... 5-7
About the Edit All Icon ..................................................................................................................... 5-7
About the Copy or Create Icons....................................................................................................... 5-8
Reordering Page Components ......................................................................................................... 5-8
About Page Rendering ...................................................................................................................... 5-9
About Page Processing ................................................................................................................... 5-11
About Shared Components ........................................................................................................... 5-12
Understanding Page Computations ............................................................................................. 5-14
Understanding Validations ........................................................................................................... 5-17
Understanding Page Processes ..................................................................................................... 5-20
Understanding Branches................................................................................................................ 5-22
Editing Page Attributes ........................................................................................................................ 5-23
Accessing Page Attributes ............................................................................................................. 5-23
About the Page Attributes Page.................................................................................................... 5-24
About the Developer Toolbar ............................................................................................................. 5-28
Working with Shared Components ................................................................................................... 5-29
Accessing the Shared Components Page..................................................................................... 5-29
About the Shared Components Page ........................................................................................... 5-30
About Exporting Shared Components......................................................................................... 5-33
Accessing Reports on Shared Components................................................................................. 5-34
Understanding Application Processes .............................................................................................. 5-34
About On Demand Application Processes.................................................................................. 5-34
Application Process Example........................................................................................................ 5-35
Creating an Application Process................................................................................................... 5-36
Accessing Application Processes Reports ................................................................................... 5-37
Understanding Application Computations...................................................................................... 5-37
About Application Computations ................................................................................................ 5-37
Creating an Application Computation ........................................................................................ 5-38
Accessing the Application Computation History Report ......................................................... 5-39
6
Building an Application
Creating an Application .......................................................................................................................... 6-1
About Creating an Application Using a Wizard ........................................................................... 6-2
About the Create Application Wizard ............................................................................................ 6-2
v
About the Create Application from Spreadsheet Wizard ............................................................ 6-6
About Demonstration Applications ................................................................................................ 6-7
Copying an Application .................................................................................................................... 6-8
Deleting an Application .................................................................................................................... 6-8
Managing Pages in an Application....................................................................................................... 6-9
About Creating Pages..................................................................................................................... 6-10
Creating a Page from the Application Home Page .................................................................... 6-10
Creating a Page from the Page Definition ................................................................................... 6-11
Creating a Page from the Developer Toolbar ............................................................................. 6-13
Copying a Page................................................................................................................................ 6-13
Running a Page or Application ..................................................................................................... 6-14
Grouping Pages ............................................................................................................................... 6-15
Locking and Unlocking a Page...................................................................................................... 6-19
Deleting a Page ................................................................................................................................ 6-21
Adding Application Comments ......................................................................................................... 6-22
Creating an Application Comment .............................................................................................. 6-22
Viewing the Application Comments Report............................................................................... 6-22
Adding Developer Comments ............................................................................................................ 6-22
Adding Developer Comments to an Application or Page ........................................................ 6-23
Viewing and Editing Developer Comments ............................................................................... 6-23
Deleting Developer Comments..................................................................................................... 6-24
About the Developer Comments Report ..................................................................................... 6-25
Creating Applications Groups............................................................................................................ 6-27
Viewing Application Groups ........................................................................................................ 6-27
Creating an Application Group .................................................................................................... 6-28
Assigning an Application to an Application Group .................................................................. 6-28
Removing an Application from an Application Group ............................................................ 6-29
Deleting an Application Group..................................................................................................... 6-29
Viewing Application Reports ............................................................................................................. 6-29
Accessing Application Reports ..................................................................................................... 6-30
Shared Components Reports......................................................................................................... 6-30
Page Components Reports............................................................................................................. 6-31
Activity Reports............................................................................................................................... 6-31
Cross Application Reports ............................................................................................................. 6-32
Understanding Page-Level Items ....................................................................................................... 6-32
Differences Between Page Items and Application Items........................................................... 6-33
About the Items Section of the Page Definition.......................................................................... 6-33
Creating Page-Level Items ............................................................................................................. 6-34
Editing Page-Level Items ............................................................................................................... 6-43
Using the Drag and Drop Layout Page........................................................................................ 6-47
Referencing Item Values ................................................................................................................ 6-50
Displaying Conditional or Read-Only Page Items..................................................................... 6-51
Working with a Multiple Select List Item.................................................................................... 6-51
Understanding Application-Level Items .......................................................................................... 6-52
Creating an Application-level Item .............................................................................................. 6-53
Accessing Application Item History ............................................................................................ 6-53
Editing Application-level Item Attributes................................................................................... 6-53
vi
7
Adding Application Components
Creating Reports....................................................................................................................................... 7-1
Creating a Report Using a Wizard .................................................................................................. 7-2
Using Interactive Reports ................................................................................................................. 7-4
Editing Interactive Reports ............................................................................................................ 7-15
Editing SQL and Wizard Reports ................................................................................................. 7-26
Printing Report Regions ................................................................................................................. 7-37
Creating Forms....................................................................................................................................... 7-46
Creating a Form Using a Wizard .................................................................................................. 7-47
Creating a Tabular Form ................................................................................................................ 7-48
Creating a Master Detail Form...................................................................................................... 7-49
Creating a Form Manually............................................................................................................. 7-51
Validating User Input in Forms .................................................................................................... 7-54
Creating Calendars................................................................................................................................ 7-55
About Creating Calendars ............................................................................................................. 7-55
Creating a New Calendar .............................................................................................................. 7-55
Editing a Calendar Title ................................................................................................................. 7-56
Editing Calendar Attributes .......................................................................................................... 7-57
Upgrading a Calendar Created in a Previous Releases............................................................. 7-60
Converting an Easy Calendar to a SQL Calendar ...................................................................... 7-60
Creating Charts ...................................................................................................................................... 7-61
About Supported Chart Types ...................................................................................................... 7-61
About Creating SQL Queries for Charts...................................................................................... 7-62
Creating an HTML Chart ............................................................................................................... 7-63
Creating a SVG Chart ..................................................................................................................... 7-65
Creating a Flash Chart.................................................................................................................... 7-71
Editing Chart Attributes................................................................................................................. 7-74
Using Custom XML with Flash Charts ........................................................................................ 7-74
Enabling Asynchronous Updates ................................................................................................. 7-75
Displaying SVG Charts in Other Languages .............................................................................. 7-75
Creating Buttons.................................................................................................................................... 7-76
About the Buttons Section of the Page Definition...................................................................... 7-76
Creating a Button Using a Wizard................................................................................................ 7-77
Creating Multiple Buttons ............................................................................................................. 7-78
Editing Buttons ................................................................................................................................ 7-78
Understanding the Relationship Between Button Names and REQUEST ............................. 7-80
About Branching with Buttons ..................................................................................................... 7-81
Displaying Buttons Conditionally ................................................................................................ 7-81
Creating Lists of Values ....................................................................................................................... 7-81
Creating a Named LOV at the Application Level ...................................................................... 7-82
About Static LOVs........................................................................................................................... 7-83
Editing an Existing LOV ................................................................................................................ 7-83
Referencing Session State Within an LOV................................................................................... 7-84
Referencing a Null Value in an Item Based on an LOV ............................................................ 7-84
Accessing LOV Reports.................................................................................................................. 7-85
Creating Dependent Select Lists ........................................................................................................ 7-85
Using Shortcuts...................................................................................................................................... 7-86
vii
About Shortcut Types.....................................................................................................................
Defining Shortcuts ..........................................................................................................................
Editing Existing Shortcuts..............................................................................................................
Accessing Shortcut Reports ...........................................................................................................
Using the Find Icon...............................................................................................................................
About the Find Icon ........................................................................................................................
About the Item Finder ....................................................................................................................
Using the Page Finder ....................................................................................................................
Using the Query Finder..................................................................................................................
Using the Table Finder ...................................................................................................................
Using the PL/SQL Finder ..............................................................................................................
Using the Images Finder ................................................................................................................
Using the CSS Finder ......................................................................................................................
Controlling Access to Applications, Pages, and Page Components............................................
How the Access Control List Works ............................................................................................
Creating an Access Control List....................................................................................................
Selecting an Application Mode and Adding Users....................................................................
Controlling Access for Pages and Page Components..............................................................
Incorporating JavaScript into an Application................................................................................
Referencing Items Using JavaScript ...........................................................................................
Incorporating JavaScript Functions ............................................................................................
Calling JavaScript from a Button ................................................................................................
Optimizing a Page for Printing ........................................................................................................
Selecting a Printer Friendly Template for an Application ......................................................
Using f?p Syntax to Toggle to Printer Friendly Mode.............................................................
Creating a Help Page ..........................................................................................................................
Creating a Help Page and Region...............................................................................................
Defining Help Text........................................................................................................................
Creating a Help Navigation Bar Entry.......................................................................................
8
7-86
7-87
7-88
7-88
7-89
7-89
7-89
7-90
7-91
7-92
7-93
7-94
7-95
7-96
7-96
7-97
7-98
7-100
7-100
7-101
7-101
7-102
7-103
7-103
7-104
7-104
7-104
7-104
7-106
Adding Navigation
Creating Tabs............................................................................................................................................. 8-1
About Template Support .................................................................................................................. 8-2
About the Tabs Section of the Page Definition .............................................................................. 8-2
Using the Reorder Tabs Icon ............................................................................................................ 8-3
About the Tabs Page .......................................................................................................................... 8-3
How to Create a Tab .......................................................................................................................... 8-3
Editing Tabs ........................................................................................................................................ 8-4
Accessing Tab Reports....................................................................................................................... 8-5
Creating Lists ............................................................................................................................................ 8-5
How To Create a List ......................................................................................................................... 8-6
Adding a List to a Page .................................................................................................................. 8-11
Editing a List .................................................................................................................................... 8-12
Editing Multiple List Entries Simultaneously............................................................................. 8-13
Accessing List Reports.................................................................................................................... 8-13
Creating Breadcrumbs.......................................................................................................................... 8-13
About Breadcrumbs........................................................................................................................ 8-14
viii
How to Create Breadcrumbs .........................................................................................................
Editing Breadcrumbs ......................................................................................................................
Reparenting Breadcrumb Entries..................................................................................................
Accessing Breadcrumb Reports ....................................................................................................
Creating Trees.........................................................................................................................................
How To Create a Tree.....................................................................................................................
Editing a Tree...................................................................................................................................
Accessing Tree Reports ..................................................................................................................
Creating a Navigation Bar Entry ........................................................................................................
About Navigation Bars...................................................................................................................
How to Create a Navigation Bar Entry ........................................................................................
Editing a Navigation Bar Entry.....................................................................................................
Editing Multiple Navigation Bar Entries Simultaneously ........................................................
Using the Reorder Navigation Bar Entries Icon .........................................................................
Accessing Navigation Bar Entry Reports ....................................................................................
Controlling Navigation Using Branches...........................................................................................
9
8-14
8-18
8-19
8-20
8-20
8-20
8-22
8-22
8-23
8-23
8-24
8-25
8-26
8-26
8-26
8-27
Controlling Page Layout
Understanding Page Layout in Oracle Application Express ........................................................... 9-1
Displaying Components on Every Page of an Application ............................................................. 9-2
Understanding Regions .......................................................................................................................... 9-2
About the Regions Section of the Page Definition ........................................................................ 9-3
Using the Reorder Regions Icon ...................................................................................................... 9-3
Editing Region Attributes ................................................................................................................. 9-4
Creating a Region............................................................................................................................... 9-7
About Region Types .......................................................................................................................... 9-8
Copying a Region............................................................................................................................... 9-9
Creating a Multiple Column Layout ................................................................................................. 9-10
Creating Regions in Multiple Columns ....................................................................................... 9-10
Creating a Multiple Column Page Template .............................................................................. 9-10
How Item Attributes Affect Page Layout ......................................................................................... 9-11
Incorporating Content from Other Web Sites.................................................................................. 9-12
Managing Images .................................................................................................................................. 9-13
Uploading Images ........................................................................................................................... 9-13
Referencing Images......................................................................................................................... 9-14
Editing Image Attributes................................................................................................................ 9-15
Deleting an Image ........................................................................................................................... 9-15
Managing Static Files ........................................................................................................................... 9-16
Uploading Static Files..................................................................................................................... 9-16
Editing an Uploaded File ............................................................................................................... 9-16
Downloading an Uploaded File.................................................................................................... 9-17
Deleting an Uploaded File ............................................................................................................. 9-17
Rendering HTML Using Custom PL/SQL........................................................................................ 9-18
10
Managing Themes and Templates
Managing Themes................................................................................................................................. 10-1
ix
Accessing the Themes Page ...........................................................................................................
Changing the Default Templates in a Theme .............................................................................
Creating a Theme ............................................................................................................................
Editing a Theme ..............................................................................................................................
Switching the Active Theme..........................................................................................................
Copying a Theme ............................................................................................................................
Deleting a Theme ............................................................................................................................
Managing Workspace Themes ......................................................................................................
About Exporting and Importing Themes ....................................................................................
Changing a Theme Identification Number .................................................................................
Viewing Theme Reports.................................................................................................................
Customizing Templates......................................................................................................................
About Cascading Style Sheets .....................................................................................................
Selecting a Default Page Template .............................................................................................
Creating a New Template ............................................................................................................
Viewing Template Reports ..........................................................................................................
Managing Templates ....................................................................................................................
Breadcrumb Templates ................................................................................................................
Button Templates ..........................................................................................................................
Calendar Templates ......................................................................................................................
Label Templates.............................................................................................................................
List Templates................................................................................................................................
Page Templates..............................................................................................................................
Popup LOV Templates .................................................................................................................
Region Templates..........................................................................................................................
Report Templates ..........................................................................................................................
Using Custom Cascading Style Sheets............................................................................................
Uploading Cascading Style Sheets .............................................................................................
Referencing an Uploaded Cascading Style Sheet in the Page Template...............................
11
Managing User Interface Defaults
Viewing Tables or Views Utilizing User Interface Defaults.........................................................
Creating to User Interface Defaults ..............................................................................................
Viewing the UI Defaults Report in Object Browser ...................................................................
Editing Column Attributes..................................................................................................................
About the Column Definition .......................................................................................................
About List of Values .......................................................................................................................
About the Database Column Definition Report .........................................................................
Comparing User Interface Defaults Across Applications .............................................................
About Exporting and Importing User Interface Defaults .............................................................
12
11-1
11-1
11-2
11-3
11-3
11-4
11-5
11-5
11-6
Debugging an Application
About Tuning Performance .................................................................................................................
Reviewing Session State ......................................................................................................................
Accessing Debug Mode........................................................................................................................
Enabling SQL Tracing and Using TKPROF .....................................................................................
Monitoring Application and Page Resource Use............................................................................
x
10-2
10-3
10-4
10-5
10-6
10-6
10-7
10-7
10-8
10-9
10-9
10-12
10-13
10-13
10-14
10-14
10-15
10-18
10-20
10-21
10-22
10-23
10-25
10-30
10-31
10-33
10-40
10-40
10-41
12-1
12-2
12-2
12-2
12-3
Viewing Reports .................................................................................................................................... 12-3
Debugging Problematic SQL Queries............................................................................................... 12-4
Removing Controls and Components to Isolate a Problem.......................................................... 12-4
13
Managing Application Security
Understanding Administrator Security Best Practices ..................................................................
Security Considerations When Using the Embedded PL/SQL Gateway...............................
About Configuring Oracle HTTP Server with mod_plsql for Oracle Application Express.
Utilizing Secure Sockets Layer (SSL)............................................................................................
Integrating with Oracle BI Publisher............................................................................................
About Setting Password Complexity Rules ................................................................................
Advantages of the Oracle Application Express Runtime Environment .................................
Understanding Session Timeout...................................................................................................
Enabling Network Services in Oracle Database 11g ..................................................................
Enabling Indexing of Online Help in Oracle Database 11gR2 and Higher ............................
Understanding Developer Security Best Practices .........................................................................
Understanding Items of Type Password .....................................................................................
Identifying At Risk Password Items...........................................................................................
About Using Zero as a Session ID ..............................................................................................
Understanding Cross-Site Scripting Protection........................................................................
About Session State and Security ...............................................................................................
Understanding Session State Protection ....................................................................................
Securing File Uploads ........................................................................................................................
Establishing User Identity Through Authentication ...................................................................
Understanding How Authentication Works.............................................................................
Determining Whether to Include Authentication ....................................................................
Creating an Authentication Scheme...........................................................................................
Using Preconfigured Authentication Schemes .........................................................................
About Creating an Authentication Scheme from Scratch .......................................................
Managing Existing Authentication Schemes ............................................................................
Viewing the Authentication Scheme Associated with an Application .................................
Changing the Authentication Scheme Associated with an Application...............................
Viewing Authentication Scheme Utilization Report................................................................
Providing Security Through Authorization...................................................................................
How Authorization Schemes Work............................................................................................
Creating an Authorization Scheme ............................................................................................
Attaching an Authorization Scheme to an Application, Page, or Components ..................
Viewing Authorization Reports..................................................................................................
14
13-1
13-1
13-2
13-2
13-2
13-3
13-4
13-4
13-5
13-8
13-9
13-9
13-10
13-10
13-11
13-13
13-14
13-24
13-24
13-25
13-25
13-26
13-26
13-30
13-32
13-32
13-32
13-33
13-33
13-33
13-34
13-35
13-36
Deploying an Application
About the Oracle Application Express Application Development Life Cycle..........................
System Development Life Cycle Methodologies to Consider ..................................................
Understanding the Packaging Process ..............................................................................................
Deployment Options to Consider.................................................................................................
Deciding Whether to Copy a Workspace ....................................................................................
Deciding Whether to Copy a Database........................................................................................
14-1
14-1
14-2
14-3
14-3
14-3
xi
About the Application ID ..............................................................................................................
Deciding to Install a New HTTP Server ......................................................................................
How to Move an Application to Another Development Instance...............................................
About Managing Database Objects ..............................................................................................
How to Create a Packaged Application.............................................................................................
How a Packaged Application Simplifies Deployment ..............................................................
Creating a Packaged Application .................................................................................................
Adding Installation Scripts for an Image, Cascading Style Sheet, or Static File....................
Adding an Access Control List to a Packaged Application ......................................................
Installing Supporting Objects........................................................................................................
Deleting Supporting Objects Scripts, Messages, and Installation Options.............................
Upgrading a Packaged Application ...........................................................................................
Deinstalling Supporting Objects .................................................................................................
Viewing an Install Summary .......................................................................................................
Exporting an Application and Related Files ..................................................................................
Exporting an Application.............................................................................................................
Exporting Workspace Users ........................................................................................................
Exporting Application Components ..........................................................................................
Exporting a Page in an Application............................................................................................
Exporting Cascading Style Sheets...............................................................................................
Exporting Images ..........................................................................................................................
Exporting Static Files ....................................................................................................................
Exporting Script Files ...................................................................................................................
Exporting Themes .........................................................................................................................
Exporting User Interface Defaults ..............................................................................................
Where Images, CSS, and Script Files Are Stored......................................................................
Importing Export Files........................................................................................................................
Importing an Application or Page ..............................................................................................
Importing Cascading Style Sheets ..............................................................................................
Importing Static Files....................................................................................................................
Importing Images ..........................................................................................................................
Importing Themes.........................................................................................................................
Importing User Interface Defaults ..............................................................................................
Installing Export Files ........................................................................................................................
Accessing the Export Repository ................................................................................................
Installing an Application Export from the Export Repository ...............................................
Installing Other Files from the Export Repository ...................................................................
Deleting Files from the Export Repository ................................................................................
Installing Export Files from SQL*Plus .......................................................................................
About Publishing the Application URL .........................................................................................
Using Build Options to Control Configuration ............................................................................
Creating Build Options ................................................................................................................
Managing Build Options..............................................................................................................
Exporting Build Options or Build Option Status .....................................................................
Viewing the Build Option Utilization Report ...........................................................................
xii
14-3
14-4
14-4
14-4
14-5
14-5
14-6
14-8
14-8
14-9
14-9
14-10
14-11
14-11
14-12
14-12
14-13
14-14
14-15
14-16
14-16
14-17
14-18
14-18
14-19
14-20
14-21
14-21
14-23
14-23
14-24
14-24
14-25
14-25
14-26
14-26
14-27
14-27
14-28
14-28
14-29
14-29
14-30
14-30
14-31
15
Advanced Programming Techniques
About DML Locking.............................................................................................................................
Accessing Data with Database Links ................................................................................................
Sending Email from an Application..................................................................................................
About Configuring Oracle Application Express to Send Email...............................................
Sending Email from an Application .............................................................................................
Using Collections ..................................................................................................................................
About the APEX_COLLECTION API ..........................................................................................
Creating a Collection ......................................................................................................................
Truncating a Collection ..................................................................................................................
Accessing a Collection ....................................................................................................................
Deleting a Collection.......................................................................................................................
Adding Members to a Collection..................................................................................................
Updating Collection Members ......................................................................................................
Deleting Collection Members ........................................................................................................
Determining Collection Status ......................................................................................................
Merging Collections......................................................................................................................
Managing Collections ...................................................................................................................
Clearing Collection Session State................................................................................................
Creating Custom Activity Reports Using APEX_ACTIVITY_LOG ..........................................
Running Background PL/SQL ..........................................................................................................
Understanding the APEX_PLSQL_JOB Package......................................................................
About System Status Updates .....................................................................................................
Using a Process to Implement Background PL/SQL ..............................................................
Implementing Web Services .............................................................................................................
Understanding Web Service References ....................................................................................
Working with SSL Enabled Web Services .................................................................................
Creating a Web Service Reference Based on a WSDL .............................................................
Using the Web Service Reference Repository ...........................................................................
Testing a Web Service Reference Created from a WSDL ........................................................
Testing a Web Service Reference Created Manually ...............................................................
Creating an Input Form and Report on a Web Service ...........................................................
Creating a Form on a Web Service .............................................................................................
Invoking a Web Service as a Process..........................................................................................
Editing a Web Service Process ....................................................................................................
Viewing a Web Service Reference History ................................................................................
About BLOB Support in Forms and Reports .................................................................................
About BLOB in Forms ..................................................................................................................
About BLOB Support in Reports ................................................................................................
Working With BLOBs Procedurally ...........................................................................................
16
15-1
15-2
15-3
15-3
15-3
15-4
15-5
15-5
15-6
15-6
15-7
15-7
15-8
15-9
15-9
15-10
15-10
15-12
15-12
15-13
15-13
15-15
15-15
15-16
15-17
15-18
15-18
15-20
15-21
15-21
15-21
15-23
15-24
15-26
15-26
15-26
15-27
15-28
15-30
Managing Application Globalization
About Translating an Application and Globalization Support ...................................................
About Language Identification .....................................................................................................
Rules for Translating Applications Built in Application Builder.............................................
How Translated Applications Are Rendered ............................................................................
16-1
16-2
16-2
16-2
xiii
About Translatable Components ..................................................................................................
Specifying the Primary Language for an Application ...................................................................
Using Format Masks for Items ......................................................................................................
Translating Applications for Multibyte Languages ..................................................................
Understanding the Translation Process ............................................................................................
Step 1: Map the Target Language .................................................................................................
Step 2: Seed and Export Text to a Translation File .....................................................................
Step 3: Translate the XLIFF File.....................................................................................................
Step 4: Upload and Apply a Translated XLIFF Document and Publish the Application.....
Manually Editing a Translation ..................................................................................................
Translating Messages..........................................................................................................................
Translating Messages Used in PL/SQL Procedures ................................................................
Translating Messages Used Internally by Oracle Application Express ................................
Translating Data That Supports List of Values..............................................................................
Defining a Dynamic Translation.................................................................................................
APEX_LANG.LANG API ............................................................................................................
About Supported Globalization Codes ..........................................................................................
A
16-2
16-4
16-5
16-5
16-5
16-6
16-6
16-8
16-9
16-10
16-11
16-11
16-13
16-25
16-26
16-26
16-27
Available Conditions
Conditions in Application Builder ...................................................................................................... A-1
B
Privileges Granted to PUBLIC
Packages ....................................................................................................................................................
Procedures.................................................................................................................................................
Functions...................................................................................................................................................
Tables .........................................................................................................................................................
Views..........................................................................................................................................................
Index
xiv
B-1
B-3
B-3
B-3
B-3
Preface
Oracle Application Express Application Builder User’s Guide describes how to use the
Oracle Application Express development environment to build and deploy
database-centric Web applications. Oracle Application Express turns a single Oracle
database into a shared service by enabling multiple workgroups to build and access
applications as if they were running in separate databases.
This preface contains these topics:
■
Topic Overview
■
Audience
■
Documentation Accessibility
■
Related Documents
■
Conventions
Topic Overview
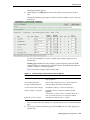
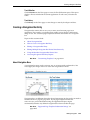
This document contains the following chapters:
Title
Description
What’s New in Oracle Application Describes new features available in this release of Oracle
Express
Application Express.
Quick Start
Offers a quick introduction to using the Oracle
Application Express.
Running a Demonstration
Application
Describes how to run and modify the demonstration
applications that install with Application Builder.
Application Builder Concepts
Provides basic conceptual information about Application
Builder. Use Application Builder to assemble an HTML
interface (or application) on top of database objects such
as tables and procedures.
Using Application Builder
Provides important background information about using
Application Builder to build dynamically rendered
applications.
Working with Application Pages
Provides important background information about
creating and managing pages within an application.
Building an Application
Describes how to use Application Builder to build an
application and application components.
xv
Title
Description
Adding Application Components
Describes how to use Application Builder to add pages to
an application and add other components (reports, charts,
or forms), page controls (buttons, items, list of values),
and shared components (breadcrumbs, lists, or tabs).
Adding Navigation
Describes how to implement navigation in your
application using different types of navigation controls,
including navigation bar entries, tabs, breadcrumbs, lists,
and trees.
Controlling Page Layout
Describes different ways you can customize your
application’s page layout by customizing regions, editing
item attributes, and incorporating images.
Managing Themes and Templates
Describes different ways you can alter your application’s
user interface and page layout through themes and
templates.
Managing User Interface Defaults
Describes how to use user interface defaults to assign
default user interface properties to a table, column, or
view.
Debugging an Application
Describes approaches to debugging your Application
Builder application, including viewing Debug Mode,
enabling SQL tracing, viewing page reports, and how to
manually remove a control or a component to isolate a
problem.
Managing Application Security
Describes how to provide security for an Application
Builder application by utilizing cross-site scripting
protection, session state protection, authentication, and
authorization.
Deploying an Application
Explains how to package an application built within
Application Builder.
Advanced Programming
Techniques
Provides information about advanced programming
techniques including establishing database links, using
collections, running background SQL, utilizing Web
services, and managing user preferences.
Managing Application
Globalization
Explains how to translate an application built-in
Application Builder.
Audience
Oracle Application Express Application Builder User’s Guide is intended for application
developers who are building database-centric Web applications using Oracle
Application Express. The guide describes how to use the Oracle Application Express
development environment to build, debug, manage, and deploy applications.
To use this guide, you must have a general understanding of relational database
concepts and an understanding of the operating system environment under which you
are running Oracle Application Express.
See Also: Oracle Database 2 Day + Oracle Application Express
Developer’s Guide
Documentation Accessibility
Our goal is to make Oracle products, services, and supporting documentation
accessible to all users, including users that are disabled. To that end, our
xvi
documentation includes features that make information available to users of assistive
technology. This documentation is available in HTML format, and contains markup to
facilitate access by the disabled community. Accessibility standards will continue to
evolve over time, and Oracle is actively engaged with other market-leading
technology vendors to address technical obstacles so that our documentation can be
accessible to all of our customers. For more information, visit the Oracle Accessibility
Program Web site at http://www.oracle.com/accessibility/.
Accessibility of Code Examples in Documentation
Screen readers may not always correctly read the code examples in this document. The
conventions for writing code require that closing braces should appear on an
otherwise empty line; however, some screen readers may not always read a line of text
that consists solely of a bracket or brace.
Accessibility of Links to External Web Sites in Documentation
This documentation may contain links to Web sites of other companies or
organizations that Oracle does not own or control. Oracle neither evaluates nor makes
any representations regarding the accessibility of these Web sites.
Deaf/Hard of Hearing Access to Oracle Support Services
To reach Oracle Support Services, use a telecommunications relay service (TRS) to call
Oracle Support at 1.800.223.1711. An Oracle Support Services engineer will handle
technical issues and provide customer support according to the Oracle service request
process. Information about TRS is available at
http://www.fcc.gov/cgb/consumerfacts/trs.html, and a list of phone
numbers is available at http://www.fcc.gov/cgb/dro/trsphonebk.html.
Related Documents
For more information, see these Oracle resources:
■
Oracle Application Express Release Notes
■
Oracle Application Express Installation Guide
■
Oracle Database 2 Day + Oracle Application Express Developer’s Guide
■
Oracle Application Express Administration Guide
■
Oracle Application Express SQL Workshop and Utilities Guide
■
Oracle Application Express API Reference
■
Oracle Application Express Migration Guide
■
Oracle Application Express Advanced Tutorials
■
Oracle Database Concepts
■
Oracle Database Advanced Application Developer's Guide
■
Oracle Database Administrator's Guide
■
Oracle Database SQL Language Reference
■
SQL*Plus User's Guide and Reference
For information about Oracle error messages, see Oracle Database Error Messages.
Oracle error message documentation is available only in HTML. If you have access to
the Oracle Database Documentation Library, you can browse the error messages by
range. Once you find the specific range, use your browser's "find in page" feature to
xvii
locate the specific message. When connected to the Internet, you can search for a
specific error message using the error message search feature of the Oracle online
documentation.
Many books in the documentation set use the sample schemas of the seed database,
which is installed by default when you install Oracle. Refer to Oracle Database Sample
Schemas for information on how these schemas were created and how you can use
them yourself.
For additional application examples, please visit the Oracle by Examples (OBEs)
Application Express page, located on Oracle’s Technology Network. The OBEs provide
step-by-step examples with screenshots on how to perform various tasks within
Application Express.
http://www.oracle.com/technology/products/database/application_express/html/obes.html
Printed documentation is available for sale in the Oracle Store at
http://oraclestore.oracle.com/
To download free release notes, installation documentation, white papers, or other
collateral, please visit the Oracle Technology Network (OTN). You must register online
before using OTN; registration is free and can be done at
http://www.oracle.com/technology/membership/
If you already have a user name and password for OTN, then you can go directly to
the documentation section of the OTN Web site at
http://www.oracle.com/technology/documentation/
Conventions
The following text conventions are used in this document:
xviii
Convention
Meaning
boldface
Boldface type indicates graphical user interface elements associated
with an action, or terms defined in text or the glossary.
italic
Italic type indicates book titles, emphasis, or placeholder variables for
which you supply particular values.
monospace
Monospace type indicates commands within a paragraph, URLs, code
in examples, text that appears on the screen, or text that you enter.
What’s New in Oracle Application Express
This section describes new features available in Oracle Application Express Release 3.2
and points you to additional information.
This preface contains these topics:
■
Oracle Application Express Release 3.2 New Features
■
Highlights of Oracle Application Express Release 3.1
Oracle Application Express Release 3.2 New Features
New features in Oracle Application Express, release 3.2 include:
■
Forms Conversion.
Forms Conversion captures the design of existing Oracle Forms and automatically
converts some components, primarily the user interface. Other components, such
as complex triggers, must be manually converted post-generation..
Moving to native HTML is not seamless and changes to the user interface are
required to deliver optimal Web interactivity. This tool enables you to take
advantage of Oracle Application Express dynamic HTML capabilities, including
interactive reports. For further information see Oracle Application Express Migration
Guide.
■
Improved Security.
Security best practices for developing Web applications specify minimizing the
exposed footprint, protecting the integrity of the session state, and ensuring that
data being transmitted between the browser and the server cannot be
compromised. To align with these best practices, Oracle Application Express,
release 3.2 has improved security measures making it more declarative and
powerful. Some key enhancements include the ability to:
–
Declaratively encrypt session state
–
Declaratively specify session timeouts for maximum idle time and maximum
session duration
–
Create new password item types that enable users to enter passwords without
ever saving them to session state.
Other features designed to minimize the exposed footprint include reducing the
privileges required by the Oracle Application Express database account, disabling
the Database Monitor feature by default, and providing administrators the ability
to require HTTPS for the administration and development suite applications. In
addition, administrators can now restrict new or updated account passwords to
xix
those that have not previously been used for a specified duration and, for new
installations, require that service administrator account passwords conform to a
strong password policy.
Oracle Application Express documentation has also been improved to provide
you with more resources to build secure Web applications. These new features
complement existing Oracle Application Express security features including
flexible authentication, authorization schemes, URL tampering protection, and so
on. For further information, see "Managing Application Security" on page 13-1.
Highlights of Oracle Application Express Release 3.1
New features in Oracle Application Express, release 3.1 include:
■
Interactive Reporting Region.
Interactive Reporting Regions enable end users to customize reports. Users can
alter the layout of report data by choosing the columns they are interested in,
applying filters, highlighting, and sorting. They can also define breaks,
aggregations, different charts, and their own computations. Users can create
multiple variations of the report and save them as named reports and download to
various file formats including comma-delimited file (CSV) format, Microsoft Excel
(XLS) format, Adobe Portable Document Format (PDF), and Microsoft Word Rich
Text Format (RTF). See "Editing Interactive Reports" on page 7-15.
For step-by-step instructions on building an example application that uses
interactive reports, see "How to Build and Deploy an Issue Tracking Application"
in Oracle Application Express Advanced Tutorials.
■
Optional Runtime-Only Installation.
For testing and production instances, Oracle Application Express, release 3.1
supports the ability to install just a runtime version of Oracle Application Express.
This minimizes the installed footprint and privileges. Scripts are also provided to
remove or add the developer interface from an existing instance. This new feature
improves application security since in a runtime instance developers cannot
advertently update a production application. See "Managing a Runtime
Environment" in Oracle Application Express Administration Guide.
■
Custom Themes.
In addition to the default themes provided with Oracle Application Express, you
can create your own customized themes. customized themes enable you to design
a very specific look and feel to meet your corporate requirements and then publish
this as a theme for all other applications to use. Two new standard themes have
also been added. See "Managing Themes" on page 10-1 and "Managing Themes for
an Oracle Application Express Instance" in Oracle Application Express
Administration Guide.
■
Documented JavaScript libraries.
Oracle Application Express, release 3.1 includes the ability to suppress standard
JavaScript and CSS files. All included JavaScript files are now compressed to
improve page load time. This release also includes an improved framework for
advanced Oracle Application Express developers to build and leverage custom
Web 2.0 capabilities, improving performance and enabling developers to create
more dynamic application widgets. See "JavaScript APIs" in Oracle Application
Express API Reference.
■
xx
Improved Security.
This release includes a new Hidden and Protected item type. This item type
greatly simplifies the developer's task of protecting item session state. This
together with other minor improvements makes the default security functionality
more robust within Oracle Application Express. See Table 6–2, " Available Item
Types" on page 6-36.
■
Enhanced Report Printing.
Release 3.1 now includes XML as a download format and supports multiple SQL
statements. See "Printing Report Regions" on page 7-37.
■
Declarative BLOB Support.
Declarative BLOB support enables files to be declaratively uploaded in forms, and
downloaded or displayed using reports. BLOB display and download can also be
authored procedurally using PL/SQL. See "About BLOB Support in Forms and
Reports" on page 15-26.
■
■
Application Builder refinements introduced with this release include:
–
The ability to define an Application Date Format
–
The ability to add a search region when creating a report
–
You can now include attachments with emails sent using the Application
Express mail APIs
–
The previous 32K limit on data when creating an application on a spreadsheet
has been removed
–
You can now create master detail reports in the Create Application Wizard
–
Master detail report implementation has been improved and refined
–
Support for declarative Media Type enables generation of pages of type other
than 'text/html'
Simplified URLs Used During Branching.
In this release, you can perform the clear cache and session state setting actions
immediately before the branch in the same database session used to process the
page submission. This results in less information being shown in the application
URLs. This enhancement improves security by making URLs less susceptible to
tampering and by exposing fewer item names, values, and indications of program
logic. It also reduces the potential of URL encoding and character set problems.
To use this feature, select the save state before branching check box on the Edit
Branch page or when creating a new branch using the Create Branch wizard. See
"Controlling Navigation Using Branches" on page 8-27.
xxi
xxii
1
Quick Start
This section offers a quick introduction to using Oracle Application Express. It is
assumed you have completed the installation process.
This section contains the following topics:
■
What is Oracle Application Express?
■
About Oracle Application Express Architecture
■
Understanding Application Express User Roles
■
Logging In to Oracle Application Express
■
About the Workspace Home Page
■
Navigation Alternatives
■
Using Online Help
See Also: Oracle Database 2 Day + Oracle Application Express
Developer's Guide
What is Oracle Application Express?
Oracle Application Express is a hosted declarative development environment for
developing and deploying database-centric Web applications. Thanks to built-in
features such as user interface themes, navigational controls, form handlers, and
flexible reports, Oracle Application Express accelerates the application development
process.
The Application Express engine renders applications in real time from data stored in
database tables. When you create or extend an application, Oracle Application Express
creates or modifies metadata stored in database tables. When the application is run,
the Application Express engine then reads the metadata and displays the application.
To provide stateful behavior within an application, Oracle Application Express
transparently manages session state in the database. Application developers can get
and set session state using simple substitutions and standard SQL bind variable
syntax.
The sections that follow describe key features of Oracle Application Express.
Reporting
With Oracle Application Express, you can quickly generate HTML reports that display
the results of SQL queries. You can also download and print reports in HTML, an
Adobe Portable Document Format (PDF), Microsoft Word Rich Text Format (RTF), or
Microsoft Excel format (XLS), or XML.
Quick Start
1-1
What is Oracle Application Express?
You can declaratively link reports together to provide drill-down reporting and use
bind variables to pass information from session state to a report. Reports support
declarative column heading sorting, control breaks, sums, and pagination. Report
sorting and pagination can use Partial Page Refresh (PPR) technology to avoid
refreshing the entire page. You can also add declarative links to a report to download
the report data to CSV or XML formats. Plus, you can customize the report appearance
using templates. See "About Bind Variable Syntax" on page 3-14 and "Creating
Reports" on page 7-1.
Interactive Reporting Regions enable end users to customize reports. Users can alter
the layout of report data by choosing the columns they are interested in, applying
filters, highlighting, and sorting. They can also define breaks, aggregations, different
charts, and their own computations. Users can create multiple variations of the report
and save them as named reports, output to comma-delimited files, and print them to
PDF documents. See "Editing Interactive Reports" on page 7-15.
Forms
Using wizards, you can easily create forms on tables or on a stored procedure. For
example, when creating a form on a table, these wizards provide automatic
management of insert, update, and delete as well as lost update detection. Once you
create a form, you can rearrange form fields (called form items) using a visual
representation, enabling you to quickly achieve the layout you want. Form items offer
a variety of display options including text fields, text areas, radio groups, select lists,
check boxes, date pickers, and popup list of values. See "Creating Forms" on page 7-46.
Charting
You can also use wizards to create HTML, SVG, or Flash charts. You can create charts
that enable users to drill down from one chart to another chart or report. Charts can
also be refreshed using Partial Page Refresh (PPR) technology, avoiding the need to
refresh an entire page. You can also configure a chart to refresh at defined intervals.
Additionally, you can take advantage of report column templates to add simple HTML
bar charts to any report. See "Creating Charts" on page 7-61.
Spreadsheet Upload
Use the Create Application from Spreadsheet Wizard to quickly upload spreadsheet
data directly into the database. You can choose to store the data in a new database
table or add it to an existing database table. Once the data is uploaded, you can
quickly create an application. This handy wizard enables you to go from spreadsheet
to a shared application in just a few clicks. See "About the Create Application from
Spreadsheet Wizard" on page 6-6.
Session State Management
Oracle Application Express transparently manages session state (or application
context) in the database. Forms automatically save session state, remembering your
application context over your session. Referencing session state within SQL and
PL/SQL is as simple as using bind variables. For example, consider the following
SELECT statement:
SELECT * FROM EMP WHERE EMPNO = :P1_ID
In this example, the value in the item P1_ID is automatically bound when the query is
run. You can also reference session state within a static context by prefixing the item
name with an ampersand (&) and suffixing it with a period(.), for example:
&P1_NAME.
1-2 Oracle Application Express Application Builder User's Guide
What is Oracle Application Express?
For management of two dimensional data sets, Oracle Application Express provides a
robust collections infrastructure. Best of all, session management is stateless and does
not consume any memory. See "Managing Session State Values" on page 3-11 and
"About Bind Variable Syntax" on page 3-14.
User Interface Themes
Oracle Application Express separates presentation (or user interface themes) from the
application logic. You can design your application in one theme, change to another
supplied theme, or create and use your own custom theme. By separating the
application logic (such as queries, processes, and branches) from the HTML rendering,
your application can take advantage of new designs and other technological advances
without an application rewrite. See "Managing Themes" on page 10-1.
Flow Control and Navigation
Every Web application needs navigation and dynamic applications need flow control.
Oracle Application Express provides built-in components to simplify the development
and maintenance of navigational controls. Navigation is controlled using declarative
tabs (one or two levels), breadcrumbs, tree controls, and lists of links. Flow control is
performed using declarative branches which can take effect at specific events and
under certain conditions. The appearance of navigation controls are managed through
templates, making it easy to change from one look to another. See "Adding
Navigation" on page 8-1 and "Controlling Navigation Using Branches" on page 8-27.
Conditionality on All Components
When creating dynamic Web applications, many application components and
processing are conditional. In other words, you only show or process certain pieces of
information based on the application context, the data, an event, or a privilege. Oracle
Application Express enables you to declaratively specify conditionality of all
components. This gives you exact control over what users see or do not see on a tab,
button, item, list entry, and so. See "Understanding Conditional Rendering and
Processing" on page 3-2.
External Interfaces and Extensibility
Even though Oracle Application Express provides a robust declarative environment
for building applications, you also have the option of developing custom interfaces or
controls. For example, if a component does not meet the needs of your environment,
you can generate your own custom HTML using PL/SQL. See "Rendering HTML
Using Custom PL/SQL" on page 9-18. You can also call external services using Web
services. See "Implementing Web Services" on page 15-16. Oracle Application Express
also includes APIs to easily integrate email alerts into an application. See "Sending
Email from an Application" on page 15-3. Plus, because Oracle Application Express
resides in the Oracle database, you can take advantage of inherent database
capabilities, including external tables, PL/SQL, database links, gateways, and
database Java to extend the functionality of your application.
Security
With Oracle Application Express, you can create public applications that do not
require a user log in, or you can create secure applications that require authentication.
Oracle Application Express provides a number of built-in authentication schemes
including Single Sign On, Database Account Credentials, and an easy-to-use user
management system. You can also use custom schemes that interface with just about
any authentication service including Microsoft Active Directory and Oracle
Applications.
Quick Start
1-3
What is Oracle Application Express?
Additionally, you can customize authorization to meet the needs of your environment
and apply authorization selectively to an entire application, a page, or a page
component. Finally, you can also take advantage of an innovative session state
protection feature to prevent URL tampering and built-in features to protect an
application form SQL Injection and cross-site scripting (XSS) attacks. See "Managing
Application Security" on page 13-1.
SQL Workshop Tools
SQL Workshop provides tools to enable you to view and manage database objects
from a Web browser. Use SQL Commands to run SQL and PL/SQL statements. See
"Using SQL Commands" in Oracle Application Express SQL Workshop and Utilities Guide.
Query Builder enables you to define queries by dragging and dropping tables and
easily create relationships between objects. See "Building Queries with Query Builder"
in Oracle Application Express SQL Workshop and Utilities Guide.
Object Browser provides an easy-to-use graphical user interface for viewing, creating,
modifying, browsing, and dropping database objects. See "Managing Database Objects
with Object Browser" in Oracle Application Express SQL Workshop and Utilities Guide.
Finally, you can use SQL Scripts to create, edit, view, run, and delete script files. See
"Using SQL Scripts" in Oracle Application Express SQL Workshop and Utilities Guide.
Supporting Objects Utility
You can simplify the steps needed to export, install, upgrade, and deinstall an
application in another Oracle Application Express instance by creating a packaged
application. Using the Supporting Objects utility, you can bundle the application
definition with scripts for creating the database objects, seed data, images, cascading
style sheets, and JavaScript.
Creating a packaged application provides application users with an installer-like
experience and automates the process of importing and installing an application in
another development, test, or even production instance. See "How to Create a
Packaged Application" on page 14-5.
Performance
Oracle Application Express provides application developers and application users
with an extremely high level of performance. Because Oracle Application Express
resides in the Oracle database, it has minimal impact on network traffic. Plus,
Application Builder includes a large number of monitoring reports to enable you to
identify and tune application performance. See "Debugging an Application" on
page 12-1.
Hosted Development
Oracle Application Express enables a single database to host large numbers of users.
Users work in a dedicated work area called a workspace. A workspace is a virtual
private database that enables multiple users to work within the same Oracle
Application Express installation while keeping their objects, data and applications
private. This flexible architecture enables a single database instance to manage
thousands of applications.
You determine how the process of provisioning (or creating) a workspace works. For
example, in email verification provision mode, users request a workspace using a link
on the login page. After the workspace request has been granted, users receive an
email containing a link that they must click to verify the validity of their email
1-4 Oracle Application Express Application Builder User's Guide
About Oracle Application Express Architecture
address. Then they receive an email with their login credentials. To see an example of
email verification provision mode, go to:
http://apex.oracle.com
See "Configuring Your Oracle Application Express Environment" on page 1-7 and
"Oracle Application Express Hosted Instance Administration" in Oracle Application
Express Administration Guide.
About Oracle Application Express Architecture
Oracle Application Express installs with your Oracle database and is comprised of
data in tables and PL/SQL code.
Whether you are running the Oracle Application Express development environment
or an application you built using Oracle Application Express, the process is the same.
Your browser sends a URL request that is translated into the appropriate Oracle
Application Express PL/SQL call. After the database processes the PL/SQL, the
results are relayed back to your browser as HTML. This cycle happens each time you
either request or submit a page.
The application session state is managed in the database tables within Application
Express. It does not use a dedicated database connection. Instead, each request is made
through a new database session, consuming minimal CPU resources.
About Oracle HTTP Server (Apache) and the Embedded PL/SQL Gateway
The version of Oracle Database you use determines how the URL is translated:
■
■
Versions prior to Oracle Database 11.1 require Oracle HTTP Server (Apache) with
mod_plsql. The following graphic illustrates the three-tier architecture.
With Oracle Database 11.1 or later or Oracle Database 10g Express Edition, you can
remove Oracle HTTP Server and mod_plsql from the architecture and replace it
with the embedded PL/SQL gateway. The following graphic illustrates the
two-tier architecture using the embedded PL/SQL gateway.
The embedded PL/SQL gateway provides the Oracle database with a Web server and
also the necessary infrastructure to create dynamic applications. The embedded
PL/SQL gateway runs in the XML DB HTTP server in the Oracle database and
Quick Start
1-5
Understanding Application Express User Roles
includes the core features of mod_plsql, but does not require the Oracle HTTP Server
powered by Apache. Inclusion of the embedded PL/SQL gateway simplifies the
architecture and eliminates the middle tier entirely.
About the Application Express Engine
The Application Express engine renders and processes pages. It also performs these
tasks:
■
session state management
■
authentication services
■
authorization services
■
page flow control
■
validations processing
Different Oracle Application Express Environments
When you install Oracle Application Express, you can install two different
environments:
■
■
A runtime environment is the appropriate choice for production implementations
in which users can run applications that cannot be modified.
A full development environment provides complete access to the Application
Builder environment to develop applications as described in this document.
See Also:
Oracle Application Express Installation Guide
Understanding Application Express User Roles
To access the Oracle Application Express development environment, users log in to a
shared work area called a workspace. Users are divided into four primary roles:
■
■
■
■
Developers are users who create and edit applications
Workspace administrators are users who perform administrator tasks specific to a
workspace such as managing user accounts, monitoring workspace activity, and
viewing log files
End users have no development privileges and are defined to provide access to
applications that do not use an external authentication scheme.
Oracle Application Express administrators are superusers that manage an entire
hosted instance using the Application Express Administration Services application
See Also:
Oracle Application Express Administration Guide
Logging In to Oracle Application Express
When you log in to Oracle Application Express you log in to a workspace. A
workspace is an area within the Oracle Application Express development environment
where developers can create applications.
How you log in to Oracle Application Express depends upon whether you have
configured your development environment:
■
If you have recently installed Oracle Application Express, you must configure
your development environment
1-6 Oracle Application Express Application Builder User's Guide
Logging In to Oracle Application Express
■
If you are a developer logging into a previously configured development
environment, an administrator must grant you access to a workspace
Topics in this section include:
■
About Browser Requirements
■
Configuring Your Oracle Application Express Environment
■
Logging In to Oracle Application Express as a Developer
About Browser Requirements
You open the Oracle Application Express home page in a Web browser. To view or
develop Oracle Application Express applications, the Web browser must support Java
Script and the HTML 4.0 and CSS 1.0 standards. Ensure also that cookies are enabled.
The following browsers meet this requirement:
■
Microsoft Internet Explorer 6.0 or later
■
Mozilla Firefox 1.0 or later
Configuring Your Oracle Application Express Environment
How you set up Oracle Application Express depends upon your user role. If you are a
developer accessing a hosted development environment, an administrator must grant
you access to a workspace. If you are an Oracle Application Express administrator, you
must perform the following steps:
1.
Log in to Oracle Application Express Administration Services. Oracle
Application Express Administration Services is a separate application for
managing an entire Oracle Application Express instance. You log in using the
ADMIN account and password created or reset during the installation process.
a.
In a Web browser, navigate to the Oracle Application Express Administration
Services application. By default, Oracle Application Express Administration
Services installs to the following location:
–
If your setup uses the embedded PL/SQL gateway, go to:
http://hostname:port/apex/apex_admin
Where:
hostname is the name of the system where Oracle XML DB HTTP Server
is installed.
port is the port number assigned to Oracle XML DB HTTP Server. In a
default installation, this number is 8080. See "Verifying the Oracle XML DB
HTTP Server Port" in Oracle Application Express Application Builder User's
Guide.
apex is the database access descriptor (DAD) defined in the configuration
file.
–
If your setup uses Apache and mod_plsql, go to:
http://hostname:port/pls/apex/apex_admin
Where:
hostname is the name of the system where Oracle HTTP Server is
installed.
Quick Start
1-7
Logging In to Oracle Application Express
port is the port number assigned to Oracle HTTP Server. In a default
installation, this number is 7777.
pls is the indicator to use the mod_plsql cartridge.
apex is the database access descriptor (DAD) defined in the mod_plsql
configuration file.
b.
On the Login page:
–
In Username, enter admin.
–
In Password, enter the Oracle Application Express administrator account
password you specified when you installed Oracle Application Express.
–
Click Login.
See Also: See "Logging in to Oracle Application Express
Administration Services" in Oracle Application Express Administration
Guide.
2.
Specify a provisioning mode. In Oracle Application Express Administration
Services you must determine how the process of creating (or provisioning) a
workspace will work. See "About Workspace Provisioning" in Oracle Application
Express Administration Guide.
3.
Create a Workspace. A workspace is a virtual private database allowing multiple
users to work within the same Oracle Application Express installation while
keeping their objects, data and applications private. Each workspace has a unique
ID and name. An Oracle Application Express administrator can create a
workspace manually or have users submit requests. See "Creating Workspaces"
and "Managing Workspace Requests" in Oracle Application Express
Administration Guide.
4.
Log in to a Workspace. Once you create a workspace in Oracle Application
Express Administration Services, return to the Oracle Application Express Login
page and log in to that workspace. See "Logging In to Oracle Application Express
as a Developer" on page 1-8.
Logging In to Oracle Application Express as a Developer
When you log in to Oracle Application Express, you log in to a workspace. If you are a
developer, an administrator must grant you access to a workspace.
Before users can request a workspace or change their
passwords, an Oracle Application Express administrator must
configure Oracle Application Express environment preferences.
Note:
"Managing Environment Settings"in Oracle Application
Express Administration Guide
See Also:
Topics in this section include:
■
Requesting a Workspace
■
Logging in to a Workspace
■
Finding Your Workspace Name
■
Resetting Your Password
1-8 Oracle Application Express Application Builder User's Guide
Logging In to Oracle Application Express
■
Logging Out of a Workspace
Requesting a Workspace
This section applies only if your Oracle Application Express
administrator has configured Oracle Application Express to support
workspace requests.
Note:
See Also:
Oracle Application Express Administration Guide
Before you can log in to Oracle Application Express, an administrator must grant you
access to a workspace. Each workspace has a unique ID and name.
To request a workspace:
1.
In a Web browser, navigate to the Oracle Application Express Login page.
If you do not know the URL for logging in to Application Express, see "Logging in
to a Workspace" on page 1-9.
The Login page appears.
2.
Under Tasks, click Request a Workspace.
The Request Service Wizard appears.
3.
Click Next and follow the on-screen instructions.
See Also: "Creating Workspaces" in Oracle Application Express
Administration Guide
Logging in to a Workspace
After an Oracle Application Express administrator approves a workspace request, an
e-mail arrives with your login credentials (the workspace name, user name, and
password).
Note that if your administrator selected Email Verification as the automated method
for handling new workspace requests, you might first receive an email containing a
verification link. This step ensures that your email is a valid one before the workspace
request is approved.
See Also:
Oracle Application Express Administration Guide
To log in to Oracle Application Express:
1.
In a Web browser, navigate to the Oracle Application Express Login page. By
default, Oracle Application Express installs to the following location:
■
If your setup uses the embedded PL/SQL gateway, go to:
http://hostname:port/apex
Where:
–
hostname is the name of the system where Oracle XML DB HTTP Server
is installed.
–
port is the port number assigned to Oracle XML DB HTTP Server. In a
default installation, this number is 8080. See "Verifying the Oracle XML DB
HTTP Server Port" on page 1-10.
Quick Start
1-9
Logging In to Oracle Application Express
–
apex is the database access descriptor (DAD) defined in the configuration
file.
For users who have upgraded from earlier releases, or who have a custom
configuration, this value may be htmldb or something else. Verify your
DAD with your Oracle Application Express administrator.
■
If your setup uses Oracle HTTP Server (Apache) and mod_plsql, go to:
http://hostname:port/pls/apex
Where:
–
hostname is the name of the system where Oracle HTTP Server is
installed.
–
port is the port number assigned to Oracle HTTP Server. In a default
installation, this number is 7777. You can find information about your
Oracle HTTP Server installation’s port number from either of the
following files:
ORACLE_BASE\ORACLE_HOME\install\portlist.ini
ORACLE_BASE\ORACLE_HTTPSERVER_HOME\Apache\Apache\conf\httpd.conf
Be aware that if you change a port number, it is not updated in the
portlist.ini file. You can only rely on this file immediately after
installation.
–
pls is the indicator to use the mod_plsql cartridge.
–
apex is the database access descriptor (DAD) defined in the mod_plsql
configuration file.
For users who have upgraded from earlier releases, or who have a custom
configuration, this value may be htmldb or something else. Verify your
DAD with your Oracle Application Express administrator.
"Managing Oracle Database Port Numbers" in Oracle
Database Installation Guide and ORACLE_BASE\ORACLE_
HTTPSERVER_HOME\Apache\modplsql\conf\dads.readme for more
information on database access descriptors
See Also:
The Login page appears.
2.
3.
Under Login, enter the following:
■
In the Workspace field, enter the name of your workspace.
■
In the Username field, enter your user name.
■
In the Password field, enter your case-sensitive password.
Click Login.
Note that, depending on your setup, you might be required to change your
password when you log in for the first time.
Verifying the Oracle XML DB HTTP Server Port To verify the port number where the Oracle
XML DB HTTP Server is running:
1.
Start SQL*Plus and connect the database where Oracle Application Express is
installed as SYS:
■
On Windows:
1-10 Oracle Application Express Application Builder User's Guide
Logging In to Oracle Application Express
SYSTEM_DRIVE:\ sqlplus /nolog
connect sys as sysdba
■
On UNIX and Linux:
$ sqlplus /nolog
connect sys as sysdba
When prompted, enter the appropriate username and password.
2.
Enter the following statement to verify the port number:
SELECT DBMS_XDB.GETHTTPPORT FROM DUAL;
If the port number returns 0, the Oracle XML DB HTTP Server is disabled.
See Also: Oracle Database Installation Guide to learn how to enable
the Oracle XML DB HTTP Server
Finding Your Workspace Name
If you cannot remember your workspace name, you can request a list of all workspace
names associated with your email address.
To find your workspace name:
1.
On the Login page, click Find My Workspace on the Tasks list.
2.
Enter your email address and click Find Workspace.
An email with the list workspace names is sent to you.
Resetting Your Password
You can reset your password by clicking the Change Password link on the Workspace
home page.
To reset your password from the Workspace home page:
1.
Log in to Oracle Application Express. See "Logging In to Oracle Application
Express" on page 1-6.
2.
From the Administration list, click Change Password.
The Change Password page appears.
3.
4.
In Change Password, enter the following:
■
Enter Current Password - Enter your current password.
■
Enter New Password - Enter your new password.
■
Confirm New Password - Enter your new password again.
Click Apply Changes.
Tip: You can also reset your password on the Login page by clicking
the Reset Password link.
"Changing an End User Password" in Oracle Application
Express Administration Guide
See Also:
Quick Start 1-11
About the Workspace Home Page
Logging Out of a Workspace
To log out of Oracle Application Express, click the Logout icon in the upper right
corner of the window.
About the Workspace Home Page
When you log in to Oracle Application Express, the Workspace home page appears. A
workspace is a virtual private database allowing multiple users to work within the
same Oracle Application Express installation while keeping their objects, data and
applications private.
Your user name and workspace name display in the lower left corner of the page. The
following three large icons display in the center of the page:
■
■
■
Application Builder. Use Application Builder to assemble an HTML interface (or
application) on top of database objects such as tables and procedures. See
"Application Builder Concepts" on page 3-1 and "Using Application Builder" on
page 4-1.
SQL Workshop. Use the SQL Workshop to access tools for viewing and managing
database objects. Click SQL Workshop to access the following database tools:
–
Object Browser. View, create, modify, browse, and drop database objects. Use
the PL/SQL editor to edit and compile packages, procedures, functions, and
triggers while taking advantage of error reporting. See "Managing Database
Objects with Object Browser" in Oracle Application Express SQL Workshop and
Utilities Guide.
–
SQL Commands. Run SQL commands and anonymous PL/SQL, scripts, and
saved queries. See "Using SQL Commands" in Oracle Application Express SQL
Workshop and Utilities Guide.
–
SQL Scripts. Use SQL Scripts to create, edit, view, run, and delete script files.
You can also upload and download scripts from your local file system. See
"Using SQL Scripts" in Oracle Application Express SQL Workshop and Utilities
Guide.
–
Query Builder. Use Query Builder’s graphical user interface to search and
filter database objects, select objects and columns, create relationships between
objects, view formatted query results, and save queries with little or no SQL
knowledge. See "Building Queries with Query Builder" in Oracle Application
Express SQL Workshop and Utilities Guide.
Utilities. Use Utilities to load and unload data from the database, generate DDL,
view object reports, restore dropped database objects, and monitor the database.
See "Using Oracle Application Express Utilities" in Oracle Application Express SQL
Workshop and Utilities Guide.
About Administration
An Administration list appears on the right side of the Workspace home page. Use the
following links to administer your application development environment:
■
Administration links to the Application Administration page. Use this page to
perform administrative tasks. See "About the Application Administration Page" in
Oracle Application Express Administration Guide.
–
Manage Services links to the Manage Services page. Use this page to manage
session state, log files, preferences, and application models. See "About the
Manage Services Page" in Oracle Application Express Administration Guide.
1-12 Oracle Application Express Application Builder User's Guide
Navigation Alternatives
■
■
–
Manage Application Express Users links to the Existing Users page. Use this
page to manage existing Application Express users and user groups. See
"Managing Application Express Users" and "Using Groups to Manage
Application Express Users" in Oracle Application Express Administration Guide.
–
Monitor Activity links to the Monitor Activity page. Use this page to monitor
page views and view application changes. See "Monitoring Activity within a
Workspace" in "Oracle Application Express Administration Guide.
Change Password links to the Change Password page. Use this page to change
your workspace password. See "Resetting Your Password" in Oracle Application
Express Administration Guide.
About Application Express links to the About Application Express page. This
page displays version and configuration information for both Application Express
and the Oracle database. See "Viewing the Application Express Product
Information Page" in Oracle Application Express Administration Guide.
About Migrations
Use the Application Migrations link to migrate a Microsoft Access application and
generate an Oracle Application Express application. See Oracle Application Express
Migration Guide.
About Workspace Schemas
The Workspace Schemas list displays beneath the Administration list. It displays the
database schemas that are associated with, and therefore accessible to, this workspace.
About Links
The Links list displays on the lower side of the Workspace home page. Use this list to
access the following Application Express resources:
■
■
■
Oracle Technology Network links to the Oracle Application Express section of
Oracle Technology Network. Use this page to access additional information and
resources about using Oracle Application Express.
Discussion Forum links to Oracle Application Express Discussion Forum. Use this
page as a resource for research and for posting your own questions or answering
those of other users.
User’s Guide links to an HTML-based online Help system. You can also access
online Help by clicking the Help link in the upper right corner of any page in
Oracle Application Express. See "About Procedural Online Help" on page 1-14.
Navigation Alternatives
This section describes alternative methods for navigating between pages in the
Application Express user interface.
Navigating Using Icons or Drop Down Menus
You can move between pages in Oracle Application Express by clicking large graphical
icons. When using these icons, you have two navigation options:
■
■
Primary Navigation (drill-down). Click a large icon to drill-down to the
appropriate page.
Secondary Navigation (drop down menus). Click the down arrow on the right
side of the icon to view a drop down menu. Select an option from the menu.
Quick Start 1-13
Using Online Help
For the purposes of consistency, this document uses the
primary navigation path (or drill-down approach) when explaining
navigation.
Note:
Navigating Using Breadcrumbs
Breadcrumbs (also called locator links) appear at the top of every page within the
Oracle Application Express user interface. Each breadcrumb entry indicates where the
current page is relative to other pages within the user interface. You can use
breadcrumbs to instantly link to a previous page. For example, clicking on Home takes
you to the Workspace home page.
Using Online Help
The Application Express user interface features three types of online help: Procedural
Online Help, Page-level Help, and Field-Level Help.
About Procedural Online Help
You can access an HTML-based online Help system by clicking the Help link in the
upper right corner of the window.
When you click the Help link, a help topic appears that describes the current page. To
view the table of contents of another help set, select it from the list in the upper left
side of the window.
1-14 Oracle Application Express Application Builder User's Guide
Using Online Help
You can browse through help topics by:
■
Expanding and collapsing the table of contents. To view a topic, simply select it.
■
Clicking the breadcrumb links at the top of each help topic.
■
Clicking the Previous and Next buttons within a topic. Click these buttons to
access the previous and next help topic within the structure of the help set.
The top of the window features a gray bar. Click Back and Forward to return to a
previously viewed page. These controls work similarly to the Back and Forward
controls in a Web browser.
Click Find to perform a keyword search of the entire help system. When the search
field appears, enter a case insensitive query in the field provided and click Find. To
search for an exact phrase, enclose the phrase in double quotation marks.
Tip: With Oracle Database 11g, you must enable network services in
order use the Find link. See "Enabling Network Services in Oracle
Database 11g" on page 13-5
About Page-level Help
Many pages with in the Application Express user interface include Page-level Help.
Page-level Help displays in a text box on the right side of the page and offers a brief
description of the page functionality.
About Field-Level Help
Most select lists, check boxes, items, and fields within the Application Express user
interface include Field-level Help. Items within the user interface that have Field-level
Help have a light gray underline. When Field-level Help is available, the item label
changes to red when you pass your cursor over it and the cursor changes to an arrow
and question mark.
Quick Start 1-15
Using Online Help
Click the item label to display a description in a separate window.
1-16 Oracle Application Express Application Builder User's Guide
2
Running a Demonstration Application
This section describes how to run the two demonstration applications provided with
Oracle Application Express. It also explains how to modify the demonstration
application called Sample Application that installs with Application Builder. Running
and analyzing how an application works is an effective way to better understand how
you can use Application Builder to build your own applications.
This section contains the following topics:
■
Installing a Demonstration Application
■
Running an Installed Demonstration Application
■
Understanding Sample Application
■
Modifying a Demonstration Application
■
Viewing Underlying Database Objects
See Also: "Next Steps" in Oracle Database 2 Day + Oracle
Application Express Developer’s Guide to learn more about other
resources to expand your knowledge of Oracle Application Express
Installing a Demonstration Application
Application Builder includes two demonstration applications you can install. Use
these applications to learn more about the different types of functionality you can
include in your applications.
To install the demonstration applications:
1.
From the Workspace home page, click the down arrow on the right side of the
Application Builder icon.
2.
From the menu, select Demonstrations.
Running a Demonstration Application
2-1
Running an Installed Demonstration Application
The Demonstration Applications page appears, displaying the following
applications:
■
■
Sample Application offers a working demonstration that highlights basic design
concepts.
Collection Showcase demonstrates shopping cart concepts.
3.
To install a demonstration application, locate the application you want to install,
and click Install.
4.
Follow the on-screen instructions.
The Application home page appears.
5.
To run an installed demonstration application, click the Run Application icon.
6.
Enter the appropriate login credentials and click Login.
■
■
For Sample Application:
–
For User Name, enter either demo or admin.
–
For Password, enter the current workspace name in lowercase letters.
For other demonstration applications, enter your workspace user name and
password.
You can also access the Demonstration Applications page by
clicking Create on the Application home page and then selecting
Demonstration Application.
Note:
See Also: "About Demonstration Applications" on page 6-7 and
"Running an Installed Demonstration Application" on page 2-2
Running an Installed Demonstration Application
Once you have installed a demonstration application, you can run it from the
Demonstration Applications page or from the Application Builder home page.
Topics in this section include:
■
Running an Application from Demonstration Applications
■
Running an Application from the Application Home Page
2-2 Oracle Application Express Application Builder User’s Guide
Understanding Sample Application
"Installing a Demonstration Application" on page 2-1 and
"Running a Page or Application" on page 6-14
See Also:
Running an Application from Demonstration Applications
To run a demonstration application from the Demonstration Applications page:
1.
From the Workspace home page, click the down arrow on the right side of the
Application Builder icon.
2.
From the menu, select Demonstrations.
The Demonstration Applications page appears.
3.
On the Demonstration Applications page, locate the application you want to run.
4.
In the Action column, click Run.
5.
Enter the appropriate login credentials and click Login.
■
■
For Sample Application:
–
For User Name, enter either demo or admin.
–
For Password, enter the current workspace name in lowercase letters.
For other demonstration applications, enter your workspace user name and
password.
Running an Application from the Application Home Page
Once you have installed a demonstration application, you can run it from the
Application Builder home page.
To run a demonstration application from the Application Builder home page:
1.
Log in to the Workspace home page.
2.
Click the Application Builder icon.
3.
Click the application to be run.
The Application home page appears.
4.
Click the Run Application icon.
5.
Enter the appropriate login credentials and click Login.
■
■
For Sample Application:
–
For User Name, enter either demo or admin.
–
For Password, enter the current workspace name in lowercase letters.
For other demonstration applications, enter your workspace user name and
password.
Understanding Sample Application
This section describes the demonstration application called Sample Application.
Sample Application shows an easy-to-use interface for viewing, updating, and searching
order and customer information for electronic and computer products. Users can
navigate among the pages using the Home, Customers, Products, Orders, and Charts
tabs.
Running a Demonstration Application
2-3
Understanding Sample Application
Sample Application demonstrates the following functionality:
■
Examples of ways to display summary information, including a dial chart and
summary reports
■
Reports for viewing, updating, and adding customers, products, and orders
■
A Calendar report
■
■
Flash charts available in Oracle Application Express including cluster bar, pie
chart, and stacked bar
Printer friendly mode
The following sections describe specific functionality available on each page.
See Also:
"What Is a Page?" on page 3-1
About the Home Page
The Home page contains four regions:
■
My Quota
■
My Orders
■
Sample Application
■
Tasks
My Quota demonstrates the use of a Flash Dial Chart. This chart displays a value
based on an underlying SQL statement.
Although not demonstrated in this example, you can enable an asynchronous refresh
by editing the attributes of any SVG or Flash chart.
Tip: The Flash Dial Chart only displays if you log in using the user
name demo.
My Orders is a interactive report based on a SQL query. This report displays a subset
of the information that appears on the Orders page. Users can link to order details by
2-4 Oracle Application Express Application Builder User’s Guide
Understanding Sample Application
selecting the Edit icon. Users can also change the appearance of the report using the
Actions menu.
Sample Application is a simple HTML region that displays static text. You can create
this type of region to display explanatory information to users.
Tasks contains a list with links to other pages within the application. Links available
on the Home page Tasks list include:
■
About this Application links to an informational page that describes this
application.
■
Enter a New Order links to a wizard for creating a new order.
■
Add a New Customer links to a form for entering new customer information.
■
Add a New Product links to a form for adding new products.
"Creating Charts" on page 7-61, "Creating a Region" on
page 9-7, and "Creating Lists" on page 8-5
See Also:
About the Customers Page
The Customers page enables users to view and edit customer information. The
Customers page consists of two main regions:
■
Customers
■
Top Customers
Running a Demonstration Application
2-5
Understanding Sample Application
Customers is an interactive report for tracking customer information. This region is
also based on a SQL query. To search for a customer, enter a customer name in the
Search field and click Go. To sort by customer name, click the column heading. A Sort
icon then appears to the right of the heading Customer Name. Users can change the
appearance of the report using the Actions menu. To update existing customer
information, click the Edit icon. 'To add a new customer, click the New Customer
button.
Top Customers ranks customers by order amount. This report is based on a SQL query
that returns top customers based on their orders.
See Also:
"Creating Reports" on page 7-1
About the Products Page
The Products page enables users to view and edit product information. The Products
page consists of two main regions:
■
Products
■
Top 10 Products
2-6 Oracle Application Express Application Builder User’s Guide
Understanding Sample Application
Products displays an interactive report for tracking product information. This region is
based on a SQL query that uses a custom function for displaying images stored in the
database. To sort by product category, click the column heading. To edit a product
description, click the Edit icon. To add a new product, click the Create Product button
at the top of the page. Users can change the appearance of the report using the Actions
menu.
Top 10 Products is also a SQL report. This report outlines the top ten products based
on quantities sold.
See Also:
"Creating Reports" on page 7-1
About the Orders Page
The Orders page enables users to view and edit customer orders. The Orders page
contains two regions:
■
My Orders
■
Orders by Day
My Orders is a wizard report that summarizes the current orders in the system. To
sort a column, click the column heading. A Sort icon then appears to the right of the
column heading. To edit an existing order, click the Edit icon. To add a new order, click
the Enter New Order button.
Running a Demonstration Application
2-7
Modifying a Demonstration Application
Orders by Day is a Calendar report. This report displays each order on the
appropriate date in a calendar. Users can select a calendar entry to view order details.
Click the Previous and Next buttons to previous and future entries.
See Also: "Creating Calendars" on page 7-55 and "Creating Reports"
on page 7-55
About the Charts Page
The Charts page illustrates three types of Flash charts available in Application Builder:
cluster bar, pie chart, and stacked bar. To view a chart, select it from the list on the left.
See Also:
"Creating Charts" on page 7-61
About the Admin Page
The Admin page displays only if you log in to Sample Application using the user name
admin. Sample Application makes use of a custom authentication scheme that stores
user names and obfuscated passwords in a table. The Manage Users page enables you
to manage additional users. To add a new user, click Add User at the bottom of the
page. To delete a user, select the user and click Remove Selected Users.
Note that this custom authentication scheme does not use any user names or
passwords associated with Oracle Application Express application developers.
Viewing Pages in Printer Friendly Mode
Clicking Print in the upper left corner of the page displays the current page in Printer
Friendly mode. When in Printer Friendly mode, the Application Express engine
displays all text within the HTML form fields as text.
To enable your application to display in Printer Friendly mode, you must create and
then specify a Print Mode Page Template on the Edit Definition page.
See Also:
"Optimizing a Page for Printing" on page 7-103
Modifying a Demonstration Application
Once you understand the type of functionality available in a demonstration
application, the next step is to learn more about the construction of each page. An
efficient way to speed up the learning process is to analyze and deconstruct the pages
in the demonstration applications. If you happen to break something, you can quickly
delete the demonstration application and install it again. See "Deleting an Application"
on page 6-8 and "Installing a Demonstration Application" on page 2-1.
You edit existing pages in an application, add pages to an application, or create
entirely new applications using Application Builder.
Topics in this section include:
■
About the Developer Toolbar
■
Editing a Demonstration Application
About the Developer Toolbar
The Developer toolbar is a quick way to edit the current application, the current
running page, create a new page, control, or component, view session state, or turn
edit links on or off.
2-8 Oracle Application Express Application Builder User’s Guide
Modifying a Demonstration Application
See Also:
"About the Developer Toolbar" on page 5-28
The Developer toolbar consists of the following links:
■
■
■
■
■
■
■
■
Home links you to the Workspace home page. See "About the Workspace Home
Page" on page 1-12.
Application links you to the Application home page. See "Application Builder
Concepts" on page 3-1.
Edit Page accesses the Page Definition for the current running page. See "About
the Page Definition" on page 5-1.
Create links to a wizard for creating a new page, region, page control (item,
button, branch, computation, process, or validation), or a shared control
(navigation bar icon, tab, list of values, list, or breadcrumb). See "Building an
Application" on page 6-1.
Session links you to session state information for the current page. See "Viewing
Session State" on page 3-5.
Activity links you to the Activity reports page. See "Activity Reports" on
page 6-31.
Debug toggles the page between Debug and No Debug mode. See "Accessing
Debug Mode" on page 12-2.
Show Edit Links toggles between Show Edit Links and Hide Edit Links. Clicking
Show Edit Links displays a small orange icon next to each editable object on the
page. Each icon is orange and contains a triangle with two rules beneath it.
Clicking the link displays another window in which to edit the object.
Editing a Demonstration Application
There are two ways to edit a demonstration application:
■
■
From the Demonstration Applications page, click Edit next to the desired
application.
If you are running an application, click Application on the Developer toolbar.
The Application home page appears. The application ID and application name display
at the top of the page.
You can run the current application, edit supporting objects, create shared
components, or export and import information by clicking one of the following:
■
Run Application submits the pages in the current application to the Application
Express engine to render viewable HTML. See "How the Application Express
Engine Renders and Processes Pages" on page 3-2.
Running a Demonstration Application
2-9
Viewing Underlying Database Objects
■
■
■
Supporting Objects links to the Supporting Objects page. See "How to Create a
Packaged Application" on page 14-5.
Shared Components links to a list of shared components and user interface
controls that can display or be applied on every page within an application. See
"Working with Shared Components" on page 5-29.
Export/Import links you to the Export/Import Wizard. Use this wizard to import
and export an entire application and related files such as cascading style sheets,
images, static files, script files, themes, user interface defaults, and workspace
users. See "Exporting an Application and Related Files" on page 14-12.
The pages that make up the application appear on the Application home page. To
access a specific page, simply click it. To search for a specific page, enter a case
insensitive query for the page title or page number in the Page field and click Go.
See Also: "About the Application Home Page" on page 4-1 and
"About the Page Definition" on page 5-1
Viewing Underlying Database Objects
The Application Express engine renders applications in real time based on data stored
in database tables. You can view the database objects for any demonstration
application in Object Browser, or by viewing the Application Database Object
Dependencies report.
Topics in this section include:
■
Viewing the Database Object Dependencies Report
■
Viewing Database Objects in Object Browser
Viewing the Database Object Dependencies Report
The Database Object Dependencies report identifies database objects referenced by the
current application. Review this report to determine what objects to move when
deploying an application.
To view the Database Object Dependencies report:
1.
Navigate to the Workspace home page.
2.
Click the Application Builder icon.
3.
Select an application.
The Application home page appears.
4.
On the Tasks list, click Application Reports.
5.
Click Shared Components.
6.
Under Application, click Database Object Dependencies.
7.
Click Compute Dependencies.
8.
To view the components that reference a specific database object, select the
Reference Count number.
See Also:
"Viewing Application Reports" on page 6-29
Viewing Database Objects in Object Browser
To view the database objects in Object Browser:
2-10 Oracle Application Express Application Builder User’s Guide
Viewing Underlying Database Objects
1.
On the Workspace home page, click SQL Workshop and then Object Browser.
Object Browser appears.
2.
Select an object type from the Object list in the upper left corner of the page. For
example, to view tables, select Tables.
3.
To search for an object name, enter keywords in the search field beneath the Object
list.
A list of matching objects appears.
4.
To perform a specific task related to the selected object, select the appropriate task
button.
For example, to modify a column in the DEMO_CUSTOMERS table:
5.
a.
From the Objects list, select Tables.
b.
From the Tables list, select DEMO_CUSTOMERS.
c.
Click Modify Column.
To view additional object details, select a tab beneath the object name. For
example, to view the data in the DEMO_CUSTOMERS table:
a.
From the Tables list, select DEMO_CUSTOMERS.
b.
Select the Data tab.
A report appears that displays the data in the DEMO_CUSTOMERS table
appears.
Running a Demonstration Application
2-11
Viewing Underlying Database Objects
See Also: "Managing Database Objects with Object Browser" in
Oracle Application Express SQL Workshop and Utilities Guide
2-12 Oracle Application Express Application Builder User’s Guide
3
Application Builder Concepts
This section provides basic conceptual information about Application Builder. Use
Application Builder to assemble an HTML interface (or application) on top of database
objects such as tables and procedures. Each application is a collection of pages linked
together using tabs, buttons, or hypertext links.
This section contains the following topics:
■
What Is a Page?
■
Understanding Page Processing and Page Rendering
■
Understanding Session State Management
■
Understanding URL Syntax
■
Managing Session State Values
■
Understanding Substitution Strings
"Using Application Builder" on page 4-1 and "Building
an Application" on page 6-1
See Also:
What Is a Page?
A page is the basic building block of an application. When you build an application in
Application Builder, you create pages that contain user interface elements, such as
tabs, lists, buttons, items, and regions.
You add controls to a page on the Page Definition.
To view the Page Definition of an existing page:
1.
Navigate to the Workspace home page.
2.
Click the Application Builder icon.
3.
Select an application.
4.
Select a page.
The Page Definition appears and is divided into three main sections:
■
■
Page Rendering lists user interface controls and logic that are executed when
a page is rendered. Page Rendering is the process of generating a page from
the database. See "About Page Rendering" on page 5-9.
Page Processing lists logic controls (such as computations and processes) that
are evaluated and executed when the page is processed. See "About Page
Processing" on page 5-11.
Application Builder Concepts 3-1
Understanding Page Processing and Page Rendering
■
Shared Components lists common components that can be used by one or
more pages within an application. See "About Shared Components" on
page 5-12.
See Also: "About the Page Definition" on page 5-1 and "Editing a
Page Definition" on page 5-7
Understanding Page Processing and Page Rendering
When you create an application in Application Builder, you link pages together using
tabs, buttons, or hypertext links. Each page can have buttons and items and can
include application logic. You can branch from one page to the next using conditional
navigation, perform calculations and validations, and display reports, calendars, and
charts. You can generate reports, charts, and forms using built-in wizards, static
HTML, or deliver more custom rendering with PL/SQL programming.
Topics in this section include:
■
How the Application Express Engine Renders and Processes Pages
■
Understanding Conditional Rendering and Processing
■
Verifying User Identity
■
Controlling Access to Controls and Components
How the Application Express Engine Renders and Processes Pages
The Application Express engine dynamically renders and processes pages based on
data stored in Oracle database tables. To view a rendered version of your application,
you request it from the Application Express engine. When you run an application, the
Application Express engine relies on two processes:
■
■
Show Page is the page rendering process. It assembles all the page attributes
(including regions, items, and buttons) into a viewable HTML page.
Accept Page performs page processing. It performs any computations, validations,
processes, and branching.
When you request a page using a URL, the engine is running Show Page. When you
submit a page, the Application Express engine is running Accept Page or performing
page processing during which it saves the submitted values in the session cache and
then performs any computations, validations, or processes.
Understanding Conditional Rendering and Processing
A condition is a small unit of logic that helps you control the display of regions, items,
buttons, and tabs as well as the execution of processes, computations, and validations.
For example, when you apply a condition to a button, the rendering engine evaluates
the condition during the rendering (or Show Page) process. Whether the condition
passes or fails determines if the page control (such as a button) displays.
You specify a condition by selecting a condition type. You can select a condition type
when you first create the control or component, or by editing the control or component
and making a selection from the Condition Type attribute. Depending upon the
Condition Type you select, you enter the appropriate values in the Expressions fields.
The condition evaluates to true or false based on the values you enter in the
Expression fields.
3-2 Oracle Application Express Application Builder User's Guide
Understanding Page Processing and Page Rendering
Whether you use the Expression fields depends upon the
selected condition type. Some condition types do not require values in
either field, others require a value only for Expression 1, and other
condition types require values in both fields. Although these fields are
labeled "Expression 1" and "Expression 2", the values for a given
condition type do not necessarily conform to any formal definition of
the term expression. They are simply text values appropriate for the
selected condition type.
Note:
To view a complete list of all available conditions for a given component or control,
click the arrow to the right of the Condition Type list. Shortcuts to common selections
appear directly beneath the list. If your condition requires an expression, enter it in the
appropriate field.
The following sections offer examples of some commonly used condition types.
See Also: Appendix A, "Available Conditions" on page A-1 for a
detailed listing of available condition types
Current Page in Expression 1
Current page in Expression 1 evaluates to true if the current page number is
contained within the comma-delimited list of pages in Expression 1. For example:
3,100,203
If the current page is 100, then this condition evaluates to true and the condition
passes.
Exists
Exists (SQL query returns at least one row) is expressed as a SQL query. If the query
returns at least one row, then the condition evaluates as true. For example:
SELECT 1 FROM employees WHERE department_id = :P101_DEPTNO
This example references item P101_DEPTNO as a bind variable. You can use bind
variables within application processes and SQL query regions to reference item session
state. If one or more employees are in the department identified by the value of P101_
DEPTNO, then the condition evaluates as true.
See Also:
"About Bind Variable Syntax" on page 3-14
Application Builder Concepts 3-3
Understanding Session State Management
PL/SQL Expression
Use PL/SQL Expression to specify an expression in valid PL/SQL syntax that
evaluates to true or false. For example:
NVL(:MY_ITEM,'NO') = 'YES'
If the value of :MY_ITEM is Yes, as in the previous example, then the condition
evaluates as true. If the value of :MY_ITEM is No, then the condition evaluates as false.
Verifying User Identity
Authentication is the process of establishing users' identities before they can access an
application. Authentication may require a user to enter a user name and password, or
may involve the use of a digital certificate or a secure key.
Oracle Application Express supports modular authentication, making it easy to switch
authentication methods when needed. You can establish a user's identity by selecting
from a number of built-in authentication methods, or by using a wizard to create your
own custom authentication approach.
See Also: "Establishing User Identity Through Authentication" on
page 13-24 for more information
Controlling Access to Controls and Components
While conditions control the rendering and processing of specific controls or
components on a page, authorization schemes control user access. Authorization is a
broad term for controlling access to resources based on user privileges.
Authorization schemes extend the security of your application's authentication
scheme. You can specify an authorization scheme for an entire application, a page, or a
specific page control such as a region, item, or button. For example, you could use an
authorization scheme to selectively determine which tabs, regions, or navigation bar
entries a user sees.
See Also: "Providing Security Through Authorization" on
page 13-33
Understanding Session State Management
HTTP, the protocol over which HTML pages are most often delivered, is a stateless
protocol. A Web browser is only connected to the server for as long as it takes to
download a complete page. In addition, each page request is treated by the server as
an independent event, unrelated to any page requests that happened previously or
may occur in the future. This means that to access form values entered on one page on
a subsequent page, some form of session state management needs to occur. Typically,
when a user enters values into a form on one page, those values are not accessible on
later pages. Oracle Application Express transparently maintains session state and
provides developers with the ability to get and set session state values from any page
in the application.
Topics in this section include:
■
What Is a Session?
■
Understanding Session IDs
■
Referencing Session State
3-4 Oracle Application Express Application Builder User's Guide
Understanding Session State Management
What Is a Session?
A session is a logical construct that establishes persistence (or stateful behavior) across
page views. Each session is assigned a unique identifier. The Application Express
engine uses this identifier (or session ID) to store and retrieve an application's working
set of data (or session state) before and after each page view.
Because sessions are entirely independent of one another, any number of sessions can
exist in the database at the same time. Also, because sessions persist in the database
until purged by an administrator, a user can return to an old session and continue
running an application long after first launching it. A user can also run multiple
instances of an application simultaneously in different browser sessions.
Sessions are logically and physically distinct from Oracle database sessions used to
service page requests. A user runs an application in a single Oracle Application
Express session from log in to log out with a typical duration measured in minutes or
hours. Each page requested during that session results in the Application Express
engine creating or reusing an Oracle database session to access database resources.
Often these database sessions last just a fraction of a second.
"Viewing Active Sessions" in Oracle Application Express
Administration Guide
See Also:
Understanding Session IDs
The Application Express engine establishes the identity (or anonymity) of the user for
each page request and the session ID to fetch session state from the database. The most
visible location of the session ID is in the URL for a page request. The session ID
displays as the third parameter in the URL, for example:
http://apex.somewhere.com/pls/apex/f?p=4350:1:220883407765693447
In this example, the session ID is 220883407765693447.
Another visible location is in the page's HTML POST data and indirectly in the
contents of a session cookie. This cookie is sent by the Application Express engine
during authentication and is maintained for the life of the application (or browser)
session.
Oracle Application Express assigns new session IDs during authentication processing,
records the authenticated user's identity with the session ID, and continually checks
the session ID in each page request's URL or POST data with the session cookie and
the session record in the database. These checks provide users with flexibility and
security.
While the session ID is the key to session state, the session cookie (where applicable)
and the session record safeguard the integrity of the session ID and the authentication
status of the user.
See Also:
"Understanding the URL that Displays for a Page" on
page 3-7
Viewing Session State
The behavior of an Oracle Application Express application is usually driven by values
in session state. For example, a button may display conditionally based on the value of
an item session state. You can view the session state for a page by clicking Session on
the Developer toolbar.
Application Builder Concepts 3-5
Understanding URL Syntax
About the Session State Page
The Session State page provides valuable information about the session in which the
application is currently running. To locate a specific page, enter the page number in
the page field and click Go. Table 3–1 describes the various types of information
available on the Session State page.
Table 3–1
Information Available on the Session State Page
Heading
Description
Application
Identifies the application name.
Session
Summarizes session state for the current session.
User
Identifies the current user.
Workspace
Identifies the current workspace ID.
Browser Language
Identifies the current browser language.
Page Items
Identify attributes of the page item, including the application
ID, page number, item name, how the item displays (for
example, check box, date picker, display only, text field,
hidden, popup, radio group, and so on), the item value in
session state, and status.
The Status column indicates the status of the session state.
Available values include:
■
I - Inserted
■
U - Updated
■
R - Reset
See Also: "Understanding Page-Level Items" on page 6-32s
Application Items
Application items are items that do not reside on a page.
Application items are session state variables without the
associated user interface properties.
See Also: "Understanding Application-Level Items" on
page 6-52 and "Understanding Substitution Strings" on
page 3-15 for information about referencing item values
See Also:
"Managing Session State Values" on page 3-11
Understanding URL Syntax
The URL that displays for each page identifies the location of Oracle Application
Express, the address of Oracle Application Express, the application ID, the page
number, and the session ID.
The application ID is a unique number that identifies each application. Similarly, the
page number uniquely identifies each page. Applications and pages may also have
alphanumeric aliases. Application aliases are unique within a workspace and page
aliases are unique within each application. When you run an application, the
Application Express engine generates a session number that serves as a key to the
user's session state.
Topics in this section include:
■
Understanding the URL that Displays for a Page
3-6 Oracle Application Express Application Builder User's Guide
Understanding URL Syntax
■
Using f?p Syntax to Link Pages
■
Calling a Page Using an Application and Page Alias
■
Calling a Page from a Button URL
■
Facilitating Bookmarks by Using Zero as the Session ID
Understanding the URL that Displays for a Page
The URL that displays for each page indicates the location of Oracle Application
Express and identifies the address of Oracle Application Express, the application ID,
page number, and session ID. For example:
http://apex.somewhere.com/pls/apex/f?p=4350:1:220883407765693447
This example indicates:
■
apex.somewhere.com is the URL of the server
■
pls is the indicator to use the mod_plsql cartridge
■
apex is the database access descriptor (DAD) name. The DAD describes how
HTTP Server connects to the database server so that it can fulfill an HTTP request.
The default value is apex.
■
f?p= is a prefix used by Oracle Application Express
■
4350 is the application being called
■
1 is the page within the application to be displayed
■
220883407765693447 is the session number
See Also:
"About Publishing the Application URL" on page 14-28
Using f?p Syntax to Link Pages
You can create links between pages in your application using the following syntax:
f?p=App:Page:Session:Request:Debug:ClearCache:itemNames:itemValues:PrinterFriendly
Table 3–2 describes the arguments you can pass when using f?p syntax.
Table 3–2
f?p Syntax Arguments
Syntax
Description
App
Indicates an application ID or alphanumeric alias.
Page
Indicates a page number or alphanumeric alias.
Session
Identifies a session ID. You can reference a session ID to create
hypertext links to other pages that maintain the same session state by
passing the session number. You can reference the session ID using
the syntax:
■
Short substitution string: &SESSION.
■
PL/SQL: V('SESSION')
■
Bind variable: :APP_SESSION
Application Builder Concepts 3-7
Understanding URL Syntax
Table 3–2 (Cont.) f?p Syntax Arguments
Syntax
Description
Request
Sets the value of REQUEST. Each application button sets the value of
REQUEST to the name of the button. This enables accept processing to
reference the name of the button when a user clicks it. You can
reference REQUEST using the syntax:
Debug
■
Substitution string: &REQUEST.
■
PL/SQL: V('REQUEST')
■
Bind variable: :REQUEST
Displays application processing details. Valid values for the DEBUG
flag are YES or NO. Setting this flag to YES displays details about
application processing. You can reference the Debug flag using the
following syntax:
■
Short substitution string: &DEBUG.
■
PL/SQL: V('DEBUG')
■
Bind variable: :DEBUG
See Also: "Debugging an Application" on page 12-1
ClearCache
Clears the cache. This sets the value of items to null.
To clear cached items on a single page, specify the numeric page
number. To clear cached items on multiple pages, use a
comma-separated list of page numbers. Clearing a page's cache also
resets any stateful processes on the page. Individual or
comma-separated values can also include collection names to be reset
or the keyword RP, which resets region pagination on the requested
page. The keyword APP clears cache for all pages and all
application-level items in the current application and removes sort
preferences for the current user. The keyword SESSION achieves the
same result as the APP keyword, but clears items associated with all
applications that have been used in the current session.
See Also: "Clearing Session State" on page 3-12
itemNames
Comma-delimited list of item names used to set session state with a
URL.
itemValues
List of item values used to set session state within a URL. Item values
cannot include colons, but can contain commas if enclosed with
backslashes. To pass a comma in an item value, enclose the characters
with backslashes. For example:
\123,45\
PrinterFriendly Determines if the page is being rendered in printer friendly mode. If
PrinterFriendly is set to Yes, then the page is rendered in printer
friendly mode. The value of PrinterFriendly can be used in rendering
conditions to remove elements such as regions from the page to
optimize printed output. You can reference the printer friendly
preference by using the following syntax:
V('PRINTER_FRIENDLY')
When referenced, the Application Express engine will not display
tabs or navigation bars, and all items will be displayed as text and not
as form elements.
Although it is important to understand how f?p syntax works, you rarely have to
construct this syntax yourself. Application Builder includes many wizards that
automatically create these references for you. The following sections describe specific
instances that utilize f?p syntax to link pages.
3-8 Oracle Application Express Application Builder User's Guide
Understanding URL Syntax
Calling a Page Using an Application and Page Alias
Application and page aliases must consist of valid Oracle identifiers, cannot contain
any whitespace, and are not case-sensitive. The following example calls a page using
an application and a page alias from within an application. It runs the page home of
the application myapp and uses the current session ID.
f?p=myapp:home:&APP_SESSION.
Application aliases must be unique within a workspace. If an application in a different
workspace has the same application alias, use the &c argument to specify the
workspace name. For example:
f?p=common_alias:home:&APP_SESSION.&c=WORKSPACE_A
Calling a Page from a Button URL
When you create a button, you can specify a URL to redirect to when the user clicks
the button. This example runs page 6001 of application 6000 and uses the current
session ID.
f?p=6000:6001:&APP_SESSION.
Note that this is only one approach to using a button. This method bypasses page
submission and acts as a hyperlink on the page. Another method is to submit the page
first. In that approach, clicking the button submits the page for processing, allowing
forms to be submitted and session state to be saved.
See Also: "Creating Buttons" on page 7-76 and "APP_SESSION" on
page 3-18
Facilitating Bookmarks by Using Zero as the Session ID
If the pages within an application are public and do not require authentication, you
make it easier for application users to bookmark pages by using zero as the session ID.
Application pages that do not require authentication can be accessed with "f?p" URLs
where the session ID is zero (that is, the single digit 0). When you request a page by
either entering the URL in the browser or by clicking on a link having 0 for the session
ID, the Application Express engine assigns a new session ID and sends a session
cookie containing this new session ID to your browser. As you navigate through the
application's public pages, you will see that all generated links to public pages will
contain 0 for the session ID and all branches to public pages will have new URLs that
use 0 as the visible session ID. Behind the scenes, however, the Application Express
engine uses the session ID in the cookie as the actual session ID to locate session state.
This feature is useful when you want to hide the actual session ID. By hiding the
session ID, you enable users to bookmark pages without needing to include the
session ID in the bookmark link. As an added benefit, using zero as the session ID also
keeps the actual session ID hidden from search engines.
In order to use zero as the session ID in your application, you have to generate at least
one link having a zero session ID. The use of this first link starts the zero session ID
mechanism. One approach would be to provide a single static link with a zero session
ID on the application home page. For example, where you might normally code the
link to page 2 as f?p=&APP_ID.:2:&APP_SESSION, you would code f?p=&APP_
ID.:2:0.
Application Builder Concepts 3-9
Understanding URL Syntax
About APEX_UTIL.PREPARE_URL
Oracle provides a utility function to enable developers to use PL/SQL to generate
anchors to application pages using the f?p syntax. Use APEX_UTIL.PREPARE_URL
whenever PL/SQL in the application produces f?p anchors that might require a zero
session ID. To learn more, see "PREPARE_URL" in Oracle Application Express API
Reference.
How the Zero Session ID Feature Works
The zero session ID feature provides support for pages having anchors in the HTML
(such as in templates or HTML regions). When the Application Express engine
encounters f?p anchors it recognizes them and replaces the session ID with zero, if
certain criteria are met.
The Application Express engine replaces the session ID component with zero when it
detects one of the following patterns:
■
&APP_ID.
■
The numeric ID of the current application
■
One of the following patterns:
–
the all-uppercase or all-lowercase alphanumeric alias of the current
application followed by a colon followed by the numeric ID of a public page in
the current application
–
the all-uppercase or all-lowercase alphanumeric alias of a public page in the
current application followed by a colon followed by &APP_SESSION. or
&SESSION.
Examples of patterns in HTML that are candidates for zero-session ID replacement
include:
■
Page 10 is a public page:
"f?p=&APP_ID.:10:&APP_SESSION.
■
Page 10 is a public page:
"f?p=100:10:&APP_SESSION.
■
home is an alias for a public page:
"f?p=&APP_ID.:home:&APP_SESSION.
■
HOME is an alias for a public page:
"f?p=&APP_ID.:HOME:&APP_SESSION.
■
PEOPLE is an application alias and HOME is an alias for a public page:
"f?p=PEOPLE:HOME:&APP_SESSION
In these examples, the pattern &APP_SESSION. (or &SESSION., not shown) is
replaced with zero if the application is operating in zero-session ID mode and the user
is a public user. Note that the user is considered a public user if the following PL/SQL
expression is true:
:app_user in ('nobody','HTMLDB_PUBLIC_USER','PUBLIC_USER','ANONYMOUS','APEX_
PUBLIC_USER')"
3-10 Oracle Application Express Application Builder User's Guide
Managing Session State Values
Managing Session State Values
When building interactive, data-driven Web applications, the ability to access and
manage session state values is critical. In Oracle Application Express, session state is
automatically managed for every page and easily referenced in static HTML or logic
controls such as processes or validations.
Topics in this section include:
■
Referencing Session State
■
Setting Session State
■
Clearing Session State
■
About Bind Variable Syntax
See Also:
"Referencing Item Values" on page 6-50
Referencing Session State
You can reference item values stored in session state in regions, computations,
processes, validations, and branches. An item can be a field, a text area, a password, a
select list, or a check box. Table 3–3 describes the supported syntax for referencing item
values.
Table 3–3
Syntax for Referencing Item Values
Type
Syntax
Description
SQL
:MY_ITEM
Use standard bind variable syntax for items whose names
are no longer than 30 characters. Use this syntax for
references within a SQL query and within PL/SQL.
PL/SQL
V('MY_ITEM')
Use PL/SQL syntax to reference an item value using the V
function.
See Also: Oracle Application Express API Reference
PL/SQL
NV('MY_NUMERIC_ITEM')
Use standard PL/SQL syntax referencing the numeric
item value using the NV function.
See Also: Oracle Application Express API Reference
Static text (exact) &MY_ITEM.
For static text or an exact substitution use the convention
&ITEM_NAME followed by a period (.), for example:
&MY_ITEM.
Setting Session State
You set the value of an item in your application and therefore session state using one
of the following methods:
■
Form submission. See "Form Submission Example" on page 3-11.
■
Bind variable. See "About Bind Variable Syntax" on page 3-14.
■
Computation. See "Understanding Application Computations" on page 5-37.
■
f?p syntax. See "Using f?p Syntax to Link Pages" on page 3-7
Form Submission Example
When a user submits a page, the Application Express engine automatically stores
values typed into fields (items) in session state. For example, suppose you have an
application containing two pages. The first page of the application contains a form in
Application Builder Concepts 3-11
Managing Session State Values
which a user can enter a phone number. You defined this form by creating an item
named P2_PhoneNo. On the second page, you want to display the information the
user enters in the form.
When the page is submitted, Oracle Application Express captures the value entered in
the phone number field and stores the value for future use. The phone number entered
by the user can then be retrieved from session state by referencing the item associated
with the field on the page.
Clearing Session State
As you develop your applications, you may find it useful to clear the cached value for
specific items, all items on a page, all pages in an application, or the current user
session. Clearing a cached value resets the value to null. The topics that follow offer
specific examples of clearing session state.
Topics in this section include:
■
Clearing Cache by Item
■
Clearing Cache by Page
■
Clearing Cache for an Entire Application
■
Clearing Cache for the Current User Session
Clearing Cache by Item
Clearing cache for a single item resets the value of the item to null. For example, you
might use this approach to make sure a specific item's value is null when a page is
prepared for rendering.
The following example uses standard f?p syntax to clear the cache for an item. This
example calls page 5 of application 100. Placing MY_ITEM in the ClearCache position
of the f?p syntax resets the value of MY_ITEM to NULL.
f?p=100:5:&APP_SESSION.::NO:MY_ITEM
The following example resets the value of the items THE_EMPNO and THE_DEPTNO.
f?p=100:5:&APP_SESSION.::NO:THE_EMPNO,THE_DEPTNO
Clearing Cache by Page
Caching application items provides an effective way to maintain session state.
However, there are occasions when you may want to clear the cache for all items on a
page. For example, suppose you needed to clear all fields on a page when a user clicks
a link that creates a new order. By clearing the cache for an entire page, you set the
value of all items on the page to null.
Clearing Session Cache for Two Pages While Resetting Pagination This example clears the
session cache for two pages and resets pagination.
f?p=6000:6003:&APP_SESSION.::NO:RP,6004,6014
This example:
■
Runs page 6003 of application 6000 and uses the current session ID
■
Indicates to not show debug information (NO)
3-12 Oracle Application Express Application Builder User's Guide
Managing Session State Values
■
■
Clears all values maintained by the current session's cache for items of pages 6004
and 6014
Resets region pagination (RP) on page 6003 (the requested page)
Clearing Session Cache on a Page and Passing an Item Value This example shows how to
implement an update form. It clears existing information and sets the item's value
(typically a primary key).
f?p=6000:6003:&APP_SESSION.::NO:6003:MY_ITEM:1234
This example:
■
Runs page 6003 of application 6000 and uses the current session ID
■
Indicates to not show debug information (NO)
■
Clears all values maintained by the current session's cache for items on page 6003
■
Sets the session state of an item called MY_ITEM to the value 1234
Clearing Session Cache on a Page and Passing Values to Multiple Items This example is
similar to the previous example, except it passes values to multiple items.
f?p=6000:6004:&APP_SESSION.::NO:6003:MY_ITEM1,MY_ITEM2,MY_ITEM3:1234,,5678
This example:
■
Runs page 6004 of application 6000 and uses the current session ID
■
Clears the current session's cache for items on page 6003
■
Indicates debug information should be hidden (NO)
■
Sets the value of MY_ITEM1 to 1234, sets the value of MY_ITEM2 to null (indicated
by the comma used as placeholder), and sets the value of MY_ITEM3 to 5678
Clearing Cache for an Entire Application
You can clear an application’s cache by using f?p syntax and creating a Clear
Cache argument using the keyword APP. For example:
f?p=App:Page:Session::NO:APP
Resetting the cache for an entire application does not restore
the application to a completely reset state. For example, if an
application includes on-new instance computations or on-new
instance processes, the Application Express engine runs these
computations and processes when the application session is
created. Then, it processes the clear cache request and displays the
requested page.
Note:
To reset an application completely without a session ID (if no
cookie is used to track the session ID), you must request it using a
URL without a session ID, or by calling APEX_UTIL.CLEAR_APP_
CACHE from another application. If the session ID is tracked using a
cookie, you will need to logout to reset the state.
Application Builder Concepts 3-13
Managing Session State Values
Clearing Cache for the Current User Session
Another approach to clearing an application’s cache is to create a Clear Cache
argument using the keyword SESSION. For example:
f?p=6000:6004:12507785108488427528::NO:SESSION
About Bind Variable Syntax
You can use bind variables syntax anywhere in Oracle Application Express where you
are using SQL or PL/SQL to reference session state of a specified item. For example:
SELECT * FROM employees WHERE last_name like '%' || :SEARCH_STRING || '%'
In this example, the search string is a page item. If the region type is defined as SQL
Query, you can reference the value using standard SQL bind variable syntax. Using
bind variables ensures that parsed representations of SQL queries are reused by the
database, optimizing memory usage by the server.
When using bind variable syntax, remember the following rules:
■
Bind variable names must correspond to an item name.
■
Bind variable names are not case-sensitive.
■
Bind variable names cannot be longer than 30 characters (that is, they must be a
valid Oracle identifier).
Although page item and application item names can be up to 255 characters, if you
intend to use an application item within SQL using bind variable syntax, the item
name must be 30 characters or less.
Using Bind Variables in Regions Based on a SQL Query or LOV
If your region type is defined as a SQL Query, SQL Query (plsql function body
returning SQL query), or list of values (LOV), you can reference session state using the
following syntax:
:MY_ITEM
One common way to do this is to incorporate a session state variable in a WHERE
clause. The following example shows how to bind the value of the item THE_DEPTNO
into a region defined from a SQL Query.
SELECT last_name, job_id, salary
FROM employees
WHERE department_id = :THE_DEPTNO
See Also: "Understanding Regions" on page 9-2 for information
about creating regions
Using Bind Variables in PL/SQL Procedures
For region types defined as a PL/SQL Procedure, regions are constructed using
PL/SQL anonymous block syntax. In other words, the beginning and ending
keywords are used to enclose the PL/SQL block. For example:
IF :P1_JOB IS NOT NULL THEN
INSERT INTO employees (employee_id, first_name, job_id)
VALUES (:P1_EMP_ID, :P1_NAME, :P1_JOB)
end if;
3-14 Oracle Application Express Application Builder User's Guide
Understanding Substitution Strings
In this example, the values of the employee_id, first_name, and job_id are
populated by the values of P1_EMP_ID, P1_NAME, and P1_JOB.
Understanding Substitution Strings
You can use substitution strings within a page template or region source to replace a
character string with another value. As you design your application and enable users
to edit items, you use substitution strings to pass information.
Topics in this section include:
■
Using Substitution Strings
■
About Built-in Substitution Strings
Using Substitution Strings
You can use substitution strings in Application Builder in the following ways:
■
Include a substitution string within a template to reference component values
■
Reference page or application items using &ITEM. syntax
■
Use built-in substitution strings to achieve a specific type of functionality
Special substitution strings available within a template are denoted by the number
symbol (#). For example:
#ABC#
To reference page or application items using substitution variables:
1.
Reference the page or application item in all capital letters.
2.
Precede the item name with an ampersand (&).
3.
Append a period (.) to the item name.
For example, you would refer to an application item named F101_X in an HTML
region, a region title, an item label, or in any of numerous other contexts in which
static text is used, for example:
&F101_X.
Notice the required trailing period. When the page is rendered, Application Express
engine replaces value the substitution string with the value of item F101_X.
Determining Substitution String Usage within a Given Template
You can determine what template-specific substitution strings are supported in which
templates by viewing the template definition. See "Customizing Templates" on
page 10-12.
About Built-in Substitution Strings
Application Builder supports a number of built-in substitution strings. You may need
to reference these values to achieve specific types of functionality.
The following sections describe these substitution strings, when to use them, and what
supported syntax is currently available. Note that bind variable :USER has special
meaning within the database. Also, the term Direct PL/SQL refers to PL/SQL that can
be used in stored database objects such as procedures and functions.
Application Builder Concepts 3-15
Understanding Substitution Strings
Topics in this section include:
■
APP_ALIAS
■
APP_ID
■
APP_IMAGES
■
APP_PAGE_ID
■
APP_SESSION
■
APP_UNIQUE_PAGE_ID
■
APP_USER
■
AUTHENTICATED_URL_PREFIX
■
BROWSER_LANGUAGE
■
CURRENT_PARENT_TAB_TEXT
■
DEBUG
■
HOME_LINK
■
LOGIN_URL
■
IMAGE_PREFIX
■
Application Express SCHEMA OWNER
■
PRINTER_FRIENDLY
■
LOGOUT_URL
■
PROXY_SERVER
■
PUBLIC_URL_PREFIX
■
REQUEST
■
SQLERRM
■
SYSDATE_YYYYMMDD
■
WORKSPACE_IMAGES
See Also:
■
■
"Substitutions" on page 4-13 for information about defining
static substitution strings as an application attribute
"Establishing User Identity Through Authentication" on
page 13-24 for information about authentication
APP_ALIAS
APP_ALIAS is an alphanumeric name for the current application. APP_ALIAS is
different from the APP_ID in that the APP_ID must be unique over all workspaces and
all applications hosted in one database. In contrast, APP_ALIAS must be unique
within a workspace. For example, by using the same APP_ALIAS you can create the
application, ABC, in two different workspaces. You can use APP_ALIAS almost
anywhere APP_ID can be used. For example, f?p syntax can use an APP_ALIAS or an
application ID as demonstrated in this example:
f?p=ABC:1:&APP_SESSION.
This example runs application ABC, page 1 using the current session.
3-16 Oracle Application Express Application Builder User's Guide
Understanding Substitution Strings
Table 3–4 describes the supported syntax for referencing APP_ALIAS.
Table 3–4
APP_ALIAS Syntax
Reference Type
Syntax
Bind variable
:APP_ALIAS
PL/SQL
V('APP_ALIAS')
Substitution string
&APP_ALIAS.
The following is an HTML example:
Click me to go to page 1 <a href="f?p=&APP_ALIAS.:1:&APP_SESSION."> of the current
application</a>
APP_ID
APP_ID identifies the application ID of the currently executing application. Table 3–5
describes the supported syntax for referencing APP_ID.
Table 3–5
APP_ID Syntax
Reference Type
Syntax
Bind variable
:APP_ID
Direct PL/SQL
APEX_APPLICATION.G_FLOW_ID (A NUMBER)
PL/SQL
NV('APP_ID')
Substitution string
&APP_ID.
The following is an example of a substitution string reference:
f?p=&APP_ID.:40:&APP_SESSION.
APP_IMAGES
Use this substitution string to reference uploaded images, JavaScript, and cascading
style sheets that are specific to a given application and are not shared over many
applications. If you upload a file and make it specific to an application, then you must
use this substitution string, or bind variable. Table 3–6 describes the supported syntax
for referencing APP_IMAGES.
Table 3–6
APP_IMAGES Syntax
Reference Type
Syntax
Bind variable
:APP_IMAGES
Direct PL/SQL
Not available.
PL/SQL
V('APP_IMAGES')
Substitution string
&APP_IMAGES.
Template substitution
#APP_IMAGES#
"IMAGE_PREFIX" on page 3-22, "WORKSPACE_
IMAGES" on page 3-25, and "Managing Images" on page 9-13
See Also:
Application Builder Concepts 3-17
Understanding Substitution Strings
APP_PAGE_ID
APP_PAGE_ID is the current application ID. For example, if your application was on
page 3, then the result would be 3. Using this syntax is useful when writing
application components that need to work generically in multiple applications.
Table 3–7 describes the supported syntax for referencing APP_PAGE_ID.
Table 3–7
APP_PAGE_ID Syntax
Reference Type
Syntax
Bind variable
:APP_PAGE_ID
PL/SQL
:APP_PAGE_ID
PL/SQL and Direct PL
NV('APP_PAGE_ID')
Substitution string
&APP_PAGE_ID.
The following is an example of a substitution string reference:
f?p=&APP_ID.:&APP_PAGE_ID.:&APP_SESSION.
APP_SESSION
APP_SESSION is one of the most commonly used built-in substitution strings. You can
use this substitution string to create hypertext links between application pages that
maintain a session state by passing the session number. Note that you can also use the
substitution string SESSION in place of APP_SESSION. Table 3–8 describes the
supported syntax for referencing APP_SESSION.
Table 3–8
APP_SESSION Syntax
Reference Type
Syntax
Bind variable
:APP_SESSION
PL/SQL
V('APP_SESSION')
Short PL/SQL
V('SESSION')
Substitution string
&APP_SESSION.
Consider the following examples:
■
From within an HTML region:
<a href="f?p=100:5:&APP_SESSION.">click me</a>
■
Using PL/SQL:
htf.anchor('f?p=100:5:'||V('APP_SESSION'),'click me');
■
Using a SQL query:
SELECT htf.anchor('f?p=100:5:'||:APP_SESSION,'clickme') FROM DUAL;
APP_UNIQUE_PAGE_ID
APP_UNIQUE_PAGE_ID is an integer generated from an Oracle sequence which is
unique for each page view. This number is used by applications to prevent duplicate
page submissions and can be used for other purposes. For example, to make a unique
URL and avoid browser caching issues, you can embed this number in the request or
3-18 Oracle Application Express Application Builder User's Guide
Understanding Substitution Strings
debug column in calls to the f procedure. Table 3–9 describes the supported syntax for
referencing APP_UNIQUE_PAGE_ID.
Table 3–9
APP_UNIQUE_PAGE_ID Syntax
Reference Type
Syntax
Bind variable
:APP_UNIQUE_PAGE_ID
PL/SQL
V('APP_UNIQUE_PAGE_ID')
Substitution string
&APP_UNIQUE_PAGE_ID.
The following is an HTML example:
SELECT 'f?p=100:1:'||:APP_SESSION||':'||:APP_UNIQUE_PAGE_ID||
':::P1_EMPNO:'||employee_id,
first_name,
job_id
FROM employees
Note the use of the APP_UNIQUE_PAGE_ID in the request column. This makes this
URL unique and may avoid excessive browser caching problems.
APP_USER
APP_USER is the current user running the application. Depending upon your
authentication model, the value of the user is set differently. If the application is
running using database authentication, then the value of the user is the same as the
database pseudo column USER. If the application uses an authentication scheme that
requires the user to authenticate, the value of APP_USER is set by the authentication
scheme, usually to the user name used during authentication. Table 3–10 describes the
supported syntax for referencing APP_USER.
Table 3–10
APP_USER Syntax
Reference Type
Syntax
Bind variable
:APP_USER
PL/SQL
V('APP_USER')
Substitution string
&APP_USER.
Consider the following examples:
■
From within an HTML region:
Hello you are logged in as &APP_USER.
■
Using PL/SQL:
htp.p('Hello you are logged in as'||V('APP_USER'));
■
As a bind variable:
SELECT * FROM some_table WHERE user_id = :APP_USER
See Also: "Authentication" on page 4-16 for information about the
Public User attribute
Application Builder Concepts 3-19
Understanding Substitution Strings
AUTHENTICATED_URL_PREFIX
This application-level attribute identifies a valid authenticated prefix (that is, a logged
in URL prefix). You can use a relative path or a full path beginning with http. This
item is useful if your application can be run in both authenticated (logged in) and
public (not logged in) modes. You can use AUTHENTICATED_URL_PREFIX to
construct a link to an authenticated page. This item is most useful when using basic
database authentication because changes to the URL can require authentication.
Table 3–11 describes the supported syntax for referencing AUTHENTICATED_URL_
PREFIX.
Table 3–11
AUTHENTICATED_URL_PREFIX Syntax
Reference Type
Syntax
Bind variable
:AUTHENTICATED_URL_PREFIX
PL/SQL
V('AUTHENTICATED_URL_PREFIX')
Substitution string
&AUTHENTICATED_URL_PREFIX.
BROWSER_LANGUAGE
BROWSER_LANGUAGE refers to the Web browser's current language preference.
Table 3–12 describes the supported syntax for referencing BROWSER_LANGUAGE.
Table 3–12
BROWSER_LANGUAGE Syntax
Reference Type
Syntax
Bind variable
:BROWSER_LANGUAGE
Direct PL/SQL
APEX_APPLICATION.G_BROWSER_LANGUAGE
PL/SQL
V('BROWSER_LANGUAGE')
Substitution string
:BROWSER_LANGUAGE.
Substitution string
&BROWSER_LANGUAGE.
CURRENT_PARENT_TAB_TEXT
CURRENT_PARENT_TAB_TEXT is most useful in page templates, but is only relevant
for applications that use two-level tabs (that is, parent and standard tabs). Use this
string to reference the parent tab label. This substitution string enables you to repeat
the currently selected parent tab within the page template. Table 3–13 describes the
supported syntax for referencing CURRENT_PARENT_TAB_TEXT.
Table 3–13
CURRENT_PARENT_TAB_TEXT Syntax
Reference Type
Syntax
Bind variable
Not Available.
Substitution string
&CURRENT_PARENT_TAB_TEXT.
DEBUG
Valid values for the DEBUG flag are Yes or No. Turning debug on shows details about
application processing. If you write your own custom code, you may want to generate
debug information only if the debug mode is set to Yes. Table 3–14 describes the
supported syntax for referencing DEBUG.
3-20 Oracle Application Express Application Builder User's Guide
Understanding Substitution Strings
Table 3–14
DEBUG Syntax
Reference Type
Syntax
Bind variable
:DEBUG
Direct PL/SQL
APEX_APPLICATION.G_DEBUG
PL/SQL
V('DEBUG')
Substitution string
&DEBUG.
The following is an example of a substitution string reference that preserves the
current value of DEBUG:
f?p=100:1:&APP_SESSION.::&DEBUG
HOME_LINK
HOME_LINK is the home page of an application. The Application Express engine will
redirect to this location if no page is given and if no alternative page is dictated by the
authentication scheme's logic. You define the Home Link on the Application Attributes
page.
Table 3–15 describes the supported syntax for referencing HOME_LINK.
Table 3–15
HOME_LINK Syntax
Reference Type
Syntax
Direct PL/SQL
APEX_APPLICATION.G_HOME_LINK
PL/SQL
V('HOME_LINK')
Template Reference
#HOME_LINK#
Substitution String
&HOME_LINK.
See Also: "Authentication" on page 4-16 for information about the
Home Link attribute
LOGIN_URL
Use LOGIN_URL to display a link to a login page for users that are not currently
logged in. Table 3–16 describes the supported syntax for LOGIN_URL.
See Also: "Authentication" on page 4-16 and "About the Security
Attributes Page" on page 4-16
Table 3–16
LOGIN_URL Syntax
Reference Type
Syntax
Bind variable
:LOGIN_URL
Direct PL/SQL
APEX_APPLICATION.G_LOGIN_URL
PL/SQL
V('LOGIN_URL')
Substitution string
&LOGIN_URL.
Template Substitution
#LOGIN_URL#
Application Builder Concepts 3-21
Understanding Substitution Strings
IMAGE_PREFIX
The value of IMAGE_PREFIX determines the virtual path the Web server uses to point
to the images directory distributed with Oracle Application Express. To reference
uploaded images, use WORKSPACE_IMAGES and APP_IMAGES. Table 3–17 describes
the supported syntax for referencing IMAGE_PREFIX.
See Also: "APP_IMAGES" on page 3-17,"WORKSPACE_
IMAGES" on page 3-25, and "Configuring the Application
Definition" on page 4-8
Table 3–17
IMAGE_PREFIX Syntax
Reference Type
Syntax
Bind variable
:IMAGE_PREFIX
Direct PL/SQL
APEX_APPLICATION.G_IMAGE_PREFIX
PL/SQL
V('IMAGE_PREFIX')
Substitution string
&IMAGE_PREFIX.
Template Substitution
#IMAGE_PREFIX#
Application Express SCHEMA OWNER
If you are generating calls to applications from within your PL/SQL code, you may
need to reference the owner of the Oracle Application Express schema. The following
describes the correct syntax for a direct PL/SQL reference:
APEX_APPLICATION.G_FLOW_SCHEMA_OWNER
You may also use #FLOW_OWNER# to reference this value in SQL queries and PL/SQL
(for example, in a region or a process).
PRINTER_FRIENDLY
The value of PRINTER_FRIENDLY determines if the Application Express engine is
running in print view mode. This setting can be referenced in conditions to eliminate
elements not desired in a printed document from a page. Table 3–18 describes the
supported syntax for referencing PRINTER_FRIENDLY.
Table 3–18
PRINTER_FRIENDLY Syntax
Reference Type
Syntax
Direct PL/SQL
APEX_APPLICATION.G_PRINTER_FRIENDLY
(VARCHAR2 DATATYPE)
PL/SQL
V('PRINTER_FRIENDLY')
Substitution string
&PRINTER_FRIENDLY.
LOGOUT_URL
LOGOUT_URL is an application-level attribute used to identify the logout URL. This is a
URL that navigates the user to a logout page or optionally directly logs out a user. To
create a logout navigation bar entry, add a trailing period to &LOGOUT_URL
(&LOGOUT_URL.). If you are coding a page template, use #LOGOUT_URL#. Table 3–19
describes the supported syntax for referencing LOGOUT_URL.
3-22 Oracle Application Express Application Builder User's Guide
Understanding Substitution Strings
Table 3–19
LOGOUT_URL Syntax
Reference Type
Syntax
Bind variable
:LOGOUT_URL
PL/SQL
V('LOGOUT_URL')
Substitution string
&LOGOUT_URL.
Template substitution
#LOGOUT_URL#
PROXY_SERVER
PROXY_SERVER is an application attribute. The attribute may be used by regions
whose source comes from a URL. The following is the correct syntax for a direct
PL/SQL reference used when you are writing PL/SQL to access remote Web servers
from within the database (for example, when using the utl_http package shipped
with the database).
APEX_APPLICATION.G_PROXY_SERVER
PUBLIC_URL_PREFIX
PUBLIC_URL_PREFIX is an application-level attribute that identifies a URL to toggle
out of a logged in mode to a public view. Table 3–20 describes the supported syntax for
referencing PUBLIC_URL_PREFIX.
Table 3–20
PUBLIC_URL_PREFIX Syntax
Reference Type
Syntax
Bind variable
:PUBLIC_URL_PREFIX
PL/SQL
V('PUBLIC_URL_PREFIX')
Substitution string
&PUBLIC_URL_PREFIX.
Template substitution
#PUBLIC_URL_PREFIX#
REQUEST
Each application button sets the value of REQUEST to the name of the button or to the
request value attribute associated with the button. This enables accept processing to
reference the name of the button when a user clicks it. In the f?p syntax, REQUEST
may be set using the fourth argument.
Referencing the Value of REQUEST REQUEST is typically referenced during Accept
processing (that is, the processing that occurs when you post a page). Table 3–21
describes the supported syntax for referencing REQUEST.
Table 3–21
REQUEST Syntax
Reference Type
Syntax
Bind variable
:REQUEST
Direct PL/SQL
APEX_APPLICATION.G_REQUEST
PL/SQL
V('REQUEST')
Substitution string
&REQUEST
&REQUEST. (exact syntax match)
Application Builder Concepts 3-23
Understanding Substitution Strings
Scope and Value of REQUEST for Posted Pages When you post a page, you initiate Accept
processing. Accept processing consists of computations, validations, processes, and
branches. The value of REQUEST is available during each phase of the Accept
processing. Once an application branches to a different page then REQUEST is set to
NULL.
The value of REQUEST is the name of the button the user clicks, or the name of the tab
the user selects. For example, suppose you have a button with a name of CHANGE, and
a label Apply Change. When a user clicks the button, the value of REQUEST is
CHANGE.
About the When Button Pressed Attribute Validations, processes, and branches have a
When Button Pressed attribute. This attribute displays as a select list and contains the
names of buttons that exist on the current page. If you make a selection from When
Button Pressed, you associate the button’s REQUEST value with the validation, process,
or branch.
When you use a button to submit a page, the REQUEST value is passed to the page.
The Accept processing logic evaluates each validation, process, and branch that uses a
When Button Pressed attribute to determine whether the component should run (or
fire). When one of these components runs, do not assume that a user actually clicked
the associated button and caused the page to be submitted. Keep in mind, that another
button using the same request value may have submitted the page. Similarly,
JavaScript on the page can also submit the page and pass in a request value.
Referencing REQUEST Using Declarative Conditions It is common to reference REQUEST
using conditions. For example, you may want to reset pagination when a user clicks
Go on a report page. You can reset pagination by creating an on-submit page process.
The page process can be made conditional using the condition Request =
Expression 1.
To conditionalize an on-submit page process:
1.
Under Condition, select the condition type Request = Expression 1.
2.
In Expression 1, enter GO.
Using REQUEST for Show Processing You can also use REQUEST for Show processing
when navigating to a page using f?p syntax. For example:
f?p=100:1:&APP_SESSION.:GO
Remember that the fourth argument in the f?p syntax is REQUEST. This example goes
to application 100, page 1 for the current session, and sets the value of REQUEST to GO.
Any process or region can reference the value of REQUEST using Show processing.
The following is a similar example using PL/SQL:
IF V ('REQUEST') = 'GO' THEN
htp.p('hello');
END IF;
Note that htp.p('hello') is a call to a PL/SQL Web Toolkit package to print out
the specified text string.
3-24 Oracle Application Express Application Builder User's Guide
Understanding Substitution Strings
See Also:
■
■
Oracle Database Advanced Application Developer's Guide for
information about developing Web applications with PL/SQL
Oracle Database PL/SQL Packages and Types Reference for
information about htp packages
SQLERRM
SQLERRM is a template substitution only available in the Applications Region Error
Message. The following describes the correct syntax for a region template substitution
reference:
#SQLERRM#
SYSDATE_YYYYMMDD
SYSDATE_YYYYMMDD represents the current date on the database server, with the
YYYYMMDD format mask applied. You may use this value instead of repeated calls to
the SYSDATE() function. The following list describes the supported syntax for
referencing SYSDATE_YYYYMMDD.
■
Bind variable
:SYSDATE_YYYYMMDD
■
PL/SQL
V('SYSDATE_YYYYMMDD')
■
Direct PL/SQL
APEX_APPLICATION.G_SYSDATE (DATE DATATYPE)
Table 3–22
SYSDATE_YYYYMMDD Syntax
Reference Type
Syntax
Bind variable
:SYSDATE_YYYYMMDD
Direct PL/SQL
APEX_APPLICATION.G_SYSDATE (DATE DATATYPE)
PL/SQL
V('SYSDATE_YYYYMMDD')
WORKSPACE_IMAGES
Use this substitution string to reference uploaded images, JavaScript, and cascading
style sheets that are shared over many applications within a workspace. Table 3–23
describes the supported syntax for referencing WORKSPACE_IMAGES.
Table 3–23
WORKSPACE_IMAGES Syntax
Reference Type
Syntax
Bind variable
:WORKSPACE_IMAGES
Direct PL/SQL
Not available
PL/SQL
V('WORKSPACE_IMAGES')
Substitution string
&WORKSPACE_IMAGES.
Template substitution
#WORKSPACE_IMAGES#
Application Builder Concepts 3-25
Understanding Substitution Strings
See Also: "APP_IMAGES" on page 3-17 and "IMAGE_PREFIX" on
page 3-22
3-26 Oracle Application Express Application Builder User's Guide
4
Using Application Builder
This section provides important background information about using Application
Builder to build dynamically rendered applications.
This section contains the following topics:
■
Accessing Application Builder
■
About the Application Builder Home Page
■
About the Application Home Page
■
About Application Attributes
"Quick Start" on page 1-1, "Application Builder
Concepts" on page 3-1, "Building an Application" on page 6-1,
"Controlling Page Layout" on page 9-1, and "Adding Navigation"
on page 8-1
See Also:
Accessing Application Builder
An application is a collection of database-driven Web pages linked together using tabs,
buttons, or hypertext links. The pages within an application share a common session
state definition and authentication method. Application Builder is the tool you use to
build the pages that comprise an application.
To access Application Builder:
1.
Log in to Oracle Application Express.
The Workspace home page appears.
2.
To view the Application Builder home page you can either:
■
■
Click the Application Builder icon to link to the Application Builder home
page.
Click the down arrow on the right side of the Application Builder icon to view
a drop down menu. Then select the appropriate menu option.
Using Application Builder
4-1
About the Application Builder Home Page
For consistency, this document uses the primary navigation
path (or drill-down approach) when explaining navigation.
Note:
About the Application Builder Home Page
The Application Builder home page displays all installed applications.
You can customize the appearance of the Application Builder home page using the
navigation bar at the top of the page. Available controls include:
■
■
■
■
Application. Use the Application field to search for an application. Enter a case
insensitive query for the application name or application ID and click Go. To view
all applications, leave the field blank and click Go.
Group. Use the Group field to search for an application group. Select an
application group and click Go. See "Creating Applications Groups" on page 6-27.
View. Use this control to display information about the applications in your
workspace. Make a selection from the list and click Go. Available options include:
–
Icons (the default) displays each application as a large icon identified by the
application name.
–
Details displays each application as a line in a report. Each line includes the
application ID, the application name, when the application was last updated,
the page count, and who last updated the application.
–
By Group displays applications by application group.
Display. Determines how many applications display on the page. To change the
display, make a selection from the list and click Go.
4-2 Oracle Application Express Application Builder User's Guide
About the Application Builder Home Page
The following buttons appear to the right of the navigation bar:
■
■
Import. Click Import to import an exported application file. See "Importing Export
Files" on page 14-21
Create. Click Create to create an application or install a demonstration application.
See "Installing a Demonstration Application" on page 2-1 and "About Creating an
Application Using a Wizard" on page 6-2.
About the Tasks List
A Tasks list displays on the right side of the Application Builder home page.
The Tasks list contains the following links:
■
■
■
■
■
■
Application Builder Defaults links to the Manage Application Builder Defaults
page. See "Leveraging Application Builder Defaults" in Oracle Application Express
Administration Guide.
Developer Preferences links to the Developer Preferences page. See "Configuring
Developer Preferences" on page 4-3.
User Interface Defaults links to the User Interface Defaults page. See "Managing
User Interface Defaults" on page 11-1.
Application Groups links to the Application Groups page. See "Creating
Applications Groups" on page 6-27.
Workspace Themes links to the Workspace Themes page. See "Managing Themes"
on page 10-1.
Export Repository links to the Export Repository page. See "Importing Export
Files" on page 14-21.
About the Recent List
The Recent list contains links to recently viewed applications.
Configuring Developer Preferences
Many pages in Application Builder include a navigation bar at the top of the page. You
can use the controls in the navigation bar to customize the appearance of the page.
Most navigation bars include a View and Display list. You can control the default
display for both lists on the Developer Preferences page.
To edit developer preferences:
1.
On the Workspace home page, click the Application Builder icon.
2.
From the Tasks list, click Developer Preferences.
3.
From Set View Mode, select one of the following:
–
Icons (the default) displays the items on the page as a large icon.
–
Details displays the items on the page as a line in a report.
Using Application Builder
4-3
About the Application Home Page
4.
From Report Rows, select the number items to display.
5.
Click Apply Changes.
About the Application Home Page
To view a specific application, select the application on the Application Builder home
page. The Application home page appears. The application ID and the application
name display at the top of the page. To link to the application definition, click
application name.
See Also:
"Configuring the Application Definition" on page 4-8
The following large icons appear next:
■
■
■
■
Run Application submits the pages in the current application to the Application
Express engine to render viewable HTML. See "How the Application Express
Engine Renders and Processes Pages" on page 3-2.
Supporting Objects links to the Supporting Objects page. See "How to Create a
Packaged Application" on page 14-5.
Shared Components links to a list of shared components and user interface
controls that can display or be applied on every page within an application. See
"Working with Shared Components" on page 5-29.
Export/Import links you to the Export/Import Wizard. Use this wizard to import
and export an entire application and related files such as cascading style sheets,
images, static files, script files, themes, user interface defaults, and workspace
users. "Exporting an Application and Related Files" on page 14-12.
About the Navigation Bar and Create Page Button
A navigation bar and the Create Page button display in the center of the Application
home page. You can use these controls to search for pages, alter the page view, or
create a page.
The Application home page navigation bar contains the following controls:
■
Page. Search for a page number or name by entering a case insensitive keyword or
phrase in the Page field and clicking Go. To view all pages in an application, leave
the Page field blank and click Go. You control how many pages display by making
a selection from the Display list.
4-4 Oracle Application Express Application Builder User's Guide
About the Application Home Page
■
■
View. By default, each page displays as a large icon. You can change the
appearance of the page by making a selection from the View list and clicking Go.
See "Understanding Page Display Alternatives" on page 4-5.
Display. Determines how many pages display. To change the number of pages that
appear, make a selection from the Display list and click Go.
The Create Page button displays to the right of the navigation bar. Click Create Page to
launch a wizard that walks you through creating a page. See "Managing Pages in an
Application" on page 6-9.
See Also:
"About the Action Bar" on page 4-6
About the Tasks List
A Tasks list displays on the right side of the Application home page.
The Tasks list contains the following links:
■
■
■
■
■
■
■
Delete this Application deletes the current application. See "Deleting an
Application" on page 6-8.
Copy this Application creates a copy of the current application. See "Copying an
Application" on page 6-8.
Page Groups links to the Page Groups page. Make the pages within your
application easier to access by organizing them into page groups. See "Grouping
Pages" on page 6-15.
Page Locks links to the Locked Pages page. Locking pages in an application
prevents conflicts during application development. See "Locking and Unlocking a
Page" on page 6-19.
User Interface Defaults link to the User Interface Defaults page. See"Managing
User Interface Defaults" on page 11-1.
Export Repository links to the Export Repository page. See "Installing Export
Files" on page 14-25.
Application Reports links to the Application Reports page. Use this page to view
reports specific to your application. See "Viewing Application Reports" on
page 6-29.
Understanding Page Display Alternatives
You can control how the Application home page appears by making a selection from
the View list and clicking Go. Available View modes include:
■
Icons
■
Details
■
by Group
■
by Type
Using Application Builder
4-5
About the Application Home Page
Icons mode (the default) displays each page as a large icon identified by the page
name. To view a page, click the icon.
See Also:
"About the Recent List" on page 4-6
Details mode displays each page as a line in a report. Each line includes the page
number, the page name, when the page was last updated, the page type, who updated
it, any associated group, and lock status. To view a page, click the page name. Use the
Lock icon to prevent conflicts during application development. Click the Run icon to
run the associated page and render viewable HTML.
See Also: "Locking and Unlocking a Page" on page 6-19 and
"Running a Page or Application" on page 6-14
By Group displays currently defined page groups. You can use page groups to
organize and manage the pages within an application. See "Grouping Pages" on
page 6-15.
By Type separates pages into categories, such as Login, Report, Tabular Form,
Dynamic Form, Chart, and so on. The number of pages within each page category
displays within a parenthesis to the right of the type name. To view a page, click the
page type and then the page.
About the Recent List
The Recent list contains links to recently viewed pages within the current application.
This list only appears when viewing the Application home page in Icon mode.
About the Action Bar
The Action bar displays beneath the Utilities tab in the upper right corner of most
pages in Application Builder.
4-6 Oracle Application Express Application Builder User's Guide
About the Application Home Page
This bar contains the icons discussed in the sections that follow. Note that the Run
Page icon, Edit Page icon, Developer Comment icon, and Find icon display on
numerous pages in Application Builder, including pages for creating and managing
shared components. See "Working with Shared Components" on page 5-29.
Run Page Icon
The Run Page icon resembles a small, light green traffic light. Click this icon to render
viewable HTML of the current page. If no page is selected, clicking this icon runs the
first page in the application. When you run a page, the Application Express engine
dynamically renders the page based on data stored in the database. See "Running a
Page or Application" on page 6-14.
Edit Icon
The Edit Page icon resembles a small green piece of paper and pencil. Click this icon to
access the Page Definition of the current page. If no page is selected, clicking this icon
displays the Page Definition of the first page in the application. See "About the Page
Definition" on page 5-1.
Shared Components Icon
The Shared Components icon resembles a small mechanical gear. Click this icon to
view a list of shared components and user interface controls that can display or be
applied on every page within an application. See "Working with Shared Components"
on page 5-29.
Developer Comment icon
The Developer Comment icon is the shape of a green balloon. Click this icon to record
comments about an application, a specific page, or a group of pages. See "Adding
Developer Comments" on page 6-22.
Find Icon
Using Application Builder
4-7
About Application Attributes
The Find icon resembles a flashlight. Click this icon to search for items, pages, queries,
tables, PL/SQL, images, and cascading style sheets (CSS) within the current
application or the schemas associated with the workspace. See "Using the Find Icon"
on page 7-89.
About Application Attributes
Application attributes apply to an entire application. Once you create an application,
the next logical step is to review and possibly update application attributes.
Topics in this section include:
■
Configuring the Application Definition
■
Configuring Security Attributes
■
Configuring Globalization Attributes
See Also: "How to Create a Packaged Application" on page 14-5 for
information on using the Supporting Objects utility to create a
packaged application
Configuring the Application Definition
You use the attributes on the Edit Definition page to control the application name and
availability and to define static substitution strings. Additionally, the Edit Definition
page displays defined build options, the associated theme, template defaults, and
component defaults. Required values are marked with a red asterisk (*).
Topics in this section include:
■
Accessing the Edit Definition Page
■
About the Edit Definition Page
Accessing the Edit Definition Page
To edit the application definition:
1.
On the Workspace home page, click the Application Builder icon.
2.
Select an application.
3.
Click Shared Components.
The Shared Components page appears.
4.
Under Application, click Definition.
The Edit Definition page appears.
Tip: You can also access the Edit Definition page by clicking the
application name at the top of the Application home page.
About Navigation Alternatives The Edit Definition page is divided into the following
sections: Name, Availability, Global Notification, Substitutions, Logo, Build Options,
Theme, Template Defaults, and Component Defaults. You can access these sections by
scrolling down the page, or by clicking a navigation button at the top of the page.
4-8 Oracle Application Express Application Builder User's Guide
About Application Attributes
When you select a button at the top of the page, the selected section appears and all
other sections are temporarily hidden. To view all sections of the page, click Show All.
About the Edit Definition Page
The following sections describe the attributes available on the Edit Definition page.
Topics in this section include:
■
Name
■
Availability
■
Global Notifications
■
Substitutions
■
Logo
■
Build Options
■
Theme
■
Template Defaults
■
Component Defaults
Name Use Name to define basic characteristics of your application, including the
application name, an optional alphanumeric alias, and a version number. Table 4–1
describes all Name attributes.
Table 4–1
Application Definition Attributes
Attribute
Description
Name
Provides a short descriptive name for the application to
distinguish it from other applications in your development
environment.
Application Alias
Assigns an alternate alphanumeric application identifier. You
can use this identifier in place of the application ID.
For example, suppose you create an alias of myapp for
application 105. Using f?p syntax, you could call application
105 as either:
■
f?p=105:1
■
f?p=myapp:1
See Also: "Using f?p Syntax to Link Pages" on page 3-7
Using Application Builder
4-9
About Application Attributes
Table 4–1 (Cont.) Application Definition Attributes
Attribute
Description
Version
Includes the application's version number on a page. You can
also automatically tie the version to the date of last
modification using the following format masks:
■
YYYY.MM.DD
■
MM.DD.YYYY
■
DD.MM.YYYY
If your application version uses YYYY.MM.DD, then
Application Builder replaces this format mask with the date of
last modification of any application attribute.
Media Type
Enter the Internet Media Type. An Internet Media Type is
two-part identifier for file formats on the Internet. A Media
Type is composed of at least two parts: a type, a subtype, and
one or more optional parameters. This Media Type is used in
the Content-Type HTTP header when rendering the page.
The page-level Media Type overrides the application-level
Media Type. The default value for this attribute is NULL. If both
the page-level and application-level values for Media Type are
NULL, the Media Type text/html is used.
Image Prefix
Determines the virtual path the Web server uses to point to the
images directory distributed with Application Builder. During
installation, the virtual path is configured as /i/.
When embedding an image in static text (for example, in page
or region headers or footers), you can reference an image using
the substitution string #IMAGE_PREFIX#. For example, to
reference the image go.gif, you would use the following
syntax:
<img src="#IMAGE_PREFIX#go.gif">
See Also: "IMAGE_PREFIX" on page 3-22, "Managing Images"
on page 9-13, and "Referencing Images" on page 9-14
Proxy Server
Use this field to specify a proxy server.
For example, you may require a proxy server when using a
region source type of URL. The URL region source embeds the
results of the URL (that is, the page returned by navigating to
the URL) as the region source. If you use a firewall and the
target of a URL is outside the firewall relative to Application
Builder, you may need to specify a proxy server.
You can reference values entered into this field from PL/SQL
using the PL/SQL package variable APEX_APPLICATION.G_
PROXY_SERVER.
Logging
Determines whether user activity is recorded in the Oracle
Application Express activity log. When set to Yes, every page
view is logged, enabling an administrator to monitor user
activity for each application.
Disabling logging may be advisable for high volume
applications.
4-10 Oracle Application Express Application Builder User's Guide
About Application Attributes
Table 4–1 (Cont.) Application Definition Attributes
Attribute
Description
Debugging
Controls debug mode for the current application. Available
options include:
■
Yes enables the application to run in a debug mode.
■
No disables the application from running in debug mode.
Running an application in debug mode is useful when an
application is under development. However, for a production
application, it is a good idea to disable debugging and thus
prevent users from viewing application logic.
Parsing Schema
Specifies the schema that all SQL and PL/SQL in the
application is parsed as. You may use the #OWNER#
substitution string to reference this value in SQL queries and
PL/SQL (for example, in a region or a process).
Exact Substitutions
Determines if exact substitutions are supported. Use exact
substitutions. Non-exact substitutions is a deprecated feature.
Exact substitutions use the following sytnax:
&ITEM.
Non-exact substitutions use the following sytnax:
&ITEM
Application Group
Displays the application group currently associated with this
application. To select another application group, make a
selection from the list. To remove an application from an
existing group, select Unassigned.
See Also: "Creating Applications Groups" on page 6-27
"Understanding Substitution Strings" on page 3-15 and
"Using f?p Syntax to Link Pages" on page 3-7
See Also:
Availability Use Availability attributes to manage your application by defining an
application status and build status. For example, if you select the status Restricted
Access, you can specify which users have access and can run the application. Table 4–2
describes these attributes.
Using Application Builder 4-11
About Application Attributes
Table 4–2
Application Availability Attributes
Attribute
Description
Status
Specifies whether the application is available or unavailable for
use. Options include:
■
■
■
■
■
■
■
Available - Application is available with no restrictions.
Available with Edit Links - Application is available for use.
For developers, the Developer toolbar displays at the
bottom of each page. Requires the developer to be logged in
to the Application Builder in the same browser session.
Available to Developers Only - Application is available to
users having developer privileges.
Restricted Access - Application is available to developers
named in the Restrict to comma separated user list.
Unavailable - Application cannot be run or edited. The
message in Message for unavailable application displays
when users attempt to access the application.
Unavailable (Status Shown with PL/SQL) - Application
cannot be run or edited.
Unavailable (Redirect to URL) - Application cannot be run.
The user is linked to the URL entered in Message for
unavailable application.
See Also: "Changing Build Status for Multiple Applications" in
Oracle Application Express Administration Guide, "Changing
Application Build Status Set During Deployment" in Oracle
Application Express Administration Guide, and "Controlling Access
to Applications, Pages, and Page Components" on page 7-96,
Build Status
Identifies the build status of the current application. Options
include:
■
■
Run and Build Application - Developers and users can
both run and develop the application.
Run Application Only - Users can only run the application.
This option is intended for applications in a production
instance.
See Also: "Changing Application Build Status Set During
Deployment" in Oracle Application Express Administration Guide
Message for unavailable
application
Use this attribute in conjunction with Status. If you set Status to
Unavailable, Unavailable (Status Shown with PL/SQL), or
Unavailable (Redirect to URL), the text you enter in this
attribute displays. If you set Status to Available, the text you
enter in this attribute does not display.
Restrict to comma separated Use this attribute in conjunction with the Status Restricted
Access. If you set Status to Restricted Access, only the users
user list (status must equal
listed in this attribute can run the application. To use this
Restricted Access)
attribute:
1.
From the Status list, select Restricted Access.
2.
Enter a comma-delimited list of users who can run the
application in the field provided.
Global Notifications You can use the Global Notifications attribute to communicate
system status to application users. For example, you can use this attribute to notify
users of scheduled downtime, or communicate other messages regarding application
availability. If the page templates used in your application contain the #GLOBAL_
NOTIFICATION# substitution string, the text entered here will display in that string's
place.
4-12 Oracle Application Express Application Builder User's Guide
About Application Attributes
To create a global notification:
1.
Include the #GLOBAL_NOTIFICATION# substitution string in your page template.
2.
Navigate to the Edit Definition page and enter a message in the Global
Notifications attribute.
3.
Click Apply Changes.
"Understanding Substitution Strings" on page 3-15 and
"Page Templates" on page 10-25
See Also:
Substitutions Use these fields to define static substitution strings for your application.
You can use static substitution string for phrases or labels that occur in many places
within an application. To create a substitution string, enter the string name in the
Substitution String column and the string value in the Substitution Value column.
Defining static substitution strings centrally enables you to change text strings in
multiple places in your application by making a single change to the Substitution
Value defined on this page.
See Also:
"Understanding Substitution Strings" on page 3-15
Logo Use Logo attributes to define an application logo. An application logo can be
text-based or image-based. To use this feature, your page template must include the
#LOGO# substitution string.
To define an application logo:
1.
2.
For Logo Type, select one of the following:
■
Select Image to use an image for the application logo.
■
Select Text to use text for the application logo.
In Logo, enter the following:
■
For an image, enter the complete image name, including the filename
extension. For example:
/i/oracle.gif
■
For text, enter the full text string. For example:
Sample Application
3.
In Logo Attributes, enter the appropriate attributes for the logo.
Image example:
width="100" height="20" alt="Company Logo"
Text example:
style="font-family:Arial; color:#000000; font-size:18; white-space:nowrap;
font-weight:bold;"
"Managing Images" on page 9-13, "Verifying the Prefix for
the Virtual Image Directory" on page 9-14, "Customizing Templates"
on page 10-12, and "Page Templates" on page 10-25
See Also:
Using Application Builder 4-13
About Application Attributes
Build Options Displays existing build options. Most applications have a build option
attribute. Build Options have two possible values: INCLUDE and EXCLUDE. If you
specify an attribute to be included, then the Application Express engine considers it at
run time. However, if you specify an attribute to be excluded, then the Application
Express engine treats it as if it did not exist.
Do not specify a build option unless you plan to exclude that object from specific
installations.
See Also: "Using Build Options to Control Configuration" on
page 14-29
Theme Displays the current theme applied to the application. Themes are collections of
templates that can be used to define the layout and style of an entire application. Each
theme provides a complete set of templates that accommodate every user interface
pattern that may be needed in an application.
See Also:
"Managing Themes" on page 10-1
Template Defaults Lists the default templates for this application. To specify a default
template at the application level, you can either:
■
■
Select a new theme. See "Switching the Active Theme" on page 10-6.
Select a new default page template on the Create/Edit Theme page. See "Changing
the Default Templates in a Theme" on page 10-3.
You can also override this default by making a selection from the Page Template list on
the Page Attributes page.
Table 4–3 describes template defaults for the current application.
Table 4–3
Application Template Defaults Attributes
Attribute
Description
Default Page Template
Indicates the default page template to display pages. You can
override this selection by making a selection from the Page
Template list on the Page Attributes page.
See Also: "Editing Page Attributes" on page 5-23
Print Mode Page Template Identifies the template to be used when the Application
Express engine is in printer friendly mode.
When calling the Application Express engine to render a page,
you have the option to specify whether the page should be
displayed using the Print Mode Page Template specified.
If you specify Yes, then the page displays using a printer
friendly template. The Application Express engine displays all
text within HTML Form Fields as text. The printer friendly
template does not need to have the #FORM_OPEN# or #FORM_
CLOSE# substitution string.
See Also: "Optimizing a Page for Printing" on page 7-103
Error Page Template
Optional. Specifies a page template to use for errors that
display on a separate page, as opposed to those that display
inline.
See Also: "Changing the Default Templates in a Theme" on
page 10-3 and "Customizing Templates" on page 10-12
4-14 Oracle Application Express Application Builder User's Guide
About Application Attributes
Component Defaults Displays the default templates used when running wizards. You
can override these settings on the attributes page for each control or component.
Table 4–4 describes component defaults for the current application.
Table 4–4
Component Defaults
Attribute
Description
Calendar
Default calendar template used when you create a calendar.
Label
Default label template used when you create page items.
Report
Default report template used when you create report.
List
Default template used when you create a list.
Breadcrumb
Default template used when you create a breadcrumb.
Button
Default template used when you create buttons that are template
controlled.
Region
Default template used when you create a region.
Chart Region
Default region template used when you create a chart.
Form Region
Default region template used when you create a form.
Report Region
Default region template used when you create a report.
Tabular Form Region
Default region template used when you create a tabular form.
Wizard Region
Default region template used when you create a wizard
component.
Breadcrumb Region
Default region template used when you create a breadcrumb.
List Region
Default region template used when you create a list.
See Also: "Changing the Default Templates in a Theme" on
page 10-3 and "Customizing Templates" on page 10-12
Configuring Security Attributes
You can provide security for your application by configuring attributes on the Edit
Security Attributes page. The Security Attributes you choose apply to all pages within
an application.
Topics in this section include:
■
Accessing the Edit Security Attributes Page
■
About the Security Attributes Page
See Also:
"Managing Application Security" on page 13-1
Accessing the Edit Security Attributes Page
To access the Edit Security Attributes page:
1.
On the Workspace home page, click the Application Builder icon.
2.
Select an application.
3.
Click Shared Components.
The Shared Components page appears.
4.
Under Security, click Edit Security Attributes.
Using Application Builder 4-15
About Application Attributes
The Edit Security Attributes page appears.
About Navigation Alternatives The Edit Security Attributes page is divided into the
following sections: Authentication, Authorization, Database Schema, Session State
Protection, and Virtual Private Database. You can access these sections by scrolling
down the page, or by clicking a navigation button at the top of the page.
When you select a button at the top of the page, the selected section appears and all
other sections are temporarily hidden. To view all sections of the page, click Show All.
About the Security Attributes Page
The following sections describe the attributes available on the Edit Security Attributes
page.
Topics in this section include:
■
Authentication
■
Authorization
■
Database Schema
■
Session Timeout
■
Session State Protection
■
Virtual Private Database (VPD)
Authentication Authentication is the process of establishing users' identities before they
can access an application. Although you define multiple authentication schemes for
your application, only one scheme can be current at a time. Table 4–5 describes the
attributes available under Authentication.
Table 4–5
Authentication Attributes
Attribute
Descriptions
Home Link
Specifies a URL or procedure that should be run when you run
the application.
For example, Home Link could contain the relative URL used to
locate the application home page. For example, f?p=6000:600
would specify application 6000 with a home page number of
600. In this example, the value you enter in Home Link replaces
the #HOME_LINK# substitution string in application templates.
You can also use this attribute to name a procedure. For
example, you could create a procedure such as personal_
calendar which renders an HTML page to serve as the
application home.
Note: Do not use the Home Link attribute to determine the page
that displays after authentication. The page that displays after
authentication is determined by other components within the
application's authentication scheme.
See Also: "HOME_LINK" on page 3-21
4-16 Oracle Application Express Application Builder User's Guide
About Application Attributes
Table 4–5 (Cont.) Authentication Attributes
Attribute
Descriptions
Login URL
Replaces the substitution strings &LOGIN_URL. in HTML or
#LOGIN_URL# in templates.
See Also: "LOGIN_URL" on page 3-21 and "Creating an
Authentication Scheme" on page 13-26
Public User
Identifies the Oracle schema used to connect to the database
through the database access descriptor (DAD). The default value
is ANONYMOUS in environments where the database server
version is Oracle Database Express Edition and it is APEX_
PUBLIC_USER for all other versions of the database server.
Once a user has been identified, the Application Express engine
keeps track of each user by setting the value of the built-in
substitution string APP_USER.
Note: Previous versions of Oracle Application Express used the
built-in substitution string HTMLDB_PUBLIC_USER.
When APP_USER equals this value, the Application Express
engine considers the current session to be a public user session.
The Application Express engine supports the following built-in
display conditions:
■
USER_IS_PUBLIC_USER
■
USER_IS_NOT_PUBLIC_USER
If the current application user (APP_USER) equals the value of
this attribute, then the user is logged on as a public user. Some
applications have public (not logged in) and a private (logged
in) modes. By determining if the user is the public user, you can
conditionally display or hide information.
For example, you can show a login button if the user is the
public user and a logout link if the user is not a public user.
Reference this value using APEX_APPLICATION.G_PUBLIC_
USER. The Application Express engine also has built in condition
types USER_IS_PUBLIC_USER and USER_IS_NOT_PUBLIC.
See Also: "HOME_LINK" on page 3-21 and "Understanding
Conditional Rendering and Processing" on page 3-2
Define Authentication
Scheme
Click this button to define an authentication scheme.
See Also: "Understanding How Authentication Works" on
page 13-25 and "Creating an Authentication Scheme" on
page 13-26
Authorization Authorization controls user access to specific controls or components
based on user privileges. You can specify an authorization scheme for your
application, by making a selection from the Authorization Scheme list. You can assign
only one authorization to an entire application. However, you can assign an
authorization scheme to individual pages, page controls (such as a region, a button, or
an item), or a shared component (such as a menu, a list, or a tab).
To create a authorization scheme, click Define Authorization Schemes.
An authorization scheme is a binary operation that either succeeds (equals true) or
fails (equals false). If it succeeds, then the component or control can be viewed. If it
fails, then the component or control cannot be viewed or processed. When you attach
an authorization scheme to a page and it fails, an error message displays instead of the
page. However, when you attach an authorization scheme to a page control (for
example, a region, a button, or an item) and it fails, no error page displays. Instead, the
control either does not display or is not processed or executed.
Using Application Builder 4-17
About Application Attributes
See Also: "Providing Security Through Authorization" on
page 13-33
Database Schema Use Parsing Schema to specify the database scheme for the current
application. Once defined, all SQL and PL/SQL commands issued by the application
will be performed with the rights and privileges of the defined database schema.
Session Timeout Use the following attributes to reduce exposure to abandoned
computers with an open Web browser by application:
■
■
■
■
Maximum Session Length in Seconds - Enter a positive integer representing how
many seconds a session used by this application will exist. Leave the value NULL
for the session to exist indefinitely. This session duration may be superseded by
the operation of the job that runs every eight hours which deletes sessions older
than 24 hours.
Session Timeout URL - Enter an optional URL to be redirected to when the
Maximum Session Length in Seconds has been exceeded. If implemented in Oracle
Application Express, the target page in this URL should be a public page. A
common use for this page would be to inform the user of the session expiration
and to present a login link or other options. If no URL is supplied, the user is
redirected to the application home page.
Maximum Session Idle Time in Seconds - Enter a positive integer representing
how many seconds of inactivity or idle time a session used by this application
should permit. The idle time is the time between one page request and the next
one. Leave the value NULL to prevent session idle time checks from being
performed.
Idle Timeout URL - Enter an optional URL to be redirected to when the Maximum
Session Idle Time in Seconds has been exceeded. If implemented in Oracle
Application Express, the target page in this URL should be a public page. A
common use for this page would be to inform the user of the session is redirected
to the application home page. If no URL is supplied, the user is redirected to the
application home page.
See Also: "Understanding Session Timeout" on page 13-4 and
"Configuring Session Timeout" in Oracle Application Express
Administration Guide
Session State Protection Enabling Session State Protection can prevent hackers from
tampering with URLs within your application. URL tampering can adversely affect
program logic, session state contents, and information privacy.
To enable or disable Session State Protection for your application, make a selection
from the Session State Protection list. Setting Session State Protection to Enabled turns
on session state protection controls defined at the page and item level.
To configure Session State Protection, click Manage Session State Protection.
See Also:
"Understanding Session State Protection" on page 13-14
Virtual Private Database (VPD) Use this attribute to enter a PL/SQL block that sets a
Virtual Private Database (VPD) context for the current database session associated
with the current "show page" or "accept page" request. The block you enter here is
executed at a very early point during the page request, immediately after the APP_
USER value is established. The value of APP_USER (using :APP_USER or v('APP_
USER')) may be used within the block. Values of other items in session state may be
4-18 Oracle Application Express Application Builder User's Guide
About Application Attributes
referenced as well, but any such items must have been established in session state
before the initiation of the current page request. Consider the following example:
dbms_session.set_context('CTX_USER_QRY','USERPRIV',my_package.my_function(:APP_
USER));
The previous example sets the value of USERPRIV in the context named CTX_USER_
QRY to the value returned by the function my_function in package my_package.
The function is passed the current value of APP_USER as an input argument.
Presumably, the named context would be used in a VPD policy ( created within the
application's parsing schema) to effect the generation of predicates appropriate to the
authenticated user.
Virtual Private Database, also know as Fine-Grained Access Control or FGAC, is an
Oracle database feature that provides an application programming interface (API) that
enables developers to assign security policies to database tables and views. Using
PL/SQL, developers can create security policies with stored procedures and bind the
procedures to a table or view by means of a call to an RDBMS package. Such policies
are based on the content of application data stored within the database, or based on
context variables provided by Oracle database. In this way, VPD permits access
security mechanisms to be removed from applications, and to be situated closer to
particular schemas.
The code entered in this section need not pertain to VPD/FGAC; in fact, it may not be
related to security at all. Any code that needs to be executed at the earliest point in a
page request can be placed here. For example, to set the database session time zone for
every page request:
BEGIN
EXECUTE IMMEDIATE 'alter session set time_zone = ''Australia/Sydney'' ';
END;
See Also: "Providing Security Through Authorization" on
page 13-33 and Oracle Label Security Administrator's Guide
Configuring Globalization Attributes
In Application Builder you can develop applications that can run concurrently in
different languages. A single application can be translated to support different
languages. Use the attributes on the Edit Globalization Attributes page to specify
globalization options such as the primary application language.
Topics in this section include:
■
Accessing the Globalization Attributes Page
■
About the Edit Globalization Attributes Page
See Also:
"Managing Application Globalization" on page 16-1
Accessing the Globalization Attributes Page
To access the Edit Globalization Attributes page:
1.
On the Workspace home page, click the Application Builder icon.
2.
Select an application.
The Application Builder home page appears.
3.
Click Shared Components.
Using Application Builder 4-19
About Application Attributes
The Shared Components page appears.
4.
Under Globalization, click Edit Attributes.
The Edit Globalization Attributes page appears.
About the Edit Globalization Attributes Page
The following sections describe the attributes available on the Edit Globalization
Attributes page.
See Also: "Specifying the Primary Language for an Application" on
page 16-4
Application Primary Language Identifies the language in which an application is
developed. This language is the base language from which all translations are made.
For example, suppose application 100 was authored in English, translated into French,
and published as application 101. English would be the Application Primary
Language.
All modifications to the application should be made to the primary language specified
here.
Application Language Derived From Determines how Application Builder determines or
derives the application language.
The application primary language can be static, derived from the Web browser
language, or determined from a user preference or item. The database language setting
also determines how the date is displayed and how certain information is sorted.
This option enables you to disable browser derived language support. You also have
the option of having the application language derived from an application preference.
Application Date Format Determines the date format to be used in the application.
This date format is used to alter the NLS_DATE_FORMAT database session setting
before showing or submitting any page in the application. This value can be a literal
string containing a valid Oracle date format mask or an item reference using
substitution syntax. If no value is specified, the default date format is derived from the
database session at runtime.
Automatic CSV Encoding Automatic CSV Encoding controls the encoding of all
comma-delimited (CSV) report output in an application. The default value for
Automatic CSV Encoding is No. If Automatic CSV Encoding is set to Yes, CSV report
output is converted to a character set compatible with localized desktop applications.
The character set for the CSV encoding is determined by the Application Language
Derived From setting.
The encoding of pages in Application Builder is determined by the character set of the
database access descriptor (DAD) used to access Oracle Application Express. For
example, if the character set of the database access descriptor is AL32UTF8, all pages
in all applications in the Oracle Application Express user interface are encoded in
UTF-8.
By default, the CSV output from report regions is encoded in the same character set as
the database access descriptor. However, some desktop spreadsheet applications
require that the data is encoded in the client desktop operating system character set. In
the case of multibyte data, the CSV output from report regions will often appear
corrupted when opened by a desktop spreadsheet application. This is because the CSV
4-20 Oracle Application Express Application Builder User's Guide
About Application Attributes
output is encoded differently than what is required by the desktop application.
Enabling Automatic CSV Encoding resolves this issue.
For example, if the user’s language preference for an application is de, the CSV data is
encoded in Western European Windows 1252, regardless of the Database Access
Descriptor character set setting. If the user's language preference is zh-cn, the CSV
data will be encoded in Chinese GBK.
See Also:
"Adding a Download Link to a Classic Report" on
page 7-33
Using Application Builder 4-21
About Application Attributes
4-22 Oracle Application Express Application Builder User's Guide
5
Working with Application Pages
This section provides important background information about creating and
managing pages within and application.
This section contains the following topics:
■
About the Page Definition
■
Using the View List on the Page Definition
■
Editing a Page Definition
■
Editing Page Attributes
■
About the Developer Toolbar
■
Working with Shared Components
■
Understanding Application Processes
■
Understanding Application Computations
"Quick Start" on page 1-1, "Application Builder
Concepts" on page 3-1, "Building an Application" on page 6-1,
"Controlling Page Layout" on page 9-1, and "Adding Navigation"
on page 8-1
See Also:
About the Page Definition
A Page Definition is the basic building block of a page. Each page can have buttons
and fields (called items), which are grouped into containers called regions. Pages can
also have application logic (or processes). You can branch from one page to the next
using conditional navigation; perform calculations (called computations); perform
validations (such as edit checks); and display reports, calendars, and charts. You view,
create, and edit the controls that define a page by accessing the Page Definition.
Topics in this section include:
■
Accessing a Page Definition
■
Understanding the Page Definition
See Also: "Using the View List on the Page Definition" on
page 5-4, "Editing a Page Definition" on page 5-7, "Editing Page
Attributes" on page 5-23, and "Using the Page Finder" on page 7-90
Working with Application Pages
5-1
About the Page Definition
Accessing a Page Definition
You can view, create, and edit the controls that define a page through the Page
Definition.
To access the Page Definition for an existing page:
1.
On the Workspace home page, click the Application Builder icon.
The Application Builder home page appears.
2.
Select an application.
The Application home page appears.
3.
Select a page.
The Page Definition appears.
See Also:
"Using the Page Finder" on page 7-90
Understanding the Page Definition
A Page Definition is the basic building block of a page. You use the Page Definition to
view, create, and edit the controls and application logic that define a page. The sections
that follow describe the different parts of the Page Definition.
Topics in this section include:
■
Available Navigation Bar Controls and Buttons
■
About the Action Bar
■
About Page Rendering, Page Processing, and Shared Components
Available Navigation Bar Controls and Buttons
A navigation bar appears directly beneath the breadcrumb trail.
Available controls on the page navigation bar include:
■
■
■
Page. Displays the current page number. To view another page, enter the page
number in the Page field and click Go.
Previous and Next. These buttons resemble less than (<) and greater than (>)
signs. Click these buttons to move to the previous or next page.
View. Controls the current page view. To view alternative reports, make a selection
from the list and click Go. See "Using the View List on the Page Definition" on
page 5-4.
The following buttons appear to the right of the navigation bar:
■
■
■
Run. Submits the current page to the Application Express engine to render
viewable HTML. See "Running a Page or Application" on page 6-14.
Copy. Creates a copy of the current page. You specify a page number and page
name.
Delete. Deletes the current page.
5-2 Oracle Application Express Application Builder User’s Guide
About the Page Definition
■
Create. Links to a wizard for creating a page. See "Creating a Page from the Page
Definition" on page 6-11.
See Also: "Managing Pages in an Application" on page 6-9 and
"Running a Page or Application" on page 6-14
About the Action Bar
The Run Page, Shared Components, Comment, Lock, Export Page, and Find icons
display on the Action bar.
Run Page Icon The Run Page icon resembles a small, light green traffic light. Click this
icon to render the current page into viewable HTML. When you run a page, the
Application Express engine dynamically renders the page based on data stored in the
database. See "Running a Page or Application" on page 6-14.
Shared Components Icon The Shared Components icon resembles a small mechanical
gear. Click this icon to view a list of shared components and user interface controls
that can display or be applied on every page within an application. See "Working with
Shared Components" on page 5-29.
Developer Comment Icon The Developer Comment icon resembles a green balloon. Use
this icon to add comments to an application, a page, or a group of pages. See "Adding
Developer Comments" on page 6-22.
Lock Icon The Lock icon indicates whether a page is available for editing. If a page is
unlocked, the icon appears as an open padlock. If the page is locked, the icon appears
as a locked padlock. Click this icon to change the lock status. See "Locking and
Unlocking a Page" on page 6-19.
Export Page Icon The Export Page icon resembles a downward arrow. Click this icon to
export the current page. See "Exporting a Page in an Application" on page 14-15.
Find Icon The Find icon resembles a flashlight. Click this icon to search for items,
pages, queries, tables, PL/SQL, images, and cascading style sheets (CSS) within the
current application or the schemas associated with the workspace. See "Using the Find
Icon" on page 7-89.
About Page Rendering, Page Processing, and Shared Components
Every Page Definition is divided into three sections:
■
■
Page Rendering. Page rendering is the process of generating a page from the
database. The Page Rendering section lists user interface controls and logic that
execute when a page is rendered. See "About Page Rendering" on page 5-9.
Page Processing. Page processing occurs once a page is submitted. Typically a
page is submitted when a user clicks a button. The Page Processing section lists
logic controls (such as computations and processes) that are evaluated and
executed when the page is processed. See "About Page Processing" on page 5-11.
Working with Application Pages
5-3
Using the View List on the Page Definition
■
Shared Components. The Shared Components section lists common components
that can be used by one or more pages within an application. See "About Shared
Components" on page 5-12.
See Also: "Using the Page Finder" on page 7-90 and "Editing a Page
Definition" on page 5-7
Using the View List on the Page Definition
You can use the View list to quickly switch from a Page Definition to the Page Events,
Database Object Dependencies, History, Export, Groups, and Referenced Components
pages.
Topics in this section include:
■
Accessing the View List on the Page Definition
■
About Page Events
■
About Database Object Dependencies
■
About History
■
About Export
■
About Groups
■
About Referenced
See Also:
"Understanding the Page Definition" on page 5-2
Accessing the View List on the Page Definition
To access other pages using the View list:
1.
Navigate to the Workspace home page.
2.
Click the Application Builder icon.
3.
Select an application.
4.
Select a page.
The Page Definition appears.
5.
From the View list, select one of the following:
■
Definition. See "Editing a Page Definition" on page 5-7.
■
Events. See "About Page Events".
■
History. See "About History" on page 5-5.
■
Export. See "About Export" on page 5-6.
5-4 Oracle Application Express Application Builder User’s Guide
Using the View List on the Page Definition
■
Groups. See "About Groups" on page 5-6.
■
Referenced. See "About Referenced" on page 5-6.
About Page Events
Page Events details all currently defined page controls and processes. This page
provides a chronological view of how and in what order the Application Express
engine renders the page, invokes logic, and runs processes.
A navigation bar appears directly beneath the breadcrumb trail. Available controls
include:
■
■
■
■
■
Page. Displays the current page number. To view another page, enter the page
number in the Page field and click Go.
View. Controls the current page view. To view alternative reports, make a selection
from the list and click Go. See "Using the View List on the Page Definition" on
page 5-4.
Show All displays all possible page controls and processes, including those not
currently defined.
Show Used displays currently used page controls and processes (Default).
Previous and Next. These buttons resemble less than (<) and greater than (>)
signs. Click these buttons to move to the previous or next page.
To view details about a specific page control or process, click the appropriate hypertext
link. Alternately, you can create page controls and processes by clicking the small icons
to the left of each entry.
About Database Object Dependencies
The Database Object Dependencies page displays a list of database objects referenced
by the current page.
A navigation bar appears directly beneath the breadcrumb trail. Available controls
include:
■
■
■
Page. Displays the current page number. To view another page, enter the page
number in the Page field and click Go.
View. Controls the current page view. To view alternative reports, make a selection
from the list and click Go. See "Using the View List on the Page Definition" on
page 5-4.
Previous and Next. These buttons resemble less than (<) and greater than (>)
signs. Click these buttons to move to the previous or next page.
About History
The History page displays a history of recent changes to the currently selected page by
developer (or user), application, page number, modification date, component, and
action.
A navigation bar appears directly beneath the breadcrumb trail. Available controls
include:
■
Page. Displays the current page number. To view another page, enter the page
number in the Page field and click Go.
Working with Application Pages
5-5
Using the View List on the Page Definition
■
■
■
View. Controls the current page view. To view alternative reports, make a selection
from the list and click Go. See "Using the View List on the Page Definition" on
page 5-4.
Display. Determines how many pages display. To change the number of pages that
appear, make a selection from the Display list and click Go.
Previous and Next. These buttons resemble less than (<) and greater than (>)
signs. Click these buttons to move to the previous or next page.
About Export
Use the Export page to export the current page and its referenced components. A
navigation bar appears directly beneath the breadcrumb trail. Available controls
include:
■
■
Page. Displays the current page number. To view another page, enter the page
number in the Page field and click Go.
View. Controls the current page view. To view alternative reports, make a selection
from the list and click Go. See "Using the View List on the Page Definition" on
page 5-4.
"About the Action Bar" on page 5-3, "How to Move an
Application to Another Development Instance" on page 14-4 and
"Exporting a Page in an Application" on page 14-15
See Also:
About Groups
The Groups page displays all pages that are part of the same page group as the current
page. Click a page number to edit the page group. Click a page name to view the page
definition.
A navigation bar appears directly beneath the breadcrumb trail. Available controls
include:
■
■
■
Page. Displays the current page number. To view another page, enter the page
number in the Page field and click Go.
Display. Determines how many pages display. To change the number of pages that
appear, make a selection from the Display list and click Go.
View. Controls the current page view. To view alternative reports, make a selection
from the list and click Go. See "Using the View List on the Page Definition" on
page 5-4.
"About the Action Bar" on page 5-3 and "Grouping Pages"
on page 6-15
See Also:
About Referenced
The Referenced Components page lists page components and shared components
associated with the current page.
A navigation bar appears directly beneath the breadcrumb trail. Available controls
include:
■
Page. Displays the current page number. To view another page, enter the page
number in the Page field and click Go.
5-6 Oracle Application Express Application Builder User’s Guide
Editing a Page Definition
■
■
View. Controls the current page view. To view alternative reports, make a selection
from the list and click Go. See "Using the View List on the Page Definition" on
page 5-4.
Previous and Next. These buttons resemble less than (<) and greater than (>)
signs. Click these buttons to move to the previous or next page.
Editing a Page Definition
A page is the basic building block of an application. Each page has a page number, a
name, and typically some text attributes such as a header, title, and footer. You add
content to your page by creating page controls (regions, items, and buttons). Page
templates and page region templates control the exact look and feel of each page.
Topics in this section include:
■
About the Edit All Icon
■
About the Copy or Create Icons
■
Reordering Page Components
■
About Page Rendering
■
About Page Processing
■
About Shared Components
■
Understanding Page Computations
■
Understanding Validations
■
Understanding Page Processes
■
Understanding Branches
See Also: "About the Page Definition" on page 5-1, "Editing Page
Attributes" on page 5-23, "Using the Page Finder" on page 7-90
About the Edit All Icon
Each Page Definition is divided into three sections: Page Rendering, Page Processing,
and Shared Components. Each of these sections is broken into subsections with
headings that identify the type of control, component, or application logic.
You can edit all controls, components, or logic within a given subsection by clicking
the Edit All icon that displays to the right of the subsection title. The Edit All icon
resembles a small grid with a pencil on top of it.
Clicking the Edit All icon displays pages that enable you to edit or delete multiple
controls, components, or application logic simultaneously or view a history of recent
changes.
For example, selecting the Edit All icon under Regions displays a summary report of
all currently defined regions on the current page. You can use this summary view to:
■
Edit the multiple attributes at once by making selections from the available fields
and select lists.
Working with Application Pages
5-7
Editing a Page Definition
■
Link to a definition page by clicking the Edit icon.
You can access similar summary views on the next or previous page by clicking the
Next and Previous buttons at top of each page. To save your edits to any summary
view, click Apply Changes.
You can also view the attributes of a specific control or component by selecting its
name on the Page Definition. For example, suppose your Page Definition contains a
region named Customers. Clicking the region name Customers would display an
attributes page for that region.
"About Page Rendering" on page 5-9, "About Page
Processing" on page 5-11, and "About Shared Components" on
page 5-12
See Also:
About the Copy or Create Icons
You can copy or create controls or components by clicking the Copy and Create icons.
The Copy icon resembles two small overlapping pages. Click the Copy icon to make a
copy of an existing control or component.
The Create icon resembles a plus (+) sign overlapping a small page. Click the Create
icon to create a control or component.
Reordering Page Components
You can quickly change the order in which regions, button, and items display using
the Reorder icon on the Page Definition. The Reorder icon displays as a light green
downward arrow and upward arrow.
To reorder page components, click the Reorder icon. When the Reorder page appears
click the up and down arrows and then click Apply Changes.
"Using the Reorder Regions Icon" on page 9-3, "Using the
Reorder Buttons Icon" on page 7-80, "Using the Edit All Icon to Edit
Multiple Items" on page 6-43, and "Using the Drag and Drop Layout
Page" on page 6-47
See Also:
About Page Rendering
Page rendering is the process of generating a page from the database. Use the Page
Rendering section to modify controls that impact the rendering of a page, including
5-8 Oracle Application Express Application Builder User’s Guide
Editing a Page Definition
page attributes, regions, buttons, items, page rendering computations, and page
processes.
You can quickly navigate to a specific subsection by clicking the icons beneath the
heading. When you select one of these icons, the subsection appears and all other
subsections are temporarily hidden. To restore the view, click Show All. The Show All
icon resembles an inverted triangle.
Topics in this section include:
■
Page
■
Regions
■
Buttons
■
Items
■
Computations
■
Processes
See Also: "About the Page Definition" on page 5-1, "About the Edit
All Icon" on page 5-7 and "About the Copy or Create Icons" on
page 5-8
Page
Page attributes control specific characteristics of a page such as the page name, display
attributes such as the page title and the associated page template, header text, and the
selected authorization scheme to name just a few. You access page attributes from the
Page Definition.
See Also:
"Editing Page Attributes" on page 5-23
Regions
A region is a area on a page that serves as a container for content. Each page can have
any number of regions. The content of a region is determined by the region source. For
example, a region may contain a report based on a SQL query you define, or it may
contain static HTML.
You control the appearance of a region through a specific region template. You can use
regions to group page controls (such as items or buttons). You can also create simple
regions that do not generate additional HTML, or create elaborate regions that frame
content within HTML tables or images.
Working with Application Pages
5-9
Editing a Page Definition
See Also:
■
■
■
"Understanding Regions" on page 9-2 for information about
creating and editing regions
Oracle Database Advanced Application Developer's Guide for
information about developing Web applications with PL/SQL
Oracle Database PL/SQL Packages and Types Reference for
information about htp packages
Buttons
As you design your application, you can use buttons to direct users to a specific page
or URL, or to enable users to submit a page. When you submit a page, the Application
Express engine posts or processes information. A button can be implemented as an
HTML button, an image, or by using a template. Buttons can be placed in predefined
region template positions or among items in a form.
See Also:
"Creating Buttons" on page 7-76
Items
Items are HTML form elements such as text fields, select lists, and check boxes with an
associated session state. Item attributes affect the display and behavior of items on a
page. For example, these attributes can impact where a label displays, how large an
item will be, and whether the item will display next to, or below the previous item.
There are two categories of items: page items and application items. Page-level items
are placed on a page and have associated user interface properties, such as Display As,
Label, and Label Template. Application-level items are not associated with a page and
therefore have no user interface properties. An application item can be used as a global
variable.
See Also: "Understanding Page-Level Items" on page 6-32 and
"Understanding Application-Level Items" on page 6-52
Computations
Computations are units of logic used to assign session state to items. You can use
computations to assign a value to an identified item when a page is submitted or
displayed.
Application-level computations assign a value to an item each time a page is rendered.
A page-level computation assigns a value to an identified item when a page is
displayed or submitted (rendered and processed).
See Also: "Creating a Page Computation" on page 5-14 and
"Understanding Application Computations" on page 5-37
Processes
Processes are logic controls used to execute data manipulation language (DML) or
PL/SQL. For example, you can use a process to populate session state at the time a
page is rendered, to execute some type of logic (for example, using PL/SQL), or to
make a call to the rendering engine. Typically a process performs an action. A process
may be hand coded PL/SQL, or the invocation of a predefined process.
See Also: "Understanding Page Processes" on page 5-20 and
"Understanding Application Processes" on page 5-34
5-10 Oracle Application Express Application Builder User’s Guide
Editing a Page Definition
About Page Processing
Page processing is the process of submitting a page. A page is typically submitted
when a user clicks a button. Use the Page Processing section of the Page Definition to
specify application logic such as computations, validations, processes, and branches.
In general, the Application Express engine runs this logic in the order it appears on the
Page Definition.
You can quickly navigate to a specific subsection by clicking the icons beneath the
heading. When you select one of these icons, the subsection appears and all other
subsections are temporarily hidden. To restore the view, click Show All. The Show All
icon resembles an inverted triangle.
Topics in this section include:
■
Computations
■
Validations
■
Processes
■
Branches
See Also: "About the Page Definition" on page 5-1, "About the Edit
All Icon" on page 5-7, and "About the Copy or Create Icons" on
page 5-8
Computations
Computations are units of logic used to assign session state to items and are executed
at the time the page is processed.
See Also:
"Understanding Page Computations" on page 5-14
Validations
Validations enable you to create logic controls to verify whether user input is valid. For
example, a validation can check whether a value has been entered into a mandatory
field.
"Understanding Validations" on page 5-17 and "About the
When Button Pressed Attribute" on page 3-24
See Also:
Working with Application Pages 5-11
Editing a Page Definition
Processes
Processes are logic controls used to execute data manipulation language (DML) or
PL/SQL. Processes are executed after the page is submitted.
See Also:
"Understanding Page Processes" on page 5-20
Branches
Branches enable you to create logic controls that determine how the user navigates
through the application.
"Understanding Branches" on page 5-22 and "About the
When Button Pressed Attribute" on page 3-24
See Also:
About Shared Components
The Shared Components section of the Page Definition contains common elements
that can display or be applied on any page within an application.
You can quickly navigate to a specific subsection by clicking the icons beneath the
heading. When you select one of these icons, the subsection appears and all other
subsections are temporarily hidden. To restore the view, click Show All. The Show All
icon resembles an inverted triangle.
See Also:
"Working with Shared Components" on page 5-29
Topics in this section include:
■
Tabs
■
Lists of Values
■
Breadcrumbs
■
Lists
■
Theme
■
Templates
■
Security
■
Navigation Bar
See Also: "About the Page Definition" on page 5-1, "About the Edit
All Icon" on page 5-7, and "About the Copy or Create Icons" on
page 5-8
5-12 Oracle Application Express Application Builder User’s Guide
Editing a Page Definition
Tabs
Tabs are an effective way to navigate between pages of an application. Application
Builder includes two types of tabs: standard tabs and parent tabs.
An application having only one level of tabs uses a standard tab set. A standard tab set
is associated with a specific page. You can use standard tabs to link users to other
pages within your application. A parent tab set functions as a container to hold a
group of standard tabs. Parent tabs give users another level of navigation and context
(or sense of place) within the application.
See Also:
"Creating Tabs" on page 8-1
Lists of Values
A list of values (LOV) is a static or dynamic definition used to display a specific type
of page item, such as a radio group, check box, or select list. LOVs can be static (that is,
based on a set of predefined display and return values) or dynamic (based on SQL
queries that select values from tables). Once created, an LOV can then be referenced by
one or more page items.
You define LOVs at the application level by running the LOV Wizard and adding them
to the List of Values repository.
See Also:
"Creating Lists of Values" on page 7-81
Breadcrumbs
A breadcrumb is a hierarchical list of links that is rendered using a template. For
example, you can display breadcrumbs as a list of links or as a breadcrumb path.
See Also:
"Creating Breadcrumbs" on page 8-13
Lists
A list is a collection of links that is rendered using a template. For each list entry, you
specify display text, a target URL, and other attributes that control when and how the
list entry displays. You control the display of the list and the appearance of all list
entries by linking the list to a template.
See Also:
"Creating Lists" on page 8-5
Theme
A theme is a named collection of templates that defines the application user interface.
Each theme contains templates for every type of application component and page
control, including individual pages, regions, reports, lists, labels, menus, buttons, and
list of values.
See Also:
"Managing Themes" on page 10-1
Templates
Templates control the look and feel of the pages in your application. As you create
your application, you specify templates for pages, regions, reports, lists, labels, menus,
buttons, and popup lists of values. Groups of templates are organized into named
collections called themes.
See Also:
"Customizing Templates" on page 10-12
Working with Application Pages 5-13
Editing a Page Definition
Security
You can provide security for your application by specifying an authorization scheme.
Authorization is a broad term for controlling access to resources based on user
privileges.
See Also: "Providing Security Through Authorization" on
page 13-33
Navigation Bar
Use a navigation bar to link users to various pages within an application. Typically a
navigation bar is used to enable users to log in, log out, or link to Help text. The
location of a navigation bar depends upon the associated page template. A navigation
bar icon enables you to display a link from an image or text. When you create a
navigation bar icon you can specify an image name, text, display sequence, and target
location (a URL or page).
See Also:
"Creating a Navigation Bar Entry" on page 8-23
Understanding Page Computations
Use page computations to assign a value to an identified item when a page is
submitted or displayed. You can also use application-level computations to assign
values to items. Most application-level computations are performed for every page in
an application. In contrast, computations created at the page-level only execute when
that page is rendered or processed.
See Also:
"Understanding Application Computations" on page 5-37
Topics in this section include:
■
Creating a Page Computation
■
Understanding Computation Points and Computation Syntax
■
Editing Page Computation Attributes
Creating a Page Computation
A page computation assigns a value to an identified item when a page is displayed or
submitted (rendered and processed).You create a page computation by running the
Create Page Computation Wizard. For each computation, specify the item for which
you are creating the computation and a computation type.
See Also:
"Computations" on page 5-10
To create a page computation:
1.
Navigate to the appropriate Page Definition. See "Accessing a Page Definition" on
page 5-2.
2.
Under Computations, click the Create icon.
3.
For Item Location, select where the computation will execute and click Next.
Location options include:
■
Item on this Page
■
Item on Another Page
■
Application Level Item
5-14 Oracle Application Express Application Builder User’s Guide
Editing a Page Definition
4.
For Item, select the item and computation point at which you would like to
perform the computation:
a.
Compute Item - Select the item the computation will update.
b.
Sequence - Select the order of evaluation.
c.
Computation Point - Select the point at which the computation executes. The
computation point On New Instance executes the computation when a new
session (or instance) is generated.
d.
Computation Type - Select the method of computation you want to create.
e.
Click Next.
5.
In Computation, enter a computation that corresponds to the selected
computation type and click Next.
6.
On Condition, you can choose to make the computation conditional. To make a
computation conditional, make a selection from the Condition Type list and enter
text in the expression fields.
7.
Click Create.
Understanding Computation Points and Computation Syntax
A good example of using computations can be illustrated by a page containing form
fields for entering phone numbers. In this example, the phone number is stored in one
database column; however, the data entry form breaks the phone number into three
components: area code, prefix, and line number. In this example, the page items are
called P10_AREA_CODE, P10_PREFIX, and P10_LINE_NUMBER.
Next, suppose you need to combine the values stored in these items into a single
string. You could accomplish this by using an After Submit computation and store the
combined values in an item called P10_PHONE_NUMBER.
To create a computation to store the combined values of P10_AREA_CODE, P10_
PREFIX, and P10_LINE_NUMBER in new items:
1.
Navigate to the appropriate Page Definition. See "Accessing a Page Definition" on
page 5-2.
2.
Create a item named P10_PHONE_NUMBER to store the combined values of P10_
AREA_CODE, P10_PREFIX, and P10_LINE_NUMBER. See "Differences Between
Page Items and Application Items" on page 6-33.
3.
Under Computations, click the Create icon.
4.
For Item Location, select Item on this Page and click Next.
5.
For Computation, select P10_PHONE_NUMBER.
6.
For Sequence, select the order of evaluation.
7.
For Computation, you have the option of creating one of the following
computation types:
a.
Static Assignment:
–
For Computation Type, select Static Assignment and click Next.
–
Enter the following computation:
(&P10_AREA_CODE.) &P10_PREFIX.-&P10_LINE_NUMBER.
–
Click Next.
Working with Application Pages 5-15
Editing a Page Definition
b.
PL/SQL Function Body:
–
For Computation Type, select PL/SQL Function Body and click Next.
–
Enter the following computation:
DECLARE
l_return_value VARCHAR2(300) DEFAULT NULL;
BEGIN
l_return_value :=
'('||:P10_AREA_CODE||')'||:P10_PREFIX||'-'||:P10_LINE_NUMBER;
RETURN l_return_value;
END;
–
c.
Click Next.
SQL Query:
–
For Computation Type, select SQL Query and click Next.
–
Enter the following computation:
SELECT '('||:P10_AREA_CODE||')'||:P10_PREFIX||'-'||:P10_LINE_NUMBER
FROM DUAL
–
d.
Click Next.
PLSQL Expression:
–
For Computation Type, select PLSQL Expression and click Next.
–
Enter the following computation:
'('||:P10_AREA_CODE||')'||:P10_PREFIX||'-'||:P10_LINE_NUMBER
–
8.
Click Next.
Click Create.
Editing Page Computation Attributes
Once you create a computation, you can edit it on the Edit Page Computation page.
To edit a page computation:
1.
Navigate to the appropriate Page Definition. See "Accessing a Page Definition" on
page 5-2.
2.
Under Computations, select the computation name.
The Edit Page Computation page appears.
3.
Edit the appropriate attributes.
4.
Click Apply Changes.
Editing the Computation Point and Source You control when a computation executes under
the Computation Point attributes by specifying a sequence and a computation point.
The computation point On New Instance executes the computation when a new
session (or instance) is generated.
Under Source, enter an expression or query to compute an item's value. In the event a
computation fails, you can optionally define an error message in the Computation
Error Message field.
5-16 Oracle Application Express Application Builder User’s Guide
Editing a Page Definition
Creating Conditional Computations You can make a computation conditional by making a
selection from the Condition Type list and entering text in the expression fields.
Understanding Validations
You can define a validation declaratively by selecting a validation method. You enter
the actual validation edit check in the Validation Messages field. Be aware that if a
validation fails, subsequent page processes or computations will not occur. Also
remember that the validation you enter must be consistent with the validation type
you selected. For more information about validation types, see online Help.
Topics in this section include:
■
Creating a Validation
■
Defining How Validation Error Messages Display
■
Processing Validations Conditionally
See Also:
"About the When Button Pressed Attribute" on page 3-24
Creating a Validation
To create a validation:
Note:
Text entered for validations may not exceed 3,950 characters.
1.
Navigate to the appropriate Page Definition. See "Accessing a Page Definition" on
page 5-2.
2.
Under Validations in Page Processing, click the Create icon.
The Create Validation Wizard appears.
3.
Select a validation level:
■
■
Item level validations are specific to a single item.
Page level validations do not apply to any single item, but apply to an entire
page.
4.
If you selected Item level validation, select the item to be validated and click
Next.
5.
Select a validation method as described in Table 5–1.
Table 5–1
Validation Methods
Validation Method
Descriptions
SQL
Compares item values to data in the database.
For example, you can use a SQL validation to verify whether a last
name typed into a field exists in the database. In the following Exists
SQL validation, the field is named P1_LAST_NAME and the table is
named customers.
SELECT 1 FROM customers
WHERE last_name = :P1_LAST_NAME
Working with Application Pages 5-17
Editing a Page Definition
Table 5–1 (Cont.) Validation Methods
Validation Method
Descriptions
PL/SQL
Useful if you need complex logic to validate entered data.
For example, suppose you need to create a validation for an address
form that requires the user to enter a province if the address is not in
the United States. You could create the validation as a Function
Returning Boolean, using the following PL/SQL:
BEGIN
IF :P1_COUNTRY = 'US' AND :P1_PROVINCE IS NULL THEN
RETURN FALSE;
ELSE
RETURN TRUE;
END IF;
END;
You could also create the same validation implemented as a PL/SQL
Expression as follows:
NOT (:P1_COUNTRY='US' AND
Item Level Null
:P1_PROVINCE IS NULL);
Checks if an item's value in session state is null.
For example, you could validate that the user enters a value in a field
by creating an item validation and then selecting the validation method
Item Not Null.
Item String
Comparison
Compares the value of an item to a specific string.
There are several string comparison validations that compare the value
of an item to a literal string. For example, you select the validation type
Item in Expression 1 is contained in Expression 2 to validate a user
entry in a field against a list of values you provide.
In Expression 1, enter the name of the item you want to validate
without a colon. For example:
P1_VALUE
In Expression 2, enter a string of values you want to validate against.
For example:
ABC/DEF/GHI
Regular Expression
Regular expressions provide a method to describe text patterns. Use a
Regular Expression validation to perform data validation.
For example, you could use the following regular expression validation
to verify that a string of entered data always consists of groups of six
numbers separated by commas and followed by a comma:
^([[:digit:]]{6},)+$
This regular expression would find the following entries valid:
123456,654321,
123456,
123456,123456,654321,
However, the following would not be valid:
123456,12345
12345
5-18 Oracle Application Express Application Builder User’s Guide
Editing a Page Definition
6.
For SQL, PL/SQL, and Item String Comparison validations, select the type of
validation you want to create and click Next.
7.
Specify the sequence and validation name and click Next.
8.
Depending upon the validation method, enter the validation or message text that
displays if the validation fails. Click Next.
9.
Define conditions that apply to this validation and click Create.
See Also:
"Validating User Input in Forms" on page 7-54
Defining How Validation Error Messages Display
You can choose to have validation error messages display inline (that is, on the page
where the validation is performed) or on a separate error page.
To define how a validation error message displays:
1.
Navigate to the appropriate Page Definition. See "Accessing a Page Definition" on
page 5-2.
2.
Under Validations, select the appropriate validation.
The attributes page for the validation appears.
3.
Scroll down to Error Message.
4.
In Error Message, enter your error message text.
5.
From Error message display location, select a display location.
This attribute identifies where a validation error message displays. Validation
error messages can display on an error page or inline within the existing page.
Inline error messages can display in a notification area (defined as part of the
page template) or within the field label.
To create a hard error that stops all processing (including validations), you must
display the error on an error page.
6.
If you select Inline with Field or Inline with Field and in Notification, you must
associate an item with the error message. To associate an item with the error
message, select the item from the Associated Item list.
7.
Click Apply Changes.
If you select Inline with Field or Inline with Field and in
Notification, be aware that the Application Express engine does not
execute computations or processes during the re-rendering of the page
when the validation error messages appear.
Tip:
Processing Validations Conditionally
You can control when and if a validation is performed under Conditions.
To create a condition for an existing validation:
1.
Navigate to the appropriate Page Definition. See "Accessing a Page Definition" on
page 5-2.
2.
Under Validations, select the appropriate validation.
The attributes page for the validation appears.
3.
Scroll down to Conditions.
Working with Application Pages 5-19
Editing a Page Definition
4.
To have a validation performed when a user clicks a particular button, make a
selection from the When Button Pressed list.
5.
Make a selection from the Condition Type list.
6.
Depending upon the selected Condition Type, enter values in the Expression
attributes. The validation will be rendered or processed if the specified condition is
met.
7.
Click Apply Changes.
Understanding Page Processes
A page process performs an action at a specified point during the rendering or
submission of the page. For example, you can create a page process to execute logic or
to make a call to the Application Express engine. A page process is a unit of logic that
runs when a specific event occurs, such as loading or submitting a page.
From a functional perspective, there is no difference between page-level and
application-level processes. The difference between these two process types is where
the process is defined, that is at the page-level or at the application level.
See Also:
"Understanding Application Processes" on page 5-34
Topics in this section include:
■
Creating a Page Process
■
Editing Process Attributes
Creating a Page Process
You create a process by running the Create Process Wizard. During the wizard, you
define a process name, specify a sequence and the point at which the process will
execute, and select a process category. You can change nearly all of these attributes on
the Edit Page Process page.
To create a process:
1.
Navigate to the appropriate Page Definition. See "Accessing a Page Definition" on
page 5-2.
2.
Under Processes, click the Create icon.
3.
Select a category. Table 5–2 describes available page process categories.
Table 5–2
Process Categories
Process Category
Description
Data Manipulation
Data Manipulation process types are frequently used by wizards
to support data manipulation language (DML) actions.
Application Builder supports the following declarative data
manipulation processes:
■
■
■
Close Popup Window
Select Automatic Row Fetch and Automatic Row
Processing (DML) to create an automatic data manipulation
language (DML) process.
Use Multi Row Update and Multi Row Delete with tabular
forms.
Use Add Rows to Tabular Form with a tabular form.
Applies to processes running within a popup window. Upon
execution, this process type closes the current popup window.
5-20 Oracle Application Express Application Builder User’s Guide
Editing a Page Definition
Table 5–2 (Cont.) Process Categories
Process Category
Description
Form Pagination
Implements pagination through the detail records associated
with a master detail form. Most often used in master detail
forms (such as in the Master Detail Wizard), this process checks
the master table to determine which set of detail records you are
in and determines what the next detail record should be.
See Also: "Creating a Master Detail Form" on page 7-49
On Demand
Creates an application-level process that can only be executed
when called from a specific page. When you create this process
type at the page-level, you are creating reference to an existing
application-level process.
See Also: "About On Demand Application Processes" on
page 5-34
PL/SQL
Runs the PL/SQL you provide. Use this process type to execute
a block of PL/SQL entered directly into the process or to simply
call an existing API.
Reset Pagination
In Report regions, resets pagination back to the first result set.
The Application Express engine keeps track of where the user is
within a given result set. This process category returns the user
to the beginning result set. In other words, this category resets
the counters associated with the report region to return the first
part of the result set the next time the result set displays.
Session State
Sets the values of existing session state items to null. Select this
process type to clear the cache for applications, sessions, or items
and to clear existing user preferences.
See Also: "Managing Session State Values" on page 3-11 and
"Managing User Preferences" in Oracle Application Express
Administration Guide
Web Services
Implements a Web Service as a process on a page. Running the
process submits a request to the service provider.
See Also: "Invoking a Web Service as a Process" on page 15-24
4.
Follow the on-screen instructions.
Editing Process Attributes
Once you create a process, you can control when the process executes and what the
process does by editing attributes on the Edit Page Process page.
To edit an existing page process:
1.
Navigate to the appropriate Page Definition. See "Accessing a Page Definition" on
page 5-2.
2.
Select the process name.
The Edit Page Process page appears.
See Also:
"About the When Button Pressed Attribute" on page 3-24
Changing Processing Points and Source You control when a process executes by
specifying a sequence number and a process point under Process Point. You can
prevent a process from running during subsequent visits to a page by selecting one of
the following options under Run Process:
■
Once for each page visit
Working with Application Pages 5-21
Editing a Page Definition
■
Once for each session or when reset
Enter the appropriate code for PL/SQL process types. For PL/SQL anonymous block
processes, enter the appropriate code under Process. For Clear Cache processes, enter
the appropriate code under Source. In the event a process fails, you can optionally
define an error message in the Process Error Message field.
Creating Conditional Processes You can make a process conditional by selecting a
condition type and entering an expression under Conditional Processing.
Additionally, you can also make a selection from the When Button Pressed attribute.
When you select a button from this list, the process only executes if a user clicks the
selected button.
Understanding Branches
A branch is an instruction to go to a specific page, procedure, or URL. For example,
you can branch from page 1 to page 2 after page 1 is submitted.
You create a branch by running the Create Page Branch Wizard and specifying Branch
Point and Branch Type. The Branch Type defines the type of branch you are creating.
For more information about Branch Types, see online Help.
Topics in this section include:
■
Defining a Branch Point and Action
■
Branching Conditionally
See Also:
"About the When Button Pressed Attribute" on page 3-24
Defining a Branch Point and Action
When you click a standard tab in an application, the Application Express engine sets
session state, executes computations, and then links you to the target page. It does not
run any processes or explicitly defined branches. In cases where the page is submitted
without clicking a tab, the Application Express engine explicitly defines branches to
direct users to a subsequent page.
You can control when a branch executes by making a selection from the Branch Point
list. Available options include:
■
■
■
■
On Submit: Before Computation - Branching occurs before computations,
validations, or processing. Use this option for buttons that do not need to invoke
any processing (for example, a Cancel button).
On Submit: Before Validation - Branching occurs after computations, but before
validations or processing. If a validation fails, page processing stops, a rollback is
issued, and the page displays the error. Because of this default behavior, you do
not need to create branches to accommodate validations. However, you may want
to branch based on the result of a computation (for example, to a previous branch
point).
On Submit: Before Processing - Branching occurs after computations and
validations, but before processing. Use this option to branch based on a validated
session state, but before performing any page processing.
On Submit: After Processing - Branching occurs after computations, validations,
and processing. This option branches to a URL or page after performing
computations, validations, and processing. When using this option, remember to
sequence your branches if you have multiple branches for a given branch point.
5-22 Oracle Application Express Application Builder User’s Guide
Editing Page Attributes
■
On Load: Before Header - Branching occurs before a page is rendered. This option
displays another page instead of the current page or redirects the user to another
URL or procedure.
Depending upon the Branch Type you select, you can specify the following additional
information in the Action attributes:
■
The page number of the page to which you want to branch
■
PL/SQL procedure which ultimately renders a branch target page
■
A URL address
Branching Conditionally
Like other controls, branches can be made conditional. To create a conditional branch,
make a selection from the Condition Type list, and enter text in the expression fields to
implement the condition type you choose.
See Also:
"Controlling Navigation Using Branches" on page 8-27
Editing Page Attributes
Page attributes control specific characteristics of a page such as the page name, display
attributes such as the page title and the associated page template, header text, and the
selected authorization scheme. You access page attributes from the Page Definition.
Topics in this section include:
■
Accessing Page Attributes
■
About the Page Attributes Page
Accessing Page Attributes
To edit page attributes:
1.
Navigate to the Page Definition. See "Accessing a Page Definition" on page 5-2.
2.
Under Page Rendering, locate the Page section.
The Page Attributes page is divided into categories that control specific page
attributes such as the Page Name, Title, HTML Header, HTML Body, Help Text,
Templates, and so on.
3.
To edit page attributes you can either:
■
■
Click the Edit page attributes icon to access the entire Page Attributes page.
This icon resembles a small page with a pencil on top of it.
Click a specific link. The specific information appears.
Clicking the Edit page attributes icon is the only way to view all
page attributes at once.
Tip:
Working with Application Pages 5-23
Editing Page Attributes
The Page Attributes page appears. Required values are marked with a red asterisk
(*).
About the Page Attributes Page
The Page Attribute page is divided into the following sections: Name, Display
Attributes, Header and Footer, HTML Header, HTML Body Attributes, Security,
Duplicate, Cache, Configuration, Error, Help, and Comments.
You can access these sections by scrolling down the page, or by clicking a navigation
button at the top of the page. When you select a button at the top of the page, the
selected section appears and all other sections are temporarily hidden. To view all
sections of the page, click Show All.
The topics that follow describe the specific sections of the Page Attributes page.
Name
Use these attributes to define general attributes for the current page such as a page
name, an optional alphanumeric alias, and associated page groups. Table 5–3 describes
these attributes.
Table 5–3
Page Attributes: Name
Attributes
Descriptions
Name
Identifies the name of the current page for application developers.
This name is used in numerous pages and reports, along with the
page number and page title.
Page Alias
Enter an alphanumeric alias for this page. This alias must be
unique within the current application.
For example, if you were working on page 1 of application 100,
you could create an alias called home. You could then access this
page from other pages using the following f?p syntax:
f?p=100:home
Group
Identify the page group you would like to associate with this
page. Page groups do not affect functionality, but help developers
manage the pages within an application.
To remove a page from a group, select No Group Assigned and
click Apply Changes.
See Also: "Grouping Pages" on page 6-15
Display Attributes
Use these attributes to define general display attributes for the current page such as
the selected page template, standard tab set, title, and cursor focus. Table 5–4 describes
these attributes.
5-24 Oracle Application Express Application Builder User’s Guide
Editing Page Attributes
Table 5–4
Page Attributes: Display Attributes
Attributes
Descriptions
Page Template
Select a page template to control the appearance of this page.
Making a selection here overrides the default page template
defined within the current theme.
See Also: "Changing the Default Templates in a Theme" on
page 10-3
Standard Tab Set
Select a standard tab set to be used for this page. A standard tab
set is associated with a specific page and page number. You can
use standard tabs to link users to a specific page.
See Also: "Creating Tabs" on page 8-1
Title
Enter a title to display in the title bar of the browser window. The
Application Express engine uses the title you specify here in place
of the #TITLE# substitution string used in the page template.
This title is inserted between the HTML tag <TITLE></TITLE>.
Cursor Focus
Specify the cursor focus. Available options include:
■
■
Media Type
Select First item on page to have the cursor focus placed in
the first field on the page.
Select Do not focus cursor if you do not want to include
JavaScript. Select this option to prevent conflicts between
generated JavaScript and custom JavaScript.
Enter the Internet Media Type. An Internet Media Type is
two-part identifier for file formats on the Internet. A Media Type
is composed of at least two parts: a type, a subtype, and one or
more optional parameters. This Media Type is used in the
Content-Type HTTP header when rendering the page.
The page-level Media type overrides the application-level media
type. The default value for this attribute is NULL If both the
page-level and application-level values for Media Type are NULL,
the Media Type text/html is used.
Header and Footer
Use these attributes to define page header, body header, body footer, and page footer
text. Table 5–5 describes these attributes.
Table 5–5
Page Header, Footer and Text Attributes
Attribute
Description
Header Text
Enter text or HTML you want to appear immediately following
the page header.
Footer Text
Enter text or HTML you want to appear before page template
footer.
HTML Header
Use HTML Header to replace the #HEAD# substitution string in the page template
header. The values entered here are inserted after the HTML <HEAD> tag. Common
uses of these attributes:
■
Code page-specific inline cascading style classes
■
Add additional style sheets for a specific page
■
Code page-specific JavaScript
■
Code page-specific meta tag page refresh
Working with Application Pages 5-25
Editing Page Attributes
For Include Standard CSS and JavaScript, select Yes to suppress the inclusion of
cascading style sheet (CSS) and JavaScript files in the HTML Header. Because
suppressing the display of these files breaks typical applications, enabling this
attribute is only recommended for advanced developers.
HTML Body Attributes
Use this attribute to add events when the page is being loaded, such as calls to
JavaScript. In the Page HTML Body attribute, enter JavaScript or text to be substituted
for your page template’s #ONLOAD# substitution string. To use this feature, your page
template must include the #ONLOAD# substitution string.
You can use the Page HTML Body attribute to write into the contents of the opening
<body> tag. A typical page template might use #ONLOAD# within the opening
<body> tag as shown in the following example:
<html>
<head>
...
</head>
<body #ONLOAD# >
See Also: "Incorporating JavaScript into an Application" on
page 7-100
Security
Use these attributes to specify an authorization scheme and authentication
requirements for the current page. Table 5–6 describes these attributes.
Table 5–6
Page Attributes: Security
Attribute
Description
Authorization Scheme
Select an authorization scheme to be applied to the page.
Authorization schemes are defined at the application level and
can be applied to many elements within the application.
An authorization scheme is evaluated either once for each
application session (at session creation), or once for each page
view. If the selected authorization scheme evaluates to true, then
the page displays and is subject to other defined conditions. If it
evaluates to false, then the page will not display and an error
message displays.
See Also: "Providing Security Through Authorization" on
page 13-33
Authentication
Specifies whether this page has been defined as public or
requires authentication. If a page is identified as public, the page
can be viewed before authentication. This attribute only applies
to applications requiring authentication. The application's page
sentry function can access this page attribute to identify pages
that do not require prior authentication to view. The
implementation of the authentication scheme's page sentry
function determines if this attribute has any effect.
See Also: "Establishing User Identity Through Authentication"
on page 13-24
Form Auto Complete
Setting this attribute to On has no effect on the page. Setting this
value to Off generates the following HTML in the FORM tag:
autocomplete="off"
5-26 Oracle Application Express Application Builder User’s Guide
Editing Page Attributes
Duplicate Submission
Use the Allow duplicate page submissions list to specify whether users may process a
page multiple times in a row. Set this attribute to No to prevent duplicate page
submissions from being processed multiple times.
Examples of duplicate page submissions include:
■
■
A user clicks the Submit button multiple times.
You create a branch of type Branch to Page, and the user clicks the browser reload
button.
In On duplicate page submissions go to this URL, enter a URL. Use this field if you set
Allow duplicate page submissions to No. If you select No and a user attempts to
submit the same page twice, Oracle Application Express displays an error message
and a link to the URL you specify.]
Cache
Use these attributes to enable caching for the current page. Enabling page caching can
improve application’s performance and works well for static pages. Table 5–7
describes these attributes.
Table 5–7
Cache Attributes
Attribute
Description
Cache Page
Specify whether to enable page caching by selecting Yes or No.
Page caching can improve performance because the page
displays from cache instead of displaying dynamically.
Cache Timeout
Specify the amount of time for which a cached page remains
valid.
Cache by User
Specify if the page should be cached by user. If Yes, the page is
cached specifically for each user. If No, the same cached page is
used for all users.
Cache Page Condition
Specify a condition. If the condition returns false, the page is
rendered dynamically and is not be cached. If the condition
returns true, the page is displayed from cache.
Expression 1
Enter values in this attribute based on the specific condition
type selected.
Expression 2
Enter values in this attribute based on the specific condition
type selected.
See Also: "Managing Cached Regions and Pages" in Oracle
Application Express Administration Guide and "Utilizing Region
Caching" on page 9-6
Configuration
Select a build option for this page. You can use build options to enable or disable
functionality. Most application attributes have a build option attribute. Do not specify
a build option for the current page unless you plan to exclude the page in certain
configurations.
Build options have two possible values: INCLUDE and EXCLUDE. If you specify an
attribute as being included, then the Application Express engine considers it part of
the application definition at run time. Conversely, if you specify an attribute as being
excluded, then the Application Express engine treats it as if it did not exist.
Working with Application Pages 5-27
About the Developer Toolbar
See Also: "Using Build Options to Control Configuration" on
page 14-29
On Error Text
Use this attribute to specify the error text that displays in the #NOTIFICATION_
MESSAGE# template substitution string in the event an error occurs on the page.
See Also:
"Page Templates" on page 10-25
Help
Use this attribute to enter Help text for the current page.
Help text is displayed using a help system that you must develop. To show the Help
for a specific page, call the APEX_APPLICATION.HELP procedure from a page that
you create for displaying Help text. For example, you could use a navigation bar icon
similar to:
f?p=4000:4600:&APP_SESSION.::&DEBUG::LAST_STEP:&APP_PAGE_ID.
Page-level help supports shortcuts using the following syntax:
"SHORTCUT_NAME"
See Also: "Creating a Help Page" on page 7-104 and "Using
Shortcuts" on page 7-86
Comments
Use this attribute to record comments about the current page. These comments never
display when the application is running.
About the Developer Toolbar
The Application Express engine dynamically renders and processes pages based on
data stored in database tables. To view a rendered version of your application, you run
or submit it to the Application Express engine by clicking the Run icon.
See Also:
"Running a Page or Application" on page 6-14
When you run an application from within the development environment, the
Developer toolbar appears at the bottom of the page. The Developer toolbar offers a
quick way to edit the current page, create a page, region, or page control, view session
state, or toggle in and out of Debug mode. You can control whether the Developer
toolbar displays by changing the Status attribute on the Edit Definition page.
The Developer toolbar consists of the following links:
■
■
■
Home links you to the Workspace home page. See "About the Workspace Home
Page" on page 1-12.
Application links you to the Application home page. See "Application Builder
Concepts" on page 3-1.
Edit Page accesses the Page Definition for the current running page. See "About
the Page Definition" on page 5-1.
5-28 Oracle Application Express Application Builder User’s Guide
Working with Shared Components
■
■
■
■
■
Create links to a wizard for creating a page, region, page control (item, button,
branch, computation, process, or validation), or a shared control (navigation bar
icon, tab, list of values, list, or breadcrumb). See "Building an Application" on
page 6-1.
Session links you to session state information for the current page. See "Viewing
Session State" on page 3-5.
Activity links you to the Activity reports page. See "Activity Reports" on
page 6-31.
Debug toggles the page between Debug and No Debug mode. See "Accessing
Debug Mode" on page 12-2.
Show Edit Links toggles between Show Edit Links and Hide Edit Links. Clicking
Show Edit Links displays a small orange icon next to each editable object on the
page. Each icon is orange and contains a triangle with two rules beneath it.
Clicking the link displays another window in which to edit the object.
Working with Shared Components
Shared components are common elements that can display or be applied on any page
within an application. You can use the tools and wizards on the Shared Components
page either at the application-level or on specific pages.
Topics in this section include:
■
Accessing the Shared Components Page
■
About the Shared Components Page
■
About Exporting Shared Components
■
Accessing Reports on Shared Components
Accessing the Shared Components Page
To access the Shared Components page:
1.
Navigate to the Workspace home page.
2.
Click the Application Builder icon.
3.
Select an application.
4.
On the Application home page, click Shared Components.
The Shared Components page appears.
5.
To create a shared component, select the appropriate link.
Using the Shared Components Icon
You can also access the Shared Components page by clicking the Shared Components
icon on the Action bar. The Action bar resembles a small mechanical gear and displays
beneath the Utilities tab in the upper right corner of most pages in Application Builder.
Working with Application Pages 5-29
Working with Shared Components
See Also:
"About the Action Bar" on page 4-6
About the Shared Components Page
The following sections describe each link on the Shared Components page.
Application
The following section describes the links under Application.
Definition Links to the Edit Application Definition page. Use this page to edit attributes
that determine the application name, application availability, and static substitution
strings. You can also use this page to define other attributes such as build options or an
application logo and view associated templates and component defaults. See
"Configuring the Application Definition" on page 4-8.
Comments Use Application Comments to enter comments specific to the currently
selected application. See "Adding Application Comments" on page 6-22
Logic
The following section describes the links under Logic.
Application Items Application-level items do not display, but are used as global
variables to the application. Commonly, you set the value of a page-level item using an
application or page computations. See "Understanding Application-Level Items" on
page 6-52.
Application Processes Use application processes to run PL/SQL logic:
■
At specific points for each page in an application
■
As defined by the conditions under which the process is set to execute
■
Upon the creation of a new session
Note that On Demand processes execute only when called from a page-level On
Demand process. See "Understanding Application Processes" on page 5-34.
Application Computations Use application-level computations to assign values to
application and page-level items for each page displayed or upon the creation of a new
application session. You can also create an application-level computation and execute
it conditionally on multiple pages. See "Understanding Application Computations" on
page 5-37.
Web Service References Web service references in Application Builder are based on the
Simple Object Access Protocol (SOAP). You can create a reference to a Web service and
then incorporate it into an application to process data submitted by a form, or to
render output in the form or report. See "Implementing Web Services" on page 15-16.
5-30 Oracle Application Express Application Builder User’s Guide
Working with Shared Components
Build Options Use build options to conditionally display or process specific
functionality within an application. You can use build options to control which
features of an application are turned on for each application deployment. See "Using
Build Options to Control Configuration" on page 14-29.
Security
The following section describes the links under Security.
Authentication Schemes Authentication is the process of establishing each user's identity
before they can access your application. Authentication may require a user to enter a
user name and password or may involve verification of a user’s identity or use of a
secure key. See "Establishing User Identity Through Authentication" on page 13-24.
Authorization Schemes Authorization restricts user access to specific controls or
components based on predefined user privileges. See "Providing Security Through
Authorization" on page 13-33.
Session State Protection Session State Protection is a built-in functionality that prevents
hackers from tampering with the URLs within your application. URL tampering can
adversely affect program logic, session state contents, and information privacy. See
"Understanding Session State Protection" on page 13-14.
Edit Security Attributes Use the Edit Security Attributes page to configure general
security attributes for all pages within an application. See "Configuring Security
Attributes" on page 4-15.
Globalization
The following section describes the links under Globalization.
Translate Application You can develop applications in Oracle Application Express that
can run concurrently in different languages. A single Oracle database and Oracle
Application Express instance can support an application in multiple languages.
Translating an application involves multiple steps. See "About Translating an
Application and Globalization Support" on page 16-1 and "Understanding the
Translation Process" on page 16-5.
Text Messages Text messages are named text strings that can be called from the
PL/SQL code you write. This PL/SQL can be anonymous blocks within page
processes and page regions, or in packages and procedures. See "Translating
Messages" on page 16-11.
Edit Attributes You can develop applications that can run concurrently in different
languages. Click this link to specify globalization options such as the Application
Primary Language and Application Language Derived From attributes. See
"Configuring Globalization Attributes" on page 4-19 and "About Translating an
Application and Globalization Support" on page 16-1.
Navigation
The following section describes the links under Navigation.
Tabs Tabs are an effective way to navigate users between pages in an application. You
can create two types of tabs: standard tabs or parent tabs. A standard tab set is
associated with a specific page and page number. A parent tab set functions as a
container to hold a group of standard tabs. See "Creating Tabs" on page 8-1.
Working with Application Pages 5-31
Working with Shared Components
Lists A list is a shared collection of links. You control the appearance of a list through
list templates. Each list element has a display condition that enables you to control
when it displays. See "Creating Lists" on page 8-5.
Breadcrumbs Breadcrumbs provide users with hierarchical navigation. A breadcrumb
is a hierarchical list of links that display using templates. You can display a
breadcrumb as a list of links or as a breadcrumb path. See "Creating Breadcrumbs" on
page 8-13.
Trees A tree is an effective way to communicate hierarchical or multiple level data. See
"Creating Trees" on page 8-20.
Navigation Bar Entries Navigation bar entries offer users a simple navigation path for
moving between pages in an application. The location of a navigation bar depends
upon the associated page template. Navigation bar entries can display as a link from
an image or text. A navigation bar entry can be an image, an image with text beneath
it, or text. See "Creating a Navigation Bar Entry" on page 8-23.
User Interface
The following section describes the links under User Interface.
Themes A theme is a named collection of templates that defines the application user
interface. See "Managing Themes" on page 10-1.
Templates Templates control the look and feel of specific constructs within your
application, such as pages, regions, items, and menus. See "Customizing Templates" on
page 10-12.
User Interface Defaults User interface defaults enable you to assign default user interface
properties to a table, column, or view within a specified schema. When you create a
form or report using a wizard, the wizard uses this information to create default
values for region and item properties.
Because user interface defaults are associated with a table, you can use them with
applications created using the form and report wizards. See "Managing User Interface
Defaults" on page 11-1.
Lists of Values A list of values (LOV) is a static or dynamic set of values used to display
a popup list of values, select list, check box, or radio group. See "Creating Lists of
Values" on page 7-81.
Shortcuts Use shortcuts to avoid repetitive coding of HTML or PL/SQL functions. You
can create a shortcut to define a page control such as a button, HTML text, a PL/SQL
procedure, or HTML. Once you define a shortcut, it is stored in a central repository so
you can reference it from various locations within your application. See "Using
Shortcuts" on page 7-86.
Reports
The following section describes the links under Reports.
Report Queries Use the Report Queries link to view a report of stored queries within the
current application. See "About Report Queries" on page 7-39.
Report Layouts Use Report Layouts with a report or shared query to render data in a
printer-friendly format, such as Adobe Portable Document Format (PDF), Microsoft
5-32 Oracle Application Express Application Builder User’s Guide
Working with Shared Components
Word Rich Text Format (RTF), or Microsoft Excel (XLS) format. See "About Report
Layouts" on page 7-42.
Files
The following section describes the links under Files.
Cascading Style Sheets Application Builder includes themes that contain templates that
reference their own cascading style sheets (CSS). Use the Cascading Style Sheets link to
upload cascading style sheets to your workspace. See "Using Custom Cascading Style
Sheets" on page 10-40.
Images Use the Images link to upload images to your workspace. See "Managing
Images" on page 9-13.
Static Files Use the Static Files link to upload static files to your workspace. See
"Managing Static Files" on page 9-16.
About Exporting Shared Components
You can export shared components and page components on the Component Export
page. You can also use this wizard to back up a component before editing it or to
create an export that functions as a patch to another Oracle Application Express
instance.
Topics in this section include:
■
Exporting Shared Components from the Export Page
■
Exporting Shared Components from the Shared Components Page
Exporting Shared Components from the Export Page
To export shared components from the Shared Components page:
1.
2.
Navigate to the Export page:
a.
On the Workspace home page, click the Application Builder icon.
b.
Select an application.
c.
On the Application home page, click Export/Import.
d.
On the Export/Import page, click Export and click Next.
On the Tasks list, click Component Export.
The Component Export page appears. See "Exporting Application Components"
on page 14-14.
Exporting Shared Components from the Shared Components Page
To export shared components from the Shared Components page:
1.
Navigate to the Workspace home page.
2.
Click the Application Builder icon.
3.
Select an application.
4.
On the Application home page, click Shared Components.
The Shared Components page appears.
5.
On the Tasks list, click Export Application Components.
Working with Application Pages 5-33
Understanding Application Processes
The Component Export page appears. See "Exporting Application Components"
on page 14-14.
Accessing Reports on Shared Components
To access the Shared Components reports:
1.
Navigate to the Workspace home page.
2.
Click the Application Builder icon.
3.
Select an application.
4.
On the Tasks list, click Application Reports.
The Application Reports page appears.
5.
Click Shared Components.
A variety of application reports appear and are divided into the same categories
that appear on the Shared Components page, including:
■
Application
■
Logic
■
Security
■
Globalization
■
Navigation
■
User Interface
■
Reports
■
Files
Note that you can also navigate to these reports by clicking View Application
Reports on the Tasks list on the Application home page.
See Also: "Viewing Application Reports" on page 6-29, and "About
the Database Object Dependencies Report" on page 6-30
Understanding Application Processes
Application processes are blocks of PL/SQL logic that are set to run at specific points
using processes from multiple pages of an application. By default, application
processes execute at the same point for every page in the application. However, you
can apply conditions for specific pages to control when the process executes.
Topics in this section include:
■
About On Demand Application Processes
■
Application Process Example
■
Creating an Application Process
■
Accessing Application Processes Reports
About On Demand Application Processes
A special type of application process is the On Demand process. An On Demand
application process has a Process Point of On Demand and executes when called from
a page-level On Demand process. On Demand processes are useful when you have
5-34 Oracle Application Express Application Builder User’s Guide
Understanding Application Processes
PL/SQL logic that you would like to run from different execution points across
multiple pages.
See Also:
"Creating a Page Process" on page 5-20
Running an On Demand Process from a Page Request
You can have a page request run an On Demand process by using the following
syntax:
f?p=application_id:page_id:session:APPLICATION_PROCESS=process_id
Where:
■
application_id is the application ID or alphanumeric alias
■
page_id is the page number or alphanumeric alias
■
session is the session ID
■
APPLICATION_PROCESS=process_id is the keyword APPLICATION_
PROCESS= followed by either the process ID or an alphanumeric name of an
application-level process having a Process Point of On Demand
When you use this syntax, the Application Express engine recognizes the request and
processes it using the following rules:
■
■
■
■
■
The page number in the URL can be any page number or alias. A page number or
alias is required in the request only as a syntactic placeholder because no specific
page is accessed for this type of request.
The process authorization scheme, the application’s authorization scheme, and the
process conditions are supported.
Session state (that is, item names and values) may be set in the URL, but clear
cache options are ignored.
Any failures of authentication, authorization, or process conditions do not result in
visible error messages or other indicators of such failures and most often result in
a blank page being displayed.
Specifying the process by name locates the first process with the specified
(case-preserved) name.
See Also:
"Clearing Session State" on page 3-12
Application Process Example
A shopping cart application is a good example of when you might use an application
process. For example, suppose you need to display the contents of a user’s shopping
cart with each page view. To accomplish this, you create a region on page zero of your
application that displays the values of the application-level items TOTAL_CART_
ITEMS and TOTAL_PURCHASE_PRICE.
See Also: "Displaying Components on Every Page of an
Application" on page 9-2
Instead of writing a process for each page to set the values of TOTAL_CART_ITEMS
and TOTAL_PURCHASE_PRICE, you could write an application process of type On
Load: Before Header to compute these values. Then, the Application Express engine
would execute the process on each page as it renders the application. As a result, each
Working with Application Pages 5-35
Understanding Application Processes
page, would display the most current values for TOTAL_CART_ITEMS and TOTAL_
PURCHASE_PRICE.
Creating an Application Process
To create an application process:
1.
Navigate to the Shared Components page:
a.
On the Workspace home page, click Application Builder.
b.
Select an application.
c.
On the Application home page, click Shared Components.
The Shared Components page appears.
2.
Under Logic, select Application Processes.
3.
Click Create.
4.
For Identification:
5.
6.
a.
Name - Enter a name for the application process.
b.
Sequence - Specify the sequence number for this process. The sequence
number determines the order in which the process will be evaluated relative to
other processes.
c.
Point - Identify the point at which this process executes.
d.
Click Next.
For Source:
a.
Process Text - Enter the text that is to be the source of your process.
b.
Error Message - Enter the error message that displays if the process raises an
error.
c.
Click Next.
For Conditionality:
a.
Condition Type - Select a condition type that must be met in order for this
process to execute.
b.
Expression 1 and Expression 2 - Use these attributes to conditionally control
whether the process executes. Enter values in this attribute based on the
specific condition type you select. The process will execute if the specified
condition is met.
c.
Click Create Process.
About the Application Process Page
Once you create an application process, it appears on the Application Processes page.
You control how the page displays by making a selection from the View list. Available
options include:
■
■
Icons (the default) displays each process as a large icon. To edit a process, click the
appropriate icon.
Details displays each application process as a line in a report. To edit a process,
click the name.
5-36 Oracle Application Express Application Builder User’s Guide
Understanding Application Computations
Accessing Application Processes Reports
After you create an application process, you can access the Utilization and History
reports.
To access application processes reports:
1.
Navigate to the Workspace home page.
2.
Click Application Builder.
3.
Select an application.
4.
On the Application home page, click Shared Components.
5.
Under Logic, select Application Processes.
6.
Select one of the following tabs at the top of the page:
7.
■
Utilization
■
History
Follow the on-screen instructions.
Utilization
Click Utilization to display the Application Process Utilization page. This page
displays application processes used in the current application.
History
Click History to display the Application Process History page. This page displays a
history of recently changed application processes by date.
Understanding Application Computations
Application Computations are units of logic that set the value of a single page or
application-level item and are run at the same point across multiple pages in an
application. Like page-level computation, application computations can be based on
static values, item values, PL/SQL, or SQL.
Topics in this section include:
■
About Application Computations
■
Creating an Application Computation
■
Accessing the Application Computation History Report
About Application Computations
A common use of an application item is to store the value of the last page viewed in
the application. By storing the value in an item, you can add a back button and then
redirect the user to the page number captured by the computation. This type of
computation works well, for example, when you need to enable users to back out of an
error page.
The following is an example of a computation that stores the last page visited. In this
example, the computation:
■
■
Stores the last application page visited to an item named LAST_PAGE
Checks that the value of a CURRENT_PAGE_ITEM is of type PL/SQL Function
Body with a Computation body of:
Working with Application Pages 5-37
Understanding Application Computations
BEGIN
:LAST_PAGE := nvl(:CURRENT_PAGE,:APP_PAGE_ID);
:CURRENT_PAGE := :APP_PAGE_ID;
RETURN :LAST_PAGE;
END;
About Application Computations that Execute On New Instance
Typically an application computation runs at the same point across multiple pages in
an application. The exception is computations having a Computation Point of On New
Instance. This type of computation only runs when a user first accesses your
application. This type of computation is useful when you need to only retrieve
information once within a user's session (for example, to retrieve a user’s job title).
Creating an Application Computation
To create an application computation:
1.
Navigate to the Shared Components page:
a.
On the Workspace home page, click Application Builder.
b.
Select an application.
c.
On the Application home page, click Shared Components.
The Shared Components page appears.
2.
Under Logic, select Application Computations.
3.
Click Create.
4.
Under Item:
a.
Sequence - Specify the sequence for this component. The sequence determines
the order of evaluation.
b.
Computation Item - Select the item this computation affects.
5.
For Computation Point, select a process point at which this computation should be
performed. Selecting After Submit causes the computation to be performed only
after the page is displayed and then submitted.
6.
Under Computation:
a.
Computation Type - Select the manner in which this computation will be
performed.
b.
Computation - Enter the computation logic that corresponds to the
computation type.
c.
Computation Error Message - Enter the error message that displays if the
computation fails.
7.
For Authorization Scheme (optional), select an authorization scheme which must
evaluate to True in order for this computation to execute.
8.
Under Conditions:
a.
Condition Type - Select a condition type that must be met in order for this
computation to execute.
b.
Expression 1 and Expression 2 - Use these attributes to conditionally control
whether the computation executes. Enter values in this attribute based on the
5-38 Oracle Application Express Application Builder User’s Guide
Understanding Application Computations
specific condition type you select. The computation will execute if the
specified condition is met.
9.
For Build Option (optional), select a build option for this component. See "Using
Build Options to Control Configuration" on page 14-29.
10. Click Create.
About the Application Computations Page
Once you create an application computation, it appears on the Application
Computations page. You control how the page displays by making a selection from the
View list. Available options include:
■
■
Icons (the default) displays each computation as a large icon. To edit an
computation, click the appropriate icon.
Details displays each application process as a line in a report. To edit a
computation process, click the name.
Accessing the Application Computation History Report
Once you create an application computation, you can view the Application
Computation History report.
To access the Application Computation History report:
1.
Navigate to the Workspace home page.
2.
Click the Application Builder icon.
3.
Select an application.
4.
When Application Builder appears, click Shared Components.
5.
Under Logic, select Application Computations.
6.
Select the History tab at the top of the page.
This Application Computation History report displays a history of recently
changed application computations by date.
Working with Application Pages 5-39
Understanding Application Computations
5-40 Oracle Application Express Application Builder User’s Guide
6
Building an Application
This section describes how to use Application Builder to build an application and
application components. It includes instructions for creating an application and
adding pages as well as adding components (reports, charts, or forms), page controls
(buttons, items, list of values), and shared components (breadcrumbs, lists, or tabs).
This section contains the following topics:
■
Creating an Application
■
Managing Pages in an Application
■
Adding Application Comments
■
Adding Developer Comments
■
Creating Applications Groups
■
Viewing Application Reports
■
Understanding Page-Level Items
■
Understanding Application-Level Items
"Using Application Builder" on page 4-1, "Controlling
Page Layout" on page 9-1, and "Adding Navigation" on page 8-1
See Also:
Creating an Application
An application is a collection of pages that share a common session state and
authentication. You create an application in Application Builder using a wizard. You
delete an application from the Application home page.
Topics in this section include:
■
About Creating an Application Using a Wizard
■
About the Create Application Wizard
■
About the Create Application from Spreadsheet Wizard
■
About Demonstration Applications
■
Copying an Application
■
Deleting an Application
Tip: You can reduce the number of steps needed to create an
application by configuring Application Builder Defaults. See
"Leveraging Application Builder Defaults" in Oracle Application Express
Administration Guide.
Building an Application
6-1
Creating an Application
About Creating an Application Using a Wizard
When you click Create on the Application Builder home page, you must choose one of
the following options:
■
■
■
Create Application. Creates an application. The application can be based on SQL
queries or database tables. You can define blank pages or pages that contain
reports, forms, tabular forms, or a report with a linked form. See "About the Create
Application Wizard" on page 6-2.
Create Application from Spreadsheet. Creates an application based on
spreadsheet data. You can upload or paste spreadsheet data to create a table and
then add a user interface. In the resulting application, users can create queries,
add, insert, or update records, or analyze the data. See "About the Create
Application from Spreadsheet Wizard" on page 6-6.
Demonstration Application. Installs or uninstalls demonstration applications. Use
demonstration applications to learn how to build applications. See "About
Demonstration Applications" on page 6-7.
See Also:
"Managing Pages in an Application" on page 6-9
About the Create Application Wizard
The Create Application wizard enables you to create a fully functional application
based on any number of tables. You can use the Create Application Wizard to create
blank pages, or pages based on SQL queries or database tables. You can create SQL
queries by manually typing SQL, or by using the graphical user interface of Query
Builder.
Applications based on tables can consist of a simple report, a form and report, or a
tabular form. When creating pages on tables, you have the option to generate analysis
pages. Analysis pages extend a simple report or a report on a form to include multiple
drill-down reports and charts.
At the workspace level, you have the option of setting defaults that are used for
applications built in that workspace. Setting these defaults enables you to exit the
wizard without paging through each step. When you exit the wizard, the application
you create uses the values you specified as defaults.
See Also: "Building Queries with Query Builder"in Oracle
Application Express SQL Workshop and Utilities Guide and "Leveraging
Application Builder Defaults" in Oracle Application Express
Administration Guide
See Tutorials: "Building Your Application" in Oracle Database 2 Day +
Oracle Application Express Developer’s Guide and Oracle Application
Express Advanced Tutorials
Topics in this section include:
■
Creating an Application Based on Tables or Queries
■
About Application Models and User Interface Defaults
■
Leveraging Application Models and User Interface Defaults
6-2 Oracle Application Express Application Builder User’s Guide
Creating an Application
Creating an Application Based on Tables or Queries
You can create an application based on a table, query, or drill-down query by selecting
Create Application in the Create Application Wizard.
To create an application based on a table, query, or drill-down query:
1.
On the Workspace home page, click the Application Builder icon.
2.
Click the Create button.
3.
For Method, select Create Application and click Next.
4.
For Name, enter the following and click Next:
a.
Name - Enter a name to identify the application.
b.
Application - Enter a unique integer value to identify the application.
c.
Create Application - Select a creation method:
–
Select From scratch to manually add all pages
–
Select Based on existing application design model to copy page
definitions from a previous application model.
Note that you will still have to define all other application attributes, or
you can choose to copy some attributes by choosing to copy shared components from another application (See step 7 and "About Application
Models and User Interface Defaults" on page 6-5).
d.
Schema - Your application will obtain its privileges by parsing all SQL as a
specific database schema. Identify the database schema owner.
Next, add pages to your application.
5.
For Pages:
a.
Select the type of page you want to add. Options include:
–
Blank creates a page with no built-in functionality.
–
Report creates a page that contains the formatted result of a SQL query.
You can choose to build a report based on a table you select, or based on a
custom SQL SELECT statement or a PL/SQL function returning a SQL
SELECT statement that you provide.
–
Form creates a form to update a single row in a database table.
–
Tabular Form creates a form to perform update, insert, and delete
operations on multiple rows in a database table.
–
Master Detail creates a form that displays a master row and multiple
detail rows within a single HTML form. With this form, users can query,
insert, update, and delete values from two tables or views.
–
Report and Form builds a two page report and form combination. On the
first page, users select a row to update. On the second page, users can add
a record or update or delete an existing record.
Action displays the currently selected page type. For each selection, the
wizard prompts you for a different types of information, such as selecting a
table name or report implementation.
Report pages include the Include Analysis Pages check box. Select this option
and follow the wizard prompts to extend a simple report or a report on a form
to include multiple drill-down reports and charts.
Building an Application
6-3
Creating an Application
b.
Click Add Page.
The page (or pages) appear at the top of the page. To delete a page, click
Delete icon.
c.
Repeat the previous steps until all pages have been added.
d.
Click Next.
Tip: To exit this wizard early and utilize Application Builder
Defaults, click the Create button. To configure Application Builder
Defaults, see "Leveraging Application Builder Defaults" in Oracle
Application Express Administration Guide.
6.
For Tabs, determine whether to include tabs in your application and click Next.
7.
For Shared Components, determine whether to import shared components from
another application. Shared components are common elements that can display or
be applied on any page within an application.
To include shared components, select the following:
a.
Copy Shared Components from Another Application - Select Yes.
b.
Copy from Application - Select the application from which you want to import
shared components.
c.
Select Components to Import - Select the components to import.
d.
Click Next.
Next, select a default authentication scheme. Authentication is the process of
establishing users' identities before they can access an application. See
"Establishing User Identity Through Authentication" on page 13-24.
8.
For Authentication Scheme, select one of the following:
■
■
■
9.
Application Express - Uses the user account credentials created and
maintained with the Application Express Service Administration application.
These are the accounts you use to log in to the Application Express
development environment. You can also create accounts in this user account
repository for end users of your applications.
No Authentication - Also known as database authentication, this option
enables users to access your application using the account credentials stored in
the modplsql DAD definition. In most cases this results in users not having
to login when accessing your application. This is the quickest way to create a
"public" application.
Database Account - Requires users logging into your application to enter a
database schema name (or user name) and a password in order to
authenticate. This account information is managed entirely within the Oracle
database.
Next, select the following globalization preferences:
a.
Language - Select the primary language for this application.
This attribute identifies the language in which an application is developed.
This language is the base language from which all translations are made.
b.
User Language Preference Derived From - Specifies how the engine
determines the application language. The application primary language can be
static (that is, derived from the Web browser language) or determined from a
6-4 Oracle Application Express Application Builder User’s Guide
Creating an Application
user preference or item. The database language setting determines date
display and sorting characteristics.
You can alter the Language and User Language Preference Derived From
attributes later on the Edit Globalization attributes page. See "Configuring
Globalization Attributes" on page 4-19.
c.
Date Format - Specifies the date format to be used in the application.
This date format is used to alter the NLS_DATE_FORMAT database session
setting before showing or submitting any page within the application. This
value can be a literal string containing a valid Oracle date format mask or an
item reference via substitution syntax. If no value is specified, the default date
format is derived from the database session at runtime. If supplied, this is also
used as the date format for any items resulting from columns of type DATE.
d.
Click Next.
10. For User Interface, select a theme and click Next.
Themes are collections of templates that can be used to define the layout and style
of an entire application. See "Managing Themes" on page 10-1.
11. Confirm your selections and click Create.
About Application Models and User Interface Defaults
The Create Application Wizard is designed with the assumption that the developer
may run it multiple times. To facilitate this iterative approach to application
development, every time you run the wizard it saves the page definitions to an
application model.
Consider the following example. You create an application by running the Create
Application Wizard. After viewing the application, you realize it is not quite what you
wanted. Instead of altering it, you can run the wizard again and select an application
model. By selecting an existing application model when you rerun the wizard, you can
quickly improve your application with minimal time and effort.
See Also: "Managing Application Models" in Oracle Application
Express Administration Guide
Another way to increase your productivity when creating an application is to specify
user interface defaults. User interface defaults are metadata that enable you to assign
default user interface properties to a table, column, or view within a specified schema.
See Also:
"Managing User Interface Defaults" on page 11-1
Leveraging Application Models and User Interface Defaults
You can increase your productivity when creating applications by leveraging
application models and user interface defaults. Consider the following scenario:
1.
Create an application based on tables or views by running the Create Application
Wizard.
2.
Run the generated application. Note any functional deficiencies.
3.
Evaluate whether to create or edit user interface defaults.
For example, you can use user interface defaults to control how form field or
report labels display. You can also utilize user interface defaults to display specific
columns or have columns display in an alternate order.
Building an Application
6-5
Creating an Application
4.
Navigate to the Application home page and create an application by clicking
Create.
5.
Select Create Application.
6.
When prompted to enter application details, specify the following:
7.
a.
Name - Enter a name to identify the application.
b.
Application - Enter a unique integer value to identify the application, or
accept the default.
c.
Create Application - Select Based on existing application design model.
Select an application model.
Note the pages you previously created already appear.
8.
Add pages, edit pages, or remove pages.
9.
Complete the wizard.
10. Repeat steps 2 through 9 until the application meets your functional requirements.
About the Create Application from Spreadsheet Wizard
You can create an application based on spreadsheet data by selecting Create from
Spreadsheet in the Create Application Wizard.
To create an application from spreadsheet data:
1.
On the Workspace home page, click the Application Builder icon.
2.
Click the Create button.
3.
Select Create from Spreadsheet.
4.
For Load Method, specify how spreadsheet data will be uploaded. Select one of
the following and click Next:
a.
b.
Upload file, comma separated (*.csv) or tab delimited. Specify the following
and click Next:
–
Text File - Click Browse to locate the file to be uploaded.
–
Separator - Specify the column separator character. Use \t for tab
separators.
–
Optionally Enclosed By - Enter a delimiter character. You can use this
character to deliminate the starting and ending boundary of a data value.
If you specify a delimiter character, the wizard ignores white space
occurring before the starting and ending boundary of a data value. You
can also use this option to enclose a data value with the specified delimiter
character.
–
File Character Set - Choose the character set in which the text file is
encoded.
Copy and paste. Copy and paste the tab delimited data you want to import.
5.
For Table Properties, review how your table will display and click Next. Specify
the table name and column names, or modify the data types. To specify whether to
include a column, make a selection from the Upload list.
6.
For User Interface Defaults:
a.
Review the displayed Singular Name and enter a Plural Name.
6-6 Oracle Application Express Application Builder User’s Guide
Creating an Application
7.
8.
9.
b.
(Optional) Under Column User Interface Defaults, review the displayed
column labels.
c.
Click Next.
For Summary Page:
a.
Summary By Column - Select the columns for which data will be summarized
in reports and charts and click Next.
b.
Aggregate By Column - Select columns for which values will be aggregated in
summary report and click Next.
For Application Options, specify the following:
a.
Application Name - Enter an alphanumeric name for this application.
b.
Create Mode:
–
Read and Write includes insert and update pages.
–
Read Only does not include insert and update pages.
c.
Report Implementation - Choose Classic to create a SQL report or Interactive
to create an interactive report.
d.
Select a chart type.
e.
Click Next.
For User Interface Theme, select a theme and click Next.
Themes are collections of templates that can be used to define the layout and style
of an entire application. See "Managing Themes" on page 10-1.
10. Confirm your selections and click Create.
See Also: "Building Queries with Query Builder" in Oracle
Application Express SQL Workshop and Utilities Guide
"How to Build an Access Control Page" in Oracle
Application Express Advanced Tutorials
See Tutorial:
About Demonstration Applications
Oracle Application Express installs with a number of demonstration applications. Use
these applications to learn more about the different types of functionality you can
include in your applications.
See Also: "Running a Demonstration Application" on page 2-1,
"Disabling the Creation of Demonstration Applications in a New
Workspace" in Oracle Application Express Administration Guide, and
"Downloading Public Packaged Applications and Sample Code in
Oracle Database 2 Day + Oracle Application Express Developer’s Guide
Accessing Demonstration Applications
To access demonstration applications:
1.
On the Workspace home page, click the Application Builder icon.
2.
Click the Create button.
3.
Select Demonstration Application.
Building an Application
6-7
Creating an Application
The Demonstration Applications page appears, displaying links to the following
applications:
■
■
Sample Application offers a working demonstration that highlights basic design
concepts
Collection Showcase demonstrates shopping cart concepts
4.
To install a demonstration application, locate the application you want to install
and click Install.
5.
Follow the on-screen instructions.
The Application home page appears.
6.
To run an installed demonstration application, click the Run link.
7.
Enter the appropriate login credentials and click Login.
■
■
For Sample Application:
–
For User Name, enter either demo or admin
–
For Password, enter current workspace name in lowercase letters
For other demonstration applications, enter your workspace user name and
password.
Copying an Application
To copy an application:
1.
On the Workspace home page, click the Application Builder icon.
2.
Select an application.
The Application home page appears.
3.
Click Copy this Application on the Tasks list. See "About the Tasks List" on
page 4-5.
4.
On Copy Application:
5.
a.
Enter a new application ID.
b.
Enter a new application name.
c.
Specify whether to copy deployment attributes.
d.
Click Next.
Click Copy Application.
Deleting an Application
You can delete an application from within Application Builder, or while editing
application attributes. If you delete an application you also delete all defined
components (reports, charts, or forms), page controls (buttons, items, list of values),
and shared components (breadcrumbs, lists, and tabs, but not user interface defaults).
See Also:
"Deinstalling Supporting Objects" on page 14-11
Topics in this section include:
■
Deleting an Application from Application Builder
■
Deleting an Application from the Edit Definition Page
6-8 Oracle Application Express Application Builder User’s Guide
Managing Pages in an Application
See Also:
"Deinstalling Supporting Objects" on page 14-11
Deleting an Application from Application Builder
To delete an application from Application Builder:
1.
On the Workspace home page, click the Application Builder icon.
2.
Select an application.
3.
When Application Builder appears, verify the application ID and name at the top
of the page.
4.
On the Tasks list, click Delete this Application.
5.
When prompted, click Permanently Delete Now.
Deleting an Application from the Edit Definition Page
To delete an application from the Edit Definition page:
1.
On the Workspace home page, click the Application Builder icon.
2.
Select an application.
3.
Click Shared Components.
The Shared Components page appears.
4.
Under Application, click Definition.
The Edit Definition page appears.
5.
Verify the application ID and name.
6.
Click Delete at the top of the page.
7.
When prompted, click Permanently Delete Now.
See Also:
"Configuring the Application Definition" on page 4-8
Managing Pages in an Application
A page is the basic building block of an application. When you build an application in
Application Builder, you create pages that contain user interface elements, such as
tabs, lists, buttons, items, and regions.
Topics in this section include:
■
About Creating Pages
■
Creating a Page from the Application Home Page
■
Creating a Page from the Page Definition
■
Creating a Page from the Developer Toolbar
■
Running a Page or Application
■
Grouping Pages
■
Locking and Unlocking a Page
■
Deleting a Page
Building an Application
6-9
Managing Pages in an Application
See Also: "Creating Reports" on page 7-1, "Creating Charts" on
page 7-61, "Creating Forms" on page 7-46, "Creating Calendars" on
page 7-55, "Creating Trees" on page 8-20, and "Controlling Access to
Applications, Pages, and Page Components" on page 7-96
About Creating Pages
You add a page or add a component to an existing page by running the Create Page
Wizard. You can access this wizard by:
■
■
■
Clicking Create Page on the Application home page. See "Creating a Page from the
Application Home Page" on page 6-10.
Clicking Create on the Page Definition. See "Creating a Page from the Page
Definition" on page 6-11.
Click the Create link on the Developer toolbar and then select New Page.
"Creating a Page from the Developer Toolbar" on page 6-13.
You can also use the Create Page Wizard to add a component
(that is, a report, chart, form, wizard, a calendar, or tree) to an existing
page. When prompted, specify an existing page number.
Note:
Creating a Page from the Application Home Page
To create a page from the Application home page:
1.
On the Workspace home page, click Application Builder.
2.
Select an application.
The Application home page appears.
3.
Click the Create Page button.
4.
Select the type of page you want to create as described in the following table.
Page Type
Description
Blank Page
Creates a blank page.
Multiple Blank Pages
Creates multiple blank pages.
Report
Formatted result of a SQL query. Available options:
■
■
■
■
SQL Report - Creates a report based on a custom SQL
SELECT statement or a PL/SQL function returning a
SQL SELECT statement that you provide.
Interactive Report - Creates an interactive report based
on a custom SQL SELECT statement you provide. Users
can alter the layout of report data by selecting specific
columns, applying filters, highlighting, and sorting.
They can also define breaks, aggregations, different
charts, and their own computations.
Report on Web Service Result - Creates a report on a
Web Service result.
Wizard Report - Creates a report without requiring any
SQL knowledge. Select the appropriate schema, table,
columns, and result set display.
See Also: "Creating Reports" on page 7-1 and "Implementing
Web Services" on page 15-16
6-10 Oracle Application Express Application Builder User’s Guide
Managing Pages in an Application
Page Type
Description
Chart
Enables you to create three types of graphical charts: HTML,
Scalable Vector Graphics (SVG), and Flash.
See Also: "Creating Charts" on page 7-61
Form
Creates a form interface with which users can update a
single row or multiple rows within a table.
See Also: "Creating Forms" on page 7-46
Wizard
Create a wizard.
Calendar
Generates a calendar with monthly, weekly, and daily views.
See Also: "Creating Calendars" on page 7-55
Tree
Creates a a tree to graphically communicate hierarchical or
multiple level data.
See Also: "Creating Trees" on page 8-20
Login Page
Creates a login page.
See Also: "Building a Login Page" on page 13-31
Access Control
Creates a page containing a access control list, enabling
developers to control access to an application, individual
pages, or page components.
See Also: "Controlling Access to Applications, Pages, and
Page Components" on page 7-96
Page Zero
A page zero that functions as a master page. The Application
Express engine renders all components you add to page zero
on every page within your application. You can further
control whether the Application Express engine renders a
component or runs a computation, validation, or process by
defining conditions.
See Also: "Displaying Components on Every Page of an
Application" on page 9-2
5.
Follow the on-screen instructions.
Creating a Page from the Page Definition
To create a page while viewing a Page Definition:
1.
Navigate to the appropriate Page Definition. See "Accessing a Page Definition" on
page 5-2.
2.
Click the Create button at the top of the page.
3.
Select the type of page you want to create:
■
New Page
■
Region on this page
■
Page control on this page
■
Shared Control
See "About Create Page Types" on page 6-12.
4.
Follow the on-screen instructions.
See Also:
"Editing a Page Definition" on page 5-7
Building an Application 6-11
Managing Pages in an Application
About Create Page Types
When you run the Create Page Wizard, you select a page type. Table 6–1 describes
available create page options based on the type of page you select.
Table 6–1
Create Page Options
Create Page Options
Available Selections
New Page
Available page types:
■
Blank page
■
Multiple blank pages
■
Report. See "Creating Reports" on page 7-1.
■
Chart. See "Creating Charts" on page 7-61.
■
Form. See "Creating Forms" on page 7-46.
■
Wizard
■
Calendar. See "Creating Calendars" on page 7-55.
■
Tree. See "Creating Trees" on page 8-20.
■
Login Page. See "Building a Login Page" on page 13-31.
■
■
Region on this page
Access control. See "Controlling Access to Applications,
Pages, and Page Components" on page 7-96.
Page Zero. See "Displaying Components on Every Page of
an Application" on page 9-2.
Regions function as containers for content. Available region
types:
■
HTML
■
Multiple HTML
■
Report
■
Form
■
Chart
■
List
■
Breadcrumb
■
PL/SQL Dynamic Content
■
Tree
■
URL
■
Calendar
■
Help Text
See Also: "Understanding Regions" on page 9-2 and "About
Region Types" on page 9-8
Page control on this page
Page controls:
■
Item. See "Understanding Page-Level Items" on page 6-32
■
Button. See "Creating Buttons" on page 7-76.
■
■
Branch. See "Controlling Navigation Using Branches" on
page 8-27
Computation. See "Understanding Page Computations" on
page 5-14.
■
Process. See "Understanding Page Processes" on page 5-20.
■
Validation. See "Understanding Validations" on page 5-17.
6-12 Oracle Application Express Application Builder User’s Guide
Managing Pages in an Application
Table 6–1 (Cont.) Create Page Options
Create Page Options
Available Selections
Shared control
Shared component options:
■
Navigation Bar icon. See "Creating a Navigation Bar Entry"
on page 8-23.
■
Parent tab. See "Creating Tabs" on page 8-1.
■
Standard tab. See "Creating Tabs" on page 8-1.
■
List of values. See "Creating Lists of Values" on page 7-81.
■
List. See "Creating Lists" on page 8-5.
■
Breadcrumb. See "Creating Breadcrumbs" on page 8-13.
Creating a Page from the Developer Toolbar
To view a rendered version of your application, you run or submit it to the Application
Express engine by clicking the Run or Run Application icon.
See Also:
"Running a Page or Application" on page 6-14
When you run an application, the Developer toolbar appears at the bottom of the
page. The Developer toolbar offers a quick way to edit the current page, create a page,
region, or page control, view session state, or turn edit links on and off. You can
control whether the Developer toolbar displays by changing the Status attribute on the
Edit Definition page.
See Also: "Configuring the Application Definition" on page 4-8 for
information on the Status list
To create a page from the Developer toolbar:
1.
Run the application. See "Running a Page or Application" on page 6-14.
2.
On the Developer toolbar, click Create.
The New Component Wizard appears.
3.
Select the type of component you want to create and click Next. Available options
include:
■
New Page
■
Region on this page
■
Page control on this page
■
Shared control
See "About Create Page Types" on page 6-12.
4.
Follow the on-screen instructions.
See Also:
"About the Developer Toolbar" on page 5-28
Copying a Page
You can copy a page from the current application or from another application. During
the copy process, you can also copy shared components or change mappings to shared
components in the target application.
To copy a page:
Building an Application 6-13
Managing Pages in an Application
1.
Navigate to the application you want to copy to:
a.
Navigate to the Workspace home page.
b.
Click the Application Builder icon.
c.
Select an application.
d.
Select a page.
The Page Definition appears.
2.
Click the Copy button.
3.
For Copy Page Option, select one of the following:
4.
■
Page in this application
■
Page in another application
Follow the on-screen instructions.
Running a Page or Application
The Application Express engine dynamically renders and processes pages based on
data stored in database tables. To view a rendered version of your application, you run
or submit it to the Application Express engine. As you create new pages, you can run
them individually, or run an entire application. You can run an application by clicking
the Run Application icon.
Topics in this section include:
■
About the Run Application and Run Page Icons
■
Running an Application from the Application Builder Home Page
■
Running an Application from the Application Home Page
■
Running a Page from the Page Definition
About the Run Application and Run Page Icons
The Run Application icon resembles a large traffic light and displays on the
Application home page. Clicking the Run Application icon runs an entire application.
The Run Page icon resembles a small, light green traffic light and displays in the upper
right corner of many pages within Application Builder. Clicking the Run Page icon
runs the current page.
Running an Application from the Application Builder Home Page
To run an entire application from the Application Builder home page:
1.
On the Workspace home page, click the Application Builder icon.
2.
From the View list, select Details and click Go.
3.
Locate the application in the Applications list.
6-14 Oracle Application Express Application Builder User’s Guide
Managing Pages in an Application
4.
Click the Run icon in the far right column.
Running an Application from the Application Home Page
To run an entire application from the Application home page:
1.
On the Workspace home page, click the Application Builder icon.
The Application Builder home page appears.
2.
Select on application.
3.
Click the Run Application icon at the top of the page.
Running a Page on the Application Home Page
You can control how the Application home page displays by making a selection from
the View list on the navigation bar at the top of the page. Selecting Details displays
each page as a line in a report. Each line includes the page number, the page name,
when the page was last updated, who last updated the page, a lock icon, and a Run
icon.
To run a page from the Pages list:
1.
On the Workspace home page, click the Application Builder icon.
2.
Select an application.
3.
From the View list, select Details and click Go.
4.
From the Pages list, locate the page you want to run and click the Run icon in the
far right column.
See Also:
"Locking and Unlocking a Page" on page 6-19
Running a Page from the Page Definition
To run a specific page from the Page Definition:
1.
On the Workspace home page, click the Application Builder icon.
2.
Select an application.
3.
Select a page.
The Page Definition appears.
4.
Click the Run Page icon in the upper right corner of the page.
Grouping Pages
You can make the pages within your application easier to access by organizing them
into page groups. To use page groups, you create a group and then assign pages to the
group.
Page groups do not have any function other than to help developers organize their
application pages.
Topics in this section include:
■
Viewing Page Groups
■
Creating a Page Group
■
Assigning a Page to a Page Group
■
Removing a Page from a Page Group
Building an Application 6-15
Managing Pages in an Application
■
Deleting a Page Group
■
Viewing the Pages by Page Group Report
Viewing Page Groups
The section describes different ways to view page groups.
Accessing the Page Groups Page To access the Page Groups page:
1.
On the Workspace home page, click the Application Builder icon.
2.
Select the application.
3.
On the Tasks List on the right side of the page, click Page Groups.
The Page Groups page appears.
Use the Navigation bar at the top of the page to search for a page group by name
or change the page display. You can change the default display by making a
selection from View list. Available options include:
■
■
4.
Icons (the default) displays each group as a large icon. To edit a group, click
the appropriate icon.
Details displays each group as a line in a report. To edit a group, click the
name.
To view the pages associated with a group, click Report Page Groups on the Tasks
list.
Note:
5.
The Tasks list only appears if groups currently exist.
To edit the group name and description, click the group name.
Viewing Page Groups from the Application Home Page To view page groups from the
Application home page:
1.
On the Workspace home page, click the Application Builder icon.
2.
On the Application Builder home page, select an application.
3.
From the View list, select by Group and click Go.
Any defined groups appear. Pages not associated with a group are filed in the
Unassigned folder.
4.
To view the pages within a group, click the group name.
Viewing Page Groups from the Page Definition To view page groups from the Page
Definition:
6-16 Oracle Application Express Application Builder User’s Guide
Managing Pages in an Application
1.
Navigate to the Page Definition. See "Accessing a Page Definition" on page 5-2.
2.
From the View list, select Groups and click Go.
3.
Make a selection from the Tasks list on the right side of the page.
Creating a Page Group
To create a page group:
1.
On the Workspace home page, click the Application Builder icon
2.
Select an application.
3.
On the Tasks List on the right side of the page, click Page Groups.
4.
On the Page Groups page, click Create.
5.
Enter a name, a description (optional), and click Create.
Accessing a Page Group Definition When you create page group you specify a name and
description.
To edit the Page Group definition:
1.
On the Workspace home page, click the Application Builder icon
2.
Select an application.
3.
On the Tasks List on the right side of the page, click Page Groups.
Page Groups page appears.
4.
Select a page group.
5.
On the Page Group page, edit the name or description and click Apply Changes.
6.
To move to the next Page Group definition, click the Previous (<) and Next (>)
buttons and repeat the previous step.
Assigning a Page to a Page Group
To assign pages to a group:
1.
On the Workspace home page, click the Application Builder icon.
2.
Select an application.
3.
On the Tasks List on the right side of the page, click Page Groups.
4.
On the Tasks list, click Manage Unassigned.
The Manage Page Group Assignments page appears. Clicking a page number
takes you to the Page Attributes page. Clicking the page Name links to the Page
Definition.
5.
From the New Group list, select a group to which you want to assign pages and
click Go.
6.
Select the pages to be assigned and click Assigned Checked.
Reassigning a Page to a Another Page Group To reassign a page to a page group:
1.
On the Workspace home page, click the Application Builder icon.
2.
Select an application.
3.
On the Tasks List on the right side of the page, click Page Groups.
Building an Application 6-17
Managing Pages in an Application
4.
On the Tasks list, click Manage Assignments.
The Manage Page Group Assignments page appears. Clicking the page number
takes you to the Page Attributes page. Clicking the page Name links to the Page
Definition.
5.
From the Group list, select a group and click Go.
6.
From New Group, select a group to which you want to assign pages.
7.
Select the pages to be reassigned and click Assigned Checked.
Removing a Page from a Page Group
To remove a page to a page group:
1.
On the Workspace home page, click the Application Builder icon.
2.
Select an application.
3.
On the Tasks List on the right side of the page, click Page Groups.
4.
On the Tasks list, click Manage Assignments.
The Manage Page Group Assignments page appears. Clicking the page number
takes you to the Page Attributes page. Clicking the page Name links to the Page
Definition.
5.
From the Group list, select a group and click Go.
6.
Under Name, locate the Group list and select - Unassign -.
7.
Select the page to be removed.
8.
Click Apply Changes.
Deleting a Page Group
To remove a page group:
1.
Remove all pages from the group to be deleted. See "Removing a Page from a Page
Group" on page 6-18.
2.
Access the Page Group page. See "Accessing a Page Group Definition" on
page 6-17.
3.
Click Delete.
A confirmation page appears.
4.
Confirm your request.
Viewing the Pages by Page Group Report
To view pages by page group:
1.
On the Workspace home page, click the Application Builder icon.
2.
Select an application.
3.
On the Tasks List on the right side of the page, click Page Groups.
4.
On the Tasks list, click Report Page Groups.
The Pages by Page Group report appears. Clicking the page number takes you to
the Page Attributes page. Clicking the Page Name links to the Page Definition.
5.
To view a page group, make a selection from the Group list and click Go.
6-18 Oracle Application Express Application Builder User’s Guide
Managing Pages in an Application
Locking and Unlocking a Page
You can prevent conflicts during application development by locking pages in your
application. By locking a page, you prevent other developers from editing it.
Topics in this section include:
■
Determining If a Page Is Locked
■
Locking a Page
■
Unlocking Pages
■
Accessing Alternative Locked Pages Views
Determining If a Page Is Locked
A lock icon indicates whether a page is currently locked. If a page is unlocked, the icon
appears as an open padlock. If the page is locked, the icon appears as a locked
padlock. A lock icon appears on the Application home page and on the Page
Definition.
To view the lock icon on the Application home page, select Details from the View list.
A list of pages appears. The lock icon appears under the Lock column.
The lock icon also appears on the Action Bar on the Page Definition. See "About the
Action Bar" on page 4-6.
Locking a Page
You can lock pages from the Page Locks page, the Pages list, and from a Page
Definition.
Locking a Page from the Page Locks Page To lock a page from the Page Locks Page:
1.
On the Workspace home page, click the Application Builder icon.
2.
Select an application.
3.
On the Tasks List on the right side of the page, click Page Locks.
The Page Locks page appears.
4.
Select the appropriate pages and click Lock Checked.
5.
Enter a comment in the Comment field.
6.
Click Lock Page(s).
Locking a Page from the Details View To lock a page from the Details view:
1.
On the Workspace home page, click the Application Builder icon.
2.
Select an application.
Building an Application 6-19
Managing Pages in an Application
3.
From the View list, select Details and click Go.
4.
In the Pages list, locate the page you want to lock and click the Lock icon.
5.
Enter a comment in the Comment field.
6.
Click Lock Page(s).
Locking a Page from the Page Definition To lock a page from the Page Definition:
1.
Navigate to the appropriate Page Definition. See "Accessing a Page Definition" on
page 5-2.
2.
Click the Lock icon in the Action bar. See "About the Action Bar" on page 4-6.
3.
Select the selected page and click Lock Checked.
4.
Enter a comment in the Comment field.
5.
Click Lock Page(s).
Unlocking Pages
Only the developer who locked a page can unlock it. However, a developer with
administrative privileges can unlock pages locked by other developers.
Unlocking Pages from the Page Locks Page To unlock a page from the Page Locks page:
1.
On the Workspace home page, click the Application Builder icon.
2.
Select the application.
3.
On the Tasks List on the right side of the page, click Page Locks.
The Page Locks page appears.
4.
Select the appropriate pages.
5.
Click UnLock Checked.
Unlocking Pages from the from the Details View To unlock a page from the Details view:
1.
On the Workspace home page, click the Application Builder icon.
2.
Select an application.
3.
From the View list, select Details and click Go.
4.
In the Pages list, locate the page you want to unlock and click the Lock icon.
The Edit Lock Comment page appears.
5.
Click UnLock.
Unlocking Pages from the Page Definition To unlock pages from the Page Definition:
1.
Navigate to the appropriate Page Definition. See "Accessing a Page Definition" on
page 5-2.
2.
Click the Lock icon in the upper right corner above Shared Components.
The Page Locks page appears.
3.
Select the page you want to unlock and click Unlock Checked.
Accessing Alternative Locked Pages Views
You can access a number of different views of Locked Pages on the Locked Pages page.
6-20 Oracle Application Express Application Builder User’s Guide
Managing Pages in an Application
To access different views of locked pages:
1.
On the Workspace home page, click the Application Builder icon.
2.
Select the application.
3.
On the Tasks List on the right side of the page, click Page Locks.
4.
On the Tasks list, click one of the following:
■
■
■
■
Show Locked Pages displays only locked pages within the current
application.
Show All Pages displays all pages within the current application.
Show Unlocked Pages displays only unlocked pages within the current
application.
Administer Locks enables an administrator to unlock any pages locked by a
developer.
Deleting a Page
You can delete a page from the Page Definition or while editing page attributes.
Topics in this section include:
■
Deleting a Page from the Page Definition
■
Deleting a Page While Editing Page Attributes
Deleting a Page from the Page Definition
To delete a page from the Page Definition:
1.
Navigate to the appropriate Page Definition. See "Accessing a Page Definition" on
page 5-2.
2.
Verify the page name.
3.
Click the Delete button at the top of the page.
4.
Follow the on-screen instructions.
See Also: "Editing a Page Definition" on page 5-7 for information
about editing page attributes
Deleting a Page While Editing Page Attributes
To delete a page while editing page attributes:
1.
Navigate to the Page Definition. See "Accessing a Page Definition" on page 5-2.
2.
Under Page Rendering, locate the Page section.
3.
Click the Edit page attributes icon to link to Page Attributes page. This icon
resembles a small page with a pencil on top of it.
Building an Application 6-21
Adding Application Comments
The Edit Page appears.
4.
Verify the page number and page name.
5.
Click Delete.
6.
Follow the on-screen instructions.
Adding Application Comments
You can add comments concerning an entire application on the Application Comments
page. You could add a description of the application or track the developers involved
in working on the application.
Topics in this section include:
■
Creating an Application Comment
■
Viewing the Application Comments Report
See Also:
"Adding Developer Comments" on page 6-22
Creating an Application Comment
To create an application comment:
1.
Navigate to the Workspace home page.
2.
Click the Application Builder icon.
3.
Select an application.
4.
On the Application home page, click Shared Components.
The Shared Components page appears.
5.
Under Application, click Comments.
The Application Comments page appears.
6.
Enter comments in the Comments field and click Apply Changes.
Viewing the Application Comments Report
To view reports specific to an application:
1.
Navigate to the Workspace home page.
2.
Click the Application Builder icon.
3.
Select an application.
The Application home page appears.
4.
On the Tasks list, click Application Reports.
5.
Click Shared Components and then Application Comments.
Adding Developer Comments
You can add developer comments to an application, a page, or a group of pages using
the Developer Comment icon. The Developer Comment icon resembles a green
balloon. This icon displays on the Action bar.
6-22 Oracle Application Express Application Builder User’s Guide
Adding Developer Comments
You can use developer comments to communicate application changes, report issues,
or record developer suggestions.
This section contains the following topics:
■
Adding Developer Comments to an Application or Page
■
Viewing and Editing Developer Comments
■
Deleting Developer Comments
■
About the Developer Comments Report
See Also:
"Adding Application Comments" on page 6-22
Adding Developer Comments to an Application or Page
The Developer Comment icon displays on any page in Application Builder that is
related to a specific application or application page. You can add developer comments
to an application, a page, or a group of pages.
To add a developer comment:
1.
On the Workspace home page, click the Application Builder icon.
2.
Select an application.
3.
Click the Developer Comment icon.
The Create Comment page displays in a separate window.
4.
In Relevant Page(s), specify the pages to which the comment applies. To enter a
comment that:
■
Applies to a specific page, enter the page number.
■
Applies to multiple pages, enter a comma-delimited list of pages. For example:
1, 2, 3
■
Does not apply to a page or group of pages, leave this field blank.
5.
In Comment, enter up to 4000 characters of text.
6.
Click Create or Create Another.
Viewing and Editing Developer Comments
To edit a developer comment:
1.
On the Workspace home page, click the Application Builder icon.
2.
Select an application.
3.
Click the Developer Comment icon.
The Create Comment page displays in a separate window.
4.
Click View Comments.
Building an Application 6-23
Adding Developer Comments
The View Comments page appears. See "About the Navigation Bar on the View
Comments Page" on page 6-24.
5.
To edit a comment, click the Edit icon.
The Edit Comment page appears.
a.
In Relevant Page(s), specify the pages to which the comment applies. To enter
a comment that:
–
Applies to a specific page, enter the page number.
–
Applies to multiple pages, enter a comma-delimited list of pages. For
example:
1, 2, 3
–
b.
6.
Does not apply to a page or group of pages, leave this field blank.
In Comment, enter up to 4000 characters of text.
Click Apply Changes.
About the Navigation Bar on the View Comments Page
A navigation bar appears at the top of the View Comments page and contains the
following controls:
■
■
■
■
Page. Search for a page number. Enter a page number and click Go. To view all
pages, leave the field blank and click Go.
Comment. Search for comments. Enter a case insensitive query for comment text
and click Go. To view all comments, leave the field blank and click Go.
Developer. Limit the display to a specific developer. Select a developer to display
and click Go.
Display. Determines how comments display. To increase or decrease the number
of comments that appear, make a selection from the Display list and click Go.
Deleting Developer Comments
You can delete developer comments on the Edit Comment page or on the Manage
Comments page.
Topics in this section include:
■
Deleting a Specific Developer Comment
■
Deleting Multiple Developer Comments
Deleting a Specific Developer Comment
To delete a developer comment:
1.
On the Workspace home page, click the Application Builder icon.
2.
Select an application.
3.
Click the Developer Comment icon.
The Create Comment page displays in a separate window.
4.
Click View Comments.
5.
Locate the comment to be deleted. See "About the Navigation Bar on the View
Comments Page" on page 6-24.
6-24 Oracle Application Express Application Builder User’s Guide
Adding Developer Comments
6.
Click the Edit icon.
The Edit Comment page appears.
7.
Click Delete.
Deleting Multiple Developer Comments
To delete multiple developer comments:
1.
On the Workspace home page, click the Application Builder icon.
2.
Select an application.
3.
Click the Developer Comment icon.
The Create Comment page displays in a separate window.
4.
Click Manage Comments.
5.
Select one of the following actions:
6.
■
Delete all comments
■
Delete comments created by a developer
■
Delete comments by date
Follow the on-screen instructions.
About the Developer Comments Report
You can also view, edit, and manage developer comments from the Developer
Comments report.
Topics in this section include:
■
Accessing the Developer Comments Report
■
Editing Comments from the Developer Comments Report
■
Deleting a Comment from the Developer Comments Report
■
Deleting Multiple Comments from the Developer Comments Report
■
Downloading the Developer Comments Report
Accessing the Developer Comments Report
To access the Developer Comments report:
1.
On the Workspace home page, click the Application Builder icon.
2.
Select an application.
3.
On the Application home page, click Application Reports on the Tasks list.
4.
Click Shared Components
5.
Under Application Reports, click Developer Comments.
The Developer Comments report appears.
A navigation bar appears at the top of the page and contains the following controls:
■
■
Page. Search for a page number. Enter a page number and click Go. To view all
pages, leave the field blank and click Go.
Comment. Search for comments. Enter a case insensitive query of comment text
and click Go. To view all, leave the field blank and click Go.
Building an Application 6-25
Adding Developer Comments
■
■
■
Developer. Limit the display to a specific developer. Select a developer to display
and click Go.
Date. Limit the display to a specific date. Select a date and click Go.
Display. Determine how comments display. To increase or decrease the number of
comments that appear, make a selection from the Display list and click Go.
Editing Comments from the Developer Comments Report
To edit a comment from the Developer Comments report:
1.
Navigate to the Developer Comments report. See "Accessing the Developer
Comments Report" on page 6-25.
The Developer Comments report appears.
2.
Locate the comment to be edited.
3.
Click the Edit icon.
The Edit Comment page displays in a separate window.
a.
In Relevant Page(s), specify the pages to which the comment applies. To enter
a comment that:
–
Applies to a specific page, enter the page number.
–
Applies to multiple pages, enter a comma-delimited list of pages, for
example:
1, 2, 3
–
b.
4.
Does not apply to a page or group of pages, leave this field blank.
In Comment, enter up to 4000 characters of text.
Click Apply Changes.
Deleting a Comment from the Developer Comments Report
To delete a comment from the Developer Comments report:
1.
Navigate to the Developer Comments report. See "Accessing the Developer
Comments Report" on page 6-25.
The Developer Comments report appears.
2.
Locate the comment to be deleted.
3.
Click the Edit icon.
The Edit Comment page displays in a separate window.
4.
Click Delete.
Deleting Multiple Comments from the Developer Comments Report
To delete multiple comments from the Developer Comments report:
1.
Navigate to the Developer Comments report. See "Accessing the Developer
Comments Report" on page 6-25.
The Developer Comments report appears.
2.
Locate the comment to be deleted.
3.
Click the Edit icon.
6-26 Oracle Application Express Application Builder User’s Guide
Creating Applications Groups
The Edit Comment page displays in a separate window.
4.
Click Manage Comments.
5.
Select one of the following actions:
■
Delete all comments
■
Delete comments created by a developer
■
Delete comments by date
6.
Follow the on-screen instructions.
7.
Click Apply Changes.
Downloading the Developer Comments Report
You can download the Developer Comments report as a comma-delimited file (.csv)
file by clicking the Export link.
To download the Developer Comments report:
1.
Navigate to the Developer Comments report. See "Accessing the Developer
Comments Report" on page 6-25.
The Developer Comments report appears.
2.
Click the Export link at the bottom of the page.
3.
Follow the on-screen instructions.
Creating Applications Groups
You can organize your applications by assigning them to application groups. To use
application groups, create a group by clicking the Create button and then assign
applications to it.
Topics in this section include:
■
Viewing Application Groups
■
Creating an Application Group
■
Assigning an Application to an Application Group
■
Removing an Application from an Application Group
■
Deleting an Application Group
Viewing Application Groups
The section describes different ways to view application groups.
Accessing the Application Group Page
To access the Application Group page:
1.
On the Workspace home page, click the Application Builder icon.
2.
On the Tasks List on the right side of the page, click Application Groups.
The Application Group page appears.
Use the Navigation bar at the top of the page to search for a page group by name
or change the page display. You can change the default display by making a
selection from View list. Available options include:
Building an Application 6-27
Creating Applications Groups
■
■
3.
Icons (the default) displays each group as a large icon. To edit a group, click
the appropriate icon.
Details displays each group as a line in a report. To edit a group, click the
name.
To view the applications associated with a group, you click the group name.
Note:
The Tasks list only appears if groups currently exist.
Viewing Page Groups from the Application Builder Home Page
To view page groups from the Application Builder home page:
1.
On the Workspace home page, click the Application Builder icon.
2.
From the View list, select By Group and click Go.
Any defined groups appear.
3.
To view or edit a page group, click the group name.
Creating an Application Group
To create an application group:
1.
On the Workspace home page, click the Application Builder icon
2.
On the Tasks List on the right side of the page, click Application Groups.
3.
On the Application Group page, click Create.
4.
Enter a name, a description (optional), and click Create.
Editing an Application Group Definition
When you create page group you specify a name and description.
To edit an application group definition:
1.
On the Workspace home page, click the Application Builder icon
2.
On the Tasks List on the right side of the page, click Application Groups.
Application Group page appears.
3.
Select an application group.
4.
On the Application Group page, edit the name or description and click Apply
Changes.
Assigning an Application to an Application Group
To assign applications to a group:
6-28 Oracle Application Express Application Builder User’s Guide
Viewing Application Reports
1.
On the Workspace home page, click the Application Builder icon.
2.
On the Tasks List on the right side of the page, click Application Groups.
3.
On the Tasks list, click Manage Unassigned.
The Manage Application Group Assignments page appears.
4.
From the New Group list, select a group.
5.
Select the applications to be assigned and click Assigned Checked.
Tip: You can also assign an application to an application group by
editing the application definition. Select the group from the
Application Group list. See "Configuring the Application Definition"
on page 4-8.
Removing an Application from an Application Group
To remove an application from an application group:
1.
On the Workspace home page, click the Application Builder icon.
2.
On the Tasks List on the right side of the page, click Application Groups.
3.
On the Tasks list, click Manage Unassigned.
The Manage Application Group Assignments page appears.
4.
From the New Group list, select Unassign.
5.
Select the pages to be unassigned and click Assigned Checked.
Tip: You can also remove an application from an application group
by editing the application definition. Select Unassigned from the
Application Group list. See "Configuring the Application Definition"
on page 4-8.
Deleting an Application Group
To remove an application group:
1.
On the Workspace home page, click the Application Builder icon.
2.
On the Tasks List on the right side of the page, click Application Groups.
3.
Assign all applications in the group to Unassign. See "Removing an Application
from an Application Group" on page 6-29.
4.
Return to the Application Groups page.
5.
Select the application group to be deleted.
6.
On the Application Group page, click Delete.
A confirmation page appears.
7.
Confirm your request.
Viewing Application Reports
Application Builder includes over 100 reports that provide a comprehensive view of
your application from various perspectives. You can use application reports to achieve
consistency among shared components and page components within your application.
For example, you can view details about buttons used on all pages within your
Building an Application 6-29
Viewing Application Reports
application. Additionally, many reports are updatable so you can standardize
components, such as item and region labels, without navigating to a specific page.
Topics in this section include:
■
Accessing Application Reports
■
Shared Components Reports
■
Page Components Reports
■
Activity Reports
■
Cross Application Reports
See Also: "Creating Custom Activity Reports Using APEX_
ACTIVITY_LOG" on page 15-12
Accessing Application Reports
To view reports specific to an application:
1.
Navigate to the Workspace home page.
2.
Click the Application Builder icon.
3.
Select an application.
The Application home page appears.
4.
On the Tasks list, click Application Reports.
5.
Select a type of report to view:
■
Shared Components. See "Shared Components Reports" on page 6-30.
■
Page Components. See "Page Components Reports" on page 6-31.
■
Activity. "Activity Reports" on page 6-31.
■
Cross Application. "Cross Application Reports" on page 6-32.
See Also:
"Identifying At Risk Password Items" on page 13-10
Shared Components Reports
Shared Components reports offer information on common elements that can display
on every page within an application. Reports are grouped by the following categories:
including Application, Logic, Security, Globalization, Conditional Components,
Navigation, User Interface, and Files. Report examples include Developer Comments,
Database Object Dependencies, Application Items, Application Computations,
Authentication Schemes, Breadcrumb Entries, and Shortcuts.
About the Database Object Dependencies Report
The Database Object Dependencies report identifies database objects referenced by the
current application. Review this report to determine what objects to move when
deploying an application.
See Also: "How to Move an Application to Another Development
Instance" on page 14-4 and "Viewing Application Reports" on
page 6-29
To view the Database Object Dependencies report:
6-30 Oracle Application Express Application Builder User’s Guide
Viewing Application Reports
1.
Navigate to the appropriate application.
a.
From the Workspace home page, click the Application Builder icon.
b.
Select an application.
2.
On the Tasks list, click Application Reports.
3.
Click Shared Components.
4.
Under Application, click Database Object Dependencies.
5.
Click Compute Dependencies.
6.
To view the components that reference a specific database object, select the
Reference Count number.
Page Components Reports
Page Components reports offer detailed information on controls and logic that execute
when a page is rendered (for example, branches, buttons, computations, items, and
regions).
See Also: "Editing Multiple Item Help Topics Simultaneously" on
page 7-105
About the Search Region Source Report
Use the Search Region Source report to search through all region source in your
application.
To view the Search Region Source report:
1.
Navigate to the Workspace home page.
2.
Click the Application Builder icon.
3.
Select an application.
4.
On the Tasks list, click Application Reports.
5.
Click Page Components.
6.
Under Regions, click Search Source.
7.
To view the Page Definition for a region, select the page number.
8.
To view region attributes for a region, select the region name.
Activity Reports
Activity reports offer details about developer activity within the current application.
Available reports are grouped into the following categories: Page Views, Caching,
Developer Activity, and Sessions.
You can also access the Activity page by clicking the Activity
link on the Developer toolbar. See "About the Developer Toolbar" on
page 5-28.
Tip:
About the Page Views by Hour Report
To view the Page Views by Hour report:
1.
Navigate to the Workspace home page.
2.
Click the Application Builder icon.
Building an Application 6-31
Understanding Page-Level Items
3.
Select an application.
4.
On the Tasks list, click Application Reports.
5.
Click Activity.
6.
Under Page Views, click By Hour.
Cross Application Reports
Cross Application reports offer information that apply to multiple applications.
Available reports include Application Attributes, Application Comments, Build
Options, Build Status and Application Status, Page Component Counts, Security
Profiles, Authentication Schemes, and Template Defaults by Application.
About the Application Comparison Report
Use the Application Comparison report to compare two applications.
To view the Application Comparison report:
1.
Navigate to the Workspace home page.
2.
Click the Application Builder icon.
3.
Select an application.
4.
On the Tasks list, click Application Reports.
5.
Click Cross Application.
The Application Comparison page appears.
6.
In the navigation bar, specify the following:
a.
Application 1 - Select the first application to compare.
b.
Application 2 - Select the second application to compare.
c.
Component - Select the components to include in the report.
d.
Page - Identify a specific page number to compare.
e.
Show - Select the number of differences to display on each page.
f.
Click Go.
7.
To view only differences, select Show Differences Only and click Go.
8.
To view details, select Show Details and click Go.
Understanding Page-Level Items
An item is part of an HTML form. An item can be a text field, text area, password,
select list, check box, and so on. Item attributes affect the display of items on a page.
For example, these attributes can impact where a label displays, how large an item is,
and if the item will display next to or below the previous item.
Topics in this section include:
■
Differences Between Page Items and Application Items
■
About the Items Section of the Page Definition
■
Creating Page-Level Items
■
Editing Page-Level Items
6-32 Oracle Application Express Application Builder User’s Guide
Understanding Page-Level Items
■
Using the Drag and Drop Layout Page
■
Referencing Item Values
■
Displaying Conditional or Read-Only Page Items
■
Working with a Multiple Select List Item
See Also: "Understanding Application-Level Items" on page 6-52,
"How Item Attributes Affect Page Layout" on page 9-11,
"Understanding Substitution Strings" on page 3-15, and "About the
Item Finder" on page 7-89
Differences Between Page Items and Application Items
There are two types of items: page items and application items. Page items are placed
on a page and have associated user interface properties, such as Display As, Label and
Label Template. Examples of page-level items include a check box, date picker, display
as text, file browse field, popup list of values, select list, or a text area. Application
items are not associated with a page and therefore have no user interface properties.
You can use an application item as a global variable.
See Also:
"Understanding Application-Level Items" on page 6-52
About the Items Section of the Page Definition
You create and edit page-level items on the Page Definition. The Items section appears
in the Page Rendering area.
You can temporarily hide all other subsections by clicking the Items icon. To restore
the view, click Show All. The Show All icon resembles an inverted triangle.
The following icons display next to the section title:
■
■
■
Edit All. The Edit All icon resembles a small grid with a pencil on top of it. Use
this icon to edit all items at once. See "Using the Edit All Icon to Edit Multiple
Items" on page 6-43.
Copy. The Copy icon resembles two small overlapping pages. Use this icon to
make a copy of an existing item.
Create. The Create icon resembles a plus (+) sign overlapping a small page. Click
this icon to create an item.
Items are organized by region. To edit an item, click the item name.
"Editing Page Item Attributes" on page 6-43 and "Using
the Reorder Buttons Icon" on page 7-80
See Also:
Building an Application 6-33
Understanding Page-Level Items
About the Drag and Drop Icon
You can quickly change the appearance of a page by clicking the Drag and drop icon to
access the Drag and Drop Layout page. The Drag and drop icon resembles a green
rectangle and displays to the right of the Reorder Region Items icon.
You can use the Drag and Drop Layout page to interactively reorder items within a
given region, change select item attributes, create items, or delete existing items. See
"Using the Drag and Drop Layout Page" on page 6-47.
About the Reorder Items Icon
You can quickly edit the label and position of items in a region by clicking the Reorder
Region Items icon on the Page Definition. This icon resembles a light green down or
up arrow.
See Also:
"Using the Reorder Region Items Icon" on page 6-46
Creating Page-Level Items
You can create page-level items by running the Create Item Wizard.
Topics in this section include:
■
Creating a Page-Level Item on the Page Definition
■
About Item Naming Conventions
■
About Item Types
■
Creating Multiple Items Using Tabular Form
■
Creating Multiple Items Using Drag and Drop
■
Creating a Static List of Values
6-34 Oracle Application Express Application Builder User’s Guide
Understanding Page-Level Items
See Also: "Differences Between Page Items and Application Items"
on page 6-33
Creating a Page-Level Item on the Page Definition
You create a page-level item by running the Create Item Wizard from the Page
Definition.
To create a page-level item:
1.
Navigate to the appropriate Page Definition. See "Accessing a Page Definition" on
page 5-2.
2.
If necessary, create an HTML region. See "Understanding Regions" on page 9-2.
3.
Under Items, click the Create icon.
4.
Select an item type. See "About Item Types" on page 6-35.
5.
Follow the on-screen instructions.
6.
To learn more about a specific field, click the field label.
When help is available, the item label changes to red when you pass your cursor
over it, and the cursor changes to an arrow and question mark. See "About
Field-Level Help" on page 1-15.
About Item Naming Conventions
When specifying an item name, remember the following rules. Item names must:
■
Be unique within an application
■
Not have quotation marks
■
Begin with a letter or a number, and subsequent characters can be letters,
numbers, or underscore characters
■
Be case-insensitive
■
Should not exceed 30 characters
■
Cannot contain letters outside the base ASCII character set
About Item Types
When you create an item, you specify an item type. Once you create an item, these
types appear on the Display As list on the Edit Page Item page. Table 6–2 describes
available item types.
Building an Application 6-35
Understanding Page-Level Items
Table 6–2
Available Item Types
Item Type
Description
Check Box
Displayed using a list of values. A list of values is required for items displayed
as check boxes. The value corresponding to a checked box is returned in a single
colon-delimited string.
The following example demonstrates how to create a single check box that
returns YES. This example would display both a check box and a field label.
SELECT NULL display_text, 'YES' return_value FROM DUAL;
This example includes the additional text Click to select.
SELECT 'Click to select' display_text, 'YES' return_value FROM DUAL;
See Also: "APEX_UTIL" in Oracle Application Express API Reference for
information about breaking up returned values
Date Picker
Displays a text field with a Calendar icon next to it. When clicked, this icon
displays a small calendar where the user can select a date and a time (optional).
If the format you need is not included in the Display As list, select Date Picker
(use application format mask) or Date Picker (use item format mask). The
latter uses the value from the Format Mask field in the Source section of the Edit
Page Item page.
Display Only
Available Display As Text subtypes include:
■
■
■
■
■
File Browse
Display as Text (does not save state) - Displays the item's source value on
the page without creating a form item.
Display as Text (escape special characters, does not save state) - Displays
the item's source value with special characters ('<','>','&') escaped.
Display as Text (saves state) - Displays the item's source value and creates
a form item that gets submitted with the page to pass the value into session
state.
Display as Text (based on LOV, does not save state) - Displays the display
value from an LOV by matching the item's source value with the LOV's
return value.
Display as Text (based on LOV, saves state) - Same as the previous option,
but also generates a form item that gets submitted with the page to pass the
return value into session state.
Displays a text field with a Browse... button. The Browse button enables the
user to locate a file on a local file system and upload it. Oracle Application
Express provides a table for these files to be uploaded to and an API to retrieve
the files.
See Also: "Securing File Uploads" on page 13-24
Hidden
Renders an HTML hidden form element. Session state can be assigned and
referenced just like a text field.
Hidden and Protected
Renders an HTML hidden form element. Session state can be assigned and
referenced just like a text field. For maximum security use Hidden and
Protected instead of Hidden unless your page has client-side behavior, for
example, JavaScript that alters the item value after the page is rendered by
Oracle Application Express.
List Manager
Based on a list of values. This item enables you to manage a list of items by
selecting and adding to a list. The list of values display as a popup.
6-36 Oracle Application Express Application Builder User’s Guide
Understanding Page-Level Items
Table 6–2 (Cont.) Available Item Types
Item Type
Description
Multiple Select
Renders as a multiselect HTML form element. When submitted, selected values
are returned in a single colon-delimited string. You can break up the values
using the APEX_UTIL API.
See Also: "Working with a Multiple Select List Item" on page 6-51 and "APEX_
UTIL" in Oracle Application Express API Reference
Password
Renders as an HTML password form element. Available password types
include:
■
■
■
■
Password - Suppresses text entered into the field. Saves the value in session
state when the page is submitted.
Password (submits when Enter pressed) - Suppresses text entered into the
field and submits the page when ENTER is pressed.
Password (does not save state) - Suppresses text entered into the field.
Does not save the value in session state.
Password (submits when Enter pressed, does not save state) - Suppresses
text entered into the filed and submits the page when Enter is pressed.
Does not save the value in session state.
The Password and Password (submits when Enter pressed) save the password
in a database table when the page is submitted. Use these password item types
only when the password is needed in session state for use by other pages
during the session.
Password (does not save state) and Password (submits when Enter pressed,
does not save state) do not save the password in a database table. Use these
password item types when the submitted password value is used only by
after-submit page processing on the same page and is never needed again
during the session.
If you must reference and retrieve the value of a password in your application
then you set the Store value encrypted in session state attribute to Yes. To learn
more, see "About Session State and Security" on page 13-13.
Building an Application 6-37
Understanding Page-Level Items
Table 6–2 (Cont.) Available Item Types
Item Type
Description
Popup List of Values
Renders as a text field with an icon. When the user clicks the icon, a popup
window appears with one of these, depending on the popup selection you
make:
■
■
List of values represented as a series of links - When the user makes a
selection from the list, the selected value is placed in the text field.
Color picker - When the user makes a selection from the palette, the HTML
value for the color selected (for example, #000000 for black) is returned.
With the exception of the color picker, you control popup lists of values through
templates. You can only specify one popup list of values (LOV) template for
each application. A popup LOV is a good choice for lists of values that are too
large to return on a single page.
There are two types of Popup LOVs: one that fetches a set of rows when the
window pops up and one that does not. Available popup LOVs include:
■
■
Popup Key LOV (Displays description, returns key value)
Popup Key LOV No Fetch (Displays description, returns key value without
pre-fetch)
■
Popup LOV (fetches first rowset and filters)
■
Popup LOV (fetches first rowset)
■
Popup LOV (no fetch)
■
Popup Color Picker
Popup LOVs must be based on a query that selects two columns with different
column aliases. For example:
SELECT ename name, empno id
FROM emp
If one of the columns is an expression, remember to use an alias. For example:
SELECT ename||' '||job display_value, empno FROM emp
Radio
Renders as an HTML radio group form element, based on a list of values.
Choose Radiogroup with Submit to have the page submitted when the radio
button is selected.
The following example displays employee names (ename), but returns
employee numbers (empno):
SELECT ename, empno FROM emp
6-38 Oracle Application Express Application Builder User’s Guide
Understanding Page-Level Items
Table 6–2 (Cont.) Available Item Types
Item Type
Description
Select List
Displays using a list of values. A list of values is required for items displayed as
a select list. Select lists are rendered using the HTML form element <select>.
The values in a select list are determined using a named list of values or a list of
values defined at the item level. You can specify the NULL display value and
NULL return value.
The following example would return employee names (ename) and employee
numbers (empno) from the emp table. Note that column aliases are not required
and are included in this example for clarity.
SELECT ename display_text, empno return_value FROM emp
Oracle Application Express provides additional enhancements to a standard
HTML select list:
■
■
■
■
Select List with Submit - Submits the page when the user changes its
selected value. Upon submit, the REQUEST is set to the name of the item
that represents the select list, allowing you to execute conditional
computations, validations, processes, and branches.
Select List with Redirect - Redirects the user back to the same page, setting
ONLY the newly selected value of the select list in session state.
Select List Returning URL Redirect - Based on a list of values with URLs
as the return values. Changing the value of the select list causes the
browser to redirect to the corresponding URL.
Select List with Branch to Page - Based on a list of values with page
numbers as return values. Changing the selected value in the select list
causes the Application Express engine to branch to the corresponding
page.
Note: Long select lists can cause errors. If you have a long select list that
generates an error, try using a Popup List of Values instead.
Shuttle
Renders as a multiple select list that includes two boxes containing lists. The left
list displays a source list of values. Users use the shuttle control icons and
buttons to select list items and move them from the left (source) list to the right
(destination) list. Each shuttle has five controls:
■
■
■
Move all - Moves all items in the source list to the destination list.
Move selected - Moves only selected items (Ctrl + Shift items) to
destination list.
Remove selected - Moves only selected items (Ctrl + Shift items) to the
source list.
■
Remove all - Moves all items on destination list back to the source list.
■
Refresh - Resets the source and destination lists.
The right destination list includes the sort controls Move to top, Move up, Move
down, and Move to bottom.
Note: In order to create this item type, you must define a list of values. See
"Creating a Static List of Values" on page 6-42, "Creating Lists of Values" on
page 7-81, and "Working with a Multiple Select List Item" on page 6-51.
Building an Application 6-39
Understanding Page-Level Items
Table 6–2 (Cont.) Available Item Types
Item Type
Description
Text
Displays as an HTML text field containing a maximum of 30,000 bytes of text.
You control the maximum length and display width by editing the Height and
Width item attribute.
Available Text display options include:
■
■
■
■
■
Text Area
Text Field - Renders as a text field.
Text Field (Disabled, does not save state) - Displays a read-only version of
a display value from a list of values by using the item's value in session
state to look up the corresponding display value in the associated list of
values. The value displayed on the screen is not saved in session state upon
submit.
Text Field (Disabled, saves state) - Displays a read-only version of a
display value from a list of values by using the item's value in session state
to look up the corresponding display value in the associated list of values.
Text Field (always submits page when Enter pressed) - Displays a
read-only version of the value in session state. Upon submit, the value
displayed is saved in session state.
Text Field with Calculator Popup - Renders as a text field with an icon
next to it. When clicked, the icon displays a small window containing a
calculator. Calculations are placed back in the text field.
Renders as an HTML text area. There is no maximum length for an item
displayed as a text area. You control the height and width by editing the Height
and Width item attribute. Additional available Text Area Display As options
include:
■
■
■
■
■
■
■
Stop and Start Table
Text Area
Text Area (auto height) - Varies the height based on the amount of text. Use
this option to scale the text area to the amount of data.
Text Area with Counter - Includes a counter that displays the number of
bytes entered in the field.
Text Area with Spell Checker - Provides a popup English language spell
checker.
HTML Editor Minimal - Provides basic text editing features, including the
application of bold, italics, and underline styles, the ability to create
numbered and bulleted lists, and indentation.
HTML Editor Standard - Provides more editing functionality, such as font,
format and color, than HTML Editor Minimal.
Text Area with HTML Editor - Provides basic text formatting controls.
Note that these controls may not work in all Web browsers.
Forces the close of an HTML table using the </table> tag and starts a HTML
table. You can use this item type to reset the column width in the middle of the
region.
Note that a Stop and Start Table item only displays its label. You can prevent the
label from displaying at all by setting it to null. To do this, you simply remove
the default label.
Creating Multiple Items Using Tabular Form
To create multiple items simultaneously:
1.
Navigate to the appropriate Page Definition. See "Accessing a Page Definition" on
page 5-2.
2.
If necessary, create an HTML region. See "Understanding Regions" on page 9-2.
3.
Under Items, click the Create icon.
6-40 Oracle Application Express Application Builder User’s Guide
Understanding Page-Level Items
The Create Item wizard appears.
4.
At the bottom of the page, click the Create multiple Items Using Tabular Form
link.
5.
On the Create Multiple Items page, specify the following:
6.
a.
Create Item(s) in Region - Select the region to contain the items.
b.
Item Template - Select an item template.
c.
For each item, enter the Sequence, Name, Label, Type and specify whether the
item should be cached.
Click Create Multiple Items.
See Also:
"About the Drag and Drop Icon" on page 6-34
Creating Multiple Items Using Drag and Drop
To create multiple items using the Drag and Drop Layout page:
1.
Navigate to the appropriate Page Definition. See "Accessing a Page Definition" on
page 5-2.
2.
If necessary, create an HTML region. See "Understanding Regions" on page 9-2.
3.
Under Items, click the Create icon.
The Create Item wizard appears.
4.
At the bottom of the page, click the Create multiple Items Using Drag and Drop
Layout link.
The Drag and Drop Layout page appears.
5.
Select an item from the palette on the left side of the page and drag it to the
appropriate position on the page.
6.
Edit the item attributes at the of the page.
a.
Display Name - Enter an item name. Use this name retrieve the value of the
item. Item names longer than 30 characters cannot be referenced using bind
variable syntax.
b.
Label - Enter the label for this item. You may include HTML, JavaScript, and
shortcuts. You can also use the substitution string #CURRENT_ITEM_NAME# to
obtain the name of the item associated with this label.
c.
Display Type - Select a display type (if applicable). See "About Item Types" on
page 6-35.
7.
To edit an existing item, edit the Item Name and Label fields, or select a new
Display Type at the top of the page.
8.
Click Next.
9.
Optionally, edit the each item’s Name and Label.
10. Click Apply Changes.
See Also:
"Using the Drag and Drop Layout Page" on page 6-47
Building an Application 6-41
Understanding Page-Level Items
Creating a Static List of Values
One way to create a static list of values is to edit an item's List of Values definition.
Note that this type of list of values is not reusable. As a best practice, create a list of
values as a shared component whenever possible.
See Also:
"Creating Lists of Values" on page 7-81
To create a static list of values:
1.
Navigate to the appropriate Page Definition. See "Accessing a Page Definition" on
page 5-2.
2.
Under Items, select the item name.
The Edit Page Item page appears.
3.
Under Name, specify how the item will be rendered. Make a selection from the
Display As list.
4.
Under List of Values, create a static list of values:
a.
From Named LOV, select Select Named LOV.
b.
In List of values definition, enter a definition using the following syntax:
STATIC[2]:Display Value[;Return Value],Display Value[;Return Value]
Where:
–
The first keyword may be STATIC or STATIC2.
STATIC results in the values being sorted alphabetically by display value.
STATIC2 results in the values being displayed in the order they are
entered in the list.
5.
–
A semicolon separates the display value from the return value in each
entry.
–
Return Value is optional. If a Return Value is not included, the
return value is the same as the display value.
To learn more, see item Help. To view help for a specific item on a page, click the
item label.
When help is available, the item label changes to red when you pass your cursor
over it and the cursor changes to an arrow and question mark. See "About
Field-Level Help" on page 1-15.
6.
Click Apply Changes.
The examples that follow demonstrate syntax for three different static LOVs.
Example 1: Four Values Displayed in Alphabetical Order In this example, the list of values
has four values (Cow, Dog, Cat, and Lion) that display in alphabetical order. The
return value of each entry equals the display value.
STATIC:Cow,Dog,Cat,Lion
Example 2: Ten Values Displayed in the Order Listed In this example, the list of values has
ten values that display in the order listed in the definition. The return value of each
entry equals the display value.
STATIC2:10,15,20,25,50,100,200,500,1000,10000
6-42 Oracle Application Express Application Builder User’s Guide
Understanding Page-Level Items
Example 3: A List of Values with Having Both a Return and Display Value In this example, the
list of values has two values: Yes and No (the display value Yes and its return value Y,
and the display value No and its return value N).
STATIC:Yes;Y,No;N
See Tutorial: "How to Control Form Layout" in Oracle Application
Express Advanced Tutorials
Editing Page-Level Items
You can edit page-level items by editing page item attributes or using the Edit All or
Reorder Items icons.
Topics in this section include:
■
Editing Page Item Attributes
■
Using the Edit All Icon to Edit Multiple Items
■
Using the Reorder Region Items Icon
See Also:
"Using the Drag and Drop Layout Page" on page 6-47
Editing Page Item Attributes
Once you create a page item, you can edit it on the Edit Page Item page.
To edit page item attributes:
1.
Navigate to the appropriate Page Definition. See "Accessing a Page Definition" on
page 5-2.
2.
Under Items, select the item name.
The Edit Page Item page appears.
3.
To learn more about a specific attribute on a page, click the attribute label.
When help is available, the item label changes to red when you pass your cursor
over it, and the cursor changes to an arrow and question mark. See "About
Field-Level Help" on page 1-15.
4.
Click Apply Changes.
See Also: "How Item Attributes Affect Page Layout" on page 9-11
and "Understanding Cross-Site Scripting Protection" on page 13-11
About Navigation Alternatives The Edit Page Item page is divided into the following
sections: Name, Displayed, Label, Element, Source, Default, List of Values, Security,
Conditions, Read Only, Help Text, Configuration, and Comments.
You can access these sections by scrolling down the page, or by clicking a navigation
button at the top of the page. When you select a button at the top of the page, the
selected section appears and all other sections are temporarily hidden. To view all
sections of the page, click Show All.
Using the Edit All Icon to Edit Multiple Items
You can edit multiple items at once by clicking the Edit All icon on the Page Definition.
The Edit All icon resembles a small grid with a pencil on top of it.
Building an Application 6-43
Understanding Page-Level Items
Clicking the Edit All icon displays a series of pages that enable you to edit multiple
items simultaneously or view a history of recent changes.
Topics in this section include:
■
Page Items
■
Item Help
■
Reassign Region Items
■
Delete Multiple Items
■
History
See Also:
"How Item Attributes Affect Page Layout" on page 9-11
Page Items Item attributes control how items display on a page. You can use the Page
Items page to edit the sequence, field label, template, region, and overall position for
all items on a page.
A Navigation bar displays at the top of the page. Use the Page field to navigate to
another page. To limit the display to just items in a specific region, make a selection
from Show Regions list.
See Also:
"Editing Page Item Attributes" on page 6-43
The Page Items page displays items in an editable report. Table 6–3 describes each
editable attribute.
Table 6–3
Editable Attributes on Page Items
Attribute
Description
Sequence
Specify the display sequence for this component. The sequence
determines the order of evaluation.
Prompt
Enter the label for this HTML form element. You may include
HTML, JavaScript, and shortcuts. You can also use the
substitution string #CURRENT_ITEM_NAME# to obtain the
name of the item associated with this label.
Field Template
Determines the label template. Label templates enable you to
define the user interface attributes in a central place and share
that definition among many labels.
Region
Defines the region in which the item displays. All items must be
in a region.
New Line
Determines whether this item displays on the same line as the
previous item or whether it displays on the next line. Items are
laid out in an HTML table. Select Yes to have an item display as
the first field in a new row in the table.
6-44 Oracle Application Express Application Builder User’s Guide
Understanding Page-Level Items
Table 6–3 (Cont.) Editable Attributes on Page Items
Attribute
Description
Width
Specifies the length (in characters) of the form element that
displays for this item.
Height
Specifies the height (in lines) for text areas and multi select lists.
Column Span
Items are laid out in HTML tables. This property defines the
value to be used for the COLSPAN attribute in the table cell.
Row Span
Items are laid out in HTML tables. The attribute determines the
value to be used for the ROWSPAN attribute in the table cell that
the item displays in.
Edit the appropriate attributes and click Apply Changes.
Item Help Use the Item Help page to edit item help for all items on a page. You can
avoid repeating the same Help text in multiple locations by subscribing to another
item.
See Also:
"Creating a Help Page" on page 7-104
To edit item Help:
1.
Navigate to the appropriate Page Definition. See "Accessing a Page Definition" on
page 5-2.
2.
Under Items, click the Edit All icon.
3.
Click Item Help.
The Item Help page appears.
Use the Navigation bar at the top of the page to narrow or broaden the display.
Available options include:
■
Page - Select or enter a new number and click Go.
■
Search - Enter a case insensitive query and click Go.
■
Show - Select whether to display All, Subscribed, or Unsubscribed Help text.
■
All Pages - Select to run the search query on all pages in the application.
■
Current Page - Select to restrict the search query to the current page.
You can also use the arrows in the Navigation bar to scroll through the
application pages.
4.
To subscribe to an existing Help item, make a selection from Subscribed To.
5.
To edit help for a specific item, click the item name.
On the Edit Help page:
6.
a.
Reference Master Item Help From - (Optional) Select a existing item Help topic
to subscribe to.
b.
Help Text - Enter or edit the Help text for this item.
c.
Click Apply Changes.
Click Apply Changes.
Building an Application 6-45
Understanding Page-Level Items
Reassign Region Items Use the Reassign Region Items page to assign items to a new
region.
To Reassign Region Items page:
1.
Navigate to the appropriate Page Definition. See "Accessing a Page Definition" on
page 5-2.
2.
Under Items, click the Edit All icon.
3.
Click Reassign Region Items.
The Reassign Region Items page appears.
Use the Navigation bar at the top of the page to narrow or broaden the display.
Available options include:
4.
■
Page - Select or enter a new number and click Go.
■
Show Regions - Select a region to display and click Go.
To reassign an item to another region:
a.
Select the items to reassign.
b.
From Assign to Region, select a new region.
c.
Click Reassign Region Items.
Delete Multiple Items Use the Delete Multiple Items page to delete multiple items at
once.
To delete multiple items:
1.
Navigate to the appropriate Page Definition. See "Accessing a Page Definition" on
page 5-2.
2.
Under Items, click the Edit All icon.
3.
Click Delete Multiple Items.
The Delete Multiple Items page appears.
Use the Navigation bar at the top of the page to narrow or broaden the display.
Available options include:
4.
■
Page - Select or enter a new number and click Go.
■
Show Regions - Select a region to display and click Go.
■
Forward (>) and Next (<) buttons - Display the previous and next page.
To reassign an item to another region:
a.
Select the items to reassign.
b.
From Assign to Region, select a new region.
c.
Click Reassign Region Items.
History Use the History page to view a summary of recent edits to page-level items.
Using the Reorder Region Items Icon
You can quickly edit the label and position of items in a region by clicking the Reorder
Region Items icon on the Page Definition. This icon resembles a light green down or
up arrow.
To use the Reorder Region Items icon:
6-46 Oracle Application Express Application Builder User’s Guide
Understanding Page-Level Items
1.
Navigate to the appropriate Page Definition. See "Accessing a Page Definition" on
page 5-2.
2.
Under Items, click the Reorder Region Items icon.
The Reorder Region Items page appears with items laid out in tables. You can edit
the position of an item by selecting values for New Line, New Field, Column Span,
and Label Alignment attributes. Note that a graphical representation of how the
items display appears at the bottom of the page.
3.
To edit an item label, enter a new title in the Label field.
4.
To change the position of an item, edit the following attributes:
■
■
■
New Line. Determines if the item displays on the same line as the previous
item, or displays on the next line. Select Yes to have an item display as the first
field in a new row in the table.
New Field. Determines if the item displays in the next column or in the same
column as the previous item. Select Yes to have the label and value for the
item display in a new HTML table cell. Use this attribute in combination with
the New Line and Span attributes to control layout.
Column Span. Defines the value to be used for the COLSPAN attribute in the
table cell. The COLSPAN attribute defines the number of columns that it spans
across the table.
5.
To change label alignment, make a selection from the Label Alignment list.
6.
To change the order in which items display, click the up and down arrows in the
far right column. Clicking the arrow moves the item one row up or down.
Note that the order you specify here translates to sequence number in the
Sequence attribute on the Edit Page Item page. See "Editing Page Item Attributes"
on page 6-43.
7.
Click Apply Changes.
Tip: You can also use the Drag and Drop Layout feature to reorder
items. See "Using the Drag and Drop Layout Page" on page 6-47.
To change the region in which an item resides, you must edit
the item attributes. See "Editing Page Item Attributes" on page 6-43.
Note:
Using the Drag and Drop Layout Page
You can use the Drag and Drop Layout page to interactively reorder items within a
given region, change select item attributes, create items, or delete existing items.
Topics in this section include:
■
Accessing the Drag and Drop Layout Page
■
About the Drag and Drop Layout Page
■
Creating a New Item
■
Editing Existing Items
■
Deleting Items
See Also: "Creating Multiple Items Using Drag and Drop" on
page 6-41
Building an Application 6-47
Understanding Page-Level Items
Accessing the Drag and Drop Layout Page
You access the Drag and Drop Layout page by either:
■
■
Clicking the Drag and drop icon on the Page Definition. See "About the Drag and
Drop Icon" on page 6-34.
Clicking the Reorder Regions Items icon and selecting the Drag and Drop Layout
tab. See "Using the Reorder Buttons Icon" on page 7-80.
See Also: "Differences Between Page Items and Application Items"
on page 6-33
About the Drag and Drop Layout Page
The Drag and Drop Layout page is divided into two sections: Item palette and Layout
region.
The Item palette displays on the left side of the page. You add items by clicking an
item type on the palette and dragging it to the correct position in the Layout region.
Note that when you position the cursor over an item type, a tooltip appears.
Use the right side of the page (or Layout region) to position items. To move an item
vertically, click the Add Row button to insert an empty row. Then drag and drop the
item into the empty row.
See Also:
"Deleting Items" on page 6-50
Creating a New Item
To create a new item on the Drag and Drop Layout page:
1.
Navigate to the Drag and Drop Layout page. See "Accessing the Drag and Drop
Layout Page" on page 6-48.
2.
Click an item type in the Item palette on the left side of the page and drag it to the
appropriate location in the Layout region.
Note that when you position the cursor over an item type, a tooltip appears.
6-48 Oracle Application Express Application Builder User’s Guide
Understanding Page-Level Items
3.
You can reposition the item:
■
■
4.
To move an item horizontally, select the item and drag it to the appropriate
position on the page.
To insert an existing or new item between two existing rows, click the Add
Row button and drag it between the existing rows. This creates an empty row
where you can then move the item.
Edit the item attributes at the of the page.
a.
Display Name - Enter an item name. Use this name to retrieve the value of the
item. Item names longer than 30 characters cannot be referenced using bind
variable syntax.
b.
Label - Enter the label for this item. You may include HTML, JavaScript, and
shortcuts. You can also use the substitution string #CURRENT_ITEM_NAME# to
obtain the name of the item associated with this label.
c.
Display Type - Select a display type (if applicable). Note that the select list is
restricted to options corresponding to the type of item you are creating. See
"About Item Types" on page 6-35.
5.
Click Next.
6.
Optionally, edit the each item’s Name and Label.
7.
Click Apply Changes.
See Also: "Creating Multiple Items Using Drag and Drop" on
page 6-41 and "Editing Page Item Attributes" on page 6-43
About List of Values If you create an item that requires a list of values (LOV), the Drag
and Drop Layout Wizard creates a static inline LOV for you. Note you must edit and
fix this LOV once you complete the layout process.
See Also:
"Creating a Static List of Values" on page 6-42
Editing Existing Items
To edit an existing item on the Drag and Drop Layout page:
1.
Navigate to the Drag and Drop Layout page. See "Accessing the Drag and Drop
Layout Page" on page 6-48.
2.
To reposition the item:
■
■
3.
To move an item horizontally, select the item and drag it to the appropriate
position on the page.
To insert an existing or new item between two existing rows, click the Add
Row button and drag it between the existing rows. This creates an empty row
where you can then move the item.
If required, select an item and edit its attributes at the of the page.
a.
Display Name - Enter an item name. Use this name retrieve the value of the
item. Item names longer than 30 characters cannot be referenced using bind
variable syntax.
b.
Label - Enter the label for this item. You may include HTML, JavaScript, and
shortcuts. You can also use the substitution string #CURRENT_ITEM_NAME# to
obtain the name of the item associated with this label.
Building an Application 6-49
Understanding Page-Level Items
c.
Display Type - Select a display type (if applicable). Note that the select list is
restricted to options corresponding to the type of item you are creating. See
"About Item Types" on page 6-35. See "About Item Types" on page 6-35.
4.
Click Next.
5.
Optionally, edit the each item’s Name and Label.
6.
Click Apply Changes.
To change the region in which an item resides, you must edit
the item attributes. See "Editing Page Item Attributes" on page 6-43.
Note:
Deleting Items
To delete an item, click it and drag it to the Recycle box at the bottom of the page. If
you delete an existing item, it appears in the Recycle box and can be retrieved until
you click Apply Changes on the next page. Note that if you drop a new item you have
just created in the Recycle box, it instantly disappears and cannot be retrieved.
Referencing Item Values
You can reference item values stored in session state in regions, computations,
processes, validation, and branches. Table 6–4 describes the supported syntax for
referencing item values.
See Also:
Table 6–4
"Managing Session State Values" on page 3-11
Syntax for Referencing Item Values
Type
Syntax
Description
SQL
:MY_ITEM
Standard bind variable syntax for items whose names are
no longer than 30 bytes. Use this syntax for references
within a SQL query and within PL/SQL.
PL/SQL
V('MY_ITEM')
PL/SQL syntax referencing the item value using the V
function.
See Also: Oracle Application Express API Reference
PL/SQL
NV('MY_NUMERIC_ITEM')
Standard PL/SQL syntax referencing the numeric item
value using the NV function.
See Also: Oracle Application Express API Reference
Static Text
&MY_ITEM
Static Text (exact) &MY_ITEM.
Static text.
Static text. Exact Substitution.
You can set the value of an item in your application using any of the following
methods:
■
For page-level items, use the Source Attribute to set the item value.
From the Page Definition, select the item name to view the Edit Page Item page.
Scroll down to Source and edit the appropriate fields.
You can also set the value of an item in any region based on PL/SQL or a process
using the following syntax:
BEGIN
:MY_ITEM :=
'new value';
6-50 Oracle Application Express Application Builder User’s Guide
Understanding Page-Level Items
END;
■
Pass the value on a URL reference using f?p syntax. For example:
f?p=100:101:10636547268728380919::NO::MY_ITEM:ABC
■
Set the value using a computation. Computations are designed to set item values.
For example:
TO_CHAR(SYSDATE,'Day DD Month, YYYY');
■
Use the PL/SQL API to set an item value within a PL/SQL context. For example:
APEX_UTIL.SET_SESSION_STATE('MY_ITEM',SYSDATE);
See Also: "Clearing Session State" on page 3-12, Oracle Application
Express API Reference, and "Understanding Cross-Site Scripting
Protection" on page 13-11
Displaying Conditional or Read-Only Page Items
You can choose to have an item display conditionally or as read-only by editing
attributes on the Edit Pages Item page.
To display a conditional or read-only item:
1.
Create the item. See "Creating Page-Level Items" on page 6-34.
2.
Navigate to the appropriate Page Definition. See "Accessing a Page Definition" on
page 5-2.
3.
Under Items, select the item name.
The Edit Page Item page appears.
4.
5.
6.
To display an item conditionally:
a.
Scroll down to Conditions.
b.
Make a selection from the Condition Type list.
c.
Enter an expression in the fields provided.
To make an item read-only:
a.
Scroll down to Read Only Display Settings.
b.
Make a selection from the Read Only Condition Type list.
c.
Enter an expression in the fields provided.
Click Apply Changes.
Working with a Multiple Select List Item
A multiple select item renders as a multiple select list form element which can be
either a Multiselect List or Shuttle item type. When submitted, selected values are
returned in a single colon-delimited string. You can handle values in this format in two
ways:
■
Using the INSTR function
■
Using the APEX_UTIL.STRING_TO_TABLE function
Building an Application 6-51
Understanding Application-Level Items
Using APEX_UTIL.STRING_TO_TABLE to Convert Selected Values
Suppose you had a report on the EMP and DEPT tables that is limited by the
departments selected from a Department multiple select list. First, you create the
multiple select item, P1_DEPTNO, using the following query:
SELECT dname, deptno
FROM dept
Second, you return only those employees within the selected departments as follows:
SELECT ename, job, sal, comm, dname
FROM emp e, dept d
WHERE d.deptno = e.deptno
AND instr(':'||:P1_DEPTNO||':',':'||e.deptno||':') > 0
Next, assume you want to programmatically step through the values selected in the
multiple select item, P1_DEPTNO. To accomplish this, you would convert the
colon-delimited string into a PL/SQL array using the APEX_UTIL.STRING_TO_
TABLE function. The following example demonstrates how to insert the selected
departments into an audit table containing the date of the query.
DECLARE
l_selected APEX_APPLICATION_GLOBAL.VC_ARR2;
BEGIN
--- Convert the colon separated string of values into
-- a PL/SQL array
l_selected := APEX_UTIL.STRING_TO_TABLE(:P1_DEPTNO);
--- Loop over array to insert department numbers and sysdate
-FOR i IN 1..l_selected.count
LOOP
INSERT INTO report_audit_table (report_date, selected_department)
VALUES (sysdate, l_selected(i));
END LOOP;
END;
"STRING_TO_TABLE Function" in Oracle Application
Express API Reference
See Also:
Understanding Application-Level Items
Application-level items do not display, but are used as global variables to the
application. You can use an application item as a global variable.
Topics in this section include:
■
Creating an Application-level Item
■
Accessing Application Item History
■
Editing Application-level Item Attributes
See Also: "Differences Between Page Items and Application Items"
on page 6-33 and "Referencing Item Values" on page 6-50
6-52 Oracle Application Express Application Builder User’s Guide
Understanding Application-Level Items
Creating an Application-level Item
To create an application-level item:
1.
Navigate to the Workspace home page.
2.
Click the Application Builder icon.
3.
Select an application.
4.
When Application
5.
Under Logic, select Application Items.
Builder appears, click Shared Components.
The Application Items page appears.
6.
To create an application item, click Create.
7.
Follow the on-screen instructions.
About the Application Items Page
Once you create a application item, it appears on the Application Items page. You
control how the Application Items page displays by making a selection from the View
list. Available options include:
■
■
Icons (the default) displays each application item as a large icon. To edit an
application item, click the appropriate icon.
Details displays each application item as a line in a report. To edit an application
item, click the name.
Accessing Application Item History
You can view a history of changes to application items by clicking History at the top of
the Application Items page.
Editing Application-level Item Attributes
Once you create an application-level item, you can edit it on the Create/Edit
Application Item page.
To edit application-level item attributes:
1.
Navigate to the Workspace home page.
2.
Click the Application Builder icon.
3.
Select an application.
4.
When Application
5.
Under Logic, select Application Items.
Builder appears, click Shared Components.
The Application Items page appears.
6.
Select an application item.
The Create/Edit Application Item page appears.
7.
To learn more about a specific item on a page, click the item label.
When Help is available, the item label changes to red when you pass your cursor
over it and the cursor changes to an arrow and question mark. See "About
Field-Level Help" on page 1-15.
8.
Click Apply Changes.
Building an Application 6-53
Understanding Application-Level Items
See Also: "Understanding Cross-Site Scripting Protection" on
page 13-11
About Navigation Alternatives
The Create/Edit Application Item page is divided into the following sections: Name,
Security, Configuration, and Comments.
You can access these sections by scrolling down the page, or by clicking a navigation
button at the top of the page. When you select a button at the top of the page, the
selected section appears and all other sections are temporarily hidden. To view all
sections of the page, click Show All.
6-54 Oracle Application Express Application Builder User’s Guide
Understanding Application-Level Items
Building an Application 6-55
Understanding Application-Level Items
6-56 Oracle Application Express Application Builder User’s Guide
7
Adding Application Components
This section describes how to use Application Builder to add pages to an application
and add other components (reports, charts, or forms), page controls (buttons, items,
list of values), and shared components (breadcrumbs, lists, or tabs).
This section contains the following topics:
■
Creating Reports
■
Creating Forms
■
Creating Calendars
■
Creating Charts
■
Creating Buttons
■
Creating Lists of Values
■
Creating Dependent Select Lists
■
Using Shortcuts
■
Using the Find Icon
■
Controlling Access to Applications, Pages, and Page Components
■
Incorporating JavaScript into an Application
■
Optimizing a Page for Printing
■
Creating a Help Page
"Using Application Builder" on page 4-1, "Controlling
Page Layout" on page 9-1, and "Adding Navigation" on page 8-1
See Also:
Creating Reports
In Oracle Application Express, a report is the formatted result of a SQL query. You can
generate reports by selecting and running a built-in query, or by defining a report
region based on a SQL query.
Topics in this section include:
■
Creating a Report Using a Wizard
■
Using Interactive Reports
■
Editing Interactive Reports
■
Editing SQL and Wizard Reports
■
Printing Report Regions
Adding Application Components
7-1
Creating Reports
Creating a Report Using a Wizard
Application Builder includes a number of built-in wizards for generating reports.
To create a report using a wizard:
1.
On the Workspace home page, click the Application Builder icon.
2.
Select the application.
3.
Click Create Page and click Next.
4.
Select Report.
5.
Select a report type and click Next:
■
■
■
■
6.
SQL Report - Creates a report based on a custom SQL SELECT statement or a
PL/SQL function returning a SQL SELECT statement that you provide. For
assistance in writing the SQL query, click the Query Builder button.
Interactive Report - Creates an interactive report based on a custom SQL
SELECT statement you provide. For assistance in writing the SQL query, click
the Query Builder button. End users can customize the report layout and data
displayed by selecting options on the Actions menu.
Report on Web Service Result - Creates a report based on a Web service
result. To learn more, see "Implementing Web Services" on page 15-16.
Wizard Report - Creates a classic report without requiring any SQL
knowledge. Select the appropriate schema, table, columns, and result set
display.
Follow the on-screen instructions. To learn more about a specific field, click the
item label.
When Help is available, the item label changes to red when you pass your cursor
over it and the cursor changes to an arrow and question mark. See "About
Field-Level Help" on page 1-15.
See Tutorials: "How to Create a Drill Down Report" and "How to
Create a Parameterized Report" in Oracle Application Express Advanced
Tutorials
Understanding the Difference Between Interactive and Classic Reports
Oracle Application Express includes two main report types, an interactive report and a
classic report. The main difference between these two report types is that interactive
reports enable the user to customize the appearance of the data through a searching,
filtering, sorting, column selection, highlighting, and other data manipulations.
The following is an example of an interactive report.
7-2 Oracle Application Express Application Builder User's Guide
Creating Reports
Notice that the interactive report includes a Search Bar, Column Heading Menu links,
and Link Column icons in the first column of each row. For a complete description of
these components, see "Using Interactive Reports" on page 7-4.
In contrast, a classic report does not include any of these customization features. The
following is an example of a classic report built on top of the same data.
Classic reports do not include a Search Bar and the links at the top of each column
only support basic sorting.
Adding Application Components
7-3
Creating Reports
"Editing Interactive Reports" on page 7-15 and "Editing
SQL and Wizard Reports" on page 7-26
See Also:
Using Interactive Reports
Interactive reports include components that enable users to alter the layout of report
data. Users can select columns, create filters, apply highlighting, sort columns, define
break groups, aggregate columns, create charts, and define computations. Once
customized, users can then save an interactive report as named report and download
the data to various file formats.
See Also:
"Editing Interactive Reports" on page 7-15
Topics in this section include:
■
About the Search Bar
■
About Link Column Icons
■
About the Actions Menu
■
Selecting Columns to Display
■
Adding a Filter
■
Selecting Columns and Sort Order
■
Creating a Control Break
■
Adding Highlighting
■
Computing Columns
■
Aggregating a Column
■
Creating a Chart
■
Executing a Flashback Query
■
Saving a Report
■
Resetting a Report
■
Downloading a Report
About the Search Bar
A search bar displays at the top of every interactive report and includes the following
features:
■
■
Search columns icon - Resembles a magnifying glass. Click this icon to narrow
your search to only specific columns. To search all columns, select All Columns.
Text area - Enter case insensitive search criteria (wild card characters are implied)
and then click Go.
■
Rows - Selects the number of rows to display per page.
■
Go button - Executes a search.
■
Actions menu - Displays the Actions menu. See "About the Actions Menu" on
page 7-6.
7-4 Oracle Application Express Application Builder User's Guide
Creating Reports
See Also: "Removing or Customizing a Search Bar in an Interactive
Report" on page 7-20
Searching Specific Columns Clicking the Search columns icon (resembles a magnifying
glass) displays a listing of all columns in the current report.
To use the Search columns icon:
1.
Click the Search columns icon and select a column.
The column name displays to the right of the Search columns icon.
2.
Enter keywords in the Text area and click Go.
Notice the filter Person Role contains 'manager' has been added to the
Report Settings area above the report.
3.
To disable the filter, select the Enable/Disable Filter check box.
4.
To delete the filter, click the Remove Filter icon.
See Also:
"Selecting Columns to Display" on page 7-7
Editing a Filter To edit an existing filter:
1.
Click the filter name.
The filter appears.
2.
Edit the the Column, Operator, and Expression fields.
3.
Click Apply.
About Link Column Icons
Link Column icons display on the far left of each row in an interactive report. A Link
Column can link to a single row view, a custom target, or be excluded from the report.
Adding Application Components
7-5
Creating Reports
To learn more about customizing this interactive report attribute, see "Understanding
Link Columns" on page 7-22 and "Creating a Column Link in an Interactive Report" on
page 7-23.
About the Actions Menu
The Actions menu appears to the right of the Go button on the Search bar. Use this
menu to customize an interactive report.
The Actions menu contains the following options:
■
■
■
■
■
■
■
Select Columns specifies which columns to display and in what order. See
"Selecting Columns to Display" on page 7-7.
Filter focuses the report by adding or modifying the WHERE clause on the query.
See "Adding a Filter" on page 7-7.
Sort specifies which columns to sort on and the sort order (that is, ascending or
descending). See "Selecting Columns and Sort Order" on page 7-8.
Control Break creates a break group on one or several columns. See "Creating a
Control Break" on page 7-9.
Highlight defines a filter that highlights the rows that meet the filter criteria. See
"Adding Highlighting" on page 7-9.
Compute enables users to add computed columns to a report. See "Computing
Columns" on page 7-11.
Aggregate enables users to perform mathematical computations against a column.
See "Aggregating a Column" on page 7-12.
7-6 Oracle Application Express Application Builder User's Guide
Creating Reports
■
■
■
■
■
■
Chart displays the report data as a chart. See "Creating a Chart" on page 7-13.
Flashback performs a flashback query enabling users to view the data as it existed
at a previous point in time. See "Executing a Flashback Query" on page 7-13.
Save Report saves the current customized report settings so they can be used in
the future. See "Saving a Report" on page 7-14.
Reset enables users to reset the report back to the default report settings. See
"Resetting a Report" on page 7-14.
Help provides detailed descriptions of how to use the interactive report
components to customize your reports.
Download enables users to download a report. Available download formats
depend upon your installation and report definition. See "Downloading a Report"
on page 7-14.
Selecting Columns to Display
To customize a report to include specific columns, select Select Columns on the
Actions menu.
To use the Select Columns option:
1.
Click the Actions menu and select Select Columns.
The Select Columns region appears.
2.
Select the columns you wish to move. Cclick the arrows in the center of region to
move a column from the Display in Report box to the Do Not Display in Report
box. To select multiple columns at once, press and hold the CTRL key.
3.
To change the order of the columns, click the Top, Up, Down, and Bottom arrows
on the right.
4.
Click Apply.
A revised report appears.
See Also:
"Resetting a Report" on page 7-14
Adding a Filter
You can create a filter to focus a report by selecting Filter on the Actions menu. This
option enables you to add or modify the WHERE clause in the query.
To add a filter:
1.
Click the Actions menu and select Filter.
Adding Application Components
7-7
Creating Reports
The Filter region appears.
2.
Select a column, an operator, and expression.
In the previous example, the filter will display all people who have the Person
Role of Lead.
3.
Click Apply.
Notice the filter Person Role contains 'Lead' has been added to the Report
Settings area above the report.
4.
To revise the filter:
a.
Click the filter name (in this example, Person Role contains 'Lead').
b.
Edit your selections and click Apply.
5.
To disable the filter, select the Enable/Disable Filter check box.
6.
To delete the filter, click Remove Filter.
Selecting Columns and Sort Order
You can specify which columns to display and the sort order (ascending or
descending) by selecting Sort on the Actions menu.
To sort by column:
1.
Click the Actions menu and select Sort.
The Sort region appears.
7-8 Oracle Application Express Application Builder User's Guide
Creating Reports
2.
Select a column, the sort direction (Ascending or Descending), and Null Sorting
behavior (Default, Nulls Always Last, or Nulls Always First).
3.
Click Apply.
Creating a Control Break
You can create a break group of one or several columns by selecting Control Break
from the Actions menu. Creating a break group pulls the columns out of the
interactive report and displays them as a master record.
To create a break group:
1.
Click the Actions menu and select Control Break.
The Control Break region appears.
2.
Select a column and then a status (Enable or Disable)
3.
Click Apply.
One or more break groups display in Report Settings area above the report.
4.
To expand the break group, click the plus (+) sign.
5.
To enable the Control Break filter, select the Enable/Disable Filter check box.
6.
To delete the filter, click Remove Filter.
Adding Highlighting
You can customize the display to highlight specific rows in a report by selecting
Highlight on the Actions menu.
To create highlighting:
1.
Click the Actions menu and select Highlight.
Adding Application Components
7-9
Creating Reports
The Highlight region appears.
2.
3.
Enter the following information:
a.
Name - Enter a name to define this filter.
b.
Sequence - Enter numeric value to identify the sequence in which the rules are
evaluated.
c.
Highlight Type - Select Cell or Row. If Cell is selected, the column referenced
in the Highlight Condition is highlighted.
d.
Background Color - Select a new color for the background of the highlighted
area.
e.
Text Color - Select a new color for the text in the highlighted area.
f.
Select a column, an operator, and expression.
Click Apply.
Notice a new filter appears in the Report Settings area above the report.
4.
5.
To revise the filter:
a.
Click the filter name (in this example, Project Lead).
b.
Edit your selections and click Apply.
To disable the filter, select the Enable/Disable Filter check box.
7-10 Oracle Application Express Application Builder User's Guide
Creating Reports
6.
To delete the filter, click Remove Filter.
Computing Columns
You can add computations to columns by selecting Compute from the Actions menu.
To create a computation:
1.
Click the Actions menu and select Compute.
The Compute region appears.
2.
From Computation, select a previously defined computation or select New
Computation.
3.
For Column Heading, enter a heading for the new column.
4.
For Format Mask, select an Oracle format mask to be applied to the new column.
Next, create the computation. Use the Columns, Keypad, and Functions sections to
create a computation.
5.
6.
To create the computation:
a.
Columns - Select the column name or alias to be added to the computation.
b.
Keypad - Click the appropriate options. This section provides shortcuts for
commonly used keys.
c.
Functions - Select the appropriate function.
Click Apply.
Deleting a Computation To delete a computation:
1.
Click the Actions menu and select Compute.
The Compute region appears.
2.
From Computation, select the defined computation.
3.
Click Delete.
Adding Application Components 7-11
Creating Reports
Aggregating a Column
You can define a mathematical computation against a column (or aggregate) by
selecting Aggregate from the Actions menu. Aggregates are displayed after each
control break and at the end of the report within the column in which they are defined.
To aggregate columns:
1.
Click the Actions menu and select Aggregate.
The Aggregate region appears.
2.
From Aggregation, select a previously defined aggregation or select New
Aggregation.
3.
For Function, select one of the following: Sum; Average, Count, Minimum,
Maximum, or Median.
4.
For column, select a column name or alias.
5.
Click Apply.
The computation appears at the bottom of the report.
In this example, the aggregate shows the sum of all amounts in the Order Total
column.
6.
To remove the aggregate:
a.
Select Aggregate from the Actions menu.
The Aggregate region appears.
Removing an Aggregate To remove aggregate columns:
1.
Click the Actions menu and select Aggregate.
The Aggregate region appears.
7-12 Oracle Application Express Application Builder User's Guide
Creating Reports
2.
From Aggregation, select a previously defined aggregation.
3.
Click Delete.
Creating a Chart
To create a chart, select Chart on the Actions menu. You can create one chart for each
interactive report. Once defined, you can switch between the chart and report views
using links on the Search bar.
To create a chart:
1.
Click the Actions menu and select Chart.
The Chart region appears.
2.
In the Chart region, specify the following:
a.
Chart Type - Select the type of chart you wish to create.
b.
Label - Select the column to be used as the label.
c.
Axis for Title for Label - Enter title to be displayed on the axis associated with
the column selected for Label (not available for pie chart).
d.
Value - Select the column to be used as the Value. If your function is a COUNT,
a Value does not need to be selected.
e.
Axis Title for Value - Enter the title to display on the axis associated with the
column selected for Value (not available for pie chart).
f.
Function - (Optional) Select a function to be performed on the column selected
for Value.
Edit Chart and View Chart links appear beneath the Search bar.
3.
To alter the chart, click Edit Chart.
4.
To return to the report, click View Report.
5.
To delete the chart, click Edit Chart and then Delete.
Executing a Flashback Query
You can execute a flashback query by selecting Flashback from the Actions menu. A
flashback query enables you to view the data as it existed at a previous point in time.
The default amount of time that you can flashback is 3 hours (or 180 minutes) but the
actual amount will differ for each database.
To execute a flashback query:
1.
Click the Actions menu and select Flashback.
Adding Application Components 7-13
Creating Reports
2.
In the Flashback region, enter the number of minutes.
3.
Click Apply.
Saving a Report
You can save a customized report by selecting Save Report from the Actions menu.
You can choose to save a Named Report or Default Report Settings.
The Save Report option does not display if an authentication
scheme is not defined for the current application. See "Establishing
User Identity Through Authentication" on page 13-24.
Tip:
Saving a Interactive Report To save an interactive report:
1.
Run the report.
2.
From the Actions menu, select Save Report.
3.
In Save Report:
a.
Save - Select As Named Report.
b.
Name - Enter a name for the report.
c.
Description - Enter an optional description.
d.
Click Apply.
Tip: To save a named report saved to a new page, disable Show
Saved Reports as Tabs under Advanced Attributes. See "Configuring
Advanced Attributes for Interactive Reports" on page 7-25
Saving Default Report Settings Default report settings determine the way a report initially
displays to end users. End users can then modify any of the settings.
To save default report settings:
1.
Click the Actions menu and select Save Report.
2.
From Save, select As Default Report Settings.
3.
Click Apply.
Resetting a Report
You can reset a report back to the default settings by selecting Reset from the Actions
menu. Resetting a report removes any customizations you have made.
To reset a report:
1.
Click the Actions menu and select Reset.
2.
Click Apply.
Downloading a Report
You can download an interactive report back by selecting Download from the Actions
menu. Available download formats depend upon your installation and report
definition but may include comma-delimited file (CSV) format, Microsoft Excel (XLS)
format, Adobe Portable Document Format (PDF), and Microsoft Word Rich Text
Format (RTF).
To download a report:
7-14 Oracle Application Express Application Builder User's Guide
Creating Reports
1.
Click the Actions menu and select Download.
2.
Select a report download format and follow the provided instructions.
See Also: "Adding a Download Option to the Actions Menu" on
page 7-20
Editing Interactive Reports
By default, an interactive report includes a Search Bar, Column Heading Menu links,
and Link Column icons. Users can use these components to alter the layout of report
data by selecting columns, applying filters, highlighting, and sorting. This section
describes how developers can customize an interactive report by editing report
attributes.
Topics in this section include:
■
Accessing the Interactive Report Attributes Page
■
Editing Interactive Report Column Attributes
■
Creating Column Groups
■
Controlling Interactive Report Pagination
■
Managing Interactive Report Column Sorting
■
Removing or Customizing a Search Bar in an Interactive Report
■
Adding a Download Option to the Actions Menu
■
Understanding Link Columns
■
Creating a Column Link in an Interactive Report
■
Defining a Column as a List of Values in an Interactive Report
■
Configuring Advanced Attributes for Interactive Reports
■
Linking to Interactive Reports
See Also:
"Using Interactive Reports" on page 7-4
Accessing the Interactive Report Attributes Page
You can access the Interactive Report Attributes page by clicking the Interactive
Report link next to the report region you want to edit on the Page Definition. You can
also navigate to the Report Attributes page by clicking the region name and then
selecting the Report Attributes tab.
To access the Report Attributes page:
1.
On the Workspace home page, click the Application Builder icon.
2.
Select the application.
3.
Select a page.
Adding Application Components 7-15
Creating Reports
The Page Definition appears.
4.
Under Regions, click Interactive Report next to the name of the report region you
want to edit.
The Report Attributes page appears and is divided into the following sections:
■
■
■
■
■
■
■
■
■
5.
Column Attributes control the report layout. See "Editing Interactive Report
Column Attributes" on page 7-17.
Column Groups attributes enable you to group columns together on the
single row view. See "Creating Column Groups" on page 7-18.
Default Report Settings displays the initial way a report displays to end
users. See "Saving Default Report Settings" on page 7-14.
Pagination attributes control report pagination. See "Controlling Interactive
Report Pagination" on page 7-18.
Sorting attributes enable you to define images and image attributes for images
that display in report headings to sort values. See "Managing Interactive
Report Column Sorting" on page 7-19.
Search Bar contain attributes that enable you to define a search bar within an
interactive report. See "Removing or Customizing a Search Bar in an
Interactive Report" on page 7-20.
Download enables you to add a download option to the Actions menu and
export the report as CSV, XLS, PDF, or RTF file. See "Adding a Download
Option to the Actions Menu" on page 7-20.
Link Column attributes enable you to add a link to a column. See "Creating a
Column Link in an Interactive Report" on page 7-23.
Advanced Attributes enable you to define a report alias, send a user a saved
view of a report, show saved reports as tabs, prevent execution of queries that
take a specified amount of time to execute, and define items to set into session
state. See "Configuring Advanced Attributes for Interactive Reports" on
page 7-25.
To learn more about a specific attribute, click the item label.
When Help is available, the item label changes to red when you pass your cursor
over it and the cursor changes to an arrow and question mark. See "About
Field-Level Help" on page 1-15.
"Creating a Column Link in a Classic Report" on page 7-34
and "Defining an Updatable Column in a Classic Report" on
page 7-35, and "Defining a Column as a List of Values in a Classic
Report" on page 7-36, and "Controlling When Columns Display in a
Classic Report" on page 7-37
See Also:
About Navigation Alternatives The Report Attribute page is divided into these sections:
Column Attributes, Groups, Default Report, Pagination, Sorting, Search Bar,
Download, Link Column, Advanced, and Description.
You can access these sections by scrolling down the page, or by clicking a navigation
button at the top of the page.
7-16 Oracle Application Express Application Builder User's Guide
Creating Reports
When you select a button at the top of the page, the selected section appears and all
other sections are temporarily hidden. To view all sections of the page, click Show All.
Editing Interactive Report Column Attributes
You can use the Column Attributes section of the Report Attributes page to precisely
control the report layout. For example, you can use these attributes to alter column
heading text, change column positioning, or hide a column.
To access Column Attributes:
1.
On the Workspace home page, click the Application Builder icon.
2.
Select the application.
3.
Select a page.
The Page Definition appears.
4.
Under Regions, click Interactive Report next to the name of the report region you
want to edit.
The Interactive Report Attributes page appears with the Column Attributes
section at the top of the page.
Use the Column Attributes section to control report column appearance and
functionality.
Heading displays the heading text to be included in the report. Type indicates the
type of query column. The Link column indicates if a link column is currently
defined.
Table 7–1 describes common report column edits.
Table 7–1
Common Report Column Edits for Interactive Reports
Description
Developer Action
Alter column display sequence.
Click the up and down arrows to change the column
display sequence.
Adding Application Components 7-17
Creating Reports
Table 7–1 (Cont.) Common Report Column Edits for Interactive Reports
Description
Developer Action
Change column group assignment.
If Column Groups are defined, individual columns can
be assigned under Column Group.
Change column heading text.
Under Heading, enter different heading text.
Change how columns display.
Select an option from Display Text As.
You can further refine the attributes of a specific column on the Column Attributes
page.
5.
To access the Column Attributes page, click the Edit icon next to the appropriate
column Alias.
You can control whether users can sort, filter, control breaks, aggregate, and create
computations or chart, by selecting the appropriate check boxes under Allow
Users To.
6.
Under Column Definition, Allow Users To, select the appropriate check boxes.
To learn more about a specific attribute, click the item label.
"Creating a Column Link in a Classic Report" on page 7-34
and "Defining an Updatable Column in a Classic Report" on
page 7-35, and "Defining a Column as a List of Values in a Classic
Report" on page 7-36, and "Controlling When Columns Display in a
Classic Report" on page 7-37
See Also:
Creating Column Groups
Use column groups to group columns together on a single row view.
To create a column group:
1.
Navigate to the Interactive Report Attributes page. See "Accessing the Interactive
Report Attributes Page" on page 7-15.
The Interactive Report Attributes page appears.
2.
Scroll down to Column Groups.
3.
Click Add Group.
4.
Under Column Group:
5.
a.
Sequence - Enter the display sequence for this column group. This attribute
determines the order in which the column groups display in the detail view.
b.
Group Name - Enter a column group name. This name displays in the region
header in detailed view.
c.
Description - Enter an optional description for the column group. This
description never displays to the end user.
Click Create.
Controlling Interactive Report Pagination
You control how pagination displays by making selections from Pagination attributes
on the Interactive Report Attributes page.
To access the Pagination section of the Report Attributes page:
7-18 Oracle Application Express Application Builder User's Guide
Creating Reports
1.
Navigate to the Interactive Report Attributes page. See "Accessing the Interactive
Report Attributes Page" on page 7-15.
The Interactive Report Attributes page appears.
2.
Scroll down to Pagination.
You use the Pagination attributes to select a pagination style, determine where
pagination occurs, specify the maximum number of rows to query, and messages
to display when more than the maximum number of rows are returned or if no
rows are returned. Table 7–2 describes the available Pagination attributes.
Table 7–2
Pagination Attributes
Attribute
Description
Pagination Type
Select a pagination type. Pagination provides the user with
information about the number of rows and the current position
within the result set. Pagination can be displayed above or
below the report (or both) and can be positioned on the left or
right. Available pagination options include:
■
Row Ranges X to Y
■
Row Ranges X to Y of Z
Pagination Display Position
Defines where pagination occurs. Pagination can be display on
the left side, right side, at the bottom, or above the report.
Show Null Values as
Enter the text you want to display for null columns. The default
value is (null).
Maximum Row Count
Defines the maximum number of rows to query, for example,
rows 1 - 10 or 456.
If you set this attribute to 200, the result would appear as
follows:
rows 1 - 10 of more than 200 rows
Note that this attribute impacts performance. Counting fewer
rows can improve performance and counting thousands of rows
can degrade performance.
When more than maximum
row data found message
Defines the text message that displays when more than
maximum row count are returned.
When No Data Found
Message
Defines the text message that displays when the query does not
return any rows.
Managing Interactive Report Column Sorting
You manage column sorting on the Interactive Report Attributes page.
To manage column sorting:
1.
Navigate to the Interactive Report Attributes page. See "Accessing the Interactive
Report Attributes Page" on page 7-15.
The Interactive Report Attributes page appears.
2.
Under Column Attributes, click the Edit icon for the column for which you want
to enable sorting.
3.
Under Column Definition, select Sort and click Apply Changes.
The Interactive Report Attributes page appears.
4.
Scroll down to Sorting.
5.
Specify ascending and descending image attributes, or click set defaults.
Adding Application Components 7-19
Creating Reports
Removing or Customizing a Search Bar in an Interactive Report
Search bars display above the report.
To remove a search bar in your report:
1.
Navigate to the Interactive Report Attributes page. See "Accessing the Interactive
Report Attributes Page" on page 7-15.
The Interactive Report Attributes page appears.
2.
Scroll down to Search Bar.
3.
For Include Search Bar, select Yes or No. Selecting No removes the following
default components:
■
■
■
■
Search Field - Displays a text field in the search bar in which to enter search
criteria.
Finder Drop Down - Enables users to search on a selected column or against
all columns.
Rows Per Page Selector - Displays a select list to enable users to select the
number of rows to display per page.
Actions Menu - Enables the user to customize the report based on selected
Actions.
4.
To customize the Actions Menu, select the Action functions to include.
5.
For Button Template, select a template for buttons that display in the search region
and in the dialogs.
6.
For Finder Image, specify an image. If no image is defined, #IMAGE_
PREFIX#/htmldb/builder/builder_find.png is used.
7.
For Actions Menu Image, specify an image. If no image is defined, #IMAGE_
PREFIX#/ws/action_dropdown.gif is used.
8.
For Search Button Label, enter the text to be used as the search button label.
9.
For Maximum Rows Per Page, enter the maximum number to display in the Rows
Per Page Selector in the search bar.
10. Click Apply Changes.
Adding a Download Option to the Actions Menu
You can add a Download option to the Actions menu to enable users to export an
interactive report as a comma-delimited file (CSV) format, Microsoft Excel (XLS)
format, Adobe Portable Document Format (PDF), and Microsoft Word Rich Text
Format (RTF).
7-20 Oracle Application Express Application Builder User's Guide
Creating Reports
To add a download link to a report you must enable the CSV output option.
See Also:
"Automatic CSV Encoding" on page 4-20
To enable the Enable CSV output option:
1.
Navigate to the Interactive Report Attributes page. See "Accessing the Interactive
Report Attributes Page" on page 7-15.
The Interactive Report Attributes page appears.
2.
Scroll down to Search Bar.
a.
For Include Search Bar, select Yes and Actions Menu.
b.
Under Include in Actions menu, select Download.
3.
Scroll down to Download.
4.
From Download Formats, select CSV - Comma-delimited file (CSV) file format.
Tip: The Download option will not display in the Actions menu if no
file formats are selected.
5.
In the CSV Separator, define the column separator. If no value is entered, a comma
or semicolon is used depending on your current NLS settings.
6.
In the CSV Enclosed By, enter delimiter character. This character is used to
delineate the starting and ending boundary of a data value. Default delimiter is
double quotation marks (" ").
7.
In Filename, enter a name for the downloaded document. Do not specify a file
extension, the extension is added automatically. If you leave this blank, the region
name is used as the file name.
Adding Application Components 7-21
Creating Reports
8.
Click Apply Changes.
Understanding Link Columns
A Link Column displays on the left side of an interactive report. It can link to a single
row view, a custom target, or be excluded from the report. Note that a Link Column
cannot be sorted, hidden, or moved by an end user and does not interact with the
standard column link defined on the Column Attributes page.
Linking to a Single Row View To link to a single row view:
1.
Navigate to the Interactive Report Attributes page. See "Accessing the Interactive
Report Attributes Page" on page 7-15.
The Interactive Report Attributes page appears.
2.
Scroll down to Link Column.
3.
For Link Column, select Link to Single Row View.
4.
From Single Row View, select the appropriate options:
5.
■
Allow Exclude Null Values - Excludes columns with null values.
■
Allow Displayed Columns - Displays only the columns shown in the report.
For Uniquely Identify Rows by, select ROWID or Unique Column.
If you select, Unique Column, specify the column in the Unique Column field.
6.
For Link Icon, select an icon.
7.
For Link Attributes (Optional), specify additional column link attributes to be
included in the <a href= > tag (for example, a link target, classes, or styles).
8.
Click Apply Changes.
Linking to a Specific Page To link to a specific page:
1.
Navigate to the Interactive Report Attributes page. See "Accessing the Interactive
Report Attributes Page" on page 7-15.
The Interactive Report Attributes page appears.
2.
Scroll down to Link Column.
3.
For Link Column, select Link to Custom Target.
4.
For Link Icon, select an icon.
5.
For Link Attributes (Optional), specify additional column link attributes to be
included in the <a href= > tag (for example, a link target, classes, or styles).
6.
For Target, select Page in this Application.
7.
For Page, select the target page number. To reset the pagination for this page,
select Reset Pagination.
8.
For Request, specify the request to be used.
9.
For Clear Cache, specify the pages (that is, the page numbers) on which to clear
cache. You can specify multiple pages by listing the page numbers in a
comma-delimited list. See "Linking to Interactive Reports" on page 7-26.
10. For Name and Value, specify session state for a specific item.
11. Click Apply Changes.
7-22 Oracle Application Express Application Builder User's Guide
Creating Reports
Linking to a URL To link to a URL:
1.
Navigate to the Interactive Report Attributes page. See "Accessing the Interactive
Report Attributes Page" on page 7-15.
The Interactive Report Attributes page appears.
2.
Scroll down to Link Column.
3.
For Link Column, select Link to Custom Target.
4.
For Link Icon, select an icon.
5.
For Link Attributes (Optional), specify additional column link attributes that to be
included in the <a href= > tag (for example, a link target, classes, or styles).
6.
From Target, select URL.
7.
In URL, enter the appropriate address.
8.
For Checksum - Select one of the following:
–
Use default
–
Application Level - Link reusable by any user
–
User Level - Link reusable by current user
To learn more about each option, see item Help.
9.
Click Apply Changes.
Excluding a Link Column To exclude a column link:
1.
Navigate to the Interactive Report Attributes page. See "Accessing the Interactive
Report Attributes Page" on page 7-15.
The Interactive Report Attributes page appears.
2.
Scroll down to Link Column.
3.
For Link Column, select Exclude Link Column.
4.
Click Apply Changes.
Creating a Column Link in an Interactive Report
Use Column Attributes to create a link from a report to another page in your
application or to a URL.
To create a column link to another page:
1.
Navigate to the Interactive Report Attributes page. See "Accessing the Interactive
Report Attributes Page" on page 7-15.
The Interactive Report Attributes page appears.
2.
Under Column Attributes, locate the column to contain the link.
3.
Click the Edit icon next to the column name.
The Column Attributes page appears.
4.
Scroll down to Column Link.
5.
To create a column link to another page:
a.
From Target, select Page in this Application.
Adding Application Components 7-23
Creating Reports
b.
(Optional) In Link Attributes, specify additional column link attributes to be
included in the <a href= > tag (for example, a link target, classes, or styles).
c.
In Link Text, enter the text to be displayed as a link, specify an image tag, or
pick from the list of default images.
d.
In Page, specify the target page number. To reset the pagination for this page,
select Reset Pagination.
e.
In Request, specify the request to be used.
f.
In Clear Cache, specify the pages (that is, the page numbers) on which to clear
cache. You can specify multiple pages by listing the page numbers in a
comma-delimited list.
g.
Use the Name and Value fields to specify session state for a specific item.
h.
For Checksum - Select one of the following:
–
Use default
–
Application Level - Link reusable by any user
–
User Level - Link reusable by current user
To learn more about each option, see item Help.
6.
Click Apply Changes.
To create a column link to a URL:
1.
Navigate to the Interactive Report Attributes page. See "Accessing the Interactive
Report Attributes Page" on page 7-15.
The Interactive Report Attributes page appears.
2.
Access the Column Attributes page by clicking the Edit icon next to the
appropriate column.
The Column Attributes page appears.
3.
Scroll down to Column Link.
4.
Under Column Link, specify the following:
5.
a.
From Target, select URL.
b.
In Link Text, enter the text to be displayed as a link and select a substitution
string.
c.
(Optional) In Link Attributes, specify additional column link attributes to be
included in the <a href= > tag (for example, a link target, classes, or styles).
d.
In URL, enter the appropriate address.
Click Apply Changes.
Defining a Column as a List of Values in an Interactive Report
In interactive reports you can use a list of values to improve the speed of built-in filter
tools.
To define a report column as a list of values:
1.
Navigate to the Interactive Report Attributes page. See "Accessing the Interactive
Report Attributes Page" on page 7-15.
The Interactive Report Attributes page appears.
7-24 Oracle Application Express Application Builder User's Guide
Creating Reports
2.
Access the Column Attributes page by clicking the Edit icon next to the
appropriate column.
The Column Attributes page appears.
3.
Scroll down to List of Values.
4.
From Column Filter List of Values, specify how to create a list of values as a filter
on the report column list. Available options include:
■
■
■
■
5.
None - Disable filter on list of values.
Default Based on Column Type - STRING and NUMBER columns derive list of
values from distinct column values. DATE columns derive list of values from
predefined date ranges.
Use Defined List of Values - Derive list of values from defined list of values
SQL Query.
List of values definition - If you select Use Defined List of Values, enter a
SQL query that selects the distinct column values. Entering a SQL query can
improve performance in some reports. This list of values will be displayed
when a user clicks on a column header.
Click Apply Changes.
Configuring Advanced Attributes for Interactive Reports
Use the Advanced Attributes section to define a report alias, send a user a saved view
of a report, show saved reports as tabs, prevent execution of queries that take a
specified amount of time to execute, and define items to set into session state.
To configure Advanced Attributes:
1.
Navigate to the Interactive Report Attributes page. See "Accessing the Interactive
Report Attributes Page" on page 7-15.
The Interactive Report Attributes page appears.
2.
Scroll down to Advanced Attributes.
Table 7–3 describes the available Advanced Attributes.
Table 7–3
Advanced Attributes
Attribute
Description
Report Alias
Enter an alphanumeric alias for this interactive report. You may
use an alias to reference an interactive report in an API call (for
example, to change the columns displayed). The alias must be
unique within the application.
Report ID Item
This attribute enables you to send a user directly to a saved view
of the report. You specify an item whose value stores the report
ID of the saved view. Report ID’s can be retrieved from the
APEX_APPLICATION_PAGE_IR_RPT view.
Show Saved Reports as Tabs If saved versions of the report exist, this attribute specifies if
they should be displayed as tabs. To create a separate page with
a list of reports, disable this attribute.
Page Items to Submit
Enter a comma separated list of items to be set into session state
when the user clicks the Go button on the search bar. Only items
on the current page will be set.
Adding Application Components 7-25
Creating Reports
Linking to Interactive Reports
Unlike classic reports which typically use page items as report parameters, the data in
an interactive report is driven by declarative filters. However, the developer may
desire to set these report parameters by modifying interactive report settings for an
end user. These settings only affect the end user's working report and will not affect
any saved report settings.
To reset an interactive report in a link, use the string "RIR" in the Clear-Cache section
of a URL. This is equivalent to the end user choosing the Reset option from the
interactive report actions menu on the target page. The report is returned to the default
report settings specified by the developer or saved by the user.
To create a Row text contains filter on an interactive report, use the string IR_
ROWFILTER in the Item Names section of the URL. Adding this string passes the filter
value in the corresponding location in the Item Values section of the URL.
To create a filter on an interactive report in a link, use the string IR<operator>_
<target column alias> in the Item Names section of the URL, and pass the filter
value in the corresponding location in the Item Values section of the URL.
Valid operators include:
■
EQ = Equals (this is the default)
■
NEQ = Not Equals
■
LT = Less than
■
LTE = Less then or equal to
■
GT = Greater Than
■
GTE = Greater than or equal to
■
LIKE = SQL Like operator
■
N = Null
■
NN = Not Null
■
C = Contains
■
NC = Not Contains
Consider the following examples:
f?p=...:IR_ENAME:KING
The previous example is equivalent to the end user creating a filter on the target page:
ENAME = KING. Note that when an operator is not provided, EQ is used because it is
the default.
f?p=...:IRGT_SAL:3000
The previous example is equivalent to the end user creating a filter on the target page:
SAL > 3000.
Editing SQL and Wizard Reports
You can control report layout, pagination, column sorting, error messages, export
links, and column break of SQL and Classic reports using the Report Attributes page.
7-26 Oracle Application Express Application Builder User's Guide
Creating Reports
Tip: With the addition of interactive reports in Oracle Application
Express release 3.1, all previous report types are referred to as classic
reports. See "Editing Interactive Reports" on page 7-15.
Topics in this section include:
■
Accessing Classic Report Attributes
■
Altering Classic Report Layout Using Column Attributes
■
Controlling Classic Report Pagination
■
Enabling Column Sorting in a Classic Report
■
Adding a Download Link to a Classic Report
■
Enabling the CSV Output Option in a Classic Report
■
Exporting a Classic Report as an XML File or a CSV File
■
Creating a Column Link in a Classic Report
■
Defining an Updatable Column in a Classic Report
■
Defining a Column as a List of Values in a Classic Report
■
Controlling When Columns Display in a Classic Report
■
Controlling Column Breaks in a Classic Report
See Tutorials:
Oracle Application Express Advanced Tutorials
Accessing Classic Report Attributes
You can access the classic Report Attributes page by clicking the Report link next to
the report region you want to edit on the Page Definition. You can also navigate to the
Report Attributes page by clicking the region name and then selecting the Report
Attributes tab.
To access the Report Attributes page:
1.
On the Workspace home page, click the Application Builder icon.
2.
Select the application.
3.
Select a page.
The Page Definition appears.
4.
Under Regions, click Report next to the name of the report region you want to
edit.
The Report Attributes page appears and is divided into the following sections:
■
■
Column Attributes control the report layout. See "Altering Classic Report
Layout Using Column Attributes" on page 7-28.
Layout and Pagination attributes control report pagination. See "Controlling
Classic Report Pagination" on page 7-30.
Adding Application Components 7-27
Creating Reports
■
■
■
■
5.
Sorting attributes enable you to define images and image attributes for images
that display in report headings to sort values. See "Enabling Column Sorting
in a Classic Report" on page 7-33.
Messages contain attributes that enable you to define messages that display if
no data is found or more data is found than can be displayed.
Report Export attributes enable you to add download link to a report or
export a report as either an XML file or CSV file. See "Adding a Download
Link to a Classic Report" on page 7-33 and "Exporting a Classic Report as an
XML File or a CSV File" on page 7-34.
Break Formatting attributes enable you to control if a specific column repeats
and how column breaks appear when printed. See "Controlling Column
Breaks in a Classic Report" on page 7-37.
To learn more about a specific attribute, click the item label.
When Help is available, the item label changes to red when you pass your cursor
over it and the cursor changes to an arrow and question mark. See "About
Field-Level Help" on page 1-15.
6.
Click Apply Changes.
"Creating a Column Link in a Classic Report" on page 7-34
and "Defining an Updatable Column in a Classic Report" on
page 7-35, and "Defining a Column as a List of Values in a Classic
Report" on page 7-36, and "Controlling When Columns Display in a
Classic Report" on page 7-37
See Also:
About Navigation Alternatives The Report Attribute page is divided into these sections:
Column Attributes, Layout and Pagination, Sorting, Messages, Report Export, Break
Formatting, and External Processing.
You can access these sections by scrolling down the page, or by clicking a navigation
button at the top of the page.
When you select a button at the top of the page, the selected section appears and all
other sections are temporarily hidden. To view all sections of the page, click Show All.
Altering Classic Report Layout Using Column Attributes
You can use the Column Attributes section of the Report Attributes page to precisely
control the report layout. For example, you can use these attributes to alter column
heading text, change column positioning, hide a column, create a sum of a column, or
select a sort sequence.
To access the Column Attributes:
1.
On the Workspace home page, click the Application Builder icon.
2.
Select the application.
3.
Select a page.
7-28 Oracle Application Express Application Builder User's Guide
Creating Reports
The Page Definition appears.
4.
Under Regions, click Report next to the name of the report region you want to
edit.
The Report Attributes page appears with the Column Attributes section at the top
of the page.
Use the Column Attributes section to control report column appearance and
functionality.
Heading Type identifies how the heading is generated for the report. The Link
column indicates if a column link is currently defined. The Edit column indicates
whether a column is currently updatable.
Table 7–4 describes common report column edits.
Table 7–4
Common Report Column Edits for Classic Reports
Description
Developer Action
Alter column display sequence.
Click the up and down arrows to change the column
display sequence.
Alter heading alignment.
Under Column Alignment, select a column alignment.
Change column heading text.
Under Heading, enter different heading text.
Control which columns display.
Click Show to indicate a column should display.
Enable a unique sort sequence.
Click Sort and select a sequence number from Sort
Sequence.
Any number of columns can be sort enabled. However, at
least one column must have a Sort Sequence defined.
Enable the sum of a column.
Click Sum to enable the sum of a column.
You can further refine the attributes of a specific column on the Column Attributes
page.
5.
To access the Column Attributes page, click the Edit icon next to the appropriate
column Alias.
Adding Application Components 7-29
Creating Reports
To learn more about a specific attribute, click the item label.
When Help is available, the item label changes to red when you pass your cursor
over it and the cursor changes to an arrow and question mark. See "About
Field-Level Help" on page 1-15.
"Creating a Column Link in a Classic Report" on page 7-34
and "Defining an Updatable Column in a Classic Report" on
page 7-35, and "Defining a Column as a List of Values in a Classic
Report" on page 7-36, and "Controlling When Columns Display in a
Classic Report" on page 7-37
See Also:
Controlling Classic Report Pagination
You control report pagination by:
■
■
Including a pagination substitution string in the report template
Making selections from the Layout and Pagination section on the Report
Attributes page
You control how pagination displays by making selections from the Layout and
Pagination attributes on the Report Attributes page.
Topics in this section include:
■
Accessing and Understanding Layout and Pagination Attributes
■
Including Pagination After the Rows in a Classic Report
■
Including Pagination Before the Rows in a Classic Report
Accessing and Understanding Layout and Pagination Attributes To access the Layout and
Pagination section of the Report Attributes page:
1.
Create a report. See "Creating a Report Using a Wizard" on page 7-2.
2.
Navigate to the appropriate Page Definition. See "Accessing a Page Definition" on
page 5-2.
3.
Under Regions, click the appropriate Report attributes link.
The Report Attributes page appears.
4.
Scroll down to Layout and Pagination.
You use the Layout and Pagination attributes to select a pagination style,
determine where pagination occurs, and specify the number of rows that display
on each page. Table 7–5 describes the most commonly used Layout and Pagination
attributes.
To learn more about a specific attribute, click the item label. When Help is
available, the item label changes to red when you pass your cursor over it and the
cursor changes to an arrow and question mark. See "About Field-Level Help" on
page 1-15.
Table 7–5
Layout and Pagination Attributes
Attribute
Description
Report Template
Specifies a template to be applied to this report. Report
templates provide control over the results of a row from your
SQL query. You can choose from a number of default templates,
or pick a custom build template.
7-30 Oracle Application Express Application Builder User's Guide
Creating Reports
Table 7–5 (Cont.) Layout and Pagination Attributes
Attribute
Description
Report Attributes
Substitution
Enter a value to be in place of the #REPORT_ATTRIBUTES#
substitution string. The #REPORT_ATTRIBUTES# substitution
string is only replaced in the before rows attribute of the report
template.
Show Null Values as
Enter the text you want to display for null columns. The default
value is (null).
Pagination Scheme
Specifies a pagination scheme for this report.
Pagination provides the user with information about the number
of rows and the current position within the result set. Pagination
also defines the style of links or buttons used to navigate to the
next or previous page.
For more information, see the Help information for this
attribute.
Enable Partial Page Refresh
If enabled, this attribute refreshed the report region when
paginating forward and backward in your result set.
Display Position
Defines where pagination occurs.
If you choose to display pagination above a report, the selected
report template needs to support that type of display.
Number of Rows
Defines the maximum number of rows to display on each page.
Number of Rows (Item)
Defines the number of rows displayed by default per page for
SQL queries (obtained dynamically from an item). Identify the
item in this attribute.
Maximum Row Count
Defines the maximum number of rows to query, for example,
rows 1 - 10 of 456.
If you set this attribute to 200, the result would appear as
follows:
rows 1 - 10 of more than 200 rows
Note that this attribute impacts performance. Counting fewer
rows can improve performance and counting thousands of rows
can degrade performance.
Strip HTML
Specify whether to remove HTML tags from the original column
values for HTML expressions, column links and report data
exported as CSV files.
If you select values from the database that contain HTML tags,
then those tags can cause conflicts with the HTML generated for
your columns links or HTML expressions. When this option is
enabled, only the actual data portion of your column value is
used.
Sort Nulls
For reports with column heading sorting, specify if you want
null valued columns to sort first or last.
See Also: "Enabling Column Sorting in a Classic Report" on
page 7-33
Including Pagination After the Rows in a Classic Report To include pagination after the rows
in a report:
1.
Create a report. See "Creating a Report Using a Wizard" on page 7-2.
Next, select the appropriate Layout and Pagination attributes.
2.
Navigate to the Report Attributes page:
Adding Application Components 7-31
Creating Reports
a.
Navigate to the Page Definition. See "Accessing a Page Definition" on page 5-2.
b.
Under Regions, click the appropriate Report attributes link.
The Report Attributes page appears.
3.
4.
5.
Under Layout and Pagination, select the following:
a.
Report Template - Select a report template (optional).
b.
Pagination Scheme - Select a pagination scheme.
c.
Display Position - Select a display position.
d.
Number of Rows - Specify how many rows display on each page.
e.
Click Apply Changes.
Edit the report template:
a.
Navigate to the Page Definition. See "Accessing a Page Definition" on page 5-2.
b.
Under Templates, select the report template name.
c.
Include the #PAGINATION# substitution string in the After Rows attribute.
d.
Click Apply Changes.
Run the page.
Including Pagination Before the Rows in a Classic Report To include pagination before the
rows in a report:
1.
Create a report. See "Creating a Report Using a Wizard" on page 7-2.
Next, select the appropriate Layout and Pagination attributes.
2.
Navigate to the Report Attributes page:
a.
Navigate to the Page Definition. See "Accessing a Page Definition" on page 5-2.
b.
Under Regions, click the appropriate Report attributes link.
The Report Attributes page appears.
3.
4.
5.
Under Layout and Pagination:
a.
Report Template - Select a report template (optional).
b.
Pagination Scheme - Select a pagination scheme.
c.
Display Position - Select a position that contains the word top.
d.
Number of Rows - Specify how many rows display on each page.
e.
Click Apply Changes.
Edit the report template.
a.
Navigate to the Page Definition. See "Accessing a Page Definition" on page 5-2.
b.
Under Templates, select the report template name.
c.
Include the #TOP_PAGINATION# substitution string in the Before Rows
attribute.
d.
Click Apply Changes.
Run the page.
7-32 Oracle Application Express Application Builder User's Guide
Creating Reports
Enabling Column Sorting in a Classic Report
You enable column sorting on the Report Attributes page.
To enable column sorting:
1.
Navigate to the Report Attributes page. See "Editing SQL and Wizard Reports" on
page 7-26.
2.
Under Column Attributes, select the Sort check box next to the columns to be
sorted.
3.
From Sort Sequence, select a sequence number.
Sort Sequence is optional. However, if there are one or more sort enabled columns,
then at least one column needs a defined Sort Sequence.
4.
Scroll down to Sorting.
5.
Specify ascending and descending image attributes or click set defaults.
6.
Click Apply Changes.
Tip: Note that column sorting must be enabled if you want columns
with null values to display at the top or end of the report. To learn
more about the Sort Nulls attribute, see "Accessing and
Understanding Layout and Pagination Attributes" on page 7-30.
Adding a Download Link to a Classic Report
You can create a link within a report that enables users to export the report as a
comma-delimited file (.csv) file. To add a CSV link to a report you must enable the
CSV output option. When using the CSV output option, the report template is not
important. You can include a CSV link with any report template that has the CSV
export substitution string defined.
See Also:
"Automatic CSV Encoding" on page 4-20
Enabling the CSV Output Option in a Classic Report
To use the enable the Enable CSV output option:
1.
Navigate to the appropriate Report Attributes page. See "Editing SQL and Wizard
Reports" on page 7-26.
2.
Scroll down to Report Export.
3.
From Enable CSV output, select Yes.
4.
(Optional) In the Separator and Enclosed By fields, define the separator and
delimiter.
The default Enclosed By by characters are a double quotation marks (" "). The
default delimiter is either a comma or a semicolon depending upon your current
NLS settings.
5.
In the Link Label field, enter link text. This text will display in your report and
enable users to invoke a download.
6.
(Optional) To specify a default export file name, enter a name in the Filename
field.
By default, the Application Express engine creates an export file name by taking
the region name and adding the appropriate file name extension (.csv or .xml).
7.
Click Apply Changes.
Adding Application Components 7-33
Creating Reports
Exporting a Classic Report as an XML File or a CSV File
You can export a report as an XML file by selecting a report template.
To export a report as a file:
1.
Navigate to the appropriate Report Attributes page. See "Editing SQL and Wizard
Reports" on page 7-26.
2.
Scroll down to Layout and Pagination.
3.
From the Report Template list, select export: XML or export: CSV.
Selecting export: XML prevents the Application Express engine from rendering
the page and dumps the content to an XML file.
4.
Click Apply Changes.
Creating a Column Link in a Classic Report
Use the Column Link attributes to create a link from a report to another page in your
application or to a URL.
To create a column link to another page:
1.
Navigate to the appropriate Report Attributes page. See "Editing SQL and Wizard
Reports" on page 7-26.
2.
Under Column Attributes, locate the column to contain the link.
3.
Click the Edit icon next to the column name.
The Column Attributes page appears.
4.
Scroll down to Column Link.
5.
To create a column link to another page:
6.
a.
From Target, select Page in this Application.
b.
(Optional) In Link Attributes, specify additional column link attributes to be
included in the <a href= > tag (for example, a link target, classes, or styles).
c.
In Link Text, enter the text to be displayed as a link, specify an image tag, or
pick from the list of default images.
d.
In Page, specify the target page number. To reset the pagination for this page,
select Reset Pagination.
e.
In Request, specify the request to be used.
f.
In Clear Cache, specify the pages (that is, the page numbers) on which to clear
cache. You can specify multiple pages by listing the page numbers in a
comma-delimited list. See "Linking to Interactive Reports" on page 7-26.
g.
Use the Name and Value fields to specify session state for a specific item.
Click Apply Changes.
To create a column link to a URL:
1.
Navigate to the appropriate Report Attributes page. See "Editing SQL and Wizard
Reports" on page 7-26.
2.
Access the Column Attributes page by clicking the Edit icon next to the
appropriate column.
The Column Attributes page appears.
7-34 Oracle Application Express Application Builder User's Guide
Creating Reports
3.
Scroll down to Column Link.
4.
Under Column Link, specify the following:
5.
a.
From Target, select URL.
b.
In Link Text, enter the text to be displayed as a link and select a substitution
string.
c.
(Optional) In Link Attributes, specify additional column link attributes to be
included in the <a href= > tag (for example, a link target, classes, or styles).
d.
In URL, enter the appropriate address.
Click Apply Changes.
Defining an Updatable Column in a Classic Report
You can make a column updatable by editing Tabular Form Element attributes on the
Column Attributes page. Note that the Application Express engine can only perform
updates if:
■
A multirow update is defined
■
A PL/SQL process is implemented to process updated data
■
When using the built-in tabular form elements and display types, then the report
has to be defined using the type SQL Query (updatable report)
To define updatable column attributes:
1.
Navigate to the appropriate Report Attributes page. See "Editing SQL and Wizard
Reports" on page 7-26.
2.
Access the Column Attributes page by clicking the Edit icon next to the
appropriate column.
The Column Attributes page appears.
3.
Scroll down to Tabular Form Element.
4.
Under Tabular Form Element, specify the following:
a.
Display As - Select a type of updatable column.
Use this option to make a column updatable. Updates can only be performed
if a multirow update is defined, or a PL/SQL process is implemented to
process updated data.
b.
Date Picker Format Mask - Make a selection if you selected the Display As
type of Date Picker.
c.
Element Width - Specify the width of the form item.
d.
Number of Rows - Specify the height of a form item (applicable to text areas).
e.
Element Attributes - Define a style or standard form element attribute.
f.
Element Option Attributes - Specify form element attributes for items in a
radio group or check box.
g.
Primary Key Source Type - Identify the default type.
h.
Primary Key Source - Identify the default source.
If the current column is part of the primary key defined in an MRU process,
only the primary key source type and source appear.
Adding Application Components 7-35
Creating Reports
Otherwise, Default and Default Type appear. Use Default and Default Type to
establish a relationship between two master records in a master detail form, or
to set the default values for new rows.
5.
i.
Reference Table Owner - Identify the owner of the referenced table. Use this
attribute to build User Interface Defaults for reports.
j.
Reference Table Name - Identify the table or view that contains the current
report column.
k.
Reference Column Name - Identify the column name that this report column
references.
Click Apply Changes.
Defining a Column as a List of Values in a Classic Report
Report columns can be rendered as lists of values. For example, a column can be
rendered using a select list or a popup list of values. Or, a column can be rendered as
read-only text based on a list of values.
This last approach is an effective strategy when creating display lookup values and is
particularly useful in regular, nonupdatable reports. This approach enables you to
display the value of a column without having to write a SQL JOIN statement.
To render a report column as a list of values:
1.
Navigate to the appropriate Report Attributes page. See "Editing SQL and Wizard
Reports" on page 7-26.
2.
Access the Column Attributes page by clicking the Edit icon next to the
appropriate column.
The Column Attributes page appears.
3.
Scroll down to List of Values.
4.
From Named LOV, make a selection from the List of Values repository. See
"Creating Lists of Values" on page 7-81.
5.
To include a null value in a list of values:
a.
In Display Null, select Yes.
b.
In Null Text, specify the value that displays.
A column can also have a value that does not display in its list of values.
6.
To define a value that does not display in the list of values:
a.
From Display Extra Value, select Yes.
The extra value is used if the actual column value is not part of the LOV. In
that situation, the actual value is shown. If you do not display extra values,
you may end up with the wrong value and unintentionally update your data
incorrectly.
b.
In Null Value, specify the value that displays.
c.
If you have not selected a Named LOV, enter the query used to display a select
list in the LOV Query field.
7.
If you have not selected a Named LOV, enter the query used to display a select list
in LOV Query.
8.
Click Apply Changes.
7-36 Oracle Application Express Application Builder User's Guide
Creating Reports
"How to Create a Tabular Form" in Oracle
Application Express Advanced Tutorials
See Tutorials:
Controlling When Columns Display in a Classic Report
You can use the Authorization and Condition attributes to control when a column
displays.
Authorization enables you to control access to resources (such as a report column)
based on predefined user privileges. For example, you could create an authorization
scheme in which only managers can view a specific report column. Before you can
select an authorization scheme, you must first create it.
A condition is a small unit of logic that enables you to control the display of a column
based on a predefined condition type. The condition evaluates to true or false based on
the values you enter in the Expressions fields.
To specify Authorization and Condition attributes:
1.
Navigate to the appropriate Report Attributes page. See "Editing SQL and Wizard
Reports" on page 7-26.
2.
Access the Column Attributes page by clicking the Edit icon next to the
appropriate column.
The Column Attributes page appears.
3.
Under Authorization, make a selection from the Authorization Scheme list.
4.
Under Conditions, make a selection from the Condition Type list, and depending
upon your selection, enter an expression or value in the appropriate Expression
fields.
If the authorization is successful and the condition type display evaluates to true,
the column displays.
See Also: "Providing Security Through Authorization" on
page 13-33, "Understanding Conditional Rendering and Processing"
on page 3-2, and Appendix A, "Available Conditions" on page A-1
Controlling Column Breaks in a Classic Report
You can control if a specific column repeats and how column breaks appear when
printed using Break Formatting attributes. For example, suppose your report displays
employee information by department number. If multiple employees are members of
the same department, you can increase the readability by specifying the department
number only appears once.
To create this type of column break:
1.
Navigate to the appropriate Report Attributes page. See "Editing SQL and Wizard
Reports" on page 7-26.
2.
Scroll down to Break Formatting.
3.
Make a selection from the Breaks list.
Printing Report Regions
You can configure a classic report region to print by exporting it to a number of
different formats. Oracle BI Publisher supports Adobe Portable Document Format
(PDF), Microsoft Word Rich Text Format (RTF), or Microsoft Excel format (XLS), or
Extensible Markup Language (XML). The supplied OC4J with Apache FOP alternative
Adding Application Components 7-37
Creating Reports
only supports PDF and XML. If you choose to use other third-party rendering engines,
other output formats can also be configured.
By taking advantage of region report printing, your application users can view and
print reports that have a predefined orientation, page size, column headings, and page
header and footer. Interactive reports also have the ability to export to PDF, RTF,
Microsoft Excel and Comma Separated Values (CSV). Note that for interactive reports,
it is not possible to define a custom report layout.
Topics in this section include:
■
About Printing Reports to PDF
■
About Report Printing Configuration Options
■
About Classic Report Printing Methods
■
About Report Queries
■
About Report Layouts
■
Configuring Classic Report Region Print Attributes
■
Configuring Interactive Report Region Print Attributes
Tip: If you are running Oracle Application Express with Oracle
Database 11g Release 1 (11.1), you must enable network services in
order to use report printing. See "Enabling Network Services in Oracle
Database 11g" on page 13-5
See Also: "How to Create a Master Detail PDF Report" in Oracle
Application Express Advanced Tutorials
About Printing Reports to PDF
When printing to a PDF, the report data is transformed using an externally defined
report server. When the application end user clicks a print link, a request is sent to the
Application Express engine. The Application Express engine then generates the report
data in XML format and report template in XSL-FO or RTF format. The external
reporting engine then transforms the data and the template into a PDF which displays
to the end user using the conversion servlet that ships with BI Publisher 10.1.3.2
(formerly known as Oracle XML Publisher). Fortunately, this architectural complexity
is transparent to both end users and developers. End users just click a print link, and
developers just declaratively set regions to support PDF printing. Output to other
formats operates in the same manner using the necessary conversion servlet.
About Report Printing Configuration Options
Your report server can be Oracle BI Publisher, OC4J with Apache FOP, or another
standard XSL-FO processing engine. Oracle BI Publisher provides a higher level of
functionality and facilitates "high fidelity" output requirements including
master-detail reports, charts, and so on. To accommodate the difference in
functionality, Oracle Application Express provides two report printing configuration
options:
■
Standard Support. Enables you to print report regions and report queries using
either the built-in templates (provided with a standard XSL-FO processing
engine), or other XSL-FO compatible formats you provide. This setting does not
support RTF.
7-38 Oracle Application Express Application Builder User's Guide
Creating Reports
Standard Support provides declarative formatting of report regions and report
queries with basic control over page attributes, including page orientation, page
size, column heading formats, page header, and page footer.
■
Advanced Support. Requires a valid license of Oracle BI Publisher (also known as
Oracle XML Publisher). This setting, provides you with all the capabilities of the
Standard configuration plus the ability to define RTF-based report layouts
developed using the BI Publisher Word Template Builder.
To learn more about installing and configuring Oracle BI Publisher, see PDF
Printing in Application Express 3.1. Go to:
http://www.oracle.com/technology/products/database/application_
express/html/configure_printing.html
To use the full functionality of report printing, your Oracle
Application Express service administrator must enable it for your site.
See "Configuring Report Printing" in Oracle Application Express
Administration Guide.
Note:
About Classic Report Printing Methods
There are two ways to print classic report regions:
■
■
Configure Printing Attributes for a Report Region. You can print a report region
by configuring the Printing Attributes for the region. See "Configuring Classic
Report Region Print Attributes" on page 7-44.
Create a Report Query. You can print a report by defining a report query as a
Shared Component. See "About Report Queries" on page 7-39.
Both report regions and report queries can be downloaded in the following formats:
■
PDF - Adobe Portable Document Format.
■
RTF - Microsoft Word Rich Text Format.
■
XLS - Microsoft Excel format. Note that this is not a true .xls file because the
content is HTML-based.
■
HTML
■
XML - Extensible Markup Language.
To format either a report region or report query, you associate it with a report layout.
To learn more, see "About Report Layouts" on page 7-42.
About Report Queries
You can print a report region by defining a report query as a Shared Component. A
report query identifies the data to be extracted. Unlike SQL statements contained in
regions, report queries contain SQL statements that are validated when you save the
query. Note that report queries must be SQL statements, not functions returning SQL
statements.
You can associate a report query with a report layout and download it as a formatted
document. If no report layout is selected, a generic layout is used. The generic layout is
intended to be used to test and verify a report query. When using the generic layout
option and multiple source queries are defined, only the first result set is included in
the print document. The reports can include session state of the current application.
To make these reports available to end users, you then integrate them with an
application. For example, you can associate a report query with a button, list item,
Adding Application Components 7-39
Creating Reports
branch, or other navigational component that enables you to use URLs as targets.
Selecting that item then initiates the printing process.
Topics in this section include:
■
Creating a Report Query
■
Editing Report Queries
■
Copying Report Queries
Creating a Report Query Note that the availability of the report query options depends
on how your service administrator configures report printing for your instance. All
options described in these steps may not be available to you.
See Also: "About Report Printing Configuration Options" on
page 7-38
To create a report query:
1.
Navigate to the Shared Components page. See "Accessing the Shared Components
Page" on page 5-29.
2.
Under Reports, click Report Queries.
3.
Click Create.
4.
For Query, specify the following information:
5.
a.
Report Query Name - Enter a name to identify the report query. When
referencing a report query as a link target, the report query name is part of the
request string.
b.
Output Format - Select the report output format. Valid options include:
–
PDF - Adobe Portable Document Format.
–
Word - Microsoft Word Rich Text Format.
–
Excel - Microsoft Excel format. Note that this is not a true .xls file
because the content is HTML-based.
–
HTML
–
XML - Extensible Markup Language.
c.
Item - Select the item to hold the format value. This can be used to determine
the output format at runtime.
d.
View File As - Select how the Web browser opens the report query document.
Options include:
–
Attachment - Displays a File Open/Save dialog box when the user clicks
the report query download button.
–
Inline - Displays the report query document inside the Browser window.
e.
Session State - Select this check box to reference session state values, such as
the values of page items in the XML structure of your report.
f.
Click Next.
For SQL Query, enter a SQL statement directly or click Query Builder to build a
SQL statement by clicking and pointing.
7-40 Oracle Application Express Application Builder User's Guide
Creating Reports
To reference applications and page items in the SQL statement, reference them as
bind variables. Click Set Bind Variables to be able to enter in values for each bind
variable and test the query to ensure the expected output is returned.
6.
For Download Definition, specify the following:
a.
Data Source for Report Layout - Use this option to download a report
definition export file. Select XML Data or XML Schema and then click
Download.
XML Schema creates XSD file (that is, a XML schema definition of your XML
structure.)
7.
8.
b.
Add Query - Click this button to add another query to the report query.
Adding another query enables the production of complex reports with more
than one output component (for example, a chart and a report based on two
different queries).
c.
Create Report Query - Click this button to exit the wizard early. The Report
Layout Source will default to use the generic report layout.
d.
Click Next.
For Upload Report Layout, specify the following:
a.
Report Layout Source - Specify how the report layout is derived. If you choose
the report based file layout then the layout name and report layout file must
be provided.
b.
Layout Name - Enter a layout name (optional). The default is the report query
name.
c.
Report Layout File - Click Browse and select a Rich Text Format (RTF).
d.
Click Next.
For Confirm:
a.
Query Name - Identifies the query.
b.
Report Layout - Identifies the report layout you selected.
c.
Output Format - Identifies the format for this report query.
d.
Derive from Item - Identifies the item to hold the format information.
e.
URL - To integrate this report with your application, use the displayed URL as
the target for a button, list item, link, or other navigational component. End
users can click a button, for example, to start the printing process.
f.
Test Report - Click this to preview your report. If you have chosen to use a
generic report layout then the Test Report will not produce an output.
g.
Click Finish.
The Report Query is created and saved to Shared Components.
Editing Report Queries To edit a report query:
1.
Navigate to the Shared Components page. See "Accessing the Shared Components
Page" on page 5-29.
2.
Under Reports, click Report Queries.
3.
On the Report Queries page, you can use the Navigation bar at the top of the page
to search for a query by name or change the page display. For example, you can
Adding Application Components 7-41
Creating Reports
change the default display by making a selection from View list. Available options
include:
■
■
Icons (the default) displays each query as a large icon. To edit a query, click
the appropriate icon.
Details displays each query as a line in a report. To edit a query, click the
name.
4.
Select the appropriate report query. On the Edit Report Query page, edit the
information.
5.
Click Apply Changes.
Copying Report Queries To copy a report query:
1.
Navigate to the Shared Components page. See "Accessing the Shared Components
Page" on page 5-29.
2.
Under Reports, click Report Queries.
3.
On the Report Queries page, click Copy.
4.
On the Copy Report Query, select the query you want to copy, enter a name for the
report query, and click Copy.
The copy appears in the query list.
About Report Layouts
To format either a classic report region or report query, you associate it with a report
layout. Using report layouts renders the data in a printer-friendly format. If you do not
select a report layout, a default XSL-FO layout is used. The default XSL-FO layout is
always used for rendering Interactive Report regions.
When creating and using report layouts, you can:
■
■
■
Take advantage of the default layouts for report regions and generic layouts for
report queries provided with Oracle Application Express.
Utilize the built-in XSL-FO-based layouts for report regions by copying and
customizing the code. You can edit a number of attributes for report regions that
control page size, fonts, colors, and so on.
Create RTF or XSL-FO report layouts to customize the report look and feel. To use
RTF report layouts, your Oracle Application Express service administrator must
select the Advanced setting for your site. See "Configuring Report Printing" in
Oracle Application Express Administration Guide.
Topics in this section include:
■
About Report Layout Options
■
Creating a Report Layout
■
Editing Report Layouts
■
Copying Report Layouts
About Report Layout Options You can create a report layout based on one of these
options:
■
Generic Columns - A generic report layout works with most query result sets.
With this layout, the number of columns is automatically adjusted when
generating the printable document.
7-42 Oracle Application Express Application Builder User's Guide
Creating Reports
A number of report layout attributes can be defined declaratively for report
regions using the built-in XSL-FO default layout. This step allows for creating
customizable copies of the built-in default XSL-FO layout, if additional control
over the report layout is needed.
■
Named Columns - A named column report layout is a query-specific report layout
designed to work with a defined list of columns in the query result set. This type
of layout is used for custom-designed layouts when precise control of the
positioning of page items and query columns is required.
Note that the availability of the Report Layout options depends on how your site
administrator configured the report printing settings at your site. All options
described in these steps may not be available to you.
See Also: "Configuring Report Printing" in Oracle Application Express
Administration Guide.
Creating a Report Layout To create a report layout:
1.
Navigate to the Shared Components page. See "Accessing the Shared Components
Page" on page 5-29.
2.
Under Reports, click Report Layouts.
3.
Click Create.
The Create Report Layout wizard appears.
4.
For Report Layout Type, select an option and click Next:
■
5.
Generic Columns (XSL-FO) - This layout is pre-populated with a default
template, which you can edit to fit your needs.
■
Named Columns (RTF) - This layout is uploaded as an RTF file.
■
Named Columns (XSL-FO) - This layout is uploaded as an XSL-FO file.
For Layout Source, review and edit the appropriate information. The options that
appear on this page depend on the layout type you select:
■
If you selected Generic Columns:
a.
Report Layout Name - Enter a name to identify the report layout when
associating it with a report query or report region.
b.
Report Layout - The report layout is the XSL-FO based definition of the page
formatting. All attributes defining page size, orientation, fonts, styles, and so
on, are defined in this section.
To see a list of valid substitution strings and other information, click the item
label, Report Layout. This opens a separate Help window.
c.
Report Column Heading - Defines the look of each cell in the report heading
row.
d.
Report Column - Defines the look of each cell for all report rows.
e.
Report Column Width - This width is computed at runtime time or can be
derived from the report column definition of a report region.
■
If you selected Named Columns:
a.
Layout Name - Enter a name to identify the report layout when associating it
with a report query or report region.
b.
8.b)Report Layout File - Upload the file containing the report layout.
Adding Application Components 7-43
Creating Reports
Editing Report Layouts You can edit a generic column report layout directly in
Application Express. However, to edit a named column report layout, you must
download the current file, edit it, and then upload it again.
To edit a report layout:
1.
Navigate to the Shared Components page. See "Accessing the Shared Components
Page" on page 5-29.
2.
Under Reports, click Report Layouts.
3.
On the Report Layouts page, select the layout you want to edit.
4.
For generic column layouts, edit the layout directly on the Edit Report Layout
page and then click Apply Changes.
5.
For named column layouts, click Download and save the file to your computer.
Edit the file and then upload the updated version as a new report layout.
Copying Report Layouts You can copy a report layout to edit and save.
To copy a report layout:
1.
Navigate to the Shared Components page. See "Accessing the Shared Components
Page" on page 5-29.
2.
Under Reports, click Report Layouts.
3.
On the Report Layouts page, click Copy.
4.
On the Copy Report Layout page, select the layout you want to copy, enter a name
for the copy, and click Copy.
The copy appears in the layout list.
Configuring Classic Report Region Print Attributes
One approach to printing a report region is to configure Print Attributes. Once
configured, these attributes only apply only to current region and cannot be used
outside the context of the region.
If the printing feature is set up for your instance, you can configure a report region to
print in various formats.
See Also: "About Classic Report Printing Methods" on page 7-39
and "Configuring Report Printing" in Oracle Application Express
Administration Guide
To configure a classic report region for printing:
1.
In your application, select the page containing the classic report region you want
to print.
The Page Definition appears.
2.
Under Regions, click Report next to the region you want to print.
3.
Click the Print Attributes tab.
4.
Under Printing, specify the appropriate information:
a.
Enable Report Printing - Select Yes.
b.
Link Label - Enter the text for the link that starts the printing process.
7-44 Oracle Application Express Application Builder User's Guide
Creating Reports
c.
Response Header - Specify whether the response header generated by Oracle
Application Express is based on your Report Settings or the Print Server. The
response header is the information the server sends back to the Web browser
in response to receiving an HTTP request. It contains the date, size and type of
file that the server is sending back to the client and also data about the server
itself. To specify content disposition (using the attribute View File As) and file
name, the response header needs to be based on Report Settings.
d.
View File As - Select how the Web browser opens the report query document.
Options include:
–
Attachment - Displays a File Open/Save dialog box when the user clicks
the report query download button.
–
Inline - Displays the report query document inside the Browser window.
e.
(Optional) File Name - Enter a name for the downloaded file. If you leave this
blank, the region name is used as the file name.
f.
Output Format - Select an output option.
g.
Item - Determines the output format at runtime. Select the application or page
item that holds format value.
h.
Report Layout - Select Default Report Layout to use the built-in generic report
layout, or an available report layout you or your administrator created. See
item Help for a listing of the supported substitution strings available when
building custom XSL-FO report layouts.
i.
Print Server Overwrite - Specify an alternate print server. A print server is
typically configured centrally for all workspaces in Oracle Application Express
Administration Services. See "Configuring Report Printing" in Oracle
Application Express Administration Guide.
Configuring an alternative print server at the report level makes debugging
and diagnosis of potential printing problems easier and supports the use of
specific custom built end points to perform custom XSLT transformations.
j.
Print URL - Report regions can be printed using the standard print link or
using a page button. To use a button, remove the Link Label, create a button
on your page, and use the URL shown in this attribute as the button target.
5.
In the remaining sections, define page size, paper orientation, page headers and
footers, fonts, text color, and background color.
6.
Under Report Columns, specify the width for each column.
The default is to make each column the same width. The Total Width is a display
only field that shows the sum of all column width values. When changing the
width for an individual column the Total Width is automatically recalculated. If
Column Width Units is set to Percentage, rather than Points, then the total column
width must be less than or equal to 100.
Use the Reset Column Width button to reset the Column Width Units to
Percentage and change all column widths back to their default value. The
Recalculate button maintains the current ratios between column widths but
reduce all column widths such that the Total Width is less than or equal to 100%.
7.
8.
Click Apply Changes.
Adding Application Components 7-45
Creating Forms
Configuring Interactive Report Region Print Attributes
Unlike classic reports, the Interactive Report Print Attributes can only utilize the
default XSL-FO layout and is initiated from the Report Attributes, Download section
rather than directly from this screen. Once configured, these attributes only apply only
to the current region and cannot be used outside the context of the region.
If the printing feature is set up for your instance, you can configure a report region to
print in various formats
To configure a interactive report region for printing:
1.
In your application, select the page containing the interactive report region you
want to print.
The Page Definition appears.
2.
Under Regions, click Interactive Report next to the region you want to print.
3.
Click the Print Attributes tab.
4.
Under Printing, specify the appropriate information:
a.
Response Header - Specify whether the response header generated by Oracle
Application Express is based on your Report Settings or the Print Server. The
response header is the information the server sends back to the Web browser
in response to receiving an HTTP request. It contains the date, size and type of
file that the server is sending back to the client and also data about the server
itself. To specify content disposition (using the attribute View File As) and file
name, the response header needs to be based on Report Settings.
b.
Content Disposition - Select how the Web browser opens the report query
document. Options include:
c.
–
Attachment - Displays a File Open/Save dialog box when the user clicks
the report query download button.
–
Inline - Displays the report query document inside the Browser window.
Print Server Overwrite - Specify an alternate print server. A print server is
typically configured centrally for all workspaces in Oracle Application Express
Administration Services. See "Configuring Report Printing" in Oracle
Application Express Administration Guide.
Configuring an alternative print server at the report level allows for easier
debugging and diagnosis of potential printing problems and supports the use
of specific custom built end points to perform custom XSLT transformations.
5.
In the remaining sections, define page size, paper orientation, page headers and
footers, fonts, text color, and background color.
6.
Click Apply Changes.
Creating Forms
You can include a variety of different types of forms in your applications. You can
include forms that enable users to update just a single row in a table or multiple rows
at once. Application Builder includes a number of wizards you can use to create forms
automatically, or you can create forms manually.
Topics in this section include:
■
Creating a Form Using a Wizard
■
Creating a Tabular Form
7-46 Oracle Application Express Application Builder User's Guide
Creating Forms
■
Creating a Master Detail Form
■
Creating a Form Manually
■
Validating User Input in Forms
Creating a Form Using a Wizard
The easiest way to create a form is to use a wizard. For example, the Form on Table or
View Wizard creates one item for each column in a table. It also includes the necessary
buttons and processes required to insert, update, and delete rows from the table using
a primary key. Each region has a defined name and display position; all other
attributes are items, buttons, processes, and branches.
To create a form using a wizard:
1.
On the Workspace home page, click the Application Builder icon.
2.
Select an application.
3.
Click Create Page.
4.
Select Form and click Next.
5.
Under Forms, select a type of form page as described in Table 7–6.
Table 7–6
Forms Page Types
Form Page Type
Description
Form on a Procedure
Builds a form based on stored procedure arguments. Use this
approach when you have implemented logic or data
manipulation language (DML) in a stored procedure or
package.
Form on a Table or View
Creates a form that enables users to update a single row in a
database table.
Form on a Table with
Report
Creates two pages. One page displays a report. Each row
provides a link to the second page to enable users to update
each record.
Note: This wizard does not support tables having more than
127 columns. Selecting more than 127 columns generates an
error.
Master Detail Form
Creates a form that displays a master row and multiple detail
rows within a single HTML form. With this form, users can
query, insert, update, and delete values from two tables or
views.
See Also: "Creating a Master Detail Form" on page 7-49
Tabular Form
Creates a form in which users can update multiple rows in a
database.
See Also: "Creating a Tabular Form" on page 7-48
Form on a SQL Query
Creates a form based on the columns returned by a SQL query
such as an EQUIJOIN.
Summary Page
Creates a read-only version of a form. Typically used to
provide a confirmation page at the end of a wizard.
Form on Web Service
Creates a page with items based on a Web service definition.
This wizard creates a user input form, a process to call the Web
service, and a submit button.
See Also: "Creating a Form on a Web Service" on page 15-23
Adding Application Components 7-47
Creating Forms
Table 7–6 (Cont.) Forms Page Types
Form Page Type
Description
Form and Report on Web
Service
Creates a page with items based on a Web service definition.
This wizard creates a user input form, a process to call the Web
service, a submit button, and displays the results returned in a
report.
See Also: "Creating an Input Form and Report on a Web
Service" on page 15-21
6.
Follow the on-screen instructions. To learn more about a specific field, click the
item label.
When Help is available, the item label changes to red when you pass your cursor
over it and the cursor changes to an arrow and question mark. See "About
Field-Level Help" on page 1-15.
Creating a Tabular Form
A tabular form enables users to update multiple rows in a table. The Tabular Form
Wizard creates a form to perform update, insert, and delete operations on multiple
rows in a database table.
To create a tabular form:
1.
On the Workspace home page, click the Application Builder icon.
2.
Select an application.
3.
Click Create Page.
4.
Select Form and click Next.
5.
Select Tabular Form and click Next.
The Tabular Form Wizard appears.
6.
For Table/View Owner:
a.
Specify the table or view owner on which you want to base your tabular form.
b.
Select the operations to be performed on the table (for example, Update, Insert
and Delete).
c.
Click Next.
7.
For Table/View Name, select a table and click Next.
8.
For Displayed Columns:
a.
Select the columns (updatable and nonupdatable) to include in the form.
Note that you can modify the column order or your SQL query after you
create the page.
b.
9.
Click Next.
For Primary Key, select the Primary Key column and a secondary Primary Key
column (if applicable) and click Next.
10. For Primary Key Source, select a source type for the primary key column and click
Next. Valid options include:
7-48 Oracle Application Express Application Builder User's Guide
Creating Forms
■
■
■
Existing trigger - Select this option if a trigger is defined for the table. You can
also select this option if you plan on specifying the primary key column source
later after completing the form.
Custom PL/SQL function - Select this option if you want to provide a PL/SQL
function to generate returning key value.
Existing sequence - Select this option if you want to pick the sequence from a
list of sequences available in the selected schema.
11. On Updatable Columns, select which columns should be updatable and click
Next.
12. On Page and Region Attributes:
a.
Specify page and region information.
b.
Select a region template.
c.
Select a report template.
d.
Click Next.
13. On Tab, specify a tab implementation for this page and click Next.
14. On Button Labels, enter the display text to appear for each button and click Next.
15. On Branching, specify the pages to branch to after the user clicks the Submit and
Cancel buttons and click Next.
16. Click Finish.
Any modification of the select list of a SQL statement of a
tabular form after it has been generated is not recommended. If you
do modify the query, make sure the values of the updateable columns
are not altered after being queried from the database by the
Application Express engine.
Note:
See Also:
"Managing User Interface Defaults" on page 11-1
"How to Create a Tabular Form" in Oracle Application
Express Advanced Tutorials
See Tutorial:
Creating a Master Detail Form
A master detail form reflects a one-to-many relationship between two tables in a
database. Typically, a master detail form displays a master row and multiple detail
rows within a single HTML form. With this form, users can insert, update, and delete
values from two tables or views.
To create a master detail form:
1.
On the Workspace home page, click the Application Builder icon.
2.
Select an application.
3.
Click Create Page.
4.
Select Form and click Next.
5.
Select Master Detail Form and click Next.
The Master Detail Wizard appears.
Adding Application Components 7-49
Creating Forms
6.
On Master Table:
a.
Select the table or view owner.
b.
Select a table or view name.
The columns in that object appear under Available Columns.
7.
c.
Select the columns to display in the form and then click the arrow keys to
move them to Displayed Columns.
d.
Click Next.
On Detail Table:
a.
Specify whether to show only related tables by selecting Yes or No.
b.
Select the table or view owner.
c.
Select a table or view name.
The columns in that object appear under Available Columns.
8.
9.
d.
Select the columns to display in the form and then click the arrow keys to
move them to Displayed Columns.
e.
Click Next.
On Primary Key:
a.
Primary Key(s) of Master Table - Select the primary key (or keys) of the master
table. You can select maximum of two primary keys for master table.
b.
Primary Key(s) of Detail Table - Select the primary key (or keys) of the detail
table. You can select maximum of two primary keys for detail table.
c.
Click Next.
On Master Detail Link, define the relationship between the master and detail
tables and click Next.
10. On Primary Key Source, select the primary key column for the master table and
click Next. Then select the primary key column for the detail table and click Next.
Options include:
■
■
■
Existing trigger - Select this option if a trigger is defined to populate the
primary key, or if the user will be expected to enter the primary key value
manually. Detail tables do not support user entered primary key values.
Custom PL/SQL function - Select this option if you want to provide a PL/SQL
function to populate the primary key.
Existing sequence - Select this option if an existing sequence will be used to
generate the primary key.
11. On Master Options, specify whether to include master row navigation and click
Next.
If you include master row navigation, define navigation order columns. If a
navigation order column is not defined, the master update form navigates by the
primary key column.
12. On Layout, specify how to build the master detail and click Next. Options include:
■
■
Edit detail as tabular form on same page creates a two page master detail.
Edit detail on separate page creates a three page master detail.
Edit detail on separate page creates a three page master detail.
7-50 Oracle Application Express Application Builder User's Guide
Creating Forms
13. On Page Attributes, review and edit the master page and detail page information
and then click Next.
14. On Tab, specify whether to include a tab set and click Next.
15. Click Create.
Creating a Form Manually
You can also create a form manually by performing the following steps:
■
Create an HTML region (to serve as a container for your page items)
■
Create items to display in the region
■
Create processes and branches
To create a form manually by creating and HTML region:
1.
Navigate to the appropriate Page Definition. See "Accessing a Page Definition" on
page 5-2.
2.
Create an HTML region:
3.
a.
Under Regions, click the Create icon.
b.
Select the region type HTML.
c.
Follow the on-screen instructions.
Start adding items to the page:
■
Under Items, click the Create icon.
■
Follow the on-screen instructions.
Processing a Form
Once you create a form, the next step is to process the data a user types by inserting
into or updating the underlying database tables or views. There are three ways to
process a form:
■
Creating an Automatic Row (DML) Processing Process
■
Creating a Process that Contains One or More Insert Statements
■
Using a PL/SQL API to Process Form Values
Creating an Automatic Row (DML) Processing Process
One common way to implement a form is to manually create an Automatic Row
Processing (DML) process. This approach offers three advantages. First, you are not
required to provide any SQL coding. Second, Oracle Application Express performs
DML processing for you. Third, this process automatically performs lost update
detection. Lost update detection ensures data integrity in applications where data can
be accessed concurrently.
To implement this approach you need to:
■
■
Add items, define the Item Source Type as Database Column, and specify a
case-sensitive column name.
Select the option Always overrides the cache value.
To create an Automatic Row Processing (DML) process:
Adding Application Components 7-51
Creating Forms
1.
Navigate to the appropriate Page Definition. See "Accessing a Page Definition" on
page 5-2
2.
Under Processes, click the Create icon.
3.
Select the process Data Manipulation.
4.
Select the process category Automatic Row Processing (DML).
5.
Specify the following process attributes:
6.
a.
In the Name field, enter a name to identify the process.
b.
In the Sequence field, specify a sequence number.
c.
From the Point list, select the appropriate processing point. In most instances,
select Onload - After Header.
d.
From the Type list, select Automated Row Processing (DML).
Follow the on-screen instructions.
Creating a Process that Contains One or More Insert Statements
In this approach to form handling, you create one or more processes to handle insert,
update, and delete actions. Instead of having the Application Express engine handling
everything transparently, you are in complete control.
For example, suppose you have a form with three items:
■
P1_ID - A hidden item to store the primary key of the currently displayed row in
a table.
■
P1_FIRST_NAME - A text field for user input.
■
P1_LAST_NAME - A text field for user input.
Assume also there are three buttons labeled Insert, Update, and Delete. Also assume
you have a table T that contains the columns id, first_name, and last_name. The
table has a trigger that automatically populates the ID column when there is no value
supplied.
To process the insertion of a new row, you create a conditional process of type PL/SQL
that executes when the user clicks the Insert button. For example:
BEGIN
INSERT INTO T ( first_name, last_name )
VALUES (:P1_FIRST_NAME, :P1_LAST_NAME);
END;
To process the updating of a row, you create another conditional process of type
PL/SQL. For example:
BEGIN
UPDATE T
SET first_name = :P1_FIRST_NAME,
last_name = :P1_LAST_NAME
WHERE ID = :P1_ID;
END;
To process the deletion of a row, you create a conditional process that executes when
the user clicks the Delete button. For example:
BEGIN
DELETE FROM T
WHERE ID = :P1_ID;
7-52 Oracle Application Express Application Builder User's Guide
Creating Forms
END;
Using a PL/SQL API to Process Form Values
For certain types of applications, it is appropriate to centralize all access to tables in a
single or a few PL/SQL packages. If you created a package to handle DML operations,
you can call procedures and functions within this package from an After Submit
PL/SQL process to process insert, updates, and delete requests.
Populating Forms
Oracle Application Express populates a form either on load or when the Application
Express engine renders the page. You can populate a form in the following ways:
■
Create a process and define the type as Automated Row Fetch.
■
Populate the form manually by referencing a hidden session state item.
To create an Automated Row Fetch process:
1.
Navigate to the appropriate Page Definition. See "Accessing a Page Definition" on
page 5-2.
2.
Under Processes, click Create.
3.
Select the process type Data Manipulation.
4.
Select the process category Automatic Row Fetch.
5.
Specify the following process attributes:
6.
a.
In the Name field, enter a name to identify the process.
b.
In the Sequence field, specify a sequence number.
c.
From the Point list, select the appropriate processing point.
d.
From the Type list, select Automated Row Fetch.
Follow the on-screen instructions.
You can also populate a form manually by referencing a hidden session state item. For
example, the following code in an Oracle Application Express process of type PL/SQL
would set the values of ename and sal. The example also demonstrates how to
manually populate a form by referencing a hidden session state item named P2_ID.
FOR C1 in (SELECT ename, sal
FROM emp WHERE ID=:P2_ID)
LOOP
:P2_ENAME := C1.ename;
:P2_SAL := C1.sal;
END LOOP;
In this example:
■
C1 is an implicit cursor.
■
The value of P2_ID has been set.
■
The process point for this process would be set to execute (or fire) on or before
Onload - Before Regions.
Adding Application Components 7-53
Creating Forms
Validating User Input in Forms
You can use validations to check data a user enters before processing. Once you create
a validation and the associated error message, you can associate it with a specific item.
You can choose to have validation error messages display inline (that is, on the page
where the validation is performed) or on a separate error page.
Creating an inline error message involves these steps:
■
Create a validation and specify error message text.
■
Associate the validation with a specific item.
Creating a Validation
To create a validation:
1.
Navigate to the appropriate Page Definition. See "Accessing a Page Definition" on
page 5-2.
2.
Under Validations, click the Create icon.
3.
When the Create Validations Wizard appears, follow the on-screen instructions.
Validation Types are divided into two categories:
■
■
4.
Item. These validations start with the term Item and provide common checks
you may want to perform on the item with which the validation is associated.
Code. These validations require that you provide either a piece of PL/SQL
code or SQL query that defines the validation logic. Use this type of validation
to perform custom validations that require verifying values of more than one
item or accessing additional database tables.
Follow the on-screen instructions.
Note:
Validations cannot contain more than 3,950 characters.
Associating a Validation with a Specific Item
To associate an item with a validation and specify error message text:
1.
Navigate to the appropriate Page Definition. See "Accessing a Page Definition" on
page 5-2.
2.
Under Validations, select the validation item you want to associate.
The attributes page for the validation appears.
3.
4.
Scroll down to Error Message:
■
In Error message display location, verify the display location.
■
In Associated Item, select the item you want to associate with this validation.
Click Apply Changes.
About Error Message
Error message display location identifies where a validation error message displays.
Validation error messages can display on an error page or inline within the existing
page. Inline error messages can display in a notification area (defined as part of the
page template) or within the field label.
7-54 Oracle Application Express Application Builder User's Guide
Creating Calendars
To create a hard error that stops processes, including any remaining validations, you
must display the error on an error page.
Creating Calendars
Application Builder includes a built-in wizard for generating a calendar with monthly,
weekly, and daily views. Once you specify the table on which the calendar is based,
you can create drill-down links to information stored in specific columns. Note that
Oracle Application Express supports the creation of only one calendar per page.
Topics in this section include:
■
About Creating Calendars
■
Creating a New Calendar
■
Editing a Calendar Title
■
Editing Calendar Attributes
■
Converting an Easy Calendar to a SQL Calendar
■
Upgrading a Calendar Created in a Previous Releases
About Creating Calendars
Application Builder supports two calendar types:
■
■
Easy Calendar creates a calendar based on schema, table, and columns you
specify. The wizard prompts you to select a date column and display column.
SQL Calendar creates a calendar based on a SQL query you provide. The SQL
SELECT statement you provide must include at least two columns: a date column
and display column.
See Also:
"Calendar Display" on page 7-57
Supported Calendar Substitution Strings
Application Builder supports a number of date format substitution strings. You can
view a complete list of supported substitution strings on the Calendar Templates page.
To view a list of supported substitution strings for calendars:
1.
Navigate to the appropriate calendar template.
2.
View the Substitution Stings list on the right side of the page.
See Also:
"Managing Themes" on page 5-2
Creating a New Calendar
How you create a calendar depends on if you are adding a calendar to an existing
page or adding a calendar on a new page. When creating calendars remember:
■
You can only create one calendar for each page. The calendar includes daily,
weekly, and monthly views.
■
The date column determines which days on the calendar will contain entries.
■
The display column defines a specific row that will display a calendar date.
Topics in this section include:
Adding Application Components 7-55
Creating Calendars
■
Adding a Calendar to an Existing Page
■
Adding a Calendar to a New Page
Tip: In Oracle Application Express release 3.1, the Create Calendar
Wizard includes a new Display Type option. Standard submits the
page along with the associated request. Partial Page Refresh only
refreshes the Calendar region. Once the calendar is created, the
display type cannot be changed. To change the display type, you must
delete the calendar and then recreate it.
Adding a Calendar to an Existing Page
Oracle Application Express supports the creation of one calendar per page.
To add a calendar to an existing page:
1.
Navigate to the Page Definition. See "Accessing a Page Definition" on page 5-2.
2.
Under Regions, click the Create icon.
The Create Region Wizard appears.
3.
Select Calendar and click Next.
4.
Select the type of calendar you want to create and click Next:
■
■
5.
Easy Calendar creates a calendar based on the date column and display
column you specify.
SQL Calendar creates a calendar based on a SQL query you provide.
Follow the on-screen instructions.
Adding a Calendar to a New Page
To create a calendar on a new page:
1.
Navigate to the Workspace home page.
2.
Click the Application Builder icon.
3.
Select an application.
4.
Click Create Page.
5.
Select Calendar and click Next.
6.
Select the type of calendar you want to create and click Next:
■
■
7.
Easy Calendar creates a calendar based on the date column and display
column you specify.
SQL Calendar creates a calendar based on a SQL query you provide.
Follow the on-screen instructions.
See Also:
"Editing Calendar Attributes" on page 7-57
Editing a Calendar Title
The title that appears at the top of calendar corresponds to the region title.
To alter the region title:
1.
Navigate to the Page Definition. See "Accessing a Page Definition" on page 5-2.
2.
Under Regions, select the region name.
7-56 Oracle Application Express Application Builder User's Guide
Creating Calendars
The Region Definition appears.
3.
Under Identification, enter a title.
4.
Click Apply Changes.
Editing Calendar Attributes
Once you create a calendar, you can alter the display by editing attributes on the
Calendar Attributes page.
Note that to disable a view of a calendar, you must delete the Monthly, Weekly, or
Daily buttons on the calendar page.
Topics in this section include:
■
Accessing the Calendar Attributes Page
■
About the Calendar Attributes Page
Accessing the Calendar Attributes Page
To access the Calendar Attributes page:
1.
Navigate to the appropriate Page Definition. See "Accessing a Page Definition" on
page 5-2.
2.
Under Regions, click Calendar next to the region name.
The Calendar Attributes page appears.
3.
Edit the appropriate attributes. To learn more about a specific item on a page, click
the item label.
When Help is available, the item label changes to red when you pass your cursor
over it and the cursor changes to an arrow and question mark.
4.
Click Apply Changes.
See Also: "About the Calendar Attributes Page" on page 7-57 and
"About Field-Level Help" on page 1-15
About Navigation Alternatives The Calendar Attribute page is divided into sections.
You can access these sections by scrolling down the page, or by clicking a navigation
button at the top of the page. When you select a button at the top of the page, the
selected section appears and all other sections are temporarily hidden. To view all
sections of the page, click Show All.
About the Calendar Attributes Page
The topics that follow describe specific sections of the Calendar Attributes page. You
can use these attribute to specify general calendar formatting, define the dates
included in the calendar, or create a link on the column or a day in the calendar.
Calendar Display Use Calendar Display to specify a calendar template, date columns,
and general calendar formatting.
Calendar Template determines what template is used when the Application Express
engine renders a calendar. Date Column defines the column from the table or query
containing the dates to be placed on the calendar. Date Item defines the item which
holds the date on which the calendar is based. Calendar Type Column specifies the
item which holds the calendar type. Display Type defines the display type. Options
Adding Application Components 7-57
Creating Calendars
include: Column, Custom, or No Display Value. Display Column defines a specific
row that displays on a calendar date. If Display Type is set to Column, use Display
Column to select the column to display in the day cell of the monthly calendar.
To select another Display Column:
1.
Navigate to the appropriate Calendar Attributes page.
2.
Locate the Calendar Display section.
3.
To specify another display column, make a selection from the Display Column list.
4.
Click Apply Changes.
To specify a custom Display Column:
1.
Navigate to the appropriate Calendar Attributes page.
2.
Locate the Calendar Display section.
3.
From Display Type, select Custom.
4.
In Column Format, enter a custom column format. You can use an HTML
expression and supported substitution strings.
5.
Click Apply Changes.
See Also:
"Supported Calendar Substitution Strings" on page 7-55
Display Attributes Use Display Attributes to define the dates that are included in the
calendar.
Begin at Start of Interval determines when the calendar should start. Selecting this
option creates a calendar that spans an entire interval (such as a month). For example:
■
■
If Begin at Start of Interval is selected, the date is June 15th, and the display is
monthly, the resulting calendar spans from June 1st to June 30th.
If Begin at Start of Interval is not selected, the date is June 15th, and the display is
monthly, the resulting calendar spans from June 15th to June 30th.
The next two attributes define which items hold the calendar start date and end date.
You can use these attributes to create calendars that span multiple months at a time.
Note that the format of the date of either item must be YYYYMMDD:
■
■
Item Containing Start Date points to an item that holds the start date of the
calendar.
Item Containing End Date points to an item that holds the end date of the
calendar.
Start of Week for Monthly Calendar determines the day on which the calendar starts
for the monthly view.
Start Day for Weekly Calendar determines the day on which the calendar starts for
the weekly view.
End Day for Weekly Calendar determines the day on which the calendar ends for the
weekly view.
Time Format determines if the time displays in a 12-hour or 24-hour format.
Start Time and End Time determine the start and end times to display in the weekly
and daily calendar views.
Column Link Use Column link to create a link on the column in the calendar.
7-58 Oracle Application Express Application Builder User's Guide
Creating Calendars
To create a column link to another page:
1.
Navigate to the appropriate Calendar Attributes page.
2.
Scroll down to Column Link.
3.
From Target is a, select Page in this Application.
4.
In Page, specify the target page number. To reset the pagination for this page,
select reset pagination for this page.
5.
In Request, specify the request to be used.
6.
In Clear Cache, specify the pages (that is, the page numbers) on which to clear
cache. Specify multiple pages by listing the page numbers in a comma-delimited
list.
You can set session state (that is, give a listed item a value) using the next two
attributes: the Set these items attribute and the With these values attribute.
7.
To set session state:
a.
Set these items - Enter a comma-delimited list of item names for which you
would like to set session state.
b.
With these values - Enter a comma-delimited list of values for the items
specified in the previous step.
You can specify static values or substitution syntax (for example, &APP_ITEM_
NAME.). Note that item values passed to f?p= in the URL cannot contain a
colon (:). Additionally, item values cannot contain commas unless you enclose
the entire value in backslashes (for example, \1234,56\).
8.
Click Apply Changes.
See Also:
"Supported Calendar Substitution Strings" on page 7-55
To create a column link to a URL:
1.
Navigate to the appropriate Calendar Attributes page.
2.
Scroll down to Column Link.
3.
From Target is a, select URL.
4.
In URL, enter the appropriate address.
5.
Click Apply Changes.
Day Link Use Day link to create a link on a day in the calendar. This attribute creates a
link on an actual number (or day) on the calendar.
To create a day link to another page:
1.
Navigate to the appropriate Calendar Attributes page.
2.
Scroll down to Day Link.
3.
From Target is a, select Page in this Application.
4.
In Page, specify the target page number.
To reset the pagination for this page, select reset pagination for this page.
5.
In Request, specify the request to be used.
Adding Application Components 7-59
Creating Calendars
6.
In Clear Cache, specify the pages (that is, the page numbers) on which to clear
cache. Specify multiple pages by listing the page numbers in a comma-delimited
list.
You can set session state (that is, give a listed item a value) using the next two
attributes: Set these items and With these values.
7.
To set session state:
a.
Set these items - Enter a comma-delimited list of item names for which you
would like to set session state.
b.
With these values - Enter a comma-delimited list of values for the items
specified in the previous step.
You can specify static values or substitution syntax (for example, &APP_ITEM_
NAME.). Note that item values passed to f?p= in the URL cannot contain a
colon (:). Additionally, item values cannot contain commas unless you enclose
the entire value in backslashes (for example, \1234,56\).
8.
Click Apply Changes.
To create a day link to a URL:
1.
Navigate to the appropriate Calendar Attributes page.
2.
Scroll down to Day Link.
3.
From Target is a, select URL.
4.
In URL, enter the appropriate address.
5.
Click Apply Changes.
Upgrading a Calendar Created in a Previous Releases
By default, calendars you create in Oracle Application Express 3.0 include daily,
weekly, and monthly views. To update calendars created in a previous release to
include these views, you can either:
■
■
Create a calendar:
a.
Create a calendar page and integrate the SQL query from your previous
calendar.
b.
Replace the previous calendar page with the new one in your application.
Upgrade the theme:
a.
Change the identification number of the existing theme. See "Changing a
Theme Identification Number" on page 5-2.
b.
Recreate the theme. See "Creating a Theme" on page 2.
c.
Apply the new theme to your application. See "Switching the Active Theme"
on page 5-2.
Converting an Easy Calendar to a SQL Calendar
Creating an Easy Calendar is the simplest way to create a calendar. However, if you
find the resulting calendar does not meet your needs, you can quickly convert it to a
SQL Calendar.
To convert an Easy Calendar to a SQL Calendar:
1.
Navigate to the Page Definition. See "Accessing a Page Definition" on page 5-2.
7-60 Oracle Application Express Application Builder User's Guide
Creating Charts
2.
Under Regions, click Calendar next to the region name.
The Calendar Attributes page appears.
3.
On the Tasks list, click Convert to SQL Based calendar.
Converting an Easy Calendar to a SQL Calendar adds a Region Source section to
the Region Definition. The Region Source contains the original SQL query that
creates the calendar. By accessing the Region Source, you can edit the query to
meet your needs.
Creating Charts
Application Builder includes built-in wizards for generating HTML, Scalable Vector
Graphics (SVG), and Flash charts. Oracle Application Express supports only those
three types of graphical charts.
Topics in this section include:
■
About Supported Chart Types
■
About Creating SQL Queries for Charts
■
Creating an HTML Chart
■
Creating a SVG Chart
■
Creating a Flash Chart
■
Editing Chart Attributes
■
Enabling Asynchronous Updates
■
Displaying SVG Charts in Other Languages
"How to Create a Stacked Bar Chart" in Oracle
Application Express Advanced Tutorials
See Tutorial:
About Supported Chart Types
Oracle Application Express supports three types of graphical charts: HTML, Scalable
Vector Graphics (SVG), and Flash.
About Flash Charts
Flash chart support in Oracle Application Express is based on the Anychart Flash
Chart Component. Anychart is a flexible Macromedia Flash-based solution that
enables developers to create animated, compact, interactive flash charts. Flash charts
are rendered by a browser and require Flash player 8 or later. Flash charts used in
interactive reports require Flash Player 9 or later. For more information about
Anychart, go to
http://www.anychart.com
About SVG Plug-in Support
SVG is an XML-based language for Web graphics from the World Wide Web
Consortium (W3C). SVG charts are defined using an embed tag. When evaluating
whether an SVG chart is the appropriate chart type for your application, remember
that:
■
Some Web browsers do not support SVG charts.
Adding Application Components 7-61
Creating Charts
■
Most Web browsers that support SVG charts require that users download an SVG
plug-in.
The Adobe SVG plug-in can handle data encoded in UTF-8, UTF-16, ISO-8859-1, and
US-ASCII. Encoding of an SVG chart is determined by the database access descriptor
(DAD) database character set. If the DAD character set is not UTF8, AL32UTF8,
AL16UTF16, WE8ISO8859P1, or US7ASCII, SVG charts may not render properly in the
Adobe SVG plug-in.
"Creating a SVG Chart" on page 7-65 and "About
Migrating SVG Charts to Flash" on page 7-73
See Also:
About Creating SQL Queries for Charts
You define a chart in Application Builder using a wizard. For most chart wizards, you
select a chart type and provide a SQL query using the following syntax:
SELECT link, label, value
FROM
...
Where:
■
link is a URL.
■
label is the text that displays in the bar.
■
value is the numeric column that defines the bar size.
For example:
SELECT null, last_name, salary
FROM
employees
WHERE DEPARTMENT_ID = :P101_DEPARTMENT_ID
Do not change the type of an existing chart. Instead, delete the
existing chart and then re-create it.
Note:
Dial Chart Syntax
To create a dial chart, select a dial chart type and provide a SQL query using the
following syntax:
SELECT value , maximum_value [ ,low_value [ ,high_value] ]
FROM
...
Where:
■
value is the starting point on the dial.
■
maximum_value is the possible highest point on the dial.
■
low_value and high_value are the historical low and high values.
For example:
SELECT dbms_random.value(500, 1200), 1300, dbms_random.value(100, 200)
FROM DUAL
7-62 Oracle Application Express Application Builder User's Guide
Creating Charts
Multiple Series Syntax (Flash only)
For column charts and line Flash charts, you can define multiple series in one SQL
query. The series names for these chart types are derived from the corresponding
column aliases in the query. To define a multiple series Flash chart, use the following
syntax:
SELECT link, label, series_1_value [, series_2_value [, ...]]
FROM
...
Range Chart Syntax (Flash only)
Range charts require two values for each bar. To create a range chart, create a Flash
chart and provide a SQL query using the following syntax:
SELECT link, label, low_value, high_value
FROM
...
Scatter Chart Syntax (Flash only)
Scatter charts require an x value and y value for each point. To create a range chart,
create a Flash chart and provide a SQL query using the following syntax:
SELECT link, label, x_value, y_value
FROM
...
Candlestick Chart Syntax (Flash only)
Candlestick charts require open, low, high, and close values for each candlestick. To
create a candlestick chart, create a Flash chart and provide a SQL query using the
following syntax:
SELECT link, label, open, low, high, close
FROM
...
Creating an HTML Chart
How you create a chart depends upon whether you are adding the chart to an existing
page, or adding a chart on a page. This chart type creates a bar chart showing one data
series with each data point represented by a bar.
Topics in this section include:
■
Adding an HTML Chart to an Existing Page
■
Adding an HTML Chart to a New Page
Adding an HTML Chart to an Existing Page
To add an HTML chart to an existing page:
1.
Navigate to the Page Definition. See "Accessing a Page Definition" on page 5-2.
2.
Under Regions, click the Create icon.
The Create Region Wizard appears.
3.
Select Chart and click Next.
4.
For Region, select HTML Chart and click Next.
5.
For Display Attributes
Adding Application Components 7-63
Creating Charts
a.
Specify the following:
–
Title
–
Region Template
–
Display Point
–
Sequence
–
Column
To learn more, click the item label. When Help is available, the item label
changes to red when you pass your cursor over it and the cursor changes to an
arrow and question mark. See "About Field-Level Help" on page 1-15.
b.
6.
For Source:
a.
b.
7.
Click Next.
Specify a query by either:
–
Entering a SQL query in the field provided. See "About Creating SQL
Queries for Charts" on page 7-62.
–
Clicking the Build Query button. When the Build Chart Query Wizard
appears, follow the on-screen instructions.
Specify relevant chart attributes. To learn more, click the item label.
Click Create Region.
Adding an HTML Chart to a New Page
To create an HTML chart on a new page:
1.
On the Workspace home page, click the Application Builder icon.
2.
Select an application.
3.
Click Create Page.
4.
Select Chart and click Next.
5.
For Region, select HTML Chart and click Next.
6.
For Page Attributes:
a.
Specify the following:
–
Page Number
–
Page Name
–
Region Template
–
Region Column
–
Breadcrumb
To learn more, click the item label. When Help is available, the item label
changes to red when you pass your cursor over it and the cursor changes to an
arrow and question mark. See "About Field-Level Help" on page 1-15.
b.
Click Next.
7.
Specify whether to include tabs and click Next.
8.
For Chart Definition:
a.
Specify a query by either:
7-64 Oracle Application Express Application Builder User's Guide
Creating Charts
9.
–
Entering a SQL query in the field provided. See "About Creating SQL
Queries for Charts" on page 7-62.
–
Clicking the Build Query button. When the Build Chart Query Wizard
appears, follow the on-screen instructions.
b.
Specify relevant chart attributes. To learn more, click the item label.
c.
Click Next.
Click Finish.
Creating a SVG Chart
Oracle Application Express supports a number of different SVG charts. To see a
complete listing, see "About SVG Chart Types" on page 7-67.
How you create a chart depends upon whether you are adding the chart to an existing
page, or adding a chart on a new page. This chart type creates a bar chart showing one
data series with each data point represented by a bar.
Topics in this section include:
■
Adding a SVG Chart to an Existing Page
■
Adding a SVG Chart to a New Page
■
About SVG Chart Types
■
Understanding SVG Chart Cascading Style Sheet Classes
■
Referencing a Custom SVG Chart Cascading Style Sheet
■
Specifying Custom CSS Styles Inline for SVG Charts
See Also: "About SVG Plug-in Support" on page 7-61 and "About
Migrating SVG Charts to Flash" on page 7-73
Adding a SVG Chart to an Existing Page
To add a SVG chart to an existing page:
1.
Navigate to the Page Definition. See "Accessing a Page Definition" on page 5-2.
2.
Under Regions, click the Create icon.
The Create Region Wizard appears.
3.
Select Chart and click Next.
4.
For Region, select SVG Chart.
5.
For Region, select a chart type and click Next. See "About SVG Chart Types" on
page 7-67.
6.
For Display Attributes
a.
Specify the following:
–
Title
–
Region Template
–
Display Point
–
Sequence
–
Column
Adding Application Components 7-65
Creating Charts
To learn more, click the item label. When Help is available, the item label
changes to red when you pass your cursor over it and the cursor changes to an
arrow and question mark. See "About Field-Level Help" on page 1-15.
b.
7.
For Source:
a.
b.
8.
Click Next.
Specify a query by either:
–
Entering a SQL query in the field provided. See "About Creating SQL
Queries for Charts" on page 7-62.
–
Clicking the Build Query button. When the Build Chart Query Wizard
appears, follow the on-screen instructions.
Specify relevant chart attributes. To learn more, click the item label.
Click Create Region.
Adding a SVG Chart to a New Page
To create a SVG chart on a new page:
1.
On the Workspace home page, click the Application Builder icon.
2.
Select an application.
3.
Click Create Page.
4.
Select Chart and click Next.
5.
Select SVG Chart.
6.
Select a chart type and click Next. See "About SVG Chart Types" on page 7-67.
7.
For Page Attributes:
a.
Specify the following:
–
Page Number
–
Page Name
–
Region Template
–
Region Name
–
Chart Color Theme
–
Breadcrumb
To learn more, click the item label. When Help is available, the item label
changes to red when you pass your cursor over it and the cursor changes to an
arrow and question mark. See "About Field-Level Help" on page 1-15.
b.
Click Next.
8.
Specify whether to include tabs and click Next.
9.
For Query:
a.
Specify a query by either:
–
Entering a SQL query in the field provided. See "About Creating SQL
Queries for Charts" on page 7-62.
–
Clicking the Build Query button. When the Build Chart Query Wizard
appears, follow the on-screen instructions.
7-66 Oracle Application Express Application Builder User's Guide
Creating Charts
b.
Specify the remaining attributes. To learn more, click the item label.
c.
Click Next.
10. Click Finish.
About SVG Chart Types
Table 7–7 describes the SVG chart types available in Application Builder.
Table 7–7
Available SVG Chart Types
Chart Type
Description
Bar, Horizontal
Single series-based bar chart oriented horizontally with each
data point in the series represented by a bar.
SVG-based. Requires an SVG plug-in.
Bar, Vertical
Single series-based bar chart oriented vertically with each data
point in series represented by a bar.
SVG-based. Requires an SVG plug-in.
Cluster Bar, Horizontal
Multiple series-based bar chart oriented horizontally and
clustered by a common variable with each data point in the
series represented by a bar (for example, Department sales total
clustered by month of year).
SVG-based. Requires an SVG plug-in.
Cluster Bar, Vertical
Multiple series-based bar chart oriented vertically clustered by a
common variable with each data point in series represented by a
bar (for example, Department sales total clustered by month of year).
SVG-based. Requires an SVG plug-in.
Dial - Sweep
Also known as an angular gauge; this chart shows either
percentage of maximum value or absolute value compared to a
maximum value represented as a solid area.
SVG-based. Requires an SVG plug-in.
Dial
Also known as angular gauge; this chart shows either
percentage of maximum value or absolute value compared to
maximum value represented as a line.
SVG-based. Requires an SVG plug-in.
Line
Multiple series-based line chart oriented with each line
representing all data points in the series.
SVG-based. Requires an SVG plug-in.
Pie
Single series-based pie chart with each slice representing a data
point in the series.
SVG-based. Requires an SVG plug-in.
Stacked Bar, Horizontal
Multiple series-based bar chart oriented horizontally with each
data point being an absolute value in the series representing a
segment of a single bar.
SVG-based. Requires an SVG plug-in.
Stacked Bar, Vertical
Multiple series-based bar chart oriented vertically with each
data point being an absolute value in the series representing a
segment of a single bar.
SVG-based. Requires an SVG plug-in.
Adding Application Components 7-67
Creating Charts
Table 7–7 (Cont.) Available SVG Chart Types
Chart Type
Description
Stacked Percentage Bar,
Horizontal
Multiple series-based bar chart oriented horizontally with each
data point being a percentage of 100% of the series represented
by a segment of a single bar.
SVG-based. Requires an SVG plug-in.
Stacked Percentage Bar,
Vertical
Multiple series-based bar chart oriented vertically with each
data point being a percentage of 100% of the series represented
by a segment of a single bar
SVG-based. Requires an SVG plug-in.
Understanding SVG Chart Cascading Style Sheet Classes
When you create a new chart, Oracle Application Express renders it based on
cascading style sheet (CSS) classes associated with the current theme. You can change
the appearance of a chart by referencing another CSS or by overriding individual
classes in the CSS section of the Edit Attributes page
The following sample contains the CSS classes for the dial chart in Sample Application.
This example contains all the available CSS classes. Class names appear in boldface.
text{font-family:Verdana, Geneva, Arial, Helvetica, sans-serif;fill:#000000;}
tspan{font-family:Verdana, Geneva, Arial, Helvetica, sans-serif;fill:#000000;}
text.title{font-weight:bold;font-size:14;fill:#000000;}
text.moredatafound{font-size:12;}
rect.legend{fill:#EEEEEE;stroke:#000000;stroke-width:1;}
text.legend{font-size:10;}
#background{fill:#FFFFFF;stroke:none;}
rect.chartholderbackground{fill:#ffffff;stroke:#000000;stroke-width:1;}
#timestamp{text-anchor:start;font-size:9;}
text.tic{stroke:none;fill:#000000;font-size:12}
line.tic{stroke:#000000;stroke-width:1px;fill:none;}
#dial{stroke:#336699;stroke-width:2px;fill:#336699;fill-opacity:.5;}
#dial.alert{fill:#FF0000;fill-opacity:.5;}
#dialbackground{stroke:#000000;stroke-width:none;fill:none;filter:url(#MyFilter);}
#dialcenter{stroke:none;fill:#111111;filter:url(#MyFilter);}
#dialbackground-border{stroke:#DDDDDD;stroke-width:2px;fill:none;filter:url
(#MyFilter);}#low{stroke-width:3;stroke:#336699;}
#high{stroke-width:3;stroke:#FF0000;}
#XAxisTitle{letter-spacing:2;kerning:auto;font-size:14;fill:#000000;text-anchor:mi
ddle;}
#YAxisTitle{letter-spacing:2;kerning:auto;font-size:14;fill:#000000;text-anchor:mi
ddle;writing-mode:tb;}
.XAxisValue{font-size:8;fill:#000000;}
.YAxisValue{font-size:8;fill:#000000;text-anchor:end;}
.nodatafound{stroke:#000000;stroke-width:1;font-size:12;}
.AxisLine{stroke:#000000;stroke-width:2;fill:#FFFFFF;}
.GridLine{stroke:#000000;stroke-width:0.3;stroke-dasharray:2,4;fill:none;}
g.dataholder rect{stroke:#000000;stroke-width:0.5;}
.legenditem rect{stroke:#000000;stroke-width:0.5;}
Table 7–8 describes all supported CSS classes. Note that certain classes only apply to
specific chart types.
Table 7–8
Available SVG Chart CSS Classes
Class
Description
text
Defines the appearance of text that displays in a chart.
7-68 Oracle Application Express Application Builder User's Guide
Creating Charts
Table 7–8 (Cont.) Available SVG Chart CSS Classes
Class
Description
tspan
Defines the appearance of text that displays in a chart.
tspan should match the definition of text.
text.title
Overrides the default chart text. Use this class for title
text.
text.moredatafound
Defines the appearance of more datafound text.
rect.legend
Creates the rectangular box that holds the chart legend.
To remove the legend border, change rect.legend to
the following:
rect.legend{fill:#CCCC99;stroke:none;}
text.legend
Defines the text that appears in the chart legend.
#background
Creates the entire background for the SVG plug-in.
For a solid white background with no border, change
#background to the following:
#background{fill:#FFFFFF;stroke:#FFFFFF;stroke-wid
th:2;}
rect.chartholderbackground Not applicable to pie and dial charts. Creates the
background of the rectangle that holds the chart data.
For a clear background, change
rect.chartholderbackground to the following:
rect.chartholderbackground(display:none;)
#timestamp
Only applicable if the Asynchronous Update chart
attribute is set to Yes. Controls the appearance of the
update timestamp test.
To disable the display of the timestamp, use defines
#timestamp as follows in the Custom CSS, Inline
attribute.
"#timestamp{display:none;}"
See Also: "Enabling Asynchronous Updates" on page 7-75
text.tic
Dial charts only. Defines the numbers on a dial chart.
line.tic
Dial charts only. Defines the graduation mark that
displays directly beneath the number on a dial chart.
#dial
Dial charts only. Defines the value that displays on the
dial chart.
#dial.alert
Dial charts only. Defines a value (called an alert value)
that renders in a dial chart using a different display.
#dialbackground
Dial charts only. Creates the background of a dial chart.
#dialcenter
Dial charts only. Creates the center of the dial on a dial
chart.
#dialbackground-border
Dial charts only. Works with #dialbackground to create
specific graphic effect.
#low
Dial charts only. Defines the historical low watermark of
the data being displayed on a chart.
#high
Dial charts only. Defines the historical high watermark of
the data being displayed on a chart.
Adding Application Components 7-69
Creating Charts
Table 7–8 (Cont.) Available SVG Chart CSS Classes
Class
Description
#XAxisTitle
Defines the title that appears on the x-axis
#YAxisTitle
Defines the title that appears on the y-axis.
.XAxisValue
Defines the value that appears on the x-axis.
.YAxisValue
Defines the value that appears on the y-axis.
.AxisLabel
Similar to the axis value.
.nodatafound
Defines the text element that displays if no information is
available.
.AxisLine
Indicates zero on charts that have negative values.
.GridLine
Creates the horizontal and vertical lines on the chart.
g.dataholder rect
Applies a blanket style to all data that displays in the
chart.
.legenditem rect
Applies a blanket style to all rectangular items in the
legend.
Referencing a Custom SVG Chart Cascading Style Sheet
You can reference a custom cascading style sheet for a chart using the CSS section of
the Chart Attributes page. When you reference an external CSS, you can reference it
entirely or simply override specific styles.
To reference a custom chart CSS:
1.
Upload the CSS to Application Builder. See "Uploading Cascading Style Sheets" on
page 5-2.
2.
Create a chart. See "Creating a SVG Chart" on page 7-65.
3.
Navigate to the Page Definition. See "Accessing a Page Definition" on page 5-2.
4.
Under Regions, click Chart next to the region name.
The Chart Attributes page appears.
5.
Scroll down to the CSS section.
6.
From Use Custom CSS, select Yes.
7.
To reference an external CSS exclusively:
a.
In Custom CSS, Link, enter a link to a custom CSS. For example:
#IMAGE_PREFIX#themes/theme_4/svg.css
b.
Specify that the CSS should be used exclusively. In Custom CSS, Inline enter
the following:
/**/
8.
To reference a custom CSS and override specific styles:
a.
In Custom CSS, Link, enter a link to a custom style sheet. For example:
#IMAGE_PREFIX#themes/theme_4/svg.css
b.
In Custom CSS, Inline, enter the custom CSS styles you want to override.
7-70 Oracle Application Express Application Builder User's Guide
Creating Charts
Specifying Custom CSS Styles Inline for SVG Charts
You can override specific styles within the default CSS, using the Custom CSS, Inline
attribute on the Chart Attributes page.
To override specific styles within the default CSS:
1.
Create a chart. See "Creating a SVG Chart" on page 7-65.
2.
Navigate to the Page Definition. See "Accessing a Page Definition" on page 5-2.
3.
Under Regions, click Chart next to the region name.
The Chart Attributes page appears.
4.
Scroll down to CSS.
5.
From Use Custom CSS, select Yes.
6.
In Custom CSS, Inline, enter the custom CSS styles you want to override.
Creating a Flash Chart
How you create a flash chart depends upon whether you are adding the chart to an
existing page, or adding a chart on a new page.
Tip: Note that in order to view Flash charts, you must install Flash
Player 8 or later. Flash charts used in interactive reports require Flash
Player 9 or later.
Topics in this section include:
■
Adding a Flash Chart to an Existing Page
■
Adding a Flash Chart to a New Page
■
Migrating a SVG Chart to Flash
■
Migrating all SVG Charts in a Application to Flash
"About Flash Charts" on page 7-61 and "About Migrating
SVG Charts to Flash" on page 7-73
See Also:
Adding a Flash Chart to an Existing Page
To add a flash chart to an existing page:
1.
Navigate to the Page Definition. See "Accessing a Page Definition" on page 5-2.
2.
Under Regions, click the Create icon.
The Create Region Wizard appears.
3.
Select Chart and click Next.
4.
For Region, select Flash Chart.
5.
For Display Attributes
a.
Specify the following:
–
Title
–
Region Template
–
Display Point
Adding Application Components 7-71
Creating Charts
–
Sequence
–
Column
To learn more, click the item label. When Help is available, the item label
changes to red when you pass your cursor over it and the cursor changes to an
arrow and question mark. See "About Field-Level Help" on page 1-15.
b.
Click Next.
6.
On Chart Preview, configure the chart attributes. Click Update to refresh the
preview image.
7.
Click Next.
8.
For Source:
a.
b.
9.
Specify a query by either:
–
Entering a SQL query in the field provided. See "About Creating SQL
Queries for Charts" on page 7-62.
–
Clicking the Build Query button. When the Build Chart Query Wizard
appears, follow the on-screen instructions.
Specify relevant chart attributes. To learn more, click the item label.
Click Create Region.
Adding a Flash Chart to a New Page
To create a flash chart on a new page:
1.
On the Workspace home page, click the Application Builder icon.
2.
Select an application.
3.
Click Create Page.
4.
Select Chart and click Next.
5.
Select Flash Chart.
6.
For Page Attributes:
a.
Specify the following:
–
Page Number
–
Page Name
–
Region Template
–
Region Name
–
Breadcrumb
To learn more, click the item label. When Help is available, the item label
changes to red when you pass your cursor over it and the cursor changes to an
arrow and question mark. See "About Field-Level Help" on page 1-15.
b.
Click Next.
7.
Specify whether to include tabs and click Next.
8.
For Chart Preview, configure the chart attributes. Click Update to refresh the
preview image.
9.
Click Next.
7-72 Oracle Application Express Application Builder User's Guide
Creating Charts
10. For Query:
a.
Specify a query by either:
–
Entering a SQL query in the field provided. See "About Creating SQL
Queries for Charts" on page 7-62.
–
Clicking the Build Query button. When the Build Chart Query Wizard
appears, follow the on-screen instructions.
b.
Specify the remaining attributes. To learn more, click the item label.
c.
Click Next.
11. Click Finish.
About Migrating SVG Charts to Flash
You can automatically migrate single or multiple SVG charts to Flash.
About SVG Chart Migration Restrictions Note that SVG charts are migrated with the
following restrictions:
■
■
Only number formats defined in axis format strings will be migrated. Date and
time formats will be ignored.
Number format elements containing the following will be migrated:
0,9,D,G,, (comma),. (period),$,C,L,FM
■
■
■
The label for each series in the Flash chart will be derived from each series' column
alias. This differs from SVG charts, where the label for each series was derived
from the Series Name attribute.
Flash Dial charts display actual values instead of percentages.
In SVG charts, only the labels for the first series are used for the x-axis. In Flash
charts, this has been enhanced so that all data appears, even if the data's label does
not occur in the first series.
Migrating a SVG Chart to Flash To migrate a SVG chart to Flash:
1.
Navigate to the Page Definition. See "Accessing a Page Definition" on page 5-2.
2.
Under Regions, click region name. The region name displays to the left of SVG
Chart.
The Region Definition appears.
3.
From the Tasks list, click Migrate SVG Chart to Flash Chart.
4.
Click Migrate.
Migrating all SVG Charts in a Application to Flash To migrate all SVG Charts to Flash charts:
1.
Navigate to the Workspace home page.
2.
Click the Application Builder icon.
3.
Select an application.
The Application home page appears.
4.
On the Tasks list, click Application Reports.
5.
Click Page Components.
Adding Application Components 7-73
Creating Charts
6.
Under Regions, click Migrate SVG to Flash Charts.
The Migrate SVG to Flash Charts page appears.
7.
To migrate specific charts, select the charts to be migrated and click Migrate
Checked.
8.
To migrate all charts, click Migrate All.
Editing Chart Attributes
Once you have created a chart, you can alter its display by editing chart attributes on
the Chart Attributes page.
To access the Chart Attributes page:
1.
Navigate to the Page Definition. See "Accessing a Page Definition" on page 5-2.
2.
Under Regions, click the chart type (Chart, SVG Chart, or Flash Chart).
The Chart Attributes page appears.
3.
Edit the appropriate attributes.
4.
To learn more about a specific item on a page, click the item label.
When Help is available, the item label changes to red when you pass your cursor
over it and the cursor changes to an arrow and question mark. See "About
Field-Level Help" on page 1-15.
5.
Click Apply Changes.
Tip: Removing the chart title of an SVG chart (that is, the Chart Title
attribute) may negatively impact the location and display of the chart
legend.
About Navigation Alternatives
The Chart Attributes page is divided into sections. You can access these sections by
scrolling down the page, or by clicking a navigation button at the top of the page.
When you select a button at the top of the page, the selected section appears and all
other sections are temporarily hidden. To view all sections of the page, click Show All.
Using Custom XML with Flash Charts
There are additional chart settings that cannot be controlled using the standard
attributes on the Chart attributes page. To further control the look and feel of a chart,
you can use custom XML.
To use custom XML:
1.
Navigate to the Chart Attributes page:
a.
Navigate to the Page Definition. See "Accessing a Page Definition" on page 5-2.
b.
Under Regions, click the chart type, Flash Chart.
The Chart Attributes page appears.
2.
Scroll down to Chart XML.
3.
From Use Custom XML, select Yes.
7-74 Oracle Application Express Application Builder User's Guide
Creating Charts
Note that when you select to use custom XML, regions with attributes that no
longer apply are hidden. To display these regions again, select No for Use Custom
XML.
4.
Edit the XML.
5.
Click Apply Changes.
Tip: For more information on supported XML format for charts, see
the Online XML Reference at:
http://www.anychart.com
Enabling Asynchronous Updates
You can create SVG and Flash charts that monitor information by enabling the
Asynchronous Update attribute on the Chart attributes page. Enabling this attribute
updates the chart to reflect changes in the underlying data within a specified time
interval.
To enable asynchronous updates:
1.
Create an SVG or Flash chart. See "Creating a SVG Chart" on page 7-65 or
"Creating a Flash Chart" on page 7-71.
2.
Navigate to the Page Definition. See "Accessing a Page Definition" on page 5-2.
3.
Under Regions, click Chart next to the region name.
The Chart Attributes page appears.
4.
Scroll down to Refresh.
5.
From Asynchronous Update, select Yes.
6.
In Update Interval (Seconds), enter the interval in seconds between chart updates.
For optimal performance, select an interval that is greater than 2 seconds.
When Asynchronous Update is enabled for an SVG chart, a timestamp displays on the
chart indicating the last update.
To disable the Asynchronous Update timestamp:
1.
Navigate to the Chart Attributes page.
2.
Locate the CSS section.
3.
From Use Custom CSS, select Yes.
4.
In Custom CSS, Inline edit #timestamp as follows:
#timestamp{display:none;}
Displaying SVG Charts in Other Languages
To display an SVG chart in another language, you edit the text and tspan classes to
reflect the correct language.
To display an SVG chart in another language:
1.
Navigate to the Chart Attributes page. See "Editing Chart Attributes" on page 7-74.
2.
Scroll down to CSS.
3.
From Use Custom CSS, select Yes.
Adding Application Components 7-75
Creating Buttons
4.
In Custom CSS, Inline, edit the text and tspan classes to reflect the correct
language. The following example demonstrates how to change a chart to Korean:
text{font-family:Batang;fill:#000000;}
tspan{font-family:Batang;fill:#000000;}
Creating Buttons
As you design your application, you can use buttons to direct users to a specific page
or URL, or to post or process information (for example, by creating Create, Cancel,
Next, Previous, or Delete buttons).
Buttons can perform two different types of actions. A button can submit a page and
then redirect to a URL. Alternately, a button can branch to a URL without submitting
the page, such as for a Cancel button.
Topics in this section include:
■
About the Buttons Section of the Page Definition
■
Creating a Button Using a Wizard
■
Creating Multiple Buttons
■
Editing Buttons
■
Understanding the Relationship Between Button Names and REQUEST
■
About Branching with Buttons
■
Displaying Buttons Conditionally
See Also:
"Calling a Page from a Button URL" on page 3-9
About the Buttons Section of the Page Definition
You create and edit buttons on the Page Definition. The Buttons section appears in the
Page Rendering area. See "Accessing a Page Definition" on page 5-2.
You can temporarily hide all other subsections by clicking the Buttons icon. To restore
the view, click Show All. The Show All icon resembles an inverted triangle.
The following icons display next to the section title:
■
■
Edit All. The Edit All icon resembles a small grid with a pencil on top of it. Use
this icon to edit all buttons at once.
Copy. The Copy icon resembles two small overlapping pages. Use this icon to
make a copy of an existing button.
7-76 Oracle Application Express Application Builder User's Guide
Creating Buttons
■
Create. The Create icon resembles a plus (+) sign overlapping a small page. Click
this icon to create a new button.
Buttons are organized by region. To edit a button, click the button name.
See Also:
"Editing Buttons" on page 7-78
Creating a Button Using a Wizard
You create a button by running the Create Button Wizard from the Page Definition.
Each button resides in a region. A region is an area on a page that serves as a container
for content.
To create a button:
1.
Navigate to the appropriate Page Definition. See "Accessing a Page Definition" on
page 5-2.
2.
If necessary, create an HTML region. See "Understanding Regions" on page 9-2.
3.
Under Buttons, click the Create icon.
The Create Button Wizard appears.
4.
Select a region to contain the button and click Next.
5.
Select a position for the button and click Next:
■
■
6.
Create a button displayed among this region's items - Select this option to
display the button within or between page items (for example, to add a button
directly to the right of a form field).
Create a button in a region position - Select this option to place the button in
a region position. A region position is a position defined by a region template.
If you select Create a button in a region position:
a.
Specify the Button Name and Label.
b.
Select a Button Type: HTML Button (Default), Image, or Template Driven
Select Button is Reset to create an Undo button. When enabled, this type of
button resets the page values to the state they were in when the page was
initially rendered.
c.
d.
7.
Select an Action:
–
Submit page and redirect to URL submits the current page to the
Application Express engine whenever a user clicks the button.
–
Redirect to URL without submitting page avoids submitting the page.
Choose this action when submitting the page for processing is not
necessary (for example, a Cancel button). This action avoids processing in
the database and therefore reduces the load.
Click Next.
If you select Create a button displayed among this region's items:
a.
Specify the Button Name and Sequence.
b.
Specify if the button displays at the beginning of a new line or new field.
c.
Specify a Label.
d.
Enter the value of Request.
e.
Select the Button Style.
Adding Application Components 7-77
Creating Buttons
f.
8.
Click Next.
Follow the on-screen instructions. To learn more about a specific field, click the
item label.
When Help is available, the item label changes to red when you pass your cursor
over it and the cursor changes to an arrow and question mark. See "About
Field-Level Help" on page 1-15.
See Also: "Understanding the Relationship Between Button Names
and REQUEST" on page 7-80
Creating an HTML Button
Buttons can be placed in a predefined region template position or among items in a
form. To create an HTML button, select one of the following while running the Create
Button Wizard:
■
Under Task, select Create a button in a region position.
■
Under Button Type, select a button type and then HTML Button (default).
Creating Multiple Buttons
You can create multiple buttons within the same region at once using the Create
Multiple Buttons Wizard.
To create multiple buttons at once:
1.
Navigate to the appropriate Page Definition. See "Accessing a Page Definition" on
page 5-2.
2.
If necessary, create an HTML region. See "Understanding Regions" on page 9-2.
3.
Under Buttons, click the Create icon.
The Create Button Wizard appears.
4.
Select Create Multiple Buttons at the bottom of the page.
The Create Multiple Button Wizard appears.
5.
From Place Buttons in Region, select the region to contain the buttons.
6.
From Template, select a template.
7.
In HTML Attributes, specify HTML attributes for these buttons. This text will be
added to the HTML element definition. For example, you could set the class of a
text button as follows:
class="myclass"
8.
To quickly populate the remaining fields, make a selection from the Quick Button
list on the right side of the page.
9.
Click Create Buttons.
Editing Buttons
When you want to edit a button, you start from the Buttons section on the Page
Definition. You can edit the attributes of a button, edit multiple buttons at once, or
change a button position within a region.
Topics in this section include:
7-78 Oracle Application Express Application Builder User's Guide
Creating Buttons
■
Editing Button Attributes
■
Using the Edit All Icon to Edit Multiple Buttons
■
Using the Reorder Buttons Icon
See Also:
"About the Edit All Icon" on page 5-7
Editing Button Attributes
You can edit button attributes on the Edit Pages Buttons page.
To edit attributes for an existing button:
1.
Navigate to the appropriate Page Definition. See "Accessing a Page Definition" on
page 5-2.
2.
Under Buttons, select the button name.
The attributes page for the button appears.
3.
To learn more about a specific item on a page, click the item label.
When Help is available, the item label changes to red when you pass your cursor
over it and the cursor changes to an arrow and question mark. See "About
Field-Level Help" on page 1-15.
4.
Click Apply Changes.
Using the Edit All Icon to Edit Multiple Buttons
You can edit multiple buttons at once by clicking the Edit All icon on the Page
Definition. The Edit All icon resembles a small grid with a pencil on top of it.
Clicking the Edit all icon displays the Buttons page, which contains a table listing the
buttons in the region. Use this icon to edit multiple buttons at once.
From the Buttons page, you can delete multiple buttons or view a history of recent
changes.
To edit multiple buttons:
1.
Navigate to the appropriate Page Definition. See "Accessing a Page Definition" on
page 5-2.
2.
Under Buttons, click the Edit All icon.
The Buttons page appears.
3.
Edit the attributes on the Buttons page, or click the Edit icon to edit the attributes
for a single button.
4.
Click Apply Changes.
Delete Multiple Buttons To delete multiple buttons at once:
Adding Application Components 7-79
Creating Buttons
1.
Navigate to the appropriate Page Definition. See "Accessing a Page Definition" on
page 5-2.
2.
Under Buttons, click the Edit All icon.
3.
Click Delete Multiple Buttons.
The Delete Multiple Buttons page appears.
4.
Select the buttons to delete and click Remove Buttons.
History Use the History page to view a summary of recent edits to buttons.
Using the Reorder Buttons Icon
You can quickly edit a button label or change a button position within a region by
clicking the Reorder Region Buttons icon on the Page Definition. The Reorder Region
Buttons icon resembles a light green downward arrow and upward arrow and
displays next to the region name.
To edit buttons using the Reorder Region Buttons icon:
1.
Navigate to the appropriate Page Definition. See "Accessing a Page Definition" on
page 5-2.
2.
Under Buttons, click the Reorder Region Buttons icon.
The Reorder Buttons page appears. Use this page to edit the button label, select a
region position, or change the button order.
3.
To edit the button label, enter a name in the Label field.
4.
To change the region position, make a selection from the Position list.
5.
To change the order in which buttons display, click the up and down arrows in the
far right column.
Note that you can also control the order in which buttons display by editing the
Sequence attribute. See "Editing Button Attributes" on page 7-79.
6.
Click Apply Changes.
To change the region where a button resides, you must edit the
button attributes. See "Editing Button Attributes" on page 7-79.
Note:
Understanding the Relationship Between Button Names and REQUEST
The name you give a button determines the value of the built-in attribute REQUEST.
You can reference the value of REQUEST from within PL/SQL using the bind variable
:REQUEST. By using this bind variable, you can conditionally process, validate, or
branch based on which button the user clicks. You can also create processes that
7-80 Oracle Application Express Application Builder User's Guide
Creating Lists of Values
execute when the user clicks a button. And you can use a more complex condition as
demonstrated in the following examples:
If :REQUEST in ('EDIT','DELETE') then ...
If :REQUEST != 'DELETE' then ...
These examples assume the existence of buttons named EDIT and DELETE. You can
also use this syntax in PL/SQL Expression conditions. Be aware, however, that the
button name capitalization (case) is preserved. In other words, if you name a button
LOGIN, then a request looking for the name Login will fail. For example:
<input type="BUTTON" value="Finish" onClick="javascript:doSubmit('Finish');">
Note that in this example Finish is the name of the REQUEST and this example is
case-sensitive.
About Branching with Buttons
Each page can include any number of branches. A branch links to another page in
your application or to a URL. The Application Express engine considers branching at
different times during page processing. You can choose to branch before processing,
before computation, before validation, and after processing. Like any other control in
Application Builder, branching can be conditional. For example, you can branch when
a user clicks a button. When you create a branch, you associate it with a specific
button. The branch will only be considered if a user clicks the button.
See Also:
"Controlling Navigation Using Branches" on page 8-27
Displaying Buttons Conditionally
You can choose to have a button display conditionally by editing attributes on the Edit
Pages Button page.
To have a button display conditionally:
1.
Create the button. See "Creating a Button Using a Wizard" on page 7-77.
2.
Navigate to the appropriate Page Definition. See "Accessing a Page Definition" on
page 5-2.
3.
Under Buttons, select the button name.
The attributes page for the button appears.
4.
Scroll down to Conditional Button Display.
5.
Make a selection from the Condition Type list.
6.
Enter an expression in the fields provided.
7.
Click Apply Changes.
See Also:
"About Bind Variable Syntax" on page 3-14
Creating Lists of Values
A list of values (LOV) is a static or dynamic set of values used to display a specific
type of page item, such as popup lists of values, a select list, a check box, a radio
group, or multiple select lists.
Creating a LOV as a shared component has a number of advantages:
■
It can be added to any page within an application.
Adding Application Components 7-81
Creating Lists of Values
■
All LOV definitions are stored in one location, making them easy to locate and
update.
Topics in this section include:
■
Creating a Named LOV at the Application Level
■
About Static LOVs
■
Editing an Existing LOV
■
Referencing Session State Within an LOV
■
Referencing a Null Value in an Item Based on an LOV
■
Accessing LOV Reports
See Also: "Creating a Static List of Values" on page 6-42 and
"Working with Shared Components" on page 5-29
Creating a Named LOV at the Application Level
You define named (or shared) LOVs at the application level by running the Create
LOV Wizard and adding them to the List of Values repository. All LOVs can be
defined as static or dynamic. Static lists are based on predefined pairs of display
values and return values. Dynamic lists are based on a SQL query you write that
selects values from a table.
To create a named LOV:
1.
On the Workspace home page, click the Application Builder icon.
2.
Select an application.
The Application home page appears.
3.
Click the Shared Components icon.
4.
Under User Interface, select Lists of Values.
The Lists of Values page appears.
5.
To create a LOV, click Create.
6.
Follow the on-screen instructions.
New named LOVs are added to the List of Values repository. Note to add the LOV
to a page you must edit the appropriate item or column and select the named LOV.
See Also: "Defining a Column as a List of Values in a Classic Report"
on page 7-36
About the List of Values Page
Once you create an LOV, it appears on the List of Values page.
7-82 Oracle Application Express Application Builder User's Guide
Creating Lists of Values
Use the Navigation bar at the top of the page to search for a LOV by name or change
the page display. For example, you can change the default display by making a
selection from View list. Available options include:
■
■
Icons (the default) displays each LOV as a large icon. To edit an LOV, click the
appropriate icon.
Details displays each LOV as a line in a report. To edit an LOV, click the name.
About Static LOVs
Static LOVs are based on a static list of display values and return values you specify
when you run the Create LOV Wizard. To create a static LOV, run the Create LOV
Wizard and select the LOV type Static. Oracle Application Express stores the display
values, return values, and sort sequence you specify in the List of Values repository.
Once you add a static LOV to the repository, you can create an item and display it as a
check box, radio group, select list, or popup list based on this definition.
Editing an Existing LOV
To edit an existing LOV, select the LOV on the Lists of Values page.
To edit an LOV:
1.
On the Workspace home page, click the Application Builder icon.
2.
Select an application.
3.
Click Shared Components.
4.
Under User Interface, select Lists of Values.
5.
Select an LOV.
The Edit List of Values page appears.
6.
To learn more about a specific item on a page, click the item label.
When Help is available, the item label changes to red when you pass your cursor
over it and the cursor changes to an arrow and question mark. See "About
Field-Level Help" on page 1-15.
7.
Click Apply Changes.
About Navigation Alternatives
The Edit List of Values page is divided into the following sections: Name,
Subscription, Source, and Comments.
Adding Application Components 7-83
Creating Lists of Values
You can access these sections by scrolling down the page, or by clicking a navigation
button at the top of the page. When you select a button at the top of the page, the
selected section appears and all other sections are temporarily hidden. To view all
sections of the page, click Show All.
See Also:
"About the Edit All Icon" on page 5-7
Bulk Edit of Static LOVs
You can edit the display values of all static LOVs by clicking the Grid Edit button on
the Edit List of Values page.
To perform a bulk edit of static LOVs:
1.
On the Workspace home page, click the Application Builder icon.
2.
Select an application.
3.
Click Shared Components.
4.
Under User Interface, select Lists of Values.
By default, LOVs display as icons.
5.
Change the default display. Select Details from the View list and click Go.
6.
Locate the Static LOV and select the LOV name.
7.
Click the Grid Edit button located under Subscription.
8.
Edit the appropriate display values and click Apply Changes.
Referencing Session State Within an LOV
You can reference session state by using bind variables. Keep in mind that referencing
session state makes an LOV a bit less reusable, but is still a recommended
development practice. In the following example, this LOV only works if the item
called my_deptno contains a valid department number.
SELECT ename, empno FROM emp WHERE deptno = :P1_DEPTNO
Referencing a Null Value in an Item Based on an LOV
LOVs have a null display value option and a null return value option. The null display
value is the value the end user sees in the list indicating the no selection from the
proper (non-null) values of the list will be made. When a user selects a null display
value, the LOV's null return value is sent to the application when the page is
submitted. If the developer has left the null return value unspecified (or empty), the
actual value transmitted is not an empty string or an Oracle null, but the literal
%null%. The application must be prepared to deal with this literal and treat is as the
null selection.
Be aware of this behavior when writing code to evaluate submitted values. For
example, suppose a page evaluates the submitted item P1_X and you need to use the
PL/SQL expression replace(:P1_X,'%'||'null%',null) to prepare the item for
permanent storage in session state or for passing to DML or other APIs.
To avoid problems, be aware of the appropriate way to code %null% in expressions
that occur in page computations, processes, and validations. You must break up the
string so that the application does not replace %null% with a null value in the page
metadata when it is saved. Consider the following example:
7-84 Oracle Application Express Application Builder User's Guide
Creating Dependent Select Lists
'%'||'null%'
Accessing LOV Reports
Application Builder includes a number of reports designed to help you better manage
LOVs.
To access LOV reports:
1.
On the Workspace home page, click the Application Builder icon.
2.
Select an application.
3.
When Application Builder appears, click Shared Components.
4.
Under User Interface, select Lists of Values.
5.
Select one of the following tabs at the top of the page:
6.
■
Search
■
Subscription
■
Utilization
■
History
Follow the on-screen instructions.
Search
Click Search to display the Search Dynamic Lists of Values page. Use this page to
search the queries that make up dynamic LOVs. Enter a query in the Query Contains
field and click Go.
Subscription
Click Subscription to display the List of Values Subscription page. This page displays
all subscribed LOVs in your application.
Utilization
Click Utilization to display the List of Values Utilization page. This page displays
LOVs used in the current application. To edit an LOV, click the LOV name.
History
Click History to display the List of Values History page. This page displays a history
of recently changed LOVs by date.
Creating Dependent Select Lists
You can use a select list to determine the range of values of another select list on the
same page. You can achieve this functionality by having a driving select list submit
values to a subsequent select list. You incorporate these values in the subsequent select
list as a bind variable in the WHERE clause of its query.
To have one LOV drive another LOV:
■
■
Create a basic form.
Define two lists of values. Note that the driving LOV must submit the page after a
value is chosen.
Adding Application Components 7-85
Using Shortcuts
■
Define a branch that branches back to the current page.
Consider the following example. The first LOV enables the user to pick a state:
SELECT state_name d, state_id v
FROM states
The second LOV selects the county name and county ID based on the state selected in
the first LOV:
SELECT county_name d, county_id v
FROM counties
WHERE state_id = :P1_STATE_ID
"Creating Forms" on page 7-46, "Creating Lists of
Values" on page 7-46, and "Controlling Navigation Using Branches"
on page 8-27
See Also:
Using Shortcuts
By using shortcuts you can avoid repetitive coding of HTML or PL/SQL functions.
You can use a shortcut to define a page control such as a button, HTML text, a PL/SQL
procedure, or HTML. Once defined, you can invoke a shortcut using specific syntax
unique to the location in which the shortcut is used. Shortcuts can be referenced many
times, thus reducing code redundancy.
This section contains the following topics:
■
About Shortcut Types
■
Defining Shortcuts
■
Editing Existing Shortcuts
■
Accessing Shortcut Reports
About Shortcut Types
When you create a shortcut, you must specify the type of shortcut you want to create.
Oracle Application Express supports the following shortcut types:
■
PL/SQL Function Body
■
HTML Text
■
HTML Text with Escaped Special Characters
■
Image
■
Text with JavaScript Escaped Single Quotes
■
Message
■
Message with JavaScript Escaped Special Quotes
Text with JavaScript Escaped Single Quotes
Use this type of shortcut to reference a shortcut inside of a JavaScript literal string.
This shortcut defines a text string. When the shortcut is referenced, it escapes the
single quotation marks required for JavaScript.
7-86 Oracle Application Express Application Builder User's Guide
Using Shortcuts
Message
Use this type of shortcut to reference a translatable message at run time. Note that
since this shortcut does not have a shortcut body, the name of the shortcut must match
the corresponding message name. At run time, the name of the shortcut expands to the
text of the translatable message for the current language.
Message with JavaScript Escaped Single Quotes
Use this type of shortcut to reference a shortcut inside of JavaScript literal string and
reference a translatable message at run time.
See Also: "About Translating an Application and Globalization
Support" on page 16-1
Defining Shortcuts
Before you can incorporate a shortcut in your application, you must define it and add
it to the Shortcuts repository. You reference shortcuts using the following syntax:
"MY_SHORTCUT"
Note that the shortcut name must be capitalized and enclosed in quotation marks.
To define a shortcut:
1.
On the Workspace home page, click the Application Builder icon.
2.
Select an application.
3.
When Application Builder appears, click Shared Components.
4.
Under User Interface, select Shortcuts.
5.
Click Create.
6.
Select one of the following creation methods:
7.
■
From Scratch
■
As a Copy of an Existing Shortcut
Follow the on-screen instructions.
New shortcuts are added to the Shortcut repository and are available for use within
the following locations:
■
■
The Region Source attribute of regions defined as HTML Text (with shortcuts). See
"Understanding Regions" on page 9-2.
Region Header and Footer Text attribute. See "Specifying a Region Header and
Footer" on page 9-5.
■
Item Label attributes and Default Value attribute. See "Items" on page 5-10.
■
Region Templates attributes. See "Customizing Templates" on page 10-12.
About the Shortcuts Page
Once you create a shortcut, it appears on the Shortcuts page. You control how the page
displays by making a selection from the View list. Available options include:
■
Icons (the default) displays each shortcut as a large icon. To edit a shortcut, click
the appropriate icon.
Adding Application Components 7-87
Using Shortcuts
■
Details displays each shortcut as a line in a report. To edit a shortcut, click the
name.
Editing Existing Shortcuts
Once you create a shortcut, you can alter it by editing attributes on the Edit Shortcut
page.
To edit an existing shortcut:
1.
On the Workspace home page, click the Application Builder icon.
2.
Select an application.
3.
Click Shared Components.
4.
Under User Interface, select Shortcuts.
5.
Select a shortcut.
The Edit Shortcut page appears.
6.
To learn more about a specific item on a page, click the item label.
When Help is available, the item label changes to red when you pass your cursor
over it and the cursor changes to an arrow and question mark. See "About
Field-Level Help" on page 1-15.
7.
Click Apply Changes.
About Navigation Alternatives
The Edit Shortcut page is divided into the following sections: Name, Subscription,
Source, Configuration, and Comments.
You can access these sections by scrolling down the page, or by clicking a navigation
button at the top of the page. When you select a button at the top of the page, the
selected section appears and all other sections are temporarily hidden. To view all
sections of the page, click Show All.
Accessing Shortcut Reports
Application Builder includes a number of reports designed to help you better manage
shortcuts.
To access shortcut reports:
1.
On the Workspace home page, click the Application Builder icon.
2.
Select an application.
3.
When Application Builder appears, click Shared Components.
4.
Under User Interface, select Shortcuts.
5.
Click one of the following tabs:
■
Subscription
■
History
The Subscription and History tabs only appear after you create
a shortcut.
Note:
7-88 Oracle Application Express Application Builder User's Guide
Using the Find Icon
Subscribed Shortcuts
Click Subscription to display the Subscribed Shortcuts page. This page displays all
subscribed shortcuts in your application.
Shortcut History
Click History to display the Shortcut History page. This page displays a history of
recently changed shortcuts by date.
Using the Find Icon
You can search for items, pages, queries, tables, PL/SQL code, images, or cascading
style sheets by clicking the Find icon on numerous pages within Application Builder.
This section contains the following topics:
■
About the Find Icon
■
About the Item Finder
■
Using the Page Finder
■
Using the Query Finder
■
Using the Table Finder
■
Using the PL/SQL Finder
■
Using the Images Finder
■
Using the CSS Finder
About the Find Icon
The Find icon resembles a flashlight and often displays to the right of the Run Page
and Edit Page icons as shown in the following illustration. The Find icon displays on
many pages in Application Builder, including the Application Home page, the Page
Definition, application attribute pages, and numerous pages for creating and
managing shared components.
See Also:
"About the Application Home Page" on page 4-4
About the Item Finder
In Application Builder, an item can be a text field, text area, password, select list, check
box, and so on. You can use the Item Finder to search for items within the current
application or within the schema associated with the workspace.
See Also:
"Understanding Page-Level Items" on page 6-32
To search for an item using the Item Finder:
1.
Click the Find icon.
The Item Finder appears.
Adding Application Components 7-89
Using the Find Icon
A search bar displays at the top of the page and contains the following controls:
■
■
■
Search. Search for an item name. Enter case insensitive keywords in the Search
field and click Go. To view all items, leave the Search field blank and click Go.
Page. Search for pages that contain items. Enter a page number in the Page
field or select a page number from the list and click Go. To view all pages
containing items, leave the Page field blank and click Go.
Display. Determine how many rows display in the resulting report. To change
the number of rows that display, make a selection from the Display list and
click Go.
A Item Finder report appears, displaying the item name, label, item type, and
associated page number.
2.
To restrict the report to display just items on a specific page, click the appropriate
page number in the far right column.
Note the page number you select appears in the Page field at the top of the page.
To expand the view to all pages, delete the page number in the Page field and click
Go.
3.
To edit a specific item, navigate to the appropriate item. See "Understanding
Page-Level Items" on page 6-32 and "Using the Edit All Icon to Edit Multiple
Items" on page 6-43.
Using the Page Finder
A page (or Page Definition) is the basic building block of an application. You can use
the Page Finder to search for pages within the current application or within the
schema associated with the workspace.
To search for a page:
1.
Click the Find icon.
2.
Select the Pages tab.
The Page Finder appears.
A search bar displays at the top of the page and contains the following controls:
■
Search. Search for a page name. Enter case insensitive keywords in the Search
field and click Go. To view all pages, leave the Search field blank and click Go.
7-90 Oracle Application Express Application Builder User's Guide
Using the Find Icon
■
Display. Determine how many rows display in the resulting report. To change
the number of rows that display, make a selection from the Display list and
click Go.
The Page Finder report appears, displaying the page number, page name, page
alias, title, tab set, and counts of the number of items and regions on the page.
3.
To link to the Items page, click the page number.
See Also: "About the Page Definition" on page 5-1 and "Editing a
Page Definition" on page 5-7
Using the Query Finder
You can use the Query Finder to locate a query within your application or within the
schema associated with the workspace.
To search for a query using the Query Finder:
1.
Click the Find icon.
2.
Select the Queries tab.
The Query Finder appears.
A search bar displays at the top of the page and contains the following controls:
■
■
Search. Search for query statements. Enter case insensitive keywords in the
Search field and click Go. To view all queries, leave the Search field blank and
click Go.
Display. Determine how many rows display in the resulting report. To change
the number of rows that display, make a selection from the Display list and
click Go.
The Query Finder report appears, displaying the page number, page name, the
region containing the query, and the query source.
Adding Application Components 7-91
Using the Find Icon
3.
To link to the Items page, click the page number.
See Also: "About the Page Definition" on page 5-1 and "Editing a
Page Definition" on page 5-7
Using the Table Finder
You can use the Table Finder to view tables within the schema associated with the
workspace.
To view tables associated within the current schema:
1.
Click the Find icon.
2.
Select the Tables tab.
The Table Finder appears.
A search bar displaying the selected schema displays at the top of the page and
contains the following controls:
■
■
■
Search. Search for a table name. Enter case insensitive keywords in the Search
field and click Go. To view all tables, leave the Search field blank and click Go.
Display. Determine how many rows display in the resulting report. To change
the number of rows that display, make a selection from the Display list and
click Go.
Views. Select the Views check box and click Go to include views in the
resulting report.
The Table Finder report appears displaying the table name, the number of rows,
and the object type.
3.
Select a table name.
A table definition appears on the right side of the page.
7-92 Oracle Application Express Application Builder User's Guide
Using the Find Icon
This report displays the column names, data type, length, precision, and scale and
the SQL necessary to re-create the table appears at the bottom of the page.
See Also: "Managing Tables" in Oracle Application Express SQL
Workshop and Utilities Guide
Using the PL/SQL Finder
You can use the PL/SQL Finder to locate and view details about stored procedures,
functions, and packages associated with each object within the schema associated with
the workspace.
To search for PL/SQL code in the current schema:
1.
Click the Find icon.
2.
Select the PL/SQL tab.
The PL/SQL Finder appears.
A search bar displays at the top of the page contains the following controls:
■
■
■
Search. Search for procedure, function, or package names. Enter case
insensitive keywords in the Search field and click Go. To view all, leave the
Search field blank and click Go.
Display. Determine how many rows display in the resulting report. To change
the number of rows that display, make a selection from the Display list and
click Go.
Procedures, Functions, or Packages. Select at least one check box and click Go
to include procedures, functions, and packages in the report. You must select
at least one check box to return results.
The PL/SQL Finder report appears.
3.
To view additional details, select the procedure, function, or package name.
Adding Application Components 7-93
Using the Find Icon
The procedure, package, or function name appears and additional information
including the owner, source name, source type, return type, argument names, data
types, and IN/OUT parameters.
See Also: "Managing Database Objects with Object Browser," in
Oracle Application Express SQL Workshop and Utilities Guide
Using the Images Finder
You can use the Images Finder to identify images available to the current application.
To view available images:
1.
Click the Find icon.
2.
Select the Images tab.
The Images Finder appears.
A search bar displays at the top of the page and contains the following controls:
■
■
Search. Search for image names. Enter case insensitive keywords in the Search
field and click Go. To view all, leave the Search field blank and click Go.
Icon Size. Select the size of icon you want to search for and click Go.
7-94 Oracle Application Express Application Builder User's Guide
Using the Find Icon
■
■
3.
Display. Determine how many rows display in the resulting report. To change
the number of rows that display, make a selection from the Display list and
click Go.
Columns. Select the number of columns to view per row and click Go.
From Show, select the type of images to view. Options include:
■
Standard Images
■
Workspace Images
■
Application Images
See Also: "Managing Database Objects with Object Browser" in
Oracle Application Express SQL Workshop and Utilities Guide
Using the CSS Finder
You can use the CSS Finder to view cascading style sheets that are available to any
application regardless of theme.
To view available cascading style sheets:
1.
Click the Find icon.
2.
Select the CSS tab.
The CSS Finder appears.
A search bar displays at the top of the page and contains the following controls:
■
■
■
Search. Enter case insensitive keywords in the Search field and click Go. To
view all, leave the Search field blank and click Go.
Category. Select a CSS category and click Go. Available options include:
–
Absolute Sizes
–
Anchor Tags
–
Relative Sizes
Display. Determine how many rows display in the resulting report. To change
the number of rows that display, make a selection from the Display list and
click Go.
Adding Application Components 7-95
Controlling Access to Applications, Pages, and Page Components
See Also: "About Cascading Style Sheets" on page 10-13 and "Using
Custom Cascading Style Sheets" on page 10-40
Controlling Access to Applications, Pages, and Page Components
You can control access to an application, individual pages, or page components by
creating an access control list.
This section contains the following topics:
■
How the Access Control List Works
■
Creating an Access Control List
■
Selecting an Application Mode and Adding Users
■
Controlling Access for Pages and Page Components
See Also: "Building Queries with Query Builder" in Oracle
Application Express SQL Workshop and Utilities Guide
"How to Build an Access Control Page" in Oracle
Application Express Advanced Tutorials
See Tutorial:
How the Access Control List Works
You create an access control list by running the Access Control Wizard. The Access
Control Wizard creates a page named Access Control Administration. This page
contains a list of application modes and an Access Control List. Once you create the
Access Control Administration page, you:
1.
Run the Access Control Administration page.
2.
Select one of the following application modes:
3.
–
Full access to all, access control list not used.
–
Restricted access. Only users defined in the access control list are allowed.
–
Public read only. Edit and administrative privileges controlled by access
control list.
–
Administrative access only.
Add users to the Access Control List.
In addition to creating the Access Control Administration page, the Access Control
Wizard also creates:
■
two tables within the application’s default schema to manage the access control
■
the authorization schemes that correspond to the application mode list options
■
the privileges available in the Access Control List
You can control access to a specific page or page component by selecting one of these
authorization schemes on the page or component attributes pages. Once you create an
Access Control, you can customize the page, tables and values to suit the specific
needs of your application.
See Also: "Attaching an Authorization Scheme to an Application"
on page 13-35
7-96 Oracle Application Express Application Builder User's Guide
Controlling Access to Applications, Pages, and Page Components
Creating an Access Control List
You create an access control list by creating a page. You can create a page on the
Application home page, while viewing a Page Definition, or by clicking Create on the
Developer toolbar.
Topics in this section include:
■
Creating an Access Control from the Application Home Page
■
Creating an Access Control from the Page Definition
■
Creating an Access Control List from the Developer Toolbar
Creating an Access Control from the Application Home Page
To create an access control list from the Application home page:
1.
On the Workspace home page, click the Application Builder icon.
2.
Select an application.
The Application home page appears.
3.
Click Create Page.
4.
For page type, select Access Control and click Next.
The Access Control Wizard appears.
5.
Specify a page number and click Next.
6.
Select a tab option and click Next.
7.
Review the confirmation page and click Finish.
Creating an Access Control from the Page Definition
To create an access control list from the Page Definition:
1.
Navigate to the appropriate Page Definition. See "Accessing a Page Definition" on
page 5-2.
2.
Click the Create button next to the navigation bar at the top of the page.
3.
Select New page and click Next.
4.
For page type, select Access Control and click Next.
The Access Control Wizard appears.
5.
Specify a page number and click Next.
6.
Select a tab option and click Next.
7.
Review the confirmation page and click Finish.
Creating an Access Control List from the Developer Toolbar
To create an access control list from the Developer toolbar:
1.
Run the application. See "Running a Page or Application" on page 6-14.
2.
On the Developer toolbar, click Create.
The New Component Wizard appears.
3.
Select New page and click Next.
4.
For page type, select Access Control and click Next.
Adding Application Components 7-97
Controlling Access to Applications, Pages, and Page Components
The Access Control Wizard appears.
5.
Specify a page number and click Next.
6.
Select a tab option and click Next.
7.
Review the confirmation page and click Finish.
Selecting an Application Mode and Adding Users
You can control access to an application by running the Access Control Administration
page, selecting an application mode, and then adding users to the Access Control list.
This section contains the following topics:
■
Selecting an Application Mode
■
Adding Users to the Access Control List and Selecting Privileges
■
Removing Users from the Access Control List
Selecting an Application Mode
To select an application mode:
1.
Create an access control list. See "Creating an Access Control List" on page 7-97.
The wizard creates a page named Access Control Administration.
2.
Run the Access Control Administration page. See "Running a Page or Application"
on page 6-14.
3.
Select an Application Mode. Options include:
■
Full access to all, access control list not used.
Select this option to enable all users access to an application.
■
Restricted access. Only users defined in the access control list are allowed.
Select this option to restrict access to users on the Access Control List. Only
users on the Access Control List can view pages and components associated
with an authorization scheme.
■
Public read only. Edit and administrative privileges controlled by access
control list.
Provides public access to pages and components associated with the access
control - view authorization scheme.
■
Administrative access only.
Only users with Administrator privileges can access pages or components
associated with an authorization scheme.
4.
Click Set Application Mode.
7-98 Oracle Application Express Application Builder User's Guide
Controlling Access to Applications, Pages, and Page Components
Note that the user interface of your page is dependent upon the theme you
selected for your application. See "Managing Themes" on page 10-1.
Next, add users to the Access Control List.
Adding Users to the Access Control List and Selecting Privileges
To add users to the Access Control List:
1.
Under Access Control List, click Add User.
A new row appears.
2.
Enter a user in the Username field.
3.
Associate a privilege with the user. Available options include:
■
Administrator
■
Edit
■
View
4.
Click Apply Changes.
5.
Repeat steps 1 to 5 for all users.
Removing Users from the Access Control List
To remove users from the Access Control List:
Adding Application Components 7-99
Incorporating JavaScript into an Application
1.
Select the user to be removed by selecting the check box to the left of the user
name.
2.
Click Delete.
Controlling Access for Pages and Page Components
The Access Control Wizard creates authorization schemes that correspond to the
application mode list options and the privileges available in the Access Control List.
You can control access to a specific page or page component by selecting one of the
following authorization schemes on the page or component attributes pages:
■
■
■
■
■
■
access control administrator. Only users with Administrator privileges can view
the page or component.
access control - edit. Users with both Edit and Administrator privileges can view
the page or component. Users with View privileges cannot view the page or
component.
access control - view. Users with Administrator, Edit, or View privileges can view
the page or component.
Not access control administrator. Users with Administrator privileges cannot
view the page or component.
Not access control - edit. Users with both Edit and Administrator privileges
cannot view the page or component. Users with View privileges can view the page
or component.
Not access control - view. Users with Administrator, Edit, or View privileges
cannot view the page or component.
See Also: "Attaching an Authorization Scheme to an Application,
Page, or Components" on page 13-35
Incorporating JavaScript into an Application
Adding JavaScript to a Web application is a great way to add features that mimic those
found in client/server applications without sacrificing all the benefits of Web
deployment. Oracle Application Express includes multiple built-in interfaces
especially designed for adding JavaScript.
Remember that JavaScript is not appropriate for data intensive validations. For
example, to verify that a name is contained within a large database table, you would
need to pull down every record to the client, creating a huge HTML document. In
general, complex operations are much better suited for server-side Application
Express validations instead of JavaScript.
This section contains the following topics:
■
Referencing Items Using JavaScript
■
Incorporating JavaScript Functions
■
Calling JavaScript from a Button
See Also:
"Understanding Validations" on page 5-17
7-100 Oracle Application Express Application Builder User's Guide
Incorporating JavaScript into an Application
Referencing Items Using JavaScript
When you reference an item, the best approach is to reference by ID. If you view the
HTML source of an Oracle Application Express page in a Web browser, you would
notice that all items have an id attribute. This id corresponds to the name of the item,
not the item label. For example, if you create an item with the name P1_FIRST_NAME
and a label of First Name, the ID will be P1_FIRST_NAME.
Knowing the item ID enables you to use the JavaScript method getElementById()
to get and set item attributes and values. The following example demonstrates how to
reference an item by ID and display its value in an alert box.
<script language="JavaScript1.1" type="text/javascript">
function firstName(){
alert('First Name is ' + document.getElementById('P1_FIRST_NAME').value );
}
// or a more generic version would be
function displayValue(id){
alert('The Value is ' + document.getElementById(id).value );
}
</script>
// Then add the following to the "Form Element Attributes" Attribute of the
item:
onchange="displayValue('P1_FIRST_NAME');"
Incorporating JavaScript Functions
There are two primary places to include JavaScript functions:
■
In the HTML Header attribute of the page
■
In a .js file in the page template
See Also: "Text with JavaScript Escaped Single Quotes" on page 7-86
for information about referencing a shortcut inside of a JavaScript
literal string
Incorporating JavaScript into the HTML Header Attribute
One way to include JavaScript into your application is to add it to the HTML Header
attribute of the page. This is a good approach for functions that are very specific to a
page and a convenient way to test a function before you include it in the .js file.
You can add JavaScript functions to a page by simply entering the code into the HTML
Header attribute of the Page Attributes page. In the following example, adding the
code would make the test function accessible from anywhere on the current page.
To add JavaScript code in the HTML Header attribute:
1.
On the Workspace home page, click the Application Builder icon.
2.
Select an application.
3.
Select a page.
4.
Under Page, click the Edit page attributes icon.
5.
Scroll down to HTML Header.
6.
Enter code into HTML Header and click Apply Changes.
Adding Application Components
7-101
Incorporating JavaScript into an Application
For example, adding the following would test a function accessible from anywhere on
the current page.
<script type="text/javascript">
function test(){
window.alert('This is a test.');
}
</script>
See Also:
"HTML Header" on page 5-25
Including JavaScript in a .js File Referenced by the Page Template
In Oracle Application Express, you can reference a .js file in the page template. This
approach makes all the JavaScript in that file accessible to the application. This is the
most efficient approach since a .js file loads on the first page view of your
application and is then cached by the browser.
The following demonstrates how to include a .js file in the header section of a page
template. Note the line script src= that appears in bold.
<!DOCTYPE html PUBLIC "-//W3C//DTD HTML 4.01 Transitional//EN">
<html>
<head>
<title>#TITLE#</title>
#HEAD#
<script src="http://myserver.myport/my_images/custom.js"
type="text/javascript"></script>
</head>
<body #ONLOAD#>#FORM_OPEN#
See Also:
"Page Templates" on page 10-25
Calling JavaScript from a Button
Calling JavaScript from a button is a great way to confirm a request. Oracle
Application Express uses this technique for the delete operation of most objects. For
example, when you delete a button, a JavaScript message appears asking you to
confirm your request. Consider the following example:
<script type="text/javascript">
function deleteConfirm(msg)
{
var confDel = msg;
if(confDel ==null)
confDel= confirm("Would you like to perform this delete action?");
else
confDel= confirm(msg);
if (confDel== true)
doSubmit('Delete');
}
</script>
This example creates a function to confirm a delete action and then calls that function
from a button. Note that the function optionally submits the page and sets the value of
the internal variable :REQUEST to Delete, thus performing the deletion using a
process that conditionally executes based on the value of the request.
7-102 Oracle Application Express Application Builder User's Guide
Optimizing a Page for Printing
Note that when you create the button, you would need to select Action Redirect to
URL without submitting page. Then, you would specify a URL target such as the
following:
confirmDelete('Would you like to perform this delete action?');
See Also:
"Creating a Button Using a Wizard" on page 7-77
Optimizing a Page for Printing
You can optimize a page for printing by creating a specific Printer Friendly template
and selecting that template on the Create/Edit Theme page. See "Changing the Default
Templates in a Theme" on page 10-3.
Generally, a Printer Friendly template optimizes a page for printing. For example, a
Printer Friendly template might:
■
Not display tabs or navigation bars
■
Display items as text instead of as form elements
If the theme you select does not include a printer friendly template, you can create a
Printer Friendly template by creating a new page template.
See Also: "Changing the Default Templates in a Theme" on
page 10-3, "Creating a Theme" on page 10-4, and "Printing Report
Regions" on page 37
Topics in this section include:
■
Selecting a Printer Friendly Template for an Application
■
Using f?p Syntax to Toggle to Printer Friendly Mode
Selecting a Printer Friendly Template for an Application
To select a Printer Friendly template:
1.
2.
Navigate to the Themes page:
a.
On the Workspace home page, click Application Builder.
b.
Select an application.
c.
Click Shared Components.
d.
Under User Interface, select Themes.
In the Themes list, click the theme name.
The Create/Edit Theme page appears.
3.
Scroll down to Component Defaults and locate the Printer Friendly Page list.
4.
Make a selection from the Printer Friendly Page list.
5.
Click Apply Changes.
See Also: "Changing the Default Templates in a Theme" on
page 10-3
Adding Application Components
7-103
Creating a Help Page
Using f?p Syntax to Toggle to Printer Friendly Mode
Once you create a Printer Friendly template and select it, you can use f?p syntax to
toggle to Printer Friendly mode. Including the ninth f?p syntax argument
(PrinterFriendly) renders the page in printer friendly mode (optimizing printed
output). For example, you could include this argument when coding a link or creating
a navigation bar icon.
See Also:
"Using f?p Syntax to Link Pages" on page 3-7
Creating a Help Page
Application Builder includes built-in attributes to create Help for your application.
Creating Help for your application involves the following steps:
1.
Create a dedicated Help page and Help region.
2.
Define page Help text.
3.
Define item Help text.
4.
Create a navigation bar icon to link to your Help page.
Help created in Application Builder displays on a dedicated Help page. To access
Help, users click a link that takes them to a dedicated Help page. This Help page
displays page and item Help topics specific to the page they are viewing.
Topics in this section include:
■
Creating a Help Page and Region
■
Defining Help Text
■
Creating a Help Navigation Bar Entry
Creating a Help Page and Region
The first step in creating Help for your application is to create a dedicated page and
Help Text region.
To create a Help Text region:
1.
Create a page for your Help. See "Managing Pages in an Application" on page 6-9.
2.
Navigate to the Page Definition of your Help page. See "Accessing a Page
Definition" on page 5-2.
3.
Under Regions, the Create icon.
4.
When prompted to select a region type, select Help Text.
5.
Follow the on-screen instructions.
Defining Help Text
You define Help text for a page or single item by editing attributes. Ideally, you would
define these attributes as you create your application. For simplicity, however, the
following procedures describe how to define this text after the fact.
See Also:
"Item Help" on page 6-45
Topics in this section include:
■
Defining Help for a Page
7-104 Oracle Application Express Application Builder User's Guide
Creating a Help Page
■
Defining Help Text for an Item
■
Editing Multiple Item Help Topics Simultaneously
Defining Help for a Page
To define page Help text:
1.
Navigate to the Page Definition for the page for which you want to add page
Help. See "Accessing a Page Definition" on page 5-2.
2.
Under Page, click the Edit page attributes icon to view the existing page
attributes.
3.
Scroll down to Help.
4.
Enter your Help text in the field provided.
5.
Click Apply Changes.
Repeat the previous procedure for each page requiring page Help text.
Defining Help Text for an Item
To define item Help text for an item:
1.
Navigate to the Page Definition for the page for which you want to add item Help.
See "Accessing a Page Definition" on page 5-2.
2.
Under Items, click the name of the item you want to edit.
3.
Scroll down to Help Text.
4.
Enter your Help text in the field provided.
5.
Click Apply Change.
Repeat the previous procedure for each item requiring Help text.
Editing Multiple Item Help Topics Simultaneously
If you are including item Help in your application, you can edit multiple item Help
topics at once using the Bulk Edit Item Help report.
Accessing the Bulk Edit Item Help Report To view the Bulk Edit Item Help report:
1.
On the Workspace home page, click the Application Builder icon.
2.
Select an application.
3.
On the Tasks list, click Application Reports.
4.
Click Page Components.
5.
Under Items, click Item Help Text.
A report displays at the bottom of the page.
6.
In Bulk Item Help Report, you can:
■
Update existing Help topics. Edit the Help text that appears and click Apply
Changes.
■
Link to the Page Definition containing the item by clicking the page number.
■
Link to the Page Item by clicking the item name.
Adding Application Components
7-105
Creating a Help Page
Seeding Item Help Topics If your application does not yet contain item Help, you can
perform a mass update of default Help text.
To seed item Help topics:
1.
Access the Bulk Edit Item Help report as described in the previous topic.
2.
Click Seed Item Help Text.
3.
In Default Help Text, enter the default text to appear in all Help topics.
4.
Click Apply Changes.
Searching for Existing Item Help Topics You can search for existing Help text, or for an
item label.
To search for existing item Help topic:
1.
In Help Contains, enter keywords.
2.
Click Go.
Searching for an Item Label To search for an item label:
1.
In Help Contains, enter keywords.
2.
Click Go.
See Also:
"Viewing Application Reports" on page 6-29
Creating a Help Navigation Bar Entry
Once you have created your Help, the next step is to create a navigation bar entry so
users can link to it.
To create a navigation bar entry:
1.
Navigate to the Page Definition. See "Accessing a Page Definition" on page 5-2.
2.
Under Navigation Bar, click the Create icon.
3.
For Attributes:
a.
Sequence - Specify the sequence for this component. The sequence determines
the order of evaluation.
b.
Alt Tag Text - Enter ALT text for navigation icons that are images. If you do
not specify an image name, then this text displays.
c.
Icon Image Name - Enter the name of the image that displays.
d.
Image Height - Enter the height of the image.
e.
Image Width - Enter the width of the image.
f.
Text - Enter additional text to display with the image. You can include text or
use icons with no text. This attribute is optional and can be translated.
g.
Click Next.
Next, specify the target location.
4.
For Target:
a.
Target is a - Select Page in this application.
b.
Page - Specify the page number of the help page you created in "Creating a
Help Page and Region" on page 7-104.
7-106 Oracle Application Express Application Builder User's Guide
Creating a Help Page
c.
Request - Enter the following:
&APP_PAGE_ID.
By specifying substitution string &APP_PAGE_ID as the Request, you are
instructing the Application Express engine to display Help text for the current
page when the user clicks this icon.
d.
5.
Click Next.
Click Create.
Adding Application Components
7-107
Creating a Help Page
7-108 Oracle Application Express Application Builder User's Guide
8
Adding Navigation
When you build an application, you can include different types of navigation controls,
such as navigation bar entries, tabs, breadcrumbs, lists, and trees. This section
describes how to implement navigation in your application.
Navigation controls are shared components, so you create the specific type of
navigation control at the application level on the Shared Components page. After that,
you can add them to any page within your application.
This section contains the following topics:
■
Creating Tabs
■
Creating Lists
■
Creating Breadcrumbs
■
Creating Trees
■
Creating a Navigation Bar Entry
■
Controlling Navigation Using Branches
See Also:
"Working with Shared Components" on page 5-29
Creating Tabs
Tabs are an effective way to navigate users between pages of an application. You can
create a tabbed application look by using parent tabs, standard tabs, and lists.
Application Builder includes two different types of tabs:
■
Standard tabs
An application having only one level of tabs uses a standard tab set. A standard
tab set is associated with a specific page and page number. You can use standard
tabs to link users to a specific page.
■
Parent tabs
A parent tab set functions as a container to hold a group of standard tabs. Parent
tabs give users another level of navigation and a context (or sense of place) within
the application. You can use parent tabs to link users to a specific URL associated
with a specific page.
Topics in this section include:
■
About Template Support
■
About the Tabs Section of the Page Definition
Adding Navigation
8-1
Creating Tabs
■
Using the Reorder Tabs Icon
■
About the Tabs Page
■
How to Create a Tab
■
Editing Tabs
■
Accessing Tab Reports
When running the Create Application Wizard, you have the
option of creating an application with tabs. The following
procedures assume you have created an application that does not
have any tabs.
Note:
See Also:
"Creating an Application" on page 6-1
About Template Support
Before you can create parent and standard tabs, you must check that your default
template has positions defined for both standard and parent tabs using the
appropriate substitution strings. You also must make sure you do not override this
template at the page-level.
See Also:
■
■
"Template Defaults" on page 4-14 for information about setting
a default page template at the application level
"Page Templates" on page 10-25
About the Tabs Section of the Page Definition
You can create and edit tabs on the Page Definition. Tabs display under the Shared
Components section.
You can temporarily hide all other Shared Components subsections by clicking the
Tabs icon under the Shared Components title. To restore the view, click Show All. The
Show All icon resembles an inverted triangle.
The following icons appear in the Tabs section:
■
■
Edit All. The Edit All icon resembles a small grid with a pencil on top of it. Use
this icon to edit all tabs at once.
Create. The Create icon resembles a plus (+) sign overlapping a small page. Click
this icon to create a new tab.
8-2 Oracle Application Express Application Builder User's Guide
Creating Tabs
■
Reorder. The Reorder icon resembles light green down and up arrows. Click this
icon to edit the label and location of tabs.
To edit a tab, click the tab name.
See Also: "About the Tabs Page" on page 8-3 and "Using the
Reorder Tabs Icon" on page 8-3
Using the Reorder Tabs Icon
You can quickly edit the label and location of tabs by clicking the Reorder Tabs icon. It
appears in the Tabs section of the Page Definition. This icon resembles light green
down and up arrows.
To edit tabs using the Reorder Tabs icon:
1.
Navigate to the appropriate Page Definition. See "Accessing a Page Definition" on
page 5-2.
2.
Under Tabs, click the Reorder Tabs icon.
The Reorder Tabs page appears.
3.
Edit the appropriate information:
a.
Label - Enter a label for the tab.
b.
Page - Enter the page number that corresponds to the tab.
c.
Tab Also Current For - List other pages that also correspond to this tab. To
enter multiple pages, enter a list of pages delimited by a comma. For example:
11,12,13,14,29,14
4.
To change the order in which tabs display, click the up and down arrows in the far
right column.
5.
Click Apply Changes.
About the Tabs Page
The Tabs page displays a graphical representation of the tabs defined in your
application. You access the Tabs page from the Shared Components page, or by
clicking the heading Tabs on the Page Definition.
How to Create a Tab
You create a parent tab or standard tab from the Tabs page.
To create a tab:
Adding Navigation
8-3
Creating Tabs
1.
Access the Tabs page:
To access the Tabs page from the Shared Components page:
a.
On the Workspace home page, click the Application Builder icon.
b.
Select an application.
c.
On the Application Builder home page, click Shared Components.
d.
Under Navigation, click Tabs.
To access the Tabs page from a Page Definition:
2.
a.
Navigate to the appropriate Page Definition. See "Accessing a Page Definition"
on page 5-2.
b.
Under Shared Components, click the Create icon in the Tabs section.
To create a tab:
a.
Click Add in the appropriate row:
–
Use the Add button in the upper row to add Parent tabs.
Think of parent tabs as a container to hold standard tabs. For example, to
add two levels of tabs, you first create a parent tab and then add standard
tabs to it.
–
Use the Add button in the lower row to add Standard tabs.
The Create Parent Tab or Create Standard Tab Wizard appears.
b.
Follow the on-screen instructions.
Editing Tabs
You can edit multiple tabs simultaneously. Also, for standard tabs, you can update tab
properties, such as their labels and order sequence, by using the Standard Tab Tasks
list.
Editing Multiple Tabs Simultaneously
You can edit multiple tabs simultaneously.
To edit multiple tabs simultaneously:
1.
2.
Navigate to the Tabs page:
a.
On the Workspace home page, click the Application Builder icon.
b.
Select an application.
c.
Click Shared Components.
d.
Under Navigation, click Tabs.
Click one of the following buttons:
■
Edit Standard Tabs
■
Edit Parent Tabs
Using the Standard Tab Task List
The Standard Tab Task list displays on the right side of the Tabs page. You can access
the links on this list to rename a standard tab set, resequence the display order,
8-4 Oracle Application Express Application Builder User's Guide
Creating Lists
associate pages with a tab set, create a new standard tab, or create a new standard tab
set.
To access the Standard Tab Task list:
1.
2.
Navigate to the Tabs page:
a.
On the Workspace home page, click the Application Builder icon.
b.
Select an application.
c.
Click Shared Components.
d.
Under Navigation, click Tabs.
Make a selection from the Standard Tab Task list:
■
Rename Standard Tab Set
■
Resequence Display Order
■
Associate Page(s) with Selected Standard Tab
■
Create New Standard Tab
■
Create New Standard Tab Set
Accessing Tab Reports
You can view the Tab Utilization and Tab History reports by clicking the appropriate
tab at the top of the Tab Manager page.
Standard Tab Utilization
Click Utilization to access the Standard Tab Utilization report. This report lists the
standard tabs used in the current application.
Standard and Parent Tab History
Click History to view the Standard Tab History and Parent Tab History reports. These
reports display a history of changes to tab attributes for the current application.
Creating Lists
A list is a shared collection of links. You add a list to a page by creating a region and
specifying the region type as List. You control the appearance of a list through list
templates.
Each list element has a display condition, which enables you to control when it
displays. You can define a list element to be either current or non-current for a specific
page. You further specify what current looks like using template attributes.
Topics in this section include:
■
How To Create a List
■
Adding a List to a Page
Adding Navigation
8-5
Creating Lists
■
Editing a List
■
Editing Multiple List Entries Simultaneously
■
Accessing List Reports
See Also: "Creating a New Template" on page 10-14 and "List
Templates" on page 10-23 for information about altering list display
How To Create a List
To add a list to a page in your application, you must:
1.
Create the list using one of these methods:
■
■
2.
Copy an existing list. If the list contains list items or entries, the items are also
copied.
Add entries to the list:
■
■
■
3.
Create a list from scratch by running the Create/Edit Lists Wizard from either
the Shared Components page or Page Definition.
Create list entries from scratch.
Copy a single list entry from the current list. This copies the list entry
attributes.
Copy list entries from another list into the current one. This merges the two
sets of list entries without changing the list whose entries are copied into the
current one.
Add the list to a page by creating a List region.
Topics in this section include:
■
Creating a List from Scratch
■
Copying Lists
■
Adding List Entries and Sublists
■
Changing Parents of List Entries
■
Removing Parent of Orphaned List Entries
Creating a List from Scratch
To create a list:
1.
Access the Create/Edit Lists Wizard:
To access the wizard from the Shared Components page:
a.
On the Workspace home page, click the Application Builder icon.
b.
Select an application.
c.
On the Application Builder home page, click Shared Components.
d.
Under Navigation, click Lists.
e.
Click Create.
To access the wizard from a Page Definition:
a.
Navigate to the appropriate Page Definition. See "Accessing a Page Definition"
on page 5-2.
8-6 Oracle Application Express Application Builder User's Guide
Creating Lists
b.
2.
3.
Under Shared Components, click the Create icon in the Lists section.
In the Create/Edit Wizard:
a.
Name - Enter a name for the list.
b.
List Template - Select a list template.
c.
Build Option - If applicable, select a build option for this component. Build
options are predefined settings that determine whether components within an
application are enabled.
Click Create.
Copying Lists
To copy a list:
1.
Access the Copy List Wizard:
To access the wizard from the Shared Components page:
a.
On the Workspace home page, click the Application Builder icon.
b.
Select an application.
c.
On the Application Builder home page, click Shared Components.
d.
Under Navigation, click Lists.
e.
Click Copy.
To access the wizard from a Page Definition:
a.
Navigate to the appropriate Page Definition. See "Accessing a Page Definition"
on page 5-2.
b.
Under Shared Components, click the Copy icon in the Lists section.
The Copy icon appears only if a list exists for this page.
2.
In the Copy Wizard, select the location of the list to copy and click Next.
3.
If you selected List in another application, select the application and click Next.
4.
For Identify List, enter a name for the new list and click Copy.
For the list to appear on a page, you must add it to the page.
Adding List Entries and Sublists
Once your list is created, you must add entries to it. You can add list entries from
scratch, copy one list entry within a list, or copy existing entries from one list to
another.
You can also create hierarchical lists that contain sublists. To create a hierarchical list,
you must:
■
■
Select a list template that supports hierarchical lists. To determine which list
templates support hierarchical lists, look for templates having the naming
convention "with Sublist."
Select a Parent List Item when you create each list entry.
"Customizing Templates" on page 10-12 and "List
Templates" on page 10-23
See Also:
Adding Entries or Sublists from Scratch To add an entry or sublist from scratch:
Adding Navigation
8-7
Creating Lists
1.
Navigate to the Lists page:
a.
On the Workspace home page, click the Application Builder icon.
b.
Select an application.
c.
On the Application home page, click Shared Components.
d.
Under Navigation, select Lists.
The Lists page appears.
2.
Select a list.
3.
Click Create List Entry.
The Create/Edit List Entry page appears.
4.
Under Entry:
a.
Parent List Item - Identify the parent for this list entry. Use this attribute if you
are creating a hierarchical list that will contain a sublist.
b.
Sequence - Indicate the order in which list entries appear.
c.
Image - Identify the file name for the image used to display this list entry. List
templates control this attribute.
d.
Attributes - Identify the image attributes (such as width="12" height="12") for
the list element image.
Use the #LIST_LABEL# substitution string to reference the list label text. This
substitution string allows for the title image attribute to be automatically set
based on the value of the list label text. For example:
title="#LIST_LABEL#"
e.
5.
List Entry Label - Enter the label text for this link.
Specify a target location.
If the target location is a URL, specify the following:
–
Target is a - Select URL.
–
URL Target - Enter a URL. For example:
http://www.yahoo.com
If the target location is a page:
a.
Target Type - Select Page in this Application.
b.
Page - Specify the target page number.
You can also select reset pagination for this page. Selecting this option causes
the page to return to the first set of data meeting a user’s new query.
You can also select Printer Friendly. Selecting this option displays the target
page using the application's Printer Friendly template. Printer friendly
templates optimize a page for printing. "Changing the Default Templates in a
Theme" on page 10-3 and "Optimizing a Page for Printing" on page 7-103.
c.
Request - Specify the request to be used.
d.
Clear Cache - Specify the page numbers on which to clear cache.
e.
To set session state (that is, give a listed item a value):
8-8 Oracle Application Express Application Builder User's Guide
Creating Lists
–
Set these items - Enter a comma-delimited list of item names for which
you would like to set session state.
–
With these values - Enter a comma-delimited list of values for the items
specified in the previous step.
You can specify static values or substitution syntax (for example, &APP_
ITEM_NAME.). Note that item values passed to f?p= in the URL cannot
contain a colon. Additionally, item values cannot contain commas unless
you enclose the entire value in backslashes (for example, \1234,56\).
6.
Under Current List Entry:
a.
List Entry Current for Pages Type - Specify when this list entry should be
current based on the page type.
List items can be current or non-current. Current list items use the current
template; non-current list items use the non-current list item template. The
actual condition and templates are defined in subsequent attributes.
b.
List Entry Current for Condition - Based on the selection above, define a
condition to evaluate. When this condition is true, then the list item becomes
current.
7.
To make the list entry conditional, specify the appropriate information under
Conditions.
8.
Under Authorization, you can specify an authorization scheme.
This authorization scheme must evaluate to TRUE in order for this component to
be rendered or otherwise processed.
9.
Under Configuration, you can select a build option for this component.
Build options are predefined settings that determine whether components within
an application are enabled.
10. Under Click Counting, you can specify if you want the list entries to be included
in the click count.
If this is a link to an external page, such as www.google.com, you can count clicks.
For more information, see "COUNT_CLICK Procedure" in Oracle Application
Express API Reference.
11. To specify additional attributes, use the User Defined Attributes section. For
example, the following adds a tabindex and accesskey.
tabindex="15" accesskey="D"
12. When you are finished defining list attributes, click Create or Create and Create
Another.
Copying List Entries To copy list entries:
1.
Navigate to the List Entries page:
a.
On the Workspace home page, click the Application Builder icon.
b.
Select an application.
c.
On the Application home page, click Shared Components.
d.
Under Navigation, select Lists.
The Lists page appears.
Adding Navigation
8-9
Creating Lists
e.
On the Lists page, click the name of the list whose entries you want to copy.
The List Entries page appears.
2.
To copy a single list entry that appears in the current list:
a.
Click the Copy icon in the in the row you want to copy. The Copy icon appears
under the Copy column in the list.
All the attributes of the selected list entry, such as image and parent, will be
copied to the new entry.
b.
3.
For Copy List Entry, enter the appropriate information and click Copy List
Entry.
To copy list entries from one list to another:
a.
Click Copy List Entries from one List to Another under the Tasks list on the
right side of the page.
b.
For Identify Copy Target, select the target list where you want to add the
entries and click Next.
c.
For Confirm List Entry Copy, click the Report of New Combined List to
review the composite list.
d.
Click Copy List Entries.
Changing Parents of List Entries
To change the parent of list entries:
1.
Navigate to the List Entries page:
a.
On the Workspace home page, click the Application Builder icon.
b.
Select an application.
c.
On the Application home page, click Shared Components.
d.
Under Navigation, select Lists.
The Lists page appears.
e.
On the Lists page, click the name of the list whose entries you want to update.
The List Entries page appears.
2.
From the Tasks list on the right, click Reparent List Entries within this List.
3.
On the Reparent List Entries page:
a.
Enter the appropriate information for List and Start With and click Go.
You can use the Start With field to filter down a large, hierarchical list to
pinpoint the entries you need to reparent. You can also use these fields to
focus on a subset of a list you want to edit.
b.
For Reparent To, select the new parent for the list entries.
c.
Select the check boxes for the list entries you want to include.
d.
Click Reparent Checked Entries.
Removing Parent of Orphaned List Entries
An orphaned list entry is a list entry whose parent is no longer a member of the
current list. When a list entry becomes orphaned, remove the parent entry.
8-10 Oracle Application Express Application Builder User's Guide
Creating Lists
To remove the parent of an orphaned list entry:
1.
Navigate to the List Entries page:
a.
On the Workspace home page, click the Application Builder icon.
b.
Select an application.
c.
On the Application home page, click Shared Components.
d.
Under Navigation, select Lists.
The Lists page appears.
e.
On the Lists page, click the name of the list whose entries you want to update.
The List Entries page appears.
2.
From the Tasks list on the right, click Manage Oprhaned List Entries.
3.
On the Manage Orphaned List Entries page:
a.
From the Show list, select Orphaned and click Go.
b.
Select the check boxes for the orphaned list entries.
c.
Click Remove Parent Entry.
Adding a List to a Page
Once you create a list and list entries, the next step is to add it to a page by creating a
region and specifying the region type as List.
See Also: "Creating a New Template" on page 10-14 and "List
Templates" on page 10-23 for information about altering list display
To add a list to a page:
1.
Navigate to the appropriate Page Definition. See "Accessing a Page Definition" on
page 5-2.
2.
Under Regions, click the Create icon.
3.
For Region, select List as the region type and click Next.
4.
For Display Attributes, specify the appropriate information and click Next:
■
Title - Enter a title for the region. This title will display if the region template
you choose displays the region title.
■
Region Template - Choose a template to control the look of the region.
■
Display Point - Identify a display point for this region.
■
■
–
Page Template Body - These positions are displayed where indicated by
the #BODY# substitution string in the page template.
–
Page Template Region - These positions are controlled by page template
substitution strings (#REGION_POSITION_01#..#REGION_POSITION_
08#). Page template region positions enable exact placement of a region
within a template.
Sequence - Specify the sequence for this component. The sequence determines
the order of evaluation.
Column - Indicate the column where this region is to be displayed. A page can
have multiple regions, which can be displayed in different columns. Note that
Adding Navigation 8-11
Creating Lists
this attribute only applies to regions that are displayed in a Page Template
Body position.
5.
For Source, select the list you want to add.
6.
Click Create List Region.
Repeat these procedures for each page where you would like to add a list.
Editing a List
Once you create a list, you can edit it on the Lists page.
To edit a list:
1.
Navigate to the Lists page.
From the Page Definition:
a.
Navigate to the Workspace home page.
b.
Click the Application Builder icon.
c.
Select an application.
d.
Select a page.
e.
Under Shared Components, click Edit All.
From the Shared Components page:
2.
a.
Navigate to the Workspace home page.
b.
Click the Application Builder icon.
c.
Select an application.
d.
On the Application home page, click Shared Components.
e.
Under Navigation, click Lists.
On the Lists page, you can change the appearance of the page by making a
selection from the View list:
■
■
3.
Icons (the default) displays each list as a large icon. To edit a list, click the
appropriate icon.
Details displays each list as a line in a report. To edit a list, click the list name.
Select a list.
The List Entries page appears.
4.
Select the appropriate list name.
The Create/Edit List Entry page that appears is divided into sections. You can
access these sections by scrolling down the page, or by clicking a navigation
button at the top of the page. When you select a button at the top of the page, the
selected section appears and all other sections are temporarily hidden. To view all
sections of the page, click Show All.
5.
Edit the appropriate attributes.
6.
To learn more about a specific item on a page, click the item label.
When Help is available, the item label changes to red when you pass your cursor
over it and the cursor changes to an arrow and question mark. See "About
Field-Level Help" on page 1-15.
8-12 Oracle Application Express Application Builder User's Guide
Creating Breadcrumbs
7.
Click Apply Changes.
Editing Multiple List Entries Simultaneously
You can edit multiple list entries simultaneously by clicking Grid Edit on the List
Entries page.
To edit multiple list entries at once:
1.
On the Workspace home page, click the Application Builder icon.
2.
Select an application.
3.
On the Application Builder home page, click Shared Components.
4.
Under Navigation, click Lists.
The Lists page appears.
5.
Select a list name.
The List Entries page appears.
6.
Click Grid Edit.
7.
Edit the appropriate items and click Apply Changes.
Accessing List Reports
You can view the List Utilization by Page, Unused Lists, and List History reports by
clicking the appropriate tab at the top of the Lists page.
The List Utilization, Unused Lists, and History buttons only
appear after you create a list.
Note:
Utilization
Click List Utilization on the Lists page to access the Lists Utilization report. This
report displays all lists included in the current application. From the report:
■
To edit list entries, select the list name.
■
To view the pages on which the list appears, click the number in the Pages column.
■
To view the template used with the list, click List Template Utilization. Then click
the name to view or edit the list template.
Unused
Click Unused on the Lists page to identify lists that are not used in the current
application.
History
Click History on the Lists page to view changes to list definitions and list entries by
developer and date.
Creating Breadcrumbs
Breadcrumbs provide users with hierarchical navigation. A breadcrumb is a
hierarchical list of links that display using templates. You can display a breadcrumb as
a list of links or as a breadcrumb path.
Adding Navigation 8-13
Creating Breadcrumbs
Topics in this section include:
■
About Breadcrumbs
■
How to Create Breadcrumbs
■
Editing Breadcrumbs
■
Reparenting Breadcrumb Entries
■
Accessing Breadcrumb Reports
See Also: "Creating a Theme" on page 10-4 and "Breadcrumb
Templates" on page 10-18
About Breadcrumbs
A breadcrumb trail indicates where the user is within the application from a
hierarchical perspective. In addition, users can click a specific breadcrumb link to
instantly view the page. You use breadcrumbs as a second level of navigation at the
top of each page, complementing other user interface elements such as tabs and lists.
How to Create Breadcrumbs
You can create breadcrumbs while creating a page, or manually by running the Create
Breadcrumb Wizard.
Topics in this section include:
■
Creating a Breadcrumb While Creating a Page
■
Creating a Breadcrumb Manually
Creating a Breadcrumb While Creating a Page
To create a breadcrumb while creating a page:
1.
Run the Create Page Wizard to add a new page. See "Managing Pages in an
Application" on page 6-9. You can access this wizard by:
■
Clicking Create Page on the Application home page
■
Clicking Create on the Page Definition
8-14 Oracle Application Express Application Builder User's Guide
Creating Breadcrumbs
■
Clicking the Create link on the Developer toolbar
During the wizard, a Breadcrumb list appears. The actual page on which this list
displays depends upon the type of page you are creating.
2.
From the Breadcrumb list, select Breadcrumb.
The Create Breadcrumb Entry form appears.
3.
In Entry Name, enter a name for the breadcrumb.
4.
For Parent Entry:
■
■
5.
To specify a parent, select a parent page from the Select Parent Entry list.
If this breadcrumb does not have a parent, select No parent breadcrumb
entry.
Follow the on-screen instructions.
Creating a Breadcrumb Manually
To create breadcrumbs manually, you need to add a breadcrumb to each page in your
application as follows:
1.
Create the breadcrumb by running the Create/Edit Breadcrumb Wizard from
either the Shared Components page or the Page Definition.
2.
Add entries to it.
3.
Add the breadcrumb to a page by creating a region.
Creating Breadcrumbs from the Shared Components Page To create breadcrumbs from the
Shared Components page:
1.
On the Workspace home page, click the Application Builder icon.
2.
Select an application.
3.
On the Application Builder home page, click Shared Components.
4.
Under Navigation, click Breadcrumbs.
The Breadcrumbs page appears.
5.
Click Create.
6.
Enter a name and click Create.
Adding Navigation 8-15
Creating Breadcrumbs
Creating Breadcrumbs from a Page Definition To create breadcrumbs from a Page
Definition:
1.
Navigate to the appropriate Page Definition. See "Accessing a Page Definition" on
page 5-2.
2.
Under Shared Components, scroll down to Breadcrumbs and click the Create
icon.
3.
For Create, select Breadcrumb and click Next.
4.
Enter a name and click Create.
After you create a breadcrumb, you add entries to it.
Adding Breadcrumb Entries To add a breadcrumb entry:
1.
Navigate to the Breadcrumbs page:
a.
Navigate to the Workspace home page.
b.
Click the Application Builder icon.
c.
Select an application.
d.
On the Application Builder home page, click Shared Components.
e.
Under Navigation, click Breadcrumbs.
The Breadcrumbs page appears.
2.
Select a breadcrumb to add entries to.
3.
Click Create Breadcrumb Entry.
4.
Under Breadcrumb, specify the page where this breadcrumb entry will display.
5.
Under Entry:
6.
a.
Sequence - Indicate the order in which breadcrumb entries appear.
b.
Parent Entry - Identify the parent of this entry.
c.
Short Name - Specify the short name of this entry (referenced in the
breadcrumb template).
d.
Long Name - Specify the long name of this entry (referenced in the
breadcrumb template).
Under Target, specify the target location. The information that appears on the page
depends on the branch type you selected:
a.
If the target location is a URL, specify the following:
–
Target is a - Select URL.
–
URL Target - Enter a URL. For example:
http://www.yahoo.com
b.
If the target location is a page, specify the following:
–
Target is a - Select Page in this Application.
–
Page - Specify the target page number.
You can also select reset pagination for this page. Selecting this option
causes the page to return to the first set of data meeting a user’s new
query.
8-16 Oracle Application Express Application Builder User's Guide
Creating Breadcrumbs
c.
–
Request - Specify the request to be used.
–
Clear Cache - Specify the page numbers on which to clear cache.
To set session state (that is, give a listed item a value):
–
Set these items - Enter a comma-delimited list of item names for which
you would like to set session state.
–
With these values - Enter a comma-delimited list of values for the items
your specified.
You can specify static values or substitution syntax (for example, &APP_
ITEM_NAME.). Note that item values passed to f?p= in the URL cannot
contain a colon. Additionally, item values cannot contain commas unless
you enclose the entire value in backslashes (for example, \1234,56\).
d.
7.
8.
Click Next.
To make the breadcrumb conditional:
a.
Make a selection from the Condition Type list.
b.
Enter an expression in the fields provided.
Under Authorization, you can specify an authorization scheme.
This authorization scheme must evaluate to TRUE in order for this component to
be rendered or otherwise processed.
9.
Under Configuration, you can select a build option for this component.
Build options are predefined settings that determine whether components within
an application are enabled.
10. When you are finished defining menu attributes, click Create at the top of the
page.
Repeat these procedures for each breadcrumb entry you need to create.
Adding a Breadcrumb Region A region is an area on a page that serves as a container for
content. Once you create a breadcrumb and a breadcrumb template, the next step is to
create a region. Once you create a region, you can add a breadcrumb to a page.
See Also: "Creating a New Template" on page 10-14 and
"Breadcrumb Templates" on page 10-18 for information about
changing menu display
To create a breadcrumb region:
1.
Navigate to the appropriate Page Definition. See "Accessing a Page Definition" on
page 5-2.
2.
Under Regions, click the Create icon.
The Create Region Wizard appears. Note that each wizard page displays a series
of blocks on the left, representing the sequence of steps. The highlighted block
indicates the step you are performing.
3.
For the region type, select Breadcrumb and click Next.
4.
For Breadcrumb Container Region:
a.
Region Title - Enter a title for this region.
b.
Region Template - Select a region template.
Adding Navigation 8-17
Creating Breadcrumbs
c.
Display Point - Select a Display Point.
Regions are organized by position (or Display Point). To determine the
appropriate region position, click the flashlight icon. A graphical
representation appears.
5.
6.
7.
d.
Sequence - Enter a number for the sequence.
e.
Click Next.
For Breadcrumb:
a.
Breadcrumb - Select the breadcrumb to be associated with this region.
b.
Breadcrumb Template - Select a template.
c.
Click Next.
For Breadcrumb Entry, identify the breadcrumb entry used to identify this page:
a.
Breadcrumb Entry Label - Enter a label for the breadcrumb entry.
b.
Parent Entry - Select the appropriate hierarchical parent.
c.
Click Next.
Click Finish.
Repeat these procedures for each page where you would like to add breadcrumb
navigation.
About Creating Dynamic Breadcrumbs To give users more exact context, you can include
session state in breadcrumbs, making your breadcrumbs dynamic. For example,
suppose a page in your application displays a list of orders for a particular company
and you want to include the following breadcrumb:
Home > Orders > Orders for ACME Inc
In this example, ACME Inc not only indicates the page a user is on but also the
navigation path. The Application Express engine stores the value of ACME Inc. in
session state.
To create this type of dynamic menu, you must include a reference to a session state
item in the breadcrumb's short name or long name. For example:
&COMPANY_NAME.
Editing Breadcrumbs
Once you create a breadcrumb, you can edit it on the Breadcrumbs page.
To edit a breadcrumb:
1.
Navigate to the Workspace home page.
2.
Click the Application Builder icon.
3.
Select an application.
4.
On the Application Builder home page, click Shared Components.
5.
Under Navigation, select Breadcrumbs.
The Breadcrumbs page appears.
You can change the appearance of the page by making a selection from the View
list and clicking Go:
8-18 Oracle Application Express Application Builder User's Guide
Creating Breadcrumbs
■
■
Icons (the default) displays each breadcrumb as a large icon. To edit a
breadcrumb, click the icon.
Details displays each breadcrumb as a line in a report. To edit a breadcrumb,
click the appropriate name.
6.
Select a breadcrumb.
7.
Select the appropriate breadcrumb entry name.
The Create/Edit Breadcrumb Entry page appears.
8.
Edit the appropriate attributes.
Tip: To learn more about a specific item on a page, click the item
label. When Help is available, the item label changes to red when you
pass your cursor over it and the cursor changes to an arrow and
question mark. See "About Field-Level Help" on page 1-15.
9.
(Optional) In the Breadcrumb Entry list on the right side of the page, you can
select the Synchronize Breadcrumb With Page Name and Title option.
Selecting this option makes changing the name of a page and breadcrumb a
one-step process. The information you provide for breadcrumb names is used to
update the referenced page name and title.
10. Click Apply Changes.
About Navigation Alternatives
The Create/Edit Breadcrumb Entry page is divided into the following sections:
Breadcrumb, Entry, Target, Conditions, Authorization and Configuration.
You can access these sections by scrolling down the page, or by clicking a navigation
button at the top of the page. When you select a button at the top of the page, the
selected section appears and all other sections are temporarily hidden. To view all
sections of the page, click Show All.
Reparenting Breadcrumb Entries
You can select a new parent for selected breadcrumb entries on the Reparent Entries
page.
To reparent breadcrumb entries:
1.
Navigate to the Breadcrumbs page:
a.
Navigate to the Workspace home page.
b.
Click the Application Builder icon.
c.
Select an application.
d.
On the Application Builder home page, click Shared Components.
e.
Under Navigation, select Breadcrumbs.
The Breadcrumbs page appears.
2.
Select a breadcrumb.
The Breadcrumb Entries page appears.
3.
From the Tasks list, click Reparent Entries within this Breadcrumb.
The Reparent Entries page appears.
Adding Navigation 8-19
Creating Trees
4.
Use the navigation bar to edit or filter the view:
■
■
Breadcrumb - Identify the breadcrumb you want to edit and click Go.
Start With - Make a selection to restrict your view to a subset of the
breadcrumb hierarchy and click Go.
5.
From Reparent to, select the new parent.
6.
Select the breadcrumbs entries you want to move and click Reparent Checked
Entries.
Accessing Breadcrumb Reports
You can view the Breadcrumb Utilization and Breadcrumb History reports by clicking
the appropriate tab at the top of the Breadcrumbs page.
The Utilization and History buttons only appear after you
create a breadcrumb.
Note:
To access the Breadcrumbs page:
1.
Navigate to the Workspace home page.
2.
Click the Application Builder icon.
3.
Select an application.
4.
On the Application Builder home page, click Shared Components.
5.
Under Navigation, select Breadcrumbs.
Breadcrumb Utilization Report
Click Utilization to access the Breadcrumb Utilization report. This report lists
breadcrumbs by page. Click the page number to go to a specific page.
Breadcrumb History Report
Click History to view the Breadcrumb History report. This report lists recent changes
to breadcrumbs.
Creating Trees
You can use a tree in your application to effectively communicate hierarchical or
multiple level data.
Topics in this section include:
■
How To Create a Tree
■
Editing a Tree
■
Accessing Tree Reports
How To Create a Tree
To create a tree:
1.
Navigate to the Shared Components page:
a.
Navigate to the Workspace home page.
8-20 Oracle Application Express Application Builder User's Guide
Creating Trees
2.
b.
Click the Application Builder icon.
c.
Select an application.
d.
On the Application Builder home page, click Shared Components.
Under Navigation, click Trees.
The Trees page appears.
3.
Click Create.
The Create Tree Wizard appears. Note that each wizard page displays a series of
blocks on the left, representing the sequence of steps. The highlighted block
indicates the step you are performing.
4.
For Page Attributes, enter basic page information and click Next.
To learn more about a specific item on a page, click the item label. A Help window
appears with a description of the item or field.
5.
For Tab, specify how tabs should be implemented and click Next.
6.
For Tree Attributes:
a.
Tree Name - Enter a name.
b.
Default Expanded Levels - Specify the number of default expanded levels.
c.
Start Tree - Specify how you want to determine the starting point. This
determines what point in the hierarchy you want to display.
- Based on New Item with Popup List of Values - Select this option to set up an
item containing a list of values. This option enables the user to determine the
starting point to display by selecting an option for the list of values.
- Based on a SQL Query - Select this option to write a query that dynamically
finds the starting point of a hierarchy (the entry with no parent).
- Static Value - Select this option to hard code the starting point.
d.
Click Next.
7.
For Tree Template, select a template and click Next.
8.
For Tree Start, specify a starting point and click Next. Depending on your Start
Tree selection, enter either a query or a single value.
9.
For Expand/Collapse, select the buttons to include and click Next.
10. For Table/View Owner, specify the owner of the table on which the tree will be
based and click Next.
11. For Table/View Name, specify the name of the table on which the tree will be
based and click Next.
12. A tree is based on a query and returns data that can be represented in a hierarchy.
This hierarchy is determined by the relationship between ID and Parent ID values.
Identify the column you want to use as the ID, the Parent ID, and specify the text
that should appear on the leaf nodes.
a.
ID - Enter the column you want to use as the ID.
b.
Parent ID - Enter the Parent ID.
c.
Leaf Node Text - Specify the text that should appear on the leaf nodes.
d.
Link Option - Select Existing Application Item to make the leaf node text a
link. If you select this option, specify a page to link to.
Adding Navigation 8-21
Creating Trees
13. Identify an optional where and order by clause to add to your query.
14. Specify the display text for the Go button.
15. Identify the page you want to branch to when the user clicks a button.
16. Click Finish.
Editing a Tree
Once you create a tree, you can edit it on the Trees page.
To edit a tree:
1.
On the Workspace home page, click the Application Builder icon.
2.
Select an application.
3.
On the Application home page, click Shared Components.
4.
Under Navigation, select Trees.
The Trees page appears.
5.
6.
You can change the appearance of the page by making a selection from the View
list:
■
Icons (the default) displays each tree as a large icon.
■
Details displays each tree as a line in a report.
Select a tree.
The Edit Tree page appears.
7.
Edit the appropriate attributes.
8.
To learn more about a specific item on a page, click the item label.
When Help is available, the item label changes to red when you pass your cursor
over it and the cursor changes to an arrow and question mark. See "About
Field-Level Help" on page 1-15.
9.
Click Apply Changes.
About Navigation Alternatives
The Edit Tree page is divided into the following sections: Name, Query, Before and
After, Static Node Templates, Dynamic Templates, Node Text Templates, and Link
Templates.
You can access these sections by scrolling down the page, or by clicking a navigation
button at the top of the page. When you select a button at the top of the page, the
selected section appears and all other sections are temporarily hidden. To view all
sections of the page, click Show All.
Accessing Tree Reports
You can view the Trees Utilization and Tree History reports by clicking the appropriate
tab at the top of the Trees page.
The Utilization and History buttons only appear after you
have created a tree.
Note:
8-22 Oracle Application Express Application Builder User's Guide
Creating a Navigation Bar Entry
Tree Utilization
Click Utilization on the Trees page to access the Tree Utilization report. This report
displays all trees included in the current application. To edit a tree, select the tree
name.
Tree History
Click History on the Trees page to view changes to trees by developer and date.
Creating a Navigation Bar Entry
Navigation bar entries offer an easy way to move users between pages in an
application. For example, a navigation entry enables you to display a link from an
image or text. The associated page template determines the location of a navigation
bar.
Topics in this section include:
■
About Navigation Bars
■
How to Create a Navigation Bar Entry
■
Editing a Navigation Bar Entry
■
Editing Multiple Navigation Bar Entries Simultaneously
■
Using the Reorder Navigation Bar Entries Icon
■
Accessing Navigation Bar Entry Reports
See Also:
"Customizing Templates" on page 10-12
About Navigation Bars
A navigation bar entry can be an image, text, or an image with text beneath it. You
must supply the images and text to use in the navigation bar entries.
Navigation bars are different from other shared components in that you do not need to
reference them on a page-by-page basis. If your page template includes the
#NAVIGATION_BAR# substitution string, the Application Express engine
automatically includes any defined navigation bars when it renders the page.
See Also:
"Supported Page Template Substitution Strings" on
page 10-25
Adding Navigation 8-23
Creating a Navigation Bar Entry
How to Create a Navigation Bar Entry
Before adding a navigation bar, you must create entries for the navigation bar. To do
so, access the Navigation Bar page from either the Page Definition or from the Shared
Components page.
See Also:
"Working with Shared Components" on page 10-25,
To create a navigation bar entry:
1.
Navigate to the appropriate Page Definition. See "Accessing a Page Definition" on
page 5-2.
2.
Under Shared Components, scroll down to Navigation Bar.
3.
Under Navigation Bar, click the Create icon.
The Create Navigation Bar Entry Wizard appears. Note that each wizard page
displays a series of blocks on the left, representing the sequence of steps. The
highlighted block indicates the step you are performing.
4.
For Attributes, specify the appropriate information:
a.
Sequence - Specify the order of evaluation for this component.
Tip: To review the existing entries, click the Existing Navigation Bar
Entries link at the bottom of the page.
5.
b.
Alt Tag Text - Enter ALT text for navigation icons that are images. If you do
not specify an image name, then this text displays.
c.
Icon Image Name - Enter an image name. For naming conventions, click the
item label (Icon Image Name). This opens item-level help with a list of
supported prefixes and examples of image names.
d.
Image Height - Define the height of the image in pixels.
e.
Width - Define the width of the image in pixels.
f.
Text - For text-only entries, enter the entry text. For images, you can also enter
additional text to display with the image. This attribute can be translated.
g.
Click Next.
For Target, specify the target location.
a.
If the target location is a URL, specify the following:
–
Target is a - Select URL.
–
URL Target - Enter a URL. For example:
http://www.yahoo.com
b.
If the target location is a page, specify the following:
–
Target is a - Select Page in this Application.
–
Page - Specify the target page number.
You can also select reset pagination for this page. Selecting this option
causes the page to return to the first set of data meeting a user’s new
query.
You can also select Printer Friendly. Selecting this option displays the target page using the application's Printer Friendly template. Printer friendly
8-24 Oracle Application Express Application Builder User's Guide
Creating a Navigation Bar Entry
templates optimize a page for printing. "Changing the Default Templates
in a Theme" on page 10-3 and "Optimizing a Page for Printing" on
page 7-103.
c.
–
Request - Specify the request to be used.
–
Clear Cache - Specify the page numbers on which to clear cache.
To set session state (that is, give a listed item a value):
–
Set these items - Enter a comma-delimited list of item names for which
you would like to set session state.
–
With these values - Enter a comma-delimited list of values for the items
your specified.
You can specify static values or substitution syntax (for example, &APP_
ITEM_NAME.). Note that item values passed to f?p= in the URL cannot
contain a colon. Additionally, item values cannot contain commas unless
you enclose the entire value in backslashes (for example, \1234,56\).
d.
6.
Click Next.
To set a condition for displaying the navigation bar entry, specify the appropriate
conditional information and click Create.
Tip: In order for a navigation bar to appear, your page template must
include the #NAVIGATION_BAR# substitution string. See"Supported
Page Template Substitution Strings" on page 10-25.
Editing a Navigation Bar Entry
Once you create a navigation bar entry, you can edit it on the Navigation Bar Entries
page.
To edit a navigation bar entry:
1.
On the Workspace home page, click the Application Builder icon.
2.
Select an application.
3.
On the Application home page, click Shared Components.
4.
Under Navigation, click Navigation Bar Entries.
The Navigation Bar Entries page appears. You can change the appearance of the
page by making a selection from the View list and clicking Go. Available options
include:
■
■
5.
Icons (the default) displays each navigation bar entry as a large icon. To edit a
navigation bar entry, click the icon.
Details displays each navigation bar as a line in a report. To edit a navigation
bar, click the appropriate sequence number.
Select a navigation bar entry.
The Edit Navigation Bar Entry page appears.
The Edit Navigation Bar Entry is divided into the following sections: Sequence,
Subscription, Image Attributes, Target, Conditions, Authorization, Configuration,
and Comments.
You can access these sections by scrolling down the page, or by clicking a
navigation button at the top of the page. When you select a button at the top of the
Adding Navigation 8-25
Creating a Navigation Bar Entry
page, the selected section appears and all other sections are temporarily hidden. To
view all sections of the page, click Show All.
6.
Edit the appropriate attributes.
7.
To learn more about a specific item on a page, click the item label.
When Help is available, the item label changes to red when you pass your cursor
over it and the cursor changes to an arrow and question mark. See "About
Field-Level Help" on page 1-15.
8.
Click Apply Changes.
Editing Multiple Navigation Bar Entries Simultaneously
To edit multiple navigation bar entries simultaneously:
1.
On the Workspace home page, click the Application Builder icon.
2.
Select an application.
3.
On the Application home page, click Shared Components.
4.
Under Navigation, click Navigation Bar Entries.
The Navigation Bar Entries page appears.
5.
Click Grid Edit at the top of the page.
6.
Edit the appropriate attributes and click Apply Changes.
Using the Reorder Navigation Bar Entries Icon
You can quickly change the order of navigation bar entries by clicking the Reorder
Navigation Bar Entries icon on the Page Definition. This icon resembles light green
down and up arrows.
To change the order of the navigation bar entries using the Reorder Tabs icon:
1.
Navigate to the appropriate Page Definition. See "Accessing a Page Definition" on
page 5-2.
2.
Under Navigation Bar, click the Reorder Navigation Bar Entries icon.
The Reorder Navigation Bar Entries page appears.
3.
To change the order in which the entries display on this page, click the up and
down arrows in the far right column or edit the numbers.
4.
Click Apply Changes.
Accessing Navigation Bar Entry Reports
You can view the Navigation Bar Entry Subscription and Navigation Bar Entry History
reports by clicking the appropriate tab at the top of the Navigation Bar Entries page.
8-26 Oracle Application Express Application Builder User's Guide
Controlling Navigation Using Branches
The Subscription and History buttons only appear after you
create a navigation bar.
Note:
Navigation Bar Entry Subscription Report
Click Subscription to access the Subscribed NavBars report. This report displays
subscribed navigation bar entries in your application.
Navigation Bar Entry History
Click History to view the Navigation Bar History report. This report lists recent
changes to navigation bars.
Controlling Navigation Using Branches
A branch is an instruction to link to a specific page, procedure, or URL after a given
page is submitted. For example, you can branch from page 1 to page 2 after page 1 is
submitted.
You create a branch by running the Create Branch Wizard and specifying the branch
point and branch type.
To create a branch:
1.
Navigate to the appropriate Page Definition. See "Accessing a Page Definition" on
page 5-2.
2.
Under Branches in the Page Processing column, click the Create icon.
3.
For Point and Type, select a branch point:
■
■
■
■
■
On Submit: Before Computation - Occurs before computations, validations, or
processing. Use this option for a Cancel button.
On Submit: Before Validation - Occurs after computations, but before
validations or processing. Typically not used. If a validation fails, page
processing stops, a rollback is issued, and the page displays the error. Because
of this default behavior, you do not need to create branches to accommodate
validations. However, you might want to branch based on the result of a
computation (for example, to the previous branch point).
On Submit: Before Processing - Occurs after computations and validations, but
before processing. Use this option to branch based on a validated session state,
but before performing any page processing.
On Submit: After Processing - Occurs after computations, validations, and
processing. This option branches to a URL or page after performing
computations, validations, and processing. When using this option, remember
to sequence your branches if you have multiple branches for a given branch
point.
On Load: Before Header - Occurs before a page is rendered. This option
displays another page, instead of the current page, or redirects the user to
another URL or procedure.
4.
Select a branch type and click Next.
5.
For Target, specify the target location. The information that appears on the page
depends on the branch type you selected:
a.
If the target location is a URL, specify the following:
Adding Navigation 8-27
Controlling Navigation Using Branches
–
Target is a - Select URL.
–
URL Target - Enter a URL. For example:
http://www.yahoo.com
b.
If the target location is a page, specify the following:
–
Target is a - Select Page in this Application.
–
Page - Specify the target page number.
You can also select reset pagination for this page. Selecting this option
causes the page to return to the first set of data meeting a user’s query.
You can also select include process success message. Selecting this option
displays a message when a user submits a page and a branch is taken to
another page. If you do not select this option, the message does not display because it is part of submitting the page, not displaying the next one.
c.
–
Request - Specify the request to be used.
–
Clear Cache - Specify the page numbers on which to clear cache. Separate
multiple entries with a comma.
To set session state (that is, give a listed item a value):
–
Set these items - Enter a comma-delimited list of item names for which
you would like to set session state.
–
With these values - Enter a comma-delimited list of values for the items
your specified.
You can specify static values or substitution syntax (for example, &APP_
ITEM_NAME.). Note that item values passed to f?p= in the URL cannot
contain a colon. Additionally, item values cannot contain commas unless
you enclose the entire value in backslashes (for example, \1234,56\).
6.
d.
Select save state before branching to clear cache and save session state before
performing the redirect. See "About Saving State Before Branching" on
page 8-28.
e.
Click Next.
Follow the on-screen instructions.
See Also:
"About the When Button Pressed Attribute" on page 3-24
Creating a Branch on a Page with a Component that Submits
If you have a page with a component that submits, such as a Go button or select list
with submit, note that you must create a branch that links back to that page. For
example, suppose you have a page with a select list and a submit button. For
processing to occur properly, you need to create a branch on the page that links back to
the page.
About Saving State Before Branching
Consider selecting save state before branching if your branch is redirecting to a URL or
returning a URL and passes clear cache directives or item names and item values in
the resulting f?p URL. By default, this information is passed after the branch is taken,
displaying any passed information in the URL.
Selecting save state before branching sets potentially sensitive information in session
state before the branch redirect. This option improves application security by making
8-28 Oracle Application Express Application Builder User's Guide
Controlling Navigation Using Branches
URLs less susceptible to tampering and by exposing fewer item names, values, and
indications of program logic.
Note that when you select save state before branching, the redirected URL no longer
include clear cache or item name and item values. You can still view this information,
by running your application in Debug mode. See "Accessing Debug Mode" on
page 12-2.
Adding Navigation 8-29
Controlling Navigation Using Branches
8-30 Oracle Application Express Application Builder User's Guide
9
Controlling Page Layout
This section describes different ways you can customize your application’s page layout
by customizing regions, editing item attributes, and incorporating images.
This section contains the following topics:
■
Understanding Page Layout in Oracle Application Express
■
Displaying Components on Every Page of an Application
■
Understanding Regions
■
Creating a Multiple Column Layout
■
How Item Attributes Affect Page Layout
■
Incorporating Content from Other Web Sites
■
Managing Images
■
Managing Static Files
■
Rendering HTML Using Custom PL/SQL
"Adding Navigation" on page 8-1 and "Using the Drag
and Drop Layout Page" on page 6-47
See Also:
Understanding Page Layout in Oracle Application Express
The Application Express engine renders pages by combining templates with
application components defined by the developer and data in the database.
The overall framework (or structure of a page) is determined by the page template. For
example, the page template controls if a page uses tabs and a navigation bar. It can
also define if a page includes a bar on the left side that serves as a placeholder for
navigation or secondary content. Finally, a page template can include definitions of
region positions, which enable precise control over placement of regions using HTML
tables or style sheet definitions. The page template itself is composed of HTML
combined with substitution strings, which are substituted with the appropriate
components at run time.
As a developer, you add content to a page by creating a region. A region is an area of a
page that serves as a container for content. Each region contains a different type of
content such as HTML, a report, a form, a chart, a list, a breadcumb, PL/SQL, a tree, a
URL, or a calendar. You position a region either relative to other regions (that is, based
on its sequence number and column), or by using a region position defined in the page
template. The style of the region is also controlled by the region template. Like the
page template, the region template defines the structure of the area that the region
takes up on a page. It defines if the region title is displayed and where it is displayed
Controlling Page Layout
9-1
Displaying Components on Every Page of an Application
relative to the main content or the body. A region can also define absolute positions for
buttons.
See Also:
"Creating a Region" on page 9-7
Displaying Components on Every Page of an Application
Page zero of your application functions as a master page. The Application Express
engine renders all components you add to page zero on every page within your
application. You can further control whether the Application Express engine renders a
component or runs a computation, validation, or process by defining conditions.
To create a page zero:
1.
On the Workspace home page, click Application Builder.
2.
Select an application.
The Application home page appears.
3.
Click the Create Page button.
4.
For Select a page type, select Page Zero.
Note that the Page Zero option only appears if the application does not have a
page zero.
5.
Click Finish.
See Also: "Managing Pages in an Application" on page 6-9,
"Understanding Conditional Rendering and Processing" on
page 3-2 and "Available Conditions" on page A-1
Understanding Regions
A region is a area on a page that serves as a container for content. Each page can have
any number of regions. You control the appearance of a region through a specific
region template. The region template controls the look of the region, the size,
determines whether there will be a border or a background color, and what type of
fonts display. A region template also determines the standard placement for any
buttons placed in region positions.
You can use regions to group page controls (such as items or buttons). You can create
simple regions that do not generate additional HTML, or create elaborate regions that
frame content within HTML tables or images.
Regions display in sequence within HTML table columns. You can also explicitly place
regions in positions defined in the page template. You can also choose to display
regions conditionally.
Topics in this section include:
■
About the Regions Section of the Page Definition
■
Using the Reorder Regions Icon
■
Creating a Region
■
About Region Types
■
Editing Region Attributes
■
Copying a Region
9-2 Oracle Application Express Application Builder User’s Guide
Understanding Regions
About the Regions Section of the Page Definition
You create and edit regions on the Page Definition. Regions display under the Page
Rendering section. See "Accessing a Page Definition" on page 5-2.
You can temporarily hide other subsections by clicking the Regions icon. To restore the
view, click Show All. The Show All icon resembles an inverted triangle.
The following icons display adjacent to the section title:
■
■
■
Edit All. The Edit All icon resembles a small grid with a pencil on top of it. Use
this icon to edit all regions at once.
Copy. The Copy icon resembles two small overlapping pages. Use this icon to
make a copy of an existing region.
Create. The Create icon resembles a plus (+) sign overlapping a small page. Click
this icon to create a region.
Regions are organized by position (or Display Point). The links available for a given
region depend upon the type of region.
"Editing Region Attributes" on page 9-4 and "Using the
Reorder Regions Icon" on page 9-3
See Also:
Using the Reorder Regions Icon
You can quickly change the order that regions display, edit a region title, or change a
region template by clicking the Reorder Regions icon on the Page Definition. The
Reorder Regions icon displays as light green down and up arrows and displays to the
right of Display Point.
To edit regions using the Reorder Regions icon:
1.
Navigate to the appropriate Page Definition. See "Accessing a Page Definition" on
page 5-2.
2.
Under Regions, click the Reorder Regions icon.
The Reorder Regions page appears. Use this page to edit the region title or select a
template.
3.
In Region, enter a title.
4.
From Template, select a template.
Controlling Page Layout
9-3
Understanding Regions
5.
To change the order in which regions display, click the up and down arrows in the
far right column.
6.
Click Apply Changes.
Editing Region Attributes
You can alter the appearance of a page by editing attributes on the Region Definition.
Topics in this section include:
■
Editing a Region Definition
■
How Region Attributes Affect Page Layout
■
Using the Reorder Regions Icon
■
Controlling Region Positioning
■
Specifying a Region Header and Footer
■
Enabling Users to Customize a Page
■
Utilizing Region Caching
■
Specifying a Static Region ID
Editing a Region Definition
To edit region attributes:
1.
Navigate to the appropriate Page Definition. See "Accessing a Page Definition" on
page 5-2.
2.
Under Regions, select the region name.
The Region Definition appears.
3.
Edit the appropriate attributes.
4.
To learn more about a specific item on a page, click the item label.
When Help is available, the item label changes to red when you pass your cursor
over it and the cursor changes to an arrow and question mark. See "About
Field-Level Help" on page 1-15.
5.
Click Apply Changes.
See Also: "How Region Attributes Affect Page Layout" on page 9-4,
"Controlling Region Positioning" on page 9-5, "Using the Reorder
Regions Icon" on page 9-3, and "Specifying a Region Header and
Footer" on page 9-5
About Navigation Alternatives The Region Definition page is divided into the following
sections: Identification, User Interface, Source, Conditions, Cache, Header and Footer,
Authorization, Customization, Configuration, and Comments.
You can access these sections by scrolling down the page, or by clicking a navigation
button at the top of the page. When you select a button at the top of the page, the
selected section appears and all other sections are temporarily hidden. To view all
sections of the page, click Show All.
How Region Attributes Affect Page Layout
Table 9–1 describes region attributes that affect the layout of a page.
9-4 Oracle Application Express Application Builder User’s Guide
Understanding Regions
Table 9–1
Region Attributes Affecting Page Layout
Attribute
Description
User Interface, Template
Determines the look of the region. Select from the region templates
defined in the application. To view template attributes, click the template
name on the Page Definition.
See Also: "Customizing Templates" on page 10-12 and "Region
Templates" on page 10-31
User Interface, Sequence
Specifies the display order of the regions within the page.
User Interface, Display Point
Identifies where the region displays within the page. Regions are
rendered in order of sequence number within a Display Point. Click the
View icon to see the page layout and select a position.
The possible display points for a region are determined by the page-level
template (which is a page attribute). If no page-level template is selected,
the default page-level template, defined in the Application Definition, is
used.
User Interface, Region HTML table cell
attributes
Defines additional attributes to be used in the HTML table cells when
regions display in multiple columns. The attributes control the cells in
the table used to lay out a region in multiple columns.
User Interface, Column
Determines the column where the region displays. If two regions are in
the same display point, you can place them next to one another by
setting the second region to display in column 2. Many regions can
display in each column and the display order of the regions within the
region display point and column is controlled by the region display
sequence number.
Header and Footer
Specifies HTML text to be displayed at the top of the region (just before
the #BODY# content).
Conditional Display
Defines conditions and appropriate expressions that determine if the
region displays. Conditions can reference session state, the currently
logged in user, or environment preferences (such as whether a page is in
Print View mode).
See Also: "Understanding Conditional Rendering and Processing" on
page 3-2 and "Optimizing a Page for Printing" on page 7-103
Customization
Enables end-user customization. To utilize this feature, you must include
the #CUSTOMIZE# substitution string in the Header, Body, or Footer
section of the page template.
See Also: "Enabling Users to Customize a Page" on page 9-6
Controlling Region Positioning When you create a region, you must specify its position
(or Display Point) on the page. You can choose either a default position (such as Page
Template Body) or a user-defined position in the template (such as Page Template
Region Position 1.)
In addition to Display Point, you can specify the column in which the region will be
placed. When you place regions in multiple columns, Oracle Application Express
automatically renders the necessary HTML to produce a multiple column layout.
Specifying a Region Header and Footer
In addition to the body content of a region (which can be a report, a chart, or HTML
with form elements), you can specify additional HTML to be placed above and below
a region or in its header and footer.
The region footer supports the following substitution strings:
Controlling Page Layout
9-5
Understanding Regions
■
■
#TIMING# shows the elapsed time in seconds used when rendering a region. You
can use this substitution string for debugging purposes.
#ROWS_FETCHED# shows the number of rows fetched by the Oracle Application
Express reporting engine (the page size). You can use these substitution strings to
display customized messages to the user. For example:
Fetched #ROWS_FETCHED# rows in #TIMING# seconds.
■
■
#TOTAL_ROWS# displays the total number of rows that satisfy a SQL query used
for a report.
#FIRST_ROW_FETCHED# and #LAST_ROW_FETCHED# display the range of rows
displayed. For example:
Row(s) #FIRST_ROW_FETCHED# through #LAST_ROW_FETCHED# of #ROWS_FETCHED#
displayed
Enabling Users to Customize a Page
You can use the Customization attribute to enable users to turn regions on and off in a
running application.
To enable end-user customization:
1.
Navigate to the appropriate Page Definition. See "Accessing a Page Definition" on
page 5-2.
2.
Under Regions, click the region name.
The Region Definition appears.
3.
Scroll down to Customization and select one of the following:
■
Customizable and Not Shown By Default
■
Customizable and Shown By Default
4.
In Customized Option Name, enter the label that represents this region on the
page to the user.
5.
Include the #CUSTOMIZE# substitution string in the Header, Body, or Footer
section of the page template.
To use this feature, you must include the #CUSTOMIZE# substitution string in the
Header, Body, or Footer section of the page template.
If at least one region supports end-user customization, a link called Customize appears
wherever you include the #CUSTOMIZE# substitution string in the page template.
When users click this link, a window appears, enabling them to turn on and off
regions on the page.
See Also:
"Customizing Templates" on page 10-12
Utilizing Region Caching
Enabling region caching is an effective way improve the performance of static regions
such as regions containing lists that do not use conditions or regions containing static
HTML.
Tip: Region caching is not available for interactive report regions.
See "Editing Interactive Reports" on page 7-15.
9-6 Oracle Application Express Application Builder User’s Guide
Understanding Regions
When you enable region caching, the Application Express engine renders a region
from a cached (or stored) respository instead of rendering it dynamically. Keep in
mind that the actual session identifiers are not cached. Instead, the Application
Express engine caches a &SESSION. substitution string and the current session
rendering the cached region is substituted on display. For example, if a region contains
a link and the link includes a session, the exact session is not cached to ensure that the
links works for all sessions.
The Application Express engine only renders a region from cache if it meets the
defined condition. Additionally, regions can be cached specific to a user or cached
independent of a user.
See Also:
"Cache" on page 5-27
Enabling Region Caching To enable region caching:
1.
Navigate to the appropriate Page Definition. See "Accessing a Page Definition" on
page 5-2.
2.
Under Regions, click the region name.
The Region Definition appears.
3.
4.
Scroll down to Cache and specify the following:
a.
Caching - Select Cached to cache the region independent of the user. Select
Cached by User to cache the region specific to a given user.
b.
Timeout Cache After - Identify how long the cached region remains valid.
c.
Cache Condition Type - Select a condition type from the list. If the condition
returns false, the region is rendered dynamically and is not be cached. If the
condition returns true, the region is cached.
d.
Expression 1 and Expression 2 - Enter values based on the specific condition
type selected.
Click Apply Changes.
Specifying a Static Region ID
Specifying a static region ID is useful when creating custom JavaScript or cascading
stylesheets. You can use the Static ID attribute on the Edit Region page to uniquely
identify a region. You can then reference the region using the #REGION_STATIC_ID#
substitution string in a region templates, the header, the footer, or the body.
To specify a static region ID:
1.
Navigate to the appropriate Page Definition. See "Accessing a Page Definition" on
page 5-2.
The Region Definition appears.
2.
Under Identification, enter a value in Static ID.
3.
Click Apply Changes.
Creating a Region
You create regions by running the Create Region Wizard.
To create a region:
Controlling Page Layout
9-7
Understanding Regions
1.
Navigate to the appropriate Page Definition. See "Accessing a Page Definition" on
page 5-2.
2.
Under Regions, click the Create icon.
The Create Region Wizard appears.
3.
Select a region type. See "About Region Types" on page 9-8.
4.
Follow the on-screen instructions.
About Region Types
When you create a region, you select a region type. The Application Express engine
interprets a region differently based on the type you select. Table 9–2 describes the
available region types.
Table 9–2
Region Types
Region Type
Description
HTML
When you select HTML, the wizard prompts you to select
one of the following:
■
■
■
HTML - Functions as containers for items and
contains the HTML you provide. Any HTML you
type may contain substitution strings.
HTML Text (escape special characters) - Same as
HTML region, but the Application Express engine
escapes special characters before they are rendered.
HTML Text (with shortcuts) - Same as HTML
region, but with support for shortcuts.
See Also: "Using Shortcuts" on page 7-86
Multiple HTML
Use this option to create multiple HTML regions at once.
In the fields provided, specify the Sequence, Title,
Display Point, Report Template, and Column for each
region.
Report
Report regions can be defined by a SQL query you write,
or by using a wizard to guide you through the steps
needed to write a query.
See Also: "Creating Reports" on page 7-1
Form
Form regions are used to contain a form.
See Also: "Creating Forms" on page 7-46
Chart
Chart regions contain line, bar, or pie charts based on
SQL queries.
See Also: on page 7-61 on page 7-61
List
List regions contain a shared collection of links called list.
See Also: "Creating Lists" on page 8-5
Breadcrumb
Breadcrumb regions contain a hierarchical list of links
called a breadcrumb.
See Also: "Creating Breadcrumbs" on page 8-13
PL/SQL Dynamic Content
Regions based on PL/SQL enable you to render any
HTML or text using the PL/SQL Web Toolkit.
9-8 Oracle Application Express Application Builder User’s Guide
Understanding Regions
Table 9–2 (Cont.) Region Types
Region Type
Description
Tree
Trees are a hierarchical navigational control based on a
SQL query executed at run time. It enables the user to
expand and collapse nodes.
See Also: "Creating Trees" on page 8-20
URL
URL based regions obtain their content by calling a Web
server using a predefined URL.
See Also: "Incorporating Content from Other Web Sites"
on page 9-12
Calendar
Calendar regions are used to contain a calendar.
See Also: "Creating Calendars" on page 7-55
Help Text
Help Text regions enable you to provide page-level help.
See Also: "Creating a Help Page" on page 7-104
See Also:
■
■
Oracle Database Advanced Application Developer's Guide for
information about developing Web applications with PL/SQL
Oracle Database PL/SQL Packages and Types Reference for
information about htp packages
Copying a Region
You can quickly copy a region by clicking the Copy icon on the Page Definition. The
Copy icon resembles two small overlapping pages.
When you copy a region, you also have the option to copy the button and items within
the region.
You cannot copy a Tree region since this type of region
encompasses more than one region.
Note:
To copy a region:
1.
Navigate to the Page Definition. See "Accessing a Page Definition" on page 5-2.
2.
Under Regions, click the Copy icon.
The Copy Region Wizard appears.
3.
For Region to Copy, select the region you want to copy.
4.
For To Page:
a.
To Page - Select the page to which you want to copy the region.
b.
Copy Region Items - Select Yes or No to determine whether to copy items
within this region.
Controlling Page Layout
9-9
Creating a Multiple Column Layout
5.
c.
Copy Buttons - Select Yes or No to determine whether to copy buttons within
this region.
d.
Click Next.
Click Copy Region.
Creating a Multiple Column Layout
A region is an area on a page that uses a specific template to format HTML content.
You use regions to group page controls. To create a multiple column layout, you create
two regions that display in adjacent cells of the same table.
You can create a multiple column layout by either:
■
Manually creating the two adjacent regions
■
Defining a page template that contains a multiple column table
Topics in this section include:
■
Creating Regions in Multiple Columns
■
Creating a Multiple Column Page Template
Creating Regions in Multiple Columns
You create regions using the Create Region Wizard. To create a two-column page, you
create two regions. Oracle Application Express replaces the #BOX_BODY# substitution
string within a two-column table and displays the regions in two separate cells.
To create a two-column page by creating regions:
1.
Navigate to the Page Definition. See "Accessing a Page Definition" on page 5-2.
2.
Create the first region:
a.
Under Regions, click Create.
The Create Region Wizard appears.
3.
b.
Select a region type.
c.
From the Column field, select 1.
d.
Follow the on-screen instructions.
Create the second region:
a.
Under Regions, click Create.
The Create Region Wizard appears.
b.
Select a region type.
c.
From the Column field, select 2.
d.
Follow the on-screen instructions.
Creating a Multiple Column Page Template
Page templates define the appearance of individual pages, including the placement of
page controls and components. Each page template is divided into three sections:
Header, Body, and Footer. The most basic template must include the substitution string
#BOX_BODY# in the Body attribute. When the page is rendered, the Application
Express engine replaces #BOX_BODY# with HTML to display the regions on that page.
9-10 Oracle Application Express Application Builder User’s Guide
How Item Attributes Affect Page Layout
You can create a multiple column page by defining a page template that contains a
multiple column table. You then explicitly place regions within specific table cells.
The following example demonstrates how to create a two-column page and specify a
region position using the #REGION_POSITION_XX# substitution string in each
column. You would enter the code in the Body section of the page-level template.
<body #ONLOAD#>
#FORM_OPEN#
<table style="width:100%">
<tr>
<td style="width:50%;padding:5px;">#REGION_POSITION_01#</td>
<td style="width:50%; border-left:2px #bbbbbb dashed; padding:5px;">#REGION_
POSITION_02#</td>
</tr>
<br />
#BOX_BODY#
#FORM_CLOSE#
</body>
Once you create this page-level template, the newly defined positions would be
available as Display Point options when you run the Create Region Wizard.
How Item Attributes Affect Page Layout
An item is part of an HTML form and can be a text field, text area, password, select
list, check box, and so on. You can alter the appearance of a page by changing the item
attributes. For example, these attributes can effect where a label displays, how large an
item will be, if the item will display next to or below the previous item.
See Also: "Understanding Page-Level Items" on page 6-32 and
"Using the Drag and Drop Layout Page" on page 6-47
To edit item attributes:
1.
Navigate to the Page Definition. See "Accessing a Page Definition" on page 5-2.
2.
Under Items, click the item name.
The Edit Page Item page appears.
Table 9–3 describes how item attributes affect the layout of a page.
Table 9–3
Item Attributes Effecting Page Layout
Heading
Attribute
Description
Displayed
Sequence
Determines the order that items are rendered within a region.
Displayed
Region
Defines the region where the item displays. All items must be in a region.
Displayed
Begin On New Line
Determines if this item displays on the same line or on the next line as
the previous item.
Displayed
...Field
Determines if this item displays in the next column or in the same
column as the previous item.
Displayed
ColSpan
Items are laid out in HTML tables. Defines the value to be used for the
COLSPAN attribute of the table cell containing an item.
Displayed
RowSpan
Items are laid out in HTML tables. Defines the value to be used for the
ROWSPAN attribute in the table cell where the item displays.
Controlling Page Layout 9-11
Incorporating Content from Other Web Sites
Table 9–3 (Cont.) Item Attributes Effecting Page Layout
Heading
Attribute
Description
Label
Label
Defines the label for this item. You can include HTML, JavaScript, and
shortcuts. You can also use the substitution string #CURRENT_ITEM_
NAME# to obtain the name of the item associated with this label.
Label
Horizontal/Vertical
Alignment
Controls the placement and the horizontal and vertical alignment of the
label. Labels can be displayed above, below, or to the left of the item.
Label
Template
Specifies the label template. Use label templates to apply a consistent
appearance to labels in your application.
Label
HTML Table Cell
Attributes
Defines additional attributes for the cell containing this item's label (for
example, nowrap="nowrap").
Element
Pre Element Texts
Specifies additional attributes for the HTML table cell used to display
each individual option in a radio group or set of check boxes. Can
include HTML, JavaScript, and shortcuts. You can reference the following
substitution strings:
■
■
Element
Post Element Texts
#CURRENT_FORM_ELEMENT# obtains the name of the HTML form
element with which this post element text is associated.
#CURRENT_ITEM_NAME# obtains the name of the item with which
this post element text is associated.
Specifies additional attributes for the HTML table cell used to display
each individual option in a radio group or set of check boxes. Can
include HTML, JavaScript, and shortcuts. You can reference the following
substitution strings:
■
■
#CURRENT_FORM_ELEMENT# obtains the name of the HTML form
element with which this post element text is associated.
#CURRENT_ITEM_NAME# obtains the name of the item with which
this post element text is associated.
List of Values
Columns
Applies to radio groups and check boxes. Defines the number of columns
to use to display the values defined in the List of Values. By default, all
values display in one column.
Conditions
Condition Type and
Expressions
Defines conditions and appropriate expressions that determine if an item
displays.
See Also: "Understanding Conditional Rendering and Processing" on
page 3-2
Read Only
Display
Settings
Read Only Condition Defines conditions and expressions that determine if the item displays as
Type
read-only. Use this attribute to display certain items to a set of users as
updatable, while displaying that same set of items to others users as
nonupdatable. Reduces the need to code duplicate interfaces for different
users.
Incorporating Content from Other Web Sites
Typically, pages in an application are based on data stored in an Oracle database. To
incorporate content from other servers, you can create a region based on a URL to
display content. For example, suppose you wanted to reference the current Oracle
stock price. You could create a region of type URL based on a URL such as the
following:
http://quote.yahoo.com/q?d=b&s=ORCL
You could then create an item called STOCK_SYMBOL and base your region on a
stock price entered by the user. For example:
http://quote.yahoo.com/q?d=b&s=&STOCK_SYMBOL.
9-12 Oracle Application Express Application Builder User’s Guide
Managing Images
Sometimes (as is the case with the previous example) the HTML returned to the region
is more than is needed. To restrict the HTML displayed, you can use the following
region attributes:
■
URL (discard until but not including this text)
■
URL (discard after and including this text)
Note that the previous example may require that you set the Proxy Server application
attribute. If you do not set the Proxy Server application attribute, you get an error
message. Oracle Application Express uses the Oracle utl_http.request_pieces
function to obtain the HTML generated from the given URL. See "Configuring the
Application Definition" on page 4-8.
Working with SSL-Enabled URLs
If you call a SSL-enabled URL (for example, by invoking a Web service), or create a
region of type URL that is SSL-enabled, you must create a wallet. A wallet is a
password-protected container that stores authentication and signing credentials
(including private keys, certificates, and trusted certificates) needed by SSL.
Tip: See "Configuring Wallet Information" in Oracle Application
Express Administration Guide
Managing Images
You can reference images within your application by uploading them to the Images
Repository. When you upload an image, you can specify whether it is available to all
applications or a specific application.
Topics in this section include:
■
Uploading Images
■
Referencing Images
■
Editing Image Attributes
■
Deleting an Image
Tip: You can use the Images Finder to identify images available to
the current application. See "Using the Images Finder" on page 7-94.
Uploading Images
You upload images to your workspace using the Image Repository.
To upload images to your workspace:
1.
On the Workspace home page, click the Application Builder icon.
2.
Select an application.
3.
Click Shared Components.
The Shared Components page appears.
4.
Under Files, select Images.
The Images page appears.
5.
To upload an image, click Create.
6.
On the Create Image page, specify the following:
Controlling Page Layout 9-13
Managing Images
7.
a.
Application - Select No Application Associated to make the image available
to all applications within the workspace, or select a specific application ID.
b.
Upload New Image - Click Browse to identify a file to upload.
c.
Note - Enter details that describe the image.
Click Upload.
Referencing Images
You can reference images in your application by referencing the substitution string
#IMAGE_PREFIX# or including a fully qualified URL to the image.
Topics in this section include:
■
Verifying the Prefix for the Virtual Image Directory
■
Referencing an Image Using #IMAGE_PREFIX#
■
Referencing Images Using a Fully Qualified URL
Verifying the Prefix for the Virtual Image Directory
When you install Application Builder, the installer creates a virtual directory for
images. This virtual directory points to the actual path on the file system that contains
uploaded images. By default, you reference this virtual directory using the prefix:
/i/
When you first create an application, you must verify this prefix on the Edit Definition
page.
To verify the Image Prefix for an application:
1.
On the Workspace home page, click the Application Builder icon.
2.
Select an application.
3.
On the Application home page, click Shared Components.
4.
Under Application, select Definition.
5.
When the Edit Application Definition page appears, locate the Image Prefix field.
By default, this attribute is defined as /i/. Contact your administrator for
information about the name of this virtual directory for your installation.
Referencing an Image Using #IMAGE_PREFIX#
When you embed an image in static text (for example, in page headers, region headers,
or footers), you can reference the image using the substitution string #IMAGE_
PREFIX#. For example, to reference the image go.gif, you would use the following
syntax:
<img src="#IMAGE_PREFIX#go.gif">
See Also: "About Built-in Substitution Strings" on page 3-15,
"IMAGE_PREFIX" on page 3-22, "APP_IMAGES" on page 3-17, and
"WORKSPACE_IMAGES" on page 3-25
9-14 Oracle Application Express Application Builder User’s Guide
Managing Images
Referencing Images Using a Fully Qualified URL
Alternatively, you can also reference an image using a fully qualified URL. For
example:
<img
src="http://g-images.amazon.com/images/G/01/associates/navbar2000/logo-no-border(1
).gif">
Editing Image Attributes
When you edit image attributes, you can add notes that describe an image or change
the associated application. However, you cannot change the actual image. To change
an image, delete it and then upload it again.
See Also: "Deleting an Image" on page 9-15 and "Uploading Images"
on page 9-13
To edit images attributes:
1.
On the Workspace home page, click the Application Builder icon.
2.
Select an application.
3.
Click Shared Components.
The Shared Components page appears.
4.
Under Files, select Images.
The Images page appears.
5.
6.
Use the following controls to filter the view:
a.
Image - Enter text to search for an image name or notes describing the image.
Select whether to search for All Images, Workspace Images, or Application
Images.
b.
View - Select one of the following:
–
Icons (the default) displays each image as a large icon.
–
Details displays each image as a line in a report.
c.
Display - Determines the number of images that display.
d.
Click Go.
Select an image.
The Edit Image Attributes page appears.
7.
From Application, specify the image availability.
Select No Application Associated to make the image available to all applications
within the workspace, or select a specific application ID.
8.
In Notes, enter details that describe the image.
9.
Click Apply Changes.
Deleting an Image
To delete an image:
1.
On the Workspace home page, click the Application Builder icon.
Controlling Page Layout 9-15
Managing Static Files
2.
Select an application.
3.
Click Shared Components.
The Shared Components page appears.
4.
Under Files, select Images.
The Images page appears.
5.
Use the following to filter the view:
a.
Image - Enter text to search for an image name or notes describing the image.
Select whether to search for All Images, Workspace Images, or Application
Images.
b.
View - Select one of the following:
c.
–
Icons (the default) displays each image as a large icon.
–
Details displays each image as a line in a report.
Click Go.
6.
Select an image.
7.
Click Delete.
Managing Static Files
You can upload static files to your workspace using the Static File Repository.
Topics in this section include:
■
Uploading Static Files
■
Editing an Uploaded File
■
Downloading an Uploaded File
■
Deleting an Uploaded File
Uploading Static Files
To upload static files:
1.
On the Workspace home page, click the Application Builder icon.
2.
Select an application.
3.
Click Shared Components.
The Shared Components page appears.
4.
Under Files, select Static Files.
The Static Files page appears.
5.
To upload a file, click Create.
6.
Follow the on-screen instructions.
Editing an Uploaded File
You can edit static files smaller than 30,000 bytes by selecting the file name. Otherwise,
you must edit the file offline and upload it again.
To edit a static file smaller than 30,000 bytes:
9-16 Oracle Application Express Application Builder User’s Guide
Managing Static Files
1.
On the Workspace home page, click the Application Builder icon.
2.
Select an application.
3.
Click Shared Components.
The Shared Components page appears.
4.
Under Files, select Static Files.
The Static Files page appears.
5.
Use the following controls to filter the view:
a.
Static File - Enter text to search for a file name or notes describing the file.
b.
Application - Narrow or broaden the view by selecting one of the following:
c.
–
All Static Files
–
No Associated Application
–
A specific application
View - Select one of the following:
–
Icons (the default) displays each file as a large icon.
–
Details displays each file as a line in a report.
d.
Display - Determines the number of files to display.
e.
Click Go.
6.
Select a file.
7.
If the file is smaller than 30,000 bytes, edit the file.
8.
In Notes, edit or enter notes describing the file.
9.
Click Apply Changes.
Downloading an Uploaded File
To download an uploaded file:
1.
On the Workspace home page, click the Application Builder icon.
2.
Select an application.
3.
Click Shared Components.
The Shared Components page appears.
4.
Under Files, select Static Files.
The Static Files Repository appears.
5.
From View, select Details and click Go.
Details displays each file as a line in a report.
6.
Select the Download icon next to the appropriate file.
Deleting an Uploaded File
To delete an uploaded static file:
1.
On the Workspace home page, click the Application Builder icon.
2.
Select an application.
Controlling Page Layout 9-17
Rendering HTML Using Custom PL/SQL
3.
Click Shared Components.
The Shared Components page appears.
4.
Under Files, select Static Files.
The Static Files Repository appears.
5.
Use the following controls to filter the view:
a.
Static File - Enter text to search for a file name or notes describing the file.
b.
Application - Narrow or broaden the view by selecting one of the following:
c.
–
All Static Files
–
No Associated Application
–
A specific application
View - Select one of the following:
–
Icons (the default) displays each file as a large icon.
–
Details displays each file as a line in a report.
d.
Display - Determines the number of files to display.
e.
Click Go.
6.
Select a file.
7.
Click Delete.
Rendering HTML Using Custom PL/SQL
If you need to generate specific HTML content not handled by Oracle Application
Express forms, reports, and charts, you can use the PL/SQL region type. To generate
HTML in this type of region, you need to use the PL/SQL Web Toolkit. You can
reference session state using bind variable syntax. Keep in mind that when you
generate HTML in this way, you do not get the same consistency and control provided
with templates.
See Also:
■
■
Oracle Database Advanced Application Developer's Guide for
information about developing Web applications with PL/SQL
Oracle Database PL/SQL Packages and Types Reference for
information about htp packages
To give you more control over HTML dynamically generated within a region, you can
use PL/SQL. For example, to print the current date, you could create a region with the
following source:
htp.p(TO_CHAR(SYSDATE,'Day Month DD, YYYY'));
This next example accesses tables:
DECLARE
l_max_sal NUMBER;
BEGIN
SELECT max(sal) INTO l_max_sal FROM emp;
htp.p('The maximum salary is: '||TO_CHAR(l_max_sal,'999,999.00'));
END;
9-18 Oracle Application Express Application Builder User’s Guide
Rendering HTML Using Custom PL/SQL
Controlling Page Layout 9-19
Rendering HTML Using Custom PL/SQL
9-20 Oracle Application Express Application Builder User’s Guide
10
Managing Themes and Templates
This section describes different ways you can alter your application’s user interface
and page layout through themes and templates.
This section contains the following topics:
■
Managing Themes
■
Customizing Templates
■
Using Custom Cascading Style Sheets
"Adding Navigation" on page 8-1 and "Using the Drag
and Drop Layout Page" on page 6-47
See Also:
Managing Themes
Themes are collections of templates that can be used to define the layout and style of
an entire application. The idea behind a theme is to provide a complete set of
templates that accommodate every UI pattern that may be needed in an application.
Templates are organized first by type (breadcrumb, button, calendar, label, list, page,
popup list of values, region, and report) and then by template classes, identifying the
purpose of the each template within that type. Each template type provides a group of
standard classes and eight custom classes. These classifications enable Oracle
Application Express to map templates among themes, making it easy to quickly
change the entire look and feel of an application.
Oracle Application Express ships with an extensive theme repository. You can add
themes to the theme repository as follows:
■
■
Workspace administrators can create Workspace themes. Workspace themes are
available to all developers within the workspace. See "Managing Workspace
Themes" on page 10-7.
Instance administrators can create public themes. Public themes are added using
the Application Express Administration Services. Once added, these themes are
available to all workspaces and developers. See "Managing Themes for an Oracle
Application Express Instance" in Oracle Application Express Administration Guide.
Topics in this section include:
■
Accessing the Themes Page
■
Changing the Default Templates in a Theme
■
Creating a Theme
■
Editing a Theme
Managing Themes and Templates 10-1
Managing Themes
■
Switching the Active Theme
■
Copying a Theme
■
Deleting a Theme
■
Managing Workspace Themes
■
About Exporting and Importing Themes
■
Changing a Theme Identification Number
■
Viewing Theme Reports
See Also:
"Customizing Templates" on page 10-12
Accessing the Themes Page
You manage themes on the Themes page. You can access the Themes page from the
Shared Components page or from the Page Definition.
Topics in this section include:
■
Accessing the Themes Page from Shared Components
■
Accessing the Themes Page from a Page Definition
■
About the Themes Page
Accessing the Themes Page from Shared Components
To access the Themes page from Shared Components:
1.
On the Workspace home page, click the Application Builder icon.
2.
Select an application.
3.
Click Shared Components.
4.
Under User Interface, select Themes.
The Themes page appears.
5.
Select Details from the View list and click Go.
A check mark in the Current column indicates which theme is selected.
6.
Click the theme name.
The Create/Edit Theme page appears.
Accessing the Themes Page from a Page Definition
To access the Themes page from the Page Definition:
1.
On the Workspace home page, click the Application Builder icon.
2.
Select an application.
3.
Select a page.
The Page Definition appears.
4.
Under Shared Components, locate the Theme section.
5.
Click a theme name.
The Create/Edit Theme page appears.
10-2 Oracle Application Express Application Builder User’s Guide
Managing Themes
Changing the Default Templates in a Theme
A standard theme contains templates for every type of application component and
region type. You can change the selected default templates for a theme on the
Create/Edit Theme page.
You can override the default templates in a theme by selecting another template when
you create components or regions, or by changing the template on the component or
region attributes page.
To review or change the default templates in a theme:
1.
Navigate to the Themes page:
a.
On the Workspace home page, click the Application Builder icon.
b.
Select an application.
c.
Click Shared Components.
d.
Under User Interface, select Themes.
The Themes page appears.
2.
To edit a theme:
a.
From the View list, select Details and click Go.
b.
Click the theme name.
The Create/Edit Theme page appears.
The Create/Edit Theme page is divided into sections. You can access these sections
by scrolling down the page, or by clicking a navigation button at the top of the
page. When you select a button at the top of the page, the selected section appears
and all other sections are temporarily hidden. To view all sections of the page,
click Show All.
Note the application ID and the Theme Identification Number display at the top of
the page.
3.
To change the theme name, enter a name in the Name field.
4.
To change a default template, make a selection from the appropriate list.
Table 10–1 describes the default templates available under Component Defaults.
Table 10–1
Component Default Templates
Attribute
Description
Page
Identifies the default template for displaying pages. If a developer
does not explicitly choose a template, then the Application Express
engine uses the template specified here.
Once defined, this default template appears on the Edit Definition
page under the heading Application Template Defaults.
See Also: "Display Attributes" on page 5-24 for information about
overriding the page template on the Page Attributes page
Error Page
Specifies a page template to use for errors that display on a separate
page as opposed to those that display inline. Leave this attribute blank
if you do not want to use a template designed to display errors.
Once defined, this default template appears on the Edit Definition
page under the heading Application Template Defaults.
Managing Themes and Templates 10-3
Managing Themes
Table 10–1 (Cont.) Component Default Templates
Attribute
Description
Printer Friendly Page
Identifies the template to be used when the Application Express
engine is in printer friendly mode.
See Also: "Optimizing a Page for Printing" on page 7-103
Breadcrumb
Identifies the default breadcrumb template used when you create a
breadcrumb.
Button
Identifies the default button template used when you create a button.
Calendar
Specifies the default calendar template used when you create a
calendar.
Label
Identifies the default label template used when you create a label.
List
Specifies the default list template used when you create a list.
Region
Specifies the default region template used when you create a region.
Report
Identifies the default region template used when you create a report.
Table 10–2 describes the default templates available under the section Regions
Defaults.
Table 10–2
Region Defaults
Attribute
Description
Breadcrumbs
Default region template used when you create a breadcrumb.
Charts
Default chart template used when you create a chart.
Forms
Default form template used when you create a form.
Lists
Default region template used when you create a list.
Reports
Default region template used when you create a report.
Tabular Forms
Default region template used when you create a tabular form.
Wizards
Default region template used when you create a wizard
component.
Creating a Theme
You can create a theme from scratch or select an existing theme from the repository.
To create a theme:
1.
Navigate to the Themes page:
a.
On the Workspace home page, click Application Builder.
b.
Select an application.
c.
Click Shared Components.
d.
Under User Interface, select Themes.
2.
Click Create.
3.
Select a creation method:
■
From the Repository
■
From Scratch
■
From Export
10-4 Oracle Application Express Application Builder User’s Guide
Managing Themes
4.
Follow the on-screen instructions.
5.
To learn more about a specific field, click the field label.
When Help is available, the item label changes to red when you pass your cursor
over it and the cursor changes to an arrow and question mark. See "About
Field-Level Help" on page 1-15.
About the Themes Page
Once you create a theme, it appears on the Themes page. A navigation bar appears at
the top of the page and contains the following controls:
■
■
■
Theme. Enter a case insensitive query for a theme name and click Go. To view all
themes, leave the field blank and click Go.
View. Controls how the page displays. Options include:
–
Icons (the default) displays each theme as a large icon. To edit a theme, click
the appropriate icon.
–
Details displays each theme as a line in a report. To change the theme name or
default templates, click the theme name. In Details view, you can select the
following options from the Show list:
–
Summary View displays the theme number, name, and current status.
–
Detailed View displays the theme number, name, current status, and the
number of templates in each template type.
Display. Determines how themes display. To increase or decrease the number,
make a selection from the Display list and click Go.
Editing a Theme
You can create a theme from scratch or select an existing theme from the repository.
To create a theme:
1.
2.
Navigate to the Themes page:
a.
On the Workspace home page, click Application Builder.
b.
Select an application.
c.
Click Shared Components.
d.
Under User Interface, select Themes.
On the Tasks list, click Edit Theme.
The Create/Edit Theme page appears.
3.
To learn more about a specific field, click the field label.
When Help is available, the item label changes to red when you pass your cursor
over it and the cursor changes to an arrow and question mark. See "About
Field-Level Help" on page 1-15.
4.
Make the appropriate edits and click Apply Changes.
See Also:
"Customizing Templates" on page 10-12
Managing Themes and Templates 10-5
Managing Themes
Switching the Active Theme
When you switch to a theme, all components with assigned templates are assigned to a
corresponding template in the theme. Application Builder accomplishes template
mapping through the assignment of template class identifiers.
You can only switch to a theme if that theme exists. For
example, before you can switch to a theme available in the repository,
you must first create it. See "Creating a Theme" on page 10-4.
Note:
To apply a theme to an application:
1.
2.
Navigate to the Themes page:
a.
On the Workspace home page, click the Application Builder icon.
b.
Select an application.
c.
Click Shared Components.
d.
Under User Interface, select Themes.
Click Switch Theme.
The Switch Theme page appears.
3.
From Switch to Theme, select a theme and click Next.
4.
Review the Status column to identify problematic mappings:
■
■
■
Check indicates the mapping was successful.
Warning indicates there are more than one template in the theme you are
switching to with the identified class. The warning provides a select list from
which to choose the appropriate template.
Error indicates that Application Builder was unable to map the class among
the themes. Ensure that a class is identified for the templates in both themes.
5.
Click Next to continue.
6.
Click Switch Theme.
See Also:
"Creating a Theme" on page 10-4
Copying a Theme
Each theme is identified by a numeric identification number (ID). When you copy a
theme, you specify a theme ID. Copying a theme is useful when experimenting with
editing a theme or to export a theme with a different ID.
To copy a theme:
1.
Navigate to the Themes page:
a.
On the Workspace home page, click the Application Builder icon.
b.
Select an application.
c.
Click Shared Components.
d.
Under User Interface, select Themes.
2.
On the Tasks list, click Copy Theme.
3.
On Copy Theme:
10-6 Oracle Application Express Application Builder User’s Guide
Managing Themes
4.
a.
Copy From Theme - Select the theme you want to copy.
b.
Copy to this Theme Identification Number - Enter a new ID for the theme.
c.
Click Next.
Click Copy Theme ID.
Deleting a Theme
You can only delete inactive themes. When you delete a theme, Application Builder
only removes inactive templates.
To delete a theme:
1.
Navigate to the Themes page:
a.
On the Workspace home page, click the Application Builder icon.
b.
Select an application.
c.
Click Shared Components.
d.
Under User Interface, select Themes.
2.
On the Tasks list, click Delete Theme.
3.
From Remove Theme, select the theme you want to delete and click Next.
4.
Click Delete Theme.
Managing Workspace Themes
Workspace administrators manage the theme repository for a workspace. Workspace
administrators can add a theme to the repository, making it available to all developers
within a workspace, or delete it.
Topics in this section include:
■
Adding a Theme to the Theme Repository
■
Deleting a Workspace Theme
■
Modifying a Workspace Theme
■
About Exporting a Workspace Theme
See Also: "Managing Themes for an Oracle Application Express
Instance" in Oracle Application Express Administration Guide
Adding a Theme to the Theme Repository
To add a theme to the Theme repository:
1.
Navigate to the Themes page:
a.
On the Workspace home page, click the Application Builder icon.
b.
Select an application.
c.
Click Shared Components.
d.
Under User Interface, select Themes.
2.
From the Tasks List, click Manage Workspace Themes.
3.
Select Create and click Next.
Managing Themes and Templates 10-7
Managing Themes
4.
For Application Theme to Copy, select the desired theme and click Next.
5.
for Identify Name, enter a theme number, name, and optional description and
then click Next.
6.
Click Create Workspace Theme.
Deleting a Workspace Theme
To delete a workspace theme:
1.
On the Workspace home page, click the Application Builder icon.
2.
On the Tasks list, click Workspace Themes.
3.
Select the theme to be deleted.
4.
Click Delete.
Modifying a Workspace Theme
You cannot edit a workspace theme directly. To modify a workspace theme, you need
to create an application using the theme, modify it, and then manually add it to the
workspace theme repository. a theme in the same way you export any related
application files.
To modify a workspace theme:
1.
Create an application using the theme you want to modify. "Creating an
Application" on page 6-1.
2.
Modify the theme. See "Editing a Theme" on page 10-5.
3.
Delete the existing workspace theme. See "Deleting a Workspace Theme" on
page 10-8.
4.
Add the modified theme to the workspace theme repository. See "Adding a Theme
to the Theme Repository" on page 10-7.
About Exporting a Workspace Theme
You export a theme in the same way you export any related application files.
Exporting a workspace theme involves the following steps:
1.
Create an application using the theme. "Creating an Application" on page 6-1.
2.
Export the application. See "Exporting an Application" on page 14-12.
3.
Import the exported file into the target Oracle Application Express instance. See
"Importing an Application or Page" on page 14-21.
4.
Install the exported file from the Export Repository. See "Installing Export Files" on
page 14-25.
About Exporting and Importing Themes
You export a theme in the same way you export any related application files.
Exporting a theme from one development instance to another involves the following
steps:
1.
Create an application using the theme. "Creating an Application" on page 6-1.
2.
Export the theme using the Export Theme utility. See "Exporting Themes" on
page 14-18.
10-8 Oracle Application Express Application Builder User’s Guide
Managing Themes
3.
Import the exported file into the target Oracle Application Express instance. See
"Importing Export Files" on page 14-21.
4.
Install the exported file from the Export Repository. See "Installing Export Files" on
page 14-25.
Changing a Theme Identification Number
Each theme has an identification number (ID). You can use the Change Theme ID
utility to change a theme ID to another identification number. Changing a theme ID is
useful when you want to export a theme with a different number and then import it
into another application.
To change a theme identification number:
1.
Navigate to the Themes page:
a.
On the Workspace home page, click the Application Builder icon.
b.
Select an application.
c.
Click Shared Components.
d.
Under User Interface, select Themes.
2.
On the Tasks list, click Change Identification Number.
3.
For Theme Number:
a.
Identify Theme - Select a theme.
b.
Change to this Theme Identification Number - Specify an identification
number.
c.
Click Next.
d.
Confirm your changes and click Change Theme ID.
Viewing Theme Reports
Application Builder includes a number of reports designed to help you manage
themes and templates.
Topics in this section include:
■
Viewing All Templates in a Theme
■
Viewing Theme Template Counts
■
Viewing File References
■
Viewing Class References
■
Viewing Template Substitution Strings
Viewing All Templates in a Theme
To view all templates that comprise a theme:
1.
Navigate to the Themes page:
a.
On the Workspace home page, click the Application Builder icon.
b.
Select an application.
c.
Click Shared Components.
d.
Under User Interface, select Themes.
Managing Themes and Templates 10-9
Managing Themes
2.
Click Reports.
3.
On the Theme Reports page:
a.
From Report, select Application Templates.
b.
From Theme, select a theme.
c.
Click Go.
A list of templates appears with the template type, template name, the associated
theme, and template class.
4.
To edit a template, select the template name.
Viewing Theme Template Counts
The Theme Template Count report lists which template classes currently have
templates created for them.
To view the Theme Template Count report:
1.
Navigate to the Themes page:
a.
On the Workspace home page, click the Application Builder icon.
b.
Select an application.
c.
Click Shared Components.
d.
Under User Interface, select Themes.
2.
Click Reports.
3.
On the Theme Reports page:
4.
a.
From Report, select Theme Template Counts.
b.
From Theme, select a theme.
c.
Click Go.
If you are using custom classifications, select Show Custom and click Go.
Viewing File References
The File References report displays a list of all files associated with templates, shared
components, or page components in the current application.
To view the File References report:
1.
Navigate to the Themes page:
a.
On the Workspace home page, click the Application Builder icon.
b.
Select an application.
c.
Click Shared Components.
d.
Under User Interface, select Themes.
2.
On the Themes page, click Reports.
3.
On the Theme Reports page:
a.
From Report, select File References.
b.
From Theme, select a theme.
c.
Click Go.
10-10 Oracle Application Express Application Builder User’s Guide
Managing Themes
4.
5.
On the File References page:
a.
From Show, select the type of component to include in the report. If you do not
make a selection, no results are returned.
b.
From Show Files, select one of the following:
–
With context displays the component, the theme identification number,
the component name, the image (if applicable), and the page number.
Select the page number to link to a Page Definition.
–
Without context displays only the file name and the image (if applicable).
c.
From File Extensions, select the type of extensions for which to search.
d.
Click Go.
To download a comma-delimited file (.csv) version of this report, click Download
at the bottom of the page.
Viewing Class References
Accessing the Class References report displays a list of classes associated with
templates, shared components, or page components in the current application.
To view the Class References report:
1.
Navigate to the Themes page:
a.
On the Workspace home page, click the Application Builder icon.
b.
Select an application.
c.
Click Shared Components.
d.
Under User Interface, select Themes.
2.
Click Reports.
3.
On the Theme Reports page:
4.
a.
From Report, select Class References.
b.
From Theme, select a theme.
c.
Click Go.
On the Class References page:
a.
From Show, select the components to check for a class reference. If you do not
make a selection, no results are returned.
b.
From Show Class Names, select one of the following:
c.
5.
–
With context displays the component, the theme identification number,
the component name, the image (if applicable), and the page number.
–
Without context displays only the referenced class.
Click Go.
To download a comma-delimited file (.csv) version of this report, click Download
at the bottom of the page.
Viewing Template Substitution Strings
Use the Template Substitution Strings report to view all supported substitution strings
by component.
Managing Themes and Templates
10-11
Customizing Templates
To view the Substitution String report:
1.
Navigate to the Themes page:
a.
On the Workspace home page, click the Application Builder icon.
b.
Select an application.
c.
Click Shared Components.
d.
Under User Interface, select Themes.
2.
Click Reports.
3.
On the Theme Reports page:
4.
a.
From the Report list, select Template Substitution Strings.
b.
From the Theme list, select which themes to include in the report.
c.
Click Go.
To link to a template definition, select the component name.
See Also:
"Understanding Substitution Strings" on page 3-15
Customizing Templates
The Application Express engine creates the user interface of an application based on a
named collection of templates called a theme. Templates control the look and feel of
the components in your application. If you need to create a custom template, it is
generally easier to start with an existing template and then modify it. Once you have
created one or more default templates, you can modify those templates to fit your
specific needs.
Topics in this section include:
■
About Cascading Style Sheets
■
Selecting a Default Page Template
■
Creating a New Template
■
Viewing Template Reports
■
Managing Templates
■
Breadcrumb Templates
■
Button Templates
■
Calendar Templates
■
Label Templates
■
List Templates
■
Page Templates
■
Popup LOV Templates
■
Region Templates
■
Report Templates
See Also:
Managing Themes on page 10-1
10-12 Oracle Application Express Application Builder User’s Guide
Customizing Templates
About Cascading Style Sheets
A cascading style sheet (CSS) provides a way to control the style of a Web page
without changing its structure. When used properly, a CSS separates visual attributes
such as color, margins, and fonts from the structure of the HTML document. Oracle
Application Express includes themes that contain templates that reference their own
CSS. The style rules defined in each CSS for a particular theme also determine the way
reports and regions display.
"Using the CSS Finder" on page 7-95 and "Using Custom
Cascading Style Sheets" on page 10-40
See Also:
Selecting a Default Page Template
You can specify a default page template in two ways:
■
Select a default page template within a specific theme.
■
Select a specific page template on a page-by-page basis.
By default, the Application Express engine uses the Page template specified on the
Themes page.
Topics in this section include:
■
Selecting a Page-level Template Within a Theme
■
Selecting a Page-level Template for a Specific Page
Selecting a Page-level Template Within a Theme
To specify a default page template within a theme:
1.
Navigate to the Themes page:
a.
On the Workspace home page, click the Application Builder icon.
b.
Select an application.
c.
Click Shared Components.
d.
Under User Interface, select Themes.
The Themes page appears.
2.
From View, select Details and click Go.
3.
In the Themes list, select the theme name.
The Create/Edit Theme page appears.
4.
Under Component Defaults, make a selection from the Page list.
5.
Click Apply Changes at the top of the page.
See Also: "Changing the Default Templates in a Theme" on
page 10-3
Selecting a Page-level Template for a Specific Page
To specify a page-level template for a specific page:
1.
On the Workspace home page, click the Application Builder icon.
2.
Select an application.
3.
Select a page.
Managing Themes and Templates
10-13
Customizing Templates
4.
Under Page, click the Edit page attributes icon.
5.
Locate the section Display Attributes.
6.
Make a selection from the Page Template list.
7.
Click Apply Changes at the top of the page.
Creating a New Template
If you must create a custom template, it is generally easier to start with an existing
template and then modify it. Once you have created one or more default templates,
you can modify those templates to fit your specific needs.
To create a custom template:
1.
Navigate to the Templates page.
a.
On the Workspace home page, click the Application Builder icon.
b.
Select an application.
c.
Click Shared Components.
d.
Under User Interface, select Templates.
2.
Click Create.
3.
Select the type of template you want to create.
4.
Select a creation method:
5.
■
From Scratch
■
As a Copy of an Existing Template
Follow the on-screen instructions.
Tip:
Make sure you associate your template with the correct theme.
Viewing Template Reports
Application Builder includes reports describing template utilization, subscription,
published templates and edit history.
To view template reports for the current application:
1.
2.
Navigate to the Themes page:
a.
On the Workspace home page, click the Application Builder icon.
b.
Select an application.
c.
Click Shared Components.
d.
Under User Interface, select Templates.
You can narrow the display by making a selection from the following lists and
clicking Go.
■
Template Name - Enter a case insensitive query.
■
Theme - View only templates in a specific theme.
■
Referenced - Select a type of template to display.
■
Type - Select a a type of template type.
10-14 Oracle Application Express Application Builder User’s Guide
Customizing Templates
■
■
3.
Since - Restrict the report to a specific time frame. Select the amount of time to
include in your report.
Subscribed - Specify whether to view All Templates, Subscribed Templates, or
Not Subscribed Templates.
To view template reports, click the following buttons:
■
■
■
Utilization displays template utilization in the current application for all
template types (page, report, region, label and list).
Subscription displays subscribed templates in your application.
History details recent changes to templates by developers and the last update
date.
Managing Templates
You can view all available templates on the Templates page. Alternatively, you can
access a template associated with a specific page on the Page Definition.
Topics in this section include:
■
Viewing Templates on the Templates Page
■
Viewing Templates Associated with a Specific Page
■
Replacing Templates
■
Replacing All Templates within an Application
■
Viewing Region Position Utilization by Page Template
■
Unsubscribing to Templates
■
Publishing Templates
"Viewing All Templates in a Theme" on page 10-9,
"Breadcrumb Templates" on page 10-18, "Button Templates" on
page 10-20, "Calendar Templates" on page 10-21, "Label Templates",
on page 10-22, "List Templates" on page 10-23, "Page Templates" on
page 10-25, "Popup LOV Templates" on page 10-30, "Region
Templates" on page 10-31, and "Report Templates" on page 10-33
See Also:
Viewing Templates on the Templates Page
To view existing templates:
1.
On the Workspace home page, click the Application Builder icon.
2.
Select an application.
3.
Click Shared Components.
4.
Under User Interface, select Templates.
The Templates page appears.
5.
You can narrow the display by making a selections from the following lists and
clicking Go.
■
Template Name - Enter a case insensitive query.
■
Theme - View only templates in a specific theme.
■
Referenced - Select a type of template to display.
Managing Themes and Templates
10-15
Customizing Templates
■
■
■
6.
Type - Select a a type of template type.
Since - Restrict the report to a specific time frame. Select the amount of time to
include in your report.
Subscribed - Specify whether to view All Templates, Subscribed Templates, or
Not Subscribed Templates.
To see a preview of a template, click the Run icon in the Preview column.
Note that not all template types have the preview capability.
7.
To view or edit a template definition, click the template name.
The template definition appears.
Each template definition is divided into sections. You can access these sections by
manually scrolling, or by clicking a navigation button at the top of the page. When
you select a button at the top of the page, the selected section appears and all other
sections are temporarily hidden. To view all sections of the page, click Show All.
8.
Edit the appropriate attributes.
Note that if you edit a template, you can make changes in one window and run
your application in another by selecting the Return to Page check box on the right
side of the template definition page. Selecting this check box keeps the page you
are editing current after you click Apply Changes.
9.
Click Apply Changes.
Viewing Templates Associated with a Specific Page
To view templates associated with a specific page:
1.
On the Workspace home page, click the Application Builder icon.
2.
Select an application.
3.
Select a page.
The Page Definition appears. Templates associated with the current page display
under the Templates heading in the far right column.
4.
To view or edit a template definition, click the template name.
The Template Definition appears.
Each template definition is divided into sections. You can access these sections by
manually scrolling, or by clicking a navigation button at the top of the page. When
you select a button at the top of the page, the selected section appears and all other
sections are temporarily hidden. To view all sections of the page, click Show All.
5.
Edit the appropriate attributes.
Note that if you edit a template, you can make changes in one window and run
your application in another by selecting the Return to Page check box on the right
side of the template definition page. Selecting this check box keeps the page you
are editing current after you click Apply Changes.
6.
Click Apply Changes.
Replacing Templates
You can update the template associated with a component using the Replace
Templates Wizard.
To replace the template associated with a component:
10-16 Oracle Application Express Application Builder User’s Guide
Customizing Templates
1.
On the Workspace home page, click the Application Builder icon.
2.
Select an application.
3.
Click Shared Components.
4.
Under User Interface, select Templates.
The Templates page appears.
5.
From the Task list, select Replace Templates.
6.
From Template Type, select a template and click Next.
7.
For Replace Templates, select the following:
8.
a.
Change From - Select the template you want to change.
b.
Change To - Select the template you want to change to.
c.
Click Next.
Click Finish.
Replacing All Templates within an Application
To replace all templates within an application with templates from another
application:
1.
On the Workspace home page, click the Application Builder icon.
2.
Select an application.
3.
Click Shared Components.
4.
Under User Interface, select Templates.
The Templates page appears.
5.
From the Task list, select Replace templates in this application with templates
from another application.
6.
From Replace from Application, select an application and click Next.
7.
On Replace Templates, select a new template for each component and then select
one of the following:
8.
■
Replace copies the template definition
■
Replace/Subscribe copies the templates and adds a subscription.
Click Replace Templates.
Viewing Region Position Utilization by Page Template
Regions are organized on a page by position (or Display Point). The possible display
points for a region are determined by the page-level template.
To view region position utilization by page template:
1.
On the Workspace home page, click the Application Builder icon.
2.
Select an application.
3.
Click Shared Components.
4.
Under User Interface, select Templates.
The Templates page appears.
5.
From the Task list, select View page template region position utilization.
Managing Themes and Templates
10-17
Customizing Templates
The Region Display Point Utilization report appears.
Unsubscribing to Templates
A subscribed template is a template that has its definition maintained in another
template, the referenced template. If your application utilizes subscribed templates,
you can unsubscribe to templates on the Unsubscribe Templates page.
To unsubscribe to templates:
1.
On the Workspace home page, click the Application Builder icon.
2.
Select an application.
3.
Click Shared Components.
4.
Under User Interface, select Templates.
The Templates page appears.
5.
From the Task list, select Unsubscribe Templates.
The Unsubscribe Templates page appears.
6.
To unsubscribe to a specific template type within the current theme, select the
template type and click Unsubscribe.
Publishing Templates
Use the Publish Templates page to view templates that are subscribed to by other
templates in your workspace.
To publish master template content to subscribing templates:
1.
On the Workspace home page, click the Application Builder icon.
2.
Select an application.
3.
Click Shared Components.
4.
Under User Interface, select Templates.
The Templates page appears.
5.
Click the Publish tab.
The Published Templates page appears.
6.
Select those you want to publish and click Publish Checked.
Breadcrumb Templates
A breadcrumb template controls the display of breadcrumb entries. You select a
breadcrumb template when you create a region.
"Customizing Templates" on page 10-12 and "Managing
Themes" on page 10-1
See also:
About Breadcrumb Style Navigation
Breadcrumbs usually indicate where the current page is relative to other pages in the
application. In addition, users can click a specific page to instantly view it. For
example, the Oracle Application Express user interface includes breadcrumb paths at
the top of each page.
10-18 Oracle Application Express Application Builder User’s Guide
Customizing Templates
See Also:
■
■
Online help for information about using specific sections of the
Edit Breadcrumb Template page
"Creating Breadcrumbs" on page 8-13
Breadcrumb Template Attributes
This section describes specific sections of the Edit Breadcrumb Template page. You can
access the sections of the page by either scrolling down the page, or by clicking a
navigation button at the top of the page. Note that when you select a button at the top
of the page, the selected section appears and all other sections are temporarily hidden.
To view all sections of the page, click Show All.
Name Name identifies the name of the template. Use the Translatable check box to
indicate that the template contains text strings that require translation. Theme
indicates the theme to which the template is a member.
Template Class identifies a specific use for the template. When you switch to a theme,
all templates in one theme are mapped to corresponding templates in another theme.
Application Builder accomplishes this template mapping through the assignment of a
template class.
Subscription Use Subscription to apply an existing template to the current application.
When you select an existing template, you become a subscriber to that template.
To load a copy of a master template, click Refresh.
Template Type Select one of the following template styles:
■
■
■
■
Child Breadcrumb Entries displays all breadcrumb entries that are children of the
current page parent breadcrumb (that is, peers of the current breadcrumb).
Current Breadcrumb displays all breadcrumb entries in sequence with a common
parent.
Parent Breadcrumb Entries displays all breadcrumb entries for the current pages
parent breadcrumb (that is, one level up from the current breadcrumb entry).
Parent to Leaf (breadcrumb style) displays the current page breadcrumb entry, its
parent to the left, and so on, until the root node is reached.
Definition Table 10–3 describes available breadcrumb Entry attributes.
Table 10–3
Breadcrumb Entry Control attributes
Attribute
Description
Before First
Defines text that displays before the first breadcrumb entry.
Current Page Breadcrumb
Entry
Defines the look of a breadcrumb entry that corresponds to the
current page. This attribute supports the following substitution
strings:
■
#NAME# specifies the short name of the breadcrumb entry.
■
#LINK# specifies the anchor target of the breadcrumb entry.
■
#LONG_NAME# specifies the long name of the breadcrumb
entry.
Managing Themes and Templates
10-19
Customizing Templates
Table 10–3 (Cont.) Breadcrumb Entry Control attributes
Attribute
Description
Non Current Page
Breadcrumb Entry
Defines the look of a breadcrumb entry that does not correspond
to the current page. This attribute supports the following
substitution strings:
■
■
■
#NAME# specifies the short name of the breadcrumb entry
#LINK# specifies the anchor target of the breadcrumb
entry
#LONG_NAME# specifies the long name of the breadcrumb
entry
After Last
Defines text that displays after the last breadcrumb entry.
Between Level
Defines text that displays between levels of breadcrumb entries.
For example, if a breadcrumb has three levels this text would
display at the "X" in the example that follows:
main X cars X porsche X 911
Maximum Levels
Specifies the number of levels that appear when displaying
breadcrumbs in a breadcrumb style.
Link Attributes Use Breadcrumb Link Attributes to specify hypertext link attributes for
a breadcrumb entry.
Comments Use this attribute to record comments about this component.
Substitution Strings Lists substitution string usage for this template. Substitution strings
are used within subtemplates to reference component values.
Button Templates
Button templates enable application developers to customize the look and feel of a
button. To build a button, you can use multiple images or HTML tags. Using button
templates is optional.
"Customizing Templates" on page 10-12 and "Managing
Themes" on page 10-1
See also:
Button Template Attributes
This section describes specific sections of the Edit Button Template page. You can
access the sections of the page by either scrolling down the page, or by clicking a
navigation button at the top of the page. Note that when you select a button at the top
of the page, the selected section appears and all other sections are temporarily hidden.
To view all sections of the page, click Show All.
Name Template Name identifies the name of the template. Use the Translatable check
box to indicate if the template contains text strings that require translation. Theme
indicates the theme to which the template is a member.
Template Class identifies a specific use for the template. When you switch to a theme,
all templates in one theme are mapped to corresponding templates in another theme.
Application Builder accomplishes this template mapping through the assignment of a
template class.
10-20 Oracle Application Express Application Builder User’s Guide
Customizing Templates
Subscription Use Subscription to apply an existing template to the current application.
When you select an existing template, you become a subscriber to that template.
To load a copy of a master template, click Refresh Template.
Definition Use Template to define the button template that displays. You have the
option of including standard application substitutions. For example, &ITEM_NAME.
values can be substituted at rendering time. Button templates support the following
substitution strings:
■
■
#LABEL# is replaced with a button label.
#LINK# is replaced with a URL. The URL then calls a #doSubmit# or a redirect
JavaScript that submits the page (that is, setting the request value), or simply
redirects it to the supplied URL.
Comments Use this attribute to record comments about this component.
Substitution Strings Lists substitution string usage for this template. Substitution strings
are used within subtemplates to reference component values.
Calendar Templates
Calendar templates control the appearance and placement of a calendar. Calendar
templates frequently use HTML tables to arrange dates. You place calendar attributes
using substitution strings such as #DD# and #MONTH#. A list of supported substitution
strings appears on the right side of the Edit Calendar Template page. Note that
template substitution strings must be in uppercase letters and begin and end with a
number sign (#).
"Creating Calendars" on page 7-55, "Customizing
Templates" on page 10-12, and "Managing Themes" on page 10-1
See Also:
Calendar Template Attributes
This section describes specific sections of the Edit Calendar Template page. You can
access the sections of the page by either scrolling down the page, or by clicking a
navigation button at the top of the page. Note that when you select a button at the top
of the page, the selected section appears and all other sections are temporarily hidden.
To view all sections of the page, click Show All.
Calendar Definition
Name Name identifies the name of the template. Theme indicates the theme to which
the template is a member.
Template Class identifies a specific use for the template. When you switch to a theme,
all templates in one theme are mapped to corresponding templates in another theme.
Application Builder accomplishes this template mapping through the assignment of a
template class.
Template Subscription Use Template Subscription to apply an existing template to the
current application. When you select an existing template, you become a subscriber to
that template.
To load a copy of a master template, click Refresh.
Comments Use this attribute to record comments about this component.
Managing Themes and Templates
10-21
Customizing Templates
Monthly Calendar, Weekly Calendar, and Daily Calendar
Use the Monthly Calendar, Weekly Calendar, and Daily Calendar attributes to control
the appearance and placement of specific calendars.
To learn more about a specific attribute, click the attribute label. When Help is
available, the item label changes to red when you pass your cursor over it and the
cursor changes to an arrow and question mark. See "About Field-Level Help" on
page 1-15.
Label Templates
Label templates are designed to centrally manage HTML markup of page item labels.
Each item can have an optional label. You can control how these labels display using
label templates. For example, you could create a label template called Required Field
that references an image (such as an asterisk) to indicate to the user that the field is
required.
Label templates enable you to define a before-and-after text string that gets prepended
and appended to the item.
"Customizing Templates" on page 10-12 and "Managing
Themes" on page 10-1
See Also:
Label Template Attributes
This section describes specific sections of the Edit Label Template page. You can access
the sections of the page by either scrolling down the page, or by clicking a navigation
button at the top of the page. Note that when you select a button at the top of the page,
the selected section appears and all other sections are temporarily hidden. To view all
sections of the page, click Show All.
Name Template Name identifies the name of the template. Use the Translatable check
box to indicate that the template contains text strings that require translation. Theme
indicates the theme to which the template is a member.
Template Class identifies a specific use for the template. When you switch to a theme,
all templates in one theme are mapped to corresponding templates in another theme.
Application Builder accomplishes this template mapping through the assignment of a
template class.
Subscription Use Template Subscription to apply an existing template to the current
application. When you select an existing template, you become a subscriber to that
template.
To load a copy of a master template, click Refresh Template.
Definition In Before Label, enter HTML to display before the item label. Before Label
supports the substitution strings #CURRENT_FORM_ELEMENT#; #CURRENT_FORM_
ID#, and #CURRENT_ITEM_NAME#. For example:
<label for="#CURRENT_ITEM_NAME#">
<a href="javascript:popupFieldHelp('#CURRENT_ITEM_ID#',
'&APP_SESSION.','&CLOSE.')" >
In After Label, enter HTML to display after the item label. Since the label will
automatically display before the HTML in this region, any open HTML tags in the
Before Label region should be closed here. For example:
</a></label>
10-22 Oracle Application Express Application Builder User’s Guide
Customizing Templates
Error Display In On Error Before Label, enter HTML to precede the item label when an
application displays an inline validation error message for the item. For example:
<font class="fieldtitleleft">#ERROR_MESSAGE#
In On Error After Label, enter HTML to be appended to the item label when an
application displays an inline validation error message for the item. This attribute
supports the substitution strings #CURRENT_FORM_ELEMENT#, #CURRENT_FORM_
ID#, and #CURRENT_ITEM_NAME#. The following example would append a space
and a closing bracket to the displayed item label with the error.
]</font>
Comments Use this attribute to record comments about this object.
Substitution Strings Lists substitution string usage for this template. Substitution strings
are used within subtemplates to reference component values.
List Templates
A list is a shared collection of links. You control the appearance of a list through list
templates. Using template attributes, you can also define a list element to be either
current or non current for a specific page.
See Also: "Creating Lists" on page 8-5, "Customizing Templates" on
page 10-12, and "Managing Themes" on page 10-1
About Hierarchical Lists
Oracle Application Express supports hierarchical lists. To create a hierarchical list, you
must:
■
■
Select a list template that supports hierarchical lists. To determine which list
templates support hierarchical lists, look for templates having the naming
convention "with Sublist."
Select a Parent List Entry when you create each list entry.
See Also:
■
■
Online Help for information about using specific sections of the
Edit List Template page
"Creating Lists" on page 8-5
List Template Attributes
This section describes specific sections of the Edit List Template page. You can access
the sections of the page by either scrolling down the page, or by clicking a navigation
button at the top of the page. Note that when you select a button at the top of the page,
the selected section appears and all other sections are temporarily hidden. To view all
sections of the page, click Show All.
Name Name identifies the name of the template. Use the Translatable check box to
indicate that the template contains text strings that require translation. Theme
indicates the theme to which the template is a member.
Managing Themes and Templates
10-23
Customizing Templates
Template Class identifies a specific use for the template. When you switch to a new
theme, all templates in one theme are mapped to corresponding templates in another
theme. Application Builder accomplishes this template mapping through the
assignment of a template class.
Subscription Use Subscription to apply an existing template to the current application.
When you select an existing template, you become a subscriber to that template.
To load a copy of a master template, click Refresh Template.
Before List Entry Enter HTML that displays before any list elements. You can use this
attribute to open an HTML table or HTML table row.
Template Definition Defines current and noncurrent list templates. Supported
substitution strings include #LINK#, #TEXT#, #IMAGE_PREFIX#, #IMAGE#,
#IMAGE_ATTR#, and #A01# to #A10#.
■
■
■
■
■
List Template Current. Enter HTML or text to be substituted for the selected (or
current) list template.
List Template Current with Sub List Items. Enter HTML or text to be substituted
for the selected (or current) list template when an item has sublist items. If not
specified, the current list item template will be used.
List Template Noncurrent. Enter HTML or text to be substituted for the
unselected (or noncurrent) list template.
List Template Noncurrent with Sub List Items. Enter HTML or text to be
substituted for the unselected (or noncurrent) list template used when an item has
sublist items. If not specified, the current list item template will be used.
Between List Elements. Enter HTML that displays between list elements. This
attribute will be ignored if no HTML is specified.
Before Sub List Entry Enter HTML that displays before any sublist elements.
Sub List Entry Defines current and noncurrent list templates. Supported substitution
strings include #LINK#, #TEXT#, #IMAGE_PREFIX#, #IMAGE#, #IMAGE_ATTR#, and
#A01# to #A10#.
■
■
■
■
■
Sub List Template Current. Enter HTML or text to be substituted for the selected
(or current) list template.
Sub List Template Current with Sub List Items. Enter HTML or text to be
substituted for the selected (or current) list template when an item has sublist
items. If not specified, the current list item template will be used.
Sub List Template Noncurrent. Enter HTML or text to be substituted for the
unselected (or noncurrent) list template.
Sub List Template Noncurrent with Sub List Items. Enter HTML or text to be
substituted for the unselected (or noncurrent) list template used when an item has
sublist items. If not specified, the current list item template will be used.
Between Sub List Items. Enter HTML that displays between list elements. This
attribute will be ignored if no HTML is specified.
After Sub List Entry Enter HTML that displays after displaying sublist elements.
After List Entry Enter HTML that displays after displaying all list elements. You can use
this attribute to close an HTML table opened in the Before List Elements attribute.
10-24 Oracle Application Express Application Builder User’s Guide
Customizing Templates
Comments Use this attribute to record comments about this object.
Substitution Strings Lists substitution string usage for this template. Substitution strings
are used within subtemplates to reference component values.
Page Templates
Page templates define the appearance of a page. Each template consists of a header
template, a body template, a footer template, and a number of subtemplates. If you do
not specify a page template as a page-level attribute, then the Application Express
engine uses the default page template defined on the Create/Edit Theme page.
Page templates combine static HTML with substitution strings that are replaced at run
time. You use substitution strings to indicate the existence and placement of a
component within a page template. You can further specify how a component should
display using subtemplates.
"Customizing Templates" on page 10-12 and "Managing
Themes" on page 10-1
See Also:
Topics in this section include:
■
Supported Page Template Substitution Strings
■
Page Template Attributes
Supported Page Template Substitution Strings
Table 10–4 describes the available page template substitution strings. Note that all
template substitution strings must be in uppercase letters and begin and end with a
number sign (#).
To view a report of substitution strings supported by a given template, look at the
Substitution Stings section of the Edit Page Template page. See "Page Template
Attributes" on page 10-27.
Table 10–4
Page Template Substitution Strings
Substitution String
Description
#APP_VERSION#
Can be used in the Header or Footer sections of the page
template. You define the value of #APP_VERSION# in the
Version attribute on the Edit Definition page
See Also: "Name" on page 4-9
#BOX_BODY#
Identifies where the Body displays. If the Body is null, then
#BOX_BODY# will be used instead.
#CUSTOMIZE#
Can be used in the Header, Body, or Footer sections of the
page template.
The Customization section of the Region Definition enables
you to turn on end-user customization. To utilize this
feature, you must also include the #CUSTOMIZE#
substitution string in the page template.
If at least one region supports end-user customization, a link
called Customize appears wherever the #CUSTOMIZE#
substitution string appears in the page template. When users
click this link, a window displays enabling them to turn on
and off regions on the page.
See Also: "Editing Region Attributes" on page 9-4
Managing Themes and Templates
10-25
Customizing Templates
Table 10–4 (Cont.) Page Template Substitution Strings
Substitution String
Description
#FORM_CLOSE#
If a #FORM_OPEN# is included, then you must include a
#FORM_CLOSE# in the header, body, or footer template.
#FORM_OPEN# must appear before the #BOX_BODY# and
#FORM_CLOSE# must appear after the #BOX_BODY#
substitution string.
#FORM_OPEN#
Specifies where the HTML open form tag <form> is placed.
You must include this substitution string in order to submit
a form.
You do not need to code your own form open; the
Application Express engine does it for you.
#GLOBAL_NOTIFICATION#
Displays the Global Notification attribute. Global
notifications are intended to communicate system status,
such as pending system downtime. You can also use APEX_
APPLICATION.G_GLOBAL_NOTIFICATION to set this value
programmatically.
See Also: "Global Notifications" on page 4-12 for
information about the Global Notification attribute
#HEAD#
Used after the <head> open tag but before the </head>
close tag. You can optionally define the contents of #HEAD#
for each page (for example, to reference additional style
sheets or JavaScript libraries).
#LOGO#
Identifies an application logo.
In the Logo section of the Edit Definition page, you can
identify an image and image attributes for an application
logo. To utilize this feature, you must also include the
#LOGO# substitution string in the Header or Body page
template.
See Also: "Logo" on page 4-13
#NAVIGATION_BAR#
Defines the existence of navigation bar entries. A navigation
bar will appear on every page in your application that uses a
template that includes this substitution string.You can
expand this substitution string using the Navigation bar
subtemplate.
See Also: "Subtemplate" on page 10-28 for information
about the Navigation Bar subtemplate
#NOTIFICATION_MESSAGE#
Enables developers to communicate messages to the user.
Defines where a summary of inline error messages is
displayed. Inline error messages can be displayed next to a
field, inline in the notification area, or both.
#ONLOAD#
Can be used in the Header and Footer section of the page
template and should be placed inside the <body> html tag.
For example:
<body #ONLOAD#>
Use this string as a substitute in a JavaScript call to be
executed when a page is loaded by the Web browser. The
JavaScript to be called can vary for each page.
#PARENT_TAB_CELLS#
Identifies the display of parent tabs. Parent tabs require
standard tabs. If your application only has one level of tabs,
you do not need this substitution string.
See Also: "Standard Tab Attributes" on page 10-29 for
information about defining Parent Tab Attributes
10-26 Oracle Application Express Application Builder User’s Guide
Customizing Templates
Table 10–4 (Cont.) Page Template Substitution Strings
Substitution String
Description
#REGION_POSITION_NN#
Identifies the exact placement of regions within a page. If no
region is specified (for example, #REGION_POSITION_
01#), then #REGION_POSITION_01# will be replaced with
nothing.
#SUCCESS_MESSAGE#
Defines where in the page success and error messages
appear. If the page process runs without raising errors, then
this text displays.
You can customize the display of the success message for
each template by adding HTML to be displayed before and
after the success message.
#TAB_CELLS#
Identifies the display of standard tabs.
See Also: "Standard Tab Attributes" on page 10-29
#TITLE#
Defines the page title. Typically included within HTML title
tags.
See Also: ""Understanding Substitution Strings" on page 3-15and
"Managing Pages in an Application" on page 6-9
Page Template Attributes
This section describes specific sections of the Edit Page Template page. You can access
the sections of the page by either scrolling down the page, or by clicking a navigation
button at the top of the page. Note that when you select a button at the top of the page,
the selected section appears and all other sections are temporarily hidden. To view all
sections of the page, click Show All.
Name Name identifies the name of the template. Theme indicates the theme to which
the template is a member.
Template Class identifies a specific use for the template. When you switch to a new
theme, all templates in one theme are mapped to corresponding templates in another
theme. Application Builder accomplishes this template mapping through the
assignment of a template class. Use the Translatable check box to indicate that the
template contains text strings that require translation.
Subscription Use Subscription to apply an existing template to the current application.
When you select an existing template, you become a subscriber to that template.
To load a new copy of a master template, select Refresh Template.
Definition Each template consists of a header, a body, a footer, and subtemplates. Use
substitution strings to include dynamic content. All template substitution strings must
be in uppercase letters and begin and end with a number sign (#). See item Help for
information about supported substitution strings.
Header is the first section of the page template. Enter HTML that defines the <Head>
section of the HTML document. Regions that display or processes and computations
that execute AFTER HEADER will display or execute immediately after this section in
the template that is rendered. For example:
<html>
<head>
<title>#TITLE#</title>
#HEAD#
Managing Themes and Templates
10-27
Customizing Templates
</head>
Body is the second section in the page template and is rendered after the header
section but before the footer section. Enter HTML that defines the <Body> section of
the HTML document. At a minimum, you must include the #BOX_BODY# substitution
string. It is recommended that you also include the #FORM_OPEN# and #FORM_
CLOSE# substitution strings. For example:
<body #ONLOAD#>
#FORM_OPEN#
#BOX_BODY#
#FORM_CLOSE#
</body>
Footer is the third section in the page template that displays after the body.
Display Points Breadcrumb Display Point applies to generated components that use
breadcrumbs. It defines where the breadcrumbs are placed on the page. Sidebar
Display Point applies to generated components that use Sidebars. It defines where
sidebars are placed on the page.
Subtemplate Use Subtemplate to specify how a component should display. Available
subtemplates include:
■
■
Success Message. Expands the #SUCCESS_MESSAGE# substitution string. You can
define a success message either programmatically or as an attribute of a process. If
a success message exists and if the page template includes the #SUCCESS_
MESSAGE# substitution string, then this subtemplate is used to render the
message.
Navigation Bar. Controls the display of navigation bar entries. Enter HTML or text
to be substituted when the #NAVIGATION_BAR# substitution string is referenced
in the template header, body, or footer. Use the #BAR_BODY# substitution string to
identify where each navigation bar icon should display. In the following example,
#BAR_BODY# substitution string will generate the appropriate HTML table cells:
<table class="navBar"><tr>#BAR_BODY#</tr></table>
■
Navigation Bar Entry. Enter HTML or text to be substituted into the navigation
bar #BAR_BODY# substitution string for each navigation bar entry. Use the
following substitution strings to create the navigation bar entry subtemplate.
Use the following substitution strings to compose the navigation bar entry
subtemplate:
–
#LINK# - entry link
–
#TEXT# - entry sub text
–
#IMAGE# - entry image
Note that the HTML image ALT, HEIGHT, and WIDTH arguments will be
included with the HTML IMG tag when supplied with the navigation bar
entry.
–
#EDIT# - Inline edit link editing capability
–
#WIDTH# - Image width
–
#HEIGHT# - Image height
–
#COLSPAN# - HTML COLSPAN value
10-28 Oracle Application Express Application Builder User’s Guide
Customizing Templates
–
■
#ALT# - Image alternative text
Notification. Enter HTML or text to be substituted when the #NOTIFICATION_
MESSAGE# substitution string is referenced in the template header, body, or footer.
Use the substitution string #MESSAGE# to indicate where the body of the message
will appear in the Notification Message.
Standard Tab Attributes You must populate this attribute if your application includes
standard tabs. Standard tabs can be placed in the header, body, or footer sections of the
page template using the #TAB_CELLS# substitution string. The page template
Header/Body/Footer defines the HTML table and rows. This subtemplate defines
how these tabs display by defining the specific cell. Available attributes include:
■
Current Tab. Enter HTML or text to be substituted for the currently selected
standard tab. Whether a tab is current is determined by standard tab attributes.
For example:
<td>#TAB_LABEL#</td>
■
Non Current Standard Tab. Enter HTML or text that will be substituted for the
unselected standard tabs. Use the #TAB_TEXT# substitution string to position a
tab's label and link within the template. For example:
<td><a href="#TAB_LINK#">#TAB_LABEL#</a></td>
See Also:
"Creating Tabs" on page 8-1
Parent Tab Attributes You must populate this attribute if your application includes two
levels of tabs. Enter HTML or text that will be substituted for the selected parent tabs.
Parent tabs can be placed in the header, body, or footer section of the page template
using the #PARENT_TAB_CELLS# substitution string. Parent tabs only display with
standard tabs. Available attributes include:
■
Current Parent Tab. Enter HTML or text that will be substituted for the selected
parent tabs. Whether a tab is current is determined by the page that displays and
the standard tab set that the page uses. Use the #TAB_TEXT# substitution string to
position a tab's label and link within the template. For example:
<td><a href="#TAB_LINK#">#TAB_LABEL#</a></td>
■
Non Current Parent Tab. Enter HTML or text that will be substituted for the
unselected parent tabs. Use the #TAB_TEXT# substitution string to position a tab's
label and link within the template. For example:
<td><a href="#TAB_LINK#">#TAB_LABEL#</a></td>
See Also:
"Creating Tabs" on page 8-1
Image Based Tab Attributes Use this subtemplate for tabs that are entirely based on
images. Available attributes include:
■
■
Current Image Tab. Enter HTML to be used to indicate that an image-based tab is
currently selected. Include the #TAB_TEXT# substitution string to show the
displayed name of the tab.
Non Current Image Tab. Enter the HTML to be used to indicate that an image tab
is not currently selected. Include the #TAB_TEXT# substitution string to show the
displayed name of the tab.
Managing Themes and Templates
10-29
Customizing Templates
Multi Column Region Table Attribute If the Application Express engine displays regions in
multiple columns in the same region position, then Oracle Application Express will
render an HTML table. This attribute enables you to control the attributes of the
<table> tag.
Error Page Template Control Use this attribute only when a page template will be
designated as an error template. Use the #MESSAGE# substitution string to place the
error message and the #BACK_LINK# substitution string to display a link back to the
previous page. A template can be designated as an error template by editing the
application attributes. For example:
#MESSAGE#
<br>
<a href="#BACK_LINK#">back</a>
Comments Use this attribute to record comments about this component.
Substitution Strings Lists substitution string usage for this template. Substitution strings
are used within subtemplates to reference component values.
Popup LOV Templates
Popup LOV templates control how popup lists display for all items defined as POPUP.
You can only specify one popup LOV template for each theme.
See Also: "Creating Lists of Values" on page 7-81, "Customizing
Templates" on page 10-12, and "Managing Themes" on page 10-1
Popup List of Values Template Attributes
This section describes specific sections of the Edit Popup List of Values Template page.
You can access the sections of the page either by scrolling down the page or by clicking
a navigation button at the top of the page. Note that when you select a button at the
top of the page, the selected section appears and all other sections are temporarily
hidden. To view all sections of the page, click Show All.
Application Theme indicates the theme to which the template is a member. Template
Class identifies a specific use for the template. When you switch to a new theme, all
templates in one theme are mapped to corresponding templates in another theme.
Application Builder accomplishes this template mapping through the assignment of a
template class. Use the Translatable check box to indicate that the template contains
text strings that require translation.
Subscription Use Subscription to apply an existing template to the current application.
When you select an existing template, you become a subscriber to that template.
To load a new copy of a master template, click Refresh Template.
Icon Use Popup Icon to specify an icon to display to the right of a form field for items
of type POPUP. By default, the Application Express engine uses a list.gif image.
Use Popup Icon Attr to define image attributes, such as height and width, for the
Popup Icon.
10-30 Oracle Application Express Application Builder User’s Guide
Customizing Templates
Search Field Use these attributes to specify how a Search field displays. Table 10–5
describes available Search Field attributes.
Table 10–5
Search Field Attributes
Attribute
Description
Before Field Text
Defines text to display before the popup list of values search
field displays.
Filter Width
Displays the text field using this width.
Filter Max Width
Displays the text field widget using this maximum width.
Filter Text Attribute
Displays the text field using these attributes. This will be
included within the HTML input tag.
After Field Text
Displays this text after displaying the search field, the search
button, and the close button.
Buttons Use these attributes to define the button name and attributes for the Find,
Close, Next, and Previous buttons.
Window Popup lists of values are executed using JavaScript. Use these attribute to
control the values of scrollbars=, resizable=, width=, and height=. For
information about default values, see item Help.
Pagination Defines how row count results display.
Result Set Use these attributes to define text or HTML to display before and after a
result set.
Page Attributes Use these attributes to define popup pages. For more information, see
item Help.
Region Templates
Region templates control the appearance and placement of region attributes. Region
templates frequently use HTML tables to arrange content.
Region templates apply style elements to regions. Region templates display
substitution strings. The only required substitution string, #BODY#, identifies where
the source of the region should be placed. All other substitution strings are optional.
You can use these substitution strings to indicate the existence and placement of a
page control, such as a button, within the region.
"Understanding Regions" on page 9-2, "Customizing
Templates" on page 10-12, and "Managing Themes" on page 10-1
See Also:
Region Template Attributes
This section describes specific sections of the Edit Region Template page. You can
access the sections of the page either by scrolling down the page or by clicking a
navigation button at the top of the page. Note that when you select a button at the top
of the page, the selected section appears and all other sections are temporarily hidden.
To view all sections of the page, click Show All.
Name Name identifies the name of the template. Theme indicates the theme to which
the template is a member.
Managing Themes and Templates
10-31
Customizing Templates
Template Class identifies a specific use for the template. When you switch to a new
theme, all templates in one theme are mapped to corresponding templates in another
theme. Application Builder accomplishes this template mapping through the
assignment of a template class. Use the Translatable check box to indicate that the
template contains text strings that require translation.
Subscription Use Template Subscription to apply an existing template to the current
application. When you select an existing template, you become a subscriber to that
template.
To load a new copy of a master template, click Refresh Template.
Definition Region templates provide the appearance for a portion of a page called a
region. Use substitution strings to indicate the existence and placement of a
component within the region. #BODY# is the only required substitution string. It
identifies where the source of the region should be placed. All other substitution
strings are optional. The following are valid substitution strings:
■
#TITLE#
■
#EXPAND#
■
#CHANGE#
■
#BODY#
■
#FORM_OPEN#
■
#FORM_CLOSE#
When you create a button in a region position, the positions you define will appear in
a select list. Use the following substitution strings to define positions for the placement
of buttons in a region:
■
#EDIT#
■
#CLOSE#
■
#CREATE#
■
#EXPAND#
■
#HELP#
■
#DELETE#
■
#COPY#
■
#NEXT#
■
#PREVIOUS#
See Also:
"Understanding Substitution Strings" on page 3-15
Form Table Attributes Page items display within regions. Items are rendered as HTML
form elements in an HTML table. With this template property, you can define
attributes that will be placed in the <table> tag. For example:
class="instructiontext"
Comments Use this attribute to record comments about this component.
10-32 Oracle Application Express Application Builder User’s Guide
Customizing Templates
Substitution Strings Lists substitution string usage for this template. Substitution strings
are used within subtemplates to reference component values.
Report Templates
Report column templates provide you with control over the results of a row from a
SQL query. This type of template defines a cell, not an entire row.
Each report template identifies column names using the syntax #1#, #2#, #3#, and
so on. You can also name columns using column name substitution syntax such as
#ENAME# or #EMPNO#. You can reference any item from your application within your
template. For example, to reference an item called ABC. in your template, you could
include the exact substitution string &ABC.. The actual value of ABC. would be
provided by an end user editing an item in your application named ABC.
"Creating Reports" on page 7-1, "Customizing Templates"
on page 10-12, and "Managing Themes" on page 10-1
See Also:
Topics in this section include:
■
About Generic Column Templates and Named Column Templates
■
Report Column Template Attributes for Generic Column Templates
■
Report Column Template Attributes for Named Column Templates
■
About Using JavaScript in Column Templates
About Generic Column Templates and Named Column Templates
Oracle Application Express includes two types of report templates:
■
Generic column templates
■
Named column templates
Generic Column Templates A generic column template determines the appearance of a
report by defining the look of the column once. This look is then repeated as many
times as is necessary, based on the number of columns specified in the report's
definition. This type of template is limited to reports that have a standard row and
column structure. Additional style can be applied to a report using this type of
template through the use of conditions.
The following example demonstrates how to have each column use a specific style:
<td class="tabledata" align="#ALIGN#">#COLUMN_VALUE#</td>
This example assumes your page template includes a CSS containing the class
tabledata. This example also demonstrates the use the substitution strings #ALIGN#
and #COLUMN_VALUE#. If you actually ran this report, these substitution strings
would be replaced with values generated by the results of a SQL query.
If your query uses an expression in the select list, it is a good idea to create an alias for
the columns to avoid run time errors. For example, suppose your query was as
follows:
SELECT ename, (sal + comm) * 12 FROM emp
You could rewrite the query to alias the columns as follows:
SELECT ename, (sal + comm) * 12 yearly_comp FROM emp
Managing Themes and Templates
10-33
Customizing Templates
Named Column Templates Named column templates allow for more flexibility in report
design. However, because they reference columns by name, they can only be used by
reports that are based on those columns. For example:
<tr><td>#ENAME#</td><td>#SAL#</td></tr>
Although named column templates offer flexibility, you may need to create a new
template for each query. You can also include a position notation. The following
example demonstrates how to use following HTML and substitution strings:
<tr><td>#ENAME#</td><td>#SAL#</td></tr>
<tr><td>#1#</td><td>#2#</td></tr>
Report Column Template Attributes for Generic Column Templates
This section describes specific sections of the Edit Report Template page for Generic
Column Templates. You can access the sections of the page by either scrolling down
the page, or by clicking a navigation button at the top of the page. Note that when you
select a button at the top of the page, the selected section appears and all other sections
are temporarily hidden. To view all sections of the page, click Show All.
Report Template Template Name identifies the name of the template. Template Type
indicates the type of template. Named Column templates reference column names in
the template. Generic Column Templates reference the #COLUMN_VALUE# substitution
string in the template.
Theme indicates the theme to which the template is a member. Template Class
identifies a specific use for the template. When you switch to a new theme, all
templates in one theme are mapped to corresponding templates in another theme.
Application Builder accomplishes this template mapping through the assignment of a
template class. Use the Translatable check box to indicate the template contains text
strings that require translation.
Template Subscription Use Template Subscription to apply an existing template to the
current application. When you select an existing template, you become a subscriber to
that template.
To load a new copy of a master template, click Refresh Template.
Before Rows In Before Rows, enter HTML that displays once at the beginning of a
report template. Opening an HTML table is a common use of this attribute as shown in
the following example:
<table>
You can identify column headers using the syntax #1#, #2#, #3#. For example:
<th>#1#</th><th>#2#</th><th>#3#</th>
You can include pagination above a report by including the substitution string #TOP_
PAGINATION#. This substitution string generates HTML that starts with an opening
<tr> tag and ends with a closing </tr> tag. For example, to include an open table tag
and the #TOP_PAGINATION# substitution string, you would enter the following:
<table>#TOP_PAGINATION#
10-34 Oracle Application Express Application Builder User’s Guide
Customizing Templates
You can also include the substitution string #CSV_LINK# to include support for
exporting your report to comma-separated value (CSV) format, a format compatible
with most spreadsheet programs.
Column Headings Use Column Heading Template to add color to each column header
cell. Note that the text of this attribute must indicate where the cell heading text will be
colorized. For example:
<th #ALIGNMENT#>#COLUMN_HEADER#</th>
If you do not want any column headings, enter the following:
OMIT
If you do use this attribute, Application Express engine applies the default column
heading template.
Before Each Row In Before Each Row, enter text to display before all columns in the
report. Use this attribute to open a new HTML row. Before Each Row supports the
following substitution strings:
■
#ROWNUM#
Use this substitution string to specify the current row.
■
#COLCOUNT#
Use this substitution string to specify the number of columns.
■
#HIGHLIGHT_ROW#
Use this substitution string to specify the number of highlighted rows.
Column Templates Column templates define the look of each column. You can define up
to four column templates; each can be conditional. For example, you can have different
background colors for even and odd rows, or highlight rows that meet a PL/SQL
defined condition.
In each Column Template, you define the look of each column. Column Templates
support the substitution strings described in Table 10–6.
Table 10–6
Column Template Substitution Strings
Substitution String
Description
#ALIGNMENT#
Determines the column alignment. Specified by the user.
#COLCOUNT#
Defines the count of the number of columns.
#COLNUM#
Defines the current column number.
#COLUMN_HEADER#
Defines the column header.
#COLUMN_VALUE#
Replaced with the value of the column.
#ROWNUM#
Specifies the current row number.
Consider the following example:
<td> #ALIGNMENT#>#COLUMN_VALUE#</td>
If you actually ran this report, these substitution strings would be replaced with values
generated by the results of a SQL query.
Managing Themes and Templates
10-35
Customizing Templates
By creating conditions, you can create a report that displays columns differently
depending on whether the specified condition is met. To specify a column template be
used conditionally, select a condition type from the Column Template Condition list.
Valid values include:
■
Use Based on PL/SQL Expression. Conditionally formats columns based on data
in that row.
■
Use for Even Numbered Rows. Conditionally formats even numbered rows.
■
Use for Odd Numbered Rows. Conditionally formats odd numbered rows.
If you select Use Based on PL/SQL Expression, the next step is to enter a PL/SQL
expression in the Column Template Expression field. For example, the following
expression displays a value in bold if the value is greater than 2000:
#SAL# > 2000
Note that you could also use the substitution string #ROWNUM#. For example:
#ROWNUM# > 2000
After Each Row In After Each Row, enter HTML that displays after all columns in the
report display. This attribute is often used to close an HTML table row. For example:
</tr>
After Rows Use After Rows to specify text that should display after the last row. A
common use of this attribute is to close the HTML table tag. For example:
</table>
The After Rows attribute supports the following substitution strings:
■
#PAGINATION#
Replaced with a pagination attribute.
■
#COLCOUNT#
Substituted at run time with the number of columns defined in the report.
Row Highlighting Use Background color for checked row to control the background
color of a report row when the row selector is checked. Use Background color for
current row to control the background color of a report row when the user moves the
mouse over the row.
Pagination Subtemplate The Pagination Subtemplate section contains attributes for
editing the Pagination Template, Next Page Template, Previous Page Template, Next
Set Template, and Previous Template. Pagination Subtemplates support the
substitution strings #PAGINATION_NEXT#, #PAGINATION_NEXT_SET#,
#PAGINATION_PREVIOUS# and #PAGINATION_PREVIOUS_SET#. Table 10–9
describes these templates.
10-36 Oracle Application Express Application Builder User’s Guide
Customizing Templates
Table 10–7
Pagination Subtemplate Attributes
Pagination Subtemplate Attribute
Description
Pagination Template
Applies to the entire pagination subtemplate. For
example:
<span class="instructiontext">#TEXT#</span>
You can use the substitution string #TEXT# to specify
where you want the pagination subtemplate to display.
Use the other Pagination Subtemplate attributes to
modify individual items.
Next Page Template
Enter HTML to modify how the Next Page portion of
the pagination subtemplate appears. For example:
<a href="#LINK#">next</a>
Previous Page Template
Enter HTML to modify how the Previous Page portion
of the pagination subtemplate appears. For example:
<a href="#LINK#">previous</a>
Next Set Template
Enter HTML to modify how the Next Set portion of the
pagination subtemplate appears. For example:
<a href="#LINK#">next set</a>
Previous Set Template
Enter HTML to modify how the Previous Set portion of
the pagination subtemplate appears. For example:
<a href="#LINK#">previous set</a>
Comments Use this attribute to record comments about this component.
Report Column Template Attributes for Named Column Templates
This section describes specific sections of the Edit Report Template page for Named
Column Templates. You can access the sections of the page by either scrolling down
the page, or by clicking a navigation button at the top of the page. Note that when you
select a button at the top of the page, the selected section appears and all other sections
are temporarily hidden. To view all sections of the page, click Show All.
Name Template Name identifies the name of the template. Template Type indicates
the type of template. Named Column templates reference column names in the
template. Generic Column Templates reference the #COLUMN_VALUE# substitution
string in the template.
Theme indicates the theme to which the template is a member. Use the Translatable
check box to indicate the template contains text strings that require translation.
Template Class identifies a specific use for the template. When you switch to a new
theme, all templates in one theme are mapped to corresponding templates in another
theme. Application Builder accomplishes this template mapping through the
assignment of a template class.
Subscription Use Subscription to apply an existing template to the current application.
When you select an existing template, you become a subscriber to that template.
To load a new copy of a master template, click Refresh.
Managing Themes and Templates
10-37
Customizing Templates
Row Templates Row templates define the look of each column. You can define up to
four row templates, each of which can be conditional.
In each Row Template, you define the look of each row. Row Templates support the
substitution strings described in Table 10–8.
Table 10–8
Row Template Substitution Strings
Substitution String
Description
#ALIGNMENT#
Determines the row alignment. Specified by the user.
#COLCOUNT#
Defines the count of the number of columns.
#COLNUM#
Defines the current column number.
#COLUMN_HEADER#
Defines the column header.
#COLUMN_VALUE#
Replaced with the value of the column.
#ROWNUM#
Specifies the current row number.
By creating conditions, you can create a report that displays rows differently
depending on whether the specified condition is met. To specify a row template be
used conditionally, select a condition type from the Column Template Condition list.
Valid values include:
■
Use Based on PL/SQL Expression. Conditionally formats columns based on data
in that row.
■
Use for Even Numbered Rows. Conditionally formats even numbered rows.
■
Use for Odd Numbered Rows. Conditionally formats odd numbered rows.
If you select Use Based on PL/SQL Expression, the next step is to enter a PL/SQL
expression in the Column Template Expression field. For example, the following
expression displays a value in bold if the value is greater than 2000:
#SAL# > 2000
Note that you could also use the substitution string #ROWNUM#. For example:
#ROWNUM# > 2000
Column Headings Use this template to add color to each column header cell. The text of
this attribute must include help to indicate where the cell heading text should be
colorized. If you do not enter a Column Heading Template, then a default column
header template is applied. If you do not want any column headings, then enter OMIT.
For example:
<th #ALIGNMENT#>#COLUMN_HEADER#</th>
Before first and after last row text In Before Rows, enter HTML that displays once at the
beginning of a report template. Opening an HTML table is a common use of this
attribute, as shown in the following example:
<table>
You can identify column headers using the syntax #1#, #2#, #3#. For example:
<th>#1#</th><th>#2#</th><th>#3#</th>
10-38 Oracle Application Express Application Builder User’s Guide
Customizing Templates
You can include pagination above a report by including the substitution string #TOP_
PAGINATION#. This substitution string generates HTML that starts with an opening
<tr> tag and ends with a closing </tr> tag. For example, to include an open table tag
and #TOP_PAGINATION# substitution string, you would enter the following:
<table>#TOP_PAGINATION#
You can also include the substitution string #CSV_LINK# to include support for
exporting your report to CSV format, a format compatible with most spreadsheet
programs.
Use After Rows to specify text that should display after the last row. A common use of
this attribute is to close the HTML table tag. For example:
</table>
The After Rows attribute supports the following substitution strings:
■
#PAGINATION#
Replaced with a pagination attribute.
■
#COLCOUNT#
Substituted at run time with the number of columns defined in the report.
Pagination The Pagination section contains attributes for editing the Pagination
Template, Next Page Template, Previous Page Template, Next Set Template, and
Previous Template. Pagination Subtemplates support the substitution strings
#PAGINATION_NEXT#, #PAGINATION_NEXT_SET#, #PAGINATION_PREVIOUS# and
#PAGINATION_PREVIOUS_SET#. Table 10–9 describes these templates.
Table 10–9
Pagination Subtemplate Attributes
Pagination Subtemplate Attribute
Description
Pagination Template
Applies to the entire pagination subtemplate. For
example:
<span class="instructiontext">#TEXT#</span>
You can use the substitution string #TEXT# to specify
where you want the pagination subtemplate to display.
Use the other Pagination Subtemplate attributes to
modify individual items.
Next Page Template
Enter HTML to modify how the Next Page portion of
the pagination subtemplate appears. For example:
<a href="#LINK#">next</a>
Previous Page Template
Enter HTML to modify how the Previous Page portion
of the pagination subtemplate appears. For example:
<a href="#LINK#">previous</a>
Next Set Template
Enter HTML to modify how the Next Set portion of the
pagination subtemplate appears. For example:
<a href="#LINK#">next set</a>
Managing Themes and Templates
10-39
Using Custom Cascading Style Sheets
Table 10–9 (Cont.) Pagination Subtemplate Attributes
Pagination Subtemplate Attribute
Description
Previous Set Template
Enter HTML to modify how the Previous Set portion of
the pagination subtemplate appears. For example:
<a href="#LINK#">previous set</a>
Comments Use this attribute to record comments about this component.
About Using JavaScript in Column Templates
You can conditionally display HTML depending upon values in the database using
JavaScript. The following example displays an HTML row only if the GROUP_DESC
query column is not null:
<script language="javascript">
IF ( "#GROUP_DESC#" != "" )
document.writeln( "<TR>;
<TD BGCOLOR=#336699>;</TD>
</TR>
</TR>
<TD>#GROUP_DESC#</TD>
</TR>" );
</TR>" );
See Also:
■
■
Online Help for information about using specific sections of the
Edit Report Template page
"Understanding Regions" on page 9-2
Using Custom Cascading Style Sheets
A cascading style sheet (CSS) provides a way to control the style of a Web page
without changing its structure. When used properly, a CSS separates visual attributes
such as color, margins, and fonts from the structure of the HTML document. Oracle
Application Express includes themes that contain templates that reference their own
CSS. The style rules defined in each CSS for a particular theme also determine the way
reports and regions display.
Topics in this section include:
■
Uploading Cascading Style Sheets
■
Referencing an Uploaded Cascading Style Sheet in the Page Template
See Also:
"Using the CSS Finder" on page 7-95
Uploading Cascading Style Sheets
You upload cascading style sheets to your workspace using the Cascading Style Sheet
Repository. Uploaded cascading style sheets (CSS) are available to any application
created in your workspace. The cascading style sheets are written to the file system, so
you can reference them in your HTML source code.
To upload cascading style sheets:
10-40 Oracle Application Express Application Builder User’s Guide
Using Custom Cascading Style Sheets
1.
On the Workspace home page, click the Application Builder icon.
2.
Select an application.
3.
Click Shared Components.
The Shared Components page appears.
4.
Under Files, select Cascading Style Sheets.
The Cascading Style Sheet page appears.
5.
From the View list, select Details. See "About the Cascading Style Sheets Page" on
page 10-41.
6.
To upload a CSS, click Create and follow the on-screen instructions.
7.
To edit an existing CSS, select the CSS name.
8.
To download an existing CSS, click the Download icon.
About the Cascading Style Sheets Page
Once you upload a CSS to the CSS Repository, you control how the page displays by
making a selection from the View list. Available options include:
■
■
Icons (the default) displays each CSS as a large icon. To edit a CSS, click the
appropriate icon.
Details displays each CSS as a line in a report. To edit a CSS, click the appropriate
name.
Referencing an Uploaded Cascading Style Sheet in the Page Template
You can reference an uploaded cascading style sheet within the Header section of the
page template. You use the Header section to enter the HTML that makes up the
<HEAD> section of the HTML document.
To reference an uploaded cascading style sheet:
1.
On the Workspace home page, click the Application Builder icon.
2.
Select an application.
3.
Click Shared Components.
4.
Under User Interface, select Themes.
The Themes page appears.
5.
On the Tasks list, click View Templates.
6.
Select the name of the page template you want to edit.
7.
Use a <link> tag within the head section to reference the appropriate style sheet.
To reference an uploaded file that is associated with a specific application, you
would use the substitution string #APP_IMAGES#. For example:
<html>
<head>
<title>#TITLE#</title>
#HEAD#
<link rel="stylesheet" href="#APP_IMAGES#sample2.css" type="text/css">
</head>
...
Managing Themes and Templates
10-41
Using Custom Cascading Style Sheets
To reference an uploaded file that is associated with a specific workspace, you
would use the substitution string #WORKSPACE_IMAGES#. For example:
<html>
<head>
<title>#TITLE#</title>
#HEAD#
<link rel="stylesheet" href="#WORKSPACE_IMAGES#sample3.css"
type="text/css">
</head>
...
"Uploading Cascading Style Sheets" on page 10-40,
"Creating a New Template" on page 10-14, "Managing Templates" on
page 10-15, "Page Templates" on page 10-25, "APP_IMAGES" on
page 3-17, and "WORKSPACE_IMAGES" on page 3-25
See Also:
10-42 Oracle Application Express Application Builder User’s Guide
11
Managing User Interface Defaults
User interface defaults enable you to assign default user interface properties to a table,
column, or view within a specified schema. When you create a form or report using a
wizard, the wizard uses this information to create default values for region and item
properties. Utilizing user interface defaults can save valuable development time and
has the added benefit of providing consistency across multiple pages in an application.
Because user interface defaults are associated with a table, you can use them with
applications created using the form and report wizards.
This section contains the following topics:
■
Viewing Tables or Views Utilizing User Interface Defaults
■
Editing Column Attributes
■
Comparing User Interface Defaults Across Applications
■
About Exporting and Importing User Interface Defaults
See Also: "Leveraging Application Models and User Interface
Defaults" on page 6-5
Viewing Tables or Views Utilizing User Interface Defaults
You can view tables or views utilizing user interface defaults by either navigating to
the User Interface Defaults page or viewing the UI Defaults report in Object Browser.
Topics in this section include:
■
Creating to User Interface Defaults
■
Viewing the UI Defaults Report in Object Browser
See Also: "Managing Database Objects with Object Browser" in
Oracle Application Express SQL Workshop and Utilities Guide.
Creating to User Interface Defaults
To create user interface defaults:
1.
On the Workspace home page, click the Application Builder icon.
Application Builder home page appears.
2.
Select an application.
3.
On the Application, click Shared Components.
The Shared Components page appears.
Managing User Interface Defaults 11-1
Viewing Tables or Views Utilizing User Interface Defaults
4.
Under User Interface, select User Interface Defaults.
The User Interface Defaults page appears.
The current schema displays to the right of the breadcrumb menu.
5.
To narrow the display, use the following controls at the top of the page and click
Go:
■
■
Display - Determines the types of tables to display.
■
View - Make a selection to filter the view:
■
6.
Table/View - Enter a case insensitive query for a table or view name within
the current schema.
–
Icons (default) displays each table or view as a large icon.
–
Details displays each table or view as a line in a report, identifying the
table or view name, the object type, and whether user interface defaults
currently exist.
Display determines the number of items that display in the report.
Select a specific table or view by selecting the name.
The Table Defaults page appears.
7.
If no user interface defaults exist, click Create User Interface Defaults.
Tip: You can also access the User Interface Defaults page by clicking
User Interface Defaults on the Tasks list on either the Application
Builder home or Applications home pages. See "About the
Application Builder Home Page" on page 4-2 and "About the
Application Home Page" on page 4-4.
Viewing the UI Defaults Report in Object Browser
To view the User Interface Details Report in Object Browser:
1.
On the Workspace home page, click SQL Workshop and then Object Browser.
Object Browser appears.
2.
From the Object list, select either Tables or Views.
3.
From the Object Selection pane, select an object.
4.
Select the UI Defaults tab.
The User Interface Defaults report appears displaying the following information:
■
■
Label - Specifies the default label text for items in a form and the heading for
columns in reports.
■
Report Sequence - Specifies the sequence of items in a report.
■
Report Display - Specifies how the column should be displayed in a report.
■
5.
Column Name - Indicates the name of the column.
Tabular Form Display - Specifies how an item should display in a tabular
form.
■
Form Sequence - Specifies the sequence of items in a form.
■
Form Display - Specifies how items in a form display.
To edit the user interface defaults, click Edit.
11-2 Oracle Application Express Application Builder User’s Guide
Editing Column Attributes
The Table Defaults page appears.
6.
If no user interface defaults exist, click Create Defaults.
Editing Column Attributes
You define user interface defaults for a specific column by editing column attributes.
To edit column attributes:
1.
Navigate to the Table Defaults page:
a.
On the Workspace home page, click the Application Builder icon.
b.
Select an application.
c.
On the Application, click Shared Components.
d.
Under User Interface, select User Interface Defaults.
The User Interface Defaults page appears.
e.
Select a specific table or view by selecting the name.
The Table Defaults page appears.
The following information displays at the top of the Table Defaults page:
■
■
Table/View Name identifies the name of the selected table or view.
Report Region Title and Form Region Title become the default title for all
report or form regions. These names are modified versions of Table/View
Name in which the first letter is capitalized and any underscores are replaced
with spaces.
Column-level User Interface Defaults appear next. By default, a short report
displays.
2.
To view a complete report, click Detailed Report.
3.
To edit select attributes for all displayed columns:
4.
a.
Click Grid Edit.
b.
Edit the appropriate attributes and click Apply Changes.
To edit a specific column, select the column name.
The column defaults appear. Column defaults are divided into two pages:
■
Column Definition
■
List of Values
The topics that follow describe how to edit specific attributes on these pages.
About the Column Definition
Column Definition is the default page that displays when you edit column attributes.
The top of the page displays the selected schema, table or view name, and column
name. Click View Database Column Definition to view details about a specific
column.
Label Default
This attribute is used in report and forms. Use Label to specify default label text for
items in a form and the heading for columns in reports.
Managing User Interface Defaults 11-3
Editing Column Attributes
Report Defaults
Available attributes include:
■
■
■
■
■
■
■
■
Display - Indicates if the column displays in a report. The default is Yes.
Display Sequence - Specifies the display sequence of items in a report. The default
value is based on the column ID, which is based on the order of the columns in the
table.
Display As - Specifies how the column should be displayed in a report.
Mask - Indicates if a mask should be applied against the data. This attribute is not
applicable for character- based items.
Alignment - Specifies report alignment (left, center, or right). If the column is a
number, the default is Right. Otherwise, the default is Left.
Searchable - Indicates whether the column should be searchable in reports. If the
column is VARCHAR2 or CHAR, the default is Yes. If not, the default is No.
Group By - Indicates whether the column should be used for Group By and then
the sequence of the grouping. The default is Yes.
Aggregate By - Indicates whether the column should be used for aggregation in
reports and charts.
Tabular Form Default
Use Display As to specify how an item should display in a tabular form.
Form Defaults
Available attributes include:
■
■
■
■
Display - Indicates if the column displays in a form. The default is Yes.
Display Sequence - Specifies the sequence of items in a form. The default is based
on the column ID, which is based on the order of the columns in the table.
Display As - Indicates how items in a form display. The default selection is Text
Field.
Mask - Indicates if a mask should be applied against the data in a form. Not used
for character-based items.
■
Default Value - Specifies the default value associated with this column.
■
Width - Specifies the display width.
■
■
■
■
maxWidth - Specifies the maximum string length a user is allowed to enter in this
item.
Height - Specifies the display height of an item.
Required - Used to generate a validation in which the resulting item must not be
null. If resulting item is not null, select Yes.
Help Text - Becomes Item help. By default, this text is pulled from the column hint
(if applicable).
About List of Values
You access the List of Values page by clicking the List of Values tab. The top of the
page displays the selected schema, table or view name, and column name. Click View
Database Column Definition to view details about a specific column.
11-4 Oracle Application Express Application Builder User’s Guide
Comparing User Interface Defaults Across Applications
Use the List of Values Type list to specify if the selected column will include a static or
dynamic list of values. Once you select the type, you are prompted to enter either
display value and return value pairs, or a list of values query.
About the Database Column Definition Report
You can view details about a specific column by accessing the Column Definition
report. The Column Definition report displays the schema, table name, column name,
data type, data length, and nullable as well as any check constraints, primary and
unique keys, and foreign keys that reference the column. A link to this report appears
on both the Column Definition and List of Values pages.
To view the Column Definition report:
1.
Navigate to the Table Defaults page:
a.
On the Workspace home page, click the Application Builder icon.
b.
Select an application.
c.
On the Application, click Shared Components.
d.
Under User Interface, select User Interface Defaults.
The User Interface Defaults page appears.
e.
Select a specific table or view by selecting the name.
The Table Defaults page appears.
2.
Select the column name.
3.
Under Schema and Table, click the View Database Column Definition link.
Comparing User Interface Defaults Across Applications
Use the Compare Defaults report to monitor consistency in user interface design across
all pages in a single application or multiple applications. Running the Compare
Defaults report compares currently defined user interface defaults (or column
attributes) against the item attributes set for forms, reports, and tabular forms.
See Also:
"Editing Column Attributes" on page 11-3
To run the Compare Defaults report:
1.
On the Workspace home page, click the Application Builder icon.
2.
Select an application.
3.
On the Application home page, click Shared Components.
The Shared Components page appears.
4.
Under User Interface, select User Interface Defaults.
The User Interface Defaults page appears.
5.
On the Tasks list, click Comparison Report.
The current schema displays to the right of the breadcrumb menu.
6.
Make sections from the following lists and click Go:
a.
Table/View - Restricts the comparison to the selected table or view.
Managing User Interface Defaults 11-5
About Exporting and Importing User Interface Defaults
b.
7.
Column - Select a column in which to search for form, reports, and tabular
forms.
Optionally, make sections from the following lists and click Go.
■
Display - Select an attribute category.
■
Application - Select an application.
A report appears containing the following sections:
■
Form Pages Referencing the Selected Column
■
Report Regions Referencing the Selected Column
■
Tabular Form Regions Referencing the Selected Column
About Exporting and Importing User Interface Defaults
You export user interface defaults in the same way you export any related application
file. Exporting user interface defaults from one development instance to another
involves the following steps:
1.
Export the user interface defaults using the Export User Interface Defaults utility.
See "Exporting User Interface Defaults" on page 14-19.
2.
Import the exported file into the target Oracle Application Express instance. See
"Importing User Interface Defaults" on page 14-25.
3.
Install the exported file from Export Repository. See "Installing Export Files" on
page 14-25.
When you export user interface defaults, all user interface defaults for the selected
schema are exported to a single script. The file contains an API call to create table hints
by making calls to the application PL/SQL API. You can use this file to import user
interface defaults to another database and Oracle Application Express instance.
11-6 Oracle Application Express Application Builder User’s Guide
12
Debugging an Application
This section describes approaches to debugging an application including viewing
Debug Mode, enabling SQL tracing, and viewing page reports. It also describes how to
manually remove a control or a component to isolate a problem.
This section contains the following topics:
■
About Tuning Performance
■
Reviewing Session State
■
Accessing Debug Mode
■
Enabling SQL Tracing and Using TKPROF
■
Monitoring Application and Page Resource Use
■
Viewing Reports
■
Debugging Problematic SQL Queries
■
Removing Controls and Components to Isolate a Problem
See Also: "Application Builder Concepts" on page 3-1 and "Using
Application Builder" on page 4-1
About Tuning Performance
For applications having a large number of concurrent users, maintaining optimal
performance is critical. To optimize your application's performance, remember to
utilize the following features:
■
■
Use bind variables within your application whenever possible. You can reference
session state values using bind variable syntax in SQL queries and application
logic such as PL/SQL executed from processes and validations. Accessing session
state using bind variables is the most efficient way to reference session state.
Include a #TIMING# substitution string in the region footer so that you can view
the timing of each region.
See Also:
■
"About Bind Variable Syntax" on page 3-14
■
"Understanding Substitution Strings" on page 3-15
Debugging an Application 12-1
Reviewing Session State
Reviewing Session State
Many applications are based on data contained within application controls. For
example, buttons can display conditionally based on a value stored in session state.
You can view current session state for your application by clicking the Session link on
the Developer Toolbar.
"About the Developer Toolbar" on page 5-28, "Viewing
Session State" on page 3-5, "Managing Session State Values" on
page 3-11, and "Managing Session State and User Preferences" in
Oracle Application Express Administration Guide
See Also:
Accessing Debug Mode
Viewing a page in Debug Mode enables you to track what the Application Express
engine is doing as it renders a page. You access Debug mode by clicking the Debug
link in the Developer Toolbar.
See Also:
"About the Developer Toolbar" on page 5-28
Debug Mode displays time codes that correspond to specific Application Express
engine actions. This can be useful to determine when the engine is setting session
state. The Debug view also shows additional details about item names and
computation and processing points. To exit Debug mode, click No Debug on the
Developer Toolbar.
You can also use f?p syntax to run an application in Debug mode. Simply call the
page and set the Debug argument to YES. For example:
f?p=100:1:&APP_SESSION.::YES
See Also:
"Using f?p Syntax to Link Pages" on page 3-7
Enabling SQL Tracing and Using TKPROF
Tracing your session can be a very effective way to debug an application. From a
database perspective, each page request is a single database session. If you enable SQL
tracing, then Oracle Application Express creates a temporary file you can then analyze
using the TKPROF utility.
You enable SQL tracing in Oracle Application Express by using f?p syntax to set the
argument p_trace=YES. For example, to trace the display of page 1 in application
100, you would use the syntax:
http:/.../f?p=100:1&p_trace=YES
To use the TKPROF utility:
1.
Log in to SQL*Plus as a privileged user.
2.
Execute the following statement:
show parameter USER_DUMP_DEST
3.
Navigate to the directory in which the trace file is created.
4.
Run the TKPROF utility from the operating system prompt using the following
syntax:
tkprof filename1 filename2 [waits=yes|no] [sort=option] [print=n]
12-2 Oracle Application Express Application Builder User’s Guide
Viewing Reports
[aggregate=yes|no] [insert=filename3] [sys=yes|no] [table=schema.table]
[explain=user/password] [record=filename4] [width=n]
The input and output files are the only required arguments.
5.
To view online Help, invoke TKPROF without arguments.
See Also: "Using Application Tracing Tools" in Oracle Database
Performance Tuning Guide for information about using the TKPROF
program
Monitoring Application and Page Resource Use
Oracle Application Express facilitates the monitoring of resources used by applications
and pages by calling the package DBMS_APPLICATION_INFO. Whenever the
Application Express engine renders or processes a page, the module is set to APEX and
includes the application ID and page number. Once set, you can query the V$SESSION
and V$SQLAREA views to monitor transactions.
Viewing Reports
When isolating an issue within a page, it is important to clearly understand the
functions it is performing. To accomplish this goal, Application Builder includes a
number of page and application reports.
Viewing Page Reports
To view page reports:
1.
Navigate to the appropriate Page Definition. See "Accessing a Page Definition" on
page 5-2.
2.
Click one of the following buttons at the top of the Page Definition:
■
■
■
Events links to a report that details currently defined page controls and
processes. See "About Page Events" on page 5-5.
Objects displays a list of database objects referenced by the current page. See
"About Database Object Dependencies" on page 5-5.
History displays a history of recently changed pages. See "About History" on
page 5-5.
See Also:
"Using the View List on the Page Definition" on page 5-4
Viewing Application Reports
To view application reports:
1.
On the Workspace home page, click the Application Builder icon.
2.
Select an application.
3.
On the Tasks list, click Application Reports.
4.
Select the type of reports to view:
■
Shared Components reports offer information on common elements that can
display on every page within an application. Reports are grouped by category
including Logic, Navigation, Security, User Interface, Globalization, and Files.
Report examples include Application Items, Computations, Breadcrumb
Entries, Authentication Schemes, and Shortcuts.
Debugging an Application 12-3
Debugging Problematic SQL Queries
■
■
■
Page Components reports offer detailed information on controls and logic that
execute when the page is rendered (for example, branches, buttons,
computations, items, and regions).
Activity Reports offer details about developer activity within the current
application. Available reports include Changes by Developer, Changes by
Developer by Day, Chart of Changes by Developer, Page Performance, and
Recent Changes.
Cross Application Reports offer information that apply to multiple
applications. Available reports include Application Attributes, Application
Comments, Build Options, Build Status and Application Status, Page
Component Counts, Security Profiles, Authentication Schemes, and Template
Defaults by Application.
See Also: "About the Database Object Dependencies Report" on
page 6-30 and "About the Search Region Source Report" on page 6-31
Debugging Problematic SQL Queries
If your query does not seem to be running correctly, try running it in SQL*Plus, SQL
Developer, or in SQL Commands. Any of these approaches will test your query
outside the context of your application, making it easier to determine what the
problem is.
Removing Controls and Components to Isolate a Problem
If you have problems running a page, try removing controls and components one at a
time. Using this approach, you can quickly determine which control or component
may be the source of your problem. You can disable a control or component by
selecting the Condition attribute Never.
To remove a control or component using conditional attributes:
1.
Navigate to the appropriate Page Definition. See "Accessing a Page Definition" on
page 5-2.
2.
Select the name of the control or component you want to disable.
The appropriate attributes page appears.
3.
Scroll down to Condition Type and select Never from the Condition Type list.
4.
Click Apply Changes and return to the Page Definition.
5.
Try running the page again.
6.
Continue to remove controls or components until the page runs correctly.
"Accessing a Page Definition" on page 5-2, "Editing
Page Attributes" on page 5-23, "Understanding Conditional
Rendering and Processing" on page 3-2, and "Running a Page or
Application" on page 6-14
See Also:
12-4 Oracle Application Express Application Builder User’s Guide
13
Managing Application Security
This section describes how to implement security best practices for Oracle Application
Express. Administrators are primarily responsible for ensuring the security of the
Oracle Application Express installation, while developers are responsible for building
secure applications.
This section contains the following topics:
■
Understanding Administrator Security Best Practices
■
Understanding Developer Security Best Practices
■
Securing File Uploads
■
Establishing User Identity Through Authentication
■
Providing Security Through Authorization
See Also: "Application Builder Concepts" on page 3-1 and "Using
Application Builder" on page 4-1
Understanding Administrator Security Best Practices
This section describes security best practices for Oracle Application Express
administrators.
Topics in this section include:
■
■
Security Considerations When Using the Embedded PL/SQL Gateway
About Configuring Oracle HTTP Server with mod_plsql for Oracle Application
Express
■
Utilizing Secure Sockets Layer (SSL)
■
Integrating with Oracle BI Publisher
■
About Setting Password Complexity Rules
■
Advantages of the Oracle Application Express Runtime Environment
■
Understanding Session Timeout
■
Enabling Network Services in Oracle Database 11g
■
Enabling Indexing of Online Help in Oracle Database 11gR2 and Higher
Security Considerations When Using the Embedded PL/SQL Gateway
The embedded PL/SQL gateway runs in the database as part of the XML DB HTTP
Protocol Listener. The XML DB HTTP Protocol Listener and embedded PL/SQL
Managing Application Security 13-1
Understanding Administrator Security Best Practices
gateway provides the equivalent core features of Oracle HTTP Server and mod_
plsql. Because the HTTP Listener runs in the same database where Oracle
Application Express is installed, it is not possible to separate the HTTP listener from
the database. For this reason, it is not recommended to use the embedded PL/SQL
gateway for applications that run on the Internet. Additionally, the embedded PL/SQL
gateway does not provide the same flexibility of configuration and detailed logging as
Oracle HTTP Server with mod_plsql.
About Configuring Oracle HTTP Server with mod_plsql for Oracle Application Express
Oracle HTTP Server uses the mod_plsql plug-in to communicate with the Oracle
Application Express engine within the Oracle database. mod_plsql functions act as a
communication broker between the Web server and the Oracle Application Express
engine in the Oracle database.
Each mod_plsql request is associated with a set of configuration values used to
access the database called a Database Access Descriptor (DAD). mod_plsql provides
a DAD parameter called PlsqlRequestValidationFunction which enables you
to allow or disallow further processing of a requested procedure. You can utilize this
parameter to implement tighter security for your PL/SQL application by blocking
package and procedure calls which should not be allowed to run from the DAD.
Oracle recommends a DAD configuration for Oracle Application Express which
utilizes the PlsqlRequestValidationFunction directive with a value of wwv_
flow_epg_include_modules.authorize.
The purpose of the PlsqlRequestValidationFunction parameter is to control
which procedures can be invoked through mod_plsql. By default, the only
procedures permitted are the public entry points of Oracle Application Express. This
can be extended using the validation functions shipped with Oracle Application
Express. To learn more, see "Restricting Access to Oracle Application Express" in
Oracle Application Express Administration Guide.
Utilizing Secure Sockets Layer (SSL)
Secure Sockets Layer (SSL) is a protocol for managing the security of data transmitted
on the Internet. For Web applications, SSL is implemented by using the HTTPS
protocol. Oracle recommends that you run Oracle Application Express applications
using SSL (HTTPS protocol) to prevent any sensitive data from being sent over an
unencrypted (cleartext) communication channel.
You can configure both your Oracle Application Express instance and all related
applications to require HTTPS by setting the Require HTTPS attribute to Yes on the on
the Manage Service page in Oracle Application Express Administration Services.
Setting the Require HTTPS attribute to Yes and logging out prevents anyone from
logging in to Oracle Application Express Administration Services and from logging
into an Oracle Application Express workspace as a developer or administrator unless
the protocol in use is HTTPS.
See Also: "Requiring HTTPS" in Oracle Application Express
Administration Guide
Integrating with Oracle BI Publisher
Oracle recommends that you employ Secure Sockets Layer (SSL) when integrating
Oracle Application Express with Oracle BI Publisher. Once SSL (HTTPS protocol) is
configured for your Oracle BI Publisher server, you must create a wallet and specify
13-2 Oracle Application Express Application Builder User's Guide
Understanding Administrator Security Best Practices
the HTTPS protocol for the Report Server in the internal administration Environment
Settings.
See Also: "Configuring Wallet Information" and "Configuring
Report Printing" in Oracle Application Express Administration Guide
About Setting Password Complexity Rules
Workspace administrators and developers can create user accounts for the purpose of
logging in to the Oracle Application Express development environment and for
end-user authentication to applications developed within their workspaces. The
Oracle Application Express administrator can create password complexity rules, or a
policy, for the passwords of these accounts. These rules apply to all accounts in the
installation, across all workspaces.
The following are example password complexity policies:
All passwords must:
■
Contain at least one upper-case character
■
Contain at least one numeric digit
■
Must be at least six characters long
Note that many other variations are possible. Oracle recommends administrators
establish a password complexity policy for each Oracle Application Express instance.
To learn more, see "Enabling Login Controls for All Workspaces," "About Password
Policies," and "Enabling Login Controls for a Workspace" in Oracle Application Express
Administration Guide.
Restricting Password Reuse
Site administrators can restrict password reuse for all administrator, developer, and
end-user accounts based on a history of passwords previously used for the accounts.
To restrict password reuse:
1.
Start SQL*Plus and connect to the database where Oracle Application Express is
installed having the apex_administrator_role role or as SYS specifying the
SYSDBA role. For example:
■
On Windows:
SYSTEM_DRIVE:\ sqlplus /nolog
SQL> CONNECT SYS as SYSDBA
Enter password: SYS_password
■
On UNIX and Linux:
$ sqlplus /nolog
SQL> CONNECT SYS as SYSDBA
Enter password: SYS_password
2.
Execute the following statement:
ALTER SESSION SET CURRENT_SCHEMA = APEX_030200;
3.
Execute the following statement:
BEGIN
APEX_INSTANCE_ADMIN.SET_PARAMETER('PASSWORD_HISTORY_DAYS',365);
COMMIT;
Managing Application Security 13-3
Understanding Administrator Security Best Practices
END;
/
This will restrict new or updated passwords to those that have not been used for
the account for the previous 365 days. Recording of previously used passwords
(actually, hashed representations of passwords) begins upon installation of Oracle
Application Express 3.2.
4.
To disable this feature, run the block above, providing 0 for the parameter value.
For example:
BEGIN
APEX_INSTANCE_ADMIN.SET_PARAMETER('PASSWORD_HISTORY_DAYS',0);
COMMIT;
END;
/
Tip: Developers can also use the APEX_UTIL.STRONG_PASSWORD_
CHECK procedure and the APEX_UTIL.STRONG_PASSWORD_
VALIDATION function described in Oracle Application Express API
Reference.
Advantages of the Oracle Application Express Runtime Environment
An Oracle Application Express runtime environment enables you to run production
applications, but it does not provide a Web interface for administration or direct
development of these applications
Oracle recommends that you run any sensitive production Oracle Application Express
applications with a runtime installation of Oracle Application Express. A runtime
installation does not expose the Web-based application development environment,
thus preventing the use of Application Builder, SQL Workshop, and related utilities on
a production installation. Additionally, a runtime environment only includes the
Oracle Application Express database objects and privileges necessary to run
applications, making it a more hardened environment.
See Also: "Managing a Runtime Environment" in Oracle Application
Express Administration Guide
Understanding Session Timeout
By configuring Session Timeout attributes, you can reduce your application's
exposure. Users often leave their computers unattended for extended periods and do
not close applications before departing. Therefore, an unauthorized person can easily
assume the user’s identity within the application. By setting the session and idle
timeout, users are automatically logged out of their application after the specified
timeout.
Session Timeout attributes include:
■
Maximum Session Length in Seconds
■
Session Timeout URL
■
Maximum Session Idle Time in Seconds
■
Idle Timeout URL
To learn more about configuring these attributes at an application-level, see "Session
Timeout" on page 4-18. To learn more about configuring these attributes for an entire
13-4 Oracle Application Express Application Builder User's Guide
Understanding Administrator Security Best Practices
Oracle Application Express instance, see "Configuring Session Timeout" in Oracle
Application Express Administration Guide.
Enabling Network Services in Oracle Database 11g
By default, the ability to interact with network services is disabled in Oracle Database
11g release 1 (11.1). Therefore, if you are running Oracle Application Express with
Oracle Database 11g release 1 (11.1), you must use the new DBMS_NETWORK_ACL_
ADMIN package to grant connect privileges to any host for the APEX_030200 database
user. Failing to grant these privileges results in issues with:
■
Sending outbound mail in Oracle Application Express.
Users can call methods from the APEX_MAIL package, but issues arise when
sending outbound email.
■
Using Web services in Oracle Application Express.
■
PDF/report printing.
■
Searching for content in online Help (that is, using the Find link).
Topics in this section include:
■
Granting Connect Privileges to a Host
■
Granting Connect Privileges to a Local Host
■
Troubleshooting an Invalid ACL Error
Tip: To run the examples described in this section, the compatible
initialization parameter of the database must be set to at least
11.1.0.0.0. By default an 11g database will have the parameter set
properly, but a database upgraded to 11g from a prior version may
not. See "Creating and Configuring an Oracle Database" in Oracle
Database Administrator's Guide for information about changing
database initialization parameters.
Granting Connect Privileges to a Host
The following example demonstrates how to grant connect privileges to a host for the
APEX_030200 database user.
DECLARE
ACL_PATH VARCHAR2(4000);
ACL_ID
RAW(16);
BEGIN
-- Look for the ACL currently assigned to '*' and give APEX_030200
-- the "connect" privilege if APEX_030200 does not have the privilege yet.
SELECT ACL INTO ACL_PATH FROM DBA_NETWORK_ACLS
WHERE HOST = '*' AND LOWER_PORT IS NULL AND UPPER_PORT IS NULL;
-- Before checking the privilege, make sure that the ACL is valid
-- (for example, does not contain stale references to dropped users).
-- If it does, the following exception will be raised:
--- ORA-44416: Invalid ACL: Unresolved principal 'APEX_030200'
-- ORA-06512: at "XDB.DBMS_XDBZ", line ...
-SELECT SYS_OP_R2O(extractValue(P.RES, '/Resource/XMLRef')) INTO ACL_ID
FROM XDB.XDB$ACL A, PATH_VIEW P
WHERE extractValue(P.RES, '/Resource/XMLRef') = REF(A) AND
Managing Application Security 13-5
Understanding Administrator Security Best Practices
EQUALS_PATH(P.RES, ACL_PATH) = 1;
DBMS_XDBZ.ValidateACL(ACL_ID);
IF DBMS_NETWORK_ACL_ADMIN.CHECK_PRIVILEGE(ACL_PATH, 'APEX_030200',
'connect') IS NULL THEN
DBMS_NETWORK_ACL_ADMIN.ADD_PRIVILEGE(ACL_PATH,
'APEX_030200', TRUE, 'connect');
END IF;
EXCEPTION
-- When no ACL has been assigned to '*'.
WHEN NO_DATA_FOUND THEN
DBMS_NETWORK_ACL_ADMIN.CREATE_ACL('power_users.xml',
'ACL that lets power users to connect to everywhere',
'APEX_030200', TRUE, 'connect');
DBMS_NETWORK_ACL_ADMIN.ASSIGN_ACL('power_users.xml','*');
END;
/
COMMIT;
Granting Connect Privileges to a Local Host
The following example is a less privileged demonstration of how to access resources
on a local host. This example would enable indexing of Oracle Application Express
Online Help and could possibly enable email and PDF printing if those servers were
also on the local host.
DECLARE
ACL_PATH VARCHAR2(4000);
ACL_ID
RAW(16);
BEGIN
-- Look for the ACL currently
-- the "connect" privilege if
SELECT ACL INTO ACL_PATH FROM
WHERE HOST = 'localhost' AND
--------
assigned to 'localhost' and give APEX_030200
APEX_030200 does not have the privilege yet.
DBA_NETWORK_ACLS
LOWER_PORT IS NULL AND UPPER_PORT IS NULL;
Before checking the privilege, make sure that the ACL is valid
(for example, does not contain stale references to dropped users).
If it does, the following exception will be raised:
ORA-44416: Invalid ACL: Unresolved principal 'APEX_030200'
ORA-06512: at "XDB.DBMS_XDBZ", line ...
SELECT SYS_OP_R2O(extractValue(P.RES, '/Resource/XMLRef')) INTO ACL_ID
FROM XDB.XDB$ACL A, PATH_VIEW P
WHERE extractValue(P.RES, '/Resource/XMLRef') = REF(A) AND
EQUALS_PATH(P.RES, ACL_PATH) = 1;
DBMS_XDBZ.ValidateACL(ACL_ID);
IF DBMS_NETWORK_ACL_ADMIN.CHECK_PRIVILEGE(ACL_PATH, 'APEX_030200',
'connect') IS NULL THEN
DBMS_NETWORK_ACL_ADMIN.ADD_PRIVILEGE(ACL_PATH,
'APEX_030200', TRUE, 'connect');
END IF;
EXCEPTION
-- When no ACL has been assigned to 'localhost'.
WHEN NO_DATA_FOUND THEN
DBMS_NETWORK_ACL_ADMIN.CREATE_ACL('local-access-users.xml',
13-6 Oracle Application Express Application Builder User's Guide
Understanding Administrator Security Best Practices
'ACL that lets power users to connect to everywhere',
'APEX_030200', TRUE, 'connect');
DBMS_NETWORK_ACL_ADMIN.ASSIGN_ACL('local-access-users.xml','localhost');
END;
/
COMMIT;
Troubleshooting an Invalid ACL Error
If you receive an ORA-44416: Invalid ACL error after running the previous script,
use the following query to identify the invalid ACL:
REM Show the dangling references to dropped users in the ACL that is assigned
REM to '*'.
SELECT ACL, PRINCIPAL
FROM DBA_NETWORK_ACLS NACL, XDS_ACE ACE
WHERE HOST = '*' AND LOWER_PORT IS NULL AND UPPER_PORT IS NULL AND
NACL.ACLID = ACE.ACLID AND
NOT EXISTS (SELECT NULL FROM ALL_USERS WHERE USERNAME = PRINCIPAL);
Next, run the following code to fix the ACL:
DECLARE
ACL_ID
RAW(16);
CNT
NUMBER;
BEGIN
-- Look for the object ID of the ACL currently assigned to '*'
SELECT ACLID INTO ACL_ID FROM DBA_NETWORK_ACLS
WHERE HOST = '*' AND LOWER_PORT IS NULL AND UPPER_PORT IS NULL;
-- If just some users referenced in the ACL are invalid, remove just those
-- users in the ACL. Otherwise, drop the ACL completely.
SELECT COUNT(PRINCIPAL) INTO CNT FROM XDS_ACE
WHERE ACLID = ACL_ID AND
EXISTS (SELECT NULL FROM ALL_USERS WHERE USERNAME = PRINCIPAL);
IF (CNT > 0) THEN
FOR R IN (SELECT PRINCIPAL FROM XDS_ACE
WHERE ACLID = ACL_ID AND
NOT EXISTS (SELECT NULL FROM ALL_USERS
WHERE USERNAME = PRINCIPAL)) LOOP
UPDATE XDB.XDB$ACL
SET OBJECT_VALUE =
DELETEXML(OBJECT_VALUE,
'/ACL/ACE[PRINCIPAL="'||R.PRINCIPAL||'"]')
WHERE OBJECT_ID = ACL_ID;
END LOOP;
ELSE
DELETE FROM XDB.XDB$ACL WHERE OBJECT_ID = ACL_ID;
END IF;
END;
/
REM commit the changes.
COMMIT;
Managing Application Security 13-7
Understanding Administrator Security Best Practices
Once the ACL has been fixed, you must run the first script in this section to apply the
ACL to the APEX_030200 user. See "Granting Connect Privileges to a Host" on
page 13-5.
Enabling Indexing of Online Help in Oracle Database 11gR2 and Higher
The ability to search Oracle Application Express online Help is accomplished through
Oracle Text and a URL datastore. There is a change in the default behavior and
permissions to use an Oracle Text URL datastore in database 11gR2 and higher.
If users attempt to search Oracle Application Express online Help in Oracle database
11gR2 and encounter the following error, then the permission to use an Oracle Text
URL datastore has not been granted to database user APEX_030200.
ORA-29855: error occurred in the execution of ODCIINDEXCREATE routine
ORA-20000: Oracle Text error:
DRG-10758: index owner does not have the privilege to use file or URL datastore
To enable the indexing of online Help in Oracle Application Express, the permission to
use an Oracle Text URL datastore must be granted to the APEX_030200 database user.
This is accomplished by assigning this specific privilege to a datbase role and then
granting this role to the APEX_030200 database user.
To determine if the ability to use an Oracle Text URL datastore is already granted to a
database role:
1.
Start SQL*Plus and connect to the database where Oracle Application Express is
installed as SYS specifying the SYSDBA role. For example:
■
On Windows:
SYSTEM_DRIVE:\ sqlplus /nolog
SQL> CONNECT SYS as SYSDBA
Enter password: SYS_password
■
On UNIX and Linux:
$ sqlplus /nolog
SQL> CONNECT SYS as SYSDBA
Enter password: SYS_password
2.
Run the following command:
SELECT par_value FROM ctxsys.ctx_parameters WHERE par_name = 'FILE_ACCESS_
ROLE';
This returns either NULL or the database role which is granted the ability to use an
Oracle Text URL datastore.
3.
If no value is returned by step 2, then create a new database role as shown in the
following example:
CREATE ROLE APEX_URL_DATASTORE_ROLE;
4.
Grant this role to the database user APEX_030200 with the following statement:
GRANT APEX_URL_DATASTORE_ROLE to APEX_030200;
If step 2 returned a value, use this database role name instead of the example
APEX_URL_DATASTORE_ROLE.
13-8 Oracle Application Express Application Builder User's Guide
Understanding Developer Security Best Practices
5.
Lastly, if step 2 did not return a value, then use the Oracle Text API to grant
permission to the newly created database role with the following statement:
EXEC ctxsys.ctx_adm.set_parameter('file_access_role', 'APEX_URL_DATASTORE_
ROLE');
Understanding Developer Security Best Practices
This section describes security best practices for Oracle Application Express
developers.
Topics in this section include:
■
Understanding Items of Type Password
■
Identifying At Risk Password Items
■
About Using Zero as a Session ID
■
Understanding Cross-Site Scripting Protection
■
About Session State and Security
■
Understanding Session State Protection
Understanding Items of Type Password
Password items do not emit the text entered to the Web browser screen. When creating
items of type password, Oracle recommends using password item types that do not
save session state. This prevents the password from being saved in the database in the
session state tables.
Available password item types include:
■
■
■
■
Password - Suppresses text entered into the field. Saves the value in session state
when the page is submitted.
Password (submits when Enter pressed) - Suppresses text entered into the field
and submits the page when ENTER is pressed.
Password (does not save state) - Suppresses text entered into the field. Does not
save the value in session state.
Password (submits when Enter pressed, does not save state) - Suppresses text
entered into the filed and submits the page when Enter is pressed. Does not save
the value in session state.
The Password and Password (submits when Enter pressed) save the password in a
database table when the page is submitted. Use these password item types only when
the password is needed in session state for use by other pages during the session.
Password (does not save state) and Password (submits when Enter pressed, does not
save state) do not save the password in a database table. Use these password item
types when the submitted password value is used only by after-submit page
processing on the same page and is never needed again during the session.
If you must reference and retrieve the value of a password in your application then
you should set the Store value encrypted in session state attribute to Yes. To learn
more, see "About Session State and Security" on page 13-13.
See Also:
"About Item Types" on page 6-35
Managing Application Security 13-9
Understanding Developer Security Best Practices
Identifying At Risk Password Items
At risk password items are those that either:
■
Do not use one of the password item types that does not save session state
■
Store the value in session state un-encrypted
Use the Password Items, Security Profiles, and Password Items report to help identify
at risk password item:
To view reports that identify at risk password item types:
1.
Navigate to the Workspace home page.
2.
Click the Application Builder icon.
3.
Select an application.
The Application home page appears.
4.
On the Tasks list, click Application Reports.
5.
To view the Password Items report:
a.
Select Page Components.
b.
Under Items, click Password Items.
This report shows all of the password items within the application and
indicates if they use encryption and whethere they save state. Password items
that do neither are highlighted as At Risk.
6.
7.
To view the Security Profiles report:
a.
Select Cross Application.
b.
Under Items, click Password Items.
To view the Password Items report:
a.
Select Cross Application.
b.
Under Items, click Security Profiles.
Notice the At Risk Password Items column.
For pages that contain password items, set page attribute Form Auto Complete to Off.
Setting that attribute to Off prevents the Web browser from attempting to auto
complete items on the page. To learn more about this attribute, see Table 5–6 on
page 5-26.
About Using Zero as a Session ID
When users access Oracle Application Express application pages, numerous links
containing session IDs become visible in the Web browser's location window. If the
application is publicly accessible and the user communicates one of these links to
another application user, for example by using email or a messaging service, the
recipient can use the link and immediately begin sharing the original user's session.
This can have a negative effect on both users as they use the application and lead to
unpredictable, hard to reproduce screen behavior. To prevent this, Oracle recommends
the use of the Zero Session ID feature for all applications where users are not required
to provide login authentication. To learn more, see "Facilitating Bookmarks by Using
Zero as the Session ID" on page 3-9.
13-10 Oracle Application Express Application Builder User's Guide
Understanding Developer Security Best Practices
Understanding Cross-Site Scripting Protection
Cross site-scripting (also referred to as XSS) is a security breach that takes advantage of
dynamically generated Web pages. In a XSS attack, a Web application is sent a script
that activates when it is read by a user's browser. Once activated, these scripts can steal
data, even session credentials, and return the information to the attacker.
If malicious code were introduced into an Oracle Application Express application, it
could be rendered into HTML regions and other places within the application during
normal page rendering. To prevent the introduction of malicious code into session
state, the Application Express engine escapes characters in certain cases.
Topics in this section include:
■
Protecting HTML Regions and Other Static Areas
■
Protecting Dynamic Output
■
Protecting Report Regions
■
Protecting Form Items
Protecting HTML Regions and Other Static Areas
In HTML regions and other static display areas, you can reference session state using
the &ITEM. notation. Examples of static display areas include HTML regions, page
headers and footers, region headers and footers, region titles, button labels, help text,
form item labels and post-element text, templates, radiogroup (before and after field
text), event success messages, event error messages, navigation bar attributes,
application static substitution string values, chart labels and legends, breadcrumbs
and list framing text, and calendar text, labels, or legends.
About Safe Item Display Types When session state is referenced in this way, the value
emitted to the page will not have special characters (<, >, &, ") escaped if the
referenced item is one of the following safe item display types:
■
Display as Text (does not save state)
■
Display as Text (escape special characters, does not save state)
■
Display as Text (based on LOV, does not save state)
■
Display as Text (based on PL/SQL, does not save state)
■
Text Field (Disabled, does not save state)
■
Stop and Start HTML Table (Displays label only)
If the referenced item has a display type other than one of the above types, the value
emitted to the page will have special characters escaped. Although application-level
items are also considered to have a safe display type, they do not actually have display
properties like form items do.
See Also:
"Understanding Page-Level Items" on page 6-32
About the Rules Used to Determine Whether to Escape Values The Application Express
engine uses predefined smart escaping rules to determine if and when to escape
values fetched from session state.
The reason for these rules is that items that use the display types listed previously are
often for text containing HTML that is intended to be emitted to the browser without
being filtered (that is, escaped). The only way this can be made safe is by the
enforcement of the rule that these types of items are always escaped on input to the
Managing Application Security
13-11
Understanding Developer Security Best Practices
application. For example, if a user passes some text into a safe item using an Oracle
Application Express f?p URL syntax, the Application Express engine escapes special
characters when saving the value into session state. This has two intended results:
1.
If the value contained no special characters, the value passed in is saved into
session state exactly as it was provided.
2.
If the value contained special characters, those characters are escaped when the
value is saved into session state.
In either situation, the item can now safely be referenced using an &ITEM. notation in
any HTML region or other static area mentioned previously.
Using Safe Item Types to Hold and Emit HTML Markup You can use the safe item types listed
previously to hold and emit HTML markup to the browser. For example, suppose you
have a requirement to render some text in bold face by referencing a safe page item
named P1_XXX (using &P1_XXX.) The item P1_XXX is presumed to contain the
following HTML:
<b>ABABABAB</b>
You can achieve this by using application controls (computations, processes, item
source expressions, item default values, and so on) to store values into these safe
items. When values are introduced in this way, you ensure the safety of the content.
When you use these methods, the Application Express engine does not escape any
special characters when saving the values into session state.
Finally, the safety of safe items is ensured by a rule that prevents those items from
being posted on a page and submitted to the Application Express engine as part of a
page submission.
Protecting Dynamic Output
Items fetched from session state and rendered using htp.p or other methods should
be explicitly escaped by the code where it is appropriate to do so. For example,
suppose a PL/SQL dynamic content region on a page uses the following:
htp.p(v(‘SOME_ITEM’));
If the value of the item fetched from session state could contain unintended tags or
scripts, you might want to use the following in the region:
htp.p(htf.escape_sc(v(‘SOME_ITEM’)));
However, if you are confident that the fetched value is safe for rendering, you do not
need to escape the value. As a developer, you need to determine when it is appropriate
to not escape output.
As a best practice, follow this rule:
■
Never emit an item fetched from session state without escaping it unless the item
is one of the safe types described in "About Safe Item Display Types" on
page 13-11.
The reason for this is that as a developer, there is no way you can prevent a hacker
from posting a malicious value into a non-safe item. Even if your application does not
present these items visibly to ordinary users, be aware that a hacker can mount a XSS
attack using your application if you do not follow this rule.
13-12 Oracle Application Express Application Builder User's Guide
Understanding Developer Security Best Practices
Protecting Report Regions
The Application Express engine escapes data rendered in the body of a report.
References to session state in report headings and messages are fetched from session
state using the smart escaping rules so that the values of safe item types are not
escaped and the values of other item types are escaped.
Protecting Form Items
When form items, including hidden items, obtain their values during the generation of
the form page to be sent to the browser, the resulting text is escaped before rendering.
Some of the safe item types are exceptions to this rule in order to support the intended
behavior of each display type.
About Session State and Security
Oracle Application Express persists session state in database tables. Session state is
preserved in database tables because it is more secure to store the session state on the
server side than on the client. Because Oracle Application Express applications use the
stateless HTTP protocol, an application's session state across multiple page views is
preserved in database tables. Not maintaining a synchronous database connection for
each Oracle Application Express application user significantly lessens memory and
database resource requirements.
Developers can query the session state stored by Oracle Application Express
applications using the Application Builder and built-in monitoring pages. Developers
and administrators can access session state for any application in the workspace to
which they are authenticated.
A few best practices for developers include:
■
■
■
As a standard part of implementing program control flow, clear the session state of
unneeded values using clear-cache page processes or clear-cache directives in
URLs used to navigate to pages.
Use password page item types that do not save state. This prevents the entered
passwords from being saved in session state tables in the database.
When sensitive data must persist in a session, it should be saved in Oracle
Application Express session state tables in encrypted form. To use this feature, set
the page item’s Store value encrypted in session state attribute to Yes. Encrypted
stored values are automatically decrypted when read.
The objective of encrypted session state is to persist session
state such that the unencrypted values cannot be read by other Oracle
Application Express developers or database administrators who
might have access to the Oracle Application Express session state
tables, debug output, or database data files. Oracle recommends that
database backups be performed using facilities that encrypt data in
the backup files.
Note:
Tip: You can encrypt item values up to 4000 bytes in length.
Attempts to encrypt values longer than 4000 bytes produces an error
message.
Managing Application Security
13-13
Understanding Developer Security Best Practices
Understanding Session State Protection
Session State Protection is a built-in functionality that prevents hackers from
tampering with the URLs within your application. URL tampering can adversely affect
program logic, session state contents, and information privacy.
Enabling Session State Protection is a two-step process. First, you enable the feature.
Second, you set page and item security attributes.
Topics in this section include:
■
How Session State Protection Works
■
Enabling Session State Protection
■
Configuring Session State Protection
How Session State Protection Works
When enabled, Session State Protection uses the Page Access Protection attributes and
the Session State Protection item attributes with checksums positioned in f?p= URLs
to prevent URL tampering and unauthorized access to and alteration of session state.
When Session State Protection is disabled, the page and item attributes related to
session state protection are ignored and checksums are not included checksums in
generated f?p= URLs.
Enabling Session State Protection
You can enable session state protection from either the Edit Security Attributes page or
the Session State Protection page.
Enabling Session State Protection is a two-step process. First, you enable the feature.
Second, you set page and item security attributes. You can perform these steps using a
wizard, or you can set security attributes for pages and items manually on the Session
State Protection page.
Topics in this section include:
■
Enabling Session State Protection from Edit Security Attributes
■
Enabling Session State Protection from Session State Protection
Enabling Session State Protection from Edit Security Attributes To enable Session State
Protection from the Edit Security Attributes page:
1.
On the Workspace home page, click the Application Builder icon.
2.
Select an application.
3.
Click the Shared Components icon.
4.
Under Security, click Edit Security Attributes.
5.
Scroll down to Session State Protection and select Enabled from the Session State
Protection list.
6.
To configure session Session State Protection, click Manage Session State
Protection.
The Session State Projection page appears.
7.
Navigate to the Edit Security Attributes page to set page and item security
attributes.
13-14 Oracle Application Express Application Builder User's Guide
Understanding Developer Security Best Practices
To disable Session State Protection, perform the same steps
again, but select Disabled instead of Enabled. Disabling Session State
Protection will not change existing security attribute settings, but
those attributes will be ignored at run time.
Tip:
About the Expire Bookmarks Button Enabling Session State Protection affects whether
bookmarked links to the current application will work. Consider the following rules:
1.
Bookmarked links created after Session State Protection is enabled will work if the
bookmarked link contains a checksum.
2.
Bookmarked links created before Session State Protection is enabled will not work
if the bookmarked link contains a checksum.
3.
Bookmarks that do not contain checksums or contain unnecessary checksums will
not be affected by Session State Protection.
During page rendering, the Application Express engine uses a hidden application
attribute (a checksum salt) during computation and to verify checksums included in
f?p URLs. When you enable Session State Protection, the Application Express engine
includes checksums. You can reset the checksum salt attribute by clicking Expire
Bookmarks on the Edit Security Attributes page. Note that if you click Expire
Bookmarks, bookmarked URLs used to access your application that contain
previously generated checksums will fail.
Enabling Session State Protection from Session State Protection To enable Session State
Protection:
1.
Navigate to the Shared Components page:
a.
On the Workspace home page, click the Application Builder icon.
b.
Select an application.
c.
Click Shared Components.
d.
Under Security, select Session State Protection.
The Session State Protection page appears. Note the current Session State
Protection status (Enabled or Disabled) displays at the top of the page.
2.
Click the Set Protection button.
The Session State Protection wizard appears.
3.
Under Select Action, select Enable and click Next.
Next, determine whether to set security attributes for pages and items.
4.
Select Enable and click Next.
5.
Click Enable Session State Protection.
Tip: To disable Session State Protection, perform the same steps, but
select Disable instead of Enable. Disabling Session State Protection
will not change existing security attribute settings, but those attributes
will be ignored at run time.
Configuring Session State Protection
Once you have enabled Session State Protection, the next step is to configure security
attributes. You can configure security attributes in two ways:
Managing Application Security
13-15
Understanding Developer Security Best Practices
■
■
Use a wizard and select a value for specific attribute categories. Those selections
will then be applied to all pages and items within the application.
Configure values for individual pages, items, or application items.
Topics in this section include:
■
Reviewing Existing Session State Protection Settings
■
Configuring Session State Protection Using a Wizard
■
Configuring Session State Protection for Pages
■
Configuring Session State Protection for Items
■
Configuring Session State Protection for Application Items
Tip: Before you can configure security attributes, you must first
enable Session State Protection. See "Enabling Session State
Protection" on page 13-14.
Reviewing Existing Session State Protection Settings You can review a summary of Session
State Protection settings for pages, items, and application items on the first page of the
Session State Protection wizard.
To view summaries of existing Session State Protection settings:
1.
Navigate to the Session State Protection page:
a.
On the Workspace home page, click the Application Builder icon.
b.
Select an application.
c.
Click Shared Components.
d.
Under Security, select Session State Protection.
The Session State Protection page appears.
2.
Click Set Protection.
3.
Expand the following reports at the bottom of the page:
■
Page Level Session State Protection Summary
■
Page Item Session State Protection Summary
■
Application Item Session State Protection
Configuring Session State Protection Using a Wizard When you configure Session State
Protection using a wizard, you set a value for specific attribute categories. Those
selections are then applied to all pages and items within the application.
To configure Session State Protection using a wizard:
1.
Navigate to the Session State Protection page:
a.
On the Workspace home page, click the Application Builder icon.
b.
Select an application.
c.
Click Shared Components.
d.
Under Security, select Session State Protection.
The Session State Protection page appears.
2.
Click Set Protection.
13-16 Oracle Application Express Application Builder User's Guide
Understanding Developer Security Best Practices
The Session State Protection wizard appears.
3.
Under Select Action, select Configure and click Next.
4.
For Page Access Protection, select one of the following:
■
■
■
■
5.
Unrestricted - The page may be requested using a URL with or without
session state arguments (Request, Clear Cache, Name/Values).
Arguments Must Have Checksum - If Request, Clear Cache, or Name/Value
arguments appear in the URL, a checksum must also be provided. The
checksum type must be compatible with the most stringent Session State
Protection attribute of all the items passed as arguments.
No Arguments Allowed - A URL may be used to request the page but no
Request, Clear Cache, or Name/Value arguments are allowed.
No URL Access - The page may not be accessed using a URL; however, the
page may be the target of a Branch to Page branch type, which does not do a
URL redirect.
For Application Item Protection, select one of the following:
■
■
■
■
■
Unrestricted - The item's session state may be set by passing the item
name/value in a URL or in a form. No checksum is required in the URL.
Checksum Required: Application Level - The item's session state may be set
by passing the item name/value in a URL if a checksum specific to the schema
is provided. A user-level checksum or a session-level checksum will also
suffice (see next bullets). Use this option when you want to allow the item to
be set only by URLs having checksums that were generated by any user
running the same application in the current workspace but in a different
session.
Checksum Required: User Level - The item's session state may be set by
passing the item name/value in a URL if a checksum specific to the
workspace, application, and user is provided. A session-level checksum will
also suffice (see next bullet). Use this option when you want to allow the item
to be set only by URLs having checksums that were generated by the same
named user, running the same application in the current workspace but in a
different session.
Checksum Required: Session Level - The item's session state may be set by
passing the item name/value in a URL if a checksum specific to the current
session is also provided. Use this option when you want to allow this item to
be set only by URLs having checksums that were generated in the current
session.
Restricted - May not be set from browser - The item may not be altered using
the URL or POSTDATA. Use this option when you want to restrict the way
that the item value can be set to internal processes, computations, and so on.
This attribute is applicable only to items that cannot be used as data entry
items and is always observed even if Session State Protection is disabled.
Use this attribute for application items or for page items with any of these
Display As types:
–
Display as Text (escape special characters, does not save state)
–
Display as Text (does not save state)
–
Display as Text (based on LOV, does not save state)
–
Display as Text (based on PLSQL, does not save state)
Managing Application Security
13-17
Understanding Developer Security Best Practices
6.
Text Field (Disabled, does not save state)
–
Stop and Start HTML Table (Displays label only)
For Page Data Entry Item Protection, select one of the following:
■
■
■
■
7.
–
Unrestricted - The item's session state may be set by passing the item
name/value in a URL or in a form. No checksum is required in the URL.
Checksum Required: Application Level - The item's session state may be set
by passing the item name/value in a URL if a checksum specific to the schema
is provided. A user-level checksum or a session-level checksum will also
suffice (see next bullets). Use this option when you want to allow the item to
be set only by URLs having checksums that were generated by any user
running the same application in the current workspace but in a different
session.
Checksum Required: User Level - The item's session state may be set by
passing the item name/value in a URL if a checksum specific to the
workspace, application, and user is provided. A session-level checksum will
also suffice (see next bullet). Use this option when you want to allow the item
to be set only by URLs having checksums that were generated by the same
named user, running the same application in the current workspace but in a
different session.
Checksum Required: Session Level - The item's session state may be set by
passing the item name/value in a URL if a checksum specific to the current
session is provided. Use this option when you want to allow this item to be set
only by URLs having checksums that were generated in the current session.
For Page Display-Only Item Protection, select one of the following:
■
■
■
■
■
Unrestricted - The item may be set by passing the item name/value in a URL
or in a form. No checksum is required in the URL.
Checksum Required: Application Level - The item's session state may be set
by passing the item name/value in a URL if a checksum specific to the schema
is provided. A user-level checksum or a session-level checksum will also
suffice (see next bullets). Use this option when you want to allow the item to
be set only by URLs having checksums that were generated by any user
running the same application in the current workspace but in a different
session.
Checksum Required: Session Level - The item's session state may be set by
passing the item name/value in a URL if a checksum specific to the current
session is provided. Use this option when you want to allow this item to be set
only by URLs having checksums that were generated in the current session.
Checksum Required: User Level - The item's session state may be set by
passing the item name/value in a URL if a checksum specific to the
workspace, application, and user is provided. A session-level checksum will
also suffice (see next bullet). Use this option when you want to allow the item
to be set only by URLs having checksums that were generated by the same
named user, running the same application in the current workspace but in a
different session.
Restricted: May not be set from browser - The item may not be altered using
the URL or POSTDATA. Use this when you want to restrict the way that the
item value can be set to internal processes, computations, and so on. This
attribute is always observed, even if Session State Protection is disabled.
This attribute may be used with any of these Display As types:
13-18 Oracle Application Express Application Builder User's Guide
Understanding Developer Security Best Practices
–
Display as Text (escape special characters, does not save state)
–
Display as Text (does not save state)
–
Display as Text (based on LOV, does not save state)
–
Display as Text (based on PLSQL, does not save state)
–
Text Field (Disabled, does not save state)
–
Stop and Start HTML Table (Displays label only)
8.
Click Next.
9.
Click Finish.
Configuring Session State Protection for Pages To configure Session State Protection for
Pages:
1.
Navigate to the Session State Protection page:
a.
On the Workspace home page, click the Application Builder icon.
b.
Select an application.
c.
Click Shared Components.
d.
Under Security, select Session State Protection.
The Session State Protection page appears.
2.
Click the Page icon.
3.
To filter the view, use the Page, Display, and Page Access Protection lists at the top
of the page.
4.
Select a page number.
The Set Page and Item Protection page appears. The following information
displays at the top of the page:
5.
■
Application ID and name
■
Session State Protection status (Enabled or Disabled)
■
Page Number
■
Page name
For Page Access Protection, select one of the following:
■
■
■
■
6.
Unrestricted - The page may be requested using a URL with or without
session state arguments (Request, Clear Cache, Name/Values).
Arguments Must Have Checksum - If Request, Clear Cache, or Name/Value
arguments appear in the URL, a checksum must also be provided. The
checksum type must be compatible with the most stringent Session State
Protection attribute of all the items passed as arguments.
No Arguments Allowed - A URL may be used to request the page but no
Request, Clear Cache, or Name/Value arguments are allowed.
No URL Access - The page may not be accessed using a URL; however, the
page may be the target of a Branch to Page branch type, which does not do a
URL redirect.
For Item Types, select Data Entry Items or Display-only Items.
Managing Application Security
13-19
Understanding Developer Security Best Practices
Data Entry items are items that can be altered using forms and include hidden
items. Display-Only items are rendered only and are not submitted with the form.
7.
If you select Data Entry Items, select a session state protection level for each item:
■
■
■
■
8.
Unrestricted - The item's session state may be set by passing the item
name/value in a URL or in a form. No checksum is required in the URL.
Checksum Required: Application Level - The item's session state may be set
by passing the item name/value in a URL if a checksum specific to the schema
is provided. A user-level checksum or a session-level checksum will also
suffice (see next bullets). Use this option when you want to allow the item to
be set only by URLs having checksums that were generated by any user
running the same application in the current workspace but in a different
session.
Checksum Required: User Level - The item's session state may be set by
passing the item name/value in a URL if a checksum specific to the
workspace, application, and user is provided. A session-level checksum will
also suffice (see next bullet). Use this option when you want to allow the item
to be set only by URLs having checksums that were generated by the same
named user, running the same application in the current workspace but in a
different session.
Checksum Required: Session Level - The item's session state may be set by
passing the item name/value in a URL if a checksum specific to the current
session is provided. Use this option when you want to allow this item to be set
only by URLs having checksums that were generated in the current session.
If you select Display-only Item, select a session state protection level for each
item:
■
■
■
■
Unrestricted - The item may be set by passing the item name/value in a URL
or in a form. No checksum is required in the URL.
Restricted: May not be set from browser - The item may not be altered using
the URL or POSTDATA. Use this when you want to restrict the way that the
item value can be set to internal processes, computations, and so on. This
attribute is always observed, even if Session State Protection is disabled. This
attribute may be used with any of these Display As types:
–
Display as Text (escape special characters, does not save state)
–
Display as Text (does not save state)
–
Display as Text (based on LOV, does not save state)
–
Display as Text (based on PLSQL, does not save state)
–
Text Field (Disabled, does not save state)
–
Stop and Start HTML Table (Displays label only)
Checksum Required: Application Level - The item's session state may be set
by passing the item name/value in a URL if a checksum specific to the schema
is provided. A user-level checksum or a session-level checksum will also
suffice (see next bullets). Use this option when you want to allow the item to
be set only by URLs having checksums that were generated by any user
running the same application in the current workspace but in a different
session.
Checksum Required: User Level - The item's session state may be set by
passing the item name/value in a URL if a checksum specific to the
13-20 Oracle Application Express Application Builder User's Guide
Understanding Developer Security Best Practices
workspace, application, and user is provided. A session-level checksum will
also suffice (see next bullet). Use this option when you want to allow the item
to be set only by URLs having checksums that were generated by the same
named user, running the same application in the current workspace but in a
different session.
■
9.
Checksum Required: Session Level - The item's session state may be set by
passing the item name/value in a URL if a checksum specific to the current
session is provided. Use this option when you want to allow this item to be set
only by URLs having checksums that were generated in the current session.
Click Apply Changes.
Configuring Session State Protection for Items To configure Session State Protection for
items:
1.
Navigate to the Session State Protection page:
a.
On the Workspace home page, click the Application Builder icon.
b.
Select an application.
c.
Click Shared Components.
d.
Under Security, select Session State Protection.
The Session State Protection page appears.
2.
Click the Item icon.
3.
To filter the view, select from the Page, Display, and Item Session State Protection
lists at the top of the page and click Go.
4.
Select a page number.
The Edit Session State Protection for Page and Items page appears. The following
information displays at the top of the page:
5.
■
Application ID and name
■
Session State Protection status (Enabled or Disabled)
■
page Number
■
Page name
For Page Access Protection, select a session state protection level for each item:
■
■
■
■
6.
Unrestricted - The page may be requested using a URL with or without
session state arguments (Request, Clear Cache, Name/Values).
Arguments Must Have Checksum - If Request, Clear Cache, or Name/Value
arguments appear in the URL, a checksum must also be provided. The
checksum type must be compatible with the most stringent Session State
Protection attribute of all the items passed as arguments.
No Arguments Allowed - A URL may be used to request the page but no
Request, Clear Cache, or Name/Value arguments are allowed.
No URL Access - The page may not be accessed using a URL, however the
page may be the target of a Branch to Page branch type, which does not do a
URL redirect.
For Item Types, select Data Entry Items or Display-only Items.
Data Entry items are items that can be altered using forms and include hidden
items. Display-Only items are rendered only and are not submitted with the form.
Managing Application Security
13-21
Understanding Developer Security Best Practices
7.
If you select Data Entry Items, select a session state protection level for each item:
■
■
■
■
8.
Unrestricted - The item's session state may be set by passing the item
name/value in a URL or in a form. No checksum is required in the URL.
Checksum Required: Application Level - The item's session state may be set
by passing the item name/value in a URL if a checksum specific to the schema
is provided. A user-level checksum or a session-level checksum will also
suffice (see next bullets). Use this option when you want to allow the item to
be set only by URLs having checksums that were generated by any user
running the same application in the current workspace but in a different
session.
Checksum Required: User Level - The item's session state may be set by
passing the item name/value in a URL if a checksum specific to the
workspace, application, and user is provided. A session-level checksum will
also suffice (see next bullet). Use this option when you want to allow the item
to be set only by URLs having checksums that were generated by the same
named user, running the same application in the current workspace but in a
different session.
Checksum Required: Session Level - The item's session state may be set by
passing the item name/value in a URL if a checksum specific to the current
session is provided. Use this option when you want to allow this item to be set
only by URLs having checksums that were generated in the current session.
If you select Display-only Item, select a session state protection level for each
item:
■
■
■
■
Unrestricted - The item may be set by passing the item name/value in a URL
or in a form. No checksum is required in the URL.
Restricted: May not be set from browser - The item may not be altered using
the URL or POSTDATA. Use this when you want to restrict the way that the
item value can be set to internal processes, computations, and so on. This
attribute is always observed, even if Session State Protection is disabled. This
attribute may be used with any of these Display As types:
–
Display as Text (escape special characters, does not save state)
–
Display as Text (does not save state)
–
Display as Text (based on LOV, does not save state)
–
Display as Text (based on PLSQL, does not save state)
–
Text Field (Disabled, does not save state)
–
Stop and Start HTML Table (Displays label only)
Checksum Required: Application Level - The item's session state may be set
by passing the item name/value in a URL if a checksum specific to the schema
is provided. A user-level checksum or a session-level checksum will also
suffice (see next bullets). Use this option when you want to allow the item to
be set only by URLs having checksums that were generated by any user
running the same application in the current workspace but in a different
session.
Checksum Required: User Level - The item's session state may be set by
passing the item name/value in a URL if a checksum specific to the
workspace, application, and user is provided. A session-level checksum will
also suffice (see next bullet). Use this option when you want to allow the item
to be set only by URLs having checksums that were generated by the same
13-22 Oracle Application Express Application Builder User's Guide
Understanding Developer Security Best Practices
named user, running the same application in the current workspace but in a
different session.
■
9.
Checksum Required: Session Level - The item's session state may be set by
passing the item name/value in a URL if a checksum specific to the current
session is provided. Use this option when you want to allow this item to be set
only by URLs having checksums that were generated in the current session.
Click Apply Changes.
Configuring Session State Protection for Application Items To configure Session State
Protection for application items:
1.
Navigate to the Session State Protection page:
a.
On the Workspace home page, click the Application Builder icon.
b.
Select an application.
c.
Click Shared Components.
d.
Under Security, select Session State Protection.
The Session State Protection page appears.
2.
Click the Application Item icon.
3.
Select an application item.
4.
Under Security, select one of the following from the Session State Protection list:
■
■
■
■
Unrestricted - The item's session state may be set by passing the item
name/value in a URL or in a form. No checksum is required in the URL.
Restricted - May not be set from browser - The item may not be altered using
the URL or POSTDATA. Use this option when you want to restrict the way
that the item value can be set to internal processes, computations, and so on.
This attribute is only applicable only to items that cannot be used as data entry
items and is always observed even if Session State Protection is disabled. This
attribute may be used for application items or for page items with any of these
Display As types:
–
Display as Text (escape special characters, does not save state)
–
Display as Text (does not save state)
–
Display as Text (based on LOV, does not save state)
–
Display as Text (based on PLSQL, does not save state)
–
Text Field (Disabled, does not save state)
–
Stop and Start HTML Table (Displays label only)
Checksum Required: Application Level - The item's session state may be set
by passing the item name/value in a URL if a checksum specific to the schema
is provided. A user-level checksum or a session-level checksum will also
suffice (see next bullets). Use this option when you want to allow the item to
be set only by URLs having checksums that were generated by any user
running the same application in the current workspace but in a different
session.
Checksum Required: User Level - The item's session state may be set by
passing the item name/value in a URL if a checksum specific to the
workspace, application, and user is provided. A session-level checksum will
also suffice (see next bullet). Use this option when you want to allow the item
Managing Application Security
13-23
Securing File Uploads
to be set only by URLs having checksums that were generated by the same
named user, running the same application in the current workspace but in a
different session.
■
5.
Checksum Required: Session Level - The item's session state may be set by
passing the item name/value in a URL if a checksum specific to the current
session is provided. Use this option when you want to allow this item to be set
only by URLs having checksums that were generated in the current session.
Click Apply Changes.
Securing File Uploads
Oracle Application Express enables you to easily build an application that can be used
to upload files and to access uploaded files. These files are uploaded into a common
file storage table. Although the database view APEX_APPLICATION_FILES shows
those files associated with your database account (or workspace), programmatic access
to the common file storage table does not always require authentication, enabling
other users to see your uploaded files. For this reason, Oracle recommends that
developers either use the methods described in "About BLOB Support in Forms and
Reports" on page 15-26 or use the methods described in Oracle Application Express
How To Documents for file upload on OTN at:
http://www.oracle.com/technology/products/database/application_
express/howtos/index.html
Either of these methods results in the uploaded files being stored in schema tables and
not the public table.
See Also: "Differences Between Page Items and Application Items"
on page 6-33 and "About Item Types" on page 6-35 to learn more
about creating a File Browse page-level item
Establishing User Identity Through Authentication
Authentication is the process of establishing each user's identify before they can access
your application. Authentication may require a user identify a user name and
password or could involve the use of digital certificates or a secure key.
When you create an authentication scheme, you have the option of choosing from a
number of preconfigured authentication schemes, copying an authentication scheme
from an existing application, or creating your own custom authentication scheme.
Topics in this section include:
■
Understanding How Authentication Works
■
Determining Whether to Include Authentication
■
Creating an Authentication Scheme
■
Using Preconfigured Authentication Schemes
■
About Creating an Authentication Scheme from Scratch
■
Managing Existing Authentication Schemes
■
Viewing the Authentication Scheme Associated with an Application
■
Changing the Authentication Scheme Associated with an Application
■
Viewing Authentication Scheme Utilization Report
13-24 Oracle Application Express Application Builder User's Guide
Establishing User Identity Through Authentication
Understanding How Authentication Works
You determine how your application interacts with users. If all users have the same
rights and privileges, they are referred to as public users. However, if your application
needs to track each user individually, you need to specify an authentication method.
Authentication establishes the identity of each user who accesses your application.
Many authentication processes require that a user provide some type of credentials
such as a user name and password. These credentials are then evaluated and they
either pass or fail. If the credentials pass, the user has access to the application.
Otherwise, access is denied.
Once a user has been identified, the Application Express engine keeps track of each
user by setting the value of the built-in substitution string APP_USER. As a user
navigates from page to page, the Application Express engine sets the value of APP_
USER to identify the user. The Application Express engine uses APP_USER as one
component of a key for tracking each user's session state.
From a programming perspective, you can access APP_USER using the following
syntax:
■
From PL/SQL:
V('APP_USER')
■
As a bind variable from either PL/SQL or SQL:
:APP_USER
You can use APP_USER to perform your own security checks and conditional
processing. For example, suppose you created the following table:
CREATE TABLE my_security_table (
user_id
VARCHAR2(30),
privilege VARCHAR2(30));
Once created, you could populate this table with user privilege information and then
use it to control the display of pages, tabs, navigation bars, buttons, regions, or any
other control or component.
See Also: "APP_USER" on page 3-19 and "Configuring Security
Attributes" on page 4-15
Determining Whether to Include Authentication
As you create your application, you need to determine whether to include
authentication. You can:
■
■
■
Choose to not require authentication. Oracle Application Express does not check
any user credentials. All pages of your application are accessible to all users.
Select a built-in authentication scheme. Create an authentication method based
on available preconfigured authentication schemes. Depending on which scheme
you choose, you may also have to configure the corresponding components of
Oracle 10giAS, Oracle Internet Directory, or other external services. See "Using
Preconfigured Authentication Schemes" on page 13-26 and "Changing the
Authentication Scheme Associated with an Application" on page 13-32.
Create custom authentication scheme. Create a custom authentication method to
have complete control over the authentication interface. To implement this
approach, you must provide a PL/SQL function the Application Express engine
executes before processing each page request. This function's Boolean return value
Managing Application Security
13-25
Establishing User Identity Through Authentication
determines whether the Application Express engine processes the page normally
or displays a failure page. See "Creating an Authorization Scheme" on page 13-34.
Creating an Authentication Scheme
To create an authentication scheme:
1.
On the Workspace home page, click the Application Builder icon.
2.
Select an application.
3.
On the Application home page, click Shared Components.
The Shared Components page appears.
4.
Under Security, select Authentication Schemes.
The Authentication Schemes page appears.
5.
To create a new authentication scheme, click Create.
6.
Specify how the scheme should be created by selecting one of the following:
■
7.
Based on preconfigured scheme. See "Managing Existing Authentication
Schemes" on page 13-32.
■
As a copy of an existing scheme
■
From scratch
Follow the on-screen instructions.
See Also: "Using Preconfigured Authentication Schemes" on
page 13-26 and "About Creating an Authentication Scheme from
Scratch" on page 13-30
Using Preconfigured Authentication Schemes
When you select a preconfigured authentication scheme, Oracle Application Express
creates an authentication scheme for your application that follows a standard behavior
for authentication and session management.
Topics in this section include:
■
Open Door Credentials
■
Oracle Application Express Account Credentials
■
Database Account Credentials
■
LDAP Credentials Verification
■
DAD Credentials Verification
■
Single Sign-On Server Verification
Open Door Credentials
Open Door Credentials enables anyone to access your application using a built-in
login page that captures a user name. This authentication method is useful during
application development.
Setting Up Open Door Credentials To set up Open Door Credentials:
1.
On the Workspace home page, click the Application Builder icon.
2.
Select an application.
13-26 Oracle Application Express Application Builder User's Guide
Establishing User Identity Through Authentication
3.
On the Application home page, click Shared Components.
The Shared Components page appears.
4.
Under Security, select Authentication Schemes.
5.
On the Authentication Schemes page, click Create.
6.
Select Based on a pre-configured scheme from the gallery.
7.
From Gallery, select Show Login Page and Use Open Door Credentials.
8.
Specify a login page and click Next.
9.
Enter a name and click Create Scheme.
Oracle Application Express Account Credentials
Oracle Application Express Account Credentials are internal user accounts (also
known as "cookie user" accounts) that are created within and managed in the Oracle
Application Express user repository. When you use this method, your application is
authenticated against these accounts.
See Also: "Managing Application Express Users" in Oracle
Application Express Administration Guide
Application Express Account Credentials is a good solution when:
■
You want control of the user account repository
■
User name and password-based approach to security is sufficient
■
You do not need to integrate into a single sign-on framework
This is an especially good approach when you need to get a group of users up and
running on a new application quickly.
Setting Up Application Express Account Credentials To set up Application Express Account
Credentials:
1.
On the Workspace home page, click the Application Builder icon.
2.
Select an application.
3.
On the Application home page, click Shared Components.
The Shared Components page appears.
4.
Under Security, select Authentication Schemes.
5.
On the Authentication Schemes page, click Create.
6.
Select Based on a pre-configured scheme from the gallery.
7.
From Gallery, select Show Login Page and Use Application Express Account
Credentials.
8.
Specify a login page and click Next.
9.
Enter a name and click Create Scheme.
Database Account Credentials
Database Account Credentials utilizes database schema accounts.This authentication
scheme requires that a database user (schema) exist in the local database. When using
this method, the user name and password of the database account is used to
authenticate the user.
Managing Application Security
13-27
Establishing User Identity Through Authentication
Database Account Credentials is a good choice if having one database account for each
named user of your application is feasible and account maintenance using database
tools meets your needs
Setting Up Database Account Credentials To set up Database Account Credentials:
1.
On the Workspace home page, click the Application Builder icon.
2.
Select an application.
3.
On the Application home page, click Shared Components.
The Shared Components page appears.
4.
Under Security, select Authentication Schemes.
5.
On the Authentication Schemes page, click Create.
6.
Select Based on a pre-configured scheme from the gallery.
7.
From Gallery, select Show Login Page and Use Database Account Credentials.
8.
Specify a login page and click Next.
9.
Enter a name and click Create Scheme.
LDAP Credentials Verification
You can configure any authentication scheme that uses a login page to use Lightweight
Directory Access Protocol (LDAP) to verify the user name and password submitted on
the login page.
Application Builder includes wizards and edit pages that explain how to configure this
option. These wizards assume that an LDAP directory accessible to your application
for this purpose already exists and that it can respond to a SIMPLE_BIND_S call for
credentials verification. When you create an LDAP Credentials authentication scheme,
the wizard requests and saves the LDAP host name, LDAP port, and the DN string.
An optional preprocessing function can be specified to adjust formatting of the user
name passed to the API.
Setting Up LDAP Credentials Verification To set up LDAP credentials verification:
1.
On the Workspace home page, click the Application Builder icon.
2.
Select an application.
3.
On the Application home page, click Shared Components.
The Shared Components page appears.
4.
Under Security, select Authentication Schemes.
5.
On the Authentication Schemes page, click Create.
6.
Select Based on a pre-configured scheme from the gallery.
7.
From Gallery, select Show Login Page and Use LDAP Directory Credentials.
8.
Specify a login page and click Next.
9.
Specify the following and click Next.
a.
LDAP Host
b.
LDAP Port
c.
LDAP Distinguished Name (DN) String
13-28 Oracle Application Express Application Builder User's Guide
Establishing User Identity Through Authentication
d.
(Optional) LDAP Username Edit Function
To view help for a specific item, click the item label. When help is available, the
item label changes to red when you pass your cursor over it and the cursor
changes to an arrow and question mark. See "About Field-Level Help" on
page 1-15.
10. Enter a name and click Create Scheme.
DAD Credentials Verification
Database Access Descriptor (DAD) database authentication uses the Oracle database
native authentication and user mechanisms to authenticate users using a basic
authentication scheme. This authentication scheme gets the user name from the DAD
either as the value stored in the DAD configuration or, if the account information is not
stored in the DAD configuration, as the user name captured using the basic
authentication challenge.
To use DAD credentials verification:
■
■
Each application user must have a user account in the Oracle database.
You must configure a PL/SQL DAD for basic authentication (without account
information).
This results in one user name/password challenge for browser session for your
application users. The user identity token is then made available in the APP_USER
item.
DAD database authentication is useful when you need to implement an authentication
method that requires minimal setup for a manageable number of users. Ideally these
users would have self-managed accounts in the database and your use of this
authentication method would be short lived (for example, during the demonstration
or prototyping stages of development).
The main drawback of this approach is burdensome account maintenance, especially if
users do not administer their own passwords, or if their database accounts exist only
to facilitate authentication to your application.
Setting Up DAD Credentials Verification To set up DAD Credentials Verification:
1.
On the Workspace home page, click the Application Builder icon.
2.
Select an application.
3.
On the Application home page, click Shared Components.
The Shared Components page appears.
4.
Under Security, select Authentication Schemes.
5.
On the Authentication Schemes page, click Create.
6.
Select Based on a pre-configured scheme from the gallery.
7.
From Gallery, select No Authentication (using DAD).
8.
Enter a name and click Create Scheme.
Single Sign-On Server Verification
Oracle Application Server Single Sign-On verification delegates authentication to the
Oracle AS Single Sign-On (SSO) Server. To use this authentication scheme, your site
must have been registered as a partner application with the SSO server.
Managing Application Security
13-29
Establishing User Identity Through Authentication
Oracle Application Express applications can operate as partner applications with
Oracle Application Server's Single Sign-On (SSO) infrastructure. To accomplish this,
you must register your application (or register the Application Express engine) as the
partner application. To do so, follow the Oracle Application Server instructions for
registering partner applications and install the Oracle 9iAS SSO Software Developer
Kit (SDK).
If you choose this approach, your application will not use an integrated login page.
Instead, when a user accesses your application in a new browser session, the
Application Express engine redirects to the Single Sign-On login page. After the user is
authentication by SSO, the SSO components redirect back to your application, passing
the user identity and other information to the Application Express engine. The user
can then continue to use the application until they log off, terminate their browser
session, or until some other session-terminating event occurs.
Setting Up Oracle Application Server Single Sign-On To set up Oracle Application Server
Single Sign-On:
1.
On the Workspace home page, click the Application Builder icon.
2.
Select an application.
3.
On the Application home page, click Shared Components.
The Shared Components page appears.
4.
Under Security, select Authentication Schemes.
5.
On the Authentication Schemes page, click Create.
6.
Select Based on a pre-configured scheme from the gallery.
7.
From Gallery, select one of the following:
■
■
8.
Oracle Application Server Single Sign-On (Application Express engine as
Partner App) delegates authentication to the Oracle AS Single Sign-On (SSO)
Server. To use this authentication scheme, your site must have been registered
as a partner application with the SSO server.
Oracle Application Server Single Sign-On (My application as Partner App)
delegates authentication to the SSO server. Requires that you register an
application with SSO as a partner application.
Enter a name and click Create Scheme.
About Creating an Authentication Scheme from Scratch
Creating an authentication scheme from scratch gives you complete control over your
authentication interface. This is the best approach for applications when any of the
following is true:
■
Database authentication or other methods are not adequate.
■
You want to develop your own login form and associated methods.
■
You want to delegate all aspects of user authentication to external services such as
Oracle 10gAS Single Sign-On.
■
You want to control security aspects of session management.
■
You want to record or audit activity at the user or session level.
■
You want to enforce session activity or expiry limits.
13-30 Oracle Application Express Application Builder User's Guide
Establishing User Identity Through Authentication
■
■
■
You want to program conditional one-way redirection logic before Oracle
Application Express page processing.
You want to integrate your application with non-Oracle Application Express
applications using a common session management framework.
Your application consists of multiple applications that operate seamlessly (for
example, more than one application ID).
"APEX_CUSTOM_AUTH" in Oracle Application Express
API Reference
See Also:
About Session Management Security
When running custom authentication, Oracle Application Express attempts to prevent
two improper situations:
■
■
Intentional attempts by a user to access session state belonging to someone else.
However, users can still type in an arbitrary application session ID into the URL.
Inadvertent access to a stale session state (probably belonging to the same user
from an earlier time). This would commonly result from using bookmarks to
application pages.
Oracle Application Express checks that the user identity token set by the custom
authentication function matches the user identity recorded when the application
session was first created. If the user has not yet been authenticated and the user
identity is not yet known, the session state being accessed does not belong to someone
else. These checks determine whether the session ID in the request can be used. If not,
the Application Express engine redirects back the same page using an appropriate
session ID.
Building a Login Page
When you create an application in Oracle Application Express, a login page is created.
The alias for the page is 'LOGIN'. You can use this page as the "invalid session page"
in an authentication scheme. The page is constructed with processes that call the
Oracle Application Express login API to perform credentials verification and
session registration.
You can also build your own login pages using the pre-built pages as models and
tailoring all of the user interface and processing logic to your requirements.
To create a login page for your application:
1.
On the Workspace home page, click the Application Builder icon.
2.
Select an application.
3.
Click Create Page.
4.
Select Login Page.
5.
Specify Login page attributes and click Create.
About Deep Linking
Deep linking refers to the ability to link to an Oracle Application Express page out of
context (for example, from a hyperlink in an email or workflow notification). When
you link to a page out of context and the application requires the user be
authenticated, the user will be taken to the login page. After credentials verification,
the Application Express engine automatically displays the page that was referenced in
Managing Application Security
13-31
Establishing User Identity Through Authentication
the original link. Deep linking is supported for applications that use authentication
schemes.
Managing Existing Authentication Schemes
Once created, available authentication schemes display in the Authentication Schemes
Repository.
To navigate to the Authentication Schemes Repository:
1.
On the Workspace home page, click the Application Builder icon.
2.
Select an application.
3.
On the Application home page, click Shared Components.
The Shared Components page appears.
4.
Under Security, select Authentication Schemes.
The Authentication Schemes page appears. You can change the appearance of the
page by making a selection from the View list. Available options include:
■
■
Icons (the default) displays each authentication scheme as a large icon. To edit
an authentication scheme, click the appropriate icon.
Details displays each application item as a line in a report.
In Details view you can:
–
Edit an authentication scheme by selecting the scheme name
–
View a list of the steps performed on each page by clicking the Show icon
–
Apply an authentication scheme to an application by clicking the make
current link
Viewing the Authentication Scheme Associated with an Application
To view the current authentication scheme for an application:
1.
On the Workspace home page, click the Application Builder icon.
2.
Select an application.
3.
Click Shared Components.
4.
Under Security, click Edit Security Attributes.
5.
Locate the Authentication section. The current authentication scheme displays
next to Authentication Scheme.
6.
To link to the Authentication Scheme pages, select the scheme name.
Changing the Authentication Scheme Associated with an Application
To change the authentication scheme for an application:
1.
Navigate to the Authentication Schemes:
a.
On the Workspace home page, click the Application Builder icon.
b.
Select an application.
c.
On the Application home page, click Shared Components.
The Shared Components page appears.
13-32 Oracle Application Express Application Builder User's Guide
Providing Security Through Authorization
d.
Under Security, select Authentication Schemes.
2.
Click the Change Current tab at the top of the page.
3.
Select a new authentication scheme and click Next.
4.
Click Make Current.
Viewing Authentication Scheme Utilization Report
The Authentication Schemes report lists authentication scheme utilization for all
applications in the current workspace.
To view the Authentication Schemes report:
1.
On the Workspace home page, click the Application Builder icon.
2.
Select an application.
The Application home page appears.
3.
On the Tasks list, click View Application Reports.
4.
Click Cross Application Reports.
5.
Select Authentication Schemes.
6.
Click the application ID to link to the appropriate Application home page.
Providing Security Through Authorization
Authorization is a broad term for controlling access to resources based on user
privileges. While conditions control the rendering and processing of specific page
controls or components, authorization schemes control user access to specific controls
or components.
Topics in this section include:
■
How Authorization Schemes Work
■
Creating an Authorization Scheme
■
Attaching an Authorization Scheme to an Application, Page, or Components
■
Viewing Authorization Reports
How Authorization Schemes Work
An authorization scheme extends the security of your application's authentication
scheme. You can specify an authorization scheme for an entire application, page, or
specific control such as a region, item, or button. For example, you could use an
authorization scheme to selectively determine which tabs, regions, or navigation bars a
user sees.
An authorization scheme either succeeds or fails. If a component or control level
authorization scheme succeeds, the user can view the component or control. If it fails,
the user cannot view the component or control. If an application or page-level
authorization scheme fails, then Oracle Application Express displays a previously
defined message.
When you define an authorization scheme, you give it a unique name. Once defined,
you can attach it to any component or control in your application. To attach an
authorization scheme to a component or control in your application, simply navigate
Managing Application Security
13-33
Providing Security Through Authorization
to the appropriate attributes page and select an authorization scheme from the
Authorization Scheme list.
Creating an Authorization Scheme
Before you can attach an authorization scheme to an application or an application
component or control, you must first create it.
To create an authorization scheme:
1.
On the Workspace home page, click the Application Builder icon.
2.
Select an application.
3.
On the Application home page, click Shared Components.
The Shared Components page appears.
4.
Under Security, select Authorization Schemes.
5.
Click Create.
6.
Specify how to create an authorization scheme by selecting one of the following:
7.
■
From Scratch
■
As a Copy of an Existing Authorization Scheme
Follow the on-screen instructions.
See Also: "Attaching an Authorization Scheme to an Application,
Page, or Components" on page 13-35
Editing Attributes of an Existing Authorization Scheme
To edit attributes of an existing authorization scheme:
1.
On the Workspace home page, click the Application Builder icon.
2.
Select an application.
3.
On the Application home page, click Shared Components.
The Shared Components page appears.
4.
Under Security, select Authorization Schemes.
The Authorization Schemes page appears. By default, each scheme displays as an
icon.
5.
To access a detail view of all schemes, select Details from the View list.
The Authorization Schemes page appears. You can change the appearance of the
page by making a selection from the View list. Available options include:
■
■
Icons (the default) displays each authentication scheme as a large icon. To edit
an authorization scheme, click the appropriate icon.
Details displays each application item as a line in a report. To edit an
authorization scheme, select the scheme name.
About the Evaluation Point Attribute
You can specify when your authorization scheme is validated in the Evaluation Point
attribute. You can choose to have your authorization scheme validated once for each
session or once for each page view.
13-34 Oracle Application Express Application Builder User's Guide
Providing Security Through Authorization
Keep in mind, if you specify that an authorization scheme should be evaluated once
for each session and the authorization scheme passes, the underlying code, test, or
query will not be executed again for the duration of the application session. If your
authorization scheme consists of a test whose results might change if evaluated at
different times during the session, then you should specify that the evaluation point be
once for each page view.
About Resetting Authorization Scheme State
If an authorization scheme is validated once for each session, Oracle Application
Express caches the validation results in each user's session cache. You can reset a
session's authorization scheme state by calling the APEX_UTIL.RESET_
AUTHORIZATIONS API.
Calling this procedure nulls out any previously cached authorization scheme results
for the current session. Be aware that this procedure takes no arguments and is part of
the publicly executable APEX_UTIL package.
See Also: "RESET_AUTHORIZATIONS Procedure" in Oracle
Application Express API Reference
Attaching an Authorization Scheme to an Application, Page, or Components
Once you have created an authorization scheme you can attach it to an entire
application, page, control, or component.
Topics in this section include:
■
Attaching an Authorization Scheme to an Application
■
Attaching an Authorization Scheme to a Page
■
Attaching an Authorization Scheme to a Control or Component
Attaching an Authorization Scheme to an Application
To attach an authorization scheme to an application:
1.
On the Workspace home page, click the Application Builder icon.
2.
Select an application.
3.
Click the Shared Components icon.
The Shared Components page appears.
4.
Under Security, click Edit Security Attributes.
5.
Scroll down to Authorization and make a selection from the Authorization Scheme
list.
Attaching an Authorization Scheme to a Page
To attach an authorization scheme to a page:
1.
On the Workspace home page, click the Application Builder icon.
2.
Select an application.
3.
Select a page.
4.
Under Page Rendering, locate the section with the title of Page.
Managing Application Security
13-35
Providing Security Through Authorization
5.
Click Edit page attributes icon.
6.
Scroll down to Security and make a selection from the Authorization Scheme list.
Attaching an Authorization Scheme to a Control or Component
To attach an authorization scheme to a page component or control:
1.
On the Workspace home page, click the Application Builder icon.
2.
Select an application.
3.
Select a page.
4.
Click the name of the component or control to which you want to apply the
authorization scheme.
5.
Scroll down to Security and make a selection from the Authorization Scheme list.
Viewing Authorization Reports
You can use the Authorization Scheme Subscription and Authorization Scheme
Utilization reports to better manage authorization schemes within your application.
To view authorization scheme reports:
1.
On the Workspace home page, click the Application Builder icon.
2.
Select an application.
3.
On the Application home page, click Shared Components.
The Shared Components page appears.
4.
Under Security, select Authorization Schemes.
5.
Click the appropriate tab at the top of the page:
■
Subscription
■
Utilization
Subscription
Use the Authorization Scheme Subscription report to view details about authorization
schemes subscription.
Utilization
Use the Authorization Scheme Utilization report to view details about authorization
schemes utilization.
To view additional reports indicating which pages having authorization schemes and
which do not, select one of the following from the Tasks list:
■
Report Pages With Authorization Schemes
■
Report Pages Without Authorization Schemes
13-36 Oracle Application Express Application Builder User's Guide
14
Deploying an Application
This section describes how to package an application built within Application Builder.
This section contains the following topics:
■
About the Oracle Application Express Application Development Life Cycle
■
Understanding the Packaging Process
■
How to Move an Application to Another Development Instance
■
How to Create a Packaged Application
■
Exporting an Application and Related Files
■
Importing Export Files
■
Installing Export Files
■
About Publishing the Application URL
■
Using Build Options to Control Configuration
"Advanced Programming Techniques" on page 15-1 and
"Managing Application Express Users" in Oracle Application Express
Administration Guide
See Also:
About the Oracle Application Express Application Development Life Cycle
When developing applications using Application Builder, you need to find a balance
between two dramatically different development methodologies:
■
Iterative, rapid application development
■
Planned, linear style development
The first approach offers so much flexibility that you run the risk of never completing
your project. In contrast, the second approach can yield applications that do not meet
the needs of end users even if they meet the stated requirements on paper.
System Development Life Cycle Methodologies to Consider
The system development life cycle (SDLC) is the overall process of developing
software using a series of defined steps. There are a number of SDLC models that
work well for developing applications in Oracle Application Express.
The SDLC waterfall is probably the best known model. In this methodology, the
development process is broken down into the following stages:
1.
Project Planning
Deploying an Application
14-1
Understanding the Packaging Process
2.
Requirements Definition
3.
Design
4.
Development
5.
Integration and Testing
6.
Installation and Acceptance
7.
Maintenance
This methodology is referred to as a waterfall because the output from one stage is the
input for the next stage. One of the primary problems with this approach is that it is
assumed that all requirements can be established in advance. Unfortunately,
requirements often change and evolve during the development process.
The Oracle Application Express development environment enables developers to take
a more iterative approach to development. Unlike many other development
environments, creating prototypes is easy. With Oracle Application Express,
developers can:
■
Use built-in wizards to quickly design an application user interface
■
Make protoypes available to users and gather feedback
■
Implement changes in real time, creating new prototypes instantly
Other methodologies that work well with Oracle Application Express include:
■
■
Spiral - This approach is actually a series of short waterfall cycles. Each waterfall
cycle yields new requirements and enables the development team to create a
robust series of prototypes.
Rapid application development (RAD) life cycle - This approach has a heavy
emphasis on creating a prototype that closely resembles the final product. The
prototype is an essential part of the requirements phase. One disadvantage of this
model is that the emphasis on creating the prototype can cause scope creep;
developers can lose sight of their initial goals in the attempt to create the perfect
application.
Understanding the Packaging Process
To move an application from one Oracle Application Express instance to another, you
must move both the metadata and supporting objects used by the application as
follows:
1.
Move the application definition and all associated files. See "How to Move an
Application to Another Development Instance" on page 4.
2.
Move the supporting objects. Review the Database Dependencies report to
determine what objects to move. See "About the Database Object Dependencies
Report" on page 6-30 and "How to Create a Packaged Application" on page 14-5.
This section contains the following topics:
■
Deployment Options to Consider
■
Deciding Whether to Copy a Workspace
■
Deciding Whether to Copy a Database
■
About the Application ID
14-2 Oracle Application Express Application Builder User’s Guide
Understanding the Packaging Process
Deployment Options to Consider
When you develop an application in Application Builder, you create the application
within a specific workspace. Each workspace has a unique ID and name. A common
scenario is to create the application in a development instance and then deploy it to a
production instance.
During the deployment process, you must decide whether you want to use the
existing application ID, the existing workspace, the existing database, the existing
Oracle HTTP Server, or create new ones. Deployment options to consider include:
1.
Create Application Express End Users. The simplest way to deploy an application
is to create Application Express end users and then send the URL and login
information to users. This approach works well for applications with a small and
tolerant user population. See "About Publishing the Application URL" on
page 14-28 and "Managing Application Express Users" in Oracle Application Express
Administration Guide.
2.
Use the same workspace and same schema. Export and then import the
application and install it using a different application ID. This approach works
well when there are few changes to the underlying objects, but frequent changes to
the application functionality.
3.
Use a different workspace and same schema. Export and then import the
application into a different workspace. This is an effective way to prevent a
production application from being modified by developers.
4.
Use a different workspace and different schema. Export and then import the
application into a different workspace and install it so that it uses a different
schema. This new schema will need to have the database objects required by your
application. See "About the Database Object Dependencies Report" on page 6-30.
5.
Use a different database with all its variations. Export and then import the
application into a different Oracle Application Express instance and install it using
a different schema and database.
Deciding Whether to Copy a Workspace
Deciding whether to copy an existing workspace is a matter of preference. Keep in
mind that the production version must have access to all the appropriate objects. For
example, you might want to copy a workspace in the following situations:
■
■
When the application subscribes to other Oracle Application Express objects
within the workspace.
When the application relies on Oracle Application Express authentication.
Copying the workspace automatically migrates all the required user data.
Deciding Whether to Copy a Database
When deciding whether to copy the database, remember that the schema against
which the application runs must have access to the same objects as the development
instance. The actual name of the schema is unimportant. You can change it during the
import process.
About the Application ID
It is not necessary to have matching application IDs for a development version and
production version of an application. In fact, as a best practice never hard code the
application ID into your application. Instead, use the application alias (defined on the
Deploying an Application
14-3
How to Move an Application to Another Development Instance
Edit Definition page), or use a built-in substitution string (such as APP_ID and APP_
ALIAS). Using a substitution string is the better approach because it enables you to
change the application ID without affecting any application functionality.
See Also: "Name" on page 4-9 for information about defining an
application alias and "About Built-in Substitution Strings" on
page 3-15 for information about using APP_ID and APP_ALIAS
Deciding to Install a New HTTP Server
In order to run, Oracle Application Express must have access to either the embedded
PL/SQL gateway or Oracle HTTP Server and mod_plsql. Installing a new HTTP
server is another way to separate a development version and production version of an
application. To learn more about HTTP server configuration options, see "Choosing a
HTTP Server" in the appropriate installation guide for your operating environment.
See "Related Documents" on page -xvii.
How to Move an Application to Another Development Instance
Whether you want to move an application to another workspace or just make a copy
of it, deploying involves the following steps:
1.
Move the supporting database objects (if appropriate). Review the Database
Dependencies report to determine what objects to move. See "About the Database
Object Dependencies Report" on page 6-30.
2.
Package an application definition with its supporting objects to create a packaged
application. See "How to Create a Packaged Application" on page 14-5.
3.
Import the exported files into the target Oracle Application Express instance. See
"Importing Export Files" on page 14-21.
Note that if the target instance is a different schema, you also need to export and
import any required database objects.
4.
Install the exported files from Export Repository. See "Installing Export Files" on
page 14-25.
You can import an application into your workspace regardless of the workspace in
which it was developed. See "Deployment Options to Consider" on page 14-3.
Tip: You can also move the application definition and all supporting
objects manually. See "Exporting an Application and Related Files" on
page 14-12.
About Managing Database Objects
Before you export an application and the appropriate related files, you must determine
if you also need to migrate the database objects referenced by the application. If you
are unsure of which database objects to move, review the Database Object
Dependencies report.
See Also: "About the Database Object Dependencies Report" on
page 6-30 and "How to Create a Packaged Application" on page 14-5
If the target schema is different from the schema used in the development
environment, you need to migrate the database objects referenced by the application.
In many cases, this process can be as simple as using Oracle database export and
import utilities to copy the application schema from the development environment to
14-4 Oracle Application Express Application Builder User’s Guide
How to Create a Packaged Application
target instance. The following are two common scenarios where this approach does not
work:
■
■
When the object development schema refers to tablespaces to which the target
instance schema does not have access
When the development instance schema has sample data that you do not want to
migrate to the target instance schema
If a database administrator or an Oracle Application Express administrator is the
person responsible for exporting Oracle Application Express applications, be sure to
clearly communicate if he or she:
■
Should include all data when exporting your application
■
Should not include data from specific tables you identify
Tip: "Loading and Unloading Data from the Database" in Oracle
Application Express SQL Workshop and Utilities Guide
How to Create a Packaged Application
You can greatly simplify the steps needed to deploy an application by creating a
packaged application on the Supporting Objects page.
See Also: "How to Move an Application to Another Development
Instance" on page 14-4 and "Exporting an Application and Related
Files" on page 14-12
This section contains the following topics:
■
How a Packaged Application Simplifies Deployment
■
Creating a Packaged Application
■
Adding Installation Scripts for an Image, Cascading Style Sheet, or Static File
■
Adding an Access Control List to a Packaged Application
■
Installing Supporting Objects
■
Deleting Supporting Objects Scripts, Messages, and Installation Options
■
Upgrading a Packaged Application
■
Deinstalling Supporting Objects
■
Viewing an Install Summary
How a Packaged Application Simplifies Deployment
From a user’s perspective, importing and installing an application is a complicated
process. First, you create the target database objects and seed data. Second, you import
and install the application definition and all related files, including images, themes,
and any other required static files.
Creating a packaged application using the Supporting Objects utility greatly simplifies
this process. Instead of performing numerous steps to create the database objects and
then import and install the application and all supporting files, you can define the
supporting objects so that the application and supporting files can be migrated in a
few easy steps.
Deploying an Application
14-5
How to Create a Packaged Application
After users import and install the application definition, a wizard guides them
through a few simple configuration steps. Then, the wizard asks whether to install the
supporting application objects. Users have the option of installing the supporting
application objects then or doing it later.
From a developer’s perspective, this feature has a number of advantages:
■
■
■
■
■
Ensures that the supporting objects are created in the correct order.
Provides users with an automated process for deploying an application quickly
using very few steps.
Gives users the option to install supporting application objects when they import
and install the application definition or at a later time. See "Installing Supporting
Objects" on page 14-9.
Enables users and developers with a convenient method for removing the
application definition, supporting files, and all database objects. See "Deinstalling
Supporting Objects" on page 14-11.
Enables users and developers with an easy way to upgrade a previously released
packaged application. See "Upgrading a Packaged Application" on page 14-10.
Plus, you can also take advantage of the Deinstall and Install features to quickly edit
the underlying database objects that support an application. For example, you can
deinstall and remove all database objects, edit the underlying database object creation
scripts, and reinstall to create the redefined application objects.
Creating a Packaged Application
To create a packaged application, you must create installation scripts that define your
application's supporting objects (including database objects, images, and seed data)
and any preinstallation validations. You define these objects and the installation and
deinstallation scripts and the messages that display when the user installs or deinstalls
on the Supporting Objects page.
This section contains the following topics:
■
Accessing the Supporting Objects Page
■
About the Supporting Objects Page
Accessing the Supporting Objects Page
You create a packaged application on the Supporting Objects page.
To access the Supporting Objects Page application:
1.
On the Workspace home page, click the Application Builder icon.
2.
Select the application.
The Application home page appears.
3.
Click the Supporting Objects icon.
The Supporting Objects page appears.
About the Supporting Objects Page
The top of the Supporting Objects page displays the application name and indicates
current selections for the following: Check for Objects, Verify System Privileges,
Required Free KB, Prompt for License, Substitutions, Build Options, Validations,
Installation Scripts, Upgrade Scripts, Deinstallation Script, and Include in Export.
14-6 Oracle Application Express Application Builder User’s Guide
How to Create a Packaged Application
The rest of the page is divided into four categories.
Installation Use the links under Installation to define the following types of
information:
■
■
Prerequisites. Defines built-in checks required before installing the application,
including required free disk space, required system privileges, and schema object
restrictions.
Application substitution strings. Lists static substitution strings defined for the
application. You can define static substitution strings for phrases or labels that
occur in many places within an application. See "Substitutions" on page 4-13.
When packaging an application, you can include prompts for substitution strings
which users can specify when they install the packaged application.
■
Build Options. Lists build options defined for this application. You can use build
options to conditionally display specific functionality within an application. See
"Using Build Options to Control Configuration" on page 14-29 and "Exporting
Build Options or Build Option Status" on page 14-30.
When packaging an application, you can include prompts for specific build
options which display when the application is installed.
■
■
Pre-installation Validations. Lists validations defined for the packaged
application. Similar to normal page validations, these validations prevent a user
from installing database objects if the user-defined conditions are not satisfied. To
create a new validation, click Create and follow the on-screen instructions.
Installation Scripts. Enables a you to define multiple installation scripts that
install supporting objects for the application. To create a new script, click Create
and follow the on-screen instructions. To edit an existing script, click the Edit icon.
Message Use the links under Message to define message to display when the user
installs or deinstalls the application. Supported HTML tags include <b>, <i>, <u>,
<p>, <br>, <hr>, <ul>, <ol>, <li>, and <pre>. Available message types include:
■
Welcome
■
License
■
Application Substitutions
■
Build Options
■
Validations
■
Confirmation
■
Post Installation
■
Upgrade
■
Deinstallation
Deploying an Application
14-7
How to Create a Packaged Application
Note that when these messages display, only a limited set of HTML tags are
recognized in order to prevent a cross site-scripting (XSS) attack. See "Understanding
Cross-Site Scripting Protection" on page 13-11.
Upgrade Click Upgrade scripts to define scripts to upgrade database objects, images,
and seed data when upgrading an existing application. See "Upgrading a Packaged
Application" on page 14-10.
Deinstallation Click Deinstallation script to define a script to drop database objects and
static files created by the installation scripts. To edit an existing script, click the Edit
icon.
Adding Installation Scripts for an Image, Cascading Style Sheet, or Static File
You can create installation scripts for images, cascading style sheets, and static files
you have previously uploaded for your application or workspace on the Installation
Scripts page. Oracle Application Express uses the name of the file you select as the
name for each new script. It also adds corresponding API calls to the end of the
deinstallation script (or creates one if one does not already exist), which removes the
selected files when the application’s supporting objects are deinstalled.
See Also: "Using Custom Cascading Style Sheets" on page 10-40,
"Managing Images" on page 9-13, and "Managing Static Files" on
page 9-16
To create installation scripts for an image, cascading style sheet, or static file:
1.
Navigate to the Supporting Objects page:
a.
On the Workspace home page, click the Application Builder icon.
b.
Select the application.
The Application home page appears.
c.
Click Supporting Objects.
The Supporting Objects page appears.
2.
Under Installation, click Installation scripts.
The Installation Scripts page appears.
3.
Click Create.
4.
At the bottom of the page, click Create Script to Install Files.
A list of available cascading style sheets, images, and static files appears.
5.
Select the files to include with your packaged application and click Create Script.
Adding an Access Control List to a Packaged Application
You can control access to an application, individual pages, or page components by
creating an access control list.
To add an access control list of a packaged application:
1.
Create an access control list. See "Controlling Access to Applications, Pages, and
Page Components" on page 7-96.
2.
Navigate to the Supporting Objects page:
14-8 Oracle Application Express Application Builder User’s Guide
How to Create a Packaged Application
a.
On the Workspace home page, click the Application Builder icon.
b.
Select the application.
The Application home page appears.
c.
Click Supporting Objects.
The Supporting Objects page appears.
3.
Under Installation, click Installation scripts.
The Installation Scripts page appears.
4.
Click Create.
5.
At the bottom of the page, click Create Scripts for Access Control Tables.
If Access Control tables are defined, the Create Script page displays the tables to
be included.
6.
Click Create Script.
Installing Supporting Objects
After you edit your supporting objects and create the appropriate scripts, you can run
your installation scripts by clicking Install Supporting Objects on the Tasks list.
End users can also use this feature if they elect to not install the packaged application
(or supporting objects) after they import and install the application definition.
To install supporting objects:
1.
On the Workspace home page, click the Application Builder icon.
2.
Select the application.
3.
Click Supporting Objects.
The Supporting Objects page appears.
4.
Click the Install Supporting Objects on the Tasks list.
5.
To view details about the installation script before running it, click Preview
Installation Script.
The Preview Scripts page appears listing summary information, prerequisites, and
the actual scripts to be run.
6.
To exit the Preview Scripts page and continue, click Close.
7.
From Install Supporting Objects, click Yes and click Next.
8.
Follow the on-screen instructions.
Deleting Supporting Objects Scripts, Messages, and Installation Options
You can delete the metadata that defines supporting object scripts, messages, and
installation options associated with a packaged application by clicking Remove
Supporting Object Installation on the Tasks list on the Supporting Objects page.
To delete the metadata that defines supporting object scripts, messages, and
installation options:
1.
On the Workspace home page, click the Application Builder icon.
2.
Select an application.
Deploying an Application
14-9
How to Create a Packaged Application
3.
Click Supporting Objects.
The Supporting Objects page appears.
4.
On the Tasks list on the right side of the page, click Remove Supporting Object
Installation.
5.
Follow the on-screen instructions.
Upgrading a Packaged Application
You can define scripts to upgrade a previously published application on the Upgrade
page.
This section contains the following topics:
■
Defining an Upgrade Script
■
Upgrading a Packaged Application
Defining an Upgrade Script
You can use the Upgrade page to define scripts to upgrade database objects, images,
and seed data when upgrading an existing application.
To create an upgrade script:
1.
On the Workspace home page, click the Application Builder icon.
2.
Select an application.
3.
Click Supporting Objects.
The Supporting Objects page appears.
4.
Under Upgrade, click Upgrade Scripts.
5.
To create a script, click Create.
Tip: To enable users to upgrade from various earlier versions of this
application, you can add conditions to the upgrade scripts by going to
the Script Properties page.
Use the Detect Existing Supporting Objects section to determine if the appropriate
objects are installed or need to be upgraded.
6.
In Query to Detect Existing Supporting Objects, enter a query in the field provided
that returns at least one row if the supporting objects exist.
This query determines whether the user who installs the packaged application is
prompted to run the installation scripts or the upgrade scripts.
7.
Follow the on-screen instructions.
Upgrading a Packaged Application
After you create your upgrade script, you can test it by clicking Upgrade Supporting
Objects on Tasks list on the Supporting Object page.
End users can also use this feature to upgrade an existing packaged application.
To upgrade a packaged application:
1.
Import a new version of application to be upgraded (if applicable). See "Importing
an Application or Page" on page 14-21.
14-10 Oracle Application Express Application Builder User’s Guide
How to Create a Packaged Application
2.
On the Workspace
home page, click the Application Builder icon.
3.
Select the application.
4.
Click Supporting Objects.
The Supporting Objects page appears.
5.
From the Tasks list, click Upgrade Supporting Objects.
6.
Follow the on-screen instructions.
Deinstalling Supporting Objects
Once you create or install a packaged application, you can deinstall it by either:
■
Clicking the Deinstall Supporting Objects on the Supporting Objects page
■
Clicking Delete this Application on the Application home page
When you deinstall an application, you have the option of removing the current
application definition and running the deinstallation script defined in the Supporting
Objects.
See Also:
"Creating a Packaged Application" on page 14-6.
To deinstall a packaged application:
1.
On the Workspace home page, click the Application Builder icon.
2.
Select the application.
3.
Click Supporting Objects.
The Supporting Objects page appears.
4.
Click Deinstall Supporting Objects.
5.
Select a deinstallation option:
■
■
6.
Remove Application Definition removes the current application definition.
Deinstall Database Objects runs the deinstallation script defined in the
deployment attributes for this application.
Follow the on-screen instructions.
Viewing an Install Summary
You can view a log of recent installation and deinstallation by clicking View Install
Summary on the Tasks list on the Supporting Objects page. Note that this log only
displays results from the most recent installation or deinstallation that occurred during
the current Application Express session.
To view the Install Summary:
1.
On the Workspace home page, click the Application Builder icon.
2.
Select the application.
3.
Click Supporting Objects.
The Supporting Objects page appears.
4.
On the Tasks list on the right side of the page, click View Install Summary.
A Summary page appears.
Deploying an Application 14-11
Exporting an Application and Related Files
Exporting an Application and Related Files
You export and import application definitions and all associated files using the
Workspace Users, Application, CSS, Images, Files, Themes, and User Interface Defaults
tabs located at the top of the Export page. Note that it is not necessary to export a
workspace unless you want to migrate workspace users or replicate shared component
subscriptions in the target instance.
Once you export an application and any related files, you must import them into the
target Oracle Application Express instance and then install them. As a general rule,
always import the application first and then the related files. See "How to Move an
Application to Another Development Instance" on page 14-4.
Tip: You can simplify the steps needed to deploy an application by
creating a packaged application. See "How to Create a Packaged
Application" on page 14-5.
This section contains the following topics:
■
Exporting an Application
■
Exporting Workspace Users
■
Exporting Application Components
■
Exporting a Page in an Application
■
Exporting Cascading Style Sheets
■
Exporting Images
■
Exporting Static Files
■
Exporting Script Files
■
Exporting Themes
■
Exporting User Interface Defaults
■
Where Images, CSS, and Script Files Are Stored
Exporting an Application
When you export an application, Oracle Application Express generates a text file
containing PL/SQL API calls.
See Also:
"Exporting Application Components" on page 14-14
To export an application:
1.
Navigate to the Export page:
a.
On the Workspace home page, click the Application Builder icon.
b.
Select an application.
c.
On the Application home page, click Export/Import.
d.
On the Export/Import page, click Export and then click Next.
2.
From Application, select the application to be exported.
3.
From File Format, select how rows in the export file will be formatted:
■
Choose UNIX to have the resulting file contain rows delimited by line feeds.
14-12 Oracle Application Express Application Builder User’s Guide
Exporting an Application and Related Files
■
Choose DOS to have the resulting file contain rows delimited by carriage
returns and line feeds.
4.
From Owner Override, optionally select another owner. By default, the application
is owned by the owner identified in the application attribute owner.
5.
From Build Status Override, select one of the following:
■
Run Application Only - Developers can only run an application
■
Run and Build Application - Developers can both run and edit an application
Selecting Run Application Only is an effective way to protect an application from
modifications from other developers.
Tip: If you select Run Application Only, you cannot set the
argument p_trace to Yes. See "Using Build Options to Control
Configuration" on page 14-29. Also, the only way to change this
setting after you import the application, is to log in to Oracle
Application Express Administration Services. See "Changing
Application Build Status Set During Deployment" in Oracle Application
Express Administration Guide.
6.
From Debugging, select one of the following:
■
Yes exports the application with debugging enabled.
■
No exports the application with debugging disabled.
7.
From Exporting Supporting Object Definitions, specify whether to export
supporting object definitions with your application. Available options include: See
"How to Create a Packaged Application" on page 14-5.
8.
From Export Comments, specify whether to export comments for this application.
See "Adding Developer Comments" on page 6-22.
9.
Use the As of field to export your application as it was previously defined. Specify
the number of minutes in the field provided.
This utility uses the DBMS_FLASHBACK package. Because the timestamp to System
Change Number (SCN) mapping is refreshed approximately every five minutes,
you may have to wait that amount of time to locate the version for which you are
looking. The time undo information is retained and influenced by the startup
parameter UNDO_RETENTION (the default is three hours). However, this only
influences the size of the undo tablespace. While two databases can have the same
UNDO_RETENTION parameter, you are able to go back further in time on a
database with fewer transactions because it is not filling the undo tablespace,
forcing older data to be archived.
10. Click Export Application.
In addition to exporting the actual application file, you may also need to export other
related files such as cascading style sheets, images, and script files.
See Also:
"Enabling SQL Tracing and Using TKPROF" on page 12-2
Exporting Workspace Users
You can make an application available to other users by creating workspace users.
When you export workspace users, Oracle Application Express creates an ASCII text
SQL script of users and any defined user groups.
To export workspace users:
Deploying an Application 14-13
Exporting an Application and Related Files
1.
Navigate to the Export page:
a.
On the Workspace home page, click the Application Builder icon.
b.
Select an application.
c.
On the Application home page, click Export/Import.
d.
On the Export/Import page, click Export and then click Next.
2.
On the Export page, click the Workspace Users tab.
3.
From File Format, select how rows in the export file will be formatted:
■
■
4.
Choose UNIX to have the resulting file contain rows delimited by line feeds.
Choose DOS to have the resulting file contain rows delimited by carriage
returns and line feeds.
Click Export Workspace Users.
See Also: "Managing Application Express Users" in Oracle
Application Express Administration Guide
Exporting Application Components
You can export shared components or components of a page on the Component Export
page. You can use this wizard to:
■
■
■
Export shared components or page components to another application or
workspace
Back up a component before editing it
Create an export to function as a patch to another Oracle Application Express
instance
"Exporting an Application" on page 14-12, "Exporting a
Page in an Application" on page 14-15, "Importing an Application or
Page" on page 14-21, and "Exporting Build Options or Build Option
Status" on page 14-30
See Also:
To export shared components or page components:
1.
Navigate to the Component Export page:
a.
On the Workspace home page, click the Application Builder icon.
b.
Select an application.
c.
Click Shared Components.
d.
From the Tasks list, click Export Application Components.
The Component Export page appears.
2.
Click the following tabs and select the components to be exported:
■
■
Components displays shared application components and entire pages. Use
the navigation bar at the top of the page to search for components. See
"Working with Shared Components" on page 5-29 and "Exporting Build
Options or Build Option Status" on page 14-30.
Components by Page lists components of the selected page. Navigate to a
specific page by making a selection from the Page. Click Check All to select all
components.
14-14 Oracle Application Express Application Builder User’s Guide
Exporting an Application and Related Files
■
■
Application Attributes displays application attributes. Press CTRL or SHIFT
to select multiple attributes. See "About the Edit Definition Page" on page 4-9.
Build Option Status displays available build options. Use this page to turn
build options on and off. See "Exporting Build Options or Build Option Status"
on page 14-30.
3.
Click Add to Export.
4.
Click Next.
5.
On Components to Export:
a.
b.
From File Format, select how rows in the export file will be formatted:
–
Choose UNIX to have the resulting file contain rows delimited by line
feeds.
–
Choose DOS to have the resulting file contain rows delimited by carriage
returns and line feeds.
Use the As of field to export a page as it was previously defined. Specify the
number of minutes in the field provided.
This utility uses the DBMS_FLASHBACK package. Because the timestamp to
System Change Number (SCN) mapping is refreshed approximately every five
minutes, you may have to wait that amount of time to locate the version for
which you are looking. The time undo information is retained and influenced
by the startup parameter UNDO_RETENTION (the default is three hours).
However, this only influences the size of the undo tablespace. While two
databases may have the same UNDO_RETENTION parameter, you are able to go
back further in time on a database with fewer transactions because it is not
filling the undo tablespace, forcing older data to be archived.
c.
Click Export Components.
Exporting a Page in an Application
You can also export a specific page within an application by clicking the Export page
icon on the Page Definition. When exporting a page, remember that exported pages
can only be imported sucessfully if they have the same application ID and workspace
ID.
See Also: "Exporting Application Components" on page 14-14,
"Exporting an Application" on page 14-12, and "Importing an
Application or Page" on page 14-21
To export a page in an application:
1.
Navigate to the appropriate Page Definition. See "Accessing a Page Definition" on
page 5-29.
2.
On the Page Definition, you can export a page in two ways:
■
Click the Export Page icon, the down arrow in the upper right corner.
■
From the View list, select Export and click Go.
The Export Page Wizard appears.
3.
From Page, select the page to be exported.
4.
From File Format, select how rows in the export file will be formatted:
Deploying an Application 14-15
Exporting an Application and Related Files
■
■
5.
Choose UNIX to have the resulting file contain rows delimited by line feeds.
Choose DOS to have the resulting file contain rows delimited by carriage
returns and line feeds.
Use the As of field to export a page as it was previously defined. Specify the
number of minutes in the field provided.
This utility uses the DBMS_FLASHBACK package. Because the timestamp to System
Change Number (SCN) mapping is refreshed approximately every five minutes,
you may have to wait that amount of time to locate the version for which you are
looking. The time undo information is retained and influenced by the startup
parameter UNDO_RETENTION (the default is three hours). However, this only
influences the size of the undo tablespace. While two databases may have the
same UNDO_RETENTION parameter, you are able to go back further in time on a
database with fewer transactions because it is not filling the undo tablespace,
forcing older data to be archived.
6.
Click Export Page.
Exporting Cascading Style Sheets
Use the Export Cascading Style Sheets utility to export uploaded cascading style
sheets. Note that you can use this utility to export only uploaded cascading style
sheets.
To export related cascading style sheets:
1.
Navigate to the Export page:
a.
On the Workspace home page, click the Application Builder icon.
b.
Select an application.
c.
On the Application home page, click Export/Import.
d.
On the Export/Import page, click Export and then click Next.
2.
Click the CSS tab at the top of the page.
3.
On the Export Cascading Style Sheets page, select the following:
a.
Stylesheets - Select the cascading style sheets to export.
b.
File Format - Select how rows in the export file will be formatted:
c.
–
Choose UNIX to have the resulting file contain rows delimited by line
feeds.
–
Choose DOS to have the resulting file contain rows delimited by carriage
returns and line feeds.
Click Export Style Sheets.
See Also: "Importing Cascading Style Sheets" on page 14-23 and
"Using Custom Cascading Style Sheets" on page 10-40
Exporting Images
Use the Export Images utility to export uploaded images. When you export images
using this utility, the images are converted to a text document. Note that you can use
this utility to export only uploaded images.
To export upload images:
14-16 Oracle Application Express Application Builder User’s Guide
Exporting an Application and Related Files
1.
Navigate to the Export page:
a.
On the Workspace home page, click the Application Builder icon.
b.
Select an application.
c.
On the Application home page, click Export/Import.
d.
On the Export/Import page, click Export and then click Next.
2.
Click the Images tab at the top of the page.
3.
On the Export Images page, select the following:
a.
Export Images in Application - Select an application from which to export
images.
Be aware that selecting Workspace Images only exports those images in your
repository that are not associated with a specific application. If all of your
images are associated with specific applications, then the workspace image
export file will be empty.
b.
4.
File Format - Select how rows in the export file will be formatted:
–
Choose UNIX to have the resulting file contain rows delimited by line
feeds.
–
Choose DOS to have the resulting file contain rows delimited by carriage
returns and line feeds.
Click Export Images.
See Also: "Importing Images" on page 14-24, "Managing Images" on
page 9-13, and "Using the Images Finder" on page 10-40
Exporting Static Files
Use the Export Static Files utility to export static files you have imported. Note that
you can use this utility to export only uploaded static files.
To export related static files:
1.
Navigate to the Export page:
a.
On the Workspace home page, click the Application Builder icon.
b.
Select an application.
c.
On the Application home page, click Export/Import.
d.
On the Export/Import page, click Export and then click Next.
2.
Click the Files tab at the top of the page.
3.
On Export Static Files, select the following:
a.
Static Files - Select the files to be exported.
b.
File Format - Select how rows in the export file will be formatted:
c.
–
Choose UNIX to have the resulting file contain rows delimited by line
feeds.
–
Choose DOS to have the resulting file contain rows delimited by carriage
returns and line feeds.
Click Export File(s).
Deploying an Application 14-17
Exporting an Application and Related Files
About Importing into Another Oracle Application Express Instance
Note that you cannot use the Web interface described in this section to import
exported static files into another Oracle Application Express instance. To import
exported static files into another Oracle Application Express instance, use SQL*Plus
while connected to the database. Note that you must export from and to a workspace
having the same name and workspace ID.
Exporting Script Files
You can transfer selected scripts from your current Script Repository to a Script
Repository in a different Workspace by using the Export and Import tasks.
To export script files:
1.
On the Workspace home page, click the SQL Workshop icon.
2.
Click SQL Scripts.
3.
On the Tasks list, click Export.
4.
Select the appropriate script files and click Add to Export.
5.
Review the file name and click Export All.
Select the Remove check box to remove the script.
See Also: "Using SQL Scripts" in Oracle Application Express SQL
Workshop and Utilities Guide
Exporting Themes
Use the Export Theme utility to export themes from one Oracle Application Express
development instance to a file.
See Also: "Importing Themes" on page 14-24and "Managing
Themes" on page 10-1
Exporting a Theme from the Export Page
To export an application theme from the Export page:
1.
Navigate to the Export page:
a.
On the Workspace home page, click the Application Builder icon.
b.
Select an application.
c.
On the Application home page, click Export/Import.
d.
On the Export/Import page, click Export and click Next.
2.
Click the Themes tab at the top of the page.
3.
On the Export Application Theme page, select the following:
a.
Export Theme - Select the theme to be exported.
b.
File Format - Select how rows in the export file will be formatted:
c.
–
Choose UNIX to have the resulting file contain rows delimited by line
feeds.
–
Choose DOS to have the resulting file contain rows delimited by carriage
returns and line feeds.
Click Export Theme.
14-18 Oracle Application Express Application Builder User’s Guide
Exporting an Application and Related Files
Exporting a Theme from the Themes Page
To export an application theme from the Themes page:
1.
On the Workspace home page, click the Application Builder icon.
2.
Select an application.
3.
On the Application home page, click Shared Components.
4.
Under User Interface, select Themes.
The Themes page appears.
5.
On the Tasks list, click Export Theme.
The Export page appears.
6.
On the Export Theme page, select the following:
a.
Export Theme - Select the theme to be exported.
b.
File Format - Select how rows in the export file will be formatted:
c.
–
Choose UNIX to have the resulting file contain rows delimited by line
feeds.
–
Choose DOS to have the resulting file contain rows delimited by carriage
returns and line feeds.
Click Export Theme.
Exporting User Interface Defaults
Exporting User Interface Defaults is useful when you plan to develop on a target
system.
When you export User Interface Defaults, all User Interface Defaults for the selected
schema are exported to a single SQL Command script. When prompted, save this file
to your hard drive. The file contains an API call to create table hints by making calls to
the application PL/SQL API. You can use this file to import User Interface Defaults to
another database and Oracle Application Express instance.
See Also: "Importing User Interface Defaults" on page 14-25 and
"Managing User Interface Defaults" on page 11-1
Exporting User Interface Defaults from the Export Page
To export User Interface Defaults from the Export page:
1.
Navigate to the Export page:
a.
On the Workspace home page, click the Application Builder icon.
b.
Select an application.
c.
On the Application home page, click Export/Import.
d.
On the Export/Import page, click Export and click Next.
2.
Click the User Interface Defaults tab at the top of the page.
3.
On the Export User Interface Defaults page, select the following:
a.
Schema - Select the schema that owns the table associated with the User
Interface Defaults.
b.
File Format - Select how rows in the export file will be formatted:
Deploying an Application 14-19
Exporting an Application and Related Files
c.
–
Choose UNIX to have the resulting file contain rows delimited by line
feeds.
–
Choose DOS to have the resulting file contain rows delimited by carriage
returns and line feeds.
Click Export User Interface Defaults.
Exporting User Interface Defaults from the User Interface Defaults Page
To export User Interface Defaults from the User Interface Defaults page:
1.
On the Workspace home page, click the Application Builder icon.
2.
Select an application.
3.
On the Application Builder home page, click Shared Components.
4.
Under User Interface, select User Interface Defaults.
The User Interface Defaults page appears.
5.
From the Tasks list, click Export.
6.
On the Export User Interface Defaults page, select the following:
a.
Schema - Select the schema that owns the table associated with the User
Interface Defaults.
b.
File Format - Select how rows in the export file will be formatted:
c.
–
Choose UNIX to have the resulting file contain rows delimited by line
feeds.
–
Choose DOS to have the resulting file contain rows delimited by carriage
returns and line feeds.
Click Export User Interface Defaults.
Where Images, CSS, and Script Files Are Stored
In order to run, Oracle Application Express must have access to either Oracle HTTP
Server and mod_plsql or the embedded PL/SQL gateway. Where images, CSS, and
script files are stored depends upon the HTTP server you choose.
This section contains the following topics:
■
■
Where Images, CSS, and Script Files Are Stored When Using Oracle HTTP Server
Where Images, CSS, and Script Files Are Stored When Using the Embedded
PL/SQL Gateway
Where Images, CSS, and Script Files Are Stored When Using Oracle HTTP Server
In an Oracle HTTP Server or Oracle Application Server configuration, images are
stored on the file system in the location referenced by the alias /i/. To locate the
images directory on the file system, review the following files and search for the text
alias /i/:
■
■
■
Oracle9i HTTP Server Release 2—see the httpd.conf file.
Oracle HTTP Server distributed with Oracle Database 11g—see the dads.conf
file.
Oracle Application Server 10g—see the marvel.conf file.
14-20 Oracle Application Express Application Builder User’s Guide
Importing Export Files
Specific examples for locating the text alias /i/ can be found in Oracle Application
Express Installation Guide
Where Images, CSS, and Script Files Are Stored When Using the Embedded
PL/SQL Gateway
When running Oracle Application Express with the embedded PL/SQL gateway,
images are stored directly in the database within the Oracle XML DB repository. You
can access images by using the WebDAV feature of Oracle XML DB or by using FTP. To
learn more, see "Using Protocols to Access the Repository" in Oracle XML DB
Developer's Guide.
Importing Export Files
Once you export an application and any related files, you need to import them into the
target Oracle Application Express instance before you can install them. As a general
rule, always import the application first and then the related files. See "How to Move
an Application to Another Development Instance" on page 14-4.
Tip: You can simplify the steps needed to deploy an application by
creating a packaged application. See "How to Create a Packaged
Application" on page 14-5.
This section contains the following topics:
■
Importing an Application or Page
■
Importing Cascading Style Sheets
■
Importing Images
■
Importing Themes
■
Importing User Interface Defaults
Importing an Application or Page
To import an Application or Page Export into a target Oracle Application Express
instance:
1.
2.
Navigate to the Import page:
a.
On the Workspace home page, click the Application Builder icon.
b.
Select an application.
c.
On the Application home page, click Export/Import.
d.
On the Export/Import page, click Import and then click Next.
For Specify File, specify the following:
a.
Import file - Click Browse and navigate to the file.
b.
File Type - Select Application, Page, or Component Export.
c.
Verify that File Character Set is correct.
d.
Click Next.
Once you import a file, you have the option to install it.
3.
To install an imported file, click Next.
Deploying an Application 14-21
Importing Export Files
The Install Application wizard appears.
4.
In the Install Application wizard, specify the following:
a.
Parsing Schema - Select a schema.
This is the schema against which all of the application's SQL and PL/SQL will
be parsed.
b.
Build Status - Select one of the following:
–
Run Application Only - Users can only run an application.
–
Run and Build Application - Users can run an application and developers
can both run and edit an application.
Selecting Run Application Only is an effective way to protect an application
from modifications from other developers.
Tip: If you select Run Application Only, the only way to change this
setting after you import the application is to log in to Oracle
Application Express Administration Services. See "Changing
Application Build Status Set During Deployment" in Oracle Application
Express Administration Guide.
c.
Install As Application - Select one of the following:
–
Auto Assign New Application ID
–
Reuse Application ID From Export File
–
Change Application ID
Use these options to avoid application ID conflicts. These options come in
handy when you have two versions of the same application in the same
instance. For example, you might be migrating an application to a production
instance and still need to maintain the development version.
d.
Click Install.
If you are installing a packaged application (that is, one for which you have
defined Supporting Objects), the installer prompts you to install the packaged
installation scripts. Follow the on-screen instructions.
See Also:
"How to Create a Packaged Application" on page 14-5
About Importing Application Groups
Application groups are exported with an application, application exports include an
group ID, name, and comments. When importing an application, the application
import follows these rules:
■
■
■
On import, an application uses an existing group if the ID matches.
If no application group exists with the same ID on the target machine, then
application import looks for another group ID with the same name. If a name
match is found, the application is imported with the ID corresponding to this
application group name.
If no ID or name matches existing application groups on the target machine then a
new application group is created. The new application group will use the
application group ID if that ID is not used in that Oracle Application Express
instance. If the group ID is being used, then a new ID will be generated.
14-22 Oracle Application Express Application Builder User’s Guide
Importing Export Files
Importing Cascading Style Sheets
After you import an application into the target Oracle Application Express instance,
you must import all related files.
To import a CSS Export file:
1.
2.
Navigate to the Import page:
a.
On the Workspace home page, click the Application Builder icon.
b.
Select an application.
c.
On the Application home page, click Export/Import.
d.
On the Export/Import page, click Import and then click Next.
For Specify File, select the following:
a.
Import file - Click Browse and navigate to the file.
b.
File Type - Select CSS Export.
c.
File Character Set - Verify that File Character Set is correct.
d.
Click Next.
Once you import a file, you have the option to install it.
3.
To install an imported file, click Next.
4.
Click Install CSS.
See Also: "Using Custom Cascading Style Sheets" on page 10-40 and
"Exporting Cascading Style Sheets" on page 14-16
Importing Static Files
After you import an application into the target Oracle Application Express instance,
you must import all related files.
To import a static file:
1.
2.
Navigate to the Import page:
a.
On the Workspace home page, click the Application Builder icon.
b.
Select an application.
c.
On the Application home page, click Export/Import.
d.
On the Export/Import page, click Import and click Next.
For Specify File, select the following:
a.
Import file - Click Browse and navigate to the file.
b.
File Type - Select File Export.
c.
File Character Set - Verify that File Character Set is correct.
d.
Click Next.
Once you import a file, you have the option to install it.
3.
To install an imported file, click Next.
4.
Click Install Static Files.
See Also:
"Exporting Static Files" on page 14-17
Deploying an Application 14-23
Importing Export Files
Importing Images
After you import an application into the target Oracle Application Express instance,
you must import all related files.
To import an Image Export file:
1.
2.
Navigate to the Import page:
a.
On the Workspace home page, click the Application Builder icon.
b.
Select an application.
c.
On the Application home page, click Export/Import.
d.
On the Export/Import page, click Import and click Next.
On Import Definition, select the following:
a.
Import file - Click Browse and navigate to the file.
b.
File Type - Select Image Export.
c.
File Character Set - Verify that File Character Set is correct.
d.
Click Next.
Once you import a file, you have the option to install it.
3.
To install an imported file, click Next.
4.
Click Install Image.
"Managing Images" on page 9-13, "Using the Images
Finder" on page 7-94, and "Exporting Images" on page 14-16
See Also:
Importing Themes
After you import an application into the target Oracle Application Express instance,
you must import all related files.
To import a Theme Export file:
1.
2.
Navigate to the Import page:
a.
On the Workspace home page, click the Application Builder icon.
b.
Select an application.
c.
On the Application home page, click Export/Import.
d.
On the Export/Import page, click Import and click Next.
On Import Definition, select the following:
a.
Import file - Click Browse and navigate to the file.
b.
File Type - Select Theme Export.
c.
File Character Set - Verify that File Character Set is correct.
d.
Click Next.
Once you import a file, you have the option to install it.
3.
To install an imported file, click Next.
4.
Click Install Theme.
14-24 Oracle Application Express Application Builder User’s Guide
Installing Export Files
See Also: "Managing Themes" on page 10-1 and "Exporting Themes"
on page 14-16
Importing User Interface Defaults
User Interface Defaults enables you to assign default user interface properties to a
table, column, or view within a specified schema.
After you import an application into the target Oracle Application Express instance,
you must import all related files.
To import User Interface Defaults:
1.
Navigate to the Import page:
a.
On the Workspace home page, click the Application Builder icon.
b.
Select an application.
c.
On the Application home page, click Export/Import.
d.
On the Export/Import page, click Import and then click Next.
2.
Select an application.
3.
On Import Definition, select the following:
a.
Import file - Click Browse and navigate to the file.
b.
File Type - Select User Interface Defaults.
c.
File Character Set - Verify that File Character Set is correct.
d.
Click Next.
Once you import a file, you have the option to install it.
4.
To install an imported file, click Next.
5.
Click Install User Interface Defaults.
"Managing User Interface Defaults" on page 11-1 and
"Exporting User Interface Defaults" on page 14-19
See Also:
Installing Export Files
After you import an application and any related files into the target Oracle Application
Express instance, the files are stored in the Export Repository. Next, you must install
them.
You can install export files in the following ways:
■
■
■
After you import the export file, click the Install button and follow the on-screen
instructions.
Import the export files into Application Builder and then install the files from the
Export Repository.
Install the export files from SQL*Plus.
Tip: You can simplify the steps needed to deploy an application by
creating a packaged application. See "How to Create a Packaged
Application" on page 14-5.
This section contains the following topics:
Deploying an Application 14-25
Installing Export Files
■
Accessing the Export Repository
■
Installing an Application Export from the Export Repository
■
Installing Other Files from the Export Repository
■
Deleting Files from the Export Repository
■
Installing Export Files from SQL*Plus
Accessing the Export Repository
When you import an application and any related files into a target Oracle Application
Express instance, the files are stored in the Export Repository.
To access the Export Repository:
1.
On the Workspace home page, click the Application Builder icon.
2.
Select an application.
3.
On the Tasks list, click Manage Export Repository.
The Export Repository appears.
Tip: You can also access the Export Repository by clicking Export
Repository on the Tasks list on either the Application home or
Application Builder home pages.
Installing an Application Export from the Export Repository
After you import an application export into an Oracle Application Express instance,
you must install it before it can become active or available in Application Builder.
To install an application export from the Export Repository:
1.
Navigate to the Export Repository:
a.
On the Workspace home page, click the Application Builder icon.
b.
Select an application.
c.
On the Tasks list, click Manage Export Repository.
The Export Repository appears.
2.
Select an application export and click Install in the Action column.
3.
Specify the following:
a.
Parsing Schema - Select a schema.
This is the schema against which all of the application's SQL and PL/SQL will
be parsed.
b.
Build Status - Select one of the following:
–
Run Application Only
–
Run and Build Application
Select Run Application Only to run the application in the target instance and
make it inaccessible to developers.
14-26 Oracle Application Express Application Builder User’s Guide
Installing Export Files
Tip: If you select Run Application Only, the only way to change this
setting after you import the application is to log in to Oracle
Application Express Administration Services. See "Changing
Application Build Status Set During Deployment" Oracle Application
Express Administration Guide.
c.
Install As Application - Select one of the following:
–
Reuse Application ID from Export File
–
Auto Assign New Application ID
–
Change Application ID
Use these options to avoid application ID conflicts. Use these options when
you must have two versions of the same application in the same instance. For
example, you might be migrating an application to a production instance and
still need to maintain the development version.
d.
Click Install.
About Installing a Packaged Application
If you are installing a packaged application, the installer prompts you to install the
packaged installation scripts. Follow the on-screen instructions.
See Also:
"How to Create a Packaged Application" on page 14-5
Installing Other Files from the Export Repository
After you import files into an Oracle Application Express instance, you must install
them before they can become active or available in Application Builder.
To install files stored in the Export Repository:
1.
Navigate to the Export Repository.
a.
On the Workspace home page, click the Application Builder icon.
b.
Select an application.
c.
On the Tasks list, click Manage Export Repository.
The Export Repository appears.
2.
Select the file to be installed and click Install in the Action column.
3.
Follow the on-screen instructions and click the Install button.
Deleting Files from the Export Repository
You can delete a file from the Export Repository.
To delete a file from the Export Repository:
1.
Navigate to the Export Repository.
a.
On the Workspace home page, click the Application Builder icon.
b.
Select an application.
c.
On the Tasks list, click Manage Export Repository.
The Export Repository appears.
2.
Select the file to be deleted and click Delete Checked.
Deploying an Application 14-27
About Publishing the Application URL
Installing Export Files from SQL*Plus
You can also install export files from SQL*Plus. Note there are two restrictions:
■
■
■
The export file must originate from the same user database account as the one into
which you are installing.
If the export file is an application, the application ID will be overwritten.
Therefore, the target workspace must own the ID of the application being
installed.
If the export file contains Supporting Object scripts, the scripts are not run when
the application is installed. You can either log in to the Application Builder to
install Supporting Objects, or copy the installation scripts to a standalone
SQL*Plus script and run them from there.
This section contains the following topics:
■
Verifying If Source and Target Workspace IDs Are Identical
■
Using SQL*Plus to Install Export Files
Verifying If Source and Target Workspace IDs Are Identical
You can verify that the source and target workspaces are identical by running a query
in SQL Command Processor.
To verify that the source and target workspaces are identical:
1.
Log in to the source workspace.
2.
Click the SQL Workshop icon on the Workspace home page.
3.
Click SQL Commands.
4.
Enter the following in the SQL editor pane and click Run:
SELECT &WORKSPACE_ID. FROM DUAL
5.
Note the workspace ID.
6.
Log in to the target workspace.
7.
Repeat steps 2 through 5 to verify the workspace IDs match.
Using SQL*Plus to Install Export Files
To install Oracle Application Express export files from SQL*Plus:
1.
Log in to SQL*Plus.
2.
Run the export file.
For example, if your export file is names f144.sql by default, you would type
@f144 at the command prompt.
About Publishing the Application URL
Once you have deployed your application, loaded data, and created users, you can
publish your production URL.
You can determine the URL to your application by positioning the mouse over the
Run icon on the Application home page. The URL displays in the status bar at the
bottom of the page.
14-28 Oracle Application Express Application Builder User’s Guide
Using Build Options to Control Configuration
The Run icon gets its value from the Home link attribute on the Edit Security
Attributes page. This link is only referenced by this icon and by applications that do
not use the Oracle Application Express Login API. Consider the following example:
http://apex.somewhere.com/pls/apex/f?p=11563:1:3397731373043366363
Where:
■
apex.somewhere.com is the URL of the server.
■
pls is the indicator to use the mod_plsql cartridge.
■
apex is the database access descriptor (DAD) name. The DAD describes how
Oracle HTTP Server connects to the database server so that it can fulfill an HTTP
request. The default value is apex.
■
f?p= is a prefix used by Oracle Application Express.
■
11563 is the application being called.
■
1 is the page within the application to be displayed.
■
3397731373043366363 is the session number.
To run this example application, you would use the URL:
http://apex.somewhere.com/pls/apex/f?p=11563:1
When users log in, they receive unique session numbers.
See Also:
"Accessing the Edit Security Attributes Page" on page 4-15
Using Build Options to Control Configuration
Build options enable you to conditionally display specific functionality within an
application.
Build options have two possible values: INCLUDE and EXCLUDE. If you specify an
attribute as being included, then the Application Express engine considers it part of
the application definition at run time. Conversely, if you specify an attribute as being
excluded, then the Application Express engine treats it as if it did not exist.
This section contains the following topics:
■
Creating Build Options
■
Managing Build Options
■
Exporting Build Options or Build Option Status
■
Viewing the Build Option Utilization Report
See Also: See "Changing Application Build Status Set During
Deployment" in Oracle Application Express Administration Guide.
Creating Build Options
You create a build option for an application on the Build Options page.
To create a build option:
1.
On the Workspace home page, click the Application Builder icon.
2.
Select an application.
3.
On the Application Builder home page, click Shared Components.
Deploying an Application 14-29
Using Build Options to Control Configuration
4.
Under Application, click Build Options.
5.
To create a new build option, click Create.
6.
Follow the on-screen instructions.
About the Build Options Page
Once you create a build option, it appears on the Build Options page. You control how
the Build Options page displays by making a selection from the View list. Available
options include:
■
■
Icons (the default) displays each build option as a large icon. To edit a build
option, click the appropriate icon.
Details displays each build option as a line in a report. Each line includes the
application ID, build option name, status, and a link to the Build Option
Utilization report. To edit a build option, click the appropriate name.
Managing Build Options
Build options have two possible values: INCLUDE and EXCLUDE. If you specify an
attribute as being included, then the Application Express engine considers it part of
the application definition at run time. Conversely, if you specify an attribute as being
excluded, then the Application Express engine treats it as if it did not exist.
To include or exclude a build option:
1.
On the Workspace home page, click the Application Builder icon.
2.
Select an application.
3.
On the Application Builder home page, click Shared Components.
4.
Under Application, click Build Options.
5.
Select the appropriate build option.
The Create/Edit Build Option page appears.
6.
For Status, select either INCLUDE or EXCLUDE.
Selecting a Build Option
Once you create a build option, you can select it for a page, a component (report, chart,
or form), a specific page control (button, item, list of value), and another shared
component (breadcrumb, list, or tab). You apply build options to a page, component,
page control, or shared component by navigating to the appropriate attributes page.
Most attributes pages contain a Configuration section where you can select defined
build options.
See Also:
"Editing Page Attributes" on page 5-23
Exporting Build Options or Build Option Status
You can export build options or build option status on the Component Export page.
Exporting build option status is an effective way to toggle build options on or off
within another environment. For example, you can use this feature to deploy a
production application with a hidden feature.
To accomplish this, you associate the components of the hidden feature with a build
option having the status of EXCLUDE. After deployment, you can enable the hidden
14-30 Oracle Application Express Application Builder User’s Guide
Using Build Options to Control Configuration
feature by changing the status of the build option to INCLUDE and then exporting the
Build Option Status.
Once you apply the Build Options Status to the production instance, the new feature
appears.
See Also: "How to Create a Packaged Application" on page 14-5
and "Exporting Application Components" on page 14-14
To export build options or build option status:
1.
Navigate to the Component Export page:
a.
On the Workspace home page, click the Application Builder icon.
b.
Select an application.
c.
Click Shared Components.
d.
From the Tasks list, click Component Export.
The Component Export page appears.
2.
3.
Select the build options to be exported:
a.
Click the Components tab and select the build options to be exported.
b.
Click Add to Export.
Select Build Option Status to be exported:
a.
Click the Build Options Status tab and select the build options to be exported.
b.
Click Add to Export.
4.
Click Next.
5.
On Components to Export:
a.
b.
From File Format, select how rows in the export file will be formatted:
–
Choose UNIX to have the resulting file contain rows delimited by line
feeds.
–
Choose DOS to have the resulting file contain rows delimited by carriage
returns and line feeds.
Use the As of field to export a page as it was previously defined. Specify the
number of minutes in the field provided.
This utility uses the DBMS_FLASHBACK package. Because the timestamp to
System Change Number (SCN) mapping is refreshed approximately every five
minutes, you may have to wait that amount of time to locate the version for
which you are looking. The time undo information is retained and influenced
by the startup parameter UNDO_RETENTION (the default is three hours).
However, this only influences the size of the undo tablespace. While two
databases may have the same UNDO_RETENTION parameter, you are able to go
back further in time on a database with fewer transactions because it is not
filling the undo tablespace, forcing older data to be archived.
c.
Click Export Components.
Viewing the Build Option Utilization Report
Once you create a build option, a Utilization tab appears on the Build Options page.
This report details build option utilization in the current application.
Deploying an Application 14-31
Using Build Options to Control Configuration
The Utilization tab only appears on the Build Options page
after you create a build option.
Note:
To view the Build Option Utilization report:
1.
Navigate to the Build Options page:
a.
Navigate to the Workspace home page.
b.
Click the Application Builder icon.
c.
Select an application.
d.
On the Application Builder home page, click Shared Components.
e.
Under Application, click Build Options.
The Build Options page appears.
2.
On the Build Options page, click Utilization.
The Build Option Utilization report appears.
3.
Select a build option and click Go.
14-32 Oracle Application Express Application Builder User’s Guide
15
Advanced Programming Techniques
This section provides information about advanced programming techniques including
working with automatic data manipulation language, establishing database links,
using collections, running background SQL, utilizing Web services, and managing user
preferences.
This section contains the following topics:
■
About DML Locking
■
Accessing Data with Database Links
■
Sending Email from an Application
■
Using Collections
■
Creating Custom Activity Reports Using APEX_ACTIVITY_LOG
■
Running Background PL/SQL
■
Implementing Web Services
■
About BLOB Support in Forms and Reports
See Also: Oracle Application Express API Reference and "Deploying an
Application" on page 14-1
About DML Locking
When automatic data manipulation language (DML) is used in Oracle Application
Express to update or delete rows of a table, a transaction is initiated to first lock the
row, verify if it has changed since it was displayed on the page, and then finally issue
the actual UPDATE or DELETE statement for the row.
In some environments where locking of rows is prevalent, you may want to control the
DML operation and determine if the DML operation:
■
waits indefinitely
■
fails immediately
■
waits for a specified period of time
About APEX_DML_LOCK_WAIT_TIME
You can set the value of an application substitution string, an application item, or a
page item to APEX_DML_LOCK_WAIT_TIME to control the DML operation. The
following values are supported:
Advanced Programming Techniques 15-1
Accessing Data with Database Links
■
If null (the default), results in the same behavior as previous versions of Oracle
Application Express, that is, wait indefinitely.
■
If 0, fail immediately if the row is locked by another database session.
■
If > 0 and the row is locked, wait for the specified number of seconds.
When set in an application, the value for APEX_DML_LOCK_WAIT_TIME applies to all
UPDATE and DELETE DML operations using Automatic DML in the entire application.
To control a specific Automatic DML process, update the value of APEX_DML_LOCK_
WAIT_TIME before the Automatic DML process and reset it after the Automatic DML
process. Note that this does not affect updates and deletes using tabular forms.
About FSP_DML_LOCK_ROW
You can also set the value of an application substitution string, an application item, or
a page item to FSP_DML_LOCK_ROW to control the DML operation. The following
values are supported:
■
■
If the value is set to FALSE, then no SELECT FOR UPDATE will be issued.
If the value is anything other than FALSE, the default behavior of SELECT FOR
UPDATE is performed when issuing an UPDATE or DELETE DML operation using
Automatic DML.
Accessing Data with Database Links
Because the Workspace home page runs in an Oracle database, you have access to all
distributed Oracle database capabilities. Typically, you perform distributed database
operations using database links.
A database link is a schema object in one database that enables you to access objects on
another database. Once you have created the database link you can access the remote
objects by appending @dblink to the table or view name where dblink is the
Database Link Name you specify in the Create Database Object Wizard.
By default, the CREATE DATABASE LINK system privilege is
not granted to a provisioned workspace or database user. To use this
feature, a DBA or administrator needs to grant this specific privilege
to the database user in the user's workspace. See "Creating Database
Links" in Oracle Database Administrator's Guide
Note:
To create a database link:
1.
On the Workspace home page, click SQL Workshop and then Object Browser.
Object Browser appears.
2.
Click Create.
3.
Select Database Link and click Next.
4.
Follow the on-screen instructions.
Note that Database Link names must conform to Oracle naming conventions and
cannot contain spaces, or start with a number or underscore.
To view an existing a database link:
1.
On the Workspace home page, click SQL Workshop and then Object Browser.
Object Browser appears.
15-2 Oracle Application Express Application Builder User's Guide
Sending Email from an Application
2.
Select the object type Database Links at the top of the page.
See Also: "Managing Database Objects with Object Browser" in
Oracle Application Express SQL Workshop and Utilities Guide and
"Database Links" in Oracle Database Administrator's Guide
Sending Email from an Application
This section describes how to send email from an Oracle Application Express
application.
Topics in this section include:
■
About Configuring Oracle Application Express to Send Email
■
Sending Email from an Application
"Managing Mail" in Oracle Application Express
Administration Guide
See Also:
Tip: If you are running Oracle Application Express with Oracle
Database 11g Release 1 (11.1), you must enable network services in
order to send outbound email. See "Enabling Network Services in
Oracle Database 11g" on page 13-5
About Configuring Oracle Application Express to Send Email
Before you can send email from an Application Builder application, you must:
1.
Log in to Oracle Application Express Administration Services and configure the
email settings on the Instance Settings page. See in Oracle Application Express
Administration Guide.
2.
If you are running Oracle Application Express with Oracle Database 11g release
1 (11.1), you must enable outbound mail. In Oracle Database 11g release 1 (11.1),
the ability to interact with network services is disabled by default. See "Enabling
Network Services in Oracle Database 11g" on page 13-5.
Tip: You can configure Oracle Application Express to automatically
email users their login credentials when a new workspace request has
been approved. To learn more, see "Specifying a Provisioning Mode"in
Oracle Application Express Administration Guide.
Sending Email from an Application
You can send an email from an Application Builder application by calling the PL/SQL
package APEX_MAIL. This package is built on top of the Oracle supplied UTL_SMTP
package. Because of this dependence, in order to use APEX_MAIL, the UTL_SMTP
package must be installed and functioning.
See Also: Oracle Database PL/SQL Packages and Types Reference for
more information about the UTL_SMTP package and "APEX_
MAIL" in Oracle Application Express API Reference
APEX_MAIL contains three procedures for sending email:
■
Use APEX_MAIL.SEND to manually send an outbound email mess age from your
application
Advanced Programming Techniques 15-3
Using Collections
■
■
Use APEX_MAIL.ADD_ATTACHMENT to send an outbound email message from an
application as an attachment. APEX_MAIL.ADD_ATTACHMENT
Use APEX_MAIL.PUSH_QUEUE to deliver mail messages stored in APEX_MAIL_
QUEUE
Oracle Application Express stores unsent email messages in a table named APEX_
MAIL_QUEUE. You can deliver mail messages stored in this queue to the specified
SMTP gateway by calling the procedure APEX_MAIL.PUSH_QUEUE.
Oracle Application Express logs successfully submitted messages in the table APEX_
MAIL_LOG with the timestamp reflecting your server's local time.
The following UNIX/LINUX example demonstrates the use of the APEX_
MAIL.PUSH_QUEUE procedure using a shell script.
SQLPLUS / <<EOF
APEX_MAIL.PUSH_QUEUE;
DISCONNECT
EXIT
EOF
See Also: "APEX_MAIL" in Oracle Application Express API Reference
and "Managing Mail" in Oracle Application Express Administration Guide
Using Collections
Collections enable you to temporarily capture one or more nonscalar values. You can
use collections to store rows and columns currently in session state so they can be
accessed, manipulated, or processed during a user's specific session. You can think of a
collection as a bucket in which you temporarily store and name rows of information.
The following are examples of when you might use collections:
■
■
■
When you are creating a data-entry wizard in which multiple rows of information
first need to be collected within a logical transaction. You can use collections to
temporarily store the contents of the multiple rows of information, before
performing the final step in the wizard when both the physical and logical
transactions are completed.
When your application includes an update page on which a user updates multiple
detail rows on one page. The user can make many updates, apply these updates to
a collection and then call a final process to apply the changes to the database.
When you are building a wizard where you are collecting an arbitrary number of
attributes. At the end of the wizard, the user then performs a task that takes the
information temporarily stored in the collection and applies it to the database.
Topics in this section include:
■
About the APEX_COLLECTION API
■
Creating a Collection
■
Truncating a Collection
■
Accessing a Collection
■
Deleting a Collection
■
Adding Members to a Collection
■
Updating Collection Members
15-4 Oracle Application Express Application Builder User's Guide
Using Collections
■
Deleting Collection Members
■
Determining Collection Status
■
Merging Collections
■
Managing Collections
■
Clearing Collection Session State
About the APEX_COLLECTION API
Every collection contains a named list of data elements (or members) which can have
up to 50 character attributes (VARCHAR2(4000)), and one large character attribute
(CLOB). You insert, update, and delete collection information using the PL/SQL API
APEX_COLLECTION.
About Collection Naming
When you create a collection, you must give it a name that cannot exceed 255
characters. Note that collection names are not case-sensitive and will be converted to
uppercase.
Once the collection is named, you can access the values in the collection by running a
SQL query against the view APEX_COLLECTIONS.
See Also:
"Accessing a Collection" on page 15-6
Creating a Collection
Every collection contains a named list of data elements (or members) which can have
up to 50 character attributes (VARCHAR2(4000)), and one large character attribute
(CLOB). You use the following methods to create a collection:
■
CREATE_COLLECTION
■
CREATE_OR_TRUNCATE_COLLECTION
■
CREATE_COLLECTION_FROM_QUERY
■
CREATE_COLLECTION_FROM_QUERY_B
The CREATE_COLLECTION method raises an exception if the named collection exists,
for example:
APEX_COLLECTION.CREATE_COLLECTION(
p_collection_name => collection name );
The CREATE_OR_TRUNCATE_COLLECTION method creates a collection if the named
collection does not exist. If the named collection exists, this method truncates it.
Truncating a collection empties it, but leaves it in place, for example:
APEX_COLLECTION.CREATE_OR_TRUNCATE_COLLECTION(
p_collection_name => collection name);
The CREATE_COLLECTION_FROM_QUERY method creates a collection and then
populates it with the results of a specified query, for example:
APEX_COLLECTION.CREATE_COLLECTION_FROM_QUERY(
p_collection_name => collection name,
p_query
=> your query ,
p_generate_md5
=> 'YES' or 'NO' );
Advanced Programming Techniques 15-5
Using Collections
The CREATE_COLLECTION_FROM_QUERY_B method also creates a collection and then
populates it with the results of a specified query, for example:
APEX_COLLECTION.CREATE_COLLECTION_FROM_QUERY_B(
p_collection_name => collection name,
p_query
=> your query );
The CREATE_COLLECTION_FROM_QUERY_B method offers significantly faster
performance than the CREATE_COLLECTION_FROM_QUERY method by performing
bulk SQL operations, but has the following limitations:
■
■
No column value in the select list of the query can be more than 2,000 bytes. If a
row is encountered that has a column value of more than 2,000 bytes, an error will
be raised during execution.
The MD5 checksum will not be computed for any members in the collection.
About the Parameter p_generate_md5
Use the p_generate_md5 flag to specify if the message digest of the data of the
collection member should be computed. By default, this flag is set to NO. Use this
parameter to check the MD5 of the collection member (that is, compare it with another
member or see if a member has changed).
"Determining Collection Status" on page 15-9 for
information about using the GET_MEMBER_MD5 function
See Also:
Truncating a Collection
If you truncate a collection, you remove all members from the specified collection, but
the named collection remains in place, for example:
APEX_COLLECTION.TRUNCATE_COLLECTION(
p_collection_name => collection name );
Accessing a Collection
You can access the members of a collection by querying the database view APEX_
COLLECTIONS. The APEX_COLLECTIONS view has the following definition:
COLLECTION_NAME
SEQ_ID
C001
C002
C003
C004
C005
...
C050
CLOB001
MD5_ORIGINAL
NOT NULL VARCHAR2(255)
NOT NULL NUMBER
VARCHAR2(4000)
VARCHAR2(4000)
VARCHAR2(4000)
VARCHAR2(4000)
VARCHAR2(4000)
VARCHAR2(4000)
CLOB
VARCHAR2(4000)
Use the APEX_COLLECTIONS view in an application just as you would use any other
table or view in an application, for example:
SELECT c001, c002, c003
FROM APEX_collections
WHERE collection_name = 'FIREARMS'
15-6 Oracle Application Express Application Builder User's Guide
Using Collections
Deleting a Collection
If you delete a collection, you delete the collection and all of its members, for example:
APEX_COLLECTION.DELETE_COLLECTION (
p_collection_name => collection name );
Be aware that if you do not delete a collection, it will eventually be deleted when the
session is purged. For example:
Deleting All Collections for the Current Application
Use the DELETE_ALL_COLLECTIONS method to delete all collections defined in the
current application, for example:
APEX_COLLECTION.DELETE_ALL_COLLECTIONS;
Deleting All Collections in the Current Session
Use the DELETE_ALL_COLLECTIONS_SESSION method to delete all collections
defined in the current session., for example:
APEX_COLLECTION.DELETE_ALL_COLLECTIONS_SESSION;
Adding Members to a Collection
When data elements (or members) are added to a collection, they are assigned a
unique sequence ID. As you add members to a collection, the sequence ID will change
in increments of 1, with the newest members having the largest ID.
You add new members to a collection using the ADD_MEMBER function. Calling this
function returns the sequence ID of the newly added member. The following example
demonstrates how to use the ADD_MEMBER function.
APEX_COLLECTION.ADD_MEMBER(
p_collection_name => collection name,
p_c001
=> [member attribute 1],
p_c002
=> [member attribute 2],
p_c003
=> [member attribute 3],
p_c004
=> [member attribute 4],
p_c005
=> [member attribute 5],
p_c006
=> [member attribute 6],
p_c007
=> [member attribute 7],
...
p_c050
=> [member attribute 50]);
p_clob001
=> [CLOB member attribute 1],
p_generate_md5 => 'YES' or 'NO');
You can also add new members (or an array of members) to a collection using the
ADD_MEMBERS method, for example:
APEX_COLLECTION.ADD_MEMBERS(
p_collection_name => collection name,
p_c001
=> member attribute array
p_c002
=> member attribute array
p_c003
=> member attribute array
p_c004
=> member attribute array
p_c005
=> member attribute array
p_c006
=> member attribute array
p_c007
=> member attribute array
1,
2,
3,
4,
5,
6,
7,
Advanced Programming Techniques 15-7
Using Collections
...
p_c050
p_generate_md5
=> member attribute array 50);
=> 'YES' or 'NO');
This method raises an error if the specified collection does not exist with the specified
name of the current user and in the same session. Also any attribute exceeding 4,000
characters will be truncated to 4,000 characters. The number of members added is
based on the number of elements in the first array.
About the Parameters p_generate_md5 and p_clob001
Use the p_generate_md5 flag to specify if the message digest of the data of the
collection member should be computed. By default, this flag is set to NO. Use this
parameter to check the MD5 of the collection member (that is, compare it with another
member or see if a member has changed).
Use p_clob001 for collection member attributes which exceed 4,000 characters.
"Determining Collection Status" on page 15-9 for
information about using the function GET_MEMBER_MD5
See Also:
Updating Collection Members
You can update collection members by calling the UPDATE_MEMBER procedure and
referencing the desired collection member by its sequence ID, for example:
APEX_COLLECTION.UPDATE_MEMBER (
p_collection_name => collection name,
p_seq
=> member sequence number,
p_c001
=> member attribute 1,
p_c002
=> member attribute 2,
p_c003
=> member attribute 3,
p_c004
=> member attribute 4,
p_c005
=> member attribute 5,
p_c006
=> member attribute 6,
p_c007
=> member attribute 7,
...
p_c050
=> member attribute 50),
p_clob001
=> [CLOB member attribute 1];
The UPDATE_MEMBER procedure replaces an entire collection member, not individual
member attributes. This procedure causes an error if the named collection does not
exist.
Use the p_clob001 parameter for collection member attributes which exceed 4,000
characters.
To update a single attribute of a collection member, use the UPDATE_MEMBER_
ATTRIBUTE procedure, for example:
APEX_COLLECTION.UPDATE_MEMBER_ATTRIBUTE(
p_collection_name
=> collection_name,
p_seq
=> member sequence number,
p_attr_number
=> member attribute number,
p_attr_value
=> member attribute value )
APEX_COLLECTION.UPDATE_MEMBER_ATTRIBUTE(
p_collection_name
=> collection_name,
p_seq
=> member sequence number,
p_clob_number
=> CLOB member attribute number,
p_clob_value
=> CLOB member attribute value );
15-8 Oracle Application Express Application Builder User's Guide
Using Collections
Calling the UPDATE_MEMBER_ATTRIBUTE procedure causes an error if the named
collection does not exist.
Note that the only valid value for the p_clob_number parameter is 1.
Deleting Collection Members
You can delete a collection member by calling the DELETE_MEMBER procedure and
referencing the desired collection member by its sequence ID, for example:
APEX_COLLECTION.DELETE_MEMBER(
p_collection_name => collection name,
p_seq
=> member sequence number);
Note that this procedure leaves a gap in the sequence IDs in the specified collection. In
addition, calling this procedure causes an error if the named collection does not exist.
You can also delete all members from a collection by when an attribute matches a
specific value, for example:
APEX_COLLECTION.DELETE_MEMBERS(
p_collection_name => collection name,
p_attr_number
=> number of attribute used to match for the specified
attribute value for deletion,
p_attr_value
=> attribute value of the member attribute used to
match for deletion);
Note that the DELETE_MEMBERS procedure also leaves a gap in the sequence IDs in
the specified collection. This procedure causes an error if:
■
The named collection does not exist.
■
The specified attribute number is outside the range of 1 to 50, or not valid.
If the supplied attribute value is null, then all members of the named collection will be
deleted where the attribute (specified by p_attr_number) is null.
Determining Collection Status
The p_generate_md5 parameter determines if the MD5 message digests are
computed for each member of a collection. The collection status flag is set to FALSE
immediately after you create a collection. If any operations are performed on the
collection (such as add, update, truncate, and so on), this flag is set to TRUE.
You can reset this flag manually by calling RESET_COLLECTION_CHANGED, for
example:
APEX_COLLECTION.RESET_COLLECTION_CHANGED (
p_collection_name => collection name)
Once this flag has been reset, you can determine if a collection has changed by calling
COLLECTION_HAS_CHANGED, for example:
l_changed := APEX_COLLECTION.COLLECTION_HAS_CHANGED(
p_collection_name => collection_name);
When you add a new member to a collection, an MD5 message digest is computed
against all 50 attributes and the CLOB attribute if the p_generated_md5 parameter is
set to YES. You can access this value from the MD5_ORIGINAL column of the view
APEX_COLLECTION. You can access the MD5 message digest for the current value of a
specified collection member by using the function GET_MEMBER_MD5. For example:
Advanced Programming Techniques 15-9
Using Collections
APEX_COLLECTION.GET_MEMBER_MD5 (
p_collection_name => collection name,
p_seq
=> member sequence number );
RETURN VARCHAR2;
Merging Collections
You can merge members of a collection with values passed in a set of arrays. By using
the p_init_query argument, you can create a collection from the supplied query.
Note that if the collection exists, the following occurs:
■
Rows in the collection not in the arrays will be deleted.
■
Rows in the collection and in the arrays will be updated.
■
Rows in the array and not in the collection will be inserted.
Any attribute value exceeding 4,000 characters will be truncated to 4,000 characters.
Table 15–1 describes the available arguments you can use when merging collections.
Table 15–1
Available Arguments for Merging Collections
Argument
Description
p_collection_name
Name of the collection.
See Also: "About Collection Naming" on page 15-5
p_seq
Identifies the sequence number of the member to be merged.
p_c001
Array of first attribute values to be merged. Maximum length
is 4,000 characters. If the maximum length is greater, it will be
truncated to 4,000 characters.
The count of elements in the P_C001 PL/SQL table is used as
the total number of items across all PL/SQL tables. For
example, if P_C001.count = 2 and P_C002.count = 10, only 2
members will be merged. Note that if P_C001 is null, an
application error will be raised.
p_c0xx
Attribute of XX attributes values to be merged. Maximum
length is 4,000 characters. If the maximum length is greater, it
will be truncated to 4,000 characters.
p_null_index
Use this argument to identify rows the merge function should
ignore. This argument identifies an row as null. Null rows are
automatically removed from the collection.
p_null_value
Use this argument with the p_null_index. Identifies the null
value. If used this value cannot be null. A typical value for this
argument is 0.
p_init_query
Use the query defined by this argument to create a collection if
the collection does not exist.
Managing Collections
You can use the following utilities to manage collections.
Topics in this section include:
■
Obtaining a Member Count
■
Resequencing a Collection
■
Verifying Whether a Collection Exists
15-10 Oracle Application Express Application Builder User's Guide
Using Collections
■
Adjusting a Member Sequence ID
■
Sorting Collection Members
Obtaining a Member Count
Use COLLECTION_MEMBER_COUNT to return the total count of all members in a
collection. Note that this count does not indicate the highest sequence in the collection,
for example:
l_count := APEX_COLLECTION.COLLECTION_MEMBER_COUNT (
p_collection_name => collection name );
Resequencing a Collection
Use RESEQUENCE_COLLECTION to resequence a collection to remove any gaps in
sequence IDs while maintaining the same element order, for example:
APEX_COLLECTION.RESEQUENCE_COLLECTION (
p_collection_name => collection name )
Verifying Whether a Collection Exists
Use COLLECTION_EXISTS to determine if a collection exists, for example:
l_exists := APEX_COLLECTION.COLLECTION_EXISTS
p_collection_name => collection name );
(
Adjusting a Member Sequence ID
You can adjust the sequence ID of a specific member within a collection by moving the
ID up or down. When you adjust a sequence ID, the specified ID is exchanged with
another ID. For example, if you were to move the ID 2 up, 2 becomes 3, and 3 would
become 2.
Use MOVE_MEMBER_UP to adjust a member sequence ID up by one. Alternately, use
MOVE_MEMBER_DOWN to adjust a member sequence ID down by one, for example:
APEX_COLLECTION.MOVE_MEMBER_DOWN(
p_collection_name => collection name,
p_seq
=> member sequence number);
Note that while using either of these methods an application error displays:
■
If the named collection does not exist for the current user in the current session
■
If the member specified by the p_seq sequence ID does not exist
However, an application error will not be returned if the specified member has the
highest or lowest sequence ID in the collection (depending on if you are calling MOVE_
MEMBER_UP or MOVE_MEMBER_DOWN).
Sorting Collection Members
Use the SORT_MEMBERS method to reorder members of a collection by the column
number. This method sorts the collection by a particular column number and also
reassigns the sequence IDs for each member to remove gaps, for example:
APEX_COLLECTION.SORT_MEMBERS(
p_collection_name
=> collection name,
p_sort_on_column_number => column number to sort by);
Advanced Programming Techniques
15-11
Creating Custom Activity Reports Using APEX_ACTIVITY_LOG
Clearing Collection Session State
Clearing the session state of a collection removes the collection members. A shopping
cart is a good example of when you might need to clear collection session state. When
a user requests to empty the shopping cart and start again, you must clear the session
state for a collection. You can remove session state of a collection by calling the
TRUNCATE_COLLECTION method or by using f?p syntax.
Calling the TRUNCATE_COLLECTION method deletes the existing collection and then
recreates it, for example:
APEX_COLLECTION.TRUNCATE_COLLECTION(
p_collection_name => collection name);
You can also use the sixth f?p syntax argument to clear session state, for example:
f?p=App:Page:Session::NO:collection name
See Also:
"Understanding URL Syntax" on page 3-6
Creating Custom Activity Reports Using APEX_ACTIVITY_LOG
The APEX_ACTIVITY_LOG view records all activity in a workspace, including
developer activity and application run-time activity. You can use APEX_ACTIVITY_
LOG to view to query all activity for the current workspace. For example, you can use
this view to develop monitoring reports within a specific application to provide
real-time performance statistics.
Table 15–2 describes the columns in the APEX_ACTIVITY_LOG view.
Table 15–2
Columns in APEX_ACTIVITY_LOG
Column
Type
Description
time_stamp
DATE
Date and time that activity was logged
at the end of the page view.
component_type
VARCHAR2(255)
Reserved for future use.
component_name
VARCHAR2(255)
Reserved for future use.
component_attribute
VARCHAR2(4000)
Title of page.
information
VARCHAR2(4000)
Reserved for future use.
elap
NUMBER
Elapsed time of page view in seconds.
num_rows
NUMBER
Number of rows processed on page.
userid
VARCHAR2(255)
User ID performing page view.
ip_address
VARCHAR2(4000)
IP address of client.
user_agent
VARCHAR2(4000)
Web browser user agent of client.
flow_id
NUMBER
Application ID.
step_id
NUMBER
Page number.
session_id
NUMBER
Oracle Application Express session
identifier.
sqlerrm
VARCHAR2(4000)
SQL Error message.
sqlerrm_component_type VARCHAR2(255)
Reserved for future use.
sqlerrm_component_name VARCHAR2(255)
Reserved for future use.
15-12 Oracle Application Express Application Builder User's Guide
Running Background PL/SQL
To conserve space in the activity log, only the first log entry of each unique session will
contain the IP address and Web browser user agent.
The following example demonstrates how to create a report that displays the total
number of page views and the average page view time in the past 24 hours for
application 9529, and grouped by userid:
SELECT COUNT(*), AVG(elap), userid
FROM APEX_ACTIVITY_LOG
WHERE time_stamp > (SYSDATE-1)
AND flow_id = 9529
GROUP BY userid
Keep in mind that logging of activity in an Oracle Application Express instance is
rotated between two different log tables. Because of this, logging information is only as
current as the oldest available entry in the logs. If you want to persist your application
specific log information for all time, you must either copy the log information into
your own application table or implement logging directly in your application.
See Also: "Name" on page 4-9 for information on enabling logging
on the Edit Definition page
Running Background PL/SQL
You can use the APEX_PLSQL_JOB package to run PL/SQL code in the background of
your application. This is an effective approach for managing long running operations
that do not need to complete for a user to continue working with your application.
Topics in this section include:
■
Understanding the APEX_PLSQL_JOB Package
■
About System Status Updates
■
Using a Process to Implement Background PL/SQL
Understanding the APEX_PLSQL_JOB Package
APEX_PLSQL_JOB is a wrapper package around DBMS_JOB functionality offered in
the Oracle database. Note that the APEX_PLSQL_JOB package only exposes that
functionality which is necessary to run PL/SQL in the background. The following is a
description of the APEX_PLSQL_JOB package:
SQL> DESC APEX_PLSQL_JOB
FUNCTION JOBS_ARE_ENABLED RETURNS BOOLEAN
PROCEDURE PURGE_PROCESS
Argument Name
Type
------------------------------ ----------------------P_JOB
NUMBER
FUNCTION SUBMIT_PROCESS RETURNS NUMBER
Argument Name
Type
------------------------------ ----------------------P_SQL
VARCHAR2
P_WHEN
VARCHAR2
P_STATUS
VARCHAR2
FUNCTION TIME_ELAPSED RETURNS NUMBER
Argument Name
Type
------------------------------ ----------------------P_JOB
NUMBER
PROCEDURE UPDATE_JOB_STATUS
Argument Name
Type
In/Out Default?
------ -------IN
In/Out
-----IN
IN
IN
Default?
-------DEFAULT
DEFAULT
In/Out Default?
------ -------IN
In/Out Default?
Advanced Programming Techniques
15-13
Running Background PL/SQL
------------------------------ ----------------------- ------ -------P_JOB
NUMBER
IN
P_STATUS
VARCHAR2
IN
Table 15–1 describes the functions available in the APEX_PLSQL_JOB package.
Table 15–3
APEX_PLSQL_JOB Package: Available Functions
Function or Procedure
Description
SUBMIT_PROCESS
Use this procedure to submit background PL/SQL. This
procedure returns a unique job number. Because you can use
this job number as a reference point for other procedures and
functions in this package, it may be useful to store it in your
own schema.
UPDATE_JOB_STATUS
Call this procedure to update the status of the currently
running job. This procedure is most effective when called from
the submitted PL/SQL.
TIME_ELAPSED
Use this function to determine how much time has elapsed
since the job was submitted.
JOBS_ARE_ENABLED
Call this function to determine whether the database is
currently in a mode that supports submitting jobs to the APEX_
PLSQL_JOB package.
PURGE_PROCESS
Call this procedure to clean up submitted jobs. Submitted jobs
stay in the APEX_PLSQL_JOBS view until either Oracle
Application Express cleans out those records, or you call
PURGE_PROCESS to manually remove them.
You can view all jobs submitted to the APEX_PLSQL_JOB package using the APEX_
PLSQL_JOBS view. The following is the description of APEX_PLSQL_JOBS view:
SQL> DESCRIBE APEX_PLSQL_JOBS
Name
Null?
--------------------------------- -------ID
JOB
FLOW_ID
OWNER
ENDUSER
CREATED
MODIFIED
STATUS
SYSTEM_STATUS
SYSTEM_MODIFIED
SECURITY_GROUP_ID
Type
---------------------------NUMBER
NUMBER
NUMBER
VARCHAR2(30)
VARCHAR2(30)
DATE
DATE
VARCHAR2(100)
VARCHAR2(4000)
DATE
NUMBER
Table 15–4 describes the columns available in APEX_PLSQL_JOBS view.
Table 15–4
APEX_PLSQL_JOBS View Columns
Name
Description
ID
A unique identifier for each row.
JOB
The job number assigned to each submitted PL/SQL job. The
APEX_PLSQL_JOB.SUBMIT_PROCESS function returns this
value. This is also the value you pass into other procedures
and functions in the APEX_PLSQL_JOB package.
FLOW_ID
The application from which this job was submitted.
15-14 Oracle Application Express Application Builder User's Guide
Running Background PL/SQL
Table 15–4 (Cont.) APEX_PLSQL_JOBS View Columns
Name
Description
OWNER
The database schema that owns the application. This
identifies what schema will parse this code when DBMS_JOB
runs it.
ENDUSER
The end user (that is, who logged into the application) that
caused this process to be submitted.
CREATED
The date when the job was submitted.
MODIFIED
The date when the status was modified.
STATUS
The user-defined status for this job. Calling APEX_PLSQL_
JOB.UPDATE_JOB_STATUS updates this column.
SYSTEM_STATUS
The system defined status for this job.
SYSTEM_MODIFIED
The date when the system status was modified.
SECURITY_GROUP_ID
The unique ID assigned to your workspace. Developers can
only see jobs submitted from their own workspace.
See Also:
APEX_PLSQL_JOBS in Oracle Application Express API
Reference
About System Status Updates
Submitted jobs can contain any of the following system status settings:
■
SUBMITTED indicates the job has been submitted, but has not yet started. The
DBMS_JOB does not guarantee immediate starting of jobs.
■
IN PROGRESS indicates that the DBMS_JOB has started the process.
■
COMPLETED indicates the job has finished.
■
BROKEN (sqlcode) sqlerrm indicates there was a problem in your job that
resulted in an error. The SQL code and SQL error message for the error should be
included in the system status. Review this information to determine what went
wrong.
Using a Process to Implement Background PL/SQL
The following example runs a PL/SQL job in the background for testing and
explanation:
001
002
003
004
005
006
007
008
009
010
011
BEGIN
FOR i IN 1 .. 100 LOOP
INSERT INTO emp(a,b) VALUES (:APP_JOB,i);
IF MOD(i,10) = 0 THEN
APEX_PLSQL_JOB.UPDATE_JOB_STATUS(
P_JOB
=> :APP_JOB,
P_STATUS => i || 'rows inserted');
END IF;
APEX_UTIL.PAUSE(2);
END LOOP;
END;
In this example, note that:
■
Lines 002 to 010 run a loop that inserts 100 records into the emp table.
Advanced Programming Techniques
15-15
Implementing Web Services
■
■
■
APP_JOB is referenced as a bind variable inside the VALUES clause of the INSERT,
and specified as the P_JOB parameter value in the call to UPDATE_JOB_STATUS.
APP_JOB represents the job number which will be assigned to this process as it is
submitted to APEX_PLSQL_JOB. By specifying this reserved item inside your
process code, it will be replaced for you at execution time with the actual job
number.
Note that this example calls to UPDATE_JOB_STATUS every ten records, INSIDE
the block of code. Normally, Oracle transaction rules dictate updates made inside
code blocks will not be seen until the entire transaction is committed. The APEX_
PLSQL_JOB.UPDATE_JOB_STATUS procedure, however, has been implemented
in such a way that the update will happen regardless of whether the job succeeds
or fails. This last point is important for two reasons:
1.
Even if your status shows "100 rows inserted," it does not mean the entire
operation was successful. If an error occurred at the time the block of code
tried to commit, the user_status column of APEX_PLSQL_JOBS would not
be affected because status updates are committed separately.
2.
Updates are performed autonomously. You can view the job status before the
job has completed. This gives you the ability to display status text about
ongoing operations in the background as they are happening.
Implementing Web Services
Web services enable applications to interact with one another over the Web in a
platform-neutral, language independent environment. In a typical Web services
scenario, a business application sends a request to a service at a given URL by using
the protocol over HTTP. The service receives the request, processes it, and returns a
response. You can incorporate calls with external Web services in applications
developed in Application Builder.
Web services are based on Simple Object Access Protocol (SOAP). SOAP is a World
Wide Web Consortium (W3C) standard protocol for sending and receiving requests
and responses across the Internet. SOAP messages can be sent back and forth between
a service provider and a service user in SOAP envelopes.
SOAP offers two primary advantages:
■
■
SOAP is based on XML, and therefore easy to use.
SOAP messages are not blocked by firewalls because this protocol uses simple
transport protocols, such as HTTP.
Tip: If you are running Oracle Application Express with Oracle
Database 11g Release 1 (11.1), you must enable network services in
order to use Web services. See "Enabling Network Services in Oracle
Database 11g" on page 13-5
Topics in this section include:
■
Understanding Web Service References
■
Working with SSL Enabled Web Services
■
Creating a Web Service Reference Based on a WSDL
■
Using the Web Service Reference Repository
■
Testing a Web Service Reference Created from a WSDL
15-16 Oracle Application Express Application Builder User's Guide
Implementing Web Services
■
Testing a Web Service Reference Created Manually
■
Creating an Input Form and Report on a Web Service
■
Creating a Form on a Web Service
■
Invoking a Web Service as a Process
■
Editing a Web Service Process
■
Viewing a Web Service Reference History
The SOAP 1.1 specification is a W3C note. (The W3C XML
Protocol Working Group has been formed to create a standard that
will supersede SOAP.)
Note:
For information about Simple Object Access Protocol (SOAP) 1.1 see:
http://www.w3.org/TR/SOAP/
Understanding Web Service References
To utilize Web services in Oracle Application Express, you create a Web service
reference using a wizard. Web service references can be based either on a W