1
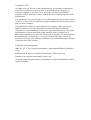
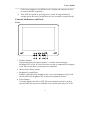
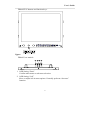
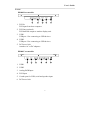
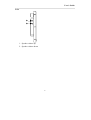
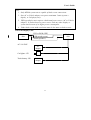
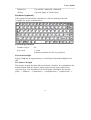
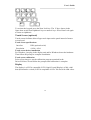
DISPLAY UNIT
DP860 SERIES
USER’S GUIDE
Copyright © 2003
All rights reserved. No part of this publication may be reproduced, transmitted,
transcribed, stored in a retrieval system, or translated into any language, or
computer language, in any form, or by any means, electronic, mechanical,
magnetic, optical, chemical, or other, without the prior written permission of the
manufacturer.
The manufacture reserves the right to revise this publication and to make changes
from time to time in the contents hereof without obligation to notify any person of
such revision or changes.
The manufacturer makes no representations or warranties, either expressed or
implied, with respect to the contents hereof and specifically disclaims any
warranties as to merchantability or fitness for any particular purpose. Any of the
manufacturer's software described in this manual is sold or licensed "as is".
Should the programs prove defective following their purchase, the buyer (and not
the manufacturer, its distributor, or its dealer), assumes the entire cost of all
necessary servicing, repair and any incidental or consequential damages resulting
from any defect in the software.
Trademark Acknowledgments
IBM, PC, AT, XT are registered trademarks of International Business Machines
Corp.
MS-DOS and Windows are registered trademarks of Microsoft Corp.
Pentium is the registered trademark of Intel Corp.
All product and company names are trademarks or registered trademarks of their
respective holders.
EMC and Safety Notice
Federal Communications Commission
Radio Frequency Interference Statement
This equipment generates, uses, and can radiate radio frequency energy and if not
installed and used in accordance with the instructions, may cause interference to
radio communications. This equipment has been tested and found to comply with
Class B digital devices, pursuant to Part 15 of the FCC rules which are designed
to provide reasonable protection against such interference when operated in a
commercial or residential environment.
Countermeasures if interference occurs
You are encouraged to do the following if interference occurs while you are
operating the device:
1. Turn OFF the unit and unplug the AC adapter from the outlet to see if the
interference disappears.
2. Connect the AC adapter to the outlet in another room and check if the
interference still exists.
3. Use an outlet that is far away from the interfered appliance.
4. Re-orient your computer in respect to the interfered appliance to see if there is
improvement.
If all of these failed, please call your dealer for help.
CE
This equipment complies with the requirements set out in the Council Direction on
the Approximation of the laws of the Member States relating to Electromagnetic
Compatibility (89/336/EEC). For the evaluation regarding the electromagnetic
compatibility, the following standards were applied:
EMI: EN55022 (CISPR 22) class B (conduction and radiation)
EMS EN55024
Harmonics: EN61000-3-2
Flicker: EN61000-3-3
ESD: EN61000-4-2
RS: EN61000-4-3
EFT: EN61000-4-4
Surge: EN61000-4-5
CS: EN61000-4-6
Power-Frequency Magnetic Field: EN61000-4-8
Voltage Dips, Interruptions: EN61000-4-11
UL, TÜV
AC Adapter (EN60950 LVD is included in TÜV)
Power Conservation
It is recommended that you enable the power saving functions even not running
with battery.
Recycling
All materials used in the construction of this unit are recyclable or
environmentally friendly. No CFC or related materials were used in the
manufacturing process or inside the product.
Please recycle the packing materials, and at the end of the unit's life, all other
materials in accordance with the local regulations.
Please refer “Material and Recycling” for the contents of the materials.
CONTENTS
UNPACKING ........................................................................................................................... 1
QUICK OPERATION ............................................................................................................ 1
CONTROLS, INDICATORS, AND PORTS ..................................................................... 2
OPERATION ENVIRONMENT .......................................................................................... 9
RUGGEDNESS ........................................................................................................................ 9
SYSTEM AND DISPLAY UNIT CONFIGURATIONS .............................................. 10
AC ADAPTER ...................................................................................................................... 12
KEYBOARD (OPTIONAL) ................................................................................................ 13
TOUCH SCREEN (OPTIONAL) ....................................................................................... 14
DISPLAY ................................................................................................................................ 14
DIMENSIONS AND WEIGHT .......................................................................................... 15
MATERIALS AND RECYCLING .................................................................................... 15
ENVIRONMENTAL ............................................................................................................. 15
CLEANING AND MAINTENANCE ................................................................................ 16
TROUBLESHOOTING ........................................................................................................ 16
RMA SERVICE ................................................................................................................... 16
User’s Guide
Unpacking
The following components come with your display unit. If anything is missing or
damaged please notify the dealer immediately.
•
DP860 display unit
•
DVI or Analog cable
•
Vehicle or AC adapter (optional)
•
DC power cord
•
Y-cable
•
User's guide
Quick Operation
•
Attach the DVI or analog cable to computer.
•
Attach audio and touch screen controller cable to computer (optional for
Uxxx models only).
•
Attach the AC or vehicle adapter. The green LED indicates the power is
ready.
•
Turn ON the system by pressing the power switch of display unit or
computer momentarily.
1
User’s Guide
(If the host computer is not MT686 series, display and computer need to
be turned ON/OFF separately.)
•
Turn OFF the system by pressing power switch for approximately 4
seconds (press the power switch down for one second for suspend mode).
Controls, Indicators, and Ports
Front:
1. Display Suspend
Depress this button for approximately 1 second to turn the display
backlight OFF or ON. It is used for power saving or temporarily leaving the
work. The screen data or system power is unaltered.
2. (Reserved for future option)
3. Brightness Up and Down
Push the right side of the brightness key to increase brightness (Up). Push
the left side of the brightness key to decrease brightness (Down).
4. Power Button
Turns the display unit ON or OFF. The power button can also be used to
turn ON/OFF the system unit (MT686 series system units only). In ACPI
2
User’s Guide
mode the button may act as suspend key as well. Refer MT686 User’s
Guide for detail.
5. (Reserved for future option)
6. Power indicator
Note: Control buttons are made of cold light illumination material. Energy
stored from external light sources enables the control buttons to light up
in the dark. The control buttons do not consume either AC or battery
power.
DP860 Uxxx models buttons and function keys:
Other buttons same as above.
3
User’s Guide
DP860UX15 buttons and function keys:
Upper:
DP860 Uxxx models:
1. OSD Setting “Enter”
Confirm main menu or sub-menu selection.
2. OSD Setting “Left”
Move or adjust left in menu options. Generally performs “decrease”
function.
4
User’s Guide
3. OSD Setting “Right”
Move or adjust right in menu options. Generally performs “increase”
function.
4. OSD Setting “Menu”
Press to pop up OSD menu. After setting is done press Menu again to exit.
OSD: On Screen Display, is the on-screen menu for display adjusting.
The 4 buttons are available on DP860 Uxxx models only.
Pop up menu:
Brightness
Adjust brightness by LCD bias; the power consumption is not changed. The
brightness Up and Down button in the front are recommended for brightness
adjustment.
Black Level
Adjust black level.
Contrast
Adjust contrast ratio of selected RGB channel.
5
User’s Guide
Color
Select from: All (RGB), Red, Green, Blue.
Then go down to Video to adjust each setting.
Position
H-Position: Move display left or right.
V-Position: Move display up or down.
Image
Phase: Automatically adjust phase.
Clock: Adjust clock per line.
Auto Configuration
Automatically adjust image position, clock, and phase.
Information
Show input, resolution, refresh rate information.
(Reserved)
Reserved functions.
Input Select
Select analog or digital input.
Save
Save the settings.
6
User’s Guide
Lower:
DP860 Dxxx models:
1. DVI In
DVI input from host computer.
2. DVI Out (optional)
DVI buffered output to another display unit.
3. USB 1
USB port 1 for connecting to USB devices.
4. USB 2
USB port 2 for connecting to USB devices.
5. DC Power Jack
Attaches AC or DC adapters.
DP860 Uxxx models:
1. USB 1
2. USB 2
3. Analog RGB Input
4. DVI Input
5. Combo port for USB, serial and speaker input
6. DC Power Jack
7
User’s Guide
Left:
1. Speaker volume up
2. Speaker volume down
8
User’s Guide
Operation Environment
A clean and moisture-free environment is preferred. Make room for air circulation.
Avoid areas with:
• Sudden or extreme changes in temperature.
• Extreme heat.
• Strong electromagnetic fields (near television set, motor rotation area, etc.).
• Dust or high humidity.
If it is necessary to work in a hostile environment, please regularly maintain the
display unit by cleaning dust, water, etc. to keep it in optimal condition.
Ruggedness
The display unit is designed with rugged features such as vibration, shock, dust,
and rain/water protection. However, it is still necessary to provide appropriate
protection while operating in harsh environments.
The display unit may withstand rainfall from top with mild wind blowing only.
Please keep it in normal operating direction to maintain water resistance.
NEVER immerse the unit in water, or spray water at an upside-down system.
Doing so may cause permanent damage.
All connectors will be corroded if exposed to water or moisture. Corrosion is
accelerated if the system’s power is ON. Please take proper water-resistant
measures for cable connections.
The DC jack and cables are sealed and may be operated with water splashing
while attached. All port covers should be in place when no cable is attached.
9
User’s Guide
System and Display Unit Configurations
DVI Single Screen:
DVI 1
System
Unit
DC cord
Display
Unit
Y-cable
Car lighter 12V
Truck battery 24V
AC 110/220V
Vehicle
adapter
AC adapter
DVI Dual Screen:
DVI 2
System
Unit
Display
Unit #1
DVI 1
Y-cable
Car lighter 12V
Truck battery 24V
AC 110/220V
Vehicle
adapter
Vehicle
adapter
AC
adapter
AC
adapter
10
Display
Unit #2
User’s Guide
Note:
1. Only MT686 system unit is capable of dual screen connections.
2. One AC or Vehicle adapter can power maximum 2 units (system +
display, or 2 displays) only.
3. VHB type display unit requires a dedicated power source (AC or Vehicle
adapter). It cannot share its power source with any other display or
system unit because of its higher power consumption.
4. Under dual screen mode resolution must be the same on both screens.
Universal Display Unit:
DVI or RGB (CRT)
PC system
unit
USB (touch screen)
Audio (speaker)
AC 110/220V
AC
adapter
Car lighter 12V
Truck battery 24V
Vehicle
adapter
11
Display
unit
User’s Guide
AC adapter
The following are recommended when using the AC adapter:
• Use a properly grounded AC outlet.
• Use one AC outlet exclusively for the display unit and computer. Having
other appliances on the same line may cause interference.
• Use a power strip with built-in surge protection.
Connect the AC adapter:
1. Plug the AC cord into the adapter.
2. Plug the other end of the AC cord into the outlet. Make sure the green
LED on the adapter turns on.
3. Attach the DC plug into the power jack of the Y-cable; turn the lock ring
clockwise to secure it.
4. Attach the Y-cable and DC cord to computer and display unit.
The AC adapter automatically detects the AC line voltage (110V or 220V) and
adjusts accordingly.
AC or Vehicle Adapter Indicator
The green LED indicates that the power is ready.
AC Adapter Specifications
Input Voltage:
AC 90 - 240 V
Input Frequency:
50/60 Hz
Output Voltage:
DC 19V
Maximum Power:
65 Watts
Dimension:
122 mm(W) x 55mm(D) x 29mm(H)
Weight:
240 g (0.52 lb.)
Vehicle Adapter Specifications
Input Voltage
12V/24V (10~32V) Auto-sense
Input Current
2.5A/5.5A max. (24V/12V respectively)
Output Voltage
19V +/-5%
Maximum Power:
55 Watts
12
User’s Guide
Dimension:
118 mm(W) x 64mm(D) x 40mm(H)
Wiring
Cigarette lighter or Truck battery
Keyboard (optional)
The keyboard is functionally equivalent to a full size desktop keyboard.
A sample key layout is shown below.
Keyboard Specifications
Number of keys:
89
Key travel:
1.5 mm
Emulates standard 101/102-key keyboard
Keyboard Backlight
Press [☼I-O] key for approximately 1 second turns keyboard backlight ON or
OFF.
The Numeric Keypad
The numeric keypad functions like an electronic calculator. It is embedded in the
main keyboard, with the numeric figures printed on the upper right of their
respective keys. The keypad has keys for the digits 0 through 9, the decimal
point ( . ), addition ( + ), subtraction ( - ), multiplication ( * ), and division ( / ).
13
User’s Guide
To activate the keypad, press the Num Lock key. The 15 keys shown in the
figure then switch from alphabetic keys to numeric keys. Press Num Lock again
to return to alphabetic.
Touch Screen (optional)
Touch screen facilitates direct finger touch input on the panel instead of mouse
or touch pad.
Touch screen specifications
Interface
USB (optional serial)
Resolution
>1024 x 1024
Touch screen driver installation
For Windows, just plug in the display unit and let Windows detect the hardware.
Then follow the prompt to complete installation.
Touch screen calibration
Prior to first time use, run the calibration program contained in the
Driver/Utilities CD and follow the prompts until calibration is complete.
Display
The display is a SVGA compatible LCD (Liquid Crystal Display) of 800 x 600
dots (horizontal x vertical) or XGA compatible 1024 x 768 dots with 16M colors.
14
User’s Guide
Display Types
Model
DP860 xx08
Type
Resolution
Mode
Color
8.4” TFT color
800 x 600 pixels
SVGA
16.8 million
DP860 xx12
DP860 xx13
12.1” TFT Color 13.3” TFT Color
800 x 600 pixels 1024 x 768 pixels
SVGA
XGA
16.8 million
16.8 million
Dimensions and Weight
Model
DP860 xx08
DP860 xx12
DP860 xx13
Width:
Height:
250mm (9.8”)
200mm (7.9”)
306mm (12”)
319mm (12.5”)
277mm (10.9”) 299mm (11.7”)
Depth:
150mm (5.9”)
150mm (5.9”)
150mm (5.9”)
Weight:
3.2Kg (7.0 lb.)
4.0Kg (8.8 lb.)
4.5Kg (9.9 lb.)
Note: Weight varies depending on system configurations.
Materials and Recycling
Materials of the display unit are as follows:
Cabinet:
Steel with Nickel plating, Aluminum 5052, or Stainless Steel
S304
PCB:
FR-4, UL 94V0
Packing: Carton: Unbleached paper
Cushion: Recyclable PE
User's Guide: Paper
Please recycle the parts according to local regulations.
Environmental
Temperature:
0 ~ 45ºC (32 ~ 113ºF) operating
-20 ~ 60ºC (-4 ~ 140ºF) storage
Humidity:
5~95% Non-condensing operating
95% maximum storage
Altitude:
0 ~ 12,180 meters (0 ~ 40,000 feet) operating
15
User’s Guide
Cleaning and Maintenance
ALWAYS turn OFF the power and unplug the power cord before cleaning.
The exterior may be wiped with a clean, soft, and lint-free cloth. If there is
difficulty removing dirt, apply non-ammonia, non-alcohol based glass cleaner to
the cloth and wipe.
An air gun is recommended for cleaning water and dust. For salty water
please clean with fresh water then blow-dry with an air gun. Be sure not to
turn the display up side down while water is being applied.
Troubleshooting
Should the device failed to function properly, you may try the following to
troubleshoot it.
•
Check cable connections.
•
Check AC/vehicle adapter and the power source.
•
Minimize the configuration, i.e., remove extra peripherals and devices.
•
Set factory default.
•
Re-install driver and application software related to display or touch
screen.
RMA Service
If troubleshooting steps are unsuccessful, consult your dealer for service. If it is
necessary for you to send in your computer for repairs, a representative from
your authorized technical support department will provide you with an RMA#.
Only after you have spoken with a technical support representative and received
an RMA# should you send in your computer. Shipping instructions:
1. Remove any personal diskettes, CD's, or other media.
2. Use the original shipping container and packing materials, if possible.
3. If the original packing materials are not available, wrap the equipment with
soft material (e.g., PU/ PE form) then put the wrapped equipment into a hard
cardboard shipping box.
4. Include a sheet with the following information: (Note: please keep a copy of
this sheet for your records)
•
Name
16
User’s Guide
•
Address
•
Unit serial number
•
Place and date of purchase or the original invoice number
•
Date of failure
•
A DETAILED Description of the problems you have encountered
•
A list of the hardware/software configuration, if applicable.
5. Clearly mark the outside of the shipping box with the RMA #. If an RMA # is
not present on the shipping box, receiving will be unable to identify it and it
might be returned.
6. Unless prior arrangements have been made, the customer is responsible for all
shipping costs. Unauthorized use of the company’s shipping accounts is not
permitted.
17
Printed in Taiwan
Recycled / Recyclable