1
>kNÂ@ÌXiIIIPlus™Ì,ÂÎkÂÅ
3Åk¿ÅÌ×bk
Customer Order # 11348L
Manufacturer Part # 11348LB Rev. 3
3URSULHWDU\6WDWHPHQW
This manual contains proprietary information of Zebra Technologies. It is intended solely for the information and use
of parties operating and maintaining the equipment described herein. Such proprietary information may not be used,
reproduced, or disclosed to any other parties for any other purpose without the expressed written permission of Zebra
Technologies.
3URGXFW,PSURYHPHQWV
Continuous improvement of products is a policy of Zebra Technologies. All specifications and signs are subject to
change without notice.
)&&&RPSOLDQFH6WDWHPHQW
This equipment has been tested and found to comply with the limits for a Class B digital device, pursuant to Part 15 of
the FCC Rules. These limits are designed to provide reasonable protection against harmful interference in a residential
installation. This equipment generates, uses, and can radiate radio frequency energy and, if not installed and used in
accordance with the instructions, may cause harmful interference to radio communications. However, there is no
guarantee that the interference will not occur in a particular installation. If this equipment does cause harmful
interference to radio or television reception, which can be determined by turning the equipment off and on, the user is
encouraged to try to correct the interference by one or more of the following measures:
• Reorient or relocate the receiving antenna.
• Increase the separation between the equipment and the receiver.
• Connect the equipment into an outlet on a circuit different than that to which the receiver is connected.
• Consult the dealer or an experienced Radio/TV technician for help.
NOTE: This unit was tested with shielded cables on the peripheral devices. Shielded cables must be used with the
unit to ensure compliance.
“The user is cautioned that any changes or modifications not expressly approved by Zebra Technologies could void the
user’s authority to operate the equipment.”
&DQDGLDQ'2&&RPSOLDQFH6WDWHPHQW
This digital apparatus does not exceed the Class A limits for radio noise emissions from digital apparatus as set out in
the radio interference regulations of the Canadian Department of Communications.
&(&RPSOLDQFH
If the accompanying printer displays the CE mark, it also meets EMC directive 89/336/EEC, with amendments
effective at the time of manufacture.
/LDELOLW\'LVFODLPHU
Zebra Technologies takes steps to assure that its published Engineering Specifications and Manuals are correct;
however, errors do occur. Zebra Technologies reserves the right to correct any such errors and disclaims liability
resulting therefrom.
1R/LDELOLW\IRU&RQVHTXHQWLDO'DPDJH
In no event shall Zebra Technologies or anyone else involved in the creation, production, or delivery of the
accompanying product (including hardware and software) be liable for any damages whatsoever (including, without
limitation, damages for loss of business profits, business interruption, loss of business information, or other pecuniary
loss) arising out of the use of or the results of use or inability to use such product, even if Zebra Technologies has been
advised of the possibility of such damages. Because some states so not allow the exclusion or limitation of liability for
consequential or incidental damages, the above limitation may not apply to you.
&RS\ULJKWV
This copyrighted manual and the label printer described herein are owned by ZIH Corp. All rights are reserved.
Unauthorized reproduction of this manual or the software in the label printer may result in imprisonment of up to one
year and fines of up to $10,000 (17 U.S.C.506). Copyright violators may be subject to civil liability.
All products and brand names are trademarks of their respective companies. All rights reserved.
© 2002 ZIH Corp. All rights reserved.
ii
Zebra XiIIIPlus™ Printers User’s Guide
Zebra XiIIIPlus™ Printers User’s Guide
iii
iv
Zebra XiIIIPlus™ Printers User’s Guide
2AOlÍyÍÏlÏÆ
ÏÃcØYÏ ³³³³³³³³³³³³³³³³³³³³³³³³³³³³³³³³³³³³³³³³³³³³³³³³³³³³³³³³³³³³³¦
Hello! .......................................................................................................................1
Unpacking and Inspection........................................................................................2
Reporting Damage ..............................................................................................2
Storage ................................................................................................................2
Media and Ribbon Requirements.............................................................................3
Power Cord ..............................................................................................................3
Printer Anatomy 101................................................................................................4
AOÃAÏÍÏlÍ-ÃÏló³³³³³³³³³³³³³³³³³³³³³³³³³³³³³³³³³³³³³³³³³³³{
Purpose.....................................................................................................................5
Types of Media ........................................................................................................6
Non-Continuous Web Media ..............................................................................6
Non-Continuous Black Mark Media ..................................................................7
Continuous Media...............................................................................................7
Choosing the Print Mode .........................................................................................8
Loading the Media ...................................................................................................9
Positioning the Media Sensors...............................................................................10
Transmissive Sensor .........................................................................................10
Black Mark Sensor ...........................................................................................12
Loading the Ribbon................................................................................................13
Operator Controls...................................................................................................14
POWER Switch ................................................................................................14
Front Panel........................................................................................................14
Configuring the Printer ..........................................................................................15
Configuring the Software or Printer Driver ...........................................................16
Media and Ribbon Calibration...............................................................................17
Printing a Test Label ..............................................................................................19
Zebra XiIIIPlus™ Printers User’s Guide
v
ÆÏAOÆÍØYAÏ ³³³³³³³³³³³³³³³³³³³³³³³³³³³³³³³Ö¦
System Considerations .......................................................................................... 21
Interfaces .......................................................................................................... 21
Data Specifications........................................................................................... 21
Cabling Requirements ........................................................................................... 23
-ÃÏlÃÍAÆYÆ ³³³³³³³³³³³³³³³³³³³³³³³³³³³³³³³³³³³³³³³³³³³³³³³³³³³³³³³³³Ö{
Operator Controls .................................................................................................. 25
POWER Switch................................................................................................ 25
Front Panel Display .......................................................................................... 26
Front Panel Keys ............................................................................................. 27
Front Panel Lights ............................................................................................ 28
Roll Media Loading............................................................................................... 29
Tear-Off Mode ................................................................................................. 29
Peel-Off Mode.................................................................................................. 30
Rewind Mode (for Printers without the Cutter Option) ................................... 32
Rewind Mode (for Printers with the Cutter Option) ........................................ 34
Cutter Mode...................................................................................................... 36
Fanfold Media Loading ......................................................................................... 37
Removing the Label Liner..................................................................................... 38
Ribbon Loading ..................................................................................................... 39
Ribbon Removal .................................................................................................... 41
yØÃAÏ ³³³³³³³³³³³³³³³³³³³³³³³³³³³³³³³³³³³³³³³³³³³³³³³³³³³³³³³³~Ñ
Entering the Setup Mode ....................................................................................... 43
Changing Password-Protected Parameters ............................................................ 44
Leaving the Setup Mode........................................................................................ 45
Configuration and Calibration Sequence .............................................................. 46
/ØÏlÍAÃlÍAcÍcØÆÏlÏ ³³³³³³³³³³³³³³³³³³³³³³³³³³³³³³³ËÊ
Cleaning................................................................................................................. 67
Cleaning the Exterior ....................................................................................... 68
Cleaning the Interior......................................................................................... 68
Cleaning the Printhead and Platen Roller ........................................................ 68
Preventive Maintenance ................................................................................... 70
Cleaning the Sensors ........................................................................................ 74
Cleaning the Snap Plate.................................................................................... 74
Cleaning the Cutter Module ............................................................................. 76
vi
Zebra XiIIIPlus™ Printers User’s Guide
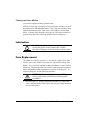
Lubrication .............................................................................................................76
Fuse Replacement ..................................................................................................76
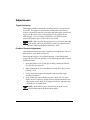
Adjustments ...........................................................................................................78
Toggle Positioning............................................................................................78
Printhead Pressure Adjustment.........................................................................78
Media Sensor Position Adjustment ..................................................................79
2ÃØOlÆϳ³³³³³³³³³³³³³³³³³³³³³³³³³³³³³³³³³³³³³³³³³³³³³³³³³³³³q¦
LED Error Conditions and Warnings ....................................................................81
Print Quality Problems...........................................................................................84
Wrinkled Ribbon....................................................................................................85
Communications ....................................................................................................85
Printer Diagnostics.................................................................................................87
Power-On Self Test...........................................................................................87
Additional Printer Self Tests ............................................................................87
0®lYyYAÏÆ ³³³³³³³³³³³³³³³³³³³³³³³³³³³³³³³³³³³³³³³³³³³³³³³³³³³³³³³³³Ñ
Media Handling .....................................................................................................93
Standard XiIIIPlus Features ...................................................................................93
Options ...................................................................................................................94
Zebra Programming Language (ZPL II®)..............................................................94
Bar Codes...............................................................................................................95
General Specifications ...........................................................................................95
Printing Specifications ...........................................................................................96
Ribbon Specifications ............................................................................................96
Media Specifications..............................................................................................97
Power Cord Specifications.....................................................................................98
®®lcà ³³³³³³³³³³³³³³³³³³³³³³³³³³³³³³³³³³³³³³³³³³³³³³³³³³³³³³³³³³³³³³³³
Printer Interface Technical Information.................................................................99
RS-232 Serial Data Port....................................................................................99
Parallel Data Port ............................................................................................104
Memory Cards .....................................................................................................105
PCMCIA Card ................................................................................................105
CompactFlash Card ........................................................................................106
clà³³³³³³³³³³³³³³³³³³³³³³³³³³³³³³³³³³³³³³³³³³³³³³³³³³³³³³³³³³³³³³³³³³³³³¦ç
Zebra XiIIIPlus™ Printers User’s Guide
vii
viii
Zebra XiIIIPlus™ Printers User’s Guide
ÏÃcØYÏ
+HOOR
Thank you for purchasing this high-quality Zebra XiIIIPlus printer,
manufactured by the industry leader in quality, service, and value—Zebra
Technologies. For over 30 years, Zebra has provided customers with the
highest caliber of products and support.
• This manual provides all of the information you need to operate your
printer.
• The ZPL II® Programming Guide Volume I and Volume II
(part # 45540L) shows you how to create the perfect label format for
your application. These books also explain how, through ZBI™, you
can extend the power of ZPL II by allowing custom programs to be
written that operate within the printer and directly interface with bar
code scanners and keyboard display devices. In addition, the books
contain information about the enhanced operating system features of
your printer. There are three ways to obtain these books: on the
accessory CD-ROM (supplied with the printer), on our Web site
(www.zebra.com), or as printed manuals that can be ordered from your
distributor.
• The ZebraNet® Networking: PrintServer II™ Installation and User’s
Guide (part # 45537L) explains how you can quickly set up your printer
on an IP network and experience ZebraLink™, our revolutionary
real-time connectivity and control solution for Zebra printers (optional
ZebraNet® PrintServer II required).
• The ZebraNet® Wireless Card Socket Installation and User’s Guide
(part # 48622L) provides detailed information on Zebra’s wireless
Ethernet solution for the XiIIIPlus printers.
• The Maintenance Manual (part # 48152L) contains the information you
need to maintain your printer.
Zebra XiIIIPlus™ Printers User’s Guide
1
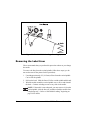
8QSDFNLQJDQG,QVSHFWLRQ
Carefully unpack and inspect the printer for possible damage incurred
during shipment.
• Check all exterior surfaces.
• Raise the media access door and inspect the media compartment.
In case shipping is required, save the carton and all packing material.
Contact your authorized Zebra reseller for instructions.
5HSRUWLQJ'DPDJH
If you discover shipping damage:
• Immediately notify the shipping company and file a damage report with
them. Zebra Technologies is not responsible for any damage incurred
during shipment of the equipment and will not repair this damage under
warranty.
• Keep the carton and all packing material for inspection.
• Notify your authorized Zebra reseller.
6WRUDJH
If you are not placing the printer into operation immediately, repackage it
using the original packing materials. The printer may be stored under the
following conditions:
• Temperature: –40° to 140° F (–40° to 60° C)
• Relative humidity: 5% to 85% non-condensing
2
Zebra XiIIIPlus™ Printers User’s Guide
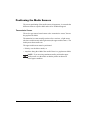
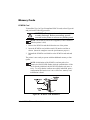
0HGLDDQG5LEERQ5HTXLUHPHQWV
Since print quality is affected by media and ribbon, printing speeds, and
printer operating modes, it is very important to run tests for your
applications.
We STRONGLY RECOMMEND the use of Zebra Technologies-brand
supplies for continuous high-quality printing. A wide range of paper,
polypropylene, polyester, and vinyl stock has been specifically engineered
to enhance the printing capabilities of the printer and to ensure against
premature printhead wear.
• Continuous roll media, fanfold media, or card stock with optional
perforations and registration holes may be used.
• Printhead life may be reduced by the abrasion of exposed paper fibers
when using perforated media.
• The ribbon MUST be as wide as or wider than the media being used. If
the ribbon is narrower than the media, areas of the printhead are
unprotected and subject to premature wear. (When printing in direct
thermal mode, ribbon is not used and should not be loaded in the
printer.)
3RZHU&RUG
:$51,1*)RUSHUVRQQHODQGHTXLSPHQWVDIHW\
DOZD\VXVHDWKUHHSURQJSOXJZLWKDQHDUWKJURXQG
FRQQHFWLRQWRWKH$&SRZHUVRXUFH
NOTE: Depending on how your printer was ordered, a power cord
may or may not be included. If one is not included, or if the one
included is not suitable for your requirements, refer to “Power Cord
Specifications” on page 98.
The power cord connector must be plugged into the mating connector on
the rear of the printer before it is connected to a live power source.
Make sure that the POWER switch (located at the back of the printer) is in
the OFF position before connecting the power cable to an electrical outlet.
Zebra XiIIIPlus™ Printers User’s Guide
3
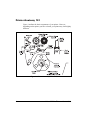
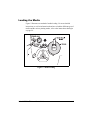
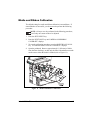
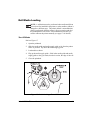
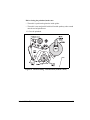
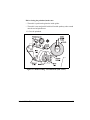
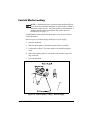
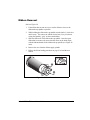
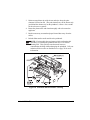
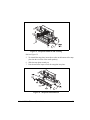
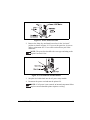
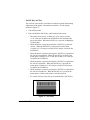
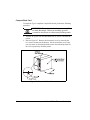
3ULQWHU$QDWRP\
Figure 1 outlines the basic components of your printer. However,
depending on the options you have selected, your printer may look slightly
different.
Figure 1. Printer Anatomy Overview
4
Zebra XiIIIPlus™ Printers User’s Guide
AOÃAÏÍÏlÍ-ÃÏlÃ
This chapter of the User’s Guide is so important that we’ve printed it on a
different color paper! This way, it is easy for you to find when you must
calibrate (set up) the printer for your particular application.
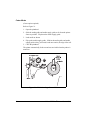
3XUSRVH
• To calibrate the printer.
• To verify that the printer is properly set up by printing a test label.
NOTE: This procedure must be performed when the printer is first
installed or if it does not properly detect the top of the label.
To calibrate the printer, you must perform the following procedures:
• Determine the type of media (labels) being used.
• Choose the print method.
• Position the media sensors (if necessary).
• Configure the printer and software or driver based on the label being
used.
• Perform a media and ribbon calibration.
• Print a test label.
Zebra XiIIIPlus™ Printers User’s Guide
5
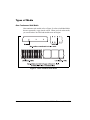
7\SHVRI0HGLD
1RQ&RQWLQXRXV:HE0HGLD
Non-continuous web media (refer to Figure 2) refers to individual labels
that are separated by a gap, notch, or hole. When you look at the media,
you can tell where one label ends and the next one begins.
Figure 2. Non-Continuous Web Media
6
Zebra XiIIIPlus™ Printers User’s Guide
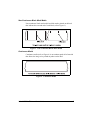
1RQ&RQWLQXRXV%ODFN0DUN0HGLD
Non-continuous black mark media has black marks printed on the back
that indicate the start and end of each label (refer to Figure 3).
Figure 3. Non-Continuous Black Mark Media
&RQWLQXRXV0HGLD
Continuous media (refer to Figure 4) is one uninterrupted roll of material
that allows the image to be printed anywhere on the label.
Figure 4. Continuous Media
Zebra XiIIIPlus™ Printers User’s Guide
7
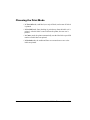
&KRRVLQJWKH3ULQW0RGH
• In Tear-Off mode, each label (or a strip of labels) can be torn off after it
is printed.
• In Peel-Off mode, liner (backing) is peeled away from the label as it is
printed. After this label is removed from the printer, the next one is
printed.
• In Cutter mode, the printer automatically cuts the label after a specified
number of labels has been printed.
• In Rewind mode, the media and liner are rewound onto a core as the
labels are printed.
8
Zebra XiIIIPlus™ Printers User’s Guide
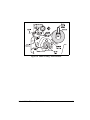
/RDGLQJWKH0HGLD
Figure 5 illustrates one method of media loading. For more detailed
instructions, as well as information about how to load the different types of
media and the various printing modes, refer to the instructions that begin
on page 29.
Figure 5. Media Loading
Zebra XiIIIPlus™ Printers User’s Guide
9
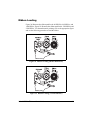
3RVLWLRQLQJWKH0HGLD6HQVRUV
The correct positioning of the media sensors is important—it can make the
difference between a perfect label and a call to Technical Support!
7UDQVPLVVLYH6HQVRU
The web or gap sensor, better known as the “transmissive sensor,” detects
the gap between labels.
The transmissive sensor actually consists of two sections: a light source
(the lower media sensor) and a light sensor (the upper media sensor). The
media passes between the two.
The upper media sensor must be positioned:
• Directly over the hole or notch, or
• Anywhere along the width of the media if there is a gap between labels.
NOTE: If you are using continuous media, position the upper
media sensor over the media so that the printer can detect an
out-of-paper condition.
10
Zebra XiIIIPlus™ Printers User’s Guide
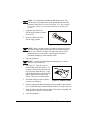
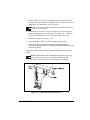
$GMXVWLQJWKH8SSHU0HGLD6HQVRU
Refer to Figure 6. (For clarity, not all printer parts are shown.)
1. Remove the ribbon (if it is installed).
2. Locate the upper media sensor. The upper media sensor “eye” is
directly below the adjustment screw head.
3. Slightly loosen the upper media sensor adjustment screw (use a
Phillips-head screwdriver).
4. Using the tip of the screwdriver, slide the upper sensor along the slot
to the desired position.
5. Tighten the adjustment screw to secure the upper media sensor.
Figure 6. Upper Media Sensor Adjustment
Zebra XiIIIPlus™ Printers User’s Guide
11
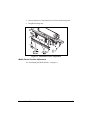
$GMXVWLQJWKH/RZHU0HGLD6HQVRU
Position the lower media sensor (refer to Figure 7) by sliding it in its slot
until it is positioned directly under the upper media sensor.
Figure 7. Lower Media Sensor Adjustment
%ODFN0DUN6HQVRU
The black mark sensor is in a fixed position and enabled via the front panel
(refer to “Configuring the Printer” on page 15 for details).
12
Zebra XiIIIPlus™ Printers User’s Guide
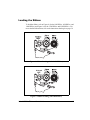
/RDGLQJWKH5LEERQ
To load the ribbon, refer to Figure 8 (for the 90XiIIIPlus, 96XiIIIPlus, and
140XiIIIPlus) and Figure 9 (for the 170XiIIIPlus and 220XiIIIPlus). For
more detailed information, refer to the instructions that begin on page 39.
Figure 8. Ribbon Loading (90/96/140XiIIIPlus)
Figure 9. Ribbon Loading (170/220XiIIIPlus)
Zebra XiIIIPlus™ Printers User’s Guide
13
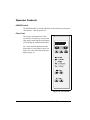
2SHUDWRU&RQWUROV
32:(56ZLWFK
The POWER switch is located at the back of the printer above the power
cord and fuse. Turn the printer ON.
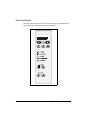
)URQW3DQHO
The step-by-step instructions in this
section tell you which keys to press and
what appears on the liquid crystal display
(LCD) during the calibration procedure.
For a more detailed explanation of the
front panel keys and lights (as shown in
Figure 10), refer to the instructions that
begin on page 26.
Figure 10. Front Panel
14
Zebra XiIIIPlus™ Printers User’s Guide
&RQILJXULQJWKH3ULQWHU
The configuration procedure in the next table contains the information you
need to get your printer up and running, but it is not comprehensive. Refer
to page 43 for more information.
• Enter the configuration mode by pressing the SETUP/EXIT key at the
“PRINTER READY” display.
NOTE: You need to press the NEXT/SAVE key more than once to
advance to some of the displays.
• Use the RIGHT BLACK OVAL key to increase the value, answer “yes,”
indicate “on,” or move to the next selection.
• Use the LEFT BLACK OVAL key to decrease the value, answer “no,”
indicate “off,” or return to the previous selection.
NOTE: When changing parameters, an asterisk (*) in the upper
left-hand corner of the LCD indicates that you have changed this
setting from what is currently stored in memory.
Zebra XiIIIPlus™ Printers User’s Guide
15
3UHVV
²
/&'6KRZV
35,17(55($'<
'$5.1(66
35,1763(('
$FWLRQ([SODQDWLRQ
1RUPDOSULQWHURSHUDWLRQ
3UHVVWKH%/$&.29$/NH\VWRLQFUHDVHRUGHFUHDVHWKHSULQW
GDUNQHVVVHWWLQJ<RXPD\QHHGWRFKDQJHWKLVVHWWLQJZKHQ\RX
SULQW\RXUODEHO
3UHVVWKH%/$&.29$/NH\VWRVHOHFWWKHDSSURSULDWHSULQW
VSHHGIRU\RXUVSHFLILFSULQWHU
35,1702'(
3UHVVWKH%/$&.29$/NH\VWRVHOHFWWHDURIISHHORIIFXWWHURU
UHZLQGPRGH
0(',$7<3(
3UHVVWKH%/$&.29$/NH\VWRVHOHFWFRQWLQXRXVRUQRQ
FRQWLQXRXVPHGLDW\SH,I\RXFKRRVHFRQWLQXRXVPHGLD\RX
PXVWDOVRLQFOXGHDODEHOOHQJWKLQVWUXFWLRQLQ\RXUODEHOIRUPDW
3UHVVWKH%/$&.29$/NH\VWRVHOHFWWUDQVPLVVLYHRUEODFNPDUN
VHQVLQJPRGH8QOHVV\RXUPHGLDKDVEODFNPDUNVRQWKHEDFN
OHDYH\RXUSULQWHUDWWKHGHIDXOWVHWWLQJZHE
3UHVVWKH%/$&.29$/NH\VWRVHOHFWWKHUPDOWUDQVIHULI\RXDUH
XVLQJULEERQRUGLUHFWWKHUPDOQRULEERQ
6(16257<3(
35,170(7+2'
0$;,080/(1*7+ 3UHVVWKH%/$&.29$/NH\VWRVHWWKHYDOXHWKDWLVFORVHVWWR
EXWQRWOHVVWKDQWKHOHQJWKRIWKHODEHO\RXDUHXVLQJ
6$9(&+$1*(6
²
35,17(55($'<
3UHVVWKH%/$&.29$/NH\VWRVHOHFW
3(50$1(17²VDYHVFKDQJHVZKHQSRZHULVWXUQHGRII
3UHVV6(783(;,7WRDFFHSWWKHVHOHFWLRQ
<RXKDYHH[LWHGWKHFRQILJXUDWLRQPRGHDQGDUHQRZUHDG\WR
FDOLEUDWHWKHSULQWHU
&RQILJXULQJWKH6RIWZDUHRU3ULQWHU'ULYHU
Many printer settings may also be controlled by your printer’s driver or
label preparation software. Please refer to the driver or software
documentation for more information.
16
Zebra XiIIIPlus™ Printers User’s Guide
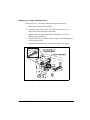
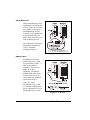
0HGLDDQG5LEERQ&DOLEUDWLRQ
The default setting for media and ribbon calibration is autocalibrate. If
autocalibration is successful, you do not need to perform the following
procedure.
NOTE: All steps must be performed in the following procedure,
even if only one sensor needs to be adjusted.
1. Press the SETUP/EXIT key.
2. Press the NEXT/SAVE key until “MEDIA AND RIBBON
CALIBRATE” displays.
3. To start the calibration procedure, press the RIGHT BLACK OVAL
key. “LOAD BACKING CANCEL CONTINUE” displays.
4. Open the printhead. Remove approximately 8″ (200 mm) of labels
from the liner (backing), so that only the liner is threaded between the
media sensors when the media is loaded (refer to Figure 11).
Figure 11. Media and Ribbon Calibration
Zebra XiIIIPlus™ Printers User’s Guide
17
5. Press the RIGHT BLACK OVAL key. The LCD shows “REMOVE
RIBBON CANCEL CONTINUE.”
6. Either remove the ribbon or slide it as far from the printer frame as
possible.
7. Close the printhead.
8. Press the RIGHT BLACK OVAL key. The LCD shows
“CALIBRATING PLEASE WAIT.”
9. When this part of the calibration process is completed, the LCD reads
“RELOAD ALL CONTINUE.”
10. Open the printhead. Pull the liner until a label is positioned between
the media sensors.
11. Either load the ribbon or return the ribbon to its proper position.
12. Close the printhead. Press the RIGHT BLACK OVAL key to perform
the next part of the calibration sequence. “MEDIA AND RIBBON
CALIBRATE” displays. The printer is calibrated when the media
stops feeding.
13. Press the SETUP/EXIT key to leave the setup mode. Choose
“permanent” when “SAVE CHANGES” displays.
18
Zebra XiIIIPlus™ Printers User’s Guide
3ULQWLQJD7HVW/DEHO
To print a test label:
1. Turn off the printer.
2. Press and hold the
CANCEL key while
turning on the printer.
A configuration label prints
showing the parameters
currently stored in the
printer’s memory (see Figure
12 for a sample label).
If you encounter problems
while you are configuring or
calibrating the printer or
printing a test label, refer to
“Troubleshooting” beginning
on page 81. Otherwise, refer
to “Establishing
Communication” beginning
on page 21 to set up the
communication parameters.
Figure 12. Configuration Label
Zebra XiIIIPlus™ Printers User’s Guide
19
20
Zebra XiIIIPlus™ Printers User’s Guide
ÆÏAOÆÍØYAÏ
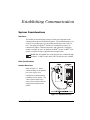
6\VWHP&RQVLGHUDWLRQV
,QWHUIDFHV
The method of interfacing this printer to a data source depends on the
communication options installed in the printer. The standard interfaces are
an RS-232 serial data port, a bi-directional parallel port, and a USB 2.0
port. The optional ZebraNet® PrintServer II enables the printer to be
connected to 10Base-T Ethernet networks, and a Wireless Card Socket
option is available as well. In addition, the IBM® Twinax or IBM® Coax
option is available for those applications that require them.
NOTE: RS-422 and RS-485 serial data ports are available through
an adapter. A DB-25 cable and a USB 2.0 cable are also available.
'DWD6SHFLILFDWLRQV
3DUDOOHO'DWD3RUW
Refer to Figure 13. When
communicating via the parallel
port, refer to page 54 to
configure the communication
parameters for the printer. The
values selected must be the
same as those used by the host
equipment connected to the
printer.
Figure 13. Parallel Data Port
Zebra XiIIIPlus™ Printers User’s Guide
21
6HULDO'DWD3RUW
When communicating via an
asynchronous serial data port
(refer to Figure 14), the baud
rate, number of data, parity,
and handshaking are userselectable. Parity applies only
to data transmitted by the
printer because the parity of
received data is ignored.
For parallel and serial pinout
and technical information,
refer to “Appendix”
beginning on page 99.
Figure 14. Serial Data Port
86%3RUW
In addition to serial and
parallel data ports, a USB
2.0 port (which is USB 1.1
and 1.0 compatible) is
available to connect your
printer to the host
equipment. The industry
standard USB cable has an
A-male connector on one
end and a B-male connector
on the other end (see
Figure 15). Zebra
recommends using a USB
2.0-certified compliant cable
that is a maximum of 5 m in
length (Zebra part # 33011).
Figure 15. USB Port
22
Zebra XiIIIPlus™ Printers User’s Guide
&DEOLQJ5HTXLUHPHQWV
Data cables must be fully shielded and fitted with metal or metalized
connector shells. Shielded cables and connectors are required to prevent
radiation and reception of electrical noise.
To minimize electrical noise pickup in the cable:
• Keep data cables as short as possible.
• Do not bundle the data cables tightly with the power cords.
• Do not tie the data cables to power wire conduits.
NOTE: Zebra printers comply with FCC “Rules and Regulations,”
Part 15, Subpart J, for Class A Equipment, using fully shielded
6′ (2 m) data cables. Use of longer cables or unshielded cables may
increase radiated emissions above the Class A limits.
NOTE: RS-422 and RS-485 applications should use twisted
shielded pairs as recommended in the Appendix of the
TIA/EIA.-485 Specification.
Zebra XiIIIPlus™ Printers User’s Guide
23
24
Zebra XiIIIPlus™ Printers User’s Guide
-ÃÏlÃÍAÆYÆ
2SHUDWRU&RQWUROV
This section discusses the functions of the various controls and indicators
on the printer. Become familiar with each of these functions before
operating the printer.
32:(56ZLWFK
This switch is located at the back of the printer above the power cord and
fuse. The POWER switch should be turned off before connecting or
disconnecting any cables.
External influences, such as lightning storms or noise on the power or data
cables, may cause erratic printer behavior. Turning the printer’s power off
and then back on may re-establish proper printer operation.
Zebra XiIIIPlus™ Printers User’s Guide
25
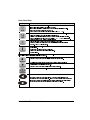
)URQW3DQHO'LVSOD\
The front panel display or LCD (as shown in Figure 16) communicates
operational status and setup modes and parameters.
Figure 16. Front Panel
26
Zebra XiIIIPlus™ Printers User’s Guide
)URQW3DQHO.H\V
.H\
)XQFWLRQ
6WDUWVDQGVWRSVWKHSULQWLQJSURFHVV
,IWKHSULQWHULVQRWSULQWLQJQRSULQWLQJFDQRFFXU
,IWKHSULQWHULVSULQWLQJSULQWLQJVWRSVRQFHWKHFXUUHQWODEHOLVFRPSOHWH
3UHVVWRUHPRYHHUURUPHVVDJHVIURPWKH/&'
127(3DXVHPRGHFDQDOVREHDFWLYDWHGYLD=3/,,~PP, ^PP
)RUFHVWKHSULQWHUWRIHHGRQHEODQNODEHOHDFKWLPHWKHNH\LVSUHVVHG
3ULQWHUQRWSULQWLQJRQHEODQNODEHOLPPHGLDWHO\IHHGV
3ULQWLQJRQHEODQNODEHOIHHGVDIWHUWKHFXUUHQWEDWFKRIODEHOVLVFRPSOHWH
127((TXLYDOHQWWRWKH6OHZWR+RPH3RVLWLRQ~PH, ^PH=3/,,LQVWUXFWLRQ
:KHQLQWKHSDXVHPRGHWKLVNH\FDQFHOVSULQWMREV
3ULQWMRELQTXHXHSUHVVRQFHIRUHDFKSULQWMREWREHGHOHWHG
3UHVVDQGKROGIRUVHYHUDOVHFRQGVWRFDQFHODOOSULQWMREVLQWKHSULQWHU¶V
PHPRU\7KH'$7$OLJKWWXUQVRII
:KHQLQWKHSDXVHPRGHWKLVNH\FDOLEUDWHVWKHSULQWHUIRU
0HGLDOHQJWK
0HGLDW\SHFRQWLQXRXVRUQRQFRQWLQXRXV
3ULQWPRGHGLUHFWWKHUPDORUWKHUPDOWUDQVIHU
6HQVRUYDOXHV
127(7KHNH\VEHORZDUHXVHGRQO\ZKHQFRQILJXULQJWKHSULQWHU6SHFLILFXVHVRIWKHVHNH\V
DUHH[SODLQHGLQ³&RQILJXUDWLRQ´EHJLQQLQJRQSDJH 6FUROOVWRWKHSUHYLRXVSDUDPHWHU
3UHVVDQGKROGWRJREDFNZDUGTXLFNO\WKURXJKSDUDPHWHUVHWV
6FUROOVWRWKHQH[WSDUDPHWHU6DYHVDQ\FKDQJHV\RX¶YHPDGHLQWKH
FRQILJXUDWLRQDQGFDOLEUDWLRQVHTXHQFH
3UHVVDQGKROGWRDGYDQFHTXLFNO\WKURXJKSDUDPHWHUVHWV
(QWHUVDQGH[LWVWKHVHWXSPRGH
7KHVHNH\VFKDQJHWKHSDUDPHWHUYDOXHV7KH\DUHXVHGLQGLIIHUHQWZD\V
GHSHQGLQJRQWKHSDUDPHWHUGLVSOD\HG&RPPRQXVHVDUHWRLQFUHDVHGHFUHDVHD
YDOXHDQVZHU³\HV´RU³QR´LQGLFDWH³RQ´RU³RII´VFUROOWKURXJKVHYHUDOFKRLFHV
LQSXWWKHSDVVZRUGRUVHWXSWKHSULQWHUIRUDILUPZDUHGRZQORDG
Zebra XiIIIPlus™ Printers User’s Guide
27
)URQW3DQHO/LJKWV
NOTE: If two operating conditions occur simultaneously (for
example, one that causes a light to be on constantly and one that
causes the same light to flash), the light flashes.
/LJKW
6WDWXV
,QGLFDWLRQ
2II
2Q
7KHSULQWHULVRIIRUSRZHULVQRWDSSOLHG
7KHSULQWHULVRQ
7$.(/$%(/
2II
)ODVKLQJ
1RUPDORSHUDWLRQ
3HHO2IIPRGHRQO\7KHODEHOLVDYDLODEOH3ULQWLQJLVSDXVHGXQWLO
WKHODEHOLVUHPRYHG
(5525
2II
)ODVKLQJ
1RUPDORSHUDWLRQ²QRSULQWHUHUURUV
$SULQWHUHUURUH[LVWV&KHFNWKH/&'IRUPRUHLQIRUPDWLRQ
32:(5
&+(&.5,%%21 2II
2Q
3$3(5287
2II
2Q
3$86(
2II
2Q
'$7$
28
2II
2Q
)ODVKLQJ
1RUPDORSHUDWLRQ²ULEERQLIXVHGLVSURSHUO\ORDGHG
3ULQWLQJLVSDXVHGWKH/&'VKRZVDZDUQLQJPHVVDJHDQGWKH3$86(
OLJKWLVRQ
,IWKHSULQWHULVLQGLUHFWWKHUPDOPRGHULEERQLVORDGHGDQGVKRXOG
QRWEH
,IWKHSULQWHULVLQWKHUPDOWUDQVIHUPRGHQRULEERQLVORDGHGRUWKH
ULEERQKDVUXQRXW
1RUPDORSHUDWLRQ²PHGLDLVSURSHUO\ORDGHG
1RPHGLDLVXQGHUWKHPHGLDVHQVRU3ULQWLQJLVSDXVHGWKH/&'
VKRZVDQHUURUPHVVDJHDQGWKH3$86(OLJKWLVRQ
1RUPDORSHUDWLRQ
7KHSULQWHUKDVVWRSSHGDOOSULQWLQJRSHUDWLRQV(LWKHUWKH3$86(NH\
ZDVSUHVVHGDSDXVHFRPPDQGZDVLQFOXGHGLQWKHODEHOIRUPDWWKH
RQOLQHYHULILHUGHWHFWHGDQHUURURUDSULQWHUHUURUZDVGHWHFWHG5HIHU
WRWKH/&'IRUPRUHLQIRUPDWLRQ
1RUPDORSHUDWLRQ1RGDWDEHLQJUHFHLYHGRUSURFHVVHG
'DWDSURFHVVLQJRUSULQWLQJLVWDNLQJSODFH1RGDWDLVEHLQJUHFHLYHG
7KHSULQWHULVUHFHLYLQJGDWDIURPRUVHQGLQJVWDWXVLQIRUPDWLRQWRWKH
KRVWFRPSXWHU)ODVKLQJVORZVZKHQWKHSULQWHUFDQQRWDFFHSWPRUH
GDWDEXWUHWXUQVWRQRUPDORQFHGDWDLVDJDLQEHLQJUHFHLYHG
Zebra XiIIIPlus™ Printers User’s Guide
5ROO0HGLD/RDGLQJ
NOTE: A calibration must be performed when media and ribbon
(if used) are first installed in the printer, or when media or ribbon is
changed to a different type. The printer default is autocalibration,
which is performed when the printer is first powered up and after
the printhead has been closed. If autocalibration fails, then you
need to calibrate the printer manually (see page 17 for details).
7HDU2II0RGH
Refer to Figure 17.
1. Open the printhead.
2. Slide the media guide and media supply guide as far from the printer
frame as possible. Flip down the media supply guide.
3. Load media as shown.
4. Flip up the media supply guide. Slide in the media guide and media
supply guide so they just touch, but don’t restrict, the edge of the roll.
5. Close the printhead.
Figure 17. Media Loading—Tear-Off Mode
Zebra XiIIIPlus™ Printers User’s Guide
29
3HHO2II0RGH
Refer to Figure 18.
1. Remove the rewind plate from the front of the printer (if installed).
Store it on the two mounting screws on the inside of the front panel.
2. Open the printhead.
3. Slide the media guide and media supply guide as far from the printer
frame as possible. Flip down the media supply guide.
4. Load media as shown.
5. When loading media, allow approximately 36″ (915 mm) of media to
extend past the tear-off/peel-off bar. Remove all labels from this
portion to create a leader.
6. Remove the hook from the rewind spindle. If you are using a core,
slide it onto the rewind spindle until it is flush against the guide plate.
7. Wind the label liner around either the 3″ (76 mm) core or the rewind
spindle and reinstall the hook.
8. Flip up the media supply guide. Slide in the media guide and media
supply guide so they just touch, but don’t restrict, the edge of the roll.
Before closing the printhead, make sure:
• The media is positioned against the inside guides.
• The media is taut and parallel with itself and the pathway when wound
onto the rewind spindle/core.
9. Close the printhead.
10. To remove the label liner from the rewind spindle, refer to the
instructions on page 38.
30
Zebra XiIIIPlus™ Printers User’s Guide
Figure 18. Media Loading—Peel-Off Mode
Zebra XiIIIPlus™ Printers User’s Guide
31
5HZLQG0RGHIRU3ULQWHUVZLWKRXWWKH&XWWHU2SWLRQ
(Rewind option required.)
Refer to Figure 19.
1. Remove the rewind plate from its storage location in front of the print
mechanism inside the media compartment.
2. Invert the rewind plate so that the lip on the attached hook plate points
down.
3. Insert the hook plate lip a short distance (½″ or 13 mm) into the lower
opening in the side plate.
4. Align the upper end of the rewind plate with the corresponding
opening in the side plate. Slide in the rewind plate so that it stops
against the printer’s main frame.
5. Open the printhead.
6. Slide the media guide and media supply guide as far from the printer
frame as possible. Flip down the media supply guide.
7. Load media as shown.
8. When loading media, allow approximately 36″ (915 mm) of media to
extend past the printhead. Remove all labels from this portion to
create a leader.
9. Remove the hook from the rewind spindle. If you are using a core,
slide it onto the rewind spindle until it is flush against the guide plate.
10. Wind the label liner around either the 3″ (76 mm) core or the rewind
spindle and reinstall the hook.
11. Flip up the media supply guide. Slide in the media guide and media
supply guide so they just touch, but don’t restrict, the edge of the roll.
32
Zebra XiIIIPlus™ Printers User’s Guide
Before closing the printhead, make sure:
• The media is positioned against the inside guides.
• The media is taut and parallel with itself and the pathway when wound
onto the rewind spindle/core.
12. Close the printhead.
Figure 19. Media Loading—Rewind Mode (without Cutter)
Zebra XiIIIPlus™ Printers User’s Guide
33
5HZLQG0RGHIRU3ULQWHUVZLWKWKH&XWWHU2SWLRQ
(Cutter and rewind options required.)
Refer to Figure 20.
1. Remove the rewind plate from its storage location in front of the print
mechanism inside the media compartment.
2. Invert the rewind plate so that the lip on the attached hook plate points
down.
3. Insert the hook plate lip a short distance (½″ or 13 mm) into the lower
opening in the side plate. Slide in the rewind plate so that it stops
against the printer’s main frame.
4. Insert the two small tabs on the rewind plate into the corresponding
slots in the cutter support bracket. (The rewind plate should spring
into the proper position.)
5. Open the printhead.
6. Slide the media guide and media supply guide as far from the printer
frame as possible. Flip down the media supply guide.
7. Load media as shown.
8. When loading media, allow approximately 36″ (915 mm) of media to
extend past the printhead. Remove all labels from this portion to
create a leader.
9. Remove the hook from the rewind spindle. If you are using a core,
slide it onto the rewind spindle until it is flush against the guide plate.
10. Wind the label liner around either the 3″ (76 mm) core or the rewind
spindle and reinstall the hook.
11. Flip up the media supply guide. Slide in the media guide and media
supply guide so they just touch, but do not restrict, the edge of the roll.
34
Zebra XiIIIPlus™ Printers User’s Guide
Before closing the printhead, make sure:
• The media is positioned against the inside guides.
• The media is taut and parallel with itself and the pathway when wound
onto the rewind spindle/core.
12. Close the printhead.
Figure 20. Media Loading—Rewind Mode (with Cutter)
Zebra XiIIIPlus™ Printers User’s Guide
35
&XWWHU0RGH
(Cutter option required.)
Refer to Figure 21.
1. Open the printhead.
2. Slide the media guide and media supply guide as far from the printer
frame as possible. Flip down the media supply guide.
3. Load media as shown.
4. Flip up the media supply guide. Slide in the media guide and media
supply guide so they just touch, but do not restrict, the edge of the roll.
5. Close the printhead.
The printer automatically feeds out and cuts one label when the printer is
turned on.
Figure 21. Media Loading—Cutter Mode
36
Zebra XiIIIPlus™ Printers User’s Guide
)DQIROG0HGLD/RDGLQJ
NOTE: A calibration must be performed when media and ribbon
(if used) are first installed in the printer, or when media or ribbon is
changed to a different type. The printer default is autocalibration; a
manual calibration must be performed if the printer does not
autocalibrate (see page 17).
Fanfold media feeds through either the bottom or rear access slot from
outside the printer.
Refer to Figure 22 (bottom supply) and Figure 23 (rear supply).
1. Open the printhead.
2. Slide the media guide as far from the printer frame as possible.
3. Load media as shown. If in cutter mode, route media through the
cutter.
4. Slide in the media guide so it just touches, but does not restrict, the
edge of the roll.
5. Close the printhead.
Figure 22. Fanfold Media Loading—Bottom Supply
Zebra XiIIIPlus™ Printers User’s Guide
37
Figure 23. Fanfold Media Loading—Rear Supply
5HPRYLQJWKH/DEHO/LQHU
Zebra recommends that you perform this procedure whenever you change
the media.
To remove the liner from the rewind spindle, follow these steps (you do
not need to turn off the printer for this procedure):
1. Unwind approximately 36″ (915 mm) of liner from the rewind spindle.
Cut it off at the spindle.
2. Pull out the hook. Slide the liner off of the rewind spindle and discard.
3. Wind the media around the rewind spindle once or twice and reinstall
the hook. Continue winding to remove any slack in the media.
NOTE: If the media is not exhausted, you must remove it from the
rewind spindle, slide the liner off, and then reload the media before
completing step 3. Refer to “Roll Media Loading” beginning on
page 29 for details.
38
Zebra XiIIIPlus™ Printers User’s Guide
5LEERQ/RDGLQJ
Figure 24 illustrates the ribbon path for the 90XiIIIPlus, 96XiIIIPlus, and
140XiIIIPlus; Figure 25 illustrates the ribbon path for the 170XiIIIPlus and
220XiIIIPlus. For thermal transfer printing, refer to the appropriate figure
and use the following procedure to load the ribbon.
Figure 24. Ribbon Loading (90/96/140XiIIIPlus)
Figure 25. Ribbon Loading (170/220XiIIIPlus)
Zebra XiIIIPlus™ Printers User’s Guide
39
NOTE: Use ribbon that is at least as wide as the media. The
smooth liner of the ribbon protects the printhead from wear and
premature failure due to excessive abrasion. (For direct thermal
print mode, ribbon is not used and should not be loaded in the
printer.)
1. Align the segments of the
ribbon supply spindle as shown
in Figure 26.
2. Place the ribbon roll on the
ribbon supply spindle.
Figure 26. Spindle Alignment
NOTE: Make sure that the core is pushed up against the stop on
the ribbon supply spindle and that the ribbon is aligned squarely
with its core. If this is not done, the ribbon may not cover the
printhead entirely on the inside, exposing print elements to
potentially damaging contact with the media.
3. Open the printhead.
NOTE: To make ribbon loading and unloading easier, make a
leader for your ribbon roll.
4. See Figure 27. Tear off a strip of
media (labels and liner) about 6″–12″
(150 mm–300 mm) long from the roll.
Peel off a label from this strip. Apply
half of this label to the end of the strip
and the other half to the end of the
ribbon. This acts as a ribbon leader.
5. Thread the ribbon as shown without
creasing or wrinkling it.
Figure 27. Ribbon Leader
6. Before wrapping the ribbon around the take-up spindle, ensure that the
arrow on the knob aligns with the indented notch (see Figure 28 inset).
7. Place the ribbon with the leader around the ribbon take-up spindle and
wind counterclockwise for several turns.
8. Close the printhead.
40
Zebra XiIIIPlus™ Printers User’s Guide
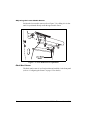
5LEERQ5HPRYDO
Refer to Figure 28.
1. If the ribbon has not run out, tear or cut the ribbon as close to the
ribbon take-up spindle as possible.
2. While holding the ribbon take-up spindle, turn the knob (1) clockwise
until it stops. This causes the ribbon release bars (2) to pivot down,
easing the spindle’s “grip” on the wound ribbon.
3. Slide the ribbon off of the ribbon take-up spindle. Once the spent
ribbon has been removed, ensure that the arrow on the knob aligns
with the indented notch in the ribbon take-up spindle (see Figure 28
inset).
4. Remove the core from the ribbon supply spindle.
5. Follow the ribbon loading procedure on page 39 to load the new
ribbon.
Figure 28. Ribbon Removal
Zebra XiIIIPlus™ Printers User’s Guide
41
42
Zebra XiIIIPlus™ Printers User’s Guide
yØÃAÏ
After you have installed the media and ribbon and the Power-On Self Test
(POST) is complete, the LCD shows “PRINTER READY.” (If the printer
fails its POST, refer to page 87.) You may now set printer parameters for
your application using the LCD and the five keys directly below it.
NOTE: Printers that are operating on an IP network can be quickly
configured via ZebraLink™ WebView (optional ZebraNet®
PrintServer II required). For information, refer to ZebraNet
Networking: PrintServer II Installation and User’s Guide.
If it becomes necessary to restore the initial printer defaults, see “FEED
Key and PAUSE Key Self Test” on page 91.
NOTE: Unless otherwise noted, all parameters are listed in the
order they are displayed, starting with “DARKNESS.”
(QWHULQJWKH6HWXS0RGH
To enter the setup mode, press the SETUP/EXIT key. Press either the
NEXT/SAVE key or PREVIOUS key to scroll to the parameter you wish
to set.
NOTE: You may also press and hold the NEXT/SAVE and
PREVIOUS keys to advance quickly through the configuration
parameters.
Parameters in this section are shown in the order displayed when pressing
the NEXT/SAVE key. Throughout this process, press the NEXT/SAVE
key to continue to the next parameter, or press the PREVIOUS key to
return to the previous parameter in the cycle.
An asterisk (*) in the upper left-hand corner of the LCD indicates that the
value displayed is different from the currently stored value.
Zebra XiIIIPlus™ Printers User’s Guide
43
&KDQJLQJ3DVVZRUG3URWHFWHG3DUDPHWHUV
Certain parameters are password-protected by factory default.
CAUTION: Do not change password-protected parameters
unless you have a complete understanding of what you are
doing! If the parameters are set incorrectly, they could
cause the printer to function in an unpredictable way.
The first attempt to change one of these parameters (pressing one of the
BLACK OVAL keys) requires you to enter a four-digit password via the
“ENTER PASSWORD” display. The LEFT BLACK OVAL key changes
the selected digit position; the RIGHT BLACK OVAL key increases the
selected digit value. After entering the password, press the NEXT/SAVE
key. The parameter you wish to change is displayed. If the password was
entered correctly, you can now change the value.
The default password value is 1234. The password can be changed using
the ^KP (Define Password) ZPL II instruction or through ZebraLink™
WebView (optional ZebraNet® PrintServer II required).
NOTE: Once the password has been entered correctly, it does not
have to be entered again unless you leave and re-enter the setup
mode using the SETUP/EXIT key, or if you power the printer down
and then re-enter the setup mode.
NOTE: You can disable the password protection feature so that it no
longer prompts you for a password by setting the password to ØØØØ via
the ^KPØ ZPL/ZPL II command. To re-enable the password-protection
feature, send the ZPL/ZPL II command ^KPx, where “x” can be any
number, one to four digits in length, except Ø.
44
Zebra XiIIIPlus™ Printers User’s Guide
/HDYLQJWKH6HWXS0RGH
You can leave the setup mode at any time by pressing the SETUP/EXIT
key. The “SAVE CHANGES” display appears. There are five choices, as
described below. Pressing the LEFT or RIGHT BLACK OVAL key
displays other choices and pressing the NEXT/SAVE key selects the
displayed choice.
• PERMANENT—Permanently saves the changes. Values are stored in
the printer even when power is turned off.
• TEMPORARY—Saves the changes until you change them again or
until power is turned off.
• CANCEL—Cancels all changes from the time you pressed the
SETUP/EXIT key except the darkness and tear-off settings (if they were
changed).
• LOAD DEFAULTS—Loads factory defaults. The factory defaults are
shown on the following pages.
NOTE: Loading factory defaults causes the printer to
autocalibrate.
• LOAD LAST SAVE—Loads values from the last permanent save.
Zebra XiIIIPlus™ Printers User’s Guide
45
&RQILJXUDWLRQDQG&DOLEUDWLRQ6HTXHQFH
3UHVV
²
/&'6KRZV
6HWWLQJ3ULQW3DUDPHWHUV
'$5.1(66
35,1763(('
7($52))
35,1702'(
46
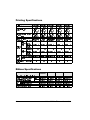
$FWLRQ([SODQDWLRQ
35,17(55($'< 1RUPDOSULQWHURSHUDWLRQ
$GMXVWLQJ3ULQW'DUNQHVV3UHVVWKH5,*+7%/$&.29$/NH\
WRLQFUHDVHGDUNQHVVSUHVVWKH/()7%/$&.29$/NH\WR
GHFUHDVHGDUNQHVV
'HIDXOW
5DQJHWR
'DUNQHVVVHWWLQJVDUHGHSHQGHQWRQDYDULHW\RIIDFWRUVLQFOXGLQJ
ULEERQW\SHPHGLDDQGWKHFRQGLWLRQRIWKHSULQWKHDG<RXPD\
DGMXVWWKHGDUNQHVVIRUFRQVLVWHQWKLJKTXDOLW\SULQWLQJ
,ISULQWLQJLVWRROLJKWRULIWKHUHDUHYRLGVLQSULQWHGDUHDV\RX
VKRXOGLQFUHDVHWKHGDUNQHVV,ISULQWLQJLVWRRGDUNRULIWKHUHLV
VSUHDGLQJRUEOHHGLQJRISULQWHGDUHDV\RXVKRXOGGHFUHDVHWKH
GDUNQHVV
7KH)(('.H\6HOI7HVWRQSDJH FDQDOVREHXVHGWR
GHWHUPLQHWKHEHVWGDUNQHVVVHWWLQJ6LQFHWKHGDUNQHVVVHWWLQJ
WDNHVHIIHFWLPPHGLDWHO\\RXFDQVHHWKHUHVXOWVRQODEHOVWKDW
DUHFXUUHQWO\SULQWLQJ
&$87,21 6HWWKHGDUNQHVVWRWKHORZHVWVHWWLQJWKDWSURYLGHV
JRRGSULQWTXDOLW\'DUNQHVVVHWWRRKLJKPD\FDXVH
LQNVPHDULQJRUEXUQWKURXJKWKHULEERQ
'DUNQHVVVHWWLQJVDOVRPD\EHFKDQJHGE\WKHGULYHURUVRIWZDUH
VHWWLQJV
$GMXVWLQJ3ULQW6SHHG3UHVVWKH5,*+7%/$&.29$/NH\
WRLQFUHDVHSULQWVSHHGSUHVVWKH/()7%/$&.29$/NH\WR
GHFUHDVHSULQWVSHHG
'HIDXOWLSV
5DQJH±LSVWRLSVGHSHQGHQWRQVSHFLILFSULQWHU
6ORZHUSULQWVSHHGVW\SLFDOO\\LHOGEHWWHUSULQWTXDOLW\3ULQW
VSHHGFKDQJHVWDNHHIIHFWXSRQH[LWLQJWKHPHQXPRGH
$GMXVWLQJWKH7HDU2II3RVLWLRQ3UHVVWKH5,*+7%/$&.
29$/NH\WRLQFUHDVHWKHYDOXHSUHVVWKH/()7%/$&.29$/
NH\WRGHFUHDVHWKHYDOXH(DFKSUHVVRIWKHNH\DGMXVWVWKH
WHDURIISRVLWLRQE\IRXUGRWURZV
'HIDXOW
5DQJH±WR
7KLVSDUDPHWHUHVWDEOLVKHVWKHSRVLWLRQRIWKHPHGLDRYHUWKH
WHDURIISHHORIIEDUDIWHUSULQWLQJ
6HOHFWLQJ3ULQW0RGH3UHVVWKH5,*+7RU/()7%/$&.29$/
NH\WRGLVSOD\RWKHUFKRLFHV
'HIDXOW7HDURII
6HOHFWLRQV7HDURIISHHORIIFXWWHUUHZLQGDSSOLFDWRU
3ULQWPRGHVHWWLQJVWHOOWKHSULQWHUWKHPHWKRGRIPHGLDGHOLYHU\
\RXZLVKWRXVH%HVXUHWRVHOHFWDSULQWPRGHWKDW\RXU
KDUGZDUHFRQILJXUDWLRQVXSSRUWVDVVRPHRIWKHVHOHFWLRQV
GLVSOD\HGDUHIRURSWLRQDOSULQWHUIHDWXUHV
Zebra XiIIIPlus™ Printers User’s Guide
3UHVV
/&'6KRZV
$FWLRQ([SODQDWLRQ
6HWWLQJ(DUO\:DUQLQJ3UHVVWKH5,*+7RU/()7%/$&.29$/
NH\WRGLVSOD\RWKHUFKRLFHV
'HIDXOW0HGLDGLVDEOHGULEERQGLVDEOHGPDLQWHQDQFHGLVDEOHG
6HOHFWLRQV 0HGLDGLVDEOHGPHGLDHQDEOHGULEERQGLVDEOHG
ULEERQHQDEOHGPDLQWHQDQFHGLVDEOHGPDLQWHQDQFH
HQDEOHG
7KLVSDUDPHWHUHQDEOHVWKHSULQWHUWRSURYLGHHDUO\ZDUQLQJV
ZKHQODEHOVRUULEERQVDUHUXQQLQJORZRUZKHQWKHSULQWKHDG
QHHGVWREHFOHDQHG
7RHQDEOHWKH(DUO\:DUQLQJ6\VWHPSUHVV6(783(;,7WKHQ
SUHVV1(;76$9(7RVHOHFWWKH(DUO\:DUQLQJVHWWLQJVFUROO
EDFNXQWLO0HGLD(QDEOHGLVOLVWHGRQWKH/&'DQGSUHVV
1(;76$9(WRDFFHVVWKHPHGLDVHWWLQJV8VHWKH5,*+7RU
/()7%/$&.29$/NH\WRVHOHFWWKHVHWWLQJWKHQSUHVV
6(783(;,7DQG1(;76$9(WRVDYHWKHVHWWLQJ5HSHDWWKLV
($5/<:$51,1* SURFHVVWRVHWWKHHDUO\ZDUQLQJIRUULEERQRUPDLQWHQDQFH
SULQWKHDGFOHDQLQJ
127( :KHQVHWWLQJWKHHDUO\ZDUQLQJIRUPDLQWHQDQFHDQ
DGGLWLRQDOVHWWLQJDSSHDUVDIWHUWKHPHGLDVHWWLQJWKDW
SURPSWVWKH/&'WRDVN³+($'&/($1´8VHWKH5,*+7
%/$&.29$/NH\WRVHOHFW³<(6´DQGWKHQSUHVV
6(783(;,7DQG1(;76$9(WRUHVHWWKHODEHOFRXQWHU
:KHQWKHSULQWHUGHWHFWVLWLVUXQQLQJORZZLWKOHVVWKDQRI
WKHUHPDLQLQJODEHOVRUULEERQVWKHIROORZLQJPHVVDJHDSSHDUV
RQWKH/&'³:$51,1*0(',$/2:´RUµ:$51,1*5,%%21
/2:´,IWKHDOHUWIXQFWLRQKDVEHHQHQDEOHGDQDOHUWLVDOVRVHQW
:KHQWKHSULQWKHDGLVRSHQHGDQGWKHQFORVHGDIWHUDPHGLDRU
ULEERQZDUQLQJKDVEHHQUHFHLYHGWKH/&'DVNV³0(',$
5(3/$&('´RU³5,%%215(3/$&('´3UHVVWKH5,*+7
%/$&.29$/NH\³<(6´WRFOHDUWKHZDUQLQJDQGUHVWWKHODEHO
FRXQWHU
127( /DEHOVSHUUROODQGULEERQOHQJWKQHHGWREHXSGDWHG
ZKHQEHJLQQLQJXVHRIWKH(DUO\:DUQLQJ6\VWHP$OVR
WKHSULQWHUGRHVQRWPDNHDQ\DGMXVWPHQWVZKHQSRZHULV
WXUQHGRIIDQGRQ
6HWWLQJ/DEHOV3HU5ROO3UHVVWKH5,*+7RU/()7%/$&.
29$/NH\WRGLVSOD\RWKHUFKRLFHV
'HIDXOWODEHOV
/$%(/63(552// 5DQJHODEHOV±ODEHOV
7KLVSDUDPHWHUQHHGVWREHXSGDWHGZKHQVHWWLQJWKH(DUO\
:DUQLQJ6\VWHPVRWKHSULQWHUFDQSURYLGHHDUO\ZDUQLQJVZKHQ
ODEHOVDUHUXQQLQJORZ
6HWWLQJ5LEERQ/HQJWK3UHVVWKH5,*+7RU/()7%/$&.
29$/NH\WRGLVSOD\RWKHUFKRLFHV
'HIDXOWP′
5,%%21/(1*7+ 5DQJHP±P′±′
7KLVSDUDPHWHUQHHGVWREHXSGDWHGZKHQVHWWLQJWKH(DUO\
:DUQLQJ6\VWHPVRWKHSULQWHUFDQSURYLGHHDUO\ZDUQLQJVZKHQ
ULEERQLVUXQQLQJORZ
Zebra XiIIIPlus™ Printers User’s Guide
47
3UHVV
/&'6KRZV
0(',$7<3(
6(16257<3(
35,170(7+2'
48
$FWLRQ([SODQDWLRQ
6HWWLQJ0HGLD7\SH3UHVVWKH5,*+7RU/()7%/$&.29$/
NH\WRGLVSOD\RWKHUFKRLFHV
'HIDXOW&RQWLQXRXV
6HOHFWLRQV&RQWLQXRXVQRQFRQWLQXRXV
7KLVSDUDPHWHUWHOOVWKHSULQWHUWKHW\SHRIPHGLD\RXDUHXVLQJ
6HOHFWLQJFRQWLQXRXVPHGLDUHTXLUHVWKDW\RXLQFOXGHDODEHO
OHQJWKLQVWUXFWLRQLQ\RXUODEHOIRUPDW^LLxxxxLI\RXDUHXVLQJ
=3/RU=3/,,
:KHQQRQFRQWLQXRXVPHGLDLVVHOHFWHGWKHSULQWHUIHHGVPHGLD
WRFDOFXODWHODEHOOHQJWKWKHGLVWDQFHEHWZHHQWZRUHFRJQL]HG
UHJLVWUDWLRQSRLQWVRIWKHLQWHUODEHOJDSZHEELQJRUDOLJQPHQW
QRWFKRUKROH
6HWWLQJWKH6HQVRU7\SH3UHVVWKH5,*+7RU/()7%/$&.
29$/NH\WRGLVSOD\RWKHUFKRLFHV
'HIDXOW:HE
6HOHFWLRQV:HEPDUN
7KLVSDUDPHWHUWHOOVWKHSULQWHUZKHWKHU\RXDUHXVLQJPHGLDZLWK
DZHEJDSVSDFHEHWZHHQODEHOVQRWFKRUKROHWRLQGLFDWHWKH
VHSDUDWLRQVEHWZHHQODEHOVRULI\RXDUHXVLQJPHGLDZLWKDEODFN
PDUNSULQWHGRQWKHEDFN,I\RXUPHGLDGRHVQRWKDYHEODFN
PDUNVIRUUHJLVWUDWLRQRQWKHEDFNOHDYH\RXUSULQWHUDWWKHGHIDXOW
ZHE
6HOHFWLQJ3ULQW0HWKRG3UHVVWKH5,*+7%/$&.29$/NH\IRU
WKHQH[WYDOXHSUHVVWKH/()7%/$&.29$/NH\IRUWKHSUHYLRXV
YDOXH
'HIDXOW7KHUPDOWUDQVIHU
6HOHFWLRQV7KHUPDOWUDQVIHUGLUHFWWKHUPDO
7KHSULQWPHWKRGSDUDPHWHUWHOOVWKHSULQWHUWKHPHWKRGRISULQWLQJ
\RXZLVKWRXVHGLUHFWWKHUPDOQRULEERQRUWKHUPDOWUDQVIHU
XVLQJWKHUPDOWUDQVIHUPHGLDDQGULEERQ
127( 6HOHFWLQJGLUHFWWKHUPDOZKHQXVLQJWKHUPDOWUDQVIHU
PHGLDDQGULEERQFUHDWHVDZDUQLQJFRQGLWLRQEXW
SULQWLQJFRQWLQXHV
Zebra XiIIIPlus™ Printers User’s Guide
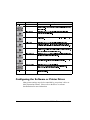
3UHVV
/&'6KRZV
$FWLRQ([SODQDWLRQ
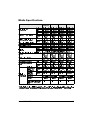
6HWWLQJ3ULQW:LGWK3UHVVWKH5,*+7%/$&.29$/NH\WR
LQFUHDVHWKHYDOXHSUHVVWKH/()7%/$&.29$/NH\WR
GHFUHDVHWKHYDOXH7RFKDQJHWKHXQLWRIPHDVXUHPHQWSUHVV
WKH/()7%/$&.29$/NH\XQWLOWKHXQLWRIPHDVXUHPHQWLV
DFWLYHWKHQSUHVVWKH5,*+7%/$&.29$/NH\WRWRJJOHWRD
35,17:,'7+
GLIIHUHQWXQLWRIPHDVXUHPPLQFKHVRUGRWV
'HIDXOW5DQJH 7KHGHIDXOWDQGUDQJHRIDFFHSWDEOHYDOXHVYDU\
GHSHQGLQJRQZKDWSULQWHU\RXKDYH5HIHUWR
³3ULQWLQJ6SHFLILFDWLRQV´RQSDJH IRUIXUWKHU
LQIRUPDWLRQDERXWWKHUDQJHVDYDLODEOHIRU\RXU
PRGHO3ULQWZLGWKGHWHUPLQHVWKHSULQWDEOHDUHD
DFURVVWKHZLGWKRIWKHODEHO
127( 7KHSULQWHUGRHVQRWDFFHSWDQ\YDOXHODUJHUWKDQWKH
PD[LPXPSULQWZLGWKOLVWHGRQSDJH 6HWWLQJ0D[LPXP/HQJWK3UHVVWKH/()7%/$&.29$/NH\WR
GHFUHDVHWKHYDOXHSUHVVWKH5,*+7%/$&.29$/NH\WR
LQFUHDVHWKHYDOXH
'HIDXOW5DQJH 7KHGHIDXOWDQGUDQJHRIDFFHSWDEOHYDOXHVYDU\
GHSHQGLQJRQ\RXUSULQWHU¶VFRQILJXUDWLRQ
0$;,080/(1*7+
9DOXHVDUHDGMXVWDEOHLQ″PP
LQFUHPHQWV
0D[LPXPOHQJWKLVXVHGLQFRQMXQFWLRQZLWKWKHFDOLEUDWLRQ
SURFHGXUH7KHYDOXHRIWKLVVHWWLQJLVWKHPD[LPXPODEHOOHQJWK
WKDWLVXVHGGXULQJWKHPHGLDSRUWLRQRIWKHFDOLEUDWLRQSURFHVV
2QO\DIHZODEHOVDUHUHTXLUHGWRVHWPHGLDVHQVRUV$OZD\VVHW
WKHYDOXHWKDWLVDWOHDVW″PPORQJHUWKDQWKHORQJHVW
ODEHOWREHXVHGRQWKHSULQWHU
Zebra XiIIIPlus™ Printers User’s Guide
49
/LVWLQJ3ULQWHU,QIRUPDWLRQ
3UHVV
/&'6KRZV
$FWLRQ([SODQDWLRQ
/LVW)RQWV3UHVVWKH5,*+7%/$&.29$/NH\WRSULQWDODEHO
OLVWLQJDOORIWKHDYDLODEOHIRQWV
7KLVVHOHFWLRQLVXVHGWRSULQWDODEHOWKDWOLVWVDOOIRQWVFXUUHQWO\
DYDLODEOHLQWKHSULQWHULQFOXGLQJVWDQGDUGSULQWHUIRQWVSOXVDQ\
RSWLRQDOIRQWV)RQWVPD\EHVWRUHGLQ5$0)/$6+PHPRU\IRQW
(3520VRUIRQWFDUGV
/LVW%DU&RGHV3UHVVWKH5,*+7%/$&.29$/NH\WRSULQWD
/,67%$5&2'(6 ODEHOOLVWLQJDOORIWKHDYDLODEOHEDUFRGHV
7KLVVHOHFWLRQLVXVHGWRSULQWDODEHOWKDWOLVWVDOOEDUFRGHV
FXUUHQWO\DYDLODEOHLQWKHSULQWHU
/LVW,PDJHV3UHVVWKH5,*+7%/$&.29$/NH\WRSULQWDODEHO
OLVWLQJDOORIWKHDYDLODEOHLPDJHV
7KLVVHOHFWLRQLVXVHGWRSULQWDODEHOWKDWOLVWVDOOLPDJHVFXUUHQWO\
/,67,0$*(6
VWRUHGLQWKHSULQWHU¶V5$0)/$6+PHPRU\RSWLRQDO(3520RU
RSWLRQDOPHPRU\FDUG
/LVW)RUPDWV3UHVVWKH5,*+7%/$&.29$/NH\WRSULQWDODEHO
OLVWLQJDOORIWKHDYDLODEOHIRUPDWV
/,67)250$76 7KLVVHOHFWLRQLVXVHGWRSULQWDODEHOWKDWOLVWVDOOIRUPDWVFXUUHQWO\
VWRUHGLQWKHSULQWHU¶V5$0)/$6+PHPRU\RSWLRQDO(3520RU
RSWLRQDOPHPRU\FDUG
/LVW6HWXS3UHVVWKH5,*+7%/$&.29$/NH\WRSULQWDODEHO
OLVWLQJWKHFXUUHQWSULQWHUFRQILJXUDWLRQ
/,676(783
7KLVVHOHFWLRQLVXVHGWRSULQWDODEHOWKDWOLVWVWKHFXUUHQWSULQWHU
FRQILJXUDWLRQLQIRUPDWLRQ6DPHDVWKH&$1&(/.H\6HOI7HVW
RQSDJH /LVW$OO3UHVVWKH5,*+7%/$&.29$/NH\WRSULQWDODEHO
/,67$//
OLVWLQJDOODYDLODEOHIRQWVEDUFRGHVLPDJHVIRUPDWVDQGWKH
FXUUHQWSULQWHUFRQILJXUDWLRQ
/,67)2176
50
Zebra XiIIIPlus™ Printers User’s Guide
3UHVV
/&'6KRZV
$FWLRQ([SODQDWLRQ
,QLWLDOL]H0HPRU\&DUG
&$87,21 3HUIRUPWKLVRSHUDWLRQRQO\ZKHQLWLVQHFHVVDU\WR
HUDVHDOOSUHYLRXVO\VWRUHGLQIRUPDWLRQIURPWKH
PHPRU\FDUG3UHVVWKH1(;76$9(NH\WRE\SDVV
WKLVIXQFWLRQ
3UHVVWKH5,*+7%/$&.29$/NH\WRVHOHFW³<(6´,I\RXU
SULQWHULVVHWWRUHTXLUHDSDVVZRUG\RXDUHQRZSURPSWHGWR
HQWHUWKHSDVVZRUG(QWHUWKHSDVVZRUGDQGWKHQSUHVVWKH
1(;76$9(NH\
7KH/&'DVNV³,1,7,$/,=(&$5'´3UHVVWKH5,*+7%/$&.
,1,7,$/,=(&$5'
29$/NH\³<(6´
7KH/&'DVNV³$5(<28685(´
3UHVVWKH5,*+7%/$&.29$/NH\³<(6´WREHJLQ
LQLWLDOL]DWLRQ
RU
3UHVVWKH/()7%/$&.29$/NH\³12´WRFDQFHOWKHUHTXHVW
DQGUHWXUQWRWKH³,1,7,$/,=(&$5'´SURPSW
3UHVVWKH6(783(;,7NH\IROORZHGE\WKH1(;76$9(NH\
,ILQLWLDOL]DWLRQLVVWLOOLQSURFHVVWKH/&'IODVKHVEDFNDQG
IRUWKEHWZHHQWKHWZRSKUDVHV³&+(&.,1*%0(025<´
DQG³35,17(5,'/(´:KHQLQLWLDOL]DWLRQLVFRPSOHWHWKH
SULQWHUDXWRPDWLFDOO\H[LWVWKHVHWXSPRGHDQGWKH/&'VKRZV
³35,17(55($'<´
127( 'HSHQGLQJRQWKHDPRXQWRIPHPRU\LQWKHPHPRU\
FDUGLQLWLDOL]DWLRQPD\WDNHXSWRILYHPLQXWHVWR
FRPSOHWH
,QLWLDOL]H)ODVK0HPRU\
&$87,21 3HUIRUPWKLVRSHUDWLRQRQO\ZKHQLWLVQHFHVVDU\WR
HUDVHDOOSUHYLRXVO\VWRUHGLQIRUPDWLRQIURPWKH
)/$6+PHPRU\3UHVVWKH1(;76$9(NH\WR
E\SDVVWKLVIXQFWLRQ
3UHVVWKH5,*+7%/$&.29$/NH\WRVHOHFW³<(6´,I\RXU
SULQWHULVVHWWRUHTXLUHDSDVVZRUG\RXDUHQRZSURPSWHGWR
,1,7)/$6+0(0
HQWHUWKHSDVVZRUG(QWHUWKHSDVVZRUGDQGWKHQSUHVVWKH
1(;76$9(NH\
7KH/&'DVNV³,1,7,$/,=()/$6+´3UHVVWKH5,*+7
%/$&.29$/NH\³<(6´
7KH/&'DVNV³$5(<28685(´
3UHVVWKH5,*+7%/$&.29$/NH\³<(6´WREHJLQ
LQLWLDOL]DWLRQ
RU
3UHVVWKH/()7%/$&.29$/NH\³12´WRFDQFHOWKHUHTXHVW
DQGUHWXUQWRWKH³,1,7,$/,=()/$6+´SURPSW
Zebra XiIIIPlus™ Printers User’s Guide
51
0HGLDDQG5LEERQ6HQVRU&DOLEUDWLRQ
%HIRUH\RXEHJLQWKLVSURFHGXUHPDNHVXUHWKDWWKHPD[LPXPOHQJWKLVVHWWRDYDOXH″
PPJUHDWHUWKDQWKHOHQJWKRIWKHODEHOV\RXDUHXVLQJ,IWKHPD[LPXPOHQJWKLVVHWWRD
ORZHUYDOXHWKHFDOLEUDWLRQSURFHVVDVVXPHVWKDWFRQWLQXRXVPHGLDLVLQWKHSULQWHU6HHSDJH IRUPRUHLQIRUPDWLRQ
7KHUHDUHWZRGLIIHUHQWW\SHVRIFDOLEUDWLRQWKDWFDQEHSHUIRUPHGE\WKHSULQWHU
$XWR&DOLEUDWLRQ:KHQWKHSULQWHULVILUVWSRZHUHGXSDQGDIWHUWKHSULQWKHDGKDVEHHQFORVHG
WKHSULQWHUIHHGVPHGLDDQGDXWRPDWLFDOO\VHWVWKHYDOXHLWGHWHFWVIRUPHGLDPHGLDOLQHUPDWHULDO
WKHVSDFHVEHWZHHQODEHOVDQGPHGLDRXW7KLVW\SHRIFDOLEUDWLRQDOVRRFFXUVDVSDUWRIWKH
VHQVRUSURILOHDQGPHGLDDQGULEERQFDOLEUDWLRQSURFHGXUHV
0HGLDDQG5LEERQ6HQVRU6HQVLWLYLW\&DOLEUDWLRQ3HUIRUPLQJWKHPHGLDDQGULEERQFDOLEUDWLRQ
SURFHGXUHILUVWUHVHWVWKHVHQVLWLYLW\RIWKHVHQVRUVWRGHWHFWFRUUHFWO\WKHPHGLDDQGULEERQ\RXDUH
XVLQJ:LWKWKHVHQVRUVDWWKHLUQHZVHQVLWLYLW\WKHSULQWHUWKHQSHUIRUPVWKHVWDQGDUGFDOLEUDWLRQ
&KDQJLQJWKHW\SHRIULEERQDQGRUPHGLDPD\UHTXLUHUHVHWWLQJWKHVHQVLWLYLW\RIWKHPHGLDDQGULEERQ
VHQVRUV,QGLFDWLRQVWKDWWKHVHQVLWLYLW\PD\QHHGWREHUHVHWZRXOGEHD&+(&.5,%%21OLJKWRQ
ZLWKWKHULEERQSURSHUO\LQVWDOOHGRUQRQFRQWLQXRXVPHGLDEHLQJWUHDWHGDVFRQWLQXRXVPHGLD
127(
3UHVV
/&'6KRZV
$FWLRQ([SODQDWLRQ
6HQVRU3URILOH 3UHVV1(;76$9(WRVNLSWKLVVWDQGDUGFDOLEUDWLRQ
SURFHGXUHDQGFRQWLQXHZLWKWKHPHGLDDQGULEERQFDOLEUDWLRQ
SDUDPHWHUWKDWIROORZV3UHVVWKH5,*+7%/$&.29$/NH\WR
LQLWLDWHWKLVVWDQGDUGFDOLEUDWLRQSURFHGXUHDQGSULQWDPHGLDVHQVRU
6(1625352),/( SURILOH
6HH)LJXUH7KHPHGLDVHQVRUSURILOHPD\EHXVHGWR
WURXEOHVKRRWUHJLVWUDWLRQSUREOHPVWKDWPD\EHFDXVHGZKHQWKH
PHGLDVHQVRUGHWHFWVSUHSULQWHGDUHDVRQWKHPHGLDRUH[SHULHQFHV
GLIILFXOW\LQGHWHUPLQLQJZHEORFDWLRQ,IWKHVHQVLWLYLW\RIWKHPHGLD
DQGRUULEERQVHQVRUV0867EHDGMXVWHGXVHWKHPHGLDDQGULEERQ
VHQVRUVHQVLWLYLW\SURFHGXUH
Figure 29. Sensor Profile
52
Zebra XiIIIPlus™ Printers User’s Guide
3UHVV
/&'6KRZV
0(',$$1'
5,%%21
&$/,%5$7(
$FWLRQ([SODQDWLRQ
127( ,I\RXXVHWKLVSURFHGXUHWXUQDXWRFDOLEUDWLRQRII
0HGLDDQG5LEERQ6HQVRU6HQVLWLYLW\3UHVV1(;76$9(WR
VNLSWKHFDOLEUDWLRQSURFHGXUHDQGFRQWLQXHZLWKWKHKRVWSRUW
VHOHFWLRQSDUDPHWHUVWKDWIROORZ3UHVVWKH5,*+7%/$&.29$/
NH\WRVWDUWWKHFDOLEUDWLRQSURFHGXUH
7KLVSURFHGXUHLVXVHGWRDGMXVWWKHVHQVLWLYLW\RIWKHPHGLDDQG
ULEERQVHQVRUV
127( 7KHSURFHGXUHPXVWEHIROORZHGH[DFWO\DVSUHVHQWHG
$OOVWHSVPXVWEHSHUIRUPHGHYHQLIRQO\RQHRIWKH
VHQVRUVUHTXLUHVDGMXVWPHQW
0HGLDDQG5LEERQ&DOLEUDWLRQ3URFHGXUH
²
3UHVVWKH/()7%/$&.29$/NH\WRFDQFHOWKHRSHUDWLRQRUGR
WKHIROORZLQJ
2SHQWKHSULQWKHDG
/2$'%$&.,1* 5HPRYHDSSUR[LPDWHO\″PPRIODEHOVIURPWKHPHGLD
OLQHUDQGSXOOWKHPHGLDLQWRWKHSULQWHUVRWKDWRQO\WKHOLQHU
LVEHWZHHQWKHPHGLDVHQVRUV
3UHVVWKH5,*+7%/$&.29$/NH\WRFRQWLQXH
3UHVVWKH/()7%/$&.29$/NH\WRFDQFHOWKHRSHUDWLRQRUGR
WKHIROORZLQJ
5(029(5,%%21 5HPRYHWKHULEERQ
&ORVHWKHSULQWKHDG
3UHVVWKH5,*+7%/$&.29$/NH\WRFRQWLQXH
7KHSULQWHUDXWRPDWLFDOO\DGMXVWVWKHVFDOHJDLQRIWKHVLJQDOVLW
&$/,%5$7,1*
UHFHLYHVIURPWKHPHGLDDQGULEERQVHQVRUV2QWKHVHQVRU
3/($6(:$,7
SURILOHWKLVHVVHQWLDOO\FRUUHVSRQGVWRPRYLQJWKHSHDNRIWKH
JUDSKXSRUGRZQWRRSWLPL]HWKHUHDGLQJVIRU\RXUDSSOLFDWLRQ
:KHQ³5(/2$'$//´LVGLVSOD\HG
2SHQWKHSULQWKHDGDQGSXOOWKHPHGLDIRUZDUGXQWLODODEHOLV
5(/2$'$//
SRVLWLRQHGXQGHUWKHPHGLDVHQVRU
5HORDGWKHULEERQEDFNLQWRWRLWVSURSHUSRVLWLRQ
&ORVHWKHSULQWKHDG
3UHVVWKH5,*+7%/$&.29$/NH\WRFRQWLQXH
1RZWKDWWKHVFDOHKDVFKDQJHGWKHSULQWHUSHUIRUPVD
0(',$$1'
FDOLEUDWLRQHTXLYDOHQWWRSUHVVLQJWKH&$/,%5$7(NH\GXULQJWKLV
5,%%21
SURFHVVWKHSULQWHUGHWHUPLQHVWKHODEHOOHQJWK7KHSURFHVVLV
&$/,%5$7(
QRZFRPSOHWH7RVHHWKHQHZUHDGLQJVRQWKHQHZVFDOHSULQWD
VHQVRUSURILOH
Zebra XiIIIPlus™ Printers User’s Guide
53
6HWWLQJ&RPPXQLFDWLRQ3DUDPHWHUV
&RPPXQLFDWLRQSDUDPHWHUVPXVWEHVHWFRUUHFWO\IRUWKHSULQWHUWRFRPPXQLFDWHZLWKWKHKRVWFRPSXWHU
7KHVHSDUDPHWHUVHQVXUHWKDWWKHSULQWHUDQGKRVWFRPSXWHUDUH³VSHDNLQJWKHVDPHODQJXDJH´$OO
FRPPXQLFDWLRQSDUDPHWHUVDUHSDVVZRUGSURWHFWHG
3UHVV
/&'6KRZV
3$5$//(/&200
6(5,$/&200
%$8'
'$7$%,76
54
$FWLRQ([SODQDWLRQ
6HWWLQJ3DUDOOHO&RPPXQLFDWLRQV3UHVVWKH5,*+7RU/()7
%/$&.29$/NH\WRGLVSOD\RWKHUFKRLFHV
'HIDXOW3DUDOOHO
6HOHFWLRQV3DUDOOHOWZLQD[FRD[
6HOHFWWKHFRPPXQLFDWLRQVSRUWWKDWPDWFKHVWKHRQHEHLQJXVHG
E\WKHKRVWFRPSXWHU
6HWWLQJ6HULDO&RPPXQLFDWLRQV3UHVVWKH5,*+7RU/()7
%/$&.29$/NH\WRGLVSOD\RWKHUFKRLFHV
'HIDXOW56
6HOHFWLRQV565656PXOWLGURS
6HOHFWWKHFRPPXQLFDWLRQVSRUWWKDWPDWFKHVWKHRQHEHLQJXVHG
E\WKHKRVWFRPSXWHU
6HWWLQJ%DXG3UHVVWKH5,*+7RU/()7%/$&.29$/NH\WR
GLVSOD\RWKHUFKRLFHV
'HIDXOW
6HOHFWLRQV 7KHEDXGVHWWLQJRIWKHSULQWHUPXVWPDWFKWKHEDXGVHWWLQJRIWKH
KRVWFRPSXWHUIRUDFFXUDWHFRPPXQLFDWLRQVWRWDNHSODFH6HOHFW
WKHYDOXHWKDWPDWFKHVWKHRQHEHLQJXVHGE\WKHKRVWFRPSXWHU
6HWWLQJ'DWD%LWV3UHVVWKH5,*+7RU/()7%/$&.29$/NH\
WRGLVSOD\RWKHUFKRLFHV
'HIDXOWELWV
6HOHFWLRQVELWVELWV
7KHGDWDELWVRIWKHSULQWHUPXVWPDWFKWKHGDWDELWVRIWKHKRVW
FRPSXWHUIRUDFFXUDWHFRPPXQLFDWLRQVWRWDNHSODFH6HWWKH
GDWDELWVWRPDWFKWKHVHWWLQJEHLQJXVHGE\WKHKRVWFRPSXWHU
127( 0XVWEHVHWWRGDWDELWVWRXVH&RGH3DJH
Zebra XiIIIPlus™ Printers User’s Guide
3UHVV
/&'6KRZV
$FWLRQ([SODQDWLRQ
6HWWLQJ3DULW\3UHVVWKH5,*+7RU/()7%/$&.29$/NH\WR
GLVSOD\RWKHUFKRLFHV
'HIDXOW(YHQ
3$5,7<
6HOHFWLRQV(YHQRGGQRQH
7KHSDULW\RIWKHSULQWHUPXVWPDWFKWKHSDULW\RIWKHKRVW
FRPSXWHUIRUDFFXUDWHFRPPXQLFDWLRQVWRWDNHSODFH6HOHFWWKH
SDULW\WKDWPDWFKHVWKHRQHEHLQJXVHGE\WKHKRVWFRPSXWHU
6HWWLQJ+RVW+DQGVKDNH3UHVVWKH5,*+7RU/()7%/$&.
29$/NH\WRGLVSOD\RWKHUFKRLFHV
'HIDXOW;21;2))
+267+$1'6+$.( 6HOHFWLRQV;21;2))'75'65
7KHKDQGVKDNHSURWRFRORIWKHSULQWHUPXVWPDWFKWKHKDQGVKDNH
SURWRFRORIWKHKRVWFRPSXWHUIRUSURSHUFRPPXQLFDWLRQVWRWDNH
SODFH6HOHFWWKHKDQGVKDNHSURWRFROWKDWPDWFKHVWKHRQHEHLQJ
XVHGE\WKHKRVWFRPSXWHU
6HWWLQJ3URWRFRO3UHVVWKH5,*+7RU/()7%/$&.29$/NH\
WRGLVSOD\RWKHUFKRLFHV
'HIDXOW1RQH
6HOHFWLRQV1RQH=HEUD$&.1$&.
3URWRFROLVDW\SHRIHUURUFKHFNLQJV\VWHP'HSHQGLQJRQWKH
35272&2/
VHOHFWLRQDQLQGLFDWRUPD\EHVHQWIURPWKHSULQWHUWRWKHKRVW
FRPSXWHUVLJQLI\LQJWKDWGDWDKDVEHHQUHFHLYHG6HOHFWWKH
SURWRFROWKDWLVUHTXHVWHGE\WKHKRVWFRPSXWHU)XUWKHUGHWDLOV
RQSURWRFROFDQEHIRXQGLQWKH=3/,,3URJUDPPLQJ*XLGH
127( =HEUDLVWKHVDPHDV$&.1$&.H[FHSWWKDWZLWK=HEUD
WKHUHVSRQVHPHVVDJHVDUHVHTXHQFHG,I=HEUDLV
VHOHFWHGSULQWHUPXVWXVH³'75'65´KRVWKDQGVKDNH
SURWRFRO
Zebra XiIIIPlus™ Printers User’s Guide
55
3UHVV
/&'6KRZV
$FWLRQ([SODQDWLRQ
6HWWLQJ1HWZRUN,'3UHVVWKH/()7%/$&.29$/NH\WRPRYH
WRWKHQH[WGLJLWSRVLWLRQSUHVVWKH5,*+7%/$&.29$/NH\WR
LQFUHDVHWKHYDOXHRIWKHGLJLW
'HIDXOW
1(7:25.,'
5DQJH±
1HWZRUN,'LVXVHGWRDVVLJQDXQLTXHQXPEHUWRDSULQWHUXVHG
LQDQ5656QHWZRUN7KLVJLYHVWKHKRVWFRPSXWHUWKH
PHDQVWRDGGUHVVDVSHFLILFSULQWHU,IWKHSULQWHULVXVHGLQDQ
5656QHWZRUN\RXPXVWVHOHFWDQHWZRUN,'QXPEHU
7KLVGRHVQRWDIIHFW7&3,3RU,3;QHWZRUNV
6HWWLQJ&RPPXQLFDWLRQV0RGH3UHVVWKH5,*+7RU/()7
%/$&.29$/NH\WRGLVSOD\RWKHUFKRLFHV
'HIDXOW1RUPDOPRGH
6HOHFWLRQV1RUPDOPRGHGLDJQRVWLFV
7KHFRPPXQLFDWLRQGLDJQRVWLFVPRGHLVDWURXEOHVKRRWLQJWRRO
IRUFKHFNLQJWKHLQWHUFRQQHFWLRQEHWZHHQWKHSULQWHUDQGWKHKRVW
FRPSXWHU:KHQ³GLDJQRVWLFV´LVVHOHFWHGDOOGDWDVHQWIURPWKH
KRVWFRPSXWHUWRWKHSULQWHULVSULQWHGDVVWUDLJKW$6&,,
&20081,&$7,216 FKDUDFWHUVZLWKWKHKH[YDOXHEHORZWKH$6&,,WH[W7KHSULQWHU
SULQWVDOOFKDUDFWHUVUHFHLYHGLQFOXGLQJFRQWUROFRGHVOLNH&5
FDUULDJHUHWXUQ$VDPSOHSULQWRXWLVVKRZQLQ)LJXUHRQ
SDJH 127(6RQGLDJQRVWLFSULQWRXWV
)(LQGLFDWHVDIUDPLQJHUURU
2(LQGLFDWHVDQRYHUUXQHUURU
3(LQGLFDWHVDSDULW\HUURU
1(LQGLFDWHVQRLVH
)RUDQ\HUURUVFKHFNWKDW\RXUFRPPXQLFDWLRQSDUDPHWHUVDUH
FRUUHFW6HWWKHSULQWZLGWKHTXDOWRRUOHVVWKDQWKHODEHOZLGWK
XVHGIRUWKHWHVW6HHSDJH IRUPRUHLQIRUPDWLRQ
56
Zebra XiIIIPlus™ Printers User’s Guide
6HOHFWLQJ3UHIL[DQG'HOLPLWHU&KDUDFWHUV
3UHIL[DQGGHOLPLWHUFKDUDFWHUVDUHGLJLWKH[YDOXHVXVHGZLWKLQWKH=3/=3/,,IRUPDWVVHQWWRWKHSULQWHU
7KHSULQWHUXVHVWKHODVWSUHIL[DQGGHOLPLWHUFKDUDFWHUVVHQWWRLWZKHWKHUIURPD=3/,,LQVWUXFWLRQRUIURP
WKHIURQWSDQHO
127( '2127XVHWKHVDPHKH[YDOXHIRUWKHFRQWUROIRUPDWDQGGHOLPLWHUFKDUDFWHU7KHSULQWHUPXVW
VHHGLIIHUHQWFKDUDFWHUVWRIXQFWLRQSURSHUO\
3UHVV
/&'6KRZV
$FWLRQ([SODQDWLRQ
&RQWURO3UHIL[&KDUDFWHU3UHVVWKH/()7%/$&.29$/NH\
WRPRYHWRWKHQH[WGLJLWSRVLWLRQSUHVVWKH5,*+7%/$&.
29$/NH\WRLQFUHDVHWKHYDOXHRIWKHGLJLW
&21752/35(),; 'HIDXOW(WLOGH²GLVSOD\HGDVDEODFNVTXDUH
5DQJH±))
7KHSULQWHUORRNVIRUWKLVGLJLWKH[FKDUDFWHUWRLQGLFDWHWKH
VWDUWRID=3/=3/,,FRQWUROLQVWUXFWLRQ
)RUPDW3UHIL[&KDUDFWHU3UHVVWKH/()7%/$&.29$/NH\
WRPRYHWRWKHQH[WGLJLWSRVLWLRQSUHVVWKH5,*+7%/$&.
29$/NH\WRLQFUHDVHWKHYDOXHRIWKHGLJLW
)250$735(),; 'HIDXOW(FDUHW
5DQJH±))
7KHSULQWHUORRNVIRUWKLVGLJLWKH[FKDUDFWHUWRLQGLFDWHWKH
VWDUWRID=3/=3/,,IRUPDWLQVWUXFWLRQ
'HOLPLWHU&KDUDFWHU3UHVVWKH/()7%/$&.29$/NH\WR
PRYHWRWKHQH[WGLJLWSRVLWLRQSUHVVWKH5,*+7%/$&.29$/
NH\WRLQFUHDVHWKHYDOXHRIWKHGLJLW
'HIDXOW&FRPPD
'(/,0,7(5&+$5 5DQJH±))
7KHGHOLPLWHUFKDUDFWHULVDGLJLWKH[YDOXHXVHGDVD
SDUDPHWHUSODFHPDUNHULQ=3/=3/,,IRUPDWLQVWUXFWLRQV
5HIHUWRWKH=3/,,3URJUDPPLQJ*XLGH9ROXPH,IRUPRUH
LQIRUPDWLRQ
Zebra XiIIIPlus™ Printers User’s Guide
57
6HOHFWLQJ=3/0RGH
3UHVV
/&'6KRZV
=3/02'(
$FWLRQ([SODQDWLRQ
6HOHFWLQJ=3/0RGH3UHVVWKH5,*+7RU/()7%/$&.29$/
NH\WRGLVSOD\RWKHUFKRLFHV
'HIDXOW=3/,,
6HOHFWLRQV=3/,,=3/
7KHSULQWHUUHPDLQVLQWKHVHOHFWHGPRGHXQWLOLWLVFKDQJHGE\
WKLVIURQWSDQHOLQVWUXFWLRQRUE\XVLQJD=3/=3/,,FRPPDQG
7KHSULQWHUDFFHSWVODEHOIRUPDWVZULWWHQLQHLWKHU=3/RU=3/,,
7KLVHOLPLQDWHVWKHQHHGWRUHZULWHDQ\=3/IRUPDWV\RXDOUHDG\
KDYH5HIHUWRWKH=3/,,3URJUDPPLQJ*XLGHIRUPRUH
LQIRUPDWLRQRQWKHGLIIHUHQFHVEHWZHHQ=3/DQG=3/,,
3RZHU8SDQG+HDG&ORVH3DUDPHWHUV
0HGLD3RZHU8S3UHVVWKH5,*+7RU/()7%/$&.29$/NH\
WRGLVSOD\RWKHUFKRLFHV
'HIDXOW&DOLEUDWLRQ
6HOHFWLRQV)HHGFDOLEUDWLRQOHQJWKDQGQRPRWLRQ
0(',$32:(583 7KLVSDUDPHWHUHVWDEOLVKHVWKHDFWLRQRIWKHPHGLDZKHQWKH
SULQWHULVWXUQHGRQ
&DOLEUDWLRQ'HWHUPLQHVWKHOHQJWKRIWKHODEHO
/HQJWK8VHGLQFRQWLQXRXVPRGHWRIHHGWKHODVWVWRUHGODEHO
OHQJWK
1R0RWLRQ0HGLDGRHVQRWPRYH
)HHG)HHGVWKHODEHOWRWKHILUVWUHJLVWUDWLRQSRLQW
+HDG&ORVH3UHVVWKH5,*+7RU/()7%/$&.29$/NH\WR
GLVSOD\RWKHUFKRLFHV
'HIDXOW&DOLEUDWLRQ
6HOHFWLRQV)HHGFDOLEUDWLRQOHQJWKQRPRWLRQ
+($'&/26(
'HWHUPLQHVWKHDFWLRQRIWKHPHGLDDIWHUWKHSULQWKHDGKDVEHHQ
RSHQHGDQGWKHQFORVHG
&DOLEUDWLRQ'HWHUPLQHVWKHOHQJWKRIWKHODEHO
/HQJWK8VHGLQFRQWLQXRXVPRGHWRIHHGWKHODVWVWRUHGODEHO
OHQJWK
1R0RWLRQ0HGLDGRHVQRWPRYH
)HHG)HHGVWKHODEHOWRWKHILUVWUHJLVWUDWLRQSRLQW
58
Zebra XiIIIPlus™ Printers User’s Guide
/DEHO3RVLWLRQLQJ3DUDPHWHUV
3UHVV
/&'6KRZV
%$&.)(('
/$%(/723
/()7326,7,21
$FWLRQ([SODQDWLRQ
%DFNIHHG6HTXHQFH3UHVVWKH5,*+7RU/()7%/$&.29$/
NH\WRGLVSOD\RWKHUFKRLFHV
'HIDXOW'HIDXOW
6HOHFWLRQV 'HIDXOWDIWHUEHIRUH
RII
7KLVSDUDPHWHUHVWDEOLVKHVZKHQDQGKRZPXFKODEHOEDFNIHHG
RFFXUVDIWHUDODEHOLVUHPRYHGRUFXWLQWKHSHHORIIFXWWHUDQG
DSSOLFDWRUPRGHV,WKDVQRHIIHFWLQUHZLQGRUWHDURIIPRGHV
7KLVSDUDPHWHUVHWWLQJFDQEHVXSHUVHGHGE\WKH ~JSLQVWUXFWLRQ
ZKHQUHFHLYHGDVSDUWRIDODEHOIRUPDWUHIHUWRWKH=3/,,
3URJUDPPLQJ*XLGH
127( 7KHGLIIHUHQFHEHWZHHQWKHYDOXHHQWHUHGDQG
HVWDEOLVKHVKRZPXFKEDFNIHHGRFFXUVEHIRUHWKHQH[W
ODEHOLVSULQWHG)RUH[DPSOHDYDOXHRIPHDQVWKDW
RIWKHEDFNIHHGWDNHVSODFHDIWHUWKHODEHOLV
UHPRYHGRUFXW7KHUHPDLQLQJWDNHVSODFHEHIRUH
WKHQH[WODEHOLVSULQWHG$YDOXHRI³EHIRUH´PHDQVWKDW
DOOEDFNIHHGWDNHVSODFHEHIRUHWKHQH[WODEHOLVSULQWHG
$GMXVWLQJ/DEHO7RS3RVLWLRQ3UHVVWKH5,*+7%/$&.29$/
NH\WRLQFUHDVHWKHYDOXHSUHVVWKH/()7%/$&.29$/NH\WR
GHFUHDVHWKHYDOXH7KHGLVSOD\HGYDOXHUHSUHVHQWVGRWV
'HIDXOW
5DQJH±WRGRWURZV
7KHODEHOWRSSRVLWLRQDGMXVWVWKHSULQWSRVLWLRQYHUWLFDOO\RQWKH
ODEHO3RVLWLYHQXPEHUVDGMXVWWKHODEHOWRSSRVLWLRQIXUWKHUGRZQ
WKHODEHODZD\IURPWKHSULQWKHDGQHJDWLYHQXPEHUVDGMXVWWKH
SRVLWLRQXSWKHODEHOWRZDUGWKHSULQWKHDG
$GMXVWLQJ/HIW3RVLWLRQ3UHVVWKH/()7%/$&.29$/NH\WR
PRYHWKHFXUVRUSUHVVWKH5,*+7%/$&.29$/NH\WRFKDQJH
EHWZHHQDQG±DQGWRLQFUHDVHWKHYDOXHRIWKHGLJLW7KH
GLVSOD\HGYDOXHUHSUHVHQWVGRWV
'HIDXOW
5DQJH±WR
127( )RUDQHJDWLYHYDOXHHQWHUWKHYDOXHEHIRUHFKDQJLQJWR
WKHPLQXVVLJQ
7KLVSDUDPHWHUHVWDEOLVKHVKRZIDUIURPWKHOHIWHGJHRIDODEHO
WKHIRUPDWEHJLQVWRSULQWE\DGMXVWLQJKRUL]RQWDOSRVLWLRQLQJRQ
WKHODEHO3RVLWLYHQXPEHUVDGMXVWWKHSULQWLQJWRWKHOHIWE\WKH
QXPEHURIGRWVVHOHFWHGQHJDWLYHQXPEHUVVKLIWSULQWLQJWRWKH
ULJKW
Zebra XiIIIPlus™ Printers User’s Guide
59
3UHVV
/&'6KRZV
$FWLRQ([SODQDWLRQ
6HWWLQJWKH+HDG7HVW&RXQW3UHVVWKH/()7%/$&.29$/
NH\WRPRYHWKHFXUVRUSUHVVWKH5,*+7%/$&.29$/NH\WR
FKDQJHWKHYDOXHRIWKHGLJLW
+($'7(67&2817 'HIDXOWGLVDEOHVWKHWHVW
5DQJH±
7KHSULQWHUSHULRGLFDOO\SHUIRUPVDWHVWRIWKHSULQWKHDG
IXQFWLRQDOLW\FDOOHGD³SULQWKHDGWHVW´RU³KHDGWHVW´7KLV
SDUDPHWHUHVWDEOLVKHVKRZPDQ\ODEHOVDUHSULQWHGEHWZHHQ
WKHVHLQWHUQDOWHVWV
6HWWLQJWKH+HDG5HVLVWRU9DOXH3UHVVWKH/()7%/$&.
29$/NH\WRPRYHWKHFXUVRUSUHVVWKH5,*+7%/$&.29$/NH\
WRLQFUHDVHWKHYDOXHRIWKHGLJLW
&$87,21 7KLVSDUDPHWHUVKRXOGEHFKDQJHGRQO\E\TXDOLILHG
SHUVRQQHO
,QLWLDO9DOXH)DFWRU\VHWWRPDWFKWKHSULQWKHDGVKLSSHGZLWK
\RXUSULQWHU
'HIDXOW9DOXH
+($'5(6,6725 5DQJH±
7KLVYDOXHKDVEHHQSUHVHWDWWKHIDFWRU\WRPDWFKWKHUHVLVWDQFH
YDOXHRIWKHSULQWKHDG,WGRHVQRWQHHGWREHFKDQJHGXQOHVVWKH
SULQWKHDGLVUHSODFHGRUWKHPDLQORJLFERDUGLVUHSODFHG
&$87,21 '2127VHWWKHYDOXHKLJKHUWKDQWKDWVKRZQRQWKH
SULQWKHDG6HWWLQJDKLJKHUYDOXHPD\GDPDJHWKH
SULQWKHDG
%HIRUHUHSODFLQJDSULQWKHDGORRNRQWKHSULQWKHDGIRUWKHODEHO
WKDWVKRZVWKHUHVLVWDQFHYDOXHRKPYDOXH
6HWWLQJWKH9HULILHU3RUW3UHVVWKH5,*+7RU/()7%/$&.
29$/NH\WRGLVSOD\RWKHUFKRLFHV
'HIDXOW2II
6HOHFWLRQV2II9(5535179(57+58387
7KHDX[LOLDU\SRUWLVXVHGWRGHWHUPLQHKRZWKHSULQWHUUHDFWVWR
WKHRQOLQHYHULILHU7KHUHDUHFXUUHQWO\WKUHHRSHUDWLQJFRQGLWLRQV
IRUWKLVSRUW
2II7KHYHULILHUSRUWLVRII
9(5,),(53257 9(553517(55/DEHOUHSULQWHGLIYHULILHUGHWHFWVDQHUURU
,IDEDUFRGHLVQHDUWKHXSSHUHGJHRIWKHODEHOWKHODEHOLVIHG
RXWIDUHQRXJKWREHYHULILHGDQGWKHQEDFNIHGWRDOORZWKHQH[W
ODEHOWREHSULQWHGDQGYHULILHG
9(57+58387$OORZVJUHDWHVWWKURXJKSXWEXWPD\QRW
LQGLFDWHDYHULILFDWLRQHUURULPPHGLDWHO\XSRQGHWHFWLRQ0D\
SULQWIURPRQHWRWKUHHODEHOVEHIRUHDQHUURULVUHFRJQL]HGDQG
SULQWLQJVWRSV
)RUPRUHLQIRUPDWLRQRQWKHRSHUDWLRQRIWKHRSWLRQDOYHULILHUUHIHU
WRWKHGRFXPHQWDWLRQSURYLGHGZLWKWKDWRSWLRQ
60
Zebra XiIIIPlus™ Printers User’s Guide
3UHVV
/&'6KRZV
$FWLRQ([SODQDWLRQ
6HWWLQJWKH$SSOLFDWRU3RUW3UHVVWKH5,*+7RU/()7
%/$&.29$/NH\WRGLVSOD\RWKHUFKRLFHV
'HIDXOW2II
6HOHFWLRQV2IIPRGHPRGHPRGHPRGH
'HWHUPLQHVWKHDFWLRQRIWKHYHULILHUSRUW
2II7KHDSSOLFDWRUSRUWLVRII
0RGH$VVHUWVWKHa(1'B35,17VLJQDOORZZKLOHWKH
$33/,&$7253257 SULQWHULVPRYLQJWKHODEHOIRUZDUG
0RGH$VVHUWVWKHa(1'B35,17VLJQDOKLJKZKLOHWKH
SULQWHULVPRYLQJWKHODEHOIRUZDUG
0RGH$VVHUWVWKHa(1'B35,17VLJQDOORZIRU
PLOOLVHFRQGVZKHQDODEHOKDVEHHQFRPSOHWHGDQG
SRVLWLRQHG1RWDVVHUWHGGXULQJFRQWLQXRXVSULQWLQJPRGHV
0RGH$VVHUWVWKHa(1'B35,17VLJQDOKLJKIRU
PLOOLVHFRQGVZKHQDODEHOKDVEHHQFRPSOHWHGDQG
SRVLWLRQHG1RWDVVHUWHGGXULQJFRQWLQXRXVSULQWLQJPRGHV
127( 6HWDVVXJJHVWHGE\WKHDSSOLFDWRUPDQXIDFWXUHU
:(%6
0(',$6
5,%%216
0$5.6
0$5.0('6
7KHVHSDUDPHWHUVDUHDXWRPDWLFDOO\VHWGXULQJWKHFDOLEUDWLRQ
SURFHGXUH7KH\VKRXOGEHFKDQJHGRQO\E\DTXDOLILHGVHUYLFH
WHFKQLFLDQ5HIHUWRWKHPDLQWHQDQFHPDQXDOIRUPRUH
LQIRUPDWLRQRQWKHVHSDUDPHWHUV
3UHVVWKH1(;76$9(NH\UHSHDWHGO\WRVNLSWKHVH
SDUDPHWHUV
0(',$/('
5,%%21/('
0$5./('
Zebra XiIIIPlus™ Printers User’s Guide
61
3UHVV
62
/&'6KRZV
$FWLRQ([SODQDWLRQ
6WDUW3ULQW6LJQDO3UHVVWKH5,*+7RU/()7%/$&.29$/
NH\WRGLVSOD\RWKHUFKRLFHV
'HIDXOW3XOVH0RGH
6HOHFWLRQV3XOVH0RGH/HYHO0RGH
7KLVSDUDPHWHUGHWHUPLQHVKRZWKHSULQWHUUHDFWVWRWKH6WDUW
3ULQW6LJQDOLQSXWRQSLQRIWKHDSSOLFDWRULQWHUIDFHFRQQHFWRU
67$5735,176,* DWWKHUHDURIWKHSULQWHU
,Q3XOVH0RGHODEHOVSULQWZKHQWKHVLJQDOWUDQVLWLRQVIURP
+,*+WR/2:
,Q/HYHO0RGHODEHOVSULQWDVORQJDVWKHVLJQDOLVDVVHUWHG
/2:
&$87,21 6WDUW3ULQW6LJQDOLVVHWE\WKHDSSOLFDWRU
PDQXIDFWXUHUDQGVKRXOGQRWEHFKDQJHGXQOHVV
WKHIDFWRU\GHIDXOWVKDYHEHHQUHORDGHG3OHDVH
PDNHDQRWHRILW:KLOHRWKHUFKRLFHVDUHYDOLG
WKHSULQWHUPXVWEHUHWXUQHGWRLWVGHVLJQDWHG
VHWWLQJLQRUGHUIRULWWRZRUNSURSHUO\
5HV\QFK0RGH3UHVVWKH5,*+7RU/()7%/$&.29$/NH\
WRGLVSOD\RWKHUFKRLFHV
'HIDXOW)HHG0RGH
6HOHFWLRQV)HHG0RGH(UURU0RGH
7KLVSDUDPHWHUGHWHUPLQHVKRZWKHSULQWHUUHDFWVLIWKHODEHO
V\QFKURQL]DWLRQLVORVWDQGWKHODEHOWRSLVQRWZKHUHH[SHFWHG
)(('02'(²,IWKHODEHOWRSLVQRWZKHUHH[SHFWHGWKH
SULQWHUIHHGVDEODQNODEHOWRILQGWKHODEHOWRSSRVLWLRQ
(552502'(²,IWKHODEHOWRSLVQRWZKHUHH[SHFWHGWKH
SULQWHUVWRSVHQWHUVWKH3$86(PRGHGLVSOD\VWKHPHVVDJH
³(UURU&RQGLWLRQ)HHG/DEHO´IODVKHVWKH(5525/('DQG
DVVHUWVWKH³6HUYLFH5HTXLUHG´VLJQDOSLQRQWKH$SSOLFDWRU
5(6<1&+02'( ,QWHUIDFH&RQQHFWRU
7RUHV\QFKWKHPHGLDWRWKHWRSRIWKHODEHOLQ(5525PRGH
SUHVVWKH3$86(NH\WRH[LWWKH3$86(VWDWH7KH(5525
/('VWRSVIODVKLQJDQGWKH³6HUYLFH5HTXLUHG´VLJQDOLV
GHDFWLYDWHG7KHDFWLRQRIWKHSULQWHULVGHWHUPLQHGE\WKH
³+HDG&ORVH´FRQILJXUDWLRQVHOHFWLRQ
³&DOLEUDWLRQ´²GHWHUPLQHVWKHOHQJWKRIWKHODEHO
³)HHG´²IHHGVWKHODEHOVWRWKHILUVWUHJLVWUDWLRQSRLQW
³/HQJWK´²XVHGLQFRQWLQXRXVPRGHWRIHHGWKHODVWVWRUHG
ODEHOOHQJWK
³1R0RWLRQ´²WKHPHGLDGRHVQRWPRYH7KHXVHUPXVWSUHVV
WKH)(('NH\WRFDXVHWKHSULQWHUWRUHV\QFKWRWKHVWDUWRI
WKHQH[WODEHO
Zebra XiIIIPlus™ Printers User’s Guide
3UHVV
/&'6KRZV
$FWLRQ([SODQDWLRQ
/&'$GMXVWPHQW3UHVVWKH/()7%/$&.29$/NH\WR
GHFUHDVHWKHYDOXHUHGXFHFRQWUDVWSUHVVWKH5,*+7%/$&.
/&'$'-867
29$/NH\WRLQFUHDVHWKHYDOXHLQFUHDVHFRQWUDVW
5DQJH±
7KLVSDUDPHWHUDOORZV\RXWRDGMXVWWKHFRQWUDVWRI\RXU/&'LILWLV
GLIILFXOWWRUHDG
)RUPDW&RQYHUW3UHVVWKH5,*+7RU/()7%/$&.29$/NH\WR
GLVSOD\RWKHUFKRLFHV
'HIDXOW1RQH
)250$7&219(57 6HOHFWLRQV 1RQH →→ → → 6HOHFWVWKHELWPDSVFDOLQJIDFWRU7KHILUVWQXPEHULVWKHRULJLQDO
GRWVSHULQFKGSLYDOXHWKHVHFRQGWKHGSLWRZKLFK\RXZRXOG
OLNHWRVFDOH
127( 1RWDSSOLFDEOHRQDOOSULQWHUV
,GOH'LVSOD\3UHVVWKH5,*+7RU/()7%/$&.29$/NH\WR
GLVSOD\RWKHUFKRLFHV
'HIDXOW)LUPZDUHYHUVLRQ
6HOHFWLRQV PPGG\\KRXUPPGG\\KRXU
,'/(',63/$<
GGPP\\KRXUGGPP\\KRXU
7KLVSDUDPHWHUVHOHFWVWKH/&'RSWLRQVIRUWKHUHDOWLPHFORFN
127( ,IWKHGHIDXOWYDOXHLVQRWVHOHFWHGSUHVVLQJHLWKHU%/$&.
29$/NH\EULHIO\GLVSOD\VWKHILUPZDUHYHUVLRQRIWKH
SULQWHU
57&5HDOWLPHFORFN'DWH3UHVVWKH/()7%/$&.29$/NH\
WRPRYHWRWKHQH[WGLJLWSRVLWLRQSUHVVWKH5,*+7%/$&.29$/
57&'$7(
NH\WRLQFUHDVHWKHYDOXHRIWKHGLJLW
7KLVSDUDPHWHUDOORZV\RXWRVHWWKHGDWHIROORZLQJWKHFRQYHQWLRQ
VHOHFWHGLQ³,'/(',63/$<´
57&5HDOWLPHFORFN7LPH3UHVVWKH/()7%/$&.29$/NH\
WRPRYHWRWKHQH[WGLJLWSRVLWLRQSUHVVWKH5,*+7%/$&.29$/
57&7,0(
NH\WRLQFUHDVHWKHYDOXHRIWKHGLJLW
7KLVSDUDPHWHUDOORZV\RXWRVHWWKHWLPHIROORZLQJWKHFRQYHQWLRQ
VHOHFWHGLQ³,'/(',63/$<´
Zebra XiIIIPlus™ Printers User’s Guide
63
3UHVV
/&'6KRZV
$FWLRQ([SODQDWLRQ
,35HVROXWLRQ3UHVVWKH5,*+7RU/()7%/$&.29$/NH\WR
GLVSOD\RWKHUFKRLFHV
'HIDXOW'\QDPLF
,35(62/87,21 6HOHFWLRQV'\QDPLFSHUPDQHQW
'HSHQGLQJRQWKHVHOHFWLRQDOORZVHLWKHUWKHXVHU³SHUPDQHQW´RU
WKHVHUYHU³G\QDPLF´WRVHOHFWWKH,3DGGUHVV)RUPRUH
LQIRUPDWLRQUHIHUWR=HEUD1HW1HWZRUNLQJ3ULQW6HUYHU,,
,QVWDOODWLRQDQG8VHU¶V*XLGH
,33URWRFROV3UHVVWKH5,*+7RU/()7%/$&.29$/NH\WR
GLVSOD\RWKHUFKRLFHV
'HIDXOW$OO
6HOHFWLRQV $OOJOHDQLQJRQO\5$53%2273'+&3
,335272&2/6
'+&3%2273
,I³G\QDPLF´ZDVFKRVHQLQWKHSUHYLRXVSDUDPHWHUWKLVVHOHFWLRQ
GHWHUPLQHVWKHPHWKRGVE\ZKLFKWKH3ULQW6HUYHU,,UHFHLYHVWKH
,3DGGUHVVIURPWKHVHUYHU)RUPRUHLQIRUPDWLRQUHIHUWR
=HEUD1HW1HWZRUNLQJ3ULQW6HUYHU,,,QVWDOODWLRQDQG8VHU¶V*XLGH
,3$GGUHVV3UHVVWKH/()7%/$&.29$/NH\WRPRYHWRWKH
QH[WGLJLWSRVLWLRQSUHVVWKH5,*+7%/$&.29$/NH\WRLQFUHDVH
WKHYDOXHRIWKHGLJLW
,3$''5(66 7KLVSDUDPHWHUDOORZV\RXWRVHOHFWWKH,3DGGUHVVLI³SHUPDQHQW´
ZDVFKRVHQLQ³,35(62/87,21´,I³G\QDPLF´ZDVFKRVHQWKH
XVHUFDQQRWVHOHFWWKHDGGUHVV)RUPRUHLQIRUPDWLRQUHIHUWR
=HEUD1HW1HWZRUNLQJ3ULQW6HUYHU,,,QVWDOODWLRQDQG8VHU¶V*XLGH
6XEQHW0DVN3UHVVWKH5,*+7RU/()7%/$&.29$/NH\WR
GLVSOD\RWKHUFKRLFHV
'HIDXOW3HUPDQHQWXVHUPXVWVHW
68%1(70$6. 6HOHFWLRQV '\QDPLFXVHUPD\VHWEXWVHUYHUFDQDVVLJQ
SHUPDQHQW
7KLVSDUDPHWHUVHOHFWVWKHSDUWRIWKH,3DGGUHVVWKDWLVFRQVLGHUHG
WREHSDUWRIWKHORFDOQHWZRUN,WFDQEHUHDFKHGZLWKRXWJRLQJ
WKURXJKWKHGHIDXOWJDWHZD\
'HIDXOW*DWHZD\3UHVVWKH/()7%/$&.29$/NH\WRPRYHWR
WKHQH[WGLJLWSRVLWLRQSUHVVWKH5,*+7%/$&.29$/NH\WR
'()$8/7
LQFUHDVHWKHYDOXHRIWKHGLJLW
*$7(:$<
7KLVSDUDPHWHUDOORZV\RXWRVHOHFWWKH,3DGGUHVVWKDWWKHQHWZRUN
WUDIILFLVURXWHGWKURXJKLIWKHGHVWLQDWLRQDGGUHVVLVQRWSDUWRIWKH
ORFDOQHWZRUN
=HEUD1HW3ULQW6HUYHU,,RSWLRQUHTXLUHG
64
Zebra XiIIIPlus™ Printers User’s Guide
3UHVV
/&'6KRZV
$FWLRQ([SODQDWLRQ
6HOHFWLQJWKH'LVSOD\/DQJXDJH3UHVVWKH5,*+7RU/()7
%/$&.29$/NH\WRGLVSOD\RWKHUFKRLFHV
'HIDXOW(QJOLVK
/$1*8$*(
6HOHFWLRQV (QJOLVK6SDQLVK)UHQFK*HUPDQ,WDOLDQ
1RUZHJLDQ3RUWXJXHVH6ZHGLVK'DQLVK
6SDQLVK'XWFK)LQQLVK-DSDQHVH
7KLVSDUDPHWHUDOORZV\RXWRFKDQJHWKHODQJXDJHXVHGRQWKH
/&'
<RXKDYHQRZFRPSOHWHGWKHHQWLUHFRQILJXUDWLRQDQGFDOLEUDWLRQVHTXHQFH<RXPD\HLWKHUSUHVVWKH
1(;76$9(NH\RUWKH6(783(;,7NH\
<RXDUHQRZEDFNDWWKHILUVWSDUDPHWHULQWKHFRQILJXUDWLRQ
VHTXHQFH
127( ,I\RXSUHVVHGWKH1(;76$9(NH\EXWDUHWKURXJK
SURJUDPPLQJWKHSULQWHUFRQILJXUDWLRQ\RXPD\SUHVVWKH
'$5.1(66
6(783(;,7NH\DQGFRQWLQXHZLWKWKH³6$9(
&+$1*(6´IXQFWLRQ
6DYH&KDQJHV3UHVVWKH5,*+7RU/()7%/$&.29$/NH\WR
GLVSOD\RWKHUFKRLFHV
'HIDXOW3HUPDQHQW
6HOHFWLRQV 3HUPDQHQWWHPSRUDU\FDQFHOORDGGHIDXOWVORDG
ODVWVDYH
7KLVGLVSOD\DSSHDUVZKHQ\RXDWWHPSWWRH[LWWKHVHWXSPRGH
3HUPDQHQW3HUPDQHQWO\VDYHVWKHFKDQJHVHYHQZKHQ
SULQWHUSRZHULVWXUQHGRII
6$9(&+$1*(6 7HPSRUDU\6DYHVWKHFKDQJHVXQWLOFKDQJHGDJDLQRUXQWLO
SRZHULVWXUQHGRII
&DQFHO&DQFHOVDOOFKDQJHVVLQFH\RXHQWHUHGWKHVHWXS
PRGHH[FHSWIRUGDUNQHVVDQGWHDURIISRVLWLRQLIWKH\ZHUH
FKDQJHG
/RDGGHIDXOWV/RDGVIDFWRU\GHIDXOWV
127( /RDGLQJIDFWRU\GHIDXOWVUHTXLUHVFDOLEUDWLRQ
/RDGODVWVDYH/RDGVWKHYDOXHVIURPWKHODVWSHUPDQHQW
VDYH
²
35,17(55($'< <RXKDYHH[LWHGWKHFRQILJXUDWLRQDQGFDOLEUDWLRQVHTXHQFHDQG
DUHQRZUHDG\IRUQRUPDOSULQWHURSHUDWLRQ
Zebra XiIIIPlus™ Printers User’s Guide
65
66
Zebra XiIIIPlus™ Printers User’s Guide
/ØÏlÍAÃlÍAcÍcØÆÏlÏ
&OHDQLQJ
Table 1 provides a brief cleaning schedule. Specific cleaning procedures
are provided on the following pages.
Table 1. Cleaning Schedule
$UHD
0HWKRG
,QWHUYDO
3ULQWKHDG
6ROYHQW
:KHQD³&/($1+($'12:´ZDUQLQJ
DSSHDUVRU
3ODWHQUROOHU
6ROYHQW
'LUHFWWKHUPDOSULQWPRGH
7UDQVPLVVLYHVHQVRU
$LUEORZ
$IWHUHYHU\UROORIPHGLD
%ODFNPDUNVHQVRU
$LUEORZ
RU′PRIIDQIROGPHGLD
0HGLDSDWK
6ROYHQW
7KHUPDOWUDQVIHUSULQWPRGH
5LEERQVHQVRU
$LUEORZ
$IWHUHYHU\UROORIULEERQ
/DEHODYDLODEOHVHQVRUV
$LUEORZ
0RQWKO\
7HDURIISHHORIIEDU
6ROYHQW
$VQHHGHG
6QDSSODWH
6ROYHQW
&XWWHU
6ROYHQW
=HEUDUHFRPPHQGVXVLQJLVRSURS\ODOFRKRO
)RUGSLSULQWHUVXVH=HEUD¶V6DYHD3ULQWKHDGFOHDQLQJILOPVHHSDJH IRUGHWDLOV
CAUTION: Use only the cleaning agents indicated. Zebra
Technologies is not responsible for damage caused by any
other fluids being used on this printer.
Zebra XiIIIPlus™ Printers User’s Guide
67
&OHDQLQJWKH([WHULRU
The exterior surfaces of the printer may be cleaned with a lint-free cloth.
Do not use harsh or abrasive cleaning agents or solvents. If necessary, a
mild detergent solution or desktop cleaner may be used sparingly.
&OHDQLQJWKH,QWHULRU
Inspect this area after every four rolls of media. Remove any dirt and lint
from the interior of the printer using a soft bristle brush and/or vacuum
cleaner.
&OHDQLQJWKH3ULQWKHDGDQG3ODWHQ5ROOHU
Inconsistent print quality, such as voids in the bar code or graphics, may
indicate a dirty printhead. For best results, perform the following cleaning
procedure after every roll of ribbon.
NOTES: For 600 dpi printers, clean after every roll of media or
when a “CLEAN HEAD NOW” warning appears on the LCD.
You do not need to turn off the printer before cleaning the
printhead. If power is turned off, all label formats and images, as
well as any temporarily saved parameter settings stored in the
printer’s internal memory, are lost. When power is turned back on,
these items must be reloaded.
If power is removed from a 600 dpi printer when cleaning the
printhead, the “CLEAN HEAD NOW” warning shown on the LCD
will not disappear.
:$51,1*$QLPSURSHUO\VHDWHGSULQWKHDGGDWD
FDEOHRUSRZHUFDEOHFRXOGUHVXOWLQWKHSULQWKHDG
JHQHUDWLQJH[FHVVLYHKHDWWKDWFRXOGFDXVHKDUPLI
LWLVWRXFKHG
To clean the printhead, refer to Figure 30 and follow these steps:
1. Open the printhead.
2. Remove the media and ribbon (if loaded).
68
Zebra XiIIIPlus™ Printers User’s Guide
3. Moisten an applicator tip with solvent and wipe along the print
elements from end to end. (The print elements are on the brown strip
just behind the chrome strip on the printhead.) Allow a few seconds
for the solvent to evaporate.
4. Rotate the platen roller and clean thoroughly with solvent and an
applicator.
5. Brush/vacuum any accumulated paper lint and dust away from the
rollers.
6. Reload ribbon and/or media and close the printhead.
NOTE: If print quality has not improved after performing this
procedure, try cleaning the printhead with Save-a-Printhead
cleaning film. This specially coated material removes
contamination buildup without damaging the printhead. Call your
authorized Zebra reseller or distributor or see page 70 for more
information.
Figure 30. Printhead and Platen Roller Cleaning
Zebra XiIIIPlus™ Printers User’s Guide
69
([WHQGWKH/LIHRI<RXU3ULQWKHDG
:LWK6DYHD3ULQWKHDG&OHDQLQJ)LOP
(Recommended for all Zebra printers—especially 600 dpi printers.)
&KDOOHQJH
The printhead is the most critical component in your printer, and possibly
the most delicate. It is a consumable item just like the brakes on your car,
which eventually wears over time. With ongoing careful attention and
maintenance, you can extend the life of the printhead.
Below are photographs of three printheads. The first printhead is brand
new. The second has printed over 1 million linear inches of thermal
transfer labels and has been properly maintained. The third printhead has
printed far fewer labels, but without proper care and maintenance, signs of
abrasion and contamination buildup are evident.
3UHYHQWLYH0DLQWHQDQFH
For optimum performance, clean the printhead regularly after every roll of
thermal transfer ribbon or after every roll of direct thermal labels. Take
care when handling or cleaning the printhead by removing any jewelry that
may scratch the printhead and use a grounding strap or anti-static mat to
discharge static electricity that could damage the printhead.
NOTE: For 600 dpi printers, clean after each roll of media or
when a “CLEAN HEAD NOW” warning appears on the LCD.
70
Zebra XiIIIPlus™ Printers User’s Guide
To start, use only the pre-soaked (isopropyl alcohol) cleaning swabs
provided in the preventive maintenance kit. First, open the media cover to
access the printhead, then open the printhead. Lightly blow or brush away
any loose dust and lint particles within the print mechanism (such as
rollers, media/ribbon sensors, and printhead). NEVER use any hard,
metallic, or abrasive objects—such as a screwdriver—to remove adhesives
or other contaminants that may have built up on the printhead. Next, press
the swab tip against the printhead and swipe the print elements from end to
end. Finally, turn the platen rollers while wiping them from side to side.
Repeat this last step until the swab no longer shows dirt.
$YRLGWKH&RQWULEXWLQJ)DFWRUVWR3UHPDWXUH3ULQWKHDG)DLOXUH
Abrasion: Over time, the movement of media/ribbon across the printhead
wears through the protective ceramic coating, exposing and eventually
damaging the print elements (dots).
In order to avoid abrasion:
• Clean your printhead frequently and use well-lubricated thermal transfer
ribbons with backcoatings optimized to reduce friction.
• Minimize printhead pressure and burn temperature settings by
optimizing the balance between the two.
• Ensure that the thermal transfer ribbon is as wide or wider than the label
media to prevent exposing the elements to the more abrasive label
material.
Ribbon Backcoating and Buildup: Printhead contamination from direct
thermal media or thermal transfer ribbon may occur in applications
requiring high burn settings, high head pressure, high speed, or high
volume. This contamination builds up on the printhead elements, creating
a barrier to the heat transformation required to produce high quality
images. Contaminant buildup occurs gradually and results in poor print
quality that may look like faded print or failed print element(s). This
buildup is very resistant to cleaning with the pre-soaked swabs and is
difficult to remove.
Zebra XiIIIPlus™ Printers User’s Guide
71
In order to avoid ribbon backcoating and buildup:
• Use thermal transfer ribbons that have been specially cured to provide
backcoat protection for high-demand applications. These ribbons
(sometimes referred to as anti-stick ribbons) also dissipate static and
provide more lubrication.
• Follow the recommended Printhead Preventive Maintenance
procedures.
• Use our Save-a-Printhead cleaning film to remove printhead
contamination buildup quickly and easily.
6DYHD3ULQWKHDG&OHDQLQJ)LOP
Save-a-Printhead cleaning film is a specially coated film that removes
contamination buildup without damaging the printhead.
Save-a-Printhead cleaning film extends the life of your printhead, reduces
maintenance downtime and the cost of replacing a printhead, and is an
inexpensive, easy, and quick way to remove contaminants without having
to remove the printhead.
Use Save-a-Printhead cleaning film when you see degrading print quality
that looks like faded print or a failed print element(s) that cannot be
corrected by cleaning with the pre-soaked cleaning swabs.
+RZWR8VH6DYHD3ULQWKHDG&OHDQLQJ)LOP
NOTE: If power is removed from a 600 dpi printer when cleaning
the printhead, the “CLEAN HEAD NOW” warning shown on the
LCD will not disappear.
:$51,1*$QLPSURSHUO\VHDWHGSULQWKHDGGDWD
FDEOHRUSRZHUFDEOHFRXOGUHVXOWLQWKHSULQWKHDG
JHQHUDWLQJH[FHVVLYHKHDWWKDWFRXOGFDXVHKDUPLI
LWLVWRXFKHG
1. Open the media cover.
2. Open the printhead and remove media and ribbon from the print
mechanism.
72
Zebra XiIIIPlus™ Printers User’s Guide
3. Clean the printhead per the recommended Preventive Maintenance
procedures.
4. Position the Save-a-Printhead film in the print path, placing the glossy
side down away from the printhead (matte side up).
5. Close and latch the printhead.
6. Slowly pull the full length of the film through the print mechanism.
7. Again, clean the printhead per the recommended Preventive
Maintenance procedures.
8. Reload media and ribbon, close and latch the printhead.
9. Close the media cover.
10. Print labels and inspect for improved print quality. If quality has not
improved, contact our Technical Support staff at 1.847.913.2259 or
visit our Web site: http://www.zebra.com.
Only one pass of Save-a-Printhead film is required to remove
contamination buildup, and each strip of film can be used up to 10 times.
Discard the strip when residue buildup or other contamination is apparent.
If a replacement printhead is needed, product from the Original
Equipment Manufacturer (OEM) is strongly recommended to ensure
that your printer and part warranties remain intact and that the product
performs optimally.
+RZWR2UGHU6DYHD3ULQWKHDG&OHDQLQJ)LOP.LWV
There are five kits to accommodate the different width printers. Each kit
contains three 10″ (25.4 mm) long strips of film. See Table 2 to order the
appropriate kit for your printer:
Table 2. Save-a-Printhead Cleaning Film Kits
2UGHUNLWQXPEHU
)RU3ULQWHUVZLWK3ULQW:LGWKV
″²″PP²PP
″²″PP²PP
″²″PP²PP
″²″PP²PP
″²″PP²PP
Zebra XiIIIPlus™ Printers User’s Guide
73
&OHDQLQJWKH6HQVRUV
The media, ribbon, and label available sensors should be cleaned on a
regular basis to ensure proper operation of the printer. To locate these
sensors, refer to Figure 30 on page 69, Figure 6 on page 11, and Figure 7
on page 12. Brush/vacuum any accumulated paper lint and dust off of
these sensors.
&OHDQLQJWKH6QDS3ODWH
Clean the snap plate to remove label adhesive or a label that has adhered to
the underside of the snap plate.
Refer to Figure 31.
1. Insert a small-blade screwdriver or similar tool into the loop on the left
side of the snap plate. Lift the snap plate.
CAUTION: Take care not to bend, twist, or otherwise
deform the loops! If the snap plate is damaged in any way,
a new plate may be required for proper ribbon sensing.
2. Repeat step #1 on the right side of the snap plate.
3. Remove the snap plate from the printer.
4. Clean the snap plate with cleaning solvent and a soft cloth.
74
Zebra XiIIIPlus™ Printers User’s Guide
Figure 31. Snap Plate Removal and Cleaning
Refer to Figure 32.
5. To reinstall the snap plate, insert the two tabs on the bottom of the snap
plate into the two slots of the media pathway.
6. Slide the snap plate toward you.
7. Press down on the loops to lock the snap plate into place.
Figure 32. Snap Plate Reinstallation
Zebra XiIIIPlus™ Printers User’s Guide
75
&OHDQLQJWKH&XWWHU0RGXOH
(For printers equipped with the optional cutter.)
If labels are not being cut properly or if the cutter jams with labels, turn off
the printer power and unplug the printer. Then, clean the stationary cutter
blade with cleaning solvent. This removes label adhesive and/or paper
debris. If further cutter cleaning is necessary, or if the cutter continues to
perform unsatisfactorily, contact an authorized service technician.
/XEULFDWLRQ
CAUTION: No lubricating agents of any kind should be
used on this printer! Some commercially available
lubricants will damage the finish and the mechanical parts.
)XVH5HSODFHPHQW
The printer uses a metric-style fuse (5 × 20 mm IEC) rated at F5A, 250V.
The AC power entry module comes with two approved fuses in the fuse
holder: one is “in-circuit” and the second is provided as a “spare” (refer to
Figure 34). The end caps of the fuse must bear the certification mark of a
known international safety organization (see Figure 41 on page 98). To
replace a faulty fuse, use the following procedure:
:$51,1*7XUQWKH$&SRZHUVZLWFK2))DQG
UHPRYHWKHSRZHUFRUGEHIRUHSHUIRUPLQJWKLV
SURFHGXUH
1. Refer to Figure 33. Using a small-blade screwdriver or similar tool,
remove the fuse holder, which is part of the AC power entry module at
the rear of the printer.
76
Zebra XiIIIPlus™ Printers User’s Guide
Figure 33. Power Switch Location
2. Remove the faulty fuse and install a new fuse in the “in-circuit”
position as shown in Figure 34. If you use the spare fuse, be sure to
order a replacement fuse. Fuses can be ordered from your Zebra
distributor.
NOTE: The spare fuse should be the exact type and rating as the
original “in-circuit” fuse.
Figure 34. Fuse Removal and Installation
3. Snap the fuse holder back into the AC power entry module.
4. Reconnect the power cord and turn the printer ON.
NOTE: If AC power is not restored, an internal component failure
may have occurred and the printer requires servicing.
Zebra XiIIIPlus™ Printers User’s Guide
77
$GMXVWPHQWV
7RJJOH3RVLWLRQLQJ
Both toggles should be positioned so that they provide even pressure on
the media. The toggles are positioned by sliding them to the desired
location. On media too narrow to accommodate both toggles, position one
toggle over the center of the media and decrease the pressure on the
unused toggle. If you are using a 90XiIIIPlus or 96XiIIIPlus printer,
position the single toggle over the center of the media.
NOTE: Make sure that the toggle pressure is even across the width
of the media; otherwise, print quality will not be consistent across
the label and the media and/or ribbon may “drift.”
3ULQWKHDG3UHVVXUH$GMXVWPHQW
This adjustment may be necessary if printing is too light on one side or if
thick media is used. Refer to Figure 35.
Ensure that the toggle(s) are positioned properly. If positioning them
properly does not solve the problem, use the following procedure to adjust
printhead pressure:
1. Print some labels at 2.4″/61 mm per second by running the PAUSE
Key Self Test (see page 89).
2. While printing labels, lower the darkness setting until a gray level of
printing is seen.
3. Loosen the knurled (upper) locking nuts at the top of the toggle
assembly/assemblies.
4. Some media types require higher pressure to print well. For these
media, increase or decrease spring pressure using the knurled (lower)
adjusting nuts on the shafts of the toggle until the left and right edges
of printed area are equally dark.
NOTE: Printhead life can be maximized by using the lowest
pressure that produces the desired print quality.
78
Zebra XiIIIPlus™ Printers User’s Guide
5. Increase darkness to the optimum level for the media being used.
6. Retighten locking nuts.
Figure 35. Printhead Pressure Adjustment
0HGLD6HQVRU3RVLWLRQ$GMXVWPHQW
See “Positioning the Media Sensors” on page 10.
Zebra XiIIIPlus™ Printers User’s Guide
79
80
Zebra XiIIIPlus™ Printers User’s Guide
2ÃØOlÆÏ
/('(UURU&RQGLWLRQVDQG:DUQLQJV
(UURU&RQGLWLRQ³5LEERQ2XW
3UREOHP
,QWKHUPDOWUDQVIHUPRGHWKHULEERQLVQRW
ORDGHG
RUORDGHGLQFRUUHFWO\
6ROXWLRQ
/RDGWKHULEERQFRUUHFWO\6HH³5LEERQ/RDGLQJ´RQ
SDJH ,QWKHUPDOWUDQVIHUPRGHWKHULEERQVHQVRULV 3HUIRUPWKHPHGLDDQGULEERQVHQVRUFDOLEUDWLRQVHH
QRWVHQVLQJORDGHGULEERQFRUUHFWO\
SDJH (QVXUHWKDWULEERQLVQRWLQVWDOOHGDQGSXWWKHSULQWHULQ
,QGLUHFWWKHUPDOPRGHZKHQULEERQLVQRW
GLUHFWWKHUPDOSULQWPRGH
XVHG
(QVXUHWKDWWKHSULQWHUGULYHURUVRIWZDUHVHWWLQJVDUH
FRUUHFWO\VHWLIDSSOLFDEOH
(UURU&RQGLWLRQ³3DSHU2XW
3UREOHP
RUORDGHGLQFRUUHFWO\
6ROXWLRQ
7KHPHGLDLVQRWORDGHG
5HORDGWKHPHGLD5HIHUWR³5ROO0HGLD/RDGLQJ´RQ
7KHPHGLDVHQVRULVQRWDGMXVWHGSURSHUO\
&KHFNWKHSRVLWLRQRIWKHXSSHUDQGORZHUPHGLDVHQVRUV
SDJH 5HIHUWR³3RVLWLRQLQJWKH0HGLD6HQVRUV´RQSDJH (LWKHUORDGWKHFRUUHFWPHGLDRUVHWWKHSULQWHUIRUWKH
FRUUHFWPHGLDW\SHXVLQJWKHIURQWSDQHOFRQWUROV
7KHSULQWHULVVHWIRUQRQFRQWLQXRXVPHGLD
(QVXUHWKDWWKHSULQWHUGULYHURUVRIWZDUHVHWWLQJVDUH
EXWFRQWLQXRXVPHGLDLVORDGHG
FRUUHFWO\VHWLIDSSOLFDEOH
&DOLEUDWHWKHSULQWHUVHHSDJH 8VLQJWKHIURQWSDQHOFRQWUROVFKHFNWKHVHQVRUW\SHWR
7KHLQFRUUHFWPHGLDVHQVRULVEHLQJXVHG
HQVXUHWKDWWKHFRUUHFWRQHLVXVHGIRUWKHPHGLDORDGHG
6HHSDJH &DOLEUDWHWKHSULQWHUVHHSDJH 7KHPD[LPXPODEHOOHQJWKLVVHWVKRUWHUWKDQ 8VLQJWKHIURQWSDQHOFRQWUROVVHWWKHODEHOOHQJWKWRD
WKHODEHOOHQJWKEHLQJXVHG
YDOXHWKDWLVVOLJKWO\ORQJHUWKDQWKHOHQJWKRIWKHODEHOEHLQJ
XVHG
Zebra XiIIIPlus™ Printers User’s Guide
81
(UURU&RQGLWLRQ³+HDG2SHQ
3UREOHP
7KHSULQWKHDGLVQRWIXOO\FORVHG
6ROXWLRQ
&ORVHWKHSULQWKHDG
(UURU&RQGLWLRQ³+HDG(OHPHQW%DG
3UREOHP
6ROXWLRQ
2QHRUPRUHRIWKHSULQWKHDGHOHPHQWVKDV
,IWKHIDLOHGHOHPHQWVLPSDFW\RXUSULQWLQJDSSOLFDWLRQ
IDLOHGWKHSULQWKHDGHOHPHQWWHVW
UHSODFHWKHSULQWKHDG7RRYHUULGHWKLVHUURUGLVDEOHWKH
KHDGWHVWFRXQWIHDWXUHRQWKHIURQWSDQHOE\GHIDXOWLQJWKH
YDOXHWR³´6HHSDJH :DUQLQJ³5LEERQ,Q
3UREOHP
6ROXWLRQ
5HPRYHWKHULEERQDQGVHWWKHSULQWHUWRGLUHFWWKHUPDO
PRGH
7KHULEERQLVORDGHG
(QVXUHWKDWWKHSULQWHUGULYHUDQGRUVRIWZDUHVHWWLQJVDUH
FRUUHFWO\VHWLIDSSOLFDEOH
:DUQLQJ³+HDG7RR+RW
3UREOHP
6ROXWLRQ
$OORZWKHSULQWHUWRFRRO3ULQWLQJDXWRPDWLFDOO\UHVXPHV
7KHSULQWKHDGLVRYHUWHPSHUDWXUH
ZKHQWKHSULQWKHDGHOHPHQWVFRROWRDQDFFHSWDEOH
RSHUDWLQJWHPSHUDWXUH
:DUQLQJ³&OHDQ+HDG1RZ
3UREOHP
7KHSULQWKHDGUHTXLUHVFOHDQLQJ
6ROXWLRQ
6HHSDJH DQGFOHDQWKHSULQWKHDG
127(
,IWKHZDUQLQJGRHVQRWJRDZD\DIWHUWKHSULQWKHDG
LVFOHDQHGRSHQWKHSULQWKHDGDQGWKHQFORVHLW
82
Zebra XiIIIPlus™ Printers User’s Guide
:DUQLQJ³+HDG&ROG
3UREOHP
6ROXWLRQ
&RQWLQXHSULQWLQJZKLOHWKHSULQWKHDGUHDFKHVWKHFRUUHFW
7KHSULQWKHDGLVXQGHUWHPSHUDWXUH
RSHUDWLQJWHPSHUDWXUH,IWKHHUURUUHPDLQVWKH
HQYLURQPHQWPD\EHWRRFROGIRUSURSHUSULQWLQJ5HORFDWH
WKHSULQWHUWRDZDUPHUDUHD
:$51,1* 7KHSULQWKHDGFDQEHYHU\KRWDQGFDQFDXVH
3ULQWKHDGGDWDFDEOHLVQRWSURSHUO\
FRQQHFWHG
VHYHUHEXUQV$OORZWKHSULQWKHDGWRFRRO
'LVFRQQHFWDQGUHFRQQHFWGDWDFDEOHWRWKHSULQWKHDG
(QVXUHWKDWWKHFDEOHFRQQHFWRULVIXOO\LQVHUWHGLQWRWKH
SULQWKHDGFRQQHFWRU
:DUQLQJ³&XWWHU-DPPHG
3UREOHP
&XWWHUEODGHLVLQWKHPHGLDSDWK
6ROXWLRQ
7XUQRIIWKHSULQWHUSRZHUDQGXQSOXJWKHSULQWHU,QVSHFW
WKHFXWWHUPRGXOHIRUGHEULVDQGFOHDQDVQHHGHGIROORZLQJ
WKHFOHDQLQJLQVWUXFWLRQVRQSDJH 2XWRI0HPRU\
3UREOHP
6ROXWLRQ
6KXWRIISULQWHUWRFOHDUPHPRU\DQGWU\WRSULQWDJDLQ
,IWKHHUURUUHFXUVWKHUHLVLQVXIILFLHQWPHPRU\IRUWKHODEHO
7KHUHLVQRWHQRXJKPHPRU\WRSHUIRUPWKH
OHQJWKGRZQORDGHGIRQWVJUDSKLFVDQGLPDJHV
IXQFWLRQVKRZQRQWKHVHFRQGOLQHRIWKHHUURU (QVXUHWKDWWKHGHYLFHVXFKDV)ODVKPHPRU\RU3&0&,$
PHVVDJH
FDUGLVLQVWDOOHGDQGQRWZULWHSURWHFWHGRUIXOO
(QVXUHWKDWWKHGDWDLVQRWGLUHFWHGWRDGHYLFHWKDWLVQRW
LQVWDOOHGRUDYDLODEOH
Zebra XiIIIPlus™ Printers User’s Guide
83
3ULQW4XDOLW\3UREOHPV
*HQHUDO3ULQW4XDOLW\,VVXHV
3UREOHP
<RXDUHXVLQJDQLQFRUUHFWPHGLDDQGULEERQ
6ROXWLRQ
&RQVXOW\RXUDXWKRUL]HG=HEUDUHVHOOHUGLVWULEXWRUIRU
FRPELQDWLRQIRU\RXUDSSOLFDWLRQ
LQIRUPDWLRQDQGDGYLFH
7KHSULQWHULVVHWDWWKHLQFRUUHFWSULQWVSHHG
)RURSWLPDOSULQWTXDOLW\VHWWKHSULQWVSHHGWRWKHORZHVW
SRVVLEOHVHWWLQJYLD=3/,,WKHGULYHURUWKHVRIWZDUH
7KHSULQWHULVVHWDWWKHLQFRUUHFWGDUNQHVV
)RURSWLPDOSULQWTXDOLW\VHWWKHGDUNQHVVWRWKHORZHVW
OHYHO
SRVVLEOHVHWWLQJYLDWKHIURQWSDQHOWKHGULYHURUWKH
7KHSULQWKHDGLVGLUW\
&OHDQWKHSULQWKHDGDFFRUGLQJWRWKHLQVWUXFWLRQVRQ
VRIWZDUH
SDJH 7KHUHLVOLJKWSULQWLQJRUQRSULQWLQJRQWKH
OHIWRUULJKWVLGHRIWKHODEHO
RUWKHSULQWHG
7KHWRJJOHSUHVVXUHQHHGVWREHDGMXVWHG)ROORZWKH
SULQWKHDGSUHVVXUHDGMXVWPHQWLQVWUXFWLRQVRQSDJH LPDJHLVQRWVKDUS
*UD\OLQHVRQEODQNODEHOVZLWKQRFRQVLVWHQWSDWWHUQ
3UREOHP
7KHSULQWKHDGLVGLUW\
6ROXWLRQ
&OHDQWKHSULQWKHDGDFFRUGLQJWRWKHLQVWUXFWLRQVRQ
SDJH /LJKWFRQVLVWHQWYHUWLFDOOLQHVUXQQLQJWKURXJKDOORIWKHODEHOV
3UREOHP
7KHSULQWKHDGRUSODWHQUROOHULVGLUW\
6ROXWLRQ
&OHDQWKHSULQWKHDGSODWHQUROOHURUERWKDFFRUGLQJWRWKH
LQVWUXFWLRQVRQSDJH ,QWHUPLWWHQWFUHDVHVRQWKHOHIWDQGULJKWHGJHVRIWKHODEHOV
3UREOHP
6ROXWLRQ
7KHUHLVWRRPXFKWRJJOHSUHVVXUHRQWKH
5HGXFHWKHWRJJOHSUHVVXUH6HH³3ULQWKHDG3UHVVXUH
SULQWKHDG
$GMXVWPHQW´RQSDJH 84
Zebra XiIIIPlus™ Printers User’s Guide
:ULQNOHG5LEERQ
3UREOHP
6ROXWLRQ
7KHULEERQLVQRWORDGHGFRUUHFWO\
/RDGWKHULEERQFRUUHFWO\6HH³5LEERQ/RDGLQJ´RQ
7KHGDUNQHVVVHWWLQJLVLQFRUUHFW
6HWWKHGDUNQHVVWRWKHORZHVWSRVVLEOHVHWWLQJIRUJRRG
,QFRUUHFWSULQWKHDGSUHVVXUHRUEDODQFH
6HWWKHSUHVVXUHWRWKHPLQLPXPUHTXLUHGIRUJRRGSULQW
SDJH SULQWTXDOLW\6HH³'$5.1(66´RQSDJH TXDOLW\6HH³3ULQWKHDG3UHVVXUH$GMXVWPHQW´RQSDJH 7KHPHGLDLVQRWIHHGLQJFRUUHFWO\,WLV
0DNHVXUHWKDWWKHPHGLDJXLGHDQGPHGLDVXSSO\JXLGH
³ZDONLQJ´IURPVLGHWRVLGH
WRXFKWKHHGJHRIWKHPHGLD
$GMXVWWKHULEERQVWULSSODWH
&RPPXQLFDWLRQV
$ODEHOIRUPDWZDVVHQWWRWKHSULQWHUEXWQRWUHFRJQL]HG7KH
'$7$OLJKWGRHVQRWIODVK
3UREOHP
6ROXWLRQ
&KHFNWKHSULQWHUGULYHURUVRIWZDUHFRPPXQLFDWLRQV
VHWWLQJVLIDSSOLFDEOH
&KHFNWKHSULQWHUKRVWSRUWVHWWLQJYLDWKHIURQWSDQHOVHH
SDJH 6HOHFWWKHSRUWWKDWPDWFKHVWKHRQHEHLQJXVHG
7KHFRPPXQLFDWLRQSDUDPHWHUVDUH
LQFRUUHFW
E\WKHKRVW
(QVXUH\RXDUHXVLQJWKHFRUUHFWFRPPXQLFDWLRQFDEOH
6HHSDJH IRUWKHUHTXLUHPHQWV
8VLQJWKHIURQWSDQHOFRQWUROVFKHFNWKHSURWRFROVHWWLQJ,W
VKRXOGEHVHWWR³QRQH´6HHSDJH (QVXUHWKDWWKHFRUUHFWGULYHULVEHLQJXVHGLIDSSOLFDEOH
Zebra XiIIIPlus™ Printers User’s Guide
85
$ODEHOIRUPDWZDVVHQWWRWKHSULQWHU6HYHUDOODEHOVSULQWWKHQ
WKHSULQWHUVNLSVPLVSODFHVPLVVHVRUGLVWRUWVWKHLPDJHRQWKH
ODEHO
3UREOHP
6ROXWLRQ
7KHKRVWLVVHWWR(33SDUDOOHO
&KDQJHWKHVHWWLQJVRQWKHFRPSXWHUKRVWWRVWDQGDUG
FRPPXQLFDWLRQV
SDUDOOHOFRPPXQLFDWLRQV
(QVXUHWKDWWKHIORZFRQWUROVHWWLQJVPDWFK
&KHFNWKHFRPPXQLFDWLRQFDEOHOHQJWK6HHSDJH IRU
7KHVHULDOFRPPXQLFDWLRQVHWWLQJVDUH
LQFRUUHFW
UHTXLUHPHQWV
&KHFNWKHSULQWHUGULYHURUVRIWZDUHFRPPXQLFDWLRQV
VHWWLQJVLIDSSOLFDEOH
$ODEHOIRUPDWZDVVHQWWRWKHSULQWHUEXWQRWUHFRJQL]HG7KH
'$7$OLJKWIODVKHVEXWQRSULQWLQJRFFXUV
3UREOHP
6ROXWLRQ
7KHSUHIL[DQGGHOLPLWHUFKDUDFWHUVVHWLQWKH 9HULI\WKHSUHIL[DQGGHOLPLWHUFKDUDFWHUV6HHSDJH SULQWHUGRQRWPDWFKWKHRQHVLQWKHODEHO
IRUPDW
(QVXUHWKDW=3/LVEHLQJXVHG
,QFRUUHFWGDWDLVEHLQJVHQWWRWKHSULQWHU
&KHFNWKHFRPPXQLFDWLRQVHWWLQJVRQWKHFRPSXWHU
(QVXUHWKDWWKH\PDWFKWKHSULQWHUVHWWLQJV
7KHSULQWHUIDLOVWRFDOLEUDWHRUGHWHFWWKHWRSRIWKHODEHO
3UREOHP
7KHSULQWHUZDVQRWFDOLEUDWHGIRUWKHODEHO
6ROXWLRQ
3HUIRUPWKHFDOLEUDWLRQSURFHGXUHRQSDJH EHLQJXVHG
7KHSULQWHULVFRQILJXUHGIRUFRQWLQXRXV
6HWWKHPHGLDW\SHWRQRQFRQWLQXRXVPHGLD
PHGLD
7KHGULYHURUVRIWZDUHFRQILJXUDWLRQLVQRWVHW $VGULYHURUVRIWZDUHVHWWLQJVSURGXFH=3/FRPPDQGVWKDW
FRUUHFWO\
FDQRYHUZULWHWKHSULQWHUFRQILJXUDWLRQFKHFNWKHGULYHURU
VRIWZDUHPHGLDUHODWHGVHWWLQJ
86
Zebra XiIIIPlus™ Printers User’s Guide
3ULQWHU'LDJQRVWLFV
3RZHU2Q6HOI7HVW
A limited Power-On Self Test (POST) is performed automatically each
time the printer is turned on (additional self tests can be performed by
pressing the CANCEL and CALIBRATE keys when you turn the printer
on). During either test sequence, the front panel LEDs illuminate and the
LCD monitors the progress of the POST. If the printer fails any of these
tests, the word “FAILED” is added to the LCD. If this occurs, notify an
authorized Zebra reseller.
$GGLWLRQDO3ULQWHU6HOI7HVWV
These self tests produce sample printouts and provide specific information
that help determine the operating conditions for the printer.
Each self test is enabled by pressing a specific front panel key or
combination of keys while turning the POWER switch on. Keep the
key(s) depressed until the DATA light turns off. When the POST is
complete, the selected self test starts automatically.
NOTES: When performing self tests, avoid sending a label format
to the printer. In the case of a remote host, ensure that the printer is
off and disconnect all data interface cables from the printer.
When canceling a self test prior to its actual completion, always
turn the printer power off and then back on to reset the printer.
When performing these self tests while in the Peel-Off mode, you
must remove the labels as they become available.
If your media is not wide enough or long enough, unexpected
and/or undesired results may occur. Make sure that your print
width is set correctly for the media you are using before you run any
self tests, otherwise the test may print out on the platen roller. See
page 49 for information on setting the print width.
Zebra XiIIIPlus™ Printers User’s Guide
87
CANCEL Key Self Test
This self test prints a listing of the
configuration parameters currently
stored in the printer’s memory.
See Figure 36 (depending on the
options ordered, your label may
look different).
1. Turn the printer off.
2. Press and hold the CANCEL
key while turning on the
power.
The configuration may be changed
either temporarily (for specific
label formats or ribbon and label
stock) or permanently (by saving
the new parameters in memory).
Saving new parameters occurs
whenever a calibration procedure
is performed. Refer to page 15 for
further information about the
configuration procedure.
Additional Power-Up Self Tests
are also performed during the
POST for this test.
Figure 36. Configuration Label
88
Zebra XiIIIPlus™ Printers User’s Guide
PAUSE Key Self Test
This self test can be used to provide the test labels required when making
adjustments to the printer’s mechanical assemblies. See the sample
printout in Figure 37.
1. Turn off the printer.
2. Press and hold the PAUSE key while turning on the power.
• The initial self test prints 15 labels at 2.4″/61 mm per second
(1″/25.4 mm per second for the 96XiIIIPlus), then automatically
pauses the printer. When the PAUSE key is pressed, an additional
15 labels print.
• While the printer is paused, pressing the CANCEL key alters the
self test. When the PAUSE key is pressed, the printer prints
15 labels at 6″/152 mm per second (4″/102 mm per second for the
96XiIIIPlus).
• While the printer is paused, pressing the CANCEL key again alters
the self test a second time. When the PAUSE key is pressed, the
printer prints 50 labels at 2.4″/61 mm per second (1″/25.4 mm per
second for the 96XiIIIPlus).
• While the printer is paused, pressing the CANCEL key again alters
the self test a third time. When the PAUSE key is pressed, the
printer prints 50 labels at 6″/152 mm per second (4″/102 mm per
second for the 96XiIIIPlus).
• While the printer is paused, pressing the CANCEL key again alters
the self test a fourth time. When the PAUSE key is pressed, the
printer prints 15 labels at the printer’s maximum speed.
• To exit this self test at any time, press and hold the CANCEL key.
Figure 37. Test Label
Zebra XiIIIPlus™ Printers User’s Guide
89
FEED Key Self Test
See Figure 38.
1. Turn off the printer.
2. Press and hold the FEED
key while turning on the
power.
This self test prints out at
various darkness settings
above and below that of the
darkness value shown on the
configuration label. Inspect
these labels and determine
which one has the best
darkness setting for your
application. This value can be
entered into the printer by
setting the darkness during the
configuration procedure (see
page 46 for more information).
Figure 38. Darkness Setting Label
The value printed on that label is added to (plus) or subtracted from
(minus) the darkness value specified on the configuration label. The
resulting numeric value (0 to 30) is the best darkness value for that specific
media/ribbon combination.
90
Zebra XiIIIPlus™ Printers User’s Guide
FEED Key and PAUSE Key Self Test
1. Turn off the printer.
2. Press and hold the FEED and PAUSE keys while turning on the power.
Performing this self test temporarily resets the printer configuration to the
factory default values. These values are active only until power is turned
off unless you save them permanently in memory.
Communications Diagnostics Test
This test is controlled from the front panel display. Refer to
“COMMUNICATIONS” on page 56. A typical printout from this test is
shown in Figure 39. Turn off the power to exit this self test.
NOTE: This label is inverted when printed.
Figure 39. Sample Communications Label
Additional Printer Diagnostics
Additional diagnostic tests are available for this printer, however, they are
beyond the scope of this User’s Guide. Refer to the Maintenance Manual
for information about these additional tests.
Zebra XiIIIPlus™ Printers User’s Guide
91
92
Zebra XiIIIPlus™ Printers User’s Guide
0®lYyYAÏÆ
NOTE: Printer specifications are subject to change without notice.
0HGLD+DQGOLQJ
• Tear-Off mode: Labels are produced in strips.
• Peel-Off mode: Labels are dispensed and peeled from the liner as
needed.
• Cutter mode: Labels are printed and individually cut.
• Rewind mode: Labels are rewound internally.
6WDQGDUG;L,,,3OXV)HDWXUHV
• Thermal transfer and direct thermal printing
• DRAM 16 MB
• USB 2.0 Port
• Real-time Clock
• Advanced Counter
Zebra XiIIIPlus™ Printers User’s Guide
93
2SWLRQV
&XWWHU
,%0WZLQD[LQWHUIDFH
5HZLQG
,%0FRD[LQWHUIDFH
&XWWHUUHZLQG
)RQWFDUGV
&XWWHUWUD\
3&0&,$PHPRU\FDUGV&RPSDFW)ODVKPHPRU\
0HGLDVXSSO\VSLQGOH PPFRUH
'RXEOHKLQJHGPHGLDGRRUZLWKFOHDUSDQHO
0HGLDVXSSO\VSLQGOH PPFRUH
=HEUD1HW
=HEUD1HW
FDUGV
″
″
:LQGRZVEDVHG:<6,:<*
%$521(
:LUHOHVV&DUG6RFNHW
3ULQW6HUYHU,,LQFOXGLQJ(WKHUQHW
RQVFUHHQODEHOGHVLJQDQGSULQWDSSOLFDWLRQ
LQWHUIDFH%DVH7=HEUD/LQN:HE9LHZ
VRIWZDUH
JUDSKLFDOVHWXSDQGSULQWHUFRQWURODQG=HEUD/LQN
$OHUWXQVROLFLWHGHUURUQRWLILFDWLRQ
3ULQWHUGULYHUVIRU:LQGRZVRSHUDWLQJV\VWHPV
=HEUD3URJUDPPLQJ/DQJXDJH=3/,,
'RZQORDGDEOHJUDSKLFVVFDODEOHDQGELWPDS
IRQWVDQGODEHOIRUPDWV
2EMHFWFRS\LQJEHWZHHQPHPRU\DUHDV
&RQWUROOHGYLDPDLQIUDPHPLQLFRPSXWHU3&
SRUWDEOHGDWDWHUPLQDO
3URJUDPPDEOHTXDQWLW\ZLWKSULQWSDXVHDQGFXW
5$0PHPRU\FDUGDQGLQWHUQDO)ODVK
FRQWURO
&RGH3DJHFKDUDFWHUVHW
&RPPXQLFDWHVLQSULQWDEOH$6&,,FKDUDFWHUV
$GMXVWDEOHSULQWFDFKH
(UURUFKHFNLQJSURWRFRO
'DWDFRPSUHVVLRQ
6WDWXVPHVVDJHWRKRVWXSRQUHTXHVW
$XWRPDWLFYLUWXDOLQSXWEXIIHUPDQDJHPHQW
6HULDOL]HGILHOGV
)RUPDWLQYHUVLRQ
,QVSHF2&5$DQG2&5%
0LUURULPDJHSULQWLQJ
83&($1
)RXUSRVLWLRQILHOGURWDWLRQ
8VHUSURJUDPPDEOHSDVVZRUG
6OHZFRPPDQG
94
Zebra XiIIIPlus™ Printers User’s Guide
%DU&RGHV
%DUFRGHUDWLRV²
,6%7
&RGDEDUVXSSRUWVUDWLRVRIXSWR
/2*0$56
&2'$%/2&.
0D[L&RGH
&RGH
0LFUR3')
&RGHVXSSRUWVUDWLRVRIXSWR
06,
&RGHGLPHQVLRQDOEDUFRGH
3')GLPHQVLRQDOEDUFRGH
&RGH
3OHVVH\
&KHFNGLJLWFDOFXODWLRQZKHUHDSSOLFDEOH
32671(7
'DWD0DWUL[
45&RGH
($1($1($1H[WHQVLRQV
6WDQGDUGRI
,QGXVWULDORI
83&$83&(83&H[WHQVLRQV
,QWHUOHDYHGRIVXSSRUWVUDWLRVRIXSWR
&RGHZLWKVXEVHWV$%DQG&DQG8&&FDVH
0RGXOXV&KHFN'LJLW
&FRGHV
*HQHUDO6SHFLILFDWLRQV
*HQHUDO6SHFLILFDWLRQV
+HLJKW
:LGWK
'HSWK
:HLJKWZLWKRXWRSWLRQV
*HQHUDODXWRDGMXVWLQJ
(OHFWULFDO
3RZHU
&RQVXPSWLRQ
&RPSOLDQFH
3ULQWLQJ
3$86(WHVW
ODEHODW
VORZHVW
VSHHG
3ULQWHULGOH
$JHQF\$SSURYDOV
7HPSHUDWXUH
2SHUDWLQJ
(QYLURQPHQW
6WRUDJH
5HODWLYH
+XPLGLW\
7KHUPDO
WUDQVIHU
'LUHFW
WKHUPDO
2SHUDWLQJ(QYLURQPHQW
6WRUDJH
;L,,,3OXV
″ PP
″ PP
″ PP
OE
NJ
±9$&
+]
;L,,,3OXV
″ PP
″ PP
″ PP
OE
NJ
±9$&
+]
;L,,,3OXV
″ PP
″ PP
″ PP
OE
NJ
±9$&
+]
;L,,,3OXV
″ PP
″ PP
″ PP
OE NJ
±9$&
+]
:
:
:
:
:
:
:
:
&RPSOLHVZLWK)&&FODVV³%´DQG&DQDGLDQ'RFFODVV³$´UXOHV
&DUULHVWKH&(PDUNRIFRPSOLDQFH
%L1DWLRQDO8/UGHGLWLRQ&6$&$1&6$&1RUGHGLWLRQ
,(&(1(1&ODVV%(1(1
&DQDGLDQ,&(6&ODVV%)&&FODVV%$UJHQWLQD3KDVH
$XVWUDOLD$61=652&&16
WR)
WR&
WR)
WR&
±WR)
±WR&
WRQRQFRQGHQVLQJ
WRQRQFRQGHQVLQJ
Zebra XiIIIPlus™ Printers User’s Guide
95
3ULQWLQJ6SHFLILFDWLRQV
3ULQWLQJ6SHFLILFDWLRQV
5HVROXWLRQ
;L,,,3OXV
GRWVLQFK
GRWVPP
″î
'RWVL]HZLGWKîOHQJWK
″
PPî
PP
)LUVWGRWORFDWLRQPHDVXUHGIURPLQVLGH ″″
PHGLDHGJH
PP
PP
0D[LPXPSULQWZLGWK
″PP
6HOHFWDEOH3ULQW6SHHGV
LQFKHVSHUVHFRQG
:LWKVWDQGDUG ″PP
1RQ
0%
FRQWLQXRXV PHPRU\
SULQWLQJ
:LWK0%
″PP
PHPRU\
3ULQWOHQJWK
H[SDQVLRQ
PD[LPXP
:LWKVWDQGDUG ″PP
0%
&RQWLQXRXV PHPRU\
SULQWLQJ
:LWK0% ″PP
PHPRU\
H[SDQVLRQ
%DUFRGH /DGGHUURWDWHGRULHQWDWLRQ PLOWRPLO
PRGXOXV 3LFNHWIHQFHQRQURWDWHG PLOWRPLO
³;´
GLPHQVLRQ RULHQWDWLRQ
<HV
7KLQILOPSULQWKHDGZLWK(OHPHQW(QHUJ\
(TXDOL]HU(
;L,,,3OXV ;L,,,3OXV ;L,,,3OXV ;L,,,3OXV
GRWVLQFK GRWVLQFK GRWVLQFK GRWVLQFK
GRWVPP
GRWVPP
GRWVPP
GRWVPP
″î
″î
″î
″î
″
″
″
″
PPî
PPî
PPî PPî
PP
PP
PP
PP
″ð ″″ ″″ ″″
PP
PP
PP
PP
PP
PP
PP
PP
″PP
″PP
″PP
″PP
″PP
″PP
″PP
″PP
″PP
″PP
″PP
″PP
″PP
″PP
″PP
″PP
″PP
″PP
″PP
″PP
PLOWRPLO
PLOWRPLO
PLOWRPLO
PLOWRPLO
PLOWRPLO
PLOWRPLO
PLOWRPLO
PLOWRPLO
<HV
<HV
<HV
<HV
5LEERQ6SHFLILFDWLRQV
5LEERQ6SHFLILFDWLRQV
5LEERQPXVWEHZRXQGZLWKWKHFRDWHGVLGHRXW
5LEERQZLGWK
0LQLPXP
0D[LPXP
=HEUDUHFRPPHQGVXVLQJ
ULEERQDWOHDVWDVZLGHDVWKHPHGLDWR
SURWHFWWKHSULQWKHDGIURPZHDU
6WDQGDUG PHGLDWRULEERQUROOUDWLR
OHQJWKV PHGLDWRULEERQUROOUDWLR
5LEERQFRUHLQVLGHGLDPHWHU
0D[LPXPULEERQUROORXWVLGHGLDPHWHU
96
;L,,,3OXV ;L,,,3OXV ;L,,,3OXV ;L,,,3OXV
;L,,,3OXV
″PP
″PP
″PP
″PP
″PP
″PP
″PP
″PP
′P
′P
″PP
″PP
′P
′P
″PP
″PP
′P
′P
″PP
″PP
′P
′P
″PP
″PP
Zebra XiIIIPlus™ Printers User’s Guide
0HGLD6SHFLILFDWLRQV
0HGLD6SHFLILFDWLRQV
;L,,,3OXV ;L,,,3OXV ;L,,,3OXV ;L,,,3OXV
;L,,,3OXV
7HDURII
″PP
″PP
″PP
″PP
3HHORII
″PP
″PP
″PP
″PP
0LQLPXPODEHOOHQJWK
&XWWHU
″PP
″PP
″PP
″PP
5HZLQG
″PP
″PP
″PP
″PP
0LQLPXP
″PP
″PP
″PP
″PP
7RWDOPHGLDZLGWKODEHOOLQHULIDQ\
0D[LPXP
PP
PP
PP
PP
PP
PP
PP
PP
0LQLPXP
″
″
″
″
PP
PP
PP
PP
7RWDOWKLFNQHVVLQFOXGHVOLQHULIDQ\
0D[LPXP
″
″
″
″
PP
PP
PP
PP
&XWWHUPD[LPXPIXOOZLGWKPHGLDWKLFNQHVV
″PP ″PP ″PP ″PP
5ROOPHGLDFRUHLQVLGHGLDPHWHU
″PP
″PP
″PP
″PP
0D[LPXPUROOGLDPHWHU
″PP
″PP
″PP
″PP
0LQLPXP
″PP
″PP
″PP
″PP
3UHIHUUHG
″PP
″PP
″PP
″PP
,QWHUODEHOJDS
0D[LPXP
0D[LPXPLQWHUODEHOJDS îODEHOOHQJWKIRUZKLFK\RXKDYHFDOLEUDWHGWKHSULQWHU″
0D[LPXPLQWHUQDOIDQIROGPHGLDSDFNVL]HODEHOOLQHU ″î″î″ ″î″î″ ″[″[″ ″[″[″
/î:î+
PPî
PPî
PPî
PPî
PPî
PPî
PPî
PPî
PP
PP
PP
PP
7LFNHWWDJVHQVLQJQRWFK/î:
″î″ ″î″ ″î″ ″î″
PPîPP PPîPP PPîPP PPîPP
7LFNHWWDJVHQVLQJKROHGLDPHWHU
″PP
″PP
″PP
″PP
9HUWLFDO
″
″
″
″
(IIHFWLYHOHDGLQJHGJHUHJLVWUDWLRQ
PP
PP
PP
PP
DFFXUDF\
+RUL]RQWDO
″
″
″
″
PP
PP
PP
PP
0DUNOHQJWK
0LQLPXP
″PP
″PP
″PP
″PP
PHDVXULQJSDUDOOHO 0D[LPXP
″PP
″PP
″PP
″PP
WRODEHOWDJHGJH
0DUNZLGWK
0LQLPXP
″PP
PP
″PP
″PP
PHDVXULQJWR
0D[LPXP
)XOOPHGLDZLGWK )XOOPHGLDZLGWK )XOOPHGLDZLGWK )XOOPHGLDZLGWK
SHUSHQGLFXODU
$GGLWLRQDO
ODEHOWDJHGJH
VSHFLILFDWLRQVIRU
0DUNVPXVWEHORFDWHGZLWKLQ″PPRIWKHLQVLGHPHGLDHGJH
EODFNPDUNVHQVLQJ 0DUNORFDWLRQ
!2SWLFDO
!2SWLFDO
!2SWLFDO
!2SWLFDO
0DUNGHQVLW\
'HQVLW\8QLW
'HQVLW\8QLW
'HQVLW\8QLW
'HQVLW\8QLW
2'8
2'8
2'8
2'8
0D[LPXPGHQVLW\RIWKHEDFNRIWKH
2'8
2'8
2'8
2'8
PHGLDRQZKLFKWKHEODFNPDUNLV
SULQWHG
0HGLDUHJLVWUDWLRQDQGPLQLPXPODEHOOHQJWKDUHDIIHFWHGE\PHGLDW\SHDQGZLGWKULEERQW\SHSULQWVSHHGDQGSULQWHUPRGHRIRSHUDWLRQ
3HUIRUPDQFHLPSURYHVDVWKHVHIDFWRUVDUHRSWLPL]HG=HEUDUHFRPPHQGVDOZD\VTXDOLI\LQJDQ\DSSOLFDWLRQZLWKWKRURXJKWHVWLQJ
Zebra XiIIIPlus™ Printers User’s Guide
97
3RZHU&RUG6SHFLILFDWLRQV
• The overall length must be less than 9.8′ (3.0 m).
• It must be rated for at least 5 A, 250 V.
• The chassis ground (earth) MUST be connected to ensure safety and
reduce electromagnetic interference. The ground connection is handled
by the third wire (earth) in the power cord. See Figure 40.
• The AC power plug and IEC 320 connector must bear the certification
mark of at least one of the known international safety organizations
shown in Figure 41.
Figure 40. AC Power Cord
Figure 41. International Safety Organizations Symbols
98
Zebra XiIIIPlus™ Printers User’s Guide
®®lcà
3ULQWHU,QWHUIDFH7HFKQLFDO,QIRUPDWLRQ
566HULDO'DWD3RUW
The connection for this standard interface is made through the female
DB-9 connector on the rear panel. A DB-9 to DB-25 interface module is
available for all RS-232 connections through a DB-25 cable (see page 102
for details).
For all RS-232 input and output signals, the printer follows both the
Electronics Industries Association’s (EIA) RS-232 specifications and the
Consultative Committee for International Telegraph and Telephone
(CCITT) V.24 standard signal level specifications.
Table 3 shows the pin configuration and function of the rear panel serial
data connector on the printer.
Table 3. Rear Panel Serial Data Connector Pin Configuration
3LQ1R
1DPH
'HVFULSWLRQ
²
5;'
7;'
'75
6*
'65
576
&76
9'&
1RWFRQQHFWHG
5HFHLYHGDWD²GDWDLQSXWWRSULQWHU
7UDQVPLWGDWD²GDWDRXWSXWIURPSULQWHU
'DWDWHUPLQDOUHDG\²RXWSXWIURPSULQWHU
6LJQDOJURXQG
'DWDVHWUHDG\²LQSXWWRSULQWHU
5HTXHVWWRVHQG²RXWSXWIURPSULQWHU
&OHDUWRVHQG²LQSXWWRSULQWHU
9'&VLJQDORXWSXW
127( 7KLVSLQLVDOVRDYDLODEOHDVD9'&SRZHUVRXUFHDW
P$7KHPD[LPXPFXUUHQWGUDZPD\EHOLPLWHGE\
RSWLRQFRQILJXUDWLRQ7RHQDEOHWKLVFDSDELOLW\DMXPSHU
RQWKHFRPSXWHU¶VPDLQORJLFERDUGQHHGVWREHLQVWDOOHG
RQ-3SLQVDQG
NOTE: An interface module is required for RS-422/RS-485
interface support (see page 103).
Zebra XiIIIPlus™ Printers User’s Guide
99
RS-232 Interface Connections
The printer is configured as Data Terminal Equipment (DTE).
Figure 42 illustrates the internal connections of the printer’s RS-232
connector.
Figure 42. RS-232 to DB-9 Connections
NOTE: The cable used to connect the printer to a computer must
be a null modem (crossover) cable. If you want to connect the
printer to any other DTE devices, a null modem cable must also be
used.
100
Zebra XiIIIPlus™ Printers User’s Guide
When the printer is connected via its RS-232 interface to Data
Communication Equipment (DCE) such as a modem, use a standard
RS-232 (straight-through) interface cable. Figure 43 illustrates the
connections required for this cable.
Figure 43. RS-232 Straight-Through Connections
Zebra XiIIIPlus™ Printers User’s Guide
101
RS-232 Interconnections Using a DB-25 Cable
In order to connect the printer’s DB-9 interface to a DB-25 connector, an
interface adapter is required (Zebra part # 33138). A generic DB-25
adapter may also be used, however, the +5VDC signal source would not be
passed through. Figure 44 illustrates the connections required for the
DB-9 to DB-25 interface.
Figure 44. DB-9 to DB-25 Connections
102
Zebra XiIIIPlus™ Printers User’s Guide
RS-422/RS-485 Interconnections
NOTE: A jumper on the computer’s main logic board needs to be
installed on JP1, Pins 2 and 3, in order for the RS-422/RS-485
interface adapter to function properly.
To connect the printer’s RS-232 DB-9 interface to a host computer through
an RS-422 or RS-485 interface, an interface adapter is required (Zebra
part # 33130). Figure 45 illustrates the required cable wiring for
interconnecting to the interface adapter’s DB-25 female connector.
Figure 45. RS-422/RS-485 Connections
Zebra XiIIIPlus™ Printers User’s Guide
103
3DUDOOHO'DWD3RUW
A standard 36-pin parallel connector is available at the rear of the printer
for connection to the data source. Under normal circumstances, data sent
from the printer to the host computer in response to a “Printer Status
Request” command is sent through the RS-232 serial port. However, if the
host computer has a properly configured IEEE-1284 parallel port that is
recognized by the printer, status information is returned through the
parallel port. Port selection for status information is determined each time
the printer is turned on.
Parallel Port Interconnections
Table 4 shows the pin configuration and function of a standard computerto-printer parallel cable.
Table 4. Parallel Port Pin Configuration
SLQ&RQQHFWRU
'HVFULSWLRQ
±
Q6WUREH+RVW&ON
'DWD%LWV±
Q$&.3WU&ON
%XV\3WU%XV\
3(UURU$&.'DWD5HT
6HOHFW;IODJ
Q$XWR)G+RVW%XV\
1RWXVHG
*URXQG
9#P$
127(7KHPD[LPXPFXUUHQWGUDZPD\EHOLPLWHGE\
RSWLRQFRQILJXUDWLRQ
*URXQG
QLQLW
Q)DXOW1'DWD$YDLO
1RWXVHG
9WKURXJKD.Ω5HVLVWRU
16HOHFWLQDFWLYH
±
104
Zebra XiIIIPlus™ Printers User’s Guide
0HPRU\&DUGV
3&0&,$&DUG
To install the Type I or Type II compliant PCMCIA card, refer to Figure 46
and perform the following procedure:
:$51,1*7KHSULQWHUHOHFWURQLFVDUHVXVFHSWLEOH
WRVWDWLFGLVFKDUJH%HIRUHSURFHHGLQJJURXQG
\RXUVHOIWRWKHSULQWHUWRUHPRYHDQ\H[LVWLQJVWDWLF
NOTE: The PCMCIA card is hot-swappable (it can be installed
while the printer is ON).
1. Remove the PCMCIA card shield from the rear of the printer.
2. Insert the PCMCIA card, with the notch UP, into the card slot as
shown. (Insert far enough to cause the eject button to pop out.)
3. Reinstall the PCMCIA card shield over the PCMCIA card and card
slot.
The printer is now ready to operate with the additional memory or font
option.
NOTE: Initialization of the PCMCIA card may take a few
minutes; the PAUSE LED flashes while the card initializes. If the
card is already initialized, the PAUSE LED flashes only once or
twice. To verify that the card has successfully initialized, print a
configuration label and review it to see if the new memory card
information is listed.
Figure 46. PCMCIA Card Installation
Zebra XiIIIPlus™ Printers User’s Guide
105
&RPSDFW)ODVK&DUG
To install the Type I compliant CompactFlash card, perform the following
procedure:
:$51,1*7KHSULQWHUHOHFWURQLFVDUHVXVFHSWLEOH
WRVWDWLFGLVFKDUJH%HIRUHSURFHHGLQJJURXQG
\RXUVHOIWRWKHSULQWHUWRUHPRYHDQ\H[LVWLQJVWDWLF
1. Turn the AC power OFF and disconnect the AC power cord from the
printer.
2. Refer to Figure 47. Remove the electronics cover by removing the
two screws located near the bottom. Lift the electronics cover at the
rear top corner as shown and pull the corner forward and up, then lift
the cover up and away from the printer.
Figure 47. Electronics Cover Removal
106
Zebra XiIIIPlus™ Printers User’s Guide
3. Refer to Figure 48. Insert the CompactFlash card into the card slot
located on the upper portion of the option board—the card can only be
inserted one way and should “snap” into place.
NOTE: The CompactFlash card should be inserted with the back
side of the card facing out.
4. Reinstall the electronics cover by lowering the cover so the lip goes
into the channel on the top of the printer (see Figure 47). Secure the
cover by reinstalling the two screws on the bottom of the cover.
5. Reconnect the printer AC power cord.
6. Press and hold the FEED key while turning the printer ON.
7. Verify the presence of additional memory or optional fonts by
checking the information on the configuration label printed during the
power-on sequence.
The printer is now ready to operate with the additional memory or font
option.
NOTE: Initialization of the CompactFlash card may take a few
minutes; if the process isn’t successfully completed within
10 minutes, contact Zebra Technical Support for assistance.
Figure 48. CompactFlash Card Installation
Zebra XiIIIPlus™ Printers User’s Guide
107
108
Zebra XiIIIPlus™ Printers User’s Guide
clà
A
Adjustments
Lower Media Sensor, 12
Printhead Pressure, 78
Toggle Positioning, 78
Upper Media Sensor, 11
Applicator Port Setting, 61
B
Backfeed Setting, 59
Bar Codes (Specifications), 95
Baud Setting, 54
Black Mark Sensor Positioning, 12
C
Cabling Requirements, 23
Calibration, 5–20
CANCEL Key Self Test, 88
Cleaning
Cutter Module, 76
Exterior, 68
Interior, 68
Printhead and Platen Roller, 68
Save-a-Printhead Film, 70–73
Schedule, 67
Sensors, 74
Snap Plate, 74
Communications (Troubleshooting), 85–86
Communications Diagnostics Test, 91
Communications Setting, 56
CompactFlash Card Installation, 106
Zebra XiIIIPlus™ Printers User’s Guide
Configuration
Calibration Sequence, 46–65
IP Network, 43
Password-Protected Parameters, 44
Printer, 15–16
Setup Mode, 43–45
Software or Printer Driver, 16
Continuous Media, 7
Control Prefix Setting, 57
D
Damage (Reporting), 2
Darkness Setting, 46
Data Bits Setting, 54
Data Ports
Parallel, 21, 104
Serial, 22, 99
USB (Cable), 22
Data Specifications, 21
Default Gateway Setting, 64
Delimiter Character Setting, 57
E
Early Warning Setting, 47
F
Fanfold Media Loading, 37
Features, Standard (Specifications), 93
FEED Key and PAUSE Key Self Test, 91
FEED Key Self Test, 90
Format Convert Setting, 63
Format Prefix Setting, 57
Front Panel
Display, 26
Keys, 27
Lights, 28
Fuse Replacement, 76
109
G
General Specifications, 95
H
Head Close Setting, 58
Head Resistor Value Setting, 60
Head Test Count Setting, 60
Host Handshake Setting, 55
I
Idle Display Setting, 63
Initialize Card Setting, 51
Initialize Flash Memory Setting, 51
Inspection, 2
Interconnections
Parallel Port, 104
RS-232, 100–101
RS-422/RS-485, 102
Interfaces
Printer, 99–104
System, 21
IP Network Configuration, 43
IP Settings
Address, 64
Protocols, 64
Resolution, 64
L
Label Liner Removal, 38
Label Top Setting, 59
Labels Per Roll Setting, 47
Language Setting, 65
LCD Adjust Setting, 63
LED Error Conditions and Warnings, 81–83
Left Position Setting, 59
List Settings
All, 50
Bar Codes, 50
Fonts, 50
Formats, 50
Images, 50
Setup, 50
Loading the Media, 9, 29–38
Loading the Ribbon, 13, 39
Lower Media Sensor Adjustment, 12
Lubrication, 76
110
M
Maximum Length Setting, 49
Media
Calibration, 17
Handling Specifications, 93
Requirements, 3
Specifications, 97
Media and Ribbon Calibrate Setting, 53
Media Loading
Cutter Mode, 36
Fanfold, 37
Peel-Off Mode, 30
Rewind Mode, 32, 34
Tear-Off Mode, 29
Media Power Up Setting, 58
Media Sensor Positioning
Black Mark Sensor, 12
Transmissive Sensor, 10
Media Type Setting, 48
Media Types
Continuous Media, 7
Non-Continuous Black Mark Media, 7
Non-Continuous Web Media, 6
Memory Card Installation
CompactFlash Card, 106
PCMCIA Card, 105
N
Network ID Setting, 56
Non-Continuous Black Mark Media, 7
Non-Continuous Web Media, 6
O
Operator Controls
Front Panel (Overview), 14
Front Panel Display, 26
Front Panel Keys, 27
Front Panel Lights, 28
POWER Switch, 14, 25
Options, 94
Zebra XiIIIPlus™ Printers User’s Guide
P
Parallel Communication Setting, 54
Parallel Data Port, 21, 104
Parallel Port Interconnections, 104
Parity Setting, 55
Password-Protected Parameters, 44
PAUSE Key Self Test, 89
PCMCIA Card Installation, 105
Power Cord
Overview, 3
Specifications, 98
POWER Switch, 25
Power-On Self Test, 87
Print Method Setting, 48
Print Mode Setting, 46
Print Modes, 8
Print Quality Problems, 84
Print Speed Setting, 46
Print Width Setting, 49
Printer
Anatomy Overview, 4
Configuration, 15–16, 46–65
Diagnostics, 87–91
Driver Configuration, 16
Printhead Pressure Adjustment, 78
Printing a Test Label, 19
Printing Specifications, 96
Protocol Setting, 55
R
Removal of Label Liner, 38
Reporting Damage, 2
Resynch Mode Setting, 62
Ribbon
Calibration, 17
Loading, 13, 39
Removal, 41
Requirements, 3
Specifications, 96
Ribbon Length Setting, 47
RS-232 Interconnections, 100–101
RS-422/RS-485 Interconnections, 103
RTC Settings
Date, 63
Time, 63
Zebra XiIIIPlus™ Printers User’s Guide
S
Save Changes Setting, 65
Save-a-Printhead Cleaning Film, 70–73
Self Tests
Additional Printer Self Tests, 87
CANCEL Key, 88
Communications Diagnostics Test, 91
FEED Key and PAUSE Key, 91
FEED Key, 90
PAUSE Key, 89
Power-On, 87
Sensor Profile Setting, 52
Sensor Type Setting, 48
Serial Communication Setting, 54
Serial Data Port, 22, 99–103
Setup Mode
Entering, 43
Leaving, 45
Software Configuration, 16
Specifications
Bar Codes, 95
General, 95
Media Handling, 93
Media, 97
Options, 93
Power Cord, 98
Printing, 96
Ribbon, 96
Standard Features, 93
ZPL Programming Language, 94
Start Print Signal Setting, 62
Storage, 2
Subnet Mask Setting, 64
System Interfaces, 21
T
Tear-Off Setting, 46
Test Label (Printing), 19
Toggle Positioning, 78
Transmissive Sensor Positioning, 10
Troubleshooting
Communications, 85–86
LED Error Conditions and Warnings, 81–83
Print Quality Problems, 84
Wrinkled Ribbon, 85
111
U
Unpacking, 2
Upper Media Sensor Adjustment, 11
USB Port (Cable), 22
V
Verifier Port Setting, 60
W
Wrinkled Ribbon, 85
Z
ZPL Mode Setting, 58
ZPL Programming Language (Specifications), 94
112
Zebra XiIIIPlus™ Printers User’s Guide
=HEUD7HFKQRORJLHV
Warranty Information
(IIHFWLYH1RYHPEHU
$OO=HEUDSURGXFWVDUHVROGZLWKZDUUDQWLHV)ROORZLQJLVVRPHJHQHUDO
LQIRUPDWLRQ
3ULQWHU3URGXFWV
3ULQWHUV$OOSULQWHUVH[FOXGLQJSULQWKHDGVDUHZDUUDQWHGDJDLQVWGHIHFWLQ
PDWHULDORUZRUNPDQVKLSIRUWZHOYHPRQWKVIURPWKHSXUFKDVHGDWH
3URRIRISXUFKDVHRUVKLSPHQWGDWHLVUHTXLUHGWRYDOLGDWHWKHZDUUDQW\SHULRG
7KHZDUUDQW\EHFRPHVYRLGLIWKHHTXLSPHQWLVPRGLILHGLPSURSHUO\LQVWDOOHG
RUXVHGGDPDJHGE\DFFLGHQWRUQHJOHFWRULIDQ\SDUWVDUHLPSURSHUO\
LQVWDOOHGRUUHSODFHGE\WKHXVHU
127(3URGXFWVUHWXUQHGPXVWEHSDFNDJHGLQWKHRULJLQDORUFRPSDUDEOH
SDFNLQJDQGVKLSSLQJFRQWDLQHU,QWKHHYHQWHTXLSPHQWLVQRWVRSDFNDJHGRU
LIVKLSSLQJGDPDJHLVHYLGHQWLWZLOOQRWEHDFFHSWHGIRUVHUYLFHXQGHU
ZDUUDQW\6XUIDFHWUDQVSRUWDWLRQFKDUJHVIRUUHWXUQWRFXVWRPHUVLQWKH
FRQWLQHQWDO8QLWHG6WDWHVLVSDLGE\=HEUD2WKHUZLVH=HEUDSD\V&37
FDUULDJHSDLGWRQHDUHVWDLUSRUWFXVWRPHUSD\VFXVWRPVGXWLHVWD[HVDQG
IUHLJKWIURPDLUSRUWWRGHVWLQDWLRQ,I=HEUDGHWHUPLQHVWKDWWKHSURGXFW
UHWXUQHGIRUZDUUDQW\VHUYLFHRUUHSODFHPHQWLVQRWGHIHFWLYHDVKHUHLQ
GHILQHGWKHFXVWRPHUZLOOSD\DOOKDQGOLQJDQGWUDQVSRUWDWLRQFRVWV
3ULQWKHDGV6LQFHSULQWKHDGZHDULVSDUWRIQRUPDORSHUDWLRQWKHRULJLQDO
SULQWKHDGLVFRYHUHGE\DOLPLWHGZDUUDQW\DVLQGLFDWHGEHORZ:DUUDQW\SHULRG
EHJLQVRQSXUFKDVHGDWH
3ULQWKHDG
%DUFRGHODEHOSULQWHUSULQWKHDGV
&DUGSULQWHUSULQWKHDGV
Warranty Information
:DUUDQW\3HULRG
PRQWKV
PRQWKV
1
7RTXDOLI\IRUWKLVZDUUDQW\WKHSULQWKHDGPXVWEHUHWXUQHGWRWKHIDFWRU\RUWR
DQDXWKRUL]HGVHUYLFHFHQWHU&XVWRPHUVDUHQRWUHTXLUHGWRSXUFKDVH=HEUD
VXSSOLHVPHGLDDQGRUULEERQVIRUZDUUDQW\TXDOLILFDWLRQ+RZHYHULILWLV
GHWHUPLQHGWKDWWKHXVHRIRWKHUPDQXIDFWXUHUVXSSOLHVKDVFDXVHGDQ\GHIHFW
LQWKHSULQWKHDGIRUZKLFKDZDUUDQW\FODLPLVPDGHWKHXVHULVUHVSRQVLEOHIRU
=HEUD·VODERUDQGPDWHULDOFKDUJHVUHTXLUHGWRUHSDLUWKHGHIHFW7KHZDUUDQW\
EHFRPHVYRLGLIWKHSULQWKHDGLVSK\VLFDOO\ZRUQRUGDPDJHGDOVRLILWLV
GHWHUPLQHGWKDWIDLOXUHWRIROORZWKHSUHYHQWLYHPDLQWHQDQFHVFKHGXOHOLVWHGLQ
WKH8VHU·V*XLGHKDVFDXVHGGHIHFWLQWKHWKHUPDOSULQWKHDGIRUZKLFKD
ZDUUDQW\FODLPLVPDGH
6RIWZDUH6RIWZDUHLVZDUUDQWHGWREHIUHHRIGHIHFWVLQPDWHULDODQG
ZRUNPDQVKLSIRUGD\VIURPWKHGDWHRISXUFKDVH,QWKHHYHQWRIQRWLILFDWLRQ
ZLWKLQWKHZDUUDQW\SHULRGRIGHIHFWV=HEUDZLOOUHSODFHWKHGHIHFWLYHGLVNHWWH
RUGRFXPHQWDWLRQ
%DWWHULHV0RELOHSULQWHUEDWWHULHVDUHZDUUDQWHGWREHIUHHRIGHIHFWVLQ
PDWHULDODQGZRUNPDQVKLSIRUGD\VIURPGDWHRISXUFKDVH,QWKHHYHQWRI
QRWLILFDWLRQZLWKLQWKHZDUUDQW\SHULRG=HEUDZLOOUHSODFHWKHGHIHFWLYHEDWWHU\
SURYLGHGWKHUHKDVQRWEHHQGDPDJHUHVXOWLQJIURPXVHUDEXVH
3DUWV$OOSDUWVPDLQWHQDQFHNLWVRSWLRQVNLWVDQGDFFHVVRULHVDUHZDUUDQWHG
WREHIUHHRIGHIHFWVLQPDWHULDODQGZRUNPDQVKLSIRUGD\VH[FHSWZKHUH
RWKHUZLVHQRWHGIURPGDWHRISXUFKDVH7KLVZDUUDQW\EHFRPHVYRLGLIWKH
LWHPLVPRGLILHGLPSURSHUO\LQVWDOOHGRUXVHGRUGDPDJHGE\DFFLGHQWRU
QHJOHFW
6XSSOLHV3URGXFWV
6XSSOLHVDUHZDUUDQWHGWREHIUHHIURPGHIHFWLQPDWHULDODQGZRUNPDQVKLSIRU
DSHULRGRIVL[PRQWKVIRUPHGLDDQGWZHOYHPRQWKVIRUULEERQIURP
WKHGDWHRIVKLSPHQWE\=HEUD7KLVLVSURYLGHGWKHXVHUKDVFRPSOLHGZLWK
VWRUDJHJXLGHOLQHVKDQGOLQJDQGXVDJHRIWKHVXSSOLHVLQ=HEUDSULQWHUV
=HEUD·VVROHREOLJDWLRQXQGHUWKHVHZDUUDQWLHVLVWRIXUQLVKSDUWVDQGODERUIRU
WKHUHSDLURUSRVVLEOHUHSODFHPHQWRISURGXFWVIRXQGWREHGHIHFWLYHLQ
PDWHULDORUZRUNPDQVKLSGXULQJWKHZDUUDQW\SHULRG=HEUDPD\LQLWV
GLVFUHWLRQLVVXHDFUHGLWIRUDQ\VXFKGHIHFWLYHSURGXFWVLQVXFKDPRXQWDVLW
GHHPVUHDVRQDEOH
2
Warranty Information
:DUUDQW\([FOXVLRQV&RQGLWLRQV6WDWHPHQW
7KHZDUUDQWLHVSURYLGHGDERYHDUHWKHRQO\ZDUUDQWLHVDSSOLFDEOH1RRWKHU
ZDUUDQWLHVH[SUHVVHGRULPSOLHGDUHJLYHQ=HEUDGRHVQRWPDNHDQ\,03/,('
:$55$17<2)0(5&+$17$%,/,7<25),71(66)25$3$57,&8/$5
385326(LQFRQQHFWLRQZLWKLWVVDOHRISURGXFWVRUVHUYLFHV:KLOH=HEUD·V
GHVLUHLVWREHUHVSRQVLYHWRVSHFLILFQHHGVDQGTXHVWLRQV=HEUDGRHVQRW
DVVXPHUHVSRQVLELOLW\IRUDQ\VSHFLILFDSSOLFDWLRQWRZKLFKDQ\SURGXFWVDUH
DSSOLHGLQFOXGLQJEXWQRWOLPLWHGWRFRPSDWLELOLW\ZLWKRWKHUHTXLSPHQW$OO
VWDWHPHQWVWHFKQLFDOLQIRUPDWLRQRUUHFRPPHQGDWLRQVUHODWLQJWR=HEUD
SURGXFWVDUHEDVHGXSRQWHVWVEHOLHYHGWREHUHOLDEOH\HWGRQRWFRQVWLWXWHD
JXDUDQW\RUZDUUDQW\
=HEUD·VPD[LPXPOLDELOLW\IRUZDUUDQW\FODLPVLVOLPLWHGWRWKHLQYRLFHSULFHRI
WKHSURGXFWFODLPHGGHIHFWLYH=HEUDGRHVQRWDVVXPHUHVSRQVLELOLW\IRUGHOD\V
RUUHSODFHPHQWRUUHSDLURISURGXFWV=HEUDVKDOOQRWXQGHUDQ\FLUFXPVWDQFHV
ZKDWVRHYHUEHOLDEOHWRDQ\SDUW\IRUORVVRISURILWVORVWGDWDGLPLQXWLRQRI
JRRGZLOORUDQ\RWKHUVSHFLDORUFRQVHTXHQWLDOGDPDJHVZKDWVRHYHUZLWK
UHVSHFWWRDQ\FODLPPDGHXQGHUDJUHHPHQWZLWK=HEUD6SHFLILFDOO\IRU
VRIWZDUH=HEUDLVQRWOLDEOHIRUDQ\LQFLGHQWDORUFRQVHTXHQWLDOGDPDJHV
FDXVHGE\DEXVHRUPLVDSSOLFDWLRQRIWKHVRIWZDUHRUE\LWVXVHLQYLRODWLRQRI
WKH86FRS\ULJKWODZRULQWHUQDWLRQDOWUHDW\
1RVDOHVSHUVRQUHSUHVHQWDWLYHRUDJHQWRI=HEUDLVDXWKRUL]HGWRPDNHDQ\
JXDUDQW\ZDUUDQW\RUUHSUHVHQWDWLRQWKDWFRQWUDGLFWVWKHIRUHJRLQJ$Q\
ZDLYHUDOWHUDWLRQDGGLWLRQRUPRGLILFDWLRQWRWKHIRUHJRLQJZDUUDQWLHVPXVWEH
LQZULWLQJDQGVLJQHGE\DQH[HFXWLYHRIILFHURI=HEUDWREHYDOLG
Warranty Information
3
4
Warranty Information
ZebraLink License Agreement
Printer Software and Firmware License Agreement
YOU SHOULD CAREFULLY READ THE FOLLOWING TERMS AND CONDITIONS OF THIS ZEBRA
TECHNOLOGIES PRINTER SOFTWARE AND FIRMWARE LICENSE AGREEMENT (“PSFLA”)
BEFORE USING THE PRINTER WHICH IS ENCLOSED OR OTHERWISE ASSOCIATED WITH THIS
AGREEMENT. IF YOU DO NOT AGREE WITH THESE TERMS AND CONDITIONS, DO NOT
OPERATE THE PRINTER AND PLEASE PROMPTLY RETURN THE PRINTER, ENCLOSURES AND
ALL PACKAGING FOR A FULL REFUND.
Zebra Technologies (“ZEBRA”) hereby grants you a non-exclusive, non-transferable license to use the
SOFTWARE and FIRMWARE embedded in the printer and the accompanying documentation according to the
following terms:
1.
The printer enclosed with or otherwise associated with this Agreement has or includes certain
SOFTWARE and FIRMWARE therein which is protected by copyright laws and international
copyright treaties, as well as other intellectual property laws and treaties. The SOFTWARE and
FIRMWARE is licensed, not sold. Such SOFTWARE and/or FIRMWARE may include, but is
not limited to, SOFTWARE and/or FIRMWARE that is licensed under one or more of the
following trademarks: ZPL (Zebra Programming Language), Zebralink, Web View, Web Alert,
ZBI (Zebra Basic Interpreter), BAR-ONE, ZTools, Utilities, ZebraNet View for IP, ZebraNet
Alert, PC Management Program, ZebraNet View for Networks and ZebraNet Connect.
2.
GRANT OF LICENSE. This License grants you the following rights:
• SOFTWARE and FIRMWARE. You may use, access, display, run, or otherwise interact with
(“RUN”) the SOFTWARE and FIRMWARE in connection with operating the printer which
is enclosed with or otherwise associated with this PSFLA (“PRINTER”). The primary user
of the PRINTER may make a second copy for his or her exclusive use on a portable
computer/printer.
• Storage/Network Use. You may also store or install a copy of the SOFTWARE and
FIRMWARE on a storage device, such as a network server, used only to RUN the
SOFTWARE and FIRMWARE on your other PRINTERS over an internal network;
however, you must acquire and dedicate a license for each separate PRINTER on which the
SOFTWARE and FIRMWARE is RUN from the storage device. A license for the
SOFTWARE and FIRMWARE may not be shared or used concurrently on different
PRINTERS.
•
Reservation of Rights. All rights not expressly granted are reserved by ZEBRA.
• Accessing Services Using the SOFTWARE and FIRMWARE. Your use of any service
accessible using the SOFTWARE and FIRMWARE is not covered by this PSFLA and may
be governed by separate terms of use, conditions or notices.
Printer Software and Firmware License Agreement
1
3.
RESTRICTIONS.
• You must maintain all copyright notices on all copies of the SOFTWARE and FIRMWARE.
• Limitations on modification. You may not modify, adapt, translate, or create derivative
works based on this SOFTWARE OR FIRMWARE or the accompanying documentation.
• Limitations of Reverse Engineering, Decompilation and Disassembly. You may not reverse
engineer, decompile, or disassemble the SOFTWARE or the FIRMWARE, except and only
to the extent that such activity is permitted by applicable law notwithstanding this limitation.
• Rental. You may not rent or lease or lend the SOFTWARE or FIRMWARE.
• Support Services. ZEBRA may provide you with support services related to the
SOFTWARE and/or FIRMWARE (“SUPPORT SERVICES”), in its discretion. Use of
SUPPORT SERVICES, if any, is governed by the ZEBRA policies and programs described
in the user manual, in “online” documentation, and/or other ZEBRA provided materials.
Any supplemental SOFTWARE or FIRMWARE code provided to you as a part of
SUPPORT SERVICES shall be considered part of the SOFTWARE and/or FIRMWARE and
is subject to the terms of this PSFLA. With respect to technical information you provide to
ZEBRA as part of the SUPPORT SERVICES, ZEBRA may use such information for its
business purposes, including for product support and development. ZEBRA will not utilize
such technical information in a form that personally identifies you except to the extent
necessary to provide you with support.
• Replacement, Modification and Upgrade of the SOFTWARE and/or FIRMWARE. ZEBRA
reserves the right to replace, modify or upgrade the SOFTWARE and/or FIRMWARE at any
time by offering you a replacement or modified version of the SOFTWARE and/or
FIRMWARE or such upgrade and to charge for such replacement, modification or upgrade.
Any such replacement or modified SOFTWARE and/or FIRMWARE code or upgrade to the
SOFTWARE and/or FIRMWARE offered to you by ZEBRA shall be considered part of the
SOFTWARE and/or FIRMWARE and subject to the terms of this PSFLA (unless this
PSFLA is superseded by a further PSFLA accompanying such replacement or modified
version of or upgrade to the SOFTWARE and/or FIRMWARE). In the event that ZEBRA
offers a replacement or modified version of or any upgrade to the SOFTWARE and/or
FIRMWARE, (a) your continued use of the SOFTWARE and/or FIRMWARE is conditioned
on your acceptance of such replacement or modified version of or upgrade to the
SOFTWARE and/or FIRMWARE and any accompanying superseding PSFLA and (b) in the
case of the replacement or modified SOFTWARE and/or FIRMWARE, your use of all prior
versions of the SOFTWARE and/or FIRMWARE is terminated.
2
4.
TERMINATION. Without prejudice to any other rights, ZEBRA may terminate this PSFLA if
you fail to comply with the terms and conditions of this PSFLA. ZEBRA may terminate this
PSFLA by offering you a superseding PSFLA for the SOFTWARE and/or FIRMWARE or any
replacement or modified version of or upgrade to the SOFTWARE and/or FIRMWARE and
conditioning your continued use of the SOFTWARE and/or FIRMWARE or such replacement,
modified or upgraded version on your acceptance of such superseding PSFLA. In addition,
ZEBRA may terminate this PSFLA by notifying you that your continued use of the
SOFTWARE and/or FIRMWARE is prohibited. In the event that ZEBRA terminates this
PSFLA, you must immediately stop using the SOFTWARE and/or FIRMWARE and destroy all
copies of the SOFTWARE and/or FIRMWARE and all of its component parts.
5.
COPYRIGHT. All title and copyrights in and to the SOFTWARE and FIRMWARE, the
accompanying printed materials, and any copies of the SOFTWARE and FIRMWARE, are
owned by ZEBRA or its suppliers. All title and intellectual property rights in and to the content
which may be accessed through use of the SOFTWARE and/or FIRMWARE is the property of
the respective content owner and may be protected by applicable copyright or other intellectual
property laws and treaties. This PSFLA grants you no rights to use such content. If this
SOFTWARE and/or FIRMWARE contains documentation which is provided only in electronic
form, you may print one copy of such electronic documentation. You may not copy the printed
materials accompanying the SOFTWARE and/or FIRMWARE.
Printer Software and Firmware License Agreement
6.
U.S. GOVERNMENT RESTRICTED RIGHTS. All SOFTWARE and/or FIRMWARE
provided to the U.S. Government pursuant to solicitations issued on or after December 1, 1995
is provided with the commercial rights and restrictions described elsewhere herein. All
SOFTWARE and/or FIRMWARE provided to the U.S. Government pursuant to solicitations
issued prior to December 1, 1995 is provided with RESTRICTED RIGHTS as provided for in
FAR, 48 CFR 52.227-14 (JUNE 1987) or DFAR, 48 CFR 252.227-7013 (OCT 1988), as
applicable.
7.
EXPORT RESTRICTIONS. You agree that you will not export or re-export the SOFTWARE
and/or FIRMWARE, any part thereof, or any process or service that is the direct product of the
SOFTWARE and/or FIRMWARE (the foregoing collectively referred to as the “RESTRICTED
COMPONENTS”), to any country, person or entity subject to U.S. export restrictions. You
specifically agree not to export or re-export any of the RESTRICTED COMPONENTS (i) to
any country to which the U.S. has embargoed or restricted the export of goods or services,
which currently include, but are not necessarily limited to Cuba, Iran, Iraq, Libya, North Korea,
Sudan and Syria, or to any national of any such country, wherever located, who intends to
transmit or transport the RESTRICTED COMPONENTS back to such country; (ii) to any
person or entity who you know or have reason to know will utilize the RESTRICTED
COMPONENTS in the design, development or production of nuclear, chemical or biological
weapons; or (iii) to any person or entity who has been prohibited from participating in U.S.
export transactions by any federal agency of the U.S. government. You warrant and represent
that neither the U.S. Commerce Department, Bureau of Export Administration nor any other
U.S. federal agency has suspended, revoked or denied your export privileges.
8.
DISCLAIMER OF WARRANTIES. ZEBRA AND ITS SUPPLIERS PROVIDE THE
SOFTWARE AND/OR FIRMWARE “AS IS” AND WITH ALL FAULTS, AND HEREBY
DISCLAIM ALL OTHER WARRANTIES AND CONDITIONS, EITHER EXPRESS,
IMPLIED OR STATUTORY, INCLUDING BUT NOT LIMITED TO ANY (IF ANY)
IMPLIED WARRANTIES OR CONDITIONS OF MERCHANTABILITY, OF FITNESS FOR
A PARTICULAR PURPOSE, OF LACK OF VIRUSES, AND OF LACK OF NEGLIGENCE
OR LACK OF WORKMANLIKE EFFORT. ALSO, THERE IS NO WARRANTY OR
CONDITION OF TITLE, OF QUIET ENJOYMENT, OR OF NONINFRINGEMENT. THE
ENTIRE RISK ARISING OUT OF THE USE OR PERFORMANCE OF THE SOFTWARE
AND FIRMWARE IS WITH YOU. ZEBRA DOES NOT WARRANT THAT THE
OPERATION OF THE SOFTWARE OR FIRMWARE WILL BE UNINTERRUPTED OR
ERROR FREE.
9.
EXCLUSION OF ALL DAMAGES. TO THE MAXIMUM EXTENT PERMITTED BY
APPLICABLE LAW, IN NO EVENT SHALL ZEBRA OR ITS SUPPLIERS BE LIABLE
FOR ANY CONSEQUENTIAL, INCIDENTAL, DIRECT, INDIRECT, SPECIAL,
PUNITIVE, OR OTHER DAMAGES WHATSOEVER (INCLUDING, WITHOUT
LIMITATION, DAMAGES FOR ANY INJURY TO PERSON OR PROPERTY, DAMAGES
FOR LOSS OF PROFITS, BUSINESS INTERRUPTION, LOSS OF BUSINESS
INFORMATION, FOR LOSS OF PRIVACY FOR FAILURE TO MEET ANY DUTY
INCLUDING OF GOOD FAITH OR OF REASONABLE CARE, FOR NEGLIGENCE, AND
FOR ANY PECUNIARY OR OTHER LOSS WHATSOEVER) ARISING OUT OF OR IN
ANY WAY RELATED TO THE USE OF OR INABILITY TO USE THE SOFTWARE OR
FIRMWARE, WHETHER BASED ON CONTRACT, TORT, NEGLIGENCE, STRICT
LIABILITY OR OTHERWISE, EVEN IF ZEBRA OR ANY SUPPLIER HAS BEEN
ADVISED OF THE POSSIBILITY OF SUCH DAMAGES. THIS EXCLUSION OF
DAMAGES SHALL BE EFFECTIVE EVEN IF ANY REMEDY FAILS OF ITS ESSENTIAL
PURPOSE.
Printer Software and Firmware License Agreement
3
10. LIMITATIONS AND RELEASE OF LIABILITY.
• To the extent that the SOFTWARE and/or FIRMWARE covered by this PSFLA includes
emulation libraries, emulation libraries are offered “as is”. ZEBRA does not provide any
warranty associated with the emulation libraries.
• The emulation library does not work 100% correctly or cover 100% of the functionality of
the printer language being emulated. Modifications may be required for each target
application. If such modification is necessary, prior to making any such modification, you
are required to contact ZEBRA to obtain express written consent to make such modification.
• If the emulation library is sold separately by an authorized party other than ZEBRA
(“RESELLER”—A party other than ZEBRA which is authorized by ZEBRA to distribute
the SOFTWARE and/or FIRMWARE with its application so long as the SOFTWARE and/or
FIRMWARE is used with a ZEBRA printer) or is sold bundled with a printer to an end-user
by a RESELLER, and if claims are made by the RESELLER that the emulation library
performs as a 100% emulation solution, ZEBRA is not responsible if the emulation library
does not work as advertised by the RESELLER. Furthermore, ZEBRA is not liable for any
damages directly or indirectly relating to such emulation library which is sold separately by
the RESELLER or which is sold bundled with a printer to an end-user by the RESELLER.
• The SOFTWARE and FIRMWARE was provided to you at no additional charge and
ZEBRA has included in this PSFLA terms that disclaim all warranties and liability for the
SOFTWARE and FIRMWARE. To the full extent allowed by law, YOU HEREBY
RELEASE ZEBRA AND ITS SUPPLIERS FROM ANY AND ALL LIABILITY
ARISING FROM OR RELATED TO ALL CLAIMS CONCERNING THE SOFTWARE
AND/OR FIRMWARE OR ITS USE. If you do not wish to accept the SOFTWARE OR
FIRMWARE under the terms of this PSFLA, do not use the PRINTER enclosed with or
otherwise associated with this PSFLA.
11. GOVERNING LAW. If you acquired the SOFTWARE and/or FIRMWARE in the United States
of America, the laws of the State of Illinois, U.S.A. will apply to this contract. If you acquired
this SOFTWARE and/or FIRMWARE outside of the United States of America, then local law
may apply. If any provision of this PSFLA is held invalid, the remainder of this PSFLA shall
continue in full force and effect.
12. QUESTIONS. Should you have any questions, or if you desire to contact ZEBRA for any
reason, please contact the ZEBRA subsidiary serving your country, or write:
Zebra Technologies
333 Corporate Woods Parkway
Vernon Hills, IL 60061
4
Printer Software and Firmware License Agreement