1
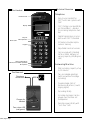
HomeHandy Pìco voice
Operating instructions
GAP
Technical Overview
The Handset
Telephone
Receiver Inset
Display
Keys for
menu operation
-
Easy to use Handset for
DECT units and systems with
GAP
-
CLIP (Calling Line Identification Presentation) - displays
the incoming telephone number
-
Digital transmission in accordance with DECT standard
-
21 Name & Number alphanumeric memory
-
Adjustable hand-set volume
-
Can be used with standard
NiCd or NiMH batteries of
varying capacity (AA/Mignon
size)
Menu-/ON
Keypad
Short-code dialling/
internal/ last number repetition
Microphone
/OFF-/Signal keys
Answering Machine
-
Total recording capacity of up
to 15 minutes
-
Two recordable greetings
(with and without message
recording)
-
Programmable start of
Answering Machine (counts
ringing signal)
-
Recording facility
-
Incoming messages can be
played over the base-set
loudspeaker
-
Remote enquiry facility with
"cost-free" calls
The Base set
Telephone
connection
Charger for
handset
Two-colour LED
(red/green)
Table of Contents
1
1
1.1
1.2
1.3
1.4
1.5
1.6
Getting to know and connecting your HomeHandy
Some technical information
Preparing to use
Charging and handling batteries
Fitting and changing batteries
Some settings values on delivery
Setting up Answering Machine for immediate use
3
3
4
5
6
6
7
2
2.1
2.2
2.3
2.4
2.5
2.6
General Operation
General operation
Operating guide
Entering names and text
Display indicators - stand-by mode
Display indicators - Powered-up: ready to dial
Display indicators - Powered-up: prepare to dial
9
9
10
11
13
13
14
3
3.1
3.2
3.3
3.4
3.5
Basic Functions: Telephoning
Switching on and dialling (external call)
Dialling with block-dial (external call)
Switching on and dialling (internal call)
Ending your call
Accepting calls (incoming calls)
15
15
15
16
16
16
4
4.1
4.2
4.3
4.4
4.5
4.6
4.7
4.8
4.9
4.10
4.11
4.12
4.13
4.14
4.15
4.16
4.17
4.18
4.19
4.20
4.21
4.22
4.23
4.24
Extra Features
Last number redial - History function
Short-codes - general
Storing names and numbers
SOS Emergency numbers
Erasing short-code memory
Dialling in short-code
Emergency numbers - deleting
Mute
Switching on/off the mobile unit
Temporary shut-down of the mobile unit
Switching on the keypad
Switching off the keypad
Activating the disabling function/changing PIN
Telephoning with lock enabled
Deactivating the disabling facility
Call duration display
Temporarily changing the dialling mode
Changing the PIN
CLIP (Calling Line Identification Presentation)
Switching on/off the CLIP facility
Displaying and selecting new number from the call list (CLIP)
Selecting from the complete call list (CLIP)
Deleting numbers from the call list (CLIP)
Deleting all answered numbers from the call list (CLIP)
18
18
19
19
20
21
22
23
23
24
24
24
24
25
25
26
26
26
27
28
28
29
30
31
32
2
Table of Contents
5
5.1
5.2
5.3
5.4
5.5
5.6
5.7
5.8
5.9
5.10
5.11
5.12
5.13
5.14
The Answering Machine
General notes on the Answering Machine
Selecting Answering Machine features
Recording your greeting
Switching on the Answering Machine/checking the greeting
Playing back recorded messages
Recording telephone conversations
Deleting messages
Listening to incoming messages
Setting the start position of the Answering Machine
Setting the date and time
Automatic time update (CLIP)
Setting up remote operation and remote query
Using remote operation and remote query
Free-phone remote query
33
33
33
34
35
35
37
37
39
39
39
41
42
42
43
6
6.1
6.2
6.3
6.4
6.5
6.6
Settings/Programming
Switching on/off key click
Setting the Handset ringing type
Setting the base-set ringing type
Increasing the volume in the handset
Re-setting the handset volume to default value
Setting the dialling mode and dial pauses
44
44
44
45
46
46
46
7
7.1
7.2
7.3
7.4
7.5
7.6
Operating more than one Handset/ Base-set
Measuring the field strength
Selecting the base-set
Logging-on Handsets to a base-set
Connecting additional Handsets (Multilink)
Disconnecting Handsets (Multilink)
Holding and transferring calls to another Handset
47
47
47
48
49
49
50
8
8.1
8.2
Operating within a telephone installation (PABX)
PABX (private automatic branch exchange)
Extending a call / consultation hold within PABX
51
51
51
9
9.1
Using other mobile handsets
General information
52
52
Symbols used in display
53
Trouble Shooting
53
Approval and CE Marks
54
Overview of menu items
Overview of Handset/base-set menu items
Overview of Answering Machine menu items
56
56
58
Cleaning and Maintenance/Technical data
60
1
Getting to know and connecting your HomeHandy
3
1.1 Some Technical Information…
The HomeHandy Pìco voice is a cordless telephone conforming to the
DECT (Digital Enhanced Cordless Telephone) standard. It consists of a
handset and a base-set with an integrated charging device for the battery
in the handset. Additional chargers are available as accessories.
Note
Caution
The speech in the handset and base-set is encrypted by the requirements
stipulated in the DECT standard: this offers protection against eavesdropping by scanners. The voice quality is not adversely affected.
Usage in connection with hearing aids can result in interference.
During power failures calls cannot be made with the HomeHandy
Pìco voice due to the lack of power supply to the base-set unless fitted
with a backup battery supply.
The HomeHandy operates to the GAP (Generic Access Profile) standard, i.e. it can accommodate other GAP-standard mobile units which can
be logged-on to the base-set. In the same way, this Handset can be logged-on to other GAP base-sets. Refer to relevant manufacturers' handbook.
Your HomeHandy has the option of using a PIN. This is delivered with a
default value of "0000". If you want to prevent unauthorised adjustments to
certain settings (e.g. the number of assigned Handsets, etc.) then change
the PIN. Do not forget this number and if necessary write it down as the
unit can only then re-installed by a service engineer.
Special notes on the Answering Machine
• All programming is only possible via the Handset and is supported by
text in the display
• No programming is possible during remote access
• The Answering Machine is disabled during programming. Incoming
calls are still signalled
• When the storage capacity of the Answering Machine falls below 30
seconds, the machine will automatically default to greeting no. 2 (no
message recording)
• It is possible to switch off the Answering Machine even if there are still
messages stored in memory
• If, during programming, there is no keypad activity for 30 seconds the
program will time-out.
• User are accustomed that calls are answered normally within about 10
seconds and the majority of abandoned calls are not answered within
45 seconds.
This apparatus has been approved for the use of the following facilities:
DECT telephony
Auto calling
DTMF dialling
Loop disconnect dialling
Auto answering.
4
1
Getting to know and connecting your HomeHandy
Any other usage will invalidate the approval of the apparatus if as a result it
then ceases to comply with the standards against which approval was
granted.
If the battery backup is not installed to your phone (see „Instruction for
use of the backup power supply unit“ p. 55) a call cannot be made with
the HomeHandy Pìco voice during a power failure as the power supply to
the base station is then interrupted.
1.2 Preparation
Positioning
the base-set
When choosing the position of the base-set for the HomeHandy Pìco
voice, please note the following:
• Avoid immediate proximity to CD players, video recorders, and television
sets, computers and microwave devices. Satellite receivers and other
Answering Machines should also be avoided as these are not particularly DECT secure and can lead to interference
• Avoid installing in places where there is a strong possibility of dust or
smoke, direct sunlight or high humidity, or close proximity to heat sources
• Try to position the base-set as close as possible to the centre of the
area to be used for making calls. In a house with several floors you will
possibly get the best range by placing the base-set close to the stairs
Place a non-slip pad beneath the base-set and charger (accessory) so
that the plastic base does not scratch the varnish on furniture and leave
unwanted marks on surfaces.
Connecting
the base-set
Power
supply Telephone
network
Power supply
Base-set
Telephone network
Before using the HomeHandy Pìco voice you must first connect the baseset to the telephone network and power supply. Connect as indicated in the diagram. The connector sockets are positioned underneath the
base-set and are indicated by the corresponding symbols.
1
Getting to know and connecting your HomeHandy
5
1.3 Charging and handling batteries
Charging
When installing from new or after a prolonged time in storage, the batteries
for the Handset must be initially charged up. Place the Handset in the
charger.
The Handset can be used with different battery types (e.g. NiCd 650 mAh,
NiCd 700 mAh, NiMH 1200 mAh, etc.): ensure that only identical
batteries are fitted.
When charging for the first time the batteries are charged for 14
hours: this does not happen constantly, but in pulses.
In normal use (i.e. when the Handset is placed in the base-set after the
"Battery Low" is indicated) the batteries will charge more quickly.
During use the charge is reduced: the display shows these reductions at
different stages (100,80,70,60, etc.).
After changing the batteries no capacity value is given (the same
applies for a charged battery, as this is an unknown state for the Handset).
In the display will appear: ___%
Only after a few hours will the normal indicator appear with a percentage
value.
If disconnected from the power supply for several hours (e.g. holidays or
during a lengthy installation), the batteries should be removed as they will
lose too much charge and will need to be fully re-charged before the unit
is to be used again.
Handling the batteries
Apart from charging the batteries as a result of normal usage, there is no
particular handling instruction necessary in order to maximise the efficiency of the batteries.
NI-CD
NI-MH
Note:
Even so, the battery is a consumable and its capacity and the resulting
operating time will eventually diminish.
Dispose of used batteries in accordance with local regulations. Do not
dispose with household waste!
Only rechargeable batteries can be used!
6
1
Getting to know and connecting your HomeHandy
1.4 Installing/changing the batteries
Remove the cover of the battery chamber by pressing gently on the upper
edge where the clips are situated. Remove the old batteries. Fit the new
batteries as indicated. Slide back the cover, making sure the lock is engaged.
Only fit identical battery types with identical capacity.
Only use rechargeable batteries!
1.5 Default settings on delivery
The HomeHandy Pìco voice is delivered with the following basic settings:
Handset
• No phone numbers stored
• Ringer melody level 2
• Ringer volume level 5
• Handset volume normal
• Keypad lock inactive
• Key click switched on
• Logged in
Base-set
• Public net
• Ringer melody level 1
• Ringer volume level 4
• DTMF dialling
• PIN 0000
• No dialling pause
• CLIP function inactive
Answering Machine
• Monitoring on
• Remote control off
• Number of ringing 4
• Time 00:00
• Date 01.01
1
Getting to know and connecting your HomeHandy
7
1.6 Setting up Answering Machine for immediate use
To immediately use the Answering Machine simply record your
greeting, set the operating mode and enter the actual date and
time:
press menu key
/
Select SYSTEM
press OK- key
1: Record your greeting
(
/
Select VOICE
)
press OK- key
/
Select INPUT TEXT
press OK- key
/
a) INPUT TEXT 1 (greeting with recording function)
Or
b) INPUT TEXT 2 (greeting without recording function)
press OK- key
In the display the corresponding selection will appear RECORD TEXT 1
or RECORD TEXT 2. After the tone give your greeting loud and clear into
the handset microphone.
End the greeting by pressing the OK-key. The greeting will then be
played back to you
To record the second message repeat the process starting at a) or b)
2: Set mode
Press STOP-Key
/
select VOICE ON/OFF
press OK- key
2: Set mode
8
1
/
Getting to know and connecting your HomeHandy
select a) TEXT 1 (for recording messages)
or
b) TEXT 2 (when the Answering Machine is not recording messages but
playing back greeting 2)
press OK- key. The relevant greeting is repeated back to you. The LED on
the base-set flashes red for setting a) and green for setting b). The Answering Machine is now activated.
Press STOP-Key
/
select VOICE SET UP
press OK- key
/
select SET TIME 00:00
3: Set time and date
press OK- key
Enter the actual time via the keypad (first hours, then minutes)
press OK- key
/
select SET DATE 01/01
press OK- key
Enter the actual month (with leading "0" if necessary)
press OK- key
Enter the actual day (with leading "0" if necessary)
press OK- key
By pressing the ON/OFF Key the machine is put on stand-by. The Answering Machine is now ready for use.
2
General operation
9
2.1 General Operation
The keypad
The keypad consists of 22 keys:
Number keys
to
and characters
and
Special keys for:
last number redial
Menu Key
internal connection
Select key
Signal key (hold)
Stop key
/
Switch on/off (Hook)
Cursor control
Short-code memory
Time-Out
Incomplete programming changes or control displays are abandoned 30
seconds after the last keystroke (fixed): this is also indicated by the
negative acknowledgement tone
Acknowledgement tone
Positive acknowledgement tone
0,6 s
Negative acknowledgement tone
0,1 s 0,1 s 0,1 s 0,1 s 0,1 s 0,1 s 0,1 s
Ringing Signal
Exchange call sequence
- external call coming in
Internal call
Internal engaged tone
- concluding successful programming
- connection with another Handset
(see 6.2 and 6.3)
- error
- battery very low
(talk-time @ 3 mins)
- all radio channels busy
0,5
0,5
3,5 s
0,3
0,3
0,5
0,5
0,5
0,3
on incoming calls during an
internal connection
0,5
0,5
4s
Internal dialling tone
Call waiting
tone
(in handset)
0,5
0,5
0,3
0,3
0,5
0,5
0,5
0,5
0,3
0,3
0,1
3,5 s
0,1
5s
5s
10
2
General operation
2.2 User Guide
Your new telephone is simple to use
thanks to the user guide in the display
Menu key
The menu is activated and cancelled
by pressing the Menu key. It is context sensitive as to which menu item
is prompted (see Overview of Menu
Items)
In the first line of the display you are
shown (with the help of symbols)
the current status of the Handset
(see Symbols in the Display). In the
first line of text available functions
are presented as clear text. In the
second line of text you are given the
relevant sub-options from these functions, presented as text and abbreviations. You have the following options:
Option 1: OK-key
Make selection by pressing the OKkey. For example, you can now enter
a short-dial code or change an existing one.
The OK-key basically serves as
confirmation of a selection or storing
an entry.
Option 2: STOP-key
End the menu display by pressing
the Stop-key. With the stop-key
you can terminate use at any time,
i.e. cancel keying-in. Repeated pressing will take you to the previous
menu level and eventually to standby mode.
/
Option 3: Cursor keys
With the cursor keys you can
scroll forward (right key) or backward (left key) to select a menu item
or an entry.
2
General operation
11
2.3 Entering names and text
Entering characters is possible when
"A-Z" is displayed in the 2nd row of
text.
Letters, numbers and various
punctuation marks are available
(keys "0" and "1").
Entry is via the numeric keypad. Every number is assigned to several characters located on the upper half of the keys.
Selecting characters
Press once = 1st character
Press twice = 2nd character
The last character is followed by the key number, followed again by the
first character, etc.
Character selected
Press the key for the next character
Should you need to select the same character on the same
key:
Press the right cursor key and again select the character
Example: character selection ABC - Key number 2
1st Press key "2"
Displays letter "A"
2nd Press key "2"
Displays letter "B"
3rd Press key "2"
Displays letter "C"
4th Press key "2"
Displays number "2"
5th Press key "2"
Displays letter "A"
Each name can hold a maximum of 13 characters
12
2
General operation
Delete characters: press left cursor key
Press the right cursor key and
the cursor moves one place to the
right: select more characters.
Press again generates a blank
space.
Example: Enter the name "OTTO"
Press number key 6 three times for
"O"
Press number key 8 once for "T".
As you need the same letter again,
press the right cursor key to select the next letter and press number 8 again for "T".
Press number key 6 three times for
"O"
2
General operation
13
Prompts in the display will help you when operating the unit. The actual
mode of the machine will determine which options are available and are
presented in the 2nd line of text.
2.4 Display indicator - stand-by mode
When at rest the following status is
indicated:
The Handset is ready to use; there is
no connection and no call is being signalled.
In the 2nd line of text the selected baseset is indicated (A,B…) as well as the
current battery capacity. This is displayed in steps of 20% or 10%
If the Handset has an estimated charge
of 0%, a warning message is displayed
and accompanied by a warning signal.
A connected call in progress cannot be
continiued. If, on the other hand, at this
point there is a radio connection, there
is 3 minutes operating time remaining.
When the Handset is placed in the
base-set, you will hear a short acknowledgement tone. It is now being
charged as the battery did not have a
full charge and "POWER" appears in
the display.
When the signal becomes weaker,
i.e. the Handset is outside the range
of base-set or is not logged-on to a
base-set, the message "NO BASE"
appears.
2.5 Display indicator- switching on: ready to dial
At "Ready to dial" the following status is indicated: the Handset is switched on via the ON/OFF key there is radio connection to the baseset.
The telephone is now ready for you to dial a number. In the second line of
the display you are shown various options. For example, choose a number
from the last number redial ( ) or select a short-code ( )
14
2
General operation
2.6 Display indicator - stand-by mode: preparing to dial
At preparing to dial the following status is indicated: The handset is in
stand-by mode; there is no radio connection to the base-set.
You can enter the telephone number
in to the keypad (max. 24 places). A
number stored in last number redial or
in short-code can be recalled by pressing the relevant key and the number
is shown in the display.
Corrections can also be made retrospectively, in which numbers can be
added or deleted from the end by
using the left cursor key and replaced
with the correct numbers.
By pressing the ON/OFF key the radio connection is automatically made
and the number dialled.
3
Basic Functions: Telephoning
15
3.1 Switching on and dialling (external calls)
The Handset is in stand-by
mode
Press the ON/OFF KEY
Enter the telephone number, every
entered digit is immediately dialled.
Start conversation
In external calls the duration of the
call is displayed after the first
minute. Counting begins 10
seconds after the last keystroke.
3.2 Dialling "en bloc" (external calls)
You can enter a number whilst the Handset is in stand-by mode: by
then pressing the ON/OFF key the radio connection is made and the
number is dialled as displayed (en bloc).
Enter telephone number
Press ON/OFF Key
Begin talking
A dialled number is stored in the last
number redial after the Handset is
switched off. You can opt to use the
memory functions for short code
redial or last number redial.
Call duration is displayed in
minutes/seconds, no later
than after the first minute
16
3
Basic Functions: Telephoning
3.3 Switching on and dialling (internal call)
If you are operating a base-set with several Handsets (maximum of 8) you
can have free internal calls between Handset: the duration of the call is not
indicated.
The Handset is in stand-by
mode
Press INT key
Enter number of the required
Handset. Begin talking.
3.4 Ending a call (internal and external)
Press the ON/OFF KEY
Or
Replace Handset in the base-set
3.5 Accepting a call (incoming)
On receiving a call
The phone rings and the following messages appear
Examples
External call (CLIP) not activated
External call (CLIP) activated
If the displayed number is longer than 16 characters (indicated by "+" at
the end) use the right cursor key to scroll to the right to read the whole
number.
Call from another Handset on the
same base-set (no.3)
3
Basic Functions: Telephoning
17
Accepting the call
By picking up the Handset from the base-set (automatically switches
on the Handset)
Or
By pressing the ON/OFF Key
Alternatively
The Handset is in the base-set
When the Handset is in the base-set at the time of the incoming call
you need only pick up and the connection is automatically made and
you can begin talking immediately. The ON/OFF key is made inactive
for 3 seconds to avoid accidentally switching off the Handset and
ending the call.
18
4
Extra Features
4.1 Last number redial - History function
It is not necessary to manually enter numbers for redialling: at the touch of
a button you can dial with the last number redial.
This stores the last 5 dialled calls = history function
You can display these numbers in the display and activate the redial.
The last dialled number will overwrite the oldest entry in the last number
memory.
Handset in stand-by state or
ready to dial
Press the last number redial
key
The last number dialled is displayed.
Corrections or additions to the
number is possible (see also
"General Information - Display
Indicators when telephoning)
Press the last number redial
key
The last-but-one dialled number is
displayed, and so on.
Required number is selected
in stand-by mode
Number is dialled after pressing
the ON/OFF key
Or
in Ready to Dial the number is
dialled by pressing the OK key
Numbers longer than 15 digits: only the last 15 digits are displayed. As
mentioned in section 2.6 you also have the option of correcting or adding
to the number.
Telephone numbers stored in last number redial are retained even
after changing the battery
4
Extra Features
4.2 Short-code - general
The Handset can store 21 numbers and names. Stored entries can be
retrieved either by scrolling with the cursor keys or by entering the
memory location number (01-21).
As a special feature it is possible to give the Handset its own name
(max. 13 characters) which is displayed when stand-by in the upper
text line. This name must be stored in
memory location number 21.
4.3 Storing names and numbers
press menu key
press OK key
select NAME/NO.
/
press OK key
press OK key
Select memory location
or
/
The first memory location is indicated. You can now enter a two
digit location number or user
the cursor key to locate an empty
field or to re-use a field. If location
is unoccupied "-------" is displayed.
press OK key
Note:
The user should ensure that all
stored numbers are correctly programmed.
19
20
4
Extra Features
Key in name: for further details see
section "General Information: entering
names and text"
Complete the keying in of the name by
pressing the OK key
Enter telephone number
Press the last number redial key
to transfer number to the shortcode memory
or
(
)
Make corrections with the left
cursor key
press OK Key
Search for the next available
location or leave this function by
pressing the menu key
Note:
If a dialling pause is required press the short-code key
priate point.
at the appro-
4.4 SOS Emergency numbers
Your new telephone contains special short-code memory locations for
emergency numbers: two of which are reserved for "Police" and "Fire
Dept". Enter the actual numbers for these services in your area (i.e. 999)
The third number is for your own choice, for example your local doctor,
etc. These numbers are always ready for dialling in any operating mode
and are simple to recall (se section 4.7 "Calling emergency numbers)
Emergency numbers are stored as follows:
press menu key
/
select NAME/NO.
press OK key
4
Extra Features
/
select PROG. SOS-NO.
/
select either one of the preprogrammed numbers (Fire
Dept/Police) or the personalised number (name)
21
press OK key
press OK key
(
For the personalised number
now enter the name
press OK key
)
enter telephone number
make corrections if necessary
with cursor keys
press OK key
4.5 Deleting short-code memory
Press menu key
press OK key
/
select NAME/NO.
/
select DEL.NAME/NO.
/
Select memory location either
by using cursor keys
OR
by entering the 2 digit number
press OK key
press OK key
or
press OK key
Memory location is deleted.
22
4
Extra Features
You can now delete another shortcode memory or quit this function
via the menu key.
You can also delete all shortcode memory at once. Instead
of selecting DELETE NAME/NO.
choose DELETE ALL and press
the OK key twice.
4.6 Dialling with short-code
The Handset is in stand-by
mode
/
with the cursor keys you can
immediately reach the first and last
location numbers ( :21, :01).
The following will enable you to
select target location numbers:
Press the short-code key.
/
Select a number either by keying in
the memory location number
(01-21) in the key pad or by scrolling through the memory by either
the cursor keys or the shortcode key. The corresponding
name is displayed.
After pressing the OK key the
corresponding number is displayed. The option to amend numbers is identical to manual dialling
and last number redialling.
If you want to select the displayed
number, press the ON/OFF key
Numbers longer than 15 digits: only the last 15 digits are displayed
4
Extra Features
23
4.7 Using emergency numbers
You will always have the option of dialling one of the two pre-programmed
numbers (Police/Fire Dept) and the third personalised SOS number (see
section 4.4). Dial as follows:
press menu key
press 1 key
/
select the name with the cursor
keys
By pressing the ON/OFF key the
radio connection is made and the
emergency number is dialled
4.8 Mute function
The microphone of the telephone is switched off by the mute key. The
other person on the line now cannot hear you.
The Handset is connected on a call
press menu key
press 0 key
Microphone is switched off
MIC.OFF is displayed for 3 seconds
press menu key
press 0 key
microphone is reactivated
MIC.ON is displayed for 3 seconds
24
4
Extra Features
4.9 Switching on/off the mobile unit
You can switch off the mobile unit when:
You do not want to be disturbed by incoming calls
You are outside the range of the base-set and you wish to save the batteries
To switch off press and hold ON/OFF key for two seconds. When the
handset is switched off "POWER OFF" appears in the display
To switch on again, press the ON/OFF key
When powered off incoming calls are not signalled
4.10 Temporarily switching off the mobile unit
If you do not wish to accept an incoming call pressing the STOP key will
stop the telephone ringing
4.11 Switching on the keypad
press menu key
press star key
4.12 Switching off the keypad
press menu key
press star key
4
Extra Features
25
4.13 Activating the lock/changing the PIN
This device ca be protected against unauthorised use by allocating a PIN
If a PIN is issued in the following way, outgoing calls can only be made if
the PIN is entered beforehand.
Handset is in stand-by mode
press menu key
press OK key
/
select TEL.-LOCK ON/OFF
press OK key
enter new personalised PIN (i.e.
1234)
enter PIN once again
press OK key
The unit is now locked. Outgoing
calls can only be made by entering
this PIN
Please take careful note of the PIN. If you forget this PIN the unit can
only be unlocked by a Service Engineer
4.14 Making a call with lock enabled
Press ON/OFF key
enter the PIN (i.e. 1234)
After correct PIN the handset is
„ready to dial“
Dial required number
26
4
Extra Features
4.15 Disabling the lock
Handset is in stand-by mode
press menu key
/
select TEL.-LOCK ON/OFF
press OK key
enter PIN
press OK key
The unit is now unlocked
4.16 Call duration display
10 seconds after dialling the last digit of an external number counting
begins. After the first minute of the
call has passed the actual duration
of the call appears in the display as
minutes and seconds.
4.17 Temporarily changing the dialling mode
This change is necessary for installed pulse dialling mode, i.e. remote
query of the Answering or voice mail box.
press star key
If DTMF is installed, the music note
symbol is displayed
Dial the number
Switchback by
ending the connection
Note:
To permanently change the dialling mode see chapter 8.1.
To change signalling method and dial pause see chapter 8.1.
4
Extra Features
27
4.18 Changing the PIN at the base-set
The PIN provides protection against unauthorised use of vital installed
features in your telephone. In order to effectively protect your phone, you
should program your own PIN. Note this PIN carefully as only a service
engineer is able to reset the PIN to its default value of 0000.
!
The Handset is in stand-by
mode and close to the assigned base-set:press menu key
press OK key
/
select SYSTEM
/
select PROG.PIN
press OK key
confirm with OK key
enter actual PIN
(default value 0000), every entered
digit deletes one stroke "---"
enter new PIN (4 digits, numbers
0-9)
re-enter new PIN and end with OK
Key
If code is incorrect , re-enter the
new PIN once more
Press menu key, the unit is now
in stand-by mode
Note
Press menu key at any stage to cancel programming
28
4
Extra Features
4.19 CLIP (Caller Line Identification Presentation)
Your HomeHandy Pìco voice telephone comes with the CLIP facility, the
display of external numbers. In order to use CLIP you must order the service from your telephone company and install the facility at the Handset
(see 4.20). The number of the caller is then displayed whilst ringing, provided that the caller has allowed his number to be transmitted. In addition,
your telephone stores callers' numbers in a list which have either been
accepted by you or the Answering Machine. Callers who do not transmit a
number are indicated by „ANONYM“.
4.20 switching on/off the CLIP facility
In order to use CLIP you must order the service from your telephone company as well as activated the facility in you telephone (default value:
CLIP=OFF)
The Handset is in stand-by
mode:
press menu key
press OK key
/
select SYSTEM
/
select MODE
/
select CLIP ON or CLIP OFF
press OK key
press OK key
press OK key
press OK key once more; you
have now switched on/off both the
CLIP facility as well as the caller
list
4
Extra Features
4.21 Display and dialling new numbers from the caller list
(CLIP)
If new numbers have been received in the caller list, the message NEW
CALL is displayed and the total number of new numbers
Viewing numbers
press OK key
With the OK key and the STOP
key you can scroll within an entry.
The entries are listed as follows:1. Running order of the call
2. Caller's number (max 10 digits
are displayed: with longer numbers a "+" before or after indicates missing digits from the display. Missing numbers at the
beginning are reached by the
STOP Key and at the end by
the OK key.
3. The last digit indicates the number of calls mad by the displayed
telephone number
press OK key once more
4. Date and time of the call (multiple calls by the same number
registers the time of the last call.
one more press of the OK key
selects the corresponding number
directly from the caller list
/
use cursor keys to scroll through
individual entries on the list.
29
30
4
Extra Features
4.22 Selecting from the whole caller list (CLIP)
If you have already picked up all new messages from the Answering
Machine as well as seen all numbers in the caller listpress OK key
/
select caller list
If you have NOT already picked up all new messages from the Answering
Machine NOR have you seen all numbers in the caller list-
press Menu key
/
select SYSTEM
press OK key
/
select CALLER LIST
press OK key
/
select CHOOSE NUMBER
press OK key
/
select an entry on the list with the cursor keys
by pressing the OK key and STOP
Key you can scroll within the entry
(see 4.21)
to dial the displayed number, press
the OK key within the date entry.
The number will now be indicated by
a " " (in place of the number of calls
made) as a returned call.
4
Extra Features
4.23 Deleting numbers from the caller list (CLIP)
The caller list can store a maximum of 20 different telephone numbers.
When all memory locations are full, the oldest returned-call number is
replaced by the new incoming call. If all numbers in the list are not returned calls, then the oldest number is overwritten. It is also possible to
remove individual numbers from the list;
/
select caller list (see 4.22)
press OK key
/
select DELETE NUMBER
press OK key
/
select an entry with the cursor keys
press OK key to scroll to the
date/time entry
press OK key
/
select more numbers
or
end with ON/OFF key
31
32
4
Extra Features
4.24 Delete all returned call entries in the caller list (CLIP)
It is possible to remove all returned call entries from the caller list at once.
Numbers not yet called are then removed individually (see 4.23)
/
select caller list
press OK Key
/
select DELETE LIST
press OK Key
select further menu items
or quit the menu with the ON/OFF key
5
The Answering Machine
33
5.1 General information on the Answering Machine
Before using the Answering Machine for the first time it is necessary to at
least record one welcome greeting. If no greeting is recorded then the
machine cannot be used, instead you will hear the negative acknowledgement tone in the Handset (4 short tones). After correctly recording greeting
text 1 the Answering Machine is automatically switched on to record mode.
The Answering Machine in the HomeHandy Pìco voice offers the option of
choosing between Greeting Text 1with message recording and Greeting Text
2 without message recording. We recommend, however, that you record
two greetings, as the machine will automatically default to Greeting Text 2
when the recording capacity is less than 30 seconds. In case of running out
recording capacity, the answering machine signals a series of 3 tones.
At the base-set the current Greeting mode and the resulting incoming
messages are signalled via a two colour LED (red = Greeting Text 1,
green = Greeting Text 2, flashing = messages, rapid flashing = new
messages.
Greeting Text 1*
Greeting with the facility to record a message. After a signal tone (i.e. after
giving your name "…I can't take your call at the moment. Please leave a
message after the tone". Duration of the greeting: 3-180 seconds.
Greeting Text 2*
Greeting without the facility to record a message ( no tone, for example
after giving your name "…you can reach us after such and such a time".
Duration of greeting : 3-180 seconds. If there is no Greeting Text , the
VOICE)
Answering
Machine will accept no more calls once the message record
facility has run out.
* Recording a telephone number in the answering message there must be included the
national code in the text.
5.2 Selecting Answering Machine functions
All functions within the Answering Machine are basically activated by the
Handset logged on to the base-set. The following procedure brings you to
the menu controlling the Answering Machine function (
(If there are no new messages on the Answering Machine, simply press OK
Key. For new messages collect these first or access via the menu see 5.5).
press Menu key
/
select SYSTEM
press OK Key
(
/
select VOICE
)
34
5
The Answering Machine
press OK Key
VOICE
Here you choose the appropriate function and quit the menu path when
finished by pressing the ON/OFF key. The Handset will then automatically be on stand-by.
5.3 Recording your Greeting
After reaching the menu section "Answering Machine functions
(see 5.2) proceed as follows
/
select INPUT TEXT
press OK Key
/
choose between
Greeting Text 1 (INPUT TEXT 1)
Greeting Text 2 (INPUT TEXT 2)
press OK Key
In the display will appear the corresponding selection RECORD TEXT 1
or RECORD TEXT 2
A short bleep signals the beginning of the recording
Speak clearly into the Handset microphone
The recording is ended by the OK key or automatically after a silence of 8
seconds. After the recording has finished the greeting is played back. You
are still in the INPUT MENU and by using the and cursor keys
enter more greetings or by pressing the STOP Key return to the Voice
menu. Complete the process and return the Handset to stand-by.
NOTE
Only by successfully recording Greeting Text 1 is the machine ready for
use. For optimum speech clarity it is essential to record the greeting in a
room free from background noise
Only by successfully recording a Greeting Text will the greeting overwrite
the old one. If the greeting is not accepted you will hear 4 short tones
indicating that you must repeat the recording procedure.
If the storage capacity has completely run out then no further adjustments
to the greetings can take place. In this case delete some of the stored
messages.
5
35
The Answering Machine
5.4 Switching on the Answering Machine and checking the
greeting
After reaching the menu section answering machine functions VOICE
(see 5.2):
/
select VOICE ON/OFF
press OK Key
/
choose between
*Text 1
*Text 2
*VOICEBOX=ON
press OK Key
(
when choosing VOICEBOX=ON press the OK key once more
)
End the input with the ON/OFF key
NOTE
If you selected TEXT 1, Greeting Text 1 will be played back. You can cancel this with the STOP Key . The Answering Machine is now switched to
record a message after playing Greeting Text 1 (the LED at the base-set is
now red)
If, on the other and, you have selected TEXT 2, Greeting Text 2 is played. .
You can cancel this with the STOP Key. The Answering Machine will now
answer calls with Greeting Text 2 but no message will be recorded (LED is
green).
Switching the VOICEBOX=ON to VOICEBOX=OFF with the OK Key
switches off the Answering Machine. If the Answering Machine is already
switched off this is indicated in the display. This menu item now has no further function.
5.5 Playing back recorded messages
Messages are always heard via the Handset or via remote access (see
remote access).
When new messages are on the
Answering Machine the envelope
symbol appears. The number of
new messages
is displayed
and the LED flashes quickly.
36
5
The Answering Machine
Searching for new messages
press OK Key to activate play back
The received messages are then
played back in order. The order number and current time (received today)
or date (received on previous days) of time display/message from the same day
their arrival is displayed (see 5.10 "Setting Date and Time"
Interrupt messages by pressing the
STOP Key
If the key is pressed within 25
seconds, the interrupted message is
re-started. Wait more than 25 seconds
and the whole process s cancelled and
the Handset returns to stand-by mode
By pressing the key the current
message being replayed is cancelled
and you jump to the next message. At
the end of every playback there is a
short acknowledgement tone.
After the last message there are two
acknowledgement tones and there is
then the option to delete all played
messages at once. To delete press the
OK key. If you want to store the messages end the procedure with STOP
or by pressing ON/OFF key
Searching through all messages
(including old ones: LED flashes slowly)
Alternatively you have the option of
choosing from the playback menu.
After reaching menu branch answering machine functions VOICE:
/
select MESSAGE
date display/older message
5
The Answering Machine
37
press OK Key
All stored messages are played back
in order. You have the same options to
repeat, interrupt or cancel as with
playing new messages (see above)
After the last message, the text
MESSAGE END appears in the display and there are two acknowledgement tones.
Finish listening to messages by pressing ON/OFF key
5.6 Recording telephone calls
You can record all or part of a telephone conversation and store in the
Answering Machine. This recording is treated in the same way as an ordinary message and can be played back or deleted in the same way
To start recording during the conversation press OK Key
/
To end re-press OK Key or finish the
call. The recording is treated as a normal message.
5.7 Deleting messages
You have the option to delete either all messages at once, excluding those
which have not yet been picked up, or to delete individual messages.
After reaching the menu item Answering Machine functions VOICE:
/
select DELETE MESSAGE
press OK Key
you are now given the option to
delete all messages at once. Out of
safety this is limited to played back
messages only. To accept press OK
Key
38
5
or
The Answering Machine
Alternatively you can select individual
messages for deletion by pressing
the key. The first message is then
played back: to delete this message
press OK Key
Interrupt the actual message by
pressing STOP Key
If the key is pressed within 25 seconds, the interrupted message is restarted. Wait more than 25 seconds and the whole process is cancelled
and the Handset returns to stand-by mode
By pressing the key the current message being replayed is cancelled
and you jump to the next message. At the end of every playback there is a
short acknowledgement tone.
After the last message, the text MESSAGE END appears in the display
and there are two acknowledgement tones. With the
key you begin
once more to play back messages not yet deleted. The number of the
message is stored. By pressing the OK key you can leave the menu item
DEL MESSAGE. End the playback of messages by pressing the
ON/OFF key.
The numbering of messages is changed by leaving the menu item
DEL MESSAGE; resulting gaps caused by deleting individual messages
are now filled.
5
The Answering Machine
39
There are a number of special features which must be first installed at the
Answering Machine via the Handset. After reaching menu section answering machine functions VOICE (see 5.2) choose the menu item VOICE
SET UP for these special installations.
5.8 Listening to incoming messages
Through programming you can decide to listen to messages via the integral speaker in the base-set. By switching on this facility you have the
option of deciding whether or not to take an incoming call after identifying
the caller. To speak to the caller simply switch on the Handset. To switch
on the listening facility select the menu item VOICE SET UP in the
VOICE menu (see 5.2). Confirm by pressing the OK key and by using
the / keys select the menu item MONITOR=ON or
MONITOR=OFF. By pressing the OK key the appropriate mode will
become active. The actual mode/status is shown in the display. End the
installation by pressing the ON/OFF key or select another menu item.
5.9 Start position of the Answering Machine
By programming the number of rings you can decide when the Answering
Machine answers the call. The options range from 1 to 4. By choosing 5
will result in the Answering Machine switching on after the second ring if
there are new messages present, otherwise after the 5th ring (see 5.14
Free-phone remote query).
To install the number of rings select the menu item VOICE SET UP in
VOICE. Confirm with the OK key and select menu item PICK UP NO.
After confirming with the OK key you can select the number of required
rings by keying in digits 1-5 on the keypad. Confirm your selection with the
OK key . End the installation with the ON/OFF key or select another
menu item.
5.10 Setting the Time and Date
In order to organise incoming messages more efficiently on your Answering Machine your telephone has a simple clock. Incoming messages are
recorded at the relevant time and shown on the display. Messages received before today are displayed with the day and month of entry. In order to
use this feature you need to set the time and date in your Answering
Machine.
40
5
The Answering Machine
Select the menu item VOICE SET UP in VOICE menu (see 5.2)
press OK Key
/
select SET TIME
(the actual installed time is displayed)
press OK Key
Enter the actual time via the key pad.
The format is hh:mm
You have the option to make corrections with the
with the OK key
/
key. End the input
select SET DATE
(the actual date is displayed)
press OK Key
now enter the month (with leading 0)
press OK Key
now enter the day (with leading 0)
press OK Key
Complete the installation by pressing the ON/OFF key or select another
menu item
Comment:
The time and date must be reset after a power failure, after which the following default values are entered: TIME: 00:00, MONTH: 01, DAY:01
5
The Answering Machine
41
5.11 Automatic time update (CLIP)
If you have the CLIP facility switched on, the phone is prepared for automatical time update via the telephone network (feature of the used network). In this way every external call will compare the time in your telephone with the actual time on the network and update it if necessary.
Select VOICE SET UP in VOICE menu:
press OK Key
/
select menu item
TIME ACTU.=OFF or
TIME ACTU.=ON
press OK Key
press OK Key
Automatic time update is switched on/off.
42
5
The Answering Machine
5.12 Remote Operation and Remote Query
It is possible to enable certain functions within the Answering Machine
remotely whilst you are out. In order to use this facility you require a telephone installed with DTMF(dual tone multi-frequency or Touch Tone dialling) or a DTMF transmitter. Access to the control of the Answering
Machine is via the PIN protecting the base-set (default value 0000). If
remote access is approved, but the Answering Machine is switched off (no
LED), the caller will hear a multiple tone after approx. 60 seconds. After this
request access to the remote query/interrogation can follow. Use the following procedure to set up remote access.
Select VOICE SET UP in the VOICE menu
press OK Key
/
select menu item
REMOTE=OFF or
REMOTE=ON
By pressing the OK Key the relevant
mode will switch between on/off. The
display text shows the actual current
mode.
Complete the installation with the ON/OFF key or select another menu
item
5.13 Using remote operation /remote query
Dial telephone number
With the Answering Machine switched off there is a multiple tone sequence
for approx 1 minute. If the Answering Machine is switched on the greeting
will start after the pre-programmed number of rings
During the greeting or after the multiple tone sequence enter the digit 0.
After hearing 3 signal tones:enter the PIN assigned to the base set and Answering Machine.
Two signal tones are heard on successfully entering the PIN. A maximum of
2 attempts is allowed, after which the connection with the HomeHandy Pìco
voice base-set is terminated.
5
The Answering Machine
43
After successfully entering the PIN any new messages are then played
back (enter 0 at any time to interrupt). The following features are now
available by entering the appropriate number (always confirmed by an acknowledgement tone:
switch off the Answering Machine
-ok: positive acknowledgement tone (1x longer tone)
activate Answering Machine (Greeting Text 1)
-ok: greeting 1 + pos. acknowledgement tone/not ok: neg. acknowledgement tone (4x short tones)
activate Answering Machine (Greeting Text 2)
-ok: greeting 2 + pos. acknowledgement tone/not ok: neg. acknowledgement tone
leave your own message
(wait for the request tone/end with 0)
-when ready: request tone/ok: pos. acknowledgement tone/not ok neg. acknowledgement tone
listen to messages/playback from beginning
-no message: neg. acknowledgement tone/after every message: pos. acknowledgement tone/after last
message: 2x pos. acknowledgement tone
Delete all messages
-no message: neg. acknowledgement tone/after successful deletion pos. acknowledgement tone
Re-record Greeting Text 1
(await request tone/end with 0*)
-when ready: request tone/ok pos. acknowledgement tone + playback of the new greeting/not ok: neg.
acknowledgement tone
Re-record Greeting Text 2
(await request tone/end with 0*)
-when ready: request tone/ok pos. acknowledgement tone + playback of the new greeting/not ok: neg.
acknowledgement tone
*The recording will stop after a silence of at least 8 seconds. Greeting texts
are played back once more to verify
To quit the current function
To quit remote operation and remote query
Note:
Skipping messages is not possible
Deleting individual messages is not possible
5.14 Free-phone remote query
You have the option of making remote query free of charge. In this way you
can determine whether or not there are any new messages. If there are no
messages you do not need to access and you do not incur any charges for
the call. To activate this feature you must select 5 in the menu item PICK
UP NO. (see 5.9).Your Answering Machine will now take messages after
2 rings providing there are messages already recorded. If there are no new
messages then connection is only made after the 5th ring. You therefore
have time to hang up before the call is chargeable and still obtain the information that no new messages are present.
44
6
Settings / Programming
6.1 Switching on/off keyclick
The keyclick is an acoustic acknowledgement on pressing a key. When
delivered the key click is switched on: the following will enable you to
switch if off or vice versa.
press menu key
press OK Key
/
select SET UP
/
select BEEP=ON
or BEEP=OFF
press OK Key
press OK Key
press OK Key
Press menu key to select other
menu items
6.2 Setting the Handset ringing type
The ringing type to signal incoming calls can be individually configured for tune and volume.
10 melodies and 8 volume settings are available.
At volume level 01 the tone sounds only once in order not to disturb users
meetings, for example. When delivered the Handset is set at volume 05
and melody 2
press menu key
press OK Key
/
select VOLUME/MELODY
/
select VOLUME or MELODY
/
to set the volume:
8 levels: 00= no ringing type; 01=short click; 02-07 = volume
to set the melody:10 melodies 01-10
press OK Key
press OK Key
6
Settings / Programming
45
press OK Key
press menu key
6.3 Setting the base-set ringing type
The HomeHandy Pìco voice base-set has a built in ringing type. This can
be adjusted for volume and melody. There are 7 volume levels (1-6: 0= off)
and 5 melodies.
Assuming the Handset is on stand-by near the base-set:
press menu key
press OK Key
/
select SYSTEM
press OK Key
/
select VOLUME/MELODY
press OK Key
/
select VOLUME or MELODY
press OK Key
/
use cursor keys to set required level
pressOK Key once more to store the setting
46
6
Settings / Programming
6.4 Increasing the volume in the handset
The pre-set volume in the handset can be increased. VOLUME HIGH or
VOLUME STANDARD is displayed for 3 seconds after changing
press menu key
press hash key
6.5 Switch handset volume back to standard
press menu key
press hash key
6.6 Setting the dialling mode and dialling pauses
See 8.1
7
Operating more than one Handset / Base-set
47
7.1 Measuring the field strength
In order to assist you in deciding on the choice of location for the baseset, you can measure the field strength. The quality of the connection to
the three strongest base-sets is then indicated (The display information
about „KE1“ and „KE2“ is redundant).
press menu key
press number 5
In the top line the three strongest base-sets are indicated. In the lower line
their field strengths are compared. If the field strength is too weak, this
indicated by two dashes (--) Quit this function by pressing the menu key
7.2 Selecting a base-set
The Handset can be assigned to up to 4 base-set (A,B,C,D)
This means you can use the Handset in various locations. If you
change location then select the appropriate base-set or allow the
system to select the most favourable base-set via the AUTO function.
Please note that the Handset can only select between those basesets to which it has already been assigned: it will then choose the
base-set with the strongest signal at that time.
press menu key
confirm with the OK Key
/
select SET UP
press OK Key
/
select NEW BASE
press OK Key
/
select required base-set
(i.e. A,B…)
or
48
7
Operating more than one Handset / Base-set
Select AUTO
press OK Key
Select another menu item or quit
menu with menu key
7.3 Assigning Handset to a base-set
The Handset must be assigned to a base-set in order to make calls. When
logging on essential data is transferred from the base-set. In order to
assign the Handset to a base-set or a base system, it is necessary to carry
out programming at the Handset as well as the base-set prior to logging
on.
To begin logging on
press menu key
press OK Key
/
select SET UP
/
select NEW BASE
/
select required base (i.e.A,B,..)
DO NOT SELECT AUTO
press OK Key
press OK Key
press OK Key
/
select LOG IN
press OK Key
enter PIN (delivered default value
0000)
7
Operating more than one Handset / Base-set
49
Essential preparation at the base-set
Remove the plug socket from the mains for a short period of time. After
plugging in again, the base-set is ready for a period of 30 seconds to carry
out the assigning process.
Continue to log in the Handset
only now press OK Key: the process of logging-in can take several
seconds
enter one of the available numbers
displayed to assign as the Handset's internal telephone number
end the log-in procedure with the
OK key .
7.4 Assigning additional Handsets (multilink)
Up to 8 Handsets can be assigned to a single base-set. External calls can
be made from all the Handsets: incoming calls are only signalled at the first
4 Handsets.
Logging-in a new Handset is the same procedure as for the first (see 7.3)
If handsets from other manufacturers are logged in please
refer to their operating instructions
7.5 To log-off a Handset (multilink)
All Handsets logged on to a base can be logged-off: Handsets cannot
log-off by themselves.
Assuming Handset is on stand-by:
press menu key
press OK Key
50
7
Operating more than one Handset / Base-set
/
select SYSTEM
/
select LOG OUT
press OK Key
press OK Key
enter actual PIN: displays assigned
Handsets
enter internal number of the Handset
to log-out.
press OK Key and menu key
7.6 Holding/transferring calls to another Handset (multilink)
During an internal or external call
press INT key
enter number of required Handset
Cancel hold
press INT or R key
Or
Transfer call
press ON/OFF key
Hinweise
An incoming external call during an internal connection is signalled to the
users by a call-waiting tone. The internal callers must end their conversation (ON/OFF key) to receive the call and wait for the ringing. After ringing the external call can be accepted with the ON/OFF key. It is not
possible to hold for another external call.
8
Operating with a telephone installation (PABX)
51
8.1 PABX (private automatic branch exchange)
According to requirements, the dialling mode, the flash-time of the R signal
key and the dialling pause can be installed. See also the overview of menu
items. PULSE mode, or the faster pre-installed DTMF can be used.
Assuming the Handset is on stand-by:press the Menu key
press OK Key
(
/
/
select SYSTEM
/
select MODE
/
select the required setting
press OK Key
press OK Key
press OK Key
)
select further settings
or
end the process by pressing the menu key
The Handset returns to stand-by mode
8.2 Extending a call / consultation hold within PABX
During a call
Press the signal key, dial the number of the required extension
To transfer
After you have contacted the other extension, announce the call and press
ON/OFF key: the call is now transferred.
To end on-hold
Press the signal key and you are re-connected to the first caller.
52
9
Using other mobile handsets
9.1 General Information
Because the Pìco System includes a GAP capable device, mobile units
from other manufacturers (assuming they are also GAP compatible) can
be used at the base-set. Providing the mobile has an alpha-numeric display, it can navigate within the system menu (with limited functionality). If,
on the other hand, the mobile has a numeric display but a INT key and
you are allowed access to the service menu, it is still possible to install
system features at the Pìco base-set (i.e. switching over the dialling mode)
• Dial into the system menu with the mobile (see operator guide from
relevant manufacturer)
• On the mobile's display you will see either # # or "-" (depending on
the kind of display).
You can now select from the following features:
change the base-set PIN
*97
enter actual PIN
enter 2x new PIN
set dialling mode
*20
PULSE
or
DTMF-flashkey 88 ms
or
DTMF-flashkey 270 ms
and
enter actual PIN
enter actual PIN
enter internal Handset
number
*22
*23
log-off Handset
*40
set dialling pause
*24
*25
dialling pause
(approx 3 sec)
after the 1st digit
or
delete dialling pause
and
enter actual PIN
The procedure is ended by pressing the INT key at any time and by hanging up .
Symbols used in display / Trouble Shooting
53
Symbols used in display
9 different symbols are used to help you operate the Handset:Ready to use indicator: logged-on and in range of the base-set.
microphone switched off
active when pressing the last number redial key to select a redial number
when preparing to dial (history function)
deactivated on retrieval of the telephone number or by completing or leaving the procedure
activated on pressing the short-code key when prompted to select or programming a short-code number
deactivated on retrieval of the number, or by completing or leaving the
procedure.
active when the Handset is locked against unauthorised use
active when DTMF is installed - this symbol is controlled by the base-set
active when the handset is switched to LOUD
active when the keypad is disabled
new messages on the Answering Machine
Trouble Shooting
●
no functionality
●
no battery status display
●
no outgoing calls possible
●
no dialling tone
●
signal key doesn't work properly
no dialling possible in DTMF
●
➠ battery low ➠ change battery.
Check that the batteries are correctly fitted especially ensuring the
contacts are free from dust, etc.
(see1.4)
➠ assign the Handset to the baseset (see 7.2 and 7.3)
➠ battery has been changed (display only appears on reaching 60%
capacity ➠ change battery (see 1.3)
➠ incorrect dialling mode installed
(see 8.1)
➠ cable not correctly inserted (i.e.
telephone and power cables mixed
up (se1.2)
➠ signal key has no function in current installation
➠ extension or local exchange does
not support DTMF (See 8.1)
54
Approval and CE Marks
The product complies with the basic requirements of all respective directives of the European Union Council. The specified conformity assessment
procedures were performed.
CE 0188 X for the portable part
The portable part meets the requirements of the following EU directives:
CTR 6 (97/523/EG) (Edition II)
CTR 10 (97/524/EG) (Edition II)
CTR 22 (97/525/EG) (Edition I)
EN 50081-1 (01/92)
EN 50082-1 (01/92)
ETS 300 329 (06/97)
EN 60950-A4 (07/96)
EN 41003 (03/93)
CE and BABT certificates for the fixed part
The fixed part meets the requirements of the following EU directives:
British Standard PD 6568 / 92
British Standard PD 6569 - Part 1 / 92
British Standard PD 6569 - Section 3.1 / 92
NET 4 [ETS 300 001 - 08/92]
CTR 6 (97/523/EG) [Edition II]
CTR 10 (97/524/EG) [Edition II]
CTR 22 (97/525/EG) [Edition I]
EN 50081-1 (01/92)
EN 50082-1 (01/92)
ETS 300 329 (06/97)
EN 60950-A4 (07/96)
EN 41003 (03/93)
Appendix for safety and power informations
55
Safety information
This product may be used legally only in a country where the appropriate
authority has given its specific authorisation. This authorisation appears on the
BABT-label at the back of the base station.
Power requirements
This product requires an electrical supply of 230 volt / 50Hz, alternating
monophased current, excluding (IT) installations defined in the standard EN
60950.
Warning!
The electrical network is classified as excessive according to criteria in the
standard EN 41003.
The only way to power down this product is by unplugging the power cable
from the electrical outlet. Make sure the electrical outlet is located close to
the apparatus and is always easily accessible.
It is recommended that this telephone be used as a complement to another
telephone which does not require mains power.
Telephone connection:
The voltage on this network is classified as TNV (Telecommunication Network
Voltage) and the voltages presented on the RJ11-connection (Western-plug)
are classified TNV (Telecommunication Network Voltage) and SELV (Safety
Extra Low Voltage), as defined in the standard EN 41003
Safety precautions:
Do not allow the handset to come into contact with water. Do not open handset or the base station. This could expose you to high voltages. Contact our
after-sales service for all repairs.
• Do not allow the charging contacts or the battery to come into contact with
conductive materials such as keys, paper clips, rings, bracelets, etc. Use your
Battery Backup Power Supply Unit only according the „Instructions for
Use“
Instructions for use of Battery Backup Power Supply Unit
a) The HomeHandy Pìco is suitable for connection to the PSTN (public switched telephone network) circuits in the U.K. or P.A.B.X.
b) The HomeHandy Pìco has a ringer equivalence number (REN) of 1. That is
you can connect the HomeHandy Pìco simultaneously to the line with all
56
Appendix for safety and power informations
the apparatus you have connected before, provided that you have paid
attention to the rule that the sum of all RENs may not exceed four. Otherwise it is not guaranteed that all apparatus will ring correctly.
c) You can use the HomeHandy Pìco on PSTN lines with loop-disconnect or
multi-frequency dialling.
d) A call cannot be made with the HomeHandy Pìco during a mains failure
because the power supply to the base station is then interrupted.
In case of mains failure all functions of the HomeHandy Pìco will be preserved
for a minimum of 7 hours if the battery backup is installed. During the 7 hour
period you have the possibility of communication for at least 1 hour.
General
- Replace the batteries after a mains failure has occured
- Replace the batteries once a year
- Use 6 AA cells with 1,5 Ah
- Do not use rechargeable batteries
Installation of battery backup
- Place the batteries in the battery holder, paying attention to the polarity
- Plug the power supply into the battery backup
- Connect the base station
Replacement of batteries
- Disconnect the base station
- Unplug the power supply
- see installation of battery backup
Note: For best availability of BT emergency (999) service it is recommended
that you connect the HomeHandy Pìco together with another telephone (that
needs no external power source to provide the simple telephone functions) to
the telephone network.
57
If the battery backup is not installed to your phone a call cannot be made
with the HomeHandy PÌco voice during a power failure as the power supply to the base station is then interrupted.
Making a call is only possible if the batteries in the mobilpart are loaded.
58
Overview of menu items
Overview of menu items – Handy
(
)
/
(only in range of the
assigned base-set)
Overview of menu items
59
Overview of menu items – Base-set
Answering Machine menu:
For detail see the next double
page
(only with
installed CLIP
facility,
see.4.19)
/
60
Main menu:
Voice
B
MESSAGE:1
>
ok
<>
tut
B
MESSAGE:2
>
tut
23/03
pause
> or automatically
stop
08:59
pause
> or automatically
B
MESSAGE:3
>
<>
tut tut
stop
12:45
pause
stop
> or automatically
B
MESSAGE END
ok
B
DEL MESSAGE
ok
B
DELETE ALL 02
ok
ok
<>
ok
B
NEW MESSAGES
play
100%
By pressing > skips to the next message. The
messages are automaticalle played back in
sequence and separated by an acoustic signal.
B
MESSAGE:nn
>
12:45
All read messages are deleted.
Unread messages remain stored.
>
Ch. 5.7
tut
B
DELETE:2
ok
>
<>
>
tut
B
DELETE:3
ok
>
tut tut
ok
23/03
pause
stop
> or automatically
ok
08:59
pause
stop
> or automatically
ok
12:45
pause
Confirm via the OK key that the message is
to be permanently deleted.
The STOP key interrupts the playback of the
current message (the whole procedure is
cancelled after 30 seconds).
The > key rewinds the interrupted message to
play back from the beginning.
stop
> or automatically
B
DEL. MESS. END
ok
>
Ch. 5.5
The STOP key interrupt the playback of the
current message (the whole procedure is
cancelled after 30 seconds)
The > key rewinds the interrupted message to
play back from the beginning
>
B
DELETE:1
ok
>
Ch. 5.5
B
DELETE:nn
>
12:45
Overview of menu items
B
MESSAGE
ok
The number of un-read messages appears on the Handset display
when in stand-by mode via the message NEW MESSAGES. The
envelope symbol
also appears.
The LED at the base-set flashes red.
B
VOICE ON/OFF
ok
ok
<>
B
TEXT 1
ok
ok
<>
Activate Answering Machine with Greeting Text 1:
Messages recorded
LED flashes red.
<>
B
TEXT 2
ok
ok
<>
<>
<>
B
INPUT TEXT
ok
ok
<>
Switch off
Answering Machine
= ON
<>
B
INPUT TEXT 1
ok
ok
<>
B
RECORD TEXT 1
ok
B
INPUT TEXT 2
ok
B
VOICE
ok
ok
SET UP
<>
B
MONITOR = ON
off
ok
To record telephone
conversations during a call
press OK key:
B
12345
Start rec.
The following appears in
the display:
B
12345
Stop rec.
The recorded conversation
is recorded under the next
available message number.
ok
<>
B
RECORD TEXT 2
ok
= OFF
<>
ok
<>
Record / playback
Greeting Text
<>
<>
B
VOICEBOX
ok
Ch. 5.4
ok
Ch. 5.4
<>
Listen to speakers
via speaker
Ch. 5.8
<>
Overview of menu items
B
VOICEBOX
off
Activate Answering Machine with Greeting Text 2:
No messages are recorded
LED flashs green.
On activating
the Answering
Machine are
relevant
Greeting Text
is given.
<>
B
PICK UP NO.
ok
ok
<>
B
PICK UP NO.= _
ok
1-8
ok
Start position of
recording
Ch. 5.9
<>
B
REMOTE = ON
off
ok
Remote operation
<>
Ch. 5.11/5.12
<>
B
TIME ACTU. = ON
off
<>
<>
B
SET TIME
ok
hh:mm
<>
B
TIME:00:00
ok
x-y
ok
<
<>
B
SET DATE
ok
dd/mm
<>
Ch. 5.10
B
MONTH:01
ok
x-y
<
B
DAY:01
ok
x-y
<
Ch. 5.6
61
62
Cleaning and maintenance / Technical Data
Cleaning and maintenance
Simply wipe the plastic with a slightly damp cloth or an anti-static cloth: do
not use a dry cloth and avoid the use of cleaning or scouring fluids.
Technical Data
Standard
DECT GAP
CLIP:
In accordance with BT-standard SIN
242 and SIN 227 plus CCA-standard
Transmission/reception frequency:
1880 -1900 MHz
Range
up to 300m
In buildings up to 50m
Power supply
base-set 230 V~/ 50Hz, 11VA
(plug power supply)
Operating time
with fully charged
batteries, 2 x 700 mAh
Standby : up to 40 hours (typ)
talktime: up to 4 hours (typ)
Recommended conditions
+15°C - + 35°C /
20% -75% rel. Humidity
Dialling mode
PULSE/DTMF
Flash key, 90 ms
Dimensions: base-set
Handset
W x H x D = 86 x 50 x 178 mm
W x H x D = 53 x 150 x 24 -28 mm
(depends on the battery cover used)
300g
160g
Weight:
base-set
Handset
Length of connecting cable
power cable base-set 3 m
Telephone connection cable 3 m
Connection plugs: telephone lead:
national connector, at the device =
Western connector
Power cable:
power supply = european connector,
at the device Western connector
Storage Temperature
0° C - + 55° C
63
✃
Short Remote Operation Manual
HomeHandy Pìco voice
Notes
Remote Operation / Remote Query
• Dial number
• Quit announcement by „0“
• Enter PIN
Functions:
Switching off answering m.
Activating text 1
Activating text 2
Recording messages *
Playing messages
Deleting messages
Recording text 1 *
(waiting for signal)
Recording text 2 *
(waiting for signal)
Stop remote query
✃
* Ending with „0“
06/98
Cut, fold, stick together backsides, put into a check card bag - so you always have your Remote
Operation Manual for use, when you need it.
Remote Operation Manual / Service
Service
Subject to changes
Hagenuk GmbH
Westring 431
D 24118 Kiel
Operating instructions HomeHandy Pìco voice
Mat.-Nr. 3027.050
Edition 09/98