1
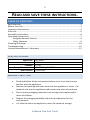
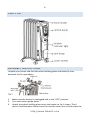
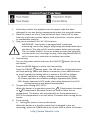
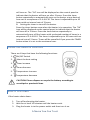
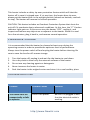
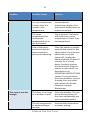
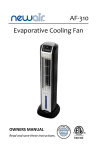
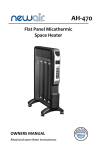
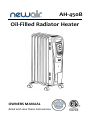
AH-450B Oil-Filled Radiator Heater OWNERS MANUAL Read and save these instructions. . 2 A Name You Can Trust Trust has to be earned and we will earn yours. Customer happiness is the focus of our business. From the factory to the warehouse, from the sales floor to your home, the whole NewAir family promises to provide you with innovative products, exceptional service, and support when you need it the most. Count on NewAir. As a proud NewAir owner, welcome to our family. There are no robots here, real people shipped your product and real people are here to help you. Thank you for your purchase and remember NewAir, A Name You Can Trust. Call us today at 855-963-9247 Or email [email protected] For future reference, we recommend you attach a copy of your sales receipt here and record the following information. You will need this information if it becomes necessary to contact the manufacturer for service inquiries. Date of Purchase: ___________________________________ Serial Number: ___________________________________ Model Number: ___________________________________ Connect with us online. http://www.NewAir.com 3 READ AND SAVE THESE INSTRUCTIONS. TABLE OF CONTENTS Specifications ....................................................................................................... 3 Before First Use.................................................................................................... 3 Important Instructions ......................................................................................... 4 Parts List ............................................................................................................... 6 Assembly Instructions .......................................................................................... 6 Operating Instructions ......................................................................................... 7 Using the Remote Control ........................................................................... 9 Safety Features ............................................................................................ 9 Cleaning & Storage............................................................................................. 10 Troubleshooting ................................................................................................. 10 Limited Manufacturer’s Warranty ..................................................................... 12 SPECIFICATIONS MODEL NO. VOLTAGE: CURRENT: POWER CONSUMPTION: HEAT OUTPUT: AH-450B 120V 12.5A HI=1500W; LO=900W 5120 BTUs BEFORE FIRST USE Read and follow all the instructions below even if you feel you are familiar with the appliance. Remove the packing and make sure that the appliance is intact. If in doubt do not use the appliance and contact the place of purchase. Do not leave packaging materials such as bags and staples within reach of children. Dispose of packaging carefully and with consideration for the environment. It is ideal to retain the appliance carton for seasonal storage. A Name You Can Trust 4 For your convenience, record the date you received the appliance on the warranty page of these instructions, and attach your proof of purchase. Retain this information in the event that warranty service is required. IMPORTANT INSTRUCTIONS When using any electrical appliance, basic safety precautions must be followed in order to reduce the risk of fire, electrical shock and/or injury to persons or property. Be sure to read all instructions before using this appliance and observe the following safety tips: This heater is hot when in use. To avoid burns, do not let bare skin touch the hot surface. If provided, always use handles when moving this heater. Keep combustible materials such as furniture, pillows, bedding, papers, clothes and curtains at least 3 feet (0.9 m) from the front of the heater and keep them away from the sides and rear. Extreme caution is necessary when any heater is used by or near children and whenever the heater is left operating and unattended. Always unplug the heater when not in use. Do not operate the heater with a damaged cord or plug, if the heater malfunctions, or has been dropped or damaged in any manner. Return heater to authorized service facility for examination, electrical or mechanical adjustment, or repair. Do not use the heater outdoors. This heater is not intended for use in bathrooms, laundry areas and similar humid indoor locations. Never locate heater where it may fall into a bathtub or other water container. Do not run cord under carpeting. Do not cover cord with throw rugs, runners or similar items. Arrange cord away from high-traffic areas where it can be tripped over. CAUTION: This appliance has a polarized plug (one blade is wider than the other). To reduce the risk of electric shock, this plug is intended to fit in a polarized outlet only one way. If the plug does not fit fully in the outlet, reverse the plug. If it still does not fit, contact a qualified electrician. http://www.NewAir.com 5 This heater draws 12.5 A during operation. To prevent overloading a circuit, do not plug the heater into a circuit that already has other appliances working. CAUTION: It is normal for the plug to feel warm to the touch; however, a loose fit between the AC outlet (receptacle) and plug may cause overheating and distortion of the plug. Contact a qualified electrician to replace a loose or worn outlet. To disconnect the heater, first turn controls to the OFF position, then remove plug from the outlet. Never pull by the cord. No object should be inserted into any part of the heater at any time. To prevent a possible fire, do not block air intakes or exhaust in any manner. Do not use on soft surfaces, like a bed, where openings may become blocked. A heater has hot and arcing parts inside. Do not use it in the areas where gasoline, paint, or flammable liquids are used or stored. Use this heater only as described in this manual. Any other use not recommended by the manufacturer may cause fire, electric shock or injury to persons. CAUTION: Avoid the use of an extension cord because the extension cord may overheat and cause a risk of fire. However, if you have to use an extension cord, the cord must be No. 14 AWG minimum size and rated not less than 1875 W. The output of this heater may vary and its temperature may become intense enough to burn exposed skin. Use of this heater is not recommended for persons with reduced sensitivity to heat or an inability to react to avoid burns. Before using the unit, check if the voltage indicated corresponds with the intended outlet (120V). This heater may include a visual alarm to warn that parts of the heater are getting excessively hot. If the alarm flashes, immediately turn the heater off and inspect for any objects on or adjacent to the heater that may cause high temperatures. DO NOT OPERATE THE HEATER WITH THE ALARM FLASHING. SAVE THESE INSTRUCTIONS A Name You Can Trust 6 PARTS LIST ASSEMBLY INSTRUCTIONS Unpack your heater and find the wheel-holding plate and butterfly nuts between the fin assemblies. 1. 2. 3. Make sure the heater is unplugged and in the “OFF” position. Turn the heater upside down. Attach the wheel-holding plates onto the heater as Fig.1 shows. The U plate is fixed between the last two fins and the other one is fixed under the http://www.NewAir.com 7 4. 5. metal control box. Fix the castors to the vertical axis of both the wheel holding plates. Insert the butterfly nuts and screw them in tightly. Turn the heater upright. Your heater is now ready for use. WARNING: Risk of fire. Do not operate heater without wheel assemblies attached. Operate heater in upright position only (wheels on bottom, controls on top). Ensure that the surface beneath the heater is clean and free of any obstructions. It is not recommended that this heater be placed on high-pile carpeting or any other surface that impedes the flow of air underneath the heater. This heater includes a visual alarm to warn that parts of the heater are getting excessively hot. If the alarm flashes, immediately turn the heater off and inspect for any objects on or adjacent to the heater that may cause high temperatures. DO NOT OPERATE THE HEATER WITH THE ALARM FLASHING. OPERATING INSTRUCTIONS A Name You Can Trust 8 1. 2. 3. 4. 5. 6. Check that neither the appliance nor the power cable has been damaged in any way during transportation when first using the heater. Place the heater on a firm, level surface at least 3 feet (0.9 m) away from any wall and any other objects such as furniture, curtains, plants or combustible material. Plug into a standard 120 V AC, 60 Hz source. IMPORTANT: Your heater is equipped with a polarized alternating current line plug (a plug having one blade wider than the other). This plug will fit into the power outlet only one way. This is a safety feature. If you are unable to insert the plug fully into the outlet, try reversing the plug. If the plug should still fail to fit, contact your electrician to replace your outlet. Heat setting Turn on the power switch and press the ON/OFF button to turn on the heater. Press the MODE button to select the heat setting. Press the ON/OFF button again. The LED will turn off and the heater will stop working. When the heater is turned on, press MODE button to select appropriate setting which is shown in the LED as follows: HI: Heater operates at a higher wattage, approximately 1500W. LO: Heater operates at a medium wattage, approximately 900W. ECO: Heater operates in ECO mode, alternating between HI and LO settings based on the desired temperature. Temperature setting (65°F-85°F). When the heater is in operation press the (Temperature Increase) or (Temperature Decrease) button to raise or lower the set temperature. The heater will automatically set the temperature to 85°F if the temperature is not set within 2 minutes after turning on the heater. Timer setting A. Setting the timer to turn on the heater. When the heater is in stand-by mode (unit is plugged in but not operating), press the TIMER button to set the time at which the heater http://www.NewAir.com 9 will turn on. The “2H” icon will be displayed on the control panel to indicate that the heater will turn on after 2 hours. Press the timer button repeatedly to automatically turn on the heater at any desired hour set in a sequence of 2-4-6-8-10. The timer is adjustable up to 10 hours with an interval rate of 2 hours. B. Setting the timer to turn off the heater. Press the timer button once when the heater is in operation. The “2H” icon will be displayed on the control panel to indicate that the heater will turn off in 2 hours. Press the timer button repeatedly to automatically turn off the heater with a selected number of hours in a sequence of 2-4-6-8-10. The timer is adjustable up to 10 hours with an interval rate of 2 hours. Timer will be cancelled if you press the TIMER button when it is set to the maximum hour. USING THE REMOTE CONTROL There are 6 keys that have the following functions: 1. 2. ON/OFF Switch Select the heat setting 3. Timer increase 4. Timer decrease 5. Temperature increase 6. Temperature decrease CAUTION: Please dispose or recycle the battery according to municipal or provincial laws. SAFETY FEATURES If the heater shuts down: 1. 2. 3. Turn off and unplug the heater. Wait for at least 10 minutes until the heater cools. Plug the heater in to the power outlet and then turn it on. A Name You Can Trust 10 This heater includes a safety tip-over protection feature which will shut the heater off in case it is tipped over. If, at any time, the heater does tip over, please put the heater back in the upright position (wheels on bottom, controls on top). The heater will resume its normal operation. CAUTION: This heater includes an Overheat Protection System that shuts the unit off if it overheats due to abnormal conditions. At this time, the “C” Caution Indicator Light gets on. If this occurs turn the heater “OFF”, unplug it, and inspect and remove any objects on or adjacent to the heater. Allow it to cool for a few minutes, plug it back in, and resume normal operation. CLEANING & STORAGE It is recommended that the heater be cleaned at least once during the operating season in order to provide the optimum level of performance. Always turn the power switch off and unplug the heater before cleaning. Be sure to save the box for off-season storage. 1. 2. 3. 4. 5. Turn the heater off, unplug it and wait for the heater to cool down. Use a dry cloth to clean only the external surfaces of the heater. Do not use any cleaning agents or detergents. Never immerse the heater in water. Pack the heater in the original carton and store it in a cool and dry place. TROUBLESHOOTING Problem Possible Causes Solution The heater shut off unexpectedly or fails to operate. There is no power. Be sure it is plugged in and that the electrical outlet is working. http://www.NewAir.com 11 Problem The room is not hot enough. Possible Causes Solution The set temperature is lower than the current room temperature. Set the desired temperature higher than the current temperature to restart the heater. The room temperature has reached the temperature set at the thermostat. This is normal. The heater will restart once room temperature is lower than set temperature. One of the safety protection devices was activated to prevent overheating. Place the heater in upright position and check for any obstructions. If you find an obstruction, turn the heater off. Unplug the heater and wait at least 10 minutes for it to cool down. Carefully remove the obstruction. Plug the heater in and restart it as described in the OPERATING INSTRUCTIONS section. If you still notice the same problem, remove the plug from the outlet and contact the NewAir Customer Support Department. The room is too large or a window is open. Close the window. Turn on the main heat source of the room and possibly use more portable heaters. The set temperature or power setting is too low. Increase the temperature or power setting. A Name You Can Trust 12 LIMITED MANUFACTURER’S WARRANTY This appliance is covered by a limited manufacturer’s warranty. For one year from the original date of purchase, the manufacturer will repair or replace any parts of this appliance that prove to be defective in materials and workmanship, provided the appliance has been used under normal operating conditions as intended by the manufacturer. Warranty Terms: During the first year, any components of this appliance found to be defective due to materials or workmanship will be repaired or replaced, at the manufacturer’s discretion, at no charge to the original purchaser. The purchaser will be responsible for any removal or transportation costs. Warranty Exclusions: The warranty will not apply if damage is caused by any of the following: Power failure Damage in transit or when moving the appliance Improper power supply such as low voltage, defective household wiring or inadequate fuses Accident, alteration, misuse or abuse of the appliance such as using non-approved accessories, inadequate air circulation in the room or abnormal operating conditions (extreme temperatures) Use in commercial or industrial applications Fire, water damage, theft, war, riot, hostility or acts of God such as hurricanes, floods, etc. Use of force or damage caused by external influences Partially or completely dismantled appliances Excess wear and tear by the user Obtaining Service: When making a warranty claim, please have the original bill of purchase with purchase date available. Once confirmed that your appliance is eligible for warranty service, all repairs will be performed by a NewAir™ authorized repair facility. The purchaser will be responsible for any removal or transportation costs. Replacement parts and/or units will be new, re-manufactured or refurbished and is subject to the manufacturer’s discretion. For technical support and warranty service, please email [email protected]. http://www.NewAir.com