1
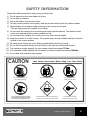
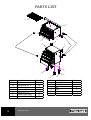
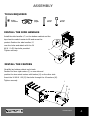
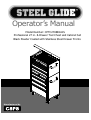
Operator’s Manual Model Number: CPTC2708B1A1S Professional 27 in. 8-Drawer Tool Chest and Cabinet Set Black Powder Coated with Stainless Steel Drawer Fronts Manufactured by WARRANTY INFORMATION LIMITED WARRANTY Model # CPTC2708B1A1S Steel Glide TM Professional 27in 8-Drawer Tool Chest and Cabinet Set CSPS Metal Inc. (”CSPS) warrants to the original consumer purchaser (”Purchaser”) of the Steel Glide Professional 27 in 8-Drawer Tool Chest and Cabinet Set (”Product”) that each Product shall be free from defects in workmanship and materials for a period of 3 years from the date of original purchase. CSPS’s obligation under this warranty shall be limited to repair or replacement, at the option of CSPS, of the Product during the warranty period. CSPS’s liability shall not extend beyond repair or replacement, or the cost equivalent thereto. This warranty excludes normal wear and tear of the Product and its parts or components, and damage arising from any of the following: negligent use or misuse of the Product, use contrary to this Operator ’s Manual, or alteration by any one other than CSPS. The limited warranty period of 3 years shall not be extended or renewed by the repair or replacement of the Product. This warranty is non-transferrable. If your Product is defective or otherwise requires service or parts, please first call CSPS Customer Service toll-free at (800) 929-3299, between 8:30a.m. and 5:00 p.m. PST , fax CSPS at (310) 830-6599, or e-mail us at customerservice@amex-csps.com. Please provide the model number, the date of purchase, and a description of the issue. CSPS will use its very best efforts to honor this warranty, and repair or replace your Product. A copy of your original purchase receipt must accompany your service request. LIMITATION OF REMEDIES AND LIABILITY *PLEASE READ THE FOLLOWING* CSPS shall not be liable for any incidental or consequential damages for breach of any express or implied warranty on its Product. Except to the extent prohibited by applicable law, any implied warranty or fitness for a particular purpose on this Product shall be limited to the duration of the above warranty. Neither CSPS nor anyone else who has been involved in the creation, production, or delivery of the Product shall be liable for any damages of any type, including but not limited to any lost profits, lost saving, loss of anticipated benefits, or other incidental or consequential damages which may arise out of the purchase, use, or inability to use the Product, whether arising out of contract, negligence, strict tort, or under any warranty, or otherwise , even if you have been advised of the possibility of such damage or any other claim by any other party. CSPS’s liability for any breach of warranty shall be limited to repair or replacement of the defective part or parts as described above. Some states do not allow the exclusion or limitation of incidental or consequential damages, so the above limitation or exclusion may not apply to you. The above warranty gives you specific legal rights, and you may have other rights which vary from state to state. 1 WARRANTY INFORMATION SAFETY INFORMATION Please take safety precautions when using your tool chest 1) 2) 3) 4) 5) 6) 7) 8) 9) 10) 11) 12) 13) Do not open more than one drawer at a time. Do not step on drawers. Do not let children near the tool chest. To help prevent product from tipping, load the product starting with the bottom drawer. Set the brake on the locking casters unless you are moving the product. This will help prevent the product from rolling. Do not move the product prior to closing and locking all the drawers. The drawers could come open and make the product unstable and tip. Do not mount this product on a truck bed or any other moving object. Keep the product on a level surface. The product may become unstable and tip if stored or moved on an uneven surface. Be carful when closing the cover. Remove hands before closing the cover. Do not lift this product directly with a forklift or tow with any mechanical devices. The maximum weight capacity for each drawer should not exceed 75 lbs. The maximum weight capacity for the product’s contents should not exceed 700 lbs. Do not alter this product in any manner. CAUTION Take Safety Precautions When Using Your Tool Chest ! Do not open more than one drawer at a time. Do not step on drawers. Do not let children near the tool chest Do not start to fill the tool chest from the top drawer of the rolling tool chest, as it might fall over. Set the brake on the locking casters unless you are moving the tool chest. Lock drawers and lid before moving the chest Safety Information 2 PARTS LIST L A D K B E J C F I G H Part # A B C D E F G 3 Description Gas Lift Hex Bolt M6 x 1.0 Side Handle Mounting Bracket Screw M4 x 12L Drawer Slide (pair) Hex Bolt M8 x 1.25 PARTS LIST Qantity 2 24 4 2 8 9 16 Part # H I J K L M M Description Caster W / Brake Rigid Caster Key Lock Drawer Liner Washer M8x19 Quantity 2 2 2 2 9 16 ASSEMBLY TOOLS REQUIRED 10 . 13 . INSTALL THE SIDE HANDLES Install the side handles (C) on the bottom cabinet and the top chest to make it easier to lift and move the product. Position the side handles (C) over the holes and attach with the 24 M6 X 1.0 (B) Hex bolts provided. Tighten securely. B C INSTALL THE CASTERS Carefully lay bottom cabinet on its back. Position the two rigid casters (I) on one side and position the two swivel casters with brakes (H) on the other side. Insert the 16 M8 X 1.25 (G) Hex bolts through the 16 washers (M) Tighten securely. I M G ASSEMBLY 4 ASSEMBLY Assembly Instructions (continued) INSTALL THE MOUNTING BRACKETS Place top chest on top of the bottom cabinet first, then install the mounting brackets to secure the top chest to the bottom cabinet. Position the mounting brackets (D) over the holes and attach with the 8 M4 X 12L Screws (E) provided. Tighten securely. E INSTALL THE DRAWER LINERS Place the drawer liners (L) in the drawers to protect the drawer surfaces. Place the liners (L) inside the top compartment and inside of each drawer. L 5 ASSEMBLY D OPERATION Usage Instruction TO REMOVE THE DRAWERS Pull drawer out so it is fully extended. Press the right hand side blue lever down , and the left hand side blue lever up. While holding the levers in the positions as instructed above, pull the drawer outward until it is released from the drawer slide (F). PRESS DOWN RIGHT HAND SIDE F TO REPLACE THE DRAWERS Extend the drawer slides (F) from the tool chest, being careful that the slides are positioned into the slot. Once properly inserted, gently close the drawer completely to set the slides in their proper position. PRESS UP LEFT HAND SIDE ! F Make sure the top lid and drawers are closed tightly before you turn the key to the locking position. . OPERATION 66 OPERATION TO REMOVE THE DRAWER SLIDE For Outer Slide: 1. Extend the drawer slide to full length. 2. Insert the tip of a pry-bar just behind the first tab between the cabinet wall and the slide. Gently pry the slide outward.(See Pic 1). 3. Push up on the drawer slide to free the first tab. Pull the slide forward slightly and free the rear tab. For Inner Slide : 1. Remove the drawer in which the inner slide is attached. 2. On one side of the drawer, insert the tip of the pry-bar just behind the first tab between the drawer and the slide. Gently pry the inner slide outward.(See Pic 2). 3. Push down the drawer slide to free the first tab. Then repeat step 2 on the other tab of the slide. Pic 1 Pic 2 TO REPLACE THE DRAWER SLIDE For Outer Slide: 1. Extend the drawer slide to full length. 2. Align the rear and front slide tabs with the slots on the inside of the cabinet wall. 3. Insert the rear tab of the slide into the slot on the cabinet wall. (See Pic 3). 4. Lift the drawer slide member slightly, then press it down and against the side of the cabinet wall to engage the front tabs into their slots. (See Pic 3). 5. Make sure to push down on the slide until all snap-in tabs are securely in place. For Inner Slide: 1. Align the slots of the drawer with the rear and front tabs of the drawer slide member. 2. Insert the clip tab in its drawer slot. 3. Push up the slide slightly to engage the rear and front tabs into their drawer slots 1 and make sure they are securely in place. 2 (See Pic 4). Pic 3 7 OPERATION Pic 4 MAINTENANCE INFORMATION MAINTAINING THE DRAWERS 1. Periodically clean the drawer trim, and inside the drawers with a mild detergent and water. 2. Remove grease and oil with a standard, nonflammable cleaning fluid. 3 . The use of drawer liners is recommended to protect the finish inside the drawers and make. the drawers easier to clean. 4. Lubricate the slides semi-annually with grease or equivalent. MAINTAINING THE CASTERS 1. Grease the casters annually using high quality bearing grease. CARE AND CLEANING 1. This steel product has been coated with industrial powder coating for a durable finish. 2. To help protect the powder coated finish, do not allow harsh chemicals (oil, grease, or other chemical) to remain on the powder coating surface. 3. Use a glass cleaner (Windex or equivalent product) to clean and maintain all surfaces of powder coating. MAINTENANCE INFORMATION 3 8 CSPS METAL INC. 3628 Michelle Drive , Torrance , CA 90503 U.S.A. TEL:1-800-929-3299 FAX:310-830-6599 EMAIL: customerservice@amex-csps.com