1
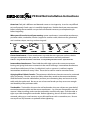
PE Bird Net Installation Instructions
Overview: Each job is different and demands some on-site ingenuity. It can be very difficult
to install properly if each step isn’t carefully thought out. Double check your measurements
before cutting the net and be sure you have all materials necessary to complete the job
before beginning.
What you will need to install your netting: corner attachments, intermediate attachments,
perimeter cable, turnbuckles, ferrules (copper for stainless cable, aluminum for galvanized)
and a ratchet crimper, net rings and net ring tool.
Corner Attachments: Corner attachments are under the most pressure and must be the
strongest component in the system; be sure all attachments are firmly anchored.
♦ Wood – use galvanized/stainless ♦ Concrete – use expanding net bolts ♦ Steel – eye bolts & nut.
Intermediate Attachments: These hold the cable tight against the structure to prevent
bowing and giving birds room to enter/exit the area of coverage. Intermediate attachments
should be installed every 23 feet. Smaller birds (such as sparrows & swallows) require
intermediate attachments every 2 feet. These can be used in wood or concrete frames.
Stringing Wire/Cable & Ferrules: The perimeter cable frames the entire area to be sectioned
off by the netting. Ferrules secure the cables where they attach to the corner attachments.
Slide the ferrules onto the cable before you form your connecting loop and secure it to the
cable with the ratchet tool. Be sure to use at least two ferrules per loop to ensure strength
and durability of the perimeter cable.
Turnbuckles: Turnbuckles also must be well anchored as they are subject to a great deal of
tension between the cable and the corner attachments – be sure your components are well
secured. When installing, make sure the turnbuckles are all the way open. Pull the cable as
tight as possible through the turnbuckle. Before tightening, be sure all slack in the cable is
removed, taking up as much tension as possible and fasten with a screwdriver, etc. Be sure
not to pull out any fasteners or eyehooks when tightening.
Net Rings: Net rings are used to attach the netting to the cable. Using the ring tool, secure
one loop per square of netting.
Attaching the Netting: Begin working from one side making your way to the other side -DO NOT attempt to meet in the middle while attaching netting. Begin in one corner and
attached the netting using the net rings horizontally. Once you’ve got a few feet in place, go
back to the corner and begin attaching a few feet vertically so you have a strong corner in
place. Continue to attach the netting horizontally then continue fastening vertically at the
beginning corner. Once the top and side are finished, you can finish the remaining sides as
desired. After you’ve attached the netting, inspect the cable to check for bowing or large
gaps. If any inconsistencies exist, carefully tighten your turnbuckles to close any gaps.
This is a general overview of Bird-X Bird Net Installation. Complicated projects could
require additional materials and instruction. If you need more information on how to
complete your project, please call your Bird-X representative for additional assistance.
Bird-X, Inc. ♦ 300 N. Oakley Blvd. ♦ Chicago, IL 60612 ♦ 312.226.2473 ♦ [email protected]