1
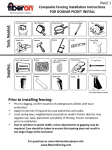
UltraShieldTM Decking Installation Instructions
IMPORTANT: Read all sections before you start
For the most up to date information please visit our website @ www.newtechwood.com
Prior to installing any composite decking system it is
recommended that you check with local building codes for any
special requirements or restrictions. The diagrams and
instructions outlined in this guide are for illustration purposes only
and are not meant or implied to replace a licensed professional.
Any construction or use of NewTechWood must be in accordance
with all local zoning and/or building codes. The consumer
assumes all risks and liability associated with the construction
and use of this product.
Planning
Safety
Construction
When dealing with any type of construction project it is necessary
to wear appropriate safety equipment to avoid any risk of injuries.
NewTechWood recommends but is not limited to the following
safety equipment when handling, cutting, and installing
NewTechWood: gloves, a respiratory protection, long sleeves,
pants, and safety glasses.
NewTechWood UltraShield is NOT intended for use as columns, support posts, beams,
joist stringers or other primary load-bearing members. NewTechWood must be
supported by a code-compliant substructure. While NewTechWood products are great
for deck re-planking (removing old deck surface planks and installing NewTechWood on
code-compliant substructure), NewTechWood boards CANNOT be installed on existing
deck boards.
Tools
Routing
Standard woodworking tools may be used. It is recommended
that all blades have a carbide tip. Standard stainless steel or
acceptable coated deck screws and nails are recommended.
NewTechWood UltraShield SHOULD NOT be routed aside from routing a groove on the
side of solid boards US-07 for start/stop of UltraShield locking systems.
Environment
Static
A clean, smooth, flat, and strong surface is needed to install
UltraShield correctly. Please check with local building codes
before ever installing any type of decking. If installation does not
occur immediately UltraShield needs to be put on a flat surface at
all times. Never ever should it be put on a surface that isn’t flat.
Static build-up is a natural occurring phenomenon that can occur with many plastic
products. Dry and windy environments may make this even more apparent, this all
varies depending on the climate and age of the deck.
Plan a layout for your deck before starting it to ensure the best possible looking deck for
your project. Building codes and zoning ordinances generally apply to permanent
structures, meaning anything that is anchored to the ground or attached to the house. So
nearly every kind of deck requires permits and inspections from a local building
department. We recommend drawing out a site plan of your proposed project that you
intend to do to minimize errors and make your perfect deck.
1
UltraShieldTM Decking Installation Instructions
Ventilation
NewTechWood UltraShield CANNOT be directly installed onto a flat surface. It must be installed onto a substructure, so there is adequate and
unobstructed air flow under the deck to prevent excessive water absorption. A minimum of 6” of continuous net free area under the deck surface is
required for adequate ventilation on all decking so air can circulate between adjacent members to promote drainage and drying.
Heat and Fire
Excessive heat on the surface of NewTechWood UltraShield from external sources such as but not limited to fire or reflection of sunlight from energy
efficient window products. Low-emissivity (Low-E) glass can potentially harm NewTechWood UltraShield products. Low-E glass is designed to prevent
passive heat gain within a structure and can cause unusual heat build-up on exterior surfaces. This extreme elevation of surface temperatures, which
exceeds that of normal exposure, can possibly cause NewTechWood UltraShield products to melt, sag, warp, discolor, increase expansion/contraction,
and accelerate weathering.
Current or potential NewTechWood UltraShield customers that have concerns about possible damage by Low-E glass should contact the manufacturer of
the product which contains Low-E glass for a solution to reduce or eliminate the effects of reflected sunlight.
Fasteners
When fastening UltraShield all screws that are face fastened should always be driven in at a 90 degree angle to the decking surface. Toe nailing/screwing
should never been down to UltraShield. An extra joist should be added if a 90 degree angle cannot be driven into the board.
Use white chalk, straight boards, or string lines as templates for straight lines. NEVER USE COLORED CHALK. Colored chalk will permanently stain
UltraShield and is highly not recommended.
Face fastening should follow the guidelines set out on page # of this installation guide. All nails/screws that are face fixed should always be stainless steel.
Depending on the screws that you use when face fixing there could be potential bulging or mushrooming. It is recommended to take care of these
mushrooms/bulges by taking a rubber mallet and patting them down to give your deck a better look.
When choosing which screws/nails to use always check first with your local home centers and hardware stores to see if they have screws that are
engineered specifically for composite decking. These screws/nails will always work and give UltraShield the best looking outcome, using other screws/nails
that are not recommended for composite could potentially damage/harm the deck. If you are unsure which screw/nail to use contact your manufacturer for
221
UltraShieldTM Decking Installation Instructions
Board Spacing (Cont.)
For butt joint gapping the concept for UltraShield is simple when using the clip systems. The user wants to be locking the board down where it
creates the least amount of expansion and contraction to be seen.
Therefore if the user were installing a setup like below he or she will want to lock the boards in the middle and allow for expansion and
contraction to happen at the ends. This will give the deck a very nice look when it is done because of zero gapping in the middle.
NEVER try to lock down two boards with a single locking clip or CEC clip. Two boards should NEVER be installed on the
same joist, when butting up board ends they have to be installed on separate joists.
Calculate the distance of the board from the position of locking
per 1 meter of decking there needs be a minimum of 2 mm gapping
For example:
For a 3 meter board locked on one end the gapping left on the other end would need to be at least 6 mm.
For that same board but locked in the middle both ends will need at least 3 mm.
321
UltraShieldTM Decking Installation Instructions
Framing
First, determine the decking span, that is , how
far apart your joists will be.
The frame needs to be completely level before
installing any boards.
Note: Adequate spacing in the joists is
required to keep the deck boards from
bending. Please review the chart on page 9
of this installation guide to see what spacing
is required for your profile.
Decking
Diagram 1
When installing the deck the first and last board
of your project will need to be nailed, screwed,
or use a starting accessory. Every other board
will use the hidden fastener for its installation.
Option 1: Screw from the side
1. After calculating the decking span and making
the frame of your deck the first board is ready
to be installed.
2. First pre-drill a hole for the screw through the
groove of the board and into the joist.
3. Next, fix the screw into the hole shown in
Diagram 1 & 2.
Diagram 2
12
4
UltraShieldTM Decking Installation Instructions
Decking
Option 2: Screw from the top
1. After calculating the decking span and making the
frame of your deck the first board is ready to be
installed.
2. First, mark where you will drill on the top of board as
shown in Diagram 3.
Note: When face fastening the minimum distance is:
A. From the ends of the board 1-1 1/2” (38mm)
B. From the sides of the board 1” (26 mm)
Diagram 3
3. Pre-drill a hole for the screw through the board from
above and into the joist.
4. Next, fix the screw into the hole shown in Diagram 4.
5. Repeat steps 1-4 for each joist for the first and last
board of your deck.
Note: When making the final cuts we recommend
snapping a chalk line and using a circular saw to the
cut the deck boards that ran wild during installation.
Option 3: Starting accessory
1. A starting accessory can be used by first drilling the
accessory into the joist.
2. First pre-drill into the joist then fix the starting
accessory into the joist as shown in Diagram 5
3. Then take your first board and push it into the
starting accessory as shown in Diagram 5
Diagram 4
Diagram 5
51
UltraShieldTM Decking Installation Instructions
Hidden Fasteners
Installing hidden fasteners with UltraShieldTM is
relatively simple and quick compared to regular lumber.
Before you installing hidden fasteners into
UltraShield always figure out which type of style/
pattern you will be doing for your deck. Plan out
where the locking and moving clips will be going on
each joist. See page 10 & 11 for more information.
Diagram 6
There are two options when installing hidden fasteners
into UltraShield:
Option 1: T-Clip System
1. First slide the TC-1 and TC-2 clips into the groove of
the boards with screws facing up.
2. After getting all the TC-1 and TC-2 clips into position
take your next board and slide them into the
fasteners as shown in Diagram 6 & 7.
3. Next screw down the TC-1 and TC-2 clips from the
top
4. Repeat steps 1-3 until the deck is finished.
Diagram 7
Note: For an easier install with the T-Clip System try
first pushing all the boards together and then
coming back in and sliding the clips into the
grooves and then into place on each joist as shown
in Diagram 8
(Continued on the next page)
Diagram 8
61
UltraShieldTM Decking Installation Instructions
Hidden Fasteners (continued)
Option 2: UltraLock System
1. First slide the UL-1 and UL-2 clips into the grooves
of the boards at a 30-45 degree angle at their
respective joists as shown in Diagram 9.
2. Once the clip is in press down and the clip will be
ready to install into the joists as shown in Diagram
10 & 11.
3. Next screw the clips into the joists using a 45 degree
angle.
4. Once all clips are screwed down the next board will
come in at a 30-45 degree angle and then pushed
down into place as shown in Diagram 12.
5. Repeat steps 1-4 until the deck is complete.
Diagram 9
Diagram 10
Note: Using hidden fasteners that are not
manufactured by NewTechWood nor recommended
by NewTechWood are not warranted. Use these
fasteners at your own risk.
Diagram 11
Diagram 12
71
UltraShieldTM Decking Installation Instructions
Fascia Board
First make sure you know which type of installation you
are doing for your fascia board. There are two types:
Option 1: Installing against the length of decking
1. First the distance from where the board is locked to
the end of deck where the fascia board is to be
installed needs to be measured
2. After measuring remember that your gapping will be
2mm/meter from the locking clip.
3. Since there will be a gap at the end of the deck an
extra piece of wood will need to be added at the end
of the joist to make up the gapping distance.
4. The fascia board will now be installed into the block
of wood and into the joist as show in Diagram 13
Option 2: Installing against the width of decking
1. If you have installed where the edge of the board
hangs over the joist a block of wood will need to be
used under as shown in Diagram 15. If you have
installed where the edge of the board is flush with the
joist than the fascia will just be installed through the
joist as shown in Diagram 16
2. First pre-drill the holes for the fascia board. The
fascia board should be drilled with bigger holes or
routed to allow for expansion and contraction and
fixed either at either end or in the middle as shown in
Diagram 17. When fixing the bigger holes it is
recommended to use washers.
3. The fascia board will be installed into the the block
wood and through the joist.
Note: NEVER install the fascia by drilling into the
decking as shown in Diagram 14. ALWAYS install the
fascia into the joist. ALWAYS pre-drill the fascia
board
Diagram 13
Diagram 14
Diagram 15
Diagram 16
Diagram 17
81
UltraShieldTM Decking Installation Instructions
MAXIMUM DECKING SPAN FROM CENTER TO CENTER (OC) OF JOISTS ALLOWED
Decking Span
Decking Span
Profile
Residential
Commercial
Solid Board
US07
Solid Board with Grooves
US01
400 mm (16 in)
350 mm (14 in)
400 mm (16 in)
350 mm (14 in)
400 mm (16 in)
350 mm (14 in)
350 mm (14 in)
300 mm (12 in)
350 mm (14 in)
300 mm (12 in)
Channeled Solid Board with
Grooves
US02
Circle Hollow Board with
Grooves
UH02
Channeled Circle Hollow Board
with Grooves
UH07
Square Hollow Board with
Grooves
UH01
This profile is only for
300 mm (12 in)
Residential use, and cannot
be used for stair treads
91
UltraShieldTM Decking Installation Instructions
1
10
UltraShieldTM Decking Installation Instructions
1
11