1
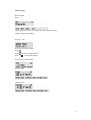
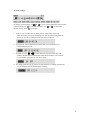
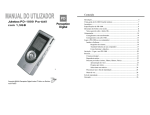
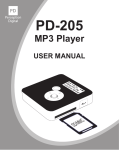
Table of Contents
Introduction..................................................................................................……….…2
Copright notice...........................................................................................…….3
Safety information...................................................................................………3
Precautions..............................................................................................….……5
In the Package...................................................................................................……….6
Specifications.............................................................................................................….7
Knowing Your Portable MP3 Player................................................................……….8
Name of parts.................................................................................................…...8
Inserting battery.........................................................................................………9
Turn on MP3 player...................................................................................…….10
Turn off MP3 player...................................................................................…….10
System Requirement........................................................................................……….11
Mass Storage PC Connection.........................................................................………..12
Mass Storage PC Connection...................................................................……..12
How to format the player?..........................................................................……14
Firmware Upgrade......................................................................................……14
Detailed Controls..............................................................................................………15
Selecting modes........................................................................................……..15
Playing music or voice files.......................................................................……15
Recording...................................................................................................……17
Menu Settings...................................................................................................………19
Menu settings in Music mode.....................................................................……19
Menu settings in Radio mode......................................................................……21
Menu settings in Voice mode......................................................................……25
System Settings.................................................................................................………..26
Troubleshooting................................................................................................………..28
Company Contacts.............................................................................................……....30
1
Introduction
Thank you for purchasing the Yamakawa MR-240 portable MP3 player!
With this MP3 player you can enjoy digital music in a more convenient way. You
can directly encode your music from any audio source and record your voice into
MP3 quality, all of this without the use of a computer. You can high quality
one-touch voice-recording feature you can record lectures, interviews or meetings
in MP3 quality.
The MP3 player is compact in size, light in weight and highly functional. Begin
to enjoy the various features of your player by following this user manual.
To familiarize yourself with your player, here are some function highlights:
•
•
•
•
•
•
•
•
•
•
•
•
•
•
•
•
Built-in USB jack
Direct line-in encoding to MP3 or voice format
128MB, 256MB, or 512MB internal memory, depending on version of
the player
MP3, WMA, and ADPCM playback
30 FM radio preset channels (Enhanced Feature!)
FM recording in MP3 quality
High quality voice recording from built-in microphone
Voice message recording in MP3 or voice format
Various MP3 recording bit rates (48kbps, 96kbps, 128kbps)
Supports ID3 tagging
Mass Storage
Firmware upgrades available
A-B looping support
5 equalizers
Sleep preset
2
Introduction
Copyright Notice
You must be aware that distribution of MP3 files without the permission from the
content owner is against the copyright laws. Perception Digital Ltd. and its
associating companies will not be liable against such actions.
Safety information
The user manual or instruction manual for an intentional or unintentional radiator
shall caution the user that changes or modifcations not expressly by the party
responsible for compliance could void the user 抯 authority to operate the equipment.
Modifications not authorized by the manufacturer may void users authority to
operate this device.
This equipment has been tested and found to comply with limits for class B digital
device, pursuant to part 15 of the FCC rules. These limits are designed to provide
reasonable protection against harmful interference in a residential installation. This
equipment generates, uses and can radiate radio frequency energy and, if not
installed and used in accordance with the instruction, may cause harmful interference
3
Introduction
to radio communications. However, there are no guarantees that interference
will not occur in a particular installation. If this equipment does cause harmful
interference to radio or television reception, which can be determined by
turning the equipment off and on, the user is encouraged to try to correct the
interference by one or more of the following measures:
Reorient or relocate the receiving antenna
Increase the separation between the equipment and receiver
Connect the equipment into an outlet on a circuit different from
that to which the receiver is connected.
Consult the dealer or an experienced radio / TV technician for help.
Keep in mind, modifications not authorized by the manufacturer
may void users authority to operate this device.
If the product suddenly has no response or power off, it may be caused by
electrostatic discharge. If this circumstance, please follow the procedures
below for recovery:
Switch off the unit, if the unit has no response
Turn on the unit again
4
Introduction
5
In the Package
6
Specifications
7
Knowing your Portable MP3 Player
8
Knowing your Portable MP3 Player
9
Knowing your Portable MP3 Player
Turn on MP3 player
Press and hold
Make sure the HOLD button is switched off. If not, “LOCKED”will be
displayed.
Turn off MP3 player
Press and hold
(except when your player is connected to a PC)
10
System Requirement
Your PC must have the following minimum specifications:
Windows98 SE, 2000, XP or upper
Pentium II 200
64MB RAM
500MB Hard disk space
CD-ROM drive
USB 1.1
The MP3 player is installed as a mass storage device. The driver
installation is not essential unless your PC is running Windows 98/SE.
Multiple Language Support
When the player is in stop mode, pressing the Vol+ and Vol- buttons will
change the song name display language. By using these buttons you can
convert the song titles through a series of different languages listed below:
Western European Language
Korean (Hangeul)
Japanese (Hiragana, Katakana and Kanzi)
Chinese Traditional
Chinese Simplified
11
Mass Storage PC Connection
Mass Storage PC Connection
This is a mass storage device. No driver installation is required except
Windows 98 SE. For Windows 98 SE users, please download the driver from
www.perceptiondigital.com. Locate the downloaded driver file (setup.exe)
on your hard drive and double click the driver file (setup.exe). Follow onscreen prompts to complete the driver installation process.
(For Windows 98 SE users, you can use the Windows 98 SE driver CD if
your retailer has bundled it in the package)
Transfer files from PC to player:
1. Switch on the player and connect it securely to the PC with the
USB cable.
2. Double click on "My Computer" on the desktop of windows, there
will be an additional drive created.
3. If the player is connected to your PC, you will see "USB Connected"
on the player's screen.
4. To download music files to your MP3 player, simply drag the files
from the Windows File Explorer and drop them to the newly opened
drive. You can also upload files from the player to the PC by doing
the reverse.
12
Mass Storage PC Connection
CAUTION:
ONLY UNPLUG THE USB CABLE WHEN ALL DOWNLOAD PROCEDURES
ARE COMPLETED.
Do not unplug the USB cable when the LCD is still displaying “USB writing”as
doing so may corrupt the files stored in the player and you will need to re-format
the MP3 player. If the player encounters abnormal interruption during recording
such as battery removal, you may also need to re-format it.
13
Mass Storage PC Connection
Add on functions:
1. The MP3 player can also be used as an external drive for storage of non-music
Files.
2. The MP3 player is compatiable with Music Match.You can directly rip your
audio CDs to WMA or MP3 format using Music Match software and directly
download to the player.
* Our MP3 player does not support WAV files downloaded or created by user.
only supports WAV files recording direct from the MP3 player.
It
How to format the player?
The purpose of re-formatting the player is to try to restore the player to normal
operation. This is for when the player is not able to function properly or in cases
where you player is unable to power on. Keep in mind, that the content of the player
will be removed once being formatted.
1.
Connect the player to the PC.
2.
Right click the additional drive and click Format.
3.
Click "Yes" to confirm.
The player only supports FAT / FAT16 file system. Do not format it by FAT32.
Firmware Upgrader
You should check your vendor’s website for new firmware upgrades, these developments provide add-on functions and language support options. Upgrades are
announced on the web site and users can then download the software from the
download section at www.yamakawa.de
14
Detailed Operating Controls
Selecting Modes
The MP3 player has three operation modes: MUSIC, FM and VOICE
Hold the
control for the selection of “MUSIC”, “ FM”or “VOICE”
mode. Select the mode required by using the
or the
control and
enter by pressing
Playing Music or Voice Files
1. PLAY/STOP
Navigate the MP3 player into music or voice file. Press
playback. While the MP3 player is playing, press
The default status of the track is “ ”
to start
to pause.
2. Selecting Tracks
2.1 When the MP3 player is stopped/paused, use either the
or the
control to browse through the tracks.
2.2 While the MP3 player is playing, use the
control to skip
to the next track and the
control to play the previous one.
3. Fast Forward/Fast Reverse
Press the
or the
control for more than one second to start fast
forwarding or reversing.
15
Detailed Operating Controls
4. A-B Looping
While playing music or voice files, press REC/A-B to mark the point where
you want the loop to start (A). Press REC/A-B again where you want the
section to end (B). The marked section will start to repeat. Press REC/A-B
one more time to cancel the loop.
5. Deleting Files
Press the
control and use the
or the
control to select
"DELETE". Press
to enter. Use the
or the
control to select the
file to be deleted. Press
to delete the track. To exit press the “ ”
control.
16
Detailed Operating Controls
Recording
1.
Music recording in music mode
This function enables you to record any audio source to MP3. Simply, connect the
audio source to line-in jack by using a stereo cable.
Navigate your player into music mode. Press the REC button to start recording in
music mode. To stop recording, press REC again.
Note:
In Music mode, the default recording source is “Line-In.”
17
Detailed Operating Controls
2. Voice recording in voice mode.
This feature offers high quality one touch voice recording.You can select to record
voice into MP3 quality in music mode or ADPCM format in voice mode to enjoy
smaller file size.
Navigate your player into voice mode. Press the REC button to start recording in
voice mode. To stop recording, press REC again. When recording, a“ ”will be
shown on the LCD display. Press
to pause or resume recording.
Note:
The default recording source in Voice mode is the internal microphone ,
“MIC-IN”ou can record audio files line-in in voice mode. The quality of the
audio file will be in voice quality but the file size will be smaller. Please refer to the
System Settings section to find out how to do this.
3. Radio recording in radio mode
First navigate your player into radio mode. Press the REC button to start recording
in radio mode.To stop recording, press REC again. When recording, a “ ”will
be shown on the LCD display.
Note:
Radio recording quality depends on the reception quality at the time of recording.
18
Menu Settings
To change the settings, use the
jog dial to select each particular option.
Press the
button to enter into the sub-menu and use the
jog dial
to choose the desired settings. Press the
button to confirm your choice.
Press the “ ”button to exit to the sub-menu.
The following table shows all key responses for menu settings in different
modes:
Menu settings in Music Mode
19
Menu Settings
Playmode
Equalizers
Select Normal, Rock, Classic, Jazz, Pop and User default
Bass:
Treble:
Set bass from levels 1 to 4 (1 is the weakest and
4 is the strongest)
Set treble from levels 1 to 4 (1 is the weakest
and 4 is the strongest)
20
Menu Settings
Recording Bit
Rates
There are various choices of recording bit rates in MP3 recording:
48kbps, 96kbps, and 128kbps.
Deleting
File
Go to file you want to delete.
Press
Press
button to confirm deletion
Press “ ”to Exit Delete Menu.
Menu setting in Radio Mode
Normal Mode
Channel Preset
21
Menu Settings
Your MP3 player can store up to 30 preset programme frequencies. These
programmes can be quickly tuned when the radio is in the PRESET MODE.
This section gives instructions for saving programme presets. The next section
explains how to enter the PRESET MODE and retrieve a preset programme.
1.
2.
3.
4.
5.
6.
7.
Enter the RADIO mode as described previously.
In NORMAL MODE tune the radio to the programme you wish to preset.
Press the
button.
Use the
or
controls to select CH PRESET.
Press
Use the
or
controls to select the preset number..
Press
to confirm.
Using the preset mode
Mono/Stereo
Mode
Set FM radio output to stereo or mono
22
Menu Settings
Preset Mode
1.
2.
3.
4.
5.
Enter the RADIO mode as described previously.
Press the
button.
Use the
or
controls to select PRESET MODE.
Press . The radio is now operating in preset mode.
Use the
or
controls to select the preset programmes until the
one you require is selected.
23
Menu Settings
Deleting
Preset
Program
Deleting programme presets
1.
2.
3.
4.
5.
6.
Enter the RADIO PRESET MODE as described above.
Press the
button.
Use the
or
controls to select DELETE.
Press
Use the
or
controls to select the preset programme you wish to
delete.
Press
24
Menu Settings
Menu setting in Voice Mode
MUSIC: Switch to music mode
FM: Switch to radio mode
VOICE: Switch to voice mode
Deleting
File
Go to file you want to delete.
Press
Press
button to confirm deletion
Press“ ”to Exit Delete Menu.
25
System Settings
&
to move to each particular system setting
To change system settings, use
sub-menu and press
to enter the sub-menu. Use
&
to choose the
desired settings. Press
to confirm.
1.
Source: You can select the recording source in this menu. Selecting
LINE-IN means you will be recording from line-in and selecting MIC-IN
means you will be recording from the internal microphone.
2.
Sleep preset: Choose the time in minutes that you want the device to
automatically power off.
3.
Resume: Use the
/
to switch between “On”and “Off” This will
enable or disable the resume function. This function allows you to return
to a track when you power on the device again.
4.
Scrolling Speed of song 抯 name: Choose between 5 scrolling speed levels,
4 is the fastest speed and OFF disables scrolling.
26
Menu Settings
5. Backlit time: There are 4 backlit time levels; 10, 30, 60, and permanent.
These refer to the length of time in seconds the backlight will remain on
after pressing a button.
6.
Contrast level: Set the display contrast from level 1 to 10.
7.
Default setting: You may choose to resume your settings to default by
pressing either "Yes" or "No."
8.
Version number: For checking the firmware version of this player.
9.
Idle time: The device will automatically power off when it is left for a
specified idle time. For example, you can set it at 3 seconds and the
device will turn off when it is left idle for this length of time.
10. ASD (Audio Silence Detection): This menu allows you to choose the
length of silence before ending the current line-in recording and starting a
new file. You can also turn the silence detection feature off with this menu.
27
Trouble shooting
1. The player does not work or nothing is displayed on the LCD.
Check the capacity and the polarity of the battery.
The player will automatically shut down to save power if it is left idle for
1 minute.
2. The buttons are not responding.
Check if the "Hold" button on the main unit is locked. If yes, buttons will
have no response.
3. Unable to play MP3 file.
Check if the memory contains any MP3 files.
Check if the player is in Music Mode.
Check if the MP3 player supports the format of the stored files.
4. Unable to play ADPCM
Check if the memory contains any VOC files
Check if the player is in Voice Mode.
5. Unable to record via line-in.
Check if there is enough space in the selected memory.
Check if cable is stereo and connected to the device properly.
6. A-B looping function is not working.
This function only works during playback.
28
Trouble shooting
7. Unable to install software.
Our installation CD only supports Windows 98, ME, NT, 2000, XP XP
Pro, XP home with Latest Windows Service Pack. Other systems are not
supported.
8. Unable to find the mass storage device after connecting to the PC.
Make sure your device is powered on and ready.
9. How to reset MP3 Player to factory settings.
Choose default setting in system settings. Choosing “YES”allows you to
reset the player to factory default settings.
10. Backlight does not turn on.
Check if the backlight is disabled in the system setting. This is for power
saving purposes.
29