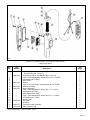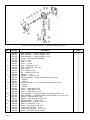
1
OPERATION, SERVICE & PARTS MANUAL Before installing hoist, fill in the information below. Refer to the Hoist and Motor data plates. Model No. _________________ Serial No. _________________ SERIES Y80 Purchase Date _____________ Voltage ___________________ ® YALE Rated Load _______________ WIRE ROPE ELECTRIC HOISTS INCLUDING WEIGHT WATCHER OVERLOAD CLUTCH MODELS RATED LOADS 1/2 THRU 5 TONS Printed in U.S.A. May, 2003 Copyright 2003, Yale•Lift-Tech, division of Columbus McKinnon Corporation Part No. 117404-10 Page 1 FOREWORD This manual contains important information to help you install, operate, maintain and service your new YALE electric hoist. We recommend that you study its contents thoroughly before putting the hoist into use. Read ANSI B30.16 safety code for hoists. Then, thru proper installation, application of correct operating procedures and by practicing the recommended maintenance suggestions you can expect maximum lifting service from the hoist. It will likely be a long time before parts information found in Section IX is needed; therefore, after the hoist is installed and you have completely familiarized yourself with operation and preventive maintenance procedures, we suggest that this book be carefully filed for future reference. When ordering replacement parts from this book, it will be necessary that you include, with your order, the Hoist Serial Number, Model Number and Catalog Number which is found on the nameplate attached to the hoist electrical cover. For your convenience, a space has been provided on the front cover of this Manual for entering this information. We recommend that you fill it out immediately so it is readily at hand when needed. The contents of this manual are of necessity, general in nature and may cover features not incorporated on your hoist; therefore, the user must exercise care in applying instructions given in this manual. If specific information not in this manual is required, contact the factory at Muskegon, Michigan 49443. THE INFORMATION CONTAINED IN THIS MANUAL IS FOR INFORMATIONAL PURPOSES ONLY AND YALE•LIFT-TECH DOES NOT WARRANT OR OTHERWISE GUARANTEE (IMPLIEDLY OR EXPRESSLY) ANYTHING OTHER THAN THE COMPONENTS THAT YALE•LIFT-TECH MANUFACTURES AND ASSUMES NO LEGAL RESPONSIBILITY (INCLUDING, BUT NOT LIMITED TO CONSEQUENTIAL DAMAGES) FOR INFORMATION CONTAINED IN THIS MANUAL. NOTICE: Information contained in this book is subject to change without notice. SECTION I Paragraph Paragraph Paragraph INDEX GENERAL DESCRIPTION Page 1-1 General ................................................................................................................................................................. 3 1-2 Basic Construction ............................................................................................................................................... 3 1-3 Differences Between Models ............................................................................................................................... 3 SECTION II Paragraph Paragraph Paragraph Paragraph INSTALLATION 2-1 General ................................................................................................................................................................. 3 2-2 Suspending Hoist ................................................................................................................................................. 3 2-3 Connecting Hoist to Electrical Service ................................................................................................................ 4 2-4 Pre-Operation Checks .......................................................................................................................................... 4 SECTION III Paragraph Paragraph Paragraph Paragraph OPERATION 3-1 General ................................................................................................................................................................. 6 3-2 Push Button Operation ......................................................................................................................................... 6 3-3 Overload Clutch Operation (Optional) ................................................................................................................. 6 3-4 Operating Precautions .......................................................................................................................................... 6 SECTION IV Paragraph Paragraph Paragraph Paragraph Paragraph Paragraph LUBRICATION 4-1 General ................................................................................................................................................................. 7 4-2 Change Gear Case Oil ......................................................................................................................................... 7 4-3 Lubricate Hoist Cable ........................................................................................................................................... 7 4-4 Lubricate Upper Sheave and Lower Block Assembly ......................................................................................... 7 4-5 Lubricate Limit Stop Lever .................................................................................................................................... 8 4-6 Lubricate Limit Switch .......................................................................................................................................... 8 SECTION V Paragraph Paragraph Paragraph Paragraph Paragraph Paragraph Paragraph Paragraph Paragraph Paragraph INSPECTION AND PREVENTIVE MAINTENANCE 5-1 General ................................................................................................................................................................. 8 5-2 Inspect Lower Block ............................................................................................................................................. 9 5-3 Inspect Upper Block and Hoist Suspension ........................................................................................................ 9 5-4 Inspect Electrical Controls .................................................................................................................................... 9 5-5 Inspect Motor Brake ........................................................................................................................................... 11 5-6 Inspect Mechanical Load Brake, Gearing and Overload Clutch (Optional) ..................................................... 11 5-7 Inspect Rope Drum and Shaft ............................................................................................................................ 13 5-8 Rope Inspection, Maintenance and Replacement ............................................................................................ 14 5-9 Rope Reeving ..................................................................................................................................................... 14 5-10 Testing Hoist and Overload Clutch (Optional) ................................................................................................... 17 SECTION Vl TROUBLE SHOOTING CHART ............................................................................................................................ 19-20 SECTION Vll Paragraph Paragraph Paragraph Paragraph Paragraph ADJUSTMENTS 7-1 Mechanical Load Brake ...................................................................................................................................... 21 7-2 Motor Brake ......................................................................................................................................................... 21 7-3 Block Operated Limit Switch .............................................................................................................................. 21 7-4 Screw- Type Limit Switch .................................................................................................................................... 21 7-5 Overload Clutch Adjustment .............................................................................................................................. 22 SECTION VIII WIRING DIAGRAMS SECTION IX PARTS LIST Paragraph 9-1 General ............................................................................................................................................................... 22 Paragraph 9-2 List of Parts Illustrations ..................................................................................................................................... 22 No part of this document may be reproduced in any form, in an electronic retrieval system or otherwise, without prior written permission of the publisher. Page 2 SECTION I — GENERAL DESCRIPTION 1-1. GENERAL. YALE electric hoists are precision built wire rope and drum type hoists which are made in five rated load sizes (1/2, 1, 2, 3 and 5 tons) with various lifts, lifting speeds and electrical service. Equipped with an integrally welded mounting lug, they are designed to be rigidly attached to an overhead structure or mounted on YALE rigid mount trolleys for operation on runway beams. On certain models optional base mounting or other supporting methods may be obtained. For full information apply to factory at Muskegon, Michigan 49443. NOTICE YALE hoists are available with an optional built-in mechanical overload clutch. Hoists having this device are identified with words WEIGHT WATCHER on the hoist. The WEIGHT WATCHER overload clutch permits operation of your hoist within its rated load and helps prevent lifting of excessive loads which could cause permanent deformation of a properly maintained hoist or trolley. 1-2. BASIC CONSTRUCTION. All models are of the same basic construction and consist of a rugged welded steel frame which houses a lifting drum and serves as the suspension for carrying the entire hoist load. A mounting lug, for attaching the hoist to a trolley or overhead support, is located on top of the frame. An aluminum alloy gearcase and cover, attached to one end of frame, houses a three-reduction gear train and a mechanical load brake. An electric driving motor with disctype motor brake is located beside the frame, face mounted on the back of the gearcase. Electrical system components, located on the end of the frame (opposite gearcase end) and enclosed by a steel cover, control operation and rotating direction of a driving motor. A hoisting rope and an enclosed lower block assembly are used for lifting loads. An upper limit stop is used to limit travel of the lower block in the raising direction, to protect hoist from damage. A push button control station, for operating the hoist, is suspended from the electrical compartment. 1-3. DIFFERENCES BETWEEN MODELS. The main differences between models are in rope reeving and frame size as described below. a. Rope Reeving. There are four types of rope reeving used: Two parts of rope single reeved, four parts of rope single reeved, six parts of rope single reeved and two parts of rope double reeved. Single reeved hoists have one end of the rope anchored to the drum, whereas, double reeved hoists have both ends anchored to the drum. On single reeved models, the lower block travels sideways as rope winds on drum, double reeved models offer true ver tical lift. For illustrations, refer to Section V, paragraph 5-9, “Rope Reeving” instructions. b. Frame Size. Length of frame furnished is dependent on hoist capacity and lift. Four frame lengths are used; short frame, long frame, first and second extensions. Short frame hoists have a rope drum flange to flange distance of approximately 9-3/4", whereas this distance on a long frame hoist is approximately 16-3/4". First extension frame hoists have a flange to flange distance of 22-15/16" and second extensions have 35-3/8". c. Motor Brake. Hoists are equipped with a disc brake mounted on the motor end bell and operated by a short stroke solenoid. This brake requires periodic adjustment. SECTION II — INSTALLATION 2-1. GENERAL. YALE electric hoists are lubricated and tested before being shipped from the factory. To place hoist in service, attach to a suitable suspension (paragraph 2-2), connect to electrical service (paragraph 2-3) and perform pre-operation tests and checks (paragraph 2-4). WARNING Before attempting installation of hoist or trolley, the main power switch must be locked in the open position (off). 2-2. SUSPENDING HOIST. The hoist may be suspended in a fixed location servicing only the area directly below the hoist (Lug Mounted) or the hoist may be attached to a moveable trolley or trolleys which in turn may be mounted on an l-beam attached to a building or crane, servicing a larger area (Trolley Mounted). WARNING DO NOT use small holes for attaching this hoist unless rated load on lower block is 1 (one) ton (2000 Ibs.) or less. a. Lug Mounted hoists attach to adequate supports welded or bolted to a building or other structure. The supporting structure must have sufficient strength with appropriate safety factor, to support the weight of the hoist and rated load as well as other loads to which the supporting structure may be subjected. WARNING Design and installation of hoist support shall be performed only by qualified persons. Steel angles or plates used to suspend hoist should be spaced as close to the hoist suspension lug as possible. Mounting bolts or threaded studs, attaching hoist to mounting structure, shall have a diameter not less than recommended by manufacturer and material equivalent to ASTM A 325. Make certain that mounting bolts or studs are long enough so that the threads do not engage the mounting support and that mounting bolts or studs are secured with nuts and lockwashers, self-locking nuts or cross bolting, if unthreaded. b. Trolley Mounted hoists are attached to moveable trolleys. If the hoist is mounted on an existing trolley, a qualified person shall determine that the trolley and its supporting structure are adequate to support the rated load and weight of the hoist. Hoist/trolley units may be shipped from the factory with trolley packaged separately. If the trolley can be installed directly over the end of the supporting beam, assemble trolley to hoist. Be certain that the spacing between wheel flanges, after assembly, is 1/4" greater than exact width of beam flange. (See Figure 2-1 below and instruction sheet furnished with trolley.) Using proper equipment, carefully lift trolley and hoist and install on end of beam. Page 3 For trolleys which are to be mounted along the span of a beam not having open ends, measure exact width of beam flange and assemble trolley to hoist so that spacing between wheel flanges is 1/4" (see Figure 2-1) greater than beam width (3/8" if beam has curves). This is accomplished by rearranging the spacer washers on the bolts connecting trolley side plates to hoist mounting lug. If trolley is shipped separate from hoist, see instruction sheets furnished with trolley for orientation and installation. When proper spacing has been determined, loosen mounting nuts (item 1, Figure 2-1) to allow trolley wheels to spread far enough to pass over edges of beam flange. (Some installations may require complete removal of one trolley side plate.) Using adequate equipment, carefully lift the hoist and trolley so the wheel treads will rest on the lower beam flange. Replace side plate and washers if removed for installation. Replace suspension stud nuts. CAUTION Recheck spacer washers to make certain that the number of washers between the side plate and hoist suspension lug are equal, and also the number on the outside of each side plate are equal. The suspension stud nuts should only be snugged up on the lockwashers until a load has been applied on the hook. A partial load (approx. 25% rated hoist load) placed on the hook will properly seat hoist in the trolley. Tighten suspension stud nuts only after hoist has been properly seated in the trolley. WARNING Mounting of the hoist-trolley unit on the monorail and final pre-operation inspection shall be performed only by qualified persons properly supervised. WARNING Be certain that electrical power supply is off and locked in the open position before attempting any electrical connections to the hoist. This equipment must be effectively grounded according to the National Electric Code, or other applicable codes. If the grounding method used is through the trolley wheels, then each section of track must be grounded by metal-to-metal connection to the building ground. Certain environments may prevent proper grounding by this means. In this case a separate grounding conductor should be provided. a. Follow National, State and Local Electrical Codes when providing electrical service to the hoist. CAUTION 208/230/460V single speed motors are reconnectable at the motor. See motor nameplate. Transformer may be reconnected for 200/230/460/575V. See transformer. Check with wiring diagram to make certain that motor, transformer and brake leads are properly connected. b. Make electrical connections using the appropriate wiring diagrams furnished with the hoist. All electrical connections, including connections to collectors or power cord, shall be made only by qualified journeymen electricians. WARNING The green wire provided in the power supply cable (when furnished) is a grounding wire and must be connected to a proper ground. c. When trolley is shipped separate from hoist, see special instructions fur nished with trolley for orientation and installation. 2-4. PRE-OPERATION CHECKS. 11207A a. Check Oil Level and Grease Fittings. The gearcase has been filled with oil to the proper level and grease points for lower and upper sheaves have been lubricated at the factory. However, this should be checked before operating hoist. Check oil level by removing oil level plug with hoist in a level position. Oil level should be at the bottom edge of the plug hole. If not, add oil as specified in Section IV. Grease fittings in lower and upper sheave pins should show evidence of grease. CAUTION Figure 2-1. Sectional View of Trolley showing proper wheel and washer spacing. 2-3. CONNECTING HOIST TO ELECTRICAL SERVICE. Electrical service to the hoist may be power cable or a guarded system having sliding shoe collectors. Page 4 Overfilling of the gearcase may result in the excess fluid being expelled through the breather. b. Check Push Button Operation and Phasing. WARNING On three phase hoists it is possible to have “Reverse Phasing” causing the lower block to lower when the á button is depressed. When this condition exists, the automatic limit stop switch is inoperative and hoist operation will be dangerous. When floating rod is raised, stop switch is actuated first and then the reversing switch is actuated (Figure 2-3). Stop switch stops hoist. Reversing switch lowers hook block in case of floating rod over-travel. If limit switch does not function in this manner, refer to trouble shooting chart Section Vl for possible remedy. To properly check the phase of the hoist, follow the steps below: (1) With “POWER OFF” operate all the push buttons and determine that they do not bind or stick in any position WARNING If any push button binds or sticks in any position — DO NOT TURN POWER ON — determine the cause and correct the malfunction before operating. Figure 2-3. Electrical Compartment Cover Removed Showing Limit Switch and Reversing Switch Arrangement. WARNING (2) Temporarily connect hoist to power source. (3) Operate á button briefly to determine direction of hook travel. Do not attempt to make above test with hook in a high position near hoist. (4) If hook raises, phase is correct. Turn power off and make temporary connections permanent. (2) A screw-type upper and lower limit switch is provided optionally when both upper and lower limit stops are required (Figure 7-2). This switch is adjustable and must be adjusted, at time hoist is installed, to desired high and low limits of lower block travel. Refer to Section Vll. (5) If hook lowers, hoist is “Reverse Phased”. TURN POWER OFF and correct by interchanging any two leads at power source connection. Do not change internal wiring of hoist. c. Check Limit Switch Operation. (1) A block operated upper limit stop (Figure 2-2) is furnished as standard equipment. This limit stop is factory set to stop lower block in its high position and guard against over-travel and possible damage to hoist. (Note mounting position of floating lever for 3 and 5 ton hoists.) No adjustment can be made. Limit switch operation should be tested when hoist is installed. Move hook to a low position by depressing push button marked â. Now depress button marked á to raise hook. While hook is traveling upward, manually (or with an extension pole) raise limit stop mechanism (Figure 2-2). d. Check Lower Block and Hoisting Cable. Depress â push button and run lower block to its lowest position. No less than two wraps shall remain on the drum with the loaded hook in its lowest position, unless hoist is equipped with a lower limit switch in which case no less than one and one half wraps shall remain on the drum. Also check to see that lower block and rope does not twist excessively. If it does twist to the extent that two ropes rub against each other, disengage rope from the frame anchor and twist rope four or five turns in a direction opposite to that which the block turns. Reconnect rope to anchor (Figure 2-4), holding firmly to eliminate rope twisting back to its original position. Operate hoist up and down a few times. If lower block still rotates, repeat process until twisting is corrected. e. Lubricate Hoisting Cable. For longer cable life, it is recommended that the cable be lubricated at time of installation by applying a Chain and Cable Fluid as outlined in Section IV, paragraph 4-3. 11403 Figure 2-2. Limit Stop Mechanism Being Tripped By Lower Block. Figure 2-4. Rope End Anchor. Page 5 SECTION III — OPERATION 3-1. GENERAL. Operation of Series 800 YALE electric hoists is controlled by a convenient pendant push button station. With it, the hoist can be controlled to give fast lifting and lowering; or controlled to lift or lower load in small increments, providing accurate spotting. The push button station has a built-in interlock to prevent depressing opposing buttons simultaneously. When first using hoist, break-in by operating under lighter loads to full travel before applying maximum load. 3-2. PUSH BUTTON OPERATION. a. Depress push button marked á to raise load. b. Depress push button marked â to lower load. c. Jogging the push button will give “hairline” load movement. The quickness of the depressing motion will determine the amount of movement. Excessive use of this “Jogging” feature will cause premature burning of contact tips and motor overheating. d. On two-speed hoists, partial depression of button operates the hoist at slow speed; depressing button completely operates the hoist at fast speed. 3-3. OVERLOAD CLUTCH OPERATION (Optional). The overload clutch, when furnished with the hoist, is factory preset and tested so that the hoist will lift its full rated load but will refuse to lift overloads which could cause deformation or weakening of your hoist. If the load to be lifted exceeds the clutch setting, the hoist motor will continue to run when the á button is depressed and rotate the load brake gear without lifting the load. Whenever this slipping occurs, immediately release the á push button to prevent overheating of the clutch friction surfaces and the hoist motor. NOTICE Always know load to be lifted. Lift-Tech does not recommend lifting loads greater than the rated load of your hoist. 3-4. OPERATING PRECAUTIONS. WARNING Equipment covered herein is not designed or suitable as a power source for lifting or lowering persons. Safe operation of an overhead hoist is the operator’s responsibility. Listed below are some basic rules that can make an operator aware of dangerous practices to avoid and precautions to take for his own safety and the safety of others. Observance of these rules in addition to frequent examinations and periodic inspection of the equipment may save injury to personnel and damage to equipment. d. e. DO make sure hoist limit switches function properly. DO maintain firm footing when operating a hoist. f. DO make sure that load slings or other approved single attachments are properly sized and seated in the hook saddle. g. DO make sure that the hook latch, is closed and not supporting any part of the load. h. DO make sure that load is free to move and will clear all obstructions. i. DO take up slack carefully, check load balance, lift a few inches and check load holding action before continuing. j. DO avoid swinging of load or load hook. k. DO make sure that all persons stay clear of the suspended load. l. DO warn personnel of an approaching load. m. DO protect wire rope from weld splatter or other damaging contaminants. n. DO promptly repor t any malfunction, unusual performance, or damage of the hoist. o. DO inspect hoist regularly, replace damaged or worn parts, and keep appropriate records of maintenance. p. DO use the hoist manufacturer’s recommended parts when repairing a hoist. q. DO use hook latches. r. DO apply lubricant to wire rope as recommended. s. DO NOT lift more than rated load. t. DO NOT use a damaged hoist or a hoist that is not working correctly. u. DO NOT use the hoist with twisted, kinked, damaged or worn wire rope. v. DO NOT lift a load unless wire rope is properly seated in its drum groove(s). w. DO NOT use wire rope as a sling or wrap rope around the load. x. DO NOT lift a load if any binding prevents equal loading on all supporting ropes. y. DO NOT apply the load to the tip of the hook. z. DO NOT operate unless load is centered under hoist. aa. DO NOT allow your attention to be diverted from operating the hoist. ab. DO NOT operate the hoist beyond limits of wire rope travel. ac. DO NOT use limit switches as routine operating stops unless recommended. They are emergency devices only. ad. DO NOT use hoist to lift, support or transport people. ae. DO NOT lift loads over people. af. DO NOT leave a suspended load unattended unless specific precautions have been taken. ag. DO NOT allow sharp contact between two hoists or between hoist and obstructions. a. DO read ANSI B30.16 Safety Standard for Overhead Hoists and the Operation, Service and Parts Manual. ah. DO NOT allow the rope or hook to be used as a ground for welding. b. DO be familiar with hoist operating controls, procedures and warnings. c. DO make sure hook travel is in the same direction as shown on controls. ai. DO NOT allow the rope or hook to be touched by a live welding electrode. Page 6 aj. DO NOT remove or obscure the warnings on the hoist. SECTION IV — LUBRICATION ak. DO NOT adjust or repair a hoist unless qualified to perform hoist maintenance. al. DO NOT attempt to lengthen the wire rope or repair damaged wire rope. am. DO NOT allow personnel not physically fit or properly qualified to operate hoist. an. DO NOT operate hoist unless limit switch is operating properly. ao. DO be sure there is no twist in wire rope. ap. DO avoid operating hoist when hook is not centered under hoist. Avoid side pulls and swinging of load or load hook when traveling hoist. WARNING DO NOT operate hoist with the hoisting rope out of the drum groves. Such operation may result in the rope breaking and dropping the load which can cause damage to equipment and injury to operator and other personnel. Hoist rope will remain in the drum groves during operation under normal operating conditions, however, slack or kinked rope, excessive side pulls, swinging or jerking of load, or similar abuse, may cause the rope to leave the groves. 4-1. GENERAL. The lubr ication ser vices outlined in paragraphs 4-2 thru 4-6 should be performed at regular intervals to maintain top hoist performance and ensure long life. Intervals of at least six (6) months, coinciding with spring and fall seasons, are recommended. The reason for this is, on hoists installed out-of-doors and in unheated areas, a “cold test” lubricant is required in cold (below freezing) climates making seasonal changes necessary. 4-2. CHANGE GEARCASE OIL. (Figure 4-1) a. Remove oil drain plug from bottom of gearcase and drain out oil. (Two drain plugs, one on front and one on back of gearcase.) b. Flush out housing using petroleum solvent. Reinstall drain plug. c. Refill thru oil hole cover to proper level (bottom of oil level plug hole) using 10 pints of Automatic Transmission Fluid, DEXRON III Type, suitable for all temperature ranges. aq. DO operate hoist within recommended duty cycle and do not “jog’’ unnecessarily. ar. DO conduct regular visual inspections for signs of damage or wear. as. DO NOT operate hoist with hooks that have opened up. See Figure 5-1. at. DO provide supporting structure or anchoring means that has a load rating at least equal to that of the hoist. 11413A au. DO NOT use hoists in locations that will not allow operator movement to be free of the load. av. DO, when starting to lift or pull, move the load a few inches at which time the hoist should be checked for proper load holding action. The operation shall be continued only after the operator is assured that the hoist is operating properly. aw. DO NOT leave a loaded hoist unattended at the end of a work shift or for extended periods during the work shift. Where operations are such that this condition cannot be avoided the operator must be assured that the condition does not create a hazard to personnel or property. ax. DO NOT use the hoist load limiting device to measure the load. ay. DO NOT operate hoist unless hook moves in the same direction as indicated on the pushbutton. If opposite direction occurs, see pre-operation checks, Paragraph 24.b. az. Observe recommended inspection and maintenance procedures. ba. DO use common sense and best judgement whenever operating a hoist. Observe American National Standard Safety standard, ANSI B30.16, Iatest issue. Figure 4-1. View Showing Location of One Oil Drain Plug. 4-3. LUBRICATE HOISTING CABLE. Hoists are shipped from the factory without an exterior coating on hoisting cable. It is recommended, where conditions permit, that the cable be thoroughly coated at installation and kept well lubricated with LUBRIPLATE Chain and Cable Fluid, or equal, suitable for all temperature ranges. 4-4. LUBRICATE UPPER SHEAVE AND LOWER BLOCK ASSEMBLY. a. All hoists have grease fittings located in ends of sheave pins. Apply (*) NLGI No. 2 grease for operating temperatures from +50°F to +125°F. For colder temperatures, (-20°F to +50°F) use NLGI No. 1 grease. b. Apply a few drops of S.A.E. No. 50 oil to hook thrust bearings. (*) National Lubricating Grease Institute. 4-5. LUBRICATE LIMIT STOP LEVER. a. Apply a few drops of S.A.E. No. 50 oil to pivot points of limit rod. b. Apply a few drops of S.A.E. No. 50 oil to shaft bearing at rear of electrical compartment. Page 7 4-6. LUBRICATE LIMIT SWITCH. Provide a light film of NLGI No. 2 grease on bevel gear of limit switch. SECTION V INSPECTION AND PREVENTIVE MAINTENANCE 5-1. GENERAL. YALE, Series 800, hoists are inspected and tested at the factory. Regular in service inspection and preventive maintenance programs not only help reduce overall maintenance costs but may also prevent serious shutdowns by forewarning of problems that could cause these shutdowns. Regular inspections, periodic minor adjustments, regular cleaning and lubrication and replacement of worn parts can help preserve good performance and operation of your hoist. Many factors influence the inspection and preventive maintenance program required for your hoist. Frequency and severity of service and material handled, local environmental conditions and various applicable codes are some of the factors that the user must consider to adjust inspection and maintenance program outlined in this section to meet his specific conditions. The inspection and maintenance services outlined in this section are considered minimum. Recommended in the schedule are minimum inspection and maintenance intervals based on average daily use in a normal environment. Average daily use is based on 1000 operational hours per year maximum and intermittent operation of the hoist eight hours per day, five days per week with a maximum 40% “on” time and the average loading not exceeding 65% of rated load. Environmental conditions in which the hoist operates are also important considerations for the user when adjusting hoist inspection and maintenance programs to local conditions. Frequency of inspection and maintenance must be increased if hoist is subjected to severe atmospheric environmental conditions, such as corrosive vapors, extreme heat or cold, cement or dust and other airborne contaminants. The user should carefully consider all environmental conditions and adjust frequency and degree of maintenance for his local conditions. Consult Lift-Tech Field Service Department for advice for unusual environmental conditions. Various codes also regulate inspection and maintenance programs. Attention must be given to applicable Federal Standards, OSHA regulations, National Standards, state and local codes which may include mandatory rules relating to hoist inspection and maintenance. The user should become familiar with all applicable codes for his area and be guided accordingly. Listed on the Recommended Inspection and Maintenance Schedule are inspection frequencies and requirements. Perform these inspections regularly as scheduled and additional inspections as may be required for activity, service and environment of your hoist. The hoist operator must be responsible for determining the operating conditions and severity of service. Inspection Schedule and Maintenance Report Form. Shown on page 10 of this manual is a recommended Inspection Schedule and Maintenance Report form which lists various components of the hoist. The form also includes trolley components, runway components, and miscellaneous items. This form is suggested as a guide for written inspection Page 8 reports. Inspections are recommended each month and should be performed thoroughly enough to inform the hoist user of deficiencies for any item listed. This form does not supersede the Inspection and Maintenance Schedule listed below but may be used to record scheduled inspection and maintenance services required. The user should revise the inspection interval, add additional units or provide a similar form to suit particular conditions which may exist. However, written, dated and signed inspection reports should be maintained particularly on critical items, such as hoist hooks, hoisting ropes, sheaves, drums and brakes. Periodic review of old inspection reports can point out service life of hoist components, forecasting need for adjustment, repair or replacement of these components. As a matter of expedience, appointed maintenance personnel inspecting the hoist can also take care of minor adjustments, repairs and cleaning, where required. Note the column on Inspection Schedule and Maintenance Report form headed Corrective Action and Notes. When corrective action is made during inspection, note condition of part or unit as inspected in appropriate Condition column with a check mark (ü). Note “during inspection” corrective action taken and date in space provided. In this manner, items requiring further attention will be checked (ü) without showing corrective action. This will advise the designated person responsible for hoist operation and safety, who reviews the reports, that deficiencies exist. The designated person will check all deficiencies as listed and reexamine or otherwise determine whether they constitute a safety WARNING Deficiencies may be hazardous to personnel and equipment. Do not operate a hoist having deficiencies unless a designated qualified person has determined that these deficiencies DO NOT constitute a safety hazard. Written, dated and signed inspection reports for many items are mandatory under OSHA regulations, and many state safety codes. It is strongly recommended that the Inspection Schedule and Maintenance Repor t, shown herein, be completed by a qualified person designated with the responsibility for hoist operation and safety or an inspector appointed by this person. Inspection records can point out the service life of hoist components and help forecast the need for adjustments, repairs and ordering of replacement parts. File and review these reports after each inspection. WARNING Do not operate a hoist having unusual vibrations, sounds or other conditions. Danger may be present that the hoist operator cannot see. Determine and correct cause of unusual conditions and make certain the hoist can be operated safely. Be certain to disconnect power to the hoist whenever electrical cover is removed. 5-2. INSPECT LOWER BLOCK. a. Check lubrication of all parts. If the thrust bearing is not equipped with a grease fitting, lubricate with SAE No. 50 oil. Also lubricate the shank of the hook which passes through the lower block body. b. Check each sheave to ensure rope groove is smooth and free from burrs, or other surface defects. c. Check each sheave for freedom of rotation; replace bearings if defective. d. Make certain that dowel pin, holding the hook nut to the hook, is securely in position. e. If hook is equipped with a safety latch or rotational lock, check to determine that they are in good operating condition. f. Check throat opening of hook. (Refer to Figure 5-1.) It is recommended that upon receipt of the hoist a measurement be made and recorded of the hook throat opening. OSHA Standards require that the hook be replaced if the throat opening exceeds 15 percent of the original opening, or if the hook is twisted more than 10 degrees from the unbent plane. A gage block, properly identified to the hoist, similar to the one shown in Figure 5-1, is suggested to be made for each hook for use in these measurements. NOTE: Hooks and hook openings shown are based on hooks normally furnished with standard hoists. For dimensions of hooks having a special size, shape or material, consult the Muskegon, Michigan factory. For hooks with certain kinds of safety latches it may be necessary to remove latch to measure hook opening. g. Hooks showing signs of cracks must be replaced. Hooks should be inspected at least once per year using dye penetrants, magnetic particle or other suitable crack detecting methods. HOIST RATED LOAD HOOK SIZE 11202A d. Check hoist suspension bolts on lug suspended hoists; make certain that bolts are secure, properly tightened and free from damage. e. Inspect suspension lug at top of hoist frame for cracks, hole elongation or other signs of wear. On the suspension lug is integral with hoist frame and frame must be replaced when suspension lug is and requires replacement. damage, all hoists, the entire damaged WARNING Do not operate a hoist having worn or damages suspension bolts. f. Reinstall all parts following procedure in reverse of disassembly. 5-4. INSPECT ELECTRICAL CONTROLS. Arrangement of electrical control equipment varies with the type of control, physical space and the optional control features ordered with the hoist. a. Disconnect electrical power to hoist, remove electrical compartment cover (Figure 9-1, Ref. No. 29) and inspect wiring and terminals. Terminals should be securely crimped to wires and electrical insulation should be sound. Terminal screws should be tight. b. Check condition of contactor assembly, transformer, and limit stop and reverse switches. CORRECT "L" DIMENSION (IN TONS) (STANDARD) 1/2 1 2 3 5 c. Make certain that rope guide pins are not bent, loose or otherwise distorted; guide pins must have close clearance to sheave flange to keep rope in sheave grooves. G G H I J (NEW HOOK) 1-1/8" 1-1/8" 1-1/4" 1-1/2" 1-3/4" Figure 5-1. Proper Hook Opening. (Shown with latch removed for clarity.) h. Check wear of the hook, especially at the saddle and replace if badly worn. 5-3. INSPECT UPPER BLOCK AND HOIST SUSPENSION. a. Check upper block sheaves (when hoist is so equipped) for wear, damage and freedom of rotation. If sheaves do not rotate freely, disassemble block and inspect bearings. Replace worn or damaged bearings, washers, pins or sheaves. b. Make certain that all sheaves, bearings and hanger pins are free of foreign material and properly lubricated. Bearings without grease fittings are lubricated for the life of the bearing and require no further lubrication. After inspection, lubricate all upper block lubrication fittings. Page 9 INSPECTION SCHEDULE AND MAINTENANCE REPORT HOIST SERIAL NO. (MFGRS) _______________________ RATED LOAD _________________ TYPE ________________________ VOLTAGE _____________________ CLEANING OR PAINTING REQUIRED LUBRICATION REQUIRED (Low Oil or Grease, Rust or Corrosion) REPLACEMENT REQUIRED (Worn or Damaged) REPAIR REQUIRED (Loose Parts or Wires) CONDITION (Check column best indicating condition when part or unit is inspected. Use note column to the right if condition is not listed below.) ADJUSTMENT REQUIRED ANNUAL MONTHLY SEMI-ANNUAL LOCATION COMPONENT, UNIT OR PART Recommended Inspection Interval GOOD * COMPONENT, UNIT OR PART and location CUSTOMER CRANE IDENTITY NO. _______________________ LOCATION IN PLANT __________________________________ THIS INSPECTION IS MONTHLY o ANNUAL o SEMI-ANNUAL o INSPECTED BY: ________________ DATE _____________ CORRECTIVE ACTION NOTES (Indicate corrective action taken during inspection and note date. For corrective action to be done after inspection, a designated person must determine that the existing deficiency does not constitute a safety hazard before allowing unit to operate. When corrective action is completed, describe and note date in this column.) DATE Motor Motor Brake Mechanical Load Brake Overload Clutch Couplings HOIST Gears, Shafts & Bearings Upper Block Lower Block Hook & Throat Opening X Record Hook Throat Opening Hoist Rope Rope Drum Guards CONTROL STATION OR PUSH BUTTON Limit Switch Pushbutton Wiring Motor Brake (when so equipped) TROLLEY Couplings Gears, Shafts & Bearings Frame Wheels Bumpers Guards Conductors RUNWAYS RESISTORS Collectors Hoist Trolley Monorail Joints Monorail Main Conductors Main Collectors MISC. General Condition Load Attachment Chains Rope Slings & Connections Change Gearcase Lub. Grounding Faults * See text for DAILY & WEEKLY REQUIREMENTS. INSPECTION INTERVAL. SIGNED & DATED REPORT REQUIRED – OSHA. X MAGNETIC PARTICLE OR EQUIVALENT EXAMINATION REQUIRED. Typical Inspection Schedule and Maintenance Report form. User must adjust inspection interval and components to suit his individual conditions and usage. Page 10 12375B TIME INTERVAL Daily or start of each shift (\/isual) INSPECTION OR MAINTENANCE Check operation of all functional mechanisms including limit switch operation, brakes and control. Check hoist cable for kinks, abrasions, corrosion or broken wires or evidence of improper spooling on drum. Inspect hooks, upper and lower blocks, and all load bearing components for damage. 1 Month * HOIST CABLE — Inspect and lubricate per paragraph 5-8. 1 - 3 Months * ELECTRICAL CONTROLS — Inspect per paragraph 5-4. Check hoist gearcase oil level — add oil as required per paragraph 4-2. 6 Months * LOWER BLOCK — Inspect per paragraph 5-2. UPPER BLOCK — Inspect per paragraph 5-3. Annually Motor brake and actuating mechanisms. Inspect and adjust per paragraph 5-5. * Inspect hooks with suitable crack detecting procedures per paragraph 5-2. Drain and refill hoist gearcase per paragraph 4-2. 6 Months or 500 - 750 hours “on” time Inspect electrical controls per paragraph 5-4. Change hoist gearcase oil — Fill with oil per paragraph 4-2. Lubricate hoist cable per paragraph 4-3. Lubricate * upper and lower hook block per paragraph 4-4. Lubricate limit stop lever per paragraph 4-5. If a screw type limit switch is furnished, add a light film of NLGI No. 2 grease to bevel gear. 5 Years elapsed time or 5000 hours “on” time Complete inspection, disassembly, and maintenance required. It is recommended * that your YALE Repair Station be contacted for this service. *Perform services described by paragraph indicated. Figure 5-2. Inspection and Maintenance Schedule. 5-5. INSPECT MOTOR BRAKE. See Figure 9-4. a. Remove acorn nuts holding brake cover and remove brake cover. b. Remove brake mounting plate screws and lift brake assembly off. c. Check braking surfaces for wear and scoring. Replace badly worn or scored parts. d. Reinstall parts in reverse of disassembly. e. Adjust brake as explained in Section Vll. 11404A Figure 5-3. View of Gearcase – Cover Removed. 5-6. INSPECT MECHANICAL LOAD BRAKE, GEARING AND OVERLOAD CLUTCH (Optional). a. The mechanical load brake and gearing may be inspected and serviced with hoist suspended. To do so, remove lower block and wire rope, drain oil from gearcase, remove 12 hex head bolts and lockwashers holding gearcase cover, and pull cover from gearcase (Figure 5-3). b. To inspect gearing, pull out intermediate gear and pinion assembly and roller thrust bearings (Figure 5-4), and load brake assembly (Figure 5-5). Do not remove drum gear unless visual inspection indicates replacement is necessary. c. Inspect gears and pinions for signs of tooth wear and damage. If replacement of any parts appears necessary, disassemble drum gear, intermediate gear and pinion assembly, and load brake assembly as directed on following page. Page 11 (2) Using a puller tool, remove brake flange from shaft. A groove is provided around outer diameter for this purpose. See Figure 5-7. Remove key from shaft and lift off 2 friction discs, and the pawl and ratchet assembly (Figure 5-8). 11421 Figure 5-4. Removing Intermediate Gear and Pinion Assembly. 10334 Figure 5-7. View Showing Load Brake Flange Removed. (3) Remove load brake gear. If replacement of spring, spring retainer or cam is necessary, press off shaft (Figure 5-9). (4) The load brake pawl and ratchet is a riveted assembly and is not to be disassembled. 11422 Figure 5-5. Removed Load Brake Assembly. d. To disassemble drum gear, remove external snap ring from splined shaft, using heavy-duty snap ring pliers, and pull off gear. (5) Clean all parts thoroughly and inspect for wear and damage. Replace all parts that are excessively worn or damaged. Hard surface or glazed friction discs should be replaced. e. To disassemble intermediate gear and pinion, press pinion shaft from gear using an arbor press. f. It is recommended that load brake assembly be returned to an Authorized Repair Station for inspection and repair. If it is necessary that you make your own inspection and repair, instructions below must be followed: (1) Place load brake assembly, flange up, in a vise equipped with brass or copper jaw plates to protect pinion gear teeth. Remove snap ring from end of load brake shaft (Figure 5-6). 10335A Figure 5-8. Removing Pawl and Ratchet Assembly From Load Brake Shaft. 10333 Figure 5-6. Remove Snap Ring From Load Brake Shaft. Page 12 g. Reassemble gearing and load brake parts following reverse procedure of disassembly. In assembling load brake, observe assembly steps (1) through (4) below: (1) Before installing spring in its retainer (Figure 5-9), apply a good grade of ball bearing grease to inside of retainer. Spring must be positioned exactly as illustrated, butted against pin at side of cam. LOAD BRAKE — OVERLOAD CLUTCH (4) The brake spring must be pre-loaded at assembly to a torque of from 10 to 14 lb.-ft. This is accomplished using a plumber’s strap wrench to wind (rotate) load brake gear to set up spring (Figure 5-10) while pressing brake flange into place using an arbor press. Clamp pinion end of shaft into a portable vise to keep brake from rotating in press. Use brass or copper jaw plates on vise to protect pinion gear teeth. Wind gear counterclockwise (viewing brake from flange end) with strap wrench and press down on flange until snap ring groove in shaft is exposed allowing snap ring to be installed. Use extreme care not to over wind spring as yield will result and final spring torque will be reduced. Do not wind gear beyond point necessary to install snap ring in groove. h. Install gearing and load brake assembly in gearcase in reverse order of disassembly. Be certain roller thrust bearings are installed at both ends of intermediate gear shaft as shown in Figure 5-4 and that thrust washers are properly installed at both ends of load brake shaft as noted below: (1) A steel thrust washer with 5/8" I.D. must be installed on the brake flange end (end opposite pinion) of load brake as shown in Figure 5-5. (2) A bronze thrust washer with a lug on one side goes on pinion end of load brake shaft and it must be installed so that its lug engages the special slot located on the spot face surrounding the load brake bearing bore inside gearcase cover. Use heavy grease to hold it in place on cover as cover is installed. On hoists with 18 or 20 tooth load brake pinion, an 11/ 16" I.D. steel thrust washer is installed between pinion and bronze thrust washer. LOAD BRAKE — STANDARD Figure 5-9. Load Brake Gear Removed From Load Brake Showing Load Brake Spring. (2) When installing pawl and ratchet assembly on load brake shaft, be certain that teeth on ratchet face are in the same direction as shown in Figure 5-8. The ratchet assembly should rotate freely when turned counterclockwise and the pawl should engage ratchet teeth when unit is turned clockwise. (3) When installing brake flange, position it with chamfer facing friction disc (Figure 5-7). j. At completion of reassembly of gearing and load brake in gearcase, refill gearcase to proper level using correct grade of oil, as outlined in Section IV — LUBRICATION. k. For hoists equipped with an overload clutch (optional) which has been functioning properly, visually inspect clutch adjusting nut and spring washer for signs of damage or looseness. With a small hex allen wrench, make certain two set screws in adjusting nut are tight. DO NOT TURN ADJUSTING NUT OR DISASSEMBLE CLUTCH. If spring washer, adjusting nut or gear is loose or damaged, or the clutch did not function properly before disassembly of hoist for inspection, consult the nearest YALE Authorized Repair Station for repair or adjustment. 5-7. INSPECT ROPE DRUM AND SHAFT. a. To remove dr um, remove wire rope, electr ical compartment cover and electrical panel assembly (Figure 9-1) and gearing and load brake assembly (paragraph 5-6). b. Remove four hex socket head bolts securing gearcase to cover. Three bolts are accessible from inside frame (Figure 2-2, Section II) and the fourth is accessible from electrical end of frame thru special access hole using a socket hex key wrench with an extension (Figure 5-11). With bolts removed, pry assembled gearcase and motor from frame. Exercise caution so that gearcase and motor assembly does not fall as it comes free of frame. This disassembly operation is not recommended with hoist suspended. Drum will remain in frame and can be lifted from drum shaft. To remove shaft, remove internal retaining ring from bearing bore in frame. Figure 5-10. Winding Load Brake Gear Using a Strap Wrench to Set Up Load Brake Spring. Page 13 b. Maintenance. Keep rope well lubricated to help reduce internal friction and prevent corrosion. Lubricant, as described in paragraph 4-3, should be applied as a part of the regular maintenance program. Special attention is required to lubricate sections of rope over equalizing sheaves and other hidden areas. Avoid dragging ropes in dirt or around sharp objects which will scrape, nick, crush or induce sharp bends in the rope. c. Replacement. When recommended by an authorized inspector, the rope should be replaced. Replacement rope assemblies are shipped from the factory carefully coiled to prevent damage by kinking. Care must be taken to avoid twisting or kinking when uncoiling and handling during reeving. Figure 5-11. Removing Bolt Securing Gearcase to Frame. Before replacing rope, check condition of grooves in sheaves and drums to determine if they are excessively worn. c. Check parts for wear and damage. Replace drum if there are any signs of cracks or other damage. 5-8. ROPE INSPECTION, REPLACEMENT. MAINTENANCE WARNING Wire rope improperly handled or abused can create a SAFETY HAZARD. Read and comply with inspection, maintenance and replacement information given herein. a. Inspection. Wire rope on your hoist is one of the most important components requiring frequent inspection and maintenance. All wire ropes will eventually deteriorate to a point where they are not safe and will require replacement. WIRE ROPE SHOULD BE THOROUGHLY INSPECTED AT REGULAR MONTHLY INTERVALS BY AN AUTHORIZED PERSON AND A DETERMINATION MADE WHEN FURTHER USE OF THE ROPE WOULD CONSTITUTE A SAFETY HAZARD. Each inspection should include a written, dated and signed report of rope condition. Reports should be filed and reviewed each month and any rope deterioration carefully noted. Inspections revealing but not limited to the following conditions should cause the inspector to question remaining strength of rope and consider replacement: (1) Twelve randomly distributed broken wires in one rope lay or four broken wires in one strand. (2) Wear of one-third of the original diameter of outside individual wires. (3) Kinking, crushing or bird caging. (4) Heat damage from any cause. (5) Reductions from nominal diameter of more than 1/64" for 3/16", 1/4", and 5/16" diameter rope. (6) Rope corrosion, internal or external. (7) Effects from improper lubrication. (8) Rope idle for month or more due to shutdown. Special attention should be exercised when inspecting rope normally hidden during inspecting procedures. Page 14 WARNING AND Use only factory approved rope with swagged wire rope sockets. When first using the hoist after rope replacement, break-in rope by operating under lighter loads to full travel before applying maximum load. 5-9. ROPE REEVING. a. General. Before unreeling rope from a coil or reel, be sure floor is clean. Dirt picked up by the rope can cause excessive wear and abrasion. Uncoil the rope by rolling the coil or reel along the floor; or, place reel on a stand with a shaft thru the center of reel so rope can be pulled straight out with the reel rotating. CAUTION It is imperative that the rope reel or coil rotates as rope unwinds. If coil or reel does not rotate, the wire will be twisted as it is uncoiled and kinking will result. A kinked rope may be damaged and unsafe. Before removing the old rope, refer to reeving diagrams, (Figures 5-12, 5-14, 5-15 and 5-17). Face the rope drum on your hoist from the side which the rope comes off drum. To assist with rereeving your hoist, select the reeving diagram for your hoist. Note the description (such as 2 part double reeved, Figure 5-17) and refer to the paragraph below with the same description which describes rereeving procedure. b. Removing old rope — for all reevings. (1) Lower the bottom block to a scaffold located 6 to 7 feet below hoist to relieve tension on wire rope. (Bottom block may be lowered to floor if desired; however, to handle less weight and for ease of rereeving adequate scaffold below the hoist is recommended.) (2) Remove bottom block sheave guard. (3) Remove key plates from both sides of sheave pin and slide sheave pin from bottom block. (4) Lift out sheaves from the top of the bottom block and remove wire rope. (5) Remove key plates or snap rings from upper block sheave(s) and slide out upper block sheave pins, releasing upper block sheaves. Remove wire rope from sheaves. With new rope installed on the drum as described in paragraph 5-9c single reeved above, proceed with rereeving following steps below: (6) Make certain all personnel are clear of hoist and operate hoist â to completely unwind all wire rope from drum. Stop hoist so drum anchor slot(s) is accessible. Remove live rope and socket(s) from drum. (1) Pass other end of rope thru bottom opening of hoist, between floating limit rod and motor, and attach rope to cast dead end anchor fitting. A slot is located at top of fitting to accept cable. Reinstall bolt and lockwasher in end of anchor fitting to lock rope compression fitting in place. (7) TURN OFF POWER TO HOIST. (8) Remove the bolt and lockwasher in the end of the rope anchor fitting. Remove rope from slot in top of anchor. c. Installing new rope. WARNING Winding rope on rope drums with power can be hazardous. Keep hands safe distance from drum, wear gloves and use extreme care when handling rope. (2) Grasp loop, formed after installing end anchor, and place bottom block sheave in loop. Lower sheave into bottom block and insert sheave pin. Replace key plates and bolts holding sheave pin in place. (3) Replace sheave guard. Make certain rope is not twisted. Should the two parts of rope tend to wind around each other, remove cable from anchor slot and untwist cable. Reattach the cable anchor. (4) Lubricate cable per paragraph 4-3. SINGLE REEVED HOISTS Stretch new cable on floor in one continuous length. Make certain there is no twist in rope. (1) Place one end of rope in rope drum anchor slot. Be sure end fitting is properly seated. (2) With all personnel clear of hoist — TURN ON POWER. (3) Operate hoist á, guiding new rope into drum grooves with gloved hand, until the following lengths remain unwound: (a) 2 part single reeved — about 14'-0". (b) 4 part single reeved — about 28'-0". (c) 6 part single reeved — about 42'-0". (4) Proceed with reeving as described in appropriate paragraph below and the reeving diagram for your hoist. 12203A DOUBLE REEVED HOISTS Stretch new cable on floor in one continuous length. Make certain there are no twists in rope. (1) Pull far end of rope toward end of rope nearest hoist, until both ends are even and a loop is formed. Place fittings on both ends of rope in anchor slots on rope drum. Be sure end fittings are properly seated. (2) With all personnel clear of hoist — TURN ON POWER. (3) Operate hoist á guiding rope into grooves at both ends of drum, until the distance from the drum to the loop is — about 28' for 2 part double reeved. (4) Proceed with reeving as described in appropriate paragraph below and the reeving diagram for your hoist. d. Figure 5-12. Hoist Reeving — Two Part Single. e. Reeving — 4 part single. See Figure 5-14 for diagram. See Figure 9-13 for block parts. With new rope installed on the drum as described in paragraph 5-9c single reeved above, proceed with rereeving following steps below: (1) Grasp the cable near the middle (about 14'-0") of the unwound end and form a loop. Place upper sheave in this loop. Slide upper sheave with cable into sheave pocket. (2) Insert sheave pin into sheave. Replace key plates and bolts to hold sheave pin in place. Reeving — 2 part single. See Figure 5-12 for diagram. See Figure 9-11 for block parts. Page 15 (1) Grasp cable at a point one-third (approx. 14’0") the distance hanging below the rope drum and form a loop. Place one upper sheave in this loop. Slide upper sheave with cable into sheave pocket; partially insert sheave pin to hold sheave in place. (2) Repeat (1) above and install second upper sheave with rope. Insert sheave pin and install key plates and bolts to secure sheave pin. Figure 5-13. Upper Sheave Installed. (Typical 3 and 5 Ton) (3) Pass free end of rope thru bottom opening of hoist between floating limit rod and motor, and insert rope in anchor fitting at hoist frame. Be certain power is off before attempting to place rope in anchor fitting. With end fitting properly seated in anchor, replace bolt and lockwasher in end of socket. Two loops have now been formed for bottom block sheaves. 12205A Figure 5-15. Hoist Reeving — Six Part Single. (3) Pass free end of rope thru bottom opening of hoist between floating limit rod and motor and insert in rope anchor fitting at hoist frame. Be certain power is off before attempting to place rope in anchor fitting. With end fitting properly seated in anchor, replace bolt and lockwasher in end of socket. Three loops have now been formed for bottom block sheaves. (4) Place sheave in each loop. Install one sheave with cable in bottom block; partially insert sheave pin to hold sheave in place. NOTE: Be certain that washers are installed between sheaves, as shown on parts illustration. 12204A Figure 5-14. Hoist Reeving — Four Part Single. (4) Place one sheave in each loop. Install one sheave with cable in bottom block, partially insert sheave pin to hold sheave in place. NOTE: Some blocks have spacer washers between sheaves. Be certain that washers are installed between sheaves, when shown on parts illustration. Install second sheave with cable into bottom block. Slide sheave pin through sheave. Replace key plates and bolts securing sheave pin. (5) Replace sheave guard. (6) Lubricate cable per paragraph 4-3. f. Reeving — 6 part single. (5) Repeat step 4 for remaining bottom block sheaves. Install sheave pin through sheaves. Replace key plates and bolts securing sheave pin. (6) Replace sheave guard. (7) Lubricate cable per paragraph 4-3. g. Reeving — 2 part double. See Figure 5-17 for diagram. See Figure 9-12 for block parts. With new rope installed on the drum as described in paragraph 5-9c double reeved above, proceed with rereeving following steps below: See Figure 9-13 for block parts. (1) Form loops in the two ropes coming from rope drum. Place these loops into bottom block pockets and slide pipe or rod through sheave pin holes. Note position of ropes passing limit stop bar. With new rope installed on the drum as described in paragraph 5-9c single reeved above, proceed with rereeving following steps below: (2) Partially insert upper block sheave pin in opening and install one spacer washer. Raise remaining rope up to hoist, form a loop and place upper sheave in this loop. See Figure 5-15 for diagram. Page 16 (d) Tur n on power ; raise and lower the block several times to feed the correcting twist in the rope through the reeving. (e) If block still tends to twist, repeat the above procedure until block rotation is corrected. (2) To remove rope twist in double reeved hoists. (a) Observe direction block tends to rotate. (b) Lower the bottom block unspooling rope from rope drum until only one quarter (1/4) turn remains to rope end anchors in drum. Figure 5-16. Upper Sheave Installed (Typical). (c) Rotate rope near ends entering drum in a direction tending to correct block rotation. This rotates rope end fittings in the drum. (3) Place sheave with rope into upper sheave pocket and slide pin partially thru sheave. Install remaining washer and push pin thru side plates. Install snap ring on each end of pin to secure pin in place. (d) Turn on power; raise and lower the block several times to feed the correcting twist in the rope through the reeving. (e) If block still tends to twist, repeat the above procedure until block rotation is corrected. 5-10. TESTING HOIST AND OVERLOAD CLUTCH (Optional). a. General. Before placing hoist in service or after disassembly and reassembly, hoist should be tested. To test suspend hoist from an overhead supporting member of sufficient strength to support the weight of the hoist and the rated load. Hoists having overload clutches, require an overhead supporting structure capable of supporting with appropriate safety factor, a load equal to 200 percent rated load and the weight of the hoist. Connect hoist to power supply as shown on hoist nameplate and perform the checks listed in b and c below. 12206A b. Check hoist as outlined in PRE-OPERATION CHECKS, Section II, paragraph 2-4. Figure 5-17. Hoist Reeving — Two Part Double. c. (4) Insert lower sheave pin into bottom block removing pipe as sheave pin is inserted. Be certain washers are replaced as shown on parts illustration. With sheave pin installed, replace key plates and bolts to secure sheave pin. (5) Replace sheave guard. (6) Lubricate rope per paragraph 4-3. h. Checking for and removal of rope twisting. Although rereeving of hoist may have been done carefully, sometimes after new rope has been installed twisting may occur. With new rope installed, the hoist block should be raised and lowered several times with gradually increasing loads, through full lift. If the block still rotates excessively at no load, the rope may have twists which should be removed. (1) To remove rope twist in single reeved hoists. (a) Observe direction block tends to rotate. (b) Lower the block to a low position and turn off power. Check hoist with capacity load. (1) Attach rated load to lower hook. (2) Depress á push button and raise load. When push button is released, hoist should immediately stop and hold load at that level. (3) Depress â push button, lower load a short distance and release button. Hoist should stop immediately and hold load at that level. NOTE: If load drifts downward slowly in step 2 or 3 above, motor brake requires adjustment — see MOTOR BRAKE ADJUSTMENT — Section Vll — paragraph 7-2. d. Overload Clutch. The overload clutch (optional) must be tested for proper operation before placing hoist in service or after disassembly and reassembly of hoist. For test procedure follow instructions listed below. (c) Rotate rope near the anchor end several turns in a direction tending to correct block rotation. This rotates rope end fitting in the anchor. Page 17 WARNING BEFORE ATTEMPTING TO TEST THE OVERLOAD CLUTCH, MAKE CERTAIN THE FOLLOWING PREREQUISITES ARE STRICTLY OBSERVED: a. An appointed person must determine, before starting, that all structures supporting the hoist are adequately strong to withstand the test load of 200% of the rated load, plus the weight of the hoist, whether hoist is tested in installed position or moved to a designated test facility. b. Loads used for testing must be accurately known. c. Test must be made ONLY by a qualified operator, thoroughly familiar with the hoist and the purpose of the test. d. Adequate and proper rigging must be provided to ensure that test loads are securely attached, properly balanced, and lifted level. Failure to provide adequate support could cause injury to personnel and/or damage to equipment. (1) Using a known load, equal to the hoist rated load, energize hoist to lift the load. Raise this load just high enough to be certain hoist is lifting the entire load. Clutch should not slip with the rated load. Lower load to rest position. If clutch slips with rated load, adjustment is required. (See paragraph 7-5. — “OVERLOAD CLUTCH ADJUSTMENT”.) If hoist will lift rated load, proceed to step (2). (2) Increase load in steps from rated load, TO A MAXIMUM OF 200% of the rated load, attempting to lift load with each increase in weight. Hoist Overload Clutch should slip and refuse to lift load before 200% of the rated load is reached. Should hoist lift 200% of the rated load — STOP TEST — A CLUTCH ADJUSTMENT IS REQUIRED. (See paragraph 7-5 — “OVERLOAD CLUTCH ADJUSTMENT”.) (3) Run hoist with load causing clutch to slip (hoist refusing load) five cycles of approximately 1 second each. CAUTION To prevent overheating, release the hoist control button at once when the hoist refuses to lift the load. (4) Remove weights added in step (2) and return to hoist rated load. Lift rated load one final time. Clutch should not slip. WARNING Do not lift more than rated load except for test purposes. NOTICE ALWAYS KNOW LOAD TO BE LIFTED, LIFT-TECH DOES NOT RECOMMEND LIFTING LOADS GREATER THAN THE RATED LOAD OF YOUR HOIST. Page 18 SECTION Vl - TROUBLE SHOOTING Trouble 6-1. Hoist Will Not Operate. 6-2. Hook Moves in Wrong Direction. 6-3. Hook Will Raise But Not Lower. 6-4. Hook Will Lower But Not Raise. Probable Cause Remedy a. No power to hoist. a. Check switches, circuit breakers or fuses and connections in power supply lines. Check power collectors. b. Wrong voltage. b. Check voltage required on motor data plate against power supply. c. Loose or broken wire connections in hoist electrical system. c. Shut off power supply, remove electrical cover on hoist and check wiring connections. Also check connections in push button station and limit switches. d. Contactor functioning. d. See that necessary jumper wires are properly installed. Verify that the contactor armatures are free to move. If binding occurs, replace contactor. Check for burned out contactor coils. assembly not e. No control voltage. e. Check transformer fuse. If blown, check for grounding and/or shorts in the push button station. Check the transfor mer coil for signs of overheating. Replace transformer if burned out. Verify the transformer secondary is the same voltage as the coils to which it is connected. f. Motor burned out. f. Replace motor. Check input power supply. Check hoist motor connections. a. Reverse phasing on threephase hoists. a. Interchange any two power supply line leads. Refer to Section II, paragraph 2-4 b. b. Hoist wired wrong. b. Check wiring connections with appropriate wiring diagram. a. Lower electrical circuit open. a. Check for loose connections. See that necessary jumper wires are properly installed on contactor. b. Contactor functioning. b. See that necessary jumper wires are properly installed. Verify that the contactor armatures are free to move. If binding occurs, replace contactor. Check for burned out contactor coils. assembly not c. Down, push button inoperative. c. Check push button contacts and wires. a. Excessive load. a. Reduce loading to rated load of hoist, as shown on nameplate. b. Hoist electrical circuit open. b. Check for loose connections. See that necessary jumper wires are properly installed on contactor. Check limit switch mounting and connections. c. Contactor functioning. c. See that necessary jumper wires are properly installed. Verify that the contactor armatures are free to move. If binding occurs, replace contactor. Check for burned out contactor coils. assembly not d. Up, push button inoperative. d. Check push button contacts and wires. Page 19 SECTION Vl - TROUBLE SHOOTING (Continued) Trouble 6-5. Hoist Will Not Lift Rated Load. Probable Cause a. Low voltage Remedy a. See that power supply current is same voltage Iisted on motor data plate. Check hoist motor connections. Check size of power supply lines. b. Overload Clutch not properly b. See Section VII, paragraph 7-5. adjusted. 6-6. Hoist Motor Overheats. a. Excessive load. a. Reduce loading to rated load of hoist, shown on nameplate. b. Excessive duty-cycle. b. Reduce frequency of lifts or amount of jogging. c. Wrong voltage or frequency. c. Check current rating on motor data plate against power supply. Check hoist motor connections. d. Defective motor or worn bear- d. Disassemble hoist and inspect for defective, worn ings in hoist frame. or damaged parts. e. Overload Clutch slipping without e. See Section VII, paragraph 7-5. lifting load. 6-7. Load Drifts Excessively When Hoist Is Stopped. a. Excessive load. a. Reduce loading to rated load, as shown on nameplate. b. Motor brake not holding. b. With No Load, check hoist for drift. If drifting is excessive, inspect motor brake (Section V, paragraph 5-5) and adjust as outlined in Section VII, paragraph 7-2. c. Load brake not holding. c. (1) After determining that the motor brake is working properly, attach rated load to hook and operate hoist. If the load accelerates during lowering, the load brake is not functioning properly. See Section V, paragraph 5-6 for replacing worn or damaged parts. (2) If load brake checks O.K., magnetic motor brake needs adjustment (see b. above). 6-8. Hoist Operates Intermittently Page 20 a. Collectors make poor contact. a. Check collectors for free movement of spring arm, weak spring or electrical connections. b. Loose connections. b. Check all wiring for loose connections. SECTION Vll — ADJUSTMENTS 7-1. MECHANICAL LOAD BRAKE. The mechanical load brake on Series 800 YALE hoists is a pawl and ratchet “Weston” type automatic brake. The brake is not adjustable and requires only periodic inspection and occasional replacement of the friction washers. 7-2. MOTOR BRAKE. Instructions for adjusting the brake are inside the brake cover and are repeated below. Check brake adjustment after the first 30 days of service and regularly thereafter during the six-month inspection procedure. Two versions of the motor brake occur in this manual. c. On the early version of the brake (Figure 7-1), if the tang is below the midway position of the two adjustment points shown on the brake, the brake should be adjusted to bring the tang back up alongside the NORMAL position on the brake. d. Remove the hex key (1/8" size) from the holster on the cover mounting stud and carefully turn the ADJUSTING SCREW (located above the solenoid coil) clockwise. The indicating tang will move a large distance for a small turn of the adjusting screw, therefore turn the screw no more than one quarter turn before checking adjustment. e. After adjustment operate the brake by hand to assure brake disc running clearance. The outboard brake pad should separate from the brake disc by approximately .010". f. Replace hex key in holster. g Replace brake cover. 7-3. BLOCK OPERATED LIMIT SWITCH. The block operated upper limit stop, furnished as standard equipment, is nonadjustable and designed to stop lower block at its high point of travel to guard against over-travel with possible damage to hoist. When high point is reached, limit stop switch automatically stops hook travel. If hook drifts upward slightly after stop switch is actuated, a reversing switch will close and automatically reverse direction of hook travel. 12759C Figure 7-1A. Motor Brake - Later Version. 7-4. SCREW-TYPE LIMIT SWITCH. This limit switch has a rotary screw driven by a gear reduction which is coupled to the end of the drum shaft. Adjustment discs operate the contacts of separate switches; one for the hoisting circuit and one for the lowering circuit. The switch assembly must be wired in accordance with the appropriate wiring diagram, which is packaged with hoist. Adjustment of this screw-type limit switch is accomplished as follows: (Refer to Figure 7-2). WARNING Before attempting actual adjustments, be certain main power switch is OFF and locked in the open position. 12759 Figure 7-1. Motor Brake - Early Version. SWITCH 12758B a. Examine position of indicating tang located below the solenoid coil (Figure 7-1 or 7-1A). b. On the later version of the brake (Figure 7-1A), if the tang is below the line by more than 1/8", the brake should be adjusted to bring the top of the tang back up alongside the line on the adjust label. LOCKING PLATE ADJUSTMENT DISCS SWITCH Figure 7-2. Screw-Type Limit Switch Adjustment. (Wires not Shown for Clarity.) a. Remove four screws and lift off switch cover. b. Loosen locking plate screws. Slide locking plate away from adjustment discs. Page 21 c. Turn proper adjustment disc (right for up, left for down) toward stitch to reduce hook travel or away from switch to increase hook travel. hoist is furnished as a separate insert and shipped with hoist. We suggest you carefully file the wiring diagram with this book for future reference. d. Slide locking plate back into position ensuring slots on adjustment discs are fully engaged, tighten locking plate screws to 4 in-lbs. WHEN ORDERING PARTS OR INFORMATION ON THIS EQUIPMENT, ALWAYS INCLUDE MODEL AND SERIAL NUMBER ON ORDER. e. Replace cover. SECTION IX — PARTS LIST WARNING Check limit switch operation carefully, without load, before placing hoist in service. If misadjusted, SEVERE DAMAGE AND/OR A DROPPED LOAD COULD RESULT. Allow 6" for hook drift in both directions. Never allow less than 1-1/2 complete wraps of rope on drum with hook in lowest position. Provide a light film of NLGI No. 2 grease on bevel gear of limit switch. 7-5. OVERLOAD CLUTCH ADJUSTMENT. When properly adjusted, the overload device is designed so that the hoist will lift its full rated load but will refuse to lift an excessive overload. The overload clutch is not externally adjustable. It is necessary to remove the overload clutch assembly from the hoist for proper adjustment. Therefore, it is strongly recommended that when adjustment and/or replacement parts are required, a SHAWBOX Authorized Repair Station be contacted. Consult your SHAWBOX Distributor for nearest Repair Station. SECTION VIII — WIRING DIAGRAMS Wiring diagrams for SHAWBOX electric hoists have been omitted from this book because of many possible variations. This is due to different currents and types of electrical components used in their construction. A print of the correct wiring diagram for each 9-1. GENERAL. The parts lists and illustrations in this section of the manual, cover parts for all standard 800 SHAWBOX Electric Hoists. A typical hoist is shown as the basis for the exploded parts illustrations; therefore, certain variations may occur from the information given. For this reason, always give the Hoist Serial Number, Catalog Number, Motor Horsepower, Voltage, Phase, Frequency and Rated Load of Hoist when ordering parts. Certain parts of your hoist will, in time, require replacement under normal wear conditions. It is suggested that these parts be purchased for your hoist as spares for future use. These parts are indicated by a (†) symbol at the right side of the parts reference numbers. WARNING NON-FACTORY AUTHORIZATIONS OR MODIFICATION OF EQUIPMENT AND USE OF NON-FACTORY REPAIR PARTS CAN LEAD TO DANGEROUS OPERATION AND INJURY. TO AVOID INJURY: • Do not alter or modify equipment without factory authorization. • Do use only factory provided replacement parts. The numbers assigned to the parts of our various assemblies in our parts lists are not the part numbers used in manufacturing the part. They are identification numbers, that when given with the model number, permit us to identify, select or manufacture, and ship the correct part needed. 9-2. Figure No. 9-1 9-2 9-3 9-4 9-5 9-6 9-7 9-8 9-9 9-10 9-11 9-12 9-13 9-14 Page 22 INDEX OF EXPLODED VIEW PARTS ILLUSTRATIONS Title Page No. Frame, Gearcase and External Parts ........................................................................................................... 23 Gearing and Load Brake Parts ..................................................................................................................... 26 Hoist Motor Brake - Later Version ................................................................................................................. 28 Hoist Motor Brake - Early Version............................................................................................ .................. 30 Three Phase Motor Assembly ....................................................................................................................... 32 Upper Limit Switch Parts ............................................................................................................................... 33 Electrical Control Equipment ......................................................................................................................... 34 Push Button Station Assembly and Conductor Cable (Single Speed) ........................................................ 35 Push Button Station Assembly and Conductor Cable (Two Speed) - Later Version ................................... 36 Push Button Station Assembly and Conductor Cable (Two Speed) - Early Version ................................... 38 Lower Block Assembly — 2 parts rope, single reeved ................................................................................ 40 Lower Block Assembly — 2 part double reeved ........................................................................................... 41 Upper and Lower Block Parts (3 & 5 Ton) .................................................................................................... 42 Screw-Type Limit Switch Parts ...................................................................................................................... 43 11455C Figure 9-1. Frame, Gearcase and External Parts. Ref. No. Part Number 1 2 3 4† 5 6 800-197 800-192 800-105 800-106 800-107 800-109 800-111 800-2100 800-108 800-110 800-2101 7 800-113 800-115 800-112 800-114 800-2102 800-2103 800-2104 800-2105 Description Plug — Oil Level Cover & Bearing Assembly — Gearcase Dowel Gasket — Gearcase Gearcase & Bearing Assembly Drum & Hub Assembly (Double Reeved Models) 1/2 & 1 Ton (3/6" Dia. Rope) 18' Lift 34' Lift 47' Lift 2 Ton (1/4" Dia. Rope) 14' Lift 25' Lift 36' Lift Drum & Hub Assembly (Single Reeved Models) 1/2 & 1 Ton (1/4" Dia. Rope) 25' Lift 50' Lift 2 Ton (5/16" Dia. Rope) 20' Lift 40' Lift 3 Ton (5/16" Dia. Rope) 30' Lift 45' Lift 5 Ton (5/16" Dia. Rope) 20' Lift 30' Lift Qty. Req’d 2 1 2 1 1 1 1 Page 23 Figure 9-1. Frame, Gearcase & External Parts. (Cont’d.) Ref. No. 8 9 Part Number 800-116 800-117 800-118 800-2106 800-2107 800-2108 800-2109 9A 12 14 15 19 20 21 22† 23 24 25 26 27 29 30 32 34 35 41 43 44 45† 800-2110 800-2111 800-2112 800-121 800-124 800-125 800-130 800-131 800-2113 800-2114 800-132 800-133 800-134 800-135 800-136 800-137a 800-138 800-139 800-194c 800-2121 800-146a 800-2122 800-149 See Fig. 9-3 & Fig. 9-4 800-155 800-156 800-158 800-161 800-157 800-160 800-2115 800-2116 47 48 Page 24 800-2117 800-2118 800-164 800-165 Description Screw — Hex, Socket Button Head — Self-Locking Frame Assembly (Single Reeved Models) 1/2, 1 & 2 Ton Short Frame Long Frame 3 Ton First Extension Second Extension 5 Ton First Extension Second Extension Frame Assembly (Double Reeved Models) 1/2, 1 & 2 Ton Short Frame Long Frame First Extension Closure — 1/2" Plug Nut — Hex (Double Reeved Models) Lockwasher (Double Reeved Models) Shaft — Extension, Drum Short Frame Long Frame First Extension Second Extension Key — Woodruff (“Hi-Pro” Type) Ring — Retaining, Hub (Internal) Bearing — Drum Shaft Ring — Retaining, External Ring — Retaining, Beveled Hub (Internal) Plate Assembly — Base Lockwasher Screw — Hex Socket Head Cap Cover Assembly — Electrical Screw — Self-Tapping Plate Assembly — Base (Short Frame) Shell — Brake, Short Frame Screw — Self-Tapping Motor & Brake Screw — Hex Socket Head Lockwasher Rope & Thimble Assembly (Single Reeved Models) 1/2 & 1 Ton (1/4" Dia. Rope) 25' Lift 50' Lift 2 Ton (5/16" Dia. Rope) 20' Lift 40' Lift 3 Ton (5/16" Dia. Rope) 30' Lift 45' Lift 5 Ton (5/16" Dia. Rope) 20' Lift 30' Lift Screw — Hex Socket Head Roll Pin Qty. Req’d. 4 1 1 3 4 4 1 1 1 1 1 1 1 16 4 1 2 1 1 2 1 1 1 1 4 2 Figure 9-1. Frame, Gearcase & External Parts. (Cont’d.) Ref. No. 49 50 51 52 53 54† 55† 56† Part Number 800-166 800-167 800-168 800-169 800-170 800-171 800-172 800-174 800-176 800-2119 57 58 61 800-173 800-175 800-2120 800-177 800-178 800-196 Description Lockwasher Screw — Hex Head Cap Key Plate Shaft — Sheave (Double Reeved Models) Bracket, Sheave (Double Reeved Models) Bearing, Sheave (Double Reeved Models) Sheave Assembly, Upper (Double Reeved Models) Includes Bearing Rope & Thimble Assembly (Double Reeved Models) 1/2 & 1 Ton (3/16" Dia. Rope) 18' Lift 34' Lift 47' Lift 2 Ton (1/4" Dia. Rope) 14' Lift 25' Lift 36' Lift Plug, Pin Bolt, Hex Head Label, Rated Load (Specify Rated Load) Qty. Req’d. 2 2 1 1 1 1 1 1 2 12 1 †Recommended spares. NOTES Page 25 11456LC Figure 9-2. Gearing and Load Brake Parts. Ref. No. 1† 2† 3† 4 5 7 Part Number 800-201 800-202 800-203 800-204 800-205 800-266 800-206 800-2205A 800-207 800-209 800-210 800-2209 8 800-211 800-212 800-2211 Page 26 Description Bearing Assembly — Needle, Intermediate & Drum Gear Shaft Race — Thrust Bearing Bearing Assembly — Needle Thrust Gear — Intermediate 104 Teeth 109 Teeth 103 Teeth 90 Teeth 107 Teeth Key — Woodruff Gear — Drum 71 Teeth 61 Teeth 71 Teeth Shaft — Intermediate Gear 14 Teeth 24 Teeth 14 Teeth Qty. Req’d. 2 4 2 1 1 1 1 Figure 9-2. Gearing and Load Brake Parts. (Cont’d.) Ref. No. 15 17 18† 19 20 21† 22† 23† 24 25 26 27 28* 29 30 31 32 33† 34† 35 36 37 Part Number 800-219 800-221 800-222 800-269 800-224 800-225 800-226 800-227 800-228 800-229 800-230 800-231 800-267 800-232 800-2232A 800-233 800-234 800-235 800-236 800-237 800-238 800-239 800-240 800-241 800-242 800-243 38† 39† 40† * ** 800-244 800-245 800-268 800-246 800-2246A 800-247 800-248 800-249 800-250 800-251 43 44 45 46 47 48 49 800-254 800-253 800-252 800-260 800-263 800-261 800-262 Description Ring — Retaining, Drum Shaft Bearing Ring — Retaining Bearing Assembly — Roller, Intermediate Shaft Cover — Oil Hole Pipe Plug — Hex Socket Oil Seal — Motor Shaft Bearing Assembly — Ball, Motor Shaft Bearing Assembly — Needle, Load Brake Shaft Ring — Retaining, Motor Shaft Bearing Washer — Thrust (Steel) Brake Assembly — Load, Complete (Includes Items 26 thru 37) 23 Teeth 36 Teeth 24 Teeth 18 Teeth 20 Teeth Ring — Retaining, Brake Flange Flange — Load Brake Washer — Friction Pawl & Ratchet Assembly — Load Brake (Available Only As An Assembly) Bushing — Ratchet Gear & Center Assembly Pin — Groove Cam — Load Brake Spring — Load Brake Retainer — Spring, Load Brake Key — Woodruff Shaft & Integral Pinion — Load Brake 23 Teeth 36 Teeth 24 Teeth 18 Teeth 20 Teeth Washer — Thrust (Used With 800-246 Only) Washer — Thrust (Bronze) Bearing Assembly — Needle, Load Brake Shaft Load Brake — Clutch Assembly With Bearings (Complete) Load Brake — Clutch Assembly (Includes Items 26 thru 30, 34, 36 thru 38 and 43 thru 45) Spring Retainer Available only as part of Brake Gear, Center 800-250 or 800-251 above Clutch Assembly Ring — Retaining Oil Seal — Drum Shaft Bearing Assembly — Ball, Drum Shaft Shaft — Drum Qty. Req’d. 1 1 1 1 1 1 1 1 1 1 1 1 1 2 1 1 1 2 1 1 1 2 1 1 1 1 1 1 } 3 1 1 1 † Recommended spares. * Recommended Replacement Kit for Load Brake Clutch (Complete). ** Replacement Complete, Less Bearings and Thrust Washers. For hoists built prior to March, 1997, gearing part numbers, with four digits (rather than three) after “800-”, must be replaced in sets. For hoists built between March 1, 1997 and July 1, 1997, contact the factory for gearing requirements. Page 27 12756H Figure 9-3. Hoist Motor Brake - Later Version. Ref. No. 1 2 3 4 5 6 7 8 9 10 11 14 15 16 17 18 19 20 21 22 23 24 25 26 27 28 29 30 31 Part Number 800-2401 * 800-2402 * * * * * 800-2410† * * 800-2411 * 800-2403 * * * * * * * * * * 800-2404 * * * Description Motor Brake Assembly (Includes Ref. Nos. 1 thru 31) Acorn Nut - Plated (#10-32) Brake Cover Assembly (Includes Brake Cover and Label Inside Cover) Cover Stud Gasket Phillips Pan Head Self Tapping Screw - Plated (#10-32 x 1-3/4) Solenoid Frame Cover Assembly Hex Key (1/8 - 3/4 x 2) Solenoid Coil Assembly Tubing Hex Nut - Plated (#10-32) Solenoid Frame Hex Head Self Locking Nut - Plated (#10-32) Solenoid Support Hex Washer Head Thread Forming Screw - Plated (#10-32 x 1/4) Solenoid Plunger Hex Socket Head Set Screw - Oval Point (1/4-28 x 1) Hex Socket Shoulder Screw (#10-24 x 1)** Hex Head Self Locking Nut - Plated (#10-24)** Brake Spring (Use Red Spring Only) Brake Lever Assembly Pressure Pad Brake Disc (Non-asbestos) Brake Support Stud Separating Spring Brake Mounting Plate Hex Socket Head Self Locking Set Screw - Cup Point (1/4-20 x 3/8) Brake Hub Hex Socket Head Screw (3/8-16 x 3/4) Lock Washer (3/8) Wire Nuts — Not Shown (No. 22 thru 14 AWG) * Not available as individual parts. See replacement kits listed below. ** Later models have a hex socket head screw (1/4-20 x 1-1/2) with a hex head self locking nut - plated (1/4-20). Kits include quantities shown above. Page 28 Qty. Req’d. 1 2 1 2 1 4 1 1 1 3 2 1 2 1 2 1 1 1 1 1 1 2 1 2 2 1 2 1 2 2 4 Figure 9-3. Hoist Motor Brake. (Cont’d.) Kit Description Part Number Reference Numbers Included Brake Disc 800-2405† 23, 24, 26 Brake Lever 800-2406 6, 15, 17, 18, 19, 20, 21 (Red Color), 22, Adjusting Screw Label, Brake Adjust Label — Discard Zinc Colored Spring Rectifier 800-2407 12, 13, 4 Wire Nuts Hardware 800-2408 1, 3, 4, 5, 7, 9, 10, 12, 16, 18, 20, 25, 28, 30, 31, Instruction Label, Power Warning Label Brake Hub 800-2409 28, 29, Hub Drive Key (Shown Elsewhere) † Recommended spares. NOTES Page 29 12756A Figure 9-4. Hoist Motor Brake - Early Version. Ref. No. Part Number 1 2 3 4 5 6 7 8 9 10 11 14 15 16 17 18 20 21 22 23 24 25 26 27 28 29 30 31 32 800-1400 800-1401 * 800-1402 * * * * * * * * * * 800-1403 * * 800-1404 * * * * * * * * * * * 800-1405 * Description Motor Brake Assembly (Includes Ref. Nos. 1 thru 32) Short Frame Models Only Other Models Acorn Nut (#10-32) Brake Cover Assembly (Includes Brake Cover and Label Inside Cover) Cover Stud Gasket Hex Washer Head Thread Forming Screw (#10-32 x 1 -3/4) Solenoid Frame Cover Assembly Hex Key (1/8-3/4 x 2-1/4) Solenoid Coil Assembly Tubing Hex Nut (#10-32 Pltd.) Solenoid Frame Hex Head Self-Locking Nut (#10-24) Solenoid Support Hex Washer Head Thread Forming Screw (#10-32 x 1/4) Solenoid Plunger Hex Socket Head Self-Locking Set Screw - Oval Point (1/4 - 28 x 1) Clevis Pin (3/16 x 1-1/4) Flat Washer Brake Spring Brake Lever Assembly Pressure Pad Brake Disc (Non-asbestos) Brake Support Stud Separating Spring Hex Socket Head Self-Locking Set Screw - Cup Point (1/4 - 20 x 3/8) Brake Hub Hex Socket Head Screw (3/8 - 16 x 3/4) Brake Mounting Plate Wire Nuts — Not Shown (No. 22 thru 16 AWG) * Not available as individual parts. See replacement kits listed below. Kits include quantities shown above. Page 30 Qty. Req’d. 1 2 1 2 1 4 1 1 1 3 2 1 2 1 2 1 1 1 2 1 1 2 1 2 2 2 1 2 1 4 Figure 9-4. Hoist Motor Brake. (Cont’d.) Kit Description Brake Disc Part Number 800-1406 Reference Numbers Included 24, 25, 27 Solenoid 800-1407 5, 6, 8, 11, 17 Brake Lever 800-1408 18, 20, 21, 22, 23 Brake Hub 800-1409 28, 29, Hub Drive Key (Shown Elsewhere) Special Hardware 800-1410 3, 4, 9, 26, Instruction Label inside cover, Adjust Label, Adjusting Screw Label on brake lever assembly, Power Warning Label on cover Hardware 800-1411 1, 5, 7, 10, 12, 14, 16, 18, 20, 21, 28, 30 NOTES Page 31 12724 Figure 9-5. Three Phase Motor Assembly. Ref. No. Part Number 800-1301 800-1302 800-1303 800-1304 800-1305 800-1306 800-1307 800-1308 800-1309 800-1310 800-1311 800-1312 800-1313 800-1314 800-1315 800-1316 800-1317 800-1318 800-1319 800-1320 800-1321 1 2 3 4 5 6 7 8 800-1322 800-1323 800-1324 800-1325 * * * * * * * * Description Motor Assembly (Includes Ref. Nos. 1 thru 8) 1 Horsepower (1 Speed) 200 Volt 230/460 Volt 575 Volt 2 Horsepower (1 Speed) 200 Volt 230/460 Volt 575 Volt 4 Horsepower (1 Speed) 200 Volt 230/460 Volt 575 Volt 1 - 1/3 Horsepower (2 Speed) 200 Volt 230 Volt 460 Volt 575 Volt 2 - 2/3 Horsepower (2 Speed) 200 Volt 230 Volt 460 Volt 575 Volt 3 - 1 Horsepower (2 Speed) 200 Volt 230 Volt 460 Volt 575 Volt 4 - 2 Horsepower (2 Speed) 200 Volt 230 Volt 460 Volt 575 Volt Bell — End Ring — Retaining Bearing — Ball Ring — Retaining Key — Brake Rotor and Shaft Assembly Stator Assembly Bolt — Motor * Furnished only as part of motor assembly. Page 32 Qty. Req’d. 1 1 1 1 1 1 1 1 4 11460 Figure 9-6. Upper Limit Switch Parts. Ref. No. Part Number 1 2 800-501 800-502 800-503 800-526 800-527 3 4 5 6 7 8† 9 10† 11 12 13 14 15 16 17 18 19 20 800-504 800-505 800-528 800-529 800-506 800-507 800-525 800-509 800-510 800-511 800-512 800-513 800-514 800-515 800-516 800-517 800-518 800-519 800-520 800-521 800-522 Description Pin — Pivot Arm — Lever Short Frame Long Frame First Extension Second Extension Lever — Floating Short Frame Long Frame First Extension Second Extension Washer Pin — Cotter Coupling Pin — Roll Switch Assembly — Limit, Reversing (Includes Wire Leads) Connector — Wire Switch Assembly — Limit, Stop (Includes Wire Leads) Screw — Round Head Screw — Socket Head Shoulder Shaft & Cam Assembly Insulator — Limit Switch Bearing — Nylon Screw — Socket Head Cap Lockwasher Nut — Lock Bracket Assembly — Mounting Nut — Hex Qty. Req’d. 2 1 1 2 2 1 2 1 3 1 4 1 1 1 2 2 2 1 1 2 † Recommended Spares. Page 33 12748A Figure 9-7. Electrical Control Equipment. Ref. No. Part Number Description 3 5 6† 7† 8 9† 10 11† 12 800-670 800-654 800-655 800-656 800-657 800-671 800-663 800-672 800-673 800-674 800-675 800-676 Cord Grip — Conductor Screw — Self-Tapping Contactor — Two Speed Contactor Screw — Self-Tapping Transformer Screw — Self-Tapping Terminal Board (Reconnectable Hoist Only) Fuse, Fuse Holder and Wire Assembly Fuse Only (2A, 300V) Brake Module Screw — Self Tapping 13 14 † Recommended Spares. NOTES Page 34 Qty. Req’d. 2 4 1 1 2 1 4 1 1 1 1 2 12763 Figure 9-8. Push Button Station and Conductor Cable Assembly. Single Speed Hoists. Ref. No. Part Number 800-2701 1 2 3 4 5 6 7 8 9 10 11 12 13 14 15 16 17 800-2702 * * * 800-2703 * 800-2704 800-2705 * * * * * * 800-2706 * 800-2707 800-2708 Description Push Button Station and Conductor Cable Assembly (Includes Ref. Nos. 1 thru 17) Push Button Station (Includes Ref. Nos. 1 thru 15) Type 1 Pan Head Machine Screw (M 3.5 x 0.6 x 12 Pltd.) Lockwasher (M 3.5 Pltd.) Rear Cover Gasket Type 1 Pan Head Thread Cutting Screw (M 4 x 15 Pltd.) Contact Assembly Button Assembly Type 1 Pan Head Machine Screw (M 6 x 1 x 12 Pltd.) Lockwasher (M 6 Pltd.) Plain Washer (M 6 Pltd.) Type 1 Pan Head Machine Screw (M 3.5 x 1 x 14 Pltd.) Lockwasher (M 3.5 Pltd.) Housing Cap Grommet Housing Conductor Cable Assembly Plastic Warning Tag Qty. Req’d. 1 1 7 7 1 1 2 1 1 1 1 1 2 2 1 1 1 1 1 * Not available separately. Order Push Button Station. Page 35 12721A Figure 9-9. Push Button Station and Conductor Cable Assembly. Two Speed Hoists Only - Later Version. Ref. No. Part Number 800-1821 1 7 11 12 13 14 15 16 17 18 19 Page 36 800-1822 800-1823 800-1812 800-1813 800-1814 * * * * * * * Description Push Button Station and Conductor Cable Assembly (Includes Ref. Nos. 1 thru 30) Grommet Conductor Cable Operator Warning Label Push Button Station (Includes Ref. Nos. 12 thru 30) Sleeve — Conductor Support — Strain Cable Screw — Slotted Head Lockwasher Enclosure — Rear Gasket Screw — Slotted Head Screw — Slotted Head Qty. Req’d. 1 1 As Req’d 1 1 1 1 4 4 1 1 2 2 Figure 9-9. Push Button Station and Conductor Cable Assembly. (Cont’d.) Ref. No. Part Number 20 21 * * 800-1815 800-1816 * 800-1817 22 800-1818 23 24 25 26 27 28 29 30 ** * ** ** ** ** ** ** Description Clamp — Conductor Contact Block Assembly Contact Block (ZB2-BE101) Contact Block (ZB2-BE201) Interlock—Mechanical Up Push Button Assembly (Includes 1 Each of Ref. Nos. 23 and 25 thru 29) Down Push Button Assembly (Includes 1 Each of Ref. Nos. 23, 25 thru 28 and 30) Ring — Retaining Enclosure — Front Seat — Spring Spring Seal Plate — Push Button Push Button — Up Push Button — Down Qty. Req’d. 1 1 2 2 1 1 1 2 1 2 2 2 2 1 1 * Not available separately. Order Push Button Station. ** Not available separately. Order Push Button Assembly. NOTES Page 37 12721 Figure 9-10. Push Button Station and Conductor Cable Assembly. Two Speed Hoists Only - Early Version. Ref. No. Part Number 800-1801 1 2 3 4 5 6 7 8 9 10 11 12 Page 38 800-1802 800-1803 800-1804 800-1805 800 1806 800-1807 800-1808 800-1809 800-1810 800-1811 800-1812 800-1813 800-1814 Description Push Button Station and Conductor Cable Assembly (Includes Ref. Nos. 1 thru 30) Anchor Bracket — Strain Cable Grip Assembly — Conductor Connector — Strain Cable Thimble — Strain Cable Connector — Conductor to Strain Cable Clamp — Conductor Conductor Cable Strain Cable Sleeve — Pressure Tie — Conductor Operator Warning Label Push Button Station (Includes Ref. Nos. 12 thru 30) Sleeve — Conductor Qty. Req’d. 1 1 1 1 2 1 1 1 1 1 As Req’d. 1 1 1 Figure 9-10. Push Button Station and Conductor Cable Assembly. (Cont’d.) Ref. No. Part Number 13 14 15 16 17 18 19 20 21 * * * * * * * * * 800-1815 800-1816 * 800-1817 22 800-1818 23 24 25 26 27 28 29 30 ** * ** ** ** ** ** ** Description Support — Strain Cable Screw — Slotted Head Lockwasher Enclosure — Rear Gasket Screw — Slotted Head Screw — Slotted Head Clamp — Conductor Contact Block Assembly Contact Block (ZB2-BE101) Contact Block (ZB2-BE201) Interlock — Mechanical Up Push Button Assembly (Includes 1 Each of Ref. Nos. 23 and 25 thru 29) Down Push Button Assembly (Includes 1 Each of Ref. Nos. 23, 25 thru 28 and 30) Ring — Retaining Enclosure — Front Seat — Spring Spring Seal Plate — Push Button Push Button — Up Push Button — Down Qty. Req’d. 1 4 4 1 1 2 2 1 1 2 2 1 1 1 2 1 2 2 2 2 1 1 * Not available separately. Order Push Button Station. ** Not available separately. Order Push Button Assembly. NOTES Page 39 11464 Figure 9-11. Lower Block Assembly — Two Parts Rope, Single Reeved. Ref. No. 1 2 3 4 5 6 † 7 8 † 7 8 9 10 † † 11 12 † † 13 14 15 Part Number 800-801 800-802 800-803 800-804 800-805 800-806 800-807 800-808 800-809 800-810 800-811 800-812 800-813 800-814 800-815 800-816 800-817 800-818 800-819 800-820 800-821 800-822 800-823 800-824 800-825 800-826 800-827 800-828 800-829 800-830 800-831 800-832 800-833 800-834 † Recommended Spares. Page 40 Description Block Assembly — Lower, Complete, 2 Ton Block Assembly — Lower, Complete, 1 Ton Block Assembly — Lower, Complete, 1/2 Ton Screw — Flat Head, Self-Threading Cover — 2 Ton Cover — 1 Ton Cover — 1/2 Ton Ring — Retaining, 2 Ton Ring — Retaining, 1/2 & 1 Ton Lube Fitting Pin — Sheave, 2 Ton Pin — Sheave, 1/2 & 1 Ton Spacers — 2 Ton Spacers — 1/2 Ton & 1 Ton Sheave Assembly — 2 Ton (Consists of Items 7 and 8) Bearing Sheave Sheave Assembly — 1/2 & 1 Ton (Consists of Items 7 and 8) Bearing Sheave Cover — Lower Block, 2 Ton Cover — Lower Block, 1 Ton Cover — Lower Block, 1/2 Ton Hook Assembly — (Consists of Hook, Nut & Grooved Pin), 2 Ton Hook Assembly — (Consists of Hook, Nut & Grooved Pin), 1/2 & 1 Ton Shroud — Thrust Bearing, 2 Ton Shroud — Thrust Bearing, 1/2 & 1 Ton Bearing Washer -— Thrust, 2 Ton Bearing Washer — Thrust, 1/2 & 1 Ton Body — Lower Block, 2 Ton Body — Lower Block, 1/2 & 1 Ton *Safety Hook Latch Kit — 2 Ton *Safety Hook Latch Kit — 1/2 & 1 Ton Screw — Flat Head, Self-Threading Qty. Req’d. 1 1 1 2 1 1 1 2 2 1 1 1 2 2 1 1 1 1 1 1 1 1 1 1 1 1 1 1 1 1 1 1 1 2 11465 Figure 9-12. Lower Block Assembly—Two Parts Double Reeved. Ref. No. 1 2 3 4 5 6 † 7 8 9 10 11 † † 12 13 † † 14 15 Part Number 800-851 800-852 800-853 800-804 800-854 800-806 800-807 800-809 800-810 800-855 800-814 800-818 800-819 800-820 800-856 800-834 800-824 800-825 800-826 800-827 800-828 800-829 800-857 800-858 800-832 800-833 Description Block Assembly — Lower, Complete, 2 Ton Block Assembly — Lower, Complete, 1 Ton Block Assembly — Lower, Complete, 1/2 Ton Screw — Flat Heads Self-Threading Cover — Lower Block, 2 Ton Cover — Lower Block, 1 Ton Cover — Lower Block, 1/2 Ton Ring — Retaining Fitting — Lube Pin — Sheave Spacer Sheave Assembly — (Consists of Items 7 and 8) Bearing Sheave Cover — Intermediate Screw — Flat Head, Self-Threading Hook Assembly — (Consists of Hook, Nut & Grooved Pin), 2 Ton Hook Assembly — (Consists of Hook, Nut & Grooved Pin), 1/2 & 1 Ton Shroud — Thrust Bearing, 2 Ton Shroud — Thrust Bearing, 1/2 & 1 Ton Bearing — Thrust, 2 Ton Bearing — Thrust, 1/2 & 1 Ton Body — Lower Block, 2 Ton Body — Lower Block, 1/2 & 1 Ton *Safety Hook Latch Assembly — 2 Ton *Safety Hook Latch Assembly — 1/2 & 1 Ton Qty. Req’d. 1 1 1 4 2 2 2 2 1 1 4 2 2 2 1 4 1 1 1 1 1 1 1 1 1 1 † Recommended Spares. * Furnished as Standard with hook. Page 41 12197LA Figure 9-13. Upper and Lower Block Parts (3 & 5 Ton — Typical). Ref. No. 1 2 3 4 5 6 7† 8† 9 11 12† 13† 14 15 16† 17 18† 19 20 21 22 23 24 25 26 27 Part Number 800-1501 800-1502 800-1503 800-1504 800-1505 800-1506 800-1507 800-1508 800-1509 800-1510 800-1535 800-1513 800-1514 800-1515 800-1516 800-1517 800-1518 800-1530 800-1531 800-1519 800-1520 800-1521 800-1522 800-1523 800-1524 800-1525 800-1526 800-1527 800-1528 800-1529 Description Block Assembly — Lower, 4 Part Single (Complete) Block Assembly — Lower, 6 Part Single (Complete) Screw — Hex Head Cap Lockwasher Key Plate Fitting — Grease Pin — Upper Sheave Spacer Washer — Upper Sheave Bearing — Upper Sheave (Includes Outer Race) Sheave — Upper Pin — Rope Guide Spacer Washer — Lower Sheave Bearing — Lower Sheave (Includes Outer Race) Sheave — Lower Pin — Roll, Hook Nut Nut — Hook* Bearing — Thrust, Hook Shield — Bearing (Not Shown) Washer — Thrust (Not Shown) Fitting — Grease Hook Assembly — (includes Hook, Latch & Nut) Plate — Capacity Screw — Round Head, Self-Tapping (Capacity Plate) Guard — Sheave Body — Lower Block Pin — Lower Sheave Screw — Button Head Cap, Self-Locking (Sheave Guard) Ring — Retaining, External Lockwasher — (Capacity Plate) Spacer — Upper Block, 9/16" † Recommended Spares. * Hook Nuts with roll pins are not interchangeable — Available only as an assembly. Page 42 Quantity Required Reeving 3-Ton/4 PS 5-Ton/6 PS 1 — 2 2 1 1 1 2 1 1 2 4 2 2 1 1 1 1 2 1 1 2 4 1 1 1 4 2 4 2 — 1 2 2 1 1 1 4 2 2 2 6 3 3 1 1 1 — — 1 1 2 4 1 1 1 4 2 4 — 12757A Figure 9-14. Screw-Type Limit Switch Parts. Ref. No. Part Number 1 2 3 4 800-1655 800-1651 800-1652 800-1657 Description Limit Switch Assembly (Includes Ref. Nos. 2, 3 and 4) Cap Screw — Hex Socket Head Sealing Washer Drum Shaft Insert Qty. Req’d. 1 3 3 1 For switch element replacement order 800-1654. NOTES Page 43 Recommended Spare Parts for Your Yale Hoist Certain parts of your hoist will, in time, require replacement under normal wear conditions. It is suggested that the following parts be purchased for your hoist as spares for future use. One Friction Disc Kit One Motor Brake Solenoid Coil One Set Of Contactors One Transformer One Wire Rope Assembly One Gearcase Gasket Note: When ordering parts always furnish Hoist Serial Number, Catalog Number, Motor Horsepower, Voltage, Phase, Frequency and Rated Load of Hoist on which the parts are to be used. Parts for your hoist are available from your local authorized SHAW-BOX repair station. For the location of your nearest repair station, write: IN USA YaleLift-Tech P.O. Box 769 Muskegon, MI 49443-0769 Phone: 800 742-9269 Fax: 800 742-9270 WARRANTY WARRANTY AND LIMITATION OF REMEDY AND LIABILITY A. Seller warrants that its products and parts, when shipped, and its work (including installation, construction and start-up), when performed, will meet applicable specifications, will be of good quality and will be free from defects in material and workmanship. All claims for defective products or parts under this warranty must be made in writing immediately upon discovery and in any event, within one (1) year from shipment of the applicable item unless Seller specifically assumes installation, construction or start-up responsibility. All claims for defective products or parts when Seller specifically assumes installation, construction or start-up responsibility and all claims for defective work must be made in writing immediately upon discovery and in any event, within one (1) year from completion of the applicable work by Seller, provided; however, all claims for defective products and parts made in writing no later than eighteen (18) months after shipment. Defective items must be held for Seller’s inspection and returned to the original f.o.b. point upon request. THE ‘FOREGOING IS EXPRESSLY IN LIEU OF ALL OTHER WARRANTIES WHATSOEVER, EXPRESS, IMPLIED AND STATUTORY, INCLUDING, WITHOUT LIMITATION, THE IMPLIED WARRANTIES OF MERCHANTABILITY AND FITNESS. B. Upon Buyer’s submission of a claim as provided above and its substantiation, Seller shall at its option either (i) repair or replace its product, part or work at either the original f.o.b. point of delivery or at Seller’s authorized service station nearest Buyer or (ii) refund an equitable portion of the purchase price. C. This warranty is contingent upon Buyer’s proper maintenance and care of Seller’s products, and does not extend to normal wear and tear. Seller reserves the right to void warranty in event of Buyer’s use of inappropriate materials in the course of repair or maintenance, or if Seller’s products have been dismantled prior to submission to Seller for warranty inspection. D. The foregoing is Seller’s only obligation and Buyer’s exclusive remedy for breach of warranty and is Buyer’s exclusive remedy hereunder by way of breach of contract, tort, strict liability or otherwise. In no event shall Buyer be entitled to or Seller liable for incidental or consequential damages. Any action for breach of this agreement must be commenced within one (1) year after the cause of action has accrued.