1
A Note To You
2
Important Safety
Instructions
3
Parts And Features
6
Using Your Cooktop
7
(1
Caring For
Your Cook-top
17
HYouNeed
Assistance
Or Service
27
Warranty
32
1-800-253-I 301
Call us with questions
or comments.
ELECTRIC COO KTOP
I
%3
MODELS
RC8920XA
RC8900XA
A Note To You
Thank
you for buying
a Whirlpool
zlppliance.
You have purchased a quality, world-class home zlppliance. Years of engineering experience
have gone into its manufacturing. To ensure that you will enjoy many years of trouble-free
operation, we have developed this Use and Care (&ride. It is full of valuable information on
how to operate and maintain your appliance properly and safely. Please read it carefully. Also,
please complete and mail the Ownership Registraiion Card provided with your appliance. This
will help us notify you about any new information OI your appliance.
Your
safety
is important
to us.
This guide contains safety symbols and statement:;. Please pay special attention to these
symbols and follow any instructions given. Here is ,a brief explanation of the use of each
symbol.
This symbol will help alert you to such
dangers as personal injury, burns, fire and
electrical shock.
Tt ris symbol will help you avoid actions
WIrich could cause product damage
(s:ratches, dents, etc.) and damage to your
pemrsonal property.
Our Consumer
Assistance
Center
is toll-free,
24 hours a day.
nllmber,
l-800-253-1
301,
If you ever have a question concerning your appliar Ice’s operation, or if you need service, first
see “If You Need Assistance Or Service” on page 27. If you need further help, feel free to call
our Consumer Assistance Center. When calling, YOIJwill need to know your appliance’s
complete model number and serial number. You cali find this information on the model and
serial number plate (see diagram on page 6). For your convenience, we have included a
handy place below for you to record these numbers the purchase date from the sales slip and
your dealer’s name and telephone number. Keep th s book and the sales slip together in a
safe place for future reference.
Model Number
De; ller Name
Serial Number
De; ller Phone
Purchase
2
Date
Important
Safety Instructions
General
l
l
l
l
l
l
l
Read all instructions before
using the cooktop.
Install or locate the cooktop
only in accordance with the
provided Installation Instructions. The cooktop must be
Installed by a qualified installer.
The cooktop must be properly
connected to electrical supply
and grounded.
CAUTION: Do not store things
children might want above the
cookto . Children could be
burne cf or injured while climbing on it.
Do not leave children alone or
unattended in area where the
cooktop is in use. They should
never be allowed to sit or stand
on any part of the cooktop.
They could be burned or injured.
PO not operate the cooktop if
It IS damaged or not working
properly.
Do not use the cooktop for
warming or heatin the room.
Persons could be ii!urned or
injured, or a fire could start.
Use the cooktop only for its
intended use as described in
this manual.
LNITS. Surface units may be
hDt even though they are dark
irl color. Areas near surface
units become hot enough to
cause burns. During and after
use, do not touch, or let clothing or other flammable materials contact surface units or
areas near units until the have
had sufficient time to coo.7
‘\
@
l
l
l
l
Do not wear loose or hanging
{:arments when using the
cooktop. The could Ignite if
t~ie touch a i ot surface unit
;.n J you could be burned.
Use only dry potholders. Moist
or damp potholders on hot
z8urfaces ma result in burns
from steam. b 0 not let
potholder touch hot surface
units. Do not use a towel or
bulky cloth for a potholder.
It could catch on fire.
Do not heat unopened containf!t-s. They could explode. The
hot contents could cause burns
:ind container particles could
c:ause injury.
Do not store flammable materiills on or near the cookto . The
iumes can create an exp Posion
and/or fire hazard.
. DO NOT TOUCH SURFACE
UNITS OR AREAS NEAR
continued
on next page
3
When
l
l
l
l
using
the cooktop
For coil elements, make sure
the reflector bowls are in
place during cookin . Cookrng without reflector % owls
may subject the wiring and
components underneath
them to damage.
For coil elements, do not line
reflector bowls with aluminum
foil or other liners. Improper
installation of these liners
may result in a risk of electrical shock or fire.
Do not cook on ceramic
cooktop module if it is broken.
If cooktop should break,
cleaning solutions and
spillovers may penetrate the
broken cooktop and create a
risk of electrical shock. Contact a qualified technician
immediately.
Select a pan with a flat bottom that IS about the same
size as the surface unit. If
an is smaller than the surPace unit, some of the heating
element will be e>lcpos.edand
BNever leave surface unils
unattended at high heat settings. A boilover could result
and cause smoking and greasy
spillovers that may ignite.
41Turn pan handles inward, but
not over other surface units.
This will help reduce the
chance of burns, i niting of
flammable materia 9 s, and spills
due to bumping of the pan.
Grease
l
l
l
4
i%iK?gsud) ~%Z!:;XZ.
rect pan size also improves
cooking efficiency.
Check to be sure lass cooking utensils are sa9e for use
on the cooktop. Only certain
types of glass, glass-ceramic,
ceramic, earthenware or
other lazed utensils are
suitab Be for cooktops without
breaking due to the sudden
change In temperature.
Grease is flammable. Do not
allow rease to collect
aroun !I cooktop. Wipe
spillovers immediately.
Do not use water on grease
fires. Never pick up a flaming
pan. Smother flaming pan on
ran e by coverin with a
wel B-fitted lid, coo9(ie sheet or
flat tray. Flaming grease
outside of pan can be extinuished with baking soda or,
Y
I available, a multipurpose
dry chemical or foam-type
extinguisher.
Care and cleaning
l
l
For coil elements do not soak
removable heating elements in
water. The element will be
damaged and shock or fire
could result.
Clean ceramic cooktop with
care. Some cleaners can produce noxious fumes if applied
to a hot surface. If a wet aper
towel is used to wipe spil Ps on
a hot cooking area, be careful
to avoid steam burns.
-SAVE
l
l
Do not repair or replace any
part of the cooktop unless
:;pecifically recommended in
this manual. All other servicing
:;hould be referred to a qualif ied technician.
[Iisconnect the electrical supply before servicing the
c ooktop.
THESE INSTRUCTIONS
-
Parts And Featwes
This section contains captioned illustrations of YOUI cooktop. Use them to become familiar
with the location and appearance of all parts and fc atures.
Model and serial
number olate .
-
cooktop
module
Griddle
Solid element
surface unit
module
Grill
Control
vem
NOTE: You must purchase modules separately. Model RC8920XA, however, comes
with fixed coil elements on right side. To
order modules, contact a WhirlpooP service
company or dealer.
6
module
panel
Using Your Coolktop
In This
Section
Page
units .~.. .. ... .. .. .. ... .. .. .. ... .. .. .. .. . 7
Using the grill .. .. ... .. .. .. .. .. ... .. .. .. ... .. .. ... .. .. .. .. ... .. . 10
Using the griddle . .. .. .. .. ..*................................ 12
Using the surface
U! iing the vent system
Page
.. .. ... . ... ... . ... .. .. ... .. . 3
Cl banging the cooktop
El lergy saving
modules ... .. ... .. .. . -’4
tips .. .. ... . ... .. .. .... . .. ... .. .. ... .. . 6
To obtain the best cooking results possible, you moist operate your cooktop properly. This
section gives you important information for efficient and safe use of your cooktop.
Using
the surface
units
Push in control knobs before turning
them to a setting. You can set them
anywhere between HI and OFF.
Surface
markers
unit
and grill
The solid dot in the surface unit marker
shows which surface unit is turned on by
that knob.
The grill marker shows which control
knobs operate the grill.
Surface
unit
indicator
lights
One of the Surface Unit Indicator Lights
on the control panel will glow when a
surface unit is on.
Burn and Fire Hazard
Be sure all control knobs are turned to
OFF and all indicator lights are OFF
when you are not cooking.
Someone could be burned or a fire
could start if a surface unit is accidentally left ON.
Until you get used to the settings, use
the following as a guide. For best results,
start cooking at the high setting; then turn
the control knob down to continue cooking.
-.~-.-
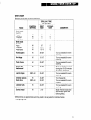
SETI-ING
___.
HI
MED-HI
&Z~MMENDED
--~
1
* To start foods cooking.
* To bring liquids to a boil.
: * -To hold a rapid boil.
l To fry chicken
or pancakes.
i l On solid elements, turn
to LO or MED-LO when
sizzle starts.
MED
l
l
l
MED-LO
l
l
LO
USE
l
For gravy, pudding and
icing.
To cook large amounts
of vegetables.
On solid elements, turn
to LO or MED-LO when
sizzle starts.
To keep food cooking
after starting it on a
higher setting.
On solid elements, turn
to LO to finish cooking.
To keep food warm until
ready to serve.
Using the solid element
surface
unit module
Solid element surface units are made of
heavy cast-iron to provide even cooking.
Each surface unit has a built-in protective
limiter as a safety feature.
The limiter senses uneven cooking
temperatures when:
l A pan boils dry.
l A pan is removed
and the surface unit is
left on.
l
The bottom of the pan is too large or too
l
small for the surface unit. This WIII result In
longer cooking times.
The bottom of the pan is rounded,
warped, ribbed or dented and does not
make full contact with the surface unit.
8
1 he limiter will automatically reduce the heat
I( vel to provide even cooking temperatures
aid to protect the surface unit.
NOTE: Solid elements stay hot for a long
ti ne. Do not use the HI setting for long
p ?riods of time or leave pans on hot elerr ents when cooking is done. Burned food
a id damage to the cookware could result.
Use a lower setting to complete the cooking
ar\d turn the solid element surface unit off a
fs w minutes before you finish cooking.
Before placing a pan on solid element
sluface units for the first time, heat on HI
st!tting for five minutes. The surface units
w II give off smoke as the protective coating,
afrplied at the factory, finishes bonding to
th a surface.
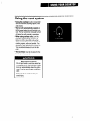
Using the ceramic
cl>oktop
module
glass
Cooking on the ceramic glass cooktop is
allnost the same as cooking on coil surface
ur its. There are, however, a few differences:
l --he surface
unit will glow red when it is
t Jrned on. You will see the element cycling
on (glowing red) and off - even on HI
: etting - to maintain the proper temperat Jre setting you have selected.
l Z;liding metal pans on ceramic
glass
cooktop surface could leave marks. Wiping
c ff the cooktop before and after each use
v/ill help keep the surface free from stains
snd provide the most even heating. See
rages 21 and 22 for care and cleaning
suggestions.
Cookware
tips
Select a pan that is about the same size
l
as the surface unit.
Product Damage Hazard
NOTE: For best results and greater
energy efficiency, use only flat-bottomed
l
l
l
l
l
utensils that make good contact with the
surface units. Utensils with rounded,
warped, ridged (such as some porcelain
enamel-ware) or dented bottoms could
cause severe overheating of coil elements,
which damages the utensil and/or surface
unit.
Woks, canners and teakettles with flat
bottoms suitable for use on your cooktop
are now available in most stores that sell
housewares.
The pan should have straight sides and a
tight-fitting lid.
Choose medium to heavy gauge (thickness) pans that are fairly light-weight.
The pan material (metal or glass) affects
how fast heat transfers from the surface
unit through the pan material and how
evenly heat spreads over the pan bottom.
Choose pans that provide the best cooking
results.
Handles should be made of sturdy, heatresistant material and be securely attached
to the pan.
Ceramic cooktop module:
With your hand, feel the bottom of your
l
l
l
l
pans while they are cool for nicks and
scratches. Nicks and scratches on pan
bottoms will scratch the ceramic glass
cooktop.
Make sure bottoms of pans are clean and
dry before using on cooktop.
Avoid spillovers on cooktop. Use pans
with tall sides.
Do not cook food directly on cooktop.
DOn coil elements, if a surface unit stays
red for a long time, the bottom of the
pan is not flat enough or is too small for
the surface unit. Prolonged usage of
incorrect utensils can result in damage
to the surface unit, cooktop, wiring and
surrounding areas. To prevent damage,
use correct utensils, start cooking on
HI and turn control down to continue
cooking.
BDo not leave an empty utensil, or one
which has boiled dry, on a hot surface
unit. The utensil can overheat and may
damage the utensil or surface unit.
klome
canning
information
Solid and coil elements: The large diame:er of most water-bath or pressure canners
c lmbined with high heat settings for long
periods of time can shorten the life of regular
s Jr-face units and cause damage to the
c ,oktop.
If you plan to use the coil element cooktop
for canning, we recommend the installation
0’ a Canning Kit. Order the kit (Part No.
2 12905) from your Whirlpool dealer or
authorized WhirlpooFM service company.
To protect your cooktop:
Use flat-bottomed canners/pans for
l
best results. Some canners have ribbed
bottoms (porcelain enamel-ware) and are
not recommended for solid elements. They
do not make good contact with the surface
unit, causing the limiter to reduce the heat
level. This interferes with the canning
process.
continued
on next page
9
a Use the largest surface unit for best
results. Solid and coil elements: also,
l
use a canner/pan which can be centered
over the surface unit and which does not
extend more than one inch outside surface
unit area. Large diameter canners/pans, if
not properly centered, trap heat and can
cause damage to the cooktop.
Solid and coil elements: do not place
canner on two surface units at the same
time. Too much heat will build up and will
damage the cooktop.
Using
l
l
l
tips
Do not cover the entire cooking surface
with meat. Leave space between the food
items to allow smoke and steam to ventilate properly.
Meat with a normally high fat content will
produce more smoke and flare-ups, but
cook faster than lean meat, Trim fat from
meat before placing on the grill to prevent
excessive smoke or flare-ups.
If meat begins to cook too quickly, turn
the grill control knob to a lower setting.
Do not leave grill unattet Jed.
10
l
On coil element module, keep reflector
I,owls clean for best heat reflection.
--o prolong the life of solid and coil
t elements:
-. Prepare small batches at a time.
-. Do not use elements for canning all
day.
for the
Wash with warm, soapy water; rinse and
dry. Never use a metal scrubbing pad or
abrasive cleanser on the grill; these will
damage the nonstick surface. After cleaning, lightly wipe cooking surface with
cooking oil to prevent food from sticking.
l
l
litart with hot water. This reduces the
lime the control is set on high. Reduce
Ireat setting to lowest position needed to
I;eep water boiling.
the grill
Before you use the grill
first time:
Cooking
l
Fire Hazard
Grease can cause excessive flare-ups.
To put out fire:
- Remove food from the grill, turn the
grill control to OFF and cover the
grill with a large metal pan.
- Make sure the vent system has been
switched to ON.
- Do not put water on a grease fire.
Product Damage Hazard
The use of metal utensils can scratch the
nonstick coating. Only nylon or plastic
utensils should be used.
Grill
chart
Preheat 10 minutes on HI for best flavor.
GRILLINt Z TIME
(in min Ites)
SECOND I
SIDE
1
FOOD
COMMENTS
Beef steak
(Y2-94”)
l
l
l
rare
medium
well-done
HI
HI
HI
5
6
8
4
6
8
HI
HI
HI
5-7
9-l 1
12-15
5
10
12
HI
20-25’
HI
12-15*
HI
25-30’ -t
HI
50-60*
___-
-
Beef steak
(l-l %“)
rare
*medium
l well-done
l
Hamburgers
Hot dogs
Pork chops
Spare ribs,
barbecued
Lamb chops
Chicken pieces
Ham slice
Lobster tails
Garlic bread
s
i
s
t
+
-
4
-
HI
MED-HI
HI
Grilling times are approximate
‘Total grilling time.
Turn as needed for even
cooking.
Turn as needed for even
cooking.
45-60’
Turn frequently.
20-25* t
Turn as needed for even
cooking.
20-25’
4
I
HI
Turn as needed for even
cooking.
Brush on barbecue sauce
during last 15-20 minutes
of cooking, if desired.
25-35’ t
MED-HI
Turn as needed for even
cooking.
2-3’
t
Turn as needed for even
cooking.
Butter French bread and
sprinkle with garlic salt
before grilling.
and may need to be ac justed to individual tastes.
11
Using
the griddle
Bc,!fore using the griddle
thie first time:
Burn and Fire Hazard
Be sure the griddle control is off and
the griddle is cool and covered when
not in use.
Failure to do so could result in burns or
fire.
Product Damage Hazard
l
l
When cleaning griddle, never use a
metal scouring pad or abrasive
cleanser on the griddle. These will
damage the nonstick cooking surface.
Do not use cookware on the griddle.
Use only plastic or nylon kitchen
utensils on the griddle. Metal can
damage the nonstick cooking surface.
Griddle
1. Wash the cooking surface with warm,
soapy water. Rinse and dry.
2. After cleaning, lightly wipe the cooking
surface with cooking oil to prevent food
from sticking. You don’t have to season
(grease) the griddle every time you use it.
Do not use shortening or butter to season
the griddle.
3. Preheat on HI, then turn control to a
lower setting to cook.
4. Place food directly on cooking surface.
5. Turn off the griddle element when
cooking is finished. Leaving element on
will damage the griddle.
chart
Preheat 10 minutes on HI, then turn to a lower settirlg to cook.
FOOD
COOK
SElTING
Bacon
Pancakes
HI
MED-HI
Pork sausage patty
HI
GRIDDLING TIME (in minutes)
SIDE 2
!‘ilDE 1
3
1-2
1S-2
1-2
8
4
Eggs
MED-LO
3
1
Grilled sandwiches
MED-HI
3
3
MED
3
2-3
French toast
Griddling times are approximate
12
for
and may need to b’s adjusted to individual tastes.
--*--w-
Using
l
l
l
the vent
1-
-
-
.-*-.
system
Using the cooktop’s built-in downdraft
vent fan removes cooking vapors, odor
and smoke.
The fan will automatically operate at
HIGH speed when the grill module is in
use. The fan cannot be manually turned
off when the grill module is operating.
When using surface units, turn the
Vent Fan Control Knob clockwise to
HIGH or LOW. Use HIGH only when
doing cooking that produces significant
cooking vapors, odor and smoke. You
will hear a click when the fan comes on.
Turn counterclockwise to turn the fan
OFF.
9 The fan filters must be in place for the
fan to operate properly.
Personal Injury Hazard
Do not put hands in vent box when fan
or controls are on. The vent fan system
turns on automatically when the grill is
used. Turn fan and cooktoo controls to
OFF.
Failure to do so could result in personal injury.
13
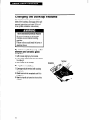
Changing
the cooktop
modules
The cooktop modules will work on both
sides of the cooktop. (See page 23 for grill
removal instructions and page 15 for optional griddle installation instructions.)
Burn and Electrical Shock Hazard
Be sure all controls are off and the
modules are cool before handling
modules.
Failure to do so could result in burns or
electrical shock.
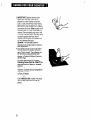
To remove coil element,
solid
element
and ceramic
glass
modules:
1. Lift module slightly by the handle.
2. Pull module toward you with both hands
to unplug it.
3. Lift module out of cooktop.
To replace
modules:
1. Line up module terminal with cooktop
receptacle.
2. Push terminal into receptacle until it is
plugged in.
3. Use the handle to lower the front of the
module.
14
Terminal
Installing
module
optional
griddle
To install:
1. Remove the grill sections.
2. Slide the griddle into place with drain slot
at rear.
To remove:
1. Lift front slightly by both front corners and
set aside.
-
2. Replace the grill sections.
i
Energy
saving
tips
Although the energy used for cooking is
usually a very small percentage of the total
energy used in the home, cooking energy
can be used efficiently. Here are some tips
to help you save energy when using your
cooking product.
l Use pans with flat bottoms,
straight sides
and tight-fitting lids.
l Match the pan to the surface
unit size.
of liquid or fat to
l Cook with a minimum
help shorten cooking time.
l Preheat pans only when recommended
and for the shortest time possible.
16
Start food on higher heat settings, then
set surface unit control on low or off to
finish cooking. Use retained heat for
cooking when possible.
l Turn on the surface
unit only after placing
filled pan on the unit.
l Plan your meals for the most efficient
use
of the cooktop.
. Keep reflector bowls clean for best heat
reflection.
l
Caring For Your Cooktop
In This
Section
Page
Page
Removing
surface
units and
... .. .. .. ... .. ... .. .. .. .. ... .. ... ....*... 17
reflector
bowls
Cleaning
the solid element
surface
units . .. ... .. .. .. ... . .... .. .. .. ... .. .. ... ....*... 19
Your cooktop is designed for ease of care.
You can do most cleaning with items found
around your home. Cleaning your cook-top
whenever spills or soiling occurs will help to
keep it looking and operating like new.
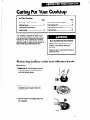
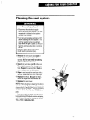
Removing
surface
units
cooktop
. ... .. ... ... .. . 21
Cleaning
the ceramic
Cleaning
the grill . .. .. ... .. .. .. .. ... .. .. .. .... .. .. ... . 23
Cleaning
the vent system
Cleaning
chart . ... .. .. .. ... .. ... . ... ... . .. ... ... .. .. ... . 26
Burn and Elect&al
.... . ... .. .. ... .. .. .. .. 25
Shock Hazard
Make sure all controls are off and the
cooktop is cool before cleaning or
servicing.
Failure to do so could result in burns or
electrical shock.
and reflector
bowls
Removing
1. Make sure all control knobs are turned
off and cool before removing surface
units and reflector bowls.
2. Lift the edge of the unit, opposite the
receptacle, just enough to clear the
reflector bowl.
3. Pull the surface unit straight away from
the receptacle.
17
4. Lift out the reflector bowl. See “Cleaning
chart” on page 26 for cleaning
instructions.
Replacing
1. Make sure all control knobs are turned
off and cool before replacing surface units
and reflector bowls.
_-i--z
00
0a
iill
2. Line up openings in the reflector bowl
with the surface unit receptacle.
3. Hold the surface unit as level as possible
with the terminal just started into the
receptacle.
4. While pushing the surface unit terminal
into the receptacle, lift a little on the edge
of the unit nearest the receptacle. When
the terminal is pushed into the receptacle
as far as it will go, the surface unit will fit
into the reflector bowl.
18
NOTE: Reflector bowls reflect heat back to
the utensils on the surface units. They also
help catch spills. When they are kept clean,
they reflect heat better and look new longer.
If a reflector bowl gets discolored, some of
your utensils may not be flat enough, or
some may be too large for the surface unit.
In either case, some of the heat that’s meant
to go into or around a utensil goes down and
heats the reflector bowl. This extra heat can
discolor it.
Cleaning
the solid
element
surface
units
Burn and Electrical Shock Hazard
Solid element surface units do not glow
red when hot. Make sure all controls
are OFF and the range is COOL before
cleaning.
Failure to do so can result in burns or
electrical shock.
1. Make sure all surface units are off and
cool.
2. For best results, wipe off surface units
with a damp sponge and soapy water
after each use. Remove burned-on food
with a soap-filled scrubbing pad. Rinse
well. The red spot in the center of the
surface unit will gradually wash off. This is
normal and will not affect the operation of
the surface unit.
NOTE: Make sure plastic scrubbing pad
does not contain metal or abrasive
particles. Do not use abrasive cleaners.
19
3. IMPORTANT: Dry the element completely after cleaning. Turn on the
element for a few minutes to dry thoroughly. After the element has cooled,
use a paper towel to apply a thin coat of
salt-free oil to the surface units to season
and restore the finish. Wipe excess oil off
stainless steel trim rings. Then heat 3-5
minutes. Some smoking may occur; this
is normal. If surface units have dark spots
caused by grease and food, the oil
treatment will improve their appearance,
but not eliminate the spots.
Optional: You can apply Electrol@
dressing to the surface units to improve
their appearance.
4. The stainless steel trim rings will yellow
from the heat of the surface units and
pans. This is normal. The yellowing can
be removed by using stainless steel
cleaner or Cooktop Polishing Creme on
the trim rings.
To order information for Cooktop
Polishing Creme (Part No. 3184477) or
Electrole Dressing (Part No. 814030)
write to:
Whirlpool Corporation
Attention: Customer Service Department
1900 Whirlpool Drive
LaPorte, IN 46350
OR
Call l-800-253-1301 to order. You must
have a major credit card to order by
phone.
20
Cleaning
the ceramic
The ceramic cooktop module is designed for
easy care. However, ceramic cooktops need
to be maintained differently than standard
electric open-coil elements. Foods spilled
directly on the cooktop will not burn off as on
open-coil elements. Because of this, the
surface should be dust-free and soil-free
before heating.
Your cooktop has been prepolished at the
factory for improved protection and
cleanability. The Cooktop Polishing Creme
(included with your unit), paper towels or a
sponge, and a razor scraper is all you need to
clean your cooktop. For proper cleaning
methods, please review “Cleaning tips” on
page 22. Follow them after each use to
ensure top performance and to preserve that
uniquely elegant look.
cooktop
Personal Injury Hazard
When removing heavy or sugary spills
from the hot cooktop, wear oven mitts
to prevent burns.
. Do not use cooktop cleaner on a hot
cooktop. The cleaner may produce
hazardous fumes or damage the
cooktop.
l Do not use the cooktop
if cracked or
broken.
Failure to follow these instructions can
result in personal injury.
l
To avoid damaging the cooktop,
follow these instructions:
Remove sugary spills before cooktop
cools to prevent pitting.
. Do not use the cooktop as a cutting
board.
. Do not allow anything that may melt
(such as plastic or aluminum foil) to
come in contact with the surface while
it is hot.
B Do not use the ceramic cooktop to
cook popcorn that comes in prepackaged aluminum containers. The
container can leave aluminum marks
on the cooktop that cannot be removed completely.
‘1 Do not use steel wool, plastic cleaning
pads, abrasive powdered cleansers,
chlorine bleach, rust remover, ammonia or glass cleaning products with
ammonia. These could damage the
cooktop surface.
4 Dropping heavy or hard objects on the
cooktop can crack it. Be careful with
heavy skillets. Do not store jars or
cans above the cooktop.
l
21
Cleaning
tips
What to use:
l Cooktop
Polishing Creme with paper
towel or clean, damp sponge-Included
with your unit, this creme has been developed especially for cleaning and protecting
your cooktop. When using, follow instructions on container.
. Razor scraper-Use to remove cooked-on
soils from your ceramic cooktop. Razor
blades will not scratch your cooktop. Store
razor blades out of reach of children.
Steps to follow:
1. Most spills can be wiped off easily using
a paper towel or clean, damp sponge as
soon as surface units are cool.
2. Rub Cooktop Polishing Creme into
cooked-on soil using a paper towel. If
some soil remains, leave some creme on
the spot(s) and follow Step 3.
3. Carefully scrape spots with the razor
scraper.
4. Finish by polishing entire cooktop with
Cooktop Polishing Creme and a paper
towel.
1 ,dditional tips:
l Sugar spills
and soils (such as jellies and
candy syrups) can cause pitting on the
cooktor, if not removed while the ceramic
surface is still warm. Remove as soon as
possible after the spill occurs.
Remove dark streaks, specks and
discoloration with Cooktop Polishing
Creme.
Remove metal marks (from copper or
aluminum pans) with Cooktop Polishing
Creme before heating the cooktop again. If
seated before cleaning, metal marks may
70t come off.
Tiny scratches or abrasions do not
sffect cooking. In time, these will become
ess visible as a result of cleaning. To
Irevent scratches and abrasions, use
>ooktop Polishing Creme regularly.
rlonabrasive cleanser with damp paper
‘owe1 or sponge can be used as an
i~lternative method for removing cooked-on
: ioils. Always rinse and dry your
c:ooktop thoroughly after using cleanser to
l jrevent streaking or staining.
TCIobtain order information for Cooktop
Polishing Creme (Part No. 3184477),
WIite to:
W iirlpool Corporation
At ention: Customer Service Dept.
1900 Whirlpool Drive
LaPorte, IN 46350
OR
CE II l-800-253-1301 to order. You must
ha Je a major credit card to order by phone.
22
Cleaning
the grill
Food cooked on the grill may spatter. You
should clean all parts of the module except
the heating element after each use. A soiled
heating element cleans itself by burning off
spills and spatters.
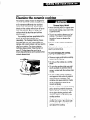
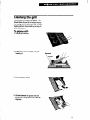
To remove
grill:
1. Lift off grill sections.
2. Lift heating element slightly and pull
toward you.
Rfce ptacle
3. Lift out splatter shield.
4. Lift and remove the grease well and
grease pan, being careful not to spill fat
drippings.
23
To clean
grill:
7. Wash grill sections with warm, soapy
water and a nonabrasive plastic scrubbing pad, or use a dishwasher.
Do not use metal scrubbing pads or
abrasive cleansers. They will scratch
the nonstick finish.
2. Rinse and wipe dry.
3. Wash the splatter shield, grease well,
grease pan and frame in warm, soapy
water. Use a plastic scrubbing pad for
heaving soiled areas. You can clean the
grease well and grease pan in a
dishwasher.
4. Rinse and wipe dry.
NOTE: Do not clean heating element under
the grill/griddle. Soil burns off. Do not put in
water.
To replace
grill:
1. Lower the grease pan and the grease
well into opening.
2. Put in splatter shield.
3. Plug beating element terminal into
receptacle.
4. Place grill sections over heating element.
24
Cleaning
the vent
system
Personal Injury Hazard
Disconnect the electrical supply
before servicing the cooktop. The wall
receptacle is located in the cabinet
beneath the cooktop.
*Turn fan and cooktop controls to OFF
before cleaning the vent system. The
vent fan system turns on automatically when the grill is used. Do not put
hand in vent box when fan or controls
are on.
Failure to follow these instructions
could result in personal injury.
l
1. Remove the vent cover and wash in
warm, soapy water or wipe with a
sponge. Do not use metal scrubbing
pads or abrasive cleansers.
2. Reach into vent box and lift a filter out.
Turn slightly to pass filter through vent
hole. Repeat for second filter. Wash in
warm, soapy water or dishwasher.
3. Wipe in and around the vent box with a
sponge. Clean up spills with a sponge.
4. Replace the filters. Be sure the filters
rest at an angle over the exhaust fan.
5. Replace the vent cover.
Filter
NOTE: Filters must be in place for the fan to
operate properly. Replacement filters can be
ordered from a WhirlpoolSM service company
or dealer. Order Part Number 786235 (one
pair).
If you are unable to obtain the name of a
local authorized Whirlpool service company,
call Whirlpool Consumer Assistance Center
TOLL-FREE l-800-253-1 301.
25
Cleaning
ch
Use the following table to help you clean all parts cf your cooktop.
-.-__-.-i--_.-
_--- PART
Control knobs
Zontrol panel
-
WHAT TO USE
and warm,
f !Sponge
;Oapy water
I!
Sponge and warm,
soapy water
OR
HOW TO CLEAN
-
Turn knobs to OFF and pull straight
away from control panel.
l Wash, rinse and dry thoroughly.
Do
not soak.
l Replace
knobs. Make sure all knobs
point to OFF.
DO NOT USE steel wool or abrasive
cleaners. They may damage the finish
of the knobs.
l
Wash, rinse and dry thoroughly.
DO NOT USE steel wool or abrasive
cleaners. They may damage the finish.
l
Paper towel and spray
glass cleaner
Cooktop surface
Sponge and warm,
soapy water
Coil element
surface units
Porcelain enamel
reflector bowls
l Wash, rinse and dry thoroughly.
USE nonabrasive, plastic scrubbing
pad on heavily soiled areas.
l Do not use abrasive
or harsh
cleansers.
NOTE: Do not allow foods containing
acids (such as vinegar, tomato or
lemon juice) to remain on surface.
Acids may remove the glossy finish.
Also wipe up milk or egg spills when
cooktop is cool.
No cleaning is required. Spatters or
spills will burn off. Do not immerse in
water.
Nonabrasive, plastic
scrubbing pad and warm,
soapy water
OR
l
l
l
A dishwasher
Griddle
Same as grill. See “Clear
ing the grill” on page 23.
Area under
zooktop
Sponge and warm, soap)
water
26
l
l
l
Wipe off excess spills.
Wash, rinse and dry thoroughly.
Do not use abrasive or harsh
cleansers.
Same as grill. See “Cleaning the grill”
on page 23.
Wash, rinse and dry thoroughly.
Do not soak.
If You Need Assistance
Or Service
This section is designed to help you save the cost of a service call. Pat-t 1 of this section
outlines possible problems, their causes, and actions you can take to solve each problem.
Parts 2 and 3 tell you what to do if you still need assistance or service. When calling our
Consumer Assistance Center for help or calling for service, please provide a detailed description of the problem, your appliance’s complete mode and serial numbers and the purchase
date. (See page 2.) This information will help us respond properly to your request.
1. Before
calling
for assistance
...
Performance problems often result from little things 1ou can find and fix without tools Of any
kind. Please check the chart below for problems you can fix. It could save you the cost of a
service call.
PROBLEM
POSSIBLE CAUSE
SOLUTION
Nothing will
operate
The unit is not wired into a
live circuit with proper
voltage.
A household fuse has blown
or a circuit breaker has
tripped.
Wire the unit into a live circuit with
proper voltage. (See Installation
Instructions.)
Replace household fuse or reset
circuit breaker.
The surface
units will not
operate
A household fuse has blown
or a circuit breaker has
tripped.
You have not plugged in coil
element surface units all the
way.
You are not setting the control
knobs correctly.
Replace household fuse or reset
circuit breaker.
You have not left space
Leave more space between items.
The grill does
not work
properly
Control
knob(s) will
not turn
between food items.
You have not preheated the
grill for the proper amount of
time.
Food was partially frozen or
very cold before grilling. This
will make cooking time longer.
You are not pushing in before
turning.
Plug surface units in all the way.
(See “Replacing” on page 18.)
Push control knobs in before turning
to a setting.
Remove food and let grill preheat.
Allow for more cooking time.
Push control knob(s) in before turning
to a setting.
27
POSSIBLE CAUSE I.---- PROBLEM
_,
I Venting
: Exhaust fan is not turned on.
: results are not ; Vent filters are not clean or
: what you
I are not in place.
expected
! Vent duct or outside opening
1 is blocked.
; There is a draft in room
i where cooktop is installed.
; Meat is not well trimmed.
:
f
/
i
Cooking
results are not
what you
expected
,
I
I
I
!
I
28
~ The cooktop is not level.
/
! The recipe has never been
i tested or is not from a
/ reliable source.
: The pan used is not the type
I or size recommended in the
1 recipe.
j Cooking utensil does not fit
) the surface unit being used.
---~
SOLUTION
Turn on exhaust fan.
See page 2.5 for cleaning and replacement instructions.
Unblock vent duct or outside opening.
Close door or window causing draft.
Trim off all meat fat.
Level cooktop. (See Installation
Instructions.)
Use only tested recipes from a
reliable source.
Refer to a reliable cookbook for
recommended pan type and size.
Pan should be the same size or
slightly larger than surface unit being
used.
2. If you need
assistance
...
Call Whirlpool Consumer Assistance
Center telephone number. Dial free from
anywhere in the U.S.:
1-800-253-l 301
and talk with one of our trained consultants.
The consultant can instruct you in how to
obtain satisfactory operation from your
appliance or, if service is necessary, recommend a qualified service company in your
area.
If you prefer, write to:
Mr. William Clark
Consumer Assistance Representative
Whirlpool Corporation
2000 M-63
Benton Harbor, Ml 49022
Please include a daytime phone number in
your correspondence.
4, If you need FSP@ replacement parts ,..
F$ P is a registered trademark of Whirlpool
Cc rporation for quality parts. Look for this
sy nbol of quality whenever you need a
relblacement part for your Whirlpool applian :e. FSP replacement parts will fit right
an j work right, because they are made to
the same exacting specifications used to
bu Id every new Whirlpool appliance.
1’0 locate FSP replacement parts in your
arc a, refer to Step 3 above or call the
Wt irlpool Consumer Assistance Center
nulnber in Step 2.
5. If you are not satisfied
how the problem
was
solved . . .
with
C zntact the Major Appliance Consumer
A:tion Panel (MACAP). MACAP is a group
oi independent consumer experts that
v( Iices consumer views at the highest
le Jels of the major appliance industry.
l C Intact
MACAP only when the dealer,
at lthorized servicer and Whirlpool have
fa led to resolve your problem.
Major Appliance Consumer Action Panel
20 North Wacker Drive
Chicago, IL 60606
. M,GAP will in turn inform us of your
action.
l
v SERVICE
3. If you need
service
...
Whirlpool has a nationOlm yide network of authortzed WhirlpoolSM service
companies. Whirlpool
service technicians are trained to fulfill the
product warranty and provide after-warranty
service, anywhere in the United States. To
locate the authorized Whirlpool service
company in your area, call our Consumer
Assistance Center telephone number (see
Step 2) or look in your telephone directory
Yellow Pages under:
i,+l
‘APPLIANCE-HOUSEHOLDMAJOR, SERVICE L REPAIA
-See: Whirlpool Applmces
or
Auihcmzed Whwipool Service
(Example: XYZ Service Co.)
. WASHING
DRYERS,
MACHINES
&
SERVICE & REPAIR
See: WhIrlpool Appliances or
Authorwed
Whirlpool Service
(Examp/e: XYZ Servce CO.)
29
WHIRLPOOL”
Electric Cooking Product
Warrainty
LENGTH OF WARRANTY
WHIRLPOOL WILL ‘AY FOR
FSP@ replacement pi arts and repair labor to correct defects in
materials or workmalrship. Service must be provided by an
service company.
/jM
WHIRLPOOL WILL NOT PAY FOR
A. Service calls to:
1. Correct the installation of the cooking product.
2. Instruct you how to use the cooking product.
3. Replace house fuses or correct house wiring.
B. Repairs when the cooking product is used in ot ler than normal, single-family household
use.
C. Pickup and delivery. This product is designed t 1 be repaired in the home.
D. Damage to the cooking product caused by act dent, misuse, fire, flood, acts of God or
use of products not approved by Whirlpool.
E. Repairs to parts or systems caused by unauthorized modifications made to the
appliance.
8-92
WHIRLPOOL CORPORATION SHALL NOT BE LI/rBLE FOR INCIDENTAL OR CONSEQUENTIAL DAMAGES. Some states do not allow ihe exclusion or limitation of incidental or
consequential damages, so this limitation or exclus on may not apply to you. This warranty
gives you specific legal rights, and you may also h;.ve other rights which vary from state to
state.
Outside the United States, a different warranty ma) apply. For details, please contact your
authorized Whirlpool distributor or military exchang a.
If you need service, first see the “Assistance or Set vice” section of this book. After checking
“Assistance or Service,” additional help can be foul Id by calling our Consumer Assistance
Center telephone number, 1-800-253-l 301, from a iywhere in the U.S.
PART NO. 36-307916-03-O/43631 29
0 1993 WhIrlpool
Corporation
8 Registered
Trademark&M
Sew :e Mark of WhIrlpool
Corporation
PrInted in U.S.A