1
- - - - - - - - - - -- - - - --
e
Pro Stepper
e
Ie
Service Manual
Table of Contents
•
•
Table of Contents
Display Panel
Preventive Maintenance
Preventive Maintenance - Cont'd
Settings - Maintenance Mode
Settings - Maintenance Mode (cont.)
Diagnostics - Display Codes
Diagnostics - LED Test
Diagnostics - Keypad Test
Diagnostics - Heart Rate Test, Measurements
Trouble Shooting - How do I use the Stepper?
Trouble Shooting - FAQ
Trouble Shooting - Incorrect Model Setting
Trouble Shooting - Noise
Trouble Shooting - Noise- Clutch Pillow Blocks
Trouble Shooting - Noise - Springs
Trouble Shooting - Noise - Pedals
:
Part Installation Procedure - Shrouds
Parts Replacement - Shroud's
Part Installation Procedure - Shrouds
Part Adjsutment - Adjsuting Belt Tension
Part Installation Procedure - Load Control board Wiring
Part Installation Procedure - Alternator Wiring
Part Assemblies - Hardware Kit
Part Assemblies - Clutch Assembly
Part Assemblies - Display Assembly
Part Assemblies - Right Pedal Assembly
Part Assemblies - Left Pedal Assembly
Part Assemblies - Chain Link Assembly
Part Assemblies - Electrical Components
Part Assemblies - Frame Assembly Right
Part Assemblies - Frame Assembly Left
Part Assemblies - Frame Assembly Parts Iist...
Part Assemblies - Frame Assembly
Maintenance Log
Warranty
0
1
2
3
4
5
6
7
8
9
10
11
12
13
14
15
16
17
17
18
19
20
21
22
23
24
26
25
27
28
29
30
31
32
33
35
. . .1
~
I
Pro Stepper Service Manual
1
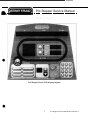
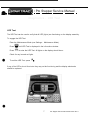
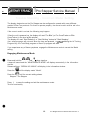
Display Panel
•
Pro Stepper Series 5100 display keypad
•
1
Pro Stepper Service Manual 620-7619 Rev A
_
. .I
~
I Pro Stepper Service Manual I
Preventive Maintenance
To keep your Star Trac Pro Stepper in top condition , Star Trac strongly recommends performing
regular daily , weekly and monthly preventive maintenance routines outlined below.
Daily Maintenance
Remove excessive accumulations of dust, dirt and other substances by using a clean , soft cloth
and a non-abrasive liquid cleaner, such as Formula 409™ or FANTASTIKTM . Wipe down the
exterior of the display panel, pedals, shrouds and heart rate grips.
•
Spray on the cloth first then wipe the display.
Weekly Maintenance
Perform the following services each week:
• Vacuum the floor under and around the Pro Stepper. Move the unit to another spot, if
necessary , to vacuum thoroughly .
• Inspect the screws (i.e. display panel mounting screws) for security, and retighten if
necessary .
• Inspect the display panel keypads for wear.
Monthly Maintenance
Perform all the steps in weekly maintenance plus the following services each month, or as
needed:
• Check that the pedals and shrouds are secure.
• Check for smooth and quiet operation of all moving parts.
•
2
Pro Stepper Service Manual 620-7619 Rev A
. 1~ I
Pro Stepper Service Manual I
Preventive Maintenance - Cont'd
Quarterly Maintenance
Perform all the steps in weekly and monthly maintenance plus the foll owing services each month,
or as needed :
•
•
Remove the return springs form the chains:
• Raise and lower the pedal arms and inspect for smoothness . Binding or excessive
looseness might indicate a worn bushing.
• Rotate the clutch sprocket and inspect for smoothness. As you rotate the clutch towards
the pedals it will turn the drive belt but as you turn the clutch towards the drive belt it will
spin freely and will not turn the drive belt.
• Inspect the cha in pulleys by spinning them.
a. If they spin freely they are ok
b. If they bind check for areas that bind and adjust or replace as needed.
• Inspect the chains and springs for wear.
a. Frozen links will require a chain replacement.
• Lubricate the chain with white lithium grease.
• Rotate the clutch sprockets 180 degrees from the original position and reassemble the
spri ngs and chain back onto the sprockets.
3
Pro Stepper Service Manual 620-76 19 Rev A
.J ~
I Pro Stepper Service Manual
1
_
Settings - Maintenance Mode
The Maintenance Mode allows you to query and modify the basic settings of the Star Trac Pro
Stepper.
Engaging Maintenance Mode
•
Press and hold the
,
and
keys together.
A beep will sound and the "MAl NTENANCE MODE" will display momentarily in the information
window .
Release all keys. "SERIAL NO XXXXX" will display in the information window.
Modifying the Maintenance Mode
The following keys are used to modify Maintenance Settings:
•
Upper and Lower Data Infonnation Window SCROLL keys: Display the next
previous settings.
and
Increase and Decrease Level Keys: Adjust the value of the displayed
setting up and down respectively , in increments of 1 unit.
OK Key: Updates (saves) the value of the display setting in the Flash memory, and exits
Maintenance Mode.
Maintenance Mode Settings
The items that you may display and change:
Default values set in 0
Serial Number
Date
Display Vers 1
Display Vers 2
LCa Vers
Units
•
Pro Stepper serial number (0)
Manufactures date for the Pro Stepper (01/05)
Display software version (N/A)
Display software version (N/A)
LCB software version (N/A)
English = units of pounds, miles, feet inches; (English)
Metric = units of kilograms , kilometers , centimeters
Time Maximum time in minutes allowed for program, excluding warm-up and cooldown (20)
Weight Default (to user) , typical weight in Ib (UNITS=English) or kg (UNITS = Metric)
(350 Ibs, 159 KG)
4
Pro Stepper Service Manual 620-7619 Rev A
. 1~ I
Pro Stepper Service Manual
1
Settings - Maintenance Mode (cant.)
Language is English , Dutch, French , German , Spanish, Swedish ,
Italian or Katakana (English)
Model PB-UB Pro Bike Upright, PB-RB Pro Bike Recumbent , Pro CT
Pro CrossTrainer, Elite CT Elite CrossTrainer, Stepper Pro
Stepper
LCB Type LCB hardware version Ver3
CSAFE Turns on/off CSAFE functionality (Off)
Auto Status Turns on/off the unsolicited status of the CSAFE feature (Off)
Wall Power Turns the wall power settinq on/off (Off)
IRDA Turns on/off infrared port functionality (Off)
OPER Hours Total operating hours (0)
Quick Start Number of times the Quick Start program was run since last reset (0)
Manual Number of times the Manual program was run since last reset (0)
Language
=
=
=
=
=
Fat Burner Number of times the Fat Burner program was run since the last reset
•
IHR Pro
CHR Pro
Fit Test
GLT Sculpt
Thigh TNR
Famous Step
Comm Lost
Key Down
LED Test
Keypad Test
Heart Rate Test
Measurements
•
(0)
Number of times the Interval Heart Rate Control program was run
since the last reset (0)
Number of times the Constant Heart Rate Control program was run
since last reset (0)
Number of times the Fitness Test proqram was run since last reset (0)
Number of times the Glute Sculptor program was run since last reset
(0)
Number of times the Thigh Toner program was run since last reset (0)
Number of times the Famous Step program was run since last reset
(0)
Number of times a Comm Lost condition has occurred . See Display
Codes
Number of times a Key Down condition has occurred. See Display
Codes
Access to integral LED test function
Access to inteqral keypad test function
Access to inteqral heart rate system test function
Access to integral measurements function
5
Pro Stepper Service Manual 620-7619 Rev A
. 1~ I
Pro Stepper Service Manual
1
Diagnostics - Display Codes
Display Codes
Star Trac Pro Steppers perform a self-test at the beginning of every workout. If a problem is
detected , a message displays before or after the workout, depending on the nature of the
problem.
Key Down - One or more keys on the display panel are stuck in the "on" position for at least 10
seconds. This can occur if a user presses keys before the system is turned on .
Comm Lost - Communication between the Load Control Board (LCB) and the display are lost.
This can occur if the display cable is not connected securely at install.
•
•
6
Pro Stepper Service Manual 620-7619 Rev A
_
. . .1
~
I Pro Stepper Service Manual
1
Diagnostics - LED Test
LED Test
The LED Test can be used to verify that all LED (lights) are functioning on the display assembly.
To engage the LED Test
Enter the Maintenance Mode (see Settings - Maintenance Mode) .
Press
until LED Test is displayed in the information window.
Press
to enter the LED Test. All lights on the display should be on.
Check for any bumed out lights.
•
•
~
To exit the LED Test. press
• ~.
If any of the LED's do not illuminate. they may not be functioning and the display electronics
should be replaced .
7
Pro Stepper Service Manual 620-7619 Rev A
.J ~ I
Pro Stepper Service Manual I
Diagnostics - Keypad Test
Keypad Test
The Keypad Test can be used to verify that all keys are functioning on the display assembly .
To engage the Keypad Test
Enter the Maintenance Mode (see Settings - Maintenance Mode) .
Press
until Keypad Test is displayed in the information window.
Press
to enter the Keypad Test.
Press each key on the display . Each time you press a key , the information window will display
which key has been pressed.
o
•
•
To exit the keypad test, press
t
!'!Y .
If any of the keys do not respond , they may not be functioning and the display keypad must be
replaced .
8
Pro Stepper Service Manual 620-7619 Rev A
- - - - - -
- - - - - - - - -
. 1~
I Pro Stepper Service Manual
I
Diagnostics - Heart Rate Test, Measurements
Heart Rate Test
Heart Rate can be checked using the Heart Rate Test.
To verify heart rate operation:
Enter the Maintenance Mode (see Settings - Maintenance Mode).
Press
until Heart Rate Test is displayed in the information window.
Press
to enter Heart Rate Test.
The display will read TELEMETRY .
If checking contact heart rate it will read "CONTACT" and the heart rate number.
If checking Polar, the display will read "TELEMETRY" and the heart rate number.
,/;
•
5. To exit the heart rate test, press
•
Measurements Mode
Measurements can be done to verify the voltage of the battery .
To verify the battery voltage:
Enter the Maintenance Mode (see Settings - Maintenance Mode).
Press
until Measurements is displayed in the information window.
Press
to enter Measurements.
="and the voltage of the battery.
To exit the measurements, press •
The display will read "BATT VLT
lj
•
9
Pro Stepper Servi ce Manua l 620-76 19 Rev A
.. I
~
I Pro Stepper Service Manual I
Trouble Shooting - How do I use the Stepper?
Q. Why does the stepper not have any resistance when I increase the level?
A. When pressing the UpA or down .... key you are actually changing the workout level of the
user.
Press the increase (UP) A level key the pedals will fall faster and there is less resistance so you
have to work harder to keep up with it.
Press the down level (DOWN) .... it makes the pedals move slower so it is easier to keep up with it.
•
•
Do not let the pedals touch the floor. Step fast enough to keep the pedals in their middle
range, with step heights from 2 to 16 inches. If the pedals sink to the floor, step faster or decrease
your work level by pressing the level down key .... .
10
Pro Stepper Service Ma nual 620-7619 Rev A
. 1~ I
Pro Stepper Service Manual I
Trouble Shooting - FAQ
Symptom
•
•
Possible Problem
Solution
Page #
Squeaking noise
Loose bearing
Check all bearings
14
Clicking Noise
Possible spacer missing
Examine clutch
assembly
23
Popping noise
Frozen link on chain
Examine chain links
27
Pedals Slip
Possible clutch failure
Perform clutch and belt
test
19
Loose Pedals
Bushing wear
Inspect bushings on
pedal arms and pedals
16
No Power
Low battery
Check battery and
connections
29
No resistance
(Pedals fall) at level1
to 5
Too much resistance
(Pedals won't move) at
level 10 to 15
Possible low battery or
RPM sensor out of
alignment
Check battery voltage
and rpm senor alignment
28
Possible model error or
LCB failure
Check model in
Maintenance mode.
Swap LCB
Check RPM sensor LED
on LCB (Load control
board)
Change Model to Pro
Stepper
12
Turns on but does not
give speed
RPM sensor
Start Pedaling
Wrong Model Selected
Start Striding
Wrong Model Selected
Change Model to Pro
Stepper
12
I forgot where the
wires go on the
alternator
Wires may be in the wrong
position
Refer to the wiring photo
21
I'm replacing the LCB
but am not sure where
the connectors plug in .
The connectors are all
different shapes so it is not
possible to plug them in the
wrong place
Refer to the LCB wiring
diagram
20
11
18
12
Pro Stepper Service Manual 620-7619 Rev A
. 1~ I
Pro Stepper Service Manual
1
Trouble Shooting - Incorrect Model Setting
The display electronics on the Pro Stepper can be configured to operate with many different
models of Star Trac products . For them to operate properly , the correct model must be set in the
Maintenance mode.
If the correct model is not set, the following may happen:
VVhen the unit is powered up, the display will read "Pro Bike" (or Pro CrossTrainer or Elite
CrossTrainer) in the level profile window .
The display wil l read "Start Pedaling" or "Start Striding" instead of "Start Stepping".
Al so, some programs will not work when the keys are pressed . i. e. 'M1en pressing the Hr Training
Program Key , the Total Body program or Warm Up program will start.
If you experience any of these symptoms, engage the Maintenance mode to correct the Model
setting.
Engaging Maintenance Mode
•
;;
•
Press and hold the
,
and
":'" keys together.
A beep will sound and the "MAINTENANCE MODE" will display momentarily in the information
window.
Release all keys . "SERIAL NO XXXXX" will display in the information window.
until the display reads "Model".
Press the
Press the
Stepper
until the correct setting shows.
Pro Stepper
=
•
Press
to save the setting and exit the maintenance mode .
Test for functional ity .
•
12
Pro Stepper Service Manual 620-7619 Rev A
. 1~ 1
Pro Stepper Service Manual
1
Trouble Shooting - Noise
Noise is one of the hardest things to diagnose because it may only make the noise under certain
conditions. To find the part that is making the noise will require some patience and trial and error.
It may also require the help of another person to slowly and safely move the part while another
person listens.
NOTE: Always use safe work practices and do not allow clothing , hair or fingers to get caught in
moving parts.
Try these methods when trying to locate the noise:
•
•
•
•
•
•
•
•
Move the product to a quiet location to help in diagnosing the noise when possible.
Loosen or tighten screws to make the noise louder or eliminate the noise. Often a noise
will change its pitch when you do this and that may point you towards the correct part.
Gently and carefully when possible spray a little lube on the bearing or shaft to see if the
noise will get quieter. This is very successful when a shaft is spinning within a bearing and
making a squealing noise.
Remove part of the moving assembly to help isolate the noise.
Try swapping parts, such as with the pedal springs, one spring may make a noise and not
the other. Swap the springs to determine if the spring is at fault or the pulley, etc.
Check for worn or damaged parts such as a worn spot on a plastic pulley .
Look for metal shavings which might indicate a worn bearing or a set screw that is not tight.
The following pages discuss some areas that have moving parts and could be the source of
noise.
Proper cleaning and lubrication as suggested in maintenance can prevent noises.
•
13
Pro Stepper Service Manual 620-7619 Rev A
_
- - - - - - - - - - - - - - - - - - ---- - - - -- - -
.J ~ [
Pro Stepper Service Manual I
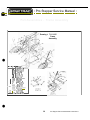
Trouble Shooting - Noise- Clutch Pillow Blocks
The noise that you might hear as a result of the pillow block bearings being loose is a
slight click or ticking sound.
•
•
•
•
•
Use two 9/16 wrenches (or socket and wrench) to
verify that all 4 bolts and nuts on the upper and
lower pillow block assemblies are tight.
Loosen the nuts and then ride it a little to let it settle,
then tighten the nuts to determine if the noise is
from the alignment of the shaft to the bearing.
Loosen the set screws and rotate the shaft so the
set screw is in the detent in the shaft. Tighten the
set screw in the detent first then the other set screw
and repeat the procedure on the other side.
14
Pro Stepper Service Manual 620-7619 Rev A
.J ~ I
Pro Stepper Service Manual
I
Trouble Shooting - Noise - Springs
Noise from the springs may make a pinging or a rubbing sound. Check the spring to make sure it
is not twisted and the pulley is turning as the spring rolls over it.
•
•
15
Pro Stepper Service Manual 620-7619 Rev A
-
-
- -- - - -- - - - - - - - - - - - - - - --
.J ~ I
- - - -- - -
Pro Stepper Service Manual I
Trouble Shooting - Noise - Pedals
•
•
Check all hardware under the pedals for looseness.
Check clips and springs to make sure they are aligned properly so they do not come off.
•
•
16
Pro Stepper Service Manual 620-7619 Rev A
Pro Stepper Service Manual
Parts Needed:
Shroud Left (711-3165-01)
Shroud Right (711-3165-02)
•
Tools Needed:
Phillips Head Screwdriver
Procedure:
Remove the Shroud by unscrewing the 6 screws on each side of the shroud and lift the shroud off
the frame. Be careful not to pull on any of the cables as you remove the shroud.
•
17
Pro Stepper Service Manual 620-7619 Rev A
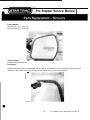
Pro Stepper Service Manual
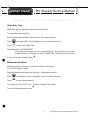
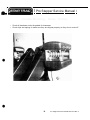
Open the left side for testing the alternator and the cables.
•
The RPM sensor and alternator adjustments are accessible from the
right side.
The gap on the RPM sensor should be approx. 1 credit card.
•
18
Pro Stepper Service Manual 620-7619 Rev A
.J ~
I Pro Stepper Service Manual I
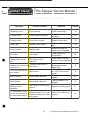
Part Adjsutment - Adjsuting Belt Tension
To adjust the tension of the main drive belt perform the following check.
•
•
•
•
•
•
•
19
If the drive belt Is slipping on the
adjustable bracket assembly or the main
pulley in-between the clutch sprockets, the
belt will have to be tightened.
Using a 9/16" inch open end wrench,
loosen the large nuts holding the
adjustable bracket on the frame of the
stepper.
Using a 7/16" open end wrench or socket
wrench, tum the bolt in the front of the
frame.
To tighten the belt, tum the bolt clockwise
this will pull the adjustable bracket
forward. This will tighten the belt.
To loosen the belt, tum the bolt counter
clockwise. This will push the adjustable
bracket closer to the pedals. This will
loosen the belt.
Pro Stepper Service Manual 620-7619 Rev A
.J ~
I Pro Stepper Service Manual I
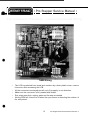
Part Installation Procedure - Load Control board Wiring
•
Lea Wiring
•
•
•
•
•
•
The LCB is protected from sweat and moisture by a clear plastic cover, remove
this cover while accessing the LCB.
All the connectors are keyed and will only fit properly in one direction.
Make sure the connector is fully seated and locked.
Run wires away from moving parts and tie wrap as needed.
Not the RPM led, this will be lit when the rpm sensor is detecting the rotation of
the alt flywheel .
20
Pro Stepper Service Manual 620-7619 Rev A
. .I
<R!m
I
Pro Stepper Service Manual
1
I
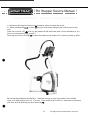
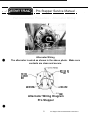
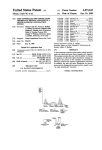
Part Installation Procedure - Alternator Wiring
•
Alternator Wiring
The alternator is wired as shown in the above photo. Make sure
contacts are clean and secure.
(B ) fmlilVE
1f\J1
( I.H!)
2!l)-OIB2
ALIEIilNAIIJ!,
I\£F
00 (fiEEN. StWJ. )
(GH .LA2I )
FIELD (1l1£)
Alternator Wiring Diagram
Pro Stepper
•
21
Pro Stepper Service Manual 620-7619 Rev A
_
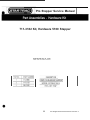
Pro Stepper Service Manual
711-3182 Kit, Hardware 5100 Stepper
SS,60
•
22
Pro Stepper Service Manual 620-7619 Rev A
- - - -- -- - - - - - - - - - -- - _ . _ -
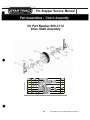
Pro Stepper Service Manual
Kit Part Number 800-3114
Drive Shaft Assembly
•
HEM
I
2
3
4
5
6
•
PIN
71 1-0105
130-1537
130--0401
020-o0l9
020-o0l8
020-1760
[fSCRIPTlON
PIllEY ~\d,lN DRIVE WELDED
SPROCKET13 TEETH
PILLOWfl[K \'
SPACER ~\d,lN DRIVE .91' lG
SPACER MA1N DRIVE .20' TH ~
CLUTCH RIllER \»
J
I
23
QTY
1
2
2
2
2
2
Pro Stepper Service Manual 620-76 19 Rev A
- - - - - - - - - - - - - - - - - - - - - - - - - - - - - -- - - - -
Pro Stepper Service Manual
Drawing # 711-3151
5
6
•
I
:\1
::;-v
)IS F'_~.Y 80--C,,1 ::>f\C 3 ~
': :!tee:: R :;E4JE~ us;:;:'
I
I
'•' .:;O··'~
. 0: -
u.==-.
I
G~O- l ?:'i-
G50-,,,..':
><EY°':'': : :;.::: S-EPP::;, ='' G..
LA~E- '~FC :'E'4ER, _'1r·l :RStL
110 ·:"~~
Sc.'-E\'~, \Jl ~xC ; xk
NO
-;
<I
5
.
110-:i2::
718-1' :-
0
-; 8- ' 0=
\I
I::
: 18-" 2':
:::O-SJ=..i
721 -Jl.13
I'
:21- 1[0;.:
15
715--)5':
C20-04' •
12
16
•
C: SC '\1 :Tr D\J
) ISP_G.Y R::',r L3 '%PRC
P':"~-
020-04' ;
C20-CA' ~
C20-04e,:
1
. OGO:'- AI> - PJ,C :R~ : 11<£
I
I
PI1 P-i,CS'z'
sc.'-E\'~, \JI4 ~O hlJoLP..,
I
5
=",Cf E':
ASS" A=n.'E/\T J E.R3
g~'f -ISPL!<V t.::A'J : OPULA
1
to
l; 3'-'.6
1
' C3 Ii:; CC··;rt"C- U&.:;5 PRO
1
ASS' "Ja.'1',',':ERACKE- PROS·.=
I
ASS" , CONI'I., FiTlIf\;\X'C/..P..JI0
AS$'/ H.AR!\:~ GROUr•.), :L&20:J
I
ASS'-' c.o.:'~ PO..t - R: (SV='' - F'\C'S
I
JISP_~Y EiG.8K,'RC 51K:.
I
24
I
Pro Stepper Service Manual 620-76 19 Rev A
. .I
~ I Pro Stepper Service Manual
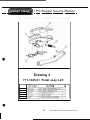
1
Part Assemblies - Left Pedal Assembly
•
Drawing #
711-1045-01 Pedal assy Left
~ -
~
•
25
0
:::..:._
-
-:rIO
_
-I
l
,~
.
Pro Stepper Service Manual 620-7619 Rev A
_
. 1~ I
Pro Stepper Service Manual
I
Part Assemblies - Right Pedal Assembly
•
Drawing #
711-1045-02 Pedal assy Right
•
26
Pro Stepper Service Manual 620-7619 Rev A
-------------~-------~-
----
. 1~ 1
Pro Stepper Service Manual
I
Part Assemblies - Chain Link Assembly
•
2
2
•
27
Pro Stepper Service Manual 620-7619 Rev A
. 1~ I
Pro Stepper Service Manual I
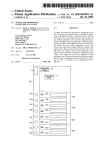
Part Assemblies - Electrical Components
•
Electrical Components
ITEM NO
IQTY
2
All , Mando , Raw All no Pulle v
3
4
800-3102
711-3162
As3V, Lcb Stepper
1
1
5
711 -3166
711-3167
Cab le, Alt And Lcb, Stepper
Cab le, Res istor, Stepper
1
1
6
•
PART NUMBER DES CRIPTION
020-6748
800-3122
1
Shroud . Left , Stepper
Battery , 6v, Ub/RblSc
28
1
1
Pro Stepper Service Manual 620-7619 Rev A
•
[
~
1
Pro Stepper Service Manual
1
Part Assemblies - Frame Assembly Right
•
•
J
I
I
I
I)
I .
I
./ I
29
Pro Stepper Service Manual 620-7619 Rev A
_
----------------- --~
a.I ~
I Pro Stepper Service Manual I
Part Assemblies - Frame Assembly Left
a-!"
-- ~
,.j
•
It
o
"
II
.
I
I
• • -
I'
f
.
/I
,
I
,I
I
,
I
I ,
I
.' I
L
•
f
30
Pro Stepper Service Manual 620-7619 Rev A
"
l
. 1~ I
Pro Stepper Service Manual
Part Assemblies - Frame Assembly Parts list
r=\·
i..?J'
J Ej - -
c;.=\- '\J.
A_ E~"'AT ,J= oL.J.:iT
::o."" ;k::- =tFV 3E""JF.;_ -8'l."~ T~-::;
S - ,~r ' :> ... L: Y '0. ' .3; S- F
-.'WH==- : J' Cl '( 5l : :
1
1
1
T
O ~ fil4
S:;'M."= ;j~ JSTA3_=
S=A0:;, 1 . 10 Jo.':' ~ .:l:
i) :j~ - !~
( ')/E.~
U:O-:(1'
I) :(l., ~ ~~
1) : l)J; 4! '
1)"o..::E.3
Qlo-;f3 ~
:
O:'!-:E3
i
u:~E 5E
:.::;..;tt.= -
Il
o :~n?
, ;;.~
"0-;' 3:
c.S \:;1'
,: , S,', :o}. ! ~'(- 3 j - ': S-l ': ~ l..
3~ ".:\\ 1 ~:,. ;1.5 H-C e Sc ':"
.;or :. ~'·t ' ':,:3>1 0 H SS:" L~ D
So... -.,. :;,". .. ~ ~ ..x_:\'4 -- . - =..(S: l..:J
~C:"E\': ;' :- '.;.4 (~H';,HE :~ IF
SJ lT ' ~. ') X:~ --( -E CS?,
S::lLT :'''&- I F.,!OHH~ fl." '. U,
:: OlT :,'o- ' : X _O' J-' - ::'S·JL.- " =:
I:
' 4 Ch:~ 3 :
I':
f·I)..:: :
14
, .. (L.(.~;~
It
\ '(;,,;6;
" G-;f1 C
1
IE
I!
s:-e.:= =..=
S.. ) l J ',' )l'·T Sr:o
~-
=:v_=
""·S. t"
:
~: . ?
<~ < -,
:c
•";U:E,c
';:;..:er
:,
, '(1. 141:
" (L I 4-':
. Ao 11F.'- C'l
"C: Y ';AC- (H:: ) lex!
..
" (1.1 :3:
;,: 0:\', ;, ~, ·a.i':5 '+ ( HE ~;
:4
I '<} I ;~
s:: :. ~ \·.
:, 'o.l b : -;: ...... .: HE (:5 2
I~>"
I ' <}IB~
:E
1'(L IE"
I 'll- I t "
'lr
'II'
1:0-.:,1"
, '1).:0:
, J-' ~X. 5 ~ OF - KS
\ r I,~ ,:: -lEX'll .:':
W,:.s- ::F; \ ~ ,-'E F..A r
W;' Sl ~ 30 ':'E F_..r
W.S -:F. 1': :'_'- ? 1~ : -I,; l CG
':'i ~;'- EF, lo X'::>:
..
1 20vll ~
1: '}v4;:
1:').;4?i.
1:(1-;4';,
3:
1 : t:'-';4 ~~
It
1<O-C4.:
: l).<;EoJ.
r
Ji
';1)...:-:::
:<
':'1). 13-::
!;
- !(L. c~
-.,-
' :0- -c.J:
"i-:: l:
~;
1 ~).J.l? :
~ ,
~~
I
1
T
0
2
:~
,.
I
:'
' l r S·'_ -<='''
'l r 1 0-1& rl'Le:- fEJ(
NIJ' 1'2- 1, rivLC" H:X
l · j}.IEJ ~
I
I
~ -Ej· _
.KO- ': - ; 0 1. _ S
~: , : \.
1',),;;<5_
1:
J'
3:
J:
l4
~
I
S.I~·
1
H:F3
~It-' a ', YlX
I
,-or;
'?
~
.
-
w;.~~ ; \5
; E OC' : o7T -~
\\':..5- ::F; 5 I;; SP . TlCG<
,,-A ~ 'F. . , ' ':' \X l,'''' . ...
='45,,7 " OLY V==
J:::r"" ". =v 'J"Q~ E":R
\',IJE . , (::). ').: ?.: ;;
="..
I
:-_.X:" E,,',:> ":: . S:;'
- =:
~
~T;.J:.~ : 5
-" oE ....3.0". - : iQKS
I~),;'B:
• ArE ';=-':~C _C ):>~
SF"
SF"
<:
':c
l U... :~ ,~
_ =Y= L=F~ : "E- .~ .1..3- 1, : 11;::',: CAf ~ r:o ?~;' E
' ''".... 12:
- : '.r
~
"
<4
',,).,:=<.
!~
1 ~0-:E3:
!!
I
2"iJ.-:' 3:
S~
I
I
;t()..
"
I
5~O-;; :' :
·:U·
-' 1· ; · '~
;.;
"\."
:~
,'\,3' ;,
;~
"l.J- ic
::
'· 1 ,3'~
•
~~- ~
f
, ; Il
lI:,"
:: 0"":1''=- =...
°1.1-.; •• :
•
0 - .) ,
S:;'~C I.::-
~.
,'I·,',
.:S
; ' 5-34 3:
-="f~4
Sj
., -
,:,~C,co
°E SISO;
A. ,-=:\A- .JF. VC \ J0
:0>E:" &'J \:>
'.s~- Sl : ='=..l,f. .J r"·i::F;S/l~
:>"'1 ~ E\:: : R I: C , ASc 3T' ~ :F'= ~
..u- S-,," : "';'V"
IIS..>Y . C? S =--F-;
AS5Y 3;GE \::::.< 3' =.." oE =.
O,;L: AlT<NDl:3 :5' ::P ~I:';
.:A5L:: ~~S S-CF\ S- ::;>fE-o
-.QE 3.=\ '11'C'l, of':) P.
31
t
\
I
I
Pro Stepper Service Manual 620·761 9 Rev A
-
-
-
- - - - - - - - - - - - - - - - - --
.J ~
- - - --
- --
-
----
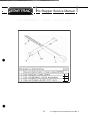
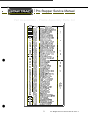
I Pro Stepper Service Manual I
I
Part Assemblies - Frame Assembly
I
Drawing # 711-3155
Frame
Assembly
I
I ,
, I
! ,1
•
\
'S
,
/
.'
~'":-
·
:!,'::FST
"
_,:,:-0 ; "'
- ,l,: -
·.,..
.~
:O~\.
,. ,
.-.-,
~"I- ;l..A.:' E:
:>-:.
".
-il
'
...... ':-:
~
i ·
"
i."
= r J. ·
"
...
·' t· ·. I : :-" -.IC!
-".r·.-<>..
·..
7
:'"i ~ '1 '
"'hl " =-- ' -,i: : . : :
..~ .
,
,=-...
.......a
:~
F-,
~'.
;'::f ••
,.
.
"
~
'"
.~
.;:--
;
' -~':" .. . J .~:
7~?
"
..
.......-.
~
I ::...
·
• -'
- ",.
•
L:"':"l~
;.
.... )-.~
::--== .n
\
.......
~~
-'''.:
~"
. . . . JO, .
. -.; ~
a
~
. ,- ,
...
: 0' '':
" sk
" . ;"
-t : r.,.:lOJ
' .
.:.
rF"-"l..J" J
..
" ...: .
l"
~:
l.'l'; ::c,
t.:'
.,'-.... : .,... :
..
H '
:
. :;. '
!i
-"'JL.
.,
-
\01 '"
' l
. .. , ..
. J..-!: ~
I"""~
: :.
~
t". : .: J a
~
-
, ,.
L C .r'1· X\· 0;1
~ :n 5 -
:;:;-~
...........
,
,"f, t." .,
_.~
! ll
';:':' -~
"
..-...
~'~-:.f"t. -
;~&1 :"
':...,1. - '"
~n
a::
n -
>~
--:' \."
,,,.,,,,,--=--
..
Ir :l'-:;«
l ·Y·~·
: :F't.--
32
Pro Stepper Service Manual 620-7619 Rev A
~~~~~~~~~~~~~~~~~~~~~~~~~~~
.J ~
------_.
_ _. -
I Pro Stepper Service Manual I
Maintenance Log
Model,
Date
_
Cleaning
Serial Number
_
Problem/Adjustment
Mfg Date
Part Replaced
_
Service performed
bv
•
Comments:
•
33
Pro Stepper Service Manual 620-7619 Rev A
-
- - --
- - - - - - - - - - - - --
. 1_ _
1
----
Pro Stepper Service Manual
1
•
•
34
Pro Stepper Service Ma nu al 620-76 19 Rev A
_
.J _ _
I
Pro Stepper Service Manual
Warranty
STAR TRAC LIMITED WARRANTY
COMMERCIAL FITNESS PRODUCTS
ST AR •RAe by l)NISE , INC. warrants to tI1c OIig.n<i pur::hasQl that 1$ Commercial Frtness Products are frae 01 de!e.;ls i; workJ1lalship a!Y.l materials. Far1s are
cO\'£!ll:o:1 fOf a period at two (2) ~'ears Iron date 01 purcrase 51:00 TreadmDI. TR4500 Treadml!1, and PIc S Treadmil dri'/e ~OIS and moior control bo.'J'ds are
co,-ere:1 Of a :lenod 11 tI1ree (3) ~ars I"om da!e 11 purcnase P,OT'eadmi Dam EMf! Trennlltwe mctCfS lJ1d 0101' coo1ml ~ ate CO'Iered let a pelio:1 at
fi~-e (5 ye~s han dale
purchase. Frar e welds iI'e WarTa'lted lor tile life of the prrox; . -readmil wear items, su:tl as rJl'flill,j bel~ rUrinirg decK, ald me:
l;('\iSI\£~ am ..~arr.&j for six (6) mmlhslrrol cate r:J ptSdIase (!ee Exckl5ions, belowj Q:her wear ilems. Sl..dI as l:'cycle seat upt:olsterY and h(J'ldklbar grips are
~?rrant eo fa ooe (I) year frem date 01 p~ase (see E)dusions, below) Du ng the app~cable warranty period, Star Trac will e'tter repair or replace.. at ft_ 0It1oo
delec i~e p~(s : al flO C arge. Add,liorally. Star Trac will cover latXlf cosls lor requAd repallS ct Sport Treadmill. lR4500 Treadmill. and Pro 5 Treadmill dnve
rro:as and malor c~:rot boards for a period of ltree (3) yein 1rCf"1 da:e of p.xcnase. Sty Trac 'd cover lalla costs !Of ecuired rcpar'S 01 Pro Treadm l and El te
Treadmi dnve motors ana IT'OIOl' coo d boards ;0' a penod ct rlW! (5) years Irom dale 0/ purcha5e_S~ar - llIC wiHCO'Illllab :;csts fer ll!q'jed e r:all s 0' no, "'ed'
ite'll parts '0" a period of one P) year Ircrn dale ct pll1C'1ase. Slar Tra:; wi:' cover labor costs for required rcpa'lS 0' ",ear item p~s fa 3 pericd of SIX f6j mcnlhs frc·,.
date 0/ ou~e . The manul3ctuter does no! wa-T3\11M hca1 ratc systan porlorrrancc CY1 this p-od1Jct as tic cart rale system ~orformanco var-es. based ':Jr a
user SooyWlogy, tn!!sslevel, q . me'hod rJ use al,d ether factors FurilerTllOle, !tie heart rate sy51em is {\()( f()l'med'lCal usa
or
I~
ordel to implernenlltle
pr~i.sions
or !!lis limited warranty, tile origjn.Jl purchaser fllJSI contact Star Trac PrtWa SuJ:pcn aI (8001503-1221.
Be prepared to
e1fec:ivi:y
p"O'(l ~e the procuct sefHi nlJnber and a detailed dc$aiption 0I1'.e problem Proof of purchase or warranty registraiion wi be neoded 10 verily warranly
a".d etT.a 11 wa-ranty servia! ~dlor ~ Do no4 ret"," 09f8c!,ve pants) lor repair or replacement-MthOUl prior authorization 110m Star Trae.
•
Sla' · rae rese~es the lighl to tevie'A' defective par1ls~ AI ccsts ct sNppilg defec1r;e parl{sl lo and from Slat Trac tor inspeclioo shal be ~ s:llet{ by tie
cnginal plKchaser. Any repair or modlx:liial 01 deIect-w pa1(s) by anyooe ('(her t1an , St. T a:; Technial Repesentave or Auihorized $eoice Provider llil void
lt is w:lmlOly. If Star lac detormines. in ~s solo discreiion. !hal ~ is ~ to ship defecti'le p3ft(s) 10 Star Tmc. Star Trac may Gesig\alc. in its sole discrclior1.
a rej:<ir ';oily 0 mspect ;rod estlrrute:lle cost to re;lair SlId1 defective pM(s) he cos!. I ally, rJ, shipping delecive parW;s.) 10 and trnm SU rep<lrladMy ar.cl 01
such estImate s all be oon"e solely by the aigilal coost.rnar p.Jchaser. Defec1i'/1O ~sl must ren'.aIl available lor mspectioo un" the claim Is fflaized \V'leneler
clan's all! settled Star Trae ~ !he rf!;hl \0 be sulro;ja:ed unoer illy exJsbng insurance policies tile dairnant may have.
Exduliofts
Far Scort readmdls. T R4~ Treidnil!s, arld Pro S Treaantts. rurmng bell w3Jing is tile orginal JlI.fd1aser's respor1sib ity. For all treailTliUs l:ajung;m tar. '. n
adlustments a"e tI1e 009nal pu"chaser's respon$lbiily Ruooing be • IIaI have sepatateO cue to heal and bets 'Mill chal!ed edges Of creasescaused by lading \10111
nol De covered Tn.! im ~ed ..,arT anty does no! apP'y to cosmetic damaQe irroer1edions that are withm design ~lC<ll iof-ds) Of thal do not ma!~aIIy al:eILllClio~3 1 ~ , cr damage ~e 10 acts cf Goo. accidellL aouse. misuse, negligence, I<ICk of nomal m:inrenalCe. abnormal servce or ~d "9 thai Clfters from that
seediec for I is model moroper flSIaIlaton or cperabon. In a1di1Dl, ;j!Efation Of modifcalJon of tI1e prcduct, or rep31r by anyono oilier li',3'1 a Star Trac tech rjc~
re;Ycsentilive 0 ' aLthonzed serv'c:e prD'fidlJr will YCid thiSwarranty. ThiSwarranty is valid only i'llhe conlinenlalllliled staleS
Obcllimer of WlrrIIltiesj Umi&Mion of ~
i lteu 01 all other warranties, exp:ess or impbeo. irr.luding . ilhoJt limtJlion, Ire ifTll*lo W2ffiWlties 11 mClCharJ<oilItf ard frtr-as I()I' II par1ic-Ja:
p.r:JOSe Rcp;ll' or lepacerr.enl as proYldoo aIlO'i@ shall be the soe and exdJsive remedy aVaJ lai:lle 10 It'e purchaser. Cooedion 01 r!elects, the rMnnilr arc '0'
Ite ~erio:l of lme cescrl:>ed CDMl, shall cons~Me comoiete JJIf~ ~I ~ 1 1ab~1ties and respcnsibiitles of ~ar Tlac to the IXllchaser with respect 10 COI1tra.."l
r.egligen~ . st',cl abiltt; or OlherwlSe. Star TIOC shall flCl be allIe or in ?JI1'f Nay r~ 'ble for any i,.,,:idenlill or coosequen ial damages ~ UOO1 Oleach 0' n"
e.(;yess 01If" pI'ed ",arranly on this P(<X1Jct Of otI1erwise,
Tn,s warraoty is
a
Some slares 00 no! aI<M' t1\e exclusiOll or ~millllion at implied warranlies Of inCIdental or consecuentlal damages. so the i'ltn'fe E)C! usiOns and Urnlt;;, ns may r,Gol
<lOO1,. 10 you Th warranty gh-e 011 sped!i' ~ r.ghts, and you mar also hcr.-e other ngh!s. whIch may vary. from stale :o S13:e.
Effective
PI\; 620-713::, REVlSION: E DOC. WAAAANTY COI.1MERCIAl
•
35
iI5I, 2004
Pro Stepper Service Manual 620-7619 Rev A
•
800-503-1221
•
•
http://su(ll?ort.startrac.com/