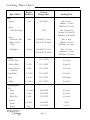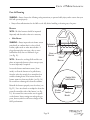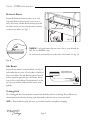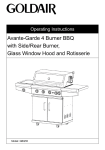
1
T
VERMON
Castings
ONT
VERMCastings
VE
RM
CaONT
st
ing
s
ONT gs
VERM
Castin
USERS MANUAL
For Models VC50 and VC75
Gas Barbecue Grill
50000621/1200
Warnings
FOR YOUR SAFETY
If you smell gas:
•
•
•
•
Shut off gas to the appliance
Extinguish any open flame
Open lid
If odor continues, immediately call your gas supplier or fire department.
FOR YOUR SAFETY
Do not store or use gasoline or other flammable vapors and liquids in
the vicinity of this or any other appliance.
An LP cylinder not connected for use shall not be stored in the vicinity
of this or any other appliance.
•
Always read and understand the WARNINGS and SAFETY INSTRUCTIONS that are contained
in this Manual before attempting to use this Gas Barbecue Grill, to prevent possible bodily
injury or property damage.
•
Always keep this Manual in or near the Grill, for convenient future reference.
Page i
Warnings
SIGNAL WORDS :
The Signal Words used in this Manual, and their intended meanings, are as follows :
DANGER : Indicates that a failure to observe the safety instructions could result in death or catastrophic
bodily injury.
WARNING : Indicates that a failure to observe the safety instructions could result in serious bodily injury.
CAUTION : Indicates that a failure to observe the safety instructions could result in property damage or
minor bodily injury.
NOTE : Designates important information relating to the safe use of the Grill.
IMPORTANT WARNINGS :
Since this outdoor cooking appliance is movable, is fueled by natural or propane gas, generates very high
temperatures for cooking and emits carbon monoxide as a bi-product of combustion, prudent precautions
must be taken to assure its safe use.
•
DANGER : This Grill has been designed for OUTDOOR use only.
Never use this outdoor Grill inside any building, garage, shed or breezeway, or inside any
boat, trailer or recreational vehicle, to prevent a possible fire and to prevent the possibility of
carbon monoxide poisoning or asphyxiation
•
DANGER : Exposing an over-filled or a disconnected propane cylinder to heat could cause venting of
fuel through the pressure release valve. Since propane vapor is heavier than air it tends to pool and, if
ignited, could produce a violent fire or explosion.
Never install a propane cylinder if it is more than 80 % full, as the contents may lack adequate room for
expansion when exposed to heat.
Never store a spare Propane Gas Cylinder in the cylinder compartment of this Grill, because it will be exposed
to high temperatures when the Grill is in use.
This Gas Barbecue Grill will provide you with many hours of pleasure and enjoyment, if it is used in
accordance with the Warnings and Safety Instructions contained in this Manual.
The essential Warnings and Safety Instructions are located throughout the pages of this Manual, but some of
the principal ones have been summarized below for your convenience:
Page ii
Warnings
A. SAFE LOCATIONS FOR USE OF THIS OUTDOOR GRILL
•
•
DANGER :
Never use this outdoor Grill inside any building, garage, shed or breezeway, or inside any boat, trailer
or recreational vehicle, to prevent a possible fire and to prevent the possibility of carbon monoxide
poisoning or asphyxiation.
WARNINGS :
Always confirm that this Grill is not positioned under a combustible object (e.g., an awning or
umbrella) or in a covered area (e.g., a porch or gazebo) before lighting it, to prevent a possible fire.
•
Always confirm that this Grill is not positioned under the overhang of a house, a garage or other
structure before lighting it. An overhang will serve to deflect flareups and radiated heat into the
structure itself, which could result in a fire.
•
Always confirm that this Grill is positioned more
than 36” (1m) away from any combustible
materials or surfaces before lighting it, and that
no gasoline or other volatile substances are
stored in the vicinity of this Grill. The temperature of a grease fire or of the radiated heat might
otherwise be sufficient to ignite nearby combustibles or volatile substances.
•
Always locate this Grill where there will be ample
combustion and ventilation air, but never
position it in the direct path of a strong wind.
•
Never allow the Grill to operate while unattended, to prevent uncontrolled grease fires from
erupting.
Never attempt to move this Grill while it is in operation or while it is still hot, to prevent possible
personal injury.
36"
(1m
)
"
36
)
m
(1
Fig. 1
• Never store or use gasoline or other flammable or volatile substances in the vicinity of this Grill or in the
vacinity of any other heat-generating appliance, because of the danger of starting a fire.
• Always confirm that the installation of this Grill conforms with the requirements of all local Codes or, in the
absence of any applicable local Codes, with either the National Fuel Gas Code, ANSI Z223.1; CAN/CGAB149.1, National Gas Installation Code; or CAN/CGA-B149.2, Propane Installation Code.
Page iii
Warnings
B. SAFE USE OF LP (PROPANE) GAS
•
DANGER :
Never install a propane cylinder that is more than 80 % full, as the contents may lack adequate room
for expansion when exposed to heat. Propane vapor may then be vented through the pressure release
valve, which could accumulate in a pool and later result in a fire or explosion.
Always instruct your certified propane fuel supplier to confirm by weight that your cylinder is not more
than 80 % full. An empty cylinder will weigh about 18 lbs., while a properly filled cylinder should weigh
no more than 38 lbs.
•
Never store a spare Propane Cylinder in the cylinder compartment of this Grill. Exposing a disconnected cylinder to heat could result in the venting of propane vapor through the pressure release valve,
and the pooled vapor could result in a violent fire. (No hazard is posed by the connected cylinder if it is
not overfilled, however, as it tends to refrigerate itself while it is being used.)
Always confirm that all openings in the cylinder compartment of this Grill are free of any obstructions
that would restrict the circulation of ventilation air. Good ventilation will prevent the pooling of leaked
propane vapor, which is heavier than air, and which could explode if ignited.
•
WARNINGS :
Always consult the Rating Label on the back of the Grill to confirm which fuel must be used with the
Grill. Never operate the Grill with propane gas if it has been configured to use natural gas, to prevent
hazardous overheating.
•
Always confirm that there are no gas leaks before lighting this Grill. Apply a 50/50 solution of liquid
soap and water to the gas supply line connectors with a brush or spray bottle, and watch for bubbles.
Never use a match or open flame to test for gas leaks.
•
Always visually inspect the gas supply line for fraying, cracking or rodent damage before each use of
this Grill and, if necessary, install a replacement obtained from your Vermont Castings dealer before
lighting this Grill.
Always store your spare Propane Gas Cylinders in an outdoor area that is well-ventilated, shady, cool and
removed from any heat source. Always store those cylinders in an upright position. Never store a spare
cylinder in the vicinity of this Grill, or in the vicinity of any other heat-generating appliance.
C. SAFE USE OF NATURAL GAS
• Always consult the Rating Label on the back of the Grill to confirm which fuel must be used with the
Grill. Never attempt to operate the Grill with natural gas if it has been configured to use propane gas, to
prevent possible bodily injury.
• Always employ a qualified service agency to install all necessary gas supply plumbing, for safety reasons
and to assure compliance with all applicable Codes.
Page iv
Safety
• Always promptly shut off the gas supply and immediately extinguish all flames if you smell gas. Always
seek assistance from your gas supplier or local Fire Department if the gas smell persists, because of the
danger of fire or explosion.
• Always confirm that there are no gas leaks before lighting this Grill. Apply a 50/50 solution of liquid
soap and water to the gas supply line connectors with a brush or spray bottle, and watch for bubbles.
Never use a match or open flame to test for gas leaks.
• Always visually inspect the gas supply line for fraying, cracking or rodent damage before each use of this
Grill and, if necessary, install a replacement before lighting this Grill.
• Never permit a gas supply line to contact any heated surface of this Grill.
D. PREVENTION OF BURNS
• Always keep children and pets under close supervision when using this Grill, and never permit them to
come near the Grill while it is in use, as the exterior surfaces will be very hot.
• Always wear insulated protective mitts when working at the Grill, or when attempting to close a gas
supply valve after cooking has been completed, to prevent possible burns. Always use insulated pot holders
when handling containers of hot food.
• Always wear an insulated protective mitt when adding a smoking agent to a Smoker Box.
• Never store or use gasoline or other flammable or volatile substances in the vicinity of this Grill, or in
the vicinity of any other heat-generating appliance.
E. ELECTRICAL SAFETY
• Always confirm that this Grill has been grounded in accordance with local Codes or, in the absence of
local Codes, with the National Electrical Code, ANSI/NFPA No. 70 or the Canadian Electrical Code, CSA
C22.1, when an external electrical source is being utilized for the Rotisserie Motor.
• Always use a grounded three-prong outlet and a three-prong extension cord to energize the Rotisserie
Motor. Never alter or remove the grounding prong on the Rotisserie Power Cord, as an electric shock
hazard would then result.
• Never permit an electrical supply cord to contact any heated surface of this Grill.
Page v
Table of Contents
Safety
Important Warnings .................................................................... i - v
Clearance Requirements ............................................................. ii
Table of Contents ........................................................................ 1
Fuels ........................................................................................... 2
Safey ........................................................................................... 3
Gas Hookup Hooking Up to the Gas Supply ..................................................... 4
LP Gas Supply Connection ........................................................... 4
Natural Gas Supply Connection .................................................... 5
Test for Leaks .............................................................................. 5
Operation
Control Functions ........................................................................ 6
Lighting the Main Burners ........................................................... 7
Turning the Burners Off .............................................................. 8
Flareups ...................................................................................... 8
Match Lighting the Main Burner .................................................. 8
Lighting the Rotisserie Burner ..................................................... 10
Match Lighting the Rotisserie Burner .......................................... 10
Rotisserie Setup .......................................................................... 11
Lighting the Side Burner .............................................................. 12
Shutting the Side Burner Off ........................................................ 12
Using the Smoker Box ................................................................. 13
Cooking
Methods of Cooking ..................................................................... 14
Preparing Food for the Grill ........................................................ 15
Grilling Tips ................................................................................ 16
Cooking Time Chart..................................................................... 17
Care &
Burners ....................................................................................... 20
Maintenance Cooking Grids ............................................................................. 21
Drip Tray ..................................................................................... 22
Stainless Steel Panels ................................................................... 22
Porcelain Enamel Castings .......................................................... 22
Burner Adjustment ...................................................................... 23
Trouble Shooting Guide .................................................................................. 24
Page 1
Safety
Fuels
WARNING : Never use Natural Gas in a Grill that has been configured to burn Propane Gas, and never use
Propane Gas in a Grill that has been configured to use Natural Gas, to avoid possible bodily injury. Always
consult the Rating Label on the back of your Grill to confirm which fuel must be used with the Grill.
NOTE: Your Vermont Castings Gas Grill has been specifically equipped at the factory to burn either Propane
Gas (LP) or Natural Gas (NG). The Grill may be converted for safe use with the alternative fuel, however,
through the installation of an appropriate Fuel Conversion Kit, which is available from your Vermont Castings
dealer.
Check hose for breaks
or wear before each use
WARNING: Use only the pressure regulator and and type I propane
gas supply coupling and hose that is originally provided with this
appliance or as specified by Vermont Castings, (see Fig. 2).
Type I
Connector
ADDITIONAL WARNINGS:
• Always install a 20 lb. propane cylinder that is equipped with a
type I valve outlet (see Fig. 3), and that has a 12” diammeter and
an 18” height. Always use a propane cylinder that has been
constructed and marked in conformance with either the
spectifications for LP Gas Cylinders of the U.S. Department of
Treasportation or the spectifications in the National Standard of
Canada, CAN/CSA-B339, Cylinder, Spheres and Tube for
Transportation of Dangerous Goods, as applicable.
• Always confirm that your propane cylinder is equipped with a
shut-off valve terminating in a Type I propane cylinder valve outlet
connection, and that it has been provided with a collar to protect
the cylinder valve.
• Never install a propane cylinder in this Grill unless it is
equipped with a listed Overfill Protection Device (OPD).
• Always have a new propane cylinder properly purged of air by
your certified propane gas dealer. Since a new cylinder is initially
filled with air, the air must first be purged before it is filled with
propane.
• Always visually inspect the gas supply line for fraying, cracking
or rodent danaged before each use of this Grill and, if necessary,
install a replacement obtained from your Vermont Castings dealer
prior to lighting this Grill.
Page 2
Fig. 2
Regulator
Shutoff
Valve
Collar
Fig. 3
Safety
DANGER:
a) Do not store a spare LP - Gas Cylinder under or near this appliance
b) Never fill the cylinder beyond 80% full; and
c) If the information in a) and b) is not followed exactly, a fire causing death or serious injury may occur.
WARNING : Always confirm that the openings in the cylinder compartment of the Grill are free of any
obstructions that would restrict the circulation of ventilation air. Good ventilation will prevent any possible
accumulation of leaked propane vapor, which is heavier than air and which could explode if ignited.
NOTE : Always have a certified propane gas supplier inspect and requalify your refillable propane gas
cylinder prior to each refilling, in accordance with DOT or TC requirements for propane cylinders.
ADDITIONAL WARNINGS :
•
•
•
•
•
•
•
•
•
•
•
•
Always handle propane cylinders with great care, as the contents are under high pressure.
Always close the propane cylinder valve promptly after each use of the Grill.
Always store propane cylinders outdoors, in an upright, secure position, out of direct sunlight, away
from living quarters and in a well-ventilated, cool, dry area. NEVER STORE A CYLINDER IN A BUILDING, GARAGE OR OTHER STRUCTURE OR ENCLOSED AREA.
Always keep cylinders out of reach of children.
Always confirm that a valve dust cap has been tightly installed and that the valve itself is fully closed,
whenever a propane cylinder has been disconnected.
Always transport a propane cylinder in an upright, secure position, after confirming that its valve is
closed.
Always stabilize a cylinder so that it cannot move, when it is being transported in a car trunk.
Never transport a propane cylinder in the passenger compartment of a car or truck.
Never store a Vermont Castings Gas Grill indoors, unless the propane cylinder has first been disconnected and removed from the Grill.
Never expose a propane cylinder to any heat source, never apply heat directly to a cylinder and never
store a spare cylinder in the vicinity of this Grill.
Never paint a propane cylinder a dark color, as this can cause the cylinder and its contents to overheat.
The LP cylinder must be arranged for vapor withdrawal.
Page 3
Gas Hookup
Hooking Up to the LP (Propane) Gas Supply
VERMONT
Castings
For Your Safety
1. WARNING : Never store or use gasoline or any
other volatile substance in the vicinity of this Grill.
ONT
VERM
Castings
2. WARNING : Never store a spare propane cylinder
in the vicinity of this Grill, or in the vicinity of any other
potential heat source.
LP (Propane) Gas Supply Connection
1. Always place the propane tank in the tank locator hole in the
bottom pan of the cylinder compartment.
2. Always confirm that all burner control knobs are in the OFF
position before activating the gas supply.
3. Always connect the gas supply regulator as follows :
• Insert the nipple of the valve coupling into the tank valve and
tighten the connection collar by turning it clockwise with one
hand while holding the regulator with the other, (see Fig. 4).
WARNING : Always conduct a leak test before lighting the Grill, to
prevent a possible fire or explosion (see page 5).
Fig. 4
Fig. 5
Page 4
Gas
Hookup
Natural Gas Supply Connection
To Connect:
1. Push back the Sleeve on the Socket as shown below (see Fig. 6a).
2. Insert Plug and release the Sleeve (see Fig. 6b).
Retract Sleeve
3. Push the Plug until Sleeve snaps forward to lock
the Plug in the Socket.
• WARNING : Always conduct the following safety
tests before lighting the Grill, to prevent a possible
fire or explosion (see leak test below)
Fig. 6a
To Disconnect:
1. Push Sleeve back and pull the Plug out.
Testing For Gas Leaks
Before attempting to operate this Grill :
1. Always confirm that all burner control knobs are
Release Sleeve
Release
Sleeve
Fig. 6b
in the OFF position.
2. Always connect the gas supply hose first and then open the gas shutoff valve.
3. Always use a brush or spray bottle to apply a 50/50 solution of liquid soap and water to all connection
points (see Fig. 5) to test for gas leaks. Never use a match or open flame for that purpose.
4. Always look for bubbles to appear, as the appearance of bubbles will indicate a gas leak. Always turn off
the gas immediately and tighten the connection, if you find that a leak exists.
5. Always repeat this procedure until no further gas leaks are found to exist, before lighting the Grill.
6. Never attempt to light this Grill, however, if a leak cannot be stopped. Always call your propane gas
supplier promptly to obtain assistance.
WARNINGS :
• Always consult the Rating Label on the back of the Grill to confirm that it has already been configured to burn Natural
Gas. If it is necessary to reconfigure the Grill, however, always utilize the Natural Gas Fuel Conversion Kit available from
your Vermont Castings retailer, to prevent possible bodily injury.
• All gas suppy plumbing should be performed only by a qualified service agency. In the U.S., the supply connection
must be made in accordance with local code or, in the absence of local codes, with the national fuel gas codes, ANSI
Z223.1. In Canada, the supply connection shell be carried out in accordance with the provincial authorities having
jurisdiction and in accordance with the requirements of the CAN/CGA 1-B149.1 AND .2 installation code. A shut-off
value must be installed between the gas grill and the main supply. For natural gas, use a 3/8” or 1/2” natural gas supply
line capable of an a input of at least 60,000 BTU’S.
• Always disconnect the Grill and close its individual manual shutoff valve, when conducting pressure tests of the gas
supply piping system at pressures which exceed 1/2 psi (3.5kPa).
• Always isolate the Grill from the gas supply piping system by closing its individual manual shutoff valve when
conducting pressure tests of the gas supply piping system at pressures which are equal to or less than 1/2 psi (3.5kPa).
Page 5
Operation
Control Functions
Propane Tank Valve
WARNING : Never open the Tank Valve unless the Grill is being prepared for use, to prevent the pooling of
propane vapor.
Always open the Valve immediately before lighting the Grill, and always close it immediately after cooking has
been completed.
Burner Control Valves
On Model VC75, three valves independently control gas flow to the Left, Right, and Rotisserie burners, as
indicated on the front Control Panel (see Fig. 7).
On Model VC50 there are two independent control valves for the main burners.
The OFF position is indicated by the dot above each knob. A full range of flame adjustment is available from
High to Low, (by turning a knob counterclockwise).
Piezo Ignition System
As you turn the Ignitor knob clockwise, you will hear a click as the Piezo module generates an ignition spark
to the burners. The burner should light within four clicks.
Models VC200 & 400
BUTTON
Fig. 7
Page 6
Operation
Lighting the Main Burners
1. Always open the Hood completely and always inspect the Grill
and burners to confirm that all components are properly
positioned, before lighting the main burners.
ONT
VERMCastings
ONT
VERM
Castings
WARNING: Never stand with your head directly over the Grill
when preparing to light the main burners, to prevent possible
bodily injury.
2. Always confirm that all of the burner control knobs are in the
OFF position before opening the gas supply.
3. Turn on the propane gas supply valve at the tank (1 to 2 turns)
or turn on the main natural gas supply valve, (see Fig. 8).
4. Turn the selected Burner Control Knob to the HI position by
pushing down on the knob and turning it counterclockwise.
Fig. 8
5. Immediately turn Igniter Button. The selected burner should
light within four clicks.
• WARNING: IF THE SELECTED BURNER DOES NOT LIGHT, immediately turn the burner control knob to the OFF
position, to prevent gas buildup. Wait five (5) minutes for the gas to clear and then repeat the preceding starting
procedure. If the burner will not light when using the Igniter, follow the match lighting instructions (see Page 9).
6. Confirm that the burner is properly lit and that the flame pattern is as desired, (see Figs. 9a, 9b & 9c, for the proper
flame patterns). If the flame pattern is other than normal, consult the Troubleshooting Guide on Page 26 for correc
tive action.
7. Always preheat the grill before starting cooking. Light both burners and adjust them to the HI position for 5 to 10
minutes. Before placing any food on the Grill, clean the cooking grids with a brass wire brush.
8. Adjust the Controls to a medium setting for most cooking requirements. A light coating of cooking oil on the cooking
grids, before heating the Grill, will prevent foods from sticking to the Grill.
Fig. 9b
Fig. 9a
Normal: Soft blue flames
Out of Adjustment: Hard blue
flames-too much air
Page 7
Fig. 9c
Poor Combustion: Wavy, yellow
flames-too little air
Operation
Lighting the Oven Burner (Models VC200 & VC400)
Use of the Oven burner is ideal for the convection cooking of roasts, seafood, vegetables and pizzas.
To start the Oven burner :
1. Always open the Hood completely, before attempting to light the Grill.
WARNING : Never stand with your head directly over the Grill when preparing to light the Oven burner, to
prevent possible bodily injury.
2. Always confirm that all of the burner control knobs are in the OFF position, before opening the gas supply.
3. Turn on the propane gas supply valve at the tank (1 to 2 turns) or turn on the main natural gas supply
valve.
4. Turn the Oven Burner Control Knob to the HI position by pushing down on the knob and turning it
counterclockwise.
5. Immediately push the Igniter Button. The Oven burner should light within four seconds.
• WARNING : IF THE OVEN BURNER DOES NOT LIGHT, immediately turn the burner control knob to the
OFF position, to prevent gas buildup. Wait five (5) minutes for the gas to clear and then repeat the
preceding starting procedure. If the Oven burner will not light when using the Igniter, first ignite one
of the main burners and then turn on the Oven burner. Turn off the main burner once the Oven burner is lit.
6. Confirm that the burner is properly lit and that the flame pattern is as desired (see Figs. 9a, 9b & 9c, for
the proper flame patterns). If the flame pattern is other than normal, consult the Troubleshooting Guide
on Page 26 for corrective action.
7. Always preheat the Grill before starting cooking.
8. Adjust the Control to a medium setting, for most cooking requirements.
WARNING : Never use the main burners while using the Oven burner, as that could result in overheat your
Grill.
Page 9
Operation
Lighting the Rotisserie Burner (Model VC75)
The Rotisserie burner provides the steady, even heat required to cook poultry and roasts to self-basted perfection.
To start the Rotisserie burner :
1. Always open the Hood completely before attempting to light the Grill.
WARNING : Never stand with your head directly over the Grill when preparing to light the Rotisserie burner,
to prevent possible bodily injury.
2. Always confirm that all of the burner control knobs are in the OFF position before opening the gas supply.
3. Turn on the propane gas supply valve at the tank (1 to 2 turns) or turn on the main natural gas supply valve.
4. Turn the Rotisserie Burner Control Knob to the HI position, by pushing down on the knob and turning it
counterclockwise.
5. Immediately turn the Igniter Button. The Rotisserie burner should light within four clicks.
• WARNING : IF THE ROTISSERIE BURNER DOES NOT LIGHT, immediately
turn the burner control knob to the OFF position, to prevent gas buildup.
Wait five (5) minutes for the gas to clear and then repeat the preceding
starting procedure. If the burner will not light when using the Piezo
Igniter, follow the match lighting instructions below.
6. Confirm that the burner is properly lit and that the flame pattern is as
desired, (see Figs. 9a, 9b & 9c, for the proper flame patterns). If the
flame pattern is other than normal, consult the Troubleshooting
Guide on Page 26 for corrective action.
7. Always preheat the Grill before starting to cook on the rotisserie.
VERMONT
Castings
ONT s
VERM
Casting
Match Lighting the Rotisserie Burner
1. Always open the Hood completely, before attempting to light the Grill.
WARNING : Never stand with your head directly over the Grill when
preparing to light the Rotisserie Burner, to prevent possible bodily injury.
2. Always confirm that all of the burner control knobs are in the OFF
position before opening the gas supply.
3. Turn on the propane gas supply valve at the tank (1 to 2 turns) or
turn on the main natural gas supply valve.
4. Insert a lit match or a butane lighter into the match lighting hole located
below the rotisserie screen (see Fig. 11).
5. Turn the Rotisserie Control Knob to the HI position by pushing down on the
knob and turning it counterclockwise.
Page 10
Rotisserie
Lighting Hole
Fig. 11
Operation
Rotisserie Setup (Optional to Model VC50 & VC75)
The Rotisserie burner is intended to be used for rotisserie cooking only.
WARNING : Never use the main burners while using the Rotisserie burner, as that could result in igniting the
drippings, or overheating your Grill.
The Rotisserie assembly includes a
counter-weight for large or irregular
food items ; using the counterweight
will reduce the strain on the motor.
1. Remove the warming rack. Lay a flat
pan directly on the cooking grates to
catch drippings. Large food items
may require that you remove the
cooking grates and place the pan on
the sear plates.
Fig. 12
Rotisserie
Forks
T
VERMON
Castings
Rotisserie
Motor
Bushing
Rotisserie
Support
Rotisserie
Bracket
2. Insert the ends of the Rotisserie
Support into the slots of the right
cooking grate, so that the edge of the
support is approximently 1” from the
right casting, and the top groove is in
line with the rotisserie spit hole in the left casting (see Fig. 12).
ONT gs
VERM
Castin
3. Engage the Motor Bracket into the Bracket guide on the inside edge of the left shelf.
4. Engage the Rotisserie Motor in the Motor Bracket (see Fig. 12).
5. Assemble the spit and meat forks. Adjust the retainer bushing to keep the spit in place (see Fig. 12).
Tighten the thumbscrews with small pliers.
Always use the counterweight to balance the spit when cooking large or irregular food items.
The Rotisserie Motor is rated to turn a maximum load of 12 lbs.
WARNINGS :
Never use the Rotisserie Motor in the rain, and never use it if it has become wet.
• Always use a grounded three-prong outlet and a three-prong extension cord to energize the Rotisserie
Motor. Never alter or remove the grounding prong on the Rotisserie Power Cord, as an electric shock hazard
would then result.
Never permit an electrical supply cord or a gas supply line to contact any heated surface of this Grill.
Page 11
Operation
Lighting the Side Burner (Optional to Models VC50 & VC75)
WARNING : Never stand with your head directly over the Grill when preparing to light the side burner, to
prevent possible bodily injury.
1. Turn the side burner control knob to HI (see Fig. 13).
2. Turn the Igniter Knob clockwise until the burner ignites. The burner
should light within four clicks of the igniter.
NOTE: Observe the flame pattern. Soft blue flames are normal ; hard blue
flames or wavy yellow flames are not. You can adjust the flame with the air
shutter below the control knob (see Fig 19). If yellow flames persist, refer to
the Troubleshooting Guide on Page 26.
Shutting the burner off
1. Turn the control knob counterclockwise to the HI position, then depress it and turn it to OFF. NEVER force
the knob without depressing it, as that can damage the valve.
IGNITOR
VALVE
CONTROL
O
F
F
HI
LO
Fig. 13
Page 12
Operation
Using the Smoker Box (Model VC75)
The VC75 model Grill is equipped with a Rotisserie Burner Smoker Box. You can add a distinct, smoky flavor
to your food by burning a variety of woods or herbs in this unit.
1. Always soak any wood chips or herbs that you wish to smoke for a half-hour or more.
2. Always pre-warm the Grill before adding your smoking agent to the Smoker Box.
3. Remove the lid from the Smoker Box with a pair of tongs, or while wearing an insulated protective mitt
and place some of the presoaked material in it (see Fig. 14).
4. Use low or medium heat for smoking.
5. Use a marinade with drier foods to benefit the smoking process and to enhance the flavor of your smoked
dishes.
WARNING : Always wear an insulated protective mitt when adding a smoking agent to the Smoker Box,
to prevent burns.
Fig. 14
Rotisserie Burner Smoker Box
Page 13
Cooking
Methods of Cooking
With its combination of burners and accessories your Vermont Castings gas grill
can provide for virtually every conceivable style of cooking.
•
The powerful Main burners deliver the middle and high range of temperatures desired for traditional barbecuing. This includes searing and finishing
steaks, hamburgers, pork chops and the like, or grilling chicken parts,
sausages, or kebabs with more moderate heat (see Fig. 15a).
•
The Rotisserie burner standard on Model VC75, delivers the succulent selfbasted flavours of chickens, ducks and hams or pork, beef and lamb roasts
that only rotissing can achieve. Also the radiant infrared unit ensures that you
will be enjoying the results much sooner (see Fig. 15b).
•
The optional Side burner boils sautés, stir fries or warms all with equal
aplomb. Plus its high power is more than adequate for deep frying seafood,
vegetables and meats or hard boiling soups, lobsters or corn on the cob (see
Fig. 15c).
•
The optional Smoker Box, standard with all Vermont Castings gas grills
allows you enhance the flavors of foods by slow smoking with herbs, or a
variety of wood chips or chunks (see Fig. 14).
•
The optional Vermont Castings Griddle pan accessory extends your
capabilities again. With this item you can pan fry eggs and bacon, potatoes
or seafood. Or if you prefer use it to grill fish steaks, other seafood or
lamb chops.
Fig. 15a
ROTISSERIE
Fig. 15b
Fig. 15c
Page 14
Cooking
One of the keys to extending your range of grilling capabilities is a fundamental understanding of the two
common methods of cooking, Direct and Indirect cooking.
In the Direct cooking method foods are placed directly above the heat source. This method is used in
searing for example where you require high and immediate heat to quickly brown the outside layer of meats
thereby sealing in their juices to enhance flavor. On the Vermont Castings grill this is accomplished using one
or both of your main burners and placing the food on the porcelain cooking grids directly over the burners.
This may be done with the grill hood either open or closed.
In the Indirect cooking method foods are placed on the grill offset from the heat source . With the grill lid
closed reflected heat surrounds the food cooking it more evenly and gently. This approximates the action of a
convection oven where heat is circulated by the use of a fan to achieve a similar result. This method is perfect
for cooking roasts of any kind but is also useful whenever you want to slow cook or bake a wide variety of
foods. Indirect cooking on your Vermont Castings grill is accomplished using one of the main burners and
placing the food on the porcelain cooking grid above the opposite burner, or on the warming rack burner.
The grill hood should always be closed when employing the indirect cooking method
Preparing Food for the Grill
WARNING: Always observe safe food-handling and safe food-preparation practices when using this Grill, to
prevent food-borne illnesses :
• Always cook foods adequately. Undercooked foods can retain bacteria, especially if thawed or exposed to
warm conditions prior to cooking.
• Always use a meat thermometer to confirm that foods have been fully cooked.
• Always use separate plates and utensils for the handling of raw food. Never place raw food and cooked
food on the same plate, and never place cooked food on a plate that was used for handling raw food. Al
ways carefully wash all plates and utensils used to handle raw food before using them to handle cooked
food.
• Always wash all vegetables, seafood and poultry before cooking.
• Always leave uncooked foods in the refrigerator until you are ready to start cooking.
• Always marinate meat in the refrigerator. Always dispose of the excess marinade, and never reuse it.
• Always preheat your Grill for 5 to 10 minutes before cooking, and clean off all grease and food residue
before using the cooking grids.
Page 15
Cooking
Grilling Tips
A few helpful hints will ensure that your grilling results are perfect every time.
• Apply a light coating of cooking oil to your cooking grids before grilling, to prevent foods from sticking.
• Cook similar portion sizes together, so that they all cook evenly.
• Use tongs to turn foods on the Grill.
• Never pierce foods while they are cooking on the Grill, as this will dry them out.
• On foods such as pork chops and steak, slit the fat strip to prevent the meat from curling during cooking.
• Turn foods infrequently. Some chefs say that a good steak should never be turned more than once.
• Apply sugar-based sauces such as commercial barbecue sauces only during the latter stages of cooking, to
prevent charring.
• Soak the string you use to tie up roasts and poultry on the Rotisserie spit to protect it from burning. Also,
soak the wooden skewers that you intend to use for kebabs for several minutes before using them for
cooking.
·
• Use a disposable aluminum tray filled with water, fruit juice, wine or a marinade to add extra flavor and
moisture to slow-cooked foods like roasts, whole chickens, turkeys or ducks. Place the tray on top of the
sear plates below the Grill surface and immediately under the foods being cooked. This will buffer the
heat from below, thereby slowing the cooking process and protecting the bottom of the food from overcooking. Check the tray periodically during cooking and keep it filled with liquid.
WARNING : Never let the tray boil dry. That could be hazardous, as grease from fatty foods that has
collected in the tray could ignite and possibly cause bodily injury or property damage.
NOTE : Always trim excess fat from your foods to reduce the occurrence of flareups during cooking.
Page 16
Cooking Time Chart
Type of Food
Beef
Burgers
Weight/
Thickness
Cooking
Temperature
1 inch
400-450° F.
Rare: 4-7min.
Medium: 7-10 min.
Well Done:10-12 min.
350°
Rare: 18-20min./lb.
Medium: 20-25 min./lb.
Well Done: 25-30 min./lb.
1 inch
550-600° F. (To sear)
400-450° F. (To finish)
Rare: 4-7min.
Medium: 7-10 min.
Well Done: 10-12 min.
2 inches
550-600° F. (To sear)
400-450° F. (To finish)
Rare: 15-17 min.
Medium: 17-19 min.
Well Done: 19-22 min.
325 –350° F.
30-45 min.
Roasts
Blade, Sirloin Tip
Steaks
Porterhouse, Rib,
Ribeye, Sirloin,
T-Bone
Filet Mignon
Poultry
Chicken, Parts
Cooking Time
Chicken, Whole
3 –4 lbs.
325 –350° F.
20 min./lb.
Chicken Breasts,
Boneless
1-2 lbs.
325 –350° F.
12-15 min.
1–1-1/2 lbs.
325 –350° F.
45-60 min.
Duck
4 –5 lbs.
325 –350° F.
18-20 min./lb.
Turkey
13 –25 lbs.
325 –350° F.
20 min./lb.
1-1-1/2 inch
1 -2 lbs.
2 -4 lbs.
400-450° F.
325-350° F.
325-350° F.
10-15 min.
20-30 min.
30-50 min.
1-1/2-2 lbs.
400-450° F.
15 min.
Large
325-350° F.
5-6 min.
Cornish Hens
Fish & Seafood
Fish
Fillets
Steaks
Whole Fish
Seafood
Lobster
Shrimp
Page 17
Cooking Time Chart
Weight/
Thickness
Cooking
Temperature
Cooking Time
1 inch
400-450° F.
25-30 min.
1 inch
400-450° F.
12-15 min.
12-14 lbs.
Bone in
325 –350° F.
Medium: 20-25 min./lb.
Well Done: 25-30min./lb.
4-5 lbs.
Boneless
325 –350° F.
50-60 min.
Ribs
Back, Side
5-6 lbs.
325-350° F.
Medium: 25-27 min./lb.
Well Done: 27-30 min./lb.
Roasts
Butt, Loin, Shoulder
3-5lbs.
325-350° F.
1-1-1/2 hrs.
375-400° F.
Medium: 30-35 min./lb.
Well Done: 35-40 min./lb.
Type of Food
Pork
Chops
Ham
Steak
Whole ham
Tenderloin
12-20 min.
Sausage
Lamb
Chops
Loin, Rib, Shoulder
Roast
Crown Roast
Leg
1 inch
400-450° F.
Rare: 7-9 min
Medium: 10-13 min.
Well Done: 14-17 min.
2 _-4 lbs.
5-9 lbs.
325-350° F.
325-350° F.
40-45 min./lb.
30-35 min./lb.
Page 18
Cooking Time Chart
Cooking
Temperature
Cooking Time
Asparagus
325-350° F.
6-8 min.
Cut off ends of stems. Lay across the
grills.
Beans
325-350° F.
30-35 min.
Wrap in foil with butter or margarine.
Turn over once.
Carrots
325-350° F.
20-30 min.
Cook directly on the grill.
Corn on the Cob
325-350° F.
25-35 min.
Soak in cold water for 15 minutes.
Cook with husk on.
Eggplant
325-350° F.
6-8 min./side
Mushrooms
325-350° F.
6-8 min.
Onions
325-350° F.
40-45 min.
Wrap in foil Turn over once during
cooking.
Peppers
400-450° F.
15-20 min.
Remove charred skin before eating.
Potatoes
325-350° F.
50-60 min.
Wrap in foil.Turn over once.
Roasted Garlic
325-350° F.
30-40 min.
Cut off top of bud and lightly coat with
Olive oil. Wrap in foil.
Tomatoes
325-350° F.
5-7 min.
Cut in half and coat in Olive oil.
Zucchini
325-350° F.
6-8 min./side
Cut into slices and coat with oil.
Type of Food
Comments
Vegetables
Page 19
Cut into slices and coat with oil.
Cook directly on the grill.
Care & Maintenance
Care & Cleaning
WARNING : Always observe the following safety precautions, to prevent bodily injury and to assure that your
Grill will operate properly :
• Always allow sufficient time for the Grill to cool fully before handling or cleaning any of its parts.
Burners
NOTE : All of the burners should be inspected
frequently and cleaned as often as is necessary.
• Main Burner
WARNING : Always inspect the air shutter screen
periodically to confirm that it is clear of food
residue, spider webs or other insect debris. A
clogged venturi tube can cause a fire to occur
beneath the Grill, due to a flashback of gas
(see Fig. 16).
Rotisserie
Burner
Oven
Burner
Main
Burner
NOTE : Remove the cooking Grills and the sear
plates to inspect the burner at least once per year,
or more frequently if required.
Loosen the burner attachment screws (from
inside) to allow the burners to be pulled away
from the valves far enough for a ventuti brush or
suitable cleaning device to be inserted into the
burner venturi to clean away debris (see Fig. 16).
Be careful not to damage the electrode ceramics.
Spider Web
and Debris
Reinstall the burners properly over the valves (see
Fig. 22). Use a wire brush or toothpick to clean the
ports all around the sides of the burner (see Fig.
18). It is normal for some surface rust to appear
on the burner. Severe rusting can enlarge the gas
ports, however, which could cause changes in the
Grill’s performance.
Page 20
Shutter
Screen
Venturi
Brush
Fig. 16
Care & Maintenance
Rotisserie Burner
Inspect the Rotisserie burner monthly, if it is used
frequently. Remove the rear panel (four screws) to
access the burner. Confirm that the burner ports and
air shutter screen are clear of food residue, cobwebs
or other insect debris (see Fig. 17).
Rotisserie Burner
Fig. 17
WARNING : A clogged venturi tube can cause a fire to occur beneath the
Grill, due to a flashback of gas.
Use a wire brush to clean all ports on the sides of the burner (see Fig. 18).
Fig. 18
Side Burner
Inspect the air shutter screen periodically (see Fig. 19)
and confirm that it is clear of food residue, cobwebs or
other insect debris. The Side Burner ignition electrode
delivers a spark to ignite the gas at the burner. Always
keep it clear of any buildup of foreign material, as that
can act as an insulator and prevent the burner from
lighting.
Adjust Shutter and
Keep Screen Clean
Fig. 19
Fig. 19
Cooking Grids
The cooking grids have been porcelain enameled for durability and ease of cleaning. These Grills may be
cleaned with any nonabrasive cleaning agent formulated for kitchen use, or a brass wire brush.
NOTE : Always handle the grids with care, as porcelain enamel is susceptible to chipping.
Page 21
Care & Maintenance
Drip Tray
The drip tray located under the burner pan in the bottom of
the Grill body is provided to catch excess cooking fats and
juices.
The drip tray is accessible from the left-hand side of the
Grill, when facing it from the front. It is necessary to lift out
the left-hand cabinet panel to gain access to the drip tray
(see Fig. 20).
Check it for accumulations after each use of the Grill, and
clean it as necessary.
Use lightly abrasive or non-abrasive products only for
cleaning the drip tray.
Fig. 20
Stainless Steel Panels
Stainless steel is very durable and should last indefinitely with a minimum of care. Due to the nature of its
brushed surface, minor scratches may appear with normal use and handling. These may be removed with the
use of a fine to medium grade Scotch-Brite* (or similar) polishing pad. Apply gentle, even pressure while
rubbing with the grain of the steel. Do not rub against the grain, as damage to the finish can result. Never use
steel wool on the stainless steel panels.
Periodic cleaning with a non-abrasive cleaning compound, specifically formulated for stainless steel, will
remove any dirt, grease, cooking residue or discoloration that may develop.
CAUTION : NEVER USE ABRASIVE CLEANING AGENTS, SCOURING PADS OR OTHER ABRASIVE MATERIALS
TO CLEAN THE STAINLESS STEEL PANELS, TO AVOID SCRATCHING THE SURFACES.
Porcelain Enamel Castings
Periodic cleaning with a dry or slightly damp cloth or soft brush will keep porcelain enamel surfaces looking
new. Use a kitchen appliance cleaner or a polish expressly formulated for use on porcelain enamel to clean
the porcelain enamel castings.
CAUTION : NEVER USE ABRASIVE CLEANING AGENTS OR ABRAISIVE MATERIALS TO CLEAN THE PORCELAIN ENAMEL CASTINGS, AS THEY WILL PERMANENTLY SCRATCH THE PORCELAIN ENAMEL SURFACES.
Page 22
Care & Maintenance
Maintenance
Burner Adjustment
NOTE : It may be necessary to adjust the burners periodically, to compensate for variables in gas characteristics. If you
notice that the burner flame pattern is irregular (see Figs. 9a,
9b & 9c) it may be necessary to adjust the air shutter opening
at the front of the venturi tubes. The shutters are accessible
under the control panel at the front of the Grill (see Fig. 21).
Use a screwdriver to loosen the locking screws. Open the
shutter just enough to achieve the desired soft, blue flames.
Make adjustments in small increments and allow the burner to
come up to operating temperature (10 min.) before making
further adjustments.
Loosen the
Locking Screw
Turn Shutter
Clockwise
to Open
Fig. 21
If burners are removed for cleaning or adjustment, always
confirm that they have been reinstalled correctly over the valve
outlets (see Fig. 22). The valves should extend into the burner
venturis approximately 1/4".
Venturi Tube
Valve
Outlet
1/4"
Page 23
Fig. 22
Troubleshooting Guide
PROBLEM
ACTION REQUIRED
POTENTIAL CAUSE
Turn on fuel supply and retry.
Burner will not light Gas supply turned off
Confirm the flow of gas by smell or by listening for the hiss
of gas being emitted. Allow gas to clear before attempting to
relight.
Out of propane
Weigh your propane cylinder. A standard 20 lb. cylinder
will weigh about 18 lb. when it is empty and 38 lb. when it
is 80 % full.
(WARNING : Never take a propane cylinder indoors for
any purpose.)
Blockage in the gas system
Confirm that the venturi tubes are not blocked by insects or
other debris. Use a special venturi brush to clean (Fig. 16).
Use a pin or needle to carefully probe the orifice in the gas
valve. Never enlarge the orifice (Fig. 18).
Misalignment of the gas valve to
the venturi tubes of the burner.
Look under the front control panel and reinsert the gas
injector into the venturi tube, if required (Fig. 22).
Improper attachment of the
propane hose and regulator
Tighten the regulator’s plastic collar onto the cylinder valve.
Hand-tighten only (Fig. 4).
Unit won’t heat up (LP) Control knob left open at startup
or
Turning gas on too quickly
For safety, the regulator coupling on your barbecue is
equipped with a flow control mechanism. This device limits
gas flow in the event of a sudden change in the demand for
gas. This may be engaged inadvertently, if a burner control
knob should be left ON when you open the propane cylinder
valve. Rapidly opening the valve can also engage flow control.
To resolve the problem, close your cylinder valve. Confirm
that all burner control knobs are in the OFF position. Open
the cylinder valve slowly (about 1 to 2 turns) and wait 5
seconds. Finally, turn a single burner ON and try relighting it.
Unit won’t stay lit
Wind
Always shelter your Grill from strong winds.
Running out of fuel
Confirm the flow of gas by smell, or by listening for the hiss
of gas being emitted.
Weigh your propane cylinder. A standard 20 lb. cylinder will
weigh about 18 lb. when it is empty and 38 lb. when it is 80
% full. (WARNING : Never take a propane cylinder indoors
for any purpose.)
Page 24
Troubleshooting Guide
PROBLEM
Uneven burn pattern
or
Flashback fire
POTENTIAL CAUSE
ACTION REQUIRED
Blockage in the burner or gas
system
Confirm that the venturi tubes are not blocked by insects or
other debris. Use a special venturi brush to clean (Fig. 16).
Use a pin or needle to probe the orifice in the gas valve.
Never enlarge the orifice (Fig. 18).
Use a small nail or toothpick to clean the burner ports
(Fig. 18).
Corrosion of a gas burner can cause the solid material
between the gas ports to deteriorate, resulting in uneven
burning. See your Vermont Castings retailer for the
appropriate replacement burner.
Corroded burner
Excessive yellow
flame
Improper air shutter opening
Your Grill should burn with a predominantly blue flame. If
the flame is mostly yellow, check the venturi tubes for
obstruction and clean as shown on Page 21. If yellow flames
still persist, adjust the opening on the air shutter of the
venturi tube located under the front console of the Grill
(Fig. 21).
Flareup
Excessively fatty foods
Trim all excess fat from meat before cooking.
Grease buildup
Confirm that the sear plate is clean and properly installed.
Remove excess grease from the burn chamber.
Electrode fouled
Electrode improperly gapped
Wipe the electrode with a soft, clean cloth.
Electrode cracked
If the ceramic insulator on the electrode is cracked, it
may short out. Replace the electrode.
Lead wire is disconnected
Confirm that the lead from the Ignitor module to the
electrode is well seated on the termination of the
module.
A crack in the lead wire may result in shorting. Replace
the wire.
Replace the Rotary Generator.
Igniter does not spark
Lead wire is cracked
Rotary Generator faulty
The electrode should be located 1/8” to 3/16” from the
burner, and positioned to spark to the edge of a gas port.
If the gap is incorrect, or the unit is not properly
sparking, gently bend the electrode tip into position. Use
caution so that the ceramic insulator does not crack.
Page 25
Notes
Notes
Warranty
OUTDOOR PRODUCTS
◆ Lifetime Warranty
• On all exterior Stainless Steel Components, such as the cart paneling & doors,
shelving, condiment bins and handles, if so equipped.
◆ 10 Year Warranty
• On all porcelain onsteel surfaces such as the hood and burn chamber.
• On all manifold and valves, knobs plus the infrared rotisserie burner housing
and screens.
• On all burners except the side burner.
◆ 5 Year Warranty
• On all remaining parts.
◆ 1 Year (Accessories)
• Rotisserie.
• The warranty is nontransferable.
• It does not cover failures due to misuse or improper installation or maintenance.
• The warranty is for replacement or repair of defective parts only. Vermont Castings
will not be responsible for incidental or consequential damages or any labor costs.
• This limited warranty does not cover damage due to chipping and scratching of porcelain
or painted surfaces nor does it cover corrosion or discoloring due to misuse, lack of
maintenance, hostile envionments, accident, alterations, abuse or neglect.
• This limited warranty does not cover any scratches, dents, corrosion or discoloring by
heat, abrasive and chemical cleaners nor chipping on porcelain enamel parts, nor any
components used in the installation ot the gas grill.
The Vermont Castings,
Majestic Products Company
410 Admiral Blvd. • Mississauga, Ontario, Canada L5T 2N6 • 905-670-7777
www.vermontcastings.com
50000621/1200