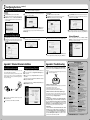
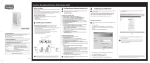
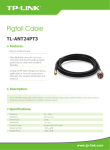
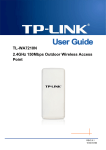
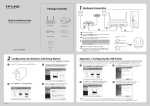
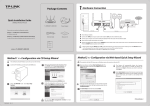
1
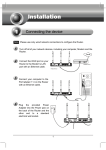
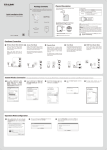
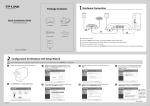
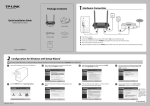
Typical Network
TL-WA7210N is used for remote point-to-point and point-to-multipoint
applications. It makes remote Internet share possible.
AP
Quick Installation Guide
Client
1 Connecting the Device
Please use only wired network connection to configure the AP.
1
2
Point-to-Point Application
Client 1
Locate a suitable mounting site for your CPE. To achieve the best performance
of the devices, please select an elevated location where trees, buildings and
large steel structures will not obstruct the antenna signals and which offers
maximum line-of-sight propagation for the devices.
4
The connection will be similar to the figure below after the above steps are
finished.
CPE
OUTDOOR
Adjust the direction of your CPE for a best signal. Place the straps through the
slots on the back of the CPE and then around the pole. Tighten the straps.
INDOOR
Power Cable
2.4GHz 150Mbps Outdoor Wireless Access Point
Main Electrical Supply
PoE Injector
To Switch or PC
CAT5 FTP Cable Ethernet + DC Power
AP
Client 2
Client 3
3
Connect one end of an Ethernet cable to the PoE port of the provided PoE and
the other end of the Ethernet cable to the LAN port of the CPE. Then, connect
the LAN port of the PoE to a PC using another Ethernet cable. Finally, plug the
provided power adapter into the DC jack on the PoE, and the other end to a
standard electrical wall socket.
5
Power Adapter
Point-to-Multipoint Application
The typical connection for TL-WA7210N is shown as above. Please make
sure that the two CPEs are placed face to face, otherwise, the wireless signal
strength might be weak. The figures shown below are a few examples, and
only the first one is correct.
PoE
Solid light
Solid light
Solid light or flashing
If the LEDs display abnormally, please check to see if all the cable
connectors (power adapter and Ethernet cable) are well connected to
your devices.
Computer
TL-WA7210N
MODEL NO.
Turn on all your network devices and then check to see if the LEDs on the AP
display normally as the diagram below describes.
TL-WA7210N
6
If you use two CPEs to build the network, please make sure that the two CPEs
are placed face to face. Please refer to the Antenna Alignment to get the
optimum signal.
4
Then the page below will appear. Click Next
5
Select the Operation Mode Type according to your needs. Click Next.
If you are using an external antenna to connect, please refer to Appendix 1.
Package Contents
2 Configuring the Computer 3 Configuring the Device
Assign a static IP address 192.168.0.100 for your computer first before logging in
the management page. Here we take the procedures in Windows 7 for example.
1
Open your web browser, type in http://192.168.0.254 in the address field
and press Enter
4
Double-click Internet Protocol
Version 4 (TCP/IPv4).
2
A dialog box will prompt you for the User name and Password. Enter the
default values (both are admin) and click OK.
5
Select Use the following IP
address, enter 192.168.0.100 into
the IP address field and
255.255.255.0 into the Subnet
mask field
1
2.4GHz 150Mbps Outdoor Wireless Access Point
Go to Start > Settings > Control
Panel, and then you will see the
following page. Click View
network status and tasks.
TL-WA7210N
TL-WA7210N
Passive PoE Injector
Resource CD
QIG
2
Click Change adapter settings.
3
Right-click Local Area Connection, then click Properties.
1. If the dialog box does not pop up, please refer to T3 in the Appendix 2:
Troubleshooting. Also, T2 will give you some help if you forget the
password.
2. If the device has been restored, the Welcome page will appear, please
read the TERMS OF USE carefully. Then select I agree to these terms of
use and click Login to continue.
Power Adapter
3
Ethernet Cable
6
Mounting Kits
Click OK to save the configurations for your computer.
Please reconfigure your computer after successfully configuring the CPE.
Select Obtain an IP address automatically and Obtain DNS server
address automatically in step 5, then click OK.
The web management page will display after your successful login. Click Quick
Setup in the main menu
a) If you want to set up a point-to-point connection with TL-WA7210N, please
skip to Configuration for Point-to-Point Connection. In this part, you will
learn about the configuration for Access Point and Client mode.
b) If you want to set the CPE to the Bridge with AP mode, please skip to
Configuration for Bridge with AP.
For configuration for other modes of TL-WA7210N, please refer to the
User Guide in the resouce CD.
(To be continued...)
7106503999
REV1.0.0
3 Configuring the Device
(continued)
Configuration for Point-to-Point Connection
The AP Setting
1
2
Select Access Point for the operation mode, then click Next.
3
Two devices are needed for this application.
The Network Setting page will appear then. It is recommended that you keep the
default settings on this page. Click Next.
Create an easy-to-remember name for your wireless network. Here we take
TP-LINK_211010 for example. Select Most Secure (WPA/WPA2-PSK)
mode and enter a wireless password below to prevent unauthorized access
to your AP. Click Next.
4
Please confirm the configurations you have set, then click Finish/Reboot button to
make all configuraions take effect. If anything is wrong, please go BACK to reset.
5
After successfully logging in, configure the other TL-WA7210N according to The
Client Setting.
3
Create a name for the Local Wireless Network. The security settings for the local
network will be set the same as the remote AP by default. Click Next.
The Client Setting
1
2
Select Client for the operation mode, then click Next.
Configuration for Bridge with AP
1
2
Select Bridge with AP for the Operation Mode, then click Next.
Click Survey button to scan the wireless networks, choose the remote AP
that you want to combine with, enter the password of the remote network,
then click Next.
4
The Network Setting page will appear then. Check the Lan IP Address of the device
to make sure that there’s no IP conflict in the network and click Next to continue.
5
Please confirm the configurations you have set, then click Finish/Reboot button to
make all configuraions take effect. If anything is wrong, please go BACK to reset.
Appendix 1: External Antenna Installation
Appendix 2: Troubleshooting
External Antenna Connection
T1. How do I restore my AP’s configuration to its factory default settings?
Configure the External Antenna
You will need to assign your computer a Static IP address within the same
range as the AP’s IP address. See the Appendix 2: Troubleshooting - T3 if you
need assistance.
If you have an external antenna with the RP-SMA(female) port, you could
connect it to the RP-SMA port of your CPE directly.
If you don’t have any external antennas, you are recommended to use TP-LINK
products for outdoor solution. You could choose TL-ANT2424B (external
antenna), TL-ANT24SP (Surge Protector), and TL-ANT200PT (Pigtail Cable) to
connect as the following steps:
TL-ANT2424B
TL-ANT200PT
TL-ANT24SP
1
Open your web browser, type in http://192.168.0.254 in the address field and
press Enter
2
A dialog box will prompt you for the User name and Password. Enter the default
values (both are admin) and click OK.
3
Configure the External Antenna. Click Wireless >Wireless Advanced, select
External Antenna, then click Save.
With the AP powered on, press and hold the RESET button for about 8 seconds before
releasing it.
Once the AP is reset, the current configuration settings will be lost and you
will need to reconfigure the router.
GND RESET
LAN
T2. What can I do if I forget my password?
1) Restore the AP’s configuration to its factory default settings. If you don’t know how
to do that, please refer to previous section T1;
2) Use the default user name and password: admin, admin;
3) Try to reconfigure your AP by following the instructions of this QIG.
T3. What can I do if I cannot access the web-based configuration page?
Restore the AP’s configuration to its factory default settings according to previous
section T1, then assign a static IP address 192.168.0.100 for your computer following
the steps below or referring to 2 Configuring the Computer.
1
Connect one side of the TL-ANT24SP to the RP-SMA port of your CPE
through the TL-ANT200PT.
2
Connect the other side of the TL-ANT24SP to the TL-ANT2424B.
3
Change LAN IP Address of the Client from 192.168.0.254 to 192.168.0.X (X can
be any number from 2 to 253) to avoid an IP conflict with the root AP. Here we
take 192.168.0.2 for example. Click Next.
4
Please confirm the configurations you have set, then click Finish/Reboot button
to make all configuraions take effect. If anything is wrong, please go BACK to reset.
Click Survey button to scan the wireless networks, and choose the SSID
(TP-LINK_211010) of the first AP you have configured. Click Next.
For Windows 7 OS
Go to Start > Settings > Control Panel. Click View network status and tasks >
Change adapter settings, right-click Local Area Connection, select Properties and
then double-click Internet Protocol Version 4 (TCP/IPv4). Select Use the following
IP address, enter 192.168.1.100 into the IP address field, 255.255.255.0 into the
Subnet mask field, select Use the following DNS server addresses, enter the DNS
server address provided by your ISP or network administrator. Click OK.
For Windows XP OS
Go to Start > Control Panel. Click Network and Internet Connections > Network
Connections, right-click Local Area Connection, select Properties and then
double-click Internet Protocol (TCP/IP). Select Use the following IP address, enter
192.168.1.100 into the IP address field, 255.255.255.0 into the Subnet mask field,
select Use the following DNS server addresses, enter the DNS server address
provided by your ISP or network administrator. Click OK.
Antenna Alignment
After basic configuration of operation mode, click Wireless > Antenna
Alignment, you can change your CPE’s direction according to the parameters
shown in this page to get a better signal strength.
Technical Support
For more troubleshooting help, go to www.tp-link.com/en/support/faq
To download the latest Firmware, Driver, Utility and User Guide, go to
http://www.tp-link.com/en/support/download/
For all other technical support, please contact us by using the following details:
Global
Australia / New Zealand
Tel: +86 755 2650 4400
Tel: AU 1300 87 5465
E-mail: [email protected]
NZ 0800 87 5465
Service time: 24hrs, 7 days a week
E-mail: [email protected] (Australia)
Singapore
[email protected] (New Zealand)
Service time: 24hrs, 7 days a week
Tel: +65 6284 0493
E-mail: [email protected]
Turkey
Service time: 24hrs, 7 days a week
Tel: 0850 7244 488 (Turkish Service)
UK
E-mail: [email protected]
Service time: 09:00 to 21:00
Tel: +44 (0) 845 147 0017
7 days a week
E-mail: [email protected]
Service time: 24hrs, 7 days a week
USA / Canada
Ukraine
Toll Free: +1 866 225 8139
Tel: 0800 505 508
E-mail: [email protected]
E-mail: [email protected]
Service time: 24hrs, 7 days a week
Service time: Monday to Friday
Malaysia
10:00 to 22:00
Tel: 1300 88 875 465
Brazil
Email: [email protected]
Service time: 24hrs, 7 days a week
Toll Free: 0800 608 9799
Poland
(Portuguese Service)
E-mail: [email protected]
Tel: +48 (0) 801 080 618 / +48 227 217 563 (if
Service time: Monday to Friday, 09:00
calls from mobile phone)
to 20:00; Saturday, 09:00 to 15:00
E-mail: [email protected]
Service time: Monday to Friday, 09:00 to 17:00.
Italy
GMT+1 or GMT+2 (Daylight Saving Time)
Tel: +39 023 051 9020
Switzerland
E-mail: [email protected]
Tel: +41 (0) 848 800 998 (German Service)
Service time: Monday to Friday
E-mail: [email protected]
09:00 to 13:00; 14:00 to 18:00
Fee: 4-8 Rp/min, depending on rate of
Indonesia
different time
Tel: (+62) 021 6386 1936
Service time: Monday to Friday, 09:00 to 12:30
E-mail: [email protected]
and 13:30 to 17:30. GMT+1 or GMT+2
Service time: Monday to Friday
(Daylight Saving Time)
09:00 to 18:00
France
*Except public holidays
Tel:
+33 (0) 820 800 860 (French service)
Germany / Austria
Email: [email protected]
Tel: +49 1805 875 465 (German Service)
Fee: 0.118 EUR/min from France
+49 1805 TPLINK
Service time: Monday to Friday, 09:00 to
+43 820 820 360
18:00 *Except French Bank holidays
E-mail: [email protected]
Russian Federation
Fee: 0.14 EUR/min from the German fixed Tel: 8 (499) 754 5560
phone network and up to 0.42 EUR/min
8 (800) 250 5560 (toll-free call from any RF
from mobile phone
region)
Service time: Monday to Friday, 09:00 to
E-mail: [email protected]
12:30 and 13:30 to 17:30. GMT+1 or
Service time: From 10:00 to 18:00 (Moscow
GMT+2 (Daylight Saving Time in Germany) time) *Except weekends and holidays in
*Except bank holidays in Hesse
Russian Federation
TP-LINK TECHNOLOGIES CO., LTD.
www.tp-link.com