1
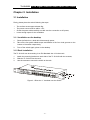
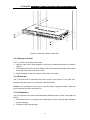
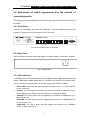
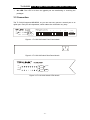
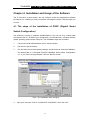
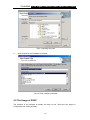
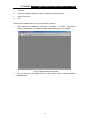
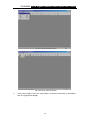
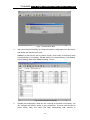
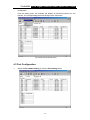
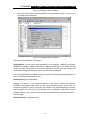
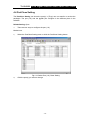
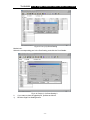
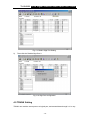
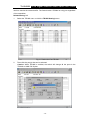
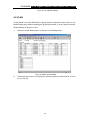
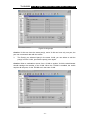
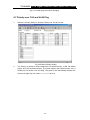
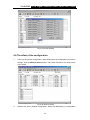
COPYRIGHT & TRADEMARKS
Specifications are subject to change without notice.
is a registered
trademark of TP-LINK Technologies Co., Ltd. Other brands and product names are
trademarks or registered trademarks of their respective holders.
No part of the specifications may be reproduced in any form or by any means or used to
make any derivative such as translation, transformation, or adaptation without
permission from TP-LINK Technologies Co., Ltd. Copyright © 2005 TP-LINK
Technologies Co., Ltd. All rights reserved.
SAFETY NOTICES
Caution:
Do not use this product near water, for example, in a wet basement or near a swimming
pool.
Avoid using this product during an electrical storm. There may be a remote risk of electric
shock from lightning.
Package Contents............................................................................................................. 1
Chapter 1: About the Guide............................................................................................... 2
1.1 Purpose................................................................................................................ 2
1.2 Terms and usage.................................................................................................. 2
1.3 Overview of the Guide.......................................................................................... 2
Chapter 2: Introduction of the Product .............................................................................. 3
2.1 Port-Trunking function.......................................................................................... 3
2.2 Virtual Local Area Network................................................................................... 3
2.3 Priority.................................................................................................................. 3
2.4 Main features ....................................................................................................... 4
Chapter 3: Installation ....................................................................................................... 5
3.1 Installation............................................................................................................ 5
3.1.1 Installation on the desktop ......................................................................... 5
3.1.2 Rack Installation......................................................................................... 5
3.1.3 Hang on the wall ........................................................................................ 6
3.1.4 Power on.................................................................................................... 6
3.1.5 Initialization ................................................................................................ 6
3.2 Explanation of switch appearance and the method of connecting switch ............ 7
3.2.1 Front Panel ................................................................................................ 7
3.2.2 Rear Panel ................................................................................................. 7
3.2.3 LED indicators ........................................................................................... 7
3.3 Connection........................................................................................................... 8
Chapter 4: Installation and Usage of the Software ............................................................ 9
4.1 The steps of the installation of GSSC (Gigabit Smart Switch Configuration)........ 9
4.2 The Usage of GSSC .......................................................................................... 10
4.3 Port Configuration .............................................................................................. 14
4.4 PortClose Setting ............................................................................................... 16
4.5 TRUNK Setting .................................................................................................. 18
4.6 VLAN.................................................................................................................. 20
4.7 Priority over ToS and VLAN Tag......................................................................... 22
4.8 The effect of the configuration............................................................................ 23
4.9 Save and Open the configuration....................................................................... 24
Appendix A: Technical Specifications .............................................................................. 26
Environmental and Physical..................................................................................... 26
Appendix B: Contact Information..................................................................................... 27
TL-SL2109
8+1G Gigabit Ethernet Smart Switch User Guide
Package Contents
The following contents should be found in your box:
One TL-SL2109 Switch
One power cord
One serial cable
This User’s Guide
One Resource CD
Rubber footpads for Desk-mount
Rack-mount kit for installing the switch in a 19-inch rack
Note: If any of the above contents is damaged or missing, please contact the retailer
from whom you purchased the TL-SL2109 Switch for assistance.
-1-
TL-SL2109
8+1G Gigabit Ethernet Smart Switch User Guide
Chapter 1: About the Guide
Thank you for purchase of TL-SL2109 8+1G Gigabit Ethernet Smart Switch. The
TL-SL2109 supports TRUNK, VLAN and port configuration. With the features of high
performance, easy to use and economical, the TL-SL2109 is one best choice for you.
1.1 Purpose
The right guide is about to help you use the model of TL-SL2109 Gigabit Smart Switch
accurately.
1.2 Terms and usage
In simple word, this guide uses the terms “Switch” (first letter upper case) to refer to the
model of TL-SL2109 8+1G Gigabit Smart Switch, and “switch” (first letter lower case) to
refer to all Ethernet switch, including the model of TL-SL2109 naturally.
1.3 Overview of the Guide
Chapter 1: About the guide.
Chapter 2: Introduction. Describes the Switch and its features.
Chapter 3: Installation. Helps you get started with the basic installation of the Switch.
Chapter 4: Install and usage of GSSC. Describe how to configure the Switch by GSSC.
Appendix A: Technical Specifications. Lists the technical (general, environmental and
physical) specifications of the Switch.
Appendix B: Twisted-Pair Cabling.
-2-
TL-SL2109
8+1G Gigabit Ethernet Smart Switch User Guide
Chapter 2: Introduction of the Product
This part simply describes the features of the model of TL-SL2109 Gigabit Smart Switch,
and some information in context about the technology of Switch.
2.1 Port-Trunking function
Basically, TRUNK permits to provide a wider bandwidth between the switches by two or
more than two ports (less than four ports generally) working side by side. It means that
the TRUNK solves many physical ports as one logical port. When there is no TRUNK,
the maximal bandwidth is decided by Auto-negotiation. The good of the TRUNK is that
you can use many lower speed devices as a higher speed device. Using the TRUNK,
you can only add the adapters in the server machine connected to the switch to solve the
traffic between the switch and the server. You also can use the switch to solve the traffic
between the switch and the server. You also can use the TRUNK between the switchs to
solve the traffic.
TL-SL2109’s TRUNK function supports one TRUNK, which is made up of the seventh
and the eighth port, the TRUNK port’s bandwidth can get to 400Mbps.
2.2 Virtual Local Area Network
The Virtual Local Area Network can be out of the constraints of the physical connections.
You can move the workstations among the workgroup and the subnet without changing
the physical connection. The work stations build up the logical workgroup or the virtual
subnet to improve the performance of the system. Poise the flux in the network and
utilize the source of the device reasonedly. In the same time, the VLAN decompresses
the management and maintenance of the network.
Virtual Group: The members of the groups’ communication with each other will be
greatly improved. And not required the router in the system.
Safety: Because only the legal user can forward the information, the safety of the
network will be improved.
Economize cost: You can use VLAN in the network without adding the router or
re-distributing the cable.
Port-based VLAN is the usual technology of the TL-SL2109. The TL-SL2109P supplies
nine Port-based VLAN.
2.3 Priority
The TL-SL2109 supplies the port-based priority. The Switch had two levels, low and high.
The switch forwards the frames based on the level of the priority. The frames with high
level priority can be solved firstly.
-3-
TL-SL2109
8+1G Gigabit Ethernet Smart Switch User Guide
2.4 Main features
Complies with IEEE 802.3、IEEE 802.3ab
8 10/100Mbps Auto-Negotiation RJ45 ports supporting Auto-MDI/MDIX
1 10/100/1000Mbps Auto-Negotiation RJ45 ports supporting Auto-MDI/MDIX
Supports IEEE802.3x flow control for Full Duplex mode and backpressure for
half-duplex mode
Supports port-based VLAN with 9 entries
Supports TRUNK
Supports Port Enable/Disable
Supports Static Port Priority with 2-level priority queuing
1 console port supporting configured software setting
Desktop or rack-mountable steel case
Internal power supply
-4-
TL-SL2109
8+1G Gigabit Ethernet Smart Switch User Guide
Chapter 3: Installation
3.1 Installation
Firstly, please place the switch following the steps:
The surface must support at least 5kg;
The power source must be within 1.5m;
Check the power cable carefully to make sure the connection to AC power;
Leave enough space for the ventilation.
3.1.1 Installation on the desktop
1.
2.
3.
Place the Switch on a desk which has enough space;
Take off the four pads’ adhesive tape and adhere to the four circle grooves on the
bottom of the switch respectively;
Turn off the switch again, place on the desktop.
3.1.2 Rack Installation
The TL-SL2109 can be mounting in an EIA Standard size 19 inches rack.
1.
Attach the mounting brackets to each side of the TL-SL2109 with the screwes;
2.
Slide the TL-SL2109 into the rack;
3.
Use the screwes to secure the switch to the rack..
Figure 3-1 Rivet the “L” brackets onto the Switch
-5-
TL-SL2109
8+1G Gigabit Ethernet Smart Switch User Guide
Figure 3-2 Fasten the Switch in the rack
3.1.3 Hang on the wall
The TL-SL2109 can be hung on the wall.
1. Drill two holes with a 6mm diameter on the wall, the distance between the holes is
160mm.
2. Press the plastic tube in the hole entirely, then put screws in the plastic tubes, screw
them with a few body stuck out the wall;
3. Place the switch to the two screws by the holes in the switch.
3.1.4 Power on
The TL-SL2109 can be used with the power source in the range of 110 to 260 VAC,
50-60Hz. After the power is on, the power LED will be light.
Caution: As a precaution in the event of a power failure, unplug the switch, when the
power resumed, plug the switch back in.
3.1.5 Initialization
Turn on the power, the switch will automatically initialize and the LEDs, will be light as
follows:
1. As the time you turn on the power, the LEDs will turn on for a second, which indicates
system resetting.
2. The power LED is always light.
-6-
TL-SL2109
8+1G Gigabit Ethernet Smart Switch User Guide
3.2 Explanation of switch appearance and the method of
connecting switch
The part gives you more details about front panel, rear panel, LEDs and extension port of
the switch.
3.2.1 Front Panel
There are 8 10/100Mbps ports and LED indicators, 1 10/100/1000Mbps port and LED
indicator, 1 serial port on the front panel of the TL-SL2109.
1
Link
Act
10M
1
2
3
4
5
6
7
8
100Mbps
2
3
4
5
6
7
8
GIGA
Console
Power
100M
1000M
Act
GIGA
Fig 3.2 Front Panel of the TL-SL2109
3.2.2 Rear Panel
There is a power connector on the rear panel. The power supply is 100V-240V, 50-60Hz.
Fig 3.3 Rear Panel
3.2.3 LED indicators
10/100Mbps ports’ LED includes Link/Act and 100Mbps speed, gigabit port includes 10M
speed, 100M speed, 1000M speed and Act. There also is a power LED. By these LEDs,
you can monitor the working state of the switch easily. More details as follows:
Power LED: The power LED will be always red when power on, or else check the
power connection.
Link/Act: The LED is green when there is a secure connection to a device at any of
the 10/100M ports. It will be lit when transferring or receiving packages.
10M LED: The LED is green when the gigabit port connects to a 10Mbps device, or
else it will turn off.
100M LED: The LED is green when the gigabit port connects to a 100Mbps device,
or else it will turn off.
1000M LED: The LED is green when the gigabit port connects to a 1000Mbps
device, or else it will turn off.
-7-
TL-SL2109
8+1G Gigabit Ethernet Smart Switch User Guide
Act LED: The LED is lit when the gigabit port are transferring or receiving the
packages.
3.3 Connection
The TL-SL2109 supports MDI/MDIX, so you can use every port as a normal port or an
uplink port. Each port is independent, which makes the connection very easy.
1
Link
10M
Act
1
2
3
4
5
6
7
8
2
3
4
5
6
7
Power
100M
100Mbps
1000M
Act
GIGA
Figure 3-1 TL-SL2109 Switch Front Panel sketch
Figure 3-2 TL-SL2109 Switch Rear Panel sketch
Link
Act
100Mbps
10M
1
2
3
4
5
6
7
8
Power
100M
1000M
Act
GIGA
Figure 3-3 TL-SL2109 Switch LEDs sketch
-8-
8
GIGA
Console
TL-SL2109
8+1G Gigabit Ethernet Smart Switch User Guide
Chapter 4: Installation and Usage of the Software
The TL-SL2109 is a smart switch. You can configure it with the management software
provided by us. It makes you every convenient to manage the switch. The part helps you
to use it.
4.1 The steps of the installation of GSSC (Gigabit Smart
Switch Configuration)
The software is running in windows (95/98/2000/NT). You can use it by a serial cable
connected to the PC. So before your configuration, you should have a computer with the
certain operating system and a serial port. The installation steps are as follows:
1.
Connect the serial cable between the PC and the Switch;
2.
Run the PC and the Switch;
3.
Run the setup.exe in the software package, and click Next to finish the installation,
The default path is “C:\Program Files\TP-LINK\Giga Smart Switch Configuration
1.0”. If you want to change the path, click the “Browse” button.
Fig 4.1 The installation path changing
4.
Input your new path, such as “D:\Switch\TP-LINK\GSSC”, then click “OK”.
-9-
TL-SL2109
8+1G Gigabit Ethernet Smart Switch User Guide
Fig 4.2 Inputting new path
5.
After Click Next, the installation is finished.
Fig 4.3 Finish changing new path
4.2 The Usage of GSSC
The interface of the software is friendly and easy to use. There are four steps on
configuration the switch generally:
- 10 -
TL-SL2109
8+1G Gigabit Ethernet Smart Switch User Guide
1.
Connect;
2.
Open the existed configuration file or configure the switch directly;
3.
Write in the result;
4.
Exit.
Here are more details about how to use the GSSC software.
1.
After finishing the installation, click Start – Programs – TP-LINK – Giga Smart
Switch Configuration, the window interface will be displayed on the desktop.
Fig 4.4 Initialized software interface
2.
Turn on the switch, and select the File—Link to switch menu or click the Link to
Switch button.
- 11 -
TL-SL2109
8+1G Gigabit Ethernet Smart Switch User Guide
Fig 4.5 Pick up from the menu
3.
Fig 4.6 Pick up from the button
If the power supply is off or the serial cable is connected incorrectly, or something
else, the program will display.
- 12 -
TL-SL2109
8+1G Gigabit Ethernet Smart Switch User Guide
Fig 4.7 Connected at fault
4.
After connecting successfully, the GSSC will read the configuration from the switch,
and display the interface as Fig 4.8.
Caution: At this time the Off Line button is light. On the right of the button, there
are eight buttons, Port Setting, TRUNK Setting, Port Close Setting, VLAN Setting,
Priority Setting, Static MAC Address Setting, in turns.
5.
Fig 4.8 Connected successfully
Operate the configuration. When the PC connects to the switch successfully. You
can configure the switch in terms of your requirement. You must click the write to
switch button lastly, the switch will reset automatically after success in
- 13 -
TL-SL2109
8+1G Gigabit Ethernet Smart Switch User Guide
configuration.
Click the setting menu, the software will display all functional buttons you can
operate. The corresponding button will be light at the same time.
Fig 4.9 All the functional menu
4.3 Port Configuration
1.
Select the Port Status Setting or click the Port Setting button.
- 14 -
TL-SL2109
2.
8+1G Gigabit Ethernet Smart Switch User Guide
Fig 4.10 Configuring the Port Status
Every port of the Switch can be configured by the software, as fig 4.11, but you can
not operate the dark button.
Fig 4.11 Configuring the Port Status
There are a few descriptions as follows:
Speed/Duplex: You can select Auto Negotiation or Force Mode, 100Mbps Full Duplex,
100Mbps Half Duplex, 10Mbps Full Duplex, 10Mbps Half Duplex. If you select the Half
Duplex, the port can transfer or receive the packages. But the port can transfer and
receive the packages at the same time of you select the Full Duplex.
If the Auto Negotiation is enabled, the port can select the favoured speed and duplex by
terms of the port connected up far end.
Default Setting: Auto Negotiation
Priority: The priority, is an advanced feature of the switch, makes the important
information transferred firstly come to true. The port-based priority is that you can
configure the priority by terms of the port you selected. The tag-based priority is that the
switch extracts the VLAN tag or the ToS tag from the packages, then make sure the
packages’ priority. The switch can only use the port-based priority. It divides two levels —
Low and High.
Default Setting: Port Number (Low)
- 15 -
TL-SL2109
8+1G Gigabit Ethernet Smart Switch User Guide
4.4 PortClose Setting
The PortClose Setting can close the port(s). It (They) can not transfer or receive the
packages. The port (1-8) and the gigabit port configure in the different place in the
software.
Default Setting: Open
1.
There are two ways to configure the port (1-8)
Method one:
1)
Select the PortClose Setting menu or click the PortClose Setting button.
2)
Fig 4.12 Select Port (1-8) Close Setting
Click the port(s) you want to change.
- 16 -
TL-SL2109
8+1G Gigabit Ethernet Smart Switch User Guide
Fig 4.13 Port (1-8) Close Setting
Method two:
Select the corresponding port in the Port Setting, and click the Port Disable.
2.
1)
Fig 4.14 Port(s) (1-8) Close Setting 2
If you want to close the gigabit port, operate as follows:
Click the Giga Port Setting button.
- 17 -
TL-SL2109
2)
8+1G Gigabit Ethernet Smart Switch User Guide
Fig 4.15 Select Giga Port Setting
Then click the Disable Giga Port 9.
Fig 4.16 Giga Port configuration
4.5 TRUNK Setting
TRUNK can combine some ports to a logical port, and transmit data through it. It is very
- 18 -
TL-SL2109
8+1G Gigabit Ethernet Smart Switch User Guide
useful to resolve the network traffic. The Switch looks a TRUNK as a big port regardless
of its composition.
Default Setting: NO
1.
Select the TRUNK menu or click the TRUNK Setting button.
2.
Fig 4.17 Select the Port TRUNK
Then click the port(s) that can be selected.
Caution: When TRUNK is enabled, the switch will change all the ports in the
TRUNK to 100M Full Duplex.
- 19 -
TL-SL2109
8+1G Gigabit Ethernet Smart Switch User Guide
Fig 4.18 Port TRUNK Setting
4.6 VLAN
VLAN (Virtual Local Area Network) is a group domain composed of many terms. It can
build a logical group without changing the physical connection. It is very easy and useful.
Default Setting: All ports in VLAN 1.
1.
Select the VLAN Setting menu or click the VLAN Setting button.
2.
Fig 4.19 Select VLAN Setting
Then move the cursor to a VLAN group, click the port(s) you want to put in, such as
P2, P3, P4, P5.
- 20 -
TL-SL2109
8+1G Gigabit Ethernet Smart Switch User Guide
Fig 20 VLAN groups
Caution: VLANs can have the same port(s), and a VLAN can have only one port, the
port can not transmit data with the others.
3.
The Port(s) you selected is(are) in the same VLAN, you can delete or add the
port(s) from the VLAN, just click the port(s) once again.
Caution: When a workstation moves from a VLAN to another VLAN the administrator
should reassign the member of the VLAN. When the TRUNK is enabled, the switch
requires all the ports, for the TRUNK are in the same VLAN.
- 21 -
TL-SL2109
8+1G Gigabit Ethernet Smart Switch User Guide
Fig 4.21 VLAN group’s member changing
4.7 Priority over ToS and VLAN Tag
1.
2.
Select the Priority Setting or click the Priority over ToS and VLAN.
Fig 4.22 Select Priority Setting
The Priority is divided to three categories: Port-based priority, VLAN Tag based
priority and ToS tag based priority. The switch support port based priority only. It
divided into two levels: Low and High. The power of the transmitting between the
low and the high has four scales, 1:1, 1:2, 1:3 and 1:4.
- 22 -
TL-SL2109
8+1G Gigabit Ethernet Smart Switch User Guide
Fig 4.23 Priority Setting
4.8 The effect of the configuration
1.
Carry out the current configuration. When finishing the all configuration you want to
change. Click the Write to Switch button. The switch will reset to run the by terms
of the result.
2.
Fig 4.24 Write to Switch
Restore the factory default configuration. Select the Manufactory’s configuration
- 23 -
TL-SL2109
8+1G Gigabit Ethernet Smart Switch User Guide
menu, the default configuration will be stored to the switch, and the switch will
reset.
Fig 4.25 Restore default configuration
4.9 Save and Open the configuration
1.
Save the file means that the software saves your current configuration to a file.
2.
Fig 4.26 Save the configuration file
Open the file means that the software opens the configuration file which you built
- 24 -
TL-SL2109
8+1G Gigabit Ethernet Smart Switch User Guide
up in the previous step.
Fig 4.27 Open the configuration file
- 25 -
TL-SL2109
8+1G Gigabit Ethernet Smart Switch User Guide
Appendix A: Technical Specifications
General
Standards
IEEE802.3 10BASE-T
IEEE802.3u 100BASE-TX
IEEE802.3ab 1000BASE-T
IEEE 802.3x Flow Control
Topology
Star
Protocol
CSMA/CD
Data Transfer Rate
Ethernet: 10Mbps (Half Duplex), 20Mbps (Full Duplex);
Fast Ethernet: 100Mbps (Half Duplex), 200Mbps (Full Duplex)
Gigabit Ethernet: 1000Mbps (Half Duplex), 2000Mbps (Full
Duplex)
Network Media (Cable)
10BASE-T: UTP category 3, 4, 5 cable (maximum 100m)
EIA/TIA-568 100Ω STP (maximum 100m)
100BASE-TX: UTP category 5, 5e cable (maximum 100m)
EIA/TIA-568 100Ω STP (maximum 100m)
1000BASE-TX: UTP category 5, 5e cable (maximum 100m)
EIA/TIA-568 100Ω STP (maximum 100m)
Number of Ports
8 10/100Mbps Auto-Negotiation ports,
1 10/100/1000Mbps Auto-Negotiation port
LED indicators
Power, Link/Act, 100Mbps, 1000Mbps
Transfer Method
Store-and-Forward
MAC Address Learning
Automatically learning, automatically Update
Frame Filter Rate
10BASE-T: 14880pps/Port;
100BASE-TX: 148800pps/Port
Frame Forward Rate
10BASE-T: 14880pps/Port;
100BASE-TX: 148800pps/Port
Environmental and Physical
Dimensions(W×D×H)
11.6×6.2×1.7in. (294×158×44mm )
Operating Temperature
0℃~40℃ (32℉~104℉)
Storage Temperature
-40~70℃ (-40℉~158℉)
Operating Humidity
10%~90% non-condensing
Storage humidity
5%~95% non-condensing
- 26 -
TL-SL2109
8+1G Gigabit Ethernet Smart Switch User Guide
Appendix B: Contact Information
For help with the installation or operation of the TP-LINK TL-SL2109 Smart Switch, please
contact us.
E-mail: [email protected]
Website: http://www.tp-link.com
- 27 -