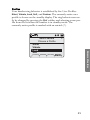
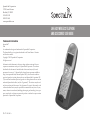
1
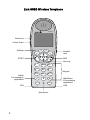
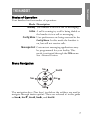
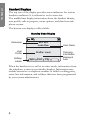
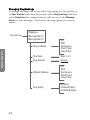
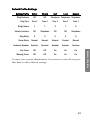
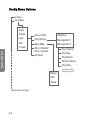
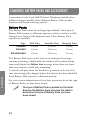
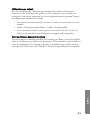
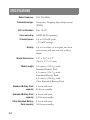
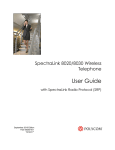
SpectraLink Corporation
5755 Central Avenue
Boulder, CO 80301
303 440 5330
800 676 5465
www.spectralink.com
LINK 6020 WIRELESS TELEPHONE
AND ACCESSORIES USER GUIDE
Trademark Information
SpectraLink®
Link
Are trademarks and registered trademarks of SpectraLink Corporation.
The SpectraLink logo is a registered trademark in the United States of America
and in other countries.
Copyright © 2007 SpectraLink Corporation.
All rights reserved
Information in this document is subject to change without notice and does not
represent a commitment on the part of SpectraLink Corporation. The software
described in this document is furnished under a license and may only be used
pursuant to the terms of (1) SpectraLink’s software license agreement available at
http://www.spectralink.com/softwareUpdates OR (2) the terms and conditions
previously agreed to in writing between the user and SpectraLink Corporation OR
(3) the terms and conditions previously agreed to in writing between the user and an
authorized SpectraLink reseller (each, the “Agreement”). The software may be used
only in accordance with the terms of the Agreement. No part of this manual, or the
software described herein, may be reproduced or transmitted in any form or by any
means, electronic or mechanical, including photocopying and recording, for any purpose except for the sole intent to operate the product or without the express written
permission of SpectraLink Corporation.
PN: 72-1205-00-A
Link 6020 Wireless Telephone
Link 6020
Volume Up
Volume Down
Softkeys
Headset
Jack
START
END
Nav keys
Left/Up
For messaging
applications
1
2ABC
3DEF
4GHI
5JKL
6MNO
7PQRS
8TUV
9WXYZ
<*
0
#>
FCN
Keypad
LINE
FCN
LINE
Microphone
2
Right/Down
For messaging
applications
INTRODUCTION
Your Link 6020 Wireless Telephone is a state–of-the-art communication device that utilizes radio wave technology to send and
receive voice transmissions. It is designed to operate like a cell
phone. However, the handset utilizes the private telephone system
installed in your facility and will not operate outside the area covered by this system.
About This Guide
This guide is meant to provide general information about your
handset. Contact your phone system administrator for additional
information on how your handset functions within your telephone
system. This guide includes information about:
•
•
•
•
•
•
The Handset
Getting Started
Advanced Features
Handset Accessories
Handset Administration
Safety Information
3
Notice
SpectraLink Corporation has prepared this document for use by SpectraLink personnel
and clients. The drawings and specifications contained herein are the property of
SpectraLink and shall be neither reproduced in whole or in part without the prior written
approval of SpectraLink, nor be implied to grant any license to make, use, or sell equipment manufactured in accordance herewith.
SpectraLink reserves the right to make changes in specifications and other information
contained in this document without prior notice, and the reader should in all cases consult
SpectraLink to determine whether any such changes have been made.
The terms and conditions governing the sale of SpectraLink hardware products and the
licensing of SpectraLink software consist solely of those set forth in the written contracts
between SpectraLink and its customers. No representation or other affirmation of fact
contained in this document including but not limited to statements regarding capacity,
response-time performance, suitability for use, or performance of products described
herein shall be deemed to be a warranty by SpectraLink for any purpose, or give rise to any
liability of SpectraLink whatsoever.
In no event shall SpectraLink be liable for any incidental, indirect, special, or consequential
damages whatsoever (including but not limited to lost profits) arising out of or related to
this document, or the information contained in it, even if SpectraLink has been advised,
knew, or should have known of the possibility of such damages.
For regulatory information, please see Link Wireless Telephone Regulatory Guide (72-1401-00).
Model Numbers
Handset model: 602X
Charger models: PCS1850, PCD1850, PCQ1850
Battery Pack models: PBP0850, PBP1300, PBP1850
4
TABLE OF CONTENTS
INTRODUCTION ....................................................................3
About This Guide .................................................................... 3
THE HANDSET .......................................................................7
Modes of Operation ............................................................... 7
Menu Navigation ................................................................... 7
Handset Displays ................................................................... 8
Shortcut Keys .......................................................................... 9
Status Bar Indicators ..........................................................10
Softkey Labels ......................................................................12
GETTING STARTED ..............................................................14
Basic Handset Operation Summary ................................14
ADVANCED FEATURES ........................................................18
Facility-Specific Features ....................................................18
Message Alert Feature ........................................................18
Data Entry and Editing ........................................................19
The Config Menu ..................................................................20
Toggle Options ..................................................................20
Profiles ...............................................................................21
Changing Ring Settings ...................................................22
Default Profile Settings ...................................................23
Config Menu Options ...........................................................24
CHARGERS, BATTERY PACKS AND ACCESSORIES ...............26
Battery Packs .......................................................................26
Charger Models ....................................................................27
Charging Status ................................................................28
Single Charger ......................................................................29
Dual Charger .........................................................................30
5
Quad Charger ....................................................................... 31
Carrying Options .................................................................. 32
Headsets ............................................................................... 32
HANDSET ADMINISTRATION ............................................... 33
FAQs ....................................................................................... 33
SAFETY INFORMATION ....................................................... 36
Chargers and Battery Packs .............................................. 36
Wireless Telephones .......................................................... 37
Operational Warnings ..................................................... 37
Electromagnetic Interference and Compatibility ....... 38
Use While Driving ............................................................. 39
INFORMATIONS CONCERNANT LA SÉCURITÉ .................. 40
Chargeurs et batteries ........................................................ 40
Téléphones sans fil ............................................................. 41
Avertissements concernant le fonctionnement .......... 41
Interférences électromagnétiques et compatibilité ... 42
Utilisation au volant ......................................................... 43
SPECIFICATIONS ............................................................... 46
CARE OF YOUR HANDSET ................................................... 47
6
The Handset
THE HANDSET
Modes of Operation
Your handset has four modes of operation:
Mode Description
Standby The handset is not in a call or messaging.
Active A call is coming in, a call is being dialed or
the handset is in a call or messaging.
Config Menu User preferences are being accessed in the
Config Menu. In this mode the handset is
on, but will not receive calls.
Message Alert Custom text messaging applications may
be programmed for your facility. This
mode is activated through the FCN menu.
See Advanced Features.
Menu Navigation
Nav
NavOK
Nav
Nav
Nav
The navigation keys (Nav keys) just below the softkeys are used to
navigate through menu options. These are referred to in this guide
as NavS, NavT, NavW, NavX, and NavOK.
7
The Handset
Handset Displays
The top row of the display provides status indicators for various
handset conditions. It is referred to as the status bar.
The middle lines display information about the handset identity,
user profile, calls in progress, menu options, and data from telephone system.
The bottom row displays softkey labels.
Standby Mode Display
Extension
Ext. 555
John Doe
User
Profile
Softkey
Labels
Profile: Loud
Spkr
Prof
Cfg
User Name
Charging
information
displayed
here
When the handset is in a call or in active mode, information from
the telephone system in your facility displays. Information may
include extension or telephone number of called or calling party,
active line information, and softkeys that have been programmed
by your system administrator.
8
When a menu is displayed, a shortcut key may be displayed on the
right edge of the menu line. Press the corresponding number on
the keypad to activate the corresponding menu option.
Menu Line
Info Line
Config Menu
Ring/Tone Settings
Lock Keys
User Profiles
Phone Settings
Admin Settings
Prof
Pl
2
Shortcut
Key
Exit
9
The Handset
Shortcut Keys
The Handset
Status Bar Indicators
Indicator
Function
The signal-strength icon indicates the
strength of the signal and can assist the
user in determining if the handset is
moving out of range.
If voicemail is available the voicemail
icon will appear when a new voicemail
message is received.
The battery icon indicates the amount of
charge remaining in the Battery Pack.
When only one level remains, the Battery
Pack needs to be charged.
The speakerphone icon displays when
the speakerphone is active.
The line indicators are associated with
telephone line status and access.
1
Up and down arrows are displayed when
a menu has additional options above or
below.
Left or right arrows are displayed during
editing when the cursor may be moved
left or right.
Muted
The muted indicator displays after the
Mute softkey has been pressed during a
call. It indicates that the microphone is
not transmitting sound. Press the Mute
softkey again to unmute the microphone.
10
Locked
Function
Locked indicates that the keypad is
locked to prevent accidental activation.
Press the Unlk softkey and then the # key
to unlock it.
The download icon indicates that the
handset is downloading code. This icon
only appears while the handset is running
the over-the-air downloader. It appears to
the right of the signal strength icon in the
same location as the voicemail icon.
11
The Handset
Indicator
The Handset
Softkey Labels
The bottom row of the handset displays labels associated with the
four softkeys just below it. When a softkey is active, a label appears
to describe its function. Pressing the softkey will activate the feature.
Label
Description
Action
Back
Go back
Returns to the previous menu
display.
CAPS
caps
Change case
Toggles to allow a change in case
when entering alphabetical text.
Cfg
Configure
Opens the Config Menu.
Clr
Clear
Deletes the entry.
Cncl Cancel
Del
Delete
Deletes the character to the left of
the cursor.
Exit
Exit
Exits out of the menus.
Hold
Hold
Places a call on hold.
Mute
Mute
Toggles to mute or unmute the
microphone.
Negative reply
Press to reply “No” to a displayed
question.
Play
Play
Plays the selected ring tone.
Prof
Profile
Opens the Profile menu.
No
12
Returns to the previous menu
display without saving any data
that might have been entered.
Description
The Handset
Label
Action
Spkr Speakerphone
Toggles speakerphone function.
Unlk
Unlock keys
Press Unlk, then the # key to
unlock a locked keypad.
Yes
Positive reply
Press to reply “Yes” to a displayed
question.
13
Getting Started
GETTING STARTED
Your Link 6020 Wireless Telephone is designed for full mobility
within the workplace and operates much like a cell phone. It also
interfaces with the telephone system at your workplace and incorporates advanced telephony features. This section covers the basic
functions available in every facility. For specific telephony system
functions, see the Facility-Specific Features section or contact your system administrator.
Place the handset into the charger for a minimum
of two hours. The handset's Battery Pack must be
fully charged before its first use. See the Charger
Models section for full information.
Basic Handset Operation Summary
If you want to
Remove the
Battery Pack
Replace the
Battery Pack
Turn handset on
Then
Press down on the latch on the Battery
Pack at the back of the handset and pull
the Battery Pack towards you. The
Battery Pack releases outward.
Slide the lip of the Battery Pack into the
bottom of the cavity. Push the top of the
Battery Pack until it snaps into place. You
should not have to force it into the
handset.
Press and hold the END key until two
chirps sound.
Turn handset off Press and hold the END key. One chirp
will sound. If you are in a call, hang up
first, then turn off the handset.
14
If you want to
Unlock the keypad
Lock the keypad
Press the Cfg softkey, then NavOK. See
Phone Settings in the Config Menu for
Keypad Autolock settings.
Press the START key, wait for a dial tone,
then dial the extension.
Make an external call Press the START key, wait for a dial tone,
then dial the number just as you would
from your desk phone.
Select a line
Dial a number
If multiple lines are available, your
telephone system may require you to
select a line before dialing a number.
Press LINE and the number key
corresponding to the desired line. You
will hear a dial tone.
Once you hear a dial tone, press the
number keys to dial the number.
Answer a call The handset will ring or vibrate to alert
you of an incoming call. Additionally, a
line indicator on the display may flash
and the display may show information
about the call, such as the caller’s name
and extension.
To answer a call, press the START key and
hold the earpiece to your ear. You may
also activate the speakerphone by
pressing the Spkr softkey or use a headset.
15
Getting Started
Make an internal call
Then
Press the Unlk softkey, then #, to unlock
the keypad.
Getting Started
If you want to
Answer a call on a
second line
Then
If you are on a call and hear subdued
ringing, a call is coming in on a second
line. The line number on the display may
be flashing. To answer this call, put your
first call on hold and press the LINE key,
then the line number of the second call.
Answer with headset
Press any key (other than END) to answer
a call when a headset is plugged in.
Silence while ringing
Press the END key to silence the ring.
Change the
ring volume
Press the up/down volume buttons on
the side of the handset during ringing.
The default ring volumes are set in the
User Profile menus.
Adjust the
speaker volume
Press the up/down volume buttons on
the side of the handset during the call.
Adjust the
headset volume
Press the up/down volume buttons on
the side of the handset during the call.
Place a call on hold Press the Hold softkey.
Resume a held call
Mute the microphone
Press the LINE key followed by the line
number key.
Press the Mute softkey.
End the call Press the END key. Be sure to do this at
the end of each call to return to the
standby mode.
16
If you want to
Change the profile
Then
Press the Prof softkey and use the Nav
keys to select a new profile while in
standby mode. The selected profile is
marked with an asterisk (*).
During a call press the FCN key to display
the options programmed to additional
features available in your facility. These
might include transfer, conference,
voicemail, etc.
Turn on the backlight
The backlight comes on when any key is
pressed or when there is an incoming call
and stays on for 10 seconds. It turns off
after 10 seconds if another key is not
pressed within that period.
Use message alerts
If programmed in your facility, message
alerts may be activated by pressing the
FCN key and then a menu option assigned
by the system administrator.
The greater-than asterisk (< *) key is used
for left and up navigation and the lesserthan pound (# >) key is used for right and
down navigation. Contact your system
administrator for detailed information
about message alert mode.
17
Getting Started
Display additional
features
ADVANCED FEATURES
Facility-Specific Features
Press the FCN key while off-hook or in a call to display the the
menu options programmed for advanced telephony features such
as transfer, conference, and voicemail.
Contact your system administrator for more information about
custom features available in your facility. The Quick Reference
Guide has a form for you to record facility-specific key press
sequences for advanced features.
Advanced Features
Message Alert Feature
Custom applications may allow you to read and respond to text
messages. The Message Alert application may be available through
the FCN menu if programmed in your facility. While off-hook, press
FCN to view the menu, then press one or more number keys to
open the application. The handset is now in Message Alert mode.
The Nav keys are not enabled by text messaging applications.
Instead, use <* to move left or up and #> to move right or down.
You may change Message Alert ring settings through the Config
Menu. See the diagram on page 22 and the Changing Ring Settings
section.
The Quick Reference Guide has a form for you to record facilityspecific Message Alert 1 and Message Alert 2 information.
18
Data Entry and Editing
Enter numbers by pressing the buttons on the keypad. The blinking underscore identifies the current cursor position. When entering alphanumeric strings, the CAPS/caps softkey will appear and
may be pressed to toggle the case. Enter letters by repeatedly pressing the corresponding key until the desired letter displays on the
screen. Use the CAPS softkey to change the case as needed.
To edit during entry, delete the character to the left of the cursor by
pressing the Del softkey. To replace an entry, delete it by pressing
the Clr softkey and then enter the new data. To edit an existing
entry, use NavW and NavX to move the cursor position, and then
press the Del softkey to delete the character to the left. Insert new
data by pressing the buttons on the keypad.
Alphanumeric entries:
caps
1
CAPS
1
2
2abc
2ABC
3
3def
3DEF
4
4ghi
4GHI
5
5jkl
5JKL
6
6mno
6MNO
7
7pqrs
7PQRS
8
8tuv
8TUV
9
9wxyz
9WXYZ
0
0
0
*
*.-!$%&’()+, : ;/\=@~
#
# <space>
Advanced Features
Key
1
19
The Config Menu
When the handset is in standby mode, press the Cfg softkey to
enter the Config Menu. The handset cannot make or receive calls
while in the Config Menu. This menu allows you to set user preferences. Refer to the diagrams on pages 24-25.
Menu line
Info line
Config Menu
General Settings
Advanced Features
Lock Keys
User Profiles
Phone Settings
Admin Settings
Prof
Pl
3
Shortcut
key
Exit
Scroll through menu options by using NavS and NavT. When an
asterisk (*) appears to the left of an option, it indicates that the
option is currently selected. Press the Exit softkey to return to
standby mode. Use the Back softkey to return to the previous menu.
Toggle Options
Some menu options that have only two possibilities operate on a
toggle basis. The current setting is shown on the second row of the
display, called the info line. Highlight the option and press NavOK
to toggle between the settings. For example, when Ring in Headset
is the menu option, Currently Speaker will show on the info line. If
you select Ring in Headset, Currently Headset will show on the info
line and the menu option will become Ring In Speaker.
20
Profiles
Your handset ring behavior is established by five User Profiles:
Silent, Vibrate, Loud, Soft, and Custom. The currently-active user
profile is shown on the standby display. The ring behavior can easily be changed by pressing the Prof softkey and selecting a new profile from the list when the handset is in standby mode. The
currently-active profile is marked with an asterisk (*).
User Profiles
Choose a Profile
P
Advanced Features
Silent
Vibrate
* Loud
Soft
Prof
3
Back
21
Changing Ring Settings
To change the ring tone or any other ring setting for any profile, go
to User Profiles and select the profile. Select Ring Settings and then
select Telephone for standard phone calls or one of the Message
Alerts for text messages. Then select the ring option you want to
adjust.
Advanced Features
Ring Settings
22
Telephone
Message Alert 1
Message Alert 2
Ring Cadence
Off
PBX
Continuous
Short Pulse
Long Pulse
Ring Tone
Tones 1-10
Ring Volume
Volume
Vibrate Cadence
Off
PBX
Continuous
Short Pulse
Long Pulse
Ring Delay
No Delay
5 Second Delay
10 Second Delay
Default Profile Settings
Setting/Profile
Silent
Vibrate
Ring Cadence
Off
Off
Ring Tone
Soft
Loud
Custom
Telephone Telephone Telephone
Tone 1
Tone 1
Tone 1
Tone 1
Tone 1
Ring Volume
1
1
3
7
5
Vibrate Cadence
Off
Telephone
Off
Off
Telephone
Ring Delay
0
0
0
0
5
Noise Mode
Normal
Normal
Normal
Normal
Normal
Headset/Speaker Speaker
Speaker
Speaker
Speaker
Speaker
Off
Off
On
On
On
Warning Tones
Off
Off
On
On
On
Contact your system administrator if you want to reset all user profiles back to these default settings.
23
Advanced Features
Key Tones
Config Menu Options
Lock Keys
User Profiles
Silent
Advanced Features
Vibrate
Loud
Soft
Custom
Set as Active
Ring Settings
Noise Mode
Ring in Headset
Ring in Speaker
Key Tones
Telephone
Message Alert 1
Message Alert 2
Ring Cadence
Ring Tone
Ring Volume
Vibrate Cadence
Ring Delay
Normal
High
Severe
continued on next page
24
See Changing Ring
Settings on page 22
continued from previous page
Phone Settings
Disable
5 Seconds
10 Seconds
20 Seconds
Language
English
French
Spanish
Set Extension
Enter Number
Set User Name
Enter Name
Display Contrast
Use Hearing Aid
Use No Hearing Aid
Startup Song
Play/Inhibit
Set Contrast
Enable Password
Enter New
Password
Disable Password
Verify
Change Password
Enter New
Password
Restore Defaults
Verify
Speakerphone
Enable/Disable
25
Advanced Features
Admin Settings
Keypad Autolock
CHARGERS, BATTERY PACKS AND ACCESSORIES
Accessories for the Link 6020 Wireless Telephone include three
different charger models, three different Battery Pack models,
headsets and several carrying options.
Battery Packs
The Battery Packs must be recharged periodically. Each type of
Battery Pack requires a different amount of time to achieve a fully
charged state from a fully depleted state. Three Battery Pack
options are available
Type
Standard
Extended
Ultra-Extended
Talk Time
4 hours
Standby Time
80 hours
Charging Time
2 hours
6 hours
120 hours
3 hours
8 hours
160 hours
4 hours
Accessories
The Battery Pack icon on the status row indicates the charge
amount remaining. Additionally the handset will sound warning
tones and display the Battery Low message when there are fewer
than two minutes of talk time remaining.
A melody will play when the handset is powered on for the first
time after being fully charged, unless this feature has been disabled.
Each Battery Pack type has a different melody.
See your system administrator if you have questions about the type
of Battery Pack you have been issued.
26
The type of Battery Pack is printed on the label.
Remove the Battery Pack and view the label to
determine the type of Battery Pack you have
been issued.
The Battery Pack can be changed while the call is still in progress.
Do not press END. Quickly remove the discharged Battery Pack and
replace with a charged Battery Pack, press END to turn the handset
back on and then press START to resume the call.
Charger Models
Three charger models are available for the Link 6020 Wireless Telephone. The Single Charger will charge a single handset with an
installed Battery Pack. The Dual Charger will charge the handset
and a spare Battery Pack. The Quad Charger can charge up to four
Battery Packs at a time.
The Single and Dual Chargers allow the handset to remain operative in speakerphone mode or with a headset while charging. Handsets may be charged while in standby mode, while in an active call
or while turned off.
Place the Single or Dual Charger on a flat, horizontal surface. Plug
the power supply into the charger and into an appropriate wall outlet. The Quad Charger may be mounted on a horizontal or vertical
surface.
Accessories
27
Charging Status
The handset display and the LED on the Dual and Quad Chargers
indicate whether or not charging is occurring or completed or if a
Battery Pack failure has been detected.*
Handset/LED
Charging…
LED Solid On
Charge Complete
Note that in the Dual Charger, the
handset’s Battery Pack takes charging
precedence, and when it is finished
charging, the single Battery Pack in the
rear slot will charge.
The Battery Pack in the handset has
finished charging.
LED Off
Battery Pack fully charged, empty slot, or
unit is not powered.
Battery Failure
Error. Battery Pack not able to be
charged. Reinsert Battery Pack or replace
Battery Pack.
LED Flash
Accessories
Charging Status
The Battery Pack in the handset is
charging.
* Note: the Single Charger does not have an LED indicator.
28
Single Charger
1
4 GHI
7 PQRS
<*
FCN
2 ABC
5 JKL
8 TUV
0
3 DEF
6 MNO
9 WXYZ
#>
LINE
The Single Charger is designed to allow the handset to remain
operational through speakerphone or headset use while the handset's Battery Pack is being charged. The handset may also be
charged while it is in standby mode or turned off.
When the handset is fully charged, Charge Complete will display.
No charging information will display during an active call.
29
Accessories
Place the handset in the Single Charger facing forward. While the
handset is charging in standby mode, it will display its extension
number and Charging…. An animated charge icon will indicate that
charging is in progress. The handset is fully operational and will ring
if called. When the handset is charging while turned off, only
Charging… will display and no calls will be received. The dots will
be racing during the charging cycle.
Dual Charger
1
4 GHI
7 PQRS
<*
FCN
2 ABC
5 JKL
8 TUV
0
3 DEF
6 MNO
9 WXYZ
#>
LINE
LED indicator
The Dual Charger is designed to charge the Battery Pack in the
handset while it remains operational and also charge an additional
Battery Pack in the rear charging bay. The handset has charging priority when both slots are occupied.
Accessories
Place the handset in the front slot, facing forward. The Battery
Pack alone snaps into the charging bay as shown in the illustration.
The LED indicates the status of the Battery Pack in the rear bay.
The handset displays its charging status as described for the Single
Charger.
When the handset is fully charged or is removed, the Battery Pack
will begin charging.
Note that the time it takes for the Battery Pack to charge will be
lengthened if its charging cycle is interrupted for a handset to charge.
30
Quad Charger
The Quad Charger is designed to simultaneously charge four Battery Packs. It may be mounted on a horizontal or vertical surface.
The Battery Pack snaps into the charging slot. The LED above the
occupied bay indicates the charging status of the Battery Pack in
the bay.
31
Accessories
A flashing LED may indicate a Battery Pack failure. Verify the condition of the Battery Pack by the
following procedure before replacing it. First
check the Battery Pack in a different bay or substitute another charger and repeat the operation
that caused the failure. If the same Battery Pack
lights a steady LED when inserted in a different
bay or charger, the first charger may be faulty.
Contact your system administrator for service
information.
Carrying Options
The following options are available for handset protection and easy
handset carrying and removal.
Belt clip: Spring-loaded plastic belt clip that attaches to the back of
the handset.
Swivel belt clip: Swivel-style belt clip that attaches to the back of
the handset with full 360 degree swivel or eight-position ratchet
options.
Swivel carrying case: Black leather case with keypad cover and
swivel-style quick release belt clip.
Holster: Black holster with belt clip.
Cord lanyard: Nylon cord lanyard with quick disconnect.
Coiled lanyard: Plastic coiled lanyard with clothing clip.
Headsets
SpectraLink offers optional headsets for use in noisy environments
or if you need to have your hands free while talking on the handset.
To use the headset, simply plug it into the jack on the right side of
the handset.
Accessories
While using a headset, the handset will ring according to the user
profile setting established in the Headset/Speaker Ring option. The
external ring will ring according to the setting of the profile.
The headsets offered by SpectraLink have been laboratory tested
and work properly with the wireless telephone. SpectraLink does
not recommend using other headsets.
32
HANDSET ADMINISTRATION
FAQs
How does the handset power off and power on?
The END key is the power on/power off key. Press and hold it to
turn the handset on. Turn the handset off from the standby mode
by pressing and holding the END key. If you are in an active call, end
the call by pressing the END key. This returns the handset to the
standby mode, then press END again to turn the handset off.
How do I place a call and terminate a call?
To place a call, press the START key and then dial the number. End
the call by pressing the END key. You can also use the speakerphone
instead of the START key.
Can I change the ring?
The ring is fully adjustable and may be set differently for different
profiles. For a complete explanation of how to change the ring, see
the Profile Settings section of this guide.
How do I change the voice volume and the ringing volume?
Whether using a headset, the speakerphone, or the internal
speaker, the speaker volume for the current call may be raised or
lowered by pressing the up and down volume buttons on the side
of the handset.
The volume buttons may be pressed while the handset is ringing to
raise or lower the ring volume, which also changes the ring volume
setting in the current profile.
33
Administration
What is the range of the wireless telephone?
As barriers affect radio transmission, there is no single answer for
this question. Normally, you can expect the same range as with any
other wireless device. However, if your facility has metal walls or
other materials that inhibit radio waves, the range will be reduced.
How do I charge the Battery Pack?
The Battery Pack in the handset may be charged in a Single or Dual
Charger without being removed from the handset by simply placing the handset into the charger. A spare Battery Pack may be
charged in the rear bay of the Dual Charger or in a Quad Charger.
How long does the Battery Pack hold a charge?
There are three different Battery Pack models and each has a different charge capacity. The type of Battery Pack is printed on the
label. Remove the Battery Pack and view the label to determine the
type of Battery Pack you have been issued.
Talk Time
Standby Time
Charging Time
Standard
Type
4 hours
80 hours
2 hours
Extended
6 hours
120 hours
3 hours
Ultra-Extended
8 hours
160 hours
4 hours
Administration
What features (transfer, mute, etc.) are available and how
are they activated?
Active call features such as Mute and Hold are available by pressing
the softkey programmed to the feature. Additional features, such as
Transfer and Conference, are locally programmed and usually activated by pressing the FCN key and then the softkey that corresponds to the programmed feature. Contact your phone system
administrator for detailed information on how to access these features in your facility.
Can I use the wireless telephone at home?
Access points installed in your facility transmit the radio waves emitted by your wireless telephone to the telephone system in your facility which links the handsets to each other and to the rest of the
world. The handset operates only within range of these access points
and therefore will not work in your home.
34
How should I clean the handset?
Wiping the handset surface with a water-dampened cloth or paper
towel will remove most films or residues. If the soiling is too stubborn for plain water, a mild detergent solution may be used. A spray
cleaner may be used with care. Do not spray at an angle. Do not allow
liquid cleaners to seep into keypad. Be sure to wipe away any detergent residue with a clean water-dampened cloth. Do not immerse in
any fluid.
Administration
35
SAFETY INFORMATION
Chargers and Battery Packs
It is normal for the Battery Pack to become warm when charging.
Chargers operate in a 50° to 85° F (10° to 30° C) environment. Do not
expose them to freezing temperatures or direct sunlight.
Do not place anything in the charger other than the handset or single Battery
Pack as appropriate, to avoid bending the contacts. Bent contacts can keep
the Battery Pack from charging.
Only use SpectraLink Battery Packs with SpectraLink chargers.
Never use a non-SpectraLink charging unit as it could damage the Battery
Pack.
Only use the original plug-in power adapter for the chargers.
Contact your service representative for assistance if you have a faulty Battery
Pack or a problem with your charger.
!
Safety
!
36
Do not immerse the Battery Pack in water or throw into
fire.
Do not throw away the Battery Pack with your domestic
waste. Take used Battery Packs to an appropriate collection point for recycling or send them back to your supplier
or servicing agent.
All batteries can cause property damage and/or bodily
injury, such as burns, if a conductive material such as jewelry, keys, or beaded chains touches exposed terminals.
The conductive material may complete an electrical circuit (short circuit) and become quite hot. Exercise care in
handling any charged battery, particularly when placing it
inside a pocket, purse, or other container with metal
objects.
Wireless Telephones
!
!
WARNING: Changes or modifications to this equipment
that are not approved by SpectraLink may cause this
equipment to fail to comply with part 15 of the FCC rules,
voiding the user’s authority to operate this equipment.
WARNING: SpectraLink products contain no user-serviceable parts inside. Refer servicing to qualified service
personnel.
It is recommended that standard acceptance procedures
be followed prior to operating this equipment in proximity
of life-support systems.
Earpiece may retain magnetic objects.
Operational Warnings
Potentially Explosive Atmospheres
Turn off your handset prior to entering any area with a potentially explosive
atmosphere. Do not remove, install, or charge batteries in such areas. Sparks
in a potentially explosive atmosphere can cause an explosion or fire resulting
in bodily injury or even death.
!
Areas with potentially explosive atmospheres include fueling areas such as below decks on boats, fuel or chemical
transfer or storage facilities, areas where the air contains
chemicals or particles such as grain, dust, or metal powders, and any other area where you would normally be
advised to turn off your vehicle engine. Areas with potentially explosive atmospheres are often posted, but not
always.
Safety
37
Electromagnetic Interference and Compatibility
Nearly every electronic device is susceptible to electromagnetic interference (EMI) if inadequately shielded,
designed, or otherwise configured for electromagnetic
compatibility.
Facilities
To avoid electromagnetic interference and/or compatibility conflicts, turn
off your handset in any facility where posted notices instruct you to do so.
Hospitals or health care facilities may be using equipment that is sensitive to
external RF energy.
Pacemakers
The Health Industry Manufacturers Association recommends that a minimum separation of 6 inches (15 cm) be maintained between a handheld,
wireless-radio product and a pacemaker. These recommendations are consistent with the independent research by, and recommendations of, Wireless
Technology Research. Persons with pacemakers should:
• ALWAYS keep the handset more than 6 inches (15 cm) from their
pacemaker when the handset is turned on.
• Not carry the handset in a breast pocket.
• Use the ear opposite the pacemaker to minimize the potential for
interference.
• Turn the handset off immediately if you have any reason to suspect that
interference is taking place.
Hearing Aids
Some digital wireless handsets may interfere with some hearing aids. The
Phone Settings option—Use Hearing Aid—is designed to improve the audio
for hearing aid users. If interference persists, you may want to consult your
hearing-aid manufacturer to discuss alternatives.
Other Medical Devices
Safety
If you use any other personal medical device, consult the manufacturer of
your device to determine if it is adequately shielded from external RF energy.
Your physician may be able to assist you in obtaining this information.
38
Use While Driving
Campus installations and warehouse facilities that use vehicles such as forklifts
or golf carts should abide by these guidelines when using wireless telephones:
• Give full attention to driving and to the road, aisle, or path.
• Use hands-free operation, if available.
• Pull off the road, aisle, or path and park before making or answering a
call.
For Vehicles Equipped with an Airbag
Do not place a portable device in the area over the airbag or in the airbag
deployment area. An airbag inflates with great force. If a handset is placed in
the airbag deployment area and the airbag inflates, the handset may be propelled at high speed and cause serious injury to occupants of the vehicle.
Safety
39
INFORMATIONS CONCERNANT LA SÉCURITÉ
Chargeurs et batteries
Il est normal que la batterie chauffe au cours du chargement.
Les chargeurs fonctionnent dans un environnement où la température est
comprise entre 10 ° et 30 °C (soit 50 ° à 85 °F). Ne les exposez pas directement au soleil, ni à des températures négatives.
Ne placez dans le chargeur aucun objet autre que le combiné ou la batterie,
selon les cas, pour éviter d’endommager les contacts. Si les contacts sont
abîmés, la batterie ne pourra pas se charger correctement.
Utilisez exclusivement des batteries SpectraLink avec les chargeurs
SpectraLink.
N’utilisez jamais de chargeurs autres que ceux de la gamme SpectraLink car
ils risqueraient d’endommager la batterie.
Utilisez toujours l’adaptateur d’alimentation fourni avec les chargeurs.
Si votre batterie est défectueuse ou en cas de problème avec votre chargeur,
contactez le représentant du service à la clientèle pour obtenir une assistance.
!
Safety
!
40
Ne plongez pas la batterie dans l'eau et ne la jetez pas au
feu.
Ne jetez pas la batterie avec vos ordures ménagères.
Déposez les batteries usagées à un point de recyclage ou
renvoyez-les à votre fournisseur ou agent de maintenance.
Toutes les batteries peuvent entraîner des dommages
maté-riels et/ou des blessures corporelles, par exemple
des brûlures, si un matériau conducteur comme un bijou,
des clés ou des chaînes à perles entrent en contact avec
les bornes exposées. Le matériau conducteur peut
refermer un circuit électrique (court-circuit) et devenir
assez chaud. Soyez vigilant lorsque vous manipulez une
batterie chargée, en particulier si vous la placez à
l'intérieur d'une poche, d'un porte-monnaie ou de tout
autre réceptacle contenant des objets métalliques.
Téléphones sans fil
!
!
AVERTISSEMENT : Toute modification apportée à cet
équipement qui n'a pas été expressément approuvée par
SpectraLink peut altérer la conformité de l'appareil à la
section 15 des normes de la FCC, annulant alors votre
droit d'utiliser cet appareil.
AVERTISSEMENT : Les produits de SpectraLink ne contiennent aucune pièce réparable par l'utilisateur. Pour
toute réparation, adressez-vous à un technicien qualifié.
Il est recommandé de suivre les procédures d'acceptation standard avant d'utiliser cet équipement à proximité
d'équipements d'assistance respiratoire.
L'écouteur peut contenir des objets magnétiques.
Avertissements concernant le fonctionnement
Atmosphères potentiellement explosives
Mettez votre combiné hors tension avant d’entrer dans une zone présentant
une atmosphère potentiellement explosive. Ne retirez pas, n’installez pas et
ne chargez pas les piles dans ces zones. Dans une atmosphère potentiellement explosive, des étincelles peuvent provoquer une explosion ou un
incendie, entraînant des blessures corporelles, voire la mort.
!
Safety
Les zones à atmosphère potentiellement explosive auxquelles il est fait référence ci-dessus comprennent les
zones de ravitaillement en carburant, par exemple les
ponts inférieurs de bateaux, les installations de transvasement ou d'entreposage de carburant ou de produits
chimiques, les zones où l'air contient des produits
chimiques ou des particules telles que des grains, des
poussières ou des poudres métalliques et toute autre
zone où il vous est généralement recommandé d'éteindre
le moteur de votre véhicule. Les zones à atmosphère
potentiellement explosive sont souvent, mais pas toujours, clairement signalées.
41
Interférences électromagnétiques et compatibilité
Quasiment tous les appareils électroniques sont sensibles aux interférences électromagnétiques (EMI) s'ils ne
sont pas convenablement protégés, conçus ou configurés pour être compatibles avec ce type d'énergie.
Établissements particuliers
Pour éviter les interférences électromagnétiques et tout problème de compatibilité, mettez votre combiné hors tension dans tout établissement où des
panneaux vous invitent expressément à l’éteindre. Les hôpitaux ou les centres de santé sont susceptibles d’utiliser des équipements sensibles à l’énergie
externe des radio-fréquences.
Stimulateurs cardiaques
L’association des fabricants de matériel médical recommande que les équipements radio portables sans fil soient maintenus à une distance minimale de
15 centimètres des stimulateurs cardiaques. Ces recommandations sont conformes aux recherches et aux recommandations du cabinet indépendant
Wireless Technology Research. Il est recommandé aux personnes portant un
stimulateur cardiaque de :
• TOUJOURS maintenir le combiné, lorsqu’il est sous tension, à une distance minimale de 15 cm de leur stimulateur cardiaque ;
• ne pas porter le combiné dans une poche proche de leur cœur ;
• utiliser l’oreille du côté opposé à celui du stimulateur cardiaque pour
minimiser les interférences potentielles ;
• mettre immédiatement hors tension le combiné s’ils soupçonnent le
moindre problème d’interférences.
Prothèses auditives
Certains combinés sans fil numériques peuvent gêner le fonctionnement des
prothèses auditives. L’option Phone Settings—Use Hearing Aid—vise à
améliorer la qualité audio pour les utilisateurs portant une prothèse auditive.
Si les interférences persistent, il peut s’avérer préférable de consulter le fabricant de la prothèse auditive pour discuter d’autres solutions.
Safety
Autres appareils médicaux
Si vous utilisez un autre appareil médical, consultez son fabricant afin de
déterminer s’il est suffisamment protégé contre l’énergie RF externe. Votre
médecin peut vous aider à obtenir ces informations.
42
Utilisation au volant
Si vous conduisez des véhicules, par exemple des chariots élévateurs à
fourche ou des voiturettes de golfe, sur votre campus ou au sein de vos
entrepôts, vous devez respecter les lois et réglementations régissant l’usage
des téléphones portables au volant :
• Vous devez être très attentif à la route, à l’allée ou au chemin où vous
circulez.
• Utilisez la fonction mains libres, si celle-ci est disponible.
• Le cas échéant, arrêtez-vous et garez-vous sur le côté de la route, de
l’allée ou du chemin avant d’effectuer un appel ou d’y répondre.
Pour les véhicules équipés d'un airbag
Ne posez pas un combiné portable sur un airbag ou dans sa zone de déploiement. Les airbags se gonflent avec puissance. Si un combiné est posé dans sa
zone de déploiement et l’airbag se gonfle, le combiné risque d’être violemment projeté à l’intérieur du véhicule et de blesser gravement les occupants.
Safety
43
INDEX
A
Accessories
Battery Packs 26
Carrying options 32
Chargers 27
Headset 32
Active mode 7
Administration
Care of handset 47
FAQs 33
Handset Operation Summary
14–17
Specifications 46
Answer call
First line 15
Second line 16
Via headset 16
B
Backlight 17
Battery Packs
Charging 28–31, 34
Charging status 28
Dual Charger 30
Options 26
Quad Charger 31
Remove/replace 14
Single Charger 29
C
Care of handset 47
Carrying options 32
Chargers
Charging status 28
Cleaning 47
Dual Charger 30
Quad Charger 31
44
Single Charger 29
Use of 27–31
Cleaning handsets and chargers 35,
47
Config Menu
Default profile settings 23
Defined 20
Entering 20
Mode 7
Options diagram 24–25
Profiles 21
Config menu
Options diagram 24
D
Data entry 19
Data entry table 19
Dial call
Outgoing calls 15, 33
Displays, handset 8
E
Edit
Arrows during 10
Data entry 19
External call 15
F
Features
Config Menu 20
Config Menu options 24–25
Display additional 17
Facility-specific 18
Message alert 7, 17, 18
H
Handset Operation Summary 14–17
Hang up 14, 16
Headset
Answer 16
Cleaning connector 47
Profile setting 23
Use of 32
Volume 16, 33
While charging 27, 29
Hold
Place a call on 16
Softkey label 12
I
Internal call 15
K
Keypad
Cleaning 35, 47
Cover 32
Illustration 2
Lock 11, 15
Unlock 13, 15
M
Menu navigation 7
Message alert 7, 17, 18
Modes of operation 7
Mute
On status bar 10
Softkey label 12
Use of 16, 34
Shortcut key 9
Softkey
Active 12–13
Labels 12–13
Speakerphone
Answer with 15
Icon 10
Softkey label 13
Use of 33
Volume with 33
While charging 27, 29
Specifications 46
Standby mode 7
Status indicators 10–11
U
User profile
Changing 17
Headsets and 32
Setting 21–23
V
Volume
Changing 33
Headset 16
Ring 16, 23
N
Navigation 7
R
Range 33
S
Safety
Use while driving 39
45
SPECIFICATIONS
Radio frequency
Transmission type
FCC certification
Frequency Hopping Spread Spectrum
(FHSS)
Part 15.247
Voice encoding
ADPCM (Proprietary)
Transmit power
Up to 100 mW peak,
< 10 mW average
Display
Model dimensions
Model weight
46
902–928 MHz
Up to four lines of text plus two icon
status rows and one row for softkey
labels.
5.4" × 2.0" × 0.9"
(14.0 × 5.1 × 2.3 cm)
3.9 ounces (112.4 g) with
Standard Battery Pack
4.1 ounces (115.7 g) with
Extended Battery Pack
4.5 ounces (128.8 g) with
Ultra-Extended Battery Pack
Standard Battery Pack
capacity
4 hours talk time
80 hours standby
Extended Battery Pack
capacity
6 hours talk time
120 hours standby
Ultra-Extended Battery
Pack capacity
8 hours talk time
160 hours standby
CARE OF YOUR HANDSET
• Avoid dropping the handset or knocking it against hard surfaces. Carrying the handset in a holster or carrying case will help protect it.
• There are no serviceable parts in the handset or chargers. You should
not open the handset case or disassemble the chargers. Doing so will
void your warranty.
• Turn off the handset and unplug chargers before you clean them. Take
care not to exert undue pressure on charger electrical contacts while
wiping.
• Wiping the handset surface with a water-dampened cloth or paper
towel will remove most films or residues. If the soiling is too stubborn
for plain water, a mild detergent solution may be used. A spray cleaner
may be used with care. Do not spray at an angle. Do not allow liquid
cleaners to seep into keypad. Be sure to wipe away any detergent residue with a clean water-dampened cloth. Do not immerse.
• Should the headset connector become dirty, you may experience a
scratchy or intermittent signal. To clean the connector, dip the nonpadded end of a wooden or paper cotton swab stick in isopropyl alcohol. Gently insert in the connector and twist, repeating several times. If
available, blow compressed air into the connector to clear debris.
• Keep the headset jack covered when it is not in use.
• Using a carrying case may help protect the surfaces and help prevent
liquids (e.g., rain) from entering into the interior of the handset.
• If your handset interior gets wet, do not try to accelerate drying with
the use of an oven or a dryer as this will damage the handset and void
the warranty. Instead, do the following:
1. Immediately power off the handset.
2. Remove the Battery Pack from handset.
3. Shake excess liquid from the handset.
4. Place the handset and Battery Pack in an upright position in an area
that is at room temperature and has good airflow.
5. Let the handset and Battery Pack dry for 72 hours before reconnecting the Battery Pack and/or powering on the handset.
If the handset does not work after following the steps listed above,
contact your phone system administrator for servicing information.
47
SpectraLink Corporation
5755 Central Avenue
Boulder, CO 80301
303 440 5330
800 676 5465
www.spectralink.com
LINK 6020 WIRELESS TELEPHONE
AND ACCESSORIES USER GUIDE
Trademark Information
SpectraLink®
Link
Are trademarks and registered trademarks of SpectraLink Corporation.
The SpectraLink logo is a registered trademark in the United States of America
and in other countries.
Copyright © 2007 SpectraLink Corporation.
All rights reserved
Information in this document is subject to change without notice and does not
represent a commitment on the part of SpectraLink Corporation. The software
described in this document is furnished under a license and may only be used
pursuant to the terms of (1) SpectraLink’s software license agreement available at
http://www.spectralink.com/softwareUpdates OR (2) the terms and conditions
previously agreed to in writing between the user and SpectraLink Corporation OR
(3) the terms and conditions previously agreed to in writing between the user and an
authorized SpectraLink reseller (each, the “Agreement”). The software may be used
only in accordance with the terms of the Agreement. No part of this manual, or the
software described herein, may be reproduced or transmitted in any form or by any
means, electronic or mechanical, including photocopying and recording, for any purpose except for the sole intent to operate the product or without the express written
permission of SpectraLink Corporation.
PN: 72-1205-00-A