1
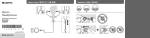
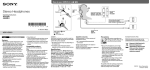
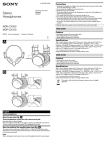
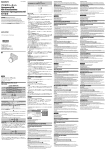
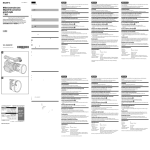
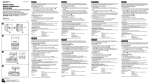
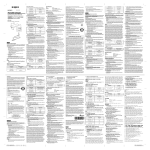
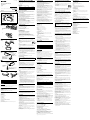
4-297-963-21(2) FM Stereo/AM Radio Troubleshooting 1 Open the battery compartment lid. 2 Insert two Sony size AA (R6) batteries (not supplied) with the and marks There is no sound from the radio. Make sure the batteries are inserted correctly. The batteries are weak. When using rechargeable batteries, charge the batteries. When using dry cell batteries, replace them all with new ones. The volume level is set to minimum. Turn up the volume of the unit. The audio is weak or poor quality. The batteries are weak. When using rechargeable batteries, charge the batteries. When using dry cell batteries, replace them all with new ones. The radio signal is weak. Listen to the radio near a window since the signal may be weak inside buildings or in vehicles. Someone is using a cell phone or other equipment that emits radio waves near the unit. Move the cell phone, etc., away from the unit. Move the unit away from possible sources of interference, such as a nearby TV. There is noise, or distorted sound when the audio signal is input from a connected component. Turn down the volume of the connected component. If a connected component has a bass boost function, set to off. The batteries are weak. When using rechargeable batteries, charge the batteries. When using dry cell batteries, replace them all with new ones. Make sure the connecting cable is securely connected. If connected to the LINE OUT jack of a connected component, connect to the headphone jack instead. The sound is low, or there is no sound while audio signal is input from a connected component. If the POWER switch is set to OFF, set to AUDIO IN. The volume level is set to minimum. Turn up the volume of the unit. The volume level of the connected component is set to minimum. Turn up the volume of the connected component. Make sure the connecting cable is securely connected. The batteries are weak. When using rechargeable batteries, charge the batteries. When using dry cell batteries, replace them all with new ones. Recorded radio sound is distorted, or noise is generated. The setting of the recording device is not correct. See notes in “Recording the radio” or refer to the Operating Instructions of the recording device. oriented correctly. 3 Close the lid. Operating Instructions Manual de instrucciones 使用說明書 사용설명서 ©2012 Sony Corporation Installing the Batteries (See fig. -) Battery life (when using the speakers) (JEITA*) (approx. hours) When using FM AM Audio input Sony alkaline size AA (LR6) 45 49 74 Sony size AA (R6) 14 16 26 * Measured by JEITA (Japan Electronics and Information Technology Industries Association) standards. The actual battery life may vary depending on the circumstance of the unit. Printed in China SRF-18 When to replace the batteries When the batteries become weak, the sound becomes weak or distorted, or the TUNE indicator becomes dim. In this case, replace both batteries with new ones. Notes on batteries Do not charge the dry batteries. Do not carry the dry batteries with coins or other metallic objects. It can generate heat if the positive and negative terminals of the batteries are accidentally contacted by a metallic object. Do not use different types of batteries at the same time. When you replace the batteries, replace all with new ones. When you are not going to use the unit for a long time, remove the batteries to avoid damage from battery leakage and corrosion. To attach the battery compartment lid if it is accidentally detached (See fig. -) The battery compartment lid is designed to come off when opened with excessive force. To put it back on, see the following and fig. -. Insert the left hook of the lid into the left hole in the unit. Hang the right hook on the right part of the compartment where the lid fits. Rear Parte trasera Slide the right hook into the right hole in the unit. Specifications Playing the Radio Frequency range: FM: 87.5 MHz - 108 MHz AM: 530 kHz - 1,710 kHz 1 Set the POWER switch to RADIO. 2 Set the FM/AM switch to FM or AM. 3 Tune in to a station using TUNING. The TUNE indicator lights up when a station is tuned in. Insert the end of the battery first. Coloque primero el extremo de la pila. To turn off the radio Power output: 80 mW + 80 mW (JEITA*) Connect the headphones to the (headphones) jack. The speakers are muted when headphones are connected. This unit cannot be used with the headphones supplied with a “WALKMAN” that has the Noise Canceling function. Note When listening to the radio, disconnect the audio connecting cable from the AUDIO IN jack of the unit, or noise may be heard. Power requirements: 3 V DC, two size AA (R6) batteries Dimensions: Approx. 155 mm × 78.5 mm × 32.5 mm (6 1/8 inches × 3 1/8 inches × 1 5/16 inches) (w/h/d, projecting parts not included) Approx. 155.4 mm × 80.3 mm × 34.2 mm (6 1/8 inches × 3 1/4 inches × 1 3/8 inches) (w/h/d, projecting parts included) (JEITA*) Mass: Approx. 198 g (7 oz) (batteries included) * JEITA (Japan Electronics and Information Technology Industries Association) standards. Improving the Reception (See fig. ) FM: Design and specifications are subject to change without notice. “WALKMAN” and “WALKMAN” logo are registered trademarks of Sony Corporation. You can connect an optional component, such as a portable music player, “WALKMAN”, etc., to the unit using the supplied audio connecting cable. You can enjoy sound from an optional component through the speakers of the unit. 1 Connect the AUDIO IN jack to the headphone jack of the component using the To AUDIO IN jack Conector para AUDIO IN To headphone jack (stereo minijack) Conector para auriculares (miniconector estéreo) Portable audio player, such as “WALKMAN”, CD player, etc. Reproductor de audio portátil, como “WALKMAN”, reproductor de CD, etc. supplied audio connecting cable. 2 Set the POWER switch to AUDIO IN. 3 Turn on the connected component. Start playing sound and adjust the volume of the connected component. 4 Adjust the volume using VOL of the unit. If the volume is too low, increase the volume of the connected component. To turn off the unit Make sure to set the POWER switch to OFF after listening. If the connected component is not playing back (no sound from speakers), the unit will not turn off when the POWER switch is set to AUDIO IN. Tip To enjoy better sound, adjust the volume of the connected component, and then adjust the volume of the unit. To AUDIO OUT jack Conector para AUDIO OUT To microphone jack Conector para micrófono Recording device, such as IC recorder, etc. Dispositivo de grabación, como una grabadora IC, entre otras. Notes If a connected portable music player, such as “WALKMAN”, has a bass boost function, set to off. This may cause distortion. If connected to the monaural output jack of a connected component, sound may not come through the right speaker of the unit. If connected to a fixed output such as the LINE OUT jack of the connected component, distortion may occur. If the sound is distorted, connect to the headphone jack instead. If the volume of the connected component is too high, the sound may be distorted. Recording the Radio (See fig. ) You can record the sound of the radio to a recording device, such as an IC recorder, etc. 1 Connect the recording device using the supplied audio connecting cable (See fig. You are cautioned that any changes or modifications not expressly approved in this manual could void your authority to operate this equipment. Features TUNE indicator for easy tuning AUDIO IN jack for connecting to optional components such as “WALKMAN”, etc. AUDIO OUT jack which is convenient for radio recording Identifying Parts FM/AM switch VOL dial* AUDIO OUT jack (headphones) jack TUNE indicator TUNING dial Telescopic antenna POWER switch (RADIO/AUDIO IN/OFF) AUDIO IN jack Holes for hand strap * There is a tactile dot beside the VOL dial to show the direction to turn up the volume. Por favor lea detalladamente este manual de instrucciones antes de conectar y operar este equipo. Recuerde que un mal uso de su aparato podría anular la garantía. Se le advierte que cualquier cambio o modificación no autorizada expresamente en este manual podrá anular la autorización que usted tiene para utilizar este equipo. Operate the unit only on 3 V DC with two size AA (R6) batteries. The nameplate indicating operating voltage, etc., is located on the bottom exterior. Avoid exposure to temperature extremes, direct sunlight, moisture, sand, dust or mechanical shock. Never leave in a car parked under the sun. Should anything fall into the unit, remove the batteries, and have the unit checked by qualified personnel before operating it any further. In vehicles or buildings, radio reception may be difficult or noisy. Try listening near a window. Since a strong magnet is used for the speakers, keep personal credit cards using magnetic coding or spring wound watches away from the unit to prevent possible damage from the magnet. When the casing becomes soiled, clean it with a soft dry cloth moistened with mild detergent solution. Never use abrasive cleansers or chemical solvents, as they may deform the casing. Do not use solvents such as benzine, thinner, commercially available cleaners or anti-static sprays intended for vinyl LPs. On placement Do not leave the unit in a location near heat sources, in a place subject to direct sunlight, excessive dust or mechanical shock, or in a car subject to the direct rays of the sun. Do not place the unit on an inclined or unstable surface. If you have any questions or problems concerning your unit, consult your nearest Sony dealer. Cómo apagar el equipo Notas Si un reproductor de música portátil conectado, como un “WALKMAN”, tiene una función de potenciación de sonidos graves, desactívela. Esto puede causar una distorsión. Si el equipo está conectado al conector de salida monoaural de un componente conectado, es posible que el sonido no se emita por el altavoz adecuado del equipo. Si está conectado a una salida fija como por ejemplo al conector LINE OUT del componente conectado, es posible que haya distorsión. Si el sonido está distorsionado, use el conector de auriculares en su lugar. Si el volumen del componente conectado es demasiado alto, el sonido puede salir distorsionado. Cómo grabar la radio (consulte la figura ) Puede grabar el sonido de la radio en un dispositivo de grabación, como una grabadora IC, etc. suministrado (consulte la figura ). Notas Al utilizar una grabadora IC Sony, elija “Audio IN” para la entrada externa. Si elige “MIC IN”, el sonido grabado estará distorsionado. Si usa el conector de entrada de micrófono de un grabador de casete, el sonido grabado estará distorsionado. Use el conector de entrada externo. 3 Comience a grabar con el dispositivo de grabación. Para obtener información detallada sobre la grabación y el cable de conexión, consulte el manual de instrucciones del dispositivo de grabación. Cómo escuchar la radio desde un equipo externo Precauciones Conector (auriculares) Indicador TUNE Perilla TUNING Antena telescópica Orificios para correa de mano * Al lado del perilla VOL hay un punto táctil para mostrar la dirección en la que se sube el volumen. Cómo colocar las pilas (consulte la figura -) 1 Abra la tapa del compartimiento de las pilas. 2 Inserte dos pilas R6 Sony (tamaño AA) (no suministradas) con las marcas y orientadas correctamente. 3 Cierre la tapa. Duración de la pila (cuando use los altavoces) (JEITA*) Use el equipo solo con 3 V cc con dos pilas R6 (tamaño AA). El rótulo que indica el voltaje de funcionamiento, entre otras cosas, se encuentra en la parte inferior externa. Evite la exposición a temperaturas extremas, luz solar directa, humedad, arena, polvo o choque mecánico. Nunca deje el equipo en un automóvil estacionado bajo el sol. En caso de que algo se caiga sobre el equipo, quite las pilas y procure que personal capacitado controle el equipo antes de continuar usándolo. En vehículos o edificios, es posible que sea difícil lograr una buena recepción de la radio o que dicha recepción tenga ruidos. Intente escucharla cerca de una ventana. Debido a que los altavoces utilizan un imán potente, mantenga las tarjetas de crédito que utilizan codificación magnética y los relojes de cuerda alejados de la unidad para evitar posibles daños causados por el imán. Cuando la carcasa se ensucie, límpiela con un paño seco suave humedecido con una solución detergente suave. Nunca use limpiadores abrasivos ni solventes químicos, ya que pueden deformar la carcasa. No use solventes como bencina, diluyente, limpiadores disponibles comercialmente o pulverizadores antiestáticos para discos de larga duración (LP) de vinilo. Ubicación No deje la unidad cerca de fuentes de calor, ni la exponga a la luz solar directa, polvo excesivo o golpes mecánicos ni en un coche expuesto a los rayos solares. No coloque la unidad en un lugar inclinado o inestable. Si tiene alguna pregunta o problema en relación con el equipo, consulte a su distribuidor Sony más cercano. (horas aprox.) Cuando use FM AM Entrada de audio Sony LR6 alcalina (tamaño AA) 45 49 74 Sony R6 (tamaño AA) 14 16 26 Cuándo cambiar las pilas Precautions Si el volumen está demasiado bajo, aumente el volumen del componente conectado. Para llevar el equipo de forma cómoda, coloque la correa de mano en el equipo. Pase la correa de mano por los orificios laterales del equipo. Conector AUDIO OUT Cuando las pilas tienen poca carga, el sonido se escucha bajo o distorsionado, o el indicador TUNE aparece poco iluminado. En este caso, cambie las dos pilas por pilas nuevas. Notas sobre las pilas No cargue las pilas secas. No lleve las pilas secas con monedas u otros objetos metálicos. Puede generarse calor si los terminales positivos y negativos de las pilas accidentalmente entran en contacto con un objeto metálico. No use diferentes tipos de pilas al mismo tiempo. Cuando cambie las pilas, cámbielas todas por pilas nuevas. Cuando no vaya a usar el equipo por un largo período, quite las pilas para evitar el daño que podría causar la corrosión o la fuga del líquido de las pilas. Cómo fijar la tapa del compartimiento de las pilas si se sale accidentalmente (consulte la figura -) La tapa del compartimiento de las pilas está diseñada para que se salga cuando se la abre con mucha fuerza. Para volver a colocarla, lea estas instrucciones y consulte la figura -. Coloque el gancho izquierdo de la tapa en el orificio izquierdo del equipo. Cuelgue el gancho derecho en la parte derecha del compartimiento donde engancha la tapa. Deslice el gancho derecho para que ingrese en el orificio derecho del equipo. Cómo usar la radio 1 Coloque el interruptor POWER en la posición RADIO. 2 Ajuste el interruptor FM/AM en FM o AM. 3 Sintonice una estación usando TUNING. El indicador TUNE se enciende cuando se sintoniza una estación. 4 Ajuste el volumen usando VOL. Cómo apagar la radio Coloque el interruptor POWER en la posición OFF. Cómo escuchar con auriculares (no suministrados) Conecte los auriculares al conector (auriculares). Los altavoces se silencian cuando se conectan los auriculares. Este equipo no se puede usar con los auriculares suministrados con un “WALKMAN” que tiene función de eliminación de ruido. Nota Cuando escuche la radio, desconecte el cable de conexión para audio del conector AUDIO IN del equipo; de lo contrario, es posible que escuche ruido. Dimensiones: Aprox. 155 mm × 78,5 mm × 32,5 mm (ancho/alto/profundidad; piezas salientes no incluidas) Aprox. 155,4 mm × 80,3 mm × 34,2 mm (ancho/alto/profundidad; piezas salientes incluidas) (JEITA*) Peso: Aprox. 198 g (pilas incluidas) * Normas de la asociación JEITA (Japan Electronics and Information Technology Industries Association). Accesorios suministrados Manual de instrucciones (1) Cable de conexión para audio (minitoma estéreo minitoma estéreo) (1) El diseño y las especificaciones están sujetos a cambio sin previo aviso. “WALKMAN” y el logotipo de “WALKMAN” son marcas comerciales registradas de Sony Corporation. Cómo colocar la correa de mano (consulte la figura ) Perilla VOL* Requisitos de alimentación: Tensión de Alimentación cc 3 V (cc 1,5 V × 2 Pilas tipo AA) 4 Ajuste el volumen usando VOL del equipo. Indicador TUNE para lograr una fácil sintonización. Conector AUDIO IN para conectar el equipo a componentes opcionales como un “WALKMAN”, entre otros. Conector AUDIO OUT que es útil para grabar radio. Interruptor FM/AM Salidas: Conector (auriculares) ( miniconector estéreo de 3,5 mm) (1) Clavija AUDIO OUT ( 3,5 mm miniconector estéreo) (1) Información acerca de derechos de autor volumen del componente conectado. Características Identificación de las piezas Entrada: Conector AUDIO IN ( miniconector estéreo de 3,5 mm) (1) 2 Coloque el interruptor POWER en la posición AUDIO IN. 3 Encienda el componente conectado. Comience a reproducir sonido y ajuste el Nota Debido a la interferencia del equipo conectado, es posible que no se reciba señal de radio o que la sensibilidad del equipo sea menor. You can connect the AUDIO OUT jack to the AUDIO IN jack or LINE IN jack of external equipment using the audio connecting cable. Radio signal received by the unit can be listened to through the connected equipment. Sound is also output from the speakers of the unit. Adjust the volume using VOL. For convenient carrying, attach the hand strap to the unit. Thread the hand strap through the holes in the side of the unit. usando el cable de conexión para audio suministrado. Toda alteración o cambio que no se apruebe, de manera expresa, a través del presente manual podría anular sus facultades para operar el presente equipo. * Medido por las normas de la asociación JEITA (Japan Electronics and Information Technology Industries Association). La duración real de la pila puede variar según la circunstancia del equipo. Attaching the Hand Strap (See fig. ) 1 Conecte el conector AUDIO IN al conector de auriculares del componente Puede conectar el conector AUDIO OUT al conector AUDIO IN o al conector LINE IN de un equipo externo usando el cable de conexión para audio. Se puede escuchar la señal de radio recibida por el equipo mediante el equipo conectado. El sonido también se emite por los altavoces del equipo. Ajuste el volumen usando VOL. Listening to the Radio from External Equipment Note Due to interference from the connected equipment, radio signal may be not received, or the sensitivity of the unit may be lower. Puede conectar un componente opcional al equipo, como un reproductor de música portátil, un “WALKMAN”, etc., usando el cable de conexión para audio suministrado. Puede disfrutar del sonido de un componente opcional mediante los altavoces del equipo. 4 Cuando haya finalizado la grabación, deje de grabar en el dispositivo conectado. Conector AUDIO IN 4 When you have finished recording, stop recording on the connected device. Cómo conectar componentes opcionales (consulte la figura ) RADIO AM/FM PORTATIL Notes When using a Sony IC Recorder, select “Audio IN” for external input. If selecting “MIC IN”, the recorded sound will be distorted. If using the microphone input jack of a tape recorder, the recorded sound will be distorted. Use the external input jack. Notes Keep the unit away from the recording device while recording. Noise may be heard in the recorded sound. Do not touch the unit, the audio connecting cable or the recording device while recording. Noise may be heard in the recorded sound. The AUDIO OUT jack outputs only radio signal received by this unit. The sound from the component connected to the AUDIO IN jack will not be output. Depending on the recording device, if no sound is output for more than 2 seconds, recording may pause automatically, and the recording device may enter sound detection status. When sound is detected again, recording may resume from a new track. The volume level output from the AUDIO OUT jack is fixed, and not affected by the VOL dial. WARNING ADVERTENCIA Interruptor POWER (RADIO/AUDIO IN/OFF) For details about recording and the connecting cable, refer to the operating instructions of the recording device. English Español ). 2 Set the POWER switch to RADIO, and tune in a desired station. 3 Start recording on the recording device. La radio tiene una antena de barra de ferrita incorporada. Gire el equipo de forma horizontal para lograr una recepción óptima (consulte la figura -). En vehículos o en edificios, es posible que sea difícil lograr una buena recepción de la radio. Intente escucharla cerca de una ventana. Notas Mantenga el equipo alejado del dispositivo de grabación mientras esté grabando; Es posible que se escuchen ruidos en el sonido grabado. No toque el equipo, el cable de conexión para audio ni el dispositivo de grabación mientras esté grabando; Es posible que se escuchen ruidos en el sonido grabado. El conector AUDIO OUT emite solo la señal de radio recibida por este equipo. No se emitirá el sonido del componente conectado al conector AUDIO IN. Según el dispositivo de grabación, si no se emite sonido durante más de dos segundos, es posible que la grabación se pause automáticamente y que el dispositivo de grabación ingrese en estado de detección de sonido. Cuando se vuelva a detectar sonido, es posible que se reanude la grabación desde una nueva pista. El nivel de volumen emitido desde el conector AUDIO OUT es fijo y no se lo puede modificar con el dial VOL. AM: Connecting Optional Components (See fig. ) Salida de potencia: 80 mW + 80 mW (JEITA*) deseada. The radio has a built-in ferrite bar antenna. Rotate the unit horizontally for optimum reception (See fig. -). In vehicles or in buildings, radio reception may be difficult. Try listening near a window. AM: 2 Coloque el interruptor POWER en la posición RADIO y sintonice la estación On Copyrights Margen de frecuencia: FM: 87,5 MHz - 108 MHz AM: 530 kHz - 1 710 kHz Altavoz: Aprox. 3,6 cm de diámetro Impedancia 7,2 (2) 1 Conecte el dispositivo de grabación usando el cable de conexión para audio Supplied accessories Operating Instructions (1) Audio connecting cable (stereo mini plug stereo mini plug) (1) Extend the telescopic antenna and adjust the angle for the optimum reception (See fig. -). Adjust the direction of the antenna by holding the bottom of it. Note that the antenna may be damaged if you move it with excessive force. Do not rotate the antenna. No gire la antena. Input: AUDIO IN jack ( 3.5 mm stereo minijack) (1) Especificaciones Extienda la antena telescópica y ajuste el ángulo para obtener una recepción óptima (consulte la fig. -). Ajuste la dirección de la antena sujetándola por la parte inferior. Tenga en cuenta que la antena se puede dañar si la mueve con demasiada fuerza. Consejo Para disfrutar de una mejor calidad de sonido, ajuste el volumen del componente conectado y luego ajuste el volumen del equipo. Speaker: Approx. 3.6 cm (1 7/16 inches) dia, 7.2 (2) Outputs: (headphones) jack ( 3.5 mm stereo minijack) (1) AUDIO OUT jack ( 3.5 mm stereo minijack) (1) To listen by headphones (not supplied) FM: Asegúrese de colocar el interruptor POWER en la posición OFF después de escuchar música. Si el componente conectado no reproduce sonido (no sale sonido de los altavoces), la unidad no se apagará cuando el interruptor POWER esté situado en AUDIO IN. 4 Adjust the volume using VOL. Set the POWER switch to OFF. Cómo mejorar la recepción (consulte la figura ) Resolución de problemas No se escucha sonido de la radio. Asegúrese de que las pilas estén colocadas correctamente. Las pilas tienen poca carga. Si usa pilas recargables, cargue las pilas. Si usa pilas secas, cámbielas todas por pilas nuevas. El nivel de volumen está en mínimo. Suba el volumen del equipo. El sonido es bajo o de mala calidad. Las pilas tienen poca carga. Si usa pilas recargables, cargue las pilas. Si usa pilas secas, cámbielas todas por pilas nuevas. La señal de radio es débil. Escuche la radio cerca de una ventana, dado que la señal puede ser débil dentro de edificios o vehículos. Alguien está usando un teléfono móvil u otro dispositivo que emite ondas de radio cerca de la unidad. Aleje el teléfono móvil, etc. de la unidad. Aleje el equipo de posibles fuentes de interferencia, como un televisor cercano. Hay ruido o sonido distorsionado cuando la señal de audio ingresa desde un componente conectado. Baje el volumen del componente conectado. Si el componente conectado tiene una función de potenciación de sonidos graves, desactívela. Las pilas tienen poca carga. Si usa pilas recargables, cargue las pilas. Si usa pilas secas, cámbielas todas por pilas nuevas. Asegúrese de que el cable de conexión esté bien conectado. Si el equipo está conectado a un conector LINE OUT de un componente conectado, use el conector de auriculares en su lugar. El sonido es bajo o no hay sonido mientras la señal de audio ingresa desde un componente conectado. Si el interruptor POWER se encuentra en la posición OFF, colóquelo en la posición AUDIO IN. El nivel de volumen está en mínimo. Suba el volumen del equipo. El nivel de volumen del componente conectado está en mínimo. Suba el volumen del componente conectado. Asegúrese de que el cable de conexión esté bien conectado. Las pilas tienen poca carga. Si usa pilas recargables, cargue las pilas. Si usa pilas secas, cámbielas todas por pilas nuevas. El sonido grabado de la radio está distorsionado o se genera ruido. La configuración del dispositivo de grabación no es correcta. Consulte las notas de la sección “Cómo grabar la radio” o consulte el manual de instrucciones del dispositivo de grabación. GLOSARIO DE TERMINOS AM: Modulación de amplitud AUDIO: Audio CD: Disco Compacto DC IN: Entrada de corriente directa (cc) FM: Frecuencia modulada IC: Circuito integrado IN/INPUT: Entrada JEITA (Japan Electronics and Information technology Industries Association): Asociación para el desarrollo de industrias electrónicas y tecnología de la información de Japón LINE IN: Línea de entrada LINE OUT: Línea de salida OFF: Apagado OUT/OUTPUT: Salida POWER: Alimentación/Encendido TUNE: Melodía TUNING: Sintonización VOL: Volumen AUDIO IN: Entrada de Audio AUDIO OUT: Salida de Audio 安裝電池(見圖 -) 規格 ᱦ᧾⬎#ᙣⰶ+ዢẦ#ȑ#ㄢⵚ, 1 打開電池艙蓋。 2 將兩顆 Sony R6(AA 尺寸)電池(不附送)的 和 標誌以正確方向裝 頻率範圍: FM: 87.5 MHz - 108 MHz AM: 530 kHz - 1710 kHz LF#≿㧋᷋#Ὠ㇏#ᯰ㇃#㈜㣏ぇ#⇳ᾋ゛#⬣ㄫὓ⏳#ᯰ㇃㿗#ⲏ#ㇿᴿᵛ1 入。 揚聲器: 直徑約 3.6 cm,7.2 3 關上電池艙蓋。 㩆⪞ 輸入: (大約時數) 使用 FM AM 聲音輸入 Sony 鹼性電池 LR6 (AA 尺寸) 45 49 74 Sony R6 (AA 尺寸) 14 16 26 * 根據 JEITA (Japan Electronics and Information Technology Industries Association) 標準測得。實際電池持續使用時間會隨本機的情況而異。 배터리의 쪽을 먼저 넣으십시오. 輸出: (耳機)插孔( 3.5 mm 立體聲迷你插孔)(1) ᆧᇊ AUDIO OUT 插孔( 3.5 mm 立體聲迷你插孔)(1) 2 3 ⬸䂯⓼=#Ⰳᴿ㧋␣⾻嗏# 功率輸出: ┟ᷯ⓼=#VUI04; 80 mW + 80 mW (JEITA*) ㊓㋧㈇2㊓㋧៤ᙷ=#Vrq|#Frusrudwlrq2Fklqd 電源要求: ㊓㋧でㅋ= 3 V DC, 兩顆 R6 (AA 尺寸) 電池 使用說明書(1) 音訊連接線(立體聲迷你插頭 立體聲迷你插頭)(1) 調入電臺時 TUNE 指示燈會亮起。 4 使用 VOL 調整音量。 若要關閉收音機 切勿轉動天線。 안테나를 돌리지 마십시오. ᱦ᧾⬎#ᙣⰶ+ዢẦ#ȑ#ㄢⵚ, でᜧẓ#ᢧᢧ㇏#ᙻ⮤ㆳ⋓#㇯㿫#⇳ᾋ゛#ⵗ䂯ᙷ#ⲏⵗẏ㐷#⿁ᛧᬏ#❯#ᢧᢧ㇏#ᚇḻᙷ#‟〫㐿#ⲏ# ㇿᴿᵛ1 Ȯ TUNING#ᵛ〳 LF#≿㧋᷋#Ὠ㇏#ᯰ㇃#㈜㣏ぇ#⇳ᾋ゛#⬣ㄫὓ⏳#ᯰ㇃㿗#ⲏ#ㇿᴿᵛ1 1 ȯ ⵗ㠌ⵔ#⾿㯃ᬏ 至 AUDIO IN 插孔 AUDIO IN 잭에 연결 至耳機插孔(立體聲迷 你插孔) 헤드폰 잭(스테레오 미니 잭)에 연결 便攜式隨身聽,如 “WALKMAN”、CD 播放機等 "WALKMAN", CD 플레이어 등의 휴대용 오디오 플레이어 AM: 收音機具有內建鐵氧體磁棒天線。水平轉動本機,以獲得最佳的接收效果 (見圖 -)。 在車輛或建築物內,可能難以接收收音機訊號。嘗試在靠近窗戶的地方收聽。 若要關閉本機 마이크로폰 잭에 연결 錄製裝置,如 IC 錄音器等 IC 레코더 등의 녹음 장치 收聽後,務必將 POWER 開關設定為 OFF。當 POWER 開關設定為 AUDIO IN 時,如果連接的裝置未在播放(揚聲器沒有聲音),本機將不會關閉。 提示 為了享受更好的音質,請調整所連接裝置的音量,然後調整本機的音量。 附註 如果“WALKMAN”等連接的便攜式音樂播放器有低音加強功能,請設定為關閉。這樣可 能會造成失真。 如果連接至所連接裝置的單聲道輸出插孔,聲音可能不會從本機右揚聲器傳出。 如果連接至所連接裝置的 LINE OUT 插孔等固定輸出,可能會發生失真。如果聲音失 真,則連接至耳機插孔。 ⇳ᾋ゛#ᯰ㇃#ⵓ#㸯␣㿓#AUDIO OUT#㈤ ˎ+DD#⬣㏿, 47 49 59 *# MHLWD+Mdsdq#Hohfwurqlfv#dqg#Lqirupdwlrq#Whfkqrorj|#Lqgxvwulhv#Dvvrfldwlrq,# ᡓ㊌ぇ#ᾧ⇳#㢘㊌ẏ〿ᴿᵛ1#ⵛ㊓#⚧㮧␣#ⲏ⓼ㆷ#❯#㊓㻿#⬣ㄠẏᴋ#䃏᜴ぇ#ᾧ⇳#ᵛ⏳# ⲏ#ㇿᴿᵛ1 ゛ᾋ゛#でᜧ#㥷⢋ㆻ#⬣ㄠ㿏っ#AUDIO OUT#㈤ㆻ#ワ⟷#ᢧᢧ㇏#DXGLR#LQ#㈤# ▖⮓#ⲏ♶⪺#㩂⫖ ₇ᴋ#OLQH#LQ#㈤ぇ#でᜧ㿗#ⲏ#ㇿᴿᵛ1#❯#㊓㻿ぇ⮓#ⲏⵗ㿓#⇳ᾋ゛#ⵗ䂯⏳#で ᙷᣃぇ#にㅇ#ㇿᛧᬏ#㐸⬣ឈ⮗#ᵶᴋ#㈜Ⰳ/#⒳㐷ᙷ#⑅ᛧᬏ#㐻Ṑ#ⵣ㿓#㈜ ˎ ᜧẓ#ᢧᢧ⏳#㰬㿫#Ὓㆻ#ⲏ#ㇿᴿᵛ1 Ⰳ#₇ᴋ#㐸⬣ឈ⮗#⾻∏㇏#㈇Ṑ㚟#⾿ぇᴋ#㊓㻿ㆻ#ᰊ⾻ệ㐷#ⵤⵓ゛1 ❯#㊓㻿㇏#ⴛ㾳㥛ぇ⮓ḻ#⬣ㄫὓᙷ#㠓⊜Ạᴿᵛ1#VOLㆻ#⬣ㄠ㿏っ#㇃≀ㆻ#㋧㉿㿏 ˎ ㊓㻿ㆻ#᜴⬣㐻#ᝪᬏ#⟿⾿㊌㿓#㈜Ⰳぇ#ệ㐷#ⵤⵓ゛1 ⵤⵓ゛1 ℚ㘚ẖ⪺#ᇪ㩆#ⷦⱂ⳺ ȭ TUNE#㻓ⵓὨ ˎ ᛫㉻㐷ᴋ#㠠㉻㿏㐷#ⵤⵓ゛1 Ȯ᛫㉻㐷⏳#Ṑ㉻ᬏ#ᢧ㬷#Ⰴ#△㜫シ#㿟᥏#ᙷ㐷#ᵛᴿ㐷#ⵤⵓ゛1#⚧㮧␣㇏# TUNING#ᵛ〳 ˎ ˎ ㇃≀#㟓Ⰳ⋓#⮛㊌ẏ〫#ㇿᴿᵛ1#❯#㊓㻿㇏#㇃≀ㆻ#ᰉⵤⵓ゛1 ℚ㘚ẖ⟎#ᮆᎻⱞ#⟎✂ᵆ#≮ẖᤆ#ᆧ⮚#≪ㄓ㩂ᴎ+ዢẦ#Ȏ0ʮ ㄢⵚ, +ᵷ∬㉸㇯#ⵓᙻ, 1 POWER#ⴛㅻ㣏⏳#RADIO⋓#⮛㊌㿠ᴿᵛ1 ▖⮓㩂#ℚ㘚ẖ IP DP 2Vrq|#⿃㣫⇳㇯#OU9 FM/AM#ⴛㅻ㣏⏳#FM#₇ᴋ#AMㆳ⋓#⮛㊌㿠ᴿᵛ1 78 7< 3+DD#⬣㏿, TUNINGㆻ#⬣ㄠ㿏っ#⚠Ⱈ#㚻ᮇㆻ#㠜ᴿᵛ1 Vrq|#U9+DD#⬣㏿, 47 ⚠Ⱈ#㚻ᮇ#㠧㐷⓫#TUNE#㻓ⵓὨ#㦓㑈ᴿᵛ1 49 ⬎᧾⬎#Ɐᴏ :7 59 ᡓ㊌ぇ#ᾧ⇳#㢘㊌ẏ〿ᴿᵛ1#ⵛ㊓#⚧㮧␣#ⲏ⓼ㆷ#❯#㊓㻿#⬣ㄠẏᴋ#䃏᜴ぇ#ᾧ⇳#ᵛ⏳# POWER#ⴛㅻ㣏⏳#OFF⋓#⮛㊌㿠ᴿᵛ1 ℚ㘚ẖ#ሺ㆞#⟆ጚ ㋼⏏ᙷ#ᵛ⏯#⚧㮧␣⏳#㿟᥏#⬣ㄠ㿏㐷#ⵤⵓ゛1 ⇳ᾋ゛⏳#Ὓㆻ#ῃぇᴋ#❯#㊓㻿㇏#AUDIO IN#㈤ぇ⮓#゛ᾋ゛#でᜧ#㥷⢋ㆻ#⟻␣㿏ⵤⵓ゛1#ᡯ≾ ˎ 㐷#⿁ㆳ⓫#㈘㇃#Ὓ#ⲏ#ㇿᴿᵛ1 ⚧㮧␣⏳#ះ㜫㿗#ῃᴋ#┟ệ#⬿ㆳ⋓#ះ㜫㿏ⵤⵓ゛1 ˎ ˎ ❯#㊓㻿ㆻ#㈜ᢧᙻ#⬣ㄠ㿏㐷#⿁ㆻ#ῃぇᴋ#⚧㮧␣#ᱻぇ#㇏㿓#⟷ⵔㆻ#⚠㐷㿏ᢧ# ㅻ㿏っ#⚧㮧␣⏳#ᤳᬫ#ᰊㆳⵤⵓ゛1 ✂⟊#▫㗆#ᄆ☊+ዢẦ#ȏ#ㄢⵚ, ℚ㘚ẖ⟎#ᮆᎻⱞ#⟎✂ᵆ#≮ẖᤆ#ᆧ⮚#≪ㄓ㩂ᴎ+ዢẦ#Ȏ0ʮ IP=# ㄢⵚ, ͨ#㊓㻿㇏#゛⏯㔴#៣Ⓞㆳ⋓#゛⏯㔴#䄻㫣⏳#♷〫#ᮚᴿᵛ1 DP=# 連接手腕帶(見圖 ) 便於調諧的 TUNE 指示燈 用於連接至 “WALKMAN” 等選購裝置的 AUDIO IN 插孔 便於收音機錄音的 AUDIO OUT 插孔 為了方便攜帶,請將手腕帶連接到本機。 將手腕帶穿過本機側邊的孔。 AUDIO OUT 插孔 (耳機)插孔 TUNE 指示燈 TUNING 撥盤 伸縮式天線 POWER 開關 (RADIO/AUDIO IN/OFF) AUDIO IN 插孔 手腕帶孔 * VOL 撥盤旁有一個觸覺點,可顯示增大音量的方向。 因爲揚聲器部分採用有強力的磁鐵,故凡使用有磁碼的個人信用卡,或發 條手錶,都請遠離本機以免可能受磁力影響而受損。 如果外殼弄髒,請用柔軟的乾布沾中性清潔劑進行清潔。 切勿使用擦洗劑或化學溶劑,這些都可能損壞外殼。 切勿使用汽油、稀釋劑、市售清潔劑等溶液,或用於乙烯 LP 的防靜電噴霧 劑。 ᱦ᧾⬎#ⱻᣃ㩂ጚ ⚠Ⱈ#㚻ᮇ#㠧㐷⓫#TUNE#㻓ⵓὨ#㦓㑈ᴿᵛ1 ᱦ᧾⬎Ṧ#ᔮᴎ 1 2 POWER#ⴛㅻ㣏⏳#AUDIO INㆳ⋓#⮛㊌㿠ᴿᵛ1 㫎ᧆ㣚+↮Ỏ㥲,Ⱖᵆ#Ⱖᴎ 3 でᜧẓ#㥫㹣ᮃ㴯⏳#㦤ᴿᵛ1#⬣ㄫὓ#㈣⭔ㆻ#ⵓ㈈㿏#でᜧẓ#㥫㹣ᮃ㴯㇏#㇃≀ㆻ# 䁛ὓ㹧ㆻ#+䁛ὓ㹧,#㈤ぇ#でᜧ㿠ᴿᵛ1# ㋧㉿㿠ᴿᵛ1 䁛ὓ㹧ㆻ#でᜧ㿏⓫#ⴛ㾳㥛ぇ⮓#Ⰳ␣ᙷ#ᬏ㐷#⿁ᴿᵛ1 4 ㊓㻿㇏#VOLㆻ#⬣ㄠ㿏っ#㇃≀ㆻ#㋧㉿㿠ᴿᵛ1# ⇢#ⴆ㥲⪺☆#%ZDONPDQ%⪺#≪♷ᤆ#ᙢⱞ#ⴆᅚ#ጚតⱞ#Ⱳ#㫎ᧆ㣚Ⱚ# ㇃≀#▫#ᬥㆻ#᜴ㄧ#でᜧẓ#㥫㹣ᮃ㴯㇏#㇃≀ㆻ#ᰉⵤⵓ゛1 ▖⮓㩊#✂#⪰➟ឲ៎1 ㄢᇊ ⇢#ጚጚṦ#ᔮᴎ ⇳ᾋ゛⏳#Ὓㆻ#ῃぇᴋ#❯#㊓㻿㇏#AUDIO IN#㈤ぇ⮓#゛ᾋ゛#でᜧ#㥷⢋ㆻ#⟻␣㿏ⵤⵓ゛1#ᡯ≾ 㐷#⿁ㆳ⓫#㈘㇃#Ὓ#ⲏ#ㇿᴿᵛ1 㜤㡟#䄻#POWER#ⴛㅻ㣏ᙷ#OFF⋓#⮛㊌ẏ〫#ㇿᴋ㐷#䃌㇯㿏ⵤⵓ゛1#でᜧẓ# 㥫㹣ᮃ㴯ᙷ#㈣⭔ẏ㐷#⿁ㆻ#᜴ㄧ+ⴛ㾳㥛ぇ⮓#⬣ㄫὓ#〽㇃,/#POWER#ⴛㅻ㣏ᙷ# AUDIO INㆳ⋓#⮛㊌ẏ〫#ㇿㆳ⓫#❯#㊓㻿㇏#㉻ㅇ#ᤳ㐷㐷#⿁ᴿᵛ1 ✂⟊#▫㗆#ᄆ☊+ዢẦ#ȏ#ㄢⵚ, 㟫 ᷋#㌂ㆷ#⬣ㄫὓ⏳#㐇ᢧ⊛⓫#でᜧẓ#㥫㹣ᮃ㴯㇏#㇃≀ㆻ#㋧㉿㿓#ᵛ㇃#❯#㊓㻿㇏#㇃≀ㆻ#㋧㉿㿏 IP=# ⵤⵓ゛1 ⵗ㠌ⵔ#⾿㯃ᬏ⏳#ᜃ#⧈#ᙷ㈜#ⲏⵗ#㈏ẏᴋ#⚠䀜ㆳ⋓#㋧㊌㿠ᴿᵛ+ᡯ#ȏ0ʭ# ㄢᇊ 㚯㋧,1 ˎ ⾿㯃ᬏ#⾻∏㔴ㆻ#㈘#⚠䀜ㆻ#㋧㊌㿏ⵤⵓ゛1#⾿㯃ᬏぇ#ᝳḻ㿓# ˎ %ZDONPDQ%ᝳ#ᚐㆷ#でᜧẓ#䆫ᵷㄠ#㇃⾼#㾃≿〫ぇ#㉷㇃#㐔㹤#ᢧᴜ#ㇿᴋ#᜴ㄧ## ᢧᴜㆻ#᪻ⵤⵓ゛1#⬣ㄫὓᙷ#ビẗ#ⲏ#ㇿᴿᵛ1 䈏ㆻ#ᙷ㿏⓫#⾿㯃ᬏᙷ#Ⰷ⬸ẗ#ⲏ#ㇿㆳᴿ#㍳㇏㿏ⵤⵓ゛1 ˎ でᜧẓ#㥫㹣ᮃ㴯㇏#┟ᯯ#㠓⊜#㈤ぇ#でᜧẓ#᜴ㄧ#㊓㻿㇏#゛⏯㔴#ⴛ㾳㥛ぇ⮓#⬣ㄫὓᙷ#㠓⊜ ẏ㐷#⿁ㆻ#ⲏ#ㇿᴿᵛ1 でᜧẓ#㥫㹣ᮃ㴯㇏#OLQH#RXW#㈤ᝳ#ᚐ#㊌ẓ#㠓⊜ぇ#でᜧẓ#᜴ㄧ#⬣ㄫὓᙷ#ビẗ# ˎ DP=# ⲏ#ㇿᴿᵛ1#⬣ㄫὓᙷ#ビẗ#᜴ㄧ#䁛ὓ㹧#㈤ぇ#でᜧ㿏ⵤⵓ゛1 ⇳ᾋ゛ぇᴋ#㸏⇳㴯#⚋#⾿㯃ᬏᙷ#ᬫ㈜ẏ〫#ㇿᴿᵛ1#㟓㉸㇏#ⲏⵗ#⬸㭓⏳#㚵ㆳ ˎ でᜧẓ#㥫㹣ᮃ㴯㇏#㇃≀#▫#㫫#᜴ㄧ#⬣ㄫὓᙷ#ビẗ#ⲏ#ㇿᴿᵛ1 ⊛⓫#㊓㻿ㆻ#㌃ㄧ⋓#ṃ␣ⵤⵓ゛+ᡯ#ȏ0ʮ#㚯㋧,1 ˎ 㚟≀#₇ᴋ#᛫△#⾿ぇ⮓ᴋ#⇳ᾋ゛#ⲏⵗ#〫⊛ㄯ#ⲏ#ㇿᴿᵛ1#ẏḻ⋔#㚴▯#ᡳ㜏 ぇ⮓#⬣ㄠ㿫#㍳ⵤⵓ゛1 關於放置 請勿將本機放置在靠近熱源,或可直接照射到太陽、特別多塵或會受到機 械撞擊的地方,或放在陽光直曬的車內。 請勿將本機放在傾斜或不穩定的地方。 如果有關於本機的任何疑問或問題,請與附近的 Sony 經銷商聯絡。 故障排除 收音機沒有聲音。 確認電池是否正確插入。 電力不足。使用充電電池時,請為電池充電。使用乾電池時,請將電池全 部換新。 音量等級設定為最小。調高本機音量。 音訊微弱或音質差。 電力不足。使用充電電池時,請為電池充電。使用乾電池時,請將電池全 部換新。 收音機訊號微弱。由於建築物或車輛內訊號可能微弱,因此請在窗戶附近 收聽收音機。 有人在本機附近使用手機或其他會發射無線電波的設備。請把手機等移離 本機。 將本機移離可能的干擾源,如附近的電視機。 從連接的裝置輸入聲音訊號時,發出噪音或聲音失真。 調低連接裝置的音量。 若連接的裝置有低音加強功能,請設定為關閉。 電力不足。使用充電電池時,請為電池充電。使用乾電池時,請將電池全 部換新。 確認連接線的連接是否牢固。 如果連接至所連接裝置的 LINE OUT 插孔,請連接至耳機插孔。 從連接的裝置輸入聲音訊號時,聲音太小或沒有聲音。 如果 POWER 開關設定為 OFF,請設定為 AUDIO IN。 音量等級設定為最小。調高本機音量。 所連接裝置的音量等級設定為最小。調高所連接裝置的音量。 確認連接線的連接是否牢固。 電力不足。使用充電電池時,請為電池充電。使用乾電池時,請將電池全 部換新。 錄製的收音機聲音失真,或是產生噪音。 錄製裝置的設定不正確。請參見“錄製收音機”中的附註或參閱錄製裝置 的使用說明書。 •ⴆ#㩞ᆚ ᱦ᧾⬎⪺☆#♶ẖც#ᖂ⺪#⨴៎1 ˎ ⚧㮧␣ᙷ#ィ⚋⏫ᜃ#Ὓ〫#ㇿᴋ㐷#䃌㇯㿏ⵤⵓ゛1 ⷦ⭾#ⴆ⮺ ˎ ⚧㮧␣ᙷ#⿴㿫㋃ᴿᵛ1#㠠㉻ⵔ#⚧㮧␣⏳#⬣ㄠ㿏ᴋ#᜴ㄧ#⚧㮧␣⏳#㠠㉻㿏ⵤⵓ ゛1#᛫㉻㐷⏳#⬣ㄠ㿏ᴋ#᜴ㄧ#┟ệ#⬿ㆳ⋓#ះ㜫㿏ⵤⵓ゛1 ⷦ㟶✂#ⅾ⯮= ˎ ㇃≀#㟓Ⰳ⋓#⮛㊌ẏ〫#ㇿᴿᵛ1#❯#㊓㻿㇏#㇃≀ㆻ#ᰉⵤⵓ゛1 IP=#;:18#PK}#0#43;#PK} DP=#863#nK}#0#4/:43#nK} ♶ẖც#ⱻᅚᖂ#ⰶ⺲ⱞ#ᖂ╂៎1 ㊆ᴏ= ❯#㊓㻿#ᙷᣃぇ⮓#㉻㶃⏳#⚠㠓㿏ᴋ#䆫ᵷ㹧#₇ᴋ#ᢧ㬷#㈜㣏⏳#⬣ㄠ㿏#ㇿ ˎ +䁛ὓ㹧,#㈤+˔#618#pp#ⴛ㯃≿゛#♯ᴿ#㈤,#+4, ᴿᵛ1#❯#㊓㻿ぇ⮓#䆫ᵷ㹧#Ὠㆻ#Ⓑ␣#㿏ⵤⵓ゛1 特點 VOL 撥盤* ᙣⰶᤆ#ᱦ᧾⬎#▖⮞ᧆც#⭆ᇋᤂᅚᖂ#ᙢⱞც#℆◇ᤆ៎1 ˎ ᯰ㇃#㈜㣏㇏#⮛㊌#ィ⚋⏫㐷#⿁ᴿᵛ1#%⇳ᾋ゛#ᯰ㇃%㇏#㚯⏳#㚯㋧㿏ᛧᬏ# ᯰ㇃#㈜㣏㇏#⬣ㄠ⮛⓼⮓⏳#㚯㋧㿏ⵤⵓ゛1 ͧ#ℓ᥈#ᾨ#Ὓ〫ᙷḻ⋔#⚧㮧␣ⵛ#゛⏯㔴ぇ#゛⏯㔴#䄻㫣⏳#ᛸᴿᵛ1 廢電池請回收 FM/AM 開關 ˎ ㇃≀#㟓Ⰳ⋓#⮛㊌ẏ〫#ㇿᴿᵛ1#❯#㊓㻿㇏#㇃≀ㆻ#ᰉⵤⵓ゛1 ˎ ᙷᣃぇ#にㅇ#ㇿᛧᬏ#㐸⬣ឈ⮗#ᵶᴋ#㈜Ⰳ/#⒳㐷ᙷ#⑅ᛧᬏ#㐻Ṑ#ⵣ㿓#㈜ ˎ でᜧẓ#㥫㹣ᮃ㴯㇏#㇃≀#㟓Ⰳ⋓#⮛㊌ẏ〫#ㇿᴿᵛ1#でᜧẓ#㥫㹣ᮃ㴯㇏#㇃≀ Ⰳ#₇ᴋ#㐸⬣ឈ⮗#⾻∏㇏#㈇Ṑ㚟#⾿ぇᴋ#㊓㻿ㆻ#ᰊ⾻ệ㐷#ⵤⵓ゛1 ㆻ#ᰉⵤⵓ゛1 ˎ ㊓㻿ㆻ#᜴⬣㐻#ᝪᬏ#⟿⾿㊌㿓#㈜Ⰳぇ#ệ㐷#ⵤⵓ゛1 ˎ でᜧ#㥷⢋#ᵟᵟ䇿#でᜧẏ〫#ㇿᴋ㐷#䃌㇯㿏ⵤⵓ゛1# ⴆ㥲⪺#㩞#ቫዲ㩆#⳺ⱞᖂ#•ⴆ⳺ⱞ#ⱲⰦ#ცጶ⮞#Vrq|#ẖ⳺Ⱖᵆ#•ⱂ㩂⫖# ˎ ⚧㮧␣ᙷ#⿴㿫㋃ᴿᵛ1#㠠㉻ⵔ#⚧㮧␣⏳#⬣ㄠ㿏ᴋ#᜴ㄧ#⚧㮧␣⏳#㠠㉻㿏ⵤⵓ ⷦ⟗⟆⬎1 ゛1#᛫㉻㐷⏳#⬣ㄠ㿏ᴋ#᜴ㄧ#┟ệ#⬿ㆳ⋓#ះ㜫㿏ⵤⵓ゛1 ➎㨦㏎= ⚧㮧␣ᙷ#⿴㿫㋃ᴿᵛ1#㠠㉻ⵔ#⚧㮧␣⏳#⬣ㄠ㿏ᴋ#᜴ㄧ#⚧㮧␣⏳#㠠㉻㿏ⵤⵓ ˎ 㐸᜴#⿴#619#fp/#:15#ˍ#+5, ゛1#᛫㉻㐷⏳#⬣ㄠ㿏ᴋ#᜴ㄧ#┟ệ#⬿ㆳ⋓#ះ㜫㿏ⵤⵓ゛1 ⟷Ⰴẓ#゛ᾋ゛#でᜧ#㥷⢋ㆻ#⬣ㄠ㿏っ#AUDIO IN#㈤ㆻ#㥫㹣ᮃ㴯㇏#䁛ὓ㹧#㈤ POWER#ⴛㅻ㣏⏳#OFF⋓#⮛㊌㿠ᴿᵛ1 ぇ#でᜧ㿠ᴿᵛ1 本機只能用兩顆 R6(AA 尺寸)電池,在 3 V DC 下使用。 標示牌位於外殼底部,註明操作電壓等資訊。 請避免讓裝置暴露在極度高溫、直射陽光、濕氣、沙塵、灰塵中,或受到 機械振動的影響。 切勿將裝置留置在停放在陽光下的車内。 如果任何物體掉入本機中,請取出電池,並經合格的專業人員檢查以後, 方可繼續使用。 在車輛或建築物內,收音機訊號可能難以接收或出現雜訊。嘗試在靠近窗 戶的地方收聽。 ▖⮓#ⲏ♶⪺#㩂⫖ ⵗ㠌ⵔ#⾿㯃ᬏ⏳#ᜃ#⧈#ᙷ㈜#ⲏⵗ#㈏ẏᴋ#⚠䀜ㆳ⋓#㋧㊌㿠ᴿᵛ+ᡯ#ȏ0ʭ# ⚧㮧␣ⵛ#ℓ᥈ㆷ#⮯ᜃ#に⓫#⟻␣ẏḻ⋔#ᾋ㈇㇯ẏ〫#ㇿᴿᵛ1#ᵛⵓ#⟷㚠㿏⊛⓫# 㚯㋧,1 ᵛ㇃#⬣㿤#⚆#ᡯ#Ȏ0ʮ⏳#㚯㋧㿏ⵤⵓ゛1# ˎ ⾿㯃ᬏ#⾻∏㔴ㆻ#㈘#⚠䀜ㆻ#㋧㊌㿏ⵤⵓ゛1#⾿㯃ᬏぇ#ᝳḻ㿓# ͦ#㊓㻿㇏#ン㔴#៣Ⓞぇ#ℓ᥈㇏#ン㔴#䄻㫣⏳#ㄸᴿᵛ1 䈏ㆻ#ᙷ㿏⓫#⾿㯃ᬏᙷ#Ⰷ⬸ẗ#ⲏ#ㇿㆳᴿ#㍳㇏㿏ⵤⵓ゛1 附註 由於受到所連接設備的干擾,可能無法收到收音機訊號,或是本機的靈敏度可能會降 低。 認識各部件 ▖⮓ⳮ#ⷦⱂ#▖㩗 ⴛ㽻≿ᴋ#⬣ㄠ㿏㐷#ⵤⵓ゛1 ⫚ᆚᤆ#㏞㣖ᗶ㞢⪺☆#⬎᧾⬎#⟊㬢ც#Ɐᴏᤂ#ᆧ⮚#♶ẖც#ⱻᅚᖂ#ᖂ⬎⺪#⨴៎1 ˎ POWER#ⴛㅻ㣏ᙷ#OFF⋓#⮛㊌ẓ#᜴ㄧ#AUDIO INㆳ⋓#⮛㊌㿏ⵤⵓ゛1 ℚ㘚ẖ#✂Ὧ +◯㢇㈯#⏷⧴#☧,+MHLWD*, ᱦ᧾⬎#ⱻᣃ㩂ጚ 您可以使用音訊連接線,將 AUDIO OUT 插孔連接至外接設備的 AUDIO IN 插 孔或 LINE IN 插孔。可以透過連接的設備聆聽本機收到的收音機訊號。 聲音也會從本機的揚聲器輸出。 使用須知 ˎ ⚧㮧␣ᙷ#⿴㿫㋃ᴿᵛ1#㠠㉻ⵔ#⚧㮧␣⏳#⬣ㄠ㿏ᴋ#᜴ㄧ#⚧㮧␣⏳#㠠㉻㿏ⵤⵓ ゛1#᛫㉻㐷⏳#⬣ㄠ㿏ᴋ#᜴ㄧ#┟ệ#⬿ㆳ⋓#ះ㜫㿏ⵤⵓ゛1 ⲏ#ㇿᴿᵛ1 ᱦ᧾⬎Ṧ#ᔮᴎ 2 Vrq|#U9+DD#⬣㏿,#⚧㮧␣+✻㻿,#ệ#ᚓ⏳#ñシ#×#㻓ⵓぇ#㠋〫#ᮚ ͧ#ℓ᥈#ᾨ#Ὓ〫ᙷḻ⋔#⚧㮧␣ⵛ#゛⏯㔴ぇ#゛⏯㔴#䄻㫣⏳#ᛸᴿᵛ1 ᴿᵛ1 ͨ#㊓㻿㇏#゛⏯㔴#៣Ⓞㆳ⋓#゛⏯㔴#䄻㫣⏳#♷〫#ᮚᴿᵛ1 3 ℓ᥈ㆻ#ᵢᴿᵛ1 ⟷Ⰴẓ#゛ᾋ゛#でᜧ#㥷⢋ㆻ#⬣ㄠ㿏っ#䆫ᵷㄠ#㇃⾼#㾃≿〫㇯#%ZDONPDQ%# 4 VOLㆻ#⬣ㄠ㿏っ#㇃≀ㆻ#㋧㉿㿠ᴿᵛ1 Ὠᝳ#ᚐㆷ#ガ⯏#㥫㹣ᮃ㴯⏳#❯#㊓㻿ぇ#でᜧ㿗#ⲏ#ㇿᴿᵛ1 ❯#㊓㻿㇏#ⴛ㾳㥛⏳#㰬㿫#ガ⯏#㥫㹣ᮃ㴯㇏#⬣ㄫὓ⏳#Ὓㆻ#ⲏ#ㇿᴿᵛ1 Ⰷ㈘#ᪿㆻ#㊓㻿#ぽ㇏#៣Ⓞぇ#ㄧⵤⵓ゛1 *# MHLWD+Mdsdq#Hohfwurqlfv#dqg#Lqirupdwlrq#Whfkqrorj|#Lqgxvwulhv#Dvvrfldwlrq,# 4 VOLㆻ#⬣ㄠ㿏っ#㇃≀ㆻ#㋧㉿㿠ᴿᵛ1 ℚ㘚ẖ#☎㍂+ዢẦ#Ȏ0ʭ#ㄢⵚ, ⚧㮧␣ⵛ#ℓ᥈ㆷ#⮯ᜃ#に⓫#⟻␣ẏḻ⋔#ᾋ㈇㇯ẏ〫#ㇿᴿᵛ1#ᵛⵓ#⟷㚠㿏⊛⓫# ᵛ㇃#⬣㿤#⚆#ᡯ#Ȏ0ʮ⏳#㚯㋧㿏ⵤⵓ゛1# 1 ⚧㮧␣ⵛ#ℓ᥈ㆻ#ぴᴿᵛ1 ͦ#㊓㻿㇏#ン㔴#៣Ⓞぇ#ℓ᥈㇏#ン㔴#䄻㫣⏳#ㄸᴿᵛ1 從外接設備聆聽收音機 產 地:中國大陸 製造廠商:索尼公司 進 口 商:台灣索尼股份有限公司 地 址:104 台北市長春路 145 號 5 樓 電 話:(02) 4499111 ᱦ᧾⬎⪺☆#♶ẖც#ᖂ⺪#⨴៎1 ᚍ#ᵛᴿᢧ#㸯␣㿏ḻ⋔#❯#㊓㻿ぇ#Ⰷ㈘#ᪿㆻ#⟷㚠㿏ⵤⵓ゛1 ˎ ⚧㮧␣ᙷ#ィ⚋⏫ᜃ#Ὓ〫#ㇿᴋ㐷#䃌㇯㿏ⵤⵓ゛1 ♶ẖც#ⱻᅚᖂ#ⰶ⺲ⱞ#ᖂ╂៎1 ˎ U9+DD#⬣㏿,#⚧㮧␣#ệ#ᚓ⏳#⬣ㄠ㿏っ#6#Y#GFぇ⮓⑃#❯#㊓㻿ㆻ#⬣ㄠ㿏ⵤ ˎ ⚧㮧␣ᙷ#⿴㿫㋃ᴿᵛ1#㠠㉻ⵔ#⚧㮧␣⏳#⬣ㄠ㿏ᴋ#᜴ㄧ#⚧㮧␣⏳#㠠㉻㿏ⵤⵓ ⵓ゛1 ゛1#᛫㉻㐷⏳#⬣ㄠ㿏ᴋ#᜴ㄧ#┟ệ#⬿ㆳ⋓#ះ㜫㿏ⵤⵓ゛1 ˎ ㈈Ṑ#㉻⿌#Ὠㆻ#㻓ⵓ㿏ᴋ#ᢧ⓼㶇ㆷ#❯㜫#⚈⓫ぇ#ㇿᴿᵛ1 ˎ ⇳ᾋ゛#ⵗ䂯ᙷ#⿴㿠ᴿᵛ1#᛫△#₇ᴋ#㚟≀#ᬫ⟷ぇ⮓ᴋ#ⵗ䂯ᙷ#⿴㿫㐿#ⲏ#ㇿㆳ☷ ˎ 㐷ᬏ㣓#ゟ/#㐸⬣ឈ⮗/#ᢧ/#┟∏/#⒳㐷ぇ#ᯯ㠓ⵓ㬛ᛧᬏ#△␣㉸㇯#㠠ᜠㆻ#ᙷ㿏 ⋓#㚴ᙷぇ⮓#⇳ᾋ゛⏳#㜤㡟㿏ⵤⵓ゛1 㐷#ⵤⵓ゛1# ˎ ❯#㊓㻿#ᙷᣃぇ⮓#㉻㶃⏳#⚠㠓㿏ᴋ#䆫ᵷ㹧#₇ᴋ#ᢧ㬷#㈜㣏⏳#⬣ㄠ㿏#ㇿ 㿾❌#⾻∏#㍳㚟ẓ#㚟#Ⰴぇ#ᰋệ㐷#ⵤⵓ゛1 ᴿᵛ1#❯#㊓㻿ぇ⮓#䆫ᵷ㹧#Ὠㆻ#Ⓑ␣#㿏ⵤⵓ゛1 ˎ △㐿#㊓㻿#ᬫ⟷⋓#Ὓ〫ᚋㆻ#ῃぇᴋ#❯#㊓㻿㇏#㈈Ṑㆻ#㎈㐷㿏#⚧㮧␣⏳# ˎ WY#ᡳ㜏#ᚐ#ᙻ⮤#⚓⭔㿗#ⲏ#ㇿᴋ#ᝪぇ⮓ᴋ#❯#㊓㻿ㆻ#Ⓑ␣#㿏ⵤⵓ゛1 ᤳᬯ#䄻#ᢧⲗ㈇㇏#㊇ᛷㆻ#⚒⾻#㍳ⵤⵓ゛1 ⫚ᆚᤆ#㏞㣖ᗶ㞢⪺☆#⬎᧾⬎#⟊㬢ც#Ɐᴏᤂ#ᆧ⮚#ᙢⱞც#◇ጚᅚᖂ#▖⮞ᧆც# ˎ 㚟#₇ᴋ#᛫△#⾿ぇ⮓ᴋ#⇳ᾋ゛#ⲏⵗ#㈏#⾿ẏᛧᬏ#㈘㇃#⚓⭔㿗#ⲏ#ㇿᴿᵛ1# ⭆ᇋᤆ៎1 ẏḻ⋔#㚴▯#ᙷᣃぇ⮓#⬣ㄠ㿫#㍳ⵤⵓ゛1 ˎ でᜧẓ#㥫㹣ᮃ㴯㇏#㇃≀ㆻ#ᬥ㠋ⵤⵓ゛1 ˎ ⴛ㾳㥛ぇᴋ#ᚌ⊜㿓#㈇⮔#⬣ㄠẏ#ㇿㆳ☷⋓#㈇ᢧ#㧋ὓᙷ#ㇿᴋ#ⵗㄠ㣫ὓᬏ# ˎ でᜧẓ#㥫㹣ᮃ㴯ぇ#㉷㇃#㐔㹤#ᢧᴜ#ㇿᴋ#᜴ㄧ##ᢧᴜㆻ#᪻ⵤⵓ゛1 㭓ぴ#ⵓᴋ#㈇⮔ぇ#㇏㿓#Ⰷ⬸ㆻ#⚠㐷㿏ᢧ#ㅻ㿫#㊓㻿ぇ⮓#Ⓑ␣#㿏ⵤⵓ゛1 ˎ ⚧㮧␣ᙷ#⿴㿫㋃ᴿᵛ1#㠠㉻ⵔ#⚧㮧␣⏳#⬣ㄠ㿏ᴋ#᜴ㄧ#⚧㮧␣⏳#㠠㉻㿏ⵤⵓ ˎ ❯㜫ᙷ#᷋≣ㅃ㐻#᜴ㄧ#ⲓ㿓#㎈⮨#⮯㊓⏳#⬫㑔#㉸ⵗ#⟷ὓ≣ㄫ#䁔ᜁㆳ⋓#ᵝ⾻#㍳ ゛1#᛫㉻㐷⏳#⬣ㄠ㿏ᴋ#᜴ㄧ#┟ệ#⬿ㆳ⋓#ះ㜫㿏ⵤⵓ゛1 ⵤⵓ゛1# ˎ でᜧ#㥷⢋#ᵟᵟ䇿#でᜧẏ〫#ㇿᴋ㐷#䃌㇯㿏ⵤⵓ゛1# で㊓#₇ᴋ#䃋㿐#⮯㊌㊓ᴋ#㉿ᵷ#⬣ㄠ㿏㐷#ⵤⵓ゛1#❯㜫ᙷ#✷䂌ẗ#ⲏ#ㇿᴿᵛ1 ˎ ✛㊗ᬏ#ⵓ#Ὠ㇏#ㄠ㿫㊓/#ⵓ㶇ẏᴋ#⢻ᵇ#OSㄠ#㫫␣#₇ᴋ#㊌㉻ᢧ#⚠㐷# ˎ でᜧẓ#㥫㹣ᮃ㴯㇏#OLQH#RXW#㈤ぇ#でᜧẓ#᜴ㄧ#䁛ὓ㹧#㈤ぇ#でᜧ㿏ⵤⵓ゛1 2 FM/AM#ⴛㅻ㣏⏳#FM#₇ᴋ#AMㆳ⋓#⮛㊌㿠ᴿᵛ1 ⬟♂#㏞㣖ᗶ㞢#⫚ᆚ+ዢẦ#Ȑ#ㄢⵚ, 3 TUNINGㆻ#⬣ㄠ㿏っ#⚠Ⱈ#㚻ᮇㆻ#㠜ᴿᵛ1 僅適用於台灣 ㇿᴿᵛ1 *# VOL#ᵛ〳#ぽぇᴋ#㇃≀ㆻ#ᰉᴋ#⚠䀜ㆻ#ᬏ㬷ᬫᴋ#ṃᢧᙷ#ㇿᴿᵛ1 4 錄製完成時,停止所連接裝置的錄製。 從 AUDIO OUT 插孔輸出的音量等級固定,而且不受 VOL 撥盤影響。 ⴆ㥲⪺#㩞#ቫዲ㩆#⳺ⱞᖂ#•ⴆ⳺ⱞ#ⱲⰦ#ცጶ⮞#Vrq|#ẖ⳺Ⱖᵆ#•ⱂ㩂⫖# ㄢᇊ ⷦ⟗⟆⬎1 でᜧẓ#ᢧᢧ㇏#ᙻ⮤ㆳ⋓#㇯㿫#⇳ᾋ゛#ⵗ䂯ᙷ#ⲏⵗẏ㐷#⿁ᛧᬏ#❯#ᢧᢧ㇏#ᚇḻᙷ#‟〫㐿#ⲏ# •ⴆ#㩞ᆚ ♺ⲋⱞ#ᔲ#≪ㄓ+ዢẦ#Ȓ#ㄢⵚ, ⇳ᾋ゛ぇᴋ#㸏⇳㴯#⚋#⾿㯃ᬏᙷ#ᬫ㈜ẏ〫#ㇿᴿᵛ1#㟓㉸㇏#ⲏⵗ#⬸㭓⏳#㚵ㆳ ⊛⓫#㊓㻿ㆻ#㌃ㄧ⋓#ṃ␣ⵤⵓ゛+ᡯ#ȏ0ʮ#㚯㋧,1 ˎ 㚟≀#₇ᴋ#᛫△#⾿ぇ⮓ᴋ#⇳ᾋ゛#ⲏⵗ#〫⊛ㄯ#ⲏ#ㇿᴿᵛ1#ẏḻ⋔#㚴▯#ᡳ㜏 1ぇ⮓#⬣ㄠ㿫#㍳ⵤⵓ゛1 POWER#ⴛㅻ㣏⏳#RADIO⋓#⮛㊌㿠ᴿᵛ1 警告 ⭢≪#ጚጚ⪺☆#ᱦ᧾⬎#ጚ ȯ〈ᡰ#⚆#㇃ᡰ#ᵟ㈇ᙷ#Ⰴ#△㜫シ#ㄧで䇿#ᵶᜃ#ẏ⓫#に#⚓⭔㿗#ⲏ#ㇿᴿᵛ1 ⵗ㠌ⵔ#⾿㯃ᬏ ˎ ㋼⏏ᙷ#ᵛ⏯#⚧㮧␣⏳#㿟᥏#⬣ㄠ㿏㐷#ⵤⵓ゛1 Ȱ POWER#ⴛㅻ㣏+RADIO/AUDIO IN/OFF, ˎ ⚧㮧␣⏳#ះ㜫㿗#ῃᴋ#┟ệ#⬿ㆳ⋓#ះ㜫㿏ⵤⵓ゛1 ȱ❯#㊓㻿ㆻ#㈜ᢧᙻ#⬣ㄠ㿏㐷#⿁ㆻ#ῃぇᴋ#⚧㮧␣#ᱻぇ#㇏㿓#⟷ⵔㆻ#⚠㐷㿏ᢧ# AUDIO IN#㈤ ˎ ㅻ㿏っ#⚧㮧␣⏳#ᤳᬫ#ᰊㆳⵤⵓ゛1 Ȳ Ⰷ㈘#ᪿ#៣Ⓞ 〈ᡰ#⚆#㇃ᡰ#ᵟ㈇ᙷ#Ⰴ#△㜫シ#ㄧで䇿#ᵶᜃ#ẏ⓫#に#⚓⭔㿗#ⲏ#ㇿᴿᵛ1 ㄢᇊ AUDIO OUT 插孔只會輸出本機收到的收音機訊號。AUDIO IN 插孔所連接裝置中的 聲音不會輸出。 視錄製裝置而定,如果超過2秒未輸出聲音,可能會自動暫停錄製,且錄製裝置可 能會進入聲音偵測狀態。當再次偵測到聲音時,可能從新曲目繼續錄製。 で㊓#₇ᴋ#䃋㿐#⮯㊌㊓ᴋ#㉿ᵷ#⬣ㄠ㿏㐷#ⵤⵓ゛1#❯㜫ᙷ#✷䂌ẗ#ⲏ#ㇿᴿᵛ1 ȩ FM/AM#ⴛㅻ㣏 您可以將收音機的聲音錄製到 IC 錄音器等錄製裝置。 附註 錄製時,請將本機遠離錄製裝置。錄製聲音中可能會有噪音。 錄製時,切勿觸碰本機、音訊連接線或錄製裝置。錄製聲音中可能會有噪音。 ˎ AUDIO OUT#㈤㇏#㇃≀#㠓⊜#≿✟#㊌ẏ/#VOL#ᵛ〳⋓ᴋ#⚋᪃㐷#⿁ᴿᵛ1 ˎ ❯㜫ᙷ#᷋≣ㅃ㐻#᜴ㄧ#ⲓ㿓#㎈⮨#⮯㊓⏳#⬫㑔#㉸ⵗ#⟷ὓ≣ㄫ#䁔ᜁㆳ⋓#ᵝ⾻#㍳ 4ⵤⵓ゛1# ᯰ㇃#ᬣㆳ⓫#でᜧẓ#㈜㣏ぇ⮓#ᯰ㇃ㆻ#㎈㐷㿠ᴿᵛ1 ˎ ✛㊗ᬏ#ⵓ#Ὠ㇏#ㄠ㿫㊓/#ⵓ㶇ẏᴋ#⢻ᵇ#OSㄠ#㫫␣#₇ᴋ#㊌㉻ᢧ#⚠㐷# ⴛ㽻≿ᴋ#⬣ㄠ㿏㐷#ⵤⵓ゛1 ⇢#ⴆ㥲⪺☆#%ZDONPDQ%⪺#≪♷ᤆ#ᙢⱞ#ⴆᅚ#ጚតⱞ#Ⱳ#㫎ᧆ㣚Ⱚ# ᛫㉻㐷ᴋ#㠠㉻㿏㐷#ⵤⵓ゛1 ˎ ▖⮓㩊#✂#⪰➟ឲ៎1 ˎ ᛫㉻㐷⏳#Ṑ㉻ᬏ#ᢧ㬷#Ⰴ#△㜫シ#㿟᥏#ᙷ㐷#ᵛᴿ㐷#ⵤⵓ゛1#⚧㮧␣㇏# 有關錄製和連接線的詳細說明,請參閱錄製裝置的使用說明書。 ˎ ⴛ㾳㥛ぇᴋ#ᚌ⊜㿓#㈇⮔#⬣ㄠẏ#ㇿㆳ☷⋓#㈇ᢧ#㧋ὓᙷ#ㇿᴋ#ⵗㄠ㣫ὓᬏ# ⬿#㴯∐ぇ⮓#ᯰ㇃#ᵛⵓ#ⵓ㈈ẗ#ⲏ#ㇿᴿᵛ1# 㭓ぴ#ⵓᴋ#㈇⮔ぇ#㇏㿓#Ⰷ⬸ㆻ#⚠㐷㿏ᢧ#ㅻ㿫#㊓㻿ぇ⮓#Ⓑ␣#㿏ⵤⵓ゛1 ≪㥲#㬿Ɫ 錄製收音機(見圖 ) 2 將 POWER 開關設定為 RADIO,然後調入想要的電臺。 3 在錄製裝置上開始錄製。 中文 ẏ#ᯰ㇃#㈜㣏ᙷ#⬣ㄫὓ#ᚇ㐷#⬸㭓⋓#Ὓ〫ᙿ#ⲏ#ㇿᴿᵛ1#⬣ㄫὓᙷ#ᵛⵓ#ᚇ㐷ẏ⓫# ᙻ㸯㿓#㴓ᵔㆻ#ㅻ㿓#TUNE#㻓ⵓὨ ˎ▖⮓㩂#ℚ㘚ẖ IP DP ⬎᧾⬎#Ɐᴏ %ZDONPDQ%#Ὠ㇏#ガ⯏#㥫㹣ᮃ㴯ぇ#でᜧ㿏ᢧ#ㅻ㿓#AUDIO IN#㈤# ˎVrq|#⿃㣫⇳㇯#OU9 78 7< :7 若所連接裝置的音量太大,聲音可能會失真。 附註 使用 Sony IC 錄音器時,將外部輸入選擇為“Audio IN”。如果選擇“MIC IN”, 錄製的聲音將失真。 如果使用錄音機的麥克風輸入插孔,錄製的聲音將失真。使用外部輸入插孔。 ᯰ㇃#⚆#でᜧ#㥷⢋ぇ#ᵷ㿓#㈇⮯㿓#ᬫㄠㆷ#ᯰ㇃#㈜㣏㇏#⬣ㄠ⮛⓼⮓⏳#㚯㋧㿏ⵤⵓ゛1 ˎ ㈈Ṑ#㉻⿌#Ὠㆻ#㻓ⵓ㿏ᴋ#ᢧ⓼㶇ㆷ#❯㜫#⚈⓫ぇ#ㇿᴿᵛ1 ㄢᇊ ˎ 㐷ᬏ㣓#ゟ/#㐸⬣ឈ⮗/#ᢧ/#┟∏/#⒳㐷ぇ#ᯯ㠓ⵓ㬛ᛧᬏ#△␣㉸㇯#㠠ᜠㆻ#ᙷ㿏 ˎ ᯰ㇃㿏ᴋ#Ṑ⾿#❯#㊓㻿ㆻ#ᯰ㇃#㈜㣏ぇ⮓#Ⓑ␣#‟〫↟⊛#ᰊㆳⵤⵓ゛1#ᯰ㇃ẓ#⬣ㄫὓぇ⮓# 㐷#ⵤⵓ゛1# ㈘㇃#Ὓ#ⲏ#ㇿᴿᵛ1 㿾❌#⾻∏#㍳㚟ẓ#㚟#Ⰴぇ#ᰋệ㐷#ⵤⵓ゛1 ˎ ᯰ㇃#ḻ㎈#❯#㊓㻿/#゛ᾋ゛#でᜧ#㥷⢋#₇ᴋ#ᯰ㇃#㈜㣏⏳#⑃㐷㐷#ⵤⵓ゛1#ᯰ㇃ẓ#⬣ㄫ でᜧẓ#㥫㹣ᮃ㴯㇏#⬣ㄫὓᴋ#㠓⊜ẏ㐷#⿁ᴿᵛ1 ˎ 㚟#₇ᴋ#᛫△#⾿ぇ⮓ᴋ#⇳ᾋ゛#ⲏⵗ#㈏#⾿ẏᛧᬏ#㈘㇃#⚓⭔㿗#ⲏ#ㇿᴿᵛ1# ˎ ᯰ㇃#㈜㣏ぇ#ᾧ⇳#⬣ㄫὓᙷ#5㝿#⬸#㠓⊜ẏ㐷#⿁ㆻ#᜴ㄧ#ᯰ㇃#㈇Ṑㆳ⋓#ㇳⵓ#㊌㐷 ẏḻ⋔#㚴▯#ᙷᣃぇ⮓#⬣ㄠ㿫#㍳ⵤⵓ゛1 㞣⺿ +ᵷ∬㉸㇯#ⵓᙻ, ⚧㮧␣ᙷ#⿴㿫㐷⓫#⬣ㄫὓᙷ#⿴㿫㐷ᛧᬏ#ビẏ/#TUNE#㻓ⵓὨ#〫ệㅃ㑈ᴿ 㫎ᧆ㣚+↮Ỏ㥲,Ⱖᵆ#Ⱖᴎ ᵛ1##᜴ㄧ#⚧㮧␣⏳#┟ệ#⬿ㆳ⋓#ះ㜫㿏ⵤⵓ゛1 䁛ὓ㹧ㆻ#+䁛ὓ㹧,#㈤ぇ#でᜧ㿠ᴿᵛ1# 䁛ὓ㹧ㆻ#でᜧ㿏⓫#ⴛ㾳㥛ぇ⮓#Ⰳ␣ᙷ#ᬏ㐷#⿁ᴿᵛ1 ℚ㘚ẖ⪺#ᇪ㩆#ⷦⱂ⳺ 1 使用隨附音訊連接線連接錄製裝置(見圖 )。 ˎ U9+DD#⬣㏿,#⚧㮧␣#ệ#ᚓ⏳#⬣ㄠ㿏っ#6#Y#GFぇ⮓⑃#❯#㊓㻿ㆻ#⬣ㄠ㿏ⵤ 3 ᯰ㇃#㈜㣏ぇ⮓#ᯰ㇃ㆻ#ⵓ㈈㿠ᴿᵛ1 ⵓ゛1 ὓぇ⮓#㈘㇃#Ὓ#ⲏ#ㇿᴿᵛ1 ˎ △㐿#㊓㻿#ᬫ⟷⋓#Ὓ〫ᚋㆻ#ῃぇᴋ#❯#㊓㻿㇏#㈈Ṑㆻ#㎈㐷㿏#⚧㮧␣⏳# ᤳᬯ#䄻#ᢧⲗ㈇㇏#㊇ᛷㆻ#⚒⾻#㍳ⵤⵓ゛1 ˎ AUDIO OUT#㈤ぇ⮓ᴋ#❯#㊓㻿ぇ⮓#ⲏⵗẓ#⇳ᾋ゛#ⵗ䂯⑃#㠓⊜Ạᴿᵛ1#AUDIO IN#㈤ぇ# ⚧㮧␣ᙷ#⿴㿫㐷⓫#⬣ㄫὓᙷ#⿴㿫㐷ᛧᬏ#ビẏ/#TUNE#㻓ⵓὨ#〫ệㅃ㑈ᴿ ȫ AUDIO OUT#㈤ ᵛ1##᜴ㄧ#⚧㮧␣⏳#┟ệ#⬿ㆳ⋓#ះ㜫㿏ⵤⵓ゛1 Ȭ +䁛ὓ㹧,#㈤ 握住天線底部調整天線方向。請注意,如果您移動天線時過度用力, 天線可能會損壞。 如果音量太小,請增大所連接裝置的音量。 至麥克風插孔 ℚ㘚ẖ#☎㍂+ዢẦ#Ȏ0ʭ#ㄢⵚ, ⬸䂯⓼=#Ⰳᴿ㧋␣⾻嗏# ┟ᷯ⓼=#VUI04; ㊓㋧㈇2㊓㋧៤ᙷ=#Vrq|#Frusrudwlrq2Fklqd 1 ⚧㮧␣ⵛ#ℓ᥈ㆻ#ぴᴿᵛ1 ㊓㋧でㅋ= 2 Vrq|#U9+DD#⬣㏿,#⚧㮧␣+✻㻿,#ệ#ᚓ⏳#ñシ#×#㻓ⵓぇ#㠋〫#ᮚ ᴿᵛ1 #ᢧᢧᴋ#ᙷ㊌ㄠ+Eᢀ,#㉻㈇㶃㉸㿠ᢧᢧ⋓⮓#㍳⋓#ᙷ㊌ぇ⮓#⬣ㄠ㿏ᴋ#ㆻ#┠㉸ ℚ㘚ẖ#ሺ㆞#⟆ጚ Ȫ VOL#ᵛ〳* 1 使用隨附的音訊連接線,將 AUDIO IN 插孔連接至裝置的耳機插孔。 2 將 POWER 開關設至 AUDIO IN。 3 開啟連接的裝置。開始播放聲音,並調整所連接裝置的音量。 4 使用本機的 VOL 調整音量。 연결 ▖⮓ⳮ#ⷦⱂ#▖㩗 2 POWER#ⴛㅻ㣏⏳#RADIO⋓#⮛㊌㿓#ᵛ㇃#ㅇ㿏ᴋ#⚠Ⱈ#㚻ᮇㆻ#㠜ᴿᵛ1 ᆧᇊ 拉出伸縮式天線並調整角度以獲得最佳的接收效果(見圖 -)。 您可以使用隨附的音訊連接線,將便攜式音樂播放器、“WALKMAN”等選購裝 置連接至本機。 您可以透過本機的揚聲器從選購裝置欣賞聲音。 至 AUDIO OUT 插孔 AUDIO OUT 잭에 ˎ 㯃㽻#≿㧋᷋㇏#㫣⋓㹧#ㇼ⊜#㈤ㆻ#⬣ㄠ㿏ᴋ#᜴ㄧ#ᯰ㇃ẓ#⬣ㄫὓᙷ#ビẗ#ⲏ#ㇿ ᴿᵛ1#ワ⟷#ㇼ⊜#㈤ㆻ#⬣ㄠ㿏ⵤⵓ゛1 *# VOL#ᵛ〳#ぽぇᴋ#㇃≀ㆻ#ᰉᴋ#⚠䀜ㆻ#ᬏ㬷ᬫᴋ#ṃᢧᙷ#ㇿᴿᵛ1 FM: 連接選購裝置(見圖 ) 㩆⪞ ℚ㘚ẖ#✂Ὧ+◯㢇㈯#⏷⧴#☧,+MHLWD*, 改善接收效果(見圖 ) ㄢᇊ ᚍ#ᵛᴿᢧ#㸯␣㿏ḻ⋔#❯#㊓㻿ぇ#Ⰷ㈘#ᪿㆻ#⟷㚠㿏ⵤⵓ゛1 ˎ Vrq|#LF#≿㧋᷋⏳#⬣ㄠ㿏ᴋ#᜴ㄧ#ワ⟷#ㇼ⊜ぇ⮓#%Dxglr#LQ%ㆻ#⮗㭔㿏ⵤⵓ゛1# Ⰷ㈘#ᪿㆻ#㊓㻿#ぽ㇏#៣Ⓞぇ#ㄧⵤⵓ゛1 %PLF#LQ%ㆻ#⮗㭔㿏⓫#ᯰ㇃ẓ#⬣ㄫὓᙷ#ビẗ#ⲏ#ㇿᴿᵛ1 Ȳ Ⰷ㈘#ᪿ#៣Ⓞ Vrq|#U9+DD#⬣㏿, ⟷Ⰴẓ#゛ᾋ゛#でᜧ#㥷⢋ㆻ#⬣ㄠ㿏っ#ᯰ㇃#㈜㣏⏳#でᜧ㿠ᴿᵛ+ᡯ#ȑ#㚯㋧,1 ♺ⲋⱞ#ᔲ#≪ㄓ+ዢẦ#Ȓ#ㄢⵚ, ȱ AUDIO IN#㈤ 若要用耳機(非附件)聆聽 附註 收聽收音機時,將音訊連接線與本機的 AUDIO IN 插孔斷開,否則可能會聽到噪音。 ᯰ㇃#ᬣㆳ⓫#でᜧẓ#㈜㣏ぇ⮓#ᯰ㇃ㆻ#㎈㐷㿠ᴿᵛ1 ㄢᇊ ȭ TUNE#㻓ⵓὨ ㆳ⋓#㿏ⓧ/#┟ὗ#㐷つぇ⮓#⬣ㄠ㿗#ⲏ#ㇿᴿᵛ1 3 ℓ᥈ㆻ#ᵢᴿᵛ1 本機無法與有消除噪音功能的“WALKMAN”隨附的耳機一起使用。 4 ゛ᾋ゛#でᜧ#㥷⢋ㆻ#⬣ㄠ㿏っ#AUDIO OUT#㈤ㆻ#ワ⟷#ᢧᢧ㇏#DXGLR#LQ#㈤# ₇ᴋ#OLQH#LQ#㈤ぇ#でᜧ㿗#ⲏ#ㇿᴿᵛ1#❯#㊓㻿ぇ⮓#ⲏⵗ㿓#⇳ᾋ゛#ⵗ䂯⏳#で ᜧẓ#ᢧᢧ⏳#㰬㿫#Ὓㆻ#ⲏ#ㇿᴿᵛ1 ❯#㊓㻿㇏#ⴛ㾳㥛ぇ⮓ḻ#⬣ㄫὓᙷ#㠓⊜Ạᴿᵛ1#VOLㆻ#⬣ㄠ㿏っ#㇃≀ㆻ#㋧㉿㿏 ⵤⵓ゛1 關於版權 Ȫ VOL#ᵛ〳* 將 POWER 開關設定為 OFF。 將耳機連接至 (耳機)插孔。 連接耳機時,揚聲器將靜音。 ˎ AUDIO OUT#㈤㇏#㇃≀#㠓⊜#≿✟#㊌ẏ/#VOL#ᵛ〳⋓ᴋ#⚋᪃㐷#⿁ᴿᵛ1 ȩ FM/AM#ⴛㅻ㣏 Ȱ POWER#ⴛㅻ㣏+RADIO/AUDIO IN/OFF, ˎ ᯰ㇃#㈜㣏ぇ#ᾧ⇳#⬣ㄫὓᙷ#5㝿#⬸#㠓⊜ẏ㐷#⿁ㆻ#᜴ㄧ#ᯰ㇃#㈇Ṑㆳ⋓#ㇳⵓ#㊌㐷 ẏ#ᯰ㇃#㈜㣏ᙷ#⬣ㄫὓ#ᚇ㐷#⬸㭓⋓#Ὓ〫ᙿ#ⲏ#ㇿᴿᵛ1#⬣ㄫὓᙷ#ᵛⵓ#ᚇ㐷ẏ⓫# ⬿#㴯∐ぇ⮓#ᯰ㇃#ᵛⵓ#ⵓ㈈ẗ#ⲏ#ㇿᴿᵛ1# ⭢≪#ጚጚ⪺☆#ᱦ᧾⬎#ጚ Ȭ +䁛ὓ㹧,#㈤ 1 將 POWER 開關設定為 RADIO。 2 將 FM/AM 開關設定為 FM 或 AM。 3 使用 TUNING 調入電臺。 ˎ AUDIO OUT#㈤ぇ⮓ᴋ#❯#㊓㻿ぇ⮓#ⲏⵗẓ#⇳ᾋ゛#ⵗ䂯⑃#㠓⊜Ạᴿᵛ1#AUDIO IN#㈤ぇ# でᜧẓ#㥫㹣ᮃ㴯㇏#⬣ㄫὓᴋ#㠓⊜ẏ㐷#⿁ᴿᵛ1 ≪㥲#㬿Ɫ 設計及規格如有變更,恕不另行通知。 “WALKMAN”和“WALKMAN”標誌是 Sony Corporation 的註冊商標。 ȫ AUDIO OUT#㈤ 使用收音機 ˎ ᯰ㇃#ḻ㎈#❯#㊓㻿/#゛ᾋ゛#でᜧ#㥷⢋#₇ᴋ#ᯰ㇃#㈜㣏⏳#⑃㐷㐷#ⵤⵓ゛1#ᯰ㇃ẓ#⬣ㄫ ὓぇ⮓#㈘㇃#Ὓ#ⲏ#ㇿᴿᵛ1 ˎ *ᙻ㸯㿓#㴓ᵔㆻ#ㅻ㿓#TUNE#㻓ⵓὨ JEITA (Japan Electronics and Information Technology Industries Association) 標 準。 IN#㈤# ˎ %ZDONPDQ%#Ὠ㇏#ガ⯏#㥫㹣ᮃ㴯ぇ#でᜧ㿏ᢧ#ㅻ㿓#AUDIO ⇳ᾋ゛#ᯰ㇃#ⵓ#㸯␣㿓#AUDIO OUT#㈤ ˎ 隨附配件 電池艙蓋設計為用力開啟時會鬆落。若要放回電池艙蓋,請參見以下說明和 圖 -。 將右掛鉤滑入本機的右孔。 ˎ ᯰ㇃㿏ᴋ#Ṑ⾿#❯#㊓㻿ㆻ#ᯰ㇃#㈜㣏ぇ⮓#Ⓑ␣#‟〫↟⊛#ᰊㆳⵤⵓ゛1#ᯰ㇃ẓ#⬣ㄫὓぇ⮓# ㈘㇃#Ὓ#ⲏ#ㇿᴿᵛ1 㞣⺿ 若要安裝不小心鬆落的電池艙蓋(見圖 -) 將右掛鉤掛在對應艙蓋的右半部電池艙上。 ᯰ㇃#㈜㣏ぇ⮓#ᯰ㇃ㆻ#ⵓ㈈㿠ᴿᵛ1 ㄢᇊ 質量: 約 198 g(含電池) 將電池艙蓋的左掛鉤插入本機的左孔。 POWER#ⴛㅻ㣏⏳#RADIO⋓#⮛㊌㿓#ᵛ㇃#ㅇ㿏ᴋ#⚠Ⱈ#㚻ᮇㆻ#㠜ᴿᵛ1 ᯰ㇃#⚆#でᜧ#㥷⢋ぇ#ᵷ㿓#㈇⮯㿓#ᬫㄠㆷ#ᯰ㇃#㈜㣏㇏#⬣ㄠ⮛⓼⮓⏳#㚯㋧㿏ⵤⵓ゛1 當電池快沒電時,聲音會變弱或失真,或者 TUNE 指示燈會變暗。在此情況 下,請將所有的電池換新。 切勿對乾電池充電。 切勿將乾電池與硬幣或其他金屬物放在一起攜帶。如果電池的正負端子意 外接觸到金屬物,則會產生熱量。 切勿同時使用不同類型的電池。 更換電池時,請將電池全部換新。 當您打算長時間不使用本機時,請取出電池,以免因電池漏液和腐蝕而損 壞本機。 先插入電池的 端。 ˎ 㯃㽻#≿㧋᷋㇏#㫣⋓㹧#ㇼ⊜#㈤ㆻ#⬣ㄠ㿏ᴋ#᜴ㄧ#ᯰ㇃ẓ#⬣ㄫὓᙷ#ビẗ#ⲏ#ㇿ ᴿᵛ1#ワ⟷#ㇼ⊜#㈤ㆻ#⬣ㄠ㿏ⵤⵓ゛1 更換電池的時間 電池的注意事項 뒷면 ˎ Vrq|#LF#≿㧋᷋⏳#⬣ㄠ㿏ᴋ#᜴ㄧ#ワ⟷#ㇼ⊜ぇ⮓#%Dxglr#LQ%ㆻ#⮗㭔㿏ⵤⵓ゛1# %PLF#LQ%ㆻ#⮗㭔㿏⓫#ᯰ㇃ẓ#⬣ㄫὓᙷ#ビẗ#ⲏ#ㇿᴿᵛ1 (2) 尺寸: #ᢧᢧᴋ#ᙷ㊌ㄠ+Eᢀ,#㉻㈇㶃㉸㿠ᢧᢧ⋓⮓#㍳⋓#ᙷ㊌ぇ⮓#⬣ㄠ㿏ᴋ#ㆻ#┠㉸ 約 155 mm × 78.5 mm × 32.5 mm(寬/高/深,不包括突出部分) ㆳ⋓#㿏ⓧ/#┟ὗ#㐷つぇ⮓#⬣ㄠ㿗#ⲏ#ㇿᴿᵛ1 約 155.4 mm × 80.3 mm × 34.2 mm(寬/高/深,包括突出部分) (JEITA*) 後面 ⟷Ⰴẓ#゛ᾋ゛#でᜧ#㥷⢋ㆻ#⬣ㄠ㿏っ#ᯰ㇃#㈜㣏⏳#でᜧ㿠ᴿᵛ+ᡯ#ȑ#㚯㋧,1 ㄢᇊ AUDIO IN 插孔( 3.5 mm 立體聲迷你插孔)(1) 電池持續使用時間 (使用揚聲器時)(JEITA*) 1 ⬟♂#㏞㣖ᗶ㞢#⫚ᆚ+ዢẦ#Ȑ#ㄢⵚ, Ɐᴏ= ⇳ᾋ゛#ⵗ䂯ᙷ#⿴㿠ᴿᵛ1#᛫△#₇ᴋ#㚟≀#ᬫ⟷ぇ⮓ᴋ#ⵗ䂯ᙷ#⿴㿫㐿#ⲏ#ㇿㆳ☷ ˎ DXGLR#LQ#㈤+˔#618#pp#ⴛ㯃≿゛#♯ᴿ#㈤,#+4, ⋓#㚴ᙷぇ⮓#⇳ᾋ゛⏳#㜤㡟㿏ⵤⵓ゛1 DXGLR#RXW#㈤+˔#618#pp#ⴛ㯃≿゛#♯ᴿ#㈤,#+4, ˎ WY#ᡳ㜏#ᚐ#ᙻ⮤#⚓⭔㿗#ⲏ#ㇿᴋ#ᝪぇ⮓ᴋ#❯#㊓㻿ㆻ#Ⓑ␣#㿏ⵤⵓ゛1 ⳮ⮺#㊆ᴏ= ⫚ᆚᤆ#㏞㣖ᗶ㞢⪺☆#⬎᧾⬎#⟊㬢ც#Ɐᴏᤂ#ᆧ⮚#ᙢⱞც#◇ጚᅚᖂ#▖⮞ᧆც# ;3#pZ#.#;3#pZ+MHLWD*, ⭆ᇋᤆ៎1 㨮⭾#ⳮ⮺= ˎ でᜧẓ#㥫㹣ᮃ㴯㇏#㇃≀ㆻ#ᬥ㠋ⵤⵓ゛1 6#Y#GF/#ệ#ᚓ㇏#U9+DD#⬣㏿,#⚧㮧␣ でᜧẓ#㥫㹣ᮃ㴯ぇ#㉷㇃#㐔㹤#ᢧᴜ#ㇿᴋ#᜴ㄧ##ᢧᴜㆻ#᪻ⵤⵓ゛1 ˎ ᆓ= ˎ ⚧㮧␣ᙷ#⿴㿫㋃ᴿᵛ1#㠠㉻ⵔ#⚧㮧␣⏳#⬣ㄠ㿏ᴋ#᜴ㄧ#⚧㮧␣⏳#㠠㉻㿏ⵤⵓ ⿴#488#pp#×#:;18#pp#×#6518#pp+ᙷ⋓2⮯⋓2ệ᥏/#ṃ㠓#⟷⟻#㊓ワ, ⿴#48817#pp#×#;316#pp#×#6715#pp+ᙷ⋓2⮯⋓2ệ᥏/#ṃ㠓#⟷⟻#㹣㿟, ゛1#᛫㉻㐷⏳#⬣ㄠ㿏ᴋ#᜴ㄧ#┟ệ#⬿ㆳ⋓#ះ㜫㿏ⵤⵓ゛1 +MHLWD*, ˎ でᜧ#㥷⢋#ᵟᵟ䇿#でᜧẏ〫#ㇿᴋ㐷#䃌㇯㿏ⵤⵓ゛1# ⷻᲳ= ˎ でᜧẓ#㥫㹣ᮃ㴯㇏#OLQH#RXW#㈤ぇ#でᜧẓ#᜴ㄧ#䁛ὓ㹧#㈤ぇ#でᜧ㿏ⵤⵓ゛1 ⿴#4<;#j+⚧㮧␣#㹣㿟, ⫚ᆚᤆ#㏞㣖ᗶ㞢⪺☆#⬎᧾⬎#⟊㬢ც#Ɐᴏᤂ#ᆧ⮚#♶ẖც#ⱻᅚᖂ#ᖂ⬎⺪#⨴៎1 INㆳ⋓#⮛㊌㿏ⵤⵓ゛1 ˎ *# POWER#ⴛㅻ㣏ᙷ#OFF⋓#⮛㊌ẓ#᜴ㄧ#AUDIO MHLWD+Mdsdq#Hohfwurqlfv#dqg#Lqirupdwlrq#Whfkqrorj|#Lqgxvwulhv# Dvvrfldwlrq,#ᡓ㊌1 ˎ ㇃≀#㟓Ⰳ⋓#⮛㊌ẏ〫#ㇿᴿᵛ1#❯#㊓㻿㇏#㇃≀ㆻ#ᰉⵤⵓ゛1 でᜧẓ#㥫㹣ᮃ㴯㇏#㇃≀#㟓Ⰳ⋓#⮛㊌ẏ〫#ㇿᴿᵛ1#でᜧẓ#㥫㹣ᮃ㴯㇏#㇃≀ ˎ ≪♷ᤆ#⩋☢☆ẖ ㆻ#ᰉⵤⵓ゛1 ⬣ㄠ⮛⓼⮓+4, ゛ᾋ゛#でᜧ#㥷⢋+ⴛ㯃≿゛#♯ᴿ#㾃≣ᡯ##ⴛ㯃≿゛#♯ᴿ#㾃≣ᡯ,#+4, ˎ でᜧ#㥷⢋#ᵟᵟ䇿#でᜧẏ〫#ㇿᴋ㐷#䃌㇯㿏ⵤⵓ゛1# ᾋ㈇㇯#⚆#㍳ㄋ#㊓ㅇㆷ#⬣㉻#㰬❫#〽#✷᜴ẗ#ⲏ#ㇿᴿᵛ1 ˎ ⚧㮧␣ᙷ#⿴㿫㋃ᴿᵛ1#㠠㉻ⵔ#⚧㮧␣⏳#⬣ㄠ㿏ᴋ#᜴ㄧ#⚧㮧␣⏳#㠠㉻㿏ⵤⵓ ゛1#᛫㉻㐷⏳#⬣ㄠ㿏ᴋ#᜴ㄧ#┟ệ#⬿ㆳ⋓#ះ㜫㿏ⵤⵓ゛1 ᙣⰶᤆ#ᱦ᧾⬎#▖⮞ᧆც#⭆ᇋᤂᅚᖂ#ᙢⱞც#℆◇ᤆ៎1 ⳪ⱻቶ⪺#㩂⫖ ˎ ᯰ㇃#㈜㣏㇏#⮛㊌#ィ⚋⏫㐷#⿁ᴿᵛ1#%⇳ᾋ゛#ᯰ㇃%㇏#㚯⏳#㚯㋧㿏ᛧᬏ# ᯰ㇃#㈜㣏㇏#⬣ㄠ⮛⓼⮓⏳#㚯㋧㿏ⵤⵓ゛1 %ZDONPDQ%#⚆#%ZDONPDQ%#⋓ᴋ#Vrq|#Frusrudwlrq㇏#Ὠ⋔#⬸㻓 ㇼᴿᵛ1 ⷦ⭾#ⴆ⮺ ⷦ㟶✂#ⅾ⯮= IP=#;:18#PK}#0#43;#PK} DP=#863#nK}#0#4/:43#nK} ➎㨦㏎= 㐸᜴#⿴#619#fp/#:15#ˍ#+5, Ɐᴏ= DXGLR#LQ#㈤+˔#618#pp#ⴛ㯃≿゛#♯ᴿ#㈤,#+4, ㊆ᴏ= +䁛ὓ㹧,#㈤+˔#618#pp#ⴛ㯃≿゛#♯ᴿ#㈤,#+4, DXGLR#RXW#㈤+˔#618#pp#ⴛ㯃≿゛#♯ᴿ#㈤,#+4, ⳮ⮺#㊆ᴏ= ;3#pZ#.#;3#pZ+MHLWD*, 㨮⭾#ⳮ⮺= 6#Y#GF/#ệ#ᚓ㇏#U9+DD#⬣㏿,#⚧㮧␣ ᆓ= ⿴#488#pp#×#:;18#pp#×#6518#pp+ᙷ⋓2⮯⋓2ệ᥏/#ṃ㠓#⟷⟻#㊓ワ, ⿴#48817#pp#×#;316#pp#×#6715#pp+ᙷ⋓2⮯⋓2ệ᥏/#ṃ㠓#⟷⟻#㹣㿟, +MHLWD*, ⟷Ⰴẓ#゛ᾋ゛#でᜧ#㥷⢋ㆻ#⬣ㄠ㿏っ#䆫ᵷㄠ#㇃⾼#㾃≿〫㇯#%ZDONPDQ%# Ὠᝳ#ᚐㆷ#ガ⯏#㥫㹣ᮃ㴯⏳#❯#㊓㻿ぇ#でᜧ㿗#ⲏ#ㇿᴿᵛ1 ❯#㊓㻿㇏#ⴛ㾳㥛⏳#㰬㿫#ガ⯏#㥫㹣ᮃ㴯㇏#⬣ㄫὓ⏳#Ὓㆻ#ⲏ#ㇿᴿᵛ1 ⷻᲳ= ⿴#4<;#j+⚧㮧␣#㹣㿟, 1 ⟷Ⰴẓ#゛ᾋ゛#でᜧ#㥷⢋ㆻ#⬣ㄠ㿏っ#AUDIO IN#㈤ㆻ#㥫㹣ᮃ㴯㇏#䁛ὓ㹧#㈤ ぇ#でᜧ㿠ᴿᵛ1 *# MHLWD+Mdsdq#Hohfwurqlfv#dqg#Lqirupdwlrq#Whfkqrorj|#Lqgxvwulhv# Dvvrfldwlrq,#ᡓ㊌1 2 3 POWER#ⴛㅻ㣏⏳#AUDIO INㆳ⋓#⮛㊌㿠ᴿᵛ1 4 でᜧẓ#㥫㹣ᮃ㴯⏳#㦤ᴿᵛ1#⬣ㄫὓ#㈣⭔ㆻ#ⵓ㈈㿏#でᜧẓ#㥫㹣ᮃ㴯㇏#㇃≀ㆻ# ㋧㉿㿠ᴿᵛ1 ㊓㻿㇏#VOLㆻ#⬣ㄠ㿏っ#㇃≀ㆻ#㋧㉿㿠ᴿᵛ1# ㇃≀#▫#ᬥㆻ#᜴ㄧ#でᜧẓ#㥫㹣ᮃ㴯㇏#㇃≀ㆻ#ᰉⵤⵓ゛1 ⇢#ጚጚṦ#ᔮᴎ 㜤㡟#䄻#POWER#ⴛㅻ㣏ᙷ#OFF⋓#⮛㊌ẏ〫#ㇿᴋ㐷#䃌㇯㿏ⵤⵓ゛1#でᜧẓ# 㥫㹣ᮃ㴯ᙷ#㈣⭔ẏ㐷#⿁ㆻ#᜴ㄧ+ⴛ㾳㥛ぇ⮓#⬣ㄫὓ#〽㇃,/#POWER#ⴛㅻ㣏ᙷ# AUDIO INㆳ⋓#⮛㊌ẏ〫#ㇿㆳ⓫#❯#㊓㻿㇏#㉻ㅇ#ᤳ㐷㐷#⿁ᴿᵛ1 㟫 ᷋#㌂ㆷ#⬣ㄫὓ⏳#㐇ᢧ⊛⓫#でᜧẓ#㥫㹣ᮃ㴯㇏#㇃≀ㆻ#㋧㉿㿓#ᵛ㇃#❯#㊓㻿㇏#㇃≀ㆻ#㋧㉿㿏 ⵤⵓ゛1 ㄢᇊ ˎ %ZDONPDQ%ᝳ#ᚐㆷ#でᜧẓ#䆫ᵷㄠ#㇃⾼#㾃≿〫ぇ#㉷㇃#㐔㹤#ᢧᴜ#ㇿᴋ#᜴ㄧ## ᢧᴜㆻ#᪻ⵤⵓ゛1#⬣ㄫὓᙷ#ビẗ#ⲏ#ㇿᴿᵛ1 ˎ でᜧẓ#㥫㹣ᮃ㴯㇏#┟ᯯ#㠓⊜#㈤ぇ#でᜧẓ#᜴ㄧ#㊓㻿㇏#゛⏯㔴#ⴛ㾳㥛ぇ⮓#⬣ㄫὓᙷ#㠓⊜ ẏ㐷#⿁ㆻ#ⲏ#ㇿᴿᵛ1 ˎ でᜧẓ#㥫㹣ᮃ㴯㇏#OLQH#RXW#㈤ᝳ#ᚐ#㊌ẓ#㠓⊜ぇ#でᜧẓ#᜴ㄧ#⬣ㄫὓᙷ#ビẗ# ⲏ#ㇿᴿᵛ1#⬣ㄫὓᙷ#ビẗ#᜴ㄧ#䁛ὓ㹧#㈤ぇ#でᜧ㿏ⵤⵓ゛1 ˎ でᜧẓ#㥫㹣ᮃ㴯㇏#㇃≀#▫#㫫#᜴ㄧ#⬣ㄫὓᙷ#ビẗ#ⲏ#ㇿᴿᵛ1 ≪♷ᤆ#⩋☢☆ẖ ⬣ㄠ⮛⓼⮓+4, ゛ᾋ゛#でᜧ#㥷⢋+ⴛ㯃≿゛#♯ᴿ#㾃≣ᡯ##ⴛ㯃≿゛#♯ᴿ#㾃≣ᡯ,#+4, ᾋ㈇㇯#⚆#㍳ㄋ#㊓ㅇㆷ#⬣㉻#㰬❫#〽#✷᜴ẗ#ⲏ#ㇿᴿᵛ1 ⳪ⱻቶ⪺#㩂⫖ %ZDONPDQ%#⚆#%ZDONPDQ%#⋓ᴋ#Vrq|#Frusrudwlrq㇏#Ὠ⋔#⬸㻓 ㇼᴿᵛ1