1
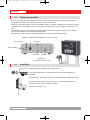
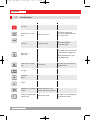
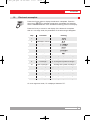
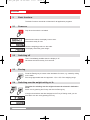
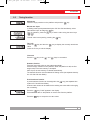
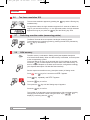
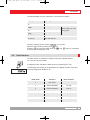
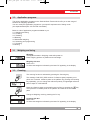
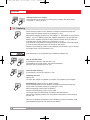
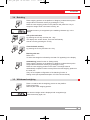
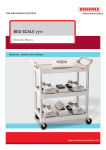
Ba_3010_GB.qxd
03.04.2008
17:06
Seite 1
FOR M EASUREAB LE SUCCESS
Basic Terminal 3010
Operating Manual
www.soehnle-professional.com
Ba_3010_GB.qxd
03.04.2008
17:06
Seite 2
English
Contents
1.
Introduction . . . . . . . . . . . . . . . . . . . . . . . . . . . . . . . . . . . . . . . . . . . . . . . . . . . ..Page 3
1.1
Operating manual notes . . . . . . . . . . . . . . . . . . . . . . . . . . . . . . . . . . . . . . . . . . .Page 3
1.2
Description of the appliance . . . . . . . . . . . . . . . . . . . . . . . . . . . . . . . . . . . . . . . .Page 3
1.3.
Putting into operation . . . . . . . . . . . . . . . . . . . . . . . . . . . . . . . . . . . . . . . . . . . . .Page 4
1.4.
Installation . . . . . . . . . . . . . . . . . . . . . . . . . . . . . . . . . . . . . . . . . . . . . . . . . . . . . .Page 4
1.5
Symbols . . . . . . . . . . . . . . . . . . . . . . . . . . . . . . . . . . . . . . . . . . . . . . . . . . . . . . ..Page 5
1.6
Description of the nameplate . . . . . . . . . . . . . . . . . . . . . . . . . . . . . . . . . . . . . . .Page 5
1.7
Control keys . . . . . . . . . . . . . . . . . . . . . . . . . . . . . . . . . . . . . . . . . . . . . . . . . . . .Page 6
1.8
Electronic nameplate . . . . . . . . . . . . . . . . . . . . . . . . . . . . . . . . . . . . . . . . . . . . .Page 7
2.0
Basic functions . . . . . . . . . . . . . . . . . . . . . . . . . . . . . . . . . . . . . . . . . . . . . . . . . .Page 8
2.1
Power-on . . . . . . . . . . . . . . . . . . . . . . . . . . . . . . . . . . . . . . . . . . . . . . . . . . . . . .Page 8
2.2
Switching off . . . . . . . . . . . . . . . . . . . . . . . . . . . . . . . . . . . . . . . . . . . . . . . . . . . .Page 8
2.3
Zeroing . . . . . . . . . . . . . . . . . . . . . . . . . . . . . . . . . . . . . . . . . . . . . . . . . . . . . . . .Page 8
2.4
Switching over the weight unit kg <> lb . . . . . . . . . . . . . . . . . . . . . . . . . . . . . . .Page 8
2.5
Taring function . . . . . . . . . . . . . . . . . . . . . . . . . . . . . . . . . . . . . . . . . . . . . . . . . .Page 9
2.6
Ten times resolution X10 . . . . . . . . . . . . . . . . . . . . . . . . . . . . . . . . . . . . . . . . . .Page 10
2.7
Switching over the scales (measuring points)
2.8
Alibi memory . . . . . . . . . . . . . . . . . . . . . . . . . . . . . . . . . . . . . . . . . . . . . . . . . . .Page 10
2.9
Hold function . . . . . . . . . . . . . . . . . . . . . . . . . . . . . . . . . . . . . . . . . . . . . . . . . . .Page 11
. . . . . . . . . . . . . . . . . . . . . . . . .Page 10
2.10 Measuring point inputs and outputs . . . . . . . . . . . . . . . . . . . . . . . . . . . . . . . . ..Page 12
2.11
3.0
4.
2
LED lamps . . . . . . . . . . . . . . . . . . . . . . . . . . . . . . . . . . . . . . . . . . . . . . . . . . . . .Page 12
Application programs
. . . . . . . . . . . . . . . . . . . . . . . . . . . . . . . . . . . . . . . . . . . .Page 13
3.1
Weighing and taring . . . . . . . . . . . . . . . . . . . . . . . . . . . . . . . . . . . . . . . . . . . . . .Page 13
3.2
Counting . . . . . . . . . . . . . . . . . . . . . . . . . . . . . . . . . . . . . . . . . . . . . . . . . . . . . ..Page 13
3.3
Totalising . . . . . . . . . . . . . . . . . . . . . . . . . . . . . . . . . . . . . . . . . . . . . . . . . . . . . ..Page 14
3.4
Batching
3.5
Withdrawal weighing . . . . . . . . . . . . . . . . . . . . . . . . . . . . . . . . . . . . . . . . . . . . .Page 15
3.6
Switching point programming . . . . . . . . . . . . . . . . . . . . . . . . . . . . . . . . . . . . . . .Page 16
3.7
Checking . . . . . . . . . . . . . . . . . . . . . . . . . . . . . . . . . . . . . . . . . . . . . . . . . . . . . .Page 16
3.8
Dosing. . . . . . . . . . . . . . . . . . . . . . . . . . . . . . . . . . . . . . . . . . . . . . . . . . . . . . . . .Page 16
. . . . . . . . . . . . . . . . . . . . . . . . . . . . . . . . . . . . . . . . . . . . . . . . . . . . . .Page 15
Troubleshooting . . . . . . . . . . . . . . . . . . . . . . . . . . . . . . . . . . . . . . . . . . . . . . . . .Page 18
Ba_3010_GB.qxd
03.04.2008
17:06
Seite 3
English
Thank you for choosing this Soehnle Professional product. All the features of this product were
designed to the state of the art and are optimised for simple and straightforward use.
If you have any queries or experience any problems with the appliance that are not addressed in
the operating instructions, please contact your Soehnle Professional service partner or visit us on
the web at www.soehnle-professional.com.
1.1
Operating manual notes
This operating manual describes all the standard functions and settings of the Basic Terminal 3010.
Further information on the Setting mode is provided on the enclosed CD.
All the information is based on the standard version of the Basic Terminal 3010.
There may be deviations on special-purposes versions.
1.2
Appliance description
Technical data
• Housing made of stainless steel, protection class IP 40 or 65, integrated power adapter
100 - 240 VAC, optional DC/DC converter, 12 or 24 V
• 2 measuring points connectable internally
• Membrane keyboard with a total of 10 keys, 1 function key
• Display: 7 digits, 7-segment display, 16 mm digit height, backlit and dimmable
• Operating temperature: -10°C to +40°C
• Calibratable to Precision Class III for n = 8000e for multirange and multidivision scales.
• Approvable weighing range 0.1 kg to 120 t.
• Smallest permissible input signal per calibration value = 0.22 µV.
• Load cell power supply 5 VDC
Optional:
• Alibi memory for min. 2 million inputs
• Interfaces: 2 x RS 232, additional ports optional, including bus, analogue output 0 - 20 mA, USB
3
Ba_3010_GB.qxd
03.04.2008
17:06
Seite 4
English
1.3
Putting into operation
Before connecting the power plug to the mains, make sure that the power supply specified on the
nameplate and the power plug version comply with local conditions.
Place the connected scales on a level and stable surface. Protect the application by selecting a site of
installation that is not subject to shocks, vibration, intensive heat or cold, draughts, chemicals or moisture.
The appliance may only be opened by trained service technicians. Before carrying out any service
work on the appliance, disconnect the power supply.
After power-on, the measured values stabilise after a warm-up period of 30 minutes.
Pressure compensation membrane on IP 65 housing
Power supply
Interface 1
Ground (GND)
Interface 2
Scale 1 + 2
Connections
e.g. Profibus, Ethernet, etc.
1.4
Installation
Install the weighing platform at the point of use.
Using a spirit level and the adjustable feet, ensure that the platform is
horizontal.
Install the Basic Terminal or mount it on the wall using the optional bracket.
Provide access to a mains power source or connect the appliance to a
DC power source using a DC/DC converter.
The scale is ready for use.
4
Ba_3010_GB.qxd
03.04.2008
17:07
Seite 5
English
1.5
M1
Symbols
Active measuring point (scale)
Active weighing range
Zero reading
Net weighing
Tare reading
Manual tare
Hold mode (The reading is fixed to improve legibility)
Total memory
Piece count mode
Alibi memory
O1-O4
1.6
Switching points (Outputs O1 - O4)
Description of the nameplate
Weighing ranges
Maximum load of weighing range
Minimum load of weighing range
Calibration value (resolution)
Serial number of scale (scale type, last digits of year
of manufacture, consecutive number)
EU conformity mark with year of affixing also start of
validity of verification
Precision class
D07-09-011 Number of EU approval
XXXX
e.g. 0103, Official Code of "Notified Body"
(this body performed the initial calibration)
M
Symbol for EU calibration
Calibration counter status
001
Max
Min
e=
SNR
XXXX
5
Ba_3010_GB.qxd
03.04.2008
17:07
Seite 6
English
1.7
Control keys
Operating mode
Setpoint input
Setting mode
On / Off
Zeroing key or Clear
tare
Set input to zero
Tare key
Increment value
Next setting step or
increment value
Next setting step or
increment value Access edit
function within setting step
or
save parameter and go to
next setting step
Print key or
Enter key
Clear key or Cancel
key
One menu level back,
or shift an editable decade
from right to left
Cancel key
Go back one menu level in
Setting mode
Info key
Totalise or
Batch
Count
6
Setpoints or corrected
values
Accept setpoints or corrected values and continue.
Freely programmable
function key
Decrement value
Go back by one setting step
or decrement value
Ba_3010_GB.qxd
03.04.2008
17:07
Seite 7
English
1.8
Electronic nameplate
Press the Info key twice to display the electronic nameplate. Press the
arrow keys (
/
) to indicate the electronic nameplate, the Serial No.
and the calibration counter of the activated measuring points in the display.
Press the CL key to cancel or end display of the electronic nameplate.
With a 1 or 2-range scale, the parameters of the other ranges disappear.
Display
step
Parameter
1.
-
2.
Calibration counter
3.
Type
4.
Year
5.
Serial No.
6.
ID Chip
7.
Max of Range 1
8.
Min of Range 1
_ 0,20kg and symbol for Range 1
9.
e of Range 1
E 0,01kg and symbol for Range 1
10.
Max of Range 2
¯ 20,00kg and symbol for Range 2
11.
Min of Range 2
_ 0,40kg and symbol for Range 2
12.
e of Range 2
E 0,02kg and symbol for Range 2
13.
Max of Range 3
¯ 30,00kg and symbol for Range 3
14.
Min of Range 3
_ 1,00kg and symbol for Range 3
15.
e of Range 3
E 0,05kg and symbol for Range 3
Reading
¯ 10,00kg and symbol for Range 1
On a non-approved scale, "d" is displayed instead of "E".
7
Ba_3010_GB.qxd
03.04.2008
17:07
Seite 8
English
2.
Basic functions
The basic functions are similar or identical for all application programs.
2.1
Power-on
Only when the scale is not loaded.
After the test routine, the display is set to zero.
The scale is ready for use.
Place the weighing product on the scale.
The display shows the gross weight.
2.2
Switching off
This is immediately possible when the display is "0".
Otherwise hold down the key for 3 seconds.
2.3
Zeroing
Press the Zeroing key to correct minor deviations from zero, e.g. caused by soiling
on the scale.
Zero range approvable and non-approved: -1% to +3% of the weighing range.
2.4
Switching over the weight unit kg <> lb
The option for switching over the weight units must be released in Calibration
mode.
Switch over by pressing the Info key and then the Zeroing key.
If weight unit switchover was also assigned to the F key in Setting mode, you can
also switch over the unit by pressing the F key.
8
Ba_3010_GB.qxd
03.04.2008
17:07
Seite 9
English
2.5
Taring function
Manual tare
Place an empty container on the platform and press the
-key.
Manual tare input
In Setting mode (see separate description 470.702.078 User Mode), select
"Manual tare input" to assign the
key.
Then in operation, press the
-key to set the value using the arrow keys
(
/
).
The set value is accepted by pressing the
-key.
Tara info
Press the
-key and then the
- key to display the currently stored tare
value.
Press the CL key to exit the display.
Clear tare
Press the
-key or the
- and
- keys in succession.
Autotare function
Tares the first weight value on the scale automatically.
Place an empty container on the platform. When the platform is still, the first
weight value in the tare memory is accepted.
After clip off, the tare memory is cleared automatically.
The Autotare function must be selected in Setting mode (see separate description 470.702.078 User Mode).
Provisional tare function
A provisional tare function can be assigned to the
-key (see separate description 470.702.078 User Mode).
Unknown tare values can be added to the existing tare value without changing
the net reading.
Press the
-key. "Hold" appears in the display.
Place additional tare on the platform or remove tare from the platform.
Press the
-key to accept the new tare value.
9
Ba_3010_GB.qxd
03.04.2008
17:07
Seite 10
English
2.6
Ten times resolution X10
The ten times resolution appears by pressing the
simultaneously.
-key and the Zeroing key
On approved scales, the high resolution appears for 5 seconds or flashes as
long as you hold down the keys - on non-approved scales, the high resolution
appears as long as you press the
-key and the Zeroing key. wird.
2.7
Switching over the scales (measuring points)
The Basic Terminal 3010 can operate 2 analogue measuring points.
Toggle between the measuring points by pressing the INFO key followed by
the
-key (in succession).
2.8
Alibi memory
The alibi memory is activated in Setting mode (see separate description
470.702.078 User Mode). When the alibi memory is activated, an arrow points
to the corresponding symbol.
The arrow flashes as soon as the entered limit for full indication is reached.
Press the
-key or data request to accept a value to the alibi memory. To
do this, the print template or the data record must be configured accordingly
(see separate description 470.508.059 Data Interface).
Send a request to the alibi memory (view/print entries) in Setting mode:
Press
Press
Press the
- and
-key repeatedly until
UCAL I appears.
UCAL 5 appears.
-key to confirm.
Then press the
Press the
-keys for 5 seconds until
-key until the Setting step 03 appears.
-key to confirm.
The number of the last data record saved appears. Call each data record by
changing the consecutive number using the arrow keys (
/
) and
display by confirming with the
-key.
10
Ba_3010_GB.qxd
03.04.2008
17:07
Seite 11
English
The selected data record is displayed in scroll mode as follows:
Display
Meaning
I2
Consecutive number of alibi entry
2880
Scale type
07
Year
000I
Consecutive number
A I2,34 kg
A 2,98 kg
Serial number of measuring point
Gross or net with alibi ID
T
Tare with alibi ID
Scroll by pressing the arrow keys (
/
) up or down.
Quite the View mode by pressing the
-key.
Press the
-key and then hold down the
- and
- keys for 5 seconds
to switch back to Weighing mode.
2.9
Hold function
The hold function is activated in Setting mode (see separate description 470.702.078 User Mode).
In weighing mode, activate the Hold function by pressing the F key.
The following Hold functions are standard on the Digital Indicator Type 301x
to freeze weight data. Default is "0".
Hold mode
Function
Clear function
0
Not active
1
Hold at standstill
On key
2
Hold at standstill
Clip off
3
Max. value
On key
4
Max. value
Clip off
5
Slave counter
On key
6
Slave counter
Clip off
11
Ba_3010_GB.qxd
03.04.2008
17:07
Seite 12
English
2.10
Inputs and outputs
The optional I/O module has 4 inputs and outputs that can be individually configured in Setting
mode (see (separate description 470.702.078 User Mode).
2.11 LED lamps
The appliance has integrated LED lamps. The functionality can be set and activated individually for
each application program in Setting mode (see separate description 470.702.078 User Mode).
12
Ba_3010_GB.qxd
03.04.2008
17:07
Seite 13
English
3.0
Application programs
The various application programs on the Soehnle Basic Terminal 3010 offer you a wide range of
solutions for weighing operations.
You can modify the application programs to your specific requirements in Setting mode
(see separate description 470.702.078 User Mode).
Below is a list of application programs available to you:
3.1. Weighing and taring
3.2. Counting
3.3. Totalising
3.4 Batching
3.5 Withdrawal weighing
3.6. Switching point programming
3.7. Checking
3.8 Dosing
3.1
Weighing and taring
Weighing
The appliance starts in Weighing mode after power-on.
Place weighing product on platform and read weight
Weighing with tare
Refer to 2.5.
An active tare weight is indicated by the letter "N" appearing in the display.
3.2
Counting
The counting function is activated by pressing the Counting key.
The message "Add XXX" (XXX=number of reference parts) requests you to
place one or several reference parts on the platform. By pressing the Counting
key repeatedly, you can change the reference quantity for lightweight reference
parts in steps of 1/2/5/10/25/50.
Place the reference parts on the platform and confirm by pressing the
-key.
Then place the countable parts on the platform and read off the countable
parts.
Change to Weighing mode by pressing the CL key.
Counting with tare
Refer to 2.5.
An active tare weight is indicated by the letter "N" appearing in the display.
13
Ba_3010_GB.qxd
03.04.2008
17:07
Seite 14
English
Displaying the piece weight
Press the Info key and then the counting key to display the piece weight.
Press the CL key to go back.
3.3 Totalising
Place weighing product on the platform in Weighing mode and accept the
weight value in the total memory by pressing the + key.
Remove the weighing product from the platform or - dependent on the previous
setting - clip off. In Setting mode (see separate description 470.702.078 User
Mode), define whether the scale must be clipped off each time you place an
individual piece on the platform by increments of 1 to 30.
If the scale is not clipped off, the weight unit is not accepted in the total memory. This prevents operations such as saving an item twice.
Place the next weighing product on the platform and press the + key to accept
the weight value in the total memory, etc.
A full total memory is recognised by the totalising character (Σ).
Call up the total value
by pressing the Info key and then the + key.
The display then scrolls: Gross, Tare, Net and Quantity.
Cancel or end by pressing the CL key.
Clear the total memory
by pressing the CL key and then the + key.
Totalising with tare
Refer to 2.5.
An active tare weight is indicated by the letter "N" appearing in the display
Autototalising (select function in Setting mode)
Place weighing product on the platform in Weighing mode and accept the
weight value in the total memory by pressing the + key.
Remove weighing product from the platform.
Place the next weighing product on the scale.
The weight value is automatically accepted in the total memory.
Remove the weighing product from the platform and place the next weighing
product, etc.
Carry out a complete configuration of the totalising functions in Setting mode
(see separate description 470.702.078 User Mode).
14
Ba_3010_GB.qxd
03.04.2008
17:07
Seite 15
English
3.4 Batching
Place weighing product on the platform in Weighing mode and accept the
weight value in the batch memory by pressing the + key.
Place the next weighing product on the platform and press the + key to
accept the weight value in the batch memory, etc.
A full batch memory is recognised by the totalising character (Σ) in the
display.
Call up the total value
by pressing the Info key and then the + key.
The display then scrolls: Gross, Tare, Net and Quantity.
Cancel or end by pressing the CL key.
Clear the batch memory
by pressing the CL key and then the + key.
Batching with tare
Refer to 2.5.
An active tare weight is indicated by the letter "N" appearing in the display.
Autobatching (select function in Setting mode)
Place weighing product on the platform in Weighing mode and accept the
weight value in the batch memory by pressing the + key.
Place the next weighing product on the scale. The weight value is
automatically accepted in batch memory.Place the next weighing product on
the scale, etc.
Carry out a complete configuration of the batching function in
Setting mode (see separate description 470.702.078 User Mode).
3.5 Withdrawal weighing
Place a container with the weighing product on the platform.
Press the tare key.
Remove part of the weighing product.
The removed weight value is displayed with a negative sign.
Press the tare key again, etc.
15
Ba_3010_GB.qxd
03.04.2008
17:07
Seite 16
English
3.6 Switching point programming
Four switching points can be set in the Basic Terminal 3010.
The switching points are used for switching and dosing.
Setting the switching points
Press the switching point key.
The first switching point is displayed. This is indicated by the arrow
in the
display.
Set the value using the arrow keys (
/
). The value is incremented
individually by tapping the key briefly. When you hold the key down, the
display increments or decrements continuously.
Acknowledge by pressing the
-key.
The display jumps to the next switching point.
Set the value using the arrow keys (
/
).
Press the
-key to confirm, etc.
Each switching point function is defined in Setting mode (see separate
description 470.702.078 User Mode).
3.7 Checking
The switching points for the internal LED lamps or the external lamps (optional) are used for checking.
Enter the setpoints as check values as follows.
Switching point
Value
S1
0
S2
Lower tolerance
S3
Upper tolerance
S4
Upper tolerance
Enter the switching points as described in 3.6.
Activate in Setting mode (470.702.078 User Mode).
3.8 Dosing
The following dosing functions can be set:
• Coarse dosing without correction value
+ fine dosing without correction value
• Coarse dosing with correction value + fine dosing with correction value
• Coarse dosing without correction value + fine dosing with correction value
• Fine dosing without correction value
• Fine dosing with correction value
16
Ba_3010_GB.qxd
03.04.2008
17:07
Seite 17
English
Select the dosing function in Setting mode (see separate description
470.702.078 User Mode and 470.051.109 Dosing).
Use the switching points (see 3.6) to set coarse flow, fine flow and correction
value.
Setting the switching points
S1 Setpoint for coarse dosing
S2 Setpoint for fine dosing
S3 Correction value for coarse dosing
S4 Correction value for fine dosing
The greatest possible switching point in the maximum scale load.
Dosing operation
Tare the container as required.
Note: A dosing start interlock with an untared scale must be selected in
Setting mode (see separate description 470.702.078 User Mode).
Start the dosing function by pressing the F key.
The dosing valve open and dosing product flows.
The yellow LED lights up and the display flashes until the set dosing weight is
reached.
The green LED lights up when the dosing weight is reached and is within the
tolerances. The dosing valve closes.
The red LED lights up when the upper dosing weight tolerance is exceeded.
Interrupting the dosing operation
Press the CL key. The yellow LED lights up, the display flashes and waits for
the dosing operation to continue (the same response takes place when the
dosing product is not sufficient for a full dosing operation).
Press the F key to continue the dosing operation.
The dosing operation is also interrupted when the scale is in overload or
underload. When the overload or underload condition is remedied, the dosing
operation continues automatically.
Ending the dosing operation
Press the CL key twice.
The scale is then in standard weighing mode.
Dosing with totalising function
The totalising function during dosing must be selected in Setting mode (see
separate description 470.702.078 User Mode). Presetting: NO totalising.
17
Ba_3010_GB.qxd
03.04.2008
17:08
Seite 18
English
4
Troubleshooting
Display
Remedy
Please check that you operated the
appliance correctly. If not, interrupt
the command chain by pressing the
CL key.
The scale sets the value zero automatically when it is switched on. If
the scale is outside the set tolerance
band, the display indicates --0--.
Clip off the platform. Possibly remove
any soiling. If the scale fails to
display zero after a few seconds, please inform your service partner
Underload: Only the lower horizontal Switch off the scale and switch it
lines appear in the display pane.
back on again. The zero point is
reset automatically
Overload: Only the upper horizontal Remove part of the weighing product
lines appear in the display pane. The from the scale.
maximum weighing range is exceeded.
Part weight too small.
Zeroing limit overshot or undershot.
Not possible to tare an unloaded
scale; not possible in overload.
Not possible to print in underload or
overload.
Switchover kg/lb locked.
In case of other error messages,
please contact your service partner.
18
Ba_3010_GB.qxd
03.04.2008
17:08
Seite 19
English
19
Ba_3010_GB.qxd
03.04.2008
17:08
Seite 20
Printed in Germany 04/2008 Subject to technical modifications
FOR M EASURAB LE SUCCESS
Soehnle Professional GmbH & Co. KG
Phone
Fax
E-Mail
470.051.104 GB
Wilhelm-Soehnle-Straße 2
71540 Murrhardt
+49 (0) 71 92 / 93 19-220
+49 (0) 71 92 / 93 19-211
[email protected]
Scales, System Solutions and Special Developments
www.soehnle-professional.com