1
AR-M230/M270 Series
Online Manual
Start
Click this "Start" button.
Introduction
This manual describes the printer function of the AR-M230/M270 series digital multifunctional system.
●
Note
For information on loading paper, replacing toner cartridges, clearing paper misfeeds, handling peripheral devices, and other
copier-related information, please refer to your operation manual for copier.
● The machine's default settings and default settings for the printer function can be changed using the key operator programs. For
more information, see the key operator's guide.
● Where "AR-XXXX" appears in this manual, please substitute the name of your model for "XXXX". For the name of your model,
see "PART NAMES AND FUNCTIONS" in the operation manual for copier.
● This manual refers to the Reversing single pass feeder as the "RSPF".
● The screen images and procedures that appear in this manual are mainly for Windows® XP. With other versions of Windows®,
some screen images may be different from those in this manual.
● For information on using your operating system, refer to your operating system's manual or online Help.
Trademark Acknowledgments
Microsoft® Windows® operating system is a trademark or copyright of Microsoft Corporation in the U.S.A. and other countries.
● Windows® 95, Windows® 98, Windows® Me, Windows NT® 4.0, Windows® 2000, and Windows® XP are trademarks or copyrights
of Microsoft Corporation in the U.S.A. and other countries.
● Acrobat® Reader Copyright© 1987- 2002 Adobe Systems Incorporated. All rights reserved. Adobe, the Adobe logo, Acrobat, and
the Acrobat logo are trademarks of Adobe Systems Incorporated.
● All other trademarks and copyrights are the property of their respective owners.
●
CONTENTS
I N D E X
2
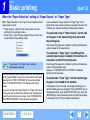
How to use the online manual
This section explains how to view the online manual. Please read this section before using the online manual.
For information on using Acrobat Reader, see Acrobat Reader Help.
How to Control the Online Manual
Following Links
In this manual, the following buttons are displayed at the
bottom of each page. Click these buttons to move quickly to
pages that you wish to view.
This manual uses a link function that allows you to jump to a
related page. If you click green, underlined text, the related
page will be displayed. (In the Contents and Index sections, the
linked areas are not underlined.)
Example: ☞Contents
To return to the previous page, click the button on the menu
bar of Acrobat Reader.
CONTENTS
Displays the Contents of this manual. Click on a topic in the
Contents to jump directly to that section.
Using Bookmarks
Bookmarks have been created on the left side of this manual.
You can click on a bookmark to jump directly to that section.
I N D E X
Displays the Index of this manual. Click on a topic in the Index
to jump directly to that section.
How to Print Out This Manual
To print this manual, select "Print" from the "File" menu of
Acrobat Reader. Select the desired printer settings in the "Print"
dialog box, and then click the "OK" button.
Takes you forward page by page.
Takes you back page by page.
CONTENTS
I N D E X
3
Contents
Introduction
How to use the online manual
2
3
1 PRINT
Basic printing
Opening the printer driver from the "start" button
Printer driver settings
Two-sided printing
Printing multiple pages on one page
Fitting the printed image to the paper
Rotating the print image 180 degrees
Printing a watermark
Stapling printed pages (when a finisher is installed)
Giving priority to a print job
Canceling a print job
5
8
9
10
11
12
13
14
15
16
17
3 TROUBLESHOOTING
Troubleshooting
Printing does not take place
Improper printing operation
Print quality is not satisfactory
If a Notice Page is printed
Uninstalling the printer driver
23
24
28
29
31
32
4 SPECIFICATIONS
Printer specifications
33
5 INDEX
2 PRINTER SHARING
Sharing the printer using windows networking
Shared printer settings
Client settings
CONTENTS
I N D E X
18
19
20
4
1
PRINT
Basic printing
(part 1)
The following example explains how to print a document from WordPad.
Before printing, make sure that the correct size of paper for your document has been loaded in the machine.
1
Make sure that the ON LINE indicator on the
operation panel is lit.
COPY
PRINT
ON LINE
DATA
SCAN
DATA
If the ON LINE indicator is not
on, press the [PRINT] key to
switch to printer mode and then
touch the [ONLINE] key.
The status of the printer function is indicated by the ON
LINE and DATA indicators next to the [PRINT] key.
ON LINE indicator
DATA indicator
Lit
The machine is online
and ready to print.
There is print data in
memory that has not
been printed yet.
Blinking
—
Off
2
The machine is
printing.
The machine is offline The machine is not
and not ready to print. printing.
Start WordPad and open the document that you
wish to print.
CONTENTS
I N D E X
3
Select "Print" from the application's "File"
menu.
The "Print" dialog box will appear.
4
Make sure that "SHARP AR-XXXX" is selected
as the printer. If you need to change any print
settings, click the "Preferences" button
("Properties" button in Windows 95/98/Me/NT
4.0) to open the printer driver setup screen.
The printer driver setup screen will appear.
Windows 2000 does not have the "Preferences" button
in this dialog box. Select settings as needed on each of
the tabs in the setup screen.
☞Printer driver settings,Two-sided printing,
Printing multiple pages on one page,
Fitting the printed image to the paper,
Rotating the print image 180 degrees,
Printing a watermark,
Stapling printed pages (when a finisher is installed)
5
PRINT
1
5
Basic printing
Click the "Print" button ("OK" button in
Windows 95/98/Me/NT 4.0).
Printing begins. The print job is delivered to one of the
following trays (depending on which output devices are
installed):
● Job separator tray kit is installed: Job separator tray
● Finisher is installed: Offset tray
●
Note
The output tray can be selected in the key operator
programs (see "OUTPUT TRAYS" in the key
operator's guide).
● The output tray can also be selected in the print
settings at the time of printing. To change the tray
selection, select the desired tray in "Output" in the
"Paper" tab of the printer driver setup screen.
● If the paper type setting in the printer driver is different
from the bypass tray's paper type setting in the
machine, printing may stop. To resume printing, press
the [PRINT] key on the operation panel, touch the
[BYPASS TRAY] key in the touch panel, and specify
the same paper type as in the printer driver.
CONTENTS
I N D E X
(part 2)
When "Paper Selection" is set to "Auto Select"
If "Paper Selection" is set to "Auto Select" in the "Paper" tab of
the printer driver setup screen and the correct size of paper for a
print job is not loaded in the machine, the printing procedure will
vary depending on the "FORCED OUTPUT OF PRINT" setting
in the key operator programs (see the key operator's guide).
When "FORCED OUTPUT OF PRINT" is disabled
If the bypass tray can be used, a message prompting you to
print from the bypass tray will appear in the touch panel.
Press the [PRINT] key on the operation panel, touch the
[BYPASS TRAY] key, touch the [BYPASS] key, and then load
paper in the bypass tray. Printing will begin automatically.
When "FORCED OUTPUT OF PRINT" is enabled
Printing will take place using a size of paper that is close to the
size of the print image.
Note
If the paper is loaded in a different orientation than the
print image, the image is automatically rotated to match
the paper. This setting can be changed in the key
operator programs (see "ROTATED PRINT" in the key
operator's guide).
6
1
PRINT
Basic printing
(part 3)
When the "Paper Selection" setting is "Paper Source" or "Paper Type"
When "Paper Selection" in the "Paper" tab of the printer driver
setup screen is set to:
● "Paper Source", select the tray that you wish to use for
printing from the pull-down menu.
● "Paper Type", select the type of paper that you wish to use
for printing from the pull-down menu.
If you selected the "Paper Source" or "Paper Type" in the
printer driver setup screen but there is no paper in the trays that
matches your selection, printing will take place as follows:
You selected a tray in "Paper Source", but the size
of the paper in the selected tray does not match
the printing size.
Even though the paper size is different, printing will take place
using the paper in the selected tray.
You selected a "Paper Type", and although the
selected type of paper is loaded in the machine, it's
size does not match the printing size.
Note
"Paper Source" and "Paper Type" cannot be
simultaneously selected.
The size and type of paper loaded in each tray and whether or
not the paper loaded in each tray can be used for printing are
specified in the "TRAY SETTINGS" of the custom settings.
(See "CUSTOM SETTINGS" in the operation manual for
copier.
If you wish to select the "Paper Source" or "Paper Type" when
printing, be sure to select these settings in the "Configuration"
tab of the printer driver setup screen. (See "CONFIGURING
THE PRINTER DRIVER" in the software setup guide.)
CONTENTS
I N D E X
Even though the paper size is different, printing will take place
using the selected paper type.
However, if "FORCED OUTPUT OF PRINT" is disabled,
printing will not take place.
You selected a "Paper Type", but the selected type
of paper is not loaded in the machine.
If the bypass tray can be used, a message prompting you to
print from the bypass tray will appear. Press the [PRINT] key on
the operation panel, touch the [BYPASS TRAY] key, touch the
[BYPASS] key, and then load the correct size and type of paper
in the bypass tray. Printing will begin automatically.
7
1
PRINT
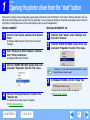
Opening the printer driver from the "start" button
Printer driver settings can be configured by opening the printer driver from the Windows "start" button. Settings adjusted in this way
will be the initial settings when you print from an application. (If you change the settings in the printer driver setup screen at the time
of printing, the settings will revert to the initial settings when you quit the application.)
Windows 2000/XP
1
Windows 95/98/Me/NT 4.0
Click the "start" button, and then click "Control
Panel".
In Windows 2000, click the "Start" button and select
"Settings".
2
1
Click the "Start" button, select "Settings" and
then click "Printers".
2
Click the "SHARP AR-XXXX" printer driver icon
and select "Properties" from the "File" menu.
Click "Printers and Other Hardware", and then
click "Printers and Faxes".
In Windows 2000, click "Printers".
3
Click the "SHARP AR-XXXX" printer driver icon
and select "Properties" from the "File" menu.
Note
3
4
Click the "Printing Preferences" button in the
"General" tab.
In Windows NT 4.0, select "Document Defaults" to open
the printer driver setup screen.
In Windows 95/98/Me, click the "Setup" tab.
The printer driver setup screen will appear.
☞Printer driver settings
The printer driver setup screen will appear.
☞Printer driver settings
CONTENTS
I N D E X
8
1
PRINT
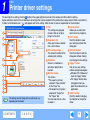
Printer driver settings
To view Help for a setting, click the
button in the upper right-hand corner of the window and then click the setting.
Some restrictions exist on the combinations of settings that can be selected in the printer driver setup screen. When a restriction is
in effect, an information icon (
) will appear next to the setting. Click the icon to view an explanation of the restriction.
1 Tab
6 Check button
The settings are grouped
Allows you to select one
1
on tabs. Click on a tab to
item from a list of options.
bring it to the front.
7 "OK" button
2
2 Drop-down list
Click this button to save
Allows you to make a selection
your settings and exit the
3
from a list of choices.
dialog box.
3 Print setting image
8 "Cancel" button
Click this button to exit the
This shows the effect of the
dialog box without making
selected print settings.
4
any changes to the settings.
4 Checkbox
9 "Apply" button
Click on a checkbox to
5
Click to save your settings
activate or deactivate a
without closing the dialog box.
function.
● Windows NT 4.0 does not
5 Machine image
6
have the "Apply" button.
This shows:
●
● The paper tray (in blue)
The "Apply" button does
7
not appear when you
selected in "Paper selection"
8
open this window from an
on the "Paper" tab.
9
● The output tray (in green)
application.
10
10 "Help" button
selected in "Output" on
Note
The settings and the image of the machine will vary
depending on the model.
CONTENTS
I N D E X
the "Paper" tab.
You can also click on a tray
to select it.
Click this button to display
the help file for the printer
driver.
9
1
PRINT
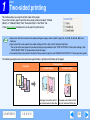
Two-sided printing
This feature allows you to print on both sides of the paper.
To use this function, open the printer driver setup screen and select "2-Sided
(Book)" or "2-Sided (Tablet)" from "Document Style" in the "Main" tab.
☞See Basic printing for details on how to open the printer driver.
●
Note
Paper sizes that can be used for two-sided printing are Ledger, Letter, Letter-R, Legal, A3, A4, A4R, A5, B4, B5, B5R, and
Foolscap.
● Paper types that can be used for two-sided printing are Plain, Letter Head*, Recycled and Color.
*The use of Letter Head paper for two-sided printing can be prohibited in the "TRAY SETTINGS" of the custom settings. (See
"CUSTOM SETTINGS" in the operation manual for copier.)
● Two-sided printing is not possible if disabled in the key operator programs (see "DISABLING OF DUPLEX" in the key operator's guide).
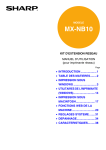
The following example shows the result when portrait data is printed on both sides of the paper.
Print data
Printing result
2-Sided (Book)
2-Sided (Tablet)
The pages are printed so that The pages are printed so that
they can be bound at the side. they can be bound at the top.
CONTENTS
I N D E X
10
1
PRINT
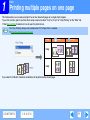
Printing multiple pages on one page
This feature allows you to reduce and print two or four document pages on a single sheet of paper.
To use this function, open the printer driver setup screen and select "2-Up" or "4-Up" for "N-Up Printing" on the "Main" tab.
☞See Basic printing for details on how to open the printer driver.
Note
The "N-Up Printing" setting is not available when "Fit To Paper Size" is selected.
☞Fitting the printed image to the paper
N-Up
Border
Border
"2-Up"
"4-Up"
If you select the "Border" checkbox, borderlines will be printed around each page.
CONTENTS
I N D E X
11
PRINT
1
Fitting the printed image to the paper
The printer driver can adjust the size of the printed image to match the size of the paper loaded in the machine.
Follow the steps shown below to use this function. The explanation below assumes that you intend to print a Ledger size document
on letter size paper.
☞See Basic printing for details on how to open the printer driver.
Note
1
2
The "Fit To Paper Size" setting is not available when "N-Up Printing" is selected.
☞Printing multiple pages on one page
Click the "Paper" tab in the printer driver setup
screen.
Select the original size (Ledger) of the print
image in "Paper Size".
4
Select the actual size of paper to be used for
printing (Letter).
The size of the printed image will be automatically
adjusted to match the paper loaded in the machine.
Paper Size: Ledger
Fit To Paper Size: Letter
3
Check the "Fit To Page" box.
Ledger size document
(Paper Size)
CONTENTS
I N D E X
Letter size paper
(Fit To Paper Size)
12
1
PRINT
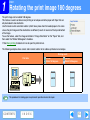
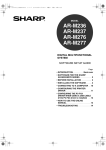
Rotating the print image 180 degrees
The print image can be rotated 180 degrees.
This feature is used to enable correct printing on envelopes and other paper with flaps that can
only be loaded in one orientation.
Use this feature when automatic rotation (which takes place when the loaded paper is the same
size as the print image and the orientations are different) results in reversal of the top and bottom
of the image.
To use the feature, select the image orientation in "Image Orientation" on the "Paper" tab, and
then select the "Rotate 180 degrees" checkbox.
☞See Basic printing for details on how to open the printer driver.
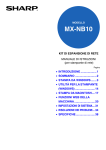
The following example shows correct and incorrect rotation of an address printed on an envelope.
Printing result
Print data
Portrait
Rotate 180 degrees
Portrait
Rotate 180 degrees
ABCD
Note
ABCD
ABCD
The procedure for loading paper is explained in operation manual for copier.
CONTENTS
I N D E X
13
1
PRINT
Printing a watermark
You can print a watermark such as "CONFIDENTIAL" on your document. To print a watermark, open the printer driver, click the
"Watermarks" tab, and follow the steps below.
☞See Basic printing for details on how to open the printer driver.
How to Print a Watermark
From the "Watermark" drop-down list, select the watermark that you wish to print (for example "CONFIDENTIAL"), and start printing.
Print sample
You can enter text to create your own custom watermark. For details on watermark settings, view printer driver Help.
☞Printer driver settings
CONTENTS
I N D E X
14
1
PRINT
Stapling printed pages (when a finisher is installed)
When a finisher is installed, printed pages can be stapled.
To use this feature, open the printer driver setup screen, and select the "Staple"
checkbox in the "Finishing" field of the "Main" tab.
☞See Basic printing for details on how to open the printer driver.
●
Note
The maximum number of sheets that can be stapled is 30.
Paper sizes that can be used for staple printing are Ledger, Letter, Letter-R, Legal, A3, A4, A4R, B4, B5, and Foolscap.
● Paper types that can be used for staple printing are Plain, Letter Head, Recycled and Color.
● Staple printing is not possible when the ROPM function is disabled. (See "CONFIGURING THE PRINTER DRIVER" in the
software setup guide.)
● Stapling is not possible if disabled in the key operator programs (see "DISABLING OF STAPLER" in the key operator's guide).
●
The following example shows how portrait oriented pages are stapled together.
Print data
Printing result
The pages are stapled in
the upper left-hand
corner.
CONTENTS
I N D E X
15
PRINT
1
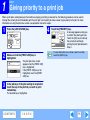
Giving priority to a print job
When a print job is waiting because the machine is copying or printing a received fax, the following procedure can be used to
interrupt the current job and immediately print the print job. Use the print job status screen to give priority to the job. For more
information on using the job status screen, see operation manual for copier.
1
Press the [JOB STATUS] key.
LINE
DATA
FAX
JOB STATUS
4
Touch the [PRIORITY] key.
TING
DETAIL
TING
CUSTOM SETTING
STOP/DELETE
JOB
2
Make sure that the [PRINT JOB] key is
highlighted.
010 / 00
PRINT
PRINT JOB
3
PRIORITY
Note
A message appears asking you
to confirm the priority print job.
Touch the [OK] key to interrupt
the current job and begin
printing the print job selected in
Step 3.
To view information on a print job, select it and then
touch the [DETAIL] key.
The print job status screen
appears when the [PRINT JOB]
key is highlighted.
If the [PRINT JOB] key is not
highlighted, touch the [PRINT
JOB] key.
In the job keys of the jobs waiting to be printed,
touch the key of the job that you wish to print
immediately.
The touched key is highlighted.
CONTENTS
I N D E X
16
PRINT
1
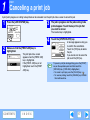
Canceling a print job
A print job in progress or waiting to be printed can be canceled. Use the print job status screen to cancel the job.
1
Press the [JOB STATUS] key.
3
LINE
DATA
FAX
JOB STATUS
The job in progress and the jobs waiting to be
printed appear. Touch the key of the job that
you wish to cancel.
The touched key is highlighted.
CUSTOM SETTING
4
Touch the [STOP/DELETE] key.
TING
DETAIL
2
Make sure that the [PRINT JOB] key is
highlighted.
010 / 00
PRINT
PRINT JOB
CONTENTS
The print job status screen
appears when the [PRINT JOB]
key is highlighted.
If the [PRINT JOB] key is not
highlighted, touch the [PRINT
JOB] key.
I N D E X
TING
PRIORITY
STOP/DELETE
JOB
Note
A message appears asking you
to confirm the cancellation.
Touch the [YES] key to delete
the job.
If you do not wish to cancel the
job, touch the [NO] key.
To pause a print job during printing, press the [PRINT]
key on the operation panel and then touch the
[OFFLINE] key. ([OFFLINE] is highlighted.)
• To cancel a print job, press the [CLEAR] key ( ).
• To resume printing, touch the [ONLINE] key to switch
the machine online.
17
2
PRINTER SHARING
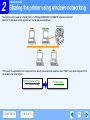
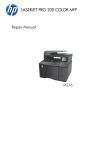
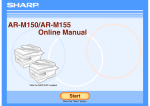
Sharing the printer using windows networking
The machine can be used as a shared printer in a Windows 95/98/Me/NT 4.0/2000/XP network environment.
Note that the Windows network environment must already be established.
Shared printer
Print server
Client
Client
Client
"Print server" as explained here is a computer that is directly connected to the machine, and a "Client" is any other computer that is
connected to the same network.
☞Shared printer settings
(On the print server)
CONTENTS
I N D E X
☞Client settings
18
PRINTER SHARING
2
Shared printer settings
On the computer to which the machine is directly connected
Follow the steps below to use the computer directly connected to the machine as a print server.
If your operating system is Windows 95/98/Me, start from step 1. If your operating system is Windows NT 4.0, 2000 or XP, open the
control panel and then start from step 6.
Note
For detailed setting procedures, refer to the Operation Manual or the help file of your operating system.
1
Click the "Start" button, select "Settings", and
then click "Control Panel".
2
Double-click the "Network" icon (
Note
Note
).
If the "Network" icon does not appear in Windows Me,
click "view all Control Panel options".
6
If a message appears asking you to restart the
computer, click the "Yes" button and restart the
computer. Then, open the printer folder and continue the
setup procedures from Step 6.
Click "Printers and Other Hardware" in the
control panel, and click "Printers and Faxes".
In operating systems other than Windows XP,
double-click the printer icon.
3
Click the "File and Print Sharing" button.
7
Click the "SHARP AR-XXXX" printer driver icon
and select "Sharing" from the "File" menu.
4
Enable "I want to be able to allow others to print
to my printer(s)." by clicking the checkbox, and
then click the "OK" button.
8
Establish the settings for sharing, and click the
"OK" button.
5
Click the "OK" button in the "Network" dialog
box.
Note
For information on a setting, click the
button at the
top-right of the dialog box and then click the setting to
display Help.
☞Client settings
CONTENTS
I N D E X
19
PRINTER SHARING
2
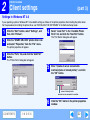
Client settings
(part 1)
Follow the procedure below to install the printer driver in the client.
Note
1
If your operating system is Windows NT 4.0, refer to "Settings in Windows NT 4.0".
Click the "start" button, and click "Control
Panel".
In Windows 95/98/Me/2000, click the "Start" button and
select "Settings".
2
Click "Printers and Other Hardware", and click
"Printers and Faxes".
In Windows 95/98/Me/2000, click "Printers".
3
4
Click the "Next" button.
5
Select "A network printer, or a printer attached
to another computer", and click the "Next"
button.
In Windows 95/98/Me/2000, select "Network printer"
and click the "Next" button.
Click "Add a printer" in "Printer Tasks".
In Windows 95/98/Me/2000, double-click the "Add
Printer" icon.
The "Add Printer Wizard" will appear.
CONTENTS
I N D E X
20
2
6
PRINTER SHARING
Client settings
Select "Browse for a printer", and click the
"Next" button.
(part 2)
7
In Windows 95/98/Me, click the "Browse" button.
In Windows 2000, select "Type the printer name, or
click Next to browse for a printer", and click the "Next"
button.
Select the printer to be shared in the network,
and click the "Next" button.
In Windows 95/98/Me, select the printer to be shared in
the network, click the "OK" button and then click the
"Next" button.
The contents of this window will vary depending on your
network environment.
CONTENTS
I N D E X
8
Select settings in the "Default Printer" screen,
and click the "Next" button.
9
Click the "Finish" button.
21
2
PRINTER SHARING
Client settings
(part 3)
Settings in Windows NT 4.0
If your operating system is Windows NT 4.0, establish settings as follows in the printer properties after installing the printer driver.
For the procedure for installing the printer driver, see "INSTALLING THE SOFTWARE" in the Software Setup Guide.
1
Click the "Start" button, select "Settings", and
then click "Printers".
2
Click the "SHARP AR-XXXX" printer driver icon
and select "Properties" from the "File" menu.
4
Select "Local Port" in the "Available Printer
Ports" list, and click the "New Port" button.
The "Port Name" dialog box will appear.
5
Enter "\\(name of server connected to
machine)\(name of shared printer)", and click
the "OK" button.
The printer properties will appear.
3
Click the "Ports" tab, and click the "Add Port"
button.
The "Printer Ports" dialog box will appear.
name of shared printer
name of server connected to machine
6
CONTENTS
I N D E X
Click the "OK" button in the printer properties
window.
22
3
TROUBLESHOOTING
Troubleshooting
This chapter describes how to solve printer problems. Refer to the relevant section based on the problem.
To load paper, remove paper misfeeds, load staples in the finisher, remove jammed staples, or replace the toner cartridge, see
"TROUBLESHOOTING" in operation manual for copier.
Printing does not take place
Print quality is not satisfactory
●
Check the connections
●
Check the paper being used
●
Check Your Computer
●
The printed image is coarse
●
Check the machine
●
The printed image is distorted
●
Checking the printer driver
●
Part of the printed image is missing
Improper printing operation
●
Printing is slow
●
Two-sided printing is not possible
●
Stapling is not possible (when a finisher is installed)
CONTENTS
I N D E X
If a Notice Page is printed
Uninstalling the printer driver
23
3
TROUBLESHOOTING
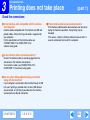
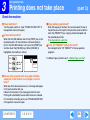
Printing does not take place
(part 1)
Check the connections
■ Is the interface cable compatible with the machine
and computer?
Interface cables compatible with this machine are USB and
parallel cables. Check which type of cable is supported by
your computer.
For the specifications of the interface cable, see
"CONNECTING TO A COMPUTER" in the
software setup guide.
■ If the interface cable becomes disconnected
If the interface cable becomes disconnected, even only once
during the machine's operation, then printing may be
disrupted.
If this occurs, check the interface cable and ensure that it is
securely connected, then restart the computer.
■ Is the interface cable connected securely?
Check if the interface cable is securely plugged into the
connectors of the machine and computer.
To connect the cable, see "CONNECTING TO A
COMPUTER" in the software setup guide.
■ Are any other USB peripherals being connected
along with the machine?
If your computer is connected to the machine through a USB
hub, see if printing is possible when no other USB devices
are connected, or if printing is possible when the machine
and computer are directly connected.
CONTENTS
I N D E X
24
3
TROUBLESHOOTING
Printing does not take place
(part 2)
Check Your Computer
■ Is there enough computer memory or hard disk
space?
To use the machine, your computer must have sufficient
memory and hard disk space. If there is insufficient hard disk
space, delete unnecessary files to increase the free space of
the hard disk. If there is insufficient memory, close
unnecessary applications to increase memory available for
printing.
■ If your computer is connected to the machine
through the parallel port, is the parallel port (LPT)
mode set to other than EPP mode?
The machine may not operate correctly if the parallel port
mode is set to EPP mode. To set the parallel port mode to a
mode other than EPP mode, refer to your computer manual
or ask the manufacturer of the computer. ECP mode is
recommended to obtain the best performance from the
machine. Note that some computers may use different
names for the modes.
Note
CONTENTS
I N D E X
If you are using Windows XP, the "Found New Hardware
Wizard" may appear after you change the port setting. In
this case, click the "Cancel" button to close the wizard,
and then reinstall the printer driver as explained in
"INSTALLING THE SOFTWARE" in the software setup
guide.
25
3
TROUBLESHOOTING
Printing does not take place
(part 3)
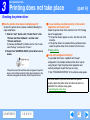
Check the machine
■ Power switch on?
■ Copy job being performed?
Turn the power switch on. (See "POWER ON AND OFF" in
the operation manual for copier)
■ Is the machine online?
When the ON LINE indicator next to the [PRINT] key on the
operation panel is lit, the machine is online and ready to
print. If the ON LINE indicator is off, press the [PRINT] key
and then touch the [ONLINE] key. (When [ONLINE] is
highlighted, the machine is online.)
COPY
PRINT
SCAN
ONLINE
OFFLINE
ON LINE
DATA
Wait until copying is finished. You can also select the key of
the job that you wish to print in the job status screen and then
touch the [PRIORITY] key. Copying will be interrupted and
the selected job printed.
☞Giving priority to a print job
■ Is the "I/O TIMEOUT" setting too short?
Set a longer time for "I/O TIMEOUT" in the key operator
programs.
If a Notice Page is printed, see "If a Notice Page is printed".
BYPASS TRAY
DATA
■ Has an error occurred such as a paper misfeed,
staple jam in the finisher, out of paper, or out of
toner?
When one of the above errors occurs, a message will appear
in the touch panel to alert you.
Follow the instructions in the message to clear the error.
Printing will automatically resume when the error is cleared.
For information on handling errors, see "TROUBLESHOOTING"
in the operation manual for copier.
CONTENTS
I N D E X
26
3
TROUBLESHOOTING
Printing does not take place
(part 4)
Checking the printer driver
■ Has the printer driver been installed properly?
Check if the printer driver has been installed, following the
steps listed below.
1 Click the "start" button, click "Control Panel", click
"Printers and Other Hardware", and then click
"Printers and Faxes".
On Windows 95/98/Me/NT 4.0/2000, click the "Start" button,
select "Settings" and then click "Printers".
2 Check if the "SHARP AR-XXXX" printer driver icon is
shown.
If the printer icon of the machine does not appear, the printer
driver is not installed correctly. Follow the instructions in the
software setup guide to correctly install the printer driver.
■ Is your machine selected correctly in the current
application for the print job?
Select the printer driver of the machine in the "Print" dialog
box of the application.
● If the printer drivers appear as icons, click the icon of the
machine.
● If the printer drivers are selected from a pull-down menu,
select the printer driver of the machine from the menu.
☞Basic printing
■ Is the port configured correctly?
It is possible that there is a problem with the port
configuration, for example another printer driver may be
using the port. Open the printer driver properties and
correctly configure the port that you are using.
☞See "TROUBLESHOOTING" in the software setup guide.
If for some reason the printer driver does not operate
correctly, delete the printer driver and then reinstall it as
explained in the software setup guide.
☞Uninstalling the printer driver
CONTENTS
I N D E X
27
3
TROUBLESHOOTING
Improper printing operation
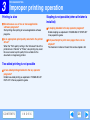
Printing is slow
■ Simultaneous use of two or more application
software programs?
Start printing after quitting all unused application software
programs.
■ Is an appropriate print quality selected in the printer
driver?
When the "Print quality" setting in the "Advanced" tab of the
printer driver is "Normal" or "Photo", slow printing may result.
Be sure to select a print quality that is suitable for the
document or image being printed.
Stapling is not possible (when a finisher is
installed)
■ Is stapling disabled in the key operator programs?
Enable stapling as explained in "DISABLING OF STAPLER"
in key operator's guide.
■ Did you attempt to print more pages than can be
stapled?
The maximum number of sheets that can be stapled is 30.
Two-sided printing is not possible
■ Is two-sided printing disabled in the key operator
programs?
Enable two-sided printing as explained in "DISABLING OF
DUPLEX" in the key operator's guide.
CONTENTS
I N D E X
28
3
TROUBLESHOOTING
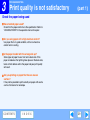
Print quality is not satisfactory
(part 1)
Check the paper being used
■ Non-standard paper used?
Check that the paper conforms to the specification. Refer to
"LOADING PAPER" in the operation manual for copier.
■ Are you using paper with a high moisture content?
Use paper that is in good condition, with a low moisture
content and no curling.
■ Is the paper loaded with the wrong side up?
Some types of paper have a front and a back side. If the
paper is loaded so that printing takes place on the back side,
toner will not adhere well to the paper and poor print quality
will result.
■ Are you printing on paper that has an uneven
surface?
It may not be possible to print correctly on paper with seams
such as the back of an envelope.
CONTENTS
I N D E X
29
3
TROUBLESHOOTING
Print quality is not satisfactory
(part 2)
The printed image is coarse
Part of the printed image is missing
■ Has the printer driver been specified to suit both
paper and the print job?
■ Did you set sufficient margins in the paper settings
of your application?
You can select "Draft", "Normal" or "Photo" for the print
quality in the "Advanced" tab of the printer driver setup
screen. When "Photo" is selected, you can click the "Image
Adjustment" button and adjust the brightness and contrast in
the dialog box that appears. Adjust these settings
appropriately for your print data and try printing again.
The printed image is distorted
■ Is the paper loaded correctly?
If a document is physically damaged when it is output or the
image is skewed on the paper, discard the damaged sheet,
reinsert the paper supply and print again. Insert the paper so
that there is no visible space between the paper and the
paper guides.
☞See the operation manual for copier for more details on
inserting paper.
Printing is not possible at the edges of the paper. The print
margins are 5/32" (4 mm) at the top and bottom of the paper
and 1/8" (3 mm) at the sides of the paper. When configuring
the paper settings in the software application, be sure to
establish margins that are at least as large as the print
margins.
■ Is the paper size loaded in the tray the same as that
specified in the printer driver?
Check if the "Paper Size" options suit the size of the paper
loaded in the tray.
If the "Fit To Page" setting is activated, make sure that the
paper size selected from the drop-down list of the "Fit To
Paper Size" option is the same as the size of the loaded
paper.
■ Is the orientation of document setting correct?
Click the "Paper" tab in the printer driver setup screen, and
verify if the "Image Orientation" option is set to your
requirements.
CONTENTS
I N D E X
30
3
TROUBLESHOOTING
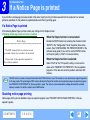
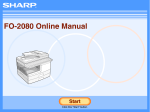
If a Notice Page is printed
If you find that a notice page has been printed at the end of a print job, the print data received from the computer has not been
printed as specified. Fix the problem as explained below and then try printing again.
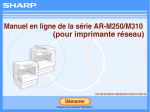
If a Notice Page is printed
If the following Notice Page is printed, check your settings for the Staple function.
☞Stapling printed pages (when a finisher is installed)
****************************************************
Notice Page
****************************************************
The IMC memory full error had occurred,
a normal output was not able to be executed.
Please refer to the operation manual for
the solution method.
Note
When the Staple function is not selected:
Disable the ROPM function by removing the checkmark from
"ROPM" in the "Configuration" tab of the printer driver setup
screen. (See "CONFIGURING THE PRINTER DRIVER" in the
software setup guide.) If you wish to use the ROPM function,
set the print quality to "Draft" or increase memory.
When the Staple function is selected:
Select "Draft" for the "Print quality" setting, or increase the
value set for "MEMORY FOR PRINTER" in the key operator
programs. If this does not solve the problem, add more IMC
memory.
The IMC memory is used to store print data when the ROPM function is used. This memory is also used to store original image data
in the copy mode. The percentage of IMC memory allocated to the printer function can be adjusted using a key operator program.
See "MEMORY FOR PRINTER" in the key operator's guide. The memory can be extended by adding commercially available
memory modules. For details, contact your SHARP dealer.
Disabling notice page printing
Notice page printing can be disabled using a key operator program (see "PROHIBIT NOTICE PAGE PRINTING" in the key
operator's guide).
CONTENTS
I N D E X
31
TROUBLESHOOTING
3
Uninstalling the printer driver
To delete a printer driver that has been installed using the installer, follow the procedure shown below.
1
Click the "start" button, and then click "Control
Panel".
On Windows 95/98/Me/NT 4.0/2000, click the "Start"
button, select "Settings", and then click "Control Panel".
2
Click "Add or Remove Programs".
3
Delete the "SHARP AR-M230/M270 Series
Printer Driver" from the list of applications.
On Windows 95/98/Me/NT 4.0/2000, double-click the
"Add/Remove Programs" icon.
For more information, refer to your operating manual or
to the help files for your operating system.
4
Restart your computer.
Note
When reinstalling the printer driver, install it correctly as
explained in software setup guide.
CONTENTS
I N D E X
32
4
SPECIFICATIONS
Printer specifications
Printing speed
AR-M236/AR-M237: 23 pages/min.
AR-M276/AR-M277: 27 pages/min.
Resolution
600 dpi
IMC Memory
32 MB*
Additional memory slots
2 slots (maximum of 1024 MB of additional memory modules (168-pin SDRAM DIMM) can be installed)
Interface
IEEE 1284-compliant bi-directional parallel interface/USB 2.0 (Full-Speed/Low-Speed) interface
*1 The factory default setting for memory used for the printer function is 16 MB. The proportion of IMC memory allocated to the
printer function can be changed in the key operator programs. See "MEMORY FOR PRINTER" in the key operator's guide.
Note
As a part of our policy of continuous improvement, SHARP reserves the right to make design and specification changes for product
improvement without prior notice. The performance specification figures indicated are nominal values of production units. There
may be some deviations from these values in individual units.
CONTENTS
I N D E X
33
5
INDEX
Index
A
G
"Auto Select" ........................................ 6
Giving priority to a print job .................16
B
H
Basic printing ....................................... 5
"Border".............................................. 11
[BYPASS TRAY] key ........................... 6
"Help"....................................................9
How to use the online manual ..............3
C
"Image Orientation".............................13
IMC memory .......................................31
Introduction ...........................................2
Canceling a print job .......................... 17
Check the connections....................... 24
Check the machine ............................ 26
Check the paper being used .............. 29
Check Your Computer ....................... 25
Checking the printer driver................. 27
[CLEAR] key ...................................... 17
Client settings .................................... 20
D
DATA indicator..................................... 5
[DETAIL] key...................................... 16
"Document Style" ............................... 10
F
"Finishing" .......................................... 15
"Fit To Page"...................................... 12
CONTENTS
I
N
Notice Page ........................................31
"N-Up Printing"....................................11
O
ON LINE indicator.................................5
Opening the printer ...............................8
"Output" ................................................6
P
"Paper Selection"..................................6
"Paper Source" .....................................7
"Paper Type".........................................7
Part of the printed image is missing....30
PRINT ...................................................5
[PRINT] key ..........................................5
Printer driver settings............................9
PRINTER SHARING...........................18
Printing a watermark...........................14
Printing does not take place ...............24
Printing is slow.................................... 28
[PRIORITY] key ..................................16
R
"ROPM" ..............................................31
"Rotate 180 degrees" ......................... 13
S
settings ................................................. 9
Shared printer settings ....................... 19
Sharing ............................................... 18
SPECIFICATIONS.............................. 33
Stapling is not possible....................... 28
Stapling printed pages........................ 15
[STOP/DELETE] key .......................... 17
T
The printed image is coarse ...............30
The printed image is distorted ............ 30
Troubleshooting..................................23
Two-sided printing .............................. 10
Two-sided printing is not possible ...... 28
U
Uninstalling the printer driver.............. 32
W
"Watermark" .......................................14
34