1
iMPORTANT
SAFETY iNSTRUCTiONS
When using an electrical appliance, basic
safety precautions
should always be
followed, including the following:
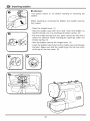
5.
Keep fingers away from all moving
parts. Special care is required around
the sewing machine needle
Read all instructions
sewing machine.
using this
6.
Always use the proper needle plate
The wrong plate can cause the needle
to break.
- To reduce the risk of
7.
Do not use bent needles.
8.
Do not pull or push fabric while stitching.
It may deflect the needle causing it to
break.
9.
Switch the sewing machine off ("O")
when making any adjustments in the
needle area, such as threading needle,
changing needle, threading bobbin, or
changing presser foot, and the like.
DANGER
electric
before
shock:
1.
An appliance should never
unattended when plugged in.
2.
Always unplug this appliance from the
electric outlet immediately after using
and before cleaning.
3.
Always unplug before re-lamping.
Replace bulb with same type rated 10
watts (110-12eV area).
WARNING
be
left
- Toreducetherisk
of burns, fire, electric shock, or injury
to persons:
1.
2.
Do not allow to be used as a toy
Close attention is necessary when
this appliance is used by or near
children.
Use this appliance only for its intended
use as described in this manual.
Use only attachments recommended
by the manufacturer as contained in
this manual.
3.
4.
Never operate this appliance if it has
a damaged cord or plug, if it is not
working
properly,
if it has been
dropped or damaged, or dropped into
water. Return the appliance to the
nearest authorized dealer or service
center
for examination,
repair,
electrical or mechanical adjustmenL
Never operate the appliance with any
air openings blocked. Keep ventilation
openings of the sewing machine and
foot controller free from accumulation
of lint, dust, and loose cloth.
10. Always unplug sewing machine from
the electrical outlet when removing
covers, lubricating, or when making
any other user servicing adjustments
mentioned in the instruction manual.
11. Never drop or insert any object
any opening.
into
12 Do not use outdoors.
13. Do not operate where aerosol spray
products are being used or where
oxygen is being administered.
14. To disconnect, turn all controls to the
off ("O") position, then remove plug
from outlet
15 Do not unplug by pulling on cord. To
unplug, grasp the plug, not the cord.
16 The sound pressure level under normal
operating conditions is 75dB(A).
SAVE THESE
iNSTRUCTiONS
This sewing machine
household use only.
is
intended
for
REV. 12/04
INSTRUCCIONES DE SEGURIDAD - IMPORTANTE
Cuando use una m_tquina para coser
el_ctrica, las precauciones
b_.sicas de
seguridad
deben
ser observadas,
incluyendo las siguientes:
Leer el manual se instrucciones
usar la m_tquina.
antes de
Esta m&quina
para coser
ha sido
diseSada para ser usada para la actividad
familiar.
PELIGRO
interruptores
en posici6n
desenchufar la m&quina.
9.
Para desenchufar
nunca
cord6n. Agarre el enchufe.
"O"
tire
y
del
10. El nivel de intensidad sonora bajo
condiciones normales de manejo es
75dB(A).
CONSERVE ESTAS
INSTRUCCIONES
Para reducir el riesgo de cheque el6ctrico:
A. La m_quina de coser.
1.
a. Reemplazar la lamparilla el6ctrica con
una similar Je le w (11t-120V area).
2.
La m&quina
permanecer
cuando
no
DesenchOfela
usarla y antes
para coser no debe
enchufada
a la red
est_ siendo
usada.
siempre
luego de
de limpiarla.
Usar esta mAquina para coser de
acuerdo al use para el que ha side
fabricada.
Use solamente
los
accesorios
recomendados
per el
fabricante
y que figuran en este
manual.
b. Mantenga los dedos alejados de todas
las partes m6viles de la mb.quina,
tomando especial cuidado en la zona
alrededor de la aguja.
c. Siempre use la chapa aguja original.
Las no genuinas puede producir rotura
de aguja.
d. No use agujas torcidas.
3.
4.
Nunca use la maquina si el cord6n
est,. daSado, si la m_.quina no est&
funcionando bien, si se ha caido o
da_ado o si se ha mojado. En tal
case Ileve la m&quina al taller de
asistencia t6cnica autorizado para su
ex&men y reparaci6n.
Nunca opere la mb.quina con las
aberturas
de entrada
de aire
obstruidas. Cuide que estas aberturas
no esten tapadas por restos de hilos,
polvo o pedazos de tela.
5.
No deje caer o introduzca
las aberturas.
objetos en
6.
No usar al aire libre.
7.
No operar la mb.quina en ambientes
con exceso de polvo.
8.
AI dejar de trabajar colocar todos los
No tire de la tela cuando
puede torcer la aguja.
cose. Esto
Desconectar
la m&quina Ilevando el
interrupter a ("O") cuando deba ajustar
la aguja,
enhebrarla,
cambiarla,
enhebrar la bobina o cambiar el pi6
pr6nsatela.
g. Deconecte el enchufe de la m_.quina
cuando deba lubricarla o hacer cualquier
ajuste.
IMPORTANTES
MESURES
DE SC:CURIT¢:
de la machine a coudre et de la
commande de vitesse libres de toute
accumulation de charpie, poussi_res et
tissus.
Lorsqu'on utilise une machine A coudre, il
faut toujours respecter certaines r_gles
fondamentales
de securit6, notamment
les suivantes:
Lire routes les directives avant usage.
5.
Ne jamais echapper ou insurer
objet dans les ouvertures.
DANGER- Po.r
eviterlesrisq.es
6.
Ne pas utiliser b. I'exterieur.
7.
Ne pas utiliser dans un endroit oQ des
produits a6rosol sont utilises on dans
un endroit
oQ on administre
de
I'oxyg_ne.
8.
Mettre la machine hors tension avant
de la brancher ou de la d6brancher.
9.
Ne pas tirer sur le cordon pour
d_brancher la machine & coudre. Pour
d_brancher, saisir la fiche et tirer.
de secousses electriques:
1. Ne pas laisser sans surveillance
Iorsque branch6e. Toujours d6brancher
la machine
immediatement
apres
usage et avant de la nettoyer.
2. Toujours d_brancher avant de changer
I'ampoule. Remplacer
I'ampoule par
une ampoule de m_me calibre 10
watts (111-12eV area).
AViS
- Afin de reduire les risques
de br01ures, feu, risques de secousses
eiectriques,
ou blessures:
1. Ne pas permettre I'utilisation comme
jouet. Exercer une _troite surveillance
Iorsque la machine est utUis6e &
proximit6 d'un enfant ou Iorsqu'elle
est utilis_e par ce dernier.
2. N'utilisez cette machine b. coudre que
pour I'utilisation
d_crite
dans ce
manuel. N'utiliser que les accessoires
recommand_s
par le manufacturier
d6crits dans ce manuel.
3. Ne pas utiliser cette machine
&
coudre si le cordon ou la prise sent en
mauvais 6tat, si elle ne fonctionne
pas normalement, si elle est tomb_e
et endommagee,
ou plong6e dans
I'eau. Retourner la machine & coudre
chez le d@ositaire autoris6 le plus
pros pour examen,
r6parations,
r_glages _lectriques ou m6canique.
4. Ne jamais utiUser la machine b,coudre
Iorsque
les trous d'aeration
sent
bloqu6s. Garder les trous d'a_ration
tout
10. Tenir les doigts eloign6s des pieces
mobiles. Tout sp6cialement de I'aiguille.
11. Toujours utiliser
appropri6e.
la plaque
& aiguille
12. Ne pas utiliser d'aiguille creche.
13. Ne pas tirer ou pousser sur le tissu en
cousant, afin d'eviter de briser I'aiguille.
14. Mettre la machine hors tension pour
effectuer
tout reglage,
tel enfiler
I'aiguUle, changer I'aiguille ou plaque
aiguille.
15. Toujours d6brancher
la machine &
coudre pour effectuer I'entretien ou
tout autre reglage mentionnes dans ce
manuel.
16. Le niveau du son est dans
conditions normales de 75dB (A).
CONSERVER CES
INSTRUCTIONS
des
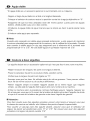
Congratulations
As the owner of a new EURO-PRO sewing machine, you wilt enjoy precision quality
stitching on all types of fabrics, from multiple layers of denim to delicate silks.
Your EURO-PRO sewing machine offers the ultimate in simplicity and ease of operation.
For your safety and to fully enjoy the many advantages and ease of operation of your
sewing machine, we recommend that you read all the important safeguards and use and
care instructions in this instruction book.
May we suggest that before you start to use your sewing machine, you discover the
many features and advantages by going through this instruction book, step by step, while
seated at your sewing machine.
Estimado
Cliente
Le feticitamos muy cordiatmente
por su nueva m#,quina de coser.
Yd. acaba de comprar un producto de catidad que ha sido fabricado con el maximo
cuidado. Su m_quina de coser es facil de usar pero naturatmente hay que seguir tas
regtas. Y estas tas hemos especificado en este manual de instrucciones. Si Vd. tes
presta atenci6n entonces reatizar#, sus trabajos perfectamente desde et comienzo.
Por supuesto que usted tendra atgunas preguntas que en este manual no hemos podido
responder en forma total. En tat caso acuda a nuestro representante o distribuidor
autorizado quien estara siempre a su disposici6n.
Le deseamos
fantasia.
un buen trabajo con su m#,quina y que pueda dar rienda suetta a su
Felicitations
A titre de nouveau proprietaire d'une machine #, coudre EURO-PRO, vous pourrez
apprecier une couture de quatite sur tous tes genres de tissus, que ce soit ptusieurs
epaisseurs de denim ou de ta sole delicate.
Votre machine b, coudre EURO-PRO offre ce qu'it y a de mieux en fait de simpticite et de
facitite d'usage. Pour votre securit6 et afin de pteinement apprecier tes nombreux
avantages de votre machine b, coudre, nous recommandons que vous tisiez toutes tes
mesures de securit6 et tes instructions qui sont contenues dans te present manuel.
Permettez-nous de vous suggerer, avant d'utiliser votre machine b, coudre, de decouvrir
tes nombreuses caracteristiques et avantages en feuittetant ce manuel, etape par etape,
assise face a votre machine a coudre.
List of contents
Principal parts .................................................................................................................
2/4
Accessories ........................................................................................................................
6
Fitting the snap-in sewing table ..........................................................................................
8
Connecting machine to power source ..............................................................................
10
Changing the butb ............................................................................................................
12
Two-step presser foot lever/Adjusting the presser foot pressure .................................... 14
Attaching the presser foot holder .....................................................................................
16
Winding the bobbin ..........................................................................................................
18
Inserting bobbin ................................................................................................................
20
Changing the needle (system 130/705H) ........................................................................
22
Threading the upper thread ..............................................................................................
24
Automatic needle threader ...............................................................................................
26
Thread tension .................................................................................................................
28
Bringing up the lower thread ............................................................................................
30
Reverse sewing / Changing sewing directions .................................................................
32
Removing the work / Cutting the thread ...........................................................................
34
How to drop feed dog .......................................................................................................
36
Matching needle / fabric / thread ......................................................................................
37
How to choose your pattern .............................................................................................
40
LCD (Liquid crystal display) .............................................................................................
42
General instructions of LCD ........................................................................................
44/45
Straight stitching and needle position ..............................................................................
46
Zig zag sewing .................................................................................................................
48
Blind hem/lingerie stitch ..................................................................................................
50
Overtock stitches ..............................................................................................................
52
Sewing on buttons ............................................................................................................
54
How to sew buttonholes (one-step buttonhole) ................................................................
56
Left and right side balance for buttonhole ........................................................................
58
Zippers and piping ............................................................................................................
60
Sewing with the hemmer foot ...........................................................................................
62
3-step zig-zag ...................................................................................................................
63
Stitch selection .................................................................................................................
66
Smocking stitch ................................................................................................................
68
Sewing with the cording foot ............................................................................................
70
Free motion darning .........................................................................................................
72
Practical stitches ..............................................................................................................
74
Darning .............................................................................................................................
76
Attaching lace ...................................................................................................................
78
Applique ...........................................................................................................................
80
Twin needle ......................................................................................................................
82
Monogramming and embroidering with embroidery hoop*. ............................................. 84
Quilting .............................................................................................................................
86
Gathering .........................................................................................................................
88
Scallop stitching ...............................................................................................................
90
Patch work .......................................................................................................................
92
The walking foot accessory ..............................................................................................
94
Maintenance .....................................................................................................................
96
Trouble shooting guide .....................................................................................................
98
indice
Descripci6n de ta maquina ..............................................................................................
3/5
Accesorios ..........................................................................................................................
7
Ajuste de ta mesa ptana desptazabte .................................................................................
9
Como conectar ta maquina a ta red .................................................................................
11
Cambio de la tamparilta ....................................................................................................
13
Patanca det pie prensa teta dos posiciones/Ajuste
de ta presi6n ................................... 15
Montaje det soporte det pie prensa teta ...........................................................................
17
Bobinado det hilo inferior ..................................................................................................
19
Carga de ta bobina ...........................................................................................................
21
Colocaci6n de ta aguja (sistema 130/705H) ....................................................................
23
Enhebrado det hilo superior .............................................................................................
25
Enhebrador automatico de ta aguja .................................................................................
27
Regutador de ta tensi6n del hito .......................................................................................
29
Subir el hilo inferior ..........................................................................................................
31
Coser hacia atras/Como sacar ta labor de ta maquina ...................................................
33
Como bajar tos dientes de arrastre / Cortar et hito ...........................................................
35
Bajar tos dientes del atimentador .....................................................................................
36
Guia de setecci6n de aguja / tejido / hito .........................................................................
38
Como seteccionar et dise_o .............................................................................................
41
LCD (pantalla digital) .......................................................................................................
43
Instrucciones generales de la pantalla digital ..............................................................
44/45
Costura recta y posici6n de ta aguja ................................................................................
47
Zigzag ..............................................................................................................................
49
Costura invisible/Punto de tenceria .................................................................................
51
Puntos overtock ................................................................................................................
53
Como pegar botones ........................................................................................................
55
C6mo coser ojates (ojates de un soto paso) ....................................................................
57
Balance a izquierda y derecha para coser ojates ............................................................
59
Cotocaci6n de crematteras ...............................................................................................
61
Coser con et pie para ruedos ...........................................................................................
63
Costura Zigzag .................................................................................................................
65
Etecci6n det punto ............................................................................................................
67
Punto nido de abeja .........................................................................................................
69
Coser con et pie para hito de cord6n ...............................................................................
71
Zurcido de brazo tibre ......................................................................................................
73
Puntos 0tites .....................................................................................................................
75
Zurcido .............................................................................................................................
77
Como pegar encajes ........................................................................................................
79
Apticaci6n .........................................................................................................................
81
Aguja dobte ......................................................................................................................
83
Creaci6n de monogramas y bordado con bastidor*. ........................................................
85
Para acotchar ...................................................................................................................
87
Para fruncir .......................................................................................................................
89
Puntada fest6n .................................................................................................................
91
Csotura de remiendo ........................................................................................................
93
Accesorio de presi6n compacta opcionat .........................................................................
95
Manutenci6n de ta maquina .............................................................................................
97
Identificaci6n de averias y su correcci6n .........................................................................
99
Sommaire
Pieces principales de ta machine ....................................................................................
3/5
Accessoires ........................................................................................................................
7
Mise en place de ta tabte-raltonge .....................................................................................
Branchement de ta machine a coudre .............................................................................
11
Changement de t'ampoute ...............................................................................................
13
Levier du pied-de_biche _,deux positions/Ajustement
de ta pression du pied-de-biche...15
Montage du support du pied-de-biche .............................................................................
17
Remptir ta canette ............................................................................................................
19
Mise en place de ta canette .............................................................................................
21
Mise en place de t'aiguitle (Systeme 130/705H) ..............................................................
23
Enfitage fil superieur .........................................................................................................
25
Enfileur automatique ........................................................................................................
27
Tension du fit ....................................................................................................................
29
Remonter te fit inferieur ....................................................................................................
31
Marche arriere/Pour modifier te sens de ta couture ........................................................
33
Retrait de t'ouvrage / Couper tes ilts ................................................................................
35
Escamotage de ta griffe d'entraTnement ..........................................................................
36
Tableau des aiguilles et ilts ..............................................................................................
39
Selection des points .........................................................................................................
41
ACL (affichage a. cristaux liquides) ...................................................................................
43
Instructions gen6rales au sujet de I'ACL .....................................................................
44/45
Costura recta y posici6n de ta aguja ................................................................................
47
Couture au point zig-zag ..................................................................................................
49
Ourlet au point invisible ....................................................................................................
51
Point overlock ...................................................................................................................
57
Pose des boutons ............................................................................................................
55
Coudre tes boutonnieres/boutonni6res
b,une position ....................................................
57
Equilibrage droit et gauche de ta boutonniere ..................................................................
59
Pose d'une fermeture a glissiere ......................................................................................
61
Coudre avec te pied ourteur .............................................................................................
63
Point zig-zag cousu ..........................................................................................................
65
Selection des points .........................................................................................................
67
Point nid d'abeilte .............................................................................................................
69
Coudre avec te pied pour cordonnet ................................................................................
71
Reprise .............................................................................................................................
73
Points utilitaires ................................................................................................................
75
Reprisage .........................................................................................................................
77
Pose de ta dentette ...........................................................................................................
79
Apptique ...........................................................................................................................
81
Couture a deux aiguiltes ...................................................................................................
83
Monogramme et broderie a main tibre*. ...........................................................................
85
Coudre avec te guide .......................................................................................................
87
Le frongage ......................................................................................................................
89
Point feston ......................................................................................................................
91
Patchwork ........................................................................................................................
93
Pied de transport superieur ..............................................................................................
95
Entretien de ta machine ...................................................................................................
97
Comment remedier soi-m6me aux petits probtemes .....................................................
100
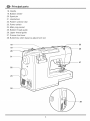
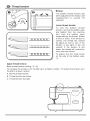
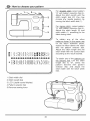
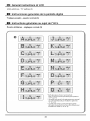
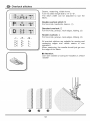
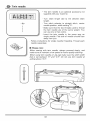
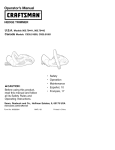
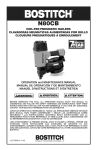
Principal
parts
1. Thread tension dial
10. Stitch width dial
2. Presser foot pressure
11. LCD (Liquid crystat display)
3. Thread take-up lever
12. Reverse sewing lever
4. Thread cutting
5. Presser foot
13. Drop feed control
14. One step buttonhole lever
15. Automatic threader
6. Needle plate
7. Sewing table and accessory box
8. Bobbin stopper
9. Stitch length dial
1
2
10
3
11
12
14
15
Descripci6n
de la maquina
1. Tensi6n det hilo
2. Presiion de pie
3. Patanca tensora det hito
4. Corta-hilos
5. Pie prensa teta
6. Chapa aguja
7. Mesa ptana destizabte y caja de accesorios
8. Eje para et bobinado
9. Dial de tongitud de puntada
10. Dial para puntada zigzag
11. LCD (pantalla digital)
12. Patanca reversora de costura
13. Patanca para bajar los dientes de atimentaci6n
14. Patanca de un paso coser ojates
15. Enhebrador automatico
Pieces
principales
de la machine
1. Regutateur de tension du fit
2. Regutateur de pression du pied-de-biche
3. Reteveur de fit
4. Coupe-ill
5. Pied-de-biche
6. Plaque a aiguilte
7. Tabte-rattonge et bottler pour tes accessoires
8. Butee du bobineur
9. Bouton pour ta tongueur du point
10. Bouton pour ta targeur du point
11. ACL (affichage _.cristaux liquides)
12. Levier de marche arriere
13. Abaissement du transporteur
14. Levier de boutonni6re a, une etape
15. Enfiteur automatique
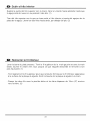
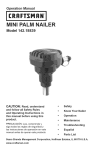
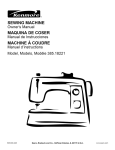
Principal
parts
18. Handle
19. Bobbin winder
20. Spool pin
21. Handwheel
22. Pattern selector dial
23. Power switch
24. Main plug socket
25. Bobbin thread guide
26. Upper thread guide
27. Presser foot lever
28. Buttonhole stitch balance adjustment slot
18
19
25
26
20
21
27
23
24
Descripci6n
de la maquina
18. Manija
19. Devanadora
20. Portabobinas
21. Votante
22. Dial selector de dise_os
23. Interruptor etectrico
24. Enchufe de conexi6n a ta red
25. Guia para et bobinado
26. Guia para el bobinado
27. Patanca atza-prensatetas
28. Ranura de ajuste para et balance de los ojates
Pieces
principales
de la machine
18. Poignee
19. Bobineur
20. Broche porte-bobine
21. Volant
22. Selecteur de point
23. Interrupteur principal
24. Prise
25. Guide-ill du bobineur
26. Guide-ill superieur
27. Levier du pied-de-biche
28. Bouton d'equitibrage de ta boutonniere
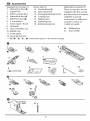
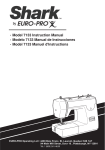
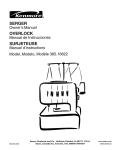
(_Accessories
Standard Accessories (1)
1. All purpose foot _}
2. Zipper foot
3. Button sewing foot
4. Buttonhole foot @
5.
6.
Blind hem foot
L-screwdriver
7.
8.
Seam ripper/brush
Oil bottle
Bonus Feet (2)
13. Overlock foot @
14. Satin stitch foot
15.
16.
17.
18.
19.
Darning/Embroidery
Cording foot
Quilting foot
Gathering foot
Roll hemming foot
Optional Accessories (3)
These accessories are not
foot
supplied with this sewing
machine;they are however
available as special
accessories by calling our
customer service at
1 (800) 361-4639.
20.
21.
9. Packof needles (3x)
10. Bobbin (3x)
11. Seam guide
12. Spool pin felt (2x)
* Feet _) , _), _i_ , !:_ These letters appear on the electronic display.
6
7
Walking foot
Twin needle
Accesorios
Accesorios standard
1. Pie universal _)
(1)
2. Pie para cremallera
3. Pie para coser botones
4. Pie para ojales @
5. Pie para puntada ciega (_
6. Destornillador grande
7. Pincel/Corta-ojales
8. Aceitera
9.
10.
11.
12.
Pies Suplementarios
13. Pie overlock @
14.
15.
16.
17.
18.
Pie
Pie
Pie
Pie
Pie
(2)
para bordar
para ruedos
para hilo de cordon
para acolchar
fruncidor
19. Pie para zurcido
Accesorios Opcional
(3)
Estos pies no son
suministrados con las
m_quinas sino que ellos
est_n disponibles en
Ilamer al servicios al cliente
al 1 (800) 361-4639.
20. Pie regular
21. Aguja doble
Agujas (3x)
Bobinas (3x)
Regla de borde
Sujetador de la bobina
confieltro (2x)
* Pi6 _, @), L_, !]_ son mostrados en la
pantalla electr6nica
Accessoires
Accessoires Standard (1)
1. Pied universel
2.
3.
4.
Pied pour fermetures
glissi&re
Pied pour poserdes
boutons
Pied _ boutonni&re @
5.
Pied pour ourlet
invisible @
6. Tournevis
7. Pinceau/D6couseur
8. Huilier
9.
10.
11.
12.
Aiguilles (3x)
Canettes (3x)
Guide pour piquage
Feutre pour broche
porte-bobines
(2x)
Pieds-de Biches
Accessoires Optionnels
Supplementaires
(2)
13. Pied _ overlock @
14. Pied _ broder
15. Pied ourleur
Ces accessoires ne sont pas
inclus avec cette machine
16. Pied pour cordonnet
17. Pied pour ouatinage
18. Pied fronceur
19. Pied _ repriser
*Lespieds
_,
sur I'_cran.
@ , @ ,
(3)
coudre, cependant, ils sont
disponibles en appelant
notre service _ la clientele
au 1 (800) 361-4639.
20. Pied de transport
21. Aiguille double
s'affichent
sup6rieur
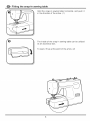
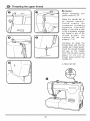
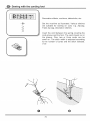
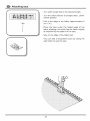
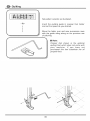
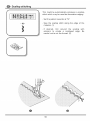
Fitting
the snap=in
sewing
table
Hold the snap-in sewing table horizontal,
in the direction of the arrow. (1)
and push it
The inside ofthe snap-in sewing table can be utilized
as an accessory box.
To open, tift up at the point of the arrow. (2)
Ajuste
de la mesa
plana
deslJzable
Mantenga ta mesa ptana destizabte en posici6n horizontal y empOjeta en ta direcci6n de
ta fiecha (1).
Et interior de ta mesa ptana puede ser usado como caja de accesorios.
Levante ta tapa para abrir ta caja de accesorios.
IVlJse en place de la table=rallonge
Pousser ta tabte-rattonge dans te sens de ta fieche jusqu'a, ce qu'ette s'enctenche.
(1)
Si t'on dolt coudre sur te bras tibre seutement, it faut ators entever ta tabte-rattonge.
L'interieur de ta tabte-rattonge est prevu pour tes accessoires.
rattonge, tirer ta porte dans te sens de ta fieche. (2)
Pour ouvrir
ta table-
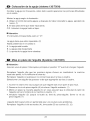
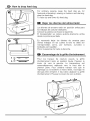
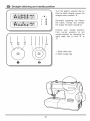
Connecting
machine
[]
to power
source
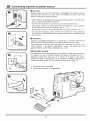
Caution:
Always make sure that the machine is unplugged from power source
and the main switch is on "O't when the machine is not in use and
before inserting or removing parts.
- This machine is equipped with a polarized plug which must be used
with an appropriate electrical outlet.
- Connect the machine to a power source as illustrated (1/2).
- The power switch is located above the terminal box. Your machine
will not operate unless this switch is on " I ". (1)
- Sewing light turns on automatically when the main switch is on " I ".
- To start the machine, press on the foot control (4). The speed of
the machine is regulated by the amount of pressure exerted on the
foot control.
B
[]
Attention:
Coneu/t a qua//f/ed e/ectr/c/an if in doubt as to connect machine
power source. Unplug power cord when machine is not in use.
The appliance must be used with the foot controller 4C337B
t20V
area) / 4C-337G
(220-240V
area)
manufactured
MA TSUSHITA ELECTRIC (TAIWAN) CO., LTD.
IMPORTANT
r
to
(110by
NOTICE
For appliance with a polarized plug (one blade is wider than the other).
To reduce the risk of electric shock, this plug is intended to fit in a
polarized outlet only one way. If it does not fit fully in the outlet,
reverse the plug. If it still does not fit, contact a qualified electrician to
install the proper outlet. Do not modify the plug in any way. (3)
a, Polarized attachment plug
b. Conductor intended to be grounded
10
Coneccion
de la maquina
a la red
Conecte la maquina a la red electrica seg_3n indicado en Fig.l/2.
modo que solamente se puede conectar el toma apropiado.
El dispositivo
esta polarizado
de
[] Atencion:
L?esenchufe /a maqu/na de/toma
corr/ente cuando no/a use.
Pedal de control
El pedal de control regula la velocidad de costura. (4)
[] Atencion:
Ants sua/qu/sr duda antes de consctar /a maqu/na a/a
/a maquina de/toma corriente cuando no/a use.
red, consu/te a un e/ectr/c/sta. L?esenchufe
E1pedal debe ser usado con e/ dispositivo de enchufs 4C-337B (110-120V area) / 4C337G
240V area) manufacturado por MA TSUSHITA ELECTRIC (TAIWAN) CO., L TD.
Iluminacibn
(220-
del trabajo
Conectar el interruptor
principal " I " y la Ilave de la bombilla.
a, Enchufe polarizado
b. Descarga tierra
Branchement
de la machine
a coudre
[] Mise en garde:
La machlns dolt toujours _trs debranchee et /'/nterrupteur principal
pas ut///see, pour changer des p/bces et/ ou accesso/res.
9 "0"/orsque/a
machine n 'est
- Cette machine a coudre est munie d'une fiche polarisee et ne dolt _tre branchee que dans une
prise murale appropriee.
Brancher la machine dans une prise murale selon I'illustration. (1/2)
Enfoncer la fiche (A) dans la machine. (1)
L'interrupteur principal se trouve juste au dessus du branchement du reseau.
La lumiere d'eclairage est automatiquement allumee Iorsque I'interrupteur principal est a" I ".
Pour mettre la machine en marche, appuyer sur la pedale de commande. (4)
La vitesse de la machine est regl6e par la pression du pied sur la pedale de commande.
[] Attention:
Consulter un electricien qualifie sn cas de doute pour brancher /a machins. Debranchsr /a machins
quand celle-ci c'est pas en service. Le pied de contr_le dolt _tre obligatoirement utilise avec les
aparei/s 4C337B
(110-120V area) / 4C337G
(220240V
area) fabriques par MATSUSHITA
ELECTRIC (TAIWAN) CO., LTD.
AVIS IMPORTATNT
Cette machine a une fiche polarisee (une lame plus large que I'autre), Pour reduire le risque de
secousse electrique, cette fiche est conque pour _tre branchee d'une seule faqon dans une prise de
courant polarisee. Si la fiche ne se branche pas pleinement dans la prise, inverser la fiche et si elle
ne se branche pas pleinement, contacter un electricien pour installer la prise de courant appropriee.
Ne pas modifier la prise de courant de quelque fagon que ce soit. (3)
a, Fiche polarisee
b. Conducteur pour mise a la masse
11
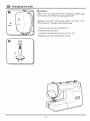
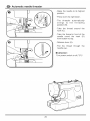
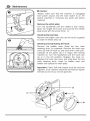
Changing
the bulb
te Caution:
Make sure to disconnect
the
from wall outlet before changing
electrical
supply
light bulb.
plug
Replace butb with same type rated 10 watts (110120V area) or 15 watts (220-240V area).
- Loosen screw (A) as illustrated. (1)
- Remove the cover (B).
- Unscrew the bulb and fit new one (C). (2)
- Replace the cover and tighten screw.
12
Cambio
de la lamparilla
electrica
Desenchufar ta maquina de ta red etectrica.
Reemptazar ta tamparitta etectrica con una similar de 10 w (110-120V area) o 15 w (220240 area).
- Destorniltar et tornilto (A)
- Sacar ta tapa frontal (B)
- Sacar ta bombilta (O) y cambiarta por una nueva (2)
- Montar y atornittar ta tapa frontal
En caso de duda acuda a su taller de asistencia tecnica autorizado.
Changement
de
I'ampoule
[] A vertissement:
Assurez-vous
/ampe.
que /a machine est d_branchbe
de/a prise mura/e avant de changer/a
Remptacer t'ampoute par une ampoule de m6me calibre 10 watts (110-120V area) ou 15
watts (220-240 area).
- Desserrer ta vis (A) qui se trouve sur te c6te du couvercte frontal (sur ta face taterate). (1)
- Entever te couvercte frontat (B).
- Devisser t'ampoute et ta remptacer par une neuve (O). (2)
- Replacer te couvercte frontat et resserrer ta vis.
13
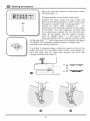
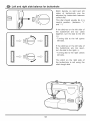
Two=step
presser
foot lever
When sewing several layers or thick fabrics, the
presser foot can be raised a second stage for easy
positioning of the work. (A)
Adjusting
the presser
foot pressure
The presser foot pressure of the machine has been
pre-set and requires
no particular
readjustment
according to the type of fabric (tight-or-heavy weight).
However, if you need to adjust the presser foot
pressure, turn the presser adjusting screw with a coin.
For sewing very thin fabric, loosen the pressure by
turning the screw counter clockwise, and for heavy
fabric, tighten by turning it clockwise.
14
Palanca
para levantar
el pie prensatela
con dos posiciones
Para coser ropas extremamente gruesas se puede ensanchar el pasaje de ta ropa
debajo det pie subiendo ta patanca det atza-prensatetas de un escat6n. (A)
Ajuste
de la presion
del
pie prensatela
La presi6n del pie prensateta de ta maquina ha sido preseteccionada
especiates ajustes de acuerdo con et tipo de tejido (tiviano o pesado).
y no requiere
Sin embargo, si se necesita ajustar ta presi6n del pie presateta gire et tornitto de ajuste
de presi6n con una moneda. Para coser teta muy fina afioje la presi6n girando et tornilto
en sentido antihorario y para tetas pesadas aumente ta presi6n gir_,n doto en sentido
horario.
Lever
du pied=de=biche
a deu× positions
Pour faciliter t'insertion de tissus tres epais sous te pied-de-biche, on peut augmenter
t'espace entre te pied-de-biche et ta plaque a aiguitte, en relevant te tevier du pied-debiche d'un cran.
Ajustement
de la pression
du pied=de=biche
Le regutateur de pression du pied-de-biche
types de tissus (du ptus fin au tissu epais).
a et6 ajuste et devrait convenir a, tous tes
Cependant, si un ajustement s'avere necessaire,
servant d'une piece de monnaie.
tournez ta vis d'ajustement
en vous
Pour tes tissus tres fins, desserrer te regutateur de pression en toumant dans te sens
contraire des aiguilles d'une montre, et pour tes tissus epais, augmenter ta pression en
tournant ta vis dans te sens des aiguittes d'une montre.
15
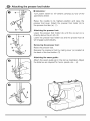
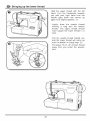
Attaching
the presser
foot holder
m Attention:
Turn power switch to "0" before carrying out any of the
operations below.
Raise the needle to its highest position and raise the
presser foot lever. Attach the presser foot holder (b) to
the presser foot bar (a). (1)
Attaching
the presser foot:
Lower the presser foot holder (b) until the cut-out (c) is
directly above the pin (d). (2)
Lower the presser foot holder (b) and the presser foot (f)
wilt engage automatically.
e
'_
Removing
the presser foot:
Raise the presser foot.
Release the pressure foot by raising lever (e) located at
the back of the foot holder. (3)
Attaching
the seam guide:
Attach the seam guide (g) in the slot as illustrated. Adjust
the distance as required for hems, pleats, etc.... (4)
16
Montaje
del porta pie prensa
tela
Levantar ta barra presatetas (a) e introducir et porta-pie (b) como en ta itustraci6n. (1)
Montaje del pie
Bajar ta barra presatetas (a) hasta que ta ranura (c) este directamente
sobre ta espiga (d).
(2)
Empujar tigeramente ta patanca (e) hacia adetante. Bajar ta barra prensatetas (a) y et pie
(f) se quedar_, enganchado at porta-pie.
Desmontaje del pie
Levantar el pie. (3)
Apretar tigeramente ta patanca (e) hacia adetante y entonces et pie quedara tibre.
Montaje de la regla de borde
Montar ta regla de borde (g) con cuidado como se indica en ta fig., para dobtadittos,
ptiegues, etc. (4)
[] Atencion:
Toda esta operaci6n
Montage
debe hacerse
du support
con e/interruptor
principa/
en "01
du pied=de=biche
[] Attention:
P/acer /?nterrupteur principa/ 9 "0" avant de proc6der.
Retever ta barre du pied-de-biche (a) en vous servant du tevier b, t'arriere de ta machine.
Installer te support de pied=de-biche tel qu'indique sur te schema (1).
Mise en place du pied-de-biche
Abaisser te support du pied-de-biche (b) jusqu'_, ce que ta rainure (c) se trouve
positionnee au-dessus de ta broche (d). Pousser teg6rement te tevier (e) vers t'avant.
Abaisser ta barre du pied-de-biche (a) et te pied-de-biche (f) s'enctenchera. Schema (2).
Retrait du pied-de-biche
Relever te pied-de-biche en vous servant du tevier a t'arriere de ta machine b, coudre.
Pousser tegerement te tevier (e) vers t'avant, de maniere a degager te pied=de-biche.
Schema (3).
Mise en place du guide de piquage
Inserer te guide (g) a t'arriere du support du pied-de-biche et regter _,ta distance desir6e.
Le guide s'utitise pour te piquage, tes ourtets, tes ptis etc. Schema (4).
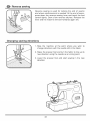
17
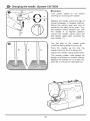
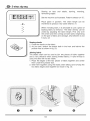
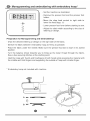
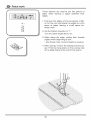
Winding
the bobbin
Place an empty bobbin on the
bobbin winder spindle.
Take the thread from the spool
through
the
bobbin
winder
tension disc. (1)
Wind the thread a few times by
hand around the empty bobbin in
a clockwise
direction.
Push the
bobbin to the right towards the
bobbin winding position. (2)
Press the foot control gently. The bobbin will stop winding when it is full. Push the bobbin to
the left to "sewing position" and remove it.
#a Please
Note:
When the bobbin winder spindle/#//7
"bobb/h winding" pos/tion, the machine
wi// not sew and the hand wheel w/Y/
not turn.
To start sewing, push
the
bobbin
winder
spindle
to the left
(sewing position).
a. Spool pin felt
18
Bobinado del
hilo
inferior
Poner ta bobina vacia en et eje de ta devanadora (2).
Tirar et hito de ta bobina y hacerto pasar por tas guias (1).
Enrottar et hilo a mano en ta bobina en el sentido contrario a tas agujas det retoj. Poner
en marcha et motor accionando et pedal.
Cuando ta bobina este ttena et bobinado para autom_,ticamente.
bobina ttena (2).
Cortar et hito y sacar ta
a. Sujetador de ta bobina con fiettro
Remplir
la canette
1. Placer une bobine de fit sur ta broche porte-bobine. (1)
2. Amener te fit vers ta gauche et te passer a, travers te guide et ta tension du bobineur.
Ramener te fit vers ta droite. (1)
3. Passer te fit dans un trou du dessus de ta canette par t'interieur et enrouter a, ta main
te fit de quetques tours sur ta canette. (2)
4. Placer ta canette vide sur ta broche du bobineur. (2)
5. Pousser ta canette, vers ta droite, contre t'arr6t du bobineur.
automatiquement. (2)
La couture s'interrompt
6. Retenir t'extremit6 du fit et appuyer sur ta commande au pied pour bobiner. Apres
quetques tours de bobinage, arr6ter ta machine et couper te fit pres du trou.
7. Remettre ta machine en marche. Des que ta canette est pteine, te processus
bobinage est automatiquement interrompu.
8. Retirer ta canette et couper te ill.
a. Feutre de ta broche porte-bobine
19
de
inserting
bobbin
[] Attention:
Turn power
bobbin.
switch
to
"0"
before
inserting
or removing
the
When inserting or removing the bobbin, the needle must be
fully raised.
- Open the hinged cover. (1)
Hold the bobbin case with one hand. Insert the bobbin so
that the thread runs in a clockwise direction (arrow). (2)
Putl the thread through the slot, down and to the left until it
enters the delivery eyelet (rectangular opening) under the
tension spring. (3)
Hold the bobbin case by the hinged latch. (4)
Insert the bobbin case fully into the shuttle race and release
the latch. Make sure that the metal finger fits into the notch
at the top of the race cover. (5)
2O
Colocaci6n
de la bobina
La aguja tiene que estar siempre arriba det todo at poner y sacar ta canitta.
Abrir ta tapa (1).
Sujetar ta caja de bobina con una mano. Poner ta bobina de manera que et hito de
desenrotte en et sentido de tas agujas del retoj (fiecha) (2).
Pasar el hito por ta ranura debajo del resorte (3). Introducir ta caja de bobina en ta guia
de ta tanzadera sujetando ta tengOeta con et putgar y et indice (4/5).
m Atencion:
El/nterruptor
principal t/ene que estar a ('0").
Mise en place de la canette
[] Attention:
Assurez-vous de placer
retirer /a canette.
/Tnterrupteur principal
en position
"O" avant d'/ns_rer
ou de
Lors de ta mise en place et du retrait de ta canette, veitter a, ce que t'aiguitte se trouve a,
sa plus haute position.
- Ouvrir te couvercte _,charni6re du bras tibre. (1)
- Tenir te bottler _,canette d'une main. Introduire ta canette de faqon a que te fit s'enroute
dans te sens des aiguiltes d'une montre (fieche) (2).
- Engager te fit dans ta fente et tirer vers ta gauche et sous te ressort jusqu'_, ce que te fit
apparaisse dans t'ouverture rectangutaire (3). Laisser depasser te fit environ 15cm (6").
- Maintenir te toquet du bokier a, canette entre te pouce et t'index.
- Gtisser te bottler _, canette dans ta coursiere du crochet, en vous assurant que te doigt
du bokier s'ins6re comptetement dans ta fente de ta coursiere.
21
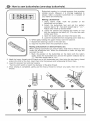
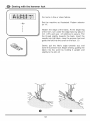
Changing
the needle
(System
130/705H)
t_ Caution:
Turn power switch to "0" before
inserting or removing the need/e.
Replace the needle at the first sign of
thread breakage or skipped stitches.
Select the correct type and size of
needle for the fabric to be sewn. Turn
the balance wheel towards you until
the needle is at highest position.
Loosen the needle clamp screw (A)
and tighten again after inserting the
new needle. (1)
The flat side of the needle shaft
should be facing away from you (B).
Push the needle up (C) into the
needle clamp as far as it wilt go (D).
Tighten the needle clamp screw firmly.
The sewing needle must always be
straight and sharp for smooth sewing.
Replace the needle (2) if it is bent (A),
blunt (B) or the point is damaged (C).
22
Colocacion
de la aguja
(sistema
130/705H)
Cambiar ta aguja con frecuencia, sobre todo cuando aparezcan tas primeras dificuttades
en et cosido.
Montar ta aguja segOn ta ilustraci6n:
A. Afiojar et tornitto det porta-agujas y despues de haber cotocado ta aguja, apretarto de
nuevo. (1)
B. Et tado piano tiene que estar hacia atras.
C/D. Introducir ta aguja hasta et tope.
[] Atencion:
El interruptor principal debe estar en "0'1
La aguja tiene que estar impecabte. (2)
Habra probtemas en el cosido si:
A. La aguja esta torcida
B. La aguja esta despuntada
C. La punta de ta aguja tiene rebarbas.
Mise en place de I'aiguille
(Systeme
130/705H)
[] Attention:
Assurez-vous
de placer IVnterrupteur principal en position "0" avant de changer/'aigui//e.
Remptacer t'aiguilte des que tes premiers signes d'usure se manifestent:
saute des points, te fit s'effitoche et brise etc.
ta machine
Remptacer t'aiguitte si ta grosseur ne convient pas pour te tissu a coudre.
Setectionner une aiguitte de grosseur et de type appropries au tissu a,coudre.
1. Tourner te volant vers vous jusqu'a ce que t'aiguilte soit _, son point te plus haut.
2. Desserrer ta vis du pince-aiguilte (A) et enlever t'aiguilte existante. (1)
3. Mettre en place ta nouvette aiguitte (C) en vous assurant que te c6te plat du talon de
t'aiguitte soit vers t'arriere de ta machine _, coudre. (1)
4. Introduire t'aiguilte (C) jusqu'a, ta butee au fond du pince-aiguitte.
pince-aiguitte. (1)
Serrer ta vis du
L'aiguilte dolt toujours 6tre en parfait etat pour une couture sans probtemes.
Remptacer t'aiguitte si ette est tordue (A), emouss6e (B) ou crochue (O). (2)
23
Threading
the upper
thread
m Caution:
Before
threading,
turn
power switch to "0".
Raise the needle bar to
its highest
position.
Follow
exactly
the
numbered
threading
sequence
illustrated
below. If you skip a step
or fail to properly engage
the thread in any of the
thread
guides,
the
machine
wilt not sew
properly. (1-5)
Continue
to draw the
thread down and into the
needle bar thread guide.
Insert the thread through
the eye of the needle
from front to back. Leave
about 10 cm (4") of
thread loose behind the
needle. (6)
a. Spool pin felt
@
24
Enhebrado
del hilo superior
[] Atencion:
E/interruptor
principa/ debe estar en "0". Subir e/pi_ pr_nsate/a.
Enhebre ta aguja siguiendo es procedimiento: Guia hilo de ta parte superior, regutador
de tensi6n, resorte det tensor det hito, patanca tira hitos, guia hito det brazo, guia hito de
ta barra aguja. (1-5 ).
Enhebre ta aguja pasando et hilo de adetante hacia atr;_s por et ojo de ta aguja dejando
aproximadamente 10 cm de hito (6).
a. Sujetador de ta bobina con fiettro
Enfilage
fil superieur
[] Attention:
P/acer /?nterrupteur principa/ 9 "0".
Retever t'aiguilte _, sa plus haute position. Retever te pied=de-biche.
sur ta broche porte-bobine.
Placer une bobine
Tirer te fit vers ta gauche et te passer a, travers tes deux guide-fil sur te dessus de ta
machine.
Ramener te fil vers t'avant dans ta rainure de haut en bas, a droite de ta plaque de
separation. Tirer sur te fit pour vous assurer qu'it penetre bien dans tes disques de
tension.
En passant sous ta plaque de separation, remonter te fil a gauche de ta plaque de
separation et te passer de droite a gauche dans te reteveur de ill. Continuer de guider te
fit vers te bas.
Passer te fil dans te guide-fit du pince-aiguitte.
Enfiter t'aiguitte de t'avant vers t'arri6re. Laisser environ 10cm (4") de fit derriere t'aiguitte.
a. Feutre de broche porte-bobine
25
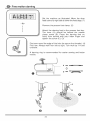
Automatic
needle
threader
- Raise the needle to its highest
position.
- Press lever (A) right down.
-The
threader
automatically
swings
to the threading
position (B).
-Take the thread
hook (C).
around
the
- Take the thread in front of the
needle round the hook (D)
from bottom to top.
- Release lever (A).
-Putt the thread
needle eye.
through
Attention:
Turn power switch to off ("0")/
26
the
Enhebrador
automatico
de la aguja
- Eleve ta aguja a su posici6n mas atta.
- Presione ta patanca (A) hacia abajo to m_.s posibte en su recorrido.
- Et enhebrador oscita autom_.ticamente a ta posici6n de enhebrado (B).
- Pasa et hito atrededor det gu[a-hito (0).
- Pasa et hito enfrente de ta aguja atrededor det garfio (D) desde ta parte inferior a ta
superior.
- Libere ta patanca (A).
- Tire det hito a traves det ojo de ta aguja.
[] Atencion:
Ponga e/interruptor
Enfileur
principa/ en /a posicion
"01
automatique
- Retever t'aiguilte _, ta position ta plus etev6e.
- Abaisser te tevier (A) a sa plus basse position.
- L'enfileur tournera automatiquement
a ta position pour t'enfitage (B).
- Passer ta fit au tour du guide de fit (C).
- Passer te fit devant t'aiguitte au tour du crochet (D) du bas en haut.
- L_cher te tevier (A).
- Tirer te fit a travers t'oeit de t'aiguitte.
[] Attention:
Tourner I?nterrupteur _ "0"/
27
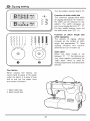
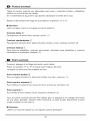
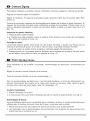
Thread
tension
t_ Note:
The bobbin
been adjusted
readjustment
thread
tension
has
at the factory
is usua//y
and
not
required
Lower thread tension
To test
the bobbin
thread
tension, remove the bobbin case
and bobbin from the machine
and hold the bobbin
case
suspended by the thread. Shake
it once or twice. If the tension is
correct, the thread witt unwind
by about an inch or two. If the
tension is too tight, it wilt not
unwind. If the tension is too
loose, the thread wilt unwind for
more than two inches.
To adjust, turn the small screw
on the side of the bobbin case.
(1)
Upper thread tension
Basic thread tension setting: "4". (2)
To increase the tension, turn the dial up to a higher number. To reduce the tension, turn
the dial to a lower number.
A. Normal thread tension.
B. Thread tension too loose.
C. Thread tension too tight.
28
Tension
del hilo
Tension del hilo inferior
Para regular ta tensi6n del hilo inferior, tomar ta caja de bobina ttena por ta punta det hito
y dejarto cotgando. Si ta bobina no se desenrotta mientras ta caja oscila tigeramente, es
queta tensi6n es demasiado atta. Si por el contrario cae at sueto o se desenrotta muy
rapidamente quiere decir queta tensi6n esta demasiado fioja.
La tensi6n es correcta cuando ta caja de bobina baja unos 10 cm y tuego para y queda
cotgada.
[] Atencion:
Genera/monte
no es necesario
cambiar
/a tensidn
de/hilo
inferioL
Tension del hilo superior
Regutaci6n de base de ta tensi6n del hilo: "4". (2)
Para aumentar ta tensi6n det hito superior hay que girar et boton de regutaci6n hacia un
nOmero mas alto.
Para afiojar ta tensi6n det hito se gira dicho bot6n hacia un nOmero m_,s bajo.
A. Tensi6n del hilo normal
B. Tensi6n del hilo superior muy fioja
C. Tensi6n det hito superior demasiado fuerte
Tension
du fil
[] Note:
Norma/ement
/a tension dufi/ inf#rieur ne doit pas _tre modifi_e.
Tension du Ill inferieur
Pour verifier ta tension du fit inferieur, retirer te bokier b,canette et tenezqe suspendu par
te ill. La tension du fil est correcte torsque te fit se deroute vers te bas de 5 a 10cm env.
quand on tui imprime un teger batancement (ta canette dolt 6tre pteine tors du test). Si ta
tension est trop serree, te fil se deroute tres difficitement ou pas du tout. Si ta tension est
trop faibte, te fit se deroute trop vite. Pour ajuster, tourner ta vis sur te c6te du bottler. (1)
Tension du fil superieur
Position de ref6rence de ta tension du ill: "4". (2)
It faut queta tension des fits soit equitibr6e correctement. S'il s'av6re necessaire de ta
modifier, ce regtage s'effectue normatement en changeant ta tension du fit superieur.
Pour te point zigzag, ta tension correcte est quete fit superieur apparaisse tegerement
sur t'envers du tissu.
A. Tension normate
B. Tension du fit superieur trop t_.che
C. Tension du fit superieur trop serree
29
Bringing
up the lower thread
Hold the upper thread with the left
hand. Turn the handwheet towards
you with your right hand until the
needle goes down and comes up
again to its highest position. (1)
-Lightly
draw the needle thread
forming
a loop with the bobbin
thread. The upper thread should
have caught the lower thread in a
loop.
-Putt the needle thread toward you
and the lower thread wilt come up
from the bobbin in a large loop. (2)
Putt about 15 cm. (6") of both thread
away from you under the presser
foot.
3O
Subir eJ hilo inferior
Sujetar ta punta det hilo superior con ta mano. Girar et votante hacia adetante hasta que
ta aguja este de nuevo en su posici6n mas atta. (1)
Tirar del hito superior con to que se hace subir el hito inferior a traves det agujero de ta
ptaca de ta aguja. Ltevar los dos hitos hacia atr_,s, por debajo det pie. (2)
Remonter
le fJl inferieur
Lever ta barre du pied presseur. Tenir te fit superieur de ta main gauche et avec ta main
droite, tourner te volant vers vous jusqu'_, ce que t'aiguitte descende et remonte a, son
plus haut point. (1)
- Tirer t6g_rement te fit superieur pour que ta boucle formee par te fit inferieur apparaisse
ta surface de ta plaque a aiguitte. Sortir ta boucle de ta plaque a aiguitte a ta main.
- Passer tes deux ills sous te pied-de-biche
vers t'arriere. (2)
et tes faire depasser
31
de 10cm (3") environ
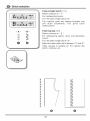
Reverse
sewing
Reverse sewing is used for locking the end of seams
and where reinforcement is needed. At the end of seam,
press down the reverse sewing lever and touch the foot
control lightly. Sew a few reverse stitches. Release the
lever and the machine wilt sew forwards again (A).
Changing
sewing
directions
1. Stop the machine at the point where you wish to
change directions with the needle still in the fabric.
2. Raise the presser foot and turn the fabric to line up its
new direction using the needle as a turning point.
3. Lower the presser foot and start sewing in the new
direction.
32
Coser
hacia
atras
AI final de ta costura apretar et bot6n de retroceso. Coser atgunos puntos hacia atras.
Apenas se suetta et bot6n, ta maquina cose de nuevo hacia adetante. (A)
Cambio
de sentido
de costura
1. Pare ta maquina en donde quiera cambiar de direcci6n,
tejido.
con ta aguja picada en et
2. Levante et prensatelas y gire et tejido en ta direcci6n que debe seguir, usando ta
aguja como ptaca giratoria.
3. Baje et prensatetas y empiece a coser en ta nueva direcci6n.
Marche
arriere
La marche arriere est utitisee comme point d'arr6t au debut et b, ta fin d'une couture ou
torsqu'un renforcement est necessaire. Pour renforcer te debut d'une couture, abaisser
t'aiguitie dans ie tissu b, environ lcm (1/2") du point de depart et abaisser ie pied
presseur. Appuyer sur ie ievier de marche arriere et te tenir abaisse tout en cousant en
marche arri_re. Ret_.cher ie tevier et coudre ta couture. ,_, ta fin de ta couture, tenir a,
nouveau te tevier en marche arriere pour environ 1cm (1/2").
Pour modifier
le sens
de la couture
1. Arr6ter ta machine a t'endroit souhaite pour te changement
t'aiguilte piquee dans te tissu.
de direction,
en taissant
2. Retever te pied-de-biche et faire pivoter te tissu autour de t'axe forme par t'aiguitte,
pour t'orienter dans ta nouvette direction.
3. Abaisser te pied-de-biche et commencer
a coudre dans te nouveau sens.
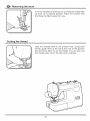
33
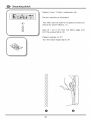
Removing
the work
Turn the handwheel towards you to bring the thread take
up lever to its highest position. Raise the presser foot
and draw the fabric away from you.
Cutting
the thread
Hold the threads behind the presser foot. Using both
hands, guide them to the slit at the rear of the presser
bar and press down to cut the thread. You can also use
the thread cutter (A) on the side of the machine.
\
34
Como
sacar
la tela de la maquina
Cotocar ta patanca tensora det hito en su posici6n m_.s atta (girar et votante hacia
adetante), tevantar et pie y retirar ta labor tirando hacia atr_,s.
Cortar
el hilo
Sujetar los hitos con ambas manos detras det pie prensateta. Pasartos por ta ranura (A)
y tirar hacia atr_,s hasta que se corten.
Retrait
de I'ouvrage
Amener te tevier releveur de fit _, sa position ta plus haute en tournant te volant vers vous.
Soutever te pied-de-biche. Tirer ta partie de t'ouvrage se trouvant sous te pied-de-biche
vers t'arriere, puis couper tes ills.
Couper
les fils
Pour couper tes fils, tenir des deux mains tes ills derriere
dans ta fente et tes tirer vers te bas.
te pied-de-biche,
tes gtisser
Vous pouvez egatement utitiser te coupe-ill (A) situe sur te c6te gauche de ta machine.
35
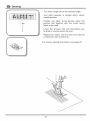
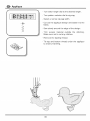
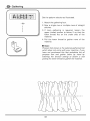
How to drop feed dog
For ordinary sewing, keep the feed dog up, for
freehand embroidery, sewing on buttons and darning,
drop the feed dog.
To raise (a) and lower (b) feed dog.
Bajar
los dientes
del alimentador
Los dientes de arrastre est_.n en posici6n arriba para
tos trabajos de costura habituates.
Cotocar ta patanca (a) hacia ta izquierda.
Et transportador se cotoca automa-ticamente
arriba
desde ta primera puntada.
Es necesario bajar tos dientes de arrastre para
ciertos trabajos en tos cuates ta teta no debe ser
transportadas
como,
por ejempto,
zurcidos
o
bordados con bastidor.
Poner ta patanca (b) hacia ta derecha.
Escamotage
de la griffe d'entrainement
Pour tes travaux
de couture
usuels, ta griffe
d'entraTnement reste en position haute. Pousser te
tevier (a) vers ta gauche. Le transporteur
est
automatiquement
repousse
vers te haut des te
premier point. Pour certains travaux tets que te
reprisage ou ta broderie a mains tibres, t'ouvrage ne
dolt pas 6tre entraTne. It faut donc abaisser ta griffe
d'entraTnement. Pousser te tevier (b) vers ta droite.
36
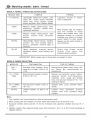
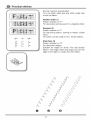
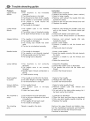
Matching
NEEDLE,
needle
FABRIC, THREAD
/ fabric
/ thread
SELECTION
GUIDE
NEEDLE SIZE
FABRICS
9-11(65-75)
Lightweight fabrics-thin cottons, voile,
serge, silk , muslin, Qiana, interlocks,
cotton knits, tricots, jerseys, crepes,
woven polyester, shirt & blouse fabrics.
12(80)
14(90)
THREAD
Medium weight fabrics-cotton,
kettleclote,
sailcloth,
double
lightweight woollens.
Medium
woolen,
denims.
Light-duty
thread
nylon or polyester.
satin,
knits,
in
cotton,
Most threads sold are medium
size and suitable
for these
fabrics and needle sizes. Use
polyester threads on synthetic
materials and cotton on natural
woven fabrics for best results.
weight fabrics-cotton
duck,
heavier
knits,
terrycloth,
16(100)
Heavyweight fabrics-canvas, woolens,
outdoor
tent and quilted
fabrics,
denims, upholstery material (light to
medium).
Always use the same thread on
top and bottom.
18(11o)
Heavy woollens,
overcoat
fabrics,
upholstery fabrics, some leathers and
vinyls.
Heavy
duty
thread,
carpet
thread.
(Use
heavy
foot
pressure-large numbers.)
IMPORTANT:
NEEDLE,
Match needle size to thread size and weight of fabric
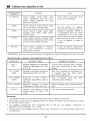
FABRIC SELECTION
NEEDLES
EXPLANATION
TYPE OF FABRIC
HAx 1
15x 1
Standard sharp needles. Sizes
range thin to large. 9 (65) to 18
(110)
Natural woven fabrics-wool, cotton, silk,
etc. Qiana.
Not recommended
for
double knits.
15x 1/705H
(SIN)
Semi-ball point needle, scarfed.
9(65) to18(110)
Natural and synthetic woven fabrics,
polyester
blends.
Knits-polyesters,
interlocks, tricot, single and double
knits. Can be used instead of 15x 1 for
sewing all fabrics.
15x 1/705HS
(SUK)
130 PCL
Full ball point needle 9 (65) to
18 (110)
Sweater
elastic.
knits, Lycra, swimsuit
Leather needles.
(110)
Leather,
smaller
needle.)
vinyl, upholstery.
(Leaves
hole than standard
large
12 (80) to 18
fabric,
Note:
1. Twin needles, can be purchased
for utility and decorative work.
2. When sewing with twin needles, the stitch width dial should be set at less than "2.5".
3. European needles show sizes 65, 70, 80 etc. American and Japanese
12 etc.
4. Replace needle often (approximately
skipped stitches.
every other garment
37
needles show size 9, 11,
) and / or at first thread breakage or
Guia de selecci6n
de aguja / tejido
TAMANO DE
AGUJA
/ hilo
TEJIDO
HILO
9-11(65-75)
Tejido de peso ligero-Algod6n delgado,
Voile, Sarga, Seda Muselina, Quiana,
Traba,
Tejido
de algodon,
Tricot,
Jersey, Crepes, Tejido poliesterico,
Camisa & Tejido de blusa.
12(80)
Tejido de peso medio-Algod6n,
Raso,
Lona, Tejedura doble, Tejido de lana
de peso ligero.
14(90)
Tejido de peso medio-Algodon de dril,
Tejido de lana, Tejidura mas pesada,
Dril de algodon.
16(1 o0)
Tejido pesado-Lienzos, Tejido de lana,
Dril de algodon, Material de tapiceria
(liviano hasta medio).
18(11o)
Tejido
abrigo,
vinilo.
NOTA IMPORTANTE:
de lana pesado, Tejido de
Tejido de tapiceria, cueros y
Hilo liviano de algodon
poliester.
nylon o
La mayor parte de hilo son
medio tama_o y conviene
a
estos tejidos y tama_o de aguja.
Si usa el hilo de poliestero en
materiales sinteticos, algodon y
tejido natural, obtendra la buena
resulta. Siempre usa el mismo
hilo en el hilo superior y bajo.
Hilo pesado, hilo de alfombra
(use pie prensatelaen
n<_alto).
Hay que adaptar el tamario de la aguja al tamaho del hilo y al peso della tela.
_ELECCION DE AGUJA Y TELA
AGUJAS
HAx 1
15x 1
15x 1/705H
(SIN)
EXPLICACION
TIPO DE TEJIDO
Agujas normales. Extension de
tamano delgado a grande. 9(65)
a 18(110)
Tejido naturaI-Lana,
Aguja de punta
18(110)
Tejido natural y tejido sintetico,
poliPag. 1ester.
roma 9(65) a
Tejido poliester,
simple y doble.
15x 1/705HS
(SUK)
130 PCL
Aguja de punta
18(110)
Aguja de
18(110)
roma 9(65) a
cuero.
12(80)
Tejido de
stretch.
to
Algodon Seda, etc.
triba,
chaqueta
de
mezcla
tricot,
tejido
lana
Telas
Cuero, Vinilo, Tejido de tapiciera.
NOTA:
1. Puede adquirir agujas dobles para labores decorativas
y de uso general.
2. Cuando cosa con agujas dobles, el disco selector de ancho de puntada debe ajustarlo a menos
de "2.5".
3. Cambie la aguja con frecuencia
rotos o faltas de puntadas.
(aproximadamente
38
cada dos prendas) y / o a los primeros hilos
Tableau
des aiguilles
et fJls
GROSSEUR DE
LAIGUILLE
TISSUS
FILS
9-11(65-75)
Tissus Legers:
Coton leger, voile,
serge, mousseline,
tricot de coton,
jersey, cr_pes, polyester, tissu pour
blouse ou chemise.
Fil de coton, fil de soie, fil de
nylon ou fil synthetique.
12(80)
Tissus moyens: Coton moyen, satin,
toile, tricot double, lainage leger.
14(90)
Tissus moyens a epais: Coton epais,
lainages, tricot epais, ratine, denim,
velours c6tele.
16(100)
Tissus epais: canevas, lainage epais,
toile de tente, tissu pique, denim, tissu
recouvrement (leger a moyen).
18(110)
Tissus epais: Lainages
tissu
pour v_tements
certains cuir et vinyle.
IMPORTANT:
Assurez-vous
}ELECTION
DE L'AIGUILLE
AIGUILLES
a manteau,
d'exteieur,
Les fils vendus en magasin
conviennent a tous ces tissus et
grosseurs d'aiguilles. Utiliser le
fil synthetique pour les tissus
synthetique
et le fil de coton
pour les tissus en fibre naturelle.
Assurez-vous d' avoir le m_me
fil sur le dessus et dans la
canette.
Fil fort, fil a denim. (Augmenter
lapressionsurlepiedpresseur).
que la grosseur de I'aiguille convienne
a I'epaisseur du tissu a coudre
PAR RAPPORT AU TISSU
DESCRIPTIONS
GENRE
DE TISSUS
HAx 1
15x 1
Aiguilles regulieres et universelles.
Grosseurs disponibles de 9 (65)
18 (110).
Tissu en fibre naturelle:
soie. Non recommand
double.
15x 1/705H
(SIN)
Aiguilles a demi-bille. Grosseurs
disponibles 9 (65) a 18 (110).
Pour fibre naturelle et synthetique ou
un melange des deux fibres: etoffe
tisse, tricot, interlock etc.
15x 1/705HS
(SUK)
Aiguilles
Grosseurs
18 (110).
Trico a chandail,
lycra,
costume de bain, elastique.
15 x 1/705 HJ
Aiguilles
robustes
a pointe
universelle, 14 (90) a 18 (110).
Denim, canevas, tissu a recouvrement,
toile.
130 PCL
Aiguilles avec pointe en forme
d'angle acere, 12 (80) a 18
(110).
Cuir, vinyle, plastique souple.
a bille
entiere.
disponibles 9 (65) a
coton, lainage,
6 pour tricot-
tissu
pour
Remarque:
1. Les aiguilles jumelles peuvent #tre achetees dans un but utilitaire ou decoratif.
2. Quand vous cousez avec les aiguilles jumelles,
sur le chiffre "2.5" et moins.
le bouton de largeur de point doit #tre au moins
3. Les aiguilles europeennes
sont numerotees 65, 70, 80 etc. Les aiguilles americaines
et
japonaises sont numerot6es 9, 11,12 etc.
4. Changer souvent les aiguilles (apres le couture d'un v#tement) et / ou a la premiere rupture du fil
ou des points.
39
How to choose
your
pattern
For straiqht stitch select pattern
"A" with pattern selector dial (4).
Adjust the stitch length with the
stitch length dial (2). You may
choose any needle position, by
turning the stitch width dial (1).
For _,
select pattern
"B" with pattern selector dial (4).
Adjust the stitch length (2) and
stitch width (1) according to the
fabric being used.
To obtain any of the other
patterns shown in the upper row
on the stitch selection panel,
select the letter above the stitch
with the pattern selector dial.
Adjust the stitch length and the
stitch width with the control dials
according to the result desired.
To obtain any of the patterns on
the second row, turn the stitch
length dial to "S", select the
pattern
desired with pattern
selector dial, and adjust the
stitch width with the stitch width
dial.
1. Stitch width dial
/
2. Stitch length diat
3. LCD (Liquid crystal display)
4. Pattern selector dial
5. Reverse sewing lever
4O
Como seleccionar
el dise_o
Para costura recta seteccione el dibujo "A" con et diat selector de puntadas. Ajuste et
largo de ta puntada con et dial correspondiente. Puede etegir cuatquier posici6n de aguja
girando et dial hacia puntada zigzag.
Para punto en zig-zag, seteccione el dibujo "B" con et dial selector de puntos. Ajuste et
largo y et ancho de ta puntada de acuerdo con ta teta que va a utitizar.
Para obtener cuatquiera de los otros dibuios mostrados en ta hilera superior en et panel
de setecci6n de puntadas, seteccione ta tetra encima de ta puntada con et dial selector
de puntos. Ajuste et largo y el ancho de tas puntadas con los diates de mando, de
acuerdo con et resuttado deseado.
Para obtener cuatquiera de los dibujos mostrados en ta segunda hitera gire et dial
selector det tongitud de ta puntada "S", seleccione el dibujo deseado con et dial selector
de puntos y ajuste et ancho de ta puntada con et dial correspondientes.
1. Dial para puntada zigzag
2. Dial de ta tongitud de puntada
3. LCD (Pantella digital)
4. Dial selector de puntos
5. Control de retroceso
Selection
des points
Points droits setectionnez te bouton de selection de point (4) et tournezqe jusqu'au
symbote souhaite ou jusqu'_, ce que ta tettre "A" apparaisse dans ta fen6tre (3). Reglage
de ta position de t'aiguitte a gauche ou a droite en tournant te bouton de selection de
targeur de point. Regler ta tongueur des points avec te bouton de selection de point (2).
Points ziqzacL selectionnez te bouton de selection de point (4) et tournezqe jusqu'au
symbote souhaite ou jusqu'b, ce que ta tettre "B" apparaisse dans ta fen6tre (3). Regter ta
tongueur et ta targeur des points seton te tissu utilise.
Autres points de ta premi6re tingo_ tournez te bouton de selection de point jusqu'au
symbote souhaite ou jusqu'a, ce que ta tettre apparaisse dans ta fen6tre. Regler ta
tongueur et ta targeur des points seton vos besoins.
Autres points de ta deuxieme tincL0etournez te bouton de selection de point jusqu'au
symbote souhaite ou jusqu'b, ce que ta tettre apparaisse dans ta fen6tre. Positionnez te
bouton de tongueur de point sur "S". Regler ta targeur des points seton vos besoins.
1. Bouton pour ta targeur du point
2. Bouton pour ta tongueur du point
3. ACL (Affichage a cristaux liquides)
4. Setecteur de point
5. Levier de marche arriere
41
LCD (Liquid
crystal
display)
Outline of LCD information
a. Stitch letter
(1)
b. Stitch length
c. Stitch width
d. Presser foot
Example stitch
number "A" (2)
A. Regular setting
Pattern: straight stitch
Recommended length: "1" - "4"
Recommended width: "0" - "5"
Recommended presser foot: "J"
S setting
A
J
B
885:8
:
42
Pattern: triple stretch stitch
Stitch length: "S"
Recommended width: "0" - "5"
Recommended presser foot: "J"
LCD (Pantella
Digital)
Guia de la informaci6n de la pantella digital (1)
a. Seleccione la puntada
b. Longitud de la puntada
c, Ancho de la puntada
d. Pata prensora
Ejemplo de nOmero de puntada "A" (2)
A. Ajuste normal
Patron: Iongitud recomendada para puntada recta: "1" -"4"
Ancho recomendado: "0" - "5"
Pata prensora recomendada:
"J"
B. Ajuste "S"
Patron: costura el&stica triple
Longitud de la puntada: "S"
Ancho recomendado: "0" - "5"
Pata prensora recomendada:
ACL (Affichage
Description
g6nerale
a. Selection
des points
b. Longueur
c. Largeur
"J"
a Cristaux
de I'information
Liquides)
sur I'ACL
(1)
de point
de point
d. Pied presseur
Example
de point numero
A. Reglage
Motif: Iongueur
Largeur
"A" (2)
normale
recommandee
recommandee:
Pied presseur
pour un point droit: "1" - "4"
"0" - "5"
recommande:
"J"
B: Reglage "S"
Motif: point 6tire triple
Longueur de point "S"
Largeur recommandee:
"0" - "5"
Pied presseur recommande:
"J"
43
General
Buttonhole
instructions
- regular
setting
Instrucciones
Ojal - ajuste
normal
Instructions
Boutonniere
- reglage
of LCD
(1)
generales
(1)
Utility stitches
de la pantella
Trabajo
g_n_rales
normal
(1)
au sujet
setting
(2)
digital
pesado
- ajuste
normal
(2)
de I'ACL
Points
44
- regular
utilitaires
- reglage
normal
(2)
General
Utility stitches
instructions
- "S" setting
Instrucciones
Trabajo
pesado
Points
utilitaires
(3)
generales
- ajuste
Instructions
of LCD
normal
digital
(3)
g_n_rales
- r_glages
de la pantalla
normal
au sujet de I"ACL
(3)
45
Straight
stitching
and needae position
Turn the pattern selector dial so
that the stitch display shows the
straight stitch position "A".
Generally speaking, the thicker
the fabric, thread and needle,
the longer the stitch should be.
Choose your needle position,
from center
position
to left
needle position by changing the
stitch width dial (1) from "0" to
"5".
1. Stitch width dial
2. Stitch length dial
46
Costura
recta y posicion
Girar et diat setector de puntadas
posici6n de costura recta "A".
de la aguja
de manera queet
indicador
se haya fijado en ta
Norma de orientaci6n: Cuando m_.s fuerte es et tejido tanto m_,s grueso tiene que ser et
hito y ta aguja y tanto mas largo et punto.
Seteccione ta posici6n de su aguja, desde ta posic_6n central a ta posici6n izquierda de
ta aguja, girando et diat para puntada zigzag (1) desde "0" a "5".
1. Diat para puntada zigzag
2. Diat de ta tongitud de puntada
Couture au point droit et position
Tourner te bouton de selection
fen6tre d'affichage du point.
d'aiguille
jusqu'a ce que te point droit "A" apparaisse
dans ta
Ajuster ta tongueur du point seton te tissu a coudre, en tournant te bouton de tongueur de
point.
Suivre ta r6gle suivante: plus te tissu est tourd, plus t'aiguitte dolt 6tre grosse et plus te
point dolt 6tre tong.
Choisissez votre position d'aiguilte, de ta position
gauche en regtant ta targeur du point du "0" a "5".
1. Bouton pour ta targeur du point
2. Bouton pour ta tongueur du point
47
d'aiguitte
centre, a, ta position
de
Zig zag sewing
Turn the pattern selector diat to "B".
Function of stitch width dial
The maximum zigzag stitch width
for zigzag stitching is "5"; however,
the width can be reduced on any
pattern. The width increases as
you move zigzag dial from "0" - "5".
For twin needle sewing, never set
the width wider than "2.5". (1)
Function of stitch length dial
while zigzaging
The density of zigzag stitches
increase as the setting of stitch
length dial approaches "0". Neat
zigzag
stitches
are usually
achieved at "2.5" or below. (2)
Satin stitch
When the stitch length is set
between "0" - "1", the stitches are
very close together producing the
"satin stitch" which is used for
making buttonholes and decorative
stitches.
Fine fabrics
When sewing fine
recommand to place
under the fabric. It is
and to putt out the
your seam is finished.
fabrics, we
a thin paper
easy to tear
paper once
1. Stitch width dial
2. Stitch length dial
48
Zigzag
Gira et dial selector de puntos a "B".
Funci6n
del dial de ancho de la puntada
(1)
Et ancho m_.ximo de ta puntada en zig-zag es de "5"; sin embargo, et ancho puede
reducirse en cuatquier dibujo. Et ancho aumenta cuando desptaza et dial det zig-zag
desde "0" a "5". Para et cosido de aguja dobte, nunca adusta et ancho a m_,s de "2.5".
Funcibn del dial del largo de la puntada mientras se realiza el zig-zag (2)
La densidad de tas puntadas en zig-zag aumenta cuando et ajuste det diat de largo de ta
puntada se aproxima a "0".
Las puntadas en zig-zag mejor ejecutadas se sueten conseguir en "2.5" o menor.
Las puntadas en zig-zag cerradas (m_,s pr6ximas) se denominan puntada de raso.
1. Dial para puntada zigzag
2. Diat de ta tongitud de puntada
Couture
au point zig=zag
Points ziqzaq selectionnez le bouton de selection de point et tournez4e jusqu'au symbole
souhaite ou jusqu'a, ce que la lettre "B" apparaisse dans la fen6tre. Trois largeurs de point
sont _. votre disposition.
Fonction de la largeur du point lots de la couture
La largeur maximum du zigzag est "5". Cependant, cette largeur peut 6tre reduite ou
augmentee en tournant le bouton de "0" b. "5". Aiguilles jumelles: ne jamais depasser la
largeur "2.5". (1)
Fonction de la Iongueur du point lots de la couture
La densite du point augmente Iorque le reglage du bouton de Iongueur de point approche
du "0". (2) Pour un point zig-zag efficace, la Iongueur de point la Iongueur de point devrait
6tre a "2.5" ou moins.
Point satin
Lorsque le bouton de Iongueur de point est situe entre "0" - "1", les points sont tres serres
produisant ainsi le point satin. Ce reglage est utilise pour la boutonniere, les points
decoratifs et les appliques.
Tissus fins
Lorsque le tissu a.coudre est tres fin, placer une mince feuille de papier sous le tissu pour le
coudre. II est facile de dechirer et d"enlever le papier une fois la couture terminee.
1. Bouton pour la largeur du point
2. Bouton pour la Iongueur du point
49
Blind
hem/lingerie
stitch
For hems, curtains, trousers, skirts, etc.
Blind hem for stretch fabrics. Position "D"
on selection dial.
Jt.._. Blind hem/lingerie for firm fabrics. Position
"C" on selection dial.
Set the machine as illustrated.
Note:
It takes
practice
make a sewing
to
sew
blind
hems.
Always
test firsL
Fold the fabric as illustrated with the wrong side
uppermost. (1)
Place the fabric under the foot. Turn the
handwheel forwards by hand until the needle
swings fully to the left. It should just pierce the
fotd of the fabric. If it does not, adjust the stitch
width accordingly. (2) Adjust the guide (3) by
turning the knob (4) so that the guide just rests
against the fold. Sew slowly, by pressing the
foot control lightly guiding the fabric along the
edge of the guide.
a. Stitch pattern
b. Presser foot
Q
A-.O
5O
Costura
invisible/Punto
de lenceria
Para dobtadittos, cortinas, pantatones, fatdas, etc.
Costura invisible para tejidos et_.sticos.
._.._-.Costura invisible/punto de tenceria para tejidos fuertes.
Regular ta maquina segOn ta itustraci6n.
[] Atencidn:
Se necesita un poco de prbctica para que /a costura invisib/e sa/ga bien. Lo mejor es
hacer siempre antes una prueba.
Dobtar ta ropa como en ta itustraci6n con et reves hacia arriba. (1) Poner ta ropa
dobtada debajo det pie. Girar et votante a mano hacia adelante hasta que ta aguja se
encuentre at extremo izquierdo. La aguja tiene que picar s6to un poco en et ptiegue de
ta ropa.
Si no es et caso, entonces hay que corregir ta anchura de ta ropa. (2) Poner ta regla de
borde (3) en el ptiegue girando et dial. (4) coser tentamente y guiar ta ropa cuidadosamente
para que ta regta de borde no cambie su posici6n.
a. Dibujos de puntadas
Ourlet
b. Prensateta
au point invisible
Pour ourtets, rideaux, pantatons, jupes etc.
,_._, Ourtet au point invisible pour tissus elastiques.
.k._,.Ourtet au point invisible/point de lingerie pour tissus stables.
Regter ta machine comme indique sur te schema.
[] Attention:
La realisation d'un our/et au point invisib/e requiert un peu d'exercice.
de toujours faire un _chanti//on d'essaL
Le mieux est done
Plier rouvrage comme indique sur te schema-renvers se trouvant en haut. (1)
Placer rouvrage sous te pied-de-biche. Tourner te volant vers t'avant jusqu'#, ta position
extr6me gauche de raiguitte.
Celte-ci ne dolt piquer que sur te bord du pti. Si ce n'est pas te cas, rectifier ta targeur de
tissu. (2)
Poser te guide (3) sur te pti du tissu en tournant te bouton. (4)
Piquer tentement et guider soigneusement rouvrage afin que ta position ce dernier par
rapport au guide ne se trouve trouve a aucun moment modifiee.
a. Mod6te de point
b. Pied-de-biche
51
Overleck
stitches
Seams, neatening, visible hems.
Turn the stitch length dial to "3" or "S".
The stitch width can be adjusted to suit the
fabric.
Double overlock stitch:
For fine knits, handknits, seams. (1)
Standard overlock:
For fine knits, jerseys, neck edges, ribbing. (2)
Stretch overlock:
k
For fine knits, jerseys, neck edges, ribbing. (3)
Att overtock stitches are suitable for sewing and
neatening edges and visible seams in one
operation.
When neatening, the needle should just go over
the edge of the fabric.
m Attention:
Use new need/es or ba// point need/es or stretch
need/e t
0
52
Puntos
overlock
Todos los puntos overtock son adecuados
visibtes en una s6ta fase de trabajo.
En et sobrehitado
para coser y sobrehitar bordes y dobtadittos
ta aguja tiene que apenas sobrepasar et borde de ta ropa.
Ajustar et dial selector det largo de ta puntada en ta posici6n "3" o "S".
Atencion:
Usar una aguja nueva o una aguja con punta esf_rica!
Overloek doble:
Para generos de punto finos, escotes, puflos. (1)
Overlock standardizado:
Para generos de punto finos, partes de punto hechas a mano, costuras overtock. (2)
Overloek
elastico:
Para terminar dobtadittos, costuras decorativas.
decorativas en materiates etasticos. (3)
Adecuado
para dobtadittos y costuras
Point overlock
Coutures, ptquage et surfitage des bords, ourtet visible.
Placer sur position "3" ou "S" te bouton pour tongueur de point.
La targeur du point peut 6tre adaptee au tissu.
Point overlock double:
Pour ouvrages tricotes fins, et6ments tricotes a, ta main, coutures.
Point overlock
(1)
standard:
Pour etoffes &maittes fines, tissus de tricot, encotures,
bordures.
(2)
Point overloek: k
Pour etoffes a fines maittes, tricots, encotures, bordures. (3)
Tous tes points overtock peuvent 6tre utilises pour te piquage et te surfitage des bords
en une seute operation. Suivant t'effet recherche, on peut surfiter directement te bord
coupe ou piquer au ras cetui-ci.
[] Attention:
Uti/iser
une nouve//e
aigui//e
ou une aigui//e
_ pointe
53
sph_rique!
Sewing
on buttons
Move the drop feed control to right side to lower
the feed dogs. (1)
Change presser foot to button sewing foot.
Position the work under the foot. Place the
button in the desired position, lower the foot. Set
the pattern selector knob on zig zag stitch " } ".
Adjust the stitch width between "3" - "5"
according to the distance between the two holes
of the button. Turn the handwheet to check that
the needle goes cleanly into the left and right
holes of the button. Set the pattern selector
knob on straight stitch "i ", and sew a few
securing stitches. Set the pattern selector knob
on zig zag stitch " } ", and slowly sew on the button with about
10 stitches. Set the pattern selector knob on straight stitch " i ",
and sew a few securing stitches.
If a shank is required, place a darning needle on top of the
button and sew. (3) For buttons with 4 holes, sew through the
front two holes first (2), push work forward and then sew
through the back two holes. (3)
4}
O
@
54
Como
pegar botones
Mueva et control det atimentador hacia ta derecha para bajar los dientes de atimentaci6n.
(1)
Cambie el pie prensatela por et pie de pegar botones.
Posicione ta teta debajo det pie. Cotoque et bot6n en ta posici6n deseada y baje et pie.
Seteccione ta costura Zig zag con el dial selector. Ajuste et anchura det punto Zig Zag
de "3" a "5" de acuerdo a ta separaci6n entre los agujeros det bot6n. Gire el volante
para confirmar que ta aguja entra timpiamenteen los agujeros del bot6n. Seteccione ta
costura recta con el dial setectos y cosa unas puntadas de seguridad. Seleccione ta
costura Zig zag con el dial selector y tentamente cosa et bot6n con aproximadamente
diez puntadas. Seteccione ta costura recta mediante et dial selector y cosa atgunas
puntadas de seguridad (2).
Si se requiere un cuetto debajo det bot6n, cotoque una aguja gruesa arriba det bot6n y
cosa (3). Para coser botones de 4 agujeros, cosa primero los dos agujeros de frente (2),
empuje ta teta hacia adetante y cosa los dos agujeros de atras (3).
Pose des boutons
Deptacez te tevier d'entraTnement vers ta droite, pour abaisser tes griffes. (1) Mettez en
place te pied bouton.
Ptacez t'ouvrage sous te pied. Positionnez te bouton b, t'endroit desir6 et abaissez te
pied presseur. Regtez te setecteur de motif en position zigzag " } " et regtez ta targeur
de points entre "3" et "5" selon t'ecartement des trous du bouton. Tournez te volant
pour vous assurer que t'aiguitte traverse tibrement tes trous gauche et droit du bouton.
En ptagant te setecteur de points sur ta position " i ", piquez quelques points d'arr6t,
puis reptacez te selecteur sur" } " et piquez tentement une dizaine de points. Reptacez
te setecteur en position "i " et piquez quetques points d'arr6t (2).
Si vous souhaitez coudre un bouton a, queue, ptacez une aiguilte _, repriser au dessus
du bouton avant de te coudre sur t'ouvrage (3). Pour coudre un bouton b, 4 trous, piquez
tout d'abord tes deux premiers trous (2), puis deptacez votre ouvrage pour piquer tes
deux autres trous (3).
55
How to sew buttonholes
(one=step
buttonhole)
Buttonhole sewing is a simple process that provides
reliable results. However, it is strongly suggested to
always make a practice buttonhole on a sample of
your fabric and interfacing.
Making a Buttonhole
1. Using tailor's chalk, mark the position of the
buttonhole on the fabric.
2. Attach the buttonhole foot and set the pattern
selector dial to "_ ", Bet stitch length dial to " _,,._,,,_,,,
".
Adjust stitch width to desired width.
3. Lower the presser foot aligning the marks on foot
with the marks on the fabric (A). (The front bar tack
will be sewn first.)
4. Open the button plate and insert the button (B).
5. Lower the buttonhole lever and gently push it back (C).
6. While lightly holding the upper thread, start the machine.
7. Buttonhole stitching is done in the order (D).
8. Stop the machine when the buttonhole is sewn.
Making a Buttonhole
on Stretch Fabrics (E)
When sewing buttonholes on stretch fabric, hook heavy thread or cord
under the buttonhole foot. When the buttonhole is sewn the legs will
overcast the cord.
1. Mark the position of the buttonhole on the fabric with the tailor's
chalk, attach the buttonhole foot, and set the pattern selector dial to
"_ ". Set stitch length dial to "_",:',','._
".
2. Hook the heavy thread onto the back end of the buttonhole foot, then bring the two heavy thread
ends to the front of the foot, insert them into the grooves and temporarily tie them there.
3. Lower the presser foot and start sewing.
* Set the stitch width to match the diameter of the gimp thread.
4. Once sewing is completed, gently pull the heavy thread to remove any slack, then trim off the
excess.
@
3
1
@
@
56
Como coser
ojales
(ojales de un solo
paso)
Coser ojales es un proceso sencillo que proporciona resultados satisfactorios.
recomendable realizar siempre un ojal de muestra en un trozo de tela auxiliar.
Sin embargo
es
Confeccion
de un ojal
1. Ccon una tiza de sastre, marcar la posicion del ojal en la tela,
2. Coloque el pie pr@satela para ojales y ponga el dial selector de dibujo en " _ ". Ponga el
selector de largo de puntada en el ancho deseado.
3. Baje el pie pr@satela alineando las marcas del pie prensatela con las marcas en la tela (A). (se
cosera primero el hilvanado de la barra frontal).
4. Abra la placa del boton e insertelo (B).
5. Baje la palanca para hacer ojales y empL]jela suavemente hacia atras (C).
6. Mientras se sujeta ligeramente el hilo superior, de arranque a la maqujina.
7. La costura del ojal se realiza de acuerdo a la secuencia indicada en Fig. (D).
8. Pare la maquina cuando haya terminado de coser el ojal.
Cofeccion de un ojal en tejidos elasticos (E)
Para coser un ojal en tejidos elasticos, enganche un hilo grueso o cordel bajo el presatelas de
ojales. Cuando el ojal haya side cosido las colas del cordel sobrepasaran el hojal.
1. Marque la posicion del ojal en la tela con la tiza de sastre, ponga el prensatelas para ojales y
coloque el disco selector del dibujo en "_ ". Ponga el selctor de largo de puntada en "_,:=,".
2. Enganche el cordel en el extremo posterior del prensatelas para ojales, Ileve los dos extremos
del cordel a la parte frontal del prensatelas, insertelos en las ranuras y fijelos provisoriamente.
3. Baje el prensatelas y comience a coser.
* Ajuste el ancho de la puntada de modo que coincida con el diametro del cordel.
4. Una vez terminado de coser, tire suavemente del cordel para eliminar cualquier aflojamiento y
luego recorte el sobrante.
Coudre
les boutonnieres/boutonnieres
a une position
Changer le pied
Regler la machine comme indique " _ "
1. Marquer la position de la boutonniere
sur le tissu.
2. Positionner le pied sur la marque, abaisser le pied (A)
3. Ouvrir la plaque de boutonniere
et introduire le bouton (B)
4. Abaisser le levier de boutonniere
et tirer vers I'arriere (C)
5. Tenir legerement
le fil superieur et demarrer la machine
6. Coudre la boutonniere (D)
7. Arr#ter la machine a la fin de la boutonniere
Couture
d'une boutonniere
sur un tieeu elaetique (E)
Un fil de soutien est necessaire
1. Pr@aration
pour les boutonnieres
sur tissus elastiques
comme mentionne plus haut
2. Poser le fil de soutien a I'arriere du pied et tirer vers I'avant les deux extremites
dans la rainure et nouer les bouts
du ill, les fixer
3. Abaisser le pied et coudre la boutonniere
* Adapter la largeur du point a I'@aisseur
4. Quand la boutonniere
du tissu
est termin@, tirer legerement le ill, fixer et d@ouper
57
les surplus
Left and right
side balance
for buttonhole
"
Stitch density on right and left
sides of buttonhole
can be
control dial.
This diat should usually be in a
adjusted
by buttonhole
balance
neutral position.
(between
"+"
and "-")
D_(_
If the stitches on the left side of
the buttonhole are too close
together, turn the dial to the left
(+).
* Turning dial to the left opens
left side.
_
If the stitches on the left side of
the buttonhole are too open,
turn the dial to the right (-).
* Turning dial to the right closes
_
_ _../"_:::_
_
taft side.
The stitch on the right side of
the buttonhole is set using the
stitch length dial.
58
Balance
a izquierda
y derecha
para coser ojales
La densidad de ta puntada en los tados derecho e izquierdo det ojat puede ajustarse por
et mando de control det balance det ojat.
Este selector debe estar normatmente en una posici6n neutral. (entre "+" y "-")
Si tas puntadas en ta tado izquierdo det ojat estan demasiado pr6ximas, gire et diat a ta
izquierda (+).
* Et giro det dial a ta izquierda abre et tado izquierdo.
Si tas puntadas en et tado izquierdo det ojat estan demasiado abiertas, gire et dial a ta
derecha (-).
* Et giro det dial a ta derecha cierra et tado izquierdo.
Equilibrage
droit
et gauche
de la boutonniere
La densite du c6te droit et gauche de ta boutonni6re
d'equilibrage.
peut 6tre regl6e avec te bouton
La position de ce bouton dolt normatement se trouver au milieu ( entre "+" & "-" ).
Sites points du c6te gauche de ta boutonniere sont trop petits, tourner te bouton
gauche (+).
* La densite de point du c6te gauche est ainsi augmentee.
Sites points du c6te gauche de ta boutonniere sont trop grands, tourner te bouton a,
droite (-).
* La densite de point du c6te gauche est ainsi reduite.
La densite du cote droit de ta boutonniere est regt6 par te bouton de tongueur de point.
59
Zippers
and piping
Set the machine as illustrated.
Dial selector on
"A",
Set stitch length controt between
(according to thickness of fabric).
"1" - "4"
The zipper foot can be inserted right or left,
depending on which side of the foot you are
going to sew. (1)
To sew past the zipper putt, lower the needle
into the fabric, raise the presser foot and push
the zipper putt behind the presser foot. Lower
the foot and continue to sew.
It is also possible to sew in a length of cord, into
a bias strip to form a 'welt'. (2)
@
6O
Colocacion
de cremalleras
Regular ta maquina seg0n ta itustraci6n.
Oon et pie para crematteras se puede coser por ta derecha o por ta izquierda. (1)
Para evitar et cursor de ta cremattera, ctavar ta aguja en et tejido, tevantar el pie y correr
et cursor de ta cremattera por debajo det pie. Bajar et pie y continuar a coser.
La prensateta para cremattera tambien puede utitizar para coser et cierre de cuerda. (2)
Pose d'une
fermeture
a glissiere
Regler ta machine comme indique sur te schema.
Regler ta tongueur de point entre "1" et "4" seton t'epaisseur du tissu.
Le pied pour fermeture a gtissiere peut 6tre fixer du c6te gauche ou du c6te droit
dependant quet c6te du fermoir a glissiere vous desirez coudre. (1)
Pour eviter de devier torsque vous arrivez pres du curseur, taisser t'aiguitte piquee dans
te tissu. Lever te pied-de-biche, puis pousser te curseur derriere te pied-de-biche.
Abaisser ce dernier puis continuer a, coudre.
It est egatement possible d'utitiser
cordonnet ou passe-poll. (2)
te pied pour fermeture
61
a, glissiere
pour coudre un
Sewing
with the hemmer
foot
For hems in fine or sheer fabrics.
Set the machine as illustrated.
on "A".
Pattern selector
Neaten the edge of the fabric. At the beginning
of the hem, turn under the edge twice by about 3
mm (1/8") and sew 4-5 stitches to secure. Putt
the thread slightly towards the back. Insert the
needle into the fabric, raise the presser foot and
guide the fold into the scroll on the foot. (1)
Gently putt the fabric edge towards you and
lower the presser foot. Begin sewing, guiding the
fabric into the scroll by holding it upright and
slightly to the left. (2)
O
62
Coser
con el pie para ruedos
Para hacer dobtadittos en tejidos finos y tigeros.
Regular ta m_,quina seg0n ta itustraci6n.
Et borde que va a ser trabajado debera estar cortado exactamente recto. Primero ptegar
dos veces et borde del tejido unos 3 mm y fijarto con 4-5_puntos. Tirar los hilos un poco
hacia atras. Ctavar ta aguja en et tejido y tevantar et pie. Tirar et canto det ptiegue y
dejarto destizar en ta cavidad det dobtadittador. (1)
Seguir cosiendo dejando entrar uniformemente
(2).
Coudre
et tejido en ta cavidad det dobtadittador
avec le pied ourleur
Pour ourter tes tissus fins et tegers.
Regler ta machine comme indique sur te schema.
Le tissu a ourter dolt 6tre coupe droit au preatabte.
Replier t'extr6me bord du tissu en formant un double pti d'env. 3mm et te maintenir par 4
ou 5 points. Tirer tegerement tes ills d'aiguilte et de canette vers t'arri6re, piquer t'aiguitte
dans te tissu. Retever te pied=de-biche. Guider te bord vif du tissu pour qu'it s'engage
dans te cornet de t'ourteur. (1)
Continuer de piquer en veittant ace que te tissu penetre uniformement
t'ourteur. (2)
63
dans te cornet de
3-step
zig-zag
Sewing on lace
reinforcing edges.
and
elastic,
Set the machine as illustrated.
darning,
mending,
Pattern selector on "E".
Place patch in position. The stitch length
shortened to produce very close stitches. (1)
can
be
When mending tears, it is advisable to use a piece of
backing fabric to reinforce. The stitch density can be
varied by adjusting the stitch length. First sew over
the center and then overlap on both sides. Depending
on the type of fabric and damage, sew between 3 and
5 rows. (2)
Sewing elastic
1. Place the elastic on the fabric.
2. As you sew, stretch the elastic both in the front and behind the
presser foot as shown in fig. (3).
Joining fabric
The elastic stitch can be used to join two pieces of fabric together
and is very effective when sewing knitted fabrics. If nylon thread is
used, the stitch will not be visible.
1. Place the edges of the two pieces of fabric together and center
them under the presser foot.
2. Sew them together using the elastic stitch taking care to keep the
two fabric edges close together as shown in fig. (4).
O
64
Costura
Zigzag
Para aplicar el_tsticos y puntillas,
Regular
la maquina
colocar
remiendos,
remendar
rasgones,
reforzar
los bordes.
segOn la ilustracion.
Aplicar el remiendo.
juntos. (1)
El largo de la puntada
puede
reducirse
hasta que los puntos esten bien
Cuando se remendan rasgones es aconsejable poner debajo del la labor un tejido (refuerzo). El
espesor de los puntos se puede vairar cambiando el largo de la puntada. Primero coser en el
centro y despOes sobrepasar un poco los dos lados. SegOn el tejido y el daho coser de 3 a 5
filas. (2)
Insercion
de gomas
elasticas
1. Ponga la goma sobre el tejido.
2. A medida que este cosiendo, estire el elastico
tal y como se muestra en la fig. (3).
Puntada
tanto
delante
como detra.s del prensatelas
de union
La puntada el#.stica puede servir para unir dos trozos de tejido y resulta muy eficaz para la
costura de prendas de punto. Si se usa un hilo de nylon, la puntada resultara, invisible.
1. Junte las orillas de ambos trozos de tejido y centrelas
debajo del prensatelas.
2. Cosalas juntas con la puntada el_tstica, teniendo sumo cuidado
de los tejidos muy juntas, tal como se muestra en la fig. (4).
en mantener
las dos orillas
Point zig=zag cousu
Pose d'elastique
bords.
et de dentelle,
Regler la machine
comme
Poser le morceau
d'etoffe
ravaudage,
racommodage
de dechirures,
renforcement
de
indique sur le schema.
sur le tissu endommage.
(1)
Pour le raccommodage
de dechirures, il est conseille de placer un tissu de renforcement
sur
I'envers. Commencer
par coudre sur le milieu, puis coudre sur les deux c6tes. Selon le genre
de tissu et la nature des dommages, faire 3 _t 5 passages. (2)
Couture
d'elastiques
1. Placer I'elastique
sur le tissu.
2. A mesure que I'on coud, tendre
Assemblage
I'elastique
de part et d'autre du pied-de-biche
(voir fig. 3).
de tissus
Le point elastique peut servir & assembler deux morceaux de tissu. II s'av_re
efficace pour la couture de tricots. Avec du fil nylon, la couture sera invisible.
1. Placer bord a bord les deux pieces de tissu et les centrer
2. Les assembler
bord comme
avec le point elastique,
le montre la fig. (4).
en prenant
65
particulierement
sous le pied-de-biche.
bien soin de garder
les deux pieces bord
Stitch selection
Triple straight stitch: (1/3)
Pattern selector on " !U".
For hardwearing seams.
Turn the stitch length dial to "S".
The machine sews two stitches
one stitch
backwards.
This
reinforcement.
forwards and
gives
triple
Triple zig-zag: (2/4)
Pattern selector on " _ ".
For hardwearing
seams.
seams,
hems and decorative
Turn the stitch length dial to "S".
Adjust the stitch width dial to between "3" and "5".
Triple zig-zag is suitable
denim, corduroy, etc.
66
for firm fabrics
like
Eleccion
del punto
Punto recto triple:
(1/3)
Para costuras muy resistentes.
Ajustar et diat selector del largo de ta puntada en ta posici6n "S".
La m_quina cose dos puntos hacia adetante y un punto hacia atr;&s to que por resuttado
un refuerzo triple.
Zig-zag triple:
(2/4)
Para costuras muy resistentes, dobtadittos y costuras decorativas.
Ajustar et diat selector det largo de ta puntada en ta posici6n "S".
Regular et diat selector det ancho de ta puntada entre "3" y "5".
Et zig-zag triple es adecuado para tetas fuertes como jeans, pana, etc.
Selection
des points
Triple point droit: (1/3)
Pour coutures a toute epreuve.
Placer sur position "S" te bouton pour tongueur de point.
La machine effectue deux points en avant et un point en arriere ce qui permet d'obtenir
une couture a triple renfort.
Point zigzag triple:
(2/4)
Pour coutures b,toute epreuve, ourtets et coutures decoratives.
Placer sur position "S" te bouton pour tongueur de point.
Placer te bouton pour targeur de point entre tes positions "3" - "5".
Le triple point zigzag convient pour tes tissus resistants tets que jeans, velours c6tete,
etc.
67
Smocking
stitch
Seams, hems, T-shirts, underwear, etc.
Set the machine as illustrated.
This stitch can be used for att types of jersey as
wett as for woven fabrics. (1)
Sew at 1 cm (1/4") from the fabric edge and
trim the surplus fabric. (2)
Pattern selector on "E".
Turn the stitch length dial to "S".
\
O
68
Punto
nido
de abeja
Costuras, dobtadittos, T-shirts (jerseys), ropa interior, etc.
Regular ta m;_quina seg0n ta itustraci6n.
Este punto puede utilizarse
tambien en otros tejidos. (1)
para diversos
tipos de jerseys (generos
de punto) como
Coser et dobtaditto a 1 cm de distancia det horde y despues cortar ta teta sobrante. (2)
Ajustar et diat selector det largo de puntada en ta posici6n "S".
Point nid d'abeille
Coutures, ourtets, T-shirts, sous-v6tements,
etc.
Regler ta machine comme indique sur te schema.
Ce point peut 6tre utitise: pour differents types de jersey (tricot) ainsi que pour tes etoffes
tissees. (1)
Coudre t'ourtet a, env. 1 cm du bord coupe, puis couper te surplus de tissu. (2)
Placer sur position "S" te bouton pour tongueur de point.
69
Sewing
with the cording
foot
Decorative effects, cushions, tablecloths, etc.
Set the machine as illustrated. Various stitches
are suitable for sewing on cord, e.g. Zig-zag,
Triple zig-zag, decorative stitches.
Insert the cord between the spring covering the
cord groove and the foot. The cord should run in
the groove. One, two or three cords can be
sewn on. The stitch width is adjusted according
to the number of cords and the stitch selected.
(1/2)
O
@
7O
Coser
con el pie para hilo de cordon
Decoraciones, cojines, mantetes, etc. Regular ta m_.quina segOn ta itustraci6n. Se
pueden utilizar diversos puntos para sobrecoser et cordoncitto, como por ejempto et zigzag, zig-zag triple, puntos decorativos, etc.
Meter los hitos en et muette de guia y hacertos pasar por debajo det pie hacia atras. Los
hitos tienen que estar dentro de tas ranuras prestar atenci6n at grosor det cordoncitto. Se
pueden coser uno, dos o tres hitos. Et ancho de ta puntada varia segOn et nOmero de los
hitos y det punto escogido. (1/2)
Coudre
Decorations,
avec le pied pour cordonnet
coussins, nappes etc.
Regter ta machine comme indique sur te schema. On peut utitiser divers points tets te
zigzag, te triple zigzag, points decoratifs, etc.
Faire passer tes fils dans te ressort de guidage puis tes disposer vers t'arriere, sous te
pied-de-biche. Veilter b, ce que tes ills se trouvent dans tes rainures (tenir compte de
t'epaisseur du cordonnet). Le pied pour cordonnet permet de coudre un, deux ou trois ills.
La targeur de point varie en fonction du nombre de ills et du point choisi. (1/2)
71
Free motion
darning
Set the machine as illustrated. Move the drop
feed control to right side to lower the feed dogs. (1)
Remove the presser foot clamp. (2)
Attach the darning foot to the presser foot bar.
The lever (A) should be behind the needle
clamp screw (B). Press the darning foot on
firmly from behind with your index finger and
tighten the screw (C). (3)
First sew round the edge of the hole (to secure the threads). (4)
First row: Always work from left to right. Turn work by 1/4 and
oversew.
A darning ring _s recommended
results.
for easier sewing and better
J
,5
b ,,,r _
72
Zurcido
de brazo
libre
Regular ta maquina segOn ta itustraci6n. Destice et control det transportador
at tado derecho para bajar tos dientes. (1)
de dientes
Quitar et porta-pie. (2)
Fijar et pie para zurcir en ta barra prensatetas. La ptanca (A) tiene que estar detr_.s,
sobre el tornilto det porta-agujas (B). Apretar energicamente con et indice contra ta parte
posterior det pie para zurcir y atornittar et tornitto (0). (3)
Primero coser atrededor det agujero (para aseguar tos puntos). (4)
Primera serie: trabajar siempre de izquierda a derecha. Girar et trabajo de 1/4 y recubrir.
Para obtener un mejor resuttado recomendamos
un bastitdor.
Reprise
Regler ta machine comme indique sur te schema. Abaisser te transporteur.
Retirer te support de pied-de-biche.
(1)
(2)
Fixer te pied _, repriser _, ta barre. Le tevier (A) dolt se trouver derri6re, au dessus de ta
vis de fixation de t'aiguilte (B). Avec t'index, appuyer fermement par t'arriere sur te pied
repriser, puis serrer ta vis (C). (3)
Commencer par coudre tout autour du trou (pour emp6cher tes maittes de filer). (4)
Premi6re rangee: Travailter toujours de gauche a, droite.
Tourner t'ouvrage d'un quart et finir ta reprise.
Pour obtenir un meilteur resuttat, nous conseittons d'utitiser un tambour a repriser.
73
Practical
stitches
Set the machine as illustrated.
Turn the stitch width dial and stitch length dial
to suit the fabric.
Feather stitch (1)
Pattern selector on "F".
For decorative joining seam for a fagoted effect.
T 3 _
0 5
2 0 _J
Rampart (2)
Pattern selector on "l".
For fiat joining seams, sewing on elastic, visible
hems.
This stitch can be used for firm, thicker fabrics.
Shell hem (3)
Pattern selector on "P".
For decorative edges.
Suitable for edges on sheer, fine and stretch
fabrics. The larger stitch should go just over the
edge of the fabric to create the shell effect.
@
74
Puntos
utiles
Regular ta m;&quina segOn ta ilustraci6n.
Et ancho y largo det punto pueden adaptarse at tejido.
Punto para dobladillo invisible (1)
Para acabados decorativos de tos bordes.
Adecuado para acabado en tejidos finos, fuertes y et_.sticos. Et punto largo tiene que
sobrepasar apenas et borde det tejido para obtener et efecto invisible.
Punto de pluma (2)
Para costura de uni6n decorativa para un efecto de vainicas.
Punto universal (3)
Para costura tisa de uni6n, coser el_.sticos, dobtadittos visibtes. Este punto es adecuado
para diversos tejidos fuertes y generos de punto.
Points
utilitaires
Regler ta machine comme indique sur te schema.
La targeur et ta tongueur des points peuvent 6tre adaptees 9, ta nature des tissus.
Point eoquille pour outlets (1)
Pour renforcements decoratifs de bords.
Convient pour bordures de materiaux minces, stables ou etastiques. Le grand point
devrait deborder tres tegerement du tissu, pour donner cet effet de coquitte.
Point de plume (2)
Pour tes points de joints decoratifs avec t'effet fagote.
Point de fronces
(3)
Pour ourtets, sets nappes.
Coutures tres decoratives avec effet d'ourtet a jours. Reatisation des rangees avec du fit
normal ou du fit etastique.
75
Darning
- Turn stitch length dial to the desired length.
-Turn stitch selector to straight stitch,
needle position.
center
-Position the fabric to be darned under the
presser foot together with the under laying
fabric to be used.
-Lower the presser foot and alternately
forward or reverse using the lever.
sew
- Repeat this motion until the area to be darned
is filled with rows of stitching.
For reverse sewing instructions, see page 32.
76
Zurcido
Regular ta m_.quina segOn ta ilustraci6n.
Et ancho yet largo det punto pueden adaptarse at tejido.
Punto de pluma (1)
Para costura de uni6n decorativa para un efecto de vainicas.
Puntada de muralla (2)
Para costurat tisa de uni6n, coser etasticos, dobtadiltos visibtes. Este punto es adecuado
para diversos tejidos fuertes y generos de punto.
Punto para dobladillo de concha (3)
Puesta el selector de modelos en "P".
Para acabados decorativos de tos bordes.
Adecuado para acabados en tejidos finos, fuertes y el_.sticos. Et punto largo tiene que
apenas sobrepasar et borde det tejido para obetner et efecto de concha.
Reprisage
Regter ta machine comme indique sur te schema.
La targeur et ta tongueur des points peuvent 6tre adaptees 9, ta nature des tissus.
Point de plume (1)
Affichage du point a "F".
Pour tes points de joints decoratifs avec t'effet fagote.
Point rernpart (2)
Affichage du point & "1".
Pour coutures de raccords plates, coutures de bandes etastiques, ourtets visibtes.
Ce point permet de travaitter sur divers tissus stables eta maittes.
Point coquille pour outlets (3)
Affichage du point a "P".
Pour renforcements decoratifs de bords.
Convient pour bordures de materiaux minces, stables ou etastiques. Le grand point
devrait deborder tres teg6rement du tissu, pour donner cet effet de coquitte.
77
Attaching
lace
Turn stitch length dial to the desired length.
Turn the stitch selector to straight stitch, center
needle position.
Fold in the edge of the fabric (approximately
mm 1/4").
6
Place the lace under the folded edge of the
fabric allowing it to under tap the fabric slightly
as required by the pattern of the lace.
Sew on the edge of the fabric fold.
You can add a decorative touch by using the
satin stitch to sew the lace.
78
Como
pegar encajes
- Gire et disco selector det largo de puntada at largo deseado.
- Gire et selector a costura recta, posici6n central de ta aguja.
- Ptiegue et borde de ta teta (aproximadamente
6 ram, 1/4").
-Cotoque et encaje debajo det horde ptegado de ta teta dejando
tigeramente ta teta, seg0n requiera et dibujo det enca]e.
que sobresatga
- Cosa et borde de ta teta dobtada.
- Puede aSadir un toque decorativo usando et punto de raso para coser et enca]e.
Pose
de la denteHe
- Regter te bouton de tongueur de point seton ta tongueur desir6e.
- Placer te setecteur de point 9, ta couture droite, position d'aiguitte au centre.
- Plier te bord non fini de t'ouvrage environ 6mm (1/4").
-Placer ta dentelte sous te bord reptie de fagon a ce que te dessus
tegerement te dessous tout en suivant te patron de ta dentette.
chevauche
- Coudre pres du bord reptie.
- Vous pouvez ajouter une touche de fantaisie en utitisant un point satin a ta place du
point droit.
79
Applique
- Turn stitch length diat to the desired length.
- Turn pattern selector dial to zig zag.
Select a narrow zig zag width.
Cut out the applique design and baste it to the
fabric.
Sew slowly around the edge of the design.
Trim excess material outside the stitching.
Make sure not to cut any stitches.
Remove the basting thread.
Tie top and bottom thread under the applique
to avoid unraveling.
8O
Aplicaci6n
- Regutar ta maquina seg0ina segun ta ii_straci6n.
- Reducir et ancho de ta puntada de zigzag.
1. Hilvane et diseflo sobre ta superficie de ta tela.
2. Empieze a coser con cuidado segOn et disefio.
3. Recorte ta teta que rebase ta costura.
4. Saque ta puntadas de hitvanar.
[]
Nota:
Vue/va a coser /as puntadas
fina/es
e incia/es
con puntada
recta para reforzar.
Applique
- Regter te bouton de tongueur de point seton ta tongueur desir6e.
- Placer te setecteur de point _, un point de zigzag etroit.
- Decouper t'apptique et te faufiter au v6tement.
- Coudre tentement pres du bord exterieur de t'apptique.
-Recouper
tout excedent
de tissu en prenant soin de ne couper aucun
COUSUS.
- Retirer te faufit.
- Tirer te fit a t'envers du tissu et attacher ensemble.
81
des points
Twin needle
* The twin needle is an optionat accessory not
supplied with your machine.
-Turn stitch length diat to the desired stitch
length.
-Turn stitch selector to straight stitch, center
needle position, width setting "0".
Make sure that the two threads used to thread
the twin needle are of the same weight. You
can use one or two colors.
Insert the twin needle in the same way as
single needle. Flat side of needle should face
away from you.
Follow instructions
needle separately.
[]
Please
for single needle threading.
Thread each
note:
When sewing
with twin need/e, a/ways proceed
slow/y,
and
make sure to maintain a low speed to insure quality stitching.
When using twin needle on zig-zag make sure the stitch width
dial is set between
"0" and '2. 5". Do not use twin needle at
setting
above
'2. 5".
f----m
82
Aguja
doble
* Et aguja dobte es un accesorio opcionat no suministrado con su maquina.
- Regute et largo de puntada con et diat a ta tongitud deseada.
- Cotoque et selector de costura recta a ta posici6n central de ta aguja dej_.ndoto en "0".
- AsegOrese de que los hilos utitizados sean det mismo grosor y peso para tas agujas
dobtes. Usted puede usau uno o dos cotores.
- Introduzca ta aguja dobte de iguat manera que ta simple es decir ta parte ptana hacia
atras.
- Enhebrar cada aguja pos separado.
[] Nota:
Cuando este cosiendo con dob/e aguja proceda /entamente, y este seguro de mantener
/a misma ve/ocidad para asegurarse de/a costura y de/a ca/idad de/a puntada. Cuando
este usando /a dob/e aguja en zig zag asegurese ClUe/a distancia de/a puntada este
programada de "0" a '2.5'i No use dob/e aguja en puntadas mayores de '2.5'i
Couture
a deu× aiguilles
* Le aiguitte double est un accessoire optionnet qui n'est pas fourni avec votre machine.
- Regler te bouton de tongueur de point & ta tongueur desir6e.
- Placer te setecteur de point _, ta couture droite, position centre.
Verifiez que ta targeur de point est regt6e sur "0".
- Assurez-vous que tes deux ills utitises soient de m6me grosseur. Vous pouvez utitiser
deux fits de m6me couteur ou de couteurs differentes.
-Retirer t'aiguitle simple et installer t'aiguilte double de ta m6me fagon que t'aiguitte
simple. Le c6te plat de t'aiguilte dolt toujours 6tre vers t'arriere de ta machine.
- Enfiter ta machine seton ta procedure normate d'enfitage jusqu'a t'aiguitte. Separer tes
ills et assurez-vous que te fit venant de ta bobine de droite entre dans t'aiguitte de droite
et que te fit venant de ta bobine de gauche entre dans t'aiguitte de gauche.
[] Attention:
Pour bien coudre avec des aiguil/es jumelbes, prenez votre temps et assurez vous ClUe
/a vitesse de couture est reduite, afin dbbtenir des points d'aspect irreprochab/e.
Pour coudre un zig-zag avec des aigui//e doub/e, assurez vous que /e se/ecteur de
/argeur de points est positionnde entre "0" et "2.5': Ale cousez pas avec des aigui//es
jume/_es si /a /argeur de points exc_de '2.5':
83
Monogramming
and embroidering
with embroidery
hoop*
Set the machine as illustrated.
Remove the presser foot and the presser foot
holder.
Move the drop feed control to right side to
lower the feed dogs. (1)
Lower presser foot lever before starting to sew.
Adjust the stitch width according to the size of
lettering or design.
Preparation
for Monogramming
and Embroidering*
- Draw the desired lettering or design on the right side of the fabric.
- Stretch the fabric between embroidery hoop as firmly as possible.
- Place the fabric under the needle. Make sure the presser foot bar is down in its lowest
position.
- Turn the balance wheel towards you to bring up the lower thread through the fabric.
Sew a few securing stitches at the starting point.
- Hold the hoop with thumb and forefingers of both hands while pressing the material with
the middle and third fingers and supporting the outside of hoop with smaller finger.
* Embroidery hoop not included with machine.
,5
O
@
84
Creaci6n
de monogramas
Baje los dientes det transportador
y bordado
con bastidor*
(NOTA: Et largo no puede controtarse con et disco).
- Ajuste ta m_quina seg0n se ilustra.
- Retire el prensatetas y su soporte.
- Destice et control det transportador de dientes at tado derecho para bajar los dientes. (1)
- Baje ta patanca del prensatetas antes de comenzar a coser.
- Ajuste et ancho de acuerdo con et tama_o de tas tetras det monograma o dibujo.
Preparacion para la creacion del monograma bordado*
- Traza tas tetras o et dibujo deseado en el tado derecho de ta tela.
- Extienda ta teta dentro det bastidor con ta mayor firmeza posibte.
- Cotoque ta tela debajo de ta aguja: Cerci6rese
en ta posici6n mas baja.
de que ta barra det pie prensateta este
- Gire et volante hacia usted para elevar et hilo inferior a traves de ta teta. Proceda a
coser unas pocas puntadas en el punto iniciat.
- Sujete et aro con los dedos putgar e [ndice de ambas manos.
* Coordine ta vetocidad de cosido y et movimiento det aro.
Monogramme
et broderie
a main
libre*
- Regter ta machine tel que demontr6 ci-dessus.
- Entever te pied-de-biche et te portepied.
- Abaisser te transporteur. (1)
- Abaisser te tevier du pied presseur avant de commencer _, coudre.
- Ajuster ta targeur du zigzag seton ta grandeur du monogramme
Preparation
pour le monogramme
- Dessiner te monogramme
et la broderie
ou du motif a broder.
a main libre*
ou te motif sur t'endroit du tissu.
- Ptacer te tissu dans un cerceau a.broder et te tendre te ptus fermement possible.
- Placer te tissu sous t'aiguitte. Assurezwous que ta barre du pied presseur est a, sa
position ta plus basse.
- En tournant te volant vers vous, faire passer te fit de ta canette b, travers te tissu et
ressortir sur t'endroit du tissu. Coudre quetques points d'arr6t au point de depart.
- Retenir te cerceau avec te pouce et t'index des deux mains, tout en pressant te tissu
avec tes doigts du milieu ators que t'auricutaire soutient te bord exterieur du cerceau.
* Le cerceau a broder n'est pas inctus avec tes accessoires de ta machine.
85
Quilting
Set pattern selector as illustrated.
Insert the quitting guide in presser foot holder
and set the space as you desired.
Move the fabric over and sew successive rows
with the guide riding along on the previous row
of stitching.
t_ Note:
Presser foot shown is the optional
qui/ting foot which does not come with
your
machine.
If you
have not
purchased this foot substitute the all
purpose fool
86
Para acolchar
Ponga et selector det dibujo tat como se itustra.
Inserte ta guia de acotchar en et soporte det prensatetas y adjuste et espacio a su gusto.
Desptace ta tela por encima y cosa hiteras sucesivas con ta guia situada a to largo de ta
hitera de puntada anterior.
[] Nora:
El Prensatelas mostrado es el prensatelas de acolchar opciona/, qub no se sum/nistra
con/a mdquina. Si no ha adquirido este prensate/as, puede sustituir/o pot e/prensate/as
universaZ
Coudre
avec le guide
Regter ta machine comme indique.
Setectionner te point "A".
Position de t'aiguilte au milieu.
Longueur de point: seton te tissu.
Inserer te guide dans te ressort du pied et fixer dans ta targeur desir6e.
Coudre des tignes parattetes en s'aidant du guide.
87
Gathering
Set the pattern selector as illustrated.
1. Attach the gathering foot.
2. Sew a single row or multiple rows of straight
stitches.
3. If more gathering is required, loosen the
upper thread tension to below 2 so that the
lower thread ties on the under side of the
material.
4. Putt the lower thread to gather more of the
material.
Note:
Presser
foot shown
is the optional
gathering
which does not come with your machine,
have not purchased
this foot substitute
purpose
lowering
pulling
88
foot
the
foot
if you
the a//
and gather
fabric
by hand
by
tension
setting
to below
2 and
the lower
thread
to gather
the material
Para fruncir
Ponga et selector det dibujo tat como se itustra.
1. Ponga el pie fruncidor.
2. Cosa una o varias hileras de puntos en costura recta.
3. Si se requiere mas fruncido, afloje ta tensi6n del hito superior
modo que et hilo inferior quede por debajo de ta teta.
4. Tire det hito inferior para fruncir mas de ta teta.
por debajo de 2, de
[] Nora:
E/prensate/as mostrado es el usado para fruncir opciona/, qub no se suministra con la
mdquina. Si no ha adquirido este prensate/as, puede sustituir/o pot e/universa/y
fruncir
/a te/a a mano bajando e/ajuste de /a tensidn a por deba/o de 2 e insertando el hi/o
inferior para fruncir /a te/a.
Le frongage
Regler ta machine comme indique.
Setectionner te point "A".
Position de t'aiguilte au milieu.
Longueur de point: seton te tissu.
1. Coudre une ou ptusieurs tignes de points droits.
2. Ret&cher ta tension du fit superieur (env. position 2) pour facititer te fronqage.
3. Tirer te fit inferieur et froncer.
89
Scallop
stitching
This machine automatically produces a scallop
stitch which may be used as decorative edging.
Set the pattern selector at "N".
Sew the scallop stitch along the edge of the
material. (1)
If desired,
trim around the scallop
with
scissors to create a scalloped edge. Be
careful not to cut the thread. (2)
0
9O
Puntada
feston
Esta maquina puede reatizar autom_,ticamente
para decorar los bordes de ta teta.
unas puntadas fest6n que pueden servir
- Puesta et selector de modelos en "N".
- Cosa tas puntadas fest6n a to largo det borde det tejido. (1)
- Si to desea, corte el borde con tijeras, siguiendo tas puntadas, para crear un borde
festonado. Sin embargo, tenga sumo cuidado en no cortar et hito. (2)
Point feston
Cette machine cree automatiquement
tisieres decoratives (_,picots).
un point de feston qui peut servir _, reatiser des
- Tourner te bouton selection des points a "N".
- Effectuer te point de feston te tong de ta tisiere du tissu. (1)
- Si on te souhaite, decouper autour des coquittes _, t'aide d'une paire de ciseaux pour
festonner te tissu. Faire attention cependant de ne pas couper te ill. (2)
91
Patch work
These stitches are used to join two pieces of
fabric while leaving a space between their
edges.
Fold over the edges of the two pieces of fabric for the hem and baste the edges to a thin
piece of paper leaving a small space between them.
2,
Set the Pattern selector on "l".
Turn the stitch length dial to "S".
3. Stitch along the edge, pulling both threads
slightly when beginning to sew.
* Use thicker than normal threads for sewing.
4,
After sewing, remove the basting and the pa per. Finish by tying knots on the reverse side
at the beginning and the end of the seams.
92
Csotura
de remiendo
Esta costura sirve para juntar dos piezas de tejido, dejando
porittas.
un espacio entre ambas
1. Dobte tas orittas de tas dos piezas de tejido para el dobtaditto e hitvanetas a un papet
fino dejando un pequeSo espacio entre ambas piezas.
2. Ponga et selector de puntada en 'T'.
Ajustar et dial selector det largo de ta puntada en ta posici6n "S".
3. Cosa a to largo de tas oriltas, tirando tigeramente de ambos hilos at comienzo.
* Use hitos mas gruesos de to normal.
4. Despues de coser, quite los hilvaes y et papet. Anude los cabos de los hitos det
comienzo y final de ta costura por et reves.
Patchwork
Ces points sont destines
entre tes deux rebords.
a, unir deux pi6ces de tissu tout en taissant un espace tibre
1. Ptiez tes rebords pour former un ourtet et b_tissez tes bords sur une fine feuitte de
papier en taissant un petit espace tibre entre tes deux.
2. Ptacez ta selection de motif sur "1".
Placer sur position "S" te bouton pour tongueur de point.
3. Cousez te tong du rebord en tirant tes deux ills de c6te au debut de ta couture. Utitisez
un fit plus epais que tes ills standards habituets.
4. Etiminez tes surfils et te papier apr6s ta couture. Nouez tes ills (debut et fin de couture)
sur t'envers pour arr6ter.
93
The walking
foot accessory
* The walking foot accessory
with this machine.
is optional.
It is not included
Always
try to sew first
without
the walking
foot
accessory which should be used only when necessary.
It is easier to guide the fabric and you have a better view of
the seam when using the standard, regular foot on your
machine. Your EURO-PR© sewing machine offers excellent
stitch quality on a wide range of fabrics from delicate
chiffons to multiple layers of denim.
The "Walking foot" accessory equalizes the feeding of the
upper and lower layers of fabric and improves the matching
of plaids, stripes and patterns. This foot helps to prevent
uneven feeding of very difficult fabrics.
1. Lift the presser foot bar.
2. Remove the "foot holder" by opening
the presser bar attaching screw. (3)
counter
clockwise
3. Attach the "walking foot" to the machine in the following
way.
i) The fork arm should
clamp. (2)
fit into the needle
screw
and
ii) Slide the plastic "attaching head" from your left to right
so that it is fitted into the "presser foot bar".
iii) Lower the "presser foot bar".
iv)Replace
and tighten
attaching screw".
clockwise
the
"presser
4. Make sure both the "needle screw" and the "presser
attaching screw" are tightly secured.
bar
bar
5. Draw the bobbin thread up and place both the bobbin
thread and the needle thread behind the walking foot
attachment.
a. Fork arm
b. Attaching head
c. Needle bar
d. Needle screw & clamp
e. Presser foot bar
f.
Presser bar attaching screw
94
Accesorio
de presion
* El pie regular es un accesorio
cornpacta
opcional
opcional no suminstrado
Siernpre trate de coser primero
este accesorio
con su maquina.
que solo ha de usarse cuando
sea necesario.
Sera mas facil guiar la tela y tendra una mejor vision de su costura cuando cosiendo use el
prensatelas normal estandar de su maquina, Su maquina de coser ofrecer una excelente calidad de
puntada en una amplia gama de telas desde delicadas muselinas de seda a mt]ltiples capas de
mezclilla (denim) para jeans.
Este accesorio hace uniforme el avance de los hilos superior e inferior de la tela y hace que casen
mejorar los cuadros excocesses, listas y dibujos. Tambien ayuda a impedir el avance no uniforme
de telas muy dificiles.
1. Eleve la barra del prensatela (e).
2. Retire el soporte del pie prensatela girando hacia la izquierda el tornillo de union de la barra
prensatela (f).
3. Incorpore este accesorio a la maquina como sigue:
i) El brazo (a) debe montarse por encima del tornillo de sujecion de la aguja y la abrazadera. (d)
ii) Deslice la cabeza de sujecion de plastico desde su izquierda a su derecha, de mode que
quede insertada en la barra del prensatelas.
iii) Baje la barra del prensatelas (e).
iv) Volver a colocar y apretar (a derechas) el tornillo de sujecion de la barra (f).
4. Cerciorese de que los tornillo de sujecion de la aguja (d) y de la barra prensatelas (f) estan bien
apretados.
5. Tire hacia arriba del hilo de la canilla y coloque este hilo y el de la aguja detras de este accesorio.
a. Brazo
b. Cabeza de union
c. Barra de aguja
d. Tornillo de sujecion de la aguja y abrazadera
e. Barra del prensatelas
f. Tornillo de sujecion de la barra del prensatelas
Pied de transport
superieur
* Le pied de transport superieur est un accessoire
optionnel qui n'est pas fourni avec votre machine.
Utilisation
du pied de transport superieur.
Pour la couture de tousles tissus tisses ou tricotes, les couvertures en laine, la soie, le vinyle, les
cuirs synthetiques, etc.
Le pied de transport superieur equilibre le transport du tissu (dessus et dessous) et ameliore
I'ajustement
de couvertures,
bandes et motifs. II facilite le transport regulier des tissus
problematiques.
Regler la machine comme indique.
Selectionner le point "A".
Position de I'aiguille au milieu.
Longueur de point: selon le tissu.
1. Soulever le pied.
2. Enlever le pied et son support.
3. Fixer le pied de transport superieur comme suit:
i) La vis de fixation de I'aiguille doit se trouver entre la fourchette. (2)
ii) Fixer le pied de transport superieur a la barre du pied. (3)
iii) Viser la vis (d).
4. Contr61er que la vis de fixation de I'aiguille. soit bien serree.
5. Saisir le fil inferieur.
6. Glisser les deux fils sous le pied.
a, Vis de fixation
e. Barre du pied
b. Fourchette
c. Vis de fixation de I'aiguille
f. Vis de fixation du pied
95
d. Barre de I'aiguille
Maintenance
Caution:
Always
make sure that the
from power
source
and the
before inserting
or removing
machine
is unplugged
main switch is on "0"
any parts and before
cleaning.
Remove the stitch
plate:
Turn the handwheet until the needle is fully raised.
Open the hinged front cover and unscrew the needle
plate screw with the screw driver. (1)
Cleaning
the feed dog:
Remove the bobbin case and use the brush supplied
to clean the whole area. (2)
Cleaning
and lubricating the hook:
Remove the bobbin case. Snap the two hook
retaining arms (a) outwards. Remove the hook race
cover (b) and the hook (c) and clean with a soft cloth.
Lubricate at the points (d) (1-2 drops) with sewing
machine oil. Turn the handwheet until the hook race
(e) is in the left position. Replace the hook (c).
Replace the hook race cover and snap back the two
hook retaining arms. Insert he bobbin case and
bobbin and replace the stitch plate.
important:
Fabric fluff and threads must be removed
regularly. Your machine should be serviced at regular
intervals at one of our service agencies.
d
c
96
Manutencion
de la maquina
m Atenoi6n:
Antes
de/a/impieza
deseonectar
/a maquina
quitando
el enehufe
de/a
red el_ctrica.
Quitar la chapa aguja:
Girar et volante hasta que ta aguja este en et punto mas alto: Abrir ta tapa y sacar et
tornitto de ta chapa con et destornittador. (1)
Limpieza del alimentador:
Sacar et porta-canittas. Limpiar bien toda ta zona con un pincet. (2)
Limpieza y aceitado de la lanzadera:
Sacar ta caja de bobina. Girar los dos gatittos de sujeci6n hacia afuera como indicado
enta figura. Sacar ta tapa del carrit (b) y ta tanzadera (c). Limpiar todo con un paso
suave. Poner 1 o 2 gotas de aceite para maquina de coser en (d). Girar et volante hasta
que et carril de ta tanzadera (e) este a ta izquierda. Poner ta tanzadera (c) y ta tapa del
carrit (b). Oerrar nuevamente los dos gatittos de sujeci6n (a). Ootocar ta caja de bobina
y ta chapa aguja.
Importante:
Peri6dicamente es conveniente quitar los residuos de hilo y potvo. Para
que su maquina este siempre en buenas condiciones es recomendabte un control
peri6dico en et tattes de asistencia tecnica autorizado.
Entretien
de la machine
[] Attention:
Toujours d_brancher la machine et me#re IFnterrupteur princ/pa/ en position
toute /bp_ration de nettoyage.
"O'pendant
Retirer la plaque a aiguille:
Tourner te volant jusqu'#, ce que t'aiguilte soit b, sa plus haute position. Ouvrir te
couvercte de ta coursiere et devisser tes vis de fixation avec te tourne-vis fourni dans ta
boke d'accessoire. (1)
Nettoyage des griffes d'entrafnement:
Retirer ta bofte a canette et nettoyer & fond & t'aide du pinceau. (2)
Nettoyage et huilage du crochet:
Retirer ta bofte b, canette. Tourner tes deux teviers de fixation (a) du crochet vers
t'exterieur. Entever t'anneau de fixation de ta coursiere (b) et te crochet (c) et tes nettoyer
avec un tissu doux et sec. Mettre 1 ou 2 gouttes d'huite pour machine 9, coudre dans ta
coursiere (d). Tourner te volant jusqu'b, ce que ta coursiere du crochet (e) soit #, gauche.
Replacer te crochet (c) et t'anneau de fixation (a). Tourner tes deux teviers vers te centre
du crochet et assurez-vous que tes teviers accrochent bien sur tes goujons. Remettre en
place ta boTte 9, canette et ta plaque a aiguilte.
important: La poussiere et tes dechets de ills doivent 6tre nettoyes de faqon regutiere.
Une revision complete de ta machine devrait aussi 6tre effectuee par un technicien a un
intervatte regutier.
97
Trouble
shooting
guide
Problem
Upper thread
breaks
Cause
1,The machine
is not threaded
correctly
2. The thread tension is too tight
3. The thread is too thick for the needle
4. The needle is not inserted correctly
5,The thread is round wound the
spool holder pin
6. The needle is damaged
Correction
1. Rethread the machine
2. Reduce the thread tension (lower number)
3. Select a larger needle
4. Remove and reinsert the needle (flat side
towards the back)
5. Remove the reel and wind thread onto reel
6. Replace the needle
Lower thread
breaks
1.The bobbin case is not inserted
correctly
2. The bobbin case is threaded wrongly
3.The lower thread tension is too fight
1. Remove and reinsert the bobbin case and
pull on the thread. The thread should pull
easily
2. Check both bobbin and bobbin case
3. Loosen lower thread tension as described
Skipped stitches
1. The needle is not inserted correctly
2. The needle is damaged
3.The wrong size needle has been
used
4. The foot is not attached correctly
1.Remove and reinsert needle (flat side
towards the back)
2. Insert a new needle
3.Choose a needle to suit the thread and
fabric
4. Check and attach correctly
Needle breaks
1. The needle is damaged
2.The needle is not correctly inserted
3. Wrong needle size for the fabric
4. The wrong foot is attached
1. Insert a new needle
2. Insert the needle correctly (flat side towards
the back)
3.Choose a needle to suit the thread and
fabric
4. Select the correct foot
Loose stitches
1.The machine
is not correctly
threaded
2.The bobbin case is not correctly
threaded
3. Needle/fabric/thread combination is
wrong
4. Thread tension wrong
1.Check the threading
2.Thread the bobbin case as illustrated
3.The needle size must suit the fabric and
thread
4. Correct the thread tension
Seams gather
or pucker
1. The needle is too thick for the fabric
2. The stitch length is wrongly adjusted
3. The thread tension is too fight
1.Select a finer needle
2. Readjust the stitch length
3. Loosen the thread tension
Uneven stitches,
uneven feed
1. Poor quality thread
2.The bobbin
case is
threaded
3. Fabric has been pulled
1.Select a better quality thread
2. Remove bobbin case and retread and
insert correctly
3. Do not pull on the fabric while sewing, let it
be taken up by the machine
The machine is
noisy
1. The machine must be lubricated
2. Fluff or oil have collected on the hook
or needle bar
3. Poor quality oil has been used
4. The needle is damaged
1. Lubricate as described
2.Clean the hook and feed dog as described
3.Only use good quality sewing machine oil
4. Replace the needle
The machine
jams
Thread is caught in the hook
Remove the upper thread and bobbin case,
turn the handwheel backwards and forwards
by hand and remove the thread remands.
Lubricate as described
wrongly
98
Identificacion
Problema
El hilo superior
de averias
y su correccion
Causa
1. La maquina esta mal enhebrada
2. La tension del hilo es demasiado
fuerte
3. El hilo es demsiado grueso para la
aguja
4. La aguja
no est_
colocada
correctamente
5. El hilo se ha enredado en el
portabobinas
6. La aguja est9 torcida o despuntada
Correcci6n
1. Enhebrar la mgquina correctamente
2.Disminuir la tension del hilo superior
(numero menor)
3. Usar una aguja mas gruesa
4.Colocar la aguja correctamente (el lado
piano hacia atr&s)
5. Sacar la bobina y devanar el hilo
6.Cambiar la aguja
El hilol inferior
se Rompe
1.La caja de bobina no est& bien
colocada
2. El porta-canillas
no est& bien
enhebrado
3. La tensi6n del hilo inferior es
demasiado fuerte
1.Colocar nuevamente la caja de bobina y
tirar del hilo. Este tiene que desen
Rollarse facilmente.
2. Controlar la canilla y el porta-canillas
3.Corregir la tensi6n del hilo inferior conforme
las instrucciones
Perdida de
puntadas
1.La aguja
no est_
colocada
correctamente
2. La aguja esta torcida o despuntada
3.Se
ha colocado
una aguja
equivocada
4. Se est_ usando un pie equivocado
1.Colocar la aguja correctamente (el lado
piano hacia atr&s)
2.Cambiar la aguja
3.Colocar la aguja adecuada al tejido y al
hilo.
4. Colocar el pie adecuado al trabajo a efectuar.
La aguja se
rompe
1. La aguja est_ torcida o despuntada
2. La aguja
no est& colocada
correctamente
3. Ropa demasiado gruesa / grosor
incorrecto de la aguja
4. Se ha montado un pie errado
1.Cambiar la aguja
2.Colocar la aguja correctamente
piano hacia atr&s)
3.Adaptar la aguja al tejido y al hilo
4. Usar el pie correcto
Durante la
costura se
Forman lazos
1. La maquina esta mal enhebrada
2.La caja porta bobina est& mal
enhebrada
3. La relaci6n aguja / ropa / hilo no es
correcta
4. La tensi6n del hilo no es correcta
1. Enhebrar la m_quina correctamente
2. Enhebrar el porta-canillas conforme las
instrucciones
3. El grosor de la aguja tiene que coincidir
con el hilo y la ropa
4.Corregir la tensi6n del hilo
La costura se
encoge, La tela
se frunce
1. La aguja es demasiado gruesa para
el tejido
2. El largo de la puntada est& mal
regulado
3. La tensi6n del hilo es demasiado
fuerte
1.Usar una aguja m_s fina
2. Regular correctamente el largo
puntada
3. Controlar la tensi6n del hilo
La costura y el
Avance de la
tela son
Irregulares
1. El hilo es demasiado debil
2. El porta-canillas
no est& bien
enhebrado
3.Se ha tirado de la tela durante la
costura
1.Usar un hilo de mejor calidad
2. Enhebrar de nuevo el porta-canillas y
colocarlo correctamente
3.No tirar de la tel& Esta es Alimentada
automaticamente
La maquina
hace Ruido y
est& dura
1. Hay que lubrificar la m&quina
2. Pelusa y trazos de aceite se han
pegado en la lanzadera o en la
barra prensatelas
1.Lubrificar
la m&quina
segt]n
las
instrucciones
2.Limpiar la lanzadera y el transportador
conforme las instrucciones
se rompe
99
(el lado
de
la
Comment
remedier
soi=m_me
aux petits problemes
Problerne
Le fil superieur
casse
Cause
1. L'enfilage du fil est incorrect
2. La tension du fil est trop forte
3. Le fil est trop epais pour I'aiguille
4. L'aiguille
n'est
pas
inseree
correcternent
5. Le fil dest entortille sur la broche de
la bobine
6. L'aiguille est endommagee
Rernede
1. Enfiler & nouveau le fil & travers la machine
et I'aiguille
2. Reduire la tension du fil superieur (chiffre
inferieur)
3. Utiliser une aiguille plus grosse
4. Enlever I'aiguille , puis la remettre en place
(talon dirige vers I'arriere)
5. Retirer la bobine et bobiner le fil
6. Remplacer I'aiguille
Le fil inferieur
casse
1. La boite & canette n'est pas placee
correcternent
2. La bo_te & canette n'est pas enfilee
correcternent
3. La tension du fil est trop forte
1. Enlever la navette, puis la remettre en place
et tirer sur le ill. Si le fil se deroule facilement,
la navette est bien en place.
2. Contr61er la canette et la navette
3. Rectifier la tension du fil inferieur de la
maniere prescrite
Les points
se forment
toujours
1.L'aiguille
n'est
pas
inseree
correctement
2. L'aiguille est tordue ou epointee
3. L'aiguille
n'a pas la classe ou la
grosseur correcte
4. Le pied-de-biche
ne convient pas
1.Enlever I'aiguille puis la remettre en place
(talon dirige vers I'arriere)
2. Remplacer I'aiguille
3.Choisir une aiguille dont la grosseur est
adaptee au filet a I'etoffe
4.Verifier si le pied-de-biche utilise convient
pour I'ouvrage
L'aiguille casse
1. L'aiguille est tordue ou epointee
2. La bo_te a canette n'est pas enfilee
correctement
3.Tissu trop epais/ grosseur incorrecte
de I'aiguille
4. Le pied-de-biche
ne convient pas
1. Remplacer I'aiguille
2. Enlever I'aiguille, puis la remettre en place
(talon dirige vers I'arriere)
3.Choisir
une aiguille dont la grosseur est
adaptee au filet au tissu
4. Changer le pied-de-biche
Des noeuds se
forment au cours
du travail
1. Le fil n'est pas enfile correctement
2. La bo_te a canette n'est pas enfilee
correctement
3. Le rapport aiguille/tissu/fil
est incorrect
4. Le fil n'est pas tendu correctement
2. Enfiler la navette de la maniere prescrite
3.Choisir
une aiguille dont la grosseur
adaptee au filet a I'etoffe
4. Rectifier la tension du fil
Les coutures se
retractent ou se
froncent
1. L'aiguille est trop grosse pour le tissu
2. La tension du fil est trop forte
1. Utiliser une aiguille plus fine
2. Rectifier la tension du fil
Les points
et
I'entra_nement
sont irreguliers
1. Le fil n'est pas assez solide
2. La bo_te a canette n'est pas enfilee
correctement
3. Le tissu est tire Iors du piquage
1. Utiliser un fil de meilleur qualite
2. Enfiler a nouveau la bo;te & canette, puis la
remettre en place
3. Ne pas tirer le tissu Iors de la couture. Celuici doit _tre entra_ne automatiquement.
La machine est
bruyante
1. La machine doit _tre lubrifiee
2. Presence de bourre ou de trace
d'huile sur le cro-chet ou sur la barre
d'aiguille
3. L'huilage a ete effectue avec une
huile de mauvaise qualite
4. L'aiguille est tordue ou epointee
1. Huiler la machine en suivant les instructions
2. Nettoyer
le
crochet
et
la
griffe
d'entra;nement
en suivant les instructions
3. Pour le huilage, utiliser exclusivement
une
huile speciale pour machine a coudre
4. Remplacer I'aiguille
La machine est
bloquee
Le fil est coince dans le crochet
Enlever le fil superieur et la navette, tourner le
volant par secousses a la main en avant et en
arriere. Enlever les restes de fil. Huller selon
les instructions.
ne
pas
100
1.Enfiler
correctement
le fil darts la machine
est
25 YEAR LIMITED WARRANTY
EURO-PRO Operating LLC warrants this sewing machine for a period of 25 years from date of the original purchase, to
be free of defective parts due to imperfections in the workmanship and materials, subject to the following conditions,
exclusions and exceptions.
EURO-PRO Operating LLC will, at its option, repair or replace this sewing machine free of charge if it fails to operate
according to specifications due to factory defects in materials or workmanship within one year from date of purchase. For
25 years from date of purchase, EURO-PRO Operating LLC will repair or replace defective sewing machine head parts;
owner pays for labor charges. The sewing machine must be shipped freight and insurance prepaid to:
In U.S. :EURO-PRO Operating LLC, 94 Main Mill Street, Door 16, Plattsburgh, N.Y. 12901 Tel.: (800) 361-4639
In Canada: EURO-PRO Operating LLC, 4400 Bois Franc, St. Laurent, Quebec, H4S 1A7 Tel.: (800) 361-4639
A copy of your sales receipt and $19.95 for handling and return packing/shipping
charges must be included.*
The electrical equipment (motor, rheostat, control, light, electronic parts etc.) are warranted free from defects in material
and workmanship for a period of two years from the date of original purchase. Non-durable parts including, without
limitation, needles, belts, bobbins, bulbs, bobbin cases, shuttles, springs, and parts which normally require replacement
are specifically excluded from this warranty.
This warranty is in effect provided the sewing machine is used only for normal household use by the original purchaser
when new, and is given reasonable good care and proper maintenance in accordance with the accompanying instruction
book. The manufacturer is not held responsible for damage, normal wear, accident, abuse, neglect, negligence or if the
machine has been repaired by unqualified personnel.
This warranty is extended to the original purchaser of the unit and excludes all other legal and/or conventional
warranties. The responsibility of EURO-PRO Operating LLC if any, is limited to the specific obligations expressly
assumed by it under the terms of the limited warranty. In no event is EURO-PRO Operating LLC liable for any indirect,
incidental or consequential damages of any nature whatsoever. Some states do not permit the exclusion or limitation of
incidental or consequential damages, so the above may not apply to you.
This warranty gives you specific legal rights, and you may also have other rights which vary from state to state or
province to province.
*Important: Carefully pack item to avoid damage in shipping. We recommend you insure the package (as
damage in shipping is not covered by your warranty). Be sure to include a copy of your sales receipt and attach
a tag to the machine with your name, address and telephone number. Please include $19.95 to cover return
shipping and handling.
OWNERSHIP
REGISTRATION
CARD
Please fill out and mail the product registration card within ten (10) days of purchase. The registration will enable us to contact you in the unlikely
event of a product safety notification. By returning this card you acknowledge to have read and understood the instructions for use, and warnings set
forth in the accompanying instructions.
RETURN TO:
In US: EURO-PRO
Operating
In Canada: EURO-PRO
Appliance
Address
N.Y. 12901 Tel.: (800) 361-4639
LLC, 4400 Bois Franc, St. Laurent, QC, H4S 1A7 Tel.: (800) 36!-4839
model
Date purchased
Owner's
LLC, 94 Main Mill Street, Door 16, Plattsburgh,
Operating
Name of store
name
City
State/Prov.
Zip/Postal
Code
TM
GARANTIE
EURO-PRO
d'ceuvre
d'achat
Operating
LLC
et mat6rielies,
garantit
en vertu
LIMITI E
que cette machine
des conditions,
a coudre
exclusions
DE 25 ANS
sera libre de pieces
et exceptions
suivantes,
defectueuses
ou d'imperfections
pour une p6riode
de main
de 25 ans a compter
de la date
d'ofigine.
EURO-PRO
Operating
manque de fonctionner
fabrication
d'achat
coudre.
&:
mat6rielles
LLC pourra,
en conformit6
ou de main d'oeuvre
d'origine,
EURO-PRO
Le propri6taire
devra
Aux €:tats-Unis
: EURO-PRO
Au Canada
: EURO-PRO
Une preuve
d'achat
L'equipement
a son choix, reparer ou remplacer
cette machine
avec les sp6cMcations
6tablies par EURO-PRO
un an suivant
la date d'achat
d'origine.
Pendant
25 arts a compter
de
de la date
Operating
LLC reparera ou remplacera
toute piece defectueuse
de la t6te de couture de la machine
defrayer les frais de main d'ceuvre.
La machine
& coudre dolt 6tre exp6di6e,
port et assurance
payes,
Operating
Operating
indiquant
61ectrique
pendant
& coudre sans frais de votre part si elle
Operating
LLC & cause de d6fectuosit6s
LLC,
LLC,
la date d'achat
(moteur,
94 Main Mill Street,
4400
rheostat,
Bois Franc,
et un montant
commandes,
Door 16, Plattsburgh,
St. Laurent
(Quebec)
N.Y. 12901
H4S
de 19,95 $ pour la manutention
lumiere,
les composantes
Tel.
1A7 T61. : (800)
et I'envoi
61ectronique,
: (800)
361-4639
361-4639
de retour
doivent
etc.) est garantit
6tre inclus.*
contre
les
defectuosit6s
mat6rielles
et de main d'ceuvre pour une periode de deux ans a compter de la date d'achat d'origine.
Les pieces nondurables y compris,
sans s'y limiter, les aiguilles, courroies,
canettes,
ampoules,
bottlers & canettes,
navettes,
ressorts et pieces
exigeant
normalement
d'6tre
remplacees,
sont specifiquement
exclues
de cette garantie.
Cette garantie est offerte sous reserve que la machine a coudre soit utilis6e dans le cadre d'un usa qe domestique
normal par
I'acheteur
d'origine,
& I'etat neuf, et qu'elle profite de boris soins et d'un entretien r6gulier tels que decrits darts le guide de directives
I'accompagnant.
n6gligence
Le fabricant
ne sera aucunement
ou des reparations
effectuees
responsable
sur la machine
des dommages,
a coudre
de I'usure
par du personnel
normale,
des accidents,
des abus,
de la
non qualifie.
Cette garantie
est propos6e
& I'acheteur
d'origine
du produit
et exclut toute autre garantie
juridique
et(ou) conventionnelle.
La
responsabilit6
de EURO-PRO
Operating
LLC, si responsabilit6
il y a, ne se rapporte
qu'aux obligations
specifiques
assumees
de
fa£on expresse
par EURO-PRO
Operating
LLC en vertu des modalit6s
de cette garantie
limit6e.
En aucun
cas EURO-PRO
Operating
LLC ne sera-t-elle
responsable
des dommages
accessoires
ou cons6cutifs
de quelque
nature que ce soit.
Certaines
provinces
ne permettent
pas que des exclusions
ou limites soient imposees
aux dommages
accessoires
ou consecutifs.
Ainsi, la
disposition
ci-dessus
pourrait ne pas s'appliquer
& vous.
Cette
garantie
*Important
vous
confere
: Emballez
des droits juridiques
soigneusement
precis
l'appareil
qui pourraient
pour
_viter
tout
varier
d'une
dommage
province
en transit.
ou d'un Etat & I'autre.
Nous
vous
recommandons
d'assurer
le coils (les dommages
survenus
en transit
ne sont pas couverts
par la garantie).
Assurez-vous
regu de caisse et fixez une _tiquette
sur la machine
_ coudre
pr_cisant
votre nom, votre adresse
et votre
t_l_phone.
Veuillez
_galement
joindre
un montant
de 19,95
$ pour
FICHE D'ENREGISTREMENT
la manutention
et I'envoi
en outre
d'y inclure
num_ro
de
votre
de retour.
DU PROPRII_TAIRE
Veuillez remplir cette fiche et Ia poster dans les dix (10) jours suivant I'achat. L'enregistrement nous permettra de communiquer avec vous pour tout
avis de s6curit6 au sujet du produit.
En nous retournant cette fiche, vous convenez d'avoir lu et compris les directives d'utilisation et Ies
avertissements pr6cises dans les directives.
RETOURNER
,_ :
Aux Etats-Unis : EURO-PRO
Au Canada : : EURO-PRO
Operating
Operating
LLC, 94 Main Mill Street, Door 16, Plattsburgh,
N.Y. 12901 Tel. : (800) 361-4639
LLC, 4400 Bois Franc, St. Laurent (Quebec) H4S 1A7 Tel. : (899) 36!-4639
Modele
Date d'achat
Nom du magasin
Nom du proprietaire
Adresse
Ville
Etat/prov.
Code Zip/postal
rM
GARANTiA
LIMITADA
DE 25 ANOS
EURO-PRO Operating LLC garantiza su maquina de coser por el termino de 25 ados desde la fecha de compra original,
contra defectos de fabricaci6n y de materiales, sujeto alas siguientes condiciones, exclusiones y excepciones.
EURO-PRO Operating LLC, a su criterio, reparara o reemplazara su maquina de coser sin cargo alguno si deja de
funcionar de acuerdo con las especiflcaciones debido a un defecto de fabricaci6n o de materiales dentro del t@mino de un
ado a partir de la fecha de compra. Durante 25 ados desde la fecha de compra, EURO-PRO Operating LLC reparara o
reemplazara las partes dadadas del cabezal de la maquina de coser; el duedo cubrira los gastos de mano de obra. Se
debe enviar la maquina de coser, con los gastos de envio y seguro pagos, a:
En los EE.UU.: EURO-PRO Operating LLC, 94 Main Mill Street, Door 16, Plattsburgh, N.Y. 12901 Tel.: (800) 361-4639
En Canada: EURO-PRO Operating LLC, 4400 Bois Franc, St. Laurent, Quebec, H4S 1A7 Tel.: (800) 361-4639
Debe incluir un comprobante de la fecha de compra y $19.95 para cubrir los gastos de envio. *
El equipamiento electrico (motor, re6stato, control, luz, componentes electr6nicos, etc.) estan garantizados contra defectos
de fabricaci6n y de materiales por el termino de dos ados desde la fecha de compra original. Los insumos tales como, sin
limitacion, agujas, correas, bobinas, lamparas, cubiertas de bobinas, lanzaderas, resortes y partes que normalmente
necesitan ser reemplazados son especificamente excluidos de la garantia.
Esta garantia es valida siempre y cuando la maquina de coser se utilice Qnicamente para costura domestica normal, por el
comprador original siendo nueva, y sea cuidada y mantenida razonablemente bien de acuerdo con el manual de
instrucciones adjunto. El fabricante no se hace responsable por dados, desgaste normal, accidentes, abuso, descuido,
negligencia, o si la maquina ha sido reparada por personal no calificado.
Esta garantia es valida para el comprador original del producto y excluye cualquier otra garantia legal y/o convencional. La
responsabilidad
de EURO-PRO Operating
LLC, de existir, se limita alas
obligaciones
especificas asumidas
expresamente bajo los terminos de esta garantia limitada. Bajo ninguna circunstancia EURO-PRO Operating LLC sera
responsable por dados indirectos, incidentales o consiguientes de ninguna clase. Algunos estados no permiten la exclusi6n
o limitaci6n de dados consiguientes o incidentales, por Io tanto Io anterior puede no ser valido para usted.
Esta garantia le otorga derechos legales especificos, y usted puede tambien tener otros derechos los que varian de estado
a estado o de provincia a provincia.
•lmportante:
Embale el producto cuidadosamente
para evitar daSos durante el transporte.
Le recomendamos
asegurar el paquete (puesto que la garantia no cubre daSos de envio). Asegurese de incluir una copia del recibo
de compra y colocarle una etiqueta a la m&quina con su nombre, direcci6n y nQmero de tel_fono. Asegurese de
incluir $19,95 para cubrir los gastos de envio.
TARJETA
Complete
y envJe
contactarnos
reconoce
ENVlAR
con
haber
A:
la tarjeta
usted
de registro
en caso
leJdo y entendido
En los EE.UU.:
En Canada:
del producto
de existir
alguna
las instrucciones
EURO-PRO
EURO-PRO
DE REGISTRO
Operating
Operating
dentro
notificaci6n
de los
diez
LLC,
Bois Franc,
dJas posteriores
con
incluidas
94 Main Mill Street,
4400
(10)
de seguridad
de uso y advertencias
LLC,
DEL CLIENTE
al producto.
en estas
instrucciones.
Door 16, Plattsburgh,
St. Laurent,
a la compra.
respecto
N.Y.
12901 Tel.:
QC, H4S 1A7 Tel.: (800)
El registro
Retornando
esta
nos
permitira
tarjeta
usted
(800) 361-4639
361-4639
Modelo del Artefacto
Fecha de compra
Nombre del Negocio
Nombre del Due_o
Direcci6n
Ciudad
Estado/Provincia
C6digo Postal
Euro-pro 7132L(993CB2E3)(_i_{_[i_
) Dec/04