1
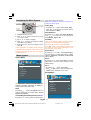
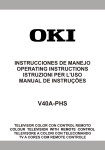
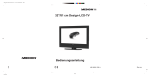
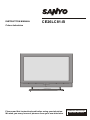
INSTRUCTION MANUAL CE26LC81-B ENGLISH 1 - 16 Colour television Problems with set-up? Please read this Instruction book before using your television. We wish you many hours of pleasure from your new television. Call 0870 240 7475 Contents Remote Control Buttons ..............................................................................................................................2 LCD TV .......................................................................................................................................................2 Preparation ................................................................................................................................................. 3 Safety Precautions .....................................................................................................................................3 Before Switching On Your TV .................................................................................................................... 5 Switching The TV ON/OFF ......................................................................................................................... 5 Navigating the Menu System ...................................................................................................................... 6 Menu System .............................................................................................................................................. 6 Other Features ......................................................................................................................................... 10 Teletext ..................................................................................................................................................... 12 Connect Peripheral Equipment .................................................................................................................. 13 Tips .......................................................................................................................................................... 14 Specifications ........................................................................................................................................... 14 Appendix A: Aerial Connection ................................................................................................................. 15 Appendix B: Connect Peripheral Equipment .............................................................................................. 15 Peripheral Equipment Connections ........................................................................................................... 16 Important Instruction ................................................................................................................................. 17 English - 1 ENG-26781W-1050UK-26 INCH 17MB22-(WO 1PC-WO PIP)-50103275.p65 02.04.2007, 12:42 Remote Control Buttons = Stand By = Cursor Up =Reveal 1 32 = Expand / 31 = Cursor Right = Info (Program Table) 0 - 9 = Direct Program 2 3 30 29 M 4 28 SELECT INFO /WIDE = Image Size = Mix, = No function OK -/-- / EXIT = No Function ABC P + = Programme Up DEF 2 3 MNO PQR 5 6 VWX YZ 4 STU + TV = Volume Up 27 DTV = TV / Quit Menu SOURCE AV = External Source (TV, EXT1, EXT2, EXT2 S, FAV, S-VIDEO, HDMI, YPBPR) Yellow button = Feature Menu Blue button = Installation Menu / = Hold / No Function = Update, Screen Format Change / GHI 1 JKL 7 8 9 PP 0 -/-EXIT 26 P+ 5 Red button = Sound Menu 6 7 8 24 9 PSWAP P<P SOURCE I-II TV DTV AV 22 21 20 19 18 17 Green button = Picture Menu P<P/SWAP =Previous Programme I-II = Mono/Stereo - Dual I-II 25 23 = Teletext = Time / / GUIDE 10 11 12 13 14 15 WIDE 16 = No function P - = Programme Down = Volume Down PP = Personal preferences OK/SELECT = Okay (Store) = Cursor Down = Cursor Left 31 M = Menu 32 = Mute = Index Page GUIDE= Electronic Programme Guide LCD TV C STANDBY TV/AV TV/AV MENU P/CH + + English - 2 ENG-26781W-1050UK-26 INCH 17MB22-(WO 2PC-WO PIP)-50103275.p65 02.04.2007, 12:42 MENU P/CH Volume Preparation Safety Precautions For ventilation, leave a space of at least 10 cm free all around the set. To prevent any fault and unsafe situations, please do not place any objects on top of the set. Use this apparatus in moderate climates. Please read the following recommended safety precautions carefully for your safety 1. Power Source The set should be operated only from a 220-240V AC, 50 Hz. outlet. Ensure you select the correct voltage setting for your convenience. 2. Power Cord Features • Remote controlled colour LCD TV. • 100 programmes from VHF, UHF bands or cable channels can be preset. • It can tune cable channels. • Controlling the TV is very easy by its menu driven system. • It has 2 Scart sockets for external devices (such as video, video games, audio set, etc.) • Stereo sound system (German+Nicam). • Full function Teletext (500 pages). Fastext, TOP text. • Headphone connection. • A.P.S. (Automatic Programming System). • All programmes can be named. Do not place the set, a piece of furniture,etc. on the power cord(mains lead) or pinch the cord.Handle the power cord by the plug.Do not pull out the plug by tugging the cord and never touch the power cord when your hands are wet as this could cause a short circuit or electric shock.Never make a knot in the cord or tie it with other cord.The power cord should be placed in such a way that they are not likely to be stepped on. A damaged power cord can cause fire or give you an electric shock. When it is damaged and need to be changed, it should be done by qualified personel. 3. Moisture and Water Do not use this equipment in a humid and damp place (avoid the bathroom, the sink in the kitchen, and near the washing machine). Do not expose this equipment to rain or water, as this may be dangerous and do not place objects filled with liquids,such as flower vases on top of the set. Avoid from dripping or splashing. If any solid object or liquid falls into the cabinet, unplug the set and have it checked by qualified personnel before operating it any further 4. Cleaning • Forward or backward automatic tuning. • Sleep timer. Before cleaning, unplug the set from the wall outlet. Do not use liquid or aerosol cleaners. Use soft and dry cloth. • Child Lock. • Automatic sound mute when no transmission. 5. Ventilation • NTSC Playback. • AV in and S-VHS in are available. • It has an HDMI connector for Digital Video and Audio. This connection is also designed to accept High Definition signals. • AVL (Automatic Volume Limiting) • When no valid signal is detected, after 5 minutes the TV switches itself automatically to stand-by mode. The slots and openings on the back cover are intended for ventilation and to ensure reliable operation. To prevent overheating, these openings must not be blocked or covered in anyway. 6. Heat and Flames The set should not be placed near to naked flames and sources of intense heat,such as an electric heater. Ensure that no naked flame sources, such as lighted candles, are placed on top of the set 7. Lightning • PLL (Frequency Search) • Audio Line Out In case of storm and lightning or when going on holiday, disconnect the power cord from the wall outlet. English - 3 ENG-26781W-1050UK-26 INCH 17MB22-(WO 3PC-WO PIP)-50103275.p65 02.04.2007, 12:42 8. Replacement Part When replacement parts are required, be sure the service technician has used replacement parts which are specified by the manufacturer or have the same specifications as the original one. Unauthorised substitutions may result in fire, electrical shock, or other hazards. 9. Servicing Please refer all servicing to qualified personnel. Do not remove the cover yourself as this may result in an electric shock. WARNING: When the device is not in use for a long time, disconnect from power. Instructions for waste disposal: • Packaging and packaging aids are recyclable and should principally be recycled. Packaging materials, such as foil bag, must be kept away from children. • Battery, including those which is heavy metal-free, should not be disposed of with household waste. Please dispose of used battery in an environmentally sound manner. Find out about the legal regulations which apply in your area. “The LCD panel is very high technology product with about a million thin film transistors, giving you fine picture details. Occasionally, a few non-active pixels may appear on the screen as a fixed point of blue, green or red. Please note that this does not affect the performance of your product.” “DO NOT LEAVE YOUR TV AT STAND-BY OR OPERATING WHEN YOU LEAVE YOUR HOUSE” • Cold cathode fluoresant lamp in LCD PANEL contains a small amount of mercury, please follow local ordinates or regulations for disposal. • The mains plug is used to disconnect the TV from the mains and therefore it shall remain readily operable. Warning: To prevent injury, this device must be securely attached to the floor/wall in accordance with the installation instrutions. Be sure to ground the connection properly. Connect the ground terminal of TV with the ground terminal provided at the power outlet using the enclosed power cord. If theprovided plug does not fit your outlet, consult an electrician for replacement of the obsolete outlet. English - 4 ENG-26781W-1050UK-26 INCH 17MB22-(WO 4PC-WO PIP)-50103275.p65 02.04.2007, 12:42 Surely connect the ground wire. Before Switching On Your TV Power Connection IMPORTANT: The TV set is designed to operate on 220-240V AC, 50 Hz. Note: Remove the battery from remote control handset when it is not to be used for a long period. Otherwise it can be damaged due to any leakage of battery. Switching The TV ON/OFF • After unpacking, allow the TV set to reach the ambient room temperature before you connect the set to the mains. To switch the TV on: Connections To The Aerial Input Socket 1- Connect the power supply cord to the system. Press Power On/Off button.Then the TV switches itself to stand-by mode (Optional). 2- To switch on the TV from stand-by mode either: • Connect the aerial or cable TV plug to the Aerial input socket located at the rear of the TV and connect the cable plug coming out from the TV out socket located on the devices (VCR, DVB etc.) to this socket as well. Your TV will switch on in two steps: Press a digit button on the remote control so that a programme number is selected, or Press the "-P/CH" or "P/CH+" button on the TV or press the “-P” or “P+” button on the remote control, so that last mode switched off is selected. By either method the TV will switch on. When the TV is operated for the first time, the following screen appears: Auto Program 75 VHF/UHF Country Language CABLE TV TXT Language REAR OF THE TV PLEASE CHECK ANTENNA CABLE AUTO. PROGRAMMING SYSTEM Inserting Batteries In The Remote Control Handset WARNING : Remote control is battery included. A plastic protector is used to disconnect the batteries in order to prevent the battery life from reducing. Please remove the plastic protector before the first use. • Remove the battery cover located on the back of the handset by gently pulling backwards from the indicated part. • Insert two AAA/R03 or equivalent type batteries inside. Place the batteries in the right directions and replace the battery cover. Ok UK Cancel By pressing “ ” or “ ” button, adjust the Country item and press “ ” to highlight “Language” item. Use “ ” or “ ” button to set “Language”. Use “ ” or “ ” buttons to select “TXT Language” and set it by using ” or “ ” buttons. Press “OK” button to continue: For more information on this process, see “Install Menu” section. To switch the TV off: • Press the “ (stand-by)” button on the remote control or On/Off switch on the TV, so the TV will switch to stand-by mode. To power down the TV completely, press Power On/ Off button or unplug the power cord from the mains socket. English - 5 ENG-26781W-1050UK-26 INCH 17MB22-(WO 5PC-WO PIP)-50103275.p65 02.04.2007, 12:42 Press / button to set the level. Hint: Hue is displayed in picture menu when the TV receives an NTSC signal. Navigating the Menu System For navigation For displaying menu options M To confirm choices SELECT INFO OK 1- Press M to display the menu. 2- Press “ ” or “” button to select an icon. Press “ ” for more options. 3- Use “” or “ ” button to highlight. 4- Press “ ” or “ ” buttons to change the settings. Press OK to set as default. 5- To exit the menu or return from sub-menu screen, press M. These explanations are available for the navigation of the whole Menu System. To select options that are explained in the following parts, refer to “Navigating The Menu System”. Menu System Picture Menu Colour Temp • By pressing / button select Colour Temp. • Press / to choose from one of these options: Cool, Normal and Warm. Noise Reduction By pressing / button select Noise Reduction. Press / to choose from one of these options: Low, Medium, High or Off. Film Mode Films are recorded at a different number offrames per second to normal television programmes. By pressing / button, select Film Mode. Press / button to set this feature On or Off. Turn this feature on when you are watchingfilms to see the fast motion scenes clearly. Picture Zoom By pressing / button select Picture Zoom. Use / buttons, to change picture zoom to Auto, 16:9, 4:3, Panaromic, 14:9 Zoom, Cinema, Subtitle, or Zoom. Reset By pressing / button, select Reset. Press or “OK ” button to reset the picture modes to factory default settings. PICTURE Store • By pressing / button select Store. • Press or “OK” button to store the adjustments. “Stored” will be displayed on the screen. Mode Contrast Brightness Sound Menu Sharpness Colour SOUND In picture menu if YPbPr or HDMI modes are selected, resolution information is displayed at the bottom of the menu osd. Mode By pressing / button, select Mode. Press / button to choose from one of these options: Cinema, Dynamic and Natural. Volume Equalizer Balance Headphone Sound Mode Contrast/Brightness/Sharpness/Colour/Hue By pressing / button, select the desired Option. English - 6 ENG-26781W-1050UK-26 INCH 17MB22-(WO 6PC-WO PIP)-50103275.p65 02.04.2007, 12:42 Volume Dynamic Bass By pressing / select Volume . Press / Dynamic Bass is used to increase bass effect of the TV set. button to change the level of the Volume. By pressing / button, select Dynamic Bass. By Equalizer pressing / button set Dynamic bass to Low, High By pressing / select Equalizer.Press / or Off. It is not recommended to select High if listening button to change the Equalizer setting. In equalizer at high volume levels. There is a subwoofer output menu, the mode can be changed to Pop, Rock, Jazz, that can accept an active subwoofer if you wish to Flat, Classic or User. Select the desired frequency create very high levels of Bass. by / button and increase or decrease the freSubwoofer is active only if Dynamic Bass is set to quency gain by pressing / button. Off. Note: Equalizer menu settings can be altered only SubWoofer when the Equalizer Mode is in User. It is possible to connect an external, active subwoofer Balance to the set to give a much deeper bass effect. By pressing / select Balance.Press / button to change the level of the balance.Balance level can By pressing / button, select Subwoofer.. Subwoofer can be set to On or Off. be adjusted between -32 and 32. Dynamic Bass is not available if Subwoofer is set to Headphone On. By pressing / button, select Headphone. Press Set Subwoofer to On when you connect an external button to enter hedphone menu. subwoofer to the set. volume Store By pressing / button, select Volume. Press • By pressing / button select Store. button to increase hp volume level. Press button to • Press or “OK” button to store the adjustments. decrease hp volume level. Headphone volume level “Stored” will be displayed on the screen. can be adjusted between 0 and 63. Features Menu sound mode By pressing / button, select Sound Mode. Press / button to change sound mode. Sound mode is used to identify sound mode of the headphone and can be set to mono, stereo, dual I or dual II according to the transmission. FEATURE balance Sleep Timer By pressing / button, select Balance. Press button to increase balance to the right. Press button to decrease balance to the left. Balance level can be adjusted between -32 and +31. Press the “M” button to return to the previous menu. Child Lock Language Ext-2 Out Blue Backgraund Sound Mode By pressing / select Sound Mode. Press / button, you can select Mono, Stereo, Dual I or Dual II mode, only if the selected channel supports that mode. AVL By pressing / select AVL VL.Press / button to set the AVL as on or off. Effect By pressing / select Effect.Press / button to set Effect as on or off. Sleep Timer By pressing / select “Sleep Timer”. Press / button to set the Sleep Timer.. The timer can be programmed between Off and 120 minutes in steps of 10 minutes. Child Lock By pressing / select Child Lock. English - 7 ENG-26781W-1050UK-26 INCH 17MB22-(WO 7PC-WO PIP)-50103275.p65 02.04.2007, 12:42 Press / button to set the Child Lock on or off.When on is selected, the TV can only be controlled by the remote control handset. In this case the control panel buttons will not work. Hence, if one of these buttons is pressed, “Child Lock On” will be displayed on the screen when the Menu screen is not visible. Install Menu INSTALL Language By pressing / button, select Language.Use / button to select the language. Program Table Program EXT2 Out Band By pressing / select EXT2 Output.Use / button, to set Ext-2 Out to TV, EXT1, FAV or YPbPr Audio. Channel Colour System Note: When TV Source is set to HDMI, HDMI Audio setting will be available among EXT-2 Out options. Blue Background You can set the TV to automatically change to a blue screen if the signal is weak or absent, or when there is no input from an external device. The Blue Background feature can be turned on or off by pressing “ ” / “ ” button. Program Table By pressing / button, select Program Table. Press “ ” to display Program Table. Menu Background By pressing / button, select Menu Background. Transparency level is adjusted by pressing “ button. ”/“ Program Table ” P01 P02 P03 P04 P05 P06 P07 P08 P09 P10 Menu Timeout By pressing / button, select Menu Timeout. Press ” / “ ” button to change menu timeout to 15 sec, 30 sec or 60 sec. Teletext Language By pressing / button, select Teletext Language. BBC 1 C 04 C 05 BBC 1 CH 4 BBC 2 C 04 C 07 C 12 C 15 P11 P12 P13 P14 P15 P16 P17 P18 P19 P20 S S S S S S S S S C 18 29 31 33 34 35 36 37 40 21 Press “ ” / “ ” button to change Teletext Language to West, East, Turk/Gre,Cyrillic, or Arabic. Name Default Zoom By pressing / button, select Default Zoom. You ou can set Default Zoom to Panoramic, 4:3, 14:9 Zoom or 16:9 by pressing / button. Delete Insert APS By moving the cursor in four directions you can reach 20 programmes in the same page. You can scroll the pages up or down by pressing the navigation buttons to see all the programmes in TV mode (except the AV mode). By cursor action, programme selection is done automatically. Name: To change the name of a decided programme, select the programme and press the RED button. The first letter of the selected name will be highlighted. Press / button to change that letter and “ ” / “ ” button to select the other letters. By pressing the RED button, you can store the name. English - 8 ENG-26781W-1050UK-26 INCH 17MB22-(WO 8PC-WO PIP)-50103275.p65 02.04.2007, 12:42 Insert: APS is running... Select the programme which you want to insert by navigation buttons. Press the GREEN button. By navigation buttons move the selected programme to the decided programme space and press the GREEN button again. Delete: UK 63.75 MHz To delete a programme, press the YELLOW button. Pressing the YELLOW button again erases the selected programme from the programme list, and the programmes below shift one up. 6% P 03 - C 04 APS (Auto Programming System) 63.75 MHz When you press the BLUE button for APS, Auto Programming System Menu will appear on the Screen. Cancel Auto Program Whenever you press the “BLUE” button, A.P.S. function stops and Program Table appears on the screen. If you wait until the end of A.P.S., Program Table is displayed with the programmes found and located. Country Program By pressing / button, select Program. Press “ ” / “ button to select the program number. You ou can also enter a number via digit buttons on the remote control. There are 100 program storage between 0 and 99. WARNING! All Prestored Programs will be deleted UK Band Ok Cancel Band can be selected either “C” or “S” by press“ “ button. A.P.S. (Auto Programming System) Country Channel Press / button to select your country. If you want to exit from A.P.S. function, press the “BLUE” button. When you press OK or RED button for starting APS, all stored programs will be erased and the following screen will be displayed: Channel can be changed by “ ” / “ Buttons. ”/ ” button or Digit Colour System By pressing / button, select Colour System. Press “ ” / “ ” button to change the colour system to PAL, SECAM, PAL60 or AUTO. If Sound System is set to I, SECAM is not available for the Colour System. Note: In EXT mode, you can choose NTSC 3.58 and NTSC 4.43 as well. Sound System By pressing / button, select Sound System. Press “ ” / “ ” button to change the sound system to BG, I, L, L’, DK. Fine Tune By pressing / button, select Fine Tune. Press “ ” / “ ” button to adjust the tuning. English - 9 ENG-26781W-1050UK-26 INCH 17MB22-(WO 9PC-WO PIP)-50103275.p65 02.04.2007, 12:42 Search By pressing / button, select Search. Press “ ” / “ ” button to start program searching.You can also enter the desired frequency via digit buttons when search item is highlighted. SOURCE Store TV By pressing / button, select Store. Press “ ”or “OK” button to store the adjustments. “Stored...” will be displayed on the screen. EXT-1 EXT-2 Install menu in AV modes EXT-2 S The following screen appears in the install menu: FAV INSTALL In source menu, highlight a source by pressing / button and switch to that mode by pressing “ ” or “OK” button. Source options are; TV, EXT-1, EXT-2, EXT-2 S, FAV, S-VIDEO, HDMI and YPBPR. Note: You can mark desired source options by pressing OK button. Therefore, when AV button is pressed, only the marked source options will be available. Colour System VCR Store Other Features Colour System By pressing / select Colour System. By pressing “ ” / “ ” button, you can change the colour system to PAL, SECAM, PAL 60, NTSC 4,43, NTSC 3,58 or AUTO. VCR TV Status Programme Number, Programme Name, Sound Indicator and Zoom Mode are displayed on the screen when a new programme is entered. Mute Indicator It is placed in the upper side of the screen when enabled. By pressing / select VCR. By pressing “ ” / “ ” button, you can set the VCR to ON or OFF.. Mute Store To cancel mute, there are two alternatives; the first By pressing / button, select Store. Press “ ”or “OK” button to store the adjustments. “Stored...” will be displayed on the screen. one is pressing the button and the second one is increasing the volume level. Source menu By pressing the AV button you can switch your TV to AV modes (except being in teletext). Pressing this button consecutively will switch the TV in one of the optional AV modes: TV, EXT1, EXT2, EXT2 S, FAV, SVIDEO, HDMI or YPBPR. By pressing “ ” / “ ” button, select the fifth icon. Source menu appears on the screen. AV Modes Personal Preference By pressing PP button, you maychange Picture Mode settings. English - 10 ENG-26781W-1050UK-26 INCH 17MB22-(WO 10 PC-WO PIP)-50103275.p65 02.04.2007, 12:42 Zoom Modes Zoom mode can be changed by pressing the WIDE button. You can change the screen size according to the picture aspect ratio. Select the optimum one from the following ZOOM modes. Note: • In YPBPR and HDMI modes, while in 720p-1080i resolutions, only FULL mode is available. 4:3 Use to view a normal picture (4:3 aspect ratio) as this is its original shape. Auto: When a WSS (Wide Screen Signalling) signal, which shows the aspect ratio of the picture, is included in the broadcast signal or the signal from an external device, the TV automatically changes the ZOOM mode according to the WSS signal. • When the AUTO mode does not function correctly due to poor WSS signal quality or when you want to change the ZOOM mode, change to another ZOOM mode manually. Zoom: This uniformly stretches the left and right sides of a normal picture (4:3 aspect ratio) to fill the wide TV screen. • For 16:9 aspect ratio pictures that have been squeezed into a normal picture (4:3 aspect ratio), use the Full mode to restore the picture to its original shape. Cinema: This zooms up the wide picture (16:9 aspect ratio) to the full screen. 14:9 Zoom: This zooms up the wide picture (14:9 aspect ratio) to the upper and lower limits of the screen. Panoramic: This stretches the left and right sides of a normal picture (4:3 aspect ratio) to fill the screen, without making the picture appear unnatural. The top and bottom of the picture are slightly cut off. Freeze Picture You can freeze the picture on the screen by pressing the “OK” button. Note: This feaute will be unavailable to be used while watching YPBPr and HDMI sources. 16:9 Zoom: This zooms up the wide picture (16:9 aspect ratio) to the full screen. Subtitle: This zooms up the wide picture (16:9 aspect ratio) with subtitles to the full screen. English - 11 ENG-26781W-1050UK-26 INCH 17MB22-(WO 11 PC-WO PIP)-50103275.p65 02.04.2007, 12:42 Fastext Teletext You can display Teletext information on your TV. Each channel which broadcasts teletext, transmits a page with information on how to use its teletext system (usually page 100). Depending on the TV channel, teletext is transmitted in different systems.The colours used in the options line correspond with the colour buttons of your remote control. • Ensure that the TV is receiving a good signal, or some text errors may occur. • When four coloured items appear at the bottom of the text page,Fasttext is available.Fasttext allows you to access pages quickly and easily.Press the corresponding coloured button to access the page. Your TV supports the 500 page Teletext system. When the page number of any of the 500 pages in memory is entered, the system will not search for the requested page; instead it will display the page automatically. If the requested page is not in memory, the system will search for the requested page number and save the 500 pages including the requested page into memory after finding it. • Press the button to move the Teletext screen forward one page at a time. • Press the button to move the Teletext screen backward one page at a time. For Fastext Special Teletext Functions The subject-heading for the information may have a particular colour. To Display a page of text. • Press an appropriate RED, GREEN, YELLOW or BLUE button in order to reach the relevant page quickly. The view text services press . To return normal viewing press again.Programmes cannot be changed until text is cancelled. • To select a page, press the number buttons or program buttons(P+, P-). • To select index page, press button. •To select superimposed over the programme on the screen, press . • Press once to enlarge top half of the page,press again to enlarge the bottom half of the page.Press again to revert normal size. • To discover solutions on quiz and games press • At times it is convenient to hold a page of text.Press to hold a page. The page will be held on screen until the button pressed again. • To select subcode pages press .Subcode pages are subsections of long Teletext pages that can only be displayed on the screen one section at a time. • Time information will be displayed on screen after TOP text TOP text mode of operation will be activated automatically according to the transmission. • If TOP text transmission is present, colour coded buttons will appear in status row. • If TOP text transmission is not present, status row will not appear. The subject-heading for information may be located in colored box. In Top mode the “-P/CH” or “P/CH+” commands will request the next or previous page respectively. If TOP text transmission is not available, in case of operation of these commands, wraparound occurs. For example page 100 appears to be one greater than page 199. pressing button.If the programme does not have teletext transmission, no information will be displayed. • When button is pressed while in teletext mode, the screen will be splitted into two windows, one displaying the teletext and the other displaying the current channel. Press the button to exit from teletext. button or TV DTV • To exit text press . Note: If the signal becomes insufficient, the teletext mode will be quitted. English - 12 ENG-26781W-1050UK-26 INCH 17MB22-(WO 12 PC-WO PIP)-50103275.p65 02.04.2007, 12:42 Connect Peripheral Equipment High Definition Your LCD Television is capable of displaying High Definition pictures from devices such as a High Definition Satellite Receiver or DVD Player. These devices must be connected via the HDMI socket or Component Socket. These sockets can accept either 720p or 1080i signals. Note: When it is desired to watch HDMI source with a DVI to HDMI cable; in order to enable audio, Audio Input (which is located at the left side of the antenna input) is to be used to get DVI device’s audio signals. Via The Scart The TV has 2 Scart sockets. If you want to connect peripherals (e.g. video, decoder, etc.) which have Scart sockets to the TV, you can use SCART socket of the TV. Note: If an external device is connected via the Scart sockets, the TV will automatically switch to AV mode. If both sockets are employed at the sime time, SCART 1 becomes the preferential. Via Aerial Input If the device you want to connect does not have a Scart socket, you should connect it to the Aerial input of the TV. If the VCR is connected via Aerial input, it is suggested to use Programme 0. Decoder If you are subscribed to cable TV offers, the organisation will supply you a corresponding decoder unit to allow the programmes to be unscrambled. For further information consult your dealer. Connect a decoder with an aerial socket to the TV • Connect the aerial cable. Connect a decoder without an aerial socket to the TV • Connect the decoder to the EXTERNAL socket of TV with a RCA cable. Through the SCART/RCA socket of the decoder, you may attain a better display resolution. TV And Video Recorder • Connect the aerial cables. Better picture quality can be obtained if you also connect a Scart cable to SCART sockets. Then, press the “AV” button to select EXT1 or EXT2. Copy Facility Source selection for VCR recording. • Select Feature menu. • Select SCART 2 Out by pressing / button. • For copying the picture that comes from the tuner, select SCART 1. Camera And Camcorder To Connect To AV Input Connect your camera or camcorder to AV input of the TV. • Connect your equipment to the TV via VIDEO (yellow), AUDIO R (red) and AUDIO L (white) inputs. You must connect the jacks into the input with the same colour. To Connect To S-VHS Input Connect your camera or camcorder S-VHS input of the TV. • Connect your equipment to the TV via S-VHS input and audio inputs of AV inputs by using S-VHS cables. Connect The Decoder To The Video Recorder Some video recorders have a special Scart socket for decoder. • Connect a Scart cable to the Scart socket of your decoder and to the special Scart socket of your video recorder. Refer to the booklet of your video recorder. Connecting Headphones (optional) Use the stereo headphone socket of the TV, to connect headphones. Note: If you want to connect more equipment to your TV, consult your dealer.) Connecting Subwoofer Use Subwoofer Out socket to connect an external, active subwoofer to the set to give a much deeper bass effect. Audio Lineout To connect the external speakers to your TV, use the Headphone Line Out of the TV. Additionally, turn “Line out” setting on in the “Sound Menu”. Note: While watching YPbPr sources, Lineout selection could only be the current source. Playback NTSC • Connect NTSC VCR player to a Scart socket of the TV. English - 13 ENG-26781W-1050UK-26 INCH 17MB22-(WO 13 PC-WO PIP)-50103275.p65 02.04.2007, 12:42 Tips Specifications Care Of The Screen Clean the screen with a slightly damp, soft cloth. Do not use abrasive solvents as they may damage the TV screen coating layer. Poor Picture Have you selected the correct TV system? Is your TV set or house aerial located too close to non-earthed audio equipment or neon lights, etc.? Mountains or high buildings can cause double pictures or ghost images. Sometimes you can improve the picture quality by changing the direction of the aerial. Is the picture or Teletext unrecognisable? Check if you have entered the correct frequency. The picture quality may degrade when two peripherals are connected to the TV at the same time. In such a case, disconnect one of the peripherals. No Picture TV BROADCASTING PAL/SECAM B/G D/K K' I/I' L/L' RECEIVING CHANNELS VHF (BAND I/III) UHF (BAND U) HYPERBAND CABLE TV (S1-S20/ S21-S41) NUMBER OF PRESET CHANNELS 100 CHANNEL INDICATOR On Screen Display RF AERIAL INPUT 75 Ohm (unbalanced) Is the aerial connected properly? Are the plugs connected tightly to the aerial socket? Is the aerial cable damaged? Are suitable plugs used to connect the aerial? If you are in doubt, consult your dealer. No Picture means that your TV is not receiving a transmission. Have you selected the correct button on the remote control?Try once more. OPERATING VOLTAGE 220-240V AC 50Hz Sound AUDIO OUTPUT POWER (WRMS. ) (%10 THD) 2x8 You can not hear any sound. Did you perhaps interrupt the sound, pressing the button? Sound is coming from only one of the speakers.Is the balance set to one extreme? See Sound menu. Remote Control Your TV no longer responds to the remote control. Perhaps the batteries are exhausted. If so you can still use the local buttons at the bottom of the TV. AUDIO German+Nicam Stereo POWER CONSUMPTION (W) 160 W 2.7 W (Stand-by) PANEL 16:9 display, 26” Screen Size DIMENSIONS (mm) DIMENSIONS (mm) D L H 210 126 699 699 546 499 Weight (kg) English - 14 ENG-26781W-1050UK-26 INCH 17MB22-(WO 14 PC-WO PIP)-50103275.p65 02.04.2007, 12:42 11,5 10,0 With stand Without stand Appendix A: Aerial Connection Outdoor Aerial Connection Round 75 ohm coaxial cable 75 VHF/UHF Rear of TV Appendix B: Connect Peripheral Equipment HEADPHONE AUDIO AUDIO IN (L) VIDEO IN (R) VIDEO IN OUT IN ANT.IN CAMCORDER SATELLITE RECEIVER ANTENNA English - 15 ENG-26781W-1050UK-26 INCH 17MB22-(WO 15 PC-WO PIP)-50103275.p65 02.04.2007, 12:42 OUT Peripheral Equipment Connections S-VHS Input HDMI Input Video Input SCART 2 Audio Inputss SCART 1 Headphone Component Audio Inputss Audio Line Outs s Component Video Inputs (YBPbr) Power Cord Input RF Power On/Off Switch PC Audio Input Subwoofer out For Service Use Only 220V-240V AC ~50 Hz POWER Note: Because FAV CVBS and SVHS Y are connected parallelly, the picture may blend if the two peripherals are used at the same time. Likewise, because SVHS C and SCART II R are connected parallelly, the picture may blend if the two peripherals are used at the same time. Thus these two are not to be used at the same time. English - 16 ENG-26781W-1050UK-26 INCH 17MB22-(WO 16 PC-WO PIP)-50103275.p65 02.04.2007, 12:43 Important Instruction For your own safety read following instruction carefully before attempting to connect this unit to the mains supply. MAINS (AC) OPERATION The wires in the mains lead are coloured in accordance with the following code : GREEN & YELLOW (Earth) (if there is earth cable) FUSE BROWN (Live) BLUE (Neutral) IMPORTANT As the colours of the wires in the mains lead of this appliance may not correspond with the coloured markings identifying the terminals in your plug, proceed as follows: The wire which is coloured green and yellow must be connected to the terminal which is marked with the letter E, or by the earth symbol, or coloured green or green and yellow. The wire which is coloured blue or black must be connected to the terminal which is marked with the letter N or coloured Black. The wire which is coloured brown or red must be connected to the terminal which is marked with the letter L or coloured Red. For continued protection against risk of fire, replace only with same type and rating of fuse (ASTA approved 5A 250VAC fuse). CAUTION TO PREVENT ELECTRIC SHOCK DISCONNECT FROM THE MAINS BEFORE REMOVING COVER. NO USER SERVICEABLE PARTS INSIDE. REFERSERVICING TO QUALIFIEDSERVICE PERSONNEL. SAFETY PRECAUTION THIS EQUIPMENT MUSTBE DISCONNECTED FROM THE MAINS WHEN NOTIN USE. DO NOTALLOW THIS UNIT TO BE EXPOSED TO RAIN OR MOISTURE. English - 17 ENG-26781W-1050UK-26 INCH 17MB22-(WO 17 PC-WO PIP)-50103275.p65 02.04.2007, 12:43 THE GUARANTEE The seller of this equipment (the vendor) warrants to the initial retail purchaser that if the equipment becomes defective, and the defect is shown to be due to faulty materials or workmanship within a period of 12 Months from the date of sale to the original purchaser it will be repaired (or at the vendors sole option) replaced free of charge, always providing that: The equipment has at all times been used in accordance with the operating instructions issued by the manufacturer, and has not been connected to an electrical supply for which it has not been properly adjusted. Unauthorised repairs or modifications, which have not been expressly approved by the manufacturer, shall render this guarantee null and void. This guarantee is not transferable and is only applicable in the UK. Nothing in this express warranty affects the statutory rights available to the purchaser of this equipment EXCLUSIONS SANYO shall not be liable for any removal or installation or re-installation of the equipment. The warranty does not coverFailure due to fair wear and tear of any item. Cosmetic items, remote controls or parts and consumable items such as lamps, filters, batteries, tapes, cables or connectors. Accidental damage or damage caused by negligence or misuse by the user. Failure caused by lightning strike, storage or operation outside the specified environment, incorrect installation, lack of routine maintenance outlined in the operating instructions supplied with the unit, incorrect fitting of lamps, filters, batteries or other consumables or parts. Units not originally supplied by SANYO Europe Ltd through a UK Reseller. Thank you for buying SANYO. This equipment should give you many years of pleasure and faithful service but in the event that a fault occurs, the following notes for you guidance may be helpful:1: PLEASE RETAIN YOUR PURCHASE RECEIPT WHICH WILL BE REQUIRED FOR SERVICE DURING WARRANTY. 2: If your SANYO equipment proves faulty during the period of guarantee, take it or send it back to the dealer who originally supplied it together with this guarantee and the proof of purchase. We have made arrangements with our approved dealers under which they will carry out in guarantee service repairs on our behalf. In this way, we hope to reduce to a minimum the amount of time you will be without your equipment. 3: If for some reason it is impossible to return the equipment to the original supplier, please contact our Customer Relations Department at the address below for further advice. 4: Should the equipment require servicing after the expiry of the guarantee period, take or send it to the original supplier or any other Sanyo dealer. He will be pleased to give you a quotation for the repair. Customer Relations Department, SANYO Europe Ltd. SANYO House, 18, COLONIAL WAY, Watford, Hertfordshire, WD24 4PT. Tel: 01923 246363 50103275 SANYO Electric Co., Ltd. 10 0 PAP E % R RE C ICL AD O L 042-02514/1.5 Dear Customer.