1
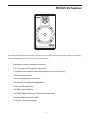
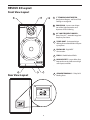
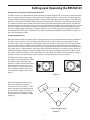
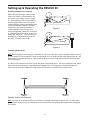
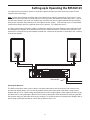
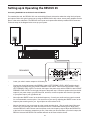
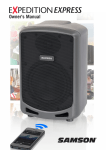
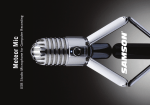
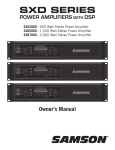
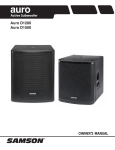
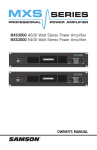
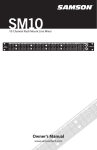
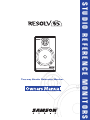
Two-way Studio Reference Monitor
STUDIO REFERENCE MONITORS
®
Safety Instructions
Caution: To reduce the hazard of electrical
shock, do not remove cover or back.
No user serviceable parts inside. Please refer
all servicing to qualified personnel.
WARNING: To reduce the risk of fire or electric shock, do not expose this unit to rain or moisture.
The lightning flash with an arrowhead symbol within an equilateral triangle, is intended to alert the user to the
presence of uninsulated "dangerous voltage" within the products enclosure that may be of sufficient magnitude to
constitute a risk of electric shock to persons.
The exclamation point within an equilateral triangle is intended to alert the user to the presence of important operating and maintenance (servicing) instructions in the literature accompanying the product.
Important Safety Instructions
1. Please read all instructions before operating the unit.
2. Keep these instructions for future reference.
3. Please heed all safety warnings.
4. Follow manufacturers instructions.
5. Do not use this unit near water or moisture.
6. Clean only with a damp cloth.
7. Do not block any of the ventilation openings. Install in accordance with the manufacturers instructions.
8. 9. Do not install near any heat sources such as radiators, heat registers, stoves, or other apparatus (including
amplifiers) that produce heat.
Do not defeat the safety purpose of the polarized or grounding-type plug. A polarized plug has two blades with one wider than the other. A grounding type plug has two blades and a third grounding prong. The wide blade or third prong is provided for your safety. When the provided plug does not fit your outlet, consult an electrician for replacement of the obsolete outlet.
10. Protect the power cord from being walked on and pinched particularly at plugs, convenience receptacles and at the point at which they exit from the unit.
11. Unplug this unit during lightning storms or when unused for long periods of time.
12. Refer all servicing to qualified personnel. Servicing is required when the unit has been damaged in any way, such as power supply cord or plug damage, or if liquid has been spilled or objects have fallen into the unit, the unit has been exposed to rain or moisture, does not operate normally, or has been dropped.
Table of Contents
Introduction RESOLV 65 Features RESOLV 65 Layout
Front & Rear View Layout
Setting Up & Operating the RESOLV 65
Background on the Resolv65 Studio Reference Monitor
Positioning the Resolv 65
Connecting the RESOLV 65
Powering the Resolv 65 Connecting the RESOLV 65 to the Resolv 120a Sub Woofer
4
5
6
7
7
8
9
10
Specifications
11 Copyright 2002 - 2007, Samson Technologies Corp.
Printed February, 2007 v1.1
Samson Technologies Corp.
45 Gilpin Avenue
Hauppauge, New York 11788-8816
Phone: 1-800-3-SAMSON (1-800-372-6766)
Fax: 631-784-2201
www.samsontech.com
Introduction
Thank you for purchasing the Samson RESOLV 65 Studio Reference Monitor. The RESOLV
65 near-field monitor sounds full and balanced with an uncompromised transparent midrange, leaving room to accurately hear and mix vocals, instruments and even subtle reverb
trails. Featuring a 6.5" extended range co-polymer woofer with a butyl surround, the Resolv
65’s low-end response is tight and punchy. The sweet and truthful high frequency response
is achieved via a 1” titanium dome tweeter incorporating a neodymium magnet and
increased power handling achieved by the addition of a heat sink and Ferro fluid cooling.
Premium transducers together with high quality crossover components provide an accurate
and pleasant listening experience even through the longest sessions. In addition, the Resolv
65’s have been magnetically shielded to meet the needs of today’s multimedia studio. With
its extended low end and linear frequency response, the RESOLV 65 is an ideal near field
monitor system for recording studios, video post-production suites, fixed installations or
where accurate monitoring is required.
In these pages, you’ll find a detailed description of the features of the RESOLV 65 subwoofer, as well as a guided tour through its control panel, step-by-step instructions for its setup
and use, and full specifications. You’ll also find a warranty card enclosed—please don’t forget to fill it out and mail it in so that you can receive online technical support and so we can
send you updated information about these and other Samson products in the future.
With proper care and adequate air circulation, your RESOLV 65 will operate trouble free for
many years. We recommend you record your serial number in the space provided below for
future reference.
Serial number:
Date of purchase:
Should your unit ever require servicing, a Return Authorization number (RA) must be
obtained before shipping your unit to Samson. Without this number, the unit will not
be accepted. Please call Samson at 1-800-3SAMSON (1-800-372-6766) for a Return
Authorization number prior to shipping your unit. Please retain the original packing materials
and if possible, return the unit in the original carton and packing materials.
RESOLV 65 Features
®
The Samson RESOLV 65 two-way studio reference monitor provides accurate a enjoyable listening even during
long, demanding sessions. Here are some of its main features:
•
Extremely accurate reference monitoring
•
6.5" Co-polymer low frequency transducer
•
1" Titanium dome tweeter with Neodymium and Ferro-fluid cooling
•
Ported tuned enclosure
•
Time corrected passive crossover
•
A/V shielded for multimedia applications
•
5-way Gold Binding Posts
•
100 Watt power handling
•
Solid MDF (Medium Density Fiberboard) construction
•
Texture painted black satin finish
•
Three-year extended warranty
RESOLV 65 Layout
Front View Layout
1
2
3
1 1
" Titanium Dome Tweeter Neodymium Magnet and Ferro-Fluid
Cooling on waveguide.
2 P
hase Plug - Insures even dispersion of the high frequencies and
improves off axis listening.
®
3 6
.5” Low frequency Driver Heavy Duty 6.5,” extended range low
frequency transducer.
4 T
UNED PORT - Quiet port design
offering linear extended low frequency response.
5 ENCLOSURE - Rigid MDF
Construction.
6 FINISH - Sleek black oak finish.
7 NON-SKID FEET - Large rubber feet
keep enclosure in place even at high
sound pressure levels.
.
4
5
6
A Speaker Terminals - 5-Way Gold
Binding Posts
.
Rear View Layout
100 Watts
-
+
100 Watts
-
+
Setting up & Operating the RESOLV 65
Background on the Resolv65 Studio Reference Monitor
The Resolv 65 is a near field reference monitor featuring a custom designed 6.5” co-polymer low frequency driver
and a 1” titanium tweeter employing a Ferro fluid cooled, neodymium magnet. The monitor’s crossover has been
carefully designed with high quality components insuring a linear frequency and phase response. The Resolv 65
enclosure is constructed from MDF (Medium Density Fiberboard) and is finished in scuff resistant textured paint.
The monitor’s enclosure also includes a tuned vent port that provides extended low-end response, and with low
turbulence design, the low frequency driver can move freely with minimal effect on the overall impedance. On the
rear of the enclosure you’ll find the connections are made from 5-way, gold binding posts providing convenient
hook up via banana plugs, spade lugs or stripped and tinned wire. In order to get the most output level, Resolv
65’s load impedance is 4 ohms, matching many of today’s popular power amplifiers whose maximum power output is also achieved at 4 ohms.
Positioning the Resolv 65
Near field monitoring has become the choice of many engineers in large and small studios because it minimizes
the effect of room acoustics. This is especially important in today’s project studios since the budget for room
acoustics is often close to nothing. By positioning the reference monitors in the near field (close to the listeners),
you can greatly reduce the effects of room acoustics. The most important considerations when evaluating the
effects of room acoustics are reflective surfaces that are around the monitoring area. These can include flat tabletops, glass mirrors or framed pictures, large open walls and even the surface of your mixing console. Mostly all
reflecting sound will eventually reach the listening position, but since it is slightly delayed from the direct source
the result is random cancellation of some frequencies or comb filtering. If possible, remove any and all reflective
surfaces. You may also want to hang some acoustic tiles on walls that are close to the monitors.
®
®
The Resolv 65’s can be used in either
the vertical or horizontal position. When
using the monitors in the horizontal
position, be certain to place the left and
right side tweeters on the outer most
sides. (Figure 1.) This will improve the
stereo imaging and bass response by
increasing the coupling of the low-end
drivers.
Figure 1.
When positioning the monitors you’ll
want to set up what is commonly
referred to as the “mix triangle”. In this
ideal configuration, the space between
the left and right monitor is equal as is
the distance from the listener to each
monitor, forming an equilateral triangle.
(Figure 2.)
Equal Distance
Prime Listening Spot
Figure 2.
Prime Listening Spot
Setting up & Operating the RESOLV 65
Positioning the Resolv 65 - continued
When choosing the height of your monitor
system, be careful to avoid reflections off
the surface of the mixing console. (Figure
3.) These reflections arrive at the listening
position slightly delayed from the original
sound resulting in strange cancellations and
overall unpredictable response. Visualize
straight lines representing the beams of
sound radiating from the monitors and
choose a height that reduces the occurrence
of reflections that will end up in the prime listening spot. (Figure 4.) In most cases, the
ideal position is slightly behind and above
the mixing console’s meter bridge.
Figure 3.
Figure 4.
Connecting the Resolv 65
Note: Before plugging in and turning on, remember the “last on first off” rule of power amplifiers. When powering
up your system, be sure to that all the wires are connected, turn your mixer and any other outboard gear on, and
then last turn your power amplifier on. When powering down, turn your power amp off first and then your mixer
and outboard gear.
The Resolv 65 connections are made via the rear panel 5-way binding posts. You can use banana plugs, spade
lugs or tinned and stripped wire. Standard strained speaker wire of 12-14 gauge is recommended and you
should use the shortest possible wire length (equal on both sides) on both the left and right monitor.
Speaker Cable (Un-Shielded)
Note: Just about all un-shielded speaker wire will have a marking indicating the negative side. To avoid phase
cancelation problems, be sure to maintain the correct connection for the positive and negative sides throughout
your system.
Setting up & Operating the RESOLV 65
It is important that your monitor system is connected in phase otherwise you will not have the proper low-end
response and stereo image.
Note: It’s fairly easy to identify a monitor that is out of phase just by listening, especially on a pop record. Listen
for the parts of the music that you would expect to be in the center of the mix like kick drum and vocals. If you do
not hear them directly in the center (for instance they sound like they are two signals panned hard right and left)
then you are more than likely listening to an out-of-phase monitor system. (This test won’t work on early Beatles
records where Ringo’s drum kit is panned all the to the right side. Try a Madonna record.)
In order to ensure that your monitor system is in phase, be careful to pay close attention to the positive and negative marking on the amplifier, wires and Resolv 65 monitors. Make sure that the + terminal of the speaker is connected to the + terminal of the power amplifier and that the - terminal of the speaker is connected to the - terminal
of the power amplifier.
100 Watts
100 Watts
CAUTION
FUSE
6A/250V
RISK OF ELECTRIC SHOCK
DO NOT OPEN
!
SAMSON
SERVO 170 STUDIO AMPLIFIER
TO PREVENT SHOCK DO NOT
OPEN. NO USER SERVICABLE
PARTS INSIDE. REFER SERVICING
TO QUALIFIED SERVICE
PERSONNEL. TO PREVENT FIRE
OR SHOCK HAZARD DO NOT
EXPOSE TO RAIN OR MOISTURE.
CAUTION
HEATSINK MAY BE HOT!
DO NOT BLOCK AIRFLOW
OR OVERHEATING MAY
OCCUR.
CAUTION ; REPLACE WITH
THE SAME TYPE FUSE AS
INDICATED. UTILISER UN
FUSIBLE DE RECHANGE DE
MEME TYPE.
~AC INPUT
115V/60Hz, 490W
+RIGHT
GROUND
R
S/N
USE CLASS 2 WIRING MINIMUM LOAD IMPEDANCE 4 RIGHT
L
(UNBALANCED 10K /0dBM)
LEFT
RIGHT
LEFT+
LEFT
INPUTS
(BALANCED 10K /0dBM)
FROM MIXER
Powering the Resolv 65
The Resolv 65 monitors have a power rating of 100 watts and thanks to the robust drivers and crossover components and efficient design, you can use any amplifier with a power rating of 60 to 200 watts. Using a power
amplifier with too low of a power rating can be dangerous since the inputs signal is often clipped in an effort to get
the desired level. Over powering the Resolv 65 can result in catastrophic failure and therefore using any amplifier
with a power rating over 200 watts will void your warranty. For the best results use a quality power amplifier with a
power rating of about 85-100 watts at 4 ohms like the Samson Servo 170.
Setting up & Operating the RESOLV 65
Connecting the RESOLV 65 to the Resolv 120a Sub Woofer
For extended low end, the RESOLV 65’s can used with the Resolv 120a active subwoofer using line level inputs
and outputs. Below is a typical system set up using the RESOLV 65’s with a mixer, stereo power amplifier and the
Resolv 120a active subwoofer. The RESOLV 120’s inputs and outputs utilize industry standard RCA connectors.
Follow the steps in the diagram below to set up your system.
100 Watts
CAUTION
FUSE
6A/250V
RISK OF ELECTRIC SHOCK
DO NOT OPEN
!
SAMSON
SERVO 170 STUDIO AMPLIFIER
TO PREVENT SHOCK DO NOT
OPEN. NO USER SERVICABLE
PARTS INSIDE. REFER SERVICING
TO QUALIFIED SERVICE
PERSONNEL. TO PREVENT FIRE
OR SHOCK HAZARD DO NOT
EXPOSE TO RAIN OR MOISTURE.
CAUTION
CAUTION ; REPLACE WITH
THE SAME TYPE FUSE AS
INDICATED. UTILISER UN
FUSIBLE DE RECHANGE DE
MEME TYPE.
HEATSINK MAY BE HOT!
DO NOT BLOCK AIRFLOW
OR OVERHEATING MAY
OCCUR.
~AC INPUT
115V/60Hz, 490W
+RIGHT
GROUND
R
S/N
USE CLASS 2 WIRING MINIMUM LOAD IMPEDANCE 4 RIGHT
L
(UNBALANCED 10K /0dBM)
LEFT
RIGHT
LEFT+
LEFT
INPUTS
(BALANCED 10K /0dBM)
FROM MIXER
10 Inch Long Throw Transducer
120 Watt Amplifier
•Lower your mixer’s master outputs to all the way off.
•Connect the mixer’s left output to the RESOLV 120a’s LEFT PREAMP LEVEL INPUT and the mixer’s
right output to the RESOLV 120’s RIGHT PREAMP LEVEL INPUT. Now connect the RESOLV 120a’s
LEFT PREAMP LEVEL OUTPUT to the left side input of the power amp, and the RESOLV 120a’s RIGHT
PREAMP LEVEL OUTPUT to the right side input of the power amp. Connect a speaker wire from the left
output of your power amp to your left Resolv 65, and then, connect a speaker wire from the right output
of your power amp to your right Resolv 65.
•Now adjust the SWEEP control to the desired frequency. Consult your studio monitors owner’s manual
for a recommended crossover point. You can also use your ears by adjusting the SWEEP control to the
frequency that sounds good to you. A good place to start is about 70 Hz.
•Now set the level of your power amp up to the normal operating level. Run an audio signal (like some
music from a CD) through your mixer and raise the level to a comfortable listening level. Now slowly
raise the RESOLV 120a’s volume control and listen to the low frequency output. Adjust the RESOLV 65
to the level of low frequency output that you like. Now when you raise and lower your mixer’s output, the
RESOLV 120a and the RESOLV 65 satellites will track at the same relative volume.
10
Specifications
120
SPL vs Freq
dBSPL
110
100
90
80
70
60
50
40
30
20
10
0
10 Hz
20
50
100
200
500
1K
2K
5K
10K
20K
40K
RESOLV 65 Frequency Chart
Specifications
Transducers:
Woofer:
6.5” co-polymer
Tweeter:1” titanium, neodymium magnet with Ferro fluid cooling and heat sink for extended power
handling
Connectors:
Gold 5-way binding posts
Crossover Frequency:
2.6kH
Nominal Impedance:
4 ohms
Sensitivity:
89 dB SPL @ 1 watt, 1 meter on axis
Enclosure:
Construction:
5/8” MDF (Medium Density Fiberboard
Finish:
Black textures, anti-scuff paint
Feet:
Large rubber anti-skid
Dimensions:
8.5″ x 10 x 13.625
216mm x 254 x 346
Weight:
13.4 lbs
6.1 kg
11
Samson Technologies Corp.
45 Gilpin Avenue
Hauppauge, New York 11788-8816
Phone: 1-800-3-SAMSON (1-800-372-6766)
Fax: 631-784-2201
www.samsontech.com