1
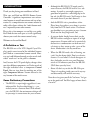
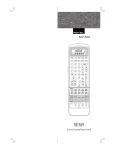
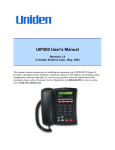
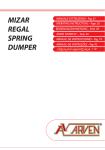
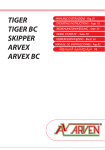
Contents
INTRODUCTION
A Definition or Two
2
Some Preliminary Precautions
2
1 – BASIC ORIENTATION
DELETE
ERROR
RESET
OK
DELETE
LEARN BATLOW
LEARN
MACRO
ROTEL
2
3
Out Of The Box
3
Your First View
3
POWER
1
2
3
Playing Around: Viewing Modes
4
4
5
6
To “Beep” Or Not To “Beep”
4
7
8
9
Custom Screen Configuration
4
10
0
A Shortcut With A Long Explanation
5
2 – INITIAL PROGRAMMING
5
VOLUME
CHANNEL
MENU
TV/VIDEO
+
–
RECALL
MUTE
TV
VCR
CD
LD
AMP
TAPE
TUNER
SEL 1
SEL 2
Here’s Why . . .
5
Here’s How . . .
5
Troubleshooting
6
Now That Your RR-990 Is Smarter
7
RR990
3 – ADVANCED FUNCTIONS
7
Deleting Individual Function Commands
7
Creating Macros
8
Using Macros
9
Clearing Memory
9
RR-990
Remote Control
Owner’s Manual
1
INTRODUCTION
Thank you for placing your confidence in Rotel.
We’re sure you’ll find our RR-990 Remote System
Controller a significant improvement over conventional remotes in overall convenience and ease of operation. It’s a comprehensive one-remote solution to
coffee table clutter without the “multi-button madness” imposed by most other remotes.
Please take a few moments to read this user guide.
You’ll find the time well spent as it will significantly
shorten your search for remote control sanity.
Welcome to the world of Rotel!
A Definition or Two
The RR-990 uses a flat LCD (Liquid Crystal Display) touch screen instead of the individual buttons
you’ll find on a conventional remote control. However, we’re old fashioned enough to refer to each individual “touch area” on the panel as a button.
And, because the LCD panel display changes when
you select different components, we’ll refer to each of
the eight individual views as component Control
Panels. You can view them by touching one of the
eight Component Selector buttons located at the
very bottom of the touch screen.
Some Preliminary Precautions
• The RR-990 is surprisingly rugged but it’s not
indestructible. So please don’t drop it — particularly not on a concrete floor! With normal
care, the RR-990’s low maintenance design will
let you enjoy its convenience for years to come.
• Although the RR-990’s LCD touch panel is
water-resistant, the RR-990 itself is not a submarine. As much as you might appreciate a
good bowl of punch or a refreshing dip in the
hot tub, the RR-990 won’t. You’ll enjoy its benefits much better if you don’t drown it.
• And the RR-990 isn’t a pincushion, either.
Please keep sharp objects away from it, particularly from the LCD touch screen. That means
you shouldn’t use a pen-point to press a button.
Watch out for sharp fingernails, too!
• As you no doubt already know, don’t put the
RR-990 in direct sunlight or expose it to high
temperatures. Extreme cold can be particularly
destructive as condensation can form on critical circuits as they warm up after a taste of the
Arctic. Moderation is the key word here.
• When the RR-990 needs a bit of cleaning, use
a soft, lint-free damp cloth. Don’t use abrasive
cleaners. Or steel wool. Or harsh detergents either. And make sure the rear panel Function
switch is Off whenever you clean the RR-990.
(We’ll show you why later.)
• Above all, don’t try to take the RR-990 apart.
There isn’t anything inside you can fix anyway
and disassembly will void the warranty.
Now that we’ve given you all the “bad news,” let’s get
on to the good stuff. You’ll be happy to know there’s
a lot of it!
2
1 – BASIC ORIENTATION
Out Of The Box
Remove the RR-990 and the package of 4 AAA batteries from the packing material.
Turn the RR-990 over and slide the cover off the battery compartment by putting your thumb on the arrowhead and pushing in the indicated direction.
Place the four AAA batteries inside (follow the polarity drawing on the bottom of the compartment) and
replace the cover. MAKE SURE you install the batteries correctly! Otherwise, you could inadvertently
damage the RR-990.
Top Section
5 hidden status indicators
and 5 control buttons.
Center Section
Control Panel with functions for each
component. Control Panels change
depending on which component is
selected. And, you can customize the
appearance of each Control Panel.
DELETE
ERROR
RESET
OK
DELETE
LEARN BATLOW
LEARN
MACRO
1
2
3
4
5
6
7
8
9
10
0
Your First View
VOLUME
When you turn the RR-990 over again, you’ll see the
component Control Panel displayed on the LCD
screen is actually divided into three areas:
1. A top section containing five always-visible
buttons. Four are small (“Reset,” “Delete,”
“Learn,” and “Macro”) while “Power” is larger.
There are also five hidden indicators (“Delete,”
“Error,” “OK,” “Learn,” and “BatLow”) that
appear only to confirm a requested function or
to alert you to something you will need to
know as you’re using the RR-990.
2. A changeable center section (most of the LCD
screen) with the operating buttons for a particular component. You can choose to view all
of the available buttons at once (Complete
mode) or only essential ones (Basic mode).
There’s also a Custom mode. You’ll find out
more about these options just a bit further on.
3. An always-visible bottom section with two
rows of selector buttons for different components. You can tell what component you’re currently operating by noting which selector has
an icon displayed to the right of the ID.
POWER
CHANNEL
MENU
TV/VIDEO
+
–
RECALL
MUTE
TV
VCR
CD
LD
AMP
TAPE
TUNER
SEL 1
SEL 2
RR990
Bottom Section
8 Component Selector buttons. Selecting a
different component causes the Control
Panel display to change accordingly. Note
the icon displayed on TV button, indicating
that this component is activated.
3
Playing Around: Viewing Modes
Custom Screen Configuration
Take a moment to get familiar with RR-990 now.
As we’ve already explained, the RR-990 gives you three
ways to view each component’s control panel: Standard, Basic, and Custom.
1. Press each of the component selectors quickly.
You’ll hear a confirming “double beep” and the
center portion of the screen will change as you
select a different component. Notice that each
selector has a hidden icon that appears only
when you’ve activated the Control Panel for
that component. Also, notice that each
component’s Control Panel takes up almost the
entire center portion of the screen.
2) Now, press and hold the active component selector (the selector with the visible icon) for
about two seconds. You’ll hear a single confirming beep (if “beep” is enabled — see below) and the control panel will change to show
only essential buttons. This is the Basic viewing mode we spoke of earlier. Press and hold
the same component selector again until you
hear another beep and you’re back to the Complete mode view. It’s your choice.
Let’s look a bit more closely at the Custom viewing
mode.
You may have noticed that the Standard mode was
very complete — perhaps too complete for your use
— while the Basic mode just didn’t provide quite
enough flexibility for your system.
The Custom mode gives you the opportunity to configure each of the RR-990’s eight component Control Panels to suit your exact needs. The Custom view
option lets you delete just the buttons you decide are
unnecessary from that component’s Standard Control Panel. Here’s how:
NOTE: You must begin to customize a Control
Panel from the Complete viewing mode.
The RR-990 will remember the view you’ve chosen
for each individual component’s Control Panel. This
lets you select, for example, a Complete view for your
VCR, a Basic view for your TV, and a Custom view
for your laserdisc player, etc.
1. Press the Component Selector for the component Control Panel you want to customize. (If
“beep” is enabled, you’ll hear a double beep as
you switch to the desired Control Panel.)
To “Beep” Or Not To “Beep”
2. Hold the appropriate Component Selector for
approximately six (6) seconds. The following
things will happen as you do:
You can turn off the confirming beep by simply pressing the component selector a second time immediately after selecting the component. To reinstate the
beep, just press the same selector once more!
NOTE: Look for the “beep” icon in the upper right
hand corner of the POWER control. If it’s there,
the beep is enabled; if not, it isn’t.
• The “Beep” icon will disappear from the
Power button.
• The Basic screen will appear accompanied
by a beep (notice that the beep icon has reappeared).
• The Standard screen will reappear accompanied by a beep.
• A Standard Edit screen will appear accompanied by three beeps.
4
Look at the Standard Edit screen and notice that
the Component Selectors at the bottom are all
blinking. The only item not blinking is the icon
associated with the component Control Panel you
are about to customize.
3. Touch any button you think you won’t need. It
will disappear and you’ll hear a double beep in
confirmation.
4. Made a mistake? Don’t worry - just press the
same point on the LCD touch screen again and
the button will reappear accompanied by a
single confirming beep.
5. Continue this process until you’ve constructed
the ideal Control Panel for the component
you’ve chosen. (Don’t worry about doing it perfectly the first time around. You can reenter
Edit mode and reconfigure the Control Panel
any time.)
6. When you’ve finished editing the Control
Panel, simply press the Component Selector
again. The RR-990 will beep three times to
confirm that it is leaving Edit mode and will
show your newly-customized Control Panel.
Congratulations, you did it!
A Shortcut With A Long Explanation
You can edit the SEL 1 and SEL 2 Control Panels
just as you would any other Control Panel (TV, VCR,
CD, etc.). However, SEL 1 and SEL 2 allow you to
quickly configure a Custom Control Panel based on
any of the RR-990’s other Control Panels.
This may be particularly useful if you’ve decided to
use SEL 1, for example, as the Control Panel for another VCR. If this is the case, simply enter into Control Panel Edit mode for SEL 1 by following steps 1
and 2 above.
When you see the Component Selectors at the bottom of the LCD panel blinking, simply touch the
Component Selector (CD, for example) whose Con-
trol Panel functions are most similar to the one you
need for SEL 1.
You’ll notice that SEL 1’s Control Panel changes immediately into a duplicate of the Control Panel for
the Component Selector you’ve just touched.
Now, just delete unneeded buttons as shown in steps
3, 4, and 5 above until you’re satisfied with your new
creation. Then touch the SEL 1 Component Selector once again. You’ve just “locked in” your new Custom Control Panel and left Edit mode.
And it took far less time to do it than to read how,
didn’t it?
2 – INITIAL PROGRAMMING
Now that you’ve gotten to know your way around
the RR-990’s LCD screen, it’s time to get really adventurous and put this knowledge to real use! After
all, this is the reason you bought the RR-990 in the
first place, isn’t it?
Here’s Why . . .
As it comes from the factory, the RR-990 is a lot like
a very precocious 3 year old: It’s got a lot of potential
but it doesn’t know very much. You need to send it to
school. However, in this case, you’re also its teacher.
The RR-990 contains no internal control codes. It is
truly a blank slate: You can point it at anything, press
all the buttons you want, and it will do . . . nothing.
It needs to be programmed first. You’re elected.
Here’s How . . .
1. Gather that confusing pile of remote controllers from your coffee table. Place them gently
near the RR-990. Make sure the area you’ve
chosen isn’t in direct sunlight or lighted by very
bright halogen lamps, etc. (The RR-990 learns
best in normal to slightly dim room lighting.)
5
2. Make sure you’ve selected a Complete, Basic,
or Custom view for each of the RR-990’s eight
Control Panels. (If you’re only using the RR990 to replace 5 other remotes, you need only
select the appropriate view for five Control
Panels, etc.)
3. Turn the Function switch on the RR-990’s rear
panel to the On position. One end of an open
paper clip makes a handy tool!
4. Select the desired Control Panel by pressing the
appropriate Component Selector at the bottom
of the RR-990’s LCD touch screen.
5. Press the “Learn” button (top row of the LCD
touch screen) for approximately 2 seconds.
(The Learn indicator will come on: You’re now
in the Learn mode.)
6. Aim the emitter end of the original remote
controller (the end you normally point at whatever component you’re trying to control) at the
receptor end of the RR-990 (the bottom of the
unit), in a “head to tail” configuration an inch
or two away.
DELETE
RESET
1
4
ERROR
DELETE
OK
2
5
8
0
3
6
9
MACRO
LEARN BATLOW
LEARN
LD
7
SEL 2
10
CD
MUTE
SEL 1
TV/VIDEO
VCR
MENU
TAPE
TUNER
RECALL
TV
VOLUME
POWER
–
+
CHANNEL
RR990
AMP
1 to 2 inches
7. Continuously press the button on the RR-990’s
Control Panel that you want to program with a
command code from the original remote.
8. At the same time, continuously press the button on the original remote to generate the signal you want the RR-990 to learn.
9. The RR-990’s Learn indicator will blink to signal you that it is learning the command.
10.When the RR-990 learns that command, the
OK indicator will come on to signal successful
completion of that cycle.
11.To program other buttons on the same Control
Panel, simply repeat steps 7 and 8 above.
12.To end a learning session, press the “Learn”
button again. The Learn indicator will go out.
(As a safety measure, the RR-990 will automatically exit Learn mode if no button is
pressed within two minutes.)
13.To prevent accidental erasure, make sure you
place the rear panel Function switch in the Off
position.
Troubleshooting
Occasionally, the learning process goes awry. (Remember your own school days?) Here are some notes to
help if you encounter difficulties:
The Error indicator:
• If you see an Error indicator during programming, repeat steps 7 and 8.
• If the Error indicator blinks, the RR-990’s
memory is most likely full and you will need to
delete some button functions from memory before the RR-990 will be able to learn new commands. (See Deleting Individual Function
Commands in Section 3 for more details.)
• If the Error indicator shows steadily after several tries, your original remote controller may
use an incompatible data format that the RR990 can not learn. Occasionally, the original
data format can temporarily “freeze” the RR990. If this happens, just remove and immediately replace the batteries. This will restore the
RR-990 to its original operating status.
• If problems persist, ask your dealer for assistance or call your Rotel distributor and ask for
Technical Support.
6
Continuous Control Codes:
• Occasionally, one of the buttons on an original
remote controller generates a very long command code or continuously generates a shorter
command sequence over and over again. (This
sometimes happens with “Volume Up” and
“Volume Down” commands for example.)
• The RR-990 accepts code sequences up to 20
seconds in duration but if you’re continuously
pressing a “Volume Up” key on the original remote until the RR-990 signals you that it has
learned the code completely, you may never see
the RR-990’s “OK” indicator come on.
• If this happens, simply press the problem key
on the original remote once while holding
down the RR-990’s corresponding button. This
will often produce a much shorter code string
that the RR-990 will have no trouble learning.
• In a very few cases, you may find that the RR990 doesn’t emulate a continuous or “repeated”
command from the original remote controller
perfectly. Experiment with the learning sequence by pressing the original remote’s problematic key several times very quickly during
the RR-990’s learn cycle. This will generally
solve the problem.
Now That Your RR-990 Is Smarter
Once you’ve programmed the RR-990 with commands from several original remote controllers, you’ll
really begin to appreciate its flexibility.
As you use it, you’ll notice the “OK” indicator flash
at the top of the screen whenever you press a programmed button on any Control panel. This is simply the RR-990’s way of telling you that the key you’ve
just pressed has been programmed successfully and
that the RR-990 is sending out a command to the
associated component for execution.
If you press a button and see the “Error” indicator
instead, the RR-990’s memory for that particular
button is empty. Most likely, you simply forgot to
program it while in Learn mode. Just follow the programming instructions in Here’s How above.
If you see the “BatLow” indicator, replace all four (4)
AAA batteries as soon as possible. A backup battery
will preserve all the command codes you programmed
into the RR-990 but you will have to reconstruct any
Custom Control Panels afterwards.
NOTE: Always replace all four AAA batteries at
the same time. We also suggest that you remove the
AAA batteries if you’re not going to be using the
RR-990 for an extended period (2 months or more).
3 – ADVANCED FUNCTIONS
Deleting Individual Function
Commands
Here’s how to delete the command codes for a particular key in a Control Panel:
1) Choose the Control Panel by pressing the appropriate Component Selector at the bottom of
the LCD touch screen.
2) Press the “Delete” button at the top of the
LCD screen for about two (2) seconds to enter
Delete mode. (The Delete indicator at the very
top of the screen will flash.)
3) Press the corresponding button for the control
codes you want to delete. (The Delete indicator will go out.)
4) Repeat steps 2 and 3 for every function you
wish to delete.
5) You can exit Delete mode at any time by simply pressing the “Delete” button.
7
Creating Macros
A “macro” is simply a series of individual commands
triggered by pressing one button. Macros make operating a complex home entertainment system much
easier.
For example, think of what you go through to play a
videotape: You turn on the TV, turn on the VCR,
select the TV input connected to the VCR, and, finally, put the VCR into Play mode. (This assumes, of
course, that there’s a tape already in the VCR.) That’s
four separate commands — and it may take you as
many as six pushes on various buttons to execute them!
A “macro” makes this simpler by executing all the
needed commands with just one push of a button!
Here’s how to construct a “macro”:
1. Place the RR-990’s rear panel Function switch
to the On position.
2. Press “Learn” at the top of the LCD screen.
(The Learn indicator will appear.)
3. Press “Macro” to enter the Macro Learn mode.
4. Select a Control Panel by pressing the corresponding Component Selector at the bottom
of the screen. (TV, for example.)
5. On the Control Panel you’ve just selected,
choose an unprogrammed button and press it.
This button becomes the “initiator” of the
macro you’re about to program into the RR990. (The “Surround” button may be a good
choice.)
6. Choose the macro’s first command by pressing
the appropriate previously programmed button
(“Power,” for example.)
7. Choose the macro’s next command by pressing
another programmed button. This button may
be in the same Control Panel or a different
one. If it’s a different Control Panel, just press
the appropriate Component Selector at the
bottom of the screen and then press the correct
command button.
8. When you’ve programmed all the individual
commands you want (up to the RR-990’s limit
of 10), touch the “Macro” button once more
to finish it.
9. Touch “Learn” again to exit the Macro Learn
mode.
10.Return the rear panel Function switch to its
Off position.
You can create a additional macros by repeating the
steps above. Just make sure that each new macro has
a different “initiator” button and there will be no confusion.
NOTE: Macros can be incredibly flexible timesavers. We suggest you experiment with different
functions. Use a macro to turn on all the components of your home entertainment system, another
to turn on just a TV and VCR for quiet movie
viewing, yet another to turn on just your audio
components if you want to listen to CD, etc. You
can create macros to mute volume, turn down or
raise the lights, draw or open the drapes, etc. Of
course, you’ll need ancillary equipment to do some
of this but the RR-990 is ready and able to create
a string of commands for any product that responds to infrared pulses so don’t be afraid to exercise your creativity.
8
Using Macros
Once you’ve created your macro “dream world,” you
can use each one easily by pressing “Macro” at the
top of the screen and then the appropriate “initiator”
button described in step 5 above. All the commands
contained in that macro will be transmitted to the
appropriate components without a second thought
on your part!
Convenient, isn’t it?
One Year Limited Warranty
Rotel of America warrants this product to
be free of defects for a period of one year
from date of purchase.
This warranty gives you specific legal rights
which may vary from state to state.
For warranty service, contact your
authorized Rotel dealer or call the Rotel
Technical Support center at:
508-664-3820 (USA only)
Clearing Memory
WARNING: Make sure you really want to do this
before you try because this operation will erase everything you’ve programmed into the RR-990. And
we mean everything — individual button commands, macros, the works. Don’t say we didn’t
warn you!
1. Turn the rear panel Function switch to the On
position.
2. Press the “Reset” button at the top of the
screen for more than two (2) seconds.
3. Kiss everything “Good-bye”!
4. Return the Function switch to its Off position.
USA
ROTEL OF AMERICA
54 CONCORD STREET
NORTH READING, MA 01864-2699
TEL: 508-664-3820
FAX: 508-664-4109
GERMANY
B&W LOUDSPEAKERS VERTREIB GMBH
KLEINE HEIDE 12
D-33790 HALLE, WESTFALIA
TEL: 05201 87170
FAX: 05201 73370
JAPAN
NOTE: You’ll probably use this function only if
you’re erasing early programming mistakes or
you’re passing the RR-990 on to a friend or family
member for use with totally different components.
As we said, be cautious.
THE ROTEL COMPANY, LTD.
BUNZAN-SHINSEN-BLDG. 4F
1010 SHINSEN CHO
SHIBUYA-KU, TOKYO 150
TEL: 813 545 85325
FAX: 813 545 85310
9