1
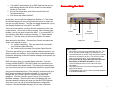
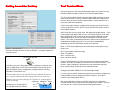
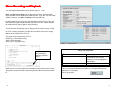
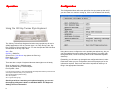
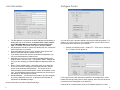
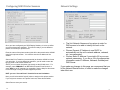
400-3100-01
Rev 2.22
September 2006
MinIT 5250E
Users Guide
Ringdale, Inc.
101 Halmar Cove
Georgetown, Texas 78628
Tel: 888-288-9080
www.nlynx.com
www.ringdale.com
Ethernet to the iSeries
Technical Support
Important Notes:
The Power Button on the top of the unit will be lit (white) when
there is power to the unit. The unit will not start until you press
the button. Then it will turn green and the unit will boot.
The correct way to power down the unit is from the Start button or the
MinIT Start Menu. Select Power Down from the menu. It will take a few
moments to shut itself down and the light will turn white again.
If you forget to power the unit down correctly, you may lose any macros that
you have recorded since the last proper shutdown.
There is extensive on-line help within the MinIT 5250E application.
If you are still in need of assistance, the following resources are available:
On the web: www.nlynx.com
Telephone Support USA: 888-288-9080 or 512-288-9080
20
TABLE OF CONTENTS
Packing List
Connecting the Unit
Getting Around the Desktop
The MinIT Start Menu
Configuration
Unit Information
Network Settings
Keyboard
5250 Sessions
Display Sessions
Printer Sessions
Printer Settings
Operation
122-key Twinax Style
Keyboard
PC Style Keyboard
Macro Recording and
Playback
Text Terminal Mode
Technical Support
2
3
4
6
7
8
9
10
11
11
12
13
14
14
15
16
17
20
1
MinIT 5250E packing list
MinIT 5250E Unit
Mouse
Power Pack
19
2
1.
In the MinIT Administrator go to 5250 Sessions then go into
each display session and click the check box that sets the
session to Text mode.
2. Go into Unit Information and click the box for Boot into
Terminal mode only.
3. Click Done and reboot the MinIT.
Connecting the Unit
At this point, the unit will boot straight into Session 1 in Text mode.
No Window Manger will be running and there will be no means for
the user to modify settings. The user can toggle between the (up to)
five Display Sessions by using Alt-F1 thru Alt-F5.
There are a few reasons, mostly to do with networking, which may
cause Session 1 to not start or fail to connect. After correcting the
problem, you do not have to reboot the MinIT. If you press Alt-F12
you will see a User Menu of options including 'r1' which restarts
Session 1. This can save you the time and trouble of a reboot.
More about this User Menu -- there are two 'secret' commands we
chose not to expose to users:
'nr' restarts networking. This may be all that is required if
your Ethernet cable was loose.
'sq' shows you the contents of the printer Spool Queues.
This menu also allows you to start a window manager session if you
wish to modify your settings. If you had earlier set an Administrative
Password, attempting to start the window manager would prompt you
for that password.
AND, this menu gives you a power down command. If you are
running the Minit 5250E in Text ONLY Mode, we recommend you
use this instead of the power button. This orderly shut down saves
any new macros that you’ve recorded onto the built-in compact flash.
One more troubleshooting hint: Even though in terminal mode your
MinIT does not display the window manager, it is running in the
background, you just can't get to it from this unit without the
password. You can, however, get to it from a PC running the
MinitMan manager. Select the Unit and click Desktop and your
Windows desktop computer will show you the MinIT5250 desktop.
From there, you can use all of the Administrative configuration
functions. See the MinitMan Manager CD for more information.
Video
Power
Parallel
(local printer)
Mouse
Keyboard
Ethernet
MinIT Notes:
1. Use only the power supply provided with the unit. The
use of any other power supply may damage the unit.
2. The Power Button on the top of the unit will be lit (white)
when there is power to the unit. The unit will not start
until you press the button. Then it will turn green.
3. The correct way to power down the unit is from the
Start button or the MinIT Root Menu. See the
Technical Support section of the manual for more
information.
4. The USB ports on the front of the unit support USB
Keyboard or Mouse.
5. The headphone jack can be used for powered speakers
or amplified headphones.
3
Getting Around the Desktop
Text Terminal Mode
One of the choices in the Setup 5250 Sessions Menu is the option to force
the Minit 5250E into what we call the “Text Terminal ONLY Mode”.
The Text Terminal ONLY Mode makes the Minit 5250E operate very much
like a twinax terminal. There can still be multiple sessions configured, but
the user does not see the windows-style desktop. All they would see is a
full screen 5250 terminal session.
If there are multiple sessions configured and running, you can get to each
one by using Alt+F1, Alt+F2, Alt+F3, Alt+F4 and Alt+F5 to jump to each of
the 5 display sessions.
Alt+F12 will take you to a small menu, with extremely limited options. If you
have configured the Minit 5250e to run in Text Terminal ONLY mode, then
this is the path you need to take to get into the Window Manager and the
Administrative Menu, should you need to reconfigure the unit for some
reason. This option is password protected to prevent curious workers from
accidentally reconfiguring the unit. For more on the Administrative
password, see the Unit Information section of the manual.
Note: In Text Terminal Mode there are a few shortcut keys that you may
need to use:
There are two ways to move around the Desktop – using the keyboard or
using the mouse.
Using the Mouse
Left Click once on an object (field, button or window) to select the item.
Alt+r = Record Macro (start and stop)
Alt+p = Play Macro
Alt+c = the Cent sign
Alt+e = the Euro symbol
From a “Text Mode Only” session, the proper way to shut down the Minit
5250E is to hit Alt+F12 to take you into the menu, then hit p and Enter. This
does an “orderly” shutdown, and saves any new macros that may have
been recorded since the last time the unit was shut down.
Click on Start Button or Left Click in the desktop area to bring up the
MinIT Root Menu (Help, Configuration, Display Sessions, Printing,
Calculator, Power Down, etc.)
Configuring the Minit 5250E for Text Terminal ONLY Mode
The dark blue title bar will identify the active window across the
top. Inactive windows will have a gray title bar across the top.
In order to get your MinIT working as a terminal you must first configure your
network settings and your Display and Printer Sessions. All of this is
covered in the Configuration section.
Windows can be moved (drag by the Title Bar) or resized (grab a
corner and drag).
Minimize Maximize Close
The buttons on the right side of
the Title Bar control the window
Window
Title Bar
We recommend that you leave your MinIT configured as a Graphical
Terminal until all of your sessions are working the way you want. Then you
can convert it to a Text only terminal with following three steps:
17
Macro Recording and Playback
You can assign keyboard Macros to function keys F1 – F24.
Note: the Record and Play keys on the lower left of the 122-key twinax
style keyboard are functional in the window mode. If you are in a Text mode
session, however, use Alt+r and Alt+p for Record and Play.
Hit the Record key (or Alt+r), then the selected Function key (F1-F24), and
then start entering the keystrokes that you’d like to record. When finished,
hit the Record key (Alt+r) again to stop recording.
To play a macro, hit the Play key (or Alt+p), then the function key (F1-F24).
On a PC (104 key) keyboard, use the Alt+r and Alt+p short cuts to assign
Macros to the function keys F1-F12.
F(x) refers to the function keys F1-F12
Alt+R+F(x) = Record Macro F(x)
Alt+R = Stop recording
Alt+P+F(x) = Play Macro F(x)
In this example, we
are recording a
macro to Function
key F1.
R 0000 F01
While you are in record mode an R will appear on the bottom of the screen,
along with a counter and the Function key that the Macro is being recorded
to.
16
Using the Keyboard
Function
To get to a particular window
To move between fields
MinIT Root Menu
Keystroke(s)
Alt + Tab (hold down the Alt key
and hit the tab key until the
window you want is highlighted,
then release).
Tab
Alt + Shift +F1
If there is an underlined letter on a button, it is a keyboard shortcut to
that button. For example,
Hit D to go to Done
5
The MinIT Start Menu
PC Style Keyboards
You can call up the MinIT
Start Menu by Clicking on
the Start Button, by clicking
on the Desktop, or by using
Alt+Shift+F1.
Hint: If a letter in the Start
Menu is underlined, it is a
keyboard shortcut to that item.
For instance, hit P to jump to
Print Queue. (Hit P again to
jump to Process Monitor).
The MinIT Start Menu is the key to most of the functions of the MinIT 5250E.
Click on the desired menu item or use the underlined keyboard shortcut.
Menu Item
Getting Started
MinIT Administration
Print Queue
Display Session Status
Process Monitor
Set Time/Date
Calculator
Exit
Reboot
POWER Down
6
Function
Help overview
Configuration of the unit
Shows status of Printer Sessions and any print
jobs outstanding. Cancel print jobs here.
Shows status of all defined Display Sessions.
For diagnostic use. Displays all active
processes running on the MinIT.
Sets the Clock (lower right corner of Desktop)
Brings up a calculator
Restarts the MinIT software (partial restart)
Full Reboot of the unit
Always use this method to turn off the unit.
There are a number of special 5250 keys that are not present on a standard
104-key PC Style Keyboard. If you are using a PC style keyboard you can
still use these functions by hitting the following shortcut key combinations:
F1 through F12 = F1 through F12
F13 through F24 = Shift + F1 through F12
Enter = Right Control (RCtrl)
Field Exit = Enter
Error Reset = Left Control (LCtrl)
Attn = Esc
Sys Req = Shift+Esc
End = End
Home = Home
Dup = Numpad *
Field - = Numpad –
Field + = Numpad +
Roll Up = Page Down
Roll Down = Page Up
Record = Alt+r
Play = Alt+p
¢ = Alt+c
Euro symbol = Alt+e
Help = Alt+h
Zoom in (bigger font) = Shift+Numpad+
Zoom out (smaller font) = Shift+NumpadAgain, if you wish to remap the keyboard to better suit your particular needs,
the keyboard mapping utility is to be found under Keyboard within the Minit
Administration Menu.
15
Operation
Configuration
The Configuration Menu will come up the first time you power up the unit (If
you don’t want it to continue coming up, Click on the Autostart radio button).
Using the 122-Key Twinax Style Keyboard
The 122-key Twinax Style Keyboard includes many special keys for use in
AS/400 applications, such as Function keys 1-24, Help, Roll up, Attn, Sys
Req, Field Plus, Record and Play, etc. For the most part the 5250 functions
are indicated on the key cap in blue.
Attn = Esc
Sys Req = Shift+Esc
Screen Print = Print Screen key (above the Print key)
Erase Input = Clear
Dup = Shift+Insert
There are also a couple of keyboard shortcuts that might come in handy.
Zoom in (bigger font) = Shift+Numpad+
Zoom out (smaller font) = Shift+NumpadEuro Symbol = Alt+e
Using the mouse to configure the unit is probably the easiest way, but you
can accomplish all the same things using the keyboard if you prefer (tab
through the fields, use the cursor keys and use the underlined keyboard
shortcuts).
Essentially, you will want to go through these configuration items in order.
Each button takes you to a configuration screen that prompts you for the
information required. Each menu has built-in help that will assist you in
filling in the appropriate information.
If you are running a session in Text Terminal Mode (see Setup 5250 Sessions), there are three
more keyboard shortcuts that you may need to use:
Alt+R for Record Macro (start and stop)
Alt+P for Play Macro
Alt+c to get the cent sign (¢).
Should you wish to customize your keyboard mapping, you can use
the mapping utility that is built in to the Minit 5250E. See Keyboard
Settings for more information.
14
7
Unit Information
The Unit Number is reported to the MinIT Management Software, to
identify this unit on the network. It needs to be a unique number
for the MinitMan Manager to be able to see and manage the
unit. The default value is the last 6 digits of the Mac address.
Unit Description should be used to help identify the unit, such as the
name of the user, or a location.
NLynx Management Server is the IP address of the Server from
which to download software updates to this unit.
If you wish to secure this unit from accidental reconfiguration, you
can set an Administrative Password here.
Minit.Man port: this is the IP port that the MinitMan Management
software uses to talk to the unit. The default is 18901. Change this
only if you are changing it on the Minit.Man management station as
well.
Boot to Terminal Mode ONLY. Select this option if you want this
unit to be forced into a straight text 5250 terminal mode, without
access to the windows looking desktop. The access to the xwindow desktop and the Administration menus will be hidden to the
user. An administrator who knows the password can access any of
the desktop or administrative functions.
Restart MinitMan. You will want to hit Restart if you have changed
any of the parameters of the unit, so that the new information is
reported to the MinitMan manager.
Click on Done when you have completed this page.
Configure Printer
You can have up to 3 printers defined to be used as 5250 host printers. For
instance, LP1 can be set up to use a parallel printer, and LP2 and LP3 can
be network printers that are on your network.
•
Choose your default Printer – usually LP1 – Then click on Configure
LP1 in order to set the printer up.
For a printer that is locally attached to this MinIT unit (Parallel Port), select
Parallel Port and give the printer a name (optional, but it may help to have a
name that is more meaningful to you than LP1).
If the printer is a network printer, fill in the IP address and give it a name.
8
13
Configuring 5250 Printer Sessions
Network Settings
Once you have configured your 5250 Display Sessions, it is time to define
up to three host printer sessions. This can be handy if you use different
printers for various pre-printed forms.
Enter the name of the printer session (this will be the name that the AS/400
uses for this printer session. You will also enter the IP address of the
AS/400.
Select Host Print Transform (recommended) to allow the AS/400 to format
your print jobs. If you use Host print transform, you will need to enter the
type of printer in the iSeries Printer box.
NOTE: you must enter the printer type exactly as the AS/400 lists it. For
example, enter *IBM2380 for an IBM 2380 Personal Printer Series II or
enter *HP4 for an HP Laserjet 4 or compatible. See the Help for this screen
to scroll through a listing of AS/400 supported printers.
The Unit Network Name must be unique in order for
DNS servers to be able to identify this unit on the
network.
Choose Dynamic IP Address to use DHCP to
automatically set the unit’s network address, netmask,
etc. (recommended).
Choose Static IP Address if you wish to fill in your own
network parameters. If you do so, fill in the appropriate
information under IP Address, Netmask, Gateway and
DNS Server.
If you made any changes to this page, we recommend that you
hit the Network Restart button, in order to make the changes
take effect now.
HINT: you can “Cut and Paste” from this list to avoid mistakes.
Next, you will select which “logical” printer to assign to this printer session.
If you only have access to one printer from here, leave this at Default.
Select Done to save your entries.
12
9
Keyboard Settings
Setup 5250 Sessions
Hit the Select button to choose and / or remap either the
• 122-key Twinax Style keyboard (default)
• 104-key PC style keyboard
The setting should match the type of keyboard that you are connecting to
the unit. This will be important for correct mapping of the keyboard within
the emulation sessions.
You can configure up to 5 Display sessions and up to 3 printer sessions.
Click done when you are finished, in order to save your changes.
104-key PC style keyboard
NLynx 122-key Twinax style keyboard
If you need to remap any of the keys, the remapping utility will assist
you. See Operation for more information about keyboards.
10
Enter the name of the Session and the IP address of the AS/400. The name
of the session needs to be unique. The AS/400 will not let two sessions
have the same name. You can leave the rest of the boxes with the default
values. Click on the Help button for more information about each field.
11