Transcript
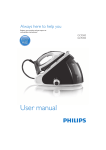
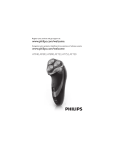
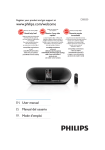
Register your product and get support at www.philips.com/welcome CID3292 1 2 a Yellow Rear display Yellow Rear display Yellow Green Blue Radio antenna b Yellow Blue/white GPS antenna c Pink Green/white Connect to the positive (+) terminal of reverse driving light c Optional accessory Gearbox Brown Red White d Red White Red White Yellow Yellow White Quick Start Guide Red ENG AV system AV system AUX AUX Amplifier Remark: Connect the AV IN wire which is marked as c to the AV IN socket on front panel. English 3 Install the car audio 1 » The main menu is displayed. Take out the original car audio and keep the screws. 3 Mount the supplied mounting brackets onto the unit with the supplied screws. a 4 5 Connect wires 2 . Take off the two screws on the top side of the unit. b Fix the unit onto the dashboard with screws. d 8 Reconnect the negative terminal of the car battery. Play disc To turn off the screen Press DISP. You can play video, audio or images stored on the following discs: DVD video, DVD-R, DVD-RW VCD Audio CD, CD-R, CD-RW Rotate VOL to adjust brightness. 1 1 1 2 Press DISP for over 2 seconds 2 3 Tap [Settings]. » To remove the disc, press the separately) before using it (see “Upgrade the map” section) » The date/time setup menu is displayed. 1 Tap the upper left corner to display home menu. 2 Tap [Navigation]. » The navigation menu is displayed in a few seconds. Turn on Risk of road accidents! Never watch video or adjust settings while you drive. 1 Press to turn on the unit. » The available OSD (On-Screen Display) languages are displayed. Listen to Radio Tap [Date]. Tap the displayed date information. » A submenu is displayed. 3 Tap or to set year, month and day. 1 2 1 2 Tap to display home menu. Tap [Radio]. » Band and frequency information is displayed. Set time mode Tap [Time mode]. Tap [12H] or [24H] to select time mode. Connect USB device 1 2 By default, all incoming calls are received automatically. 1 If there is incoming call, [Incoming call...] ÁDVKHVRQWKHVFUHHQ6SHDNLQWRWKH Bluetooth microphone. 2 When conversation ends, tap terminate the call. button. 4 Open the USB door. Insert the USB device to the USB socket. 1 2 3 Pair the phone with the unit. Tap to display the home menu. Tap [Bluetooth]. (red) to » The Bluetooth menu is displayed. » Play starts automatically. Note To remove the USB device, switch to disc, UDGLRRURWKHUVRXUFHÀUVW Play with Bluetooth device Pair the Bluetooth-enabled devices To connect your Bluetooth device to the unit, you need to pair the device to the unit. Pairing needs only to be done once. You can pair up to eight devices. 1 2 Set time 1 2 Receive call Refer to the map manual to operate the navigation tool. Set date 1 2 » if pairing succeeds. phone call record is displayed. Make a call You may need to upgrade the map (sold Tap [Time]. Enter default password “0000”. Insert the disc into the disc slot with label side facing up. Note 3 Caution 3 » Play starts automatically. Use map Slide the unit into the dashboard until a click sound is heard. c 7 3 Adjust screen To adjust screen brightness If the car does not have an on-board drive or navigation computer, disconnect the negative terminal of the car battery. 2 6 4 1 Set date and time 1 Press MENU. 4 Tap tap 5 Tap or to search for phone number from the following list: or . to select the paired phone, then Search for Bluetooth device with the device. Select “CID3292” in the pairing list. Tap [Time]. Tap the displayed time. » A submenu is displayed. 3 2 Tap a language. » The OSD language is changed to the selected language immediately. CID3292_00_QSG_V2.0.indd 1 Tap or to set hour and minute. 3 4 Tap on FM or AM to select band: %ULHÁ\WDS or by step. to tune to a radio station Or tap to dial. to dial number directly, then tap © 2010 Koninklijke Philips Electronics N.V. All rights reserved. CID3292_00_QSG_V2.0 6/4/2010 4:18:58 PM