1
Maintenance .......................................................................................................... 2
Features ................................................................................................................ 2
Main indicators/controls ......................................................................................... 3
LCD display ........................................................................................................... 5
Basic operations .................................................................................................... 6
Advanced operations ........................................................................................... 15
Menu operations
Self-Programming mode...................................................................................... 17
Self-programming chart ....................................................................................... 18
7HFKQLFDOVSHFL¿FDWLRQV ....................................................................................... 19
Troubleshooting guide ......................................................................................... 20
1
ENGLISH
Contents
ENGLISH
Content
•
•
•
•
•
•
1 transceiver
1 antenna
1 battery pack
1 belt clip
1 fast desktop charger
User manual
If any items are missing, contact your dealer.
Maintenance
Your Two Way Radio is an electronic product of exact design and should be treated
ZLWKFDUH7KHVXJJHVWLRQVEHORZZLOOKHOS\RXWRIXO¿OODQ\ZDUUDQW\REOLJDWLRQV
and to enjoy this product for many years.
ƒ 'RQRWDWWHPSWWRRSHQWKHXQLW1RQH[SHUWKDQGOLQJRIWKHXQLWPD\GDPDJHLW
ƒ :KHQXVLQJUHJXODWHGSRZHUVXSSO\WDNHQRWLFHRISRZHUYROWDJHWKDWPXVWEH
between 6V and 8V to avoid damaging the unit.
ƒ 'RQRWVWRUHWKH5DGLRXQGHUWKHVXQVKLQHRULQKRWDUHDV
ƒ +LJKWHPSHUDWXUHVFDQVKRUWHQWKHOLIHRIHOHFWURQLFGHYLFHVDQGZDUSRUPHOW
certain plastics.
ƒ 'RQRWVWRUHWKHUDGLRLQGXVW\GLUW\DUHDV
ƒ .HHSWKH5DGLRGU\5DLQZDWHURUGDPSZLOOFRUURGHHOHFWURQLFFLUFXLWV
ƒ ,ILWDSSHDUVWKDWWKH5DGLRGLIIXVHVSHFXOLDUVPHOORUVPRNHSOHDVHVKXWRIILWV
SRZHULPPHGLDWHO\DQGWDNHRIIWKHFKDUJHURUEDWWHU\IURPWKH5DGLR
ƒ 'RQRWWUDQVPLWZLWKRXWDQWHQQD
Features
ƒ :2XWSXWSRZHU9+)8+)
ƒ JURXSVRIPHPRU\FKDQQHOV
ƒ .+].+]&KDQQHOVSDFLQJFRPSDWLEOH
ƒ $XWRPDWLF1XPEHULQJ,GHQWL¿FDWLRQ$1,FRGH
ƒ %XLOWLQ92;IXQFWLRQ
ƒ $OOFKDQQHOVVFDQDQGSULRULW\FKDQQHOVFDQ
ƒ 6FUDPEOHU
ƒ /&'EDFNOLJKWDGMXVWDEOHLQGLIIHUHQWFRORXUV
ƒ (PHUJHQF\DODUP
ƒ &7&66DQG'&61RUPDO,QYHUWHGVHOHFWDEOH
ƒ 7LPHRXW7LPHU727
ƒ%XV\FKDQQHOORFNRXW
2
ENGLISH
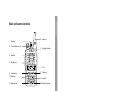
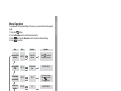
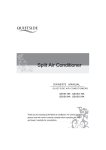
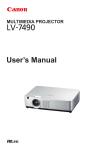
Main indicators/controls
2. Antenna
(QFRGHU
3. Power/Volume on-off
6HQGLQJLQGLFDWRU
6SHDNHU
6. Microphone
7. LCD
)XQFWLRQNH\
&OHDUNH\
(QWHUNH\
NH\SDG
.H\SDG/RFN
5HYHUVHIUHTNH\
17. Battery release
NH\
377NH\
0RQLWRUNH\
&DOONH\
6SHDNHU
PLFURSKRQHMDFN
%DWWHU\/LLRQ
3
ENGLISH
Main indicators/controls - description
Power/volume on-off
Sending indicator
Busy indicator
To turn on/off the radio and adjust the volume level.
Press the PTT is pressed, it glows to indicate the transmitting
status.
When the channel is busy, the display shows
PTT key
When pressed, it enables the transmission.
MONI (monitor) key
+ROGGRZQWKLVNH\LQUHFHLYLQJPRGHWKHFKDQQHOLQXVHZLOO
be monitored. The busy channel indicator will glow.
Call key
To call your partner
7RH[LWWKHPHQXDQGWRVZLWFKIURP9)2WR0HPRU\PRGH
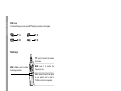
Socket and connector
SMA Connector
For connecting the supplied antenna
Speaker/microphone
jack
,I\RXZDQWWRXVHDVSHDNHURUDPLFURSKRQHFRQQHFW
WKHPWRWKLVVRFNHW,IQRWSUHYHQWZDWHUIURPGURSSLQJLQWR
it.
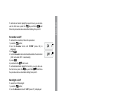
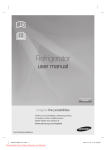
Many icons are shown on the display when the radio is on. The following table can
help you to identify each of them.
Battery level indicator
+//
6KRZV WKH 7; RIIVHW GLUHFWLRQ LQ UHODWLRQ WR WKH 5;
frequency
3RZHUOHYHOLQGLFDWRU+, +LJK/2 /RZ
Frequency scanning indication
.H\SDGORFN
Displays when DCS is turned on
CT
VOX
CTCSS turned on
92;WXUQHGRQ
Call Function
R
PRI
Display reverse frequency
Priority scan activated
5HFHLYHGVLJQDOVWUHQJWKDQG7;SRZHU
Frequency in use
Function menu
7KHVFDQ¿QGVDVLJQDORSHQVTXHOFK
5
ENGLISH
LCD display
ENGLISH
Basic operations
Supplied antenna
Insert the base of the supplied antenna into the SMA connector
DQGURWDWHLWFORFNZLVH0DNHVXUHWKHDQWHQQDKDVVHWGRZQ
7DNH RXW WKH DQWHQQD IURP WKH EDVH E\ URWDWLQJ LW FRXQWHU
FORFNZLVHURWDWLRQ
Turn on and off the power
If you want to turn on the power, rotate the PWR/VOL NQRE
FORFNZLVH XQWLO D EHHS LV KHDUG $OO LFRQV DQG IUHTXHQFLHV
appear on the screen. You can adjust your desired volume by
WXUQLQJWKHNQRE
To turn off the power, rotate the PWR/VOL NQRE FRXQWHU
FORFNZLVHURWDWLRQ$OOWKHLFRQVRQWKHGLVSOD\ZLOOGLVDSSHDU
and the radio is off.
Adjusting volume
After turning on the radio, rotate the PWR/VOLNQREFORFNZLVH
WRLQFUHDVHWKHYROXPHDQGFRXQWHUFORFNZLVHWRGHFUHDVH
Transmitting/Receiving
)LUVWO\ KROG GRZQ EULHÀ\ WKH MONI EXWWRQ WR PDNH VXUH WKDW
the frequency is not busy and then press the PTT 6SHDN
FPIDUIURPWKHXQLW
7KH7;LQGLFDWRUOLJKWVXS
Release the PTTNH\WRUHFHLYH
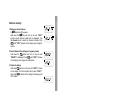
Emergency Alarm
+ROGGRZQWKHCALLNH\IRUVHFRQGDQGSUHVVMONIWKH
radio will switch to emergency alarm.
Repeater tone
:KHQ\RXSUHVVDQ\NH\DQRWHDW+]LVJHQHUDWHG
,WJLYHVWKHSRVVLELOLW\WROLQNWRUHSHDWHUV
Keypad Lock
7R/RFNRUXQORFNWKHEXWWRQV
In channel/Frequency mode, press and hold down the
NH\IRUWZRVHFRQGV7KHNH\SDGZLOOORFN5HSHDWWKHVDPH
SURFHGXUHWRXQORFNLW
6
ENGLISH
Setting Reverse Frequency Function
7KLVIXQFWLRQLVSRVVLEOHRQO\ZKHQ\RXDUHOLQNHGWRDUHSHDWHU
LWSHUPLWVWRLQYHUWWKH7;IUHTXHQF\ZLWKWKH5;IUHTXHQF\
for two seconds
In Channel/Frequency mode, hold down
until “R” appears on the display. Repeat the same procedure
to return to the previous frequency setting.
Scanning
The Scan version is very useful to monitor the channels before
transmitting.
1. Scan all the channels
,
,
and
In Channel/Frequency status, press
,
WKH UDGLR ZLOO VFDQ IURP WKH FKDQQHO LQ XVH
through all the channels. Whenever any activity is detected,
the radio will suspend the scan for 5 seconds. It will then
NH\WRHQG
continue to scan unless you press PTT or
scanning.
2. Priority channel scan
,
,
and
In Frequency Mode, press
. The radio will scan from the current frequency through
DOOWKHIUHTXHQF\UDQJHZLWKLQ0+]:KHQHYHUDQ\DFWLYLW\
is detected, the radio will suspend the scan for 5 seconds. It
will then continue to scan unless you press the PTT or
NH\WRHQGVFDQQLQJ
Select scan type
In Frequency mode, press
and rotate the Encoder until the
and turn the Encoder
display shows “SCAN 13”. Press
NQREDJDLQWRVHOHFWWKHVFDQW\SH72&26(&RQ¿UP\RXU
selection with
and exit by pressing
twice.
TO: Time-operated scan
(YHQWKRXJKWKHUDGLRVWRSVRQDEXV\FKDQQHOLWZLOOFRQWLQXH
scanning the other channels.
CO: Carrier-operated scan
The radio stops on a busy channel until there is no activity, and
then radio begins scanning the other channels.
SE: Search scan
The radio stops on a busy channel and exits the Scan mode.
7
ENGLISH
DTMF Code
In Channel/Frequency mode, press PTTDQGGLJLWDQXPEHURQWKHNH\SDG
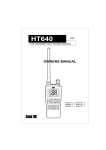
Flank keys
PTT: push to transmit and release
it to receive
MONI + CALL: push to enable
WKH(PHUJHQF\DODUP
MONI: push it to monitor the
frequency in use
CALL: press it to send a call signal
to your partner and to send a
+]WRQHWROLQNWRUHSHDWHUV
Select Mode
+ROGGRZQ
DQGWXUQRQWKHSRZHUWKHUDGLRFDQVZLWFKEHWZHHQWKH&KDQQHO
and Frequency mode. Repeat the procedure to pass to the other mode.
to switch between the Frequency mode and
In Frequency mode, press
Channel+Frequency mode.
To store a frequency
7R VWRUH D IUHTXHQF\ DQG LWV VHWWLQJV &7&66'&6 6+,)7 5(3($7(56 HWF
IROORZWKHSURFHGXUHEHORZ
DW¿UVWFKRRVHDOOWKHVHWWLQJVWRVWRUH
button,
2. press the
3. then, push
,
URWDWH WKH Encoder NQRE DQG VHOHFW WKH PHPRU\ QXPEHU ZKHUH \RX ZDQW WR
store the frequency and its settings.
.
FRQ¿UP\RXUVHOHFWLRQE\SUHVVLQJ
note: a triangle displayed underneath the channel number indicates that it has
DOUHDG\EHHQVWRUHG
8
ENGLISH
Delete a memory
1.Delete one stored channel
Mode turn off the power.
In
NH\ DQG WXUQ RQ WKH XQLW “DEL?”
+ROG GRZQ WKH
and the stored channel number will be displayed. Turn
the Encoder NQRE RU VHOHFW WKH FKDQQHO WR GHOHWH 3XVK
until “YES?” appears on the display; push it again to
FRQ¿UP
2. Reset (Delete all the settings in Frequency mode)
+ROG GRZQ WKH
button and turn on the unit until
“RESET?” is displayed. Press
until “VFO?” is shown
RQWKHGLVSOD\SXVKLWDJDLQIRUFRQ¿UPDWLRQ
3. Delete all settings
+ROGGRZQ
and turn on the unit until “VFO?” is shown
RQWKHGLVSOD\7XUQWKH(QFRGHUNQREWRVHOHFW“FULL?”,
then press
to delete all the settings in Frequency and
9)2PRGHV
9
ENGLISH
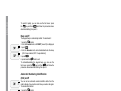
Advanced Operations
Selecting the VOX sensitivity level
7KH92;IXQFWLRQLVGHDFWLYDWHGE\GHIDXOW7RDFWLYDWHLWIROORZ
WKHSURFHGXUHKHUHEHORZ
button;
1. press the
2. turn the EncoderNQREXQWLOWKHGLVSOD\VKRZV‘VOX’ PHQX
NH\
3. push the
WXUQ DJDLQ WKH Encoder NQRE DQG VHOHFW WKH GHVLUHG 92;
OHYHO\RXFDQFKRRVHDPRQJVWGLIIHUHQWOHYHOV
NH\DJDLQ
5. push the
6. to exit, press twice
.
7R DFWLYDWH DQG VHOHFW UDSLGO\ WKH 92; IXQFWLRQ \RX FDQ GR
NH\DQG
LWDOVRE\RSHUDWLQJRQWKHIDVWPHQXSUHVVWKH
then
and follow the procedure above described starting
from point 3.
Setting the transmission power
7RVHOHFWWKHGHVLUHGSRZHUOHYHO
button;
1. press the
2. turn the EncoderNQREXQWLO ‘POW’ PHQXLVGLVSOD\HG
;
3. push
WXUQWKHEncoderNQREDQGVHOHFWWKHGHVLUHGSRZHUOHYHO
\RXFDQFKRRVHEHWZHHQOHYHOV‘H’ ed ‘L’
;
5. press
6. press twice the
NQREWRH[LW
To activate and select rapidly the power level, you can also
XVH WKH IDVW PHQX SUHVV WKH
NH\ DQG WKHQ
and
follow the procedure above described starting from point 3.
Setting squelch
7RVHOHFWWKHVTXHOFKOHYHO
button;
1. press the
2. turn the EncoderNQREXQWLO‘SQL’ PHQXLVGLVSOD\HG
;
3. push
WXUQWKHEncoderNQREDQGVHOHFWWKHGHVLUHGVTXHOFKOHYHO
GLIIHUHQWOHYHOVDUHDYDLODEOH
;
5. press
6. press twice the
NQREWRH[LW
10
ENGLISH
To activate and select rapidly the squelch level, you can also
XVH WKH IDVW PHQX SUHVV WKH
NH\ DQG WKHQ
and
follow the procedure above described starting from point 3.
Scrambler on/off
7RDFWLYDWHWKHVFUDPEOHUIROORZWKLVSURFHGXUH
button;
1. press the
2. turn the Encoder NQRE XQWLO ‘SCRM’ PHQX LV
displayed
;
3. push
WXUQWKHEncoderNQREDQGDFWLYDWHGHDFWLYDWHWKHVFUDPEOHU
21 DFWLYDWHG2)) GHDFWLYDWHG
;
5. press
6. press twice the
NQREWRH[LW
To activate/deactivate rapidly this function, you can also use
WKHIDVWPHQXSUHVVWKH
NH\DQGWKHQ
and follow
the procedure above described starting from point 3.
Backlight on/off
7RVHOHFWWKH/&'EDFNOLJKW
button;
1. press the
2. turn the EncoderNQREXQWLO ‘LED’ PHQXLVGLVSOD\HG
;
3. push
WXUQWKHEncoderNQREDQGDFWLYDWHGHDFWLYDWHWKHIXQFWLRQ
GLIIHUHQWRSWLRQVDUHDYDLODEOH$872212))
;
5. press
6. press twice the
NQREWRH[LW
7RDFWLYDWHGHDFWLYDWHUDSLGO\WKHEDFNOLJKW\RXFDQDOVRXVH
WKHIDVWPHQXSUHVVWKH
NH\DQGWKHQ
and follow
the procedure above described starting from point 3.
Select the backlight colour
7RVHOHFWWKHEDFNOLJKWFRORXU
button;
1. press the
2. turn the Encoder NQRE XQWLO ‘LIGHT’ PHQX LV
displayed
;
3. push
WXUQ WKH Encoder NQRE DQG FKRRVH WKH GHVLUHG FRORXU GLIIHUHQWFRORXUVDUHDYDLODEOH
;
5. press
6. press twice the
NQREWRH[LW
11
ENGLISH
7R VHOHFW LW UDSLGO\ \RX FDQ DOVR XVH WKH IDVW PHQX SUHVV
the
NH\DQGWKHQ
and follow the procedure above
described starting from point 3.
Beep on/off
7KHNH\SDGEHHSLVDFWLYDWHGE\GHIDXOW7RGHDFWLYDWHLW
1. press the
button;
2. turn the EncoderNQREXQWLO‘BEEP’PHQXLVGLVSOD\HG
3. push
;
WXUQ WKH Encoder NQRE DQG DFWLYDWHGHDFWLYDWH WKH EHHS
21 EHHSHQDEOHG2)) EHHSGLVDEOHG
5. press
;
NQREWRH[LW
6. press twice the
7R DFWLYDWHGHDFWLYDWH WKH NH\SDG EHHS \RX FDQ XVH WKH
IDVWPHQXSUHVVWKH
NH\DQGWKHQ
and follow the
procedure above described starting from point 3.
$XWRPDWLF1XPEHULQJ,GHQWL¿FDWLRQ
(ANI) on/off
<RX FDQ VHW DQ DXWRPDWLF QXPEHU LGHQWL¿HU YLVLEOH IURP WKH
radio’s display of your partner each time you send a call signal.
7RDFWLYDWHWKLVIXQFWLRQ
1. press the
button;
2. turn the EncoderNQREXQWLO‘ANI’PHQXLVGLVSOD\HG
3. press
;
URWDWH WKH Encoder NQRE DQG DFWLYDWHGHDFWLYDWH WKH
IXQFWLRQ21 DFWLYDWHG2)) GHDFWLYDWHG
5. push
again;
to exit.
6. press twice
7RDFWLYDWHGHDFWLYDWHWKHNH\SDGEHHS\RXFDQDOVRXVHWKH
IDVWPHQXSUHVVWKH
NH\DQGWKHQ
and follow the
procedure above described starting from point 3.
Repeater shift (for communications through
repeaters)
7RVHOHFWWKLVIXQFWLRQIROORZWKHVHVWHSV
1. press the
button;
2. rotate the EncoderNQREXQWLO‘S-D’PHQXLVGLVSOD\HG
3. press
;
WXUQ WKH Encoder NQRE DQG VHOHFW WKH UHSHDWHU VKLIW <RX
can choose amongst the following options +, - and 0;
5. press
again;
12
ENGLISH
6. press twice
to exit
7RVHOHFWWKHUHSHDWHUVKLIW\RXFDQXVHWKHIDVWPHQXSUHVV
NH\DQGWKHQ
and follow the procedure above
the
described starting from point 3.
Repeater shift adjustment
(for communications through repeaters)
1. press the
button;
2. turn the Encoder NQRE XQWLO ‘DIFFR’ PHQX LV
displayed
;
3. push
WXUQ WKH Encoder NQRE DQG VHOHFW WKH UHSHDWHU VKLIW <RX
can also enable it by digiting the frequency directly on the
NH\SDG
;
5. press
Select the frequency step
1. press the
button;
2. turn the EncoderNQREXQWLO‘STEP’ PHQXLVGLVSOD\HG
;
3. push
WXUQ WKH Encoder NQRE DQG VHOHFW WKH GHVLUHG IUHTXHQF\
VWHS<RXFDQFKRRVHDPRQJVW.+].+].+]
.+]DQG.+]
5. press twice the
NQREWRH[LW
Select the CTCSS and DCS tones
To select a CTCSS tone
button;
1. press the
2. turn the Encoder NQRE XQWLO ‘C-CDC’ PHQX LV
displayed
;
3. push
WXUQ WKH Encoder NQRE DQG VHOHFW WKH GHVLUHG VXEDXGLR
tone;
WRFRQ¿UP
5. press
To select a DCS tone:
1. select ‘C-CDC’PHQXHLWKHUZLWKWKHEncoderNQRERU
with the fast access;
2. Press
3. Press the
button;
WXUQWKHEncoderNQREDQGVHOHFWWKHGHVLUHG'&6OHYHO
13
ENGLISH
DJDLQIRUFRQ¿UPDWLRQ
5. press
While selecting the DCS codes, if you press
VHOHFWWKHQRUPDO1RULQYHUWHG,'&6FRGHV
, you will
Voice function (only in English)
With this function, you activate a voice that informs about any
operation/selection you are doing. To activate it, follow these
VWHSV
1. press the
button;
2. turn the Encoder NQRE XQWLO ‘VOICE’ PHQX LV
displayed;
3. push
;
WXUQWKHEncoderNQREDQGDFWLYDWHGHDFWLYDWHWKHIXQFWLRQ
21 HQDEOHG2)) GLVDEOHG
again;
5. Push
NQREWRH[LW
6. press twice the
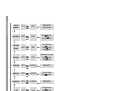
To operate with all the parts/settings of the menu, you have to follow these general
VWHSV
1 Press the
button.
2 Turn the EncoderNQREWRVHOHFWWKHGHVLUHGPHQX
3 Press
and turn the EncoderNQREWRFKRRVHWKHGHVLUHGVHWWLQJ
3UHVV
WRFRQ¿UP
Voice
Menu
Selection
Operation
scanning all the
channels
6&$1"
Scan entire
channel
to exit scan
Press
3UHVVDQ\NH\WRUHWXUQ
scanning within
1 MHz
35,"
Priority channel
scan
6$0($6$%29(
VOX activation
and sensitivity
92;"
2))
Turn encoder to select
WRFRQ¿UP
Press
to exit
Press
power level
selection
32:"
+/
6$0($6$%29(
squelch selection
64/"
0-9
6$0($6$%29(
scrambler
activation/
deactivation
6&50"
212))
6$0($6$%29(
Backlight
/('"
212))$872
6$0($6$%29(
colour of the LCD
backlight
/,*+7"
1/2/3
6$0($6$%29(
keypad beep
%((3"
212))
6$0($6$%29(
automatic
QXPEHULGHQWL¿HU
$1,"
212))
6$0($6$%29(
keypad lock
.(<%2"
0$18$/$87
6$0($6$%29(
15
ENGLISH
Menu Operation
ENGLISH
time out
transmission
727"
2))
6$0($6$%29(
Turn encoder to select
type of scanning
6&$16"
72&26(
Press
WRFRQ¿UP
to exit
Press twice
voice function
activation
92,&("
212))
Turn encoder to select
WRFRQ¿UP
Press
to exit
Press
shift repeater
',))5"
0-70.995
Input frequency or turn encoder
WRFRQ¿UP
Press
to exit
Press
ctcss/dcs rx/tx
&&'&"
See CTCSS chart
6$0($6$%29(
ctcss/dcs only rx
5&'&"
See CTCSS chart
7XUQ(QFRGHUWRVHOHFW
WRFRQ¿UP
Press
ctcss/dcs only rx
7&'&"
See CTCSS chart
6$0($6$%29(
+ / - shift
6G"
+/-/cancel
Turn encoder to select
WRFRQ¿UP
Press
to exit
Press
frequency step
selection
67(3"
NNN
NN
6$0($6$%29(
wide/narrow band
selection
1:"
Wide
1DUURZ
6$0($6$%29(
Exit
9)205
Note: parts from 16 to 21 are available only in Frequency mode.
In Channel mode only parts from 1 to 15 are active.
To pass rapidly from Frequency to Channel mode or vice versa, switch on the unit
and hold down the
button.
1$0(
16
212))
Turn encoder to select
WRFRQ¿UP
Press
to exit
Press
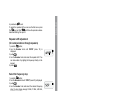
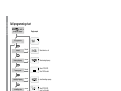
7RHQWHULQ6HOI3URJUDPPLQJPRGHIROORZWKHVHVWHSV
while turning on the unit, hold down ‘MONI’ and
until ‘SELF’ is displayed;
;
press
turn the EncoderNQREDQGVHOHFWWKHPHPRU\QXPEHUWRSURJUDP
again;
SXVK
digit the desired rx frequency;
;
press
press
and with the EncoderNQREVHOHFWWKHGHVLUHG&7&66LQ5;LI\RX
SUHVVLWDJDLQ\RXFDQVHOHFWD'&6FRGH
;
8. press
9. digit the desired tx frequency;
;
10. push
11. press
and with the EncoderNQREVHOHFWWKHGHVLUHG&7&66LQ7;LI\RX
SUHVVLWDJDLQ\RXFDQVHOHFWD'&6FRGH
;
12. press
13. with the Encoder NQRE HQDEOHGLVDEOH WKH EXV\ FKDQQHO ORFNRXW \RX FDQ
FKRRVH2))FDUULHU&7&66'&6
;
SUHVV
15. by turning the Encoder NQRE \RX FDQ HQDEOHGLVDEOH WKH SULRULW\ FKDQQHO
scanning;
;
16. press
17. turn the EncoderNQREDQGVHOHFWWKHSRZHUOHYHOLQW[+KLJKRU/ORZ
;
18. press
19. turn the Encoder NQRE DQG VHOHFW WKH WUDQVPLVVLRQ PRGH :,'( RU
1$552:
;
20. push
21. rotate the Encoder NQRE DQG VHOHFW WKH ¿UVW OHWWHU IRU WKH QDPH RI WKH
button
programmed channel. To switch to the next channel, push the
and turn the EncoderNQRE
;
22. press
VZLWFK RII WKH XQLW WR ¿QLVK WKH SURJUDPPLQJ SURFHGXUH DQG UHWXUQ WR WKH
standard modality.
1.
2.
3.
5.
6.
7.
17
ENGLISH
Self-Programming mode
ENGLISH
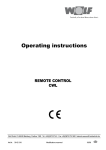
Self-programming chart
MONI+
+ switch on
the radio for 2 seconds
Display example
Self-programming
Channels
(QFRGHU
Select channel 1 to 128
Receiving frequency
(QFRGHU
Select receiving frequency
Receiving codes
(QFRGHU
Select CTCSS / DCS
3UHVV/2&.WRVZLWFK
Transmitting frequency
(QFRGHU
Select transmitting frequency
Transmitting codes
(QFRGHU
Select CTCSS / DCS
3UHVV/2&.WRVZLWFK
%XV\FKDQQHO/RFNRXW
(QFRGHU
2))FORVH
1. Carrier
2.CTCSS/DCS
Priority channel scan
(QFRGHU
$GG$GGSULRULW\&KDQQHOVFDQ
'HO'HOHWHSULRULW\
Channel scan
2XWSXW3RZHU
(QFRGHU
++LJKSRZHU
//RZSRZHU
Channel spacing
(QFRGHU
:,'(.+]
1$552:.+]
3URJUDP&+QDPH
(QFRGHU
Press
WRFRQ¿UPDQGVZLWFK
to the next channel
(1'
18
ENGLISH
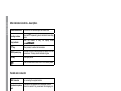
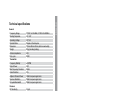
7HFKQLFDOVSHFL¿FDWLRQV
General
Frequency Range
:RUNLQJ7HPSHUDWH
2SHUDWLQJ9ROWDJH
2SHUDWH0RGH
Dimension
Weight
Antenna impedance
Duty cycle
Transmitter
Frequency Stability
2XWSXW3RZHU
Max Frequency Deviation
Audio Distortion
Adjacent Channel Power
Spurious Radiation
2FFXSLHG%DQGZLGWK
Receiver
RF Sensitivity
Audio Distortion
Audio Response
Adjacent Channel Selectivity
Intermodulation Rejection
Spurious Response
%ORFNLQJ
&70+]&70+]
-20°-+50°
'&9
Simplex or Semi-duplex
PPîPPîPP$QWHQQDH[FOXGHG
J,QFOXGLQJEDWWHU\
ȍ
5/5/90
±2.5PPM
:
.+]
:LWKLQ(XURSHDQOHJDOWHUPV
:LWKLQ(XURSHDQOHJDOWHUPV
:LWKLQ(XURSHDQOHJDOWHUPV
<0.2μV
+]·.+]
:LWKLQ(XURSHDQOHJDOWHUPV
:LWKLQ(XURSHDQOHJDOWHUPV
:LWKLQ(XURSHDQOHJDOWHUPV
:LWKLQ(XURSHDQOHJDOWHUPV
19
ENGLISH
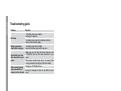
Troubleshooting guide
Problem
Solution
7KHEDWWHU\SDFNPD\EHGHDG
Recharge or replace it.
No Power
7KHEDWWHU\SDFNPD\QRWEHLQVWDOOHGFRUUHFWO\
Remove it and install it again.
7KHEDWWHU\SDFNOLIHLV¿QLVKHG
Battery power dies
5HSODFHWKHEDWWHU\SDFNZLWKDQHZRQH
shortly after charging
0DNH VXUH \RX DUH XVLQJ WKH VDPH IUHTXHQF\ DQG
CTCSS/DCS tone as the other members in your
Cannot talk to or hear
other members in your group.
group
2WKHU JURXS PHPEHUV PD\ EH WRR IDU DZD\ 0DNH
sure you are within the range of the other radios.
Change the CTCSS/DCS tone.
Other voices (besides
group members) are
Be sure to change the tone on all radios in your
present on the channel. group.
20