1
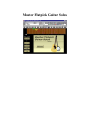
Master Flatpick Guitar Solos
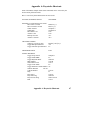
PG Music Inc. License Agreement
Program License Agreement
CAREFULLY READ THE FOLLOWING TERMS AND CONDITIONS BEFORE COMPLETING
THE INSTALLATION OF THIS SOFTWARE. USAGE OF THE SOFTWARE INDICATES YOUR
ACCEPTANCE OF THE FOLLOWING TERMS AND CONDITIONS.
LICENSE
A.
The program may only be used on a single machine.
B.
You may transfer the program and license to another party if the other party agrees to accept
the terms of this Agreement. If you transfer the program, you must either transfer all copies, whether
in printed or machine readable form, to the same party, or, destroy all copies not transferred. This
includes all modifications and/or portions of the program merged into other programs.
C.
You may receive the program in more than one media. Regardless of the type or size of media
you receive, you may install or use the media on a single machine.
D.
The program (including any images, "applets", photographs, animations, video, audio, music
and text incorporated into the program) is owned by PG Music Inc. or its suppliers, and is protected
by international copyright laws and international treaty provisions.
YOU MAY NOT USE, COPY OR TRANSFER THE PROGRAM, OR ANY COPY,
MODIFICATION OR MERGED PORTION OF THE PROGRAM, IN WHOLE OR IN PART,
EXCEPT AS EXPRESSLY PROVIDED FOR IN THIS LICENSE. IF YOU TRANSFER
POSSESSION OF ANY COPY, MODIFICATION OR MERGED PORTION OF THE PROGRAM
TO ANOTHER PARTY, YOUR LICENSE IS AUTOMATICALLY TERMINATED.
LIMITATION OF REMEDIES
PG Music Inc.'s entire liability, and your exclusive remedy shall be:
A.
The replacement of any media not meeting PG Music Inc.'s "Limited Warranty", which are
returned to PG Music Inc., or an authorized PG Music Inc. Dealer, with a copy of your receipt.
B.
If PG Music Inc. or the authorized dealer is unable to deliver replacement media which is free
of defects in materials or workmanship, you may terminate this agreement, and your money will be
refunded.
IN NO EVENT WILL PG MUSIC INC. BE LIABLE TO YOU FOR ANY DAMAGES,
INCLUDING BUT NOT LIMITED TO LOST PROFITS, LOST SAVINGS, OR OTHER
INCIDENTAL OR CONSEQUENTIAL DAMAGES ARISING OUT OF THE USE OR THE
INABILITY TO USE SUCH PROGRAM, EVEN IF PG MUSIC INC. OR AN AUTHORIZED PG
MUSIC INC. DEALER HAS BEEN ADVISED OF THE POSSIBILITY OF SUCH DAMAGES, OR
FOR ANY CLAIM BY ANY OTHER PARTY.
TRADEMARKS
Microsoft® and Windows® are either registered trademarks or trademarks of Microsoft Corporation
in the United States and/or other countries. Apple, the Apple logo, Mac, Macintosh, Power Mac , the
MacOS logo, QuickTime, and True Type are trademarks of Apple Computer, Inc. IBM and Power PC
are trademarks of International Business Machines Corporation. Other brands and their products are
trademarks or registered trademarks of their respective holders and should be noted as such.
Printed in Canada
2
PG Music Inc. License Agreement
Master Flatpick Guitar Solos
Table of Contents
PG MUSIC INC. LICENSE AGREEMENT
2
TABLE OF CONTENTS
3
CHAPTER 1: INTRODUCTION & OVERVIEW
5
Welcome to Master Flatpick Guitar Solos
Learn how to solo like a master!
How to use the program
Includes Band-in-a-Box Files
About Marty Cutler
CHAPTER 2 : INSTALLATION
Before you run the Program
Installing to Windows
Running the Program in Windows 95/98/NT
Running the Program in Windows 3.1
Selecting Your Sound or MIDI Driver
CHAPTER 3: TUTORIAL
5
5
6
6
6
7
7
7
7
7
8
11
Exploring the Master Flatpick Guitar Solos Features
Tool Bar Features And Feature Buttons:
The PLAY Buttons
Multiple Play Buttons
11
12
16
16
Check out the Main Program Screen
Navigation Buttons
Song Details
Play Your Favorite Pieces.
18
18
18
23
CHAPTER 4: USING THE PROGRAM
Selecting and Playing Pieces
Selecting Pieces
24
24
24
Table of Contents
3
Playing The Pieces
CHAPTER 5: OPTION PANELS SETTINGS
General Options
MIDI Options
Audio Options
CHAPTER 6: GUITAR OPTIONS SETTINGS
Guitar Options…
CHAPTER 7: NOTATION MODES
MIDI Notation Window
Notation Window Options
24
28
28
30
34
36
36
38
38
39
CHAPTER 8: PULL DOWN MENU ITEMS
42
APPENDIX A: KEYSTROKE SHORTCUTS
47
APPENDIX B: TROUBLESHOOTING & DRIVERS
48
Section 1: Troubleshooting
Memory
Hard Drive
MIDI SOUND
48
48
49
51
Section 2: Setting up Wave/MIDI Drivers
Checking Drivers
Installing Windows 95/98 Soundcard Drivers.
Installing the Windows 95/98 MPU-401 Compatible Driver.
Installing third-party or unlisted drivers in Windows 95/98.
53
53
57
58
59
APPENDIX C: PG MUSIC INC. CONTACT INFO
61
PG MUSIC INC. MUSIC SOFTWARE PROGRAMS
62
INDEX
76
4
Chapter 1: Introduction & Overview
Chapter 1: Introduction & Overview
Welcome to Master Flatpick Guitar Solos
The Master Flatpick Guitar Solos program is a fully-featured interactive music
program with professional flatpick arrangements of 50 songs. Each song features
a flatpick guitar solo played by top studio musician Marty Cutler, as well as
accompanying piano (comping), bass, drums, and strings. There are almost 3
hours of flatpick guitar soloing in this program.
Learn how to solo like a master!
This program is an interactive learning aid, designed to help you learn to solo like
a professional flatpick guitarist. Musicians studying improvisation typically learn
by copying other soloists' performances. Since guitar is a "visual instrument", it is
easier to learn to play by watching the fretboard than by reading the music from a
staff. The on-screen guitar fretboard shows you exactly which notes and chords
are being played on the guitar. There are guide notes for typical positions for the
key, and note names, to help you learn the fret/string positions.
The purpose of this program is to help you to learn the art of flatpick
improvisation. The student who wants to lean to improvise flatpick music is
usually told to listen to some flatpick solos, and learn from them.
Unfortunately, the student often encounters some obstacles after receiving this
advice.
! There aren't a lot of flatpick solos available in written form.
! Many solos that are written out are of very advanced material, beyond the
playing ability of the student. For example, the student may struggle to learn
16 bars of a complex solo based on a modal scale, but finds it difficult to
widely apply this information to more mainstream flatpick songs with typical
chord progressions.
We have created a program that has a huge library of flatpick solos, based on the
following parameters:
!
!
!
!
!
!
!
All of these solos are "mainstream" playing, based on typical chord
progressions.
Most of the soloing uses eighth notes, or triplets, so it is playable by most
musicians.
Each song contains 3 or more full choruses of music.
Optional guide-notes display scale tones in the correct key. Note names are
provided to aid in note/fret recognition.
You can see the solos on the on-screen fretboard, hear the solos, slow them
down, or step through them one note at a time.
You can play along with the flatpick quartet/quintet as you learn the solos.
The solos may be printed out for further study.
Chapter 1: Introduction & Overview
5
How to use the program
This program contains flatpick guitar solos covering various styles, from easy-toplay to advanced phrases. We suggest that you learn the phrases by first watching
the On-screen guitar fretboard, while the notation scrolls by. You'll notice that the
notation also contains TAB. To study a particular phrase, the program includes
advanced looping features. You can loop a number of bars, what you see on the
screen, or the entire song. If the song is playing too quickly, you can adjust the
tempo, or even the key.
Includes Band-in-a-Box Files
As an additional bonus, we’ve included the 50 songs in Band-in-a-Box format,
free with this standalone product. If you’re a Band-in-a-Box user, you’ll find
them in the FGSOLO50 directory in your main install directory.
We hope that you enjoy the Master Flatpick Guitar Solos program.
Have Fun!
PG Music Inc.
About Marty Cutler
Born in Brooklyn, New York in 1948, Marty Cutler began playing banjo in the
mid sixties. Shortly afterwards, he joined the Washington Square bluegrass scene
in New York City. His career as a banjoist and guitarist has included performing
with everyone from bluegrass greats Hazel Dickens and Peter Rowan, to Twyla
Tharp, and recording sessions for Saturday Night Live. A review of his solo
album "Charged Particles" in Downbeat magazine called him "a major innovator
on his instrument." Marty has also been a member of New York's infamous
Wretched Refuse String Band for over 20 years, and is still waiting for his gold
watch to arrive in the mail.
As a MIDI programmer, Marty Co-Authored "MIDI for Guitarists" with Bob
Ward, And has programmed synthesizers for clients ranging from Fuji Film to
Tito Puente and many others, as well as sound design and voicing for Silicon
Graphics software based GM synthesizer. His banjo can be heard in the ROM of
the Korg Trinity and Triton synthesizers. He is also the producer of PG Music's
program, the Bluegrass Band, and is the author of their "Unplugged" styles disk.
Marty currently lives with his wife and four cats in Oakland, California.
6
Chapter 1: Introduction & Overview
Chapter 2 : Installation
Before you run the Program
Make sure that the WAVE AUDIO and MIDI drivers for your computer's sound
system are already installed into the Windows Operating System. (In other words,
does your computer already make sounds?) If not, you may need to install the
support software for your sound card (i.e. Creative Labs, Yamaha, Turtle Beach,
etc.) and/or MIDI card (MPU401,MQX, SC-7, etc.) into the "Windows Control
Panel | Multimedia | Drivers" section before using this program. (See Appendix B
for additional instructions.)
Installing to Windows
This program installs directly to your hard drive. You will require approximately
10MB of Hard Disk space.
1) Find the SETUP.EXE installation file (i.e. by clicking on the "My Computer"
ICON and double-clicking on the CD-ROM ICON, or by running the file
explorer/file manager applet.)
2) Follow the instructions to install the program. This will copy all of the Master
Flatpick Guitar Solos files to your hard drive.
3) The Master Flatpick Guitar Solos program file is FLATPICK.EXE.
Running the Program in Windows 95/98/NT
1) From the Start Menu, Choose the Master Flatpick Guitar Solos menu, and then
choose the Master Flatpick Guitar Solos program.
Running the Program in Windows 3.1
1) From the File Manager, Choose the Master Flatpick Guitar Solos program
(FLATPICK.EXE) , and double-click. Alternately you can select the same
program from the Master Flatpick Guitar Solos group.
OR
As with all Windows programs, you can simply double-click with the Mouse
Button on the program ICON, or press the ENTER key (after moving the
highlighted bar to the ICON ). The Master Flatpick Guitar Solos program will
then load and run.
Chapter 2 : Installation
7
Selecting Your Sound or MIDI Driver
THE FIRST TIME THAT YOU RUN THIS SOFTWARE, the program will
attempt to automatically detect and configure your computer's Sound and MIDI
setup. The program will use your system's default Wave Output Device (i.e. from
the Windows Control Panel | Multimedia |Audio Playback Output Device
Settings) for outputting Digital Audio, and then attempt to use the "best" MIDI
Output device from your system's list of installed MIDI Output Devices (i.e.
Windows Multimedia MIDI Settings.)
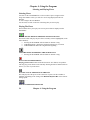
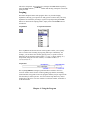
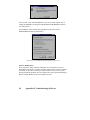
Since there are normally a number of MIDI Output Devices installed in a typical
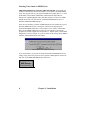
Windows Multimedia System, a dialog box (shown below) displaying the
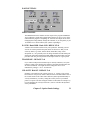
predetermined MIDI output device is presented to you in order to confirm that
this is the best MIDI Output Device present in your computer system. If the
program successfully suggests the best possible (i.e. highest quality sound) MIDI
Output Device for your system, or if you are unsure of this setting, choose YES to
continue, and skip ahead to the next chapter.
Automatic detection of optimal MIDI output settings
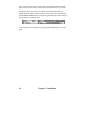
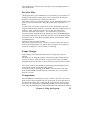
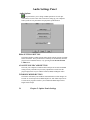
If you choose NO, or if you wish to change the automatic MIDI Output Device
setting, simply choose the program's "File | Options | MIDI Options" menu item,
and click on the MIDI DRIVERS button, shown here:
8
Chapter 2 : Installation
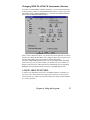
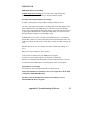
You will then be presented with a dialog like the one below:
Select MIDI Input and Output Driver dialog.
The program will play the MIDI music using the driver you specify here. In this
example, we have selected the Creative MIDI Instrument Mapper (shown in the
right-hand column), which is a common MIDI device driver setting for the
Creative Labs Sound Blaster AWE32/64 line of sound cards.
The Synth Output Latency Delay in MS setting is used in the special case when
you have a "Software Synthesizer" installed in your system which generates a
MIDI delay, or latency. If you have such a device installed, and you wish to use
this device for MIDI Output, you should refer to the documentation that came
with your "Software Synthesizer" to obtain the correct Latency setting. (e.g., A
Roland VSC-55/88 usually uses a latency setting of 420ms on a typical Pentium
system.)
OPTIONALLY SELECT AN INPUT DRIVER.
If you want to play along with the program using a computer-MIDI controller
setup (i.e. Synthesizer Keyboard, MIDI Guitar, etc. connected to your computer),
you can utilize the MIDI THRU function of the program by selecting a MIDI
driver for INPUT.
Otherwise, you can leave the INPUT DRIVER set to <NONE> as the program
does not require an INPUT DRIVER in order to function. In our example (leftcolumn shown in figure above) we have selected the SB16 MIDI In [330] driver,
since we have a MIDI-controller Keyboard connected to the MIDI-IN port of the
Soundblaster sound card.
Chapter 2 : Installation
9
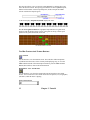
Once you have selected the driver preferences, the program's Main Screen will
appear and you will be ready to use the Master Flatpick Guitar Solos program.
The quickest way to get started is to read the following tutorial which runs
through the major features of the program. If you just can't wait a second longer,
press the PLAY ALL button now to begin song playback and to ensure that your
driver selection is working properly.
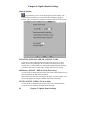
Main Toolbar
As you listen, take a few moments to go through the tutorial and the rest of this
guide.
10
Chapter 2 : Installation
Chapter 3: Tutorial
Exploring the Master Flatpick Guitar Solos Features
This tutorial assumes that you've already installed the program and your output
drivers are installed into the Windows Control Panel (see the Installation
Instructions in the previous chapter and Appendix B for detailed instructions.)
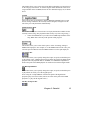
This is the main screen for the Master Flatpick Guitar Solos. There are several
areas that you will notice (from top to bottom ):
The Title Bar at the top of the screen shows the title, bar number, and the total
running time of the piece. (in 800x600 or higher screen/display resolution.)
The Main Toolbar contains the MODE BUTTONS, the SONG LISTS, the
SECTION/PART LISTS, and the many FEATURE BUTTONS such as Audio
Mix, SOLO, Key Transpose, and Print Buttons.
The Audio Overview Window (shown below) is a digital waveform
representation of a song's audio data. This window allows you to quickly move to
anywhere in a piece using by mouse clicking anywhere in the waveform area.
Chapter 3: Tutorial
11
This area also allows you to set specific LOOP POINTS by clicking above and
below the desired section. The top loop point marker sets the loop BEGIN point,
and the bottom marker sets the loop END point. (In this example the middle
section would be the looped region.)
As the lesson plays, the piano keyboard displays the notes.
The on-screen guitar fretboard is a graphical representation of a guitar neck,
displayed with the highest strings (notes) of the guitar at the top, and the open
position of the guitar (headstock) on the left.
On-Screen Guitar Fretboard
Tool Bar Features And Feature Buttons:
View Notation
Use this button to view the notation screen. This will show full transcriptions
(synchronized to the music) of the currently loaded/playing song. To view the
MIDI notation instead of the Transcription Notation, press the MIDI Notation
Button (shown below) while in the Notation Mode.
Book Button - View Text/Pictures
Use this button to view close the Notation Screen and open the Text/Content
Screen. You can enter the Text/Content mode and view pictures, text, biographies,
(and more) while the music is playing.
Song Categories List
12
Chapter 3: Tutorial
This listbox allows you to select songs from different Songlists (see below) based
on the category selected here. To use the songlist which contains the entire list of
songs available on the CD-ROM, choose the ALL SONGS category list, as shown
above.
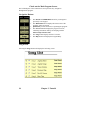
Songlist
Select a piece that you would like to hear by MOUSE CLICKING once to open
the list of songs available in the currently selected Songlist, and again over the
title of the piece. Playback Starts Automatically.
Media Playback Mode
This feature allows you to choose from a list of playback modes available for the
currently selected song. (The playback modes list may vary from song to song.)
• Choose the MIDI mode if you wish to hear a MIDI representation of the
song. Note: This is the only mode present in this program.
Part Selection
This feature allows you to select which "part" to select for muting, soloing or
MIDI notation purposes. For example, to see the MIDI notation of the "Sax" part,
select the part from this list and select MIDI notation to see this part displayed.
The Tempo Box
This feature allows you to quickly change the tempo (or speed) at which the piece
is played back. Note: Changing the tempo will affect the pitch of the digital audio
playback and if the playback mode is Au/MIDI, or Au/SMIDI an adjustment is
made to the pitch of the MIDI playback to remain in tune with the Digital Audio.
The Half Speed Button
This feature allows you to quickly change the tempo (or speed) at which the piece
is played back to exactly 1/2 of the original speed.
Note: Using the 1/2 Speed Button will affect the pitch of the digital audio
playback (plays one octave below), but has no effect on the pitch of the MIDI
playback (i.e. plays in the original octave.)
The Key Transpose Box
Chapter 3: Tutorial
13
Allows you to quickly change the Key at which the piece is played back.
Note: Changing the Key will affect the tempo of the digital audio playback and if
the playback mode is Au/MIDI, or Au/SMIDI an adjustment is made to the tempo
of the MIDI playback to remain in synch with the Digital Audio.
Mute Button
This button allows you to quickly mute or unmute the part currently selected by
the Part Selection list box. Press once to mute the part, and press again to unmute.
SOLO Button
This button allows you to quickly "Solo" the part (e.g. mute all other tracks)
currently selected by the Part Selection list box.
General Options
Launches a control panel which allows you to set various program settings such as
Notation Scroll-Ahead mode, Semitone and Cents (tuning) adjustments, Random
Playback when Play ALL is selected, etc.
Font Button
This button allows you to choose the font, and adjust its size and style for the
text/contents screens.
Print Button
The print button allows you to print full page SHEET MUSIC or individual
practice screens of the currently selected song to your Windows Compatible
Inkjet or Laser Printer.
Menu Button
This button offers easy access to the MENU items (i.e. File; Play) which offer
access to the various functions and features of the program. This is especially
helpful when running in 640x480 screen resolution mode.
Help Button
14
Chapter 3: Tutorial
This button launches the opening chapter of the program's Help Topics, which
contains full descriptions of all the features and functions available in the
program.
Loop Button and Section/Bars Selector
The Loop Button and Section/Bars selector work together to allow you to quickly
select a section (using the section selector --verse, chorus1, etc.), loop points
(using the overview window), a number of Bars (i.e. 1,4,8,12,24, etc.), or the
entire song. Select the section you wish to loop and press the Loop Button (at left)
to start the Loop Feature.
Chapter 3: Tutorial
15
The PLAY Buttons
Play Button
Play a single piece by using the play button or selecting from the song list
The PLAY button will play the piece that is currently selected (highlighted) in the
LIST Window). You can also use the mouse to select a piece; a piece will load
and play automatically as soon as it is selected from the SONGLIST drop-down
box.
Stop Button
Stop the music by pressing the stop button. When playback is resumed the song
will start from the point at which it was stopped.
Multiple Play Buttons
The following buttons allow you to play one or more pieces that are displayed in
the LIST of Pieces:
Favorites Button
PLAYING YOUR FAVORITE PIECES
You can select your favorite pieces in the lists by clicking the MOUSE button on
the checkbox beside the name of the piece. You should then see an asterix beside
the piece name indicating that it is a favorite piece of yours. Clicking the MOUSE
button again to clear the checkbox will de-select it. You can save your list of
favorite pieces (from one to all of the pieces) to disk by choosing the "Save
Favorites..." option from the File Menu. When you press the PLAY FAVORITES
button, the pieces that have been selected as your favorites will be played one
after another.
All Songs Button
This will play all of the pieces in the current list of pieces one after another, or in
a random order if the Random Playback option is selected in the General Options
Tab.
16
Chapter 3: Tutorial
Previous/Next Piece buttons.
These buttons move to the previous or next piece when you are playing more than
one piece.
Chapter 3: Tutorial
17
Check out the Main Program Screen
The left-hand pane of the Content/Text screen provides easy navigation
throughout the program.
Navigation Buttons
!
!
!
!
!
!
The BACK and FORWARD buttons let you navigate to
previously viewed pages.
The Main Menu button displays the main screen of the
program, visible on startup.
Quick Start provides the basics of operating the program.
The Overview button displays the program overview,
containing information and tips on studying with the
Master Flatpick Guitar Solos.
The Songs button displays the list of 51 tunes.
The Help button will display the Program Help.
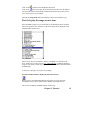
Song Details
Selecting the Songs button will display the following screen.
18
Chapter 3: Tutorial
Click on the
speaker icon to launch/hear the lesson.
Click on the
notes icon to play the lesson described in the text to the right of
the icon. This will also automatically launch the Notation mode so that you can
see as well as hear a given example.
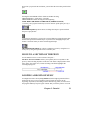
Selecting the Song Memo button will display a short memo about the song.
First, let's play the songs one at a time.
Select the ALL Category List to ensure that you are displaying the list of all the
titles in the program. You will then see the list of all the pieces displayed in the
Songlist listbox (shown next)
Select a piece that you would like to hear by CLICKING over the title of the
piece. In this case, we have selected "12 - Cluck Old Hen", indicating that this is
song #12. The memo for this song will provide more information. Playback Starts
Automatically.
As the piece is playing, you can do a lot of things:
Press the notation button to display the music/lesson notes.
When you press the NOTATION button (far top-left of screen), the main
introduction screen will be replaced by the MUSIC NOTATION screen.
This screen will display the MIDI Notation for the song.
Chapter 3: Tutorial
19
MIDI Notation Window displaying the guitar part and tablature.
As you can see, this notation mode provides you with an excellent view of exactly
which notes are being played (noteheads are highlighted in red.) You can step
through each note or chord one-at-a-time by pressing the NUMPAD period (.) and
zero (0) keys on your computer keyboard, or by mouse-clicking on the ARROW
buttons shown at the top of the MIDI Notation window. You can view each part
in the MIDI Notation Window by selecting one from the PART SELECTION box
(shown below.)
Now, let's choose an appropriate sound for the accompaniment (MIDI) part.
Press the General Options button to launch the General Options Panel. Choose the
MIDI tab.
Now, try changing all the MIDI tracks to "Tenor Sax" by selecting the PART
(shown at top-left) and then selecting the appropriate PATCH for each of the
parts, so that each PART is using the Tenor Sax patch. Click OK to continue.
20
Chapter 3: Tutorial
Now when you press the PLAY button, you will hear the Tenor Sax patch for that
part.
Pressing the SPACEBAR will also STOP or START the Song.
THE MINUS KEY '-' backs up by 2-seconds.
THE ENTER KEY Starts the song from the beginning.
SLOW DOWN OR SPEED UP THE PIECE (TEMPO CHANGE)
1) Use the [ and ] (square bracket keys) to slow down or speed up the piece by 5
beats at a time.
2) Use the Tempo Box up/down arrows to change the tempo or speed at which
the piece is played back.
3) Use the F5 function key (or press the 1/2 speed button) to toggle between Slow
Motion (half speed) and normal tempo. If you have been changing tempos, this
feature is useful to return you to the normal/original tempo.
TRANSPOSE THE PIECE up or down a semitone at a time by using the F7 or
F6 keys or by using the up/down arrows on the Key box.
MOVE TO A SECTION OF THE PIECE
Use the Mouse to move to a new section of the piece !
The Wave Overview Window allows you to quickly move to anywhere in the
piece by mouse-clicking anywhere in this area. The music is displayed here from
left to right. Also in this view, an auto-scrolling vertical bar highlights the
currently playing area.
LOOPING A REGION OF MUSIC
You might also notice the tiny Loop Markers (little triangles) positioned above
and below the wave overview window. These triangles are used to set the
beginning (top-marker) and ending (bottom-marker) loop points, in order to have
the program endlessly loop an region of music that you wish to practice. You can
Chapter 3: Tutorial
21
set these loop markers by mouse-clicking above the Wave Overview Window to
set the start marker, and below to set the end marker.
Then, all you have to do is press the LOOP button (shown below) to hear the
section you have marked loop continuously until you press the loop button again.
Print Out a Hardcopy of The Sheet Music For Further
Study!
By now, you have seen some of the program's powerful MIDI playback features.
But we still have a few more things to do. Follow these instructions to print out a
beautiful hardcopy of the sheet music right on your own inkjet or laser printer.
First, select the song you wish to print out by loading it in to the program using
the songlist.
Make sure the program is in Notation mode before you press the print button,
otherwise you may end up printing the TEXT/CONTENT screen instead of the
notation. You can switch to this by hitting F2.
Then, press the PRINT button to use the print feature.
This is the "Print MIDI Notation" option. Alternately, you can open the MIDI
Notation Window (shown below), select the part you want to print out, and press
the MIDI Notation's internal PRINT BUTTON (shown here.)
Playing All the Pieces Contained on the CD-ROM
Let's cue up more than one piece at a time.
Select the ALL SONGS Category List to ensure that you are displaying the list of
all the pieces in the program.
Then, press the play ALL button. This will play through the pieces one by one,
with a few seconds pause between each. The pieces are played in random order.
22
Chapter 3: Tutorial
(If you prefer sequential order, try setting Random to No/Off in the General
Settings Panel.)
Use the Master Flatpick Guitar Solos as Background Music while you work
in other programs.
Note that the Master Flatpick Guitar Solos will continue to play even while you
work in other programs. So for example, you can start the Master Flatpick Guitar
Solos program playing ALL songs and then switch over to your Word Processor.
Try changing the program's Window size and you will see that the notes continue
to be displayed while you work in other programs. If you MINIMIZE the program
window or RESIZE it so that only the "On-screen Fretboard" is visible, you'll see
that the notes are still displayed even while another program is active.
Play Your Favorite Pieces.
Step 1-Making up your List of Favorites: You can make up your list of favorite
pieces very easily with the Master Flatpick Guitar Solos program. To mark a song
as a 'favorite', simply mouse-click on the checkbox next to the song title. This will
place an asterix (*) beside the song's title to indicate that it is a favorite of yours.
To de-select the piece as a favorite, clear the favorites checkbox, which removes
the asterix *. You can then save your favorites selection to disk by choosing the
option SAVE AS DEFAULT FAVORITES so that the next time that you run the
Master Flatpick Guitar Solos, it will remember your Favorites.
Step 2-Playing your Favorites
button works like the PLAY ALL button,
except that it will only play pieces that are in the currently showing list which are
marked with an asterix (*) as one of your favorites.
Chapter 3: Tutorial
23
Chapter 4: Using the Program
Selecting and Playing Pieces
Selecting Pieces
You first use the CATEGORY list to select a LIST of pieces to appear in the
Songs List Window. Then, you will see a list of songs displayed in the List
Window.
To select songs in the List Window:
Use the mouse to click on the title of the Song that you want to play.
Playing The Pieces
These buttons allow you to play one or more pieces that are displayed in the
SONGLIST:
PLAY A SINGLE PIECE BY PRESSING THE PLAY BUTTON
The PLAY button will play the piece that is currently selected (highlighted) in the
LIST Window).
• Pressing the SPACEBAR will also STOP or START a song.
• THE MINUS KEY '-' Backs the playback position up by 2 seconds.
• THE ENTER KEY Starts the song from the beginning.
•
STOP THE MUSIC BY PRESSING THE STOP BUTTON
• Pressing the SPACEBAR will also STOP or START a song.
PLAY YOUR FAVORITE PIECES
Playing your Favorites button works like the PLAY ALL button, except that it
will only play pieces that are in the currently showing list that are marked with an
asterix (*) as one of your favorites.
PLAYING ALL OF THE PIECES IN THE LIST
This will play all of the pieces in the current list of pieces one after another or
randomly, depending on the setting of the Random Playback Box in the General
Settings panel.
PREVIOUS/NEXT PIECE BUTTONS
24
Chapter 4: Using the Program
These buttons move to the previous or next piece in a given Songlist. Playback
starts automatically.
Favorites Files
This program allows you to maintain files of your favorite pieces. Normally you
would just want one list of favorite pieces, but if several people are using the
program you might want to have different favorites files.
For example, you may have mastered Songs 1-14. You could deselect these songs
and save your own favorites file to help you recall the solos you still have to
master.
To mark a song as a 'favorite', simply mouse-click on the checkbox next to the
song title. This will place an asterix (*) beside the song's title to indicate that it is a
favorite of yours. To de-select the piece as a favorite, clear the favorites
checkbox, which removes the asterix *. You can then save your favorites
selection to disk by choosing the menu option FILE | SAVE FAVORITES FILE...
and entering a unique name so that the next time that you run the Master Flatpick
Guitar Solos you can reload this FAVORITES FILE by selecting FILE | OPEN
FAVORITES FILE...
and browse to the previously saved file.
The purpose of the Favorites Files is to allow you to play ONLY your favorite
pieces by pressing the PLAY FAV button; this is also a good way to make up a
custom list of songs/solos you are working on or learning.
Tempo Changes
Tempo changes can be performed both as the piece is playing or while it is
stopped.
The easiest way to change the tempo is to use the [ and ] square bracket keys to
decrease/increase by 5 beats per minute, or use the mouse to move the tempo
adjustment arrows up (increases) or down (decreases) on the main screen toolbar.
There is also a feature using the F5 key which toggles between half speed and
normal speed, just like slowing down those old 45's.
If you want to analyze a passage, hit the F5 key to slow it down by half, then
press the SPACEBAR to PAUSE the music or the minus key (-) to rewind the
music by 2 seconds.
Transposition
The F7 and F6 keys will transpose a tune by a semitone up or down. Or, use the
mouse to move the key adjustment arrows up (increases) or down (decreases) on
the main screen toolbar. Note: Transposing the song in this way will also affect
the tempo of the song playback. Transposing to higher keys increases the tempo
of the song, and transposing lower decreases the tempo. The transcription notation
Chapter 4: Using the Program
25
will not be transposed. You can, however, transpose the MIDI Notation parts by
using the MIDI Notation | OPTIONS Button and entering a transpose value in the
space provided.
Looping
The Master Flatpick Guitar Solos program offers very flexible looping
capabilities, allowing you to practice or study specific sections easily. The loop
capabilities are enabled by selecting a region to loop and pressing the LOOP
button. To deactivate the looping feature, simply click on the LOOP button a
second time.
Loop Button
Loop Section Selector
The Loop Button and Section Selector work together to allow you to quickly
select a section of the currently playing Song and loop it continuously. For
example, you can choose the currently playing screen, a specific section as
defined by the Section Description Listbox (i.e. verse 1, chorus, ending, etc.),
Loop Points (using the overview window), or a number of Bars (i.e.
1,2,3,4,8,12,24, etc.)
Loop Points
The tiny Loop Markers (triangles) positioned above and below the wave
overview window can be used to set the beginning (top-marker) and ending
(bottom-marker) loop points to have the program endlessly loop an region of the
selection that you wish to practice. You can set these loop markers by mouseclicking above the wave overview window to set the start marker, and below to
set the end marker.
26
Chapter 4: Using the Program
Changing MIDI PLAYBACK Instruments (Patches)
If you have a General MIDI compatible instrument, you can use the Patch names
to change patch by name. Use the MIDI OPTIONS button (or click on any of the
OPTIONS buttons (AUDIO,GENERAL, etc.) and click on the MIDI OPTIONS
tab) to enter the MIDI SETTINGS PANEL.
Once you have chosen this option, you can then click on the part that you want to
change (for example the Bass Part). Then, change the patch. This is a great way to
hear how different the same song sounds on different instruments.
Using the AUDIO/MIDI playback mode, you can mix Digital Audio and MIDI
tracks in any way you want. For example, you can decrease or the Volume of a
Digital Audio part (in the Audio Options Tab) and substitute the corresponding
MIDI part by increasing the Volume of the part in the MIDI Options Tab.)
A NOTE ABOUT PATCHESA "Patch" is the instrument selection for your MIDI synthesizer. Normally you
will want to use a Piano patch for the piano, Bass for the bass etc. But you can
select any Patch (e.g. Guitar, Electric Piano, Music Box, Harp, Tenor Saxophone
etc.) for any part/track.
Chapter 4: Using the Program
27
Chapter 5: Option Panels Settings
General Options
This panel allows you to control the program's general settings. The
General Options Settings are saved and stored for subsequent program
sessions. These settings can be changed as often as required, and at any time.
NOTATION SCROLLS AHEAD - DEFAULT=OFF
This feature, when enabled, instructs the program to "preview" or "read
ahead" the next bars and display the next bars of notation as the music is
playing. This is a useful feature for reading and singing along with the music
as it allows the reader to "know what's coming" as the music is playing.
SEMI(tone) ADJUST - DEFAULT=0 (Native Key)
Use this feature to change the pitch of the audio in increments of half-tones to
allow for playback in different key signatures.
Note: This feature will affect the tempo of the music; a positive number will
increase the tempo, and a negative number will decrease the tempo.
CENTS ADJUST - DEFAULT=0 (A=440)
Use this feature to change the pitch of the audio in very small increments
(cents) to allow for playback in slightly different tuning.
28
Chapter 5: Option Panels Settings
Note: This feature will affect the tempo of the music; a positive number will
increase the tempo, and a negative number will decrease the tempo.
ALWAYS SWITCH TO MIDI AT HALF SPEED
DEFAULT=ON
This feature, when enabled, will automatically set playback to be heard
through your computer's MIDI setup. This allows for 1/2 speed playback
without affecting the original pitch of the music. This is very useful for
learning pieces or sight-reading the music.
EXTEND DISPLAY OVER WINDOWS TASKBAR DEFAULT=ON
Enable this setting if you wish to use the program using the maximum screen
size available. This feature will allow the program cover the entire computer
screen including the Windows Taskbar. The taskbar can still be brought
forward and made visible by resizing the program window or by using the
CTRL-ESC hotkeys.
PIANO SHOWS ALL TRACKS EXCEPT DRUMS DEFAULT=ON
This setting instructs the program to display all the notes contained in the
MIDI tracks on the on-screen piano keyboard at once (notes show up on the
keys as blue or red dots.) Drums are excluded since this type of MIDI data
does not translate to piano keyboard notes.
SOLO STRENGTH
This setting affects the SOLO button feature of the program. When set to 100,
the SOLO feature will mute all other tracks and allow playback of only one
track or part at a time. When set to another number (i.e. 80) the SOLO
feature, when enabled, will allow for playback of all tracks/parts at a
significantly reduced volume level. This feature is useful for focussing on a
single part for practice, etc. while still being able to hear the rest of the parts
playing in the background.
RANDOM PLAYBACK (PLAY ALL)- DEFAULT=OFF
This feature is used in conjunction with the PLAY ALL or PLAY
FAVORITES feature. When enabled, it will allow for jukebox playback of
"all songs" or the "favorites" in a random fashion, instead of sequentially.
Chapter 5: Option Panels Settings
29
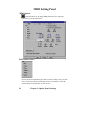
MIDI Setting Panel
MIDI Options
This Panel allows you to change MIDI parameters for a single part
(instrument ) or all the instruments.
PART SELECTION
Click on the desired instrument (part) that you want to change. Once you click
on it you will notice that the Part Settings (below) will change to reflect the
current settings for the part that you have chosen.
30
Chapter 5: Option Panels Settings
PART SETTINGS
MIDI CHANNEL
The MIDI channel is the channel used for output of the program's MIDI data.
Your synthesizer, sound card or digital piano must be set up to receive on the
channel that the program is outputting on - otherwise the output will be silent.
Changing this setting instantly changes the Channel, so you can quickly try all
16 channels to see which channel your synth is responding to.
PATCH - Bank MSB - Bank LSB - DEFAULT=0
A Patch is the instrument selection for your synthesizer. Normally you will
want to use a Piano patch for the piano, Bass for the bass etc. But you can
select any Patch (e.g. Guitar, Electric Piano, Music Box, Harp, Tenor
Saxophone etc.). It is probably easier to change the Patch from the Patch pull
down menu rather than changing the Bank MSB and/or Bank LSB, since this
procedure will also provide you with an descriptive name for a given patch.
TRANSPOSE - DEFAULT =0
If you want to transpose the instrument up or down by semitones, set by this
transpose setting. Note that this only transposes the particular instrument, not
all of the instruments. You might use this to change the octave of an
instrument by setting to +12 or -12 semitones.
VELOCITY BOOST - DEFAULT=0
Normally you would leave the Velocity boost at =0 . Velocity refers to how
hard each note was pressed, which is different from VOLUME which refers to
the overall volume of the sound. Since different synths respond differently to
velocity information, you can try setting this velocity boost if you find the
piano is too quiet even after setting the Volume to maximum for example. Try
to avoid changing the velocity boost from 0, since it will affect the dynamics
of the performance.
Chapter 5: Option Panels Settings
31
VOLUME - DEFAULT=100
Volume affects the loudness of a given part. If you want to change the overall
loudness of all the parts, use the ALL VOL knob instead.
REVERB - DEFAULT=40
Reverb is a nice sounding effect which "warms up" the sound. Typical setting
is=40 which is about 11 o'clock on the reverb knob.
CHORUS - DEFAULT=0
Chorus is a nice sounding effect which make the sound "more lush". Typical
setting is=40 which is about 11 o'clock on the reverb knob.
PANNING - DEFAULT=MIDDLE
Panning refers to placement of the output to right or left speakers
MUTE - DEFAULT=NO
If you don't want to hear a specific part then click the MUTE button for that
part. For example this would be useful if you want to turn a specific MIDI
part off so that you could play or sing along yourself, or turn another part off
for a quieter sound.
ALL VOLUME - DEFAULT=127
Changing the Volume here affects the overall volume of the sound.
MIDI THRU ENABLED - DEFAULT=ON
MIDI thru is only required if you want to play along with the program from a
MIDI controller without sounds of its own. Setting MIDI Thru to ON will
send the output of the MIDI controller thru the computer and into the sound
module.
NEVER SEND PATCH CHANGES - DEFAULT=NO
Normally you will want the program to be able to send patch changes. But if
you are having trouble with unexpected patch changes somewhere in your
system, you can disable patch changes to ensure that the program is not
sending patch changes.
AUTO HAND-SPLITTING - DEFAULT=YES
This setting is used to differentiate the left and right piano hands. This
checkbox, when active, shows the highest parts in blue on the piano keyboard,
and the lowest parts are displayed in red.
SOUND CARD SUPPORTS BRUSHES
This setting is for the drum parts only. Some more advanced sound cards
support jazz-style brush sounds on the drums. You can disable this if your
32
Chapter 5: Option Panels Settings
sound card doesn't support brushes. When disabled, drum parts that contain
brushes will be silent.
Chapter 5: Option Panels Settings
33
Audio Settings Panel
Audio Options
This panel allows you to change AUDIO parameters for each part
(instrument) or track. It also offers controls for setting up your computer's
audio system for best performance and playback synchronization.
DMA SETTINGS BUTTON
This button launches a DMA settings dialog which contains settings for DMA
buffers and Offset. These parameters are normally set automatically when the
program is first installed and run, or by pressing the ANALYZE SOUND
CARD button.
ANALYZE SOUND CARD BUTTON
This tests your computer's soundcard and sound system for audio and MIDI
timing accuracy and makes any necessary adjustments to ensure that the
program plays back in 'sync' with the Notation, MIDI, and Digital Audio.
WINDOWS MIXER BUTTON
This button will launch your Windows Soundcard Mixer so that changes can
be made to overall output level, MIDI output level, and Audio Output Level.
Use this mixer program to balance your soundcard's MIDI output with its
Digital Audio output.
34
Chapter 5: Option Panels Settings
SYNTH LATENCY OFFSET
This setting is used to configure proper synchronization of your computer's
MIDI output with the program. If your computer uses a "Software Synth" for
MIDI playback (i.e. The Roland Virtual Sound Canvas), a setting of around
420 (milliseconds) can be used to accommodate any MIDI-latency inherent in
such devices. Refer to the documentation that came with your "software
synth" for specific latency figures, if applicable.
Chapter 5: Option Panels Settings
35
Chapter 6: Guitar Options Settings
Guitar Options…
This menu item launches the guitar options panel, in which you can change
settings for the display of the on-screen guitar fretboard.
On-Screen Guitar Fretboard
Guitar Fretboard
The on-screen guitar fretboard is a graphical representation of a guitar neck,
displayed with the highest strings (notes) of the guitar at the top, and the open
position of the guitar (headstock) on the left.
Guide-Notes
Guide-Note names can also be displayed for each key in two scale positions
on the on-screen guitar fretboard. The first position displayed is Phrygian
Position, and it begins at the 3rd of the scale on the lowest string. The second
position is Aeolian Position, and it is the 6th of the scale on the lowest string.
Ellipses are drawn for each of these scale position notes, roots are in red, 3rds
and 5ths are in purple, and the remainder of the scale tones are indicated in
grey. Notes not in the scale are not displayed as guide notes.
When notes are sounded in the program, they are displayed on the guitar
fretboard. Notes displayed that are scale tones in the current key are displayed
in Green. Notes displayed that are not scale tones of the current key are
displayed in Yellow.
Guitar Options Window
The Guitar Options dialog can be accessed from the File Menu. This dialog
contains many setting for you to adjust the display of the on-screen guitar
fretboard.
36
Chapter 6: Guitar Options Settings
Guitar Options
Note Display Options
If MIDI Thru is selected (default=on) , the Guitar will display the music
played from a MIDI keyboard/Controller.
Fretboard Color
The on-screen guitar fretboard color can be brown or black. (default=brown)
Use Inlays
If you elect to not display guide notes, you can select "Use Inlays" and a
Guitar inlay will be displayed along the neck.
Show Notes at Aeolian Position
This setting enables guide-note display at the Aeolian Position.
Show Notes at Phrygian Position
This setting enables guide-note display at the Phrygian Position.
Note Names
This pull-down menu sets which guide-note note names will be displayed.
Selections are:
•
•
•
•
None - No guide-note names are displayed.
Root Only - Root guide-note names are displayed.
Chord Tones - Chord Tones guide-note names are displayed.
Scale Tones - Scale Tones guide-note names are displayed.
Chapter 6: Guitar Options Settings
37
Chapter 7: Notation Modes
MIDI Notation Window
The MIDI Notation Window displays the notes of a MIDI track on a staff
and also offers high-quality printout of the music to your printer.
MIDI Notation Window displaying the guitar part and tablature.
The primary purpose of the MIDI Standard Notation mode is to provide a
convenient way of displaying and printing a single track as highly readable music
on a staff within the program and as hardcopy practice-sheet music.
Some advanced notation features include:
- Scroll-Ahead (for sight reading purposes.)
- Bars Per Line From This Screen On setting (for formatting the display.)
- Detect fine resolution notation (allows the notation to detect phrases or songs
that require a higher lines per beat resolution than is selected for the overall song.)
- Automatic Tablature
There are some options in a dialog box which can be accessed by pressing the
button. See the Notation Window Options section for more information
on the notation window settings.
The Resolution setting determines how the program rounds the note times and
durations when translating a track into standard MIDI notation. For example, a
38
Chapter 7: Notation Modes
resolution of 4 will cause the program to round each note and duration to the
nearest 16th note when displaying the music (in 4/4). A resolution of 3 will cause
the program to round each note to the nearest 8th note triplet (in 4/4). A resolution
of 2 will cause the program to round each note to the nearest 8th note (in 4/4).
Hint: If you're displaying Jazz swing or shuffle music that has a triplet feel to the
eighth notes, make sure to set the resolution to =3 (triplets). This will display the
8th notes and other aspects of Jazz swing music correctly.
If you need to print out individual parts, open the MIDI Notation window, select
the part you want to print out, and press the MIDI Notation's internal PRINT
BUTTON, shown here:
MIDI Notation Print Button
Like the MIDI Notation Window itself, any measures with time signatures other
than 1/4, 2/4, 3/4, and 4/4 will be printed as blank. The printout will contain one
time signature at the beginning of the printout, but any time signature changes
throughout the song will not be printed.
The Clean checkbox puts the MIDI notation into Clean Mode. Clean Mode will
'clean up' the notation in certain situations where notes are played very close
together and are within a certain interval of each other. For example, when there
are a lot of grace notes leading up or down to the next note. Clean Mode also has
a routine for detecting 'glitch notes' which are notes that are short in duration and
have a low velocity.
Notation Window Options
The Bars Per Line - Song setting determines the horizontal resolution of the
screen. For example, with 2 Bars Per Line, the width of the screen is equal to 2
Bars in length. You can increase this setting to 16 Bars Per Line, although the
screen may look unusual at this extreme since the size of the note heads remains
the same regardless of this setting.
You can also use this setting to make the resolution equal to between 1 and 4
beats rather than complete bars. This is mainly for editing purposes. If you use
beats with this setting, the program will ignore any Bars Per Line (From This
Screen On) markers in order to display the partial bars. During playback the
program will not display less than 1 bar per line even if this setting is using beats
rather than bars.
Chapter 7: Notation Modes
39
The Bars Per Line - From This Beat On setting lets you change the horizontal
resolution of the screen from this beat on. This will cause the program to insert a
special Bars Per Line marker (Controller Event) into the sequence. This is useful
if you have some sections of the song that you would like to be displayed with a
different number of Bars Per Line than the overall Song setting. The notation
window will then display the bars you selected from the current screen on.
For example, if the Bars Per Line - Song setting is set to 2, and you press page
down to advance to bar 3, you could then set the From This Screen on setting to 4
and the program will display 4 Bars Per Line from the current screen on. The
current screen would now be starting at measure 3 and ending at measure 6. If you
then page down to the next screen you could then, for example, set the From This
Screen On setting back to 2, which would cause the program to display 2 Bars Per
Line from measure 7 onward, since the current screen would start at measure 7.
The Chord Vertical Position setting adjusts the vertical position in which the
chord symbols are displayed. This setting can range from 1 to 10.
The Transpose setting lets you adjust the Notation window to display notes either
higher or lower than the actual pitches.
NOTE: This setting is also useful for displaying music for non-concert
instruments such as trumpet or saxophone. Trumpet players (and other Bb
instruments) should set transpose to +2, Alto Saxophone (and other Eb
instruments) should set the transpose to -3. The music is then displayed in the
correct key for the instrument, but still plays in the concert key to the MIDI
playback system.
The Key Signature will be shown if the Show Key Signature option is enabled.
If the Highlight Played Notes checkbox is checked, notes will be highlighted in
red as they are played.
The Minimize Rests checkbox, when checked, will cause the program to display
the music with minimal rests. Use this setting if notes are displayed as shorter than
they should be.
The Clefs Split At setting determines the split point for placing notes on the Bass
or Treble clef. The default setting is 'C 5' which is middle C. For example, you
can use a higher split point, such as 'C 6' if you want some notes up to a G above
middle C to be displayed on the bass clef with ledger lines instead of on the treble
clef. If the split point is above middle C, and a note in the music is high enough
that any of the ledger lines above the bass clef would overwrite the treble clef, the
note will be placed on the treble clef.
40
Chapter 7: Notation Modes
The Tick Offset lets you display the music ahead or behind the beat. If the music
style dictates that the music is played slightly ahead of the beat, you can specify a
setting from 1 to 120 to have the music displayed forward in time. A setting from
-1 to -120 will cause the music to be displayed ahead of the beat (but not before
the beginning of the song). Generally you won't need to use this setting since the
notes are rounded when being displayed in standard notation.
Hint: The notation of Jazz swing or any "laid back" music will often be improved
by a Tick Offset setting of about -5. (minus 5) This is because Jazz music is
typically played a little behind the beat.
Chapter 7: Notation Modes
41
Chapter 8: Pull Down Menu Items
PROGRAM MENUS
FILE MENU
Options…- launches the GENERAL SETTINGS panel, where you can change
various program settings and parameters. (See Chapter 5 for additional details.)
Guitar Options – Launches the guitar options panel, in which you can change
settings for the display of the on-screen guitar fretboard.
Analyze Sound Card - tests your computer's sound card and sound system for
Wave Audio and MIDI timing accuracy and makes any necessary adjustments to
ensure that the program plays back in proper 'sync' with the notation, MIDI, and
Wave Audio.
New Favorites File…- starts a new "favorites" file, based on the settings made on
the main toolbar's "favorites" checkbox. All items selected as "favorites" will
appear with an asterix(*) in the songlist box. You can save multiple Favorites
Files with their own unique name (e.g., MyFavs.FAV) using the Save Favorites
menu item, and reload them at any time with the Open Favorites File command.
Open Favorites File…- allows you to open any Favorites File (*.FAV) you have
previously created and saved with the Save Favorites File command.
42
Chapter 8: Pull Down Menu Items
Save Favorites File…- instructs the program to save the songs currently marked as
"Favorites" for use in subsequent program sessions. Favorite songs are selected by
opening/loading a song and clicking on the Favorites Checkbox beside the song
title on the main screen's toolbar. All items selected as "favorites" will appear with
an asterix(*) in the song list-boxes.
Save as Default Favorites - saves the currently active or marked list of
"Favorites" as the Default Favorites list. This list will be automatically loaded
each time the program begins. Other "Favorites Files" can be loaded using the
Open Favorites File command.
Hide Tool Bar - This setting switches the program from the standard screen into a
FULLSCREEN mode, temporarily hiding the Toolbar, Piano Keyboard, and
Feature Buttons. This mode allows for a simple, full-screen view of the Notation,
Text, or Video (if applicable.) To re-enable the NORMAL program view, revisit
this menu item - and select SHOW TOOL BAR from the menu.
Toggle Notation/Content Window - (F2) toggles between the notation and the
book/content mode (see below for additional details.)
Notation Window - Use this menu item to view the notation screen. This will
show full transcriptions (synchronized to the music) of the currently
loaded/playing song. To view the MIDI notation instead of the Transcription
Notation, press the MIDI Notation Button while in the Notation Mode.
Content Window - Use this item to close the Notation Screen and open the
Text/Content Screen. You can enter the Text/Content mode and view pictures,
text, biographies, technique tips (and more) while the music is playing.
Help - This item launches the opening chapter of the program's Help Topics,
which contain the full descriptions of the various features and functions available
in the program.
About…- launches the program's About Box, which lists the program's Version
Number, Credits, and Company Contact Names, Numbers, and Addresses.
System Menu - pops up the application "system menu", which has menu items
such as minimize, restore, maximize, and exit.
HTTP:// - launches your Internet Browser (if applicable) and automatically
directs you to our Web Site, where you will find program patches, upgrades,
promotions, and additional product info.
Exit - exits or quits the program (or press ALT-F4.)
Chapter 8: Pull Down Menu Items
43
PLAY MENU
Play Favorites - plays the songs marked as "Favorites". These are indicated with
an asterix(*) beside the song title displayed in the songlist box. The songs are
played either sequentially or randomly, depending on the status of the Random
Playback Checkbox located on the GENERAL SETTINGS panel.
Play All - plays all the songs from the currently open songlist. The songs are
played either sequentially or randomly, depending on the GENERAL
SETTINGS panel | Random Playback Checkbox.
Play Song - plays the currently selected/loaded song.
Stop - stops playback of the currently playing song.
Backup - backs up the song 2 seconds ('-' key.)
Advance - advances the song 2 seconds ('+' key.)
Transpose Down - Use this feature (or use F6) to change the pitch of the song
down in increments of half-tones to allow for playback in different keys. Note:
This feature will affect (decrease) the tempo of the audio music. This feature has
no affect on Video Playback.
Transpose Up - Use this feature (or use F7) to change the pitch of the song up in
increments of half-tones to allow for playback in different keys.
Note: This feature will affect (increase) the tempo of the audio music. This
feature has no affect on Video Playback (if applicable).
44
Chapter 8: Pull Down Menu Items
Alternate/Normal Tempo (F5) - toggles between an alternate (i.e. 3/4 speed) and
normal (i.e. native) tempo.
Half Speed (H) - toggles between half speed and normal (i.e. native) tempo.
Advance One Chord -(Numpad ‘.’) advances the song ONE CHORD at a time.
Backup One Chord - (Numpad 0) backs the song up ONE CHORD at a time.
Decrease Tempo by 5 - ( [ ) decreases the playback tempo by 5.
Increase Tempo by 5 - ( ] ) increases the playback tempo by 5.
Send GM Mode-On Message - sends a General MIDI-Mode On message to your
computer's MIDI sound setup. This command is sometimes required to reset
certain sound modules and soundcards to the GM-Mode. Patches listed in the
MIDI SETTINGS Panel assume your MIDI setup is set to GM Mode.
Send XG Mode On Message - sends an XG MIDI-Mode On message to your
computer's MIDI sound setup. This command is sometimes required to 'reset'
certain Yamaha sound modules and soundcards to the XG-Mode.
Play Previous/Next Song - These menu items move to the previous or next piece
when you are playing a SET of songs (i.e. when playing the "Favorites" or when
Playing the "ALL" Jukebox modes.) Hot Keys are Shift + F8 and Shift+Ctrl+F8.
Toggle Loop On/Off (Numpad 1) | Choose Loop Type - These features allow
you to quickly loop one of the following:
1) a section (using the section selector - HEAD, PIANO SOLO, etc.)
2) loop points (using the overview window)
3) a number of Bars (i.e. 1,4,8,12,24, etc.).
Toggle Audio/MIDI - (F4) toggles between "MIDI Mode" and "Audio (Video)SMIDI" mode.
Toggle Playback Mode - (Shift-F4) toggles between all available playback
modes.
Mute Track - (Ctrl + M) allows you to quickly mute or unmute the part currently
selected in the Part Selection list box.
Solo/UnSolo Track - (Ctrl+S) allows you to quickly "Solo" a part (i.e. mute all
other tracks) currently selected in the Part Selection listbox.
Chapter 8: Pull Down Menu Items
45
Choose List - pops up the song list combo box.
Choose Song - pops up the song combo box.
Backup 1 Bar - (Ctrl -) backs the song up ONE BAR at a time.
Advance 1 Bar - (Ctrl +) advances the song ONE BAR at a time.
Backup 1 Section - (Alt -) backs the song up ONE SECTION (from the current
section) at a time.
Advance 1 Section - (Alt +) advances the song ONE SECTION (from the current
section) at a time.
Play Song # - (Ctrl + F5) displays a combo box which allows you to choose a
particular song.
46
Chapter 8: Pull Down Menu Items
Appendix A: Keystroke Shortcuts
Most of the Master Flatpick Guitar Solos commands can be accessed by the
mouse and/or pull down menus.
Here is a list of Keyboard shortcuts that are also useful.
PLAYING /STOPPING SONGS
SPACEBAR
MOVING TO A SECTION OF A SONG
Move back 2 seconds
Move forward 2 seconds
Chord Advance
Chord Back
Move Back 1 bar
Advance 1 bar
Backup 1 Section
Advance 1 Section
Minus key (-)
Plus key (+)
Numpad "."
Numpad "0"
Ctrl Ctrl +
Alt Alt +
CHANGING TEMPO
Change by 5 beats per min.
Toggle Half Speed/Normal
Toggle Alternate Speed/Normal
Bracket [ and ] keys
"H"
F5
TRANSPOSE PIECE
F6/F7
USEFUL HOTKEYS
Toggle Loop On/Off
Toggle Audio/MIDI
Toggle Playback Mode
Mute/Unmute
Solo/UnSolo Track
Toggle Video Mode
Toggle Notation/Content Window
Notation Window
Alt+F2
Content Window
Help
Play Song #
Play Next Song
Play Previous Song
Print
Numpad 1
F4
Shift+F4
Ctrl+M
Ctrl+S
F8
F2
Ctrl+F2
F1
Ctrl+F5
Shift+F8
Shift+Ctrl+F8
Ctrl+P
Appendix A: Keystroke Shortcuts
47
Appendix B: Troubleshooting & Drivers
Section 1: Troubleshooting
The following topics cover some of the most common technical problems that can
occur when running this (or any) program and some helpful solutions.
Lockups/Crashes/Incompatibilities, etc.
Most problems will occur when Windows is under "stress" of some kind. This
means that Windows spends most of its time on memory management or hard
disk file operations.
If you are having reoccurring problems, ensure that :
Available RAM is at least 8,000K.
This program requires a machine with at least 8MB of available memory to run.
Check the amount of memory that's available before running the program by
looking at the Program Manager | Help | About Program Manager Dialog Box
(Windows 3.1) or in the Control Panel | System | Performance Box (Windows
95/98). If you have a 16MB machine, there should be at least 8,000 K free before
you run the program. If the Program Manager (Win 3.1) shows a number smaller
than 8000K, then your computer's memory is setup incorrectly in the config.sys
file and you may need to adjust it (see below.)
Increase DOS Memory to at least 500K for Windows 3.1.
Important .dll files that are used by Windows and music programs must be locked
in memory and reside in the low memory that is mostly in the memory below
640K. To improve Windows performance, increase the amount of DOS memory
by removing TSR programs (like DoubleSpace) that eat up a lot of memory. You
can check how much memory is available in DOS by running the "MEM"'
program from the DOS command line.
If you have low DOS memory, attempts to run Windows programs will be greeted
by Windows telling you "Insufficient memory to run this application". This
message can occur even if you have 50MB of free memory above 1MB if you
have run out of low memory. There are freeware utilities (e.g., Below1mb.exe)
that can monitor this low memory condition.
Memory and Hard Drive Errors and/or sluggish system performance:
Memory
1) Run Windows (Win 3.1) in Enhanced Mode, with Virtual Memory Enabled.
We recommend using a "Permanent Swapfile" of at least 20MB. Windows 3.1
users can enable this setting by running the 386 Enhanced section of the Control
Panel Settings. In the 386 Enhanced Mode hard drive settings, ensure that the
ENABLE 32-BIT DISK/FILE ACCESS checkbox is enabled (Windows 95
handles these settings automatically.)
48
Appendix B: Troubleshooting & Drivers
2) Use on an "uncompressed" hard drive. Make sure you have at least 50MB of
available hard drive space at all times.
3) Disable any screen savers, wallpaper, or other programs before running the
program.
4) Reduce the number of displayed "group icons" if using Windows 3.1. Each
ICON that is displayed on your system uses a small amount of main memory
(about 1K each). Reducing the number of ICONS would increase your system
memory.
5) Reduce the number of Colors displayed by your Windows System (i.e. 256
colors instead of 16-bit or 24-bit color.)
6) Try disabling any 3rd party memory management utilities and programs (i.e.
QEMM, RAMDOUBLER, XEROX COLOR MATCH, etc.)
Hard Drive
Scanning and Defragmenting your Hard Drive(s)
There are many commercial utility programs available to repair/maintain your
computer's hard drive (i.e. Norton Utilities, PC Tools, etc.) If you own one of
these programs, follow the instructions provided with your software to ensure a
'healthy' hard drive(i.e. defragmented, clean surface, etc)
If you don't have one of the programs mentioned above, there are very good
utilities included with Windows (and/or Dos 6.0 and above) that you can use
regularly to ensure reliable hard drive operation.
SCANDISK is a small utility program that tests your hard drive(s) for errors, and
'locks out' any problem areas it encounters so that programs do not try to write to
them. Windows 3.1 users should run the SCANDISK program from a DOS
Prompt; simply type scandisk.exe from your c:\ or c:\dos prompt.
Windows 95/98 users can run the SCANDISK program from the START |
PROGRAMS | ACCESSORIES | SYSTEM TOOLS menu. Follow the on-screen
instructions provided.
DEFRAG is a small utility program that tests your hard drive(s) for data
fragmentation (i.e. non-contiguous blocks of data), and rearranges the data on
your hard drives so that programs (and program data) are stored in an efficient
manner. Windows 3.1 users should run the DEFRAG program from a DOS
Prompt; simply type defrag.exe from your c:\ or c:\dos prompt.
Windows 95/98 users should run the DEFRAG program from the START |
PROGRAMS | ACCESSORIES | SYSTEM TOOLS menu. When you run the
DEFRAG program, you should see a dialog like the following:
Appendix B: Troubleshooting & Drivers
49
Run the Defrag Program from the SYSTEM TOOLS Menu
" If you click on the ADVANCED button, you can avoid the separate step of
running SCANDISK by turning the CHECK DRIVE FOR ERRORS checkbox
'on' (shown below.)
You should also ensure that the defrag program will perform a FULL
DEFRAGMENTATION (as shown here).
Ensure Drive error checking and Full defragmentation options are set.
Stacker / Double Space
In our experience, many problems in Windows are traced back to the use of
DoubleSpace/Drivespace or Stacker (hard disk compression programs). Whether
or not they are the cause is the subject of great debate. In any event, if you are
having unexplained problems, and are using Stacker or Drivespace/DoubleSpace,
then try running Windows from an uncompressed drive.
50
Appendix B: Troubleshooting & Drivers
MIDI SOUND
MIDI Input Driver Not Working
If MIDI output is not working, then you must resolve that problem first,
otherwise, you won't be able to tell if you fixed the INPUT problem.
If Output is Working but Input is not working:
If output is working then your port address setting is definitely correct.
The cause of no input in this situation is an IRQ problem. The IRQ handles input
from a MIDI device to your MIDI interface. You need to ensure that the IRQ
setting on the card matches the IRQ setting in the Control Panel | Drivers program
by pressing the SETUP button to examine the IRQ setting. You need to remove
the card from the computer to see what IRQ is setup.
If MIDI input "sort of works" - but has a considerable delay in it - this indicates
that the IRQ you have set in the Control Panel doesn't match the IRQ on the card.
In this case, change the IRQ in the Control Panel to match your IRQ setting on the
card.
MPU401 defaults to port=330 and IRQ=2/9. Other common IRQ settings are 7
and 5.
IRQ2 is referred to as IRQ 2/9. This is normal.
Your synth is not connected to your MIDI Interface properly.
Your Driver is not installed properly into Windows Control Panel.
The Driver is installed but the IRQ number (from the SETUP button) is incorrect.
You don't have the MIDI In Driver selected properly inside of the program.
Output Driver Not Working
For output to be heard, the following must be working properly.
GMCLASS.EXE must be hooked up to the correct output driver in the FILE
| OPTIONS | MIDI DRIVERS setup.
The Driver must be installed before hand into the Windows Control
Panel/Multimedia Drivers Program.
Appendix B: Troubleshooting & Drivers
51
The program will display the list of drivers that are installed into the Windows |
Control Panel. The list is displayed in the FILE | OPTIONS| MIDI DRIVERS
Dialog. If you don't see your driver displayed, it may mean:
The driver has NOT been installed into your Windows System. Run the Settings
|Control Panel | Multimedia Drivers program. There you should see a list of the
drivers installed. If your driver is not on that list, then you may need to install it
using the disks that came with your soundcard.7
If you have an MPU401 MIDI interface, then you'll want to use the MPU401 driver
This is a MIDI driver made by Microsoft. It comes with Windows 3.1 (or higher.)
If you have an MPU401 MIDI interface, or a Roland or Yamaha card, then you
should install this driver.
Note: The Sound Blaster 16 is also partly MPU-401 compatible. If you have a
Sound Blaster 16, make sure that you don't have both the SB16 MIDI Out and the
Roland MPU401 installed, as they will conflict with each other.
Other causes of NO OUTPUT
Make sure the channels are set correctly with drums set to the drum channel.
Older FM-type soundcards use drum channel=16, whereas newer soundcards and
all General MIDI sound sources use drum channel=10.
Output doesn't sound right
Make sure your channels are set correctly with drums set to the drum channel (i.e.
10). Send a GENERAL MIDI MODE-ON. Or, if your module is Yamaha XGcompatible, send a XG-MODE ON command (available in the File Menu.)
MIDI Notation doesn't look right
Check to see if you have these files installed in your windows\system directory:
PGMUS. TTF is a file required to show notation in the notation window. It should
be located in the C:\Windows\System folder. If not, it can be found on your
program CD-ROM. (You may have to rename the file from PGMUS0.TTF to
PGMUS.TTF.)
52
Appendix B: Troubleshooting & Drivers
Section 2: Setting up Wave/MIDI Drivers
The Master Flatpick Guitar Solos program uses Windows' Wave Audio drivers for
proper playback of the program material. Normally, these drivers are installed and
configured properly for use with the program without any additional
configuration. If you hear any sounds from your computer when it starts up or is
shut down, this usually indicates that your soundcard is working correctly (for
audio playback.)
In the unlikely event that you do experience a problem with your computer's
sound system, by far the easiest way to configure your computer's Wave Audio
(and MIDI) setup for use with this program is to use the original installation disks
or CD-ROM that came with your computer's sound system hardware and run the
installation software found on the first disk or CD-ROM.
Many newer soundcards also come with their own diagnostic program which tests
the configuration of the sound card in your computer (i.e. IRQ, PORT
ADDRESSES, and DMA channels.) If the diagnostic program encounters an
error, it will usually try to automatically make adjustments to the configuration so
that the sound card can function correctly.
If your soundcard is still not functioning after running any built-in diagnostic
utilities and/or re-installing the sound card's DRIVER or UTILITY software, try
the following suggestions (not recommended for novices). You may also need to
consult your Computer/Soundcard/Windows documentation and/or contact your
Computer manufacturer or dealer.
Checking Drivers
In Windows 95/98, the operating status of your computer system's drivers (i.e.
Sound Blaster Soundcard, etc.) can be accessed by selecting the Control Panel |
System (icon), and clicking on the Device Manager tab (see below.)
Appendix B: Troubleshooting & Drivers
53
Check the operation of your Sound Card by viewing the Device Manager Properties.
If the soundcard drivers are not all installed and/or functioning correctly
according to the Windows Device Manager (shown above), you will notice a
small yellow exclamation mark (!) next to the driver description (highlighted
above.)
If this is the case (or if you see nothing at all listed under the "Sound, video, and
game controllers" section), you could try removing the troubled items and reinstalling the drivers using your original Soundcard Disks or CD-ROM.
54
Appendix B: Troubleshooting & Drivers
Alternatively, you can try to adjust one or more of these settings manually by
double-clicking on the troubled driver's icon (marked with an exclamation or an X
through it), choosing the "Resources" tab, clearing the "Use automatic settings"
checkbox, and clicking the "Change Settings" button (see below.)
Manually changing the Resources of a driver in Windows 95/98
If you are still having problems with adjusting these settings manually, it may
become necessary to remove the offending driver all together and try re-installing
the driver from scratch.
For additional details, see the next section on installing a new driver.
Appendix B: Troubleshooting & Drivers
55
Installing a New Driver In Windows 95/98
The following section is intended only as a guide to supplement and enhance the
documentation provided by Windows and/or your soundcard/MIDI interface
manufacturer. In the case of any discrepancy between this documentation and the
sources noted above, refer to the documentation provided by your hardware
manufacturer for explicit instructions.
Note also that many of the newer soundcards (post-Dec. '95) are 'Plug-and-Play'
compatible (e.g., Sound Blaster 16/AWE32 PnP), which means that if they are
installed in newer computers (post-Dec. '95) with Windows '95/98 they should
install the appropriate drivers and configure themselves automatically. If you
suspect that your system is 'Plug-and-Play' compatible, check to see if the drivers
required for use with Master Flatpick Guitar Solos are not already installed on
your computer.
**Make sure you have your original Windows 95/98 disks or CD-ROM, and any
Soundcard/MIDI interface hardware manufacturer's disks (if applicable) before
proceeding.
The first thing to determine is whether you are installing a driver for a soundcard
using the soundcard's built-in synthesizer, or whether it is a driver for an external
MIDI interface.
If you plan on using the soundcard's built-in synth, you will be using a:
1) Soundcard synth driver that comes with Windows 95/98 (see example 1)
- or
2) Soundcard Driver that you have on disk (supplied with your soundcard) - (see
example 3.)
If you plan on using an external MIDI interface, you will be using a:
1) MIDI driver that comes with Windows 95/98 (MPU-401 MIDI, Sound Blaster
16/AWE32 Wave and MIDI, etc.) - see example 2.
- or
2) MIDI Driver that you have on disk (supplied with your soundcard) - (see
example 3.)
Note(a): Drivers that are supplied on disk are files that end in ".DRV." They are
accompanied by small text files called OEMSETUP.INF that describe the names
of the drivers. If you have lost the floppy disk, you should search your hard drive
for files called OEMSETUP.INF, because your driver might have been copied to
the hard drive.
56
Appendix B: Troubleshooting & Drivers
Note(b): If you are unsure if the drivers provided by your hardware manufacturer
are compatible with Windows 95/98: check the driver in question's file creation
date for a date later than 21/8/95, contact your hardware manufacturer or use the
drivers included with your Windows package.
For further instructions, see the examples below:
Example 1: Installing Windows 95/98 Soundcard Drivers.
Example 2: Installing the Windows 95/98 MPU-401 Compatible driver.
Example 3: Installing third-party or unlisted drivers in Windows 95/98.
Example 1:
Installing Windows 95/98 Soundcard Drivers.
This procedure is usually performed after the soundcard has been installed in the
computer. It can be done manually before installing a new soundcard, the
advantage being that Windows 95/98 will select an IRQ and port address that are
free of conflicts so that you can set your card to those settings before installing it.
The drivers can either be installed manually or automatically within the Add New
Hardware Wizard in Windows 95/98. If the soundcard has not yet been installed,
the 'manual' procedure must be followed.
1) From the Start menu, select 'Settings' and open Control Panel.
2) In Control Panel select 'Add New Hardware'.
3) Select 'Next' to proceed.
(At this point you may proceed manually or automatically. If your card is already
installed you can use the automatic driver installation.)
1) To install your drivers automatically say 'Yes' to the Search option. This is the
procedure which Microsoft recommends.
2) Read the prompts that appear; proceed by choosing 'Next'.
3) Windows will search for your soundcard, select the proper drivers and find
conflict-free settings for the installation. This can take several minutes.
Appendix B: Troubleshooting & Drivers
57
4) Windows will tell you when it has finished detecting your hardware and will
prompt you to 'finish' the installation. If the drivers are not found on the hard
drive it will ask you for a drivers disk.
5) Choose 'Finish' to complete the installation.
If you have not yet installed your soundcard or don't want to wait for the search
you can install your drivers manually.
1) Click on 'No' to the Search option, then click on 'Next'.
2) From the list that Windows displays scroll down and select 'Sound, video and
game controllers', then choose 'Next'.
3) Select the manufacturer of your card and the driver you wish to install. Click
on 'Next' to continue.
4) Windows will advise you of the settings it has selected for your card. Choose
'Next'.
5) Windows will prompt you to finish the installation. Choose 'Finish'.
When installing your card be sure to set it to the same settings selected by
Windows 95/98. This may require changing jumpers or dip switches on the card
itself or selecting settings with a setup program supplied by the card
manufacturer.
Example 2:
Installing the Windows 95/98 MPU-401 Compatible Driver.
1) From the Start menu, choose Settings and open Control Panel.
2) In Control Panel, choose 'Add New Hardware'.
3) Press the 'Next' button to proceed.
4) If you want Windows 95/98 to install your driver automatically, select 'Yes' in
the Search options, choose 'Next', and follow the on screen instructions. If you
want to install the driver manually say 'No' to the Search option and choose 'Next'.
5) Scroll down the list of hardware options and choose Sound, video and game
controllers. Click 'Next' to continue.
58
Appendix B: Troubleshooting & Drivers
6) From the list of manufacturers choose 'Microsoft'. Under 'Models' choose
'MPU-401 compatible'. Then, click on 'Next' to continue. At this point Windows
may ask you for your original Windows Disks or CD-ROM. Insert the appropriate
disk or CD-ROM to continue.
7) Windows will then display conflict-free settings for the MPU-401. Make a note
of these and press the 'Next' button to continue.
8) Windows will prompt you to finish the installation. Then press the 'Finish'
button.
Make sure that the interface card is set to the same settings as those selected by
Windows. If it is not possible to align your card to these settings, you may have to
manually adjust your Windows settings in the Device Manager window. See your
Windows documentation for details.
Example 3:
Installing third-party or unlisted drivers in Windows 95/98.
Note: Drivers that are supplied on disk are files that end in ".DRV." They are
accompanied by small text files called OEMSETUP.INF that describe the names
of the drivers. If you have lost the floppy disk, you should search your hard drive
for files called OEMSETUP.INF, since your driver may have been previously
copied to the hard drive.
If the driver you are installing replaces or updates a driver (newer) that is already
on the system, the old driver must be removed before installing the new one.
To accomplish this, start at step 1 (below).
If you are not replacing or updating an existing driver proceed to step 7.
1) From the Start menu, choose 'Settings' and open Control Panel.
2) In Control Panel, choose 'Multimedia'.
3) Click on the tab labeled Advanced, then double click on MIDI Devices and
Instruments.
4) Find the listing for the driver you are removing, click on it to select it, then go
to the lower right corner of the window and click on Properties.
5) Click on Remove. Don't worry about the dire warnings, say Yes.
Appendix B: Troubleshooting & Drivers
59
6) Exit back to Control Panel, then select Shut Down and Restart the computer
from the Start button.
7) From the Start menu, choose 'Settings' and open Control Panel.
8) In Control Panel double click on the 'Add New Hardware' icon.
9) Press the 'Next' button to proceed.
10) If you want Windows to install your driver automatically say 'Yes' to the
Search option, choose 'Next', and follow the on screen help. If you want to install
the driver manually say 'No' to the Search, and choose 'Next' to continue.
11) Scroll down the list of hardware options and choose 'Sound, video and game
controllers'. Choose 'Next' when you are ready to continue.
12) Ignore the list of manufacturers and choose 'Have Disk'.
13) Insert the disk with the new driver in the disk drive and click on OK.
14) Windows will then list the drivers on the disk. Make your selection (the
correct driver should have the word MIDI in it), then click on OK to continue.
15) In the next window that appears, click on 'Finish'. Windows will start to copy
the drivers and then open a 'driver setup' window. Enter the appropriate Port and
IRQ settings for your card, then choose 'OK'. (If you do not know the settings for
your card, you can still install the driver, but you will need to re-configure these
settings in the System | Device Manager before your card will function. See your
Windows documentation on the System | Device Manager for details.
16) Click on 'Yes' in the 'System Setting Change' dialog to restart your computer.
60
Appendix B: Troubleshooting & Drivers
Appendix C: PG Music Inc. Contact Info
Master Flatpick Guitar Solos Info
The Master Flatpick Guitar Solos program is copyrighted
and is the property of PG Music Inc.
All rights reserved.
Canada Mailing Address
PG Music Inc.
29 Cadillac Avenue
Victoria, BC
Canada, V8Z 1T3
Email : [email protected]
phone (250) 475-6272 (250) 475-2874
fax (250) 475-2937
Technical Support
Email : [email protected]
phone (250)-475-2708
Visit our WEBSITE at www.pgmusic.com
Appendix C: PG Music Inc. Contact Info
61
PG Music Inc. Music Software Programs
PG Music Inc. is a leading innovator of computer music software that is easy,
powerful and fun! As a registered PG Music Inc. software user you will receive
regular updates on all of our latest programs, so please be sure to register.
Band-in-a-Box
(Windows/Mac)
intelligent music software
Simply select the style of song you'd like to create, and Band-in-a-Box will
automatically generate a complete song in that style, in the key and
tempo you want, complete with intro, chords, melody, arrangement and
solo improvisations. Or just type in the chords to ANY song, using
standard chord symbols (like C or Fm7), choose a style and press PLAY.
Band-in-a-Box then generates a complete, professional quality 5 piece
arrangement of bass, drums, piano, guitar and strings to be played back
through your MIDI system or PC sound card. Record your own melody and
audio tracks, Band-in-a-Box even makes your song “Internet ready”.
Add-on Band-in-a-Box Style, Song, & Soloist Disks available:
( … get “the works” in the Band-in-a-Box MegaPAK!)
•
•
•
•
•
•
•
•
•
•
•
•
•
•
•
•
•
•
•
•
•
•
•
62
Styles Disk #4 - 25 Styles - Jazz, Country, Pop, 'Old Pop", Ethnic
Styles Disk #5 - 25 Styles - Jazz, Waltz, Country, Pop, Ethnic
Styles Disk #6 - 30 Styles - Jazz and Latin
Styles Disk #7 - 25 Styles - Country and Pop
Styles Disk #8 - 25 Styles - Jazz, Classical, Pop, Ethnic, Country, Latin
Styles Disk #9 - 20 Styles - Latin and Salsa
Styles Disk #10 - 20 Styles - Pop & Rock
Styles Disk #11 - 28 Styles - Classical & Classical MIDI-Fakebook
Styles Disk #12 - 27 Styles - Country, Swing, Rock, Waltz & Boogie
Styles Disk #13 - 20 Styles - Euro-Tek Dance/Techno/Pop
Styles Disk #14 - 21 Styles - Jazz/Fusion
Styles Disk #15 - 22 Styles - Nashville Country
Styles Disk #16 - 22 Styles - All Blues
Styles Disk #17 - 26 Styles - Unplugged
Styles Disk #18 - 20 Styles - Praise And Worship
Styles Disk #19 - 26 Styles - Requested
Soloist Disk Set #2 - "Killer" Jazz Soloist Disk Set
Soloist Disk Set #3 - Jazz Soloist Disk Set
Soloist Disk Set #4 - Rock Soloist Disk Set
Soloist Disk Set #5 - Bluegrass Soloist Disk Set
Soloist Disk Set #6 - "Killer" Pop & Older Jazz
Soloist Disk Set #7 - Blues, Pop, Funk & More
Soloist Disk Set #8 - "Killer" Jazz Waltz/Older Waltz/Jazz Fusion
PG Music Inc. Music Software Programs
•
•
•
Soloist Disk Set #9 - Blues Guitar, Country Piano, and Pop
Melodist Disk Set #2 - Country, Pop and EZ-Listening
The MIDI Fakebook - Traditional/Original Jazz and Pop - 50 Songs,
Classical - 200 Songs, Bluegrass - 50 Songs.
Have Fun!
PowerGuide CD-ROM Video (Windows/Mac)
video instruction for Band-in-a-Box
Both Volume 1 (Basics) and Volume 2 (Advanced) of the popular "Inside
Band-in-a-Box" training videos with program author/creator Peter Gannon
on one convenient CD-ROM. Everything you need to become a "power
user" - from easy setup to 'hot' tips and advanced techniques. (Included in
the Band-in-a-Box MegaPAK.)
… creating and working with songs, generating solos, entering and printing
notation, MIDI driver setup, creating new harmonies, creating new soloists,
creating new styles … and much more!
"Inside Band-in-a-Box" with program creator Peter Gannon!
PowerTracks
Pro Audio (Windows)
integrated digital audio and MIDI workstation
PowerTracks Pro Audio is a professional, fully featured Digital Audio MIDI
workstation, packed with features for musicians, students & songwriters.
With seamlessly integrated stereo digital audio/MIDI recording, & built-in
music notation, PowerTracks Pro Audio turns a typical soundcard
equipped Windows PC into a music production powerhouse! Up to 48
tracks of stereo recording, with awesome effects & audio plug-ins! You can
record up to 48 tracks of CD quality audio (vocals, guitar, etc.) or MIDI
using your soundcard and microphone. Monitor audio levels with stereo
VU meters for Input and Output. Full screen Lead Sheet notation display
and printout - enter, edit, display music in standard music notation with
chord symbols, lyrics & Karaoke style 'Big Lyrics window. On-screen piano
keyboard & guitar fretboard show notes as they are played.
Comprehensive support for guitar including tab display and printout and
built-in Guitar Tuner. Cool animated 3D Drum Kit window, play and record
the dynamic drum kit with your computer keyboard! Great Jukebox player
with user controls.
Seamlessly integrated digital audio and MIDI workstation!
PG Music Inc. Music Software Programs
63
2 Volumes of MultiTracks play along CD-ROMS
now available!
Now you can have full-length (4-5 minutes) songs recorded by top studio
musicians! Each MultiTracks volume comes with 3 CD-ROMs packed full
of great live recordings of Jazz, Blues, and Rock songs. Each song is
conveniently provided in MultiTracks format, with each individual
instrument recorded on a separate track.
64
PG Music Inc. Music Software Programs
PG Music Inc. MasterClass Instruction Series
Jazz Guitar MasterClass with Oliver Gannon
(Windows)
instructional music program
The Jazz Guitar MasterClass is a fully featured instructional music program
containing interactive guitar lessons. Master jazz guitarist Oliver Gannon is
your teacher in this software program designed to illustrate basic skills to
the beginning guitarist while enhancing the skills of more advanced
guitarists.
You'll be studying 60 lessons with topics such as Chord Voicings,
Inversions, Right Hand Techniques, Comping, Scales, Modes, Arpeggios,
Common Progressions, Improvisation, Chord Melodies and more. Each
lesson has an accompanying exercise and a tip on how to practice it. The
lessons refer to the 10 program tunes, which feature common chord
progressions in a variety of styles and tempos. There are also reference
sheets and practice (backing) tracks.
The Jazz Guitar MasterClass integrates interactive audio lessons with onscreen guitar display and notation, allowing you to see and hear exactly
what Oliver Gannon is playing.
Everything you need to master jazz guitar!
Jazz Piano MasterClass with Miles Black
(Windows)
instructional music program
The Jazz Piano MasterClass is a fully featured instructional music program
containing interactive piano lessons. Master jazz pianist Miles Black is your
teacher in a software program designed to illustrate basic skills to the
beginning pianist while enhancing the skills of more advanced pianists.
You'll be studying over 60 topics such as Roots and Shells, Block Chords,
Stride Piano, Playing the Blues, Scales, Common Progressions,
Improvisation and more. All the lessons are accompanied by practice
exercises, backing tracks, and are further illustrated with 11 tunes included
in the program.
The Jazz Piano MasterClass integrates interactive audio lessons with on
screen piano display and notation, allowing you to see and hear exactly
what Miles Black is playing.
Jazz piano mastery at your fingertips!
PG Music Inc. Music Software Programs
65
Master Guitar Solos Series
Master Jazz Guitar Solos Volume 1 (Windows)
guitar study program
Note: the program also includes the same files in Band-in-a-Box song format.
Full featured program includes over 50 tunes with jazz guitar solos in the
style of the great Jazz Guitarists (Joe Pass, Pat Metheny, John Scofield
and others). What a great way to learn jazz guitar soloing! Let a master
show you solos in the styles of the greats. All tunes are done in MIDI
format, with a complete band arrangement (drums, piano, bass, guitar).
Watch and learn the tunes as they play on the guitar fretboard, notation
and tablature. Slow the music to the tempo you want, or step through the
solo note by note.
What a great way to learn!
Master Flatpick Guitar Solos Volume 1 (Windows)
guitar study program
Note: the program also includes the same files in Band-in-a-Box song format.
Full featured program, including 50 tunes with guitar flatpick solos in styles
similar to Doc Watson, Jerry Reed and others. Since guitar is such a visual
instrument, it is easiest to learn by watching the on-screen guitar as a
flatpick master plays these great solos. Slow the music to the tempo you
want, or step through the solo note by note. View or printout the material in
notation and tablature.
The easiest way to learn!
Multimedia CD-ROM Performance Series
The Blues Guitarist (Windows)
multimedia guitar program
The Blues Guitarist is a professional, fully featured music program
containing studio recordings of great electric blues guitar music.. Listen to
hot session players perform great sounding blues music, while you learn
the riffs, licks and tricks! See the music notation on-screen as you listen to
the audio performance or watch the on-screen guitar. Learn the music by
slowing down the performance or print out engraver quality notation and
tablature for further study. PLUS … biographies, history, trivia and much
more!
66
PG Music Inc. Music Software Programs
The thrill of electric blues!
The Rock Guitarist (Windows)
multimedia guitar program
The Rock Guitarist is a professional, fully featured music program
containing studio recordings of great Rock electric guitar music. Listen to
hot session players perform great sounding Rock music while you learn the
riffs, licks and tricks! See the music notation on-screen as you listen to the
audio performance or watch the on-screen guitar. Learn the music by
slowing down the performance or print out engraver quality notation and
tablature for further study. PLUS … biographies, history, trivia and much
more!
Hot players, cool licks, neat tricks!
The Jazz Saxophonist (Windows)
multimedia instrumental program
The Jazz Saxophonist is a professional, fully featured music program
containing studio recordings of great jazz saxophone music. Listen to hot
session players perform great sounding jazz saxophone music while you
learn the riffs, licks and tricks! ! See the music notation on-screen as you
listen to the audio performance or watch the on-screen keyboard. Learn
the music by slowing down the performance or print out engraver quality
notation for further study. PLUS biographies, history, trivia and much
more!
A "must-have" program for students, teachers and jazz buffs!
The Rock Saxophonist (Windows)
multimedia instrumental program
The Rock Saxophonist is a professional, fully featured music program
containing studio recordings of great rock saxophone music. Listen to hot
session players perform great sounding rock saxophone music while you
learn the riffs, licks and tricks! ! See the music notation on-screen as you
listen to the audio performance or watch the on-screen keyboard. Learn
the music by slowing down the performance or print out engraver quality
notation for further study. PLUS … biographies, history, trivia and much
more!
Learn the riffs, licks and tricks!
PG Music Inc. Music Software Programs
67
The Barbershop Quartet (Windows)
multimedia vocal program
The Barbershop Quartet is a professional, fully featured music program
containing all-time favorite Barbershop songs and an interactive
multimedia history of barbershop singing in America. We've recorded each
voice (tenor, lead, baritone and bass) on a separate track, allowing you to
listen to each part independently. Powerful multimedia features let you
study the arrangements, hear the music, and sing along with a top
barbershop quartet. Made with the assistance of SPEBSQSA, the Society
for the Preservation and Encouragement of Barbershop Quartet Singing in
America, Inc.
Sing along to 'the songs that made America a singing nation'.
The Bach Chorales (Windows)
multimedia vocal program
The Bach Chorales is a professional, fully featured music program
containing inspiring performances of Bach's famous Chorales. Listen to a
professional choral ensemble sing some of J.S. Bach's greatest
compositions, complete with a detailed multimedia history of the life and
times of Johann Sebastian Bach. See the music notation on-screen as
you listen to the audio performance. Print out engraver quality notation for
further study.
Powerful multimedia features let you study the
arrangements, hear the music, and sing along with a top choral ensemble.
The foundations of vocal harmony PLUS multimedia fun!
The Sor Studies For Classical Guitar (Windows)
multimedia guitar program
The Sor Studies is a professional, fully featured music program containing
superb professional classical guitar performances of 121 of Fernando
Sor’s celebrated studies for guitar (Opus numbers 6, 29, 31, 35, 44, and
60, complete). See the music notation on-screen as you listen to the audio
performance or watch the on-screen guitar. Watch the onscreen fretboard
and fingering to see exactly how these famous studies should be played.
Print a high-resolution engraver quality copy for further study. This
interactive program contains hours of high quality classical guitar music on
3 CD-ROMs plus a complete Sor biography, a historical timeline, and many
more powerful multimedia features for enhanced appreciation and study!
68
PG Music Inc. Music Software Programs
‘Complete Technique’ for classical guitar PLUS videos!
PG Music Inc. Pianist Series Programs
The Pianist (Windows/Mac)
classical piano performance program
A music program containing an 'indispensable' collection of over 200 of the
world's most popular classical piano pieces. All pieces have been
recorded live-to-MIDI in real time by concert pianists on an 88-note
weighted MIDI piano keyboard. They are never quantized or step
recorded. All are complete artistic performances professionally performed,
recorded and saved as standard MIDI files. Hear the CD-quality music
through your PC sound card, MIDI system, MIDI piano or sound module as
if the pianist was in your home. Program notes and Biographies provide a
wealth of information. The onscreen piano keyboard lets you see the
music as it's played - learn the music by watching the keyboard or slowing
down the performance. Other functions: Stop, Pause, Rewind, Slow
Motion, Tempo Changes, Transposition, Volume, and Velocity.
Background playback lets you listen to your favorite music while you work
in other programs. PLUS...Music Trivia Game, "Guess the Song", Musical
Dictionary … and much more!
“The Pianist is indispensable …an embarrassment of riches!”
Piano & Keyboard
The Pianist Volume II (Windows/Mac)
classical piano performance program
By popular request, we've recorded 200 more fabulous classical pieces for
The Pianist program - many titles were suggested by our customers on
registration cards. This Volume 2 upgrade includes a new version of the
program, plus the 200 new pieces - all played by world class concert
pianists. It adds to your existing program, doubling the number of pieces to
over 400!
200 selections from the great composers by popular request!
Did you know?
All of the performances in the PG Music Inc. Pianist/Performance Series
are recorded live-to-MIDI on an 88-note, weighted piano keyboard. These
PG Music Inc. Music Software Programs
69
brilliant performances are never edited or quantized, you hear them exactly
as played recorded by our top professional piano artists.
The Pianist Volume III (Windows/Mac)
classical piano performance program
Volume 3 is packed with 170 brand new performances of Chopin, Brahms,
Bach, Liszt, Debussy, Ravel and many more! You'll find popular selections
from light opera, including Delibes, Léhar, Rossini, Gounod, and Gilbert
and Sullivan! For duet lovers, there are the complete Brahms' Waltzes and
Liebeslieder Waltzes. If you already own Pianist 1 and 2, Volume 3 will give
you the complete set of Chopin Etudes and Preludes. Plus... you will find
new memos about the composers and their music, as well as improved
memos on all of the music in The Pianist. This is simply a "must have"
upgrade!
170 selections including the complete Brahms Waltzes,
Light Opera and Duets!
The Pianist Volume IV (Windows/Mac)
classical piano performance program
Volume 4 adds 200 fabulous selections to The Pianist program. There is
now more music by your favorite composers including Haydn, Mozart,
Liszt, Debussy, Fauré, Schumann and Schubert. Now listen to the
complete Mozart Piano Sonatas, Chopin Etudes, Nocturnes, Preludes,
Ballades and Scherzi, Schumann Carnaval and Album for the Young
(complete), Debussy Preludes (complete) and much more!
200 selections including complete Debussy Preludes, Mozart
Sonatas and more!
The Pianist Volume V (Windows/Mac)
classical piano performance program
For the first time, all 32 Beethoven Piano Sonatas are available on this new
"must have" volume of live-to-MIDI performances for The Pianist program.
The greatest sonatas ever composed for the piano have been performed
by world-class pianists, they are all here for your study and enjoyment.
Hear all new performances of your favorite masterpieces including:
Pathétique, Moonlight, Pastorale, Tempest, Waldstein, Appassionata, Les
Adieux and Hammerklavier!
70
PG Music Inc. Music Software Programs
All 32 Beethoven Piano Sonatas. A ‘must-have’ volume!
Did You Know?
The Pianist Series programs will play in the background while you work in
other programs. Enjoy your favorite piano music while you work.
The Blues Pianist (Windows/Mac)
piano performance program
Volume 1: 50 selections, older styles. Volume 2: 50 selections, newer styles.
We've recorded great down-home blues piano stylings by top
professionals, 100 selections in all. A wide variety of blues piano styles are
included - Boogie Woogie, Slow/fast boogies, New Orleans style, Chicago
blues and more. These are the styles made famous by Pete Johnson,
Albert Ammons, Jelly Roll Morton and others. Hours of listening pleasure
plus info and trivia on the great masters of piano blues. For the student, a
full range of playing techniques are presented through the piano roll and
the on-screen notation (Windows version) - slow them down and learn the
licks. The perfect gift for any blues lover!
Great 'down-home' blues, virtuoso piano performances!
The Children's Pianist (Windows/Mac)
piano performance program
Over 90 great piano performances of the worlds best-loved children's
songs - presented with the care, artistry, and craftsmanship that will spark
the interest of young and old alike. The words are displayed in a large
"Karaoke" style display while the song plays so you can sing along!
Includes piano arrangement tutorials. Easy-to-understand examples
from within the actual performances illustrate a host of techniques used by
real pianists to create arrangements. Work through the tutorials yourself to
learn about these and other methods:
Alternating Bass · Broken Chords · Vamping Syncopation · Parallel 3rds ·
Embellishments ·
"Mozart" bass · Stride accompaniment · Passing Chords · "Bent Notes" ·
Chorale Style · Modulations
Sing-along with the world's best-loved children's songs!
The Christmas Pianist (Windows/Mac)
piano performance program
PG Music Inc. Music Software Programs
71
The Christmas Pianist contains great piano performances of over 50 alltime favorite Christmas songs and carols -ideal for listening or sing along.
The words are displayed in a large "Karaoke" style display while the song
plays so you can sing along! (Windows version) The on-screen piano
keyboard lets you see the music as it's played - learn the music by
watching the piano keyboard or slowing down the performance. All-time
favorites including:
Adeste Fideles · All Through The Night · Angels We Have Heard On High ·
Away In a Manger · The First Noel · God Rest Ye Merry Gentleman · Hark
The Herald Angels Sing · It Came Upon a Midnight Clear · O Christmas
Tree · The Twelve Days Of Christmas · We Wish You a Merry Christmas ·
What Child is This … and many more!
Fill your home with wonderful piano music this Christmas!
The Gospel Pianist
(Windows/Mac)
piano performance program
The Gospel Pianist is a music program with over 50 "Gospel Style" piano
standards played on MIDI keyboard by top gospel pianists. Plus we've also
included Music Trivia questions, Guess the Song game, program notes,
pianist biographies (all on disk) and much more!
The Gospel Pianist is a powerful program for playing and studying a piano
style that is both universally appealing and which underlies much of the
blues, jazz and popular music played today. An on-screen piano keyboard
shows you exactly what the pianist is playing. Slow down the piece, or step
through it chord-by-chord. Learn the music note-for-note by watching the
notes on screen. Load the MIDI files into your favorite programs for future
study! We've included all your favorites, recorded by top Gospel pianists
playing in a wide variety of Gospel piano styles:
Amazing Grace · By and By · At The Cross · Go Tell it on the Mountain ·
Will the Circle Be Unbroken · Sweet Chariot · Wade in the Water · Give Me
That Old Time Religion … and many more!
Powerful Gospel performances with that 'old-time' spirit!
The Latin Pianist (Windows/Mac)
piano performance program
The Latin Pianist is a music software program containing over 50 Latin and
Salsa pieces recorded live-to-MIDI by popular Latin pianist Rebeca
72
PG Music Inc. Music Software Programs
Mauleón-Santana (editor of Sher Music's Latin Real Book) in a wide variety
of Latin Piano styles. The Latin Pianist includes authentic piano songs and
styles such as Conga, Cumbia, Merengue, Son, Mambo, Cha-Cha,
Guaracha, Samba, Partido Alto, and much more. With the onscreen piano
keyboard, you can see exactly what the pianist is playing. Slow down the
piece or step through it chord by chord. Learn the music "note for note" by
watching the notes onscreen, or load the MIDI files into your favorite
programs. This program is hot, Hot, HOT!
Authentic Latin and Salsa stylings, hot piano performances!
The Modern Jazz Pianist (Windows/Mac)
piano performance program
The Modern Jazz Pianist is the software that makes it too easy to learn
how to be a great jazz pianist. Top studio musicians Renee Rosnes, Miles
Black, Ron Johnston, and Brad Turner perform over 50 tunes in a wide
variety of modern jazz styles, such as those by Herbie Hancock, Fred
Hersch, Cedar Walton, Mulgrew Miller and many others. With the onscreen piano keyboard, you can see exactly what the pianist is playing.
Slow down the piece or step through it chord by chord. Learn the music
"note for note" by watching the notes on screen, or load the MIDI files into
your favorite programs for further study.
It’s “too easy” to learn from these great jazz pianists!
The New Age Pianist (Windows/Mac)
piano performance program
This program includes over 70 "New Age" and "New Age-Jazz" style piano
pieces, performed by top New Age Artists. This is a beautiful collection of
solo piano compositions inspired by the natural world. Learn all about New
Age piano music, where it came from, and how it's played. A full range of
piano techniques are presented, from the ambient music style of George
Winston to the "New Age-Jazz" styles of Chick Corea and Keith Jarret.
PLUS a photo album of stirring nature scenes and much more! Over 4
hours of beautiful music, perfect for playing in the background while you
work in other programs!
Beautiful piano music inspired by nature!
The New Orleans Pianist (Windows/Mac)
piano performance program
PG Music Inc. Music Software Programs
73
In a theme similar to "The Blues Pianist", we have created "The New
Orleans Pianist". This program has a huge library of over 50 "New Orleans"
style piano music standards, played on MIDI keyboard by top New Orleans
Pianists Henry Butler, Jon Cleary, Tom McDermott, Joel Simpson, and
David Torkanowsky. This is the wonderful 'rolling', 'bluesy' New Orleans
piano style made famous by Professor Longhair and Dr. John. Includes onscreen music notation and printout ability (Windows version) so that you
may learn every nuance of the pieces ! Plus we've included music trivia
questions, a "Guess the Song" game, program notes, pianist biographies
(all on disk) and much more!
Good-time piano performances “New Orleans” style!
The PG Music Inc. Performance Series
The Bluegrass Band (Windows/Mac)
instrumental performance program
A "feel good" pickin'-and-grinnin' program. We've recorded virtuoso
performances by top bluegrass musicians, playing 50 Bluegrass standards
on their MIDI equipped bluegrass instruments (banjo, fiddle, bass, guitar
and mandolin). These MIDI files are hot! As you listen to the tunes, you can
single out any of the instruments using the on-screen fretboard display,
tablature, or notation. PLUS ... Lots of Bluegrass pictures, bio's, and trivia
(all on disk) and much more. You'll be singing and dancing along with your
computer! And since it's MIDI, you can slow them down to learn them at
your own speed. Includes: Wildwood Flower, Sally Goodin, Cripple Creek,
Fire on the Mountain, Pigtown Fling, Red Haired Boy, Jesse James … and
many more!
Dazzling performances, you’ll "feel good all over"!
The Jazz Soloist (Windows/Mac)
instrumental performance program
Volume 1: Swing (50 pieces), Volume 2: Swing (50 pieces),
Volume 3: Latin, Blues, Waltzes (60 pieces).
The Jazz Soloist is a music program with professional jazz quartet
arrangements of over 50 songs per volume. Each song features a great
jazz solo played by top jazz musicians, as well as piano comping, bass and
drums.
Sight-reading was NEVER so much fun before the Jazz Soloist series!
Start the program playing, slow it down to a tempo that you can sight-read
the solos at, and then read along with these great jazz solos. You'll be
improving your reading and playing while having FUN at the same time!
74
PG Music Inc. Music Software Programs
The on-screen notation "scrolls ahead" so you can sight-read without
interruption.
Musicians studying improvisation typically learn by copying other soloists'
performances. There are several key ingredients for this process to work
correctly - hearing the solos, seeing and printing the music - and they are
all offered together in this program.
Includes the standalone "Jazz Soloist" program PLUS files in Band-in-aBox format. Windows users can see/print the notation in the standalone
program and Band-in-a-Box. Mac users can see/print the notation in Bandin-a-Box.
Learning to solo has never been so much fun!
The Roland Virtual Sound Canvas (Windows/Mac)
software MIDI synthesizer
The Virtual Sound Canvas is a software application for Windows and
Macintosh that directs MIDI file data in real time through the CPU of a
sound capable computer rather than the MIDI processor chip of an existing
sound card. This high-speed software adds a sophisticated musical
enhancement for a dramatic improvement in the performance of MIDI files
and any PG Music Inc. program, with the true instrument fidelity found in a
Roland GM/GS format wavetable synthesizer.
Windows requirements: Windows 95/98 with Pentium 166 MHz, Pentium II or equivalent.
Macintosh requirements: OS 7.55 or later with PowerPC 603e 133 MHz or higher.
PG Music programs sound spectacular!
SC-PRO Editor/Librarian (Windows/Mac)
utility program
Full featured Editor/Librarian for Roland Sound Canvas and other Roland
GS Products. On screen programming for easy patch edits and storage,
built-in mixer, MIDI file player, and more!
Sound Canvas editing made easy!
PG Music Inc. Music Software Programs
75
Index
—1—
1/2 Speed Button, 13, 21
—A—
Analyze Soundcard, 34
—B—
Bars Per Line, 39, 40
—C—
Chord Vertical Position, 40
Clean Mode, 39
Clefs Split At, 40
Controller, 9
—E—
Exit, 43
—F—
Favorites File, 42
File Menu, 42
—G—
General MIDI, 51, 52
GM-Mode On. See General MIDI
Guitar Options, 36
—H—
Hard Drive, 49
Highlight Played Notes, 40
HTTP
//…, 43
76
Index
—I—
Input Driver, 9
Interface Card, 59
Introduction, 5
IRQ, 51, 57
—K—
Key Signature, 40, 44
—L—
Looping, 21
—M—
MIDI, 8, 45
MIDI Drivers, 8
MIDI Notation, 38, 43
MIDI Output Devices, 8
Minimize Rests, 40
MPU-401, 59
Mute, 45
—N—
Non-Concert Instruments, 40
Notation, 43
Notation Window Settings, 38
—O—
OEMSETUP.INF File, 59
—P—
Parts, 39
PGMUS.TTF File, 52
Pieces, Selecting, 24
Play, 44
Play Menu, 44
Playing
All Pieces, 10, 22
Favorite Pieces, 16, 23, 24
Play Buttons, 16, 24
Index
77
—R—
Resolution, 39
—S—
Software Synthesizer, 9
Solo, 45
Swapfile, 48
—T—
Tempo, 45
Text/Content, 43
Tick Offset, 41
Transcription Notation, 43
Transpose, 40, 44
Troubleshooting, 48
Tutorial, 11
—U—
Using The Program, 24
—W—
Wave Output Device, 8
Wave/MIDI Driver Setup, 53
Windows Control Panel, 11
78
Index