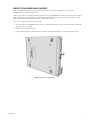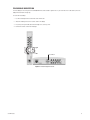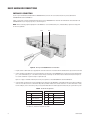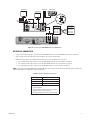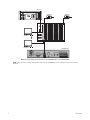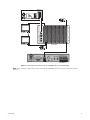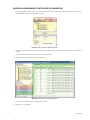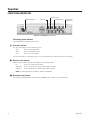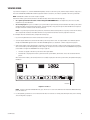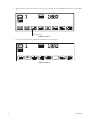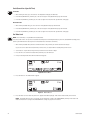
1
INSTALLATION/OPERATION
CM9700MDD-EVS
Matrix Digital Decoder
C1570M-E (4/07)
Contents
Regulatory Notices . . . . . . . . . . . . . . . . . . . . . . . . . . . . . . . . . . . . . . . . . . . . . . . . . . . . . . . . . . . . . . . . . . . . . . . . . . . . . . . . . . . . . . . . . . . . . . . . . . . .6
Description . . . . . . . . . . . . . . . . . . . . . . . . . . . . . . . . . . . . . . . . . . . . . . . . . . . . . . . . . . . . . . . . . . . . . . . . . . . . . . . . . . . . . . . . . . . . . . . . . . . . . . . . . .7
Compatible Products . . . . . . . . . . . . . . . . . . . . . . . . . . . . . . . . . . . . . . . . . . . . . . . . . . . . . . . . . . . . . . . . . . . . . . . . . . . . . . . . . . . . . . . . . . . . . .7
Optional Accessories . . . . . . . . . . . . . . . . . . . . . . . . . . . . . . . . . . . . . . . . . . . . . . . . . . . . . . . . . . . . . . . . . . . . . . . . . . . . . . . . . . . . . . . . . . . . . .7
Recommended Power Supplies . . . . . . . . . . . . . . . . . . . . . . . . . . . . . . . . . . . . . . . . . . . . . . . . . . . . . . . . . . . . . . . . . . . . . . . . . . . . . . . . . . . . . .7
Front View . . . . . . . . . . . . . . . . . . . . . . . . . . . . . . . . . . . . . . . . . . . . . . . . . . . . . . . . . . . . . . . . . . . . . . . . . . . . . . . . . . . . . . . . . . . . . . . . . . . . . .8
Rear View . . . . . . . . . . . . . . . . . . . . . . . . . . . . . . . . . . . . . . . . . . . . . . . . . . . . . . . . . . . . . . . . . . . . . . . . . . . . . . . . . . . . . . . . . . . . . . . . . . . . . . .8
Sample Application . . . . . . . . . . . . . . . . . . . . . . . . . . . . . . . . . . . . . . . . . . . . . . . . . . . . . . . . . . . . . . . . . . . . . . . . . . . . . . . . . . . . . . . . . . . . . . .9
Installation . . . . . . . . . . . . . . . . . . . . . . . . . . . . . . . . . . . . . . . . . . . . . . . . . . . . . . . . . . . . . . . . . . . . . . . . . . . . . . . . . . . . . . . . . . . . . . . . . . . . . . . . .10
Hardware Installation Overview . . . . . . . . . . . . . . . . . . . . . . . . . . . . . . . . . . . . . . . . . . . . . . . . . . . . . . . . . . . . . . . . . . . . . . . . . . . . . . . . . . . .10
Before You Begin . . . . . . . . . . . . . . . . . . . . . . . . . . . . . . . . . . . . . . . . . . . . . . . . . . . . . . . . . . . . . . . . . . . . . . . . . . . . . . . . . . . . . . . . . . .10
Parts List . . . . . . . . . . . . . . . . . . . . . . . . . . . . . . . . . . . . . . . . . . . . . . . . . . . . . . . . . . . . . . . . . . . . . . . . . . . . . . . . . . . . . . . . . . . . . . . . .10
User-Supplied Parts . . . . . . . . . . . . . . . . . . . . . . . . . . . . . . . . . . . . . . . . . . . . . . . . . . . . . . . . . . . . . . . . . . . . . . . . . . . . . . . . . . . . . . . . .10
Product Serial Number Label Placement . . . . . . . . . . . . . . . . . . . . . . . . . . . . . . . . . . . . . . . . . . . . . . . . . . . . . . . . . . . . . . . . . . . . . . . . .11
Mounting . . . . . . . . . . . . . . . . . . . . . . . . . . . . . . . . . . . . . . . . . . . . . . . . . . . . . . . . . . . . . . . . . . . . . . . . . . . . . . . . . . . . . . . . . . . . . . . . . . . . . .12
Desktop Installation . . . . . . . . . . . . . . . . . . . . . . . . . . . . . . . . . . . . . . . . . . . . . . . . . . . . . . . . . . . . . . . . . . . . . . . . . . . . . . . . . . . . . . . . .12
Wall Mount Installation . . . . . . . . . . . . . . . . . . . . . . . . . . . . . . . . . . . . . . . . . . . . . . . . . . . . . . . . . . . . . . . . . . . . . . . . . . . . . . . . . . . . . .13
Rack Mount Installation . . . . . . . . . . . . . . . . . . . . . . . . . . . . . . . . . . . . . . . . . . . . . . . . . . . . . . . . . . . . . . . . . . . . . . . . . . . . . . . . . . . . . .14
Pelco Badge Orientation . . . . . . . . . . . . . . . . . . . . . . . . . . . . . . . . . . . . . . . . . . . . . . . . . . . . . . . . . . . . . . . . . . . . . . . . . . . . . . . . . . . . . .15
Basic Hardware Connections . . . . . . . . . . . . . . . . . . . . . . . . . . . . . . . . . . . . . . . . . . . . . . . . . . . . . . . . . . . . . . . . . . . . . . . . . . . . . . . . . . . . . . .16
CM9700-CC1 Connection . . . . . . . . . . . . . . . . . . . . . . . . . . . . . . . . . . . . . . . . . . . . . . . . . . . . . . . . . . . . . . . . . . . . . . . . . . . . . . . . . . . . .16
Matrix Bay Connection . . . . . . . . . . . . . . . . . . . . . . . . . . . . . . . . . . . . . . . . . . . . . . . . . . . . . . . . . . . . . . . . . . . . . . . . . . . . . . . . . . . . . . .17
Audio Output Connection . . . . . . . . . . . . . . . . . . . . . . . . . . . . . . . . . . . . . . . . . . . . . . . . . . . . . . . . . . . . . . . . . . . . . . . . . . . . . . . . . . . . .21
Network Connection . . . . . . . . . . . . . . . . . . . . . . . . . . . . . . . . . . . . . . . . . . . . . . . . . . . . . . . . . . . . . . . . . . . . . . . . . . . . . . . . . . . . . . . . .22
Power Connection . . . . . . . . . . . . . . . . . . . . . . . . . . . . . . . . . . . . . . . . . . . . . . . . . . . . . . . . . . . . . . . . . . . . . . . . . . . . . . . . . . . . . . . . . . .23
Software Configuration . . . . . . . . . . . . . . . . . . . . . . . . . . . . . . . . . . . . . . . . . . . . . . . . . . . . . . . . . . . . . . . . . . . . . . . . . . . . . . . . . . . . . . . . . . . . . . .25
Additional Optional Configuration . . . . . . . . . . . . . . . . . . . . . . . . . . . . . . . . . . . . . . . . . . . . . . . . . . . . . . . . . . . . . . . . . . . . . . . . . . . . . . . . . . .25
Add the CM9700MDD-EVS and Endura Cameras to the 9700 Matrix Configuration . . . . . . . . . . . . . . . . . . . . . . . . . . . . . . . . . . . . . . . . . . . .26
Add the CM9700MDD-EVS to the Matrix System Configuration . . . . . . . . . . . . . . . . . . . . . . . . . . . . . . . . . . . . . . . . . . . . . . . . . . . . . .26
Configure the CM9700MDD-EVS Settings . . . . . . . . . . . . . . . . . . . . . . . . . . . . . . . . . . . . . . . . . . . . . . . . . . . . . . . . . . . . . . . . . . . . . . . .28
Add Endura Cameras to the Matrix System Configuration . . . . . . . . . . . . . . . . . . . . . . . . . . . . . . . . . . . . . . . . . . . . . . . . . . . . . . . . . . .29
Configure a CM9700 Soft Alarm to Represent an Endura Alarm . . . . . . . . . . . . . . . . . . . . . . . . . . . . . . . . . . . . . . . . . . . . . . . . . . . . . . . . . . .31
Macro Configuration . . . . . . . . . . . . . . . . . . . . . . . . . . . . . . . . . . . . . . . . . . . . . . . . . . . . . . . . . . . . . . . . . . . . . . . . . . . . . . . . . . . . . . . . . . . . .32
Network Video Recorder Management . . . . . . . . . . . . . . . . . . . . . . . . . . . . . . . . . . . . . . . . . . . . . . . . . . . . . . . . . . . . . . . . . . . . . . . . . . . . . . .34
Add a Network Video Recorder (NVR) to the Matrix System Configuration . . . . . . . . . . . . . . . . . . . . . . . . . . . . . . . . . . . . . . . . . . . . . .34
Configure a CM9700 Macro to Switch Video to a Backup NVR . . . . . . . . . . . . . . . . . . . . . . . . . . . . . . . . . . . . . . . . . . . . . . . . . . . . . . .36
Associate a Macro with a Soft Alarm . . . . . . . . . . . . . . . . . . . . . . . . . . . . . . . . . . . . . . . . . . . . . . . . . . . . . . . . . . . . . . . . . . . . . . . . . . .37
Associate a Soft Alarm with an NVR . . . . . . . . . . . . . . . . . . . . . . . . . . . . . . . . . . . . . . . . . . . . . . . . . . . . . . . . . . . . . . . . . . . . . . . . . . . .37
Export the Configuration Files and Transfer the Data to the CM9700MDD-EVS . . . . . . . . . . . . . . . . . . . . . . . . . . . . . . . . . . . . . . . . . . . . . . .38
Operation . . . . . . . . . . . . . . . . . . . . . . . . . . . . . . . . . . . . . . . . . . . . . . . . . . . . . . . . . . . . . . . . . . . . . . . . . . . . . . . . . . . . . . . . . . . . . . . . . . . . . . . . . .40
Front Panel Indicators . . . . . . . . . . . . . . . . . . . . . . . . . . . . . . . . . . . . . . . . . . . . . . . . . . . . . . . . . . . . . . . . . . . . . . . . . . . . . . . . . . . . . . . . . . . .40
Viewing Video . . . . . . . . . . . . . . . . . . . . . . . . . . . . . . . . . . . . . . . . . . . . . . . . . . . . . . . . . . . . . . . . . . . . . . . . . . . . . . . . . . . . . . . . . . . . . . . . . .41
Viewing and Controlling Video . . . . . . . . . . . . . . . . . . . . . . . . . . . . . . . . . . . . . . . . . . . . . . . . . . . . . . . . . . . . . . . . . . . . . . . . . . . . . . . . .43
Configuring the Offset+ and Offset- Functions to Switch Cameras . . . . . . . . . . . . . . . . . . . . . . . . . . . . . . . . . . . . . . . . . . . . . . . . . . . . .48
Using the Alternate Cameras Feature . . . . . . . . . . . . . . . . . . . . . . . . . . . . . . . . . . . . . . . . . . . . . . . . . . . . . . . . . . . . . . . . . . . . . . . . . . .48
Configuration/Reset Button . . . . . . . . . . . . . . . . . . . . . . . . . . . . . . . . . . . . . . . . . . . . . . . . . . . . . . . . . . . . . . . . . . . . . . . . . . . . . . . . . . . . . . . .49
Troubleshooting . . . . . . . . . . . . . . . . . . . . . . . . . . . . . . . . . . . . . . . . . . . . . . . . . . . . . . . . . . . . . . . . . . . . . . . . . . . . . . . . . . . . . . . . . . . . . . . . . . . . .50
Specifications . . . . . . . . . . . . . . . . . . . . . . . . . . . . . . . . . . . . . . . . . . . . . . . . . . . . . . . . . . . . . . . . . . . . . . . . . . . . . . . . . . . . . . . . . . . . . . . . . . . . . . .51
C1570M-E (4/07)
3
List of Illustrations
1
2
3
4
5
6
7
8
9
10
11
12
13
14
15
16
17
18
19
20
21
22
23
24
25
26
27
28
29
30
31
32
33
34
35
36
37
38
39
40
41
42
43
44
45
46
47
48
49
50
51
52
53
4
CM9700MDD-EVS Front View . . . . . . . . . . . . . . . . . . . . . . . . . . . . . . . . . . . . . . . . . . . . . . . . . . . . . . . . . . . . . . . . . . . . . . . . . . . . . . . . . . . . .8
CM9700MDD-EVS Rear View . . . . . . . . . . . . . . . . . . . . . . . . . . . . . . . . . . . . . . . . . . . . . . . . . . . . . . . . . . . . . . . . . . . . . . . . . . . . . . . . . . . . .8
Sample System Using the CM9700MDD-EVS . . . . . . . . . . . . . . . . . . . . . . . . . . . . . . . . . . . . . . . . . . . . . . . . . . . . . . . . . . . . . . . . . . . . . . . . .9
Product Serial Number Label . . . . . . . . . . . . . . . . . . . . . . . . . . . . . . . . . . . . . . . . . . . . . . . . . . . . . . . . . . . . . . . . . . . . . . . . . . . . . . . . . . . . .11
Installing Rubber Feet for Desktop Placement. . . . . . . . . . . . . . . . . . . . . . . . . . . . . . . . . . . . . . . . . . . . . . . . . . . . . . . . . . . . . . . . . . . . . . . .12
CM9700MDD-EVS Desktop Placement . . . . . . . . . . . . . . . . . . . . . . . . . . . . . . . . . . . . . . . . . . . . . . . . . . . . . . . . . . . . . . . . . . . . . . . . . . . . .12
Installing the CM9700MDD-EVS in a WM5001-4U Wall Mount . . . . . . . . . . . . . . . . . . . . . . . . . . . . . . . . . . . . . . . . . . . . . . . . . . . . . . . . .13
Tighten the Thumbscrew to Secure the Unit . . . . . . . . . . . . . . . . . . . . . . . . . . . . . . . . . . . . . . . . . . . . . . . . . . . . . . . . . . . . . . . . . . . . . . . . .13
Installing the CM9700MDD-EVS in a Rack Mount . . . . . . . . . . . . . . . . . . . . . . . . . . . . . . . . . . . . . . . . . . . . . . . . . . . . . . . . . . . . . . . . . . . .14
Tighten Thumbscrew to Secure the Unit . . . . . . . . . . . . . . . . . . . . . . . . . . . . . . . . . . . . . . . . . . . . . . . . . . . . . . . . . . . . . . . . . . . . . . . . . . . .14
Pelco Badge Orientation. . . . . . . . . . . . . . . . . . . . . . . . . . . . . . . . . . . . . . . . . . . . . . . . . . . . . . . . . . . . . . . . . . . . . . . . . . . . . . . . . . . . . . . . .15
Wiring the CM9700MDD-EVS Terminal Block . . . . . . . . . . . . . . . . . . . . . . . . . . . . . . . . . . . . . . . . . . . . . . . . . . . . . . . . . . . . . . . . . . . . . . . .16
Connecting the CM9700MDD-EVS to the CM9700-CC1 . . . . . . . . . . . . . . . . . . . . . . . . . . . . . . . . . . . . . . . . . . . . . . . . . . . . . . . . . . . . . . . .17
Sample Video Connection Between the CM9700MDD-EVS and the CM9760-MXB . . . . . . . . . . . . . . . . . . . . . . . . . . . . . . . . . . . . . . . . . .18
Sample Video Connection Between the CM9700MDD-EVS and the CM9770-MXB . . . . . . . . . . . . . . . . . . . . . . . . . . . . . . . . . . . . . . . . . .19
Sample Video Connection Between the CM9700MDD-EVS and the CM9780-MXB . . . . . . . . . . . . . . . . . . . . . . . . . . . . . . . . . . . . . . . . . .20
Audio Output Connections . . . . . . . . . . . . . . . . . . . . . . . . . . . . . . . . . . . . . . . . . . . . . . . . . . . . . . . . . . . . . . . . . . . . . . . . . . . . . . . . . . . . . . .21
Connecting the CM9700MDD-EVS to the Network. . . . . . . . . . . . . . . . . . . . . . . . . . . . . . . . . . . . . . . . . . . . . . . . . . . . . . . . . . . . . . . . . . . .22
Connecting the Power . . . . . . . . . . . . . . . . . . . . . . . . . . . . . . . . . . . . . . . . . . . . . . . . . . . . . . . . . . . . . . . . . . . . . . . . . . . . . . . . . . . . . . . . . .24
CM9700-MGR Camera Grid . . . . . . . . . . . . . . . . . . . . . . . . . . . . . . . . . . . . . . . . . . . . . . . . . . . . . . . . . . . . . . . . . . . . . . . . . . . . . . . . . . . . . .26
Adding a CM9700MDD-EVS . . . . . . . . . . . . . . . . . . . . . . . . . . . . . . . . . . . . . . . . . . . . . . . . . . . . . . . . . . . . . . . . . . . . . . . . . . . . . . . . . . . . .26
Number of Devices Page . . . . . . . . . . . . . . . . . . . . . . . . . . . . . . . . . . . . . . . . . . . . . . . . . . . . . . . . . . . . . . . . . . . . . . . . . . . . . . . . . . . . . . . .27
Port Configuration Page . . . . . . . . . . . . . . . . . . . . . . . . . . . . . . . . . . . . . . . . . . . . . . . . . . . . . . . . . . . . . . . . . . . . . . . . . . . . . . . . . . . . . . . . .27
Sample CM9700MDD-EVS Units Added to the Matrix System . . . . . . . . . . . . . . . . . . . . . . . . . . . . . . . . . . . . . . . . . . . . . . . . . . . . . . . . . .27
Configuring CM9700MDD-EVS Settings . . . . . . . . . . . . . . . . . . . . . . . . . . . . . . . . . . . . . . . . . . . . . . . . . . . . . . . . . . . . . . . . . . . . . . . . . . . .28
Adding an Endura Camera. . . . . . . . . . . . . . . . . . . . . . . . . . . . . . . . . . . . . . . . . . . . . . . . . . . . . . . . . . . . . . . . . . . . . . . . . . . . . . . . . . . . . . .29
Video Input/Output Device Page . . . . . . . . . . . . . . . . . . . . . . . . . . . . . . . . . . . . . . . . . . . . . . . . . . . . . . . . . . . . . . . . . . . . . . . . . . . . . . . . . .29
Device Identification Page . . . . . . . . . . . . . . . . . . . . . . . . . . . . . . . . . . . . . . . . . . . . . . . . . . . . . . . . . . . . . . . . . . . . . . . . . . . . . . . . . . . . . . .30
Adding a CM9700 Soft Alarm . . . . . . . . . . . . . . . . . . . . . . . . . . . . . . . . . . . . . . . . . . . . . . . . . . . . . . . . . . . . . . . . . . . . . . . . . . . . . . . . . . . .31
Viewing CM9700 Alarms . . . . . . . . . . . . . . . . . . . . . . . . . . . . . . . . . . . . . . . . . . . . . . . . . . . . . . . . . . . . . . . . . . . . . . . . . . . . . . . . . . . . . . . .31
WS5000 Add Script Dialog Box . . . . . . . . . . . . . . . . . . . . . . . . . . . . . . . . . . . . . . . . . . . . . . . . . . . . . . . . . . . . . . . . . . . . . . . . . . . . . . . . . . .32
Adding a Macro to Activate an Endura Script . . . . . . . . . . . . . . . . . . . . . . . . . . . . . . . . . . . . . . . . . . . . . . . . . . . . . . . . . . . . . . . . . . . . . . . .32
Macro Editor Window . . . . . . . . . . . . . . . . . . . . . . . . . . . . . . . . . . . . . . . . . . . . . . . . . . . . . . . . . . . . . . . . . . . . . . . . . . . . . . . . . . . . . . . . . .33
Add a Run Endura Script Command . . . . . . . . . . . . . . . . . . . . . . . . . . . . . . . . . . . . . . . . . . . . . . . . . . . . . . . . . . . . . . . . . . . . . . . . . . . . . . . .33
Adding an NVR . . . . . . . . . . . . . . . . . . . . . . . . . . . . . . . . . . . . . . . . . . . . . . . . . . . . . . . . . . . . . . . . . . . . . . . . . . . . . . . . . . . . . . . . . . . . . . . .34
Number of Devices Page . . . . . . . . . . . . . . . . . . . . . . . . . . . . . . . . . . . . . . . . . . . . . . . . . . . . . . . . . . . . . . . . . . . . . . . . . . . . . . . . . . . . . . . .34
Viewing NVRs in the Device Tree. . . . . . . . . . . . . . . . . . . . . . . . . . . . . . . . . . . . . . . . . . . . . . . . . . . . . . . . . . . . . . . . . . . . . . . . . . . . . . . . . .35
Locating the UDN for an NVR . . . . . . . . . . . . . . . . . . . . . . . . . . . . . . . . . . . . . . . . . . . . . . . . . . . . . . . . . . . . . . . . . . . . . . . . . . . . . . . . . . . .35
Adding a Macro for NVR Management . . . . . . . . . . . . . . . . . . . . . . . . . . . . . . . . . . . . . . . . . . . . . . . . . . . . . . . . . . . . . . . . . . . . . . . . . . . . .36
Sample Macro for NVR Management . . . . . . . . . . . . . . . . . . . . . . . . . . . . . . . . . . . . . . . . . . . . . . . . . . . . . . . . . . . . . . . . . . . . . . . . . . . . . .36
Associate a Macro with a Soft Alarm . . . . . . . . . . . . . . . . . . . . . . . . . . . . . . . . . . . . . . . . . . . . . . . . . . . . . . . . . . . . . . . . . . . . . . . . . . . . . .37
Associate the Alarm with the NVR . . . . . . . . . . . . . . . . . . . . . . . . . . . . . . . . . . . . . . . . . . . . . . . . . . . . . . . . . . . . . . . . . . . . . . . . . . . . . . . .37
Exporting CM9700-MGR Configuration Files . . . . . . . . . . . . . . . . . . . . . . . . . . . . . . . . . . . . . . . . . . . . . . . . . . . . . . . . . . . . . . . . . . . . . . . . .38
CM9700MDD-EVS XML File. . . . . . . . . . . . . . . . . . . . . . . . . . . . . . . . . . . . . . . . . . . . . . . . . . . . . . . . . . . . . . . . . . . . . . . . . . . . . . . . . . . . . .38
Transferring the CM9700MDD-EVS XML File Through the Endura Network . . . . . . . . . . . . . . . . . . . . . . . . . . . . . . . . . . . . . . . . . . . . . . . .39
CM9700MDD-EVS Front Panel. . . . . . . . . . . . . . . . . . . . . . . . . . . . . . . . . . . . . . . . . . . . . . . . . . . . . . . . . . . . . . . . . . . . . . . . . . . . . . . . . . . .40
DVR Menu 1 . . . . . . . . . . . . . . . . . . . . . . . . . . . . . . . . . . . . . . . . . . . . . . . . . . . . . . . . . . . . . . . . . . . . . . . . . . . . . . . . . . . . . . . . . . . . . . . . . .41
DVR Menu 2 . . . . . . . . . . . . . . . . . . . . . . . . . . . . . . . . . . . . . . . . . . . . . . . . . . . . . . . . . . . . . . . . . . . . . . . . . . . . . . . . . . . . . . . . . . . . . . . . . .42
DVR Menu 3 . . . . . . . . . . . . . . . . . . . . . . . . . . . . . . . . . . . . . . . . . . . . . . . . . . . . . . . . . . . . . . . . . . . . . . . . . . . . . . . . . . . . . . . . . . . . . . . . . .42
Define Menu. . . . . . . . . . . . . . . . . . . . . . . . . . . . . . . . . . . . . . . . . . . . . . . . . . . . . . . . . . . . . . . . . . . . . . . . . . . . . . . . . . . . . . . . . . . . . . . . . .44
Define Menu 2 . . . . . . . . . . . . . . . . . . . . . . . . . . . . . . . . . . . . . . . . . . . . . . . . . . . . . . . . . . . . . . . . . . . . . . . . . . . . . . . . . . . . . . . . . . . . . . . .44
Playback Speed Timeline . . . . . . . . . . . . . . . . . . . . . . . . . . . . . . . . . . . . . . . . . . . . . . . . . . . . . . . . . . . . . . . . . . . . . . . . . . . . . . . . . . . . . . . .47
Assigning an Alternate Camera . . . . . . . . . . . . . . . . . . . . . . . . . . . . . . . . . . . . . . . . . . . . . . . . . . . . . . . . . . . . . . . . . . . . . . . . . . . . . . . . . . .49
C1570M-E (4/07)
List of Tables
A
B
C
D
E
F
G
C1570M-E (4/07)
RS-422 Pin Assignments. . . . . . . . . . . . . . . . . . . . . . . . . . . . . . . . . . . . . . . . . . . . . . . . . . . . . . . . . . . . . . . . . . . . . . . . . . . . . . . . . . . . . . . . . . .16
Video Coaxial Cable Requirements . . . . . . . . . . . . . . . . . . . . . . . . . . . . . . . . . . . . . . . . . . . . . . . . . . . . . . . . . . . . . . . . . . . . . . . . . . . . . . . . . .17
Powering Multiple Units. . . . . . . . . . . . . . . . . . . . . . . . . . . . . . . . . . . . . . . . . . . . . . . . . . . . . . . . . . . . . . . . . . . . . . . . . . . . . . . . . . . . . . . . . . .23
Recommended Wire Gauge and Maximum Wiring Distances. . . . . . . . . . . . . . . . . . . . . . . . . . . . . . . . . . . . . . . . . . . . . . . . . . . . . . . . . . . . . .23
Video Functions Controlled by Keyboard Icons . . . . . . . . . . . . . . . . . . . . . . . . . . . . . . . . . . . . . . . . . . . . . . . . . . . . . . . . . . . . . . . . . . . . . . . . .45
Configuration/Reset Button Functions and Indicators . . . . . . . . . . . . . . . . . . . . . . . . . . . . . . . . . . . . . . . . . . . . . . . . . . . . . . . . . . . . . . . . . . . .49
Troubleshooting the CM9700MDD-EVS. . . . . . . . . . . . . . . . . . . . . . . . . . . . . . . . . . . . . . . . . . . . . . . . . . . . . . . . . . . . . . . . . . . . . . . . . . . . . . .50
5
Regulatory Notices
REGULATORY NOTICES
This device complies with Part 15 of the FCC Rules. Operation is subject to the following two conditions: (1) this device may not cause harmful
interference, and (2) this device must accept any interference received, including interference that may cause undesired operation.
RADIO AND TELEVISION INTERFERENCE
This equipment has been tested and found to comply with the limits of a Class A digital device, pursuant to Part 15 of the FCC Rules. These limits
are designed to provide reasonable protection against harmful interference when the equipment is operated in a commercial environment. This
equipment generates, uses, and can radiate radio frequency energy and, if not installed and used in accordance with the instruction manual, may
cause harmful interference to radio communications. Operation of this equipment in a residential area is likely to cause harmful interference in
which case the user will be required to correct the interference at his own expense.
Changes and modifications not expressly approved by the manufacturer or registrant of this equipment can void your authority to operate this
equipment under Federal Communications Commission's rules.
In order to maintain compliance with FCC regulations shielded cables must be used with this equipment. Operation with non-approved equipment
or unshielded cables is likely to result in interference to radio and television reception.
This Class A digital apparatus complies with Canadian ICES-003.
Cet appareil numérique de la classe A est conforme à la norme NMB-003 du Canada.
6
C1570M-E (4/07)
Description
The CM9700MDD-EVS matrix digital decoder uses the latest Endura™ technology to transmit video from Endura products to CM9700 Series
matrix switchers (using 9.03.012 software, or higher). Adding the CM9700MDD-EVS to a matrix system allows a security operator to use the
same CM9760-KBD keyboard functions to view and control video on both the Endura and matrix systems.
NOTE: CM9760-KBD software version 8.24 or higher is required.
The CM9700MMM-EVS is a special version of the single-input NET5301R video decoder. It converts digital video streams from either Endura
encoders or Endura recorders into analog video and then outputs the video to the matrix switcher. Data is communicated over a serial connection
between the CM9700MDD-EVS and the CM9700-CC1, and analog video is output to the matrix switcher using a BNC connection and coaxial
cable.
COMPATIBLE PRODUCTS
Matrix switching systems
CM9700 Series matrix switchers (CM9760, CM9770, CM9780; using 9.03.012 software, or higher)
Endura system components
OPTIONAL ACCESSORIES
RK5000PS-5U
Rack mount with power supply (12 units)
WM5001-4U
Wall mount without power supply (1 unit)
WM5001-4UEXP
Wall mount expansion (1 unit)
RECOMMENDED POWER SUPPLIES
NET5301PS
Power supply for one CM9700MDD-EVS (4-pin connector)
TF2000
Power supply for one CM9700MDD-EVS (4-pin to 2-pin connector)
MCS Series
Multiple unit power supply, indoor
C1570M-E (4/07)
7
FRONT VIEW
Figure 1 illustrates the components on the front of the CM9700MDD-EVS.
Network Connector (RJ-45)
Network Status Indicator
Pelco Badge
Network Activity Indicator
Unit Status Indicator
Configuration/Reset Button
Refer to Front Panel Indicators on page 40 for a description of each indicator.
Figure 1. CM9700MDD-EVS Front View
REAR VIEW
Figure 2 illustrates the components on the rear of the CM9700MDD-EVS.
Power
Audio In (reserved for future use)
VGA Out (Reserved for future use)
Audio Out
Video Out (MXB connection)
RS-422 Connectors
S-Video Out (reserved for future use)
Relay Connectors (reserved for future use)
Audio Switch (reserved for future use)
Alarm Connectors (reserved for future use)
Refer to Basic Hardware Connections on page 16 for a description of the connectors.
Figure 2. CM9700MDD-EVS Rear View
8
C1570M-E (4/07)
SAMPLE APPLICATION
IMPORTANT NOTE. PLEASE READ
The network implementation is shown as a general representation only and is not intended to show a detailed network topology. Your actual
network will differ, requiring changes or perhaps additional network equipment to accommodate the system as illustrated. Please contact your
local Pelco Representative to discuss your specific requirements.
CM9505-UPS
CM9760-KBD
CM9700-CC1
CAMERA 1
MATRIX MONITOR
CM97XX-MXB
CM9700MDD-EVS
CAMERA 2
CM9700MDD-EVS
ENDURA
NETWORK
SUBNET
ENCODER
NVR
WS5050
SM5000
SPECTRA
Figure 3. Sample System Using the CM9700MDD-EVS
C1570M-E (4/07)
9
Installation
HARDWARE INSTALLATION OVERVIEW
The following steps provide an overview of how to install the CM9700MDD-EVS:
1. Install all components of the matrix switching system. Refer to the matrix system documentation for instructions.
2. Install one or more CM9700MDD-EVS units, and then make the following connections:
a.
Connect the CM9700MDD-EVS to the CM9700-CC1.
b.
Connect the video output connector on the CM9700MDD-EVS to a video input connector on the matrix bay (CM9760-MXB,
CM9770-MXB, or CM9780-MXB).
c.
Connect the CM9700MDD-EVS to the network. Instructions on installing the CM9700MDD-EVS are provided in subsequent sections.
3. Install all components of the Endura system and connect all components to the network. Refer to the Endura system documentation for
instructions on installing Endura components.
Once the hardware installation and all device connections are completed, you must add the CM9700MDD-EVS to the 9700 matrix system
configuration. Refer to Software Configuration on page 25 for instructions.
BEFORE YOU BEGIN
Since Endura is a network system that requires a continuous amount of bandwidth to transmit live video, always include your network
administrator when planning and installing Endura components.
You will need the following:
•
Pelco-approved Endura certification
•
Pelco-approved Matrix System certification
PARTS LIST
Qty
Description
1
CM9700MDD-EVS
1
16-pin terminal block
1
4-pin to 2-pin power adapter
1
Pelco badge rotation sticker
4
Rubber feet for desktop installation
NOTE: Since power requirements vary by installation, an individual power supply is not included with the CM9700MDD-EVS. You can
purchase either the NET5301PS single unit power supply or the RK5000PS-5U rack mount, which includes a power supply. Refer to Power
Connection on page 23 for more information.
USER-SUPPLIED PARTS
In addition to the standard tools and cables required for a video security installation, you will need to provide the following items:
10
Qty
Description
1
Cat5e (or better) cable with an RJ-45 connector at one end and with the individual wires exposed at the other end (for connecting the
CM9700MDD-EVS to the CM9700-CC1)
1
Power supply; refer to Power Connection on page 23 for more information
1
Small flat-tip screwdriver
C1570M-E (4/07)
PRODUCT SERIAL NUMBER LABEL PLACEMENT
Product serial number labels help Pelco’s Product Support identify your system and its factory configuration in the event that the
CM9700MDD-EVS or its components require service.
A label citing your product’s serial number is attached to the bottom panel of the CM9700MDD-EVS. Because rack mounting or other installation
options may obscure the factory-applied label, two additional labels are provided. Attach one label to your product documentation or another
product location that will not be obscured by installation. The second label is a spare.
To use the serial number label, complete the following steps:
1. On the bottom panel of the CM9700MDD-EVS, locate the two small labels, attached with a yellow sticker that reads “Extra serial number
labels: remove prior to installation.”
2. Remove the yellow sticker and the labels.
3. Peel away the backing from one label and attach it to this manual, other product documentation, or an unobscured product location.
Figure 4. Product Serial Number Label
C1570M-E (4/07)
11
MOUNTING
Use one of the following installation methods for the CM9700MDD-EVS:
•
Place the CM9700MDD-EVS on a flat surface, such as a shelf or desktop
•
Mount the CM9700MDD-EVS to a wall using the optional WM5001-4U wall mount kit
•
Install the CM9700MDD-EVS in the optional RK5000PS-5U rack mount kit.
NOTES:
•
Each installation method, except the RK5000PS-5U mounting, requires the installation of a separate power supply (NET5301PS).
•
When installing the CM9700MDD-EVS on a desktop, use the rubber feet provided with the CM9700MDD-EVS to protect the desktop from
surface damage. The rubber feet are not needed when mounting the CM9700MDD-EVS in a wall or rack mount.
•
Be sure the distance from the CM9700MDD-EVS to the matrix bay video input connector is less than the maximum distance for the coaxial
cable. Refer to Table B on page 17 for maximum video coaxial cable distances.
DESKTOP INSTALLATION
To place the CM9700MDD-EVS on a flat surface, such as a desktop:
1. Attach the rubber feet to the bottom of the unit to prevent surface damage (refer to Figure 5).
RUBBER FEET
Figure 5. Installing Rubber Feet for Desktop Placement
2. Position the unit to allow for cable and power cord clearance at the front and rear panels.
WARNING: Do not place the CM9700MDD-EVS on its side; the unit could fall over and cause damage.
Figure 6. CM9700MDD-EVS Desktop Placement
12
C1570M-E (4/07)
WALL MOUNT INSTALLATION
The CM9700MDD-EVS can be mounted to a wall using the optional WM5001-4U wall mount system. You can mount up to four
CM9700MDD-EVS units, in any combination, in a fully expanded WM5001-4U (one WM5001-4U with up to three WM5001-4UEXP expansion
units).
To mount the CM9700MDD-EVS to a wall using the WM5001-4U:
1. Install the WM5001-4U and any WM5001-4UEXP expansion units; refer to the WM5000 Installation manual for instructions.
2. Install the CM9700MDD-EVS into the desired wall mount unit. Make sure all front and rear panel connectors are accessible.
Figure 7. Installing the CM9700MDD-EVS in a WM5001-4U Wall Mount
3. Tighten the thumbscrew on the wall mount to secure the unit (refer to Figure 8).
TIGHTEN
THUMBSCREW
Figure 8. Tighten the Thumbscrew to Secure the Unit
C1570M-E (4/07)
13
RACK MOUNT INSTALLATION
Up to 12 CM9700MDD-EVS units can be mounted in the optional RK5000PS-5U rack mount kit. Each unit plugs directly into a power connector in
the rack and is powered by the rack.
NOTE: The RK5000PS-5U only supplies power. It does not provide a dock for any other unit connectors.
To install the CM9700MDD-EVS into a rack mount kit:
1. Install the RK5000PS-5U into the rack (refer to the RK5000PS-5U Installation manual).
2. Insert the CM9700MDD-EVS into the desired slot.
Figure 9. Installing the CM9700MDD-EVS in a Rack Mount
3. Tighten the thumbscrew on the rack mount to secure the unit into the rack (refer to Figure 10).
TIGHTEN
THUMBSCREW
Figure 10. Tighten Thumbscrew to Secure the Unit
14
C1570M-E (4/07)
PELCO BADGE ORIENTATION
The Pelco badge on the front panel of the CM9700MDD-EVS can be rotated in quarter turns. If you install the unit on a flat surface, the Pelco
badge will be turned the wrong way.
To rotate the Pelco badge:
1. Use the Pelco badge rotation sticker that came with the unit.
2. Attach the middle portion of the rotation sticker to the badge.
3. Press firmly with your thumb and rotate the badge to its correct position.
4. Remove the rotation sticker from the badge.
PELCO BADGE
Figure 11. Pelco Badge Orientation
C1570M-E (4/07)
15
BASIC HARDWARE CONNECTIONS
CM9700-CC1 CONNECTION
Use the 16-pin terminal block (included with the CM9700MDD-EVS) for the RS-422 serial connection (Pelco P protocol) between the
CM9700MDD-EVS and the CM9700-CC1.
Figure 12 shows how to wire the terminal block and connect it to the CM9700MDD-EVS. Note that the terminal block can be attached to the
CM9700MDD-EVS only in the proper position, as shown in Figure 12.
NOTE: When connecting peripheral equipment to the CM9700-CC1 serial communication ports, shielded cabling is required to comply with
CE emissions guidelines.
PIN 1
PIN 1
Figure 12. Wiring the CM9700MDD-EVS Terminal Block
1. Prepare a Cat5e or better cable (user-supplied) with an RJ-45 connector at one end and with the individual wires exposed at the other end.
2. Connect the cable’s individual wires to the terminal block on the rear panel of the CM9700MDD-EVS. An arrow on the rear panel identifies
pin 1; on the terminal block, pin 1 is the leftmost lead on the top row and pin 9 is the leftmost lead on the bottom row (refer to Figure 12).
Use a small screwdriver to open the clamp for a particular lead.
Figure 13 on page 17 and Table A identify the RS-422 pin assignments on the CM9700MDD-EVS and the CM9700-CC1.
3. Insert the cable’s RJ-45 connector into any available RS-422 COM port on the CM9700-CC1. Remember that the first few RS-422 COM ports
on the CC1 must be used for one or more matrix bays and any network interface units and hot switch units. For more information on using
RS-422 COM ports, refer to the matrix system port assignment table and the Installation/Operation manual for your specific matrix system.
Table A. RS-422 Pin Assignments
CM9700-CC1
Pin
1
Lead
RS-422 Data TX+
CM9700MDD-EVS
Pin
Label
1
TX-
RS-422 Data TX-
Lead
2
RS-422 Data TX-
2
RX-
RS-422 Data RX-
7
RS-422 Data RX-
9
TX+
RS-422 Data TX+
8
RS-422 Data RX+
10
RX+
RS-422 Data RX+
NOTE: The alarm and relay inputs on the CM9700MDD-EVS are reserved
for future use, and are not included in this table.
16
C1570M-E (4/07)
CM9505-UPS
CM9700-MGR
CM9760-KBD
VGA MONITOR
PIN 1
PIN 8
PRINTER
COM 1
CM9700-CC1
CM9700MDD-EVS
RJ45 PIN ASSIGNMENTS
PIN ASSIGNMENTS
PIN 1 = TX+
PIN 2 = TXPIN 7 = RXPIN 8 = RX+
PIN 1 = TXPIN 2 = RXPIN 9 = TX+
PIN 10 = RX+
COM 2
RS-422
CM9700-CC1
TX+ TX- RX- RX+
CM9700MDD-EVS
Figure 13. Connecting the CM9700MDD-EVS to the CM9700-CC1
MATRIX BAY CONNECTION
1. Connect a coaxial cable to the video out connector on the CM9700MDD-EVS (refer to the CM9700MDD-EVS rear panel illustration in
Figure 2 on page 8 and to the matrix bay connection drawings shown on the following pages).
2. Connect the coaxial cable to any available matrix bay video input connector as appropriate for your system:
•
•
•
In a System 9760, video input connectors are on the CM9760-MXB rear panel, as shown in Figure 14 on page 18.
In a System 9770, video input connectors are on the CM9770-MXB rear panel, as shown in Figure 15 on page 19.
In a System 9780, video input connectors are on the CM9700-VPP panel, as shown in Figure 16 on page 20.
NOTE: The distance from the CM9700MDD-EVS to the matrix bay video input connector must be less than the maximum distance for the coaxial
cable. Refer to Table B for maximum video coaxial cable distances.
Table B. Video Coaxial Cable Requirements
Cable Type*
Maximum Distance
RG59/U
750 ft (229 m)
RG6/U
1,000 ft (305 m)
RG11/U
1,500 ft (457 m)
*Cable requirements:
• 75-ohm impedance.
• All-copper center conductor; steel-center conductor
cable may result in poor performance.
• All-copper braided shield with 95% braid coverage.
C1570M-E (4/07)
17
CM9700-CC1
CAMERA 241
PRINTER
COM 1
CAMERA 1
COM 2
Alarm
Black
Ou t
RS -422
RS -422
MONITOR 1
CM9760-MXB
MONITOR 16
CM9700MDD-EVS
Figure 14. Sample Video Connection Between the CM9700MDD-EVS and the CM9760-MXB
NOTE: Figure 14 illustrates a sample video connection. Video from the CM9700MDD-EVS can be connected to any unused input on the
matrix bay.
18
C1570M-E (4/07)
CM9700-CC1
CAMERA 1
MONITOR 1
CM9770-MXB
MONITOR 32
CAMERA 256
CM9700MDD-EVS
Figure 15. Sample Video Connection Between the CM9700MDD-EVS and the CM9770-MXB
NOTE: Figure 15 illustrates a sample video connection. Video from the CM9700MDD-EVS can be connected to any unused input on the
matrix bay.
C1570M-E (4/07)
19
CM9700MDD-EVS
CM9700-VPP
CAMERA 1
CAMERA 256
CM9700-VPP
PRINTER
COM 1
COM 2
CM9700-CC1
MONITOR 1
MONITOR 32
CM9780-MXB
Figure 16. Sample Video Connection Between the CM9700MDD-EVS and the CM9780-MXB
NOTE: Figure 16 illustrates a sample video connection. Video from the CM9700MDD-EVS can be connected to any unused input on the
matrix bay.
20
C1570M-E (4/07)
AUDIO OUTPUT CONNECTION
The CM9700MDD-EVS supports one audio output, which allows you to control a speaker or other audio equipment at the monitored location.
NOTE: When using multiple CM9700MDD-EVS units, an additional audio routing solution may be required.
SPEAKER
LINE
AUDIO PREAMP
Figure 17. Audio Output Connections
To use the audio output, complete the following steps:
1. Select the type of audio signal:
Speaker:
Move the audio switch to Mic/Spkr if you are connecting a speaker. The output level is 2.5 Vp-p.
Line:
Move the audio switch to Line if you are connecting a powered audio output device. The line output level is 1 Vp-p.
By default, the switch is set to Line.
NOTE: If the switch setting does not match your audio equipment, audio distortion problems may occur.
2. Make sure the output audio connector is wired as follows:
Connector Tip:
Signal high
Connector Sleeve: Common
3. Connect a line output device or a speaker to the audio out connector on the rear panel of the CM9700MDD-EVS.
C1570M-E (4/07)
21
NETWORK CONNECTION
NOTE: Consult your network administrator before installing the CM9700MDD-EVS to avoid possible network conflicts.
Use the network port on the front panel and a 100BaseT network Cat5e (or better) cable with RJ-45 connectors to connect the CM9700MDD-EVS
to your system network.
The indicators on the front panel show network connection speed and status (refer to Front Panel Indicators on page 40).
A NOTE ABOUT RECOGNIZING CM9700MDD-EVS DEVICE NAMES IN THE ENDURA SYSTEM:
Because the WS5000 application assigns a generic default name to each CM9700MDD-EVS unit, it can be impossible to recognize individual
CM9700MDD-EVS units in the Endura system applications. Therefore it is recommended (although not essential in a single node system) that
you connect each CM9700MDD-EVS unit to the Endura network one at a time, and then edit the device name in the WS5000 Setup window and
save the changes (refer to Export the Configuration Files and Transfer the Data to the CM9700MDD-EVS on page 38). This will allow you to
identify individual CM9700MDD-EVS units from within the WS5000 application.
In a multi-node matrix system, it is strongly recommended to:
•
follow this additional step of connecting each CM9700MDD-EVS unit to the network one at a time and changing the device name in the WS5000
Setup window, and
•
include the node name in each CM9700MDD-EVS device name. This will allow you to transfer the correct XML file to each CM9700MDD-EVS unit.
CAT5 UTP
NETWORK
Figure 18. Connecting the CM9700MDD-EVS to the Network
22
C1570M-E (4/07)
POWER CONNECTION
The CM9700MDD-EVS offers a single four-pin power connector. The RK5000PS-5U rack mount kit and the NET5301PS attach to the four-pin
connector.
When using a different power supply, attach power to the enclosed four-pin to two-pin adapter and attach the adapter to the unit.
The CM9700MDD-EVS is designed to operate from either a 12 VDC or a 24 VAC power supply. It automatically senses power type and polarity (DC).
The CM9700MDD-EVS can be powered from many sources:
•
NET5301PS power supply connects directly to the four-pin connector on the CM9700MDD-EVS rear panel.
•
The RK5000PS-5U rack mount kit supplies power through the four-pin connector on the CM9700MDD-EVS rear panel as soon as the unit
slides into place.
•
The Pelco MCS (B model), WCS (B model), and TF Series power supplies provide power through the four-pin to two-pin adapter (supplied),
which then connects directly to the four-pin connector on the CM9700MDD-EVS rear panel.
•
Other UL Listed direct plug-in power units marked “Class 2” and rated for 12 VDC +10%/-15% or 24 VAC +10%/-15% provide power
through the two-pin to four-pin adapter (supplied), which then connects directly to the four-pin connector on the CM9700MDD-EVS rear
panel.
The power consumption of the CM9700MDD-EVS is 12 W (20 VA).
Use Table C to estimate your power requirements when installing multiple CM9700MDD-EVS units. This table is based on a 24 VAC power
supply.
Table C. Powering Multiple Units
Units Powered
at 20 VA
at 48 VA
at 50 VA
at 100 VA
at 120 VA
at 240 VA
at 480 VA
1
2
2
4
5
11
24
Use Table D to help identify the necessary wire gauge and maximum cable distance. This table applies to two-conductor solid copper wire.
(Reduce the distance by 10 percent for stranded copper wire.) These maximum distances are based on a maximum allowable voltage drop of
10 percent.
Table D. Recommended Wire Gauge and Maximum Wiring Distances
Maximum Distance
Wire Gauge
12 VDC
24 VAC
59 ft (17 m)
237 ft (72 m)
18 AWG (1.0 mm2)
94 ft (28 m)
377 ft (114 m)
16 AWG (1.5 mm2)
149 ft (45 m)
599 ft (183 m)
20 AWG (0.5 mm2)
2
C1570M-E (4/07)
14 AWG (2.5 mm )
238 ft (72 m)
952 ft (290 m)
12 AWG (4.0 mm2)
377 ft (114 m)
1,511 ft (460 m)
10 AWG (6.0 mm2)
600 ft (182 m)
2,400 ft (731 m)
23
Connect power to the CM9700MDD-EVS. The Pelco badge (blue) and the status light (green) on the front panel should glow.
FOUR-PIN
OR
ADAPTER
Figure 19. Connecting the Power
24
C1570M-E (4/07)
Software Configuration
Once the hardware installation and all device connections are completed, you will need to complete the following software configuration tasks:
•
Use the CM9700-MGR software to add the CM9700MDD-EVS and Endura cameras to the matrix system configuration. Instructions are
provided in Add the CM9700MDD-EVS and Endura Cameras to the 9700 Matrix Configuration on page 26. When you assign the logical
camera numbers to the Endura cameras, be sure to match the logical camera numbers assigned through the WS5000 application. Use the
CM9700 Resource CD to install the CM9700-MGR software.
•
Export the CM9700-MGR configuration files and transfer them to the CM9700-CC1. Refer to Export the Configuration Files and Transfer the
Data to the CM9700MDD-EVS on page 38.
•
Use the Endura WS5000 application to assign logical camera numbers to each camera in the Endura system that you want to view from the
matrix system. Remember that these cameras must be identified with the same logical camera numbers in the CM9700-MGR application
and the WS5000 application. Refer to the WS5000 Operation manual and the Endura Resource CD for instructions on configuring cameras
in the Endura system.
•
(Optional) Modify the CM9700MDD-EVS configuration settings through the Endura WS5000 application. When you apply power to the unit
and connect the network cable, the Endura system manager registers the CM9700MDD-EVS as an Endura device and creates a basic
configuration. To modify this basic Endura configuration, refer to the WS5000 Operation manual and the Endura Resource CD for
instructions. Some settings that you may want to configure include the time format (configure the WS5000 Time Standard setting) and the
video format (NTSC or PAL; configure the WS5000 Type setting).
ADDITIONAL OPTIONAL CONFIGURATION
Alarm Configuration
You can configure the matrix system to receive alarms from the Endura system for monitoring and action within the matrix system.
Endura system alarms can be any of the following types:
•
Contact alarms
•
Motion alarms
Endura system alarms are received by the CM9700 system as soft alarms and can be viewed on the CM9760-KBD matrix system keyboard.
Refer to Configure a CM9700 Soft Alarm to Represent an Endura Alarm on page 31 for instructions.
Macro Configuration
You can configure macros in the CM9700 matrix system to activate scripts in the Endura system. Refer to Macro Configuration on page 32.
Network Video Recorder Configuration
You can configure the matrix system and the CM9700MDD-EVS for Network Video Recorder (NVR) management. Refer to Network Video
Recorder Management on page 34.
C1570M-E (4/07)
25
ADD THE CM9700MDD-EVS AND ENDURA CAMERAS TO THE 9700 MATRIX CONFIGURATION
To add a CM9700MDD-EVS to a 9700 matrix system configuration, you need to complete the following tasks:
1. Add the CM9700MDD-EVS to the matrix system configuration. Refer to Add the CM9700MDD-EVS to the Matrix System Configuration on
page 26 for instructions.
2. Configure the CM9700MDD-EVS settings. Refer to Configure the CM9700MDD-EVS Settings on page 28 for instructions.
3. Add the Endura network cameras to the matrix system configuration. Refer to Add Endura Cameras to the Matrix System Configuration on
page 29 for instructions. Be sure to assign each Endura camera a logical camera number that matches the logical camera number assigned
through the WS5000 application.
ADD THE CM9700MDD-EVS TO THE MATRIX SYSTEM CONFIGURATION
1. Install the CM9700-MGR software, and then configure the matrix system. Instructions are provided in the CM9700-MGR Software Guide.
As you are adding matrix system cameras, be sure to reserve matrix bay inputs to be used as tie line inputs for one or more
CM9700MDD-EVS units. You must reserve one matrix bay input for each CM9700MDD-EVS. Figure 20 illustrates unused matrix bay inputs
(starting at camera 253) that can be used as CM9700MDD-EVS tie lines.
Figure 20. CM9700-MGR Camera Grid
2. Click Wizards > Add Device Wizard (or click the tree view section, and then click Add Device). The Add Device wizard opens.
3. Specify Endura Device in the Select Device Type drop-down box, and then click CM9700_MDD_EVS in the Select Model drop-down box.
Figure 21. Adding a CM9700MDD-EVS
4. Click Next. The Number of Devices page opens.
26
C1570M-E (4/07)
Figure 22. Number of Devices Page
Select the number of CM9700MDD-EVS units. Remember that one matrix bay input must be available for each CM9700MDD-EVS, so the
number of units cannot exceed the number of available inputs on the matrix bay.
5. Click Next. The Port Configuration page opens, with the number of the first available port in the Host Port field. You can select a different
port number; note however that it is strongly recommended that you use the default baud rate and parity settings, which are provided.
NOTE: All CM9700MDD-EVS units on a CM9700-CC1 node must have the same baud rate and parity settings. If you change these settings
for one CM9700MDD-EVS unit, every unit on the node will be updated to match these settings when the CM9700-MGR configuration files
are transferred to the CM9700MDD-EVS (as described in Export the Configuration Files and Transfer the Data to the CM9700MDD-EVS on
page 38).
Figure 23. Port Configuration Page
6. Click Next, and then click Finish on the Add More Devices page. The specified number of CM9700MDD-EVS units is added to the node, as
illustrated in Figure 24. Note that camera inputs 253-256 are assigned as the CM9700MDD-EVS tie lines.
Figure 24. Sample CM9700MDD-EVS Units Added to the Matrix System
7. Continue with the steps in the following section to configure additional CM9700MDD-EVS settings.
C1570M-E (4/07)
27
CONFIGURE THE CM9700MDD-EVS SETTINGS
When you click a CM9700MDD-EVS unit in the tree view portion of the CM9700-MGR main window, the CM9700MDD-EVS unit’s properties
open in the properties box. Use these property fields to configure each CM9700MDD-EVS unit.
Figure 25. Configuring CM9700MDD-EVS Settings
1. (Optional) To change the default name click one of the CM9700MDD-EVS units, and then type a new name in the Friendly Name field.
Repeat for each CM9700MDD-EVS unit. Short names are recommended to minimize the length of the text displayed on the monitor.
2. The remaining fields in the Network Configuration section (other than the Friendly Name) are global settings. If you change any of the
following settings for one unit, the setting is changed for all CM9700MDD-EVS units on the node.
NOTE: The configuration settings are not updated in the CM9700MDD-EVS units until you complete the “Export” and “Transfer” steps.
Refer to the steps described in Export the Configuration Files and Transfer the Data to the CM9700MDD-EVS on page 38.
Audio On Switch: Select Yes to activate audio each time the camera is switched.
Big Jump: Type the number of minutes you want the video to jump during playback when you select Large Jump Forward or Large Jump
Backwards on the keyboard.
Display Mode: Select the type of video streams the CM9700MDD-EVS units will display. You can configure the units to display live video
only, recorded video only, or both types of video. If you select both types of video (“LiveAndRecorded”), use the Live On Switch setting
(described below) to set the default video display mode.
Initial Jump Back: Type the number of seconds you want the video to jump back when switching to a recorded video stream; this setting
does not affect live video.
Live On Switch: Select Yes to set live video as the default mode for all CM9700MDD-EVS units on this node. Select No to set playback
as the default mode. When an operator switches to a camera viewed through any CM9700MDD-EVS on this node, the monitor will display
either live video or playback video, based on this setting.
Small Jump: Type the number of seconds you want the video to jump during playback when you select Small Jump Forward or Small
Jump Backwards on the keyboard.
Time Sync Frequency: Type the frequency (in minutes) when the CM9700MDD-EVS will adjust the time and date settings on the
CM9700-CC1. To disable this feature, type 0.
Video Lock: Type the number of minutes you want the video lock to last. The video lock function designates a portion of video that is
saved, so that the NVR does not overwrite the video. This video can be retrieved at a later time. Refer to Set Video Lock on page 44 for
instructions on using the video lock feature.
3. The fields in the Port section control the CM9700MDD-EVS unit’s connection to the CM9700-CC1. Note that the same baud rate and parity
are applied to all CM9700MDD-EVS units on the CM9700-CC1 node. If you change these settings for any CM9700MDD-EVS unit on the
node, the settings are applied to every other unit on the node.
28
C1570M-E (4/07)
ADD ENDURA CAMERAS TO THE MATRIX SYSTEM CONFIGURATION
1. Click Wizards > Add Device Wizard. The Add Device wizard opens.
2. Specify Camera in the Select Device Type drop-down box, and then click EnduraCam in the Select Model drop-down box.
Figure 26. Adding an Endura Camera
3. Click Next. The Add Video Input/Output Device page opens.
Figure 27. Video Input/Output Device Page
4. Specify the number of devices and the physical number range by completing the following fields:
Number of Devices: Select the number of Ethernet cameras you want to add.
Start Physical Number: The first available physical number appears. It is recommended that you use this default number.
Skip or Overwrite: If you select Skip, the system will only assign available physical numbers to the new devices. If the system finds a
physical number that is already assigned, it skips to the next sequential physical number until the specified number of devices is added or
the last physical number is reached. If you select Overwrite, the system will replace any existing devices within the range of physical
numbers specified by your selections on this page.
5. Click Next. The Device Identification page opens.
C1570M-E (4/07)
29
Figure 28. Device Identification Page
6. Specify the device name(s) and logical number range by completing the following fields:
Name: Type a base name for the device. If you want a space between the name and the logical number, use the spacebar to enter a space
after the name. You can edit individual camera names after completing the Add Device wizard. Refer to How to Configure Cameras and
Other Video Input Devices in the CM9700-MGR Software Guide for instructions.
NOTE: Short names are recommended to minimize the length of the text displayed on the monitor.
Starting Logical Number: Type the first number in the range of logical numbers that you want to assign to the devices. Be sure to assign
each Endura camera a logical number that matches the logical camera number assigned through the WS5000 application.
Skip or Reuse: If you select Skip, the system will only assign available logical numbers to the new devices. If the system finds a logical
number that is already assigned, it skips to the next sequential logical number until the specified number of devices is added.
Video input (camera) logical numbers can be any number between 1 and 999989. Logical numbers between 999990 and 999999 are
reserved for system use.
If you select Reuse, the system will assign logical numbers within the range of numbers specified by your selections on this page. If any
existing devices have logical numbers within this same range, the logical numbers will be duplicated (this is not recommended).
Each device is named “NameX” where “Name” equals the entry in the Name field and “X” equals the next available number, incrementing
from the number that you specify in the Starting Logical Number field. Names and logical numbers should be unique across the system.
7. Click Next, and then click Finish on the Add More Devices page.
30
C1570M-E (4/07)
CONFIGURE A CM9700 SOFT ALARM TO REPRESENT AN ENDURA ALARM
1. Use the Endura WS5000 application to configure alarms in the Endura system. Be sure to assign each alarm a unique logical number.
These can be contact alarms or motion alarms. Refer to the WS5000 Operation manual and the Endura Resource CD for instructions.
2. Use the CM9700-MGR software to add a soft alarm for each Endura alarm. Choose alarm physical numbers to match the logical numbers
that you assigned to the corresponding Endura alarms in step 1. Refer to the How to Add Soft Alarms section in the CM9700-MGR
Software Guide for detailed instructions.
Figure 29. Adding a CM9700 Soft Alarm
3. Use the CM9700-MGR software to configure each soft alarm to display on CM9700 system monitors. Refer to the How to Program Alarms
section in the CM9700-MGR Software Guide for detailed instructions.
Figure 30. Viewing CM9700 Alarms
When the alarm is triggered in the Endura system, the alarm information is passed through to the CM9700 matrix system and is displayed on
CM9700 system monitors, according to the settings configured in step 3.
C1570M-E (4/07)
31
MACRO CONFIGURATION
To configure a CM9700 macro to activate a script in the Endura system, complete the following steps:
1. In the Endura system configure a script to complete the desired task. Note that you must use a unique logical number as the script name,
which you will use in the CM9700 matrix system (refer to step 4 on page 33; refer to the WS5000 Operation manual and the Endura
Resource CD for instructions on configuring an Endura script).
Figure 31. WS5000 Add Script Dialog Box
2. Use the CM9700-MGR software to add a macro (click the Macros tab, and then click New Macro). Click Edit Steps to open the Macro Editor
window. Refer to the Macros section in the CM9700-MGR Software Guide for detailed instructions.
Figure 32. Adding a Macro to Activate an Endura Script
32
C1570M-E (4/07)
QUICK MODE CHECK BOX
CURRENT STEP
DISPLAY BAR
MACRO
COMMAND
TREE
MACRO STEP
GRID
MACRO
STEP
BUTTONS
HELP PANEL
Figure 33. Macro Editor Window
3. In the macro command tree, click Miscellaneous, and then double click the RES (Run Endura Script) command. The command is added as a
step in the macro step grid.
Figure 34. Add a Run Endura Script Command
4. Specify the name of the Endura script as Parameter 1. This must be the unique logical number that you assigned as the script name in
step 1.
5. Click Close to save the macro and close the Macro Editor window.
C1570M-E (4/07)
33
NETWORK VIDEO RECORDER MANAGEMENT
You can use the matrix system and the CM9700MDD-EVS as an NVR (network video recorder) management tool.
Sample NVR management scenario:
This sample system includes the following components:
•
Cameras connected to the matrix switcher
•
NVRs connected to the Endura network (through Endura encoders)
If an NVR goes off line a matrix system alarm can trigger a macro that you have configured to switch the video to a backup NVR (through backup
Endura encoders, through matrix outputs). This ensures that no video will be lost as a result of an NVR failure.
To configure your system for the sample scenario, complete the following tasks:
•
Add the CM9700MDD-EVS units and cameras to the matrix system configuration, as described in the previous sections.
•
Add the NVRs to the matrix system configuration. Refer to Add a Network Video Recorder (NVR) to the Matrix System Configuration on
page 34.
•
Configure a macro to switch the video to a backup NVR (through backup Endura encoders). Refer to the CM9700-MGR Software Guide for
instructions on configuring a macro.
•
Add soft alarms, and then configure the alarms to start the backup macro when the alarm is triggered. Refer to Associate a Macro with a
Soft Alarm on page 37.
•
Specify the alarm that will be triggered if the NVR goes off line. Refer to Associate a Soft Alarm with an NVR on page 37.
ADD A NETWORK VIDEO RECORDER (NVR) TO THE MATRIX SYSTEM CONFIGURATION
1. Click Wizards > Add Device Wizard in the CM9700-MGR (or click the tree view section, and then click Add Device). The Add Device wizard
opens.
2. Specify Endura Device in the Select Device Type drop-down box, and then click NVR in the Select Model drop-down box.
Figure 35. Adding an NVR
3. Click Next. The Number of Devices page opens.
Figure 36. Number of Devices Page
4. Select the number of NVRs to add, and then click Next.
34
C1570M-E (4/07)
5. Click Finish on the Add More Devices page. The specified number of NVR units is added to the matrix system configuration.
6. To view an NVR, click the + symbol next to any CM9700MDD-EVS, and then click the + symbol next to the IP Network. All Endura cameras
and NVRs appear in the device tree under IP Network. Click an NVR to view its settings.
7. Configure each NVR with a unique identifier by completing either or both of the following fields in the CM9700-MGR (to complete the fields,
click the NVR, and then click the appropriate field in the properties box; refer to Figure 37):
Friendly Name: This name can be found in the Device FriendlyName field in the Local Device settings displayed for the device properties
in the Endura system, as illustrated in Figure 38.
UDN: This identifier can be found in the Local Device UDN field in the Local Device settings displayed for the device properties in the
Endura system, as illustrated in Figure 38.
When looking at the device properties in the Endura system, be sure to navigate to the device that is identified as a Network Video
Recorder (refer to the Device Type Field in Figure 38).
8. Configure a CM9700 macro to switch the video to a backup NVR in the event that the NVR goes off line; refer to Configure a CM9700 Macro
to Switch Video to a Backup NVR on page 36 for instructions.
9. Assign an alarm to be triggered when the NVR goes off line, as described in Associate a Macro with a Soft Alarm and Associate a Soft
Alarm with an NVR on page 37.
Figure 37. Viewing NVRs in the Device Tree
C1570M-E (4/07)
Figure 38. Locating the UDN for an NVR
35
CONFIGURE A CM9700 MACRO TO SWITCH VIDEO TO A BACKUP NVR
1. Use the CM9700-MGR software to add a macro, and then click Edit Steps to open the Macro Editor window. Refer to the Macros section in
the CM9700-MGR Software Guide for detailed instructions.
Figure 39. Adding a Macro for NVR Management
2. In the macro command tree, click Camera, and then double click the SWT (switch) command. The command is added as a step in the macro
step grid.
3. Specify the monitor number and the camera number in the parameter fields.
4. Repeat steps 2 and 3 for each camera connected to the NVR.
Figure 40. Sample Macro for NVR Management
5. Click Close to save the macro and close the Macro Editor window.
6. Repeat steps 1-5 for each NVR.
36
C1570M-E (4/07)
ASSOCIATE A MACRO WITH A SOFT ALARM
1. Use the CM9700-MGR Add Soft Alarms Wizard to add a soft alarm for each NVR.
2. (Optional) Give each alarm a recognizable name.
3. Click a soft alarm, and then select a macro in the Macro drop-down box.
Figure 41. Associate a Macro with a Soft Alarm
ASSOCIATE A SOFT ALARM WITH AN NVR
1. Click the NVR in the device tree.
2. Click the NVR Alarm field, and then select the alarm from the drop-down box.
Figure 42. Associate the Alarm with the NVR
C1570M-E (4/07)
37
EXPORT THE CONFIGURATION FILES AND TRANSFER THE DATA TO THE CM9700MDD-EVS
Once you have configured the CM9700MDD-EVS settings in the CM9700-MGR software, complete the following tasks to transfer the data to the
matrix system components:
•
Export the configuration files, and then transfer these files to the CM9700-CC1. These configuration files are named <NodeName>.* (each
type of configuration file is named with a different extension).
•
During the export process, an XML file is created for the CM9700MDD-EVS units on the node (refer to Figure 44); transfer this file, named
MDD_<NodeName>.xml, to the CM9700MDD-EVS. In a multi-node matrix system, one XML file is created for each node.
Complete the following steps to transfer CM9700MDD-EVS configuration settings to the matrix system:
1. Use the CM9700-MGR Export option (click File > Export To Configuration Files) to export the configuration files. Refer to the Creating
Configuration Files (Export) for the CC1 section in the CM9700-MGR Software Guide for instructions.
Configuration files can be exported either to a hard drive (either local or network) or to a floppy drive. If you specify a floppy drive for the
export location, the CM9700-MGR will provide prompts during the export process to insert a floppy disk for the configuration files and a
floppy disk for the XML file.
Figure 43. Exporting CM9700-MGR Configuration Files
Figure 44. CM9700MDD-EVS XML File
2. When the Export process is complete, complete the following tasks:
•
•
38
Transfer the configuration files to the CM9700-CC1, as described in the Copying the Configuration Files to the CC1 section in the
CM9700-MGR Software Guide.
Transfer the XML file to the CM9700MDD-EVS through the Endura system, as described in step 3.
C1570M-E (4/07)
3. Use the Endura WS5000 application to transfer the XML file to the CM9700MDD-EVS through the Endura network, as described in the
following steps:
a.
Click the Devices tab in the WS5000 Setup window.
b.
Navigate to the CM9700MDD-EVS unit.
A NOTE ABOUT CM9700MDD-EVS DEVICE NAMES IN THE WS5000 APPLICATION:
The WS5000 application assigns a generic default name to each CM9700MDD-EVS unit (it does not use the name assigned through the
CM9700-MGR software). Therefore it can be impossible to recognize individual CM9700MDD-EVS units in this application.
It is recommended (although not essential in a single-node system) that you connect each CM9700MDD-EVS unit to the Endura network one
at a time, and then edit the device name in the WS5000 Setup window and save the changes. This will allow you to identify individual
CM9700MDD-EVS units from within the WS5000 application.
In a multi-node matrix system, it is strongly recommended to:
•
follow this additional step of connecting each CM9700MDD-EVS unit to the network one at a time and changing the device name in the
WS5000 Setup window, and
•
include the node name in each CM9700MDD-EVS device name. This will allow you to transfer the correct XML file to each
CM9700MDD-EVS unit, as described in step f.
c.
Click the “…” button beside the MDD file field. The Open File dialog box opens.
d.
Navigate to the folder containing the CM9700MDD-EVS XML file. This is the same folder used when exporting configuration files from
the CM9700-MGR, as described in step 1. The XML file can be located on a hard drive or a floppy disk.
e.
Click the XML file, and then click Open (in a multi-node matrix system, be sure to click the correct XML file; look for the node name in
the XML file name).
The Open File dialog box closes and the file name appears in the MDD file field, as illustrated in Figure 45.
f.
Click Apply to transfer the XML file to the CM9700MDD-EVS unit.
4. Repeat step 3 for each CM9700MDD-EVS unit in your system.
Figure 45. Transferring the CM9700MDD-EVS XML File Through the Endura Network
C1570M-E (4/07)
39
Operation
FRONT PANEL INDICATORS
NETWORK CONNECTOR
UNIT STATUS
NETWORK STATUS
NETWORK ACTIVITY
CONFIGURATION/
RESET BUTTON
Figure 46. CM9700MDD-EVS Front Panel
Pelco badge (power indicator)
The Pelco badge glows blue when the unit has power.
Unit status indicator
Unit status is indicated by one of the following three colors:
Green
The unit is functioning normally.
Amber
The unit is in configuration mode.
Red
The unit is in an error condition.
If the unit status indicator is ever flashing, the unit is in one of three modes (refer to Configuration/Reset Button on page 49).
Network status indicator
Network status (connection and speed) is indicated by one of the following conditions:
Off
The unit is not connected to the network.
Solid Amber
The unit is connected to the network using the 100BaseT standard.
Solid Red
The unit is connected to the network using the 10BaseT standard.
NOTE: For optimum performance, the 100BaseT standard is recommended.
Network activity indicator
The network activity indicator flashes whenever the video CM9700MDD-EVS is sending or receiving network data.
40
C1570M-E (4/07)
VIEWING VIDEO
If you have not already done so, install the CM9760-KBD keyboard, connect it to the matrix system, and then complete the basic setup process.
Refer to the CM9760-KBD/CM9760-KBR Installation/Operation manual for instructions; this manual is provided in the matrix system binder.
NOTE: CM9760-KBD software version 8.24 or higher is required.
Video from an Endura system camera (connected to an Endura encoder) can be viewed in the following ways:
•
As a digital signal routed to the matrix switcher through the CM9700MDD-EVS: To view digital video, either live or recorded,
complete the steps described below.
•
As an analog signal: This option is available if your system includes an optional analog connection between the Endura system camera
(through the Endura encoder) and the matrix switcher. To view analog video, simply select the logical camera number that corresponds to
the input on the matrix switcher used for the analog connection.
NOTE: In a system using the optional analog connection, the alternate cameras feature provides an easy way to switch from live analog
video to digital video recorded on the Endura NVR. Refer to Using the Alternate Cameras Feature on page 48 for instructions.
To view digital video from an Endura camera, complete the following steps:
1. Log on to the keyboard and select a monitor connected to the matrix system.
2. Select the logical number of the camera from the Endura system that you want to view. This logical number is the number designated
through the CM9700-MGR application and in the Endura WS5000 application, as described in Software Configuration on page 25.
3. Video from the Endura system camera appears on the matrix system monitor. The video is either live video from the camera or recorded
video from an Endura system NVR, depending on what setting you selected for the Live On Switch field in the CM9700MDD-EVS properties
(as described in Configure the CM9700MDD-EVS Settings on page 28).
•
•
Live video is displayed on the matrix system monitor with a green border.
Recorded video is displayed on the matrix system monitor with a yellow border, and the video starts at 30 seconds back from the
present.
When video from an Endura system camera (either live or recorded) is displayed on the matrix system monitor, the keyboard LCD displays
DVR Menu 1.
EXIT ICON
Figure 47. DVR Menu 1
NOTE: To return to the default CM9760-KBD menu, press the Exit icon. To return to the DVR menu from the default CM9760-KBD menu,
press the Camera icon.
4. Use the keyboard joystick and icons to view and control the video. For instructions on viewing and controlling the video, refer to Viewing
and Controlling Video on page 43.
C1570M-E (4/07)
41
5. To switch the video mode (from live to recorded, or vice versa), press the MORE icon to view DVR Menu 2, and then press the Switch Mode
icon.
SWITCH MODE ICON
Figure 48. DVR Menu 2
6. To access the remaining DVR icons, which appear on DVR Menu 3, press the MORE icon.
ABC
Figure 49. DVR Menu 3
42
C1570M-E (4/07)
VIEWING AND CONTROLLING VIDEO
NOTE: In the following procedures the “Select Play” or “Select Pause” step can be accomplished either by moving the joystick or by pressing
the keyboard icon.
Identify the CM9700MDD-EVS Unit
If your system includes more than one CM9700MDD-EVS unit, any unit can display video on the monitor when you select video from an Endura
camera. To determine the CM9700MDD-EVS currently in use, press the ID icon on DVR Menu 3. The CM9700MDD-EVS unit’s Friendly Name
appears on the monitor, and the first LED on the CM9700MDD-EVS unit (the Unit Status Indicator LED) blinks momentarily.
PTZ Control
If the camera displayed on the monitor includes PTZ functions, you may be able to use the CM9760-KBD joystick and keys to control the PTZ
functions, depending on how the video connections are wired.
Digital Signal Connections
When video from an Endura system camera is connected to an Endura system encoder and then routed to the matrix switcher as a digital signal
through the CM9700MDD-EVS, you can control the camera’s PTZ functions from either the matrix system (using the CM9760-KBD keyboard) or
the Endura system (using the KBD5000 keyboard). Refer to the appropriate keyboard manual for instructions.
Analog Signal Connections
In some systems, an optional analog video signal may be routed from an Endura system camera (connected to an Endura system encoder) to the
matrix switcher. In this scenario, PTZ control depends on the method used, as follows:
Method 1: If the matrix system includes an optional CM9760-CXT or CM9760-CXTA Coaxitron® translator, you can control the camera’s PTZ
functions from either the matrix system (using the CM9760-KBD keyboard) or the Endura system (using either the KBD5000 keyboard or the
WS5050). Refer to the appropriate keyboard manual for instructions.
Method 2: If the analog video is routed to the matrix system through a CM9760-MDA unit, then the connection is based on P protocol, RS-422
wiring. With this method, PTZ control is available only from the matrix system keyboard (not from the Endura system); refer to the CM9760-KBD
Keyboard Installation/Operation manual for instructions.
Display or Remove Monitor Text
ABC
To remove the monitor text (camera titles, etc.) from the monitor display, press the monitor text icon. Pressing the monitor text icon again returns
the monitor text to the monitor display.
Mark an Event
Live Video
While viewing live video, press the Mark Event icon. A label displaying “Event Marked” flashes briefly on the monitor.
Recorded Video
1. While viewing recorded video, select Pause at the beginning of the video that you want to define as an event.
2. Press the Mark Event icon. A label displaying “Event Marked” flashes briefly on the monitor.
Search Recorded Video For an Event
1. While viewing recorded video, press the Next Event icon to search forward for an event. The video jumps forward to the beginning of the
next event recorded from the same camera.
2. While viewing recorded video, press the Previous Event icon to search in reverse for an event. The video jumps to the beginning of the
previous event recorded from the same camera.
C1570M-E (4/07)
43
Seek (Search for a Specific Time)
Live Video
1. While viewing live video, press the Seek icon. The keyboard LCD displays the date field.
2. Enter the date (MMDDYYYY), and then press the Seek icon again. The keyboard LCD displays the time field.
3. Enter the time (HHMMSS), and then press the Seek icon again. The video from the specified time setting plays.
Recorded Video
1. While viewing recorded video, press the Seek icon. The keyboard LCD displays the date field.
2. Enter the date (MMDDYYYY), and then press the Seek icon again. The keyboard LCD displays the time field.
3. Enter the time (HHMMSS), and then press the Seek icon again. The video from the specified time setting plays.
Set Video Lock
NOTE: This functionality is only available with recorded video.
You can use video lock to save a portion of recorded video and protect it from being deleted as a part of the standard NVR recording process.
(Refer to your NVR manual for a description of how recorded video is deleted or overwritten.)
1. While viewing recorded video, advance or rewind the video to the point that you want the lock function to begin.
Or, you can use the search functions (Next Event, Previous Event, or Seek) to find the recording that you want to lock.
2. Select Pause to stop the video at the point that you want to the lock function to begin.
3. Press the Exit icon to return to the default menu, and then press the Define icon.
4. Enter your four-digit Define menu PIN. The Define menu appears.
DEF
1
22
VIDEO
LOSS
PRST
Ptz
MOR
E
Figure 50. Define Menu
5. Press the More icon. The Define Menu 2 appears.
DEF
1
22
Ptz
MOR
E
Figure 51. Define Menu 2
6. Press the Video Lock icon. Video lock protection is applied and a label displaying “Video Locked” flashes briefly on the monitor.
NOTE: The default video lock time is one minute. You can change this setting in the CM9700-MGR by entering a new value in the
Video Lock field. Refer to Configure the CM9700MDD-EVS Settings on page 28 for instructions.
44
C1570M-E (4/07)
Using Digital Zoom (Recorded Video Only)
During playback of recorded video, you can use the digital zoom feature to enlarge a portion of the video image. When the digital zoom feature is
enabled, you will see a picture-in-picture frame on the monitor. The picture-in-picture frame displays the original recorded image, and contains a
square showing the portion of the image that is enlarged. The remaining monitor image displays the enlarged image.
1. Twist the joystick to the right or press the In key on the keyboard. Repeat this step to zoom in further.
2. To zoom out to a lower digital zoom magnification, twist the joystick to the left or press the Out key. When you reach normal magnification,
the picture-in-picture frame on the monitor disappears.
Once digital zoom is active you can move the joystick in any direction (up, down, left, or right) to move the square inside the picture-in-picture
frame; this allows you to move the portion of the image covered in the zoomed view.
Controlling Video with Keyboard Icons
Table E defines the video functions that you can control with CM9760-KBD icons from the DVR menus.
Table E. Video Functions Controlled by Keyboard Icons
Function
Keyboard Icon
Menu
Play recorded video.
DVR Menu 1
Pause recorded video.
DVR Menu 1
Small jump backwards (recorded video only).
NOTE: The default jump time is 10 seconds. You can change this setting in the CM9700MDD-EVS
properties. Refer to Configure the CM9700MDD-EVS Settings on page 28.
DVR Menu 1
Frame reverse (recorded video only).
DVR Menu 1
Frame advance (recorded video only).
DVR Menu 1
Small jump forwards (recorded video only).
NOTE: The default jump time is 10 seconds. You can change this setting in the CM9700MDD-EVS
properties. Refer to Configure the CM9700MDD-EVS Settings on page 28.
DVR Menu 1
Display the next menu
DVR Menus 1,
2, and 3
Exit the menu.
DVR Menus 1,
2, and 3
Big jump backwards (recorded video only).
NOTE: The default jump time is 60 minutes. You can change this setting in the CM9700MDD-EVS
properties. Refer to Configure the CM9700MDD-EVS Settings on page 28.
DVR Menu 2
Big jump forwards (recorded video only).
NOTE: The default jump time is 60 minutes. You can change this setting in the CM9700MDD-EVS
properties. Refer to Configure the CM9700MDD-EVS Settings on page 28.
DVR Menu 2
Switch mode (between live and recorded video).
DVR Menu 2
Previous event (recorded video only).
DVR Menu 2
C1570M-E (4/07)
45
Table E. Video Functions Controlled by Keyboard Icons (Continued)
Function
Keyboard Icon
Menu
Mark event; this feature allows the operator to mark the currently viewed video as an event. Press the
icon when you want to define an event. A label displaying “Event Marked” flashes briefly on the
monitor.
DVR Menu 2
Next event (recorded video only).
DVR Menu 2
ID: Identify the CM9700MDD-EVS currently in use; when the operator presses this icon the
CM9700MDD-EVS unit’s Friendly Name appears on the monitor and the first LED on the
CM9700MDD-EVS unit (the Unit Status Indicator LED) blinks momentarily.
DVR Menu 3
Toggle the monitor text (on or off).
ABC
Seek by time; this feature allows the operator to search for recorded video from the specified date
and time.
DVR Menu 3
DVR Menu 3
Change the audio setting (toggle off and on). The default audio setting is off (muted).
NOTE: When using multiple CM9700MDD-EVS units, an additional audio routing solution may be
required.
DVR Menu 3
Print; this function is reserved for future use.
DVR Menu 3
Lock video (recorded video only).
Define Menu 2
Controlling Recorded Video with the Joystick
Many of the joystick movements described below operate in both momentary and latching modes. These modes are defined as follows:
•
Momentary mode: The operation is activated until you release the joystick. Moving the joystick a small distance from center triggers
momentary mode.
•
Latching mode: The operation remains activated after you release the joystick, until you move the joystick again. Moving the joystick as
far from center as possible triggers latching mode.
Play Recorded Video
Move the joystick all the way up. The video resumes playing at normal speed.
NOTE: This function returns the video to normal speed, no matter what mode the playback is in at the time.
Pause Recorded Video
Move the joystick all the way down.
Play Recorded Video in Fast Forward
NOTE: You can fast forward only to the end of the recorded video, which includes recorded video up to the present.
Move the joystick to the right. The speed and mode depends on the current mode and the distance from center that you move the joystick, as
follows (refer to Playback Speed on page 47 for an explanation of the abbreviations used in this section):
Current Mode = Pause:
46
•
To the right a little: video plays at 1⁄2x (momentary).
•
To the right a little more: video plays at 1x (momentary).
•
To the right all the way: video plays at 2x (latching).
•
To the right all the way again: video plays at 4x (latching).
•
To the left all the way: video decreases speed from 4x to 2x (latching).
C1570M-E (4/07)
Current Mode = Play:
•
•
•
•
•
•
•
•
•
To the right a little: video plays at 2x (momentary).
To the right a little more: video plays at 4x (momentary).
To the right all the way: video plays at 2x (latching).
To the right all the way again: video plays at 4x (latching).
To the right all the way again: video plays at 8x (latching).
To the right all the way again: video plays at 16x (latching).
To the right all the way again: video plays at 32x (latching).
To the left all the way: video speed decreases one level (latching); for example, if video is playing at 8x, moving the joystick all the way to
the left decreases the speed to 4x.
To the left all the way from 1x: video plays at 1⁄2x (latching); moving the joystick all the way to the left from 1⁄2x changes the playback to
reverse.
NOTE: Figure 52 illustrates the playback speeds and the progression of speed settings.
Play Recorded Video in Reverse
Move the joystick to the left. The speed and mode depends on the current mode and the distance from center that you move the joystick, as
follows (refer to Playback Speed for an explanation of the abbreviations used in this section):
Current Mode = Pause:
•
•
•
•
•
To the left a little: video plays at -1⁄2x (momentary).
To the left a little more: video plays at -1x (momentary).
To the left all the way: video plays at -2x (latching).
To the left all the way again: video plays at -4x (latching).
To the right all the way: video decreases speed from -4x to -2x (latching).
Current Mode = Play:
• To the left a little: video plays at -2x (momentary).
• To the left a little more: video plays at -4x (momentary).
• To the left all the way: video plays at -2x (latching).
• To the left all the way again: video plays at -4x (latching).
• To the left all the way again: video plays at -8x (latching).
• To the left all the way again: video plays at -16x (latching).
• To the left all the way again: video plays at -32x (latching).
• To the right all the way: video speed decreases one level (latching); for example, if video is playing at -8x, moving the joystick all the way to
the right decreases the speed to -4x. This continues until the video speed is at -1⁄2x; the next movement to the right changes the playback to
forward.
NOTE: Figure 52 illustrates the playback speeds and the progression of speed settings.
Playback Speed
12
⁄x
1x
2x
4x
8x
16x
32x
=
=
=
=
=
=
=
half normal speed
normal speed
two times normal speed
four times normal speed
eight times normal speed
sixteen times normal speed
thirty-two times normal speed
Negative values (such as -8x) indicate reverse playback.
Figure 52 illustrates the playback speeds and the progression of speed settings.
-32x
-16x
-8x
-4x
-2x
-1x
-Ωx
Ωx
1x
2x
4x
8x
16x
32x
Figure 52. Playback Speed Timeline
C1570M-E (4/07)
47
CONFIGURING THE OFFSET+ AND OFFSET- FUNCTIONS TO SWITCH CAMERAS
The Offset+ and Offset- functions allow you to configure an offset value, which allows an easy way to switch cameras. To configure the Offset+
and Offset- functions, complete the following steps:
1. Assign the Offset+ function to a user-definable control key on the CM9760-KBD keyboard. Refer to the Setting the Control Keys Function
section of the CM9760-KBD Keyboard Installation/Operation manual for instructions. Select Offset+ from the list of functions.
2. Assign an Offset+ value (using the define number icon) to the user-definable control key. To switch to a new camera, this value will be
added to the camera number that the operator is viewing.
Example: If the Offset+ value is 1000, then when the operator is viewing Camera 1, pressing the Offset+ key will switch to Camera 1001.
(The new value must be a valid camera number; if not, the camera does not switch.)
3. Assign the Offset- function to a user-definable control key on the CM9760-KBD keyboard. Refer to the Setting the Control Keys Function
section of the CM9760-KBD Keyboard Installation/Operation manual for instructions. Select Offset- from the list of functions.
4. Assign an Offset- value (using the define number icon) to the user-definable control key. To switch to a new camera, this value will be
subtracted from the camera number that the operator is viewing.
Example: If the Offset- value is 200, then when the operator is viewing Camera 1000, pressing the Offset- key will switch to Camera 800.
(The new value must be a valid camera number; if not, the camera does not switch.)
USING THE ALTERNATE CAMERAS FEATURE
If your system uses an optional analog connection between the Endura camera (through the Endura encoder) and the matrix switcher, you can
use the alternate cameras feature as an easy way to switch from live analog video to digital recorded video.
When a system is installed with an analog connection, you need to define the following camera logical numbers in the CM9700-MGR:
•
Matrix Camera: This corresponds to the analog signal. For example, if you connect the first Endura camera (through the Endura encoder)
to the first input on the matrix switcher, the physical number is 1 and you might assign logical number 1 to this camera definition.
•
Endura Camera: This corresponds to the digital signal, available through the Endura network and the CM9700MDD-EVS. As an example,
you might want to assign logical number 5001 to the first Endura camera.
Using these examples, you would be able to view video from the first Endura camera by selecting either logical number 1 (for the analog
signal) or logical number 5001 (for the digital signal).
48
1.
Once you have added the Endura cameras to the matrix system configuration, click one of the matrix cameras, such as logical camera
number 1, from the example described above.
2.
Click the Alternate Cameras field in the camera property box. The Alternate Cameras dialog box opens.
C1570M-E (4/07)
Figure 53. Assigning an Alternate Camera
3. Specify the Endura logical camera number as the alternate camera. For the example described above, you would specify logical camera
number 5001.
4. Click OK to close the Alternate Cameras dialog box, and then save the configuration changes.
5. When you view video from the analog connection, you can then press the Alt key to view that camera’s recorded video.
CONFIGURATION/RESET BUTTON
Use the recessed configuration/reset button at the top of the front panel to access the following modes:
Table F. Configuration/Reset Button Functions and Indicators
Mode
Function
Unit Status Indicator Light
Configuration
(Not implemented.)
• Flashing amber when entering this mode
Reboot
Restarts the unit.
• Flashing green when entering this mode
• Flashing green when selected and during
restart
Reset
Resets unit to factory default settings and
then restarts unit.
• Flashing red when entering this mode
• Flashing red when selected, then flashing
green during restart
Cancel
Cancels any configuration or reset action.
• No light
To access one of these modes:
1. Use a probe or paper clip to press and hold the configuration/reset button. The unit starts cycling through the four modes (configuration,
reboot, reset, and cancel), holding each mode for five seconds. The unit status indicator flashes the color for the current mode.
2. When the color of the desired mode appears, release the button.
NOTE: If there is no configuration activity for 15 minutes, the CM9700MDD-EVS automatically exits configuration/reset mode.
C1570M-E (4/07)
49
Troubleshooting
If the following instructions fail to solve your problem, contact Pelco Product Support at 1-800-289-9100 or 1-559-292-1981 for assistance.
Access the properties window for the CM9700MDD-EVS unit on the WS5050 Endura workstation (refer to the WS5000 operation manual).
Then note the following before calling Pelco:
•
Unit serial number: located on the Properties window and on the product label
•
Unit firmware version: located on the Advanced Properties window, listed for “DecoderApp”
Do not try to repair the unit yourself. Opening it immediately voids any warranty. Leave maintenance and repairs to qualified technical personnel.
Exchange the defective unit and return it for repair.
Table G. Troubleshooting the CM9700MDD-EVS
50
Problem
Possible Causes
Suggested Remedy
No video on monitor
Power turned off
Check that the monitor is switched on and the
CM9700MDD-EVS power indicator is lit.
Faulty cable connections
Check all leads, plugs, contacts, and connections.
Defective camera
Connect local monitor and check camera function.
Defective encoder
Check camera on a different encoder.
Network connectivity issues
Contact your network administrator.
The unit is not ready for operation after
firmware upload
Voltage failure during programming of
update file
Replace the device and have it checked by Pelco.
No tie line
Programming or data connection to the
CM9700-CC1
Check the wiring between the CM9700-CC1 and the
CM9700MDD-EVS.
Check the CM9700MDD-EVS configuration in the
CM9700-MGR.
No audio transmission to receiver
Defective hardware
Check functioning of all connected video devices.
Connection in use by another receiver
Wait until the connection is free and try again.
Faulty cable connection
Check all cable connections and ensure all plugs are
properly plugged in.
C1570M-E (4/07)
Specifications
MODEL
CM9700MDD-EVS
Matrix digital decoder (NET5301R optimized for use with matrix) that converts digital video streams from
Endura products into analog video to be viewed and controlled on a Pelco CM9700 Series matrix switcher.
SUPPLIED ACCESSORIES
Mating Connectors
1, 16-pin
4-pin to 2-pin adapter
For user-supplied power supply
SYSTEM
Processor
PowerPC® 405EP
Operating System
Linux®
Viewing and Control
CM9760-KBD (software version 8.24 or higher)
Setup/Configuration
Endura System
Matrix System
WS5050 or VCD5000
CM9700-MGR (version 9.03.012 or higher)
VIDEO/AUDIO
Video Standards
NTSC/PAL/EIA/CCIR composite
Video Coding
MPEG-4
Video Resolutions
NTSC
PAL
4CIF
2CIF
CIF
4CIF
2CIF
CIF
704 x 480
704 x 240
352 x 240
704 x 576
704 x 288
352 x 288
Video Output
1, BNC, 75 ohms, 1 Vp-p
Video Display Stream
1
Video Display Mode
Single Image
Audio Input
Reserved for future use
Audio Output
Speaker or line out
Audio Switch
Line, speaker
SERIAL/ALARM/RELAY PORTS
Serial
Pelco P (RS-422); uses 4 of 16 pins on terminal block connector
Alarm Inputs
Reserved for future use
Relay Output
Reserved for future use
FRONT PANEL INDICATORS/FUNCTIONS
Network
RJ-45, 10/100
Power
Blue
Status
Green, amber, red
Network Link/Speed
Amber, red
Network Activity
Green
Configuration/Reset
Recessed button, configuration, reboot, reset, cancel
C1570M-E (4/07)
51
POWER
Power Consumption
12 W, 41 BTU/H
Power Input
12 VDC +10%/-15%
24 VAC +10%/-15%
Power Connectors
4-pin
4-pin to 2-pin adapter
For RK5000PS-5U or NET5301PS
For user-supplied power supply
ENVIRONMENTAL
Ambient Temperature
70° to 74°F (21° to 23°C)
Operating Temperature Range
32° to 122°F (0° to 50°C) at unit air intake
Storage Temperature Range
-40° to 149°F (-40° to 65°C)
Operating Humidity
20% to 80%, noncondensing
Maximum Humidity Gradient
10% per hour
Operating Altitude
-50 ft to 10,000 ft (-16 m to 3,048 m)
Operating Vibration
0.25 G at 3 Hz to 200 Hz at a sweep rate of 0.5 octave/minute
PHYSICAL
Construction
Sheet metal
Finish
Gray metallic with black end caps, black matte finish
Dimensions
8.75" D x 6.50" W x 1.20" H
(22.20 x 16.50 x 3.00 cm)
Mounting
Desktop
Wall or Rack
Rubber feet provided
Optional mounting accessories required
Unit Weight
2.0 lb (0.9 kg)
OPTIONAL ACCESSORIES
RK5000PS-5U
Rack mount with power supply (12 units)
WM5001-4U
Wall mount without power supply (1 unit)
WM5001-4UEXP
Wall mount expansion (1 unit)
RECOMMENDED POWER SUPPLIES
NET5301PS
Power supply for one CM9700MDD-EVS (4-pin connector)
TF2000
Power supply for one CM9700MDD-EVS (4-pin to 2-pin adapter)
MCS Series
Multiple unit power supply, indoor
STANDARDS/ORGANIZATIONS
Pelco is a member of the MPEG-4 Industry Forum
Pelco is a member of the Universal Plug and Play (UPnP) Forum
Pelco is a member of the Universal Serial Bus (USB) Implementers Forum
Pelco is a contributor to the International Standards for Organization/Electrotechnical Commission (ISO/IEC) Joint Technical Committee 1 (JTC1),
“Information Technology,” Subcommittee 29, Working Group 11
Compliance, ISO/IEC 14496 standard (also known as MPEG-4)
Compliant with International Telecommunication Union (ITU) Recommendation G.711, “Pulse Code Modulation (PCM) of Voice Frequencies”
(Design and product specifications subject to change without notice.)
52
C1570M-E (4/07)
PRODUCT WARRANTY AND RETURN INFORMATION
WARRANTY
Pelco will repair or replace, without charge, any merchandise proved defective in material or
workmanship for a period of one year after the date of shipment.
Exceptions to this warranty are as noted below:
• Five years on fiber optic products and TW3000 Series unshielded twisted pair transmission
products.
• Three years on Spectra ® IV products.
• Three years on Genex ® Series products (multiplexers, server, and keyboard).
• Three years on Camclosure ® and fixed camera models, except the CC3701H-2,
CC3701H-2X, CC3751H-2, CC3651H-2X, MC3651H-2, and MC3651H-2X camera models,
which have a five-year warranty.
• Three years on PMCL200/300/400 Series LCD monitors.
• Two years on standard motorized or fixed focal length lenses.
• Two years on Legacy ®, CM6700/CM6800/CM9700 Series matrix, and DF5/DF8 Series fixed
dome products.
• Two years on Spectra III ™, Esprit®, ExSite®, and PS20 scanners, including when used in
continuous motion applications.
• Two years on Esprit and WW5700 Series window wiper (excluding wiper blades).
• Two years (except lamp and color wheel) on Digital Light Processing (DLP ®) displays.
The lamp and color wheel will be covered for a period of 90 days. The air filter is not
covered under warranty.
• Eighteen months on DX Series digital video recorders, NVR300 Series network video
recorders, and Endura ™ Series distributed network-based video products.
• One year (except video heads) on video cassette recorders (VCRs). Video heads will be
covered for a period of six months.
• Six months on all pan and tilts, scanners or preset lenses used in continuous motion
applications (that is, preset scan, tour and auto scan modes).
Pelco will warrant all replacement parts and repairs for 90 days from the date of Pelco
shipment. All goods requiring warranty repair shall be sent freight prepaid to Pelco, Clovis,
California. Repairs made necessary by reason of misuse, alteration, normal wear, or accident
are not covered under this warranty.
Pelco assumes no risk and shall be subject to no liability for damages or loss resulting from
the specific use or application made of the Products. Pelco’s liability for any claim, whether
based on breach of contract, negligence, infringement of any rights of any party or product liability, relating to the Products shall not exceed the price paid by the Dealer to Pelco for such
Products. In no event will Pelco be liable for any special, incidental or consequential damages
(including loss of use, loss of profit and claims of third parties) however caused, whether by
the negligence of Pelco or otherwise.
The above warranty provides the Dealer with specific legal rights. The Dealer may also have
additional rights, which are subject to variation from state to state.
If a warranty repair is required, the Dealer must contact Pelco at (800) 289-9100 or
(559) 292-1981 to obtain a Repair Authorization number (RA), and provide the following
information:
1. Model and serial number
2. Date of shipment, P.O. number, Sales Order number, or Pelco invoice number
3. Details of the defect or problem
If there is a dispute regarding the warranty of a product which does not fall under the
warranty conditions stated above, please include a written explanation with the product when
returned.
Method of return shipment shall be the same or equal to the method by which the item was
received by Pelco.
RETURNS
In order to expedite parts returned to the factory for repair or credit, please call the factory at
(800) 289-9100 or (559) 292-1981 to obtain an authorization number (CA number if returned for
credit, and RA number if returned for repair).
All merchandise returned for credit may be subject to a 20% restocking and refurbishing
charge.
Goods returned for repair or credit should be clearly identified with the assigned CA or RA
number and freight should be prepaid. Ship to the appropriate address below.
If you are located within the continental U.S., Alaska, Hawaii or Puerto Rico, send goods to:
Service Department
Pelco
3500 Pelco Way
Clovis, CA 93612-5699
If you are located outside the continental U.S., Alaska, Hawaii or Puerto Rico and are instructed
to return goods to the USA, you may do one of the following:
If the goods are to be sent by a COURIER SERVICE, send the goods to:
Pelco
3500 Pelco Way
Clovis, CA 93612-5699 USA
If the goods are to be sent by a FREIGHT FORWARDER, send the goods to:
Pelco c/o Expeditors
473 Eccles Avenue
South San Francisco, CA 94080 USA
Phone: 650-737-1700
Fax: 650-737-0933
The materials used in the manufacture of this document and its components are compliant to the requirements of Directive 2002/95/EC.
This equipment contains electrical or electronic components that must be recycled properly to comply with Directive 2002/96/EC of the European Union
regarding the disposal of waste electrical and electronic equipment (WEEE). Contact your local dealer for procedures for recycling this equipment.
REVISION HISTORY
Manual #
C1570M
C1570M-A
C1570M-B
C1570M-C
Date
10/04
5/05
10/05
5/06
C1570M-D
2/07
C1570M-E
4/07
Comments
Original version.
Updated to reflect Phase II hardware and software changes.
Updated to reflect new 4-pin to 2-pin adapter, updated parts list, and minor art and text changes.
Updated specifications with minor changes and revised software configuration instructions to match the current software functionality (as a result of ECO 06-14150
and ECR 06-12039).
Revised the Parts List and Desktop Installation sections with information on using rubber feet with the decoder (as a result of ECO 06-14778). In the Specifications
section, revised operating temperature description and added ambient temperature.
Revised Figure 2 and Figure 17 to reflect revised silkscreen text (as a result of ECO 07-17426).
Pelco, the Pelco logo, Camclosure, Coaxitron, Esprit, ExSite, Genex, Legacy, and Spectra are registered trademarks of Pelco.
Endura and Spectra III are trademarks of Pelco.
DLP is a registered trademark of Texas Instruments, Inc.
Linux is a registered trademark of Linus Torvalds.
PowerPC is a registered trademark of International Business Machines Corporation.
©Copyright 2007, Pelco. All rights reserved.
Worldwide Headquarters
3500 Pelco Way
Clovis, California 93612 USA
USA & Canada
Tel: 800/289-9100
Fax: 800/289-9150
International
Tel: 1-559/292-1981
Fax: 1-559/348-1120
www.pelco.com
ISO9001
Australia
| Canada | Finland | France | Germany | Italy | Macau | The Netherlands | Russia | Singapore
| Spain | Sweden | United Arab Emirates | United Kingdom | United States
South Africa