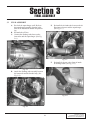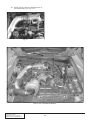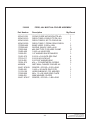
1
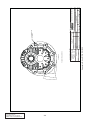
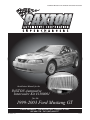
Installation Manual for the PAXTON Automotive Intercooler
Installation Manual for the
PAXTON Automotive
Intercooler Kit #1300001
for the
1999-2003 Ford Mustang GT
Paxton Automotive . 1300 Beacon Place . Oxnard CA 93033
805 604-1336 . FAX (805) 604-1337
P/N 4809638 v2.0
11/10/03
© 2003 PAXTON AUTOMOTIVE
All rights recerved. No parts of this publication may be reproduced, transmitted, transcrived, or translated into
another language in any form, by any means without written permission of Paxton Automotive.
P/N: 4809638
©2003 Paxton Automotive
All Rights Reserved, Intl. Copr. Secured
10NOV03 v2.0 99-01 MusGT(4809638 v2.0)
ii
TABLE OF CONTENTS
TABLE OF CONTENTS . . . . . . . . . . . . . . . . . . . . . . . . . . . . . . . . . . . . . . . . . . . . . . . . . . . . . .iii
IMPORTANT NOTES . . . . . . . . . . . . . . . . . . . . . . . . . . . . . . . . . . . . . . . . . . . . . . . . . . . . . . . .iv
1.1
INITIAL PREPARATION AND REMOVAL . . . . . . . . . . . . . . . . . . . . . . . . . . . . . . . .1-1
2.1
AFTERCOOLER INSTALLATION . . . . . . . . . . . . . . . . . . . . . . . . . . . . . . . . . . . . . . .2-1
3.1
FINAL ASSEMBLY . . . . . . . . . . . . . . . . . . . . . . . . . . . . . . . . . . . . . . . . . . . . . . . . . . .3-1
APPENDIX . . . . . . . . . . . . . . . . . . . . . . . . . . . . . . . . . . . . . . . . . . . . . . . . . . . . . . . . . . . . . . .A-1
List of Appendices
. . . . . . . . . . . . . . . . . . . . . . . . . . . . . . . . . . . . . . . . . . .A-2
Appendix A
7000185
ASY, S/C NOVI 1000 . . . . . . . . . . . . . . . . . . . . . . . . . .A-3
Appendix B
1300001
Kit, Parts List . . . . . . . . . . . . . . . . . . . . . . . . . . . . . . . . .A-4
iii
P/N: 4809638
©2003 Paxton Automotive
All Rights Reserved, Intl. Copr. Secured
10NOV03 v2.0 99-01 MusGT(4809638 v2.0)
IMPORTANT NOTES
C
ongratulations! You have purchased the
finest street charge cooler available for
the Mustang GT. The centerpiece of this
kit is the Highly Efficiency PAXTON charge
cooler.
The installation will require metric and SAE
sockets and wrenches, a hand drill and bits.
beginning. Make sure that you understand the
process, have identified the areas of the car that
you will be working on, and have the tools that
you will need on hand. The average installation
time is 6 to 8 hours, but your time will depend
on your working conditions, experience
installing superchargers, charge cooler, personal
skill level, and preparedness for the job. This
estimate does not include time for the initial
vehicle inspection, cleaning, fine tuning, or trouble-shooting. Once again, we recommend reading the manual before beginning the process. We
are available for tech support at (805) 604-1336,
Monday through Friday, 7AM - 3 PM PST.
Become familiar with the details of your car’s
system. If it is not operating within normal
parameters, we do not recommend the installation or use of the charge cooler.
After reading the manual, verify that all major
assembly groups are present in the main kit box.
As you remove a box or bag, note the identification label and compare it to the parts list.
This kit comes with all the parts you will need to
install the charge cooler. The instruction manual
has been edited in order of sequence, and photographs and drawings have been included to illustrate the text. This will allow you quick part
identification and orientation.
For the quickest installation time, we suggest
that you read this manual thoroughly before
PAXTON AUTOMOTIVE makes every effort to insure
that all parts are included in the box. If you
discover that you are missing any part,
or that a part was damaged in shipping, call PAXTON
immediately. DO NOT begin installation if a part
is missing. Failure to contact PAXTON prior to
beginning installation will result in a charge for
the missing part.
We suggest that the engine compartment be
cleaned before the installation. You can clean
the engine with a pressure washer that is found
P/N: 4809638
©2003 Paxton Automotive
All Rights Reserved, Intl. Copr. Secured
10NOV03 v2.0 99-01 MusGT(4809638 v2.0)
at self-serve car washes. Use a safe-for-aluminum cleaner/degreaser, and cover the distributor and any electronics with a plastic bag to prevent water from entering.
iv
Y
simple safety precautions, you can avoid many
potential dangers. The following list is not meant
to be a comprehensive list, but rather it is meant
to make you aware of some of the risks, and
encourage you to take a safety minded approach
to your work area.
ou are undoubtedly eager to get started,
but please take a little more time to
insure that your safety is not in jeopardy.
A moment’s lack of attention may cause a serious injury to you, or to someone else who happens to be standing around. By following some
• Never rely solely on a floor jack when working
underneath a vehicle. Always use jack stands that
are rated for the weight of your vehicle, use them at
the recommended lift points, and place your vehicle
in ‘PARK’ or ‘FIRST’ gear with the parking brake set.
• Always use eye protection when using power tools,
such as drills, saws, and grinders, or when working
underneath a vehicle.
• Never smoke, use an open flame, or have spark
producing items around gasoline or flammable
objects. Always have a fire extinguisher that is rated
for chemical and electrical fires handy when working on motor vehicles. Also, make sure that the
extinguisher is fully charged.
• Operate engines only in a well ventilated area.
Carbon Monoxide, gasoline, and solvent vapors are
colorless and sometimes odorless, and may
asphyxiate and explode without warning.
• Always disconnect the battery from your engine
before doing work on the electrical or fuel systems,
or doing underdash work.
• The chemicals used in the vehicle systems, such
as oils and coolants, are poisonous. Clean up any
spills immediately, and dispose of waste materials
properly. Pets, wild animals, and children may die if
they ingest the liquid.
PAXTON Automotive thanks you for your purchase. We welcome your comments and sugges-
tions to help us improve our product.
v
P/N: 4809638
©2003 Paxton Automotive
All Rights Reserved, Intl. Copr. Secured
10NOV03 v2.0 99-01 MusGT(4809638 v2.0)
This Page Left Intentionally Blank.
P/N: 4809638
©2003 Paxton Automotive
All Rights Reserved, Intl. Copr. Secured
10NOV03 v2.0 99-01 MusGT(4809638 v2.0)
vi
Section 1
INITIAL PREPARATION AND REMOVAL
1.1
INITIAL PREPARATION AND REMOVAL
C. Place car on lift or jackstands.
D. Remove the screw at the bottom of the support bar. (See Fig. 1-c.)
A. Remove the plastic clips(4) that hold the
grill cover in place. (See Fig. 1-a.)
CLIPS
Fig. 1-c
Fig. 1-a
B.
E.
Remove the hood latch support screw using
a T-30 torx bit. (See Fig. 1-b.)
Remove the power steering cooler line support screw. (See Fig. 1-d.)
SCREW
Fig. 1-d
Fig. 1-b
1-1
P/N: 4809638
©2003 Paxton Automotive
All Rights Reserved, Intl. Copr. Secured
10NOV03 v2.0 99-01 MusGT(4809638 v2.0)
E.
H. Pop loose the clips on the air deflector to the
left and right sides of the radiator. (See
Fig. 1-h.)
Remove the plastic clips (4) that hold the air
deflector in place. (See Fig. 1-e)
Fig. 1-e
F.
Fig. 1-h
Remove the plastic clips(2) that attach the
front bumper to the frame. (See Fig. 1-f.)
I.
Disconnect the rear radiator reservoir support brace from the bottom of the frame.
(See Fig. 1-i.)
Fig. 1-f
G. Remove the screw that holds the power
steering cooler bracket in place. Set the line
aside to be installed in a later step of the
installation. (See Fig. 1-g.)
Fig. 1-i
Fig. 1-g
P/N: 4809638
©2003 Paxton Automotive
All Rights Reserved, Intl. Copr. Secured
10NOV03 v2.0 99-01 MusGT(4809638 v2.0)
1-2
Section 2
INTERCOOLER INSTALLATION
2.1
INTERCOOLER INSTALLATION
A. Install the intercooler and support with jackstands or wood blocks. (See Fig. 2-a.)
C. Drill one more 1/8" hole and re-attach the
rear radiator overflow reservoir support in
its new location with a 1/4" sheetmetal
screw. (See Fig. 2-c.)
Fig. 2-a
B.
Fig. 2-c
Drill two 1/8” holes as shown in Fig. 2-b.
Install two 1/4" sheetmetal screws.
D. Re-attach the powersteering cooler line to
the intercooler.
E. Re-attach the front bumper to the frame reusing the stock plastic clips.
Fig. 2-b
2-1
P/N: 4809638
©2003 Paxton Automotive
All Rights Reserved, Intl. Copr. Secured
10NOV03 v2.0 99-01 MusGT(4809638 v2.0)
F.
Attach the supplied intercooler mounting
bracket with the bolts supplied in the kit.
(See Fig. 2-g.)
J.
Disconnect the supercharger. You will need
to loosen the two bolts on the coolant reservoir and move the reservoir to the side to
gain access to the supercharger. (See
Fig. 2-i.)
Fig. 2-g
G. Remove the discharge tube, bypass valve
and air intake tube. (See Fig. 2-h.)
Fig. 2-i
Fig. 2-h
H. Disconnect the oil lines. Disconnect the oil
return at the pan and the oil feed at the
supercharger.
I. Remove the accessory drive belt by relaxing
the tensioner.
P/N: 4809638
©2003 Paxton Automotive
All Rights Reserved, Intl. Copr. Secured
10NOV03 v2.0 99-01 MusGT(4809638 v2.0)
2-2
Section 3
FINAL ASSEMBLY
3.1
FINAL ASSEMBLY
E.
A. Re-clock the supercharger scroll. Refer to
the supercharger assembly drawing in the
back of the installation manual for positioning.
B. Re-attach the oil lines.
C. Connect the discharge tube between the
intercooler and the supercharger. (See.Fig.
3-a.)
Re-install the air intake tube between the air
filter/mass air meter and the supercharger.
(See Fig. 3-c.)
Fig. 3-c
F.
Re-install the bypass valve from air intake
to discharge tube. (See Fig. 3-d.)
Fig. 3-a
D. Attach the discharge tube assembly between
the intercooler and the throttle body. (See
Fig. 3-b.)
Fig. 3-d
Fig. 3-b
3-1
P/N: 4809638
©2003 Paxton Automotive
All Rights Reserved, Intl. Copr. Secured
10NOV03 v2.0 99-01 MusGT(4809638 v2.0)
G. Install inlet air control to discharge tube at
the throttle body. (See Fig. 3-e)
Fig. 3-e
Here is your completed installation.
P/N: 4809638
©2003 Paxton Automotive
All Rights Reserved, Intl. Copr. Secured
10NOV03 v2.0 99-01 MusGT(4809638 v2.0)
3-2
APPENDIX
A-1
P/N: 4809638
©2003 Paxton Automotive
All Rights Reserved, Intl. Copr. Secured
10NOV03 v2.0 99-01 MusGT(4809638 v2.0)
Please understand that PAXTON Automotive is constantly
improving the performance and appearance of its various
components. The parts in your kit may appear differently
than what is pictured in this manual. This may be due to
photographs being taken in pre-production, changes in materials, or improvements in performance.
Rest assured that you have purchased the best quality kit that
PAXTON Automotive manufactures at this time. The installation of the materials will remain the same.
LIST OF APPENDICES
Appendix Number
A
B
P/N: 4809638
©2003 Paxton Automotive
All Rights Reserved, Intl. Copr. Secured
10NOV03 v2.0 99-01 MusGT(4809638 v2.0)
DWG Number
Rev
DWG Title
1300001
7000185
NC
NC
Kit, Parts List
Asy, S/C NOVI 1000
A-2
1300001
FORD, 4.6L MUST A/A COOLER ASSEMBLY
Part Number
Description
Qty/Parent
------------------------------------------------------------------------------------------------.8PN101-001
COOLR CORE,W/CAPS/DUCTS,A/A
1
.8PN012-010
DISCH TUBE A,COOLR TO TB 4.6 A
1
.8PN012-020
DISCH TUBE B, S/C TO COOLR INL
1
.8PN012-030
DISCH TUBE C, FROM COOLR DISCH
1
.7PS300-400
BUMP HOSE, 3.00D x 4.00L
2
.7PS300-401
SLEEVE, BLACK 3.00D x 4.00
3
.7R002-048
#48 SAE TYPE F SS HOSE CLAMP
10
.7A250-400
1/4-20 x 4 HXHD GR5
1
.7J250-022
1/4" WASHER SAE STAINLESS
3
.7A312-075
5/16-18 x 3/4 HXCS GR5 ZINC
4
.7F312-017
5/16-18 NYLOCK NUT
4
.7J312-000
5/16 FLAT WASHER-SAE
8
.7E014-075
#14 x .75 SHEETMETAL SCREW
3
.4809638
INST MAN, CHARGE COOLER 4.6
1
.2A017-876-09
SPACER, .875 OD x 3.210 LONG
1
.7A250-051
1/4-20 x .50 HHCS ZINC PLTD
2
.7U133-100
HOSE,ELBOW,90^,1"ID, MOLDED
1
.7C060-050
M6 x 1.0 x 50 HXHD ZINC PLATE
1
.7J006-093
6MM WASHER, PLATED
1
.2A017-876-07
SPACER, .875 OD x 1.490 LONG
1
A-3
P/N: 4809638
©2003 Paxton Automotive
All Rights Reserved, Intl. Copr. Secured
10NOV03 v2.0 99-01 MusGT(4809638 v2.0)
P/N: 4809638
©2003 Paxton Automotive
All Rights Reserved, Intl. Copr. Secured
10NOV03 v2.0 99-01 MusGT(4809638 v2.0)
A-4
NONE
WEIGHT
APPR.
Appendix B - Asy, S/C NOVI 1000
FINISH
20.7 LBS
-----
-----
UNLESS OTHERWISE SPECIFIED
CAD GENERATED DRAWING,
DIMENSIONS ARE IN INCHES
DO NOT MANUALLY UPDATE
TOLERANCES ARE: .XX± .01
DECIMALS:
.XXX±.005
DATE
APPROVALS
±1/2•
FRACTIONS:
DRAWN
--------ANGLES:
±1/16
ENGINEERING
--------MATERIAL
R&D
SEE PARTS LIST
---------
RE- CLOCK SCROLL AS SHOWN
S/C ROTATION
1300 BEACON PLACE OXNARD, CA 93033
TEL: (805) 604-1336 FAX: (805) 604-1337
SCALE:
2:1
DO NOT SCALE DRAWING
REV.
NC
SHEET 1 OF 1
ASY, S/C NOVI 1000 REVERSE ROTATION
w/ INTERCOOLER
DWG. NO.
7000185
D
PAXTON AUTOMOTIVE INTERCOOLER-1999-2003 MUSTANG GT
SIZE
NUT CORNER IN LINE
WITH EDGE
This Page Left Intentionally Blank
A-5
P/N: 4809638
©2003 Paxton Automotive
All Rights Reserved, Intl. Copr. Secured
10NOV03 v2.0 99-01 MusGT(4809638 v2.0)
Paxton Automotive . 1300 Beacon Place . Oxnard CA 93033
805 604-1336 . FAX (805) 604-1337
P/N: 4809638
©2003 Paxton Automotive
All Rights Reserved, Intl. Copr. Secured
10NOV03 v2.0 99-01 MusGT(4809638 v2.0)
A-6