1
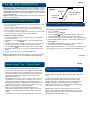
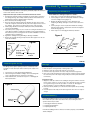
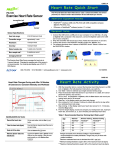
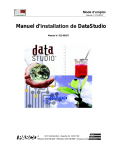
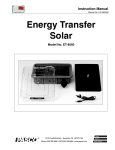
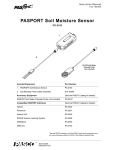
CARD 1A
Dissolved Oxygen Quick Start
Dissolved Oxygen
Sensor
The PS-2108 Dissolved Oxygen Sensor measures the amount of dissolved
oxygen (mg/liter or %) in a solution.
A d d i t i o n al E qu i p m en t N e ed e d
PS-2108
•
PASPORTTM interface (USB Link, Xplorer, etc.)
•
EZscreen or DataStudio® software (version 1.5.3 or later)
E q ui p m e nt S et up
Sensor Specifications
Sensor Range:
0 mg/L to 20 mg/L
Accuracy:
±10% of full scale
Resolution:
0.01 mg/L
Max. Sample Rate:
20 samples per second
Default Sample Rate:
2 samples per second
Response:
98% in 60 seconds
Temperature Range:
0°C to 50°C
Temperature Compensation:
10°C to 40°C
Cathode:
Platinum
Anode:
Ag/AgCI
®
1. Connect the PASPORT interface to a USB port on your computer or to a USB hub.
2. Connect the Dissolved Oxygen probe to the sensor.*
3. Connect the sensor to the PASPORT interface. (If using an Xplorer in the classroom,
connect the Xplorer cable to a USB port or hub.). The software launches when it
detects a PASPORT sensor.
4. Select a choice from the PASPORTAL window.
2
1
3
4
*Note: Prior to first use, fill the electrode
membrane cartridge and housing with
electrolyte solution. See “Changing the
Electrolyte Solution” on card 3A.
800-772-8700 • 916-786-3800 • [email protected] • www.pasco.com
012-07688C
CARD 1B
Effect of Cellular Respiration on Dissolved
Oxygen Concentration
Dissolved O2 Activity - Cellular Respiration
Equipment Required:
•
•
•
•
•
•
•
•
•
•
DataStudio/DS Lite Tasks:
View a measurement:
From the Data list, drag the run icon to the open
display.
Change measurement units: On the main toolbar, click on the Setup
button. Scroll to the Dissolved Oxygen Sensor
options box, and click to select the desired unit from
the unit drop-down menu.
Scale to fit the data:
On the graph toolbar, click on the Scale-to-Fit
button.
View data statistics:
In the Graph display, click on the Statistics
and select Minimum, Maximum, or Mean.
button,
Dissolved Oxygen Sensor with electrode storage bottle (PS-2108)
Temperature Sensor (PS-2125) or a thermometer
PASPORT interface (Xplorer (PS-2000), USB Link (PS-2100), etc.)
DataStudio software (CI-6870C)
400 mL distilled or deionized water
Sugar (sucrose), 5 grams
5 mL activated yeast suspension (follow directions on yeast package)
Clamps and lab stand to suspend the 2 sensors in solution
Lab glassware:1-L bottle with lid, 600-mL and 400-mL beakers,
graduated cylinder, small test tube, stirring rod
Wash bottles for rinsing sensors
1. Connect the Dissolved Oxygen Sensor to a USB Link (or Xplorer) and
launch DataStudio.
2. Fill a 1-liter bottle with 400 mL of distilled water.
3. Tightly close the lid and shake vigorously for 10 seconds to oxygenate
the water.
4. Pour the oxygenated water into the 600-ml beaker and dissolve five
grams of sugar into it.
5. Put the Temperature Sensor and Dissolved Oxygen Sensor into the
sugar solution, and gently stir the solution.
6. Click the Start
button to begin collecting data. Continue stirring.
After 30 seconds, add the 5-mL sample of activated yeast suspension
to the beaker. Continue stirring and recording data.
7. Record data until the dissolved oxygen level stabilizes (approximately
10 minutes), then click the Stop
button.
8. If time permits, perform additional runs with oxygenated water that is a
few degrees colder or warmer than room temperature.
Se tup a nd C al i bra ti on
CARD 2A
Equipment required: 1 PASPORT Dissolved Oxygen Sensor (PS-2108), 1 electrode
storage bottle (included with sensor), DataStudio software (version 1.5.3 or higher) or a
PASPORT Xplorer (PS-2000), and deionized water. [(Optional): Barometer (PS-2113)
and Temperature Sensor (PS-2125) for performing calibrations at a specific barometric
pressure and temperature.]
(Note: After plugging in the Dissolved Oxygen Sensor, you must allow 2 minutes for the
sensor to come to equilibrium.)
cable
Figure 1
electrode
Shake bottle vigorously for
about 10 seconds.
Check for large
water drops.
C a li br a ti on wi t h D at aS t u d i o S o f t war e
Equilibrate the Probe in 100% Humidified Air:
1. Before performing any calibration, place 5 mL of deionized water into a clean
electrode storage bottle.
2. Loosen the lid to the electrode storage bottle. Insert the probe into the
electrode storage bottle and screw on the lid. Place the end of the probe
about 2 cm above the water (See Figure 1).
3. Vigorously shake the electrode storage bottle for about 10 seconds to saturate
the water. Shake off any large water drops from the membrane.
For a percent (%) saturation calibration:
1. Put the Dissolved Oxygen Sensor in water that is 100% oxygen saturated
(See the section above).
2. In DataStudio, click the Setup
button to open the PASPORT Setup
window.
3. In the Setup window, click on the pull down menu to ensure the percent (%)
saturation unit is selected from the Dissolved Oxygen Sensor options.
4. Click the Calibrate
button. The default is 100% saturation. When
the Calibration window opens, the current value displays under Dissolved
Oxygen.
5. When the current value settles, click the Set and OK buttons.
C al i b r at io n w i th a P A S P O R T Xp lo re r
You can calibrate the Dissolved Oxygen in the field or connected to DataStudio.
For a percent (%) saturation calibration:
1. Turn on the Xplorer.
2. Plug the sensor into the Xplorer.
3. Press the Display
button until “Calibrate” appears on the screen.
4. Press the Plus (+) button and select % as the measurement unit.
5. Put the Dissolved Oxygen Sensor in water that is 100% oxygen saturated.
6. Check the Xplorer display. When the % value displayed settles, press the
Check
button.
7. Quickly press the Check button again to accept the new calibration.
8. To exit calibration mode, press the Display button.
Note: To calibrate in mg/L instead of %, see our web site for documentation on our
dissolved oxygen sensors and/or contact PASCO’s Technical Support Dept.
Note: For a mg/L calibration, see our web site (www.pasco.com) for documentation on
our Dissolved Oxygen sensors and/or contact PASCO’s Technical Support Dept.
S e ns o r U s a g e T i p s - P l e as e R e a d !
• Always change the filling solution before calibrating the Dissolved Oxygen
sensor or when taking your first set of measurements with the sensor.
• For best results, always stir the solution before taking measurements. When
using the Dissolved Oxygen Sensor, it is important to move a steady flow of
test solution past the sensor’s membrane: while measuring, the sensor uses
up 02 molecules faster than they can diffuse back into the area. Use a
magnetic stir bar if available.
• Avoid placing the sensor in acidic or caustic solutions, or vapors. The sensor
was designed for use in aqueous solutions. Placing the sensor in caustic,
abrasive, or harsh solutions may damage the membrane and/or probe.
• When taking measurements, do not drag the probe or allow the membrane to
touch the bottom of a container or body of water. The membrane is fragile
and may become damaged or pop out with mishandling.
• We do not recommend using the the Dissolved Oxygen Sensor in
environments with rapidly changing temperature conditions. The sensor is
temperature-compensated, but large temperature changes may give false
readings.
• Avoid using the sensor in solutions with high salinity, such as ocean water.
012-07688C
CARD 2B
Factors Affecting Dissolved O2 Results
Factors that may affect dissolved oxygen measurements include atmospheric
pressure, atmospheric temperature, air density, altitude, and the salinity in the
sample.
If you plan to take quantitative dissolved oxygen measurements in mg/L
instead of percent saturation, calibrate the sensor in mg/L units. A mg/L
calibration requires that you mathematically adjust for atmospheric pressure,
atmospheric temperature, and altitude. (Note: The percent saturation
measurement is recommended for comparative studies or when examining
relative changes in dissolved oxygen concentration.)
Calibration tables for mg/L units of dissolved oxygen can be found in the
following reference: Hitchman, Michael L. 1978. Measurement of Dissolved
Oxygen. In Chemical Analysis, volume 49, edited by Elving and Winefordner,
196-199, New York: John Wiley and Sons, Inc.
CARD 3A
Dissolved O 2 Sensor Maintenance
C ha ng i ng t he El e ct ro lyt e So l ut i o n
To maintain optimal performance of the probe, periodically replace the electrolyte
solution and clean the silver electrode.
Replace the electrolyte solution and clean the electrode as follows:
1. Hold the probe below the stainless steel band, unscrew the probe, and remove
the cartridge housing. (Note: Always hold the probe below the stainless steel
band when unscrewing or applying torque to the probe.)
2. Rinse and air dry the cartridge housing.
3. Rinse the electrode with deionized water. Examine the silver portion of the
electrode: if it appears tarnished, rub this portion with a paper towel to remove
the oxidation. (Be careful not to rub the glass portion of the electrode!)
4. Fill the syringe with 10 ml of electrolyte solution (the solution provided with the
sensor). Avoid air bubbles.
5. Place the tip of the syringe very close to, but not touching the membrane, and
slowly fill the membrane cartridge and cartridge housing to approximately 5
mm from the top of the housing. (Note: Do not allow air bubbles to form in the
cartridge housing or membrane.)
6. Agitate the cartridge housing after filling to dislodge air bubbles.
7. Replace the cartridge housing and dry the sides with a paper towel. Do not
touch the membrane.
Re pl a ci n g t h e M em b ran e
If the membrane is damaged, replace it as follows:
1. Follow steps 1–3 under “Changing the Electrolyte Solution.”
2. Use the plunger to push the steel cylinder membrane cartridge
out of the cartridge housing (Figure 1).
3. Examine the O-ring and replace it if it is damaged. (See
“Replacing the O-ring” and Figure 3 on the reverse side of this
card.)
4. Use the plunger to insert a replacement membrane cartridge,
and push it down until it is seated at the end of the housing that
has the O-ring (Figure 2).
5. Follow steps 4–7 of “Changing the Electrolyte Solution.”
Figure 2
plunger
Figure 1
stainless steel
band
Grasp
probe
here.
O-ring
Fill to here.
cartridge
cartridge housing
Syringe tip should
be close to,
but not touching,
the membrane.
Cartridge with
membrane
replacement
membrane
cartridge
O-ring
012-07688C
CARD 3B
R ep l ac i ng t he O- r i ng
The O-ring rarely requires replacing. However, if it develops nicks
and splits, or leaks electrolyte solution from the probe, replace it as
follows:
1. Follow steps 1–2 under “Replacing the Membrane.”
2. After removing the membrane cartridge, remove the O-ring with
a pair of fine-tipped tweezers and insert a new O-ring.
3. Reassemble the unit, as directed in steps 4–7 of “Changing the
Electrolyte Solution.”
Figure 3
cartridge housing
S t or ag e
Short-term storage:
1. Rinse the probe covering and tap or shake gently to dry.
2. Empty the electrode storage bottle and rinse it if necessary.
3. Insert the clean, dry probe into the clean, empty electrode storage bottle.
4. Enclose the probe with bottle in the plastic zip-lock storage bag. (Note: Keeping
the end of the probe in the empty storage bottle protects the probe membrane
from trauma.)
Long-term storage:
1. Empty the electrolyte solution in the cartridge housing and clean the electrode
before storage. (Note: It is not necessary to store the probe in water or solution
for long-term storage. Follow the procedure on card 3A, for “Changing the
Electrode Solution,” except for refilling the cartridge housing).
2. Clean any tarnish (oxidation) off of the electrode and replace the dry cartridge
housing.
3. Insert the probe in the empty electrode storage bottle. The sensor is ready for
storage.
Tro ubl e sho ot i n g
Examine the O-ring
for damage.
If the Dissolved Oxygen Sensor does not give the expected output, perform the
three maintenance procedures described on this card, checking the sensor
operation after each procedure:
1. “Changing the Electrolyte Solution”
2. “Replacing the Membrane”
3. “Replacing the O-ring”
If the Dissolved Oxygen Sensor still does not function properly, contact PASCO
Technical Support.