1
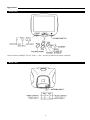
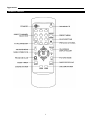
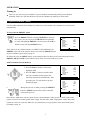
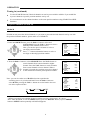
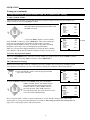
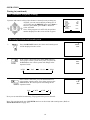
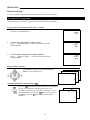
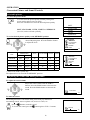
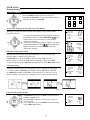
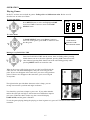
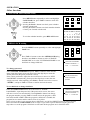
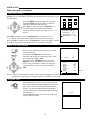
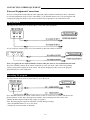
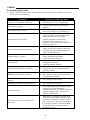
OWNER'S MANUAL
ART SERIES
51CM CORDLESS REMOTE COLOUR TELEVISION
MODEL: 5120G
5120B
5120S
Type Tested
Electrical
Safety
AS/NZS 3250 Lic 4164
Standards Australia
APP No: N17340
PALSONIC CORPORATION PTY LTD
1 JOYNTON AVENUE
WATERLOO NSW 2017 AUSTRALIA
TEL:(02)9313 7111
FAX:(02)9313 7555
www.palsonic.com.au
PALSONIC CUSTOMER SERVICE
TELEPHONE
AUSTRALIA:1300 657 888
Congratulations on your purchase of this Palsonic colour television receiver.
We recommend that you thoroughly read this manual before use to fully enjoy the many functions
and excellent effects of this receiver.
Retain this manual in an easily accessible location for future reference.
* Screen displays and illustrations in this manual may differ from the actual ones for better visibility.
Contents
INTRODUCTION
Features ...................................................1
NOTES FOR OPERATION
Cautions for safety..................................2
OPERATION
INSTALLATION
Antenna connection.................................3
Battery installation..................................3
APPEARANCE
Front view................................................4
Back view.................................................4
Remote controller...................................5
Turning the Power On/Off....................6
Menu Operation.....................................6
Tuning in.................................................7
To preset channels (ASM).........................7
To preset channels (SEARCH)..................7
To skip unnecessary position numbers......9
MFT (Manual Fine Tuning)......................9
AFT (Automatic Frequency Tuning).......10
The setting of colour and sound system..10
Channel selection.........................................11
Convenient Picture and Sound Control....12
CLOCK setting...........................................13
SYSTEM setting.........................................14
Playing Games.............................................15
Sleep timer...................................................16
Other functions............................................17
CALENDAR function..............................17
CHILD LOCK setting...............................17
CHANNEL SWAP...................................18
Super receiving function...........................18
Progam Scan.............................................18
CONNECTING OTHER EQUIPMENT
External Equipment Connections...........19
Video playback........................................19
Recording TV program............................19
OTHERS
Troubleshooting...........................................20
Specifications................................................21
INTRODUCTION
Features
.
.
.
.
.
.
.
.
.
.
.
.
.
.
Hyperband
English/Chinese on-screen menu display
256 preset channels
2
Intellectualized I C-bus control
Full function remote control
Sleep timer, ON Timer, OFF Timer
Non-signal blue background display and AUTO-POWER-OFF function
Games, built-in 500 year calendar function
Child Lock function, Channel swap
Program scan function
Program scan function
Five picture modes' setting
AUDIO/VIDEO input & output terminals
Advanced digital picture improvement circuit
1
NOTES FOR OPERATION
* Do not let the TV set be in stand-by condition for a long period of time. When it is not in use, please
turn off the power supply and remove the power plug. When it is to be left unattended for
a prolonged period of time, it is recommended to disconnect the connection to the outdoor aerial, to
avoid thunder strike.
* Please follow cautions for safety in the TV set instructions, and all warnings and descriptions denoted
on the TV set.
Cautions for safety
Note: This TV set can be operated on an AC power of 240V, 50Hz. You should not use power
supply of the other type.
When an unusual situation
occurs, turn off the power
switch at once and remove the
plug from the wall outlet.
Contact a qualified service
department in your local area.
In order to wipe dust off the
picture tube or off the cabinet,
you should remove the power
plug from the wall outlet first.
You can wipe lightly with a
piece of dry, clean, soft cloth.
Do not expose the TV set to
rain or excessive moisture, to
prevent tire disaster or
electric shock. Avoid using
the set in very warm or damp
places. Never use it in a
bathroom.
The TV set should be placed
on an adequate place without
exposing it to direct sunlight
and other sources of heat to
prevent the deformation of the
cabinet or damage to components.
There exists High Voltage in
this TV set. Do not remove
the cover to avoid danger.
Do not cover the Ventilating
holes in the cabinet. Keep a
space of more than 5cm from
the walls to the TV set, to
guarantee the good ventilation.
When the TV set is to be left
unattended, please turn off the
power switch and remove the
plug from the wall outlet.
When the power cord or the
plug is damaged, please
contact a qualified service
department to get service.
2
Installation
Antenna Connection
To ensure a bright-coloured and clear picture, you should use an outdoor aerial or CATV cable. If
the signals are strong enough, you may use an indoor aerial.
Note: In case of using the
Twin-lead aerial feeder (300 )
for UHF/VHF aerial, use a 300-75
ohm adaptor (not supplied)
When using the coaxial cable (not
supplied) (75 ) for UHF/VHF
aerial, connect the plug into the
75 ohm aerial socket directly.
Note:
When you connect the outdoor aerial cable to the aerial terminal on the TV set, please turn off the
power switch on the TV while connecting the antenna lead.
In thunder and lightning weather, please disconnect the outdoor aerial to avoid thunder/lightning
strike.
Battery installation
(1) Remove the back battery cover.
(2) Insert two size AAA batteries according to
the polarity indication inside the remote
controller.
Effective range of the remote
control operation
Notes:
1. When the remote controller is not used for
an extended period of time or the batteries
are worn out, please remove the batteries in
time to avoid battery leakage.
2. Avoid moisture and mechanical shock to
the remote controller.
3. Do not drop, dampen or disassemble the
remote controller.
3
Appearance
Front view
Note: Functions of MENU, TV/AV, VOL+/-, CH+/- are also provided to the remote controller.
Back View
4
Appearance
Remote Controller
5
OPERATION
Turning the Power On/Off & Menu Operation
.
The following describes how to turn the TV on/off using the TV's main switch and the remote
controller.
To turn the power on/off
1. Press the POWER switch, the red power indicator lights up.
2.
If no picture appears on the screen, press the
button on the set or on the remote
controller to turn the set on and the yellow indicator light up.
*Note: If there are no input signals to the TV when the TV set is on, a blue background will appear on
the screen. After 15 minutes if there are still no signals to the TV, it will enter into standby
mode automatically.
3. Press the POWER switch to turn off the set completely.
4.
If you want to turn off the TV temporarily, press the
the set to standby mode
button on the remote controller to switch
Special indication:
Last-Mode-Memory: after turning off the power, the last TV mode, picture and sound setting mode and
preset channels all are memorised. Therefore, next time you turn on the TV, the TV will work in the
previous setting mode.
.
.
If you directly pressed the main power switch on the TV to turn it off, you must press the main
power switch to turn on the TV.
If you pressed the main power switch to turn off the TV when in standby mode, press the main
power switch and then operate from the remote controller to turn the TV on.
Auto-Power-Off : there are two kinds of Auto-Power-Off function:
1. If a vacant channel is tuned or TV broadcast for a day is finished, the TV will automatically turn
off after about 10 minutes.
2. SLEEP-timer function.
3. OFF timer function.
Menu Operation
Press MENU button to enter into cartoon graphics menu page, press MENU button or POS+/- button
repeatedly can select different graphics. The selected graphics is highlighted and the menu name will
appear above the graphics (each graphics represents a menu) . Press VOL+/- button to enter into the
sub-menu. To call, press RECALL button.
6
OPERATION
Tuning in
There are two ways to preset channels: to preset channels automatically and to preset channels
manually. Below we will describe how to preset the channels by making use of the menu.
To preset channels (ASM)
Use the ASM (Automatic Search Memory) function to preset all the active channels in your local area
automatically.
To enter into the PRESET menu
Press the PRESET button to display PRESET the menu on
the screen.( Or you can press the MENU button repeatedly
to select and highlight PRESET icon, then press the VOL+/button to enter into the PRESET menu.)
PRESET
POS
SKIP
BAND
FINE
AFT
SEARCH
ASM
S-RCV
22
OFF
UHF
ON
OFF
Note: If there is any channel which is in CHILD LOCK ON mode, the
PRESET menu can not be entered. How to enter into the PRESET menu
to preset channels, please refer to page 17.
In AV mode, press the MENU button, on the interface there are three icons in red background colour
(PRESET, SWAP, LOCK), which indicates these items can not be used in AV mode.
ASM (Automatic Search Memory)
1.Press the POS+/- button to select and
highlight ASM
2. Press the VOL+/- button to start the ASM.
All active channels will be preset and
PRESET
POS
SKIP
BAND
FINE
AFT
SEARCH
ASM
S-RCV
22
OFF
UHF
ON
OFF
stored into the memory automatically. After
presetting, the TV will return to the first
channel program.
3.
During the process of ASM, pressing the PRESET
button or MENU button on the remote controller
PRESET
POS
SKIP
BAND
FINE
AFT
SEARCH
ASM
S-RCV
22
ON
UHF
OF
OFF
will stop the process.
0
Note: Before ASM (Auto search), please set the current channel's colour system to AUTO and sound
system to local area's sound system (refer to page 10), thus after ASM, all programs' colour and sound
system have been set correctly. Otherwise you should reset every program's colour and sound system
according to page 10.
7
OPERATION
Tuning in (continued)
Use the SEARCH function if desired channels can not be preset with the ASM or if you would like
to preset channels to specific position numbers one by one.
It is convenient to set the channel numbers to the same position numbers using SEARCH and SKIP
functions.
To preset channels (SEARCH)
SEARCH
If ASM can not preset the desired channels, or you want to preset the desired channels one by one with
the preferred channel numbers, please make use of SEARCH.
1. Enter into PRESET menu, press the POS+/- button to select and
highlight POS. Press the VOL+/- button to select a
desired position number (from 0-255).
Note: you can also press 0-9 button to select a
one-digit position number.
Press --/--- button and number buttons to select a
two-digit or three-digit position number.
PRESET
POS
SKIP
BAND
FINE
AFT
SEARCH
ASM
S-RCV
2. Press the POS+/- button to select SEARCH. Press the VOL+ button to
search channels from current channel to higher
channel. Press the VOL- button to search channels
from current channel to lower channel. When a
channel is located, the searching stops, this channel
is then memorized with the preset position number.
PRESET
POS
SKIP
BAND
FINE
AFT
SEARCH
ASM
S-RCV
Note: you can also make use of BAND selection to quicken the
searching process in your desired band. Press the POS+/- button to
select BAND, pressing the VOL+/- button moves the band to the next
one in the sequence below.
PRESET
POS
SKIP
BAND
FINE
AFT
SEARCH
ASM
S-RCV
V-L
V-H
UHF
3.When you want to store another channel at another position, repeat steps 1 & 2 above.
Note: After SEARCH, to exit the PRESET menu, press the RECALL button, or press PRESET
button or MENU button repeatedly until OSD disappears.
8
4
ON
V-L
OFF
OFF
4
ON
V-L
OFF
OFF
20
OFF
V-H
OFF
OFF
OPERATION
Tuning in (continued)
To skip unnecessary position numbers and MFT (Manual Fine Tuning)
To skip a position number
After presetting the channel you can skip unnecessary position numbers so that only the channels you
want to watch are selected with POS+/- button.
1. Enter into the PRESET menu, press the POS+/- button to select POS.,
then select the unwanted program number with
the VOL+/- button.
2. Press the POS+/- button to select "SKIP".
Press the VOL+/- button to select "SKIP ON". Thus, after exiting the
menu, the position number will then be skipped when you select
programs with the POS+/- button. If you want to skip other unwanted
programs, repeat step 1 above to change the program number.
Note: you can select the skipped channel by pressing the direct channel
select buttons, and the position number displayed on the screen is in red.
PRESET
POS
SKIP
BAND
FINE
AFT
SEARCH
ASM
S-RCV
PRESET
POS
SKIP
BAND
FINE
AFT
SEARCH
ASM
S-RCV
24
OFF
UHF
ON
OFF
24
ON
UHF
ON
OFF
To restore skip a position number
Enter into the PRESET menu, Select the position number you want to restore. Press the POS+/- button
to select "SKIP". Press the VOL+/- button to select "SKIP OFF".
MFT (Manual Fine Tuning)
When picture and sound's effect of a channel is poor (for example: one or two CATV channel's picture
and sound are not standard), you can correct them by making use of Manual Fine Tuning (FINE).
1. Enter into PRESET menu, select the program number
you want to fine-tune.
2. Press the POS+/- button to select FINE, then press and hold the
VOL+ or VOL- button, the channel begins
fine tuning until the optimum picture and
sound is achieved. (Press VOL+ button to
fine-tune upward, while VOL- button to
fine-tune downward. The AFT function will be
set to OFF mode automatically)
PRESET
POS
SKIP
BAND
FINE
AFT
SEARCH
ASM
S-RCV
PRESET
POS
SKIP
BAND
FINE
AFT
SEARCH
ASM
S-RCV
25
OFF
UHF
ON
OFF
25
OFF
UHF
ON
OFF
Note: if some channel’s colour or sound is abnormal, it may be that the setting of the colour or the
sound system is wrong, please do adjustment according to The setting of colour and sound system (on
page 10) to set the proper colour and sound system.
9
(or OFF)
OPERATION
Tuning in (continued)
AFT (Automatic Frequency Tuning)
If picture and sound’s effect of the channel is instead poor by making use
of FINE, you can correct them by making use of
AFT. Enter into the PRESET menu, press POS+/button to select AFT, press VOL+/- button to
select AFT ON.
Note: If the program is in AFT ON, the position
number displayed on the screen will be in green.
PRESET
POS
SKIP
BAND
FINE
AFT
SEARCH
ASM
S-RCV
22
OFF
UHF
OFF
OFF
The setting of colour and sound system
1.
2.
Press the RECALL button, the colour and sound system
will be displayed on the screen.
If the colour is abnormal, press the C-SYS button to
select proper colour system. Every time you press the
C-SYS button, the colour system will change in the
sequence below.
AUTO
3.
PAL
N3.58
M/N
9
PAL
B/G
N4.43
If the sound is abnormal, press the S-SYS button to
select proper sound system. Every time you press the
S-SYS button, the sound system will change in the
sequence below.
B/G
9
AUTO
B/G
D/K
I
Now you can watch the broadcasting TV program on the preset channels.
Note: You can also make use of SYSTEM menu to set the colour and sound system. (Refer to
SYSTEM SETTING on page 14.)
10
9
PAL
B/G
OPERATION
Channel selection
You can watch TV programmes being broadcast on the preset channels.
To watch a TV programme
You can select your desired TV program by one of the following methods.
Using the direct select buttons (0~9) and --/---button
To select a one-digit position number (0-9)
Press the 0~9 button directly.
9
AUTO
B/G
To select a two-digitposition number (10-99)
Press --/--- button to display -- on the screen, then press the
channel number.
13
AUTO
B/G
To select a three-digit position number (100-255)
Press --/--- button to display --- on the screen, then press the
channel number.
125
AUTO
B/G
Using the POS+/- buttons
Press POS- to select lower position numbers;
POS+ to select higher ones.
3
2
1
Using the PREVIOUS channel button (
)
Press the
button on the remote controller can swap the
current viewed channel with the previous one. For
example, the channel you previously watched is 11, the
present channel is 2, press the
button, it will return to
channel 11, press the
button again it will return to
channel 2.
11
11
2
OPERATION
Convenient Picture and Sound Controls
Selectable picture
To select the picture mode
You can select the picture quality instantly among four
preset modes and one user-set mode.
Press the P.M button to select the desired picture quality.
SOFT
STANDARD
VIVID
LIGHT
PERSONAL
SOFT, STANDARD , VIVID , LIGHT and PERSONAL
(user-set) can be selected cyclically.
To set the desired picture quality to the MEMORY position
1. Press the PIC button repeatedly to select the
desired adjusting item. Press the VOL+/- button
to adjust the level.
PICTURE
BRIGHT
CONTRAST
COLOUR
SHARP
TINT
28
Item
Pressing
(PERSONAL)
VOLVOL+
SOFT
STANDARD
VIVID
LIGHT
COLOUR
paler
deeper
38
38
50
50
BRIGHTNESS
darker
lighter
45
50
48
58
CONTRAST
weaker
stronger
28
50
63
63
SHARPNESS
softer
sharper
16
32
34
34
*TINT
purplish
greenish
00
00
00
00
PICTURE
BRIGHT
CONTRAST
COLOR
SHARP
TINT
38
* TINT is for NTSC system only.
The adjusted level is stored in the MEMORY position.
Adjusting the volume and muting the sound
To adjust the sound volume
Adjust the sound volume with the VOL+/buttons. Press the VOL- button to decrease the
sound. Press the VOL+ button to increase the
sound.
VOLUME
32
To mute the sound
The muting function is convenient when you need to pay attention to
surrounding sounds, answer a phone call, receive a visitor, etc.
Press the button to mute the sound.
To restore the sound, press the
button again or VOL+/- buttons.
MUTE
35
12
OPERATION
CLOCK SETTING
CLOCK menu
Press the CLOCK button to display the CLOCK menu. (Or press the
MENU button repeatedly to select and highlight CLOCK icon, and press
VOL+/- button to enter into the CLOCK menu.)
CLOCK
TIME
--:-OFF-TIME --:-ON-TIME --:-POS
-
TIME setting
Making use of this function can set the current time for the TV.
Press the POS+/- button to select and highlight TIME.
Press the VOL- button to set the hour (0~23). Press the
VOL+ button to set the minute (00~59).
CLOCK
TIME
18:23
OFF-TIME --:-ON-TIME --:-POS
-
OFF-TIME setting
Making use of this function can automatically turn off the TV at a preset time,
and bring the set to standby mode.
Press the POS+/- button to select OFF-TIME. Press the
VOL- button to set the hour (0~23) press the VOL+
button to set the minute (00~59). Once the preset time has
elapsed, the TV will automatically go into standby mode.
CLOCK
TIME
18:24
OFF-TIME 22:50
ON-TIME --:-POS
-
ON-TIME setting
Making use of this function can automatically turn on the TV at a preset time to
a preset channel.
Press the POS+/- button to select ON-TIME. Press the
VOL- button to set the hour (0~23), press the VOL+
button to set the minute (00~59).
Press the POS+/- button to select POS., press the VOL+/button to set the TV ON position number. (Or you can
press 0~9, --/--- button to set the position number).
Press the button to switch the TV to standby mode. At the
preset time, the TV will turn on automatically to the preset
channel.
CLOCK
TIME
18:25
OFF-TIME 22:50
ON-TIME 19:00
POS
-
CLOCK
TIME
18:24
OFF-TIME 22:50
ON-TIME
--:-POS
10
Note:
Once the function of ON/OFF TIMER has been fulfilled, next when you want to use the function once
more, you should set them again.
13
OPERATION
System setting
SYSTEM menu
Press the MENU button repeatly to select and
highlight the SYSTEM icon. Press the VOL+ button to
enter into the menu of SYSTEM.
SYSTEM
To select the language for the OSD (on-screen display)
Making use of this function can switch the language for the OSD to either
English or Chinese.
To switch the OSD language from English to Chinese,
press POS+/- button to select CHINESE (
),press
VOL+ button, the screen menu is automatically
displayed in Chinese.
To switch the OSD language from Chinese to English,
press POS+/- button to select
(ENGLISH) press
VOL+ button, the screen menu is automatically
displayed in English.
SYSTEM
CHINESE
ENGLISH
B/B
V.ZOOM
C-SYS
S-SYS
ON
NORMAL
AUTO
B/G
CHINESE
ENGLISH
ON
NORMAL
AUTO
B/G
B/B (blue background) setting
With the B/B (blue background) function ON, the TV will automatically
turn blue when no signal is being received.
In SYSTEM menu, press the POS+/- button to select B/B. Press the
VOL+/- button to change the B/B (blue background ) setting ON or OFF.
To exit the menu, press the MENU button repeatedly or press RECALL button.
V.ZOOM setting
Making use of this function can change the screen’s vertical size. Press POS
+/- button to select V.ZOOM press VOL+/- button, LEVEL.-2, LEVEL.
-1, NORMAL, LEVEL. 1, LEVEL.2 can be selected. You can select one of
them according to actual need, for example, to view wide screen movie VCD.
FIG. 1
SYSTEM
CHINESE
ENGLISH
B/B
V.ZOOM
C-SYS
S-SYS
ON
NORMAL
AUTO
B/G
SYSTEM
CHINESE
ENGLISH
B/B
V.ZOOM
C-SYS
S-SYS
ON
LEVEL.1
AUTO
B/G
FIG. 2
Colour/sound system selection
In SYSTEM menu, press the POS+/- button to select
C-SYS (or S-SYS) item.
Press the VOL+/- button to select proper colour (or
sound ) system.
To exit the menu, press the MENU button repeatedly
or press RECALL button.
14
SYSTEM
CHINESE
ENGLISH
B/B
V.ZOOM
C-SYS
S-SYS
ON
LEVEL.1
PAL
B/G
OPERATION
Playing Games
In this TV set there are two built-in games: Falling Cube and Millennium Alien. Below we will
describe how to make use of them.
To enter into Game
Press MENU button to select and highlight GAME
icon. Press VOL+/- button to enter into GAME
SELECT menu.
GAME
To select Game
In GAME SELECT menu, press POS+/- button to
select one of the games, press VOL+/- button to enter
into the game.
GAME SELECT
FALLING CUBE
MILLENNIUM ALIEN
Making use of FALLING CUBE
Enter into FALLING CUBE. On the screen, there are falling cubes, pressing
VOL+ button can move the cube rightward, pressing VOL- button move the
cube leftward, pressing POS- button can let the cube falling quickly while
pressing MENU button can rotate the cube.
When at the screen’s left playing area one row has been filled with the
cubes, the row will flash and disappear, and your score will gain one
point. If two rows disappear at the same time, your score will gain three
points. If three rows disappear at the same time, your score will gain
seven points.
The right window provides hints about next cube’s shape, you can
arrange current cube’s position and angle in advance.
You should try your best to improve your score. If you make mistakes
and let the cubes pile too high, it will become more difficult to improve
your score. When the cubes reach to top, the screen will display
GAME OVER, and the game is finished.
To exit the game playing (during the playing or when in gameover), press AV/TV button on the remote
controller.
15
OPERATION
Playing Games (continued) & SLEEP Timer
Making use of MILLENNIUMALIEN
Enter into MILLENNIUM ALIEN, there are characters "SHOOTING
START" flying from right to left. When the characters have flied over, you can
begin to shoot. Pressing VOL+ button can move the battleplane on the lower
screen rightward, pressing VOL- button can move the battleplane leftward,
pressing POS+/- button can shoot the bullet out.
When shooting, you should pay attention not to be hurt by opponent’s bullet. Every time you are shot
by opponent’s bullet, your life value will lose one point (there are three points altogether, and
SHOOTER on the upper screen will show them.)
There are stages in playing games (shown by STAGE on the upper screen.). At the beginning the stage
is 1, at this time if you hit the opponent for one time, the opponent’s array will lose one person, and
your score will gain 100 points.
When stage 1 is finished, the screen will show Mission Complete and BOSS STAGE. At this time you
should pay attention to the quick bullet shot by the flying machine and the STAGE is 2, Every time you
hit the opponent for one time, your score will increase 100 points.
The game will go on repeatedly in this kind, if your life value has used up, the game is over and the
screen will display GAMEOVER.
To exit the game playing (during the playing or when in gameover), press AV/TV button on the remote
controller.
Note: If you want to restart playing games when game is over, you should exit the game first, then
reenter into game and begin.
Only buttons on the remote controller can be used during playing games.
Sleep timer
SLEEP timer
Making use of the Sleep timer function allows you to have the set
automatically turned off after a preset time, and set the TV set to standby
mode.
Press the SLEEP button every time, the time displaying on
the screen will change in the sequence below:
120MIN
90MIN
60MIN
30MIN
16
SLEEP
90
--
OPERATION
Other functions
CALENDAR function(1800-2299)
Press MENU button repeatedly to select and highlight
CALENDAR icon, press VOL+/- button to enter into
calendar interface.
Pressing the POS+/- button can check years' calander
forward or backward.
Pressing the VOL+/- button can check months calendar
of some year forward or backward.
To exit the calendar interface, press RECALL button.
CALENDAR
MAR 2001
SU MO TU WE TH FR SA
1 2 3
4 5 6 7 8 9 10
11 12 13 14 15 16 17
18 19 20 21 22 23 24
25 26 27 28 29 30 31
CHILD LOCK setting
LOCK
Press the MENU button repeatedly to select and highlight
LOCK icon.
Press VOL+/- button to enter into CHILD LOCKsetting
interface, mess POS +/- button to select "CHANGE
PASSWORD" or to select "ENTER PASSWORD" to set
child lock or change child lock.
CHILD LOCK
CHANGE PASSWORD
ENTER PASSWORD -----POS. 9 LOCK OFF
To change password
Select CHANGE PASSWORD and press VOL+/- button to enter into the
menu, input the former password, please press the digit keys to enter the
former password (the preset password is 1234)
If the correct password is input, the cursor will move to next row "NEW
PASSWORD" automatically, please press the digit keys to enter the new
4-digit password. After inputting, press POS+/- button to move the cursor to
"ENTRY", and press VOL+/- button to confirm and exit the menu.
CHILD LOCK
ENTER PASSWORD
NEW PASSWORD
ENTRY
To set child lock or change child lock
CHILD LOCK
Enter into CHILD LOCK menu, move the cursor to “ENTER
CHANGE PASSWORD
PASSWORD”, input the password, if the password is correct, the cursor
ENTER PASSWORD -----will move to next row automatically. Pressing POS+/- button can change
POS. 9 LOCK OFF
the program number, pressing VOL+/- button can set the program’s child
lock mode in ON or OFF. When the program’s child lock is set ON, this
program has no content and the whole screen is in yellow.
Note: as long as there is one program whose child lock is set ON, the PRESET menu can not be entered.
Please enter into the CHILD LOCK menu to check. If you want to preset channels reagain, please do
steps above to set the program's child lock to OFF until all the programs are in child lock OFF.
17
OPERATION
Other functions (continued)
CHANNEL SWAP
Making use of CHANNEL SWAP you can reorder the programs in your
favorite order.
Press the MENU button repeatedly to select and
highlight SWAP icon. Press VOL +/- button to
enter into CHANNEL SWAP menu.
Press POS +/- button to select "POSITION A: -"
item, then input the desired channel number
which you want to swap by pressing "0-9" or "--/---"
button.
Press POS+/- button to select "POSITION B: -" item,press "0-9" or
"--/---" button to input the channel number which you want to swap to.
Press the POS+/- button to select "EXCHANGE" item, press VOL +/- button
to confirm. Then channel A and channel B’s programs are swapped.
SWAP
CHANNEL SWAP
POSITION
A: 5
POSITION B :14
EXCHANGE : OK
Super receiving function
Below we will describe how to make use of super
receiving function.
Pressing the SUPER button on the remote
controller can change the current program’s super
receiving mode to ON or OFF.
Or you can press PRESET button to enter into
PRESET menu, press POS+/-button to select
S-RCV item, press VOL +/- button can change the
current program’s super receiving mode to ON or
OFF.
S-RCV
ON
PRESET
POS
SKIP
BAND
FINE
AFT
SEARCH
ASM
S-RCV
22
OFF
UHF
OFF
OFF
or ON
Note : 1) After AUTO SEARCH (ASM). all the searched programs are set to S-RCV OFF automatically
2) When receiving signals are stronger, please set to S-RCV to OFF mode
Program Scan
Press SCAN button, the TV set will scan the channels
from current channel to higher channels one by one, the
upper right corner of the screen will display position
number, ever program will be displayed for about 2
seconds and then go on scanning until all the programs
are scanned over.
Press SCAN button again, the screen will settle at the
current scanned program.
18
7
SCAN
14
CONNECTING OTHER EQUIPMENT
External Equipment Connections
This set is incorporated with Audio & Video input and output terminals which allow direct connection
to external equipments (such as VCR, Video DISC, VCD, Satellite Receiver etc.) for playing back and
recording the programs. Refer to the owner’s manual of the equipment to be connected as well.
Video playback
The figure below shows how to connect the TV set to the video equipment.
Or you could use another group of AV IN terminals on the front cabinet as follows.
Note: As regards the AV input terminals, connect either the front or rear terminals but not both.
Press the "AV/TV" button on the remote controller to select AV mode, "AV" and corresponding
colour system will be displayed on the screen. The picture displayed on the screen is the program
played back by the video equipment.
Recording TV program
The figure below shows how to connect the TV set to the VCR
Press AV/TV button on the remote control unit to set the TV receiver to TV mode, and choose the
desired channel. At this time, the program recorded is the one displayed on the screen. (The
VIDEO/AUDIO output terminals only output TV signals.)
Note: the following mis-operation should be avoided during recording.
* Press STANDBY button or set to AV mode.
* Change the current channel accidentally
19
OTHERS
Troubleshooting Guide
.
Before calling service personnel, please check the following chart for a possible cause to the
trouble you are experiencing.
Check for the following items
Symptoms
No power, red indicator is not lit up
Poor colour, poor tint
Spots appear on the screen
Stripes appear on the screen
.
.
.
.
.
.
Picture is distorted, disturbed or lost
Double images or “ghosts”
Snowy picture
The remote controller does not work
PRESET menu can not be entered
CHANNEL SWAP menu can not be
entered
CHILD LOCK menu can not be entered
.
.
.
.
.
.
.
.
.
.
.
TV cabinet creaks
.
Unevenness in colour in some parts of
the screen.
Be sure the power cord is plugged in.
Contrast, colour, tint are not correctly
adjusted.
Possible interferences of automobiles,
motorcycle, trolley bus, neon lamps, etc.
Super receiving is set ON. When the
signals are not too weak, turning on the
super receiving may cause stripes.
Possible interference of electronic
interference from another TV set, a
computer, an electronics game machine, a
broadcast station, etc.
Super receiving is set ON. When the
signals are stronger, turning on the super
receiving may cause distorted picture, or
picture is disturbed or lost.
This may be caused by reflections from
nearby mountains or buildings.
Check the antenna direction.
It is possible that the aerial “lead-in” is
damaged or comes off.
Check the antenna direction
The batteries may be worn out.
The batteries may be installed with their
polarity reversed.
The set may be in AV mode.
There may be at least one program which
is in child lock ON mode.
The set may be in AV mode.
The set may be in AV mode.
Even if the picture or the sound is normal,
changes in the room temperature
sometimes make the TV cabinet expand or
contract, making a noise. This does not
indicate a malfunction.
When the set is switched on, do not shift
or move the set around. Sometimes it may
develop an unevenness in colour in some
parts of the screen. This can be eliminated
by switching off the set with the POWER
switch and wait for 10 minutes before
switching on again.
20
OTHERS
Specifications
Power supply:
Power consumption:
Dimensions(mm):
Weight(kg):
CRT
TV system & channel range
System
VHF
PAL-B/G
2-12
AC 240V, 50Hz
< 70W
550 (W) x 475 (H) x 470 (D)
23
51cm
Colour system:
Sound output:
Accessory:
PAL-BG, NTSC (AV)
2.5W
One remote controller
UHF
21-69
* Note: Design and specifications are subject to change without notice.
21
CATV
X~Z+2, S1~S41
PALSONIC CORPORATION PTY LTD
1 JOYNTON AVENUE
WATERLOO NSW 2017 AUSTRALIA
TEL:(02)9313 7111
FAX:(02)9313 7555
www.palsonic.com.au
PALSONIC CUSTOMER SERVICE
TELEPHONE
AUSTRALIA: 1300 657 888
604-A21Y3-01