1
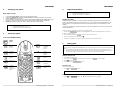
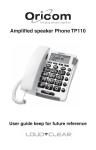
ABOUT YOUR PHONE
This Oricom cordless handset is compatible with any Oricom M5000 series base or any other DECT
GAP compatible cordless phone. Note that not all original functions may operate when used with
another brands base unit.
1
Getting Started
This package should contain the following:
•
•
•
•
•
•
1x Handset
1x Handset Battery Cover
1x Handset Base
1x Mains Power Adapter
2x Rechargeable Batteries AAA, Ni-MH, 1.2V 600mAh
1x User guide + Warranty card
If any of these items are missing, please contact the retailer where you purchased the product from.
CAUTION
Use only the mains power adaptor/charger supplied with this telephone. Incorrect adapter polarity
or voltage can seriously damage the unit. Input: 230 Vac 50Hz
CAUTION
RISK OF EXPLOSION - IF BATTERIES ARE REPLACED WITH INCORRECT TYPE. Refer to the
original type supplied with this telephone. Ni-MH batteries must be disposed of in accordance with
applicable waste disposal regulations.
Oricom M5050
CAUTION
Additional 1.8GHz DECT Cordless Handset & Charger
(Use with M5000 series or any GAP compatible DECT phone)
This telephone is not designed for making emergency telephone calls when the mains power
fails. Ensure there are alternative arrangements for access to emergency services via a mobile phone or
a corded telephone. ALWAYS have a corded or mobile phone available 24 hours a day.
Do not use your telephone during an electrical storm thunderstorm as it is possible to get an
electric shock. Refer to information contained in White pages directory.
User Guide
M5050 User guide.doc
Page 1 of 6
M5050 User guide.doc
Page 2 of 6
ABOUT YOUR PHONE
2
Setting up your phone
ABOUT YOUR PHONE
4
Note: Before you can use this handset. You need to:
1.
Charge the batteries (for 14 hours).
2.
Register the handset (to the Base unit).
Basic steps to setup
1.
2.
3.
4.
5.
Registering Handsets
Plug the mains power adapter of the charger into the wall mains supply.
Insert the two AAA batteries observing the correct polarity, into the battery compartment on the handset.
Slide the battery door firmly into place.
Place the handset on the base unit or the charger and let the batteries charge for a full 14 hours before using.
Handset may get warm during initial charge. This is normal.(Ensure wall mains supply is switched ON)
Register the handset to the base unit. (Refer to ‘Register Handsets’ section for details.)
Note: Before you can use this handset. You need to:
1.
Charge the batteries (for 14 hours).
2.
Register the handset (to the Base unit).
Register a handset
This handset is GAP compatible. You must go through the registration process with a base unit in order for it to
operate. Each handset can register to one base at a time only. The current base will be deregistered when a new
base is registered. If you register the handset with another manufacturer’s base unit, some features may not be
available.
(The following procedure may not apply if the base unit is from another manufacturer. Please refer to the instruction
manual of the base unit.)
Ensure no handset is resting on the base unit’s charging cradle:
3
1. Press & hold HANDSETLOCATOR button on the BASE UNIT for 10s until the IN-USE light flashes (you have 3
minutes to register handset).
About your phone
2. Key in a base unit number 1, 2, 3 OR 4, If you have one base unit key in 1.
3. Key in your handset’s PIN code default 0000.
Your Oricom M5000 Handset
4. Handset now registered. You will hear a tone + display shows a handset number.
PHONE
button
5
Arrow LEFT /
RECALL
button
MEMORY
button
Arrow RIGHT
/ CALLER
DISPLAY
button
DEL
MUTE /
DELETE
button
Speaker
button
INTERCOM
button
Ringer ON /
OFF button
Keypad
LOCK/
UNLOCK
VOLUME
button for
earpiece &
ringer
LAST NUMBER
redial
Making Calls
Note: OUT-OF- RANGE warning
You may be out-of-range with the BASE UNIT if you hear a warning tone or the sound becomes distorted.
Either
1.
Move handset closer within 20 seconds until the tone stops. Otherwise, your call may be cut off.
2.
Reposition & reconnect BASE UNIT to a phone connection closer to where the handset will be used
(an extension lead(s) for power & telephone line may be useful where necessary).
Make a handset call
1. Key number into telephone.
2. If necessary, press MUTE/DEL to clear single digit or Press & Hold MUTE/DEL to clear all digits
3. Press PHONE button to dial.
4. if necessary, press LAST NUMBER REDIAL button.
Answer a call
When the handset rings:
1. Press PHONE or SPEAKERPHONE button.
Note: Call timer - The call timer shows the duration of your current call on display.
End a call
1. Press PHONE or SPEAKERPHONE button. The
M5050 User guide.doc
Page 3 of 6
symbol disappears from the display.
M5050 User guide.doc
Page 4 of 6
ABOUT YOUR PHONE
6
Multi-handset use
7
Your M5000 series phone can have up to 5 handsets registered to 1 base unit. Each handset has its own
number HS-1, HS-2, HS-3, HS-4, & HS-5 shown on the left-hand side of the display.
Notes
•
•
•
A maximum of 1x outside call & 2x intercom calls can take place per base unit.
If you make an outside call + another handset is on line = result is a busy tone.
If you make an intercom call + one is already in progress = result is a busy tone.
Notes for operation in New Zealand
The grant of a Telepermit for any item of terminal equipment indicates only that Telecom has accepted
that the item complies with the minimum conditions for connection to its network. It indicates no
endorsement of the product by Telecom, nor does it provide any sort of warranty. Above all, it provides no
assurance that any item will work correctly in all respects with another item of Telepermitted equipment of
a different make or model, nor does it imply that any product is compatible with all of Telecom’s network
services. This device may be subject to ringing or bell tinkle when certain other devices are connected to
the same line. If this occurs, the problem should not be referred to the Telecom Faults service.
This equipment shall not be set to make automatic calls to the Telecom “111” Emergency Service. This
equipment may not provide for the effective hand-over of a call to another device connected to the
same line.
With 2 or more handsets you can:
Make an intercom call
REN (RN for New Zealand)
1. Press INTERCOM button. When you hear your outgoing message, press
2. Key the handset number 1, 2, 3, 4, OR 5, you wish to call.
3. On the RECIEVING handset, press PHONE button.
4. To end, press PHONE button on the CALLING handset. The RECIEVING handset will hear a busy tone.
Transfer a call between handsets
The REN (Ringer Equivalence Number) or (RN) is of significance only if you wish to connect more than 1
telephone to your telephone line. A standard telephone line has a maximum REN capacity of 3 (RN of 5). It
is possible to connect 3(5) devices with a REN of 1 (RN of 1) with no degradation to the product’s
performance. Exceeding this limit may cause the volume of the ringer in any phone to decrease or not ring
at all.
Caller ID
1. Press INTERCOM button.
2. Key the handset number 1, 2, 3, 4, OR 5, you wish to call.
3. On the RECIEVING handset, press PHONE button to receive call.
4. Press PHONE button on the CALLING handset to transfer. Call will return back within 90 seconds if
unanswered.
Customers in NZ using NON-TELECOM toll services should not use the ‘dial back’ feature for local calls as this
will incur a charge only the 7 digit number should be dialled. Some of the CID services listed may not be
available in New Zealand. This telephone is NOT designed for making emergency telephone calls when the
power fails. Ensure there are alternative arrangements for access to emergency services via a mobile
phone or a corded telephone.
8
Switch between calls
An outside call + an intercom call in progress, you switch between the 2 calls:
Warranty Information
This product is covered by a 12 month warranty against defective workmanship or parts. The warranty does
not extend to damage caused by misuse, negligence, excessive voltage, faults on the telephone line or
lightning. This guarantee in no way affects your statutory rights. Full details of the warranty are contained in
the enclosed warranty card. If you feel this product is not working correctly please consult the user guide and
ensure that you are using the product in accordance with the instructions. Remove all extra telephone
equipment and connect only this telephone directly to the telephone socket.
1. Press INTERCOM button to speak to outside call, while the intercom call is on hold.
2. Press INTERCOM button again to speak to intercom call, while outside call is on hold.
3. Press PHONE to transfer outside call to the other handset (while connected to intercom call).
Note
•
•
ABOUT YOUR PHONE
If you press the PHONE button while connected to the outside call, you will disconnect
If the other handset user presses the PHONE button to hang up, you will be left with the outside call
Conference calls
If the fault is still present, connect another telephone (if available) to the telephone socket. The results will
show you whether the fault lies with this unit or with the telephone line. If the product is working correctly
the fault is on the telephone line. Please contact your network operator for assistance
To orders spare parts additional handsets, replacement batteries and in case of any technical
issues you may have with product please consult our website for further information or send us an
email for a prompt response to your enquiry. In the unlikely event of a fault developing, please
contact us for assistance. If the product is then found to be faulty you will be asked to return it
directly to us with a copy of the purchase receipt.
A 3-way call between yourself + outside call + intercom call:
1. Either make or answer an outside call.
2. Press INTERCOM button.
3 Key in the other handset number 1, 2, 3, 4, OR 5.
4. On the RECIEVING handset, press PHONE button to receive call.
5. Press INTERCOM button & hold for about 3 seconds.
5. When connected both symbols are shown on display
M5050 User guide.doc
Page 5 of 6
Australia
Oricom International Pty Ltd
PO Box 5681, South Windsor, NSW 2756
New Zealand
Atlas Gentech (NZ) Ltd
Private Bag 14927, Panmure, Auckland
Customer support
Email: [email protected]
Web: www.oricom.com.au
Fax: (02) 4572 0939
Ph: 1300 889 785
Customer support
Email: [email protected]
Web: www.atlasgentech.co.nz
Fax: (09) 574 2722
Ph: 0900 50 025 (Toll Call)
M5050 User guide.doc
Page 6 of 6