1
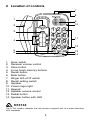
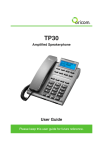
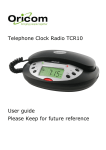
Big button phone TP58
User Guide
1 General Information
Warnings
Do not use your telephone during an electrical storm
thunderstorm as it is possible to get an electric shock. Refer
to information contained in Telstra White pages directory.
The earpiece of the handset may attract small metal objects
such as staples and pins. Care should be taken when
placing the handset near these items.
Notes for operation in New Zealand
The grant of a Telepermit for any item of terminal equipment
indicates only that Telecom has accepted that the item complies
with the minimum conditions for connection to its network. It
indicates no endorsement of the product by Telecom, nor does
it provide any sort of warranty. Above all, it provides no assurance
that any item will work correctly in all respects with another item
of Telepermitted equipment of a different make or model, nor
does it imply that any product is compatible with all of Telecom’s
network services. This equipment shall not be set to make
automatic calls to the Telecom “111” Emergency Service. This
equipment may not provide for the effective hand-over of a call
to another device connected to the same line.
This device may be subject to ringing or bell tinkle when certain
other devices are connected to the same line. If this occurs, the
problem should not be referred to the Telecom Faults Service.
REN (RN for New Zealand)
The REN (Ringer Equivalence Number) or (RN) is of significance
only if you wish to connect more than 1 telephone to your
telephone line. A standard telephone line has a maximum REN
capacity of 3 (RN of 5). It is possible to connect 3(5) devices
with a REN of 1 (RN of 1) with no degradation to the product’s
performance. Exceeding this limit may cause the volume of the
ringer in any phone to decrease or not ring at all.
1
2 Location of controls
7
8
1
9
10
RECEIV
LO MID ER
HI
2
3
123
456
789
0#
STORE
4
5
6
1.
2.
3.
4.
5.
6.
7.
8.
9.
10.
11.
12.
13.
14.
ABC
DEF
GHI
JKL
MNO
PQRS
TUV
WXYZ
RECALL
MUTE
SPEAKER
REDIAL
11
12
13
14
Hook switch
Receiver volume control
Store button
6 one touch memory buttons
Recall button
Mute button
Ringer Hi/Lo/Off switch
Recall setting switch
Speaker
Visual ringer light
Keypad
Speaker volume control
Redial button
Speaker button with LED
N13134
The A-Tick symbol indicates that this product complies with all current Australian
ACA standards.
2
3 Installation
3.1 Check contents of pack
The following items are supplied in this pack:
one telephone base
one telephone handset
one short telephone cable
one curly cord
one long telephone cable
one operating Manual
one warranty card
3.2 Connect the handset and line cord
Connect the telephone handset to the base unit. Plug one end
of the curly cord into the socket on the handset. Locate the
socket on the base of the phone and plug the other end of the
curly cord into this.
Plug one end of the telephone cable (long for desk installation)
into the wall socket. Plug the other end into the socket located
in the indentation on the base of the telephone. Then feed the
cable through the cable guide.
3.3 Wall mounting
Method A. Use two screws for fixing. At the desired location
drill two holes one above the other, 83mm apart, and leave the
screws protruding 5mm from the wall. Now place the telephone
base over the screws and gently push forwards and then
downwards.
Method B. If you wish to fit to an existing telephone wall plate
with modular connector. Plug the short telephone line cord
supplied into the base of the phone; plug the other end into the
telephone wall plate socket. Position the mounting holes on the
base of the phone over the two protruding screws on the wall
plate. Gently push the phone flush against the wall plate then
slide the phone downwards locking it into place.
3
NOTE!
There is a small hanging device in the handset rest to prevent
the handset from falling from the rest when the telephone is
mounted on the wall.
You can hang the handset on the telephone without hanging up.
Use the small hanging device for this purpose at the upper end
of the handset rest.
3.4 Adjustable ringer volume
You can use the RINGER OFF/LO/HI slide switch located on
the back of the telephone to select the incoming ring volume.
Should you not want to be disturbed, use select OFF position.
3.5
Receiver volume control
The receiver volume control is located on the handset of your
phone. This enables you to adjust the receiver volume from low
(LO), middle (MID) to high (HI) for a better listening level.
3.6 Speaker Volume Control
Under Speaker phone mode, slide the SPEAKER VOL to adjust
the speaker phone volume.
4
4.1
Operation
Using the telephone
The TP58 telephone is used like any conventional telephone
and works with all modern telephone exchanges using the tone
dialling system. Use can make or receive a call using handset
or speakerphone.
Dialing a call
1. Lift the handset or press SPEAKER button (SPEAKER LED
turns on) and wait until your hear dial tone.
2. Now dial the required telephone number.
3. To end the call, replace the handset or press SPEAKER
button (SPEAKER LED turns off).
4
Receiving a Call
When you receive a call, the phone rings and the Visual ringer
light flashes.
To answer the call, lift the handset or press SPEAKER button
(SPEAKER LED turns on). Replace the handset or press
SPEAKER button (SPEAKER LED turns off) to end the call.
NOTE!
If you want to change during a call from the handset to the
speakerphone, press the SPEAKER button and replace the
handset.
If you want to change from the speakerphone to the handset,
simply lift the handset.
4.2 Last number redial
If the number you have dialed is engaged or you were unable to
get through to anybody, simply replace the handset. The last
number (up to 32 digits) dialled will be saved in the telephone
memory. To use the redial facility, proceed as follows:
1. Lift the handset.
2. Press the REDIAL button the last saved redial number will
now be dialled.
4.3 Recall button
You will use the RECALL button when using your network
operator’s services such as call waiting etc. If this feature is not
working check the position of the Recall switch on the side of
the phone. In Australia it should be set at 100ms and in New
Zealand 600ms.
4.4 Muting the microphone
You can switch off the microphone during a call using the MUTE
button. It is then possible to speak without the other party hearing
you. You can still hear the other party.
To mute the microphone, press and hold the MUTE button during
a call. Release the MUTE button and you can continue the call
as normal.
5
5 Storing telephone numbers
You can store 6 numbers under the one touch buttons (M1M6).
5.1 Saving numbers
1.
2.
3.
4.
5.
6.
Lift the handset listen for dial tone.
Press the STORE button.
Enter the required telephone number using the number pad.
Press the STORE button.
Now press one of the six one touch dial buttons (M1-M6).
Replace the handset.
Tips on storing numbers:
Storage locations that have already been used cannot be erased.
Simply save a new number in the storage location that you want
to erase.
The storage locations can be written on the index card so that
you do not forget where the numbers have been stored. You can
remove the protective transparent cover using the tip of a
ballpoint pen or a small pin.
5.2 Making a call using the one touch dial buttons
1. Lift the handset or press SPEAKER button.
2. Now press the required one touch dial button (M1-M6). The
stored number will now be dialled automatically.
3. To end the call, replace the handset or press SPEAKER
button.
6
6 Important information
Troubleshooting
If you feel this product is not working correctly please consult
the user guide and ensure that you are using the product in
accordance with the instructions.
Remove all extra telephone equipment and connect only this
telephone directly to the telephone socket.
If the fault is still present, connect another telephone (if available)
to the telephone socket. The results will show you whether the
fault lies with this product or with the telephone line. If this
product is working correctly the fault is on the telephone line.
Please contact your network operator for assistance
In the case of technical problems with this product please consult
our website for further information or send us an email for a
prompt response to your enquiry.
Temperature and ambient conditions
The telephone is designed for indoor use (temperature range of
-10 °C to 50 °C). Do not install the telephone in areas where
there is the risk of an explosion, excessive exposure to smoke,
dust, vibrations, chemicals, moisture, and heat. The unit must
not be installed in damp locations such as a bathroom or laundry,
do not expose the unit to direct sunlight.
Cleaning and care
The surface of the case can be cleaned with a dry, soft, lint-free
cloth. Never use cleaning agents, particularly aggressive
solvents. Apart from occasional cleaning of the case, no other
care is necessary. The rubber feet of the base station are not
resistant to all cleaning agents. The telephone feet do not
normally leave any marks on the surface. However, on account
of the multitude of varnishes and surface finishes used, surface
marks caused by the feet of the unit cannot be ruled out.
7
Warranty Information
This product is covered by a 12 month warranty against defective
workmanship or parts, effective from the date of purchase.
The warranty does not extend to damage caused by misuse,
negligence, excessive voltage, faults on the telephone line or
lightning. This warranty in no way affects your statutory rights.
Full details of the warranty are contained in the enclosed warranty
card.
Technical support
In the unlikely event of a fault during this period, please consult
our website for assistance or send us an email for a prompt
response to your enquiry. If the product is then found to be faulty
you will be asked to return it directly to us with a copy of the
purchase receipt.
For further information about the Oricom range of products
please visit our website.
8
Australia
New Zealand
Oricom International Pty Ltd
Locked Bag 658
South Windsor NSW 2756
Atlas Gentech (NZ) Ltd,
Private Bag 14927,
Panmure,
Auckland
Customer support
Email:
[email protected]
Web: www.oricom.com.au
Fax: (02) 4574 8898
Ph: 1300 889 785
Customer Support
Email:
[email protected]
Fax (09) 5742722
Ph: 0900 50025 (Toll Call)
9
4LM114Y1