1
Copyright © 2004 Nokia. All rights reserved.
Copyright © 2004 Nokia. Todos los derechos reservados.
Printed in Canada / Impreso en Canadá
User Guide
www.nokia.com/us
www.nokia.com/latinoamerica
Manual del Usuario
NS333 BilESGenUG_P1 8/31/04 1:39 AM Page 1
Nokia 6235, Nokia 6235i, Nokia 6236,
and Nokia 6236i User Guide
Nota: La traducción en español de este manual inicia en la Página 109.
1
LEGAL INFORMATION
DECLARATION OF CONFORMITY
We, NOKIA CORPORATION declare under our sole responsibility that the products Nokia 6235,
Nokia 6235i, Nokia 6236, and Nokia 6236i are in conformity with the provisions of the
following Council Directive: 1999/5/EC. A copy of the Declaration of Conformity can be
found at http://www.nokiausa.com/phones/declaration_of_conformity/.
PART NO. 9235986, ISSUE NO. 1
Copyright ©2005 Nokia. All rights reserved.
Nokia, Nokia Connecting People, Nokia 6235, Nokia 6235i, Nokia 6236, Nokia 6236i,
Pop-Port™, and the Nokia Original Enhancements logos are trademarks or registered
trademarks of Nokia Corporation. Other company and product names mentioned herein
may be trademarks or trade names of their respective owners.
US Patent No. 5818437 and other pending patents. T9 text input software
Copyright ©1999-2005. Tegic Communications, Inc. All rights reserved.
Includes RSA BSAFE cryptographic or security protocol software from
RSA Security.
Java™ is a trademark of Sun Microsystems, Inc.
The information contained in this user guide was written for the Nokia 6235, Nokia 6235i,
Nokia 6236, and Nokia 6236i products. Nokia operates a policy of ongoing development.
Nokia reserves the right to make changes to any of the products described in this document
without prior notice.
UNDER NO CIRCUMSTANCES SHALL NOKIA BE RESPONSIBLE FOR ANY LOSS OF DATA OR
INCOME OR ANY SPECIAL, INCIDENTAL, AND CONSEQUENTIAL OR INDIRECT DAMAGES
HOWSOEVER CAUSED. THE CONTENTS OF THIS DOCUMENT ARE PROVIDED “AS IS.” EXCEPT
AS REQUIRED BY APPLICABLE LAW, NO WARRANTIES OF ANY KIND, EITHER EXPRESS OR
IMPLIED, INCLUDING, BUT NOT LIMITED TO, THE IMPLIED WARRANTIES OF MERCHANTABILITY
AND FITNESS FOR A PARTICULAR PURPOSE, ARE MADE IN RELATION TO THE ACCURACY AND
RELIABILITY OR CONTENTS OF THIS DOCUMENT. NOKIA RESERVES THE RIGHT TO REVISE THIS
DOCUMENT OR WITHDRAW IT AT ANY TIME WITHOUT PRIOR NOTICE.
EXPORT CONTROLS
This device may contain commodities, technology, or software subject to export laws and
regulations from the U.S. and other countries. Diversion contrary to law is prohibited.
FCC/INDUSTRY CANADA NOTICE
Your device may cause TV or radio interference (for example, when using a telephone in close
proximity to receiving equipment). The FCC or Industry Canada can require you to stop using
your telephone if such interference cannot be eliminated. If you require assistance, contact
your local service facility. This device complies with part 15 of the FCC rules. Operation is
subject to the condition that this device does not cause harmful interference.
2
Contents
Contents
For your safety....................................................................................................... 4
1. Phone at a glance ......................................................................................... 9
2. Set up your phone ...................................................................................... 13
3. Text entry ...................................................................................................... 20
4. Messages ....................................................................................................... 22
5. Call log ........................................................................................................... 35
6. Contacts......................................................................................................... 38
7. Camera........................................................................................................... 45
8. Gallery ............................................................................................................ 48
9. Media.............................................................................................................. 49
10. Settings.......................................................................................................... 52
11. Organizer ....................................................................................................... 69
12. Mobile Web .................................................................................................. 77
13. Extras.............................................................................................................. 79
14. PC Connectivity ........................................................................................... 80
15. Enhancements.............................................................................................. 83
16. Reference information............................................................................... 84
Care and maintenance ...................................................................................... 86
Additional safety information......................................................................... 87
Nokia one-year limited warranty................................................................... 93
Appendix A.............................................................................................................97
Appendix B.......................................................................................................... 100
Index..................................................................................................................... 106
3
For your safety
For your safety
Read these simple guidelines. Not following them may be dangerous or illegal.
Read the complete user guide for further information.
SWITCH ON SAFELY
Do not switch the device on when wireless phone use is prohibited or
when it may cause interference or danger.
ROAD SAFETY COMES FIRST
Obey all local laws. Always keep your hands free to operate the
vehicle while driving. Your first consideration while driving should be
road safety.
INTERFERENCE
Do not switch the device on when wireless phone use is prohibited or
when it may cause interference or danger.
SWITCH OFF IN HOSPITALS
Follow any restrictions. Switch the device off near medical equipment.
SWITCH OFF IN AIRCRAFT
Follow any restrictions. Wireless devices can cause interference
in aircraft.
SWITCH OFF WHEN REFUELING
Don't use the device at a refueling point. Don't use near fuel or chemicals.
SWITCH OFF NEAR BLASTING
Follow any restrictions. Don't use the device where blasting is in progress.
USE SENSIBLY
Use only in the normal position as explained in the product
documentation. Don't touch the antenna unnecessarily.
QUALIFIED SERVICE
Only qualified personnel may install or repair this product.
ENHANCEMENTS AND BATTERIES
Use only approved enhancements and batteries. Do not connect
incompatible products.
4
For your safety
WATER-RESISTANCE
Your phone is not water-resistant. Keep it dry.
BACK-UP COPIES
Remember to make back-up copies or keep a written record of all
important information.
CONNECTING TO OTHER DEVICES
When connecting to any other device, read its user guide for detailed
safety instructions. Do not connect incompatible products.
EMERGENCY CALLS
Ensure the device is switched on and in service. Press the end key as
many times as needed to clear the display and return to the main screen.
Enter the emergency number, then press the call key. Give your
location. Do not end the call until given permission to do so.
■ About your device
The wireless devices described in this guide are approved for use on the CDMA 800,
1900 and AMPS networks. Contact your service provider for more information
about networks.
When using the features in this device, obey all laws and respect privacy and the
legitimate rights of others.
Warning: To use any features in this device, other than the alarm clock,
the device must be switched on. Do not switch the device on when wireless
phone use may cause interference or danger.
■ Network Services
To use the device you must have service from a wireless service provider. Many of
the features in this device depend on features in the wireless network to function.
These Network Services may not be available on all networks or you may have to
make specific arrangements with your service provider before you can utilize them.
Your service provider may need to give you additional instructions for their use
and explain what charges will apply. Some networks may have limitations that
affect how you can use Network Services. For instance, some networks may not
support all language-dependent characters and services.
Your service provider may have requested that certain features be disabled or not
activated in your device. If so, they will not appear on your device menu. Contact
your service provider for more information.
5
For your safety
■ Shared memory
The following device features may share memory: contacts; text messages; photos,
images, and tones in Gallery; calendar notes; games; and applications. Use of one
or more of these features may reduce the memory available for the remaining
features sharing memory. If your phone displays a message that the memory is
full when you try to use a shared memory feature, delete some of the information
or entries stored in the shared memory features before continuing. Some of the
features, such as photos, images, and tones in Gallery; text messages; and
applications may have a certain amount of memory specially allotted to them in
addition to the memory shared with other features.
6
Welcome
Welcome
Congratulations on your purchase of the Nokia 6235, Nokia 6235i, Nokia 6236,
or Nokia 6236i mobile phone. Your device provides many functions that are
practical for daily use, such as a hands-free loudspeaker, alarm clock, calculator,
calendar, camera, FM radio, and more. Your device can also connect to a PC,
laptop, or other device using a data cable or infrared. To personalize your device
you can set your favorite ringing tones.
■ Register your device
Make sure to register your device at www.nokiausa.com/support/warranty/ or
call 1-888-NOKIA-2U (1-888-665-4228) so that we can serve your needs better
if you should need to call a customer center or to have your device repaired.
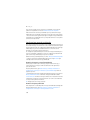
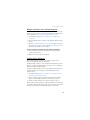
■ Getting help
If you need help, Nokia Customer Care is available for assistance. Before calling,
we recommend that you write down the Electronic serial number (ESN) and your
zip code (only in the US) and have it available.
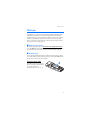
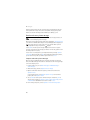
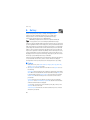
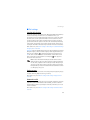
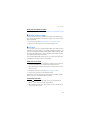
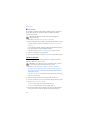
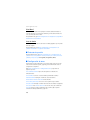
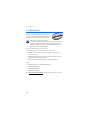
Find your device label
The ESN is found on the type label (1),
which is located beneath the battery
on the back of the device.
See "Remove the back cover," p. 14.
7
Welcome
Contact Nokia
Please have your product with you when contacting any of these numbers:
Nokia Customer Care Center, USA
Nokia Inc.
Tel: 1-888-NOKIA-2U (1-888-665-4228)
Fax: 1-813-249-9619
TTY/TDD users: 1-800-24-NOKIA (1-800-246-6542)
Customer Care Center, Canada
Nokia Products Ltd.
601 Westney Road South
Ajax, Ontario L1S 4N7
Tel: 1-888-22-NOKIA (1-888-226-6542)
Fax: 1-905-619-4360
Updates
From time to time, Nokia updates this guide to reflect changes. The latest version
and an interactive tutorial for this product may be available at the Web site
www.nokiausa.com.
Accessibility solutions
Nokia is committed to making mobile phones easy to use for all individuals,
including those with disabilities. For more information visit the Web site at
www.nokiaaccessibility.com.
8
Phone at a glance
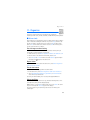
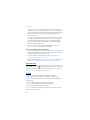
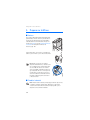
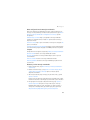
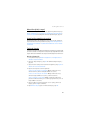
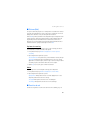
1. Phone at a glance
• Power key (1)
• Earpiece (2)
• Headset connector (3)
• Five-way joystick (4)
• Right selection key (5)
• End key (6)
• Pop-Port™ connector (7)
• Microphone (8)
• Charger port (9)
• Keypad (10)
• Call key (11)
• Left selection key (12)
• Display screen (13)
• Volume key (14)
• IR port (15)
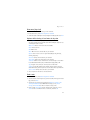
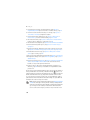
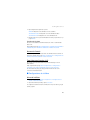
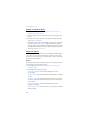
■ The start screen
Depending on your wireless service provider
and the model number of your device, some
or all of the following selection keys may
appear on the start screen.
The start screen is home base and indicates
your device is in standby mode.
Battery level (1)—A higher bar indicates
more battery power.
Menu (2)—Press the joystick to select this option.
Names or network operator menu item (3)—Press the Right selection key to select
this option.
Go to (4)—Press the Left selection key to select this option.
Signal strength (5)—A higher bar indicates a stronger network signal.
9
Phone at a glance
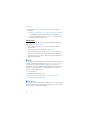
■ Quick keys
Depending on your wireless service provider and the model number of your device,
some or all of the following joystick shortcuts may be available from the start screen.
Scroll up—Activate camera from standby mode.
Scroll right—View calendar.
Scroll down—Go to contacts list.
Scroll left—Create a text message.
Press joystick—Select highlighted menus and submenus.
■ Indicators and icons
Depending on your wireless service provider and the model number of your device,
some or all of the following indicators and icons may appear on the start screen.
You have new text or picture messages. See "Text messages," p. 22.
You have new multimedia messages. See "Multimedia messages," p. 27.
You have a picture message in your inbox. See "Receive and save a
picture message," p. 26.
You have new voice messages. See "Voice messages," p. 31.
Device keypad is locked. See "Keyguard," p. 19.
Device is set to the silent profile. See "Profiles," p. 52.
Alarm clock is set to on. See "Alarm clock," p. 69.
Countdown timer is running. See "Countdown timer," p. 75.
Stopwatch timer is running in the background. See "Stopwatch," p. 75.
Integrated hands-free is active. See "Use the loudspeaker," p. 17.
Timed profile is selected. See "Profiles," p. 52.
,
or
An enhancement is connected to the device.
See "Enhancements," p. 83.
or
Location info sharing is set to Emergency or ON.
See "Location info sharing," p. 55.
Voice privacy encryption is active in the network.
You are in a digital network. See "Network Services," p. 5.
You are in an analog network. See "Network Services," p. 5.
You are in a 1XRTT network. See "Network Services," p. 5.
You are roaming outside your home network.
See "Roaming options," p. 64.
10
Phone at a glance
■ Get the most out of this guide
The following sections illustrate the various components of your phone. Familiarize
yourself with these sections to help you understand the instructions that follow.
This guide uses certain terms for the steps that you are asked to perform.
• Press means to press and release a key quickly. For example, press 7 means
press the key on the keypad that is labeled with the number 7 and letters "pqrs."
• Press and hold means to press and hold key for 2 to 3 seconds; then realease
the key.
• Selection keys and the joystick are used to select a menu option. To select an
option, press the selection key below the menu item on the device screen.
• The joystick is used to move up, down, left, or right in the menus.
• Call and end keys: Press the call key to place a call or to answer an incoming call.
Press the end key to end a call or press and hold to return to the start screen.
■ Device menus
Device features are grouped according to function and are accessed through the
main menus. Each main menu contains submenus and lists from which you can
select or view items and customize your device features. You can access these
menus and submenus by using the scroll method or by using shortcuts.
You can change your menu view from list to grid. See "Display settings," p. 53.
Note: Some features may not be available, depending on your network.
For more information, contact your wireless provider.
Scroll method
You can use the joystick to move up, down, left and right through the options.
Press the joystick to select an item.
1. At the start screen, select Menu, and scroll through the
main menus using the joystick.
As you scroll through the menus, the menu number
appears in the upper right corner of the display. On the
right side of the display screen is a scroll bar with a tab
that moves up or down as you scroll through the menus. This tab provides a
visual representation of your current position in the menu structure.
2. When you arrive at a menu, press the joystick, Select, to enter submenus.
Select Back (the Right selection key) to return to the previous menu. Press the
end key to return to the start screen from any menu or submenu.
11
Phone at a glance
■ Go to function
The Go to menu allows you to change what you can access from the Left selection
key on your device. With this function, your most frequently used functions can
be quickly accessed from the Go to menu on the start screen.
Choose Go to functions
1. Go to can be accessed by pressing the Left selection key; or, at the start screen,
select Go to > Options > Select options.
2. Use the joystick to highlight the desired function.
3. Select Mark to add a function. Select Unmark to remove a function.
4. Select Done when you have added all desired functions.
5. Select Yes to save the changes.
6. At the start screen, select Go to to display a list of the functions that you
selected in step 3.
Organize functions
1. At the start screen, select Go to > Options > Organize.
2. Use the joystick to scroll up or down and highlight the function you wish
to rearrange, and select Move > Move up, Move down, Move to top, or
Move to bottom.
3. Select Done > Yes to save the changes.
In-phone help
Many features have brief descriptions (help text) that can be viewed on the display.
To activate help text, at the start screen, select Menu > Settings > Phone settings >
Help text activation > On or Off.
To view these descriptions, scroll to a feature and wait for about 14 seconds. Use
the joystick to view all the description or press Back to exit.
12
Set up your phone
2. Set up your phone
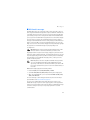
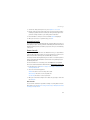
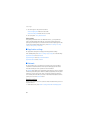
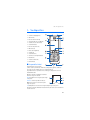
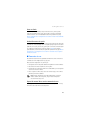
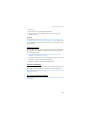
■ Antenna
In the Nokia 6235, Nokia 6235i, Nokia 6236, and
Nokia 6236i phones, the antenna is internal and
located towards the top of the device. A GPS antenna
is activated when you place an emergency call or
when you select On from the Location info sharing
menu. See "Location info sharing," p. 55.
Hold the device as you would any other telephone
with the antenna area pointed up and over your shoulder.
Note: As with any other radio
transmitting device, do not touch the
antenna unnecessarily when the device is
switched on. Contact with the antenna
affects call quality and may cause the
device to operate at a higher power level
than otherwise needed. Not touching the
antenna area during a phone call optimizes
the antenna performance and battery life.
■ Change battery
Note: Before removing the cover, always switch off the power and
disconnect the charger and any other device. Avoid touching electronic
components while changing the covers. Always store and use the device
with the covers attached.
13
Set up your phone
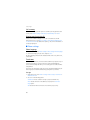
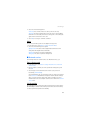
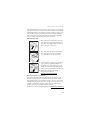
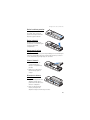
Remove the back cover
With the back of the device facing
you, slide the back cover toward the
bottom of the device and remove.
Remove the battery
After you have removed the back
cover, insert your finger into the
finger grip, and lift the battery from
its compartment.
UIM (CDMA SIM) card slot
Your device has a UIM card slot built into the mechanics, located under the
battery. The UIM is a carrier-specific feature and is not functional in this model.
Do not place any objects in this slot.
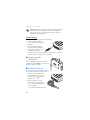
Replace the battery
1. Insert the gold-colored contact
end of the battery, into the
battery slot.
2. Push down on the other end of
the battery to snap the battery
into place.
Replace the back cover
1. Set the back cover on the device
so that the cover tabs align with
the slots in the device.
2. Slide the back cover towards the
top of the device until the back
cover is securely in place.
Important: Do not remove
the front cover of this device. Attempts to remove the front cover may
damage the device. If your device requires service, contact Customer
Care. See "Contact Nokia," p. 8.
14
Set up your phone
Charge the battery
1. Plug the charger transformer into a standard ac outlet.
2. Insert the charger output plug into
the round jack at the bottom end of
the device.
After a few seconds, the battery
indicator in the display starts to
scroll from bottom to top. If the
battery is completely discharged, it
may take a few minutes before the
charging indicator appears on the
display or before any calls can be made.
■ Turn your device on or off
To turn your device on or off, press and hold
the Power key on top of the device for at
least 3 seconds.
■ Connect the headset
You can connect a compatible headset, such as
HS-5, to your device. See "Enhancements," p. 83.
1. Plug the headset connector into the
Pop-Port™ connector at the bottom end
of your device. The
icon appears on
the start screen.
2. Position the headset on your ear.
With the headset connected, you can
make, answer, and end calls as usual.
• Use the keypad to enter numbers.
• Press the call key
to place a call.
See "Phone at a glance," p. 9.
• Press the end key
to end a call.
You can also plug a compatible headset, such as the HS-9 Universal Headset,
into the 2.5 mm headset jack on your device to allow hands-free operation.
See "Enhancements," p. 83.
15
Set up your phone
■ Change front cover
Note: Before removing the cover, always switch off the power and
disconnect the charger and any other device. Avoid touching electronic
components while changing the covers. Always store and use the device
with the covers attached.
Remove the back cover and battery
For instructions to remove back cover and battery, see "Remove the back cover,"
p. 14.
Remove the front cover
Gently pull the bottom of the front cover away from the rest of the device, and
remove the front cover.
Install the keymat and front cover
1. Remove the keymat from the old front cover.
2. Place the keymat into the new front cover.
3. Press the front cover and keymat against the phone, and snap the front cover
into place.
Warning: Always replace the front cover before replacing the battery
and the back cover. Replacing the back cover first may cause damage to
your phone.
Replace the battery and back cover
For instructions to replace back cover and battery, see "Replace the battery," p. 14,
and "Replace the back cover," p. 14.
■ Answer calls
Answer or silence an incoming call
• Press the call key or select Answer to answer the call.
• Press the end key to reject the call.
• Select Silence to mute the ringing tone then select Dismiss, or do nothing and
the call is eventually diverted to voicemail.
If your device is set to Silent in the Settings > Profiles menu, select Dismiss,
and the call is rejected and diverted to voicemail.
16
Set up your phone
Adjust the earpiece volume
Whether in or out of a call, you can scroll the volume key located on the left side
of your device up or down to adjust the volume of the earpiece. When you adjust
the volume, a bar chart indicates the volume level.
Answer a call with the keypad locked
To answer a call with the keypad locked, press the call key or select Answer.
During the call, all features function normally. When you end or reject the call,
the keypad automatically relocks. See "Keyguard," p. 19.
When the keypad lock is on, calls still may be possible to the official emergency
number programmed into your device. Enter the emergency number and press
the call key.
Use the loudspeaker
Warning: Do not hold the device near your ear when the loudspeaker is
in use, because the volume may be extremely loud.
You can use your device as a loudspeaker:
• To activate the loudspeaker while in a call select Loudsp.
• To deactivate the loudspeaker during a call, select Normal.
The loudspeaker is deactivated automatically when a call (or a call attempt) ends
or when certain enhancements are connected.
Options during a call
Many of the options that you can use during a call are network services. Check with
your wireless service provider for more information.
1. Select Options during a call to display the following:
Loudspeaker/Normal—Activate or deactivate the loudspeaker while in a call.
New call—Initiate a conference call. See "Conference calling," p. 18.
Save—Add a number while in a call to your contact list. This option is available
only when entering numbers during a call.
Add to contact—Add a contact while in a call to contact list. This option is
available only when entering numbers during a call.
End all calls—Disconnect from all active calls.
Touch tones—Enter the number(s), and select Tones to send the number(s)
as tones.
Contacts—View the contacts list.
Menu—View the phone menu.
2. Scroll to an option, and Select to activate the option or enter its submenu.
17
Set up your phone
■ Make a call
To make a call, at the start screen, enter the number you want to call and press
the call key.
Use the contacts list
To begin entering names in your contacts list:
1. Enter the number with area code at the start screen.
2. Select Save to save the number to your contacts list.
3. Enter a contact name and select OK.
To use the contacts list, from the start screen, select Names and scroll to the
contact you want to use.
Use the keypad
1. Enter the phone number (including the area code), and press the call key.
To delete a character to the left of the cursor, select Clear.
2. Press the end key to end the call or select End call to cancel the call attempt.
Use the last dialed number
1. At the start screen, press the call key to display the last 30 numbers dialed.
2. Select the number (or name) you wish to redial, and press the call key.
Conference calling
Conference calling is a network service that allows you to take part in a
conference call with two other participants.
1. Make a call to the first participant.
2. With the first participant on the line, select Options > New call.
3. Enter the phone number of the second participant, or select Search to
retrieve a number from the contacts list.
4. Select OK and the first participant is put on hold and a data query appears.
5. When the second participant picks up, press the call key to connect the calls.
6. To end the conference call, select Options > End all calls or press the end key.
18
Set up your phone
■ Keyguard
With keyguard, you can lock the keypad to prevent keys from being pressed
accidentally. If the keypad is locked, it unlocks when you answer a call. After the
call, the lock automatically reactivates.
When the keyguard is on, calls still may be possible to the official emergency
number programmed into your device. Enter the emergency number and press
the call key.
Lock the keypad
Press the joystick; then press * within two seconds.
Unlock the keypad
Press the joystick or select Unlock; then press * within two seconds.
19
Text entry
3. Text entry
You can use two methods for entering text and numbers: Standard mode and
Predictive text mode.
• Select Clear to backspace the cursor and delete a character.
• Select and hold Clear to backspace continuously and delete characters.
■ Standard mode
Standard mode is the only way to enter text into the contacts list and to rename
caller groups.
Text (Abc)
• Press a key once to insert the first letter on the key, twice for the second
letter, etc. If you pause briefly, the last letter in the display is accepted and
your device awaits the next entry.
• Press 0 to enter a space, thereby accepting a completed word.
• Press 1 to insert a period into your message.
• Press and hold * to display a complete list of special characters.
• Press and hold # to bring up the Editor settings (Number mode, Dictionary on/
Dictionary off, Writing language).
Numbers (123)
To switch to 123 mode from Abc mode, press and hold # at any message entry
screen to bring up the Editor settings menu list of Number mode, Dictionary on/
Dictionary off, and Writing language. Select Number mode, and the device will
return to the message entry screen and switch the ABC icon in the upper left
corner of the display to the 123 icon (or back).
Punctuation and special characters
While at any text entry screen, press * to display special characters (press and
hold * if predictive text is on). Press * again to cycle through all available
characters. You can navigate through the list of special characters by using the
joystick. Once a character is highlighted, select Insert to insert the character into
your message.
20
Text entry
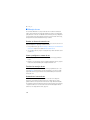
■ Predictive text mode
Predictive text mode allows you to write messages quickly using your keypad and the
built-in dictionary. Predictive mode is much faster than the standard mode method
because you only press the corresponding key on your keypad once for each letter.
Activate or deactivate
1. At any text entry screen, select Options > Dictionary on/Dictionary off.
2. If you are turning predictive text on, select the language of your choice.
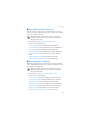
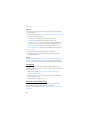
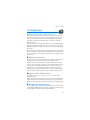
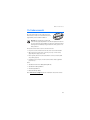
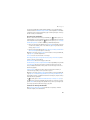
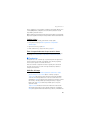
Text entry
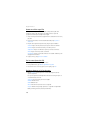
The illustration below simulates your display each time a key is pressed. For example,
to write Nokia with predictive text on and with the English dictionary selected,
press each of the following keys once:
the 6 key
the 6 key
the 5 key
the 4 key
the 2 key
• Press 0 to enter a space, and begin writing the next word.
• If a displayed word is not correct, press * to see other matches. To return to
the previous word in the list of matches, select Prev.
• If ? appears after a word, select Spell to add the word to the dictionary.
• Press 1 to insert a period into your message.
• Press and hold * to display special characters. Press * again to cycle through
all available characters.
■ Change case and mode
Press # to switch between uppercase, lowercase, and sentence case text, and
between Standard and Predictive text mode. Case and mode are indicated by the
following icons that appear in the upper left of the display screen.
Uppercase text: standard mode is on.
Lowercase text: standard mode is on.
Sentence case text: standard mode is on. This option is available
only at the beginning of a sentence.
Uppercase text: predictive text is on.
Lowercase text: predictive text is on.
Sentence case text: predictive text is on. This option is available
only at the beginning of a sentence.
21
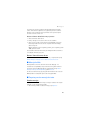
Messages
4. Messages
If you have subscribed to a message network service, you can send
and receive messages to compatible phones that also subscribe to a message service.
If supported by your service provider, you can also send and receive multimedia
messages, and e-mail. See "Text entry," p. 21.
When composing text messages, picture messages, or multimedia messages, the
number of characters allowed appears in the top right corner of the message.
The use of special (Unicode) characters takes up more space. If there are special
characters in your message, the indicator may not show the message length
correctly. Before the message is sent, the device tells you if the message exceeds
the maximum length allowed for one message.
Important: Exercise caution opening messages. Messages may contain
malicious software or otherwise be harmful to your device or PC.
Note: When sending messages, your device may display Message sent.
This is an indication that the message has been sent by your device to the
message center number programmed into your device. This is not an
indication that the message has been received at the intended destination.
For more details about messaging services, check with your service provider.
■ Text messages
Write and send
1. At the start screen, select Menu > Messages > Text messages > Create message.
To go quickly to the Create message display, scroll left from the start screen.
2. Compose and send a message using the keypad. Some or all of the following
Options are available while composing your message:
Preview—Preview the message when sending a picture message.
Sending options—Mark or Unmark the sending options of a single message as
Urgent, Delivery note, Callback no., or Signature. See "Change sending
options," p. 25.
Clear text—Erase all text from the message editor.
Insert picture—Insert a picture from Templates folder into your message.
Change picture—Change the picture in a picture message.
Delete picture—Delete the picture in a picture message.
22
Messages
Insert contact—Insert a name from your contacts list into your message.
Insert number—Insert a phone number or find a phone number in the
contacts list.
Save message—Select Drafts to save the message in the Drafts folder; select
Templates to save the message as one of your predefined templates in the
Templates folder.
Exit editor—Exit the message editor.
Use template—Insert a predefined template into your message.
See "Templates," p. 24.
Insert smiley—Insert a smiley into your message.
Insert word—Enter a word and insert it into your message. This option is
available if predictive text is turned on.
Insert symbol—Insert a special character into your message. This option is
available if predictive text is turned on.
Writing language—Choose the language you want to use.
Dictionary on or Dictionary off—Turn the predictive text on or off.
Matches—View matches in the dictionary for the word you want to use.
3. To send the message, select Send > Send to number, Send to e-mail, Send to
many, or Send to distrib. list (if a distribution list has been created). Enter the
recipient’s phone number or select Search to retrieve a number from Contacts,
and select OK.
4. To resend, edit or view recipients for the message, select Resend > Send,
Edit message or View recipients.
Distribution list
The distribution list allows you to send messages to a group of contacts. At the
start screen, select Menu > Messages > Distribution lists.
To create a distribution list select New list if lists have not been created or
Options > Create new list > name your list > OK to create additional lists. To
populate your list, select Add new and select a contact from your contacts list.
To use, rename, or modify a distribution list highlight the distribution list and
select Options > Create new list, Send text msg., Send multimedia, Rename list,
Clear list, or Delete list.
23
Messages
Templates
Templates are short, prewritten messages that can be recalled and inserted into
new text messages.
1. At the start screen, select Menu > Messages > Text messages > Create
message > Options > Use template.
2. Select one of the available templates.
3. Select Send > Send to number, Send to e-mail, Send to many, or Send to
distrib. list (if a distribution list has been created) > Select.
A distribution list only contains phone numbers of recipients and is selected
from a list of predefined groups you create.
4. Enter the recipient’s phone number or select Search and select a number from
your contacts list. Select Send.
Read message
When you receive a message, a notification message
displays.
1. Select Show to read the message or Exit to dismiss the notification and read
the message later.
2. Scroll up or down to view the whole message, if necessary.
Options
When you read a text message, some or all of the following options are available:
Delete—Discard the message.
Use number—Use or save the number. Select Options > Add to contact, Send
message, or Call.
Use web link—Displays if a URL is included in the message.
Save address—Lists the e-mail addresses included in the message. Select Save to
save the e-mail address as a new phone book entry or select Options > Add to
contact or Send e-mail. The Save address option displays only if the message
contains an e-mail address.
Save picture—Saves a picture to the Templates folder, if you receive a picture in
the message. Must be supported by service provider.
Save—Save the message to Sent items, Archive, Templates, or a folder you
have created.
Forward—Forward the message to another phone number or e-mail address.
Rename—Edit the title of the message.
24
Messages
Reply to message
1. Select Reply > Empty screen, Original text, Template, or one of the predefined
answers, then compose your reply using the keypad.
2. Create the reply, and select Send. The sender’s phone number or e-mail is
used as the default.
Change sending options
1. To change sending options for all future text messages, at the start screen, select
Menu > Messages > Text messages > Message settings > Sending options.
2. Select the setting you wish to change:
Priority—Set the priority of the note as Normal or Urgent.
Delivery note—A note is sent to you confirming delivery of the message.
Select On or Off.
Send callback number—A callback number is sent to the recipient. Select Off
or your phone number.
Signature—Select On to create a signature to send with text messages, or
select Off to turn this feature off.
Change message settings
1. At the start screen, select Menu > Messages > Text messages > Message
settings > Other settings.
2. Select the setting you wish to change:
Message font size—Select Small font or Large font.
Message overwriting—Select Sent items only, Inbox only, S. items & Inbox, or
Off. When the message memory is full, your device cannot send or receive any
new messages. However, you can set your device to automatically replace old
messages in the Inbox and Outbox folders when new ones arrive.
Save sent messages—Select Always save, Always prompt, or Off.
Queue msgs. when digital unavailable—Select On, On prompt, or Off.
Messages are stored in the Outbox until they can be sent with digital service.
■ Picture messages
Your device comes with five preloaded pictures. You can save more pictures. If
necessary, you can overwrite any of the preloaded pictures. Pictures can be
attached to a message and sent using a text message to compatible phones.
25
Messages
Picture messages behave the same as text messages, but pictures take up more
memory than text message. You cannot send a picture message using e-mail.
Pictures are stored in the Images folder in Gallery. See "Gallery," p. 48.
Receive and save a picture message
Note: Only compatible devices that offer picture message features can
receive and display picture messages.
When you receive a picture message, your device beeps, displays 1 message received
or the number of multimedia messages received, and displays the messaging icon
in the upper left corner of the start screen as a reminder. When you have
unopened picture messages in your inbox
displays.
Select Show to view the picture message. If you have more than one picture
message, scroll and select the message you want to view. Use the joystick to view
the whole picture if necessary.
You can save a received picture to your Templates folder by selecting Options >
Save picture. Enter a title and select OK. If your Templates folder is full of pictures,
you can scroll to the picture you want to replace and choose Select.
Compose and send a picture message
When you insert a standard picture into a message, the number of characters
that can be added changes. The number of characters is shown in the upper right
corner of the display screen.
1. From the start screen, select Menu > Messages > Multimedia msgs. >
Create message.
2. Write the message, and select Options > Insert > Image.
3. Open the folder that contains the picture you want to insert and select
Options > Insert.
To view another picture, select Back or Options > Insert, scroll to another
picture, and select Options > Insert.
4. Select Search to retrieve a phone number from your contacts list, Send to
enter the phone number, or Options > Send to e-mail, Send to many, or Send
to distrib. list (if a distribution list has been created) > Select.
To view or change the picture, select or Options > Preview or Delete picture.
26
Messages
■ Multimedia messages
A multimedia message can contain text, sound, a picture, and a video clip. Your
device supports multimedia messages that are up to 300 KB. If the maximum size
is exceeded, the device may not be able to receive the message. Depending upon
your network, you may receive a message that includes an Internet address where
you can go to view the multimedia message. Pictures are scaled to fit the display
area of the device. Your device has a multimedia message viewer for playing
messages and a multimedia inbox where incoming messages reside untilthe user
deletes or saves them. Once you save the multimedia message, you can use the
image as a screen saver or the sound as a ringing tone unless protected by copyright.
The appearance of a multimedia message may vary depending on the
receiving device.
Important: Exercise caution opening messages. Messages may contain
malicious software or otherwise be harmful to your device or PC.
Copyright protections may prevent some images, ringing tones, and other content
from being copied, modified, transferred, or forwarded. This function can be used
only if it is supported by your service provider or network operator. For availability
and a subscription to the multimedia messaging service, contact your service
provider or network operator.
Note: Only devices that offer compatible multimedia message features
can receive and display multimedia messages. Multimedia message
objects may contain viruses or otherwise be harmful to your device or PC.
Do not open any attachment if you are not sure of the trustworthiness of
the sender.
Multimedia messaging supports the following formats:
• Picture: JPEG, GIF, animated GIF, WBMP, BMP, and PNG
• Sound: SP-MIDI, AMR audio, QCELP, EVRC, and monophonic ringing tones
• Video: clips in H.264 (Profile 0, level 10) format with MPEG-4 (SVPO), 3GPP,
3GPP2, with AMR audio
If a received message contains unsupported elements, these elements may be
replaced with the text Object format not supported.
You can receive a multimedia message notification but you cannot receive
multimedia messages if you have a call in progress, games or other applications
running, or an active browsing session. Because delivery of multimedia messages
can fail for a variety of reasons, do not rely solely upon them for essential
communications.
27
Messages
Multimedia message settings
Before you can use the multimedia message feature, you must specify whether you
want to receive messages at all times or only if you are in the service provider’s home
system. The default setting of the multimedia message service is generally on. This
feature is a network service. check with your service provider for more information.
The default setting of the multimedia message service is generally on. On the
receiving device, the default setting to receive a multimedia message is generally on.
When messages are available, you are notified 1 multimedia message available or
the number of multimedia messages available displays. Select Reject to turn
notification of multimedia messages on or off.
Allow or block multimedia reception
You can choose to receive all messages, to block all messages, or to receive messages
only when you are in the service provider’s home network.
From the start screen, select Menu > Messages > Multimedia msgs. > Message
settings > Allow multimedia reception and one of the following:
Yes—Allow all incoming messages. When new messages arrive, Multimedia
message received or the number of multimedia messages received displays.
In home network—Allow incoming messages only if you are in the service provider’s
home system. This is a network service. Check with your service provider for
more information.
No—Block all incoming messages.
Allow or block advertisements
This setting is not available if multimedia reception is blocked.
From the start screen, select Menu > Messages > Multimedia msgs. > Message
settings > Allow advertisements > Yes or No.
Other multimedia messages settings
Other multimedia settings include saving your messages to the Sent items folder.
From the start screen, select Menu > Messages > Multimedia msgs. > Message
settings and one of the following:
Save sent messages—Select Yes to save sent multimedia messages to the Sent
items folder or No to discard messages after they are sent.
Delivery reports—Select On to be informed if the message was delivered or Off to
not be informed.
Default slide timing—Set the default time in mm:ss format for each slide in an
MMS to remain on the screen.
28
Messages
Folders
Your device has the following folders under Messages > Multimedia msgs..
Inbox—Contains received multimedia messages.
Outbox—Contains multimedia messages that are waiting to be transmitted.
Sent items—Contains sent multimedia messages.
Saved items—Contains saved multimedia messages that you can send later.
Write and send multimedia messages
1. From the start screen, select Menu > Messages > Multimedia msgs. >
Create message.
2. Enter your message text, and select Options > Insert > Image, Sound clip, New
sound clip, or Video clip. The list of available folders in the Gallery displays.
3. Open the desired folder, scroll to the image, sound clip, or video clip and
select Options > Insert.
Copyright protections may prevent some images, ringing tones, and other
content from being copied, modified, transferred, or forwarded.
4. To add a new page or slide to the message, select Options > Insert > Slide.
This applies only if there is no video clip in the message.
Each slide can contain text, one image, and one sound clip. If the message
contains several slides, you can open the desired slide by selecting Previous
slide, Next slide, or Slide list.
5. To set the time interval between the slides, select Options >Slide timing.
Enter the time interval in mm:ss, and select OK.
6. To move the text to the top or bottom of the message, select Options > Place
text first or Place text last (default).
7. To insert a name from contacts, select Options > More options > Insert contact,
scroll to the desired name, and choose Select.
8. To insert a number, select Options > More options > Insert number. Enter the
number or search for it in contacts, and select OK.
9. To insert a calendar note that has been created, select Options > Insert >
Calendar note.
10. To insert a business card, select Options > Insert > Business card.
11. To delete an image, slide, video clip, or sound clip from the message, select
Options > Delete > Image, Sound clip, Video clip, or Slide.
12. To add a subject to the message, select Options > More options > Edit subject,
enter a subject, and select OK.
29
Messages
13. To view the message or slide presentation before sending it, select
Options > Preview.
14. To save the message to Saved items, select Options > Save message.
15. To send the message, select Send or select Options > Send to e-mail,
Send to album, or Send to many. Send to album is an online network service.
Check with your service provider for more information.
16. Enter the recipient’s number or e-mail address, or search for it in contacts,
and select OK. The message is moved to the Outbox folder for sending.
It takes more time to send a multimedia message than to send a text message.
While the multimedia message is being sent, the animated indicator
displays
and you can use other functions on the device. If there is an interruption while
the message is being sent, the device automatically tries to resend it a few times.
If this fails, the message remains in the Outbox folder and you can try to manually
resend it later. Check your Outbox folder for unsent messages.
Note: When sending messages, your device may display the words
Multimedia message sent. This is an indication that the message has
been sent by your device to the message center number programmed
into your device. This is not an indication that the message has been
received at the intended destination. For more details about messaging
services, check with your service provider.
Messages that you have sent are saved in the Sent items folder if the setting Save
sent messages is set to Yes. See "Other multimedia messages settings," p. 28. This
is not an indication that the message has been received at the intended destination.
Read multimedia messages
When a multimedia message is being received, a rotating
appears in the
display along with the percentage display indicating the sending progress. Once
the message has been fully downloaded, a static
displays and 1 multimedia
message available or the number of multimedia messages available displays.
• To view the message immediately, select Show; to save the message to the
inbox for later viewing, select Exit; to discard the message, select Discard.
• To view a saved message, select Menu > Messages > Multimedia msgs. >
Inbox and scroll to view the message.
While viewing the message, select Play to view the entire multimedia messages,
or select Options and one of the following:
View text—View only the text included in the message.
Open image, Open sound clip, Open calend. note, or Open video clip—View or
listen to the corresponding file.
30
Messages
Delete message—Delete the message you are viewing.
Forward to no., Forward to e-mail, Forward to album (if supported by operator) or
Forward to many—Forward the message to a phone number, to an e-mail address,
or to multiple recipients. Copyright messages cannot be forwarded.
Message details—View the sender’s name and phone number, the message center
used, reception date and time, message size and type.
While viewing the message, select Play to view the entire multimedia message, or
select Options > Save image, Save sound clip, or Save video clip to save the file to
the Gallery. Images, sound clips, and video clips must be opened before you can
save them.
If
blinks and Multimedia me-mory full. View waiting msg.displays, the memory
for multimedia messages is full. To view the waiting message, select Show. Before
you can save the message, delete some of your old messages. See "Delete
messages," p. 33.
Reply to multimedia messages
Select Reply or Reply to all to enter a reply and send it to the original sender and
any other message recipients.
■ Voice messages
If you subscribe to voice mail, your wireless provider will furnish you with a voice
mailbox number. You need to save this number to your device to use voice mail.
When you receive a voice message, your device lets you know by beeping,
displaying a message, or both. If you receive more than one message, your device
shows the number of messages received.
Save voice mailbox number
Your wireless provider may have already saved your voice mailbox number to
your device. Select OK to leave the number unchanged.
1. At the start screen, select Menu > Messages > Voice messages > Voice
mailbox number. The Voice mailbox number displays.
2. If the box is empty, enter the voice mailbox area code and number and select OK.
Call and setup voice mail
1. Once you have saved the voice mailbox number, press and hold 1.
2. When you connect to voice mail and the prerecorded greeting begins, follow
the automated instructions to setup voice mail.
31
Messages
Listen to voice messages
Once you have set up voice mail, press and hold 1 or use the Messages menu to
dial the voice mailbox number. Once you connect and the prerecorded greeting
begins, follow the automated instructions to listen to your voice messages.
Automate voice mail
You can insert special characters called dialing codes into phone numbers such as
voice mail, and save the number to a 1-touch dialing location. Dialing codes instruct
the receiving system to pause, wait, bypass, or accept the numbers that follow them
in the dialing string. See "Setup phone numbers with dialing codes," p. 38.
Voice mail services vary by service provider. The following instructions are examples
of common operations. Please check with your service provider for specific
instructions on using your voice mail service.
Write down voice mailbox number and process
1. Write down your voice mailbox number.
2. Call and check your voice mail as you normally would.
3. Write down your interaction with the recorded prompts step-by-step.
Keep in mind that each voice mail service may vary. However, it should
look something like this:
Dial 8585551212, pause 5 seconds, press 1, pause 2 seconds, press 1234, press #.
Be precise; you will need this information to "Setup phone numbers with dialing
codes," p 38.
Clear voice mail icon
To clear the voice mail icon from the display, at the start screen, select Menu >
Messages > Voice messages > Clear voice mail icon.
■ Web messaging
Web messaging is a network service. See "Network Services," p. 5.
If your wireless service provider supports this feature, you can use the Minibrowser
to check for e-mail messages. At the start screen, select Menu > Messages >
Minibrowser messages > Connect.
See "Mobile internet access," p. 77, for more information on using the
Minibrowser in your device to access Web pages.
32
Messages
■ Text message folders
Save messages
You can save drafts of messages or received messages to an existing folder or to a
folder that you have created.
1. Open the received message or create a new message, and select Options.
2. To save a received message, select Save > Sent items, Archive, Templates, or a
folder you have created.
3. To save the draft of a message you have created, select Save message > Drafts
or Templates.
View saved messages
1. At the start screen, select Menu > Messages > Text messages.
2. Select the folder containing the message you wish to view:
Inbox—Automatically stores received messages.
Outbox—Stores messages that have not been sent.
Sent items—Stores messages that have been sent.
Drafts—Stores messages created as drafts.
Archive—Store messages that you choose to Archive from other folders.
Templates—Stores pictures and prewritten templates. Preloaded templates
can be edited and customized.
My folders—Allows you to organize your messages by creating custom folders
and saving some of your messages here. Select Add folder to add a custom
folder, or Options > Add folder, Rename folder, Delete folder if a folder has
already been created.
3. When the folder opens, scroll to the message you wish to view, and Select.
■ Delete messages
If your message memory is full and you have more messages waiting at the
network, No space for new text messages appears on the start screen. You can
do the following:
• Read some of the unread messages, and delete them individually.
• Delete messages from some of your folders.
33
Messages
Delete a single message
1. At the start screen, select Menu > Messages > Text messages.
2. Select the folder containing the message you wish to delete.
3. Select the message you wish to delete.
4. Select Options > Delete.
5. Select OK to delete the message or Back to exit.
Delete all messages in a folder
1. At the start screen, select Menu > Messages > Text messages > Delete messages.
2. Select the messages you wish to delete:
All—Deletes all messages in all of the folders.
All read—Deletes any messages that have been read in all of the folders.
All unread—Deletes any messages that have not been read in all of the folders.
3. Select and Mark the folders that have messages you want to delete:
Inbox—Deletes all messages from the Inbox folder.
Sent items—Deletes all messages from the Sent items folder.
Outbox—Deletes all messages from the Outbox folder.
Drafts—Deletes all messages from the Drafts folder.
Archive—Deletes all messages from the Archive folder.
User defined folders—Deletes all messages from the user defined folder.
4. Select Done > Yes to empty the marked folder.
■ Delete folders
Only folders created in My folders can be deleted. The Inbox, Sent items, Archive
and Templates folders are protected. When you delete a folder, all messages in
the folder are also deleted.
34
Call log
5. Call log
Call log stores information about the last 30 missed, 30 received,
and 30 dialed calls. It also adds the total duration of all calls. When the number
of calls exceeds the maximum, the most recent call replaces the oldest.
Whether viewing missed, received, or dialed calls, the menu options are the same:
Time of call—Displays the date and time of the call.
Send message—Sends a message to the number.
Use number—Edits the number and associates a name with the number.
Save—Enters a name for the number and saves it to your contacts list.
Add to contact—Adds a number to a contact and saves it in your contacts list.
Delete—Clears the number from memory.
Call—Calls the number.
■ View missed calls
The missed calls feature does not function when your device is switched off.
Missed calls are calls that were never answered. To view missed calls:
1. If the message notification displays, select List.
2. When the phone number appears in the display, select Options.
3. Select an option to activate.
OR
1. At the start screen, select Menu > Call log > Missed calls.
2. Scroll to a name or number, and select Options.
3. Select an option to view or activate.
■ View received calls
Received calls are calls that have been answered.
1. At the start screen, select Menu > Call log > Received calls.
2. Scroll to a name or number, and select Options.
3. Select an option to view or activate.
35
Call log
■ View dialed numbers
Dialed calls are previous numbers you have dialed from your device:
1. At the start screen, press the call key.
OR
At the start screen, select Menu > Call log > Dialed numbers.
2. Scroll to a name or number, and select Options.
3. Select an option to view or activate.
View call times
You can make or receive calls to or from the same number and view up to five
calls with the time each call occurred. Your device clock must be set for this
feature to work accurately.
1. From the start screen, select Menu > Call log > Missed calls, Received calls, or
Dialed numbers > Options.
2. While viewing a missed or received call, select Options > Time of call.
3. Press the joystick down to view the most recent call times from this number;
select Back to return to the options list.
■ Delete call logs
You can delete any missed, dialed, or received calls from device memory.
1. At the start screen, select Menu > Call log > Clear recent call lists.
2. Select the call type you would like to clear: All, Missed, Received or Dialed.
■ View duration of calls
Contact your service provider for the actual calls and services invoice, which may
depend on network features, rounding off for billing, taxes and so forth.
Select Menu > Call log > Call timers > Last call duration, Dialed calls' duration,
Received calls' duration, All calls' duration, Life timer, or Clear timers. After selecting
Clear timers, enter your lock code, and select OK. See "Security settings," p. 62.
Note: All call timers, except the life timer, are reset to zero when
Clear timers is selected.
Note: Some timers, including the life timer, may be reset during service
or software upgrades.
To activate the call timer on the start screen while in a call, select Details > Show
call time on display > On or Off.
36
Call log
■ View duration of data and fax calls
Data and fax calls are a network service. See "Network Services," p. 5. If your
wireless service provider supports this feature, you can view the size or duration
of sent or received data and fax calls.
Note: The actual time invoiced for calls and services by your service
provider may vary, depending on network features, rounding off for
billing, taxes, and so forth.
1. At the start screen, select Menu > Call log > Data/fax calls.
2. Scroll to one of the following options:
Last sent data/fax—View the size (KB) of the last sent data/fax call.
Last received data/fax—View the size (KB) of the last received data/fax call.
All sent data/fax—View the size (KB) of all sent data and fax calls.
All received data/fax—View the size (KB) of all received data and fax calls.
Duration of last data/fax call—View the duration time of the last data or
fax call.
Duration of all data/fax calls—View the duration time of all calls.
Clear all data/fax logs—Select OK > Yes to clear all data/fax logs.
■ View duration of minibrowser
Minibrowser is a network service. See "Network Services," p. 5. If your wireless
service provider supports this feature, you can view the size or duration of sent or
received data from the Minibrowser.
Note: The actual time invoiced for calls and services by your service
provider may vary, depending on network features, rounding off for
billing, taxes, and so forth.
1. At the start screen, select Menu > Call log > Minibrowser calls.
2. Scroll to one of the following options:
Last sent browser data—View the size (KB) of the last sent browser data.
Last received browser data—View the size (KB) of the last received data.
All sent browser data—View the size (KB) of all sent browser data.
All received browser data—View the size (KB) of all received browser data.
Last browser session—View the duration time of the last browser session.
All browser sessions—View the duration time of all browser sessions.
Clear all browser logs—Select OK > Yes to clear all browser logs.
37
Contacts
6. Contacts
The contacts list can hold up to 500 contacts with multiple numbers
and text notes for each contact. The amount of numbers and text entries that you
can save may vary, depending on length and the total number of entries in the
contacts list.
■ Add new contacts
You can access the contacts list at the start screen. Press the Right selection key
or, if the Right selection key on your device has a network operator menu, select
Menu > Contacts.
Save contact name and number
1. At the start screen, use the keypad to enter the phone number you wish to save.
2. Select Save.
3. Enter the name, and select OK.
Save contact number only
1. At the start screen, use the keypad to enter the phone number you wish to save.
2. Press and hold Options.
Save an entry
1. At the start screen, select Menu > Contacts > Add new.
2. Enter the name, and select OK.
3. Enter the phone number, and select OK > Done.
Setup phone numbers with dialing codes
Dialing codes instruct the receiving system to pause, wait, bypass, or accept the
numbers that follow them in the dialing string.
1. At the start screen, select Menu > Contacts > 1-touch dialing.
2. Scroll to an (empty) 1-touch dialing slot and select Assign.
3. Enter your mailbox number, including the area code.
4. Refer to dialing codes and enter any codes as necessary.
For example, if you pause for 5 seconds after connecting to voice mail, enter p
twice (two times 2.5 seconds) after the voice mailbox number: 2145551212pp.
38
Contacts
5. Enter any remaining pauses or other information that allows you to listen to
your messages, and select OK.
6. Enter a name (such as Voice Mail), and select OK.
To dial and listen to your voice mail, press and hold the assigned 1-touch dialing
key at the start screen.
Insert dialing codes
Press * repeatedly to cycle through dialing codes. Once the desired code appears
in the display, pause briefly and the code is inserted into the dialing string.
The following dialing codes are available:
* — Bypasses a set of instructions.
p— Pauses for 2.5 seconds before sending any numbers that follow.
+— Replaces the international access code.
w—Waits for you to press the call key before sending the numbers or codes
that follow.
Save multiple numbers and text items
You can save different types of phone numbers and short text items per name to
the contacts list. The first number you save for any entry is automatically set as
the default, or primary number, but the primary number can always be changed.
1. At the start screen, scroll to the entry to which you wish to add a phone
number or text item.
2. Select Details > Options > Add number or Add detail.
If you selected Add number, select General, Mobile, Home, Work, or Fax.
If you selected Add detail, select E-mail address, Web address, Street address,
or Note.
3. Enter the number or text for the type you have selected, and select OK.
4. To change a number type (General, Mobile, Home, Work, or Fax), select Change
type in the options list.
You can also change which phone number is the default (primary) number for the
contact entry.
1. At the start screen, use the joystick to scroll down and select the number you
wish to change, and select Details.
2. Scroll to the number you wish to set as default, and select Options >
Set as default.
39
Contacts
Set up voice tags
For information on setting up voice tags and other voice features, see "Voice
commands," p. 59.
Caller groups
You can add contacts list entries to any of five caller groups, and then assign a
unique ringing tone or graphic to that group. This enables you to identify callers
from the group by their unique ringing tone or graphic.
1. Scroll to a name in your contacts list you would like to add to a caller group,
and select Details.
2. Select Options > Caller groups > Family, VIP, Friends, Business, or Other.
3. Select Options to display the following caller group options:
Rename group—Rename the group to your preference.
Group ringing tone—Set the ringing tone for the group. For individual
contacts in the group, the group tone sounds even if another tone was
assigned to the individual.
Group logo—Turn the graphic for the caller group On or Off, or View the graphic.
Group members—Add or remove members from the caller group.
Set up 1-touch dialing
You can associate any entry in the contacts list with a key from 2–9; then dial those
entries by pressing and holding the assigned key. See "1-touch dialing," p. 56,
to activate or deactivate 1-touch dialing.
Assign a key to 1-touch dialing
1. At the start screen, select Menu > Contacts > 1-touch dialing.
2. Scroll to an (empty) 1-touch dialing slot, and select Assign.
3. Enter the number (including the area code), and select OK; or select Search to
retrieve a number from the contacts list.
4. Enter a name for the number, and select OK.
If 1-touch dialing is off, the device displays a prompt asking if you would like
to turn 1-touch dialing on.
5. Select Yes to activate 1-touch dialing.
Change 1-touch dialing numbers
1. At the start screen, select Menu > Contacts > 1-touch dialing.
2. Scroll to the 1-touch dialing entry you wish to change, and select
Options > Change.
40
Contacts
3. Enter the new number; or select Search to retrieve a number from the
contacts list, and select OK.
4. Enter a name for the entry, and select OK.
Delete 1-touch dialing numbers
1. At the start screen, select Menu > Contacts > 1-touch dialing.
2. Scroll to the 1-touch dialing location you wish to delete, and select Options >
Delete > Yes.
■ Voice tags
You can dial up to 25 stored numbers using voice dialing.
Before using voice tags, note that:
• Voice tags are not language-dependent. They are dependent on the
speaker’s voice.
• You must say the name exactly as you said it when you recorded it.
• Voice tags are sensitive to background noise. Record voice tags and use them
in a quiet environment.
• Very short names are not accepted. Use long names and avoid similar names
for different numbers.
Note: Using voice tags may be difficult in a noisy environment or during an
emergency, so you should not rely upon voice dialing in all circumstances.
Assign a voice tag to an entry
Before you can use voice dialing, you must first assign a voice tag to the number.
1. At the start screen, press the joystick down to view the contacts list.
2. Highlight the contact you want to assign a voice tag to. Select Details >
Options > Add voice tag > Start.
3. Speak clearly into the microphone. Do not select Quit unless you want to
cancel the recording. The device automatically stops recording and saves and
replays the voice tag.
The
icon appears next to commands that have voice tags assigned.
If recording is not successful, your device displays Voice system error.
Select Options > Add voice tag, and repeat step 3.
41
Contacts
Dial a number
1. Press and hold the Right selection key.
2. When you hear several beeps and Speak now appears, release the key.
3. Pronounce the voice tag clearly into the microphone.
When the device finds the voice tag, Found: appears, and the device
automatically dials the number. If the device does not locate a number or
recognize the voice tag, No match found appears.
Voice tags
After you have associated a voice tag to a contact, you can select Names > Voice
tags > Select > Playback, Change, or Delete.
■ Edit contacts list entries
1. Scroll through the contacts list to highlight the entry you would like to edit,
and select Details > Options. The list of options varies depending on whether
you are editing a contact listed by phone number or contact name.
2. Some of the following options may be available:
Add voice tag or Voice tag—Add a voice tag to the contact or select the voice
tag already associated with the contact to Playback, Change, or Delete.
Edit number or Edit detail—Edit an existing phone number or the details attached
from the contact.
Delete number or Delete detail—Delete a phone number or the details attached
from the contact.
Use number—Edit the number and associate a name with the number. Available
when a contact is selected that is listed with a contact name. Select Options
to use the number.
Change type—Change the number type to General, Mobile, Home, Work, or
Fax or the detail type to E-mail address, Web address, Street address, or Note.
Set as default—Change the default number of the contact.
Add number—Add a number to the contact.
Add detail—Add an address or note to the contact.
Add image—Add a photo to the contact.
Caller groups—Add the contact to an existing caller group.
Custom tone—Set a ringing tone to the contact different than the default.
Send bus. card—Send the contact as a business card to another device.
42
Contacts
Send message—Create and send the contact a text message or
multimedia message.
1-touch dialing—Add the contact to your 1-touch dialing list.
Edit name—Edit the name of the contact.
View name—View the name of the contact. Available when a contact is
selected that is listed with a contact name.
Delete—Delete the entire contact entry from your contacts list.
3. Edit the option to your preference, and select OK.
■ Delete contacts entries
1. At the start screen, select Menu > Contacts > Delete.
2. To delete individual entries, select One by one.
3. Scroll to the entry you wish to delete, and select Delete > Yes to confirm.
4. To delete the entire contents of your contacts list, select Delete all > Yes.
5. Enter the lock code, and select OK. See "Security settings," p. 62.
■ View the contacts menu
1. At the start screen, select Menu > Contacts and view the following options:
Search—Find a name or select from a list.
Add new—Add a contact to your contacts list.
Edit name—Edit an existing name.
Delete—Delete a name and its associated numbers.
Add number—Add a number to an existing contact.
Settings—Change the contacts list view or check the memory status of
your device.
1-touch dialing—View or modify the list of 1-touch dialing numbers.
Voice tags—Attach, listen to, or modify a voice tag to a contact in the
contacts list.
My number—View your own phone number.
Caller groups—View and edit the properties of any of the caller groups,
including Family, VIP, Friends, Business, or Other.
2. Select an item to activate the feature or enter its submenu.
43
Contacts
Search for a name
1. At the start screen, press the joystick down to display the contents of your
contacts list.
2. Press the key that corresponds to the first letter of the name for which you
are searching.
3. Scroll to select a contact, and select Details to view the details.
Configure settings
You can select how the contacts appear in your contacts list and view the amount
of memory used or available in your device.
At the start screen, select Menu > Contacts > Settings >Scrolling view to change
view of name list.
■ Send and receive contacts (business cards)
You can send and receive an entry in your contacts list using text messaging or
IR, if supported by your wireless provider. See "Receive a business card," p. 68.
Send a business card
You can send a business card as a text message to a compatible phone or other
handheld device.
1. Highlight the entry from the contacts list that you wish to send, and select
Details > Options > Send bus. card > Via infrared, Via text message, or Via
multimedia. Primary number or All details options appear only if you have
more than one number or detail saved to the contact entry.
2. Enter the number for your recipient, or select Search to retrieve a number
from your contacts list.
3. Select OK and the business card is sent.
44
Camera
7. Camera
You can take photos and record video clips with the built-in camera.
The camera lens is on the back of the device. The camera produces
photos in JPEG format and video clips in H.263 (SubQCIF) format.
After you take a picture or video, you can attach it to or send it with a multimedia
message, save it as a wallpaper, save it on a compatible PC using Nokia PC Suite
software, and upload it to a Web address with the content image uploader. When
you attach a picture to an entry in your list of contacts, the picture is displayed
when the contact calls you.
The Nokia 6235, Nokia 6235i, Nokia 6236, and Nokia 6236i devices support an
image capture resolution of 640 x 480 pixels. The image resolution in these
materials may appear different.
If there is not enough memory to take a new photo, delete old photos or other
files in the Gallery.
■ Take a photo
1. At the start screen, press the joystick up to activate the camera or select
Menu > Camera.
2. Select Capture to take the photo. When taking a photo, a shutter sound is
heard, the photo displays on the screen, and either a blinking icon or scrolling
indicator displays as the photo is saved to the Images folder of Gallery.
To change the camera mode to standard, portrait, night or video, see "Change
mode," p. 46.
3. Select Back to take another photo or Options and choose from one of
the following:
Zoom—Zoom in closer before capturing a photo or get a closer look at the
captured photo; use the joystick to navigate around the photo.
Send—Select Via multimedia or Via infrared to send a photo to a compatible
device or PC.
Rename—Enter or edit the name of the captured photo and select OK.
Open Gallery—Open the Gallery to view saved images, videos, and recordings.
Set contrast—Use the joystick to adjust the contrast of the captured photo.
Set as wallpaper—Use a captured photo for wallpaper.
Details—View the Name, Size, Created, Format, Resolution, or Copyright of a
captured photo.
45
Camera
Change mode
At the start screen, select Menu > Camera > Options > Change mode or, from the
viewfinder mode, hold and press the right or left joystick position to switch
between the following modes:
Standard photo—Take normal landscape photos.
Portrait photo—Take a smaller icon-sized, vertical photo, which can be added to
an entry in your contacts list.
Night mode—Take a photo when the lighting is dim and the camera needs a longer
exposure time for the photo to be of good quality.
Video—Record a video. See "Record a video clip," p. 47.
Self-timer
At the start screen, select Menu > Camera > Options > Self-timer to set a timer
and delay capturing a photo for 10 seconds. Select Start a beep sounds while the
self-timer runs and beeps faster when the camera is about to capture the photo.
After the timeout, the camera takes the photo and saves the photo in the Images
folder of the Gallery menu.
Settings
At the start screen, select Menu > Camera > Options > Settings to change the
settings in the camera mode. Select one of the following options:
Default mode—Select Standard photo, Portrait photo, Night mode or Video as
the default.
Image quality—Define file compression when saving the image. Select High, Normal,
or Basic. High uses the least file compression and provides the best image quality
but takes more memory.
Video clip length—Select Default ( 15 seconds) or Maximum (2.5 minutes, depending
on conditions). Only video clips that are default length or shorter can be sent in a
multimedia message.
Camera sounds—Select On or Off.
Default title—Select Automatic to use a predefined title or My title to key in or
edit a new title.
Image and video storage—Select the folder for image storage.
46
Camera
Other options
Zoom—Zoom in closer to your image before capturing a photo or get a closer look
at the captured photo. Use the joystick to navigate around the photo.
View previous—View the previously captured photo.
Open Gallery—Open the Images folder of the Gallery menu.
Record a video clip
1. From the start screen, select Menu > Camera > Options > Change mode >
Video > Record. While you are recording, the recording indicator and the
remaining recording time display.
2. Select Pause to pause the recording, Continue to resume the recording, or
Stop to stop the recording. The device saves the recording in the Video clip
folder of the Gallery menu.
3. Select Back to record another video or select Options and one of the following:
Delete—Delete the video clip.
Send—Send the video clip to another device as a multimedia message or by
using IR connectivity.
Rename—Rename the video clip.
Open Gallery—Go to the Video clip folder of the Gallery menu.
Mute audio or Unmute audio—Turn the sound on or off.
Set contrast—Increase or decrease contrast of the selected video using
the joystick.
Details—View details of the selected video, such as name, size, time and date
created, length, file format, and copyright information.
47
Gallery
8. Gallery
You can save pictures, video clips, recordings, and ringing tones to
folders in the gallery and add new folders to the ones already there.
Images and tones can be downloaded using multimedia messages,
text messages, mobile Internet sites, or Nokia PC Suite.
Note: Only compatible devices that offer compatible multimedia
message features can receive and display multimedia messages.
Your device supports a digital rights management system to protect content that
you have acquired. Content such as a ringing tone, can be protected and associated
with certain usage rules, for example, the number of usage times or a certain usage
period. Usage rules are defined in the content activation key that can be delivered
with the content or delivered separately, depending on the service provider. You
may be able to update the activation key. Always check the delivery terms of any
content and activation key before acquiring them, as they may be subject to a fee.
Copyright protection may prevent some images, ringing tones, and other content
from being copied, modified, transferred, or forwarded.
Your device has about 10 MB of memory for storing files in the gallery. This memory
is not shared with other functions, such as contacts. If the device displays a
message that the memory is full, delete some existing files before proceeding.
■ Folders
1. At the start screen, select Menu > Gallery > Images, Video clips, Music files,
Graphics, Tones, or Recordings folder.
2. Select Open to view a list of the files in the folder or select Options to access
the following:
Delete folder—Delete a folder you have created. You cannot delete a preset folder.
Move—Move the selected folder into another folder. After selecting Move, scroll
to another folder, and select Options > Move. You cannot move a preset folder.
Rename folder—Rename a folder you have created. You cannot rename a
preset folder.
Details—Show the name, size, and date of creation of the selected folder.
Type of view—Select List with details, List, or Grid to determine how the folders
and the files within folders are displayed.
Sort—Sort the contents of the selected folder by name, date, format, or size.
Add folder—Create a new folder.
Activation key list—View the list of available activation keys. You can delete
activation keys if desired.
48
Media
9. Media
■ Media player
With the media player you can download, view, and play compatible images,
audio and video files, and animated images from a variety of sources.
The media player allows you to play streaming videos and streaming audio from a
network server. Streaming functionality is a network service and requires network
support. Check the availability of these services, pricing, and tariffs with your
network operator or the service provider whose service you wish to use.
Service providers will also give you instructions on how to use their services.
From the start screen, select Menu > Media > Media player and one of the following:
Online media—Connect to the operator’s network. This is a network service.
Check with your service provider for pricing and information.
Open Gallery—Open the Gallery. From Gallery, you can play stored audio and
video files. See "Gallery," p. 48.
Go to address—Enter the address of a mobile Internet service, and select OK.
■ Radio
Your phone has an FM radio that also functions as an alarm clock radio. To listen
to the FM radio on your phone, connect a compatible music stand or stereo
headset to the connector on the bottom of the phone. The FM radio uses the wire
of the headset as an antenna. A compatible headset needs to be attached to the
device for the FM radio to function properly.The quality of a radio broadcast
depends on coverage of the radio station in that particular area.
Warning: Listen to music at a moderate level. Continuous exposure to
high volume may damage your hearing.
Turn the radio on and off
1. Connect the phone to a compatible headset or music stand.
2. From the start screen, select Menu > Media > Radio.
3. To turn off the radio, press and hold the end key.
49
Media
Use the radio
With the radio on, select Options and one of the following:
Turn off—Turn off the radio.
Save channel—Save the current station to one of 20 locations.
Automatic tuning—Press the joystick up or down to start the channel search.
Select OK when a channel is found.
Manual tuning—Press the joystick up or down to search in increments of 0.05 MHz.
Set frequency—Manually enter the frequency of a known radio station.
Delete channel—Delete a saved channel.
Rename—Rename a saved channel and select OK.
Loudspeaker or Headset—Listen to the radio through the speakerphone or
through the headset.
Mono output or Stereo output—Listen to the radio in monaural mode (default) or
in stereo. Stereo output is available through a stereo enhancement.
To set the radio frequency, press * and use the keypad to enter the frequency of a
known radio station. To tune the radio manually, press #; then press the joystick
up or down to search in increments of 0.05 MHz.
To adjust the radio volume, press the Volume up and Volume down keys.
When an application using a browser connection is sending or receiving data, it
may interfere with the radio.
When you place or receive a call, the radio automatically mutes. Once the call is
ended, the radio switches back on.
Save a radio channel
You can save a preset station to any one of 20 locations in memory, and then
tune to that station by using the joystick with the radio on.
1. With the radio on, press and hold the joystick up or down to start the channel
search. Searching stops when a channel is found.
2. To save the channel, select Options > Save channel.
3. Enter a name for the channel, and select OK.
4. Select an (empty) location to save the channel.
While the radio is playing, you can quickly save an FM station to 1–9
memory locations.
1. Press and hold the corresponding number key.
2. Enter the name of the channel, and select OK.
50
Media
■ Voice recorder
This feature allows you to record pieces of speech or sound with your device and
listen to them later. The total available time is 3 minutes if no memos have been
stored. The maximum length of a recording depends on how much memory
remains available.
From the start screen, select Menu > Media > Voice recorder > Record to start the
recording, or Recordings list to manage the folder you have defined for recording
storage. Save recordings to the Recordings folder or to another folder in the Gallery.
Record speech or sound
1. At the start screen, select Menu > Media > Voice recorder > Record.
2. After the recorder start tone is heard, begin recording speech or sound.
3. When you are finished recording, select Stop and your recording is saved to
the Recordings folder in the Gallery.
Recording options
After you have saved the recording to the Recordings folder, select Recordings
list, open the Recordings folder in the Gallery, and scroll to the recording you
created. Select Open to listen to the recording using the earpiece, or Options to:
Delete or Delete folder—Erase the recording.
Rename or Rename folder—Change the name of the recording.
Set as ring tone—Use your recording as a ringtone.
Details—Show the name, size, and date of creation of the selected folder.
Type of view—Choose whether to view the folders as a list with details, list only or
a grid.
Sort—Sort the contents of the selected folder by name, date, format, or size.
51
Settings
10. Settings
Use this menu to change profiles, tone settings, time and date
settings, call settings, phone settings, voice commands, enhancement settings,
security settings, application settings, network settings, network services, and
restore factory settings.
■ Profiles
Profiles define how your device reacts when you receive a call or message, how
your keypad sounds when you press a key, and more. Ringing options, keypad
tones, and other settings for each of the available profiles can be left at their
default setting, or customized to suit your needs. The following profiles are
available: Normal, Silent, Meeting, Outdoor, and Pager.
Profiles are also available for enhancements such as headset and car kit.
See "Enhancements," p. 83.
1. At the start screen, select Menu > Settings > Profiles.
2. Select the profile of your choice and Activate.
Customize a profile
You can customize any of the profiles a variety of ways.
1. At the start screen, select Menu > Settings > Profiles.
2. Select the profile you wish to customize.
3. Select Customize.
4. Select the option you want to customize: Incoming call alert, Ringing tone,
Ringing volume, Vibrating alert, Message alert tone, Keypad tones, Warning
tones, Alert for, or Profile name. You cannot rename the Normal profile.
Set a timed profile
Timed profiles can be used to prevent missed calls. For example, suppose you
attend an event that requires your device be set to Silent before the event starts,
but you forget to return it to Normal until long after the event. A timed profile
can prevent missed calls by returning your device to the default profile at a time
you specify. Timed profiles can be set up to 24 hours in advance.
1. At the start screen, select Menu > Settings > Profiles.
2. Select the profile you wish to activate and select Timed for timed expiration.
3. Enter the time in mm:ss for the profile to expire, and select OK.
52
Settings
■ Display settings
Wallpaper
You can set your device to display a background picture (wallpaper) on the
start screen.
1. At the start screen, select Menu > Settings > Display settings > Wallpaper >
Select wallpaper > Graphics > Open.
2. Browse the Graphics folder.
3. When you arrive at the image of your choice, select Options > Set as wallpaper.
4. To activate or deactivate wallpaper, at the start screen, select Menu >
Settings > Display settings > Wallpaper > On or Off.
Color schemes
You can change the color of some display components in your device, such as
indicators and signal bars.
1. At the start screen, select Menu > Settings > Display settings > Color schemes.
2. Select the color scheme of your choice.
Menu view
You can change the view of the main menu. The grid view shows menu icons only
in grid format, and the list view shows the icon and menu name in menu order.
At the start screen, select Menu > Settings > Display settings > Menu view >
List or Grid.
Backlight
You can choose whether the backlights will be always on, off, or on for a
selected time.
At the start screen, select Menu > Settings > Display settings >
Backlight time-out > 15 seconds or Customize.
Screen saver
From the start screen, select Menu > Settings > Display settings > Screen saver >
On, Off, Select s. saver, or Time-out (10 seconds, 30 seconds, or Other).
53
Settings
■ Tone settings
You can adjust the ringing volume, keypad tones, and more for the active profile.
See "Customize a profile," p. 52, for more information on profile settings.
Select Menu > Settings > Tone settings and one of the following:
Incoming call alert—Select how the device notifies you of an incoming call.
Ringing tone—Select the ringing tone for incoming calls.
Ringing volume—Set the volume of your ringing tone.
Vibrating alert—Turn the vibrating alert On or Off.
Message alert tone—Select the tone for received messages.
Keypad tones—Set the volume of your keypad tones (or turn them off).
Warning tones—Turn warning and confirmation tones On or Off.
Alert for—Define which caller groups the selected profile will accept or decline.
See "Caller groups," p. 40.
■ Time and date settings
Clock
At the start screen, select Menu > Settings > Time and date settings > Clock >
Show clock or Hide clock, Set the time, Time zone or Time format.
Date
At the start screen, select Menu > Settings > Time and date settings > Date >
Show date or Hide date, Set the date, Date format, or Date separator.
Set the auto-update of date and time
Auto-update is a network service. See "Network Services," p. 5. If your wireless
service provider supports this feature, you can allow the digital network to set
the clock, which is useful when you are out of your home area, for instance when
you have traveled to another network or time zone.
At the start screen, select Menu >Settings > Time and date settings > Autoupdate of date & time > On, Confirm first, or Off.
If you use the Auto-update of date & time option while outside your digital network,
you may be prompted to enter the time manually. Network time will replace the
time and date when you re-enter your digital network.
If your battery has been removed or has discharged outside the digital network,
you may be prompted to enter the time manually (once the battery is replaced or
recharged, and you are still outside of the digital network).
54
Settings
■ Call settings
Location info sharing
Location info sharing is only available for the Nokia 6235i and Nokia 6236i devices.
Location info sharing is a network service. See "Network Services," p. 5.
If your wireless service provider supports this feature, then location info sharing
allows the device to share position information over the network. For calls to
emergency numbers, this position information may be used by the emergency
operator to determine the position of the device. The functionality and accuracy
of this feature are dependent on the network, satellite systems, and the agency
receiving the information. This feature may not function in all areas or at all times.
At the start screen, select Menu > Settings > Call settings > Location info sharing >
Emergency or On > OK or No.
Emergency—This is the default profile. The device location information is shared only
during an emergency call to the official emergency number programmed into your
device. The screen displays
in the upper left hand corner of the start screen.
On—The device location information is shared with the network whenever the
device is powered on and activated. The screen displays
in the upper left
hand corner of the start screen.
Note: Location information will always be shared with the network
during emergency calls to the official emergency number programmed
into the device, regardless of which setting is selected. After placing an
emergency call the device remains in emergency mode for five minutes.
During this time, the location information will be shared with the network.
See "Emergency calls," p. 89.
Anykey answer
Anykey answer allows you to answer an incoming call by briefly pressing any key
except the Power key, Right selection key, or end key.
At the start screen, select Menu > Settings > Call settings > Anykey answer >
On or Off.
Automatic redial
Occasionally, your network may experience heavy traffic, resulting in a fast busy
signal when you dial. With automatic redial activated, your device redials the
number (number of times is specified by the network), and notifies you once the
network is available.
At the start screen, select Menu > Settings > Call settings > Automatic redial >
On or Off.
55
Settings
1-touch dialing
You can activate or deactivate 1-touch dialing. At the start screen, select Menu >
Settings > Call settings > 1-touch dialing > On or Off. See "Set up 1-touch
dialing," p. 40.
Automatic update of service
Your device is capable of receiving updates to wireless services sent to your device
by your service provider. At the start screen, select Menu > Settings > Call settings >
Automatic update of service > On or Off.
Calling card
If you use a calling card for long distance calls, you can save the calling card numbers
in your device. Your device can store up to four calling cards. Contact your calling
card company for more information.
Save information
1. At the start screen, select Menu > Settings > Call settings > Calling card.
2. Enter your lock code, and select OK. See "Change lock code," p. 63.
3. Scroll to one of the four card memory locations, and select Options > Edit >
OK > Dialing sequence.
4. Select one of the following sequence types:
Access no.+ phone no.+ card no.—Dial 1-800 access number, phone number,
then card number (+ PIN, if required).
Access no.+ card no.+ phone no.—Dial 1-800 access number, card number
(+ PIN, if required), then phone number.
Prefix+ phone no.+ card no.—Dial the prefix (numbers that must precede the
phone number) and phone number you want to dial, then card number
(+ PIN, if required).
5. Enter the required information (access number or prefix and card number),
and select OK to confirm your entries.
6. Select Card name, enter the card name, and select OK.
Make calls
After you have saved your calling card information in your device, you can make a
call using your calling card.
1. At the start screen, select Menu >Settings > Call settings > Calling card.
2. Enter your lock code, and select OK. See "Change lock code," p. 63.
56
Settings
3. Scroll to the calling card of your choice, select Options > Select > OK.
4. Press the end key to return to the start screen; then enter the phone number,
including any prefix (such as 0 or 1) that your calling card may require when
you make a calling card call. See your calling card for instructions.
5. Press and hold the call key for a few seconds until Card call is displayed.
6. When you hear the tone or system message, select OK.
International prefix
You can store an international dialing prefix into your device. When you enter + at
the beginning of a phone number, your device automatically inserts the international
dialing prefix that you have stored after you press the call key. See "Insert dialing
codes," p. 39.
Data or fax calls
Data or fax calling is a network service. See "Network Services," p. 5. If your wireless
service provider supports this feature, you can set up the device to send or receive
data or fax calls when a terminal, such as a PDA or PC, is connected.
For better performance during data calls, place the device on a stationary surface
with the keypad facing downward. Do not move the device by holding it in your
hand during a data call.
For more information on connectivity, refer to the PC/PDA Connectivity Guide
which can be downloaded from the Nokia website at http://www.nokiausa.com.
1. At the start screen, select Menu > Settings > Call settings > Data/fax calls >
Incoming data/fax call.
2. Select one of the following options:
Normal—The device receives incoming calls as usual.
Data calls only—The device receives only data calls.
Fax calls only—The device receives only fax calls.
3. When you are finished receiving the fax or data call, repeat steps 1 and 2 and
select Normal.
Data transfer
You can view the transmission speed when sending or receiving data or fax calls.
At the start screen, select Menu > Settings > Call settings > Data/fax calls > Data
rate display > Graphic or Off.
57
Settings
Call summary
Your device can display the time spent on a call when you hang up. At the start
screen, select Menu > Settings > Call settings > Call summary > On or Off.
Ringing tone for no caller ID
You can select a different ringing tone for calls received with no caller ID.
From the start screen, select Menu > Settings > Call settings > Ringing tone for
no caller ID > On or Off. See "Customize a profile," p. 52, for more information on
selecting a ringing tone.
■ Phone settings
Phone language
1. At the start screen, select Menu > Settings > Phone settings > Phone language.
2. Scroll to the language of your choice and press Select.
The phone language affects the time and date formats of the clock, alarm clock,
and calendar.
Touch tones
Touch tones, or DTMF tones, are the tones that sound when you press the keys on
your device keypad. You can use touch tones for many automated dial-up
services such as banking and airlines, or for entering your voice mailbox number
and password.
Touch tones are sent during an active call. You can send them manually from your
device keypad, or send them automatically by saving them in your device.
Set type
1. At the start screen, select Menu > Settings > Phone settings > Touch tones >
Manual touch tones.
2. Select one of the following options:
Continuous—The tone sounds for as long as you press and hold a key.
Fixed—Used to send tones of the duration you specify in the Touch tone
length option.
Off—Used to turn off tones. No tones are sent when you press a key.
58
Settings
Set length
You can specify touch-tone length for the Fixed option. At the start screen, select
Menu > Settings > Phone settings > Touch tones > Touch tone length > Short
(0.1 seconds) or Long (0.5 seconds).
Memory status
You can view the size of memory available for application installations.
See "Memory," p. 79.
Start-up tone
You can select to have a start-up tone when you first turn on your device. At the
start screen, select Menu > Settings > Phone settings > Start-up tone > On or Off.
Create a banner
If your wireless service provider supports this feature, you can choose whether
the display shows the operator logo or customized text when the device is in the
idle state. At the start screen, select Menu > Settings > Phone settings > Banner >
Default or Customize.
Help text activation
Your device displays brief descriptions for most menu items. When you arrive at a
feature or menu, pause for about 10 seconds and wait for the help text to display.
If necessary, use the joystick to page through the full help text.
The default setting for help text is On. However, you can turn help text on or off.
At the start screen, select Menu > Settings > Phone settings > Help text
activation > On or Off.
■ Voice commands
You can dial up to 25 stored numbers using voice command dialing. See "Voice
tags," p. 41.
Before using voice tags, note that:
• Voice tags are not language-dependent. They are dependent on the
speaker’s voice.
• You must say the name exactly as you said it when you recorded it.
59
Settings
• Voice tags are sensitive to background noise. Record voice tags and use them
in a quiet environment.
• Very short names are not accepted. Use long names and avoid similar names
for different numbers.
Note: Using voice tags may be difficult in a noisy environment or during an
emergency, so you should not rely upon voice dialing in all circumstances.
Handsfree operation with voice commands
You can set as many as five voice commands, which allow handsfree operation of
certain features in your device.
Assign a voice tag to a command
Before using voice commands, you must first add a voice tag to the device function.
1. At the start screen, select Menu > Settings > Voice commands.
2. Select the device function you wish to tag: Profiles, Voice mailbox, Radio,
Infrared, Voice recorder or Call log > Add.
3. Select Start, and speak the voice tag clearly into the microphone. Do not
select Quit unless you want to cancel the recording.
The device replays and saves the recorded tag. The
commands that have voice tags assigned.
icon appears next to
Activate a voice command
After you have associated a voice tag with a function in your device, you can
issue a command by speaking the voice tag.
1. From the start screen, press and hold the Right selection key.
2. When Speak now displays, pronounce the voice tag clearly into the microphone.
Select Playback to listen to the voice command tag.
When the device finds the voice tag, Found: displays, and the device plays the
recognized voice tag through the earpiece. The function you requested is activated.
Options
After you have associated a voice tag to a command, you can select one of the
following options:
Change—Change the voice command.
Delete—Erase the voice command tag.
60
Settings
■ Enhancement settings
The enhancement settings menu is shown only if the device has been connected
to a compatible enhancement. At the start screen, select Menu > Settings >
Enhancement settings > Headset, Handsfree, Loopset, TTY/TDD, or Charger.
Headset
Important: The headset may affect your ability to hear sounds around
you. Do not use the headset in situations that may endanger your safety.
Select the option of your choice to enter the submenu and modify its settings.
Default profile—Choose the profile you wish to be automatically activated when
a headset is connected.
Automatic answer—Calls are answered automatically after one ring when a
headset is connected. Select On or Off.
Handsfree
Select the option of your choice to enter the submenu and modify its settings.
Default profile—Choose the profile you wish to be automatically activated when
your device is connected to a car kit.
Automatic answer—Answer calls automatically after one ring when a car kit is
connected. Select On or Off.
Lights—Choose to keep the device lights always on, or to shut off automatically
after several seconds. Select On or Automatic.
Loopset
The LPS-4 Loopset is recommended for use with your device. Select the option of
your choice to enter the submenu and modify its settings.
Default profile—Choose the profile you wish to be automatically activated when
your device is connected to a loopset.
Automatic answer—Answer calls automatically after one ring when a loopset is
connected. Select On or Off.
TTY/TDD
Check with the manufacturer of the TTY/TDD device for a connecting cable that is
compatible with the Nokia device. TTY/TDD communications depend on network
availability. Check with your service provider for availability and description
of services.
61
Settings
Charger
Select the option of your choice to enter the submenu and modify its settings.
Default profile—Choose the profile you wish to be automatically activated when
your device is connected to the charger.
Lights—Choose to keep the device lights always on, or to shut off automatically
after several seconds. Select On or Automatic.
■ Security settings
Activate or deactivate phone lock
The phone lock feature protects your device from unauthorized outgoing calls or
unauthorized access to information stored in the device. To activate or deactivate
the phone lock setting on your device:
1. At the start screen, select Menu > Settings > Security settings.
2. Enter the lock code, and select OK. See "Change lock code," p. 63.
3. Select Phone lock and one of the following options:
Off—Immediately turns off the device lock feature.
Lock now—Immediately turns on the device lock feature.
On power-up—Turns on the device lock feature the next time you turn the
device on.
If you selected Lock now, you will be prompted to enter your lock code when you
select Menu, the right softkey, or the left softkey. When the lock code has been
entered, phone lock deactivates and your device functions normally.
When phone lock is activated, Phone locked is displayed each time you turn your
device on or off.
When the device is locked, calls still may be possible to the official emergency
number programmed into your device.
Call not allowed is displayed if you attempt to place a call while your device is
locked. To answer a call with phone lock on, select Answer or press the call key.
Allow numbers when phone locked
When phone lock is on, the only outgoing calls that can be made are to the
emergency number programmed into your device (for example, 911) or the
number stored in the Allowed no. when phone locked location:
62
Settings
1. At the start screen, select Menu > Settings > Security settings.
2. Enter the lock code, and select OK. See "Change lock code," p. 63.
3. Select Allowed no. when phone locked. Highlight an empty folder and select
Assign and enter the phone number; or select Assign > Search to recall the
number from Contacts. Select OK.
Call the allowed phone number
1. At the start screen, press the joystick down and highlight the contact you
wish to call.
2. Press the call key to place the call.
Change lock code
Avoid using codes similar to emergency numbers such as 911 to prevent
accidental dialing of the emergency number.
The preset lock code is 1234 or the last four digits of your phone number. If you
enter an incorrect lock code five times in a row, your device will prompt you for
the lock code.
If you enter the wrong lock code 5 times in succession, you will not be able to enter
a code for 5 minutes, even if you power off the device between incorrect entries.
1. At the start screen, select Menu > Settings > Security settings > Change lock code.
2. Enter the new lock code (must be 4 characters in length), re-enter the new
lock code for verification, and select OK.
3. Reenter the new lock code for verification, and select OK.
When you change your lock code, make sure you store it in a safe place, away
from your device. Avoid entering access codes similar to emergency numbers to
prevent accidental emergency calls.
Call restrictions
Call restrictions is a network service. See "Network Services," p. 5.
If your wireless service provider supports this feature, you can restrict the calls your
device makes and receives. When calls are restricted, calls still may be possible to
the official emergency number programmed into your device. Contact your service
provider for the restriction password.
1. At the start screen, select Menu > Settings > Security settings > Call restrictions.
2. Enter the lock code, and select OK. See "Change lock code," p. 63.
63
Settings
3. Select the types of calls you wish to restrict:
Restrict outgoing calls—Calls cannot be made.
Restrict incoming calls—Calls cannot be received.
4. Select an option: Select, Add restriction.
Voice privacy
Voice privacy is a network service. See "Network Services," p. 5. If your wireless
service provider supports this feature, the voice privacy feature protects the
privacy of your current phone conversation from other callers placing phone calls
on your same network. At the start screen, select Menu > Settings > Security
settings > Voice privacy > On or Off.
■ Application settings
The application setting menu changes game and application settings.
In the standby mode, select Menu > Settings > App. settings one of the following:
Application sounds—Select On or Off.
Application lights—Select App. defined or Default.
Application shakes—Select On or Off.
■ Network
The menu options you see in your device are based on your service provider’s
network. The network determines which options actually appear in the device
menu. Check with your service provider for more information.
The Network menu allows you to customize the way your device chooses a network
in which to operate while you are within or outside of your primary or home system.
Your device is set to search for the most cost-effective network. If your device
cannot find a preferred network, it selects a network automatically based on the
option you choose in the Network menu.
Roaming options
You can set your device to roam or search for another network when you are not
in your home area.
1. At the start screen, select Menu > Settings > Network > Roaming options.
64
Settings
2. Select one of the following options:
Home only—You can make and receive calls in your home area only.
Automatic—The device automatically searches for service in another digital
network. If one is not found, the device uses analog service. The roaming rate
applies when not in the home service area.
3. Select OK, if necessary, to confirm the activation.
Mode
You can choose whether your device uses digital or analog service.
1. At the start screen, select Menu > Settings > Network > Mode.
2. Select one of the following service options:
Digital preferred—The device works in digital mode but will also work in
analog mode when digital mode is unavailable.
Digital only—The device only works in digital mode.
Analog only—The device only works in analog mode.
■ Network services
The following features are network services. See "Network Services," p. 5.
Store a feature code
1. At the start screen, select Menu > Settings > Network services > Network
feature setting.
2. Enter the feature code from your service provider (for example, *633), and
select OK.
3. Select the type of service that matches the feature code you entered
(for example, Call forwarding).
The activated feature code is now stored in your device, and you are returned
to the Feature code: field. Continue entering other feature codes (for example,
*633), or press the end key to return to the start screen. Once you enter a
network feature code successfully the feature becomes visible in the Network
services menu.
Call forwarding
Call forwarding tells your network to redirect incoming calls to another number.
Call forwarding is a network service and may not work the same in all networks,
so contact your wireless provider for availability.
65
Settings
Activate
All options listed may not appear in the display. Contact your wireless provider
for more information.
1. At the start screen, select Menu > Settings > Network services > Call forwarding.
2. Select one of the following options:
Forward all calls—Forward all calls to the number you specify.
Forward if busy—Forward incoming calls when you are in a call.
Forward if not answered—Forward incoming calls to another number if you
are unable to answer. You can set a delay before forwarding takes place.
Forward if out of reach—Forward incoming calls when your device is off.
Cancel all call forwarding—Cancel any call forwarding options you have set.
3. Select Activate.
4. Select the destination to which your calls will be forwarded.
5. Enter the number to which your calls, data, or other information will be
forwarded, and select OK.
Cancel
At the start screen, select Menu > Settings > Network services > Call forwarding >
Cancel all call forwarding. Cancel all call forwarding may affect your ability to
receive voice mail messages. Contact your wireless provider for specific details.
Call waiting
If your wireless provider supports this feature, call waiting notifies you of an
incoming call even while you are in a call. You can then accept, reject, or ignore
the incoming call.
1. At the start screen, select Menu > Settings > Network services > Call
waiting > Activate or Cancel.
2. During a call, select Answer or press the call key to answer the waiting call.
The first call is put on hold.
3. Press the end key to end the active call.
Send own caller ID when calling
If your wireless service provider supports this feature, then you can allow or
prevent your number from appearing on the receiving caller ID.
At the start screen, select Menu > Settings > Network services > Send my caller
ID >Yes or No.
66
Settings
View your own phone number
At the start screen, select Menu > Settings > Network services > My number selection.
■ Restore factory settings
You can reset some of the menu settings to their original values. Data that you
have entered or downloaded is not deleted, for example, entries in your contacts
list are not affected.
1. At the start screen, select Menu > Settings > Restore factory settings.
2. Enter the lock code, and select OK. See "Security settings," p. 62.
■ Infrared
You can set up the device to receive data through its IR port. To use an IR connection,
transmission and reception must be to or from an IR compatible phone or device. You
can send or receive data such as business cards, graphics, images, sound clips, music
files, videos, and calendar notes to or from a compatible phone or data device (such
as a computer) using the IR port of your device.
Do not point the IR (infrared) beam at anyone’s eye or allow it to interfere with
other IR devices. This device is a Class 1 laser product.
Send and receive data
1. Ensure that the IR ports of the sending and receiving devices are pointing at
each other and that there are no obstructions between the devices.
The preferable distance between the two devices in an IR connection is from
3 inches to 3 feet.
2. Activate IR in your device by selecting Menu > Settings > Infrared.
3. The user of the other device should activate IR as well.
If data transfer is not started within two minutes after the activation of the IR
port, the connection is cancelled and must be restarted.
Connection indicator
• When
shows continuously, the IR connection is activated and your
device is ready to send or receive data using its IR port.
• When
blinks, your device is either trying to connect to the other device
or a connection has been lost.
67
Settings
Send a business card
1. At the start screen, select Menu > Settings > Infrared.
2. Highlight the entry from the contacts list that you wish to send.
3. Select Details > Options > Send bus. card > Via infrared > Primary number to
send primary number only or All details to send all contact information for
the contact.
4. Align the IR port to the other activated device IR port. Select OK and your
device will start sending the business card with IR.
Receive a business card
1. At the start screen, select Menu > Settings > Infrared > Select. Infrared
reception activated displays.
2. Align the IR port with the activated device port that is sending the business card.
3. Select Show > Save to save the business card in phone book memory, or select
Exit > OK to discard the business card.
68
Organizer
11. Organizer
Your device contains features to help organize your everyday life,
including an alarm clock, calendar, calculator, countdown timer, and stopwatch.
■ Alarm clock
If the alarm time is reached while the device is switched off, the device switches
itself on and starts sounding the alarm tone. If you select Stop, the device asks
whether you want to activate the device for calls. Select No to switch off the
device or Yes to make and receive calls. Do not select Yes when wireless phone
use may cause interference or danger.
Set or change an alarm setting
The alarm clock is based on the device clock. It sounds an alert any time you
specify and even works if the device is turned off.
1. At the start screen, select Menu > Organizer > Alarm clock > Alarm time > On.
2. Enter the time for the alarm in hh:mm format, and select OK.
3. Select am or pm (if 12-hour format is selected). Alarm on appears briefly in
the display and
appears on the start screen.
Repeat alarm
You can set the alarm to repeat. At the start screen, select Menu > Organizer >
Alarm clock > Repeat alarm.
Set the alarm tone
You can set which tone is played when the alarm sounds.
1. At the start screen, select Menu > Organizer > Alarm clock > Alarm tone.
2. Select Standard, Radio, Ringing tone, Open Gallery or Tone downloads to
choose the tone you want to use.
If you set your alarm to Radio, use an accessory that supports FM Stereo.
Alarm conditions
When the alarm sounds, your device beeps, vibrates (if vibrating alert is on for
currently active profile), and the display lights up.
With the device on, select OK to shut the alarm off, or select Snooze. The alarm
stops for 10 minutes and Snooze on appears in the display.
If you do not press a key, the alarms stops (snoozes) for 10 minutes, then
sounds again.
69
Organizer
If the alarm time is reached while the device is switched off, the device switches
itself on and starts sounding the alarm tone. If you select Stop, the device asks
whether you want to activate the device for calls. Select No to switch off the
device or Yes to make and receive calls. Do not select Yes when wireless device
use may cause interference or danger.
Turn an alarm off
At the start screen, select Menu > Organizer > Alarm clock > Alarm time > Off.
■ Calendar
The calendar keeps track of reminders, calls you need to make, meetings, and
birthdays. It can even sound an alarm for any of these events.
Monthly view provides an overview of the selected month and weeks. It also allows
you to jump to a specific date. Any days or dates that appear in bold font contain
calendar notes such as a meeting or reminder.
Open
At the start screen, press the joystick right or select Menu > Organizer > Calendar.
You can move the cursor in some calendar views by using the joystick.
Go to a date
1. At the start screen, select Menu > Organizer > Calendar > Options > Go to date.
2. Enter the date (for example, mm/dd/yyyy), and select OK.
Note a specific date
You can apply five types of notes to your calendar. Your device asks for further
information depending on which note you choose. You also have the option to
set an alarm for any meeting, call, birthday, memo, or reminder that you create.
1. Go to the date for which you want to set a reminder. See "Go to a date," p. 70.
2. From the monthly view (with the go-to date highlighted), select Options >
Make a note.
3. Select one of the following note types and proceed accordingly:
Meeting—Enter a subject, location, and a start or end time.
Call—Enter a phone number, a name and the time.
Birthday—Enter the person’s name and year of birth.
Memo—Enter a subject and an end date.
Reminder—Enter the subject you wish to be reminded about. You are given
the option to set an alarm.
4. Enter your note and select Options > Save.
70
Organizer
View notes (day view)
After you have created calendar notes, you can view them.
1. At the start screen, select Menu > Organizer > Calendar.
2. Scroll to the date containing the note, that appears in bold type and select View.
Options while viewing a list of notes in day view
1. Select Options while viewing a day’s note to display the following:
The options listed below are available either while viewing the body of a note
or viewing the header of a note.
Make a note—Create a new note for the selected date.
Delete—Delete the note.
Edit—Edit the note.
Move—Move the note to another date on your calendar.
Repeat—Set the note to recur on a regular basis (daily, weekly, biweekly,
monthly, and yearly).
Go to date—Jump to another date on your calendar.
Go to today—Jump to the current date on your calendar.
Send note—Send the note to another device as a text message or in calendarto-calendar (vCal) format by way of multimedia messages, SMS, or IR.
Copy—Copy the note, which you can then paste to another date.
Settings—Set the date and time, date and time format, the day each week
starts and whether you want your notes to auto-delete after a specified time.
Go to to-do list—Jump to the to-do list on your calendar.
2. Select an option to activate it or enter its submenu.
Send a note
1. At the start screen, select Menu > Organizer > Calendar.
2. Scroll to the date containing the note you wish to send, which appears in bold
type, and select View.
3. Scroll to the note you wish to send, and select Options > Send note > Via
calendar, Via multimedia (see "Multimedia messages," p. 27), Via text
message, or Via infrared (see "Receive a business card," p. 68).
4. If you selected Via calendar, enter the number for the recipient, or select
Search to retrieve a number from the contacts list, and select OK.
71
Organizer
5. If you selected Via text message, the note appears as a text message in
the display.
• Select Send > Send to number, Send to e-mail, Send to many or Send to distrib.
list. Highlight the contact you wish to send your note to and select Send.
• Enter the number for the recipient, or select Search to retrieve a number
from the contacts list, and select Send.
Receive notes
When you receive a calendar note in calendar-to-calendar (vCal) format, your
device displays Calendar note received.
• To view calendar notes, select Show and, if necessary, scroll to view the
entire message.
• To save calendar notes after viewing, select Options > Save.
• To discard calendar notes after viewing, select Options > Discard or select Exit.
When you receive a calendar note or text message, a message notification
appears on the start screen. You can save the note in your calendar and set an
alarm for any date and time.
■ Notes
You can write and save information in Notes, and send notes via multimedia, text
message, or infrared. From the start screen, select Menu > Organizer > Notes. If
there are no notes created, select Add note, create your note and select Save
when done. If notes have already been created, highlight the note you wish to use
and select View to read, or select Options to perform one of the following:
Make a note—Create additional notes.
Delete—Discard a note.
Edit—Change or add information to a note.
Send note—Send a note Via multimedia, Via text message, or Via infrared.
Delete all notes—Delete all notes created.
■ To-do list
Use the to-do list feature to keep track of your tasks. You can save a note for a task,
select a priority level for the note and mark it as done when you have completed
it. You can sort the notes by priority or by date.
72
Organizer
Add a To-do note
1. From the start screen, select Menu > Organizer > To-do list.
2. If there are no notes, select Add note.
3. Enter the subject of the to-do note, and select Save.
4. Select either High, Medium, or Low priority. The to-do note is saved. The
device automatically sets the deadline.
View a To-do note
1. From the start screen, select Menu > Organizer > To-do list.
2. Highlight a to-do note, and select Options to select from the following:
Add—Add another note (available only in header view).
Delete—Delete the note.
Mark note as done—Mark a note or task as complete; no more reminders
will follow.
Sort by deadline—Sort the notes according to their deadline.
Send—Send the note to another device using IR, as a text or multimedia
message, or as a calendar note to another compatible device.
Go to calendar—Leave the to-do list, and go to the calendar.
Save to calendar—Save the to-do note to a date on your calendar.
Delete all notes—Delete all the to-do notes in the list (available only in
header view).
3. View the to-do note and select Edit to edit the note or Options to select from
the following:
Deadline—Set a deadline for the note (available only in body view).
Mark note as done—Mark a note or task as complete; no more reminders
will follow.
Delete—Delete the note.
Edit priority—Change the priority to high, medium, or low (available only in
body view).
Send—Send the note to another device using IR, as a text or multimedia
message, or as a calendar note to another compatible device.
Go to calendar—Leave the to-do list, and go to the calendar.
Save to calendar—Save the to-do note to a date on your calendar.
73
Organizer
■ Calculator
The calculator in your device adds, subtracts, multiplies, divides, calculates the
square and the square root, changes the sign of the number entered, and
converts currency values.
Note: This calculator has a limited accuracy and is designed for
simple calculations.
1. At the start screen, select Menu > Organizer > Calculator.
2. Enter the first number in the calculation. Press # for a decimal point if necessary.
To perform a square or square root calculation, select Options > Square or
Square root.
To cycle through the add (+), subtract (-), multiply (*), and divide (/) characters,
press *. Pause briefly to select the displayed character.
To change the sign, select Options > Change sign, or scroll up or down.
3. Enter the second number in your calculation.
4. Select Equals if calculation is complete or Options if more functions are required.
Currency converter
You can convert foreign currency to domestic, or vice versa, directly from the
start screen or from the Calculator menu.
Note: When you change base currency, you must key in the new rates
because all previously set exchange rates are set to zero.
1. At the start screen, select Menu > Organizer > Calculator > Options >
Exchange rate > Foreign units in home units or Home units in foreign units.
Foreign units in home units—The number of home units it takes to make one
unit of foreign currency.
Home units in foreign units—The number of foreign units it takes to make one
unit of your home currency.
2. Enter the exchange rate (press # to insert a decimal), and select OK.
3. Select Back to return to Calculator screen and enter currency amount to convert.
4. Select Options > To home or To foreign.
To home—converts foreign currency to domestic currency.
To foreign—converts domestic currency to foreign currency.
5. If you haven’t already entered an exchange rate, the device will prompt you
to enter it now. Select OK. You can edit the exchange rate at any time.
74
Organizer
■ Countdown timer
You can enter a specified time (up to 99 hours and 59 minutes). When the time
runs out, your device sounds an alarm.
Note: The countdown timer only works when the device is on. Once you
turn off your device, the timer is no longer active.
Set the countdown timer
1. At the start screen, select Menu > Organizer > Countdown timer.
2. Enter the time (in hh:mm format), and select OK.
3. Enter a note for the timer, and select OK.
The
icon appears on the start screen when the countdown timer is set. When
the time runs out, your device sounds an alarm, displays the timer note, and
flashes its lights.
Press any key during the alarm to stop the alarm. After 3 minutes the timer alert
expires automatically.
Change the time
After you have set the timer, you can change the time.
1. At the start screen, select Menu > Organizer > Countdown timer > Change time.
2. Enter the new time, and select OK.
3. Leave the note as it was, or enter a new note, and select OK.
Stop the timer before the alarm sounds
After you have set the timer, you can stop the timer. At the start screen, select
Menu > Organizer > Countdown timer > Stop timer.
■ Stopwatch
Your device has a stopwatch that can be used to track time. The stopwatch displays
time in hours, minutes, seconds and fractions of a second in hh:mm:ss:s format.
Using the stopwatch or allowing it to run in the background when using other
features increases the demand on battery power and reduces the battery life.
Measure time
1. At the start screen, select Menu > Organizer > Stopwatch > Split timing or
Lap timing > Start. The running time displays.
75
Organizer
Split timing—You can use the split time function for such things as a long
distance race when you need to pace yourself. Select Split to note the lapsed
time. The timer continues to run and the split time appears below the running
time. Each time you select Split, the new measured time appears at the
beginning of the list.
Lap timing—You can use the lap time function when you want to track how
long it takes to complete each cycle or lap. Select Lap to note the lap time.
The clock stops, then starts immediately from zero. The lap time appears
below the running time. Each time you select Lap, the new measured time
appears at the beginning of the list.
2. Select Stop to end the timing and display the total time or select Stop >
Options > Start or Reset to continue or reset timing.
Save, view or delete lap and split times
• To save a time while the clock is running select Stop > Save, enter a name for
the measurement, and select OK. If you do not enter a name, the total time is
used as the default title for the lap or split time.
• To view a saved time, from the start screen, select Menu > Organizer >
Stopwatch > Show last time or View times.
• To delete a saved time, from Stopwatch, select View times > enter the time to
delete > Delete > Yes or select Delete times > One by one or Delete all.
Operation note
If you press the end key and return to the start screen, the clock continues to run
in the background and the
icon appears in the upper left corner of the screen.
To return to the stopwatch screens, at the start screen, select Menu > Organizer >
Stopwatch > Continue. To stop the clock, select Stop.
Options
You can choose the following options when using the stopwatch:
Continue—Appears when the stopwatch is working in the background.
Show last time—Appears when you have saved a split or lap time. Displays the
last time saved.
Split timing—Asks if you want to discontinue previous timing.
Lap timing—Asks if you want to discontinue previous timing.
View times—Allows you to browse the saved times.
Delete times—Allows you to delete any saved times. You can delete the saved
times one by one or all at once.
76
Mobile Web
12. Mobile Web
Minibrowser is a network service. See "Network Services," p. 5.
Your device has a built-in browser you can use to connect to selected services
on the mobile internet. If your wireless service provider supports this feature,
then you can view weather reports, check news or flight times, view financial
information, and much more. The Web browser on your device can display
WAP-based content.
Your device may have some bookmarks loaded for sites not affiliated with Nokia.
Nokia does not warrant or endorse these sites. If you choose to access them, you
should take the same precautions, for security or content, as you would with any
internet site.
The security icon does not indicate that the data transmission between the gateway
and the content server (or place where the requested resource is stored) is secure.
The service provider secures the data transmission between the gateway and the
content server.
■ Mobile internet access
Because mobile Internet content is designed to be viewed from your device, your
wireless provider is now your mobile Internet service provider as well.
It is likely that your wireless provider has created a home page and set up your
browser to go to this page when you log on to the mobile Internet. Once at your
service provider’s home page, you may find links to a number of other sites.
It should not be necessary to manually configure the browser on your device.
Normally this is done by your wireless provider once you have subscribed to the
feature. Contact your wireless provider if you have problems using the browser.
■ Sign on to the mobile internet
At the start screen, select Menu > Minibrowser > Connect or the operator
provided menu item.
After a brief pause, your device attempts to connect to your wireless provider’s home
page. If you receive an error message, your device may not be set up for browsing.
Contact your wireless provider to make sure that your device is configured properly.
■ Navigate the mobile Internet
Since your device screen is much smaller than a computer screen, mobile Internet
content is displayed differently than you may be accustomed to seeing. This section
contains guidelines for using the keys to navigate a WAP site.
77
Mobile Web
Phone keys
• Press the Power key to display the Minibrowser home screen.
• Scroll up or down to browse the WAP site.
• Select an item.
• To enter letters and numbers, press a key from 0–9.
• To enter special characters, press *.
Receive a call while online
Depending on your wireless service provider, you may still be able to receive a
voice call while using the WAP browser.
• To answer the incoming call, press the call key.
• To reject the incoming call, press the end key.
After you end your voice call, the mobile Internet connection automatically resumes.
Note: If your wireless service provider does not support incoming calls
while browsing, then the incoming calls are automatically diverted to
voice mail.
Make an emergency call while online
You can end your data connection then make an emergency call.
1. To close your mobile Internet connection, press the end key.
2. Press the end key as many times as needed to clear the display and ready the
device for calls.
3. Enter the emergency number for your present location (for example, 911).
Emergency numbers vary by location.
4. Press the call key.
Clear the cache and disconnect
A cache is a memory location that is used to store data temporarily. If you have
tried to access or have accessed confidential information requiring passwords,
empty the cache after each use. The information or services you have accessed
are stored in the cache. To empty the cache while in the browser menu, select
Navigate > Advanced > Clear > Cache from the home page. You can also clear
the cache by pressing and holding the Power key to power off your device.
To close your mobile internet connection while browsing, press the end key.
78
Extras
13. Extras
Challenge yourself or a friend to one of the fun games in your device.
Some menus listed are network services. Contact your wireless provider for more
information. When you download games or applications, they may be saved in
either the Games or the Collection folders.
■ Games
At the start screen, select Menu > Extras > Games to display the games on
your device.
■ Collections
Collections is a network service. See ’"Network Services," p. 5. If your wireless service
provider supports this feature, you will find useful applications pre-installed on your
device. Also, you can manage and download new Java applications that may be
offered by your wireless provider.
An application may require a few seconds to load. When you open an application,
wait for the launch screen to disappear. At that point, the application is ready.
1. At the start screen, select Menu > Extras > Collection.
2. Select an application: Converter, Translator, or World Clock.
Note: Only install applications from sources that offer adequate
protection against harmful software.
■ Memory
You can view the size of memory available for games or application installations.
At the start screen, select Menu > Extras > Memory.
Note: Only install applications from sources that offer adequate
protection against harmful software.
79
PC Connectivity
14. PC Connectivity
■ USB data transfer
You can transfer data such as music, photos, and videos from your device to a
compatible PC, or from a compatible PC to your device using a DKU-2 USB data
cable. The cable is connected to your device correctly when the arrowhead points
toward the display screen. Disconnect the USB data cable from the device to
make a call.
Use the Nokia Audio Manager software to handle your music files and transfer
them from the PC to the memory card in your device. See "Nokia PC Suite," p. 81.
Transfer files using Windows Explorer
After you have installed the Nokia Audio Manager, it is possible to use Windows
Explorer to transfer music, photo, and video files to your device and from your
device to your PC.
1. Connect your PC and your device with a DKU-2 USB cable. Data enhancement
connected displays on your device.
2. Open Windows Explorer. Your device will appear as a local drive (named by
Nokia 6235, Nokia 6235i, Nokia 6236, and Nokia 6236i), and with a drive
letter assigned to it.
3. Click on the folders to display a window that shows the contents of the folder
on the device memory card.
4. Open a second instance of Windows Explorer and display the contents of the
folder on your PC where you have MP3 files, photo files, or video files stored.
5. Select the files on your PC that you wish to transfer to the device.
6. Drag and drop the files from the second window into the first window and
place them in a folder.
7. The files are transferred to the device and can be played by the Music player,
or accessed by the Media player.
If you selected files that require more memory than the device memory has, an
error note displays. Deselect some of your files until the selections fit the memory.
8. Disconnect the USB cable by double-clicking the green arrow on the taskbar
at the bottom of your PC screen. A window pops up that shows Unplug or
Eject Hardware.
80
PC Connectivity
9. Click on USB device in the hardware devices window. A popup window shows
Stop a Hardware device.
10. Highlight USB device and click OK. The popup window Safe to Remove
Hardware is shown with the message The ‘USB Device’ device can now be
safely removed from the system. Select OK.
Important: To ensure that all memory card operations are completed in
a controlled way, do not unplug the connectivity cable until Windows
notifies you that it is safe to do so. Uncontrolled completion of the memory
card operations may cause the memory card and the information stored
on it to become corrupted. A corrupted memory card may have to be
formatted before it can be used again. When a memory card is formatted,
all information on the card is permanently lost.
■ Nokia PC Suite
Nokia PC Suite software is available for the Nokia 6235, Nokia 6235i, Nokia 6236,
and Nokia 6236i phones. Nokia PC Suite is a collection of powerful tools that you
can use to manage your device features and data. Each component is a separate
program that includes online helps. Nokia PC Suite software, installation instructions,
and other documentation, which are provided free of charge and can be downloaded
from the software downloads of the Nokia Web site: www.nokiausa.com/pcsuite.
Some of the features in your device require network support. Contact your service
provider for availability and configuration instructions.
• Nokia Application Installer installs Symbian and Java™ applications from a
compatible PC to a compatible device.
• Nokia Audio Manager creates and organizes digital music files on a compatible
PC and transfers them to a compatible mobile device.
• Nokia Connection Manager activates the connection types between a
compatible device and a compatible PC when using Nokia PC Suite applications.
• Nokia Contacts Editor edits the contacts of a compatible device from your PC.
• Nokia Content Copier copies information between two compatible Nokia
devices and backs up information from a compatible Nokia device to a
compatible PC.
• Nokia Image Converter modifies images and transfers them to a compatible
mobile device as wallpapers, portrait images, and MMS pictures.
• Nokia Multimedia Player plays MMS messages and audio and video files and
creates playlists of your favorite multimedia files.
81
PC Connectivity
• Nokia PC Sync synchronizes contacts, calendar, notes, and to-do items
between a compatible device and a compatible PC personal Information
Manager (PIM).
• Nokia Phone Browser uses your compatible PC to browse your compatible
device messages, contacts, images, videos and audio files; to copy and move
files or delete them from the phone’s memory; and to transfer files between
the device and PC.
• Nokia Sound Converter converts General MIDI ringing tones into Scalable
Polyphony MIDI tones for a compatible device.
• Nokia Text Message Editor sends and manages text messages from a
compatible PC.
• Nokia Modem Options sets options for the data calls you make.
Copyright protection may prevent some images, ring tones, and other content
from being copied, modified, transferred or forwarded.
82
Enhancements
15. Enhancements
Check the model number of any charger before use
with this device. This device is intended for use when
supplied with power from ACP-7 or ACP-12.
Warning: Use only batteries, chargers and
enhancements approved by Nokia for use with this particular model. The
use of any other types may invalidate any approval or warranty, and may
be dangerous. For availability of approved enhancements, please check
with your dealer.
A few practical rules about accessories and enhancements:
• Keep all accessories and enhancements out of the reach of small children.
• When you disconnect the power cord of any accessory or enhancement,
grasp and pull the plug, not the cord.
• Check regularly that enhancements installed in a vehicle are mounted and
are operating properly.
• Installation of any complex car enhancements must be made by qualified
personnel only.
Power
• Standard 1070 mAh Li-Ion Battery (BL-6C, BL-5C)
• Standard Travel Charger (ACP-7)
• Travel Charger (ACP-12)
• Retractable Charger (AC-1)
Go to www.nokiausa.com/phones for more information about enhancements.
83
Reference information
16. Reference information
■ Battery information
Your device is powered by a rechargeable battery. The full performance of a new
battery is achieved only after two or three complete charge and discharge cycles.
The battery can be charged and discharged hundreds of times but it will eventually
wear out. When the talk and standby times are noticeably shorter than normal,
buy a new battery. Use only Nokia approved batteries, and recharge your battery
only with Nokia approved chargers designated for this device.
Unplug the charger from the electrical plug and the device when not in use. Do not
leave the battery connected to a charger. Overcharging may shorten its lifetime.
If left unused, a fully charged battery will lose its charge over time. Temperature
extremes can affect the ability of your battery to charge.
Use the battery only for its intended purpose. Never use any charger or battery
that is damaged.
Do not short-circuit the battery. Accidental short-circuitring can occur when a
metallic object such as a coin, clip, or pen causes direct connection of the
positive (+) and negative (-) terminals of the battery. (These look like metal strips
on the battery.) This might happen, for example, when you carry a spare battery
in your pocket or purse. Short-circuitring the terminals may damage the battery
or the connecting object.
Leaving the battery in hot or cold places, such as in a closed car in summer or
winter conditions, will reduce the capacity and lifetime of the battery. Always try
to keep the battery between 59°F and 77°F (15°C and 25°C). A device with a hot
or cold battery may not work temporarily, even when the battery is fully charged.
Battery performance is particularly limited in temperatures well below freezing.
Do not dispose of batteries in a fire! Dispose of batteries according to local
regulations. Please recycle when possible. Do not dispose as household waste.
■ Nokia battery authentication guidelines
Always use original Nokia batteries for your safety. To check that you are getting an
original Nokia battery, purchase it from an authorized Nokia dealer, look for the
Nokia Original Enhancements logo on the packaging, and inspect the hologram
label using the following steps:
84
Reference information
Successful completion of the four steps is not a total assurance of the authenticity
of the battery. If you have any reason to believe that your battery is not an authentic
original Nokia battery, you should refrain from using it and take it to the nearest
authorized Nokia service point or dealer for assistance. Your authorized Nokia
service point or dealer will inspect the battery for authenticity. If authenticity
cannot be verified, return the battery to the place of purchase.
Authenticate hologram
1. When looking at the hologram label, you should
see the Nokia connecting hands symbol from one
angle and the Nokia Original Enhancements logo
when looking from another angle.
2. When you angle the hologram. to the left, right,
down, and up sides of the logo, you should see
1, 2, 3, and 4 dots on each side respectively.
3. Scratch the side of the label to reveal a 20-digit
code, for example, 12345678919876543210.
Turn the battery so that the numbers are facing
upwards. The 20-digit code reads starting from the
number at the top row followed by the bottomrow.
4. Confirm that the 20-digit code is valid by
following the instructions at
www.nokiausa.com/batterycheck.
What if your battery is not authentic?
If you cannot confirm that your Nokia battery with the hologram label is an
authentic Nokia battery, please do not use the battery. Take it to the nearest
authorized Nokia service point or dealer for assistance. The use of a battery that
is not approved by the manufacturer may be dangerous and may result in poor
performance and damage to your device and its enhancements. It may also
invalidate any approval or warranty applying to the device.
To find out more about original Nokia batteries visit www.nokiausa.com/battery.
85
Care and maintenance
Care and maintenance
Your device is a product of superior design and craftsmanship and should be treated
with care. The suggestions below will help you protect your warranty coverage and
enjoy your device for many years.
• Keep the device and all of its parts and accessories out of the reach of
small children.
• Keep the device dry. Precipitation, humidity and all types of liquids or moisture
can contain minerals that will corrode electronic circuits. If your device does
get wet, remove the battery and allow the device to dry completely before
replacing it.
• Do not use or store the device in dusty, dirty areas. Its moving parts and
electronic components can be damaged.
• Do not store the device in hot areas. High temperatures can shorten the life of
electronic devices, damage batteries, and warp or melt certain plastics.
• Do not store the device in cold areas. When the device returns to its normal
temperature, moisture can form inside the device and damage electronic
circuit boards.
• Do not attempt to open the device other than as instructed in this guide.
• Do not drop, knock, or shake the device. Rough handling can break internal
circuit boards and fine mechanics.
• Do not use harsh chemicals, cleaning solvents, or strong detergents to clean
the device.
• Do not paint the device. Paint can clog the moving parts and prevent
proper operation.
• Use a soft, clean, dry cloth to clean any lenses (such as camera, proximity
sensor, and light sensor lenses).
• Use only the supplied or an approved replacement antenna. Unauthorized
antennas, modifications, or attachments could damage the device and may
violate regulations governing radio devices.
• Use chargers indoors.
All of the above suggestions apply equally to your device, battery, charger, or any
enhancement. If any device is not working properly, take it to the nearest authorized
service facility for service.
86
Additional safety information
Additional safety information
■ Operating environment
Your device and its enhancements may contain small parts. Keep them out of the
reach of small children.
Remember to follow any special regulations in force in any area and always switch
off your device when its use is prohibited or when it may cause interference or
danger. Use the device only in its normal operating positions. This device meets
RF exposure guidelines when used either in the normal use position against the ear
of when positioned at least 7/8 inch (2.2 cm) away from the body. When a carry
case, belt clip, or holder is used for body-worn operation, it should not contain metal
and should position the device at least 7/8 inch (2.2 cm) away from your body.
In order to transmit data files or messages, this device requires a quality connection
to the network. In some cases, transmission of data files or messages may be delayed
until such a connection is available. Ensure the above separation distance
instructions are followed until the transmission is completed.
■ Medical devices
Operation of any radio transmitting equipment, including wireless phones, may
interfere with the functionality of inadequately protected medical devices. Consult
a physician or the manufacturer of the medical device to determine if they are
adequately shielded from external RF energy or if you have any questions. Switch
off your device in health care facilities when any regulations posted in these areas
instruct you to do so. Hospitals or health care facilities may be using equipment
that could be sensitive to external RF energy.
PACEMAKERS
Pacemaker manufacturers recommend that a minimum separation of 6 in (15.3 cm)
be maintained between a wireless device or phone and a pacemaker to avoid
potential interference with the pacemaker. These recommendations are consistent
with the independent research by and recommendations of Wireless Technology
Research. To minimize the potential for interference, persons with pacemakers should
• Always keep the device more than 6 inches (15.3 cm) from their pacemaker
when the device is switched on
• Not carry the device in a breast pocket
• Hold the device to the ear opposite the pacemaker to minimize the potential
for interference.
If you have any reason to suspect that interference is taking place, switch off
your device immediately.
87
Additional safety information
HEARING AIDS
Some digital wireless devices may interfere with some hearing aids. If interference
occurs, consult your service provider.
■ Vehicles
RF signals may affect improperly installed or inadequately shielded electronic
systems in motor vehicles such as electronic fuel injection systems, electronic
antiskid (antilock) braking systems, electronic speed control systems, air bag
systems. For more information, check with the manufacturer or its representative
of your vehicle or any equipment that has been added.
Only qualified personnel should service the device, or install the device in a vehicle.
Faulty installation or service may be dangerous and may invalidate any warranty
that may apply to the device. Check regularly that all wireless device equipment in
your vehicle is mounted and operating properly. Do not store or carry flammable
liquids, gases, or explosive materials in the same compartment as the device, its
parts, or enhancements. For vehicles equipped with an air bag, remember that an
air bags inflate with great force. Do not place objects, including installed or portable
wireless equipment in the area over the air bag or in the air bag deployment area.
If in-vehicle wireless equipment is improperly installed and the air bag inflates,
serious injury could result.
FCC regulations prohibit using your wireless device while in the air. The use of
wireless telephones in an aircraft may be dangerous to the operation of the aircraft,
disrupt the wireless telephone network, and may be illegal.
■ Potentially explosive environments
Switch off your device when in any area with a potentially explosive atmosphere
and obey all signs and instructions. Potentially explosive atmospheres include areas
where you would normally be advised to turn off your vehicle engine. Sparks in
such areas could cause an explosion or fire resulting in bodily injury or even death.
Switch off the device at refuelling points such as near gas pumps at service stations.
Observe restrictions on the use of radio equipment in fuel depots, storage, and
distribution areas, chemical plants or where blasting operations are in progress.
Areas with a potentially explosive atmosphere are often but not always clearly
marked. They include below deck on boats, chemical transfer or storage facilities,
vehicles using liquefied petroleum gas (such as propane or butane), and areas
where the air contains chemicals or particles such as grain, dust or metal powders.
Failure to observe these instructions may lead to suspension or denial of telephone
services to the offender, legal action, or both.
88
Additional safety information
■ Emergency calls
Important: Wireless phones, including this device, operate using radio
signals, wireless networks, landline networks, and user-programmed
functions. Because of this, connections in all conditions cannot be
guaranteed. You should never rely solely on any wireless device for
essential communications like medical emergencies.
To make an emergency call, make sure your device is properly charged before
attempting any emergency calls. If your battery becomes empty, you cannot
receive or make calls, including emergency calls and must wait a few minutes
after the charging begins to place your call.
1. If the device is not on, switch it on. Check for adequate signal strength. Some
networks may require that a valid UIM (CDMA SIM) card is properly inserted
in the device.
2. Press the end key as many times as needed to clear the display and ready the
device for calls.
3. Key in the official emergency number for your present location and press the
call key. Emergency numbers vary by location.
If certain features are in use, you may first need to turn those features off before
you can make an emergency call. If the device is in an offline or flight mode you
must change the profile to activate the device function before you can make an
emergency call. Consult this guide or your service provider. When making an
emergency call, give all the necessary information as accurately as possible. Your
wireless device may be the only means of communication at the scene of an
accident. Do not end the call until given permission to do so.
89
Additional safety information
■ Certification Information (SAR)
THIS NOKIA RM-60 MEETS THE GOVERNMENT'S REQUIREMENTS FOR EXPOSURE
TO RADIO WAVES.
Your mobile device is a radio transmitter and receiver. It is designed and
manufactured not to exceed the limits for exposure to radio frequency (RF) energy
set by the Federal Communications Commission (FCC) of the U.S. Government. These
limits are part of comprehensive guidelines and establish permitted levels of RF
energy for the general population. The guidelines are based on standards that were
developed by independent scientific organizations through periodic and thorough
evaluation of scientific studies. The standards include a substantial safety margin
designed to assure the safety of all persons, regardless of age and health.
The exposure standards for wireless mobile devices employ a unit of measurement
known as the Specific Absorption Rate, or SAR. The SAR limit set by the FCC is
1.6 watts/kilogram (W/kg).* Tests for SAR are conducted using standard operating
positions accepted by the RCC with the phone transmitting at its highest certified
power level in all tested frequency bands. Although the SAR is determined at the
highest certified power level, the actual SAR level of an operating device can be
well below the maximum value. This is because the device is designed to operate
at multiple power levels so as to use only the power required to reach the network.
In general, the closer you are to a wireless base station antenna, the lower the
power output.
Before a device model is available for sale to the public, it must be tested and certified
to the FCC that it does not exceed the limit established by the government-adopted
requirement for safe exposure. The tests are performed in positions and locations
(e.g., at the ear and worn on the body) as required by the FCC for each model.
The highest SAR value reported to the FCC when tested for use at the ear is
1.24 W/kg, and when worn on the body, as described in this user guide, is
1.26 W/kg. (Body-worn measurements differ among phone models, depending
upon available enhancements and FCC requirements.)
While there may be differences between the SAR levels of various phones and at
various positions, they all meet the government requirement. The FCC has granted
an Equipment Authorization for this model phone with all reported SAR levels
evaluated as in compliance with the FCC RF exposure guidelines. SAR information
on this model device is on file with the FCC and can be found under the Display
Grant section of http://www.fcc.gov/oet/fccid after searching on FCC ID
QMNRM-60.
90
Additional safety information
For body-worn operations, this phone has been tested and meets the FCC RF
exposure guidelines for use with a carry case, belt clip or holder that contains no
metal and that positions the handset a minimum of 7/8 inch (2.2 cm) away from
the body. Use of other carry cases, belt clips or holders may not ensure compliance
with the FCC RF exposure guidelines. If you do not use a body-worn enhancement
and are not holding the phone at the ear, positions the handset a minimum of
7/8 inch (2.2 cm) away from your body when the phone is switched on.
*In the United States and Canada, the SAR limit for mobile phone used by the public
is 1.6 watts/kilogram (W/kg) averaged over one gram of tissue. The standard
incorporates a substantial margin of safety to give additional protection for the
public and to account for any variations in measurements. SAR values may vary
depending on national reporting requirements and the network band. For SAR
information in other regions, please look under product information at
www.nokiausa.com.
91
Additional safety information
■ Technical information
Type designation—RM-60
Dimensions—Width 42.3 mm; length 105.5 mm; depth 18 mm
Weight—98 g with BL-6C Li-Ion Battery
Volume—69 cu cm
Wireless networks—CDMA 800 MHz, CDMA 1900 MHz, and AMPS 800
Frequency range (Tx)—AMPS: 824.04-848.97 MHz, PCS: 1851.25-1908.75 MHz,
Cellular: 824.70-848.37 MHz
Frequency range (Rx)—AMPS: 869.04-893.97 MHz, PCS: 1931.25-1988.75 MHz,
Cellular: 869.70-893.37 MHz
GPS frequency—1575.42 MHz
■ Battery information
This section provides information about battery charging times with the Travel
Charger (ACP-12) and the Standard Travel Charger (ACP-7), talk-times, and
standby times. Be aware that the information in this section is subject to change.
For more information, contact your service provider.
Charging times
The following charging times are approximate with the BL-6C 1070 mAh
Li-Ion battery:
Travel Charger (ACP-12): Up to 1 hour 35 minutes
Standard Travel Charger (ACP-7): Up to 3 hours 45 minutes
Talk and standby times
Operation times are estimates only and depend on signal strength, phone use,
network conditions, features used, battery age and condition (including charging
habits), temperatures to which the battery is exposed, and many other factors.
Talk time: 3 to 3.5 hours (digital)
Standby time: 8 to 12 days
■ Patent information
Manufactured or sold under one or more of the following US patents:
5889770 5802465 5991627 5754976 6078570 6009328
6148209 5596571 5699482 5701392 5924026 5930233
6072787 6128322 4969192 5859843 6510148 5793744
92
6556824
6775548
Additional safety information
■
Nokia one-year limited warranty
Nokia Inc. (“Nokia”) warrants that this cellular phone (“Product”) is free from
defects in material and workmanship that result in Product failure during normal
usage, according to the following terms and conditions:
1. The limited warranty for the Product extends for ONE (1) year beginning on
the date of the purchase of the Product. This one year period is extended by
each whole day that the Product is out of your possession for repair under
this warranty.
2. The limited warranty extends only to the original purchaser (“Consumer”) of
the Product and is not assignable or transferable to any subsequent
purchaser/end-user.
3. The limited warranty extends only to Consumers who purchase the Product in
the United States of America.
4. During the limited warranty period, Nokia will repair, or replace, at Nokia’s
sole option, any defective parts, or any parts that will not properly operate for
their intended use with new or refurbished replacement items if such repair
or replacement is needed because of product malfunction or failure during
normal usage. No charge will be made to the Consumer for any such parts.
Nokia will also pay for the labor charges incurred by Nokia in repairing or
replacing the defective parts. The limited warranty does not cover defects in
appearance, cosmetic, decorative or structural items, including framing, and
any non-operative parts. Nokia’s limit of liability under the limited warranty
shall be the actual cash value of the Product at the time the Consumer
returns the Product for repair, determined by the price paid by the Consumer
for the Product less a reasonable amount for usage. Nokia shall not be liable
for any other losses or damages. These remedies are the Consumer’s exclusive
remedies for breach of warranty.
5. Upon request from Nokia, the Consumer must prove the date of the original
purchase of the Product by a dated bill of sale or dated itemized receipt.
6. The Consumer shall bear the cost of shipping the Product to Nokia in
Melbourne, Florida. Nokia shall bear the cost of shipping the Product back to
the Consumer after the completion of service under this limited warranty.
7. The Consumer shall have no coverage or benefits under this limited warranty
if any of the following conditions are applicable:
93
Additional safety information
a) The Product has been subjected to abnormal use, abnormal conditions,
improper storage, exposure to moisture or dampness, unauthorized
modifications, unauthorized connections, unauthorized repair, misuse,
neglect, abuse, accident, alteration, improper installation, or other acts
which are not the fault of Nokia, including damage caused by shipping.
b) The Product has been damaged from external causes such as collision with
an object, or from fire, flooding, sand, dirt, windstorm, lightning, earthquake
or damage from exposure to weather conditions, an Act of God, or battery
leakage, theft, blown fuse, or improper use of any electrical source, damage
caused by computer or internet viruses, bugs, worms, Trojan Horses,
cancelbots or damage caused by the connection to other products not
recommended for interconnection by Nokia.
c) Nokia was not advised in writing by the Consumer of the alleged defect or
malfunction of the Product within fourteen (14) days after the expiration
of the applicable limited warranty period.
d) The Product serial number plate or the enhancement data code has been
removed, defaced or altered.
e) The defect or damage was caused by the defective function of the cellular
system or by inadequate signal reception by the external antenna, or viruses
or other software problems introduced into the Product.
8. Nokia does not warrant uninterrupted or error-free operation of the Product.
If a problem develops during the limited warranty period, the Consumer shall
take the following step-by-step procedure:
a) The Consumer shall return the Product to the place of purchase for repair
or replacement processing.
b) If “a” is not convenient because of distance (more than 50 miles) or for
other good cause, the Consumer shall ship the Product prepaid and
insured to:
Nokia Inc., Attn: Repair Department
795 West Nasa Blvd.
Melbourne, FL 32901
c) The Consumer shall include a return address, daytime phone number and/
or fax number, complete description of the problem, proof of purchase
and service agreement (if applicable). Expenses related to removing the
Product from an installation are not covered under this limited warranty.
d) The Consumer will be billed for any parts or labor charges not covered by
this limited warranty. The Consumer will be responsible for any expenses
related to reinstallation of the Product.
94
Additional safety information
e) Nokia will repair the Product under the limited warranty within 30 days
after receipt of the Product. If Nokia cannot perform repairs covered under
this limited warranty within 30 days, or after a reasonable number of
attempts to repair the same defect, Nokia at its option, will provide a
replacement Product or refund the purchase price of the Product less a
reasonable amount for usage. In some states the Consumer may have the
right to a loaner if the repair of the Product takes more than ten (10) days.
Please contact the Customer Service Center at Nokia at the telephone
number listed at the end of this warranty if you need a loaner and the repair
of the Product has taken or is estimated to take more than ten (10) days.
f) If the Product is returned during the limited warranty period, but the
problem with the Product is not covered under the terms and conditions
of this limited warranty, the Consumer will be notified and given an
estimate of the charges the Consumer must pay to have the Product
repaired, with all shipping charges billed to the Consumer. If the estimate
is refused, the Product will be returned freight collect. If the Product is
returned after the expiration of the limited warranty period, Nokia’s normal
service policies shall apply and the Consumer will be responsible for all
shipping charges.
9. You (the Consumer) understand that the product may consist of refurbished
equipment that contains used components, some of which have been
reprocessed. The used components comply with Product performance and
reliability specifications.
10. ANY IMPLIED WARRANTY OF MERCHANTABILITY, OR FITNESS FOR A PARTICULAR
PURPOSE OR USE, SHALL BE LIMITED TO THE DURATION OF THE FOREGOING
LIMITED WRITTEN WARRANTY. OTHERWISE, THE FOREGOING LIMITED
WARRANTY IS THE CONSUMER’S SOLE AND EXCLUSIVE REMEDY AND IS IN
LIEU OF ALL OTHER WARRANTIES, EXPRESS OR IMPLIED. NOKIA SHALL NOT
BE LIABLE FOR SPECIAL, INCIDENTAL, PUNITIVE OR CONSEQUENTIAL DAMAGES,
INCLUDING BUT NOT LIMITED TO LOSS OF ANTICIPATED BENEFITS OR PROFITS,
LOSS OF SAVINGS OR REVENUE, LOSS OF DATA, PUNITIVE DAMAGES, LOSS OF
USE OF THE PRODUCT OR ANY ASSOCIATED EQUIPMENT, COST OF CAPITAL,
COST OF ANY SUBSTITUTE EQUIPMENT OR FACILITIES, DOWNTIME, THE CLAIMS
OF ANY THIRD PARTIES, INCLUDING CUSTOMERS, AND INJURY TO PROPERTY,
RESULTING FROM THE PURCHASE OR USE OF THE PRODUCT OR ARISING FROM
BREACH OF THE WARRANTY, BREACH OF CONTRACT, NEGLIGENCE, STRICT
TORT, OR ANY OTHER LEGAL OR EQUITABLE THEORY, EVEN IF NOKIA KNEW
OF THE LIKELIHOOD OF SUCH DAMAGES. NOKIA SHALL NOT BE LIABLE FOR
DELAY IN RENDERING SERVICE UNDER THE LIMITED WARRANTY, OR LOSS OF
USE DURING THE PERIOD THAT THE PRODUCT IS BEING REPAIRED.
95
Additional safety information
11. Some states do not allow limitation of how long an implied warranty lasts, so
the one year warranty limitation may not apply to you (the Consumer). Some
states do not allow the exclusion or limitation of incidental and consequential
damages, so certain of the above limitations or exclusions may not apply to you
(the Consumer). This limited warranty gives the Consumer specific legal rights
and the Consumer may also have other rights which vary from state to state.
12. Nokia neither assumes nor authorizes any authorized service center or any
other person or entity to assume for it any other obligation or liability beyond
that which is expressly provided for in this limited warranty including the
provider or seller of any extended warranty or service agreement.
13. This is the entire warranty between Nokia and the Consumer, and supersedes
all prior and contemporaneous agreements or understandings, oral or written,
relating to the Product, and no representation, promise or condition not
contained herein shall modify these terms.
14. This limited warranty allocates the risk of failure of the Product between the
Consumer and Nokia. The allocation is recognized by the Consumer and is
reflected in the purchase price.
15. Any action or lawsuit for breach of warranty must be commenced within
eighteen (18) months following purchase of the Product.
16. Questions concerning this limited warranty may be directed to:
Nokia Inc.
Attn: Customer Service
7725 Woodland Center Blvd., Ste. 150
Tampa, FL 33614
Telephone: 1-888-NOKIA-2U (1-888-665-4228)
Facsimile: (813) 249-9619
TTY/TDD Users Only: 1-800-24-NOKIA (1-800-246-6542)
17. The limited warranty period for Nokia supplied attachments and accessories
is specifically defined within their own warranty cards and packaging.
96
Additional safety information
■ Appendix A Message from the CTIA
(Cellular Telecommunications & Internet Association)
to all users of mobile phones
© 2001 Cellular Telecommunications & Internet Association. All Rights Reserved.
1250 Connecticut Avenue, NW Suite 800, Washington, DC 20036.
Phone: (202) 785-0081
Safety is the most important call you will ever make.
A Guide to Safe and Responsible Wireless Phone Use
Tens of millions of people in the U.S. today take advantage of the unique combination
of convenience, safety and value delivered by the wireless telephone. Quite simply,
the wireless phone gives people the powerful ability to communicate by voice—
almost anywhere, anytime—with the boss, with a client, with the kids, with
emergency personnel or even with the police. Each year, Americans make billions
of calls from their wireless phones, and the numbers are rapidly growing. But an
important responsibility accompanies those benefits, one that every wireless
phone user must uphold. When driving a car, driving is your first responsibility. A
wireless phone can be an invaluable tool, but good judgment must be exercised
at all times while driving a motor vehicle—whether on the device or not.The basic
lessons are ones we all learned as teenagers. Driving requires alertness, caution
and courtesy. It requires a heavy dose of basic common sense—keep your head
up, keep your eyes on the road, check your mirrors frequently and watch out for
other drivers. It requires obeying all traffic signs and signals and staying within
the speed limit. It means using seatbelts and requiring other passengers to do the
same. But with wireless phone use, driving safely means a little more. This brochure
is a call to wireless phone users everywhere to make safety their first priority
when behind the wheel of a car. Wireless telecommunications is keeping us in touch,
simplifying our lives, protecting us in emergencies and providing opportunities to
help others in need. When it comes to the use of wireless phones, safety is your
most important call.
Wireless Phone Safety Tips
Below are safety tips to follow while driving and using a wireless phone which
should be easy to remember.
1. Get to know your wireless phone and its features such as speed dial and
redial. Carefully read your instruction manual and learn to take advantage of
valuable features most phones offer, including automatic redial and memory.
Also, work to memorize the device keypad so you can use the speed dial
function without taking your attention off the road.
97
Additional safety information
2. When available, use a hands-free device. A number of hands-free wireless phone
accessories are readily available today. Whether you choose an installed
mounted device for your wireless phone or a speaker phone accessory, take
advantage of these devices if available to you.
3. Position your wireless phone within easy reach. Make sure you place your
wireless phone within easy reach and where you can grab it without removing
your eyes from the road. If you get an incoming call at an inconvenient time,
if possible, let your voice mail answer it for you.
4. Suspend conversations during hazardous driving conditions or situations. Let
the person you are speaking with know you are driving; if necessary, suspend
the call in heavy traffic or hazardous weather conditions. Rain, sleet, snow
and ice can be hazardous, but so is heavy traffic. As a driver, your first
responsibility is to pay attention to the road.
5. Do not take notes or look up phone numbers while driving. If you are reading
an address book or business card, or writing a "to do" list while driving a car,
you are not watching where you are going. It’s common sense. Don’t get
caught in a dangerous situation because you are reading or writing and not
paying attention to the road or nearby vehicles.
6. Dial sensibly and assess the traffic; if possible, place calls when you are not
moving or before pulling into traffic. Try to plan your calls before you begin
your trip or attempt to coincide your calls with times you may be stopped at a
stop sign, red light or otherwise stationary. But if you need to dial while
driving, follow this simple tip—dial only a few numbers, check the road and
your mirrors, then continue.
7. Do not engage in stressful or emotional conversations that may be distracting.
Stressful or emotional conversations and driving do not mix—they are distracting
and even dangerous when you are behind the wheel of a car. Make people you
are talking with aware you are driving and if necessary, suspend conversations
which have the potential to divert your attention from the road.
8. Use your wireless phone to call for help. Your wireless phone is one of the
greatest tools you can own to protect yourself and your family in dangerous
situations—with your phone at your side, help is only three numbers away.
Dial 9-1-1 or other local emergency number in the case of fire, traffic
accident, road hazard or medical emergency. Remember, it is a free call on
your wireless phone!
9. Use your wireless phone to help others in emergencies. Your wireless phone
provides you a perfect opportunity to be a "Good Samaritan" in your community.
If you see an auto accident, crime in progress or other serious emergency where
lives are in danger, call 9-1-1 or other local emergency number, as you would
want others to do for you.
98
Additional safety information
10. Call roadside assistance or a special wireless nonemergency assistance number
when necessary. Certain situations you encounter while driving may require
attention, but are not urgent enough to merit a call for emergency services.
But you still can use your wireless phone to lend a hand. If you see a brokendown vehicle posing no serious hazard, a broken traffic signal, a minor traffic
accident where no one appears injured or a vehicle you know to be stolen, call
roadside assistance or other special non-emergency wireless number.
Careless, distracted individuals and people driving irresponsibly represent a hazard
to everyone on the road. Since 1984, the Cellular Telecommunications Industry
Association and the wireless industry have conducted educational outreach to
inform wireless phone users of their responsibilities as safe drivers and good citizens.
As we approach a new century, more and more of us will take advantage of the
benefits of wireless telephones. And, as we take to the roads, we all have a
responsibility to drive safely.
The wireless industry reminds you to use your phone safely when driving.
For more information, please call 1-888-901-SAFE.
For updates:
http://www.wow-com.com/consumer/issues/driving/articles.cfm?ID=85
99
Additional safety information
■ Appendix B Message from the FDA
(U.S. Food and Drug Administration)
to all users of mobile phones.
©July 18, 2001 For updates: http://www.fda.gov/cdrh/phones
Consumer Update on Wireless Phones
U.S. Food and Drug Administration
1. Do wireless phones pose a health hazard?
The available scientific evidence does not show that any health problems are
associated with using wireless phones. There is no proof, however, that wireless
phones are absolutely safe. Wireless phones emit low levels of radiofrequency
energy (RF) in the microwave range while being used. They also emit very low
levels of RF when in the stand-by mode. Whereas high levels of RF can produce
health effects (by heating tissue), exposure to low level RF that does not produce
heating effects causes no known adverse health effects. Many studies of low
level RF exposures have not found any biological effects. Some studies have
suggested that some biological effects may occur, but such findings have not
been confirmed by additional research. In some cases, other researchers have
had difficulty in reproducing those studies, or in determining the reasons for
inconsistent results.
2. What is FDA's role concerning the safety of wireless phones?
Under the law, FDA does not review the safety of radiation-emitting consumer
products such as wireless phones before they can be sold, as it does with new
drugs or medical devices. However, the agency has authority to take action if
wireless phones are shown to emit radio frequency energy (RF) at a level that
is hazardous to the user. In such a case, FDA could require the manufacturers
of wireless phones to notify users of the health hazard and to repair, replace
or recall the phones so that the hazard no longer exists.
Although the existing scientific data do not justify FDA regulatory actions, FDA
has urged the wireless phone industry to take a number of steps, including
the following:
• Support needed research into possible biological effects of RF of the type
emitted by wireless phones;
• Design wireless phones in a way that minimizes any RF exposure to the
user that is not necessary for device function; and
• Cooperate in providing users of wireless phones with the best possible
information on possible effects of wireless phone use on human health.
100
Additional safety information
FDA belongs to an interagency working group of the federal agencies that have
responsibility for different aspects of RF safety to ensure coordinated efforts at
the federal level. The following agencies belong to this working group:
• National Institute for Occupational Safety and Health
• Environmental Protection Agency
• Federal Communications Commission
• Occupational Safety and Health Administration
• National Telecommunications and Information Administration
The National Institutes of Health participates in some interagency working
group activities, as well.
FDA shares regulatory responsibilities for wireless phones with the Federal
Communications Commission (FCC). All phones that are sold in the United
States must comply with FCC safety guidelines that limit RF exposure. FCC
relies on FDA and other health agencies for safety questions about wireless
phones. FCC also regulates the base stations that the wireless phone networks
rely upon. While these base stations operate at higher power than do the
wireless phones themselves, the RF exposures that people get from these
base stations are typically thousands of times lower than those they can get
from wireless phones. Base stations are thus not the subject of the safety
questions discussed in this document.
3. What kinds of phones are the subject of this update?
The term wireless phone refers here to hand-held wireless phones with built-in
antennas, often called cell mobile or PCS phones. These types of wireless phones
can expose the user to measurable radio frequency energy (RF) because of the
short distance between the device and the user’s head. These RF exposures
are limited by Federal Communications Commission safety guidelines that
were developed with the advice of FDA and other federal health and safety
agencies. When the device is located at greater distances from the user, the
exposure to RF is drastically lower because a person's RF exposure decreases
rapidly with increasing distance from the source. The so-called cordless
phones; which have a base unit connected to the telephone wiring in a house,
typically operate at far lower power levels, and thus produce RF exposures far
below the FCC safety limits.
4. What are the results of the research done already?
The research done thus far has produced conflicting results, and many studies
have suffered from flaws in their research methods. Animal experiments
investigating the effects of radio frequency energy (RF) exposures characteristic
of wireless phones have yielded conflicting results that often cannot be repeated
101
Additional safety information
in other laboratories. A few animal studies, however, have suggested that low
levels of RF could accelerate the development of cancer in laboratory animals.
However, many of the studies that showed increased tumor development used
animals that had been genetically engineered or treated with cancer-causing
chemicals so as to be pre-disposed to develop cancer in the absence of RF
exposure. Other studies exposed the animals to RF for up to 22 hours per day.
These conditions are not similar to the conditions under which people use
wireless phones, so we don’t know with certainty what the results of such
studies mean for human health.
Three large epidemiology studies have been published since December 2000.
Between them, the studies investigated any possible association between the
use of wireless phones and primary brain cancer, glioma, meningioma, or acoustic
neuroma, tumors of the brain or salivary gland, leukemia, or other cancers.
None of the studies demonstrated the existence of any harmful health effects
from wireless phone RF exposures. However, none of the studies can answer
questions about long-term exposures, since the average period of phone use
in these studies was around three years.
5. What research is needed to decide whether RF exposure from wireless
phones poses a health risk?
A combination of laboratory studies and epidemiological studies of people
actually using wireless phones would provide some of the data that are needed.
Lifetime animal exposure studies could be completed in a few years. However,
very large numbers of animals would be needed to provide reliable proof of a
cancer promoting effect if one exists. Epidemiological studies can provide
data that is directly applicable to human populations, but 10 or more years
follow-up may be needed to provide answers about some health effects, such
as cancer. This is because the interval between the time of exposure to a
cancer-causing agent and the time tumors develop - if they do - may be
many, many years. The interpretation of epidemiological studies is hampered
by difficulties in measuring actual RF exposure during day-to-day use of
wireless phones. Many factors affect this measurement, such as the angle at
which the device is held, or which model of phone is used.
6. What is FDA doing to find out more about the possible health effects of
wireless phone RF?
FDA is working with the U.S. National Toxicology Program and with groups of
investigators around the world to ensure that high priority animal studies are
conducted to address important questions about the effects of exposure to
radiofrequency energy (RF).
102
Additional safety information
FDA has been a leading participant in the World Health Organization International
Electromagnetic Fields (EMF) Project since its inception in 1996. An influential
result of this work has been the development of a detailed agenda of research
needs that has driven the establishment of new research programs around
the world. The Project has also helped develop a series of public information
documents on EMF issues.
FDA and the Cellular Telecommunications & Internet Association (CTIA) have
a formal Cooperative Research and Development Agreement (CRADA) to do
research on wireless phone safety. FDA provides the scientific oversight, obtaining
input from experts in government, industry, and academic organizations.
CTIA-funded research is conducted through contracts to independent
investigators. The initial research will include both laboratory studies and
studies of wireless phone users. The CRADA will also include a broad assessment
of additional research needs in the context of the latest research developments
around the world.
7. How can I find out how much radiofrequency energy exposure I can get
by using my wireless phone?
All phones sold in the United States must comply with Federal Communications
Commission (FCC) guidelines that limit radiofrequency energy (RF) exposures.
FCC established these guidelines in consultation with FDA and the other federal
health and safety agencies. The FCC limit for RF exposure from wireless
telephones is set at a Specific Absorption Rate (SAR) of 1.6 watts per kilogram
(1.6 W/kg). The FCC limit is consistent with the safety standards developed by
the Institute of Electrical and Electronic Engineering (IEEE) and the National
Council on Radiation Protection and Measurement. The exposure limit takes
into consideration the body’s ability to remove heat from the tissues that
absorb energy from the wireless phone and is set well below levels known to
have effects.
Manufacturers of wireless phones must report the RF exposure level for each
model of phone to the FCC. The FCC website (http://www.fcc.gov/oet/rfsafety)
gives directions for locating the FCC identification number on your phone so
you can find your phone’s RF exposure level in the online listing.
8. What has FDA done to measure the radiofrequency energy coming from
wireless phones?
The Institute of Electrical and Electronic Engineers (IEEE) is developing a
technical standard for measuring the radiofrequency energy (RF) exposure from
wireless phones and other wireless handsets with the participation and
leadership of FDA scientists and engineers. The standard, Recommended Practice
for Determining the Spatial-Peak Specific Absorption Rate (SAR) in the Human
103
Additional safety information
Body Due to Wireless Communications Devices: Experimental Techniques, sets
forth the first consistent test methodology for measuring the rate at which RF is
deposited in the heads of wireless phone users. The test method uses a tissuesimulating model of the human head. Standardized SAR test methodology is
expected to greatly improve the consistency of measurements made at different
laboratories on the same phone. SAR is the measurement of the amount of
energy absorbed in tissue, either by the whole body or a small part of the body.
It is measured in watts/kg (or milliwatts/g) of matter. This measurement is
used to determine whether a wireless phone complies with safety guidelines.
9. What steps can I take to reduce my exposure to radiofrequency energy
from my wireless phone?
If there is a risk from these products—and at this point we do not know that
there is—it is probably very small. But if you are concerned about avoiding
even potential risks, you can take a few simple steps to minimize your exposure
to radiofrequency energy (RF). Since time is a key factor in how much exposure
a person receives, reducing the amount of time spent using a wireless phone
will reduce RF exposure.
If you must conduct extended conversations by wireless phone every day, you
could place more distance between your body and the source of the RF, since
the exposure level drops off dramatically with distance. For example, you
could use a headset and carry the wireless phone away from your body or use
a wireless phone connected to a remote antenna.
Again, the scientific data do not demonstrate that wireless phones are harmful.
But if you are concerned about the RF exposure from these products, you can
use measures like those described above to reduce your RF exposure from
wireless phone use.
10. What about children using wireless phones?
The scientific evidence does not show a danger to users of wireless phones,
including children and teenagers. If you want to take steps to lower exposure
to radiofrequency energy (RF), the measures described above would apply to
children and teenagers using wireless phones. Reducing the time of wireless
phone use and increasing the distance between the user and the RF source will
reduce RF exposure.Some groups sponsored by other national governments
have advised that children be discouraged from using wireless phones at all. For
example, the government in the United Kingdom distributed leaflets containing
such a recommendation in December 2000. They noted that no evidence exists
that using a wireless phone causes brain tumors or other ill effects. Their
recommendation to limit wireless phone use by children was strictly precautionary;
it was not based on scientific evidence that any health hazard exists.
104
Additional safety information
11. What about wireless phone interference with medical equipment?
Radiofrequency energy (RF) from wireless phones can interact with some
electronic devices. For this reason, FDA helped develop a detailed test
method to measure electromagnetic interference (EMI) of implanted cardiac
pacemakers and defibrillators from wireless telephones. This test method is
now part of a standard sponsored by the Association for the Advancement of
Medical instrumentation (AAMI). The final draft, a joint effort by FDA, medical
device manufacturers, and many other groups, was completed in late 2000.
This standard will allow manufacturers to ensure that cardiac pacemakers
and defibrillators are safe from wireless phone EMI. FDA has tested hearing
aids for interference from handheld wireless phones and helped develop a
voluntary standard sponsored by the Institute of Electrical and Electronic
Engineers (IEEE). This standard specifies test methods and performance
requirements for hearing aids and wireless phones so that no interference
occurs when a person uses a compatible phone and a accompanied hearing
aid at the same time. This standard was approved by the IEEE in 2000.FDA
continues to monitor the use of wireless phones for possible interactions with
other medical devices. Should harmful interference be found to occur, FDA will
conduct testing to assess the interference and work to resolve the problem.
12. Where can I find additional information?
For additional information, please refer to the following resources:
• FDA Web page on wireless phones
http://www.fda.gov/cdrh/phones/index.html
• Federal Communications Commission (FCC) RF Safety Program
http://www.fcc.gov/oet/rfsafety
• International Commission on Non-Ionizing Radiation Protection
http://www.icnirp.de
• World Health Organization (WHO) International EMF Project
http://www.who.int/emf
• National Radiological Protection Board (UK)
http://www.nrpb.org.uk/
July 18, 2001 For updates: http://www.fda.gov/cdrh/phones
105
Index
Index
NUMERICS
1-touch dialing 40
A
alarm clock 69
antenna 13
automate voicemail 32
automatic redial 55
B
back cover
removing 14
replacing 14
backlight timeout 53
banner 59
batteries and chargers 84
battery
authentication 84
charging 15
charging times 92
removing 14
replacing 14
talk and standby times 92
battery information 92
business cards 44
C
calculator 74
calendar 70
call duration 36
call forwarding 65
call log 35
call restrictions 63
call settings 55
call waiting 66
caller groups 40
calling card 56
calls
answering 16
in-call options 17
making 18
106
care and maintenance 86
certification information (SAR) 90
change time 75
changing battery 13, 16
charger
connecting 15
information 84
times 92
clear the cache 78
collections 79
color schemes 53
contacts list 38
add 38
delete 43
edit 42
send 44
view 43
countdown timer 75
currency converter 74
customer care 8
D
data or fax calls 57
date setting 54
deleting call logs 36
dialing codes 39
dimensions 92
display language 58
display settings 53
distribution list 23
E
emergency calls 89
while using wireless Internet 78
enhancement settings 61
handsfree 61
headset 61
loopset 61
music stand 62
TTY/TDD 61
enhancements 83
Index
F
FCC information 90
feature codes 65
folders 48
G
gallery 48, 49
games 79
go-to function 12
H
handsfree 61
headset 15, 61
help 7
help text 59
I
indicators and icons 10
infrared connectivity 67
in-phone help 12
international prefix 57
K
Keyguard 19
L
languages 58
location info sharing 55
lock code 63
loopset 61
loudspeaker 17
M
memory 59
menu view 53
message folders 33
messages 22
delete 33
minibrowser messages 32
text messages 22
voice messages 31
minibrowser 77
minibrowser messages 32
mobile Internet
sign off 78
multimedia messages 26
music stand 62
N
network services 5
O
organize ’Go to’ functions 12
organizer 69
P
patent information 92
PC connectivity 80
phone lock 62
change lock code 63
phone settings 58
picture messages 26
predictive text 21
profiles 37
Q
quick keys 10
R
radio 49
restore factory settings 67
S
safety 4
important safety information 87
scrolling 11
security settings 62
send own caller ID 66
set
time 54
settings 52
shared memory 6
speed dial 56
standard mode 20
start screen 9
start-up tone 59
stopwatch 75
107
Index
T
taking photo 45
talk and standby times 92
technical information 92
templates 24
text entry 20
predictive text 21
standard 20
text messages 22
time and date settings 54
timed profiles 52
to-do list 72
tone settings 54, 64
touch tones 58
TTY/TDD 61
turn phone off 15
turn phone on 15
type designation 92
U
USB data transfer 80
V
view
call duration 36
call times 36
data/fax call duration 37
dialed numbers 36
minibrowser duration 37
missed calls 35
own phone number 67
received calls 35
saved messages 33
108
voice dialing 41, 59
voice messages 31
voice privacy 64
voice recorder 51
voicemail 31
volume
adjusting 17
using the loudspeaker 17
W
wallpaper 53
warranty 7, 93
wireless Internet 77
make an emergency call 78
receive a call while online 78
sign on 77
wireless networks 92
Manual del Usuario Nokia 6235,
Nokia 6235i, Nokia 6236
y Nokia 6236i
Importante: Para prevenir cualquier malfuncionamiento y evitar daños, lea
detalladamente este manual de instrucciones antes de conectar y operar este
aparato. Conserve el manual para referencias futuras.
109
INFORMACIÓN LEGAL
DECLARACIÓN DE CONFORMIDAD
Nosotros, NOKIA CORPORATION declaramos bajo nuestra completa responsabilidad que los
productos Nokia 6235, Nokia 6235i, Nokia 6236, y Nokia 6236i están en conformidad a las
provisiones en el siguiente Consejo Directivo: 1999/5/EC. Puede encontrar una copia de la
Declaración de Conformidad en http://www.nokiausa.com/phones/declaration_of_conformity/.
NO. PARTE 9235986, EDICIÓN NO. 1
Copyright ©2005 Nokia. Todos los derechos reservados.
Nokia, Nokia Connecting People, Nokia 6235, Nokia 6235i, Nokia 6236, Nokia 6236i, Pop-Port™,
y los logos Nokia Original Enhancements son marcas, registradas o no, de Nokia Corporation.
Otros nombres de productos y compañías aquí mencionados podrían ser marcas o nombres,
registrados o no, de sus respectivos propietarios.
Nº de Patente EE.UU. 5818437 y otras patentes pendientes. Software Ingreso Intuitivo
de Texto T9
Copyright ©1999-2005. Tegic Communications, Inc. Todos los derechos reservados.
Se incluye el software de protocolo de seguridad o criptográfico RSA BSAFE de
RSA Security.
Java™ es marca registrada de Sun Microsystems, Inc.
La información contenida en este manual del usuario fue escrita para los productos
Nokia 6235, Nokia 6235i, Nokia 6236, y Nokia 6236i. Nokia opera bajo un sistema de
desarrollo continuo. Nokia se reserva el derecho de hacer cambios y mejoras en cualquier
producto descrito en este manual sin previo aviso.
BAJO NINGÚN CONCEPTO NOKIA SERÁ RESPONSABLE POR CUALQUIER PÉRDIDA DE DATOS
O GANANCIAS O POR CUALQUIER OTRO DAÑO ESPECIAL O INCIDENTAL, POR CUALQUIER
CAUSA DIRECTA O INDIRECTA. EL CONTENIDO DE ESTE DOCUMENTO ESTÁ PROVISTO "TAL
CUAL". ADEMÁS DE LAS EXIGIDAS POR LAS LEYES, NO SE EMITE NINGUNA OTRA GARANTÍA
DE NINGÚN TIPO, SEA EXPRESA O IMPLÍCITA, INCLUYENDO, PERO SIN LIMITARSE A, GARANTÍAS
IMPLÍCITAS DE MERCADEO Y DE CAPACIDAD PARA UN PROPÓSITO PARTICULAR, EN CUANTO
A LA PRECISIÓN Y FIABILIDAD O CONTENIDO DE ESTE DOCUMENTO. NOKIA SE RESERVA EL
DERECHO DE REVISAR ESTE DOCUMENTO O DESCONTINUAR SU USO EN CUALQUIER
MOMENTO SIN PREVIO AVISO.
CONTROL DE EXPORTACIÓN
Este dispositivo podría contener bienes, tecnología o software sujeto a leyes y regulaciones
de exportación de los Estados Unidos y otros países. Se prohíbe su desvío contraviniendo
las leyes.
AVISO FCC/INDUSTRIA CANADIENSE
Su dispositivo podría causar interferencias radioeléctricas y televisivas (por ejemplo., cuando
usted usa su teléfono muy próximo a equipos receptores electrónicos). La FCC o Industria
Canadiense puede exigirle que deje de usar su teléfono si tales interferencias no se pueden
eliminar. Si necesita ayuda, póngase en contacto con su centro de servicio local. Este dispositivo
cumple con la sección 15 de los reglamentos de la FCC. El funcionamiento de este dispositivo
está sujeto a la condición de que no cause interferencia perjudicial.
110
Contenido
Contenido
Para su seguridad ............................................................................................ 112
1. Su dispositivo ............................................................................................ 117
2. Preparar su teléfono................................................................................ 122
3. Ingreso de texto ....................................................................................... 129
4. Mensajes..................................................................................................... 132
5. Registro....................................................................................................... 146
6. Contactos (directorio)............................................................................. 150
7. Cámara........................................................................................................ 158
8. Galería......................................................................................................... 161
9. Multimedia................................................................................................. 163
10. Configuraciones........................................................................................ 166
11. Organizador ............................................................................................... 186
12. Web móvil .................................................................................................. 195
13. Extras........................................................................................................... 198
14. Conectividad PC ....................................................................................... 199
15. Accesorios .................................................................................................. 202
16. Información de referencia ..................................................................... 203
Cuidado y mantenimiento............................................................................. 206
Información adicional de seguridad........................................................... 207
Garantía Nokia Limitada de un (1) año..................................................... 213
Anexo A................................................................................................................ 218
Anexo B................................................................................................................ 221
Índice.................................................................................................................... 228
111
Para su seguridad
Para su seguridad
Lea esta información antes de utilizar su teléfono celular. No seguir estas
normas podría ser peligroso o ilegal. Lea el manual completo del usuario para
mayor información.
ENCIENDA EL TELÉFONO CON SEGURIDAD
No encienda el dispositivo cuando el uso de teléfonos celulares esté
prohibido o cuando pueda causar interferencia o peligro.
LA SEGURIDAD DEL TRÁFICO ANTE TODO
Obedezca todas las leyes locales. No ocupe las manos en otras tareas
mientras conduce. Su primera consideración cuando conduce debe
ser la seguridad en la carretera.
INTERFERENCIAS
No encienda el dispositivo cuando el uso de teléfonos celulares esté
prohibido o cuando pueda causar interferencia o peligro.
APAGUE EL TELÉFONO EN LOS HOSPITALES
Siga cualquier restricción. Apague el dispositivo cuando esté cerca de
equipos médicos.
APAGUE EL TELÉFONO EN LAS AERONAVES
Siga cualquier restricción. Los dispositivos celulares pueden causar
interferencias en las aeronaves.
APAGUE EL TELÉFONO CUANDO CARGUE COMBUSTIBLE
No use el dispositivo en estaciones de servicio. Tampoco cerca de
combustibles o elementos químicos.
APAGUE EL TELÉFONO CERCA DE DONDE SE REALIZAN EXPLOSIONES
Siga cualquier restricción. No utilice el dispositivo donde se estén
realizando explosiones.
ÚSELO SENSATAMENTE
Use el teléfono sólo en la posición normal como se explica en la
documentación del producto. No toque la antena a no ser que
sea necesario.
SERVICIO ESPECIALIZADO
Sólo personal de servicio especializado puede instalar o reparar
este producto.
ACCESORIOS Y BATERÍAS
Utilice sólo baterías y accesorios homologados. No conecte
productos incompatibles.
112
Para su seguridad
NO MOJE EL TELÉFONO
Su teléfono no es resistente al agua. Manténgalo seco.
COPIAS DE SEGURIDAD
Acuérdese de hacer copias de seguridad o de tener un registro escrito
de toda la información importante almacenada en su dispositivo.
CONEXIÓN A OTROS DISPOSITIVOS
Al hacer una conexión a otro dispositivo, lea primero el manual del
usuario para instrucciones detalladas de seguridad. No conecte
productos incompatibles.
LLAMADAS DE EMERGENCIA
Asegúrese de que el dispositivo está encendido y en servicio. Oprima
la tecla Finalizar las veces necesarias para borrar la pantalla y regresar
a la pantalla inicial. Marque el número de emergencia, luego oprima
la tecla Llamar. Indique su ubicación. No corte la llamada hasta que
reciba instrucción de hacerlo.
■ Su dispositivo
El dispositivo celular descrito en este manual está aprobado para ser usado en las
redes CDMA 800, 1900 y AMPS. Contacte a su proveedor de servicio para más
información sobre las redes.
Cuando use las opciones de este dispositivo, obedezca todas las leyes y respete la
privacidad y derechos legítimos de los demás.
Aviso: Para poder usar cualquiera de las funciones de este dispositivo,
con la excepción del reloj de alarma, el teléfono deberá estar encendido.
No encienda el dispositivo cuando el uso de teléfonos celulares esté
prohibido o cuando pueda causar interferencia o peligro.
■ Servicios de Red
Para usar el dispositivo deberá estar suscrito con un proveedor de servicio celular.
Muchas de las opciones de este dispositivo dependen de las opciones de la red
inalámbrica para su funcionamiento. Estos servicios de red podrían no estar
disponibles en todas las redes, o usted tendría que hacer arreglos específicos con
su proveedor de servicio antes de que pueda utilizarlos. Su proveedor de servicio
podría darle instrucciones adicionales acerca de su uso y explicarle los cargos que
aplican. Algunas redes pueden tener limitaciones que afectan la manera cómo se
usan los servicios de red. Por ejemplo, ciertas redes pueden no respaldar todos los
servicios y caracteres de idiomas.
113
Para su seguridad
Su proveedor de servicio puede haber pedido que ciertas opciones en su teléfono
sean inhabilitadas o no activadas. De ser así, éstas no aparecerán en el menú.
Para más información, contacte a su proveedor de servicio.
■ Memoria compartida
Las siguientes opciones de este dispositivo podrían compartir la memoria: contactos;
mensajes de texto; imágenes y tonos en la Galería; notas de agenda; juegos; y
aplicaciones. El uso de una o más de estas funciones podría reducir la memoria
disponible para cualquier función que comparta la memoria. Si su teléfono le
notifica que la memoria está llena al usar una función de memoria compartida,
borre algunos de los datos o ingresos guardados en las funciones para la memoria
compartida antes de continuar. Algunas de las funciones, como las fotos, imágenes,
y tonos en la Galería; mensajes de texto; y aplicaciones podrían tener una cantidad
de memoria especialmente asignada a éstas, además de la memoria compartida
con las otras funciones.
114
Bienvenido
Bienvenido
Enhorabuena por la compra de su teléfono móvil Nokia 6235, Nokia 6235i,
Nokia 6236, o Nokia 6236i. Su dispositivo brinda una cantidad de útiles
funciones para el uso cotidiano, tales como un altavoz manos libres, reloj
despertador, calculadora, agenda, cámara, radio FM y más. Su dispositivo
también puede conectarse a una PC, laptop, u otro dispositivo usando un cable
para datos o infrarrojos. Puede programar su timbrado musical favorito para
personalizar su dispositivo.
■ Registre su dispositivo
Asegúrese de registrar su dispositivo al momento de su compra, para poder
servirle mejor si necesita llamar al centro de servicio o reparar su teléfono.
■ Obtener ayuda
Si necesita ayuda, el Centro Nokia de Servicio al Cliente está para servirle. Antes
de llamar, le recomendamos que anote el Número de Serie Electrónico (ESN) y su
código postal (sólo en los EE.UU.) y que los tenga a mano.
Localizar la etiqueta
de su dispositivo
El ESN está en la etiqueta (1) que se
halla debajo de la batería en la parte
posterior del dispositivo. Ver "Retirar
la cubierta posterior," pág. 123.
115
Bienvenido
Contacto con Nokia
Favor de tener su teléfono consigo al llamar a cualquiera de estos números:
Centro Nokia de Servicio al Cliente, EE.UU.
Nokia Mobile Phones.
6000 Connection Drive
Irving, Texas 75039
Tel: (972) 894-5000
Fax: (972) 894-5050
Para usuarios TTY/TDD: 1-800-24-NOKIA (1-800-246-6542)
Centro de Servicio al Cliente, México
Nokia México, S.A. de C.V.
Paseo de los Tamarindos 400-A Piso 16
Col. Bosques de las Lomas
C.P. 05120
México D.F., México
Tel: (55) 261-7200
Fax: (55)261-7299
Centro de Servicio al Cliente, Argentina
Azopardo 1071
C1107ADQ Buenos Aires
Argentina
Tel: (11) 4307-1427
Fax: (11) 4362-8795
Actualizaciones
Nokia actualiza este manual para reflejar cambios. La edición más reciente
de este manual y uno interactivo están disponibles en la página Web
www.nokia.com/latinoamerica.
Soluciones de acceso
Nokia ha asumido el reto a hacer teléfonos celulares más manejables y
amigables, incluso para los usuarios con dificultades. Para más información,
visite la página Web www.nokiaaccessibility.com.
116
Su dispositivo
1. Su dispositivo
• Tecla Encender/Apagar (1)
• Auricular (2)
• Conector del auricular (3)
• Tecla joystick de cinco sentidos (4)
• Tecla de selección derecha (5)
• Tecla Finalizar (6)
• Conector Pop-Port™ (7)
• Micrófono (8)
• Puerto del cargador (9)
• Teclado (10)
• Tecla Llamar (11)
• Tecla de selección izquierda (12)
• Pantalla (13)
• Tecla de volumen (14)
• Puerto IR (15)
■ La pantalla inicial
Dependiendo de su proveedor de
servicio celular y el número de modelo de su dispositivo, algunas o todas las
teclas de selección podrían aparecer en la pantalla inicial.
La pantalla inicial es el punto de inicio e indica que su dispositivo está en la
modalidad inactiva.
Nivel de la batería (1)—Mientras más alta la
barra más carga en la batería.
Menú (2)—Oprima la tecla joystick para elegir
esta opción.
Nombres o ítem del operador de red (3)—
Oprima la tecla de selección derecha para
elegir esta opción.
Ir a (4)—Oprima la tecla de selección izquierda para elegir esta opción.
Fuerza de la señal (5)—Mientras más alta la barra, más fuerte será la cobertura de
la señal de la red.
117
Su dispositivo
■ Teclas rápidas
Dependiendo de su proveedor de servicio celular y el número de modelo de su
dispositivo, algunos o todos los atajos para la tecla joystick podrían estar
disponibles desde la pantalla inicial.
Hacia arriba—Activa la cámara en la modalidad inactiva.
Hacia la derecha—Ver la agenda.
Hacia abajo—Ir a la lista de contactos.
Hacia la izquierda—Crear un mensaje de texto.
Oprimir la tecla joystick—Elegir los menús y submenús destacados.
■ Indicadores e íconos
Dependiendo de su proveedor de servicio celular y el número de modelo de su
dispositivo, algunos o todos los siguientes indicadores e íconos podrían aparecer
en la pantalla inicial.
Tiene mensajes nuevos de texto o gráficos. Ver "Mensajes de texto,"
pág. 132.
Tiene nuevos mensajes multimedia. Ver "Mensajes multimedia,"
pág. 137.
Tiene un mensaje de gráficos en su buzón de entrada. Ver "Recibir y
guardar un mensaje de gráficos," pág. 136.
Tiene nuevos mensajes de voz. Ver "Mensajes de voz," pág. 142.
El teclado del dispositivo está bloqueado. Ver "Bloqueo de teclas,"
pág. 128.
El perfil Silencio está programado en su dispositivo. Ver "Perfiles,"
pág. 166.
El reloj despertador está configurado a activar. Ver "Alarmas,"
pág. 186.
El temporizador está funcionando. Ver "Temporizador," pág. 192.
El cronómetro está funcionando en segundo plano. Ver "Cronómetro,"
pág. 193.
El altavoz manos libres integrado está activo. Ver "Usar el altavoz
manos libres," pág. 126.
El perfil de tiempo programado ha sido elegido. Ver "Perfiles,"
pág. 166.
118
Su dispositivo
,
o
Un accesorio está conectado al dispositivo.
Ver "Accesorios," pág. 202.
La encripción para Voz confidencial está activa en la red.
o
Compartir información de ubicación está configurado a Emergencia
o Activar. Ver "Compartir información de ubicación," pág. 169.
Está dentro de una red digital. Ver "Servicios de Red," pág. 113.
Está dentro de una red análoga. Ver "Servicios de Red," pág. 113.
Está dentro de una red 1XRTT. Ver "Servicios de Red," pág. 113.
Está viajando (roaming) fuera de su red original. Ver "Opciones de
roaming," pág. 181.
■ Aproveche al máximo este manual
Las secciones siguientes describen los varios componentes de su teléfono. Lea bien
estas secciones para saber las instrucciones correspondientes.
Este manual emplea ciertos términos para efectuar los pasos en las instrucciones.
• Oprimir significa presionar brevemente una tecla y soltarla. Por ejemplo,
oprima 7 significa oprimir la tecla marcada con el número 7 y las
letras "pqrs."
• Mantener oprimida significa presionar una tecla de 2 a 3 segundos y soltarla.
• Las teclas de selección y la tecla joystick se usan para elegir una opción del
menú. Para elegir una opción, oprima la tecla de selección debajo del menú
en la pantalla.
• La tecla joystick se usa para moverse en los menús hacia arriba, abajo,
izquierda o derecha.
• Teclas Llamar y Finalizar: Oprima la tecla Llamar para hacer o contestar una
llamada. Oprima la tecla Finalizar para terminar la llamada; o manténgala
oprimida para regresar a la pantalla inicial.
■ Los menús del dispositivo
Las opciones de su teléfono están agrupadas de acuerdo a su función y puede acceder
a ellas vía los menús principales. Cada menú principal tiene submenús y listas desde
las cuales puede elegir o ver ítems, y personalizar su dispositivo. Puede acceder a
estos menús y submenús usando el método de recorrer o usando atajos.
119
Su dispositivo
Puede cambiar la vista del menú de lista a cuadrícula. Ver "Configuraciones de
pantalla," pág. 167.
Nota: Algunas funciones podrían no estar disponibles, dependiendo de
su red. Para más información, contacte a su proveedor de servicio.
Recorrer
Puede usar la tecla joystick para recorrer en las opciones hacia arriba, abajo,
izquierda y derecha. Oprima la tecla joystick para elegir una opción.
1. En la pantalla inicial, elija Menú, y recorra los menús
principales usando la tecla joystick.
Mientras recorre los menús, el número del menú aparece
en la esquina superior derecha de la pantalla. En el lado
derecho de la pantalla hay una barra con segmento que
sube o baja según recorre los menús. Este segmento provee una
representación visual de su ubicación actual en la estructura del menú.
2. Cuando llegue a un menú, oprima la tecla joystick, Seleccionar, para entrar
los submenús. Elija Atrás (la tecla de selección derecha) para regresar al menú
anterior. Oprima la tecla Finalizar para regresar a la pantalla inicial desde
cualquier menú o submenú.
■ Función Ir a
El menú Ir a le permite cambiar el menú al que puede acceder con la tecla de
selección izquierda de su dispositivo. Con esta función, podrá acceder rápidamente
a las funciones que usa con más frecuencia desde el menú Ir a en la pantalla inicial.
Elegir las funciones Ir a
1. Puede acceder a Ir a oprimiendo la tecla de selección izquierda; o, en la
pantalla inicial, elija Ir a > Opciones > Seleccionar opciones.
2. Use la tecla joystick para destacar la función deseada.
3. Elija Marcar para agregar una función. Elija Deshacer para remover la función.
4. Elija Listo cuando haya terminado de agregar funciones.
5. Elija Sí para guardar los cambios.
6. En la pantalla inicial, elija Ir a para ver la lista de las funciones que eligió en
el paso 3.
120
Su dispositivo
Organizar las funciones
1. En la pantalla inicial, elija Ir a > Opciones > Organizar.
2. Use la tecla joystick para recorrer hacia arriba o abajo y destaque la función
que desea reorganizar, y elija Mover > Subir, Bajar, Mover al principio, o
Mover al final.
3. Elija Listo > Sí para guardar los cambios.
Textos de ayuda
Muchas de las funciones tienen descripciones breves (textos de ayuda) que
aparecen en la pantalla.
Para activar los textos de ayuda, en la pantalla inicial, elija Menú > Configuraciones >
Configuraciones de teléfono > Activación textos de ayuda > Activar o Desactivar.
Para ver estas descripciones, recorra hasta la función y espere unos 14 segundos.
Use la tecla joystick para ver todas las descripciones u oprima Atrás para salir.
121
Preparar su teléfono
2. Preparar su teléfono
■ Antena
En los teléfono Nokia 6235, Nokia 6235i, Nokia 6236,
y Nokia 6236i, la antena es interna y está ubicada en
la parte superior del dispositivo. Una antena GPS es
activada cuando hace una llamada de emergencia o
cuando elige Activar en el menú Compartir información
de ubicación. Ver "Compartir información de
ubicación," pág. 169.
Sujete el dispositivo como lo haría con cualquier otro
teléfono, sobre el hombro y con la antena hacia arriba.
Nota: Igual como sucede con cualquier
dispositivo radiotransmisor, no deberá tocarse
sin necesidad la antena cuando el dispositivo
esté encendido. El contacto con la antena
afecta la calidad de la llamada y puede hacer
que el dispositivo funcione con una potencia
más alta de la necesaria. El no tocar el área
de la antena durante una llamada telefónica
brinda un rendimiento óptimo de la antena
y vida de la batería.
■ Cambiar la batería
Nota: Antes de retirar la cubierta, siempre apague el teléfono y desconecte
el cargador y cualquier otro dispositivo. No toque los componentes
electrónicos mientras cambia las cubiertas. Siempre guarde y use el
dispositivo con las cubiertas instaladas.
122
Preparar su teléfono
Retirar la cubierta posterior
Con la parte posterior del teléfono
hacia usted, deslice la cubierta
posterior hacia la parte inferior del
dispositivo y quite la cubierta.
Retirar la batería
Tras quitar la cubierta posterior,
ponga su dedo en la ranura de agarre
y levante la batería de su
compartimiento.
Ranura para la tarjeta
UIM (CDMA SIM)
Su dispositivo tiene una ranura para una tarjeta UIM, que se encuentra debajo de
la batería. La tarjeta UIM es una opción específica del proveedor y no funciona
con este modelo. No ponga ningún objeto en esta ranura.
Colocar la batería
1. Inserte el extremo con los
contactos dorados de la
batería, en el compartimiento
para ésta.
2. Empuje el otro extremo de la
batería hasta que quede en
su lugar.
Reinstalar la cubierta
posterior
1. Ponga la cubierta posterior en el
dispositivo de modo que las
pestañas estén alineadas con las
ranuras en el dispositivo.
2. Deslice la cubierta posterior
hacia la parte superior del
dispositivo hasta que la misma caiga en su sitio.
123
Preparar su teléfono
Importante: No remueva la cubierta frontal de este dispositivo. El tratar
de quitar esta cubierta podría dañar el dispositivo. Si su dispositivo
requiere servicio técnico, contacte el Centro de Atención al Cliente.
Ver "Contacto con Nokia," pág. 116.
Cargar la batería
1. Enchufe el cargador a un tomacorriente AC estándar.
2. Conecte el cable del cargador al
conector redondeado en la base del
dispositivo.
Al transcurrir unos segundos, la
barra indicadora de la fuerza de la
batería aparece y empieza a oscilar.
Si la batería está totalmente
descargada, podrían pasar unos minutos hasta que aparezca en la pantalla el
indicador de carga o hasta que pueda hacer llamadas.
■ Apagar o encender
su dispositivo
Para encender/apagar el dispositivo, mantenga
oprimida la tecla de encendido en la parte superior
del teléfono durante 3 segundos.
■ Conectar el auricular
Puede conectar un auricular compatible, como el
HS-5, a su dispositivo. Ver "Accesorios," pág. 202.
1. Enchufe el conector del auricular al
conector Pop-Port™ en la base de su
dispositivo. El ícono
aparece en la
pantalla inicial.
2. Coloque el auricular en el oído.
Con el auricular conectado, podrá
hacer, contestar y finalizar llamadas
como de costumbre.
• Use el teclado para ingresar números.
124
Preparar su teléfono
• Oprima la tecla Llamar
pág. 117.
para hacer una llamada. Ver "Su dispositivo,"
• Oprima la tecla Finalizar
para finalizar una llamada.
También puede conectar un auricular compatible, como el auricular universal HS-9,
en el puerto de conexión de 2.5 mm en su dispositivo para la funcionalidad manos
libres. Ver "Accesorios," pág. 202.
■ Cambiar la cubierta frontal
Nota: Antes de retirar la cubierta, siempre apague el teléfono y desconecte
el cargador y cualquier otro dispositivo. No toque los componentes
electrónicos mientras cambia las cubiertas. Siempre guarde y use el
teléfono con las cubiertas instaladas.
Retirar la cubierta posterior y la batería
Para instrucciones sobre cómo retirar la cubierta posterior y batería ver "Retirar
la cubierta posterior," pág. 123.
Retirar la cubierta frontal
Suavemente hale el botón de la cubierta frontal del resto del dispositivo y retírela.
Instalar el teclado y la cubierta frontal
1. Retire el teclado de hule de la cubierta frontal que desea cambiar.
2. Coloque el teclado de hule en la nueva cubierta frontal.
3. Oprima la cubierta frontal y el teclado de hule hacia el teléfono hasta que se
coloquen en su sitio.
Aviso: Siempre cambie la cubierta frontal antes de cambiar la batería y la
cubierta posterior. El cambiar la cubierta posterior primero podría dañar
su teléfono.
Reinstalar la batería y la cubierta posterior
Para instrucciones sobre cómo reinstalar la cubierta posterior y batería, ver
"Colocar la batería," pág. 123, y "Reinstalar la cubierta posterior," pág. 123.
125
Preparar su teléfono
■ Contestar llamadas
Contestar o ignorar una llamada entrante
• Oprima la tecla Llamar, o elija Contestar para contestar la llamada.
• Oprima la tecla Finalizar para rechazar la llamada.
• Elija Silenciar para no escuchar el timbre luego elija Anular, o no haga nada y
la llamada será desviada al correo de voz.
Si su dispositivo está configurado a Silencio en el menú Configuraciones >
Perfiles, elija Anular, y la llamada es rechazada y enviada al correo de voz.
Ajustar el volumen
Ya sea durante una llamada o no, puede recorrer por las opciones de volumen con
la tecla localizada en la parte izquierda de su dispositivo; recorra hacia arriba o
abajo para ajustar el volumen del auricular. Al ajustar el volumen, aparece un
gráfico de barras que indica el nivel del volumen.
Contestar una llamada con el teclado bloqueado
Para contestar una llamada con el teclado bloqueado, oprima la tecla Llamar u
oprima Contestar. Durante la llamada, todas las opciones funcionan como de
costumbre. Al finalizar o rechazar la llamada, el teclado se bloquea automáticamente.
Ver "Bloqueo de teclas," pág. 128.
Cuando el bloqueo está activado, aún sería posible hacer llamadas al número
oficial de emergencia programado en su dispositivo. Marque el número de
emergencia y oprima la tecla Llamar.
Usar el altavoz manos libres
Aviso: Cuando use el altavoz, no acerque el dispositivo al oído, ya que el
volumen podría estar demasiado alto.
Puede usar su dispositivo como un altavoz manos libres:
• Para activar el altavoz durante una llamada, elija Altavoz.
• Para desactivar el altavoz durante una llamada, oprima Normal.
El altavoz se desactiva automáticamente al finalizar una llamada (o intento de
llamada) o cuando el teléfono está conectado a ciertos accesorios.
126
Preparar su teléfono
Opciones durante una llamada
La mayoría de las opciones que puede usar durante una llamada son servicios de
red. Consulte con su proveedor de servicio celular para más información.
1. Elija Opciones durante una llamada para mostrar las siguientes opciones:
Altavoz/Normal—Activar o desactivar el altavoz mientras está en una llamada.
Llamada nueva—Iniciar una llamada de conferencia. Ver "Llamadas de
conferencia," pág. 128.
Guardar—Agregar un número a su directorio mientras está en una
llamada activa. Esta opción sólo está disponible al ingresar números
durante una llamada.
Agregar a contacto—Agregar un contacto en el directorio mientras está en
una llamada activa. Esta opción sólo está disponible al ingresar números
durante una llamada.
Finalizar llamadas—Desconectarse de todas las llamadas activas.
Enviar DTMF—Ingresar los números, y elegir DTMF para enviar los números
como tonos.
Contactos—Ver el directorio.
Menú—Ver el menú del teléfono.
2. Recorra a una opción, y Seleccionar para activar la opción o ingrese su submenú.
■ Hacer una llamada
Para hacer una llamada, en la pantalla inicial, ingrese el número al que quiere
llamar y oprima la tecla Llamar.
Usar el directorio (contactos/nombres)
Para comenzar a ingresar nombres en el directorio:
1. Ingrese el número con el código de área en la pantalla inicial.
2. Elija Guardar para almacenar el número en su lista de contactos.
3. Ingrese un nombre y elija OK.
Para usar el directorio, desde la pantalla inicial, elija Nombres y vaya al contacto
que quiera usar.
Usar el teclado
1. Ingrese el número telefónico (con el código de área), y oprima la tecla Llamar.
Para borrar un carácter a la izquierda del cursor, elija Borrar.
2. Oprima la tecla Finalizar para terminar la llamada o para dejar de llamar.
127
Preparar su teléfono
Llamar al último número marcado
1. En la pantalla inicial, oprima la tecla Llamar para mostrar los 30 últimos
números marcados.
2. Recorra hasta el número (o nombre) que quiera volver a marcar y oprima la
tecla Llamar.
Llamadas de conferencia
Llamadas de conferencia es un servicio de red que le permite tomar parte en una
llamada de conferencia con otros dos participantes.
1. Llame al primer participante.
2. Con el primer participante en la línea, elija Opciones > Llamada nueva.
3. Ingrese el número telefónico del segundo participante, o elija Buscar para
obtener un número del directorio.
4. Elija OK y la llamada del primer participante es retenida y el recuadro de
búsqueda aparece.
5. Cuando el segundo participante conteste, oprima la tecla Llamar para
conectar las llamadas.
6. Para finalizar la llamada de conferencia, elija Opciones > Finalizar llamadas, u
oprima la tecla Finalizar.
■ Bloqueo de teclas
El Bloqueo de teclas le permite bloquear el teclado para evitar tecleos no
deseados. Si el teclado está bloqueado, éste se desbloqueará cuando conteste
una llamada. Tras la llamada, el bloqueo de teclas se reactiva automáticamente.
Cuando el bloqueo de teclas esté activado, sería posible hacer llamadas al
número de emergencia programado en su dispositivo. Marque el número de
emergencia y oprima la tecla Llamar.
Bloquear el teclado
Oprima la tecla joystick; luego oprima * dentro de dos segundos.
Desbloquear el teclado
Oprima el joystick o elija Desbloquear; luego presione * dentro de dos segundos.
128
Ingreso de texto
3. Ingreso de texto
Puede usar dos métodos para ingresar texto y números: la modalidad estándar y
la modalidad de texto predecible.
• Oprima Borrar para retroceder el cursor y borrar un carácter.
• Mantenga oprimida Borrar para retroceder y borrar todos los caracteres.
■ Método estándar
El método estándar es la única forma de ingresar texto en el directorio y para
renombrar grupos de llamantes.
Texto (Abc)
• Oprima una tecla una vez para insertar su primera letra; dos veces para
ingresar la segunda letra, etc. Si se detiene brevemente, la última letra en la
pantalla es aceptada y su teléfono espera el ingreso siguiente.
• Oprima la tecla 0 para ingresar un espacio, y así aceptar la palabra.
• Oprima la tecla 1 para insertar un punto en su mensaje.
• Mantenga oprimida la tecla * para mostrar una lista completa de los
caracteres especiales.
• Mantenga oprimida la tecla # para acceder a la Configuración de editor
(Modo numérico, Diccionario activado/Diccionario desactivado, Idioma
de escritura).
Números (123)
Para cambiar de la modalidad 123 a la modalidad Abc, mantenga oprimida la
tecla # en cualquier recuadro para el ingreso de mensajes para acceder a la
Configuración de editor y lista de menús Modo numérico, Diccionario activado/
Diccionario desactivado, e Idioma de escritura. Elija Modo numérico, y el dispositivo
regresa a la pantalla para el ingreso de mensajes y el ícono ABC, en la esquina
superior izquierda, cambia a 123 (o viceversa).
129
Ingreso de texto
Ingresar signos de puntuación y caracteres especiales
Cuando esté en un recuadro para el ingreso de texto, oprima la tecla * para
mostrar los caracteres especiales (mantenga oprimida la tecla * si el ingreso
predecible de texto está activado). Oprima la tecla * otra vez para navegar los
caracteres especiales. Puede navegar por la lista de caracteres especiales usando
la tecla joystick. Cuando el carácter deseado esté destacado, oprima Usar para
ingresar el carácter en su mensaje.
■ Ingreso predecible de texto
El ingreso predecible de texto le permite agilizar la redacción usando su teclado y el
diccionario integrado. El ingreso predecible es mucho más rápido que la modalidad
estándar porque sólo oprime la tecla correspondiente a la letra una sola vez.
Activar o desactivar
1. En cualquier recuadro para el ingreso de texto, elija Opciones > Diccionario
activado/Diccionario desactivado.
2. Si está activando el texto predecible, elija el idioma de su preferencia.
Ingreso de texto
La ilustración a continuación muestra su pantalla cada vez que una tecla es
oprimida. Por ejemplo, para escribir Nokia con el texto predecible activado y con
el diccionario español elegido, oprima cada una de las siguientes teclas una vez:
la tecla 6
la tecla 6
la tecla 5
la tecla 4
la tecla 2
• Oprima la tecla 0 para ingresar un espacio y comenzar a escribir la
siguiente palabra.
• Si la palabra es incorrecta, oprima la tecla * para ver otros equivalentes.
Para regresar a la palabra previa en la lista de equivalentes, elija Anterior.
• Si el carácter ? aparece después de la palabra, oprima Deletreo para
agregarla en el diccionario.
• Oprima la tecla 1 para insertar un punto en su mensaje.
• Mantenga oprimida la tecla * para mostrar los caracteres especiales.
Oprima la tecla * otra vez para recorrer los caracteres disponibles.
130
Ingreso de texto
■ Cambiar entre mayúsculas y minúsculas
y la modalidad
Oprima la tecla # para intercambiar entre las mayúsculas y minúsculas y la
modalidad oración, y entre la modalidad de ingreso de texto estándar e ingreso
de texto predicible. Las mayúsculas y minúsculas y la modalidad son indicadas
por los siguientes Ìconos que aparecen en la parte superior izquierda de la pantalla:
Mayúsculas: la modalidad estándar está activada.
Minúsculas: la modalidad estándar está activada.
Modalidad oración: la modalidad estándar está activada. Esta opción
sólo está disponible al principio de una oración.
Mayúsculas: la modalidad predecible está activada.
Minúsculas: la modalidad predecible está activada.
Modalidad oración: la modalidad predecible está activada. Esta opción
sólo está disponible al principio de una oración.
131
Mensajes
4. Mensajes
Si se ha suscrito a un servicio de red para mensajes, podrá enviar y
recibir mensajes a teléfonos compatibles que también estén suscritos al servicio
de mensajes. Si es respaldado por su proveedor de servicio, también podrá enviar
y recibir mensajes multimedia, y email. Ver "Ingreso de texto," pág. 130.
Al redactar mensajes de texto, mensajes de gráficos o mensajes multimedia, la
cantidad de caracteres permitidos aparece en la esquina superior derecha del
mensaje. El uso de caracteres especiales (Unicode) ocupa más espacio. Si hay
caracteres especiales en su mensaje, el indicador podría no mostrar la longitud
del mensaje correctamente. Antes de enviar el mensaje, el dispositivo indica si el
mensaje excede la cantidad de caracteres máxima permitida para un mensaje.
Importante: Sea precavido al abrir los mensajes. Los mensajes podrían
contener software malicioso o dañar su dispositivo o PC.
Nota: Al enviar mensajes, su dispositivo podría mostrar las palabras
Mensaje enviado. Esto indica que el mensaje ha sido enviado por su
dispositivo al número del centro de mensajería programado en su
dispositivo. No significa que el mensaje ha sido recibido por el
destinatario. Para más detalles sobre los servicios de mensajería,
consulte con su proveedor de servicio.
■ Mensajes de texto
Redactar y enviar
1. En la pantalla inicial, elija Menú > Mensajes > Mensajes de texto > Crear
mensaje. Para acceder rápidamente al recuadro Crear mensaje, recorra hacia
la izquierda en la pantalla inicial.
2. Redacte y envíe el mensaje usando el teclado. Algunas o todas las siguientes
Opciones están disponibles mientras redacta su mensaje:
Vista previa—Vea el mensaje antes de enviar un mensaje de gráficos.
Opciones de envío—Marcar o Deshacer las opciones de envío para un mensaje
como Urgente, Aviso de envío, Número de devolución de llamada, o Firma.
Ver "Cambiar las opciones de envío," pág. 135.
Borrar texto—Borre todo el texto de la pantalla para la redacción de mensajes.
Insertar imagen—Inserte en su mensaje una imagen de la carpeta Plantillas.
132
Mensajes
Cambiar imagen—Cambie la imagen en un mensaje de gráficos.
Eliminar imagen—Borre la imagen en un mensaje de gráficos.
Insertar contacto—Ingrese un nombre del directorio e insértelo en su mensaje.
Insertar número—Ingrese o busque un número telefónico en el directorio.
Guardar mensaje—Elija Borradores para guardar el mensaje en la carpeta
Borradores; elija Plantillas para guardar el mensaje como una de sus
plantillas predefinidas en la carpeta Plantillas.
Salir del editor—Salga del editor de mensajes.
Usar plantilla—Inserte una plantilla predefinida en su mensaje.
Ver "Plantillas," pág. 134.
Insertar emoticón—Inserte una carita en su mensaje.
Insertar palabra—Ingrese una palabra e insértela en su mensaje. Esta opción
sólo está disponible si el texto predecible está activado.
Insertar símbolo—Inserte un carácter especial en su mensaje. Esta opción sólo
está disponible si el texto predecible está activado.
Idioma de escritura—Elija el idioma que desea usar.
Diccionario activado o desactivado—Active o desactive el texto predecible.
Coincidencias—Vea los equivalentes en el diccionario para la palabra que
desea usar.
3. Para enviar el mensaje, elija Enviar > Enviar a número, Enviar a e-mail, Copias
múltiples, o Enviar a lista de distribución (si una lista de distribución ha sido
creada). Ingrese el número del destinatario, o elija Buscar para obtener un
número de Contactos, y elija OK.
4. Para reenviar, editar o ver los destinatarios para el mensaje, elija Reenviar >
Enviar, Editar mensaje o Ver destinatarios.
Listas de distribución
La lista de distribución le permite enviar mensajes a un grupo de contactos. En la
pantalla inicial, elija Menú > Mensajes > Listas de distribución.
Para crear una lista de distribución, elija Nueva lista si no ha creado ninguna lista
u Opciones > Crear nueva lista > de un nombre a la lista > OK para crear listas
adicionales. Para agregar contactos a la lista, elija Nuevo y elija el contacto de
su directorio.
Para usar, renombrar, o modificar una lista de distribución, destaque la lista de
distribución y elija Opciones > Crear nueva lista, Enviar mensaje de texto, Enviar
multimedia, Renombrar lista, Borrar lista, o Eliminar lista.
133
Mensajes
Plantillas
Las plantillas son mensajes cortos preelaborados que puede obtener e insertar en
los mensajes nuevos de texto.
1. En la pantalla inicial, elija Menú > Mensajes > Mensajes de texto > Crear
mensaje > Opciones > Usar plantilla.
2. Elija una de las plantillas disponibles.
3. Elija Enviar > Enviar a número, Enviar a e-mail, Copias múltiples, o Enviar a
lista de distribución (si una lista de distribución ha sido creada) > Seleccionar.
Una lista de distribución sólo contiene los números telefónicos de los
destinatarios y es elegida de una lista predefinida de grupos que haya creado.
4. Ingrese el número telefónico del destinatario o elija Buscar y elija el número
de su directorio. Elija Enviar.
Leer mensajes
Al recibir un mensaje, aparece una notificación
al efecto.
1. Elija Mostrar par leer el mensaje o Salir para ignorar la notificación y leer el
mensaje en otro momento.
2. Recorra hacia arriba o abajo para ver todo el mensaje, si es necesario.
Opciones
Al leer una mensaje de texto, algunas o todas las siguientes opciones
están disponibles:
Eliminar—Borre el mensaje.
Usar número—Use o guarde el número. Elija Opciones > Agregar a contacto,
Enviar mensaje, o Llamar.
Usar enlace web—Muestre un URL, si ha sido incluido en el mensaje.
Guardar dirección—Vea una lista de las direcciones de email incluidas en el mensaje.
Elija Guardar para guardar las direcciones de email como nuevos ingresos del
directorio o elija Opciones > Agregar a contacto o Enviar e-mail. La opción Guardar
dirección sólo aparece si el mensaje contiene una dirección de email.
Guardar imagen—Guarde un gráfico en la carpeta Plantillas, si recibe un gráfico
en el mensaje. Deberá ser respaldado por su proveedor de servicio.
Guardar—Guarde el mensaje en las carpetas Elementos enviados, Archivo,
Plantillas, o una carpeta que haya creado.
Desviar—Envía el mensaje a otro número telefónico o dirección de email.
Renombrar—Edite el título del mensaje.
134
Mensajes
Contestar un mensaje
1. Elija Responder > Pantalla vacía, Texto original, Plantilla, o una de las
respuestas predefinidas, luego redacte su respuesta usando el teclado.
2. Redacte su respuesta, y elija Enviar. El número telefónico o email del
remitente es usado por configuración original.
Cambiar las opciones de envío
1. Para cambiar las opciones de envío para todos los mensajes futuros, en la
pantalla inicial, elija Menú > Mensajes > Mensajes de texto > Configuraciones
de mensajes > Opciones de envío.
2. Elija la configuración que quiera cambiar:
Prioridad—Elija la prioridad de la nota como Normal o Urgente.
Informes de entrega—Se le envía una nota confirmando la entrega del
mensaje. Elija Activar o Desactivar.
Enviar número de devolución—Se le envía al destinatario un número para
devolver la llamada. Elija Desactivar o su número predeterminado.
Firma—Elija Activar para crear una firma para enviar con los mensajes de
texto, o elija Desactivar para no usar esta opción.
Cambiar las configuraciones de mensajes
1. En la pantalla inicial, elija Menú > Mensajes > Mensajes de texto >
Configuraciones de mensajes > Otras configuraciones.
2. Elija la configuración que quiera cambiar:
Tamaño de letra del mensaje—Elija Letra pequeña o Letra grande.
Sobrescribir mensaje—Elija Sólo Elementos enviados, Sólo Buzón de entrada,
Elementos enviados y Buzón de entrada, o Desactivar. Cuando la memoria
para mensajes esté llena, su dispositivo no podrá enviar o recibir mensajes.
Sin embargo, podrá configurar su teléfono para que automáticamente
reemplace los mensajes viejos en el Buzón de entrada y Buzón de salida
cuando reciba mensajes nuevos.
Guardar mensajes enviados—Elija Guardar siempre, Siempre indicar, o Desactivar.
Mensajes en cola si digital no disponible—Elija Activar, Con confirmación, o
Desactivar. Los mensajes son guardados en el Buzón de salida hasta que
puedan ser enviados con el servicio digital.
135
Mensajes
■ Mensajes de gráficos
Su dispositivo viene con cinco gráficos precargados. Podrá guardar más gráficos.
De ser necesario, podrá sobrescribir cualquiera de los gráficos precargados. Podrá
adjuntar gráficos a un mensaje y enviarlos como mensajes de texto a teléfonos
compatibles. Los mensajes de gráficos funcionan como los mensajes de texto,
salvo que ocupan más espacio que los de texto. No podrá enviar un mensaje de
gráficos usando email.
Los gráficos son guardados en la carpeta Imágenes en la Galería. Ver "Galería,"
pág. 161.
Recibir y guardar un mensaje de gráficos
Nota: Sólo los dispositivos compatibles con la función de mensajes de
gráficos pueden recibir y mostrar dichos tipos de mensajes.
Al recibir un mensaje de gráficos, su dispositivo emite un bip, muestra 1 mensaje
recibido o el número de mensajes multimedias recibidos, y muestra el ícono
de mensaje
en la esquina superior izquierda de la pantalla inicial como
recordatorio. Cuando tiene mensajes de gráficos sin abrir en su buzón de
entrada aparece
.
Elija Mostrar para ver el mensaje de gráficos. Si tiene más de un mensaje de
gráficos, recorra y elija el mensaje que desea ver. Use la tecla joystick para ver
todo el gráfico si es necesario.
Puede guardar un gráfico recibido en su carpeta Plantillas, elija Opciones > Guardar
imagen. Ingrese un título y elija OK. Si su carpeta Plantillas está llena de gráficos,
puede recorrer al gráfico que desea reemplazar y elija Seleccionar.
Redactar y enviar un mensaje de gráficos
Cuando ingresa un gráfico estándar en un mensaje, cambia la cantidad de
caracteres que podrá ser añadida. El número de caracteres aparece en la esquina
superior derecha de la pantalla.
1. Desde la pantalla inicial, elija Menú > Mensajes > Mensajes multimedia >
Crear mensaje.
2. Redacte el mensaje, y elija Opciones > Insertar > Imagen.
3. Abra la carpeta que contenga el gráfico que desea agregar y elija
Opciones > Insertar.
Para ver otro gráfico, elija Atrás u Opciones > Insertar, recorra a otro gráfico,
y elija Opciones > Insertar.
136
Mensajes
4. Elija Buscar para obtener el número telefónico del directorio, Enviar para
ingresar el número telefónico, u Opciones > Enviar a e-mail, Copias
múltiples, o Enviar a lista de distribución (si una lista de distribución ha
sido creada) > Seleccionar.
Para ver o cambiar el gráfico, elija Opciones > Vista previa o Eliminar imagen.
■ Mensajes multimedia
Un mensaje multimedia puede contener texto, sonido, una imagen y un videoclip.
Su dispositivo respalda mensajes multimedia de hasta 300 KB. Si se excede el
tamaño máximo, es posible que su dispositivo no pueda recibir el mensaje.
Dependiendo de su red, podría recibir un mensaje que incluye una dirección de
Internet a la cual puede ir para ver el mensaje multimedia. Las imágenes también
son reducidas para que puedan mostrarse en la pantalla del dispositivo. Su
dispositivo tiene un visor de mensajes multimedia para reproducir mensajes y un
buzón de entrada multimedia donde los mensajes entrantes se quedan hasta que
el usuario los elimine o los guarde. Cuando haya guardado el mensaje multimedia,
puede usar la imagen como protector de pantalla o el sonido como un timbrado
musical, en caso de que no esté protegido por copyright.
La apariencia de un mensaje multimedia podría variar dependiendo del
dispositivo receptor.
Importante: Sea precavido al abrir los mensajes. Los mensajes podrían
contener software malicioso o dañar su dispositivo o PC.
Las protecciones de derecho de autor podrían prevenir la duplicación, cambio,
transferencia o desvío de ciertas imágenes, tonos de timbre y otros contenidos.
Esta función sólo puede ser usada si es respaldada por su proveedor de servicio
u operador de red. Para disponibilidad y suscripción al servicio de mensajes
multimedia, contacte a su proveedor de servicio u operador de red.
Nota: Sólo los dispositivos compatibles con funciones de mensajes
multimedia pueden recibir y mostrar mensajes multimedia. Los objetos
de mensajes multimedia podrían contener virus o perjudicar su dispositivo
o PC. No abra ningún anexo sin asegurarse de la fiabilidad del remitente.
La mensajería multimedia respalda los siguientes formatos:
• Imagen: JPEG, GIF, GIF animado, WBMP, BMP, y PNG
• Sonido: SP-MIDI, AMR audio, QCELP, EVRC, y timbrados musicales monofónicos
• Video: en H.264 (Perfil 0, nivel 10) formato con MPEG-4 (SVPO), 3GPP,
3GPP2, con AMR audio
137
Mensajes
Si un mensaje recibido contiene elementos no respaldados, estos elementos
podrían ser reemplazados con el texto Formato de objeto no compatible.
Podrá recibir un aviso de mensaje multimedia pero no podrá recibir mensajes
multimedia si tiene una llamada activa, juegos u otras aplicaciones funcionando,
o una sesión activa de navegación. Dado a que la entrega de mensajes multimedia
puede fallar por una variedad de razones, no dependa solamente en estos para las
comunicaciones importantes.
Configuraciones mensajes multimedia
Antes de que pueda usar la función de mensajes multimedia, deberá especificar si
desea recibir mensajes en todo momento o sólo si está dentro del sistema original
de su proveedor de servicio. La configuración predeterminada del servicio de mensaje
multimedia por lo general es activada. Esta función es un servicio de red.
Consulte con su proveedor para más información.
La configuración predeterminada para el servicio de mensajes multimedia por lo
general es activada. En el dispositivo receptor, la configuración predeterminada
para recibir mensajes multimedia por lo general es activada.
Cuando los mensajes están disponibles, se le avisa 1 Mensaje multimedia disponible
o el número de mensajes multimedia disponibles aparece. Elija Rechazar para
activar/desactivar el aviso de mensajes multimedia.
Permitir o bloquear la recepción multimedia
Puede optar por recibir todos los mensajes, bloquear todos los mensajes, o
recibir solamente los mensajes cuando está dentro de la red original de su
proveedor de servicio.
Desde la pantalla inicial, elija Menú > Mensajes > Mensajes multimedia >
Configuraciones de mensajes > Permitir recepción de multimedia y una de las
siguientes opciones:
Sí—Permite todos los mensajes entrantes. Cuando llegan mensajes nuevos, aparece
Mensaje multimedia recibido o el número de mensajes multimedia recibidos.
Sistema doméstico—Permite los mensajes entrantes sólo si está dentro el sistema
original de su proveedor de servicio. Esta función es un servicio de red. Consulte
con su proveedor para más información.
No—Bloquea todos los mensajes entrantes.
Permitir o bloquear publicidad
Esta configuración no estará disponible si la recepción multimedia está bloqueada.
Desde la pantalla inicial, elija Menú > Mensajes > Mensajes multimedia >
Configuraciones de mensajes > Permitir publicidad > Sí o No.
138
Mensajes
Otras configuraciones de mensajes multimedia
Entre otras configuraciones multimedia se incluyen el almacenamiento de sus
mensajes en la carpeta Mensajes enviados. Desde la pantalla inicial, elija Menú >
Mensajes > Mensajes multimedia > Configuraciones de mensajes y una de
las siguientes:
Guardar mensajes enviados—Elija Sí para guardar los mensajes multimedia
enviados en la carpeta Elementos enviados o No para descartar los mensajes
después de enviarlos.
Informes de entrega—Elija Sí para ser informado si el mensaje fue entregado o No
para no ser informado.
Programación diapositiva predeterminada—Configure el tiempo predeterminado
en el formato mm:ss para que cada página en un MMS permanezca en la pantalla.
Carpetas
Su dispositivo tiene las siguientes carpetas bajo Mensajes > Mensajes multimedia.
Buzón de entrada—Contiene los mensajes multimedia recibidos.
Buzón de salida—Contiene los mensajes multimedia que están en espera de
ser transmitidos.
Elementos enviados—Contiene los mensajes multimedia enviados.
Elementos guardados—Contiene los mensajes multimedia que podrá enviar en
otro momento.
Redactar y enviar mensajes multimedia
1. Desde la pantalla inicial, elija Menú > Mensajes > Mensajes multimedia >
Crear mensaje.
2. Redacte el texto del mensaje, y elija Opciones > Insertar > Imagen, Clip de
sonido > Nuevo clip sonido, o Videoclip. Aparece la lista de carpetas
disponibles en la Galería.
3. Abra la carpeta deseada, vaya a la imagen, clip de sonido o video, y oprima
Opciones > Insertar.
Las protecciones de derecho de autor podrían prevenir la duplicación, cambio,
transferencia o desvío de ciertas imágenes, tonos de timbre y otros contenidos.
4. Para agregar una nueva página o diapositiva al mensaje, elija Opciones >
Insertar > Diapositiva. Sólo aplica si no hay un videoclip en el mensaje.
Cada diapositiva puede tener texto, una imagen y un clip de sonido. Si el
mensaje tiene varias diapositivas, puede abrir la que quiera, oprimiendo
Diapositiva anterior, Diapositiva siguiente, o Lista de diapositiva.
139
Mensajes
5. Para programar el intervalo entre las diapositivas, oprima Opciones >
Programar diapositivas. Ingrese el intervalo en el formato mm:ss, y elija OK.
6. Para mover el texto de arriba hacia abajo en el mensaje, elija Opciones >
Texto arriba o Texto abajo (configuración original).
7. Para insertar un nombre del directorio, elija Opciones > Más opciones >
Insertar contacto, recorra al nombre deseado, y elija Seleccionar.
8. Para insertar un número, elija Opciones > Más opciones > Insertar número.
Ingrese el número o búsquelo en el directorio, y elija OK.
9. Para insertar una nota de agenda, elija Opciones > Insertar > Nota de calendario.
10. Para insertar una tarjeta de negocios, elija Opciones > Insertar > Tarjeta
de negocios.
11. Para borrar una imagen, diapositiva, clip de sonido o videoclip en el mensaje,
elija Opciones > Eliminar > Imagen, Clip de sonido, Videoclip, o Diapositiva.
12. Para añadir un tema al mensaje, elija Opciones > Más opciones > Editar
asunto, ingrese el tema, y elija OK.
13. Para ver el mensaje o diapositiva antes de enviarla, elija Opciones > Vista previa.
14. Para guardar el mensaje en la carpeta Elementos guardados, elija Opciones >
Guardar mensaje.
15. Para enviar el mensaje, elija Enviar o elija Opciones > Enviar a e-mail, Enviar a
álbum, o Copias múltiples. Enviar a álbum es un servicio de red en línea.
Consulte con su proveedor para más información.
16. Ingrese el número o dirección de email del destinatario, o búsquelo en el
directorio, y elija OK. El mensaje es trasladado a la carpeta Buzón de salida
para su envío.
El envío de un mensaje multimedia tarda más que un mensaje de texto. Cuando el
mensaje multimedia se está enviando, el indicador animado
aparece en la
pantalla y puede usar otras funciones del dispositivo. En caso de alguna interrupción
durante la transmisión del mensaje, el dispositivo tratará de reenviarlo varias
veces. Si esto fracasa, el mensaje permanecerá en la carpeta Buzón de salida, y
podrá tratar de enviarlo manualmente más tarde. Verifique su carpeta Buzón de
salida para saber si tiene mensajes no enviados.
Nota: Al enviar mensajes, su dispositivo podría mostrar Mensaje multimedia
enviado. Esto indica que el mensaje ha sido enviado por su dispositivo al
número del centro de mensajería programado en su dispositivo. No significa
que el mensaje ha sido recibido por el destinatario. Para más detalles
sobre los servicios de mensajería, consulte con su proveedor de servicio.
140
Mensajes
Los mensajes multimedia enviados quedan guardados en la carpeta Elementos
enviados si la función Guardar mensajes enviados está configurada a Sí. Ver "Otras
configuraciones de mensajes multimedia," pág. 139. No significa que el mensaje
ha sido recibido por el destinatario.
Leer mensajes multimedia
Cuando se está recibiendo un mensaje multimedia, un
rotativo aparece en
la pantalla junto con el porcentaje del progreso de envío. Cuando el mensaje haya
sido completamente descargado, un
estacionario aparece y se ve 1 mensaje
multimedia disponible o el número de mensajes multimedia disponibles.
• Para ver los mensajes inmediatamente, elija Mostrar; para guardar el mensaje
en el buzón de entrada y verlo en otro momento, elija Salir; para descartar el
mensaje, elija Descartar.
• Para ver un mensaje guardado, elija Menú > Mensajes > Mensajes multimedia >
Buzón de entrada y recorra para ver el mensaje.
Mientras ve el mensaje, elija Reproducir para ver todos los mensajes multimedia,
o elija Opciones y una de las siguientes:
Ver texto—Vea sólo el texto incluido en el mensaje.
Abrir imagen, Abrir clip de sonido, Abrir nota de agenda , o Abrir videoclip—Vea o
escuche el archivo correspondiente.
Eliminar mensaje—Borre el mensaje que está viendo.
Desviar a número, Desviar a e-mail, Desviar a álbum (si es respaldado por el operador)
o Desviar a varios—Reenvía el mensaje a un número telefónico, dirección de
email, o múltiples destinatarios. No se pueden reenviar mensajes con derechos
del autor (copyright).
Detalles mensaje—Muestra el nombre y número telefónico del remitente, el
centro de mensajes usado y la hora y fecha de recepción.
Mientras ve el mensaje, elija Reproducir para ver todos los mensajes multimedia,
o elija Opciones > Guardar imagen, Guardar clip de sonido, o Guardar videoclip
para guardar el archivo en la Galería. Deberá abrir las imágenes, clips de sonido y
videoclips antes de guardarlos.
Si
destella y aparece Memoria multimedia llena, ver mensaje en espera, la
memoria para los mensajes multimedia está llena. Para ver el mensaje en espera,
oprima Mostrar. Antes de que pueda guardar mensajes nuevos, borre algunos de
los mensajes ya leídos. Ver "Borrar mensajes," pág. 144.
Contestar un mensaje multimedia
Elija Responder o Responder a todos para redactar su respuesta y enviarla al
remitente original y otros destinatarios.
141
Mensajes
■ Mensajes de voz
Si se suscribe al Buzón de voz, su proveedor de servicio celular le facilitará un
número para el buzón de voz. Tendrá que guardar este número en su dispositivo
para poder usar el correo de voz. Cuando recibe un mensaje de voz, su dispositivo
le avisa sonando un bip y/o mostrando un mensaje. Si recibe más de un mensaje,
su dispositivo muestra la cantidad de mensajes recibidos.
Guardar su número de correo de voz
Su proveedor de servicio podría haber guardado su número de correo de voz en su
dispositivo. Oprima OK para dejar el número tal cual.
1. En la pantalla inicial, elija Menú > Mensajes > Mensajes de voz > Número del
buzón de voz . Aparece el recuadro Número del buzón de voz.
2. Si el recuadro está vacío, ingrese el código de área y número del buzón de voz
y oprima OK.
Llamar y configurar su correo de voz
1. Cuando haya guardado el número del buzón de voz, mantenga oprimida la
tecla 1.
2. Cuando se conecte al buzón de voz y el saludo pregrabado comience, siga las
instrucciones automatizadas para configurar su buzón de voz.
Escuchar los mensajes de voz
Cuando haya configurado el correo de voz, mantenga oprimida la tecla 1 o use
el menú Mensajes para marcar el correo de voz. Cuando se conecte y el saludo
pregrabado comience, siga las instrucciones automatizadas para escuchar sus
mensajes de voz.
Automatizar el correo de voz
Puede insertar caracteres especiales, también conocidos como códigos de
marcación, en los números telefónicos tales como el buzón de voz, y luego
guardar el número a una posición de marcación de 1 toque (marcación rápida).
Los códigos de marcación instruyen al sistema receptor a pausar, esperar, ignorar,
o aceptar los números en la secuencia de marcación. Ver "Configurar números
telefónicos con códigos de marcación," pág. 150.
142
Mensajes
Los servicios de correo de voz podrían variar dependiendo del proveedor de
servicio. Las instrucciones siguientes son ejemplos de operaciones comunes.
Consulte con su proveedor de servicio para instrucciones específicas para el
uso de su servicio de correo de voz.
Anotar el número de buzón de voz y el proceso
1. Anote su número de buzón de voz.
2. Llame y obtenga su correo de voz como lo hace de costumbre.
3. Anote los pasos a seguir en las instrucciones automatizadas, paso a paso.
Recuerde que cada servicio de correo de voz puede variar. Sin embargo,
deberá ser algo así:
Marque 2145551212, pause 5 segundos, oprima 1, pause 2 segundos, oprima
1234, oprima la tecla #.
Sea exacto. Necesitará esta información para "Configurar números telefónicos
con códigos de marcación," pág. 150.
Borrar el ícono del correo de voz
Para borrar de la pantalla el ícono del correo de voz, en la pantalla inicial, elija
Menú > Mensajes > Mensajes de voz > Borrar Ícono del correo de voz.
■ Mensajería Web
Mensajería Web es un servicio de red. Ver "Servicios de Red," pág. 113.
Si esta función es respaldada por su proveedor de servicio, podrá verificar los
mensajes de email vía el Miniexplorador. En la pantalla inicial, elija Menú >
Mensajes > Mensajes de miniexplorador y oprima Conectar.
Ver "Acceso a Internet móvil," pág. 195, para más información sobre el uso del
Miniexplorador en su dispositivo para acceder a las páginas Web.
■ Carpetas para los mensajes de texto
Guardar mensajes
Podrá guardar los borradores de mensajes o mensajes recibidos en una carpeta
existente o en otra carpeta que haya creado.
1. Abra el mensaje recibido o redacte un mensaje y elija Opciones.
143
Mensajes
2. Para guardar un mensaje recibido, elija Guardar > Elementos enviados,
Archivos, Plantillas, o una carpeta que haya creado.
3. Para guardar el borrador de un mensaje que haya creado, elija Guardar
mensaje > Borradores o Plantillas.
Ver mensajes guardados
1. En la pantalla inicial, oprima Menú > Mensajes > Mensajes de texto.
2. Elija la carpeta que contiene el mensaje que desea ver.
Buzón de entrada—Guarda los mensajes recibidos automáticamente.
Buzón de salida—Guarda los mensajes que no han sido enviados.
Elementos enviados—Guarda los mensajes enviados.
Borradores—Guarda los mensajes creado como borradores.
Archivos—Guarda los mensajes que elige archivar de otras carpetas.
Plantillas—Guarda gráficos y plantillas preelaboradas. Puede editar/
personalizar las plantillas preelaboradas.
Mis carpetas—Le permite organizar sus mensajes por medio de crear carpetas
personalizadas y guardar algunos de sus mensajes en éstas. Elija Agregar
carpeta para agregar una carpeta personalizada, u Opciones > Agregar
carpeta, Renombrar carpeta, Eliminar carpeta si ya ha creado una.
3. Cuando se abra la carpeta, vaya al mensaje que desea ver y elija Seleccionar.
■ Borrar mensajes
Si la memoria para mensajes está llena y tiene más mensajes a la espera en la red,
No hay espacio para mensajes nuevos aparece en la pantalla inicial. Podrá hacer
lo siguiente:
• Lea algunos de los mensajes no leídos y luego bórrelos uno a uno.
• Borre mensajes en algunas de sus carpetas.
Borre un solo mensaje
1. En la pantalla inicial, oprima Menú > Mensajes > Mensajes de texto.
2. Elija la carpeta que contiene el mensaje que desea borrar.
3. Elija el mensaje que desea borrar.
4. Elija Opciones > Eliminar.
5. Oprima OK para borrar el mensaje, o Atrás para salir.
144
Mensajes
Borrar todos los mensajes en una carpeta
1. En la pantalla inicial, elija Menú > Mensajes > Mensajes de texto >
Eliminar mensajes.
2. Elija los mensajes que desea borrar.
Todos—Borra todos los mensajes en todas las carpetas.
Todos los leídos—Borra los mensajes leídos en todas las carpetas.
Todos no leídos—Borra los mensajes no leídos en todas las carpetas.
3. Elija su opción y seleccione Marcar para las carpetas con los mensajes que
desea borrar:
Buzón de entrada—Borra todos los mensaje en la carpeta Buzón de entrada.
Elementos enviados—Borra todos los mensajes en la carpeta Elementos
enviados.
Buzón de salida—Borra todos los mensaje en la carpeta Buzón de salida.
Borradores—Borra todos los mensajes en la carpeta Borradores.
Archivos—Borra todos los mensajes en la carpeta Archivo.
Carpetas creadas por el usuario—Borra todos los mensajes en la carpeta
creada por el usuario.
4. Elija Listo > Sí para borrar la carpeta marcada.
■ Eliminar carpetas
Sólo las carpetas creadas en Mis carpetas pueden borrarse. Las carpetas Buzón de
entrada, Elementos enviados, Archivo, y Plantillas están protegidas. Cuando borra
una carpeta, todos los mensajes en ésta serán borrados.
145
Registro
5. Registro
El Registro guarda información sobre las últimas 30 llamadas
perdidas, 30 llamadas recibidas y los 30 números marcados. También calcula la
duración total de todas las llamadas. Cuando la cantidad de llamadas excede el
máximo, la llamada más reciente reemplaza la más antigua.
Las opciones para las llamadas perdidas, recibidas o marcadas son las mismas:
Hora de llamada—Muestra la fecha y hora de la llamada.
Enviar mensaje—Envía un mensaje al número.
Usar número—Edita el número y el nombre relacionado.
Guardar—Ingresa un nombre para el número y lo guarda en su directorio.
Agregar a contacto—Agrega un número al contacto y lo guarda en su directorio.
Eliminar—Borra el número de la memoria.
Llamar—Llama el número.
■ Ver las llamadas perdidas
La función Llamadas perdidas no funciona con el dispositivo apagado. Las llamadas
perdidas son aquéllas que no fueron contestadas. Para ver las llamadas perdidas:
1. Si se muestra una notificación al efecto, elija Lista.
2. Cuando el número telefónico aparezca en la pantalla, oprima Opciones.
3. Elija una opción para activar.
O BIEN
1. En la pantalla inicial, elija Menú > Registro > Llamadas perdidas.
2. Recorra hasta un nombre o número, y elija Opciones.
3. Elija una opción para ver o activar.
■ Ver las llamadas recibidas
Las llamadas recibidas son aquéllas que han sido contestadas.
1. En la pantalla inicial, elija Menú > Registro > Llamadas recibidas.
2. Recorra hasta un nombre o número y elija Opciones.
3. Elija una opción para ver o activar.
146
Registro
■ Ver los números marcados
Los números marcados son aquellos números que ha marcado desde su dispositivo:
1. En la pantalla inicial, oprima la tecla Llamar.
O BIEN
En la pantalla inicial, elija Menú > Registro > Números marcados.
2. Recorra hasta un nombre o número y elija Opciones.
3. Elija una opción para ver o activar.
Ver horas de llamadas
Puede hacer o recibir hasta cinco llamadas del mismo número, y ver la hora en
que cada una ocurrió. El reloj de su dispositivo deberá estar configurado para que
esta opción funcione debidamente.
1. Desde la pantalla inicial, elija Menú > Registro > Llamadas perdidas,
Llamadas recibidas, o Números marcados > Opciones.
2. Mientras ve una llamada perdida o recibida, elija Opciones > Hora de llamada.
3. Recorra hacia abajo con la tecla joystick para ver la duración de llamada más
reciente para este número; oprima Atrás para regresar a la lista de opciones.
■ Eliminar registros de llamadas
Podrá eliminar las llamadas perdidas, recibidas o marcadas de la memoria
del teléfono.
1. En la pantalla inicial, elija Menú > Registro > Borrar información listas de
llamadas recientes.
2. Elija el tipo de llamada que quiera borrar: Todas, Perdidas, Recibidas
o Marcadas.
■ Duración de las llamadas
Contacte a su proveedor de servicio para las llamadas actuales y factura de
servicios, la cual pudiera depender en las funciones de la red, redondeo de
facturación, impuestos y demás.
Elija Menú > Registro > Duración de las llamadas > Duración de última llamada,
Duración llamadas marcadas, Duración de llamadas recibidas, Duración de todas
las llamadas, Cronómetro general, o Cronómetros a cero. Tras seleccionar
Cronómetros a cero, ingrese su código de bloqueo, y elija OK. Ver "Configuraciones
de seguridad," pág. 178.
147
Registro
Nota: Todos los cronómetros de llamadas, con la excepción del cronómetro
general, son reprogramados a cero cuando elija Cronómetros a cero.
Nota: Ciertos cronómetros, incluso el cronómetro general, podrían ser
reprogramados cuando se actualicen los servicios o software.
Para activar el cronómetro de llamadas en la pantalla inicial, mientras está en
una llamada, elija Detalles > Mostrar duración llamadas > Activar o Desactivar.
■ Ver la duración de las llamadas de datos/fax
La llamadas de datos y fax son un servicio de red. Ver "Servicios de Red,"
pág. 113. Si la función es respaldada por su proveedor de servicio, podrá ver el
tamaño o duración de las llamadas de datos/fax enviadas y recibidas.
Nota: El tiempo actual facturado por su proveedor de servicio para las
llamadas y servicios podrían variar, dependiendo de las funciones de red,
redondeo de la facturación, impuestos, etc.
1. En la pantalla inicial, elija Menú > Registro > Llamadas datos/fax.
2. Recorra hasta una de las opciones siguientes:
Último dato y fax enviado—Muestra el tamaño (KB) de la última llamada de
datos/fax enviada.
Último dato/fax recibido—Muestra el tamaño (KB) de la última llamada de
datos/fax recibida.
Todos los datos/fax enviados—Muestra el tamaño (KB) de todas las llamadas
de datos/fax enviadas.
Todos los datos/fax recibidos—Muestra el tamaño (KB) de todas las llamadas
de datos/fax recibidas.
Duración última llamada datos/fax—Muestra la duración de la última llamada
de datos/fax.
Duración todas llamadas datos/fax—Muestra la duración de todas las llamadas.
Borrar registros datos/fax—Oprima OK > Sí para borrar todos los registros de
datos/fax.
148
Registro
■ Ver la duración de las llamadas del miniexplorador
La función Miniexplorador es un servicio de red. Ver "Servicios de Red," pág. 113.
Si esta función es respaldada por su proveedor de servicio, podrá ver el tamaño
o duración de los datos enviados o recibidos vía el Miniexplorador.
Nota: El tiempo actual facturado por su proveedor de servicio para las
llamadas y servicios podrían variar, dependiendo de las funciones de red,
redondeo de la facturación, impuestos, etc.
1. En la pantalla inicial, elija Menú > Registro > Llamadas del Miniexplorador.
2. Recorra hasta una de las opciones siguientes:
Últimos datos enviados—Ver el tamaño (KB) de los últimos datos enviados vía
el explorador.
Últimos datos de explorador recibidos—Ver el tamaño (KB) de los últimos
datos recibidos.
Todos datos enviados—Ver el tamaño (KB) de todos los datos enviados vía
el explorador.
Todos datos recibidos—Ver el tamaño (KB) de todos los datos recibidos vía
el explorador.
Última sesión del explorador—Ver la duración de la última sesión del explorador.
Todas sesiones de explorador—Ver la duración de todas las sesiones
del explorador.
Borrar registros explorador—Oprima OK > Sí para borrar todos los registros
del explorador.
149
Contactos (directorio)
6. Contactos (directorio)
El directorio puede almacenar hasta 500 ingresos con números
múltiples, y notas de texto por contacto. La cantidad de números e ingresos de
texto que puede guardar podría variar, dependiendo de su longitud y la cantidad
total de ingresos en su directorio.
■ Agregar contactos
Puede acceder al directorio desde la pantalla inicial. Oprima la tecla de selección
derecha o, si la tecla de selección derecha en su dispositivo tiene un menú del
operador de red, elija Menú > Contactos.
Guardar un nombre y número de contacto
1. En la pantalla inicial, use el teclado para ingresar el número telefónico que
desea guardar.
2. Elija Guardar.
3. Ingrese el nombre y elija OK.
Guardar solamente un número
1. En la pantalla inicial, use el teclado para ingresar el número telefónico que
desea guardar.
2. Mantenga oprimida Opciones.
Guardar un ingreso
1. En la pantalla inicial, elija Menú > Contactos > Agregar nuevo.
2. Ingrese el nombre y elija OK.
3. Ingrese el número telefónico, y elija OK > Listo.
Configurar números telefónicos con códigos de marcación
Los códigos de marcación instruyen al sistema receptor a pausar, esperar, ignorar,
o aceptar los números en la secuencia de marcación.
1. En la pantalla inicial, elija Menú > Contactos > Marcación rápida.
2. Recorra hasta una posición de marcación rápida (vacía) y oprima Asignar.
3. Ingrese su número de correo de voz, incluyendo el código de área.
150
Contactos (directorio)
4. Refiérase a códigos de marcación e ingrese los códigos necesarios.
Por ejemplo, si pausa por 5 segundos tras conectarse a su correo de voz,
ingrese p dos veces (2.5 segundos dos veces) después del número de correo
de voz: 2145551212pp.
5. Ingrese cualquier pausa restante y otra información que le permita escuchar
sus mensajes, luego elija OK.
6. Ingrese un nombre (como Correo de Voz) y oprima OK.
Para llamar y escuchar sus mensajes de voz, mantenga oprimida la tecla asignada
a la posición de marcación rápida en la pantalla inicial.
Insertar códigos de marcación
Oprima la tecla * varias veces para recorrer los códigos de marcación. Cuando la
pantalla muestre el código que quiera, haga una breve pausa y el código es
insertado en la secuencia de marcación.
Los siguientes códigos de marcación están disponibles:
*—Ignora las instrucciones del sistema.
p—Pausa por 2.5 segundos antes de enviar cualquiera de los números que sigan.
+—Reemplaza el código de acceso internacional.
w—Espera que oprima la tecla Llamar antes de enviar los números o códigos
que sigan.
Guardar varios números e ítems de texto
Puede guardar distintos tipos de números telefónicos e ingresos cortos de texto
para cada contacto en su directorio. El primer número guardado para cualquier
ingreso es programado automáticamente como el predeterminado, o número
primario, pero siempre se puede cambiar el número primario.
1. En la pantalla inicial, recorra hasta el ingreso al que añadirá un número o texto.
2. Elija Detalles > Opciones > Agregar número o Agregar detalles.
Si eligió Agregar número, elija General, Móvil, Casa, Trabajo, o Fax.
Si eligió Agregar detalles, elija Dirección e-mail, Dirección Web, Dirección,
o Nota.
3. Ingrese el número o texto para el tipo que ha seleccionado y elija OK.
4. Para cambiar el tipo de número (General, Móvil, Casa, Trabajo, o Fax), elija
Cambiar tipo en la lista de opciones.
151
Contactos (directorio)
También, puede cambiar el número telefónico original (primario) para el ingreso
de contacto.
1. En la pantalla inicial, use la tecla joystick para recorrer hacia abajo y seleccionar
el número que desea cambiar, y elija Detalles.
2. Recorra al número que quiera configurar como predeterminado, y seleccione
Opciones > Número predeterminado.
Configurar etiquetas de voz
Para más información sobre programar las etiquetas de voz y otras funciones de
voz, ver "Comandos de voz," pág. 175.
Grupos de llamantes
Puede añadir los ingresos del directorio a cualquiera de los cinco grupos de
llamantes, y luego asignar un timbre o gráfico. Esto le permite identificar a los
llamantes de cada grupo por su timbrado o gráfico.
1. Recorra en su directorio hasta el nombre que desee añadir al grupo de
llamantes y oprima Detalles.
2. Elija Opciones > Grupos de llamantes > Familia, VIP, Amistades, Oficina, u Otros.
3. Elija Opciones para mostrar las siguientes opciones para grupos de llamantes:
Renombrar grupo—Dé otro nombre al grupo que usted elija.
Tono de grupo—Configura el timbrado para el grupo. Para contactos
individuales en el grupo, el timbrado para el grupo suena aunque otro
timbrado haya sido asignado al contacto individual.
Logo de grupo—Activar o Desactivar el gráfico de grupo, o Ver el gráfico.
Miembros del grupo—Agrega o elimina nombres del grupo de llamantes.
Configurar la marcación rápida (1 toque)
Puede asignar cualquier ingreso en el directorio a una de las teclas 2-9, y
marcarlos manteniendo oprimida dicha tecla. Ver "Marcación rápida (1 toque),"
pág. 171, para activar o desactivar la marcación rápida.
Asignar una tecla a la marcación rápida
1. En la pantalla inicial, elija Menú > Contactos > Marcación rápida.
2. Recorra hasta una posición de marcación rápida (vacía), y elija Asignar.
152
Contactos (directorio)
3. Ingrese el número (y el código de área) y oprima OK; u oprima Buscar para
obtener un número del directorio.
4. Ingrese un nombre para el número y oprima OK.
Si la marcación rápida está desactivada, el teléfono le pregunta si
desea activarla.
5. Oprima Sí para activar la marcación rápida.
Cambiar los números de marcación rápida
1. En la pantalla inicial, elija Menú > Contactos > Marcación rápida.
2. Recorra al ingreso de marcación rápida que desee cambiar y elija
Opciones > Cambiar.
3. Ingrese el nuevo número, u oprima Buscar para obtener un número del
directorio y oprima OK.
4. Ingrese un nombre para el ingreso y oprima OK.
Borrar los números de marcación rápida
1. En la pantalla inicial, elija Menú > Contactos > Marcación rápida.
2. Vaya hasta la posición de marcación rápida que desee borrar y elija Opciones >
Eliminar > Sí.
■ Etiquetas de voz
Puede marcar hasta 25 números guardados usando la marcación por voz.
Antes de usar las etiquetas de voz, observe que:
• Las etiquetas de voz no dependen del idioma. Dependen de la voz del hablante.
• Deberá decir el nombre exactamente como lo grabó.
• Las etiquetas de voz absorben fácilmente los ruidos. Grabe y use las etiquetas
de voz en un entorno sin ruidos.
• No se aceptan los nombres muy cortos. Use nombres largos y evite nombres
parecidos para números distintos.
Nota: El uso de etiquetas de voz podría resultar difícil, en un lugar ruidoso
o durante una emergencia, así que no debería depender sólo de la
marcación por voz.
153
Contactos (directorio)
Asignar una etiqueta de voz a un ingreso
Antes de hacer una llamada usando la marcación por voz, tendrá primero que
asignar una etiqueta de voz al número.
1. En la pantalla inicial, oprima la tecla joystick hacia abajo para ver los
contactos en el directorio.
2. Destaque el contacto al que quiera asignarle una etiqueta de voz. Elija Detalles >
Opciones > Agregar etiqueta de voz > Iniciar.
3. Hable claramente en el micrófono. No oprima Salir cuando termine, a no ser
que quiera borrar la grabación. El dispositivo automáticamente finaliza la
grabación, la guarda y la reproduce.
El ícono
aparece junto a los comandos con etiquetas de voz asignadas
Si la grabación no resulta bien, su dispositivo mostrará Error del sistema de voz.
Elija Opciones > Agregar etiqueta de voz, y repita el paso 3.
Marcar un número
1. Mantenga oprimida la tecla de selección derecha.
2. Cuando oiga varios bips y aparezca Hable ahora, suelte la tecla.
3. Pronuncie bien en el micrófono la etiqueta de voz.
Cuando el teléfono encuentra la etiqueta Encontrado: aparece y el teléfono
marca automáticamente el número. Si el teléfono no encuentra el número, o
no reconoce la etiqueta, aparece No se encontró coincidencia.
Etiquetas de voz
Tras relacionar una etiqueta de voz a un contacto, podrá elegir Nombres >
Etiquetas de voz > Seleccionar > Reproducir, Cambiar o Eliminar.
■ Editar contactos en el directorio
1. Recorra la lista de contactos para destacar el que desea editar, y elija
Detalles > Opciones. La lista de opciones varía dependiendo en si está
editando un contacto listado como número telefónico o nombre.
2. Algunas de las siguientes opciones podrían estar disponibles:
Agregar etiqueta de voz o Etiqueta de voz —Añadir una etiqueta al contacto
o elegir la etiqueta de voz ya relacionada con el contacto para Reproducir,
Cambiar o Eliminar.
154
Contactos (directorio)
Editar número o Editar información—Editar un número telefónico existente o
los detalles de un contacto.
Eliminar número o Eliminar detalles—Borrar un número telefónico o los
detalles de un contacto.
Usar número—Edita el número y relaciona un nombre al mismo. Disponible
cuando se elige un contacto con un nombre. Elija Opciones para usar el número.
Cambiar tipo—Cambia el tipo de número a General, Móvil, Casa, Oficina, o
Fax o el tipo de detalle a Dirección e-mail, Dirección Web, Dirección, o Nota.
Número predeterminado—Cambia el número predeterminado del contacto.
Agregar número—Añade un número al contacto.
Agregar información—Añade una dirección o nota al contacto.
Agregar imagen—Añade una foto al contacto.
Grupos de llamantes—Añade el contacto a un grupo de llamantes existente.
Personalizar tono—Configura un timbrado musical para el contacto distinto
al original.
Enviar tarjeta de negocios—Enviar el ítem de contacto como tarjeta de
negocios a otro dispositivo.
Enviar mensaje—Crear y enviar al contacto un mensaje de texto o multimedia.
Marcación rápida—Añade el contacto a su lista de marcación rápida.
Editar nombre—Edita el nombre del contacto.
Ver nombre—Muestra el nombre del contacto. Disponible cuando se elige un
contacto con un nombre.
Eliminar—Borra el contacto del directorio.
3. Edite la opción deseada y oprima OK.
■ Borrar ingresos del directorio
1. En la pantalla inicial, elija Menú > Contactos > Eliminar.
2. Para borrar ingresos individuales, elija Ver uno a uno.
3. Recorra hasta el ingreso que desea eliminar, y elija Eliminar > Sí para confirmar.
4. Para eliminar el contenido completo de su directorio, elija Eliminar todo > Sí.
5. Ingrese el código de bloqueo, y oprima OK. Ver "Configuraciones de seguridad,"
pág. 178.
155
Contactos (directorio)
■ Ver el menú contactos
1. En la pantalla inicial, elija Menú > Contactos y una de las siguientes opciones:
Buscar—Busca un nombre o lo elige de una lista.
Agregar nuevo—Añade un contacto al directorio.
Editar nombre—Edita un nombre existente.
Eliminar—Borra un nombre y sus números relacionados.
Agregar número—Añade un número a un contacto existente.
Configuraciones—Cambia la vista del directorio o verifica el estado de la
memoria de su dispositivo.
Marcación rápida—Muestra o modifica los números de la lista de
marcación rápida.
Etiquetas de voz—Añade, reproduce o modifica una etiqueta de voz en
el directorio.
Mi número—Muestra su número telefónico.
Grupos de llamantes—Muestra y edita las propiedades para cualquiera de los
grupos de llamantes: Familia, VIP, Amistades, Oficina u Otros.
2. Elija un ítem para activar la función o acceder a su submenú.
Buscar un nombre específico
1. En la pantalla inicial, oprima la tecla joystick hacia abajo para ver el
contenido de su directorio.
2. Oprima la tecla que corresponda a la primera letra del nombre que
está buscando.
3. Recorra para elegir un contacto, y elija Detalles para ver los detalles
del mismo.
Fijar las configuraciones
Puede elegir cómo quiere que aparezcan los nombres en el directorio y ver la
cantidad de memoria usada o disponible en su dispositivo.
En la pantalla inicial, elija Menú > Contactos > Configuraciones > Vista de
desplazamiento para cambiar la vista de la lista de nombres.
156
Contactos (directorio)
■ Enviar y recibir contactos (tarjetas de negocios)
Puede enviar y recibir un contacto del directorio en un mensaje de texto o IR, si la
función es respaldada por su proveedor de servicio. Vea "Recibir una tarjeta de
negocios," pág. 185.
Enviar una tarjeta de negocios
Puede enviar una tarjeta de negocios como un mensaje de texto a otro teléfono o
dispositivo portátil compatible.
1. Destaque un ingreso del directorio que desee enviar y oprima Detalles >
Opciones > Enviar tarjeta de negocios > Vía infrarrojo, Vía SMS o Vía
multimedia. Número predeterminado o Todos los detalles aparecen como
opciones sólo si tiene más de un número o detalle guardado al ingreso
de contacto.
2. Ingrese el número del destinatario u oprima Buscar para obtener el número
de la lista de contactos.
3. Oprima OK y la tarjeta de negocios es enviada.
157
Cámara
7. Cámara
Puede sacar fotos y grabar videoclips con la camera integrada. El
lente de la cámara está en la parte posterior del dispositivo. La cámara produce
imágenes en el formato JPEG, y los videoclips en el formato H.263 (SubQCIF).
Tras sacar una foto o video, puede adjuntarlo o enviarlo con un mensaje
multimedia, guardarlo como imagen de fondo, guardarlo en una PC compatible
usando el software Nokia PC Suite y cargarlo a una dirección Web vía el cargador
de contenido de imágenes. Cuando adjunta una foto a un ingreso en su lista de
contactos, la fotografía es mostrada cuando su contacto le llama.
Los dispositivos Nokia 6235, Nokia 6235i, Nokia 6236, y Nokia 6236i respaldan
una resolución de captura de 640 x 480 píxeles. La resolución de imagen para
estos materiales podría aparecer distinta.
Si no hay suficiente memoria disponible para tomar una foto, deberá borrar fotos
viejas u otros archivos en la Galería.
■ Tomar una foto
1. En la pantalla inicial, oprima la tecla joystick hacia arriba para activar la
cámara o elija Menú > Cámara.
2. Elija Capturar para tomar la foto. Al tomar una foto, se escucha el sonido
del obturador, la foto aparece en la pantalla, y podría aparecer un ícono
destellante o indicador que oscila mientras guarda la foto en la carpeta
Imágenes en la Galería.
Para cambiar la modalidad de la cámara a estándar, retrato, nocturno o video,
ver "Cambiar modalidad," pág. 159.
3. Elija Atrás para sacar otra foto, o elija Opciones y elija una de las siguientes:
Zoom—Se acerca a la imagen antes de tomar la foto o ampliar una foto que ya
tomó; use la tecla joystick para navegar por la foto.
Enviar—Elija Vía multimedia o Vía infrarrojo para enviar una foto a un
dispositivo o PC compatible.
Renombrar—Ingrese o edite el nombre de una foto y elija OK.
Abrir Galería—Abra la Galería para ver las imágenes, videos y
grabaciones guardados.
158
Cámara
Configurar contraste—Use la tecla joystick para ajustar el contraste de la foto
que tomó.
Como imagen de fondo—Use una foto como imagen de fondo.
Detalles—Vea el Nombre, Tamaño, Creado, Formato, Resolución, o Copyright
de una foto.
Cambiar modalidad
En la pantalla inicial, elija Menú > Cámara > Opciones > Cambiar modo o, del
visor de la cámara, mantenga oprimida la tecla joystick hacia la izquierda o
derecha para cambiar entre las siguientes modalidades:
Foto estándar—Tome fotos estándar estilo paisaje.
Foto retrato—Tome una foto más reducida, de tamaño ícono, vertical, la cual
podrá agregar a un ingreso en su directorio.
Modo nocturno—Tome una foto cuando haya poca iluminación y la cámara necesita
un tiempo de exposición más extenso para que la foto sea de mejor calidad.
Video—Grabe un video. Ver "Grabar un videoclip," pág. 160.
Temporizador
En la pantalla inicial, elija Menú > Cámara > Opciones > Temporizador y configure
un tiempo y demore la captura de una foto por 10 segundos. Elija Iniciar; suena
un bip mientras acaba el tiempo del temporizador y suena más rápidamente cuando
la cámara va a capturar la foto. Cuando acaba el tiempo, la cámara toma la foto y
la guarda en la carpeta Imágenes en el menú Galería.
Configuraciones
En la pantalla inicial, elija Menú > Cámara > Opciones > Configuraciones para
cambiar las configuraciones en la modalidad de cámara. Elija cualquiera de las
siguientes opciones:
Modo predeterminado—Elija Foto estándar, Foto retrato, Modo nocturno o Video
como la programación original.
Calidad de imagen—Define la compresión de archivo cuando se guarda la imagen.
Elija entre Alta, Normal o Básica. Alta usa la menor compresión de archivo y
provee la mejor calidad de imagen, pero ocupa más memoria.
Duración del videoclip—Elija Predeterminada (15 segundos) o Máxima (2.5 segundos
según las condiciones). Sólo los videoclips que son de duración predeterminada o
más cortos pueden ser enviados en un mensaje multimedia.
159
Cámara
Sonidos cámara—Elija Activar o Desactivar.
Título predeterminado—Elija Automático para usar un título predefinido o Mí título
para ingresar o editar un título nuevo.
Almacenamiento imágenes y video—Elija la carpeta para guardar las imágenes.
Otras opciones
Zoom—Se acerca a la imagen antes de capturar una foto o amplía la foto ya
capturada. Use la tecla joystick para navegar la foto.
Ver anterior—Vea la foto que tomó anteriormente.
Abrir Galería—Abra la carpeta imágenes en el menú Galería.
Grabar un videoclip
1. Desde la pantalla inicial, elija Menú > Cámara > Opciones > Cambiar modo >
Video > Grabar. Mientras está grabando, aparecen en la pantalla el indicador
de grabación y el tiempo restante para la misma.
2. Elija Pausa para pausar la grabación, Continuar para seguir grabando, o Parar
para dejar de grabar. El dispositivo guarda la grabación en la carpeta Videoclips
del menú Galería.
3. Elija Atrás para grabar otro video o elija Opciones y una de las siguientes:
Eliminar—Elimina el videoclip.
Enviar—Envía el videoclip a otro dispositivo como un mensaje multimedia o
usando la conectividad IR.
Renombrar—Edita el nombre del videoclip.
Abrir Galería—Va a la carpeta Videoclips en el menú Galería.
Desactivar audio o Activar audio—Apaga o enciende el sonido.
Configurar contraste—Aumenta o disminuye el contraste del video elegido
usando la tecla joystick.
Detalles—Accede a los detalles del video elegido, como nombre, tamaño,
fecha de creación, largo, formato de archivo e información de copyright.
160
Galería
8. Galería
Puede guardar fotos, videoclips, grabaciones y timbrados musicales
en la galería y añadir carpetas. Las imágenes y tonos pueden ser descargados
usando mensajes multimedia, mensajes de texto, sitios de Internet móvil o el
Nokia PC Suite.
Nota: Sólo los dispositivos que ofrecen funciones compatibles de mensajes
multimedia o email pueden recibir y mostrar mensajes multimedia.
Su dispositivo respalda un sistema digital de manejo de copyright para proteger
el contenido que haya adquirido. Contenido como un tono del timbre, puede ser
protegido y asociado con ciertas normas de uso, por ejemplo: el número de veces
que se usa o tiempo de uso permitido. Las reglas de uso son definidas en la clave
de activación de contenido que pudiera ser entregada con el contenido o por
separado, dependiendo del proveedor de servicio. Sería posible actualizar la clave
de activación. Siempre revise los términos de entrega de cualquier contenido y
clave de activación antes de adquirirlo; puede que no sean gratis.
Las protecciones de copyright podrían prevenir la duplicación, cambio, transferencia
o desvío de ciertas imágenes, tonos de timbre y otros contenidos.
Su dispositivo tiene aproximadamente 10 MB de memoria para el almacenamiento
en la galería. Esta memoria no es compartida con otras funciones, como los
contactos. Si el dispositivo muestra un mensaje dejándole saber que la memoria
está llena, borre algunos de los archivos existentes antes de continuar.
■ Carpetas
1. En la pantalla inicial, elija Menú > Galería > Imágenes, Videoclips, Archivos
música, Gráficos, Tonos, o Grabaciones.
2. Elija Abrir para ver una lista de archivos en la carpeta o elija Opciones para
acceder a las siguientes:
Eliminar carpeta—Descarta una carpeta que ha creado. No podrá descartar
una carpeta preconfigurada.
Mover—Mueve la carpeta elegida a otra carpeta. Tras elegir Mover, recorra
a la otra carpeta, y elija Opciones > Mover. No podrá mover una carpeta
preconfigurada.
Renombrar carpeta—Renombra una carpeta que ha creado. No podrá
renombrar una carpeta preconfigurada.
161
Galería
Detalles—Muestra el nombre, tamaño, fecha de creación de la carpeta elegida.
Tipo de vista—Elija Lista con detalles, Lista o Cuadrícula para determinar cómo
se mostrarán las carpetas y archivos.
Clasificar—Organiza los contenidos en la carpeta por nombre, fecha,
formato o tamaño.
Agregar carpeta—Crea una carpeta nueva.
Lista claves de activación—Accede a la lista de claves de activación
disponibles. Podrá borrar las claves de activación si así lo desea.
162
Multimedia
9. Multimedia
■ Reproductor multimedia
Con el reproductor multimedia puede descargar, ver y reproducir imágenes, audio
y archivos de video compatibles, e imágenes animadas de diferentes fuentes.
El reproductor multimedia le permite reproducir videos y audio de contenido
directo (streaming) de un servidor de red. La funcionalidad streaming es un
servicio de red y requiere el respaldo de la misma. Consulte con su operador
de red o proveedor de servicio sobre la disponibilidad, precios y tarifas de los
servicios que desea usar. Los proveedores de servicio también le darán las
instrucciones sobre el uso de sus servicios.
Desde la pantalla inicial, elija Menú > Multimedia > Reproductor multimedia y
una de las siguientes:
Medios en línea—Conexión a la red del operador. Esta función es un servicio de
red. Consulte con su proveedor para detalles sobre precios y más información.
Abrir Galería—Accede a la Galería. Desde la Galería, puede reproducir audio y
archivos de videos guardados. Ver "Galería," pág. 161.
Ir a dirección—Ingrese la dirección de un servicio de Internet móvil, y elija OK.
■ Radio
Su teléfono tiene una radio FM que también funciona como alarma de radio. Para
escuchar la radio FM en su teléfono, conecte un soporte musical o auricular estéreo
compatible al conector en la base del teléfono. La radio FM usa el cable del equipo
auricular como una antena. Para que la radio FM funcione debidamente deberá
tener conectado un equipo auricular compatible. La calidad de la recepción de
radio depende de la cobertura de la emisora en el área.
Aviso: Escuche música a un volumen moderado. La exposición continua
a niveles altos de volumen podrían afectar su oído.
Apagar o encender la radio
1. Conecte un soporte musical o auricular compatible al teléfono.
2. Desde la pantalla inicial, elija Menú > Multimedia > Radio.
3. Para apagar la radio, mantenga oprimida la tecla Finalizar.
163
Multimedia
Usar la radio
Con la radio encendida, elija Opciones y una de las siguientes:
Apagar—Apaga la radio.
Guardar canal—Guarda la emisora actual en una de las 20 ubicaciones
disponibles.
Ajuste automático—Oprima la tecla joystick hacia arriba o abajo para comenzar a
buscar emisoras. Oprima OK cuando encuentre un canal.
Ajuste manual—Oprima la tecla joystick hacia arriba o abajo para buscar en
incrementos de 0.05 MHz.
Fijar frecuencia—Ingrese manualmente la frecuencia de una emisora de radio.
Eliminar canal—Borre una emisora programada.
Renombrar—Renombre una emisora guardada y elija OK.
Altavoz o Auricular—Escuche la radio por el altavoz manos libres o por el
equipo auricular.
Salida mono o Salida estéreo—Escuche la radio en modo monoaural
(programación original) o en estéreo. La modalidad estéreo está disponible
a través de un accesorio estéreo.
Para configurar la radiofrecuencia, oprima * y use el teclado para ingresar la
frecuencia de una emisora. Para ajustar la radio manualmente, oprima #; luego
oprima la tecla joystick hacia arriba o abajo para buscar en incrementos de 0.05 MHz.
Para ajustar el volumen de la radio, oprima las teclas de volumen superior y
volumen inferior.
Cuando una aplicación que usa una conexión de explorador está enviando o
recibiendo datos, podría interferir con la radio.
Cuando hace o recibe una llamada, la radio se enmudece automáticamente.
Cuando termine la llamada, la radio se enciende automáticamente.
Guardar una emisora
Con la radio encendida, podrá guardar una emisora preconfigurada en cualquiera
de las 20 posiciones en la memoria y recorrer para escucharla con la tecla joystick.
1. Con la radio encendida, mantenga oprimida la tecla joystick hacia arriba o
abajo para comenzar la búsqueda de emisoras. La búsqueda se detiene al
encontrar una emisora.
2. Para guardar el canal, elija Opciones > Guardar canal.
3. Ingrese un nombre para la emisora y elija OK.
164
Multimedia
4. Elija una ubicación (vacía) para guardar el canal.
Mientras la radio está encendida, se puede guardar rápidamente una emisora FM
en una de las posiciones de memoria 1-9.
1. Mantenga oprimida la tecla númérica correspondiente.
2. Ingrese el nombre para la emisora y elija OK.
■ Grabador de voz
Esta opción le permite grabar voz o sonidos realizados en su dispositivo para luego
escucharlos. El tiempo total disponible es de 3 minutos sin guardar ningún
recordatorio. La duración máxima de la grabación depende de la memoria disponible.
Desde la pantalla inicial, elija Menú > Multimedia > Grabador > Grabar para
comenzar la grabación, o Lista de grabaciones para manejar la carpeta que ha
definido para almacenar las grabaciones. Guarde las grabaciones en la carpeta
Grabaciones u otra carpeta en la Galería.
Grabar voz o sonido
1. En la pantalla inicial, elija Menú > Multimedia > Grabador > Grabar.
2. Después del tono de inicio del grabador, inicie la grabación del mensaje
o sonido.
3. Cuando termine de grabar, elija Parar y su grabación es guardada en la
carpeta Grabaciones en la Galería.
Opciones para grabar
Tras guardar la grabación en la carpeta Grabaciones, elija Lista grabaciones, abra
la carpeta Grabaciones en la Galería y recorra hacia la grabación que hizo. Elija
Abrir para escuchar la grabación usando el auricular, u Opciones para:
Eliminar o Eliminar carpeta—Borre la grabación.
Renombrar o Renombrar carpeta—Cambia el nombre de la grabación.
Como tono timbre—Use la grabación como timbrado musical.
Detalles—Muestre el nombre, tamaño y fecha de creación de la carpeta elegida.
Tipo de vista—Opte por ver las carpetas como una lista de detalle, como sólo una
lista o una cuadrícula.
Clasificar—Clasifique el contenido de la carpeta elegida por nombre, fecha
formato o tamaño.
165
Configuraciones
10. Configuraciones
Use este menú para cambiar los perfiles, configuraciones de tonos,
configuraciones de hora y fecha, configuraciones de llamadas, configuraciones
de teléfono, comandos de voz, configuraciones de accesorios, configuraciones de
seguridad, configuraciones de aplicaciones, configuraciones de red y restaurar las
configuraciones de fábrica.
■ Perfiles
Los perfiles definen la manera en que su dispositivo recibe las llamadas o mensajes,
produce los sonidos del teclado al oprimir una tecla, y más. Las opciones para los
timbrados, los tonos del teclado y otras configuraciones para cada uno de los
perfiles disponibles pueden permanecer como vienen programados, o podrá
personalizarlos para ajustarse a sus exigencias. Los perfiles siguientes están
disponibles: Normal, Silencio, Reunión, Exterior, y Pager.
Los perfiles también están disponibles para accesorios como auriculares y
equipos para auto. Ver "Accesorios," pág. 202.
1. En la pantalla inicial, elija Menú > Configuraciones > Perfiles.
2. Elija el perfil de su elección y Activar.
Personalizar un perfil
Podrá personalizar cualquiera de los perfiles de varias maneras.
1. En la pantalla inicial, elija Menú > Configuraciones > Perfiles.
2. Elija el perfil que quiera personalizar.
3. Elija Personalizar.
4. Elija la opción que quiera personalizar: Aviso de llamada entrante, Tono del
timbre, Volumen del timbre, Alerta vibrante, Tono de aviso para mensajes,
Tonos del teclado, Tonos de aviso, Aviso para o Nombre del perfil. No se puede
renombrar el perfil Normal.
166
Configuraciones
Configurar un perfil programado
Los perfiles programados se pueden usar para no perder llamadas. Por ejemplo,
suponga que está en un evento que le requiere configurar su dispositivo a Silencio
antes de que éste comience, pero se le olvidó configurar su teléfono a Normal al
terminar. Un perfil programado puede prevenir la pérdida de llamadas, volviendo
automáticamente al perfil original a la hora que especifique. Los perfiles pueden
ser programados hasta con 24 horas de anticipación.
1. En la pantalla inicial, elija Menú > Configuraciones > Perfiles.
2. Elija el perfil que desea activar y elija Programado para vencimiento de
tiempo programado.
3. Ingrese la hora de expiración en mm:ss para el perfil y elija OK.
■ Configuraciones de pantalla
Imagen de fondo
Puede programar su dispositivo para que muestre una imagen de fondo
(wallpaper) en la pantalla inicial.
1. En la pantalla inicial, elija Menú > Configuraciones > Configuraciones de
pantalla > Imagen de fondo > Seleccionar fondo > Gráficos > Abrir.
2. Recorra la carpeta Gráficos.
3. Cuando llegue a la imagen de su agrado, elija Opciones > Como imagen
de fondo.
4. Para activar o desactivar la imagen de fondo, en la pantalla inicial, elija
Menú > Configuraciones > Configuraciones de pantalla > Imagen de
fondo > Activar o Desactivar.
Esquemas de colores
Es posible cambiar el color de ciertos componentes de pantalla en su dispositivo,
ej.: indicadores y barras de la señal.
1. En la pantalla inicial, oprima Menú > Configuraciones > Configuraciones de
pantalla > Esquemas de colores.
2. Elija el esquema de color de su preferencia.
167
Configuraciones
Vista Menú
Puede cambiar la vista del menú principal. La vista de cuadrícula muestra los
íconos del menú sólo en el formato de cuadrícula, y la vista de lista muestra los
ícono y nombres del menú en orden.
En la pantalla inicial, elija Menú > Configuraciones > Configuraciones de pantalla >
Vista Menú > Lista o Cuadrícula.
Luces de fondo
Puede elegir entre dejar las luces de fondo encendidas, apagadas o por un período
de tiempo elegido.
En la pantalla inicial, elija Menú > Configuraciones > Configuraciones de
pantalla > Vista Menú > 15 segundos o Personalizar.
■ Protector de pantalla
Desde la pantalla inicial, elija Menú > Configuraciones > Configuraciones de
pantalla > Protector de pantalla > Activar, Desactivar, Seleccionar protector de
pantalla, o Tiempo de espera (10 segundos, 30 segundos, u Otro).
■ Configuración de tonos
Puede ajustar el volumen del timbre, los tonos del teclado y más, para el perfil
activo. Ver "Personalizar un perfil," pág. 166, para más información sobre las
configuraciones de perfiles.
Elija Menú > Configuraciones > Configuración de tonos y elija una de las
siguientes opciones:
Aviso de llamada entrante—Elija cómo el dispositivo le notifica de una
llamada entrante.
Tono del timbre—Seleccione el tono del timbre para llamadas entrantes.
Volumen del timbre—Configure el volumen de su tono del timbre.
Alerta vibrante—Activar o Desactivar la alerta vibrante.
Tono de aviso para mensajes—Seleccione el tono para mensajes recibidos.
Tonos del teclado—Configure el volumen de los tonos de su teclado (o los apáguelos).
Tonos de aviso—Para Activar o Desactivar los tonos de aviso y de confirmación.
Aviso para—Define los grupos de llamantes que el perfil elegido aceptará o
rechazará. Ver "Grupos de llamantes," pág. 152.
168
Configuraciones
■ Configuraciones de hora y fecha
Reloj
En la pantalla inicial, elija Menú > Configuraciones > Configuraciones de hora y
fecha > Reloj > Mostrar reloj u Ocultar reloj, Configurar la hora, Zona horaria o
Formato de hora.
Fecha
En la pantalla inicial, elija Menú > Configuraciones > Configuraciones de hora y
fecha > Fecha > Mostrar fecha u Ocultar fecha, Fijar fecha, Formato de fecha, o
Separador fechas.
Configurar la actualización automática de fecha y hora
La actualización automática es un servicio de red. Ver "Servicios de Red,"
pág. 113. Si esta función es respaldada por su proveedor de servicio, podrá
programar su reloj para que sea ajustado por la red digital; le será útil cuando se
encuentre fuera de su zona original, por ejemplo cuando esté viajando a otra
zona cubierta por otra red o con hora local.
En la pantalla inicial, elija Menú > Configuraciones > Configuraciones de hora
y fecha > Actualización auto. de fecha y hora > Activar, Confirmar primero
o Desactivar.
Al usar la Actualización auto. de fecha y hora y estando fuera de su red digital,
puede que se le pida que ingrese manualmente la hora actual. La red reemplazará
la hora y fecha cuando reingrese a su red digital.
Si la batería ha sido retirada o descargada fuera de la red digital, es posible que se
le pida que ingrese la hora actual (tras reponer/recargar la batería, y si aún se
encuentra fuera de la red digital).
■ Configuraciones de llamadas
Compartir información de ubicación
Compartir información de ubicación sólo está disponible para los dispositivos
Nokia 6235i y Nokia 6236i. La función Compartir Información de ubicación es
un servicio de red. Ver "Servicios de Red," pág. 113.
169
Configuraciones
Si esta función es respaldada por su proveedor de servicio, su dispositivo tendrá
acceso para compartir la información de ubicación sobre la red. Para llamadas a
números de emergencia, está información de ubicación podría ser usada por el
operador de emergencia para localizar su dispositivo. La funcionalidad y exactitud
de esta opción depende de la red, sistemas de satélite y la agencia receptora de la
información. Es posible que no funcione en todas las áreas en todo momento.
En la pantalla inicial, elija Menú > Configuraciones > Configuraciones de llamadas >
Compartir información de ubicación > Emergencia o Activar > OK o No.
Emergencia—Este es el perfil predeterminado. La información sobre la ubicación del
teléfono es compartida sólo durante una llamada al número oficial de emergencia
programado en su dispositivo. La pantalla muestra
en la esquina superior
izquierda de la pantalla inicial.
Activar—La información sobre la ubicación del dispositivo es compartida con la
red siempre que el dispositivo esté encendido y activado. La pantalla muestra
en la esquina superior izquierda de la pantalla inicial.
Nota: La información de ubicación siempre será compartida con la red
durante las llamadas de emergencia al número oficial de emergencia
programado en su dispositivo, sin importar la configuración elegida.
Tras hacer una llamada de emergencia, el dispositivo permanece en la
modalidad de emergencia por cinco minutos. Durante este tiempo, la
información de ubicación será compartida con la red. Ver "Llamadas de
emergencia," pág. 209.
Cualquier tecla contesta
Cualquier tecla contesta le permite contestar las llamadas entrantes: oprima
brevemente cualquier tecla excepto las teclas de encendido, de selección derecha
o finalizar.
En la pantalla inicial, elija Menú > Configuraciones > Configuraciones de
llamadas > Cualquier tecla contesta > Activar o Desactivar.
Remarcado automático
A veces hay un alto volumen de llamadas en el tráfico celular, lo cual resulta en
una señal "rápida" de ocupado al marcar. Con el remarcado automático activado,
su dispositivo remarca el número (la cantidad de veces especificada por la red), y
le notifica cuando la red esté disponible.
En la pantalla inicial, elija Menú > Configuraciones > Configuraciones de
llamadas > Remarcado automático > Activar o Desactivar.
170
Configuraciones
Marcación rápida (1 toque)
Usted puede activar/desactivar la marcación rápida. En la pantalla inicial, elija
Menú > Configuraciones > Configuraciones de llamadas > Marcación rápida >
Activar o Desactivar. Ver "Configurar la marcación rápida (1 toque)," pág. 152.
Actualización automática de servicio
Su dispositivo puede recibir actualizaciones a los servicios de red enviadas por
su proveedor de servicio. En la pantalla inicial, elija Menú > Configuraciones >
Configuraciones de llamadas > Actualización automática de servicio > Activar
o Desactivar.
Tarjeta de llamada
Si utiliza una tarjeta de llamada para llamadas de larga distancia, podrá guardar
los números de éstas en su dispositivo. Su dispositivo puede guardar hasta cuatro
tarjetas. Contacte al distribuidor de su tarjeta de llamada para más información.
Guardar información
1. En la pantalla inicial, elija Menú > Configuraciones > Configuraciones de
llamadas > Tarjeta de llamada.
2. Ingrese su código de bloqueo, y elija OK. Ver "Cambiar código de bloqueo,"
pág. 179.
3. Vaya a una de las cuatro posiciones de memoria siguientes y elija Opciones >
Editar > OK > Secuencia de marcado.
4. Elija uno de los tipos de secuencias siguientes:
Nº de acceso + Nº teléfono + Nº de tarjeta—Marque el número de acceso,
número telefónico y número de tarjeta (+ PIN si es necesario).
Nº de acceso + Nº de tarjeta + Nº teléfono—Marque el número de acceso,
número de tarjeta (+ PIN si es necesario) y el número telefónico.
Prefijo + Nº teléfono + Nº de tarjeta—Marque el prefijo (los números que
preceden el número telefónico), el nº telefónico que quiera marcar y el nº de
tarjeta (+PIN si es necesario).
5. Ingrese los datos necesarios (el número de acceso o prefijo y número de
tarjeta) y oprima OK para confirmarlos.
6. Elija Nombre de tarjeta, ingrese el nombre de la tarjeta, y elija OK.
171
Configuraciones
Hacer llamadas
Tras guardar en su dispositivo los datos de su tarjeta, ya podrá usarla para
hacer llamadas.
1. En la pantalla inicial, elija Menú > Configuraciones > Configuraciones de
llamadas > Tarjeta de llamada.
2. Ingrese su código de bloqueo, y elija OK. Ver "Cambiar código de bloqueo,"
pág. 179.
3. Vaya a la tarjeta que prefiera, elija Opciones > Seleccionar > OK.
4. Oprima la tecla Finalizar para regresar a la pantalla inicial; marque el nº
telefónico y el prefijo (ej.: 0 ó 1) que su tarjeta de llamada pueda requerir
cuando haga la llamada. Ver su tarjeta de llamada para instrucciones.
5. Mantenga oprimida la tecla Llamar por unos segundos hasta que aparezca
Llamada de tarjeta.
6. Cuando oiga el tono o mensaje de sistema, oprima OK.
Prefijo internacional
Puede guardar un prefijo de marcación internacional en su dispositivo. Cuando
ingrese + al comienzo del número telefónico, su dispositivo incluye automáticamente
el prefijo de marcación internacional que haya guardado al oprimir la tecla Llamar.
Ver "Insertar códigos de marcación," pág. 151.
Llamadas de datos/fax
La función Llamadas datos/fax es un servicio de red. Ver "Servicios de Red,"
pág. 113. Si esta función es respaldada por su proveedor de servicio, podrá
programar su dispositivo para enviar o recibir llamadas de datos o fax cuando
esté conectado a terminales como PDA o PC.
Para mejor rendimiento durante las llamadas de datos, coloque el teléfono en
una superficie firme con el teclado hacia abajo. No mueva el dispositivo al
sostenerlo en su mano durante una llamada de datos.
Para más información sobre conectividad, refiérase a la Guía de Conectividad
PC/PDA la cual podrá descargar de la página Web de Nokia en
http://www.nokiausa.com (texto en inglés).
1. En la pantalla inicial, elija Menú > Configuraciones > Configuraciones de
llamadas > Llamadas datos/fax > Llamada entrante de datos/fax.
172
Configuraciones
2. Elija cualquiera de las siguientes opciones:
Normal—El dispositivo recibe llamadas como de costumbre.
Sólo llamadas de datos—El dispositivo sólo recibe llamadas de datos.
Sólo llamadas de fax—El dispositivo sólo recibe llamadas de fax.
3. Cuando termine la recepción de llamadas de fax o datos, repita los Pasos 1 y 2
y elija Normal.
Transferencia de datos
Puede ver la velocidad de la transmisión de datos al enviar o recibir llamadas
datos o fax.
En la pantalla inicial, elija Menú > Configuraciones > Configuraciones de llamadas >
Llamadas datos/fax > Pantalla velocidad de datos > Gráfico o Desactivar.
Resumen de llamada
Su dispositivo puede mostrar la duración de una llamada al desconectarse de la
misma. En la pantalla inicial, elija Menú > Configuraciones > Configuraciones de
llamadas > Resumen de llamada > Activar o Desactivar.
Tono timbre para llamadas sin ID
Puede elegir un tono del timbre diferente para las llamadas que no tienen
ID de llamante.
Desde la pantalla inicial, elija Menú > Configuraciones > Configuraciones
de llamadas > Tono timbre para llamadas sin ID > Activar o Desactivar.
Ver "Personalizar un perfil," pág. 166, para más información sobre cómo
seleccionar un timbrado musical.
■ Configuraciones de teléfono
Idioma del teléfono
1. En la pantalla inicial, elija Menú > Configuraciones > Configuraciones de
teléfono > Idioma del teléfono.
2. Vaya hasta el idioma preferido y oprima Seleccionar.
La configuración de idioma afecta los formatos de hora y fecha del reloj, reloj de
alarma y agenda.
173
Configuraciones
Tonos al tacto
Su dispositivo genera varios sonidos denominados tonos al tacto o tonos DTMF
cuando se oprimen las teclas. Puede usar los tonos al tacto para muchos servicios
automatizados, tales como comprobar las cuentas bancarias y verificar los horarios
de vuelos, o para ingresar su número de correo de voz y contraseña.
Los tonos al tacto son enviados durante una llamada activa. Puede enviarlos
manualmente usando el teclado o automáticamente si los tiene guardados en
su dispositivo.
Configurar el tipo de tono
1. En la pantalla inicial, elija Menú > Configuraciones > Configuraciones de
teléfono > Tonos DTMF > Tonos DTMF manuales.
2. Elija cualquiera de las siguientes opciones:
Continuos—El tono suena continuamente mientras se mantiene oprimida
la tecla.
Fijos—Envía los tonos según lo especificado en la opción Duración de los
tonos DTMF.
Desactivados—Apaga los tonos. No se enviará ningún tono cuando se
opriman las teclas.
Configurar duración
También se puede programar la duración de cada tono al tacto usando la opción
Fijos. En la pantalla inicial, elija Menú > Configuraciones > Configuraciones de
teléfono > Tonos DTMF > Duración de los tonos DTMF > Cortos (0.1 segundo) o
Largos (0.5 segundo).
Estado de la memoria
Puede ver la cantidad de memoria disponible para la instalación de aplicaciones.
Ver "Memoria," pág. 198.
Tono de inicio
Puede elegir un tono de inicio para cuando enciende su dispositivo. En la pantalla
inicial, elija Menú > Configuraciones > Configuraciones de teléfono > Tono de
inicio > Activar o Desactivar.
174
Configuraciones
Crear un título
Si esta función es respaldada por su proveedor de servicio, entonces puede
elegir que la pantalla muestre el logo del operador o un texto personalizado
cuando el teléfono esté en la modalidad inactiva. En la pantalla inicial, elija
Menú > Configuraciones > Configuraciones de teléfono > Título > Predeterminado
o Personalizado.
Activación textos de ayuda
Su dispositivo muestra descripciones breves para la mayoría de los menús. Al acceder
a una función o menú, deténgase unos 10 segundos para que aparezca el texto de
ayuda. De ser necesario, use la tecla joystick para recorrer todo el texto de ayuda.
La configuración original para los textos de ayuda es Activar. Sin embargo,
podrá desactivar y activar los textos de ayuda. En la pantalla inicial, elija Menú >
Configuraciones > Configuraciones de teléfono > Activación textos de ayuda >
Activar o Desactivar.
■ Comandos de voz
Puede marcar hasta 25 números guardados usando la marcación a través de los
comandos de voz. Ver "Etiquetas de voz," pág. 153.
Antes de usar las etiquetas de voz, observe que:
• Las etiquetas de voz no dependen del idioma. Dependen de la voz del hablante.
• Deberá decir el nombre exactamente como lo grabó.
• Las etiquetas de voz absorben fácilmente los ruidos. Grabe y use las etiquetas
de voz en un entorno sin ruidos.
• No se aceptan los nombres muy cortos. Use nombres largos y evite nombres
parecidos para números distintos.
Nota: El uso de etiquetas de voz podría resultar difícil, en un lugar
ruidoso o durante una emergencia, así que no debería depender
sólo de la marcación por voz.
Operación manos libres con los comandos de voz
Puede programar hasta cinco comandos de voz los cuales le permiten el manejo
manos libres de ciertas funciones del dispositivo.
175
Configuraciones
Asignar una etiqueta de voz a un comando
Antes de usar los comandos de voz, deberá asociar una etiqueta de voz con la
función del dispositivo.
1. En la pantalla inicial, elija Menú > Configuraciones > Comandos de voz.
2. Elija la función del dispositivo a la cual quiere agregar una etiqueta: Perfiles,
Buzón de voz, Radio, Infrarrojo, Grabador o Registro > Agregar.
3. Elija Iniciar, y pronuncie claramente en el micrófono la etiqueta de voz.
No oprima Salir cuando termine, a no ser que quiera cancelar la grabación.
El dispositivo reproduce la etiqueta grabada y la guarda. El ícono
junto a los comandos con etiquetas de voz asignadas.
aparece
Activar un comando de voz
Tras asociar una etiqueta de voz a una función del dispositivo, podrá emitir un
comando pronunciando la etiqueta de voz.
1. Desde la pantalla inicial, mantenga oprimida la tecla de selección derecha.
2. Cuando aparezca Hable ahora, pronuncie bien en el micrófono la etiqueta
de voz.
Elija Reproducir para escuchar la etiqueta con un comando de voz.
Cuando el dispositivo encuentre la etiqueta de voz, Encontrado: aparece en la
pantalla del dispositivo y se oye la etiqueta de voz vía el auricular. La función
que pidió es activada.
Opciones
Tras relacionar una etiqueta con un comando, podrá elegir una de estas opciones:
Cambiar—Modifique el comando de voz.
Eliminar—Borre la etiqueta para el comando de voz.
■ Configuración de accesorios
El menú para la configuración de accesorios sólo aparece si el teléfono ha
estado conectado a un accesorio compatible. En la pantalla inicial, elija Menú >
Configuraciones > Configuración de accesorios > Auricular, Manos libres,
Extensión inductiva, TTY, o Cargador.
176
Configuraciones
Auricular
Importante: El auricular podría afectar su capacidad de oír los sonidos
a su alrededor. No use el auricular en los entornos que puedan arriesgar
su seguridad.
Elija la opción que prefiera para acceder a un submenú y modificar sus
configuraciones.
Perfil predeterminado—Elija el perfil que quiera activar automáticamente al
conectar un auricular.
Respuesta automática—Se contestarán las llamadas automáticamente tras un
timbrado cuando el auricular esté conectado. Elija Activar o Desactivar.
Manos libres
Elija la opción que prefiera para acceder a un submenú y modificar sus
configuraciones.
Perfil predeterminado—Elija el perfil que quiera activar cuando su teléfono esté
conectado a un equipo manos libres.
Respuesta automática—Se contestarán las llamadas automáticamente tras un
timbrado cuando esté conectado un equipo manos libres. Elija Activar o Desactivar.
Luces—Elija entre mantener las luces del dispositivo encendidas, o automáticamente
apagarlas tras unos segundos. Elija Activar o Automáticas.
Extensión inductiva
Se recomienda el uso del audífono LPS-4 con su dispositivo. Elija la opción que
prefiera para acceder a un submenú y modificar sus configuraciones.
Perfil predeterminado—Elija el perfil que quiera activar cuando su dispositivo esté
conectado a una extensión inductiva.
Respuesta automática—Cuando la extensión inductiva está conectada, las llamadas
son contestadas automáticamente tras un timbrado. Elija Activar o Desactivar.
TTY/TDD
Consulte con el fabricante del dispositivo TTY/TDD sobre un cable de conexión
compatible con el dispositivo Nokia. Las comunicaciones TTY/TDD dependen de
la red. Contacte a su proveedor de servicio sobre disponibilidad y descripción de
los servicios.
177
Configuraciones
Cargador
Elija la opción que prefiera para acceder a un submenú y modificar
sus configuraciones.
Perfil predeterminado—Elija el perfil que quiera activar cuando su teléfono esté
conectado al cargador.
Luces—Elija entre mantener las luces del dispositivo encendidas, o automáticamente
apagarlas tras unos segundos. Elija Activar o Automáticas.
■ Configuraciones de seguridad
Activar o desactivar el bloqueo telefónico
Esta opción protege su dispositivo de las llamadas salientes desautorizadas o
acceso ajeno a los datos guardados en su dispositivo. Para activar o desactivar el
bloqueo telefónico en su dispositivo:
1. En la pantalla inicial, elija Menú > Configuraciones > Configuraciones
de seguridad.
2. Ingrese el código de bloqueo, y oprima OK. Ver "Cambiar código de bloqueo,"
pág. 179.
3. Elija Bloqueo de teléfono y una de las siguientes opciones:
Desactivar—Inmediatamente desactiva la función de bloqueo del dispositivo.
Bloquear ahora—Inmediatamente activa la función de bloqueo del dispositivo.
Al encenderlo—Activa la función de bloqueo del dispositivo la próxima vez
que enciende el dispositivo.
Si eligió Bloquear ahora, se le indicará que introduzca su código de bloqueo
cuando elija Menú, la tecla de selección derecha o izquierda. Cuando el código
de bloqueo haya sido ingresado, el bloqueo telefónico se desactivará y su
dispositivo funcionará.
Cuando el bloqueo telefónica esté activado, Bloqueado aparecerá en la pantalla
cada vez que encienda/apague el dispositivo.
Cuando el teléfono está bloqueado aún es posible hacer llamadas al número
oficial de emergencia programado en su dispositivo.
Llamada no permitida aparecerá en la pantalla si trata de hacer una llamada
cuando el dispositivo esté bloqueado. Para contestar una llamada con el bloqueo
de teléfono activado, elija Contestar u oprima la tecla Llamar.
178
Configuraciones
Números permitidos con el teléfono bloqueado
Cuando el bloqueo de teléfono está activado, las únicas llamadas salientes que
pueden hacerse son al número de emergencia programado en su dispositivo o al
número guardado en Número permitido cuando teléfono bloqueado.
1. En la pantalla inicial, elija Menú > Configuraciones > Configuraciones
de seguridad.
2. Ingrese el código de bloqueo, y oprima OK. Ver "Cambiar código de bloqueo,"
pág. 179.
3. Elija Número permitido cuando teléfono bloqueado. Destaque una posición
vacía y elija Asignar e ingrese el número telefónico; o elija Asignar > Buscar
para obtener el número de Contactos. Elija OK.
Llamar al número permitido cuando teléfono bloqueado
1. En la pantalla inicial, oprima la tecla joystick hacia abajo y destaque el
contacto que desea llamar.
2. Oprima la tecla Llamar para hacer la llamada.
Cambiar código de bloqueo
No use códigos similares a los números de emergencia, para prevenir la
marcación accidental de números de emergencia.
El código de bloqueo original es 1234 o los últimos cuatro dígitos de su número
telefónico. Si ingresa un código de bloqueo incorrecto cinco veces seguidas, su
dispositivo le pedirá el código de bloqueo.
Si ingresa el código de bloqueo erróneo 5 veces seguidas, no podrá ingresar un
código por 5 minutos, aun así apague y encienda el dispositivo entre los
ingresos erróneos.
1. En la pantalla inicial, elija Menú > Configuraciones > Configuraciones de
seguridad > Cambiar código de bloqueo.
2. Ingrese el código de bloqueo nuevo (deberá ser de 4 caracteres de largo),
reingrese el nuevo código de bloqueo para la verificación, y elija OK.
3. Reingrese el código de bloqueo nuevo para la verificación, y elija OK.
Cuando cambie su código de bloqueo, asegúrese de guardarlo en un lugar seguro,
apartado de su dispositivo. No ingrese códigos de acceso similares a los números
de emergencia para así prevenir llamadas de emergencia accidentales.
179
Configuraciones
Restricciones de llamadas
Restricciones de llamadas es un servicio de red. Ver "Servicios de Red," pág. 113.
Si esta función es respaldada por su proveedor de servicio, podrá restringir la
salida y entrada de llamadas por su dispositivo. Cuando las llamadas están
restringidas, aún podría ser posible hacer llamadas al número oficial de
emergencia programado en su dispositivo. Solicite a su proveedor de servicio
la contraseña de restricción.
1. En la pantalla inicial, elija Menú > Configuraciones > Configuraciones de
seguridad > Restricciones de llamadas.
2. Ingrese el código de bloqueo, y oprima OK. Ver "Cambiar código de bloqueo,"
pág. 179.
3. Elija el tipo de llamadas que quiera restringir.
Restringir llamadas salientes—No se pueden hacer llamadas.
Restringir llamadas entrantes—No se pueden recibir llamadas.
4. Elija una opción: Seleccionar, Agregar restricción.
Voz confidencial
Voz confidencial es un servicio de red. Ver "Servicios de Red," pág. 113. Si esta
función es respaldada por su proveedor de servicio, su conversación telefónica
actual es protegida de otros usuarios que hacen sus llamadas telefónicas por la
misma red. En la pantalla inicial, elija Menú > Configuraciones > Configuraciones
de seguridad > Voz confidencial > Activar o Desactivar.
■ Configuraciones de aplicación
El menú de Configuraciónes de aplicación cambia juegos y configuraciones
de aplicación.
En la modalidad inactiva, elija Menú > Configuraciones > Configuraciones de
aplicación y una de las siguientes
Sonidos de aplicaciones—Elija Activado o Desactivado.
Luces de aplicaciones—Elija Aplicación definida o Predeterminado.
Sacudidas de aplicaciones—Elija Activado o Desactivado.
180
Configuraciones
■ Sistema (Red)
Las opciones del menú que aparecen en su dispositivo son basadas en la red de su
proveedor. La red determina las opciones que aparecen actualmente en el menú
del dispositivo. Consulte con su proveedor para más información.
El menú Red le permite personalizar cómo su dispositivo elige una red para funcionar
cuando está fuera o dentro de su sistema primario u original. Su dispositivo está
programado para buscar automáticamente el sistema más económico. Si su
dispositivo no encuentra ningún sistema preferido, utilizará automáticamente el
sistema basado en la opción que usted eligió en el menú Red.
Opciones de roaming
Podrá programar su dispositivo para que "viaje" o haga "roaming" para buscar
otra red cuando se encuentre fuera de su red original.
1. En la pantalla inicial, elija Menú > Configuraciones > Red > Opciones
de roaming.
2. Elija cualquiera de las siguientes opciones:
Sólo área doméstica—Sólo puede hacer y recibir llamadas en su área principal.
Automática—El dispositivo busca automáticamente el servicio en otra red
digital. Al no encontrar ninguna, el teléfono elige el servicio análogo. La tárifa
de roaming se aplica estando fuera del área de servicio original.
3. Oprima OK, si es necesario, para confirmar la activación.
Modo
Se puede elegir entre el servicio digital o análogo para su dispositivo.
1. En la pantalla inicial, elija Menú > Configuraciones > Red > Modo.
2. Elija cualquiera de las siguientes opciones:
Digital primero—El dispositivo funciona en el modo digital; mas si no está
disponible, también funcionará en el análogo.
Sólo digital—El dispositivo sólo funciona en el modo digital.
Sólo análogo—El dispositivo sólo funciona en el modo análogo.
■ Servicios de red
Las funciones siguientes son servicios de red. Ver "Servicios de Red," pág. 113.
181
Configuraciones
Guardar un código de opción
1. En la pantalla inicial, elija Menú > Configuraciones > Servicios de red >
Configuración de opciones de la red.
2. Ingrese el código de opción de su proveedor de servicio (por ejemplo, *633), y
elija OK.
3. Elija el tipo de servicio correspondiente al código de opción que ingresó (por
ejemplo, Reenvío de llamada).
El código de opción activado ya está guardado en su dispositivo, y la pantalla
mostrará el recuadro Código de opción: . Siga ingresando otros códigos de
opción (por ejemplo, *633), u oprima la tecla Finalizar para regresar a la pantalla
inicial. Cuando haya ingresado con éxito un código de opción de red, la opción
aparecerá en el menú Servicios de red.
Reenvío de llamada
La función Reenvío de llamada instruye a la red a redirigir las llamadas entrantes
a otro número. La función Reenvío de llamada es un servicio de red y es posible
que no funcione de la misma manera en todas las redes; contacte a su proveedor
de servicio sobre disponibilidad.
Activar
Es posible que todas las opciones listadas no aparezcan en la pantalla. Contacte a
su proveedor de servicio para más información.
1. En la pantalla inicial, elija Menú > Configuraciones > Servicios de red >
Reenvío de llamada.
2. Elija cualquiera de las siguientes opciones:
Desviar todas las llamadas—Desvía todas las llamadas a un número
que especifique.
Desviar si ocupado—Desvía todas las llamadas entrantes durante una llamada
en curso.
Desviar si no contesta—Desvía todas las llamadas entrantes no contestadas a
otro número. También puede programar un tiempo de espera antes de que se
efectúe el desvío.
Desviar si fuera de alcance—Desvía las llamadas entrantes cuando el
dispositivo está apagado.
Cancelar todos los desvíos—Cancela todas las opciones de desvío de llamadas
que haya activado.
182
Configuraciones
3. Elija Activar.
4. Elija el destino al cual serán desviadas sus llamadas.
5. Ingrese el número al cual sus llamadas, datos u otra información serán
desviadas y elija OK.
Cancelar
En la pantalla inicial, elija Menú > Configuraciones > Servicios de red > Reenvío
de llamada > Cancelar todos los desvíos. Cancelar todos los desvíos podría afectar
la recepción de sus mensajes de correo de voz. Contacte a su proveedor de servicio
para más detalles.
Llamada en espera
Si es respaldada por su proveedor de servicio, llamada en espera le notifica de una
llamada entrante incluso durante una llamada activa. Podrá aceptar, rechazar, o
ignorar la llamada entrante.
1. En la pantalla inicial, elija Menú > Configuraciones > Servicios de red >
Llamada en espera > Activar o Cancelar.
2. Durante una llamada, elija Contestar u oprima la tecla Llamar para contestar
la llamada en espera. La primera llamada es retenida.
3. Oprima la tecla Finalizar para terminar la llamada activa.
Enviar ID de llamante
Si esta función es respaldada por su proveedor de servicio, podrá permitir o evitar
que su número de teléfono aparezca en la pantalla del teléfono destinatario.
En la pantalla inicial, elija Menú > Configuraciones > Servicios de red > Enviar ID
de llamante > Sí o No.
Ver su propio número telefónico
En la pantalla inicial, elija Menú > Configuraciones > Servicios de red > Selección
de mi número.
183
Configuraciones
■ Restaurar configuraciones de fábrica
Puede reprogramar algunas de las configuraciones de los menús a sus programaciones
originales. Los datos que ha ingresado o ha descargado no son eliminados, por
ejemplo, los ingresos en su directorio.
1. En la pantalla inicial, elija Menú > Configuraciones > Restaurar configuraciones
de fábrica.
2. Ingrese el código de bloqueo, y oprima OK. Ver "Configuraciones de seguridad,"
pág. 178.
■ Infrarrojo
Puede programar su dispositivo para que reciba y envíe datos vía su puerto IR.
Para usar la conexión IR, la transmisión y recepción deberá ser vía un teléfono o
dispositivo compatible con IR. Puede enviar o recibir datos, como tarjetas de
negocios, gráficos, imágenes, clips de sonido, archivos de música, videos y notas
de agenda de o hacia un teléfono o dispositivo de datos compatible (por ejemplo,
una PC) vía el puerto IR de su dispositivo.
No apunte los rayos IR (infrarrojos) a los ojos ni deje que interfieran con otros
dispositivos IR. Este dispositivo es un producto Láser Clase 1.
Enviar y recibir datos
1. Asegúrese que los puertos IR de los dispositivos para el envío y recepción
están alineados y que no hay obstáculos entre los dispositivos.
La distancia preferible entre los dos dispositivos en una conexión infrarroja es
de 8 cms a 90 cms (3 pulgadas a 3 pies).
2. Active la conexión IR en su dispositivo al elegir Menú > Configuraciones >
Infrarrojo.
3. El usuario del otro dispositivo también deberá activar el puerto IR.
Si la transmisión de datos no comienza en dos minutos tras la activación del
puerto IR, la conexión es cancelada y deberá comenzarla de nuevo.
Indicador de conexión
• Cuando vea el ícono
fijo en la pantalla, significa que la conexión IR está
activada y su dispositivo está listo para enviar/recibir datos vía su puerto IR.
• Cuando
destella, su dispositivo está tratando de establecer una
conexión al otro dispositivo o una conexión se ha perdido.
184
Configuraciones
Enviar una tarjeta de negocios
1. En la pantalla inicial, elija Menú > Configuraciones > Infrarrojo.
2. Destaque el ingreso del directorio que desea enviar.
3. Elija Detalles > Opciones > Enviar tarjeta de negocios > Vía infrarrojo >
Número predeterminado para enviar sólo el número primario o Todos los
detalles para enviar toda la información de contactos.
4. Coloque alineados el puerto IR con el puerto activo del otro dispositivo IR.
Elija OK y su dispositivo comenzará el envío de la tarjeta de negocios vía IR.
Recibir una tarjeta de negocios
1. En la pantalla inicial, elija Menú > Configuraciones > Infrarrojo >
Seleccionar. Recepción de infrarrojo activa aparece en la pantalla.
2. Coloque alineados el puerto IR con el puerto activo del otro dispositivo IR que
está enviando la tarjeta de negocios.
3. Oprima Mostrar > Guardar para almacenar la tarjeta de negocios en la
memoria del teléfono, u oprima Salir > OK para borrarla.
185
Organizador
11. Organizador
Su dispositivo tiene opciones para ayudarle a organizar su vida cotidiana; incluye
un reloj de alarma, agenda, calculadora, cronómetro y temporizador.
■ Alarmas
Cuando llegue la hora de la alarma mientras el dispositivo está apagado, éste se
enciende y suena la alarma. Si oprime Parar, el dispositivo le pregunta si quiere
dejarlo encendido para las llamadas. Oprima No para apagar el dispositivo o Sí
para hacer y recibir llamadas. No oprima Sí cuando el uso del teléfono celular
pueda causar interferencia o peligro.
Configurar o cambiar una alarma
El reloj de alarma se basa en el reloj del dispositivo. Suena una alerta a la hora
que programe y también funciona cuando el dispositivo está apagado.
1. En la pantalla inicial, elija Menú > Organizador > Alarmas > Hora de
alarma > Activar.
2. Ingrese la hora para la alarma en el formato hh:mm, y elija OK.
3. Elija am o pm (si ha elegido el formato 12 horas). Alarma activada aparece
brevemente en la pantalla y
aparece en la pantalla inicial.
Repetir alarma
Puede programar la alarma para que se repita. En la pantalla inicial, elija Menú >
Organizador > Alarmas > Repetir alarma.
Programar el tono de la alarma
Puede elegir el tono a usar cuando suene la alarma.
1. En la pantalla inicial, elija Menú > Organizador > Alarmas > Tono de alarma.
2. Elija Estándar, Radio, Tono del timbre, Abrir Galería o Descargas tonos para
elegir el tono que desea usar.
Si configura su alarma a Radio, use un accesorio que respalde el estéreo FM.
186
Organizador
Condiciones de la alarma
Cuando la alarma suena, su dispositivo emite unos bips, vibra (si la alerta de
vibración está activada en el perfil activo), y se encienden las luces.
Con el dispositivo encendido, elija OK para que la alarma deje de sonar o Pausa.
La alarma es silenciada por 10 minutos y Pausa activada aparece en la pantalla.
Si no oprime ninguna tecla, la alarma se detiene (pausa) por 10 minutos, y luego
suena otra vez.
Cuando llegue la hora de la alarma mientras el dispositivo está apagado, éste se
enciende y suena la alarma. Si oprime Parar, el dispositivo le pregunta si quiere
dejarlo encendido para las llamadas. Oprima No para apagar el dispositivo o Sí
para hacer y recibir llamadas. No oprima Sí cuando el uso del teléfono celular
pueda causar interferencia o peligro.
Apagar la alarma
En la pantalla inicial, elija Menú > Organizador > Alarmas > Hora de
alarma > Desactivar.
■ Agenda
Con la agenda puede programar recordatorios, llamadas por hacer, reuniones y
cumpleaños. Puede programar una alarma para cualquiera de estos eventos.
La vista mensual muestra el mes elegido completo y las semanas. También le
permite ir a una fecha específica. Cualquier día o fecha que aparezca en negrillas
contiene notas de agenda como recordatorio o reunión.
Abrir
En la pantalla inicial, elija Menú > Organizador > Agenda. Puede mover el cursor
en algunas vistas de la agenda usando la tecla joystick.
Ir a fecha
1. En la pantalla inicial, elija Menú > Organizador > Agenda > Opciones >
Ir a fecha.
2. Ingrese la fecha (por ejemplo, dd/mm/aaaa) y elija OK.
187
Organizador
Anotar una fecha específica
Puede aplicar cinco tipo de notas a su agenda. Su dispositivo le pide más
información según el tipo de nota que elija. También tiene la opción de
programar una alarma para cualquier nota elegida.
1. Vaya a la fecha para la cual desea programar un recordatorio. Ver "Ir a fecha,"
pág. 187.
2. De la vista mensual (con la fecha deseada destacada), elija Opciones >
Crear nota.
3. Elija uno de los siguientes tipos de notas y haga los pasos indicados:
Reunión—Ingrese un tema, ubicación y hora para comenzar o finalizar.
Llamada—Ingrese un número telefónico, un nombre y la hora.
Cumpleaños—Ingrese el nombre de la persona y el año de nacimiento.
Memo—Ingrese un tema y fecha de conclusión.
Recordatorio—Ingrese el tema del cual desea ser recordado. Tendrá la opción
de programar una alarma.
4. Ingrese su nota, y elija Opciones > Guardar.
Ver las notas (notas del día)
Tras crear algunas notas de agenda, puede verlas.
1. En la pantalla inicial, elija Menú > Organizador > Agenda.
2. Recorra a la fecha con la nota; aparecerá en negrilla, y elija Ver.
Opciones mientras ve la lista de notas
1. Oprima Opciones mientras aparecen las notas del día para mostrar las
opciones siguientes:
Las opciones siguientes están disponibles mientras ve el texto principal o el
encabezamiento de una nota.
Crear nota—Crear una nota para la fecha elegida.
Eliminar—Borrar la nota.
Editar—Editar la nota.
Mover—Transferir la nota a otra fecha en su agenda.
Repetir—Activar la nota para que aparezca en el agenda con regularidad
(diaria, semanal, quincenal, mensual y anualmente).
188
Organizador
Ir a fecha—Saltar a una fecha en su agenda.
Ir a hoy—Saltar a la fecha actual en su agenda.
Enviar nota—Enviar la nota a otro dispositivo como un mensaje de texto o en
el formato de agenda a agenda (vCal) a través de los mensajes multimedia,
SMS, o IR.
Copiar—Copiar la nota, la cual podrá pegar a otra fecha.
Configuraciones—Configurar la fecha y hora, los formatos de fecha y hora, el
día de comienzo para la semana, y si desea borrar las notas automáticamente
tras un período de tiempo fijo.
Ir a lista de tareas—Va a la lista de tareas en su agenda.
2. Elija una opción para activarla o acceder a su submenú.
Enviar una nota
1. En la pantalla inicial, elija Menú > Organizador > Agenda.
2. Recorra a la fecha que contenga la nota que desea enviar, la cual aparece en
negrillas, y elija Ver.
3. Recorra a la nota la cual desea enviar, y elija Opciones > Enviar nota > Como
nota, Vía multimedia (ver "Mensajes multimedia," pág. 137), Como texto, o
Vía infrarrojo (ver "Recibir una tarjeta de negocios," pág. 185).
4. Si eligió Como nota, ingrese el número para el destinatario, u oprima Buscar
para obtener un número del directorio, y oprima OK.
5. Si elige Como texto, la nota aparecerá como un mensaje de texto en la pantalla.
• Elija Enviar > Enviar a número, Enviar a e-mail, Copias múltiples o Enviar a
lista de distribución. Destaque el contacto al que desea enviarle la nota, y
elija Enviar.
• Ingrese el número para el destinatario, u oprima Buscar para obtener un
número del directorio, y elija Enviar.
Recibir notas
Cuando recibe una nota de agenda en el formato de agenda a agenda (vCal), su
dispositivo muestra Nota de agenda recibida.
• Para ver las notas de agenda, elija Mostrar y, si es necesario, recorra para ver
todo el mensaje.
• Para guardar notas de agenda tras verlas, elija Opciones > Guardar.
189
Organizador
• Para descartar las notas de agenda tras verlas, elija Opciones > Descartar o
elija Salir.
Cuando recibe una nota de agenda o mensaje de texto, aparece una
notificación al efecto en la pantalla inicial. Ahora puede guardar la nota
en su agenda y programar una alarma para cualquier fecha u hora.
■ Notas
Puede escribir y guardar información en Notas, y enviar notas vía multimedia,
mensajes de texto, o infrarrojo. Desde la pantalla inicial, elija Menú > Organizador >
Notas. Si no ha creado notas, elija Agregar nota, redacte la nota y elija Guardar al
terminar. Si ya ha creado notas, destaque la nota que desea usar y elija Ver para
leerla, o elija Opciones para una de las siguientes opciones:
Crear nota—Crear notas adicionales.
Eliminar—Borrar una nota.
Editar—Cambiar o agregar información a una nota.
Enviar nota—Enviar una nota Vía multimedia, Como texto, o Vía infrarrojo.
Eliminar todas las notas—Eliminar todas las notas que hayan creado.
■ Lista de tareas
Use la lista de tareas para llevar registro de sus actividades. Puede guardar una
nota para una tarea, elegir su nivel de prioridad y marcarla como finalizada
cuando la haya completado. Puede organizar las notas por prioridad o por fecha.
Agregar una nota de tarea
1. En la pantalla inicial, oprima Menú > Organizador > Lista de tareas.
2. Si no hay notas, elija Agregar nota.
3. Ingrese el tema de la nota de tarea y oprima Guardar.
4. Elija entre las prioridades Alta, Media, o Baja. La nota de tarea es guardada.
El dispositivo programa automáticamente la fecha límite.
Ver una nota de tarea
1. En la pantalla inicial, oprima Menú > Organizador > Lista de tareas.
2. Destaque la nota de tarea, y elija Opciones para elegir de las siguientes:
Agregar—Agrega otra nota (sólo disponible en la vista de encabezamiento).
Eliminar—Borra la nota.
Nota realizada—Marca la nota o tarea como completada; no recibirá
más recordatorios.
190
Organizador
Ordenar fecha límite—Organiza las notas según su fecha de vencimiento.
Enviar—Envía la nota a otro dispositivo usando IR, como un mensaje de texto
o multimedia, o como nota de agenda a otro dispositivo compatible.
Ir a Agenda—Sale de la lista de tareas, y va a la agenda.
Guardar en agenda—Guarda la nota de tarea en una fecha en su agenda.
Eliminar todas notas—Borra todas las notas de tareas en la lista (sólo
disponible en la vista de encabezamiento).
3. Ver la nota de tarea y elija Editar para cambiar la nota u Opciones para elegir
de las siguientes:
Fecha límite—Programar una fecha de conclusión para la nota (sólo
disponible en la vista de nota).
Nota realizada—Marca la nota o tarea como completada; no recibirá
más recordatorios.
Eliminar—Borrar la nota.
Editar prioridad—Cambie la prioridad de alta, media o baja (sólo disponible en
la vista de nota).
Enviar—Envía la nota a otro dispositivo usando IR, como un mensaje de texto
o multimedia, o como nota de agenda a otro dispositivo compatible.
Ir a Agenda—Sale de la lista de tareas, y va a la agenda.
Guardar en agenda—Guarda la nota de tarea en una fecha en su agenda.
■ Calculadora
La calculadora en su dispositivo suma, resta, multiplica, divide, calcula el cuadrado
y la raíz cuadrada, cambia el signo del número ingresado, y convierte divisas.
Nota: Esta calculadora tiene precisión limitada y es diseñada para
procesos sencillos de cálculo.
1. En la pantalla inicial, elija Menú > Organizador > Calculadora.
2. Ingrese el número base de la operación. Oprima la tecla # para el punto
decimal, si es necesario.
Para calcular el cuadrado o la raíz cuadrada, elija Opciones > Al cuadrado o
Raíz cuadrada.
Oprima la tecla * para recorrer los caracteres para sumar (+), restar (-), multiplicar
(*), y dividir (/). Pause brevemente para elegir el carácter en la pantalla.
Para cambiar el signo, elija Opciones > Cambiar signo, o recorra hacia arriba
o abajo.
191
Organizador
3. Ingrese el segundo número de la operación.
4. Elija Igual a si el ha terminado el proceso u Opciones si necesita más pasos.
Convertidor de divisas
Puede convertir unidades extranjeras en nacionales, o viceversa, directamente
desde el menú Calculadora.
Nota: Cuando cambie la moneda base, deberá ingresar las tasas nuevas
puesto que todas las tasas anteriores son configuradas a cero.
1. En la pantalla inicial, elija Menú > Organizador > Calculadora > Opciones >
Tasa de cambio > Unidades extranjeras a nacionales o Unidades nacionales
a extranjeras.
Unidades extranjeras a nacionales—La cantidad de unidades domésticas
necesaria para cambiar una unidad de divisa extranjera.
Unidades nacionales a extranjeras—La cantidad de unidades extranjeras
necesaria para cambiar una unidad de moneda local.
2. Ingrese la tasa de cambio (oprima # para insertar un punto decimal), y elija OK.
3. Elija Atrás para regresar al menú Calculadora e ingrese la cantidad de moneda.
4. Elija Opciones > A nacional o A extranjera.
A nacional—convierte divisa extranjera en moneda local.
A extranjera—convierte moneda local en divisa extranjera.
5. Si no ha ingresado una tasa de cambio, el dispositivo le pedirá que ingrese
una. Elija OK. Puede editar la tasa de cambio en cualquier momento.
■ Temporizador
Puede ingresar una hora específica (hasta 99 horas y 59 minutos). Cuando el
tiempo vence, su dispositivo suena una alarma.
Nota: El temporizador sólo funciona cuando el dispositivo está encendido.
Cuando apague el dispositivo, el temporizador se desactivará.
Programar el temporizador
1. En la pantalla inicial, elija Menú > Organizador > Temporizador.
2. Ingrese la hora (en el formato hh:mm) y elija OK.
3. Ingrese una nota para el temporizador, y elija OK.
192
Organizador
El ícono
aparece en la pantalla al configurar el temporizador. Cuando vence
el tiempo programado, su dispositivo suena una alarma, muestra la nota del
temporizador, y destellan las luces.
Oprima cualquier tecla mientras la alarma está activa para detener el temporizador.
Después de 3 segundos la alarma para el temporizador se detiene automáticamente.
Cambiar la hora
Tras programar el temporizador, podrá cambiar el tiempo fijado.
1. En la pantalla inicial, elija Menú > Organizador > Temporizador >
Cambiar tiempo.
2. Ingrese la hora nueva, y oprima OK.
3. Puede cambiar la nota, o ingresar una nueva, y elija OK.
Parar el temporizador antes de que suene la alarma
Tras programar el temporizador, podrá cambiar el tiempo fijado. En la pantalla
inicial, elija Menú > Organizador > Temporizador > Parar cuenta regresiva.
■ Cronómetro
Su dispositivo tiene un cronómetro que se puede usar para llevar registro de la
hora. El cronómetro es mostrado en unidades de horas, minutos, segundos y
fracciones de un segundo en el formato hh:mm:ss:s.
El uso del cronómetro o dejarlo funcionando en segundo plano cuando está
haciendo otras operaciones consume la energía de la batería y reducirá su
tiempo de funcionamiento.
Medición de tiempo
1. En la pantalla inicial, elija Menú > Organizador > Cronómetro > Tiempo
parcial o Tiempo de vuelta > Iniciar. Aparece el tiempo en progreso.
Tiempo parcial—Puede usar la función de tiempo parcial para actividades
como una carrera de larga distancia en la cual es necesario mantener un
ritmo. Oprima Partir para registrar el lapso de tiempo. El cronómetro continúa
funcionando y el tiempo partido aparece debajo del tiempo en progreso.
Cada vez que elige Partir, el último tiempo medido aparece en la parte
superior de la lista.
Tiempo de vueltas—Puede usar la función de medición de vueltas cuando
desea medir cuánto tiempo le toma completar cada vuelta o ciclo. Oprima
Vuelta para registrar la medición de vuelta. El reloj se detiene, e inmediatamente
193
Organizador
comienza en cero. El tiempo de vuelta aparece debajo del tiempo en progreso.
Cada vez que elige Vuelta, el último tiempo medido aparece en la parte
superior de la lista.
2. Elija Parar para finalizar la medición de tiempo y mostrar el tiempo total o
elija Parar > Opciones > Iniciar o Reiniciar para continuar o reprogramar
el tiempo.
Guardar, ver o eliminar tiempos de vueltas o parciales
• Para guardar un tiempo mientras el reloj sigue marcando, elija Parar >
Guardar, ingrese un nombre para el tiempo medido, y elija OK. Si no ingresa
un nombre, el tiempo total será usado como el título para el tiempo de
vueltas o parcial.
• Para ver un tiempo guardado, desde la pantalla inicial, elija Menú >
Organizador > Cronómetro > Mostrar último o Ver tiempos.
• Para eliminar un tiempo guardado, desde Cronómetro, elija Ver tiempos >
ingrese el tiempo que desea borrar > Eliminar > Sí o elija Eliminar tiempos >
Uno a uno o Eliminar todos.
Nota de funcionamiento
Si oprime la tecla Finalizar y regresa a la pantalla inicial, el reloj continúa
funcionando en segundo plano y el ícono
aparece en la esquina superior
izquierda de la pantalla.
Para regresar a la pantalla del cronómetro, en la pantalla inicial, elija Menú >
Organizador > Cronómetro > Continuar. Para detener el reloj, oprima Parar.
Opciones
Puede elegir las siguientes opciones cuando usa el cronómetro.
Continuar—Aparece cuando el cronómetro está funcionando en segundo plano.
Mostrar último—Aparece cuando ha guardado un tiempo parcial o de vuelta.
Muestra el último tiempo guardado.
Tiempo parcial—Pregunta si desea descontinuar la medición anterior.
Tiempo de vuelta—Pregunta si desea descontinuar la medición anterior.
Ver tiempos—Le permite navegar por los tiempos guardados.
Eliminar horas—Le permite borrar los tiempos guardados. Podrá borrarlos uno a
uno o todos a la vez.
194
Web móvil
12. Web móvil
La función Miniexplorador es un servicio de red. Ver "Servicios de
Red," pág. 113.
Su dispositivo tiene un navegador incorporado que puede usar para conectarse
a servicios selectos del Internet móvil. Si esta función es respaldada por su
proveedor de servicio, tendrá acceso a pronósticos del tiempo, las noticias u
horarios de vuelo, la Bolsa y más. El navegador Web de su dispositivo puede
mostrar contenido basado en WAP.
Puede que su dispositivo tenga algunas anotaciones preinstaladas para páginas
no afiliadas a Nokia. Nokia no garantiza ni recomienda dichas páginas. Si desea
acceder a estas páginas, deberá tomar las mismas precauciones, como lo haría
con cualquier página de Internet, por razones de seguridad o contenido.
El ícono de seguridad no indica la seguridad de la transmisión de datos entre el
puerto y el servidor de contenido (donde se guarda información solicitada). El
proveedor de servicio asegura la transmisión de datos entre el puerto y el servidor
de contenido.
■ Acceso a Internet móvil
Debido a que el contenido de Internet móvil está diseñado para ser visto en
su teléfono, su proveedor celular también será su proveedor de servicio de
Internet móvil.
Es muy probable que su proveedor de servicio haya creado su propia página
inicial y haya configurado su navegador para que éste vaya a dicha página
cuando usted se conecte al Internet móvil. Cuando esté en la página de su
proveedor, encontrará enlaces a otras ubicaciones.
No deberá hacer nada en la configuración del teléfono para la navegación.
Por lo general, su proveedor de servicio configurará su teléfono cuando se
suscriba al servicio. Contacte a su proveedor de servicio en caso de dificultades
al usar el navegador.
■ Conexión al Internet móvil
En la pantalla inicial, elija Menú > Miniexplorador > Conectar o el ítem del menú
provisto por el operador.
Tras una breve pausa, su dispositivo tratará de conectarse a la página de inicio de
su proveedor de servicio. Si recibe una notificación de error, es posible que su
195
Web móvil
dispositivo no esté configurado para la navegación. Contacte a su proveedor de
servicio para asegurarse que su dispositivo está debidamente configurado.
■ Navegar por Internet móvil
Puesto que la pantalla de su dispositivo es mucho más reducida que la de una
computadora, el contenido de Internet móvil aparece con otro formato distinto.
Esta sección contiene instrucciones sobre el uso de las teclas para navegar por
un sitio WAP.
Teclas del teléfono
• Oprima la tecla de encendido para mostrar la página de inicio del Miniexplorador.
• Recorra hacia arriba o abajo para navegar el sitio WAP.
• Elija un ítem.
• Para ingresar letras y números, oprima una de las teclas 0-9.
• Para ingresar caracteres especiales, oprima *.
Recibir una llamada mientras está en línea
Es posible que pueda recibir llamadas de voz cuando usa el navegador WAP,
dependiendo de su proveedor de servicio celular.
• Para contestar la llamada entrante, oprima la tecla Llamar.
• Para rechazar la llamada entrante, oprima la tecla Finalizar.
Tras finalizar la llamada de voz, la conexión al Internet móvil se reactiva
automáticamente.
Nota: Si el proveedor de servicio celular no respalda las llamadas
entrantes durante la navegación, entonces dichas llamadas son
trasladadas automáticamente al correo de voz.
Hacer una llamada de emergencia mientras está en línea
Podrá finalizar su conexión de datos y hacer una llamada de emergencia.
1. Para terminar la conexión al Internet móvil, oprima la tecla Finalizar.
2. Oprima la tecla Finalizar las veces necesarias para borrar la pantalla y
preparar el dispositivo para las llamadas.
3. Marque el número de emergencia de la localidad en que se encuentra.
Los números de emergencia varían por zonas.
4. Oprima la tecla Llamar.
196
Web móvil
Borrar el caché y desconectarse
El caché es una ubicación de memoria que se usa para guardar datos
provisionalmente. Si ha tratado de tener o ha tenido acceso a información
confidencial que ha requerido contraseñas, borre el caché después de cada uso.
La información o servicios a que ha tenido acceso es almacenada en el caché.
Para vaciar el caché mientras está en el menú del navegador, elija Navegar >
Avanzado > Borrar > Caché desde la página inicial. También puede borrar el
caché manteniendo oprimida la tecla de encendido de su dispositivo.
Para terminar la conexión al Internet móvil mientras navega, oprima la
tecla Finalizar.
197
Extras
13. Extras
Desafíese usted mismo o a un amigo a jugar cualquiera de los entretenidos
juegos de su dispositivo. Algunos menús listados son servicios de red. Contacte a
su proveedor de servicio para más información. Cuando descarga juegos o
aplicaciones, éstos podrían ser guardados en las carpetas Juegos o Colección.
■ Juegos
En la pantalla inicial, elija Menú > Extras >Juegos para ver los juegos en
su dispositivo.
■ Colección
Colección es un servicio de red. Ver "Servicios de Red," pág. 113. Si esta función
es respaldada por su proveedor de servicio, le serán útiles las aplicaciones Java
preinstaladas en su dispositivo. También, puede manejar y descargar aplicaciones
Java nuevas que su proveedor de servicio podría ofrecer.
Las aplicaciones podrían tardarse unos segundos en cargar. Cuando abra una
aplicación, espere a que la pantalla de inicio desaparezca. Ahora, la aplicación
está lista.
1. En la pantalla inicial, elija Menú > Extras > Colección.
2. Elija una aplicación: Converter, Translator, o World Clock.
Nota: Sólo instale aplicaciones de sitios que ofrezcan protección
adecuada contra software dañinos.
■ Memoria
Puede verificar la cantidad de memoria disponible para la instalación de juegos y
aplicaciones. En la pantalla inicial, elija Menú > Extras > Memoria.
Nota: Sólo instale aplicaciones de sitios que ofrezcan protección
adecuada contra software dañinos.
198
Conectividad PC
14. Conectividad PC
■ Transferir datos USB
Puede transferir datos como música, fotos y videos de su dispositivo a una PC
compatible, o de una PC compatible a su dispositivo usando el cable para datos
DKU-2 USB. El cable se conecta a su dispositivo correctamente cuando las flechas
en el conector apuntan hacia la pantalla. Desconecte el cable para datos USB del
dispositivo para hacer una llamada.
Use el software Nokia Audio Manager para manejar archivos de música y
transferirlos desde la PC a la tarjeta de memoria en su dispositivo. Ver "Nokia PC
Suite," pág. 200.
Transferir archivos usando Windows Explorer
Tras instalar el Nokia Audio Manager, es posible usar el Windows Explorer para
transferir archivos de música, fotos y videos a su dispositivo y de su dispositivo a
su PC.
1. Conecte su PC y su dispositivo con el cable DKU-2 USB. Accesorio de datos
conectado aparece en su dispositivo.
2. Abra el Windows Explorer. Su dispositivo aparecerá como una unidad local
(con el nombre de Nokia 6235, Nokia 6235i, Nokia 6236, y Nokia 6236i), y con
una letra de control asignada.
3. Haga clic en las carpetas para mostrar la ventana con el contenido de la
carpeta en la tarjeta de memoria del dispositivo.
4. Abra otra ventana de Windows Explorer y muestre el contenido de la carpeta
en su PC en la cual tiene guardados los archivos MP3, fotos, o videos.
5. Elija los archivos en su PC que desea transferir a su dispositivo.
6. Tome y suelte los archivos de la segunda a la primera ventana y póngalos en
la carpeta.
7. Los archivos son transferidos al dispositivo y pueden ser reproducidos por el
reproductor de música, o acceder a ellos con el Reproductor multimedia.
Si eligió archivos que requieren más espacio de memoria que la disponible
en la memoria del dispositivo, aparecerá una nota de error. Quite algunos
archivos hasta que la selección quepa en la memoria.
199
Conectividad PC
8. Desconecte el cable USB por medio de hacer clic dos veces en la flecha verde
en la barra de tareas en la parte inferior de la pantalla de su PC. Aparece una
ventana que muestra Desconectar o Expulsar Hardware.
9. Haga clic en el dispositivo USB en la ventana de dispositivos de hardware.
Aparece una ventana que muestra Parar dispositivo de Hardware.
10. Destaque Dispositivo USB y haga clic en OK. La ventana Seguro remover
Hardware aparece con el mensaje El ‘Dispositivo USB’ puede ser
seguramente removido del sistema. Elija OK.
Importante: Para asegurar que todas las operaciones de las tarjetas de
memoria sean completadas de una manera controlada, no desconecte
el cable de conectividad hasta que Windows le notifique que es seguro
hacerlo. La finalización no controlada de las operaciones de tarjetas
de memoria podrían causar que la tarjeta de memoria y la información
guardada en ésta se corrompa. Una tarjeta de memoria corrompida
necesitaría ser formateada antes de que pueda ser usada otra vez.
Cuando una tarjeta de memoria es formateada, toda la información en
la tarjeta se pierde permanentemente.
■ Nokia PC Suite
El software Nokia PC Suite está disponible para los teléfonos Nokia 6235,
Nokia 6235i, Nokia 6236 y Nokia 6236i. El Nokia PC Suite es una colección
de poderosas herramientas que usted puede usar para administrar los datos y
funciones de su dispositivo. Cada componente es un programa por separado
que incluye ayuda en línea. El software Nokia PC Suite, las instrucciones de
instalación, y otra documentación, los cuales son provistos gratis, pueden ser
descargados de la sección para la descarga de software en el sitio Web Nokia:
www.nokiausa/pcsuite (texto en inglés).
Algunas funciones en su dispositivo requieren el respaldo de la red. Contacte a su
proveedor de servicio sobre disponibilidad e instrucciones de configuración.
• Nokia Application Installer instala las aplicaciones Symbian y Java (TM) desde
una PC compatible a un dispositivo compatible.
• Nokia Audio Manager produce y organiza archivos de música digitales en una
PC compatible y los transfiere a un dispositivo móvil compatible.
• Nokia Connection Manager activa los tipos de conexiones entre un
dispositivo compatible y una PC compatible cuando se usan las aplicaciones
Nokia PC Suite.
200
Conectividad PC
• Nokia Contacts Editor edita los contactos de un dispositivo compatible desde
su PC.
• Nokia Content Copier copia información entre dos dispositivos Nokia
compatibles y hace copias de seguridad desde su dispositivo Nokia
compatible a una PC compatible.
• Nokia Image Converter modifica imágenes y las transfiere a un dispositivo
móvil compatible como imágenes de fondo, fotos verticales e imágenes MMS.
• Nokia Multimedia Player reproduce mensajes MMS y archivos de sonido y de
vídeo y produce listas de reproducción de sus archivos multimedia favoritos.
• Nokia PC Sync sincroniza el directorio, agenda, notas e items de tarea entre
un dispositivo compatible y PIM de una PC compatible.
• Nokia Phone Browser usa su PC compatible para navegar por los mensajes de
su dispositivo compatible, contactos, imágenes, archivos de sonido y de vídeo,
para copiar y mover archivos o eliminarlos de la memoria del teléfono y
transferir archivos entre el dispositivo y su PC.
• Nokia Sound Converter convierte los tonos del timbrado MIDI General en
tonos MIDI Crómaticos Polifónicos para un dispositivo compatible.
• Nokia Text Message Editor envía y maneja los mensajes de texto desde una
PC compatible.
• Nokia Modem Options configura opciones para las llamadas de datos que
usted hace.
Las protecciones de copyright podrían prevenir la duplicación, cambio, transferencia
o desvío de ciertas imágenes, tonos de timbre y otros contenidos.
201
Accesorios
15. Accesorios
Verifique el modelo del cargador antes de usarlo con
su teléfono. Este dispositivo debe ser utilizado usando
como fuente de carga el Cargador ACP-7 o ACP-12.
Aviso: Utilice sólo baterías, cargadores y
accesorios homologados por Nokia para este modelo particular. El uso de
cualquier otro tipo podría anular la validez de cualquier aprobación o
garantía, y podría resultar peligroso. Para disponibilidad de accesorios
aprobados, consulte con su distribuidor.
Unas pocas reglas prácticas sobre los accesorios:
• Mantenga todos los accesorios fuera del alcance de los niños.
• Cuando desconecte el cordón eléctrico de cualquier accesorio, sujete el
enchufe, no el cordón.
• Verifique regularmente que los accesorios instalados en un vehículo estén
montados y operando en forma adecuada.
• Sólo personal especializado debe instalar el equipo para automóvil.
Carga
• Batería Estándar Li-Ion 1070-mAh (BL-6C, BL-5C)
• Cargador Estándar (ACP-7)
• Cargador Rápido (ACP-12)
• Cargador Retráctil (AC-1)
Visite www.nokia.com/latinoamerica para más información sobre los accesorios.
202
Información de referencia
16. Información de referencia
■ Información sobre las baterías
Su dispositivo es alimentado por una batería recargable. El rendimiento completo
de una batería nueva sólo se adquiere tras dos o tres ciclos de carga y descarga.
La batería puede ser cargada o descargada centenares de veces pero se gastará
eventualmente por sí sola. Cuando los tiempos de conversación y de reserva son
mucho más cortos que los normales, ya es momento de adquirir una batería
nueva. Use sólo baterías homologadas por Nokia, y recargue su batería sólo con
cargadores homologados por Nokia diseñados para este dispositivo.
Desconecte el cargador del enchufe y del dispositivo cuando no esté en uso. No
deje la batería conectada al cargador por demasiado tiempo. La sobrecarga puede
acortar la vida de la batería. Cuando se deje sin usar, una batería completamente
cargada se descargará eventualmente por sí misma. Las temperaturas extremas
afectan la habilidad de carga de su batería.
Utilice la batería solamente para su finalidad destinada. Nunca utilice ninguna
batería o cargador desgastado o dañado.
No ponga la batería en cortocircuito. Un cortocircuito accidental puede ocurrir
cuando un objeto metálico como una moneda, clip o bolígrafo causa una
conexión directa entre los terminales positivos (+) y negativos (-) de la batería.
(Estas parecen tiras metálicas en la batería). Puede ocurrir, por ejemplo, cuando
lleva una batería de repuesto en su bolsillo o bolsa. El cortocircuito podría dañar
la batería o el objeto que lo origina.
Dejar la batería en lugares calurosos o fríos, tales como dentro de un automóvil
cerrado y expuesto a la intemperie veraniega o invernal reducirá la capacidad y
vida de la batería. Siempre trate de mantener la batería entre los 15°C y 25°C
(59°F y 77°F). Un teléfono con la batería caliente o fría podría dejar de funcionar
momentáneamente, aun cuando la batería esté completamente cargada. El
rendimiento de las baterías se ve limitado particularmente a temperaturas bajo
los 0°C (32°F).
¡No arroje las baterías al fuego! Disponga de las baterías de acuerdo a las ordenanzas
locales. Por favor, recicle cuando le sea posible. No disponga de éstas con los
desperdicios domésticos.
203
Información de referencia
■ Normas de autenticación de la batería Nokia
Siempre use baterías auténticas de Nokia para su protección. Para estar seguro
que está adquiriendo una batería original Nokia, cómprela en un centro
distribuidor autorizado por Nokia; busque el logotipo de Nokia Original
Enhancements en el empaque, y verifique la etiqueta de holograma, siguiendo
estos pasos:
Realizar con éxito los cuatro pasos no asegura totalmente la autenticidad de la
batería. Si tiene alguna razón para creer que su batería no es batería auténtica y
original de Nokia, evite usarla y llévela al centro de distribución autorizado por
Nokia más cercano o a un distribuidor Nokia para pedir asistencia. Su distribuidor
Nokia o centro de servicio Nokia inspeccionará la batería para confirmar su
autenticidad. Ante la imposibilidad de verificar la autenticidad de la batería,
devuélvala al lugar de compra.
Holograma auténtico
1. Cuando busque la etiqueta del holograma, debería
ver el signo emblemático de Nokia de las manos
conectadas desde un ángulo y el logotipo Nokia
Original Enhancements desde otro ángulo.
2. Al posicionar el holograma a un ángulo hacia los
lados izquierdo, derecho, superior o inferior del
logo, deberá ver los puntos 1, 2, 3 y 4 en cada
lado, respectivamente.
3. Raspe el lado de la etiqueta para revelar
un código de 20 dígitos, por ejemplo,
12345678919876543210. Gire la batería con los
números hacia arriba. El código de 20 dígitos se
lee empezando con el número de la fila superior
seguido por la fila inferior.
4. Confirme la validez del código de 20 dígitos
siguiendo las instrucciones en la página Web de
Nokia www.nokiausa.com/batterycheck.
204
Información de referencia
¿Qué sucede si la batería no es auténtica?
Si no puede confirmar con la etiqueta de holograma que su batería Nokia es una
batería auténtica Nokia, favor de no usar la batería. Llévela al centro autorizado
de servicio o distribuidor Nokia más cercano para ayuda El uso de una batería
no homologada por el fabricante podría ser peligroso y podría resultar en un
rendimiento inferior y perjudicar su dispositivo y sus accesorios. También, podría
invalidar cualquier homologación o garantía aplicable al dispositivo.
Para más información sobre las baterías originales Nokia, visite
www.nokiausa.com/battery.
205
Cuidado y mantenimiento
Cuidado y mantenimiento
Su dispositivo es un producto de diseño y acabado superior, por lo tanto deberá
ser tratado con cuidado. Las siguientes sugerencias le ayudarán a cumplir con
cualquier obligación de garantía y disfrutar de este dispositivo por muchos años.
• Mantenga el dispositivo, así como sus piezas y accesorios, fuera del alcance
de los niños.
• Mantenga el dispositivo seco. Las precipitaciones, la humedad y los líquidos
contienen minerales que corroen los circuitos electrónicos. Si su dispositivo
llega a mojarse, remueva la batería y déjelo secar completamente antes de
reinstalarla/cambiarla.
• No use el teléfono ni lo almacene en lugares polvorientos o sucios. Ello podría
dañar sus partes movibles y componentes electrónicos.
• No almacene el dispositivo en lugares calurosos. Las temperaturas altas
pueden acortar la vida de los dispositivos electrónicos, dañar la batería o
torcer o derretir ciertos plásticos.
• No almacene el dispositivo en lugares fríos. Cuando el dispositivo alcanza su
temperatura normal se puede producir humedad internamente, lo cual podría
dañar las tarjetas de circuitos electrónicos.
• No trate de abrir el dispositivo a no ser para un procedimiento tratado en
este manual.
• No deje el dispositivo caer, no lo sacuda, ni lo golpee. Los manejos bruscos
pueden dañar las tarjetas interiores de circuitos y mecanismos delicados.
• No use productos químicos abrasivos, solventes de limpieza ni detergentes
para limpiarlo.
• No pinte el dispositivo. La pintura puede bloquear las partes movibles e
impedir un funcionamiento apropiado.
• Use sólo un paño suave, limpio y seco para limpiar cualquier lente (como el
lente de la cámara y de los detectores de proximidad y de luz).
• Utilice sólo la antena suministrada o un repuesto homologado. El uso de
antenas, modificaciones o accesorios no aprobados podrían dañar el
dispositivo e infringir los reglamentos sobre el uso de dispositivos de radio.
• Use los cargadores sólo en interiores bajo techo.
Todas estas sugerencias sirven para su dispositivo, batería, cargador o cualquier
accesorio. Si algún dispositivo no funciona, llévelo a su centro de servicio
especializado más cercano.
206
Información adicional de seguridad
Información adicional de seguridad
■ Entorno operativo
Su dispositivo y accesorios pueden contener partes pequeñas. Manténgalos fuera
del alcance de los niños.
Respete la normativa especial vigente en la zona donde se encuentra y siempre
apague su dispositivo cuando esté prohibido utilizarlo o cuando su uso pueda
causar interferencia o peligro. Use el dispositivo en su posición normal de
funcionamiento. Este dispositivo cumple con las normas sobre la exposición
RF cuando es usado en su posición normal de funcionamiento cerca del oído o
cuando está a una distancia mínima de 2.2 cms (7/8 de pulgada) del cuerpo.
Al usar un estuche, clip de cinto o soporte para ser portado en contacto con el
cuerpo, dicho accesorio no deberá contener partes de metal y debe mantener
el teléfono a una distancia mínima de 2.2 cms (7/8 de pulgada) del cuerpo.
Para poder transmitir archivos de datos o mensajes, este dispositivo requiere
una conexión de calidad a la red. En algunos casos, la transmisión de archivos de
datos o mensajes podría ser retrasada hasta que dicha conexión esté disponible.
Asegúrese de seguir las instrucciones sobre la separación del cuerpo hasta que la
transmisión termine.
■ Dispositivos médicos
El funcionamiento de cualquier equipo de transmisión radial, incluso teléfonos
celulares, puede interferir con el funcionamiento de dispositivos médicos que
están inadecuadamente protegidos. Si tiene alguna pregunta o para determinar
si tales aparatos tienen blindaje contra la energía externa de RF, consulte a un
médico o al fabricante del dispositivo médico. Apague su dispositivo en instalaciones
de cuidado sanitario donde tengan avisos puestos avisándole que lo apague.
Puede que los hospitales y centros de sanidad estén empleando equipos delicados
que podrían ser afectados por la potencia de las señales RF.
MARCAPASOS
Los fabricantes de marcapasos recomiendan que se mantenga una separación
mínima de 15.3 cms (6 pulgadas) entre un dispositivo celular y un marcapasos
con el fin de minimizar la potencia para interferencias. Estas recomendaciones
son consistentes con la investigación independiente efectuada y recomendada
por la entidad Wireless Technology Research. Para minimizar la potencia para
interferencias, las personas que llevan marcapasos
207
Información adicional de seguridad
• Deben mantener siempre una distancia de más de 15.3 cms (6 pulgadas)
entre el teléfono y sus marcapasos siempre que tengan el teléfono encendido
• No deben llevar el dispositivo en el bolsillo superior (chaqueta o camisa).
• Deben sujetar el teléfono en el lado contrario al marcapasos para minimizar
la posibilidad de interferencias.
Si tiene alguna razón para sospechar que existen interferencias, debería apagar
inmediatamente su teléfono.
APARATOS AUDITIVOS
Algunos dispositivos celulares digitales podrían interferir con ciertos aparatos
auditivos. En caso de tal interferencia, consulte con su proveedor de servicio.
■ Automóviles
Las señales de RF pueden afectar los sistemas electrónicos que están
inadecuadamente instalados o protegidos en los automóviles, por ejemplo,
sistemas electrónicos de inyección directa, sistemas electrónicos de frenos
antirresbalantes (antibloqueo), sistemas electrónicos de control de velocidad,
o sistemas de airbag. Para más información, consulte con el fabricante o el
concesionario del vehículo o de cualquier equipo que haya sido añadido en
su automóvil.
Sólo personal especializado debe reparar el teléfono o instalarlo en un automóvil.
Una instalación o reparación defectuosa podría resultar peligrosa y podría anular
la garantía aplicable al dispositivo. Revise periódicamente que todo el equipo del
dispositivo celular esté montado y funcionando adecuadamente. No almacene ni
transporte líquidos inflamables, gases o materiales explosivos en el mismo lugar
que el teléfono celular, sus piezas o accesorios. Para los automóviles con sistemas
de airbag incorporado, recuerde que el airbag se infla con mucha fuerza. No coloque
objetos, incluso equipos instalados o celulares en el área encima del airbag o en
la zona donde éste pueda desplegarse. Si un equipo celular de instalación para
automóvil está incorrectamente instalado y el airbag se infla, podría resultar en
heridas graves.
Las regulaciones de la FCC prohíben el uso de su dispositivo a bordo de una
aeronave. El uso de teléfonos celulares en una nave aérea puede poner en peligro
el funcionamiento de la nave y alterar la red de servicio celular, y podría ser ilegal.
208
Información adicional de seguridad
■ Entornos potencialmente explosivos
Apague su teléfono cuando se encuentre en zonas con un ambiente potencialmente
explosivo y cumpla con todos los letreros e instrucciones. Los entornos
potencialmente explosivos incluyen las zonas donde existan avisos reglamentarios
requiriéndole que apague el motor de su vehículo. Las chispas en tales zonas
podrían producir explosiones o incendios que podrían resultar en daño corporal
o incluso la muerte. Apague el dispositivo en lugares de abastecimiento de
combustible tales como cerca de estaciones de servicio o gasolineras. Observe las
restricciones en el uso de equipo de radio en depósitos de combustible, áreas de
almacenamiento y distribución de combustible, plantas químicas o lugares donde
se llevan a cabo operaciones de explosiones. Las zonas en entornos de potencia
explosiva suelen estar marcadas, pero no siempre con claridad. Entre ellas se
incluyen las cubiertas de los buques o instalaciones de almacenamiento y
transporte de productos químicos, vehículos que utilizan gas de petróleo licuado
(como propano o butano), zonas donde el aire contiene partículas o elementos
químicos, tales como grano, polvo o partículas metálicas.
El incumplimiento de estas instrucciones puede resultar en la suspensión o
denegación de los servicios de teléfonos celulares al infractor, y/o iniciar acción
legal en su contra o ambas medidas.
■ Llamadas de emergencia
Importante: Los teléfonos celulares, incluso este dispositivo, funcionan
utilizando radioseñales, redes de servicios celulares y terrestres, así
como funciones programadas por el usuario. Por lo tanto, no se puede
garantizar una conexión bajo todas las condiciones. Nunca dependa
solamente de cualquier dispositivo celular para comunicaciones
esenciales, por ejemplo, emergencias médicas.
Para hacer una llamada de emergencia, asegúrese que su dispositivo esté
debidamente cargado antes de intentar hacer cualquier llamada de emergencia.
Si su batería se descarga, no podrá recibir o hacer llamadas, incluso las llamadas
de emergencia y deberá esperar unos minutos tras comenzar la carga para hacer
su llamada.
1. Si el dispositivo está apagado, enciéndalo. Compruebe que la fuerza de la
señal sea adecuada. Ciertas redes le podrían requerir que inserte una Tarjeta
UIM (CDMA SIM) válida en su dispositivo.
2. Oprima la tecla Finalizar las veces necesarias para borrar la pantalla y
preparar el dispositivo para las llamadas.
209
Información adicional de seguridad
3. Marque el número oficial de emergencia de su ubicación actual y oprima la
tecla Llamar. Los números de emergencia varían por zonas.
Si se están usando ciertas opciones, podría ser necesario desactivarlas antes de
hacer una llamada de emergencia. Si el teléfono está en la modalidad desconectada
o de vuelo, deberá cambiar el perfil para activar para la función del dispositivo
antes de que pueda hacer una llamada de emergencia. Consulte este manual o
con su proveedor de servicio. Cuando haga una llamada de emergencia, recuerde
dar toda la información necesaria de la forma más exacta posible. Su dispositivo
celular puede ser el único medio de comunicación en el lugar de un accidente.
No corte la llamada hasta que reciba instrucción de hacerlo.
■ Información de certificado (SAR-TAE)
ESTE NOKIA RM-60 CUMPLE CON TODOS LOS REQUERIMIENTOS
GUBERNAMENTALES SOBRE EXPOSICIÓN A LA RADIOFRECUENCIA.
Su teléfono celular es radiotransmisor y receptor. Está diseñado y fabricado de
modo que no exceda los límites de exposición a radiofrecuencia (RF) adoptados
por la Comisión Federal de Comunicaciones (FCC) del gobierno de los Estados
Unidos. Estos límites forman parte de un amplio conjunto de normas y establecen
los niveles de energía RF permitidos para el público en general. Las referidas
normas están basadas en los estándares que fueron desarrollados por organizaciones
científicas autónomas por medio de evaluaciones completas y periódicas de
estudios científicos. Las normas contemplan un considerable margen de seguridad,
para ofrecer protección al público, independientemente de la edad y salud.
La norma de exposición para dispositivo celulares móviles emplea una unidad de
medida denominada Specific Absorption Rate (Tasa de Absorbencia Específica TAE). El límite SAR (TAE) establecido por la FCC es de 1.6 vatios/kilogramos (W/kg)*.
Las pruebas SAR son efectuadas mediante el uso en posiciones estándares
aceptadas por la FCC, con el teléfono transmitiendo al nivel más alto de potencia
certificado, en todas las bandas de frecuencia probadas. A pesar que el SAR es
determinado al nivel de potencia más alto certificado, el nivel SAR actual de un
dispositivo en funcionamiento puede ser mucho más bajo que el valor máximo.
Esto es debido a que el dispositivo fue diseñado para funcionar a niveles de
potencia múltiples para que sólo utilice la energía requerida para acceder a la
red. En general, cuanto más cerca a la antena de la estación base celular, más
baja será la energía de transmisión.
210
Información adicional de seguridad
Antes de poner el modelo de dispositivo a la venta al público, deberá ser probado
y certificado ante la FCC a efectos de que el dispositivo no sobrepase el límite
requerido establecido y adoptado por el gobierno para una exposición segura.
Estos ensayos SAR (TAE) son realizados en posiciones y ubicaciones (por ejemplo,
cerca al oído y portado en contacto con el cuerpo) conforme a las exigencias de la
FCC para cada modelo.
Según la información suministrada a la FCC, el valor SAR (TAE) máximo cuando
fue probado para uso junto al oído, es de 1.24 W/kg y cuando está en contacto
con el cuerpo, según lo indicado en este manual del usuario, es de 1.26 W/kg.
(Las medidas, cuando el dispositivo es portado en contacto con el cuerpo, varían
dependiendo de los accesorios disponibles y de los requerimientos de la FCC).
A pesar de la posibilidad de que haya diferencias entre los niveles SAR de varios
teléfonos en varias posiciones, todos los modelos reúnen los requerimientos del
gobierno. La FCC ha concedido una Autorización para este modelo de teléfono
con toda la información de todos los niveles SAR (TAE) analizados en cumplimiento
con las normas FCC sobre la exposición a RF. La información SAR de este modelo
de teléfono está en el archivo de la FCC y se puede encontrar bajo la sección
Display Grant en http://www.fcc.gov/oet/fccid después de localizar la
identificación FCC ID QMNRM-60.
Al portar el teléfono y con el fin de cumplir con los reglamentos adoptados por
la FCC sobre la exposición RF, utilice sólo accesorios que no contengan metal y
que coloquen el auricular a una distancia mínima de 2.2 cms (7/8 de pulgada)
del cuerpo. El uso de otros estuches, clips de cinto o soportes podría infringir
los reglamentos de la FCC sobre la exposición RF. Al no portar un accesorio y si
no está sujetando el teléfono sobre el oído, sitúe el teléfono apartado del
cuerpo a una distancia mínima de 2.2 cms (7/8 de pulgada) cuando tenga el
teléfono encendido.
*En los Estados Unidos de América y Canadá, el límite SAR establecido para los
teléfonos móviles usados por el público es de 1.6 vatios/kilogramos (W/kg) con un
promedio de un gramo por tejido. La norma incorpora un margen de seguridad
considerable para ofrecer más protección al público y para considerar cualquier
variación en las medidas. Los valores SAR podrían variar dependiendo de los
requerimientos y la banda de la red. Para información sobre SAR en otras regiones,
refiérase a la sección de información de productos en www.nokia.com.
211
Información adicional de seguridad
■ Información técnica
Designación de tipo—RM-60
Dimensiones—Ancho 42.3 mm; largo 105.5 mm; espesor 18 mm
Peso—98 g con la batería BL-6C Li-Ion
Volumen—69 centímetros cúbicos
Redes celulares—CDMA 800 MHz, CDMA 1900 MHz, y AMPS 800
Gama de frecuencia (Tx)—AMPS: 824.04-848.97 MHz, PCS: 1851.25-1908.75
MHz, Celular: 824.70-848.37 MHz
Gama de frecuencia (Rx)—AMPS: 869.04-893.97 MHz, PCS: 1931.25-1988.75
MHz, Celular: 869.70-893.37 MHz
Frecuencia GPS—1575.42 MHz
■ Información sobre las baterías
Esta sección da información sobre la batería referente al tiempo de carga usando
el Cargador Rápido (ACP-12), el Cargador Estándar (ACP-7); los tiempos de
conversación, y de reserva. Dicha información está sujeta a cambios. Para más
información, contacte a su proveedor de servicio.
Tiempos de carga
Los siguientes tiempos de carga son aproximados con la batería Li-Ion
1070-mAh (BL-6C):
Cargador Rápido (ACP-12): hasta 1 hora 35 minutos
Cargador Estándar (ACP-7): hasta 3 horas 45 minutos
Tiempos de conversación y de reserva
Los tiempos de funcionamiento son sólo estimados y dependen de la fuerza de la
señal, uso del teléfono, condiciones de la red, funciones usadas, la condición y
vida de la batería (incluso el procedimiento de carga), temperaturas a las cuales
se expone la batería, y muchos otros factores.
Tiempo de conversación: de 3 hasta 3.5 horas (digital)
Tiempo de reserva: de 8 a 12 días
■ Información de patente
Fabricado o a la venta bajo una o más de las siguientes patentes EE.UU.:
5889770 5802465 5991627 5754976 6078570 6009328
6148209 5596571 5699482 5701392 5924026 5930233
6072787 6128322 4969192 5859843 6510148 5793744
212
6556824
6775548
Información adicional de seguridad
■ Garantía Nokia Limitada de un (1) año
Nokia Inc. (“Nokia”) garantiza que este teléfono celular (“Producto") está libre de
defectos en materiales y mano de obra los cuales generan averías durante su uso
normal, de acuerdo a los siguientes términos y limitaciones:
1. La garantía limitada cubre UN (1) año a partir de la fecha de compra del
Producto. El período de garantía de un año tiene una prórroga dependiendo
de cuántos días el Comprador no tendrá acceso al teléfono debido a la
reparación amparada por dicha garantía.
2. La garantía limitada ampara al Comprador original ("Comprador") del
Producto y no es ni asignable ni transferible a cualquier subsecuente
comprador/consumidor final.
3. La garantía limitada ampara únicamente a los Compradores que hayan
comprado el Producto en los Estados Unidos de América.
4. Durante el período de la garantía limitada, Nokia reparará, o repondrá, a
elección de Nokia, cualquier parte o piezas defectuosas, o que no cumplan
apropiadamente con su función original, con partes nuevas o reconstruidas si
dichas partes nuevas o reconstruidas son necesarias debido al mal
funcionamiento o avería durante su uso normal. No se aplicará ningún cargo
al Comprador por dichas partes. Nokia pagará también los costos de mano de
obra que Nokia incurra e la reparación o reemplazo de las partes defectuosas.
La garantía limitada no ampara los defectos en hechura, las partes
cosméticas, decorativas o artículos estructurales, tampoco el marco, ni
cualquier parte inoperativa. El límite de responsabilidad de Nokia bajo la
garantía limitada será el valor actual en efectivo del Producto en el momento
que el Comprador devuelva el producto para la reparación, que se determina
por el precio que el Comprador pagó por el producto menos una cantidad
razonable deducida por el tiempo de uso del producto. Nokia no será
responsable de cualquier otra pérdida o perjuicio. Estos remedios son los
remedios exclusivos del Comprador para la violación de la garantía.
5. A solicitud de Nokia, el Comprador deberá comprobar la fecha de la compra
original del producto mediante un resguardo con fecha de la compra del Producto.
6. El Comprador deberá asumir el costo de transportación del producto a Nokia en
Melbourne, Florida. Nokia asumirá el costo del embarque de regreso del Producto
al Comprador una vez completado el servicio bajo esta garantía limitada.
213
Información adicional de seguridad
7. El Comprador no tendrá derecho a aplicar esta garantía limitada ni a
obtener ningún beneficio de la misma si cualquiera de las siguientes
condiciones es aplicable:
a) El Producto haya sido expuesto a: uso anormal, condiciones anormales,
almacenamiento inapropiado, exposición a la humedad, modificaciones
no autorizadas, conexiones no autorizadas, reparaciones no autorizadas,
mal uso, descuido, abuso, accidente, alteración, instalación inadecuada,
u otros actos que no sean culpa de Nokia, incluyendo daños ocasionados
por embarque.
b) El Producto haya sido estropeado debido a causas externas tales como,
colisión con otro objeto, incendios, inundaciones, arena, suciedad, huracán,
relámpagos, terremoto o deterioro causado por condiciones meteorológicas,
factores de fuerza mayor o drenaje de batería, robo, fusible roto, o uso
inapropiado de cualquier fuente de energía; daños causados por cualquier
tipo de virus, insectos, gusanos, Caballos de Troya, robo de cancelación
(Cancelbots) o perjuicio causado por una conexión a otros productos no
recomendados por Nokia para la interconexión.
c) Nokia no haya sido avisado por escrito por el Comprador del supuesto o
mal funcionamiento del Producto dentro del período de catorce (14) días
después de la caducidad del período de la aplicable garantía limitada.
d) La placa del número de serie del Producto o el código de dato del accesorio
haya sido quitado, borrado o alterado.
e) El defecto o daño haya sido causado por un funcionamiento defectuoso
del sistema celular, o por una inadecuada recepción de señal de la antena
exterior, o por cualquier tipo de virus u otros problemas de software que
haya sido agregado al Producto.
8. Nokia no garantiza ni un funcionamiento ininterrumpido del producto ni una
operación sin errores. Si durante el período de la garantía limitada llegase a
desarrollar un problema, el Comprador deberá seguir paso a paso el
siguiente procedimiento:
a) El Comprador deberá devolver el Producto al lugar de adquisición para su
reparación o proceso de reemplazo.
b) Si “a” no resulta conveniente debido a la distancia (más de 50 millas) o
por cualquier otra buena razón, el Comprador deberá embarcar el
Producto prepagado y asegurado a:
Nokia Inc., Attn.: Departamento de Reparación
795 West Nasa Blvd.
Melbourne, FL 32901
214
Información adicional de seguridad
c) El Comprador deberá incluir la dirección del remitente, número telefónico
(de día) y/o número de fax, una descripción completa del problema,
resguardo de compra y acuerdo de servicio (si es aplicable). Los gastos
incurridos para remover el Producto de una instalación no son cubiertos
por la garantía limitada.
d) El Comprador será requerido para cubrir las partes o la mano de obra no
cubiertas por esta garantía limitada. El Comprador será responsable de
cualquier gasto de reinstalación del Producto.
e) Nokia reparará o autorizará la reparación del Producto bajo la garantía
limitada dentro de un plazo de 30 días después de la recepción del
Producto por parte de Nokia o de un centro Nokia de servicio autorizado.
Si Nokia no puede realizar la reparación amparada por esta garantía
limitada dentro de 30 días, Nokia tiene la opción de proveer un repuesto
del Producto o abonar el precio de compra del Producto menos una
cantidad razonable aplicable al uso. En ciertos estados el Consumidor
tendrá derecho a un teléfono prestado cuando la reparación del producto
pueda durar más de diez (10) días. Contacte a su Centro Nokia de Servicio
al Cliente al número 1-888-NOKIA-2U (1-888-665-4228) si necesita un
teléfono prestado y si la reparación del Producto tardará/está calculado a
tardar más de diez (10) días.
f) En caso de que el producto haya sido devuelto a Nokia dentro del período
de la garantía limitada, pero el problema del Producto no esté amparado
por los términos y condiciones de esta garantía limitada, el Comprador
será notificado y recibirá un presupuesto del costo a pagar por el
Comprador por la reparación del producto y gastos de envío facturado al
Comprador. Si el presupuesto es rechazado, el producto será devuelto al
cliente por mensajería por cobrar. Si el producto es devuelto a Nokia
después de la fecha de vencimiento del plazo de la garantía limitada, se
aplicarán las políticas normales de servicio de Nokia y el Comprador será
responsable de todos los gastos de envío.
9. Usted (El Comprador) entiende que el producto podría constar de un
ensamble nuevo que puede contener componentes usados los cuales han sido
reprocesados. Según las expecificaciones de desempeño y confiabilidad del
producto. Los componentes usados han sido reprocesados según las
especificaciones de desempeño y confiabilidad del producto.
215
Información adicional de seguridad
10. CUALQUIER GARANTÍA IMPLÍCITA O MERCANTIL PARA CUALQUIER PROPÓSITO
O USO PARTICULAR DEBE LIMITARSE A LA DURACIÓN DE LA ESCRITA GARANTÍA
LIMITADA PRECEDENTE. DE OTRA FORMA, LA GARANTÍA PRECEDENTE ES EL
ÚNICO EXCLUSIVO REMEDIO DEL COMPRADOR Y EN LUGAR DE CUALQUIER
OTRA GARANTÍA EXPRESA O IMPLÍCITA. NOKIA NO PODRÁ SER REQUERIDO
POR DAÑOS INCIDENTALES O CONSECUENCIALES O POR PÉRDIDAS
ANTICIPADAS INCLUYENDO, PERO SIN LIMITAR, A PÉRDIDA DE BENEFICIOS
O GANANCIAS ANTICIPADAS, PÉRDIDA DE AHORROS O INGRESOS, DAÑOS
PUNITIVOS, PÉRDIDA DE USO DEL PROUCTO O DE CUALQUIER OTRO EQUIPO
RELACIONADO, COSTO DE CAPITAL, COSTO DE CUALQUIER EQUIPO O
FACILIDAD DE REEMPLAZO, TIEMPO MUERTO, LAS DEMANDAS DE PERSONAS
A TERCERAS INCLUYENDO CLIENTES, Y DAÑO A LA PROPIEDAD COMO
RESULTADOS DE LA COMPRA O USO DEL PRODUCTO O CAUSADO POR UNA
VIOLACIÓN DE LA GARANTÍA DE CONTRATO, NEGLIGENCIA, INDEMNIZACIÓN
ETRICTA, O CUALQUIER OTRA TEORÍA LEGAL O IMPARCIAL, AÚN CUANDO
NOKIA SUPIERA DE LA EXISTENCIA DE DICHOS DAÑOS. NOKIA NO SERÁ
RESPONSABLE DE LA DEMORA EN LA APORTACIÓN DE SERVICIO BAJO L A
GARANTÍA LIMITADA, O PÉRDIDA DE USO DURANTE EL PERÍODO DE LA
REPARACIÓN DEL PRODUCTO.
11. Algunos estados no permiten limitación de duración de una garantía implícita,
entonces puede que la garantía limitada de un año arriba mencionada no le
concierna a usted (el Comprador). Algunos estados no permiten exclusiones o
limitaciones de daños incidentales y consecuentes, por lo tanto puede que
ciertas limitaciones o exclusiones arriba indicadas no le conciernan a usted
(el Comprador). Esta garantía limitada le proporciona al Comprador derechos
específicos y legales y puede ser que el Comprador tenga otros derechos, los
cuales varían de estado a estado.
12. Nokia tampoco asume ninguna otra responsabilidad ni por centros de servicio
no autorizados ni por cualquier otra persona o entidad que se asumiera, ni
ninguna otra cosa que no esté explícitamente provista en esta garantía limitada
incluyendo el proveedor o vendedor de cualquier contrato extendido de
garantía o de servicio.
13. Ésta es la garantía entera entre Nokia y el Comprador, e invalida todos los
acuerdos anteriores y contemporáneos, verbales o escritos, y todas las
comunicaciones relacionadas al Producto y ninguna representación, promesa
o condición no mencionadas en el presente modificará estos términos.
14. La garantía limitada indica el riesgo de falla del producto entre el Comprador
y Nokia. La indicación es reconocida por el Comprador y se refleja en el precio
de venta del Producto.
216
Información adicional de seguridad
15. Cualquier gestión o acción legal relacionada a la garantía deberá ser iniciada
dentro de los dieciocho (18) meses subsecuentes al envío del Producto.
16. Cualquier pregunta concerniente a esta garantía limitada puede dirigirse a:
Nokia Inc.
Attn: Centro de Servicio al Cliente, EE.UU.
7725 Woodland Center Blvd., Ste. 150
Tampa, FL 33614
Teléfono: 1-888-NOKIA-2U (1-888-665-4228)
Fax: (813) 249-9619
Usuarios de TTY: 1-800-24-NOKIA (1-800-246-6542)
17. El período de garantía limitada de Nokia para accesorios y anexos está
específicamente definido dentro de sus propias tarjetas de garantía
y empaque.
217
Información adicional de seguridad
■ Anexo A Mensaje de la CTIA
(Cellular Telecommunications & Internet Association)
para usuarios de teléfonos celulares
© 2001 Cellular Telecommunications & Internet Association. Todos los derechos
reservados. 1250 Connecticut Avenue, NW Suite 800, Washington, DC 20036.
Tel: (202) 785-0081
La seguridad es su deber más importante que tendrá que realizar.
Una guía para el uso responsable y seguro del teléfono celula
Hoy día millones de personas en los Estados Unidos aprovechan de la combinación
única de comodidad, seguridad y valor que la telefonía celular aporta. Sencillamente,
el teléfono celular da a la gente la habilidad poderosa de poder comunicarse por
voz - casi en todos los sitios a cualquier hora - con el jefe, un cliente, los hijos, en
caso de emergencias o incluso con la policía. Cada año los americanos hacen miles
de millones de llamadas con sus teléfonos celulares, y aun la cifra asciende
rápidamente. Pero una responsabilidad importante acompaña esas ventajas la
cual es reconocida por el usuario de teléfono celular. Cuando está conduciendo,
su responsabilidad primordial es conducir. Un teléfono celular puede ser una
herramienta indispensable, no obstante, el conductor deberá tener un buen juicio
todo el tiempo mientras está conduciendo - esté o no esté usando el teléfono. Las
lecciones básicas son aquellas que habíamos aprendido cuando éramos jóvenes.
El conducir requiere agilidad, precaución y cortesía. Necesita mucho sentido
común - mantenga la cabeza en posición normal, dirija la vista hacia el trayecto,
compruebe los visores con frecuencia y precaución con los demás conductores.
Deberá respetar todas las señales de tráfico y mantenerse dentro del límite de
velocidad. Deberá abrocharse el cinturón de seguridad y requerir que los otros
pasajeros hagan lo mismo. Pero con el teléfono celular, el conducir significa algo
más. Este folleto es una llamada a todos los usuarios de teléfonos celulares en
todos los sitios para que la seguridad sea su prioridad cuando están detrás del
volante. La telecomunicación celular sirve para ponernos en contacto, simplificar
nuestra vida, protegernos durante una emergencia y proveernos la oportunidad de
poder ayudar a los demás. En cuanto al uso del teléfono celular, la seguridad es
su deber más importante.
Guías de seguridad sobre el uso del Teléfono Celular
A continuación, se reflejan las guías de seguridad a seguir mientras está conduciendo
y usando un teléfono celular las cuales deberían ser fáciles de recordar.
218
Información adicional de seguridad
1. Conozca bien su teléfono celular y sus funciones, tales como la marcación
rápida y rediscado. Lea detenidamente su manual de instrucciones y aprenda
a optimizar las opciones que el teléfono pueda ofrecer, incluyendo rediscado
automático y la memoria. También, aprenda de memoria el teclado para
poder usar la función de marcación rápida sin la necesidad de quitar la vista
de la carretera.
2. Cuando esté disponible, use la función manos libres. Hoy día se dispone de
una cantidad de accesorios manos libres. Aunque elija el dispositivo de
montaje instalado para su teléfono celular o un microteléfono, aproveche
los dispositivos disponibles.
3. Coloque su teléfono celular para un alcance fácil. Asegúrese de ubicar su
teléfono celular a la mano, donde lo pueda levantar sin tener que quitar la
vista de la carretera. Cuando entre una llamada, si es posible, que su buzón
de voz lo responda.
4. Posponga cualquier conversación mientras esté conduciendo en una
situación muy peligrosa. Como conductor, su responsabilidad es prestarle
atención al tráfico. Dígale a la otra persona que usted está conduciendo; si
fuera necesario, cancele la llamada en embotellamientos o durante
situaciones peligrosas de tiempo. La lluvia, aguanieve, nieve y hielo pueden
ser tan peligrosas como los embotellamientos. Como conductor, su
responsabilidad es prestarle atención al tráfico.
5. No tome notas o busque números telefónicos cuando esté conduciendo. Si está
leyendo un directorio o tarjeta de negocio, o escribiendo una lista de "tareas"
mientras está conduciendo, no estará al tanto de su ruta. Es caso de sentido
común. No se involucre en situaciones de tráfico peligrosas debido a que
usted esté leyendo o escribiendo sin prestar atención al tráfico y a los
vehículos cercanos.
6. Marque con sensatez y esté al tanto del tráfico; si fuera posible, haga las llamadas
cuando esté estacionado o retirado de la carretera antes de hablar. Trate de
planear sus llamadas antes de emprender el viaje para que sus llamadas
coincidan con las señales de Stop, semáforos en rojo o estacionamientos.
Pero, si es preciso hacer una llamada mientras esté conduciendo, siga esta
norma sencilla: marque unos pocos números, compruebe la carretera y sus
visores, y luego continúe.
7. Evite conversaciones estresantes y emotivas que puedan distraer la atención.
No se pueden combinar el conducir y las conversaciones emotivas y estresantes es muy peligroso cuando está detrás del volante. Que la persona con quien
está hablando sepa que usted está conduciendo, y si es necesario, evite
conversaciones de distracción.
219
Información adicional de seguridad
8. Utilice su teléfono celular para pedir socorro. Su teléfono celular es una de las
mejores herramientas que puede adquirir para protegerse a usted y a su
familia en situaciones peligrosas - con su teléfono a su lado tendrá el socorro a
su alcance con sólo la marcación de tres números. Marque 9-1-1 o el número
local de emergencia en caso de incendio, accidente de tráfico, peligro en la
carretera o emergencia médica. Recuerde, ¡es una llamada gratis en su
teléfono celular!
9. Use su teléfono celular para ayudar a los demás en tiempo de emergencia. Su
teléfono celular le brinda la oportunidad perfecta para ser "un buen samaritano"
en su comunidad. En situaciones de accidente de tráfico, crímenes u otras
emergencias de vida, llame al 9-1-1 o el número local de emergencia, como
usted quiere que los demás hagan por usted.
10. Cuando sea necesario, llame al centro de asistencia de tráfico u otro número
celular de ayuda para situaciones que no son de emergencia. Puede encontrar
ciertas situaciones cuando esté conduciendo las cuales no merecen la necesidad
de referirlas a los servicios de emergencia. Pero sí puede usar su teléfono
celular para echar una mano. Si ve un automóvil que no corre en medio de la
carretera aunque no signifique ningún peligro, señales rotas de tráfico, un
accidente de tráfico sin ningún herido, o un vehículo robado, llame a la
asistencia o a otros números especiales de teléfonos celulares en situaciones
que no son de emergencia.
Las personas irresponsables, descuidadas, distraídas y los que conduzcan
irresponsablemente representan un peligro en la carretera. Al acercarnos hacia un
siglo nuevo, más gente se aprovechará de las ventajas de los teléfonos celulares.
Desde el año 1984, la Asociación de la Industria de Telecomunicaciones Celulares
(CTIA) y la industria celular han realizado asistencia educativa para informar a los
usuarios de teléfonos celulares de su responsabilidad siendo conductores cautelosos
y buenos ciudadanos. Al acercarnos hacia un siglo nuevo, más gente se aprovechará
de las ventajas de los teléfonos celulares. Y, al dirigirnos a la carretera, todos
tenemos la responsabilidad de conducir con cautela.
La industria celular le recuerda utilizar con seguridad su teléfono
mientras conduce.
Para más información, llame a 1-888-901-SAFE.
Para datos actualizados, visite:
http://www.wow-com.com/consumer/issues/driving/articles.cfm?ID=85
220
Información adicional de seguridad
■ Anexo B Mensaje de la FDA
(U.S. Food and Drug Administration)
a los usuarios de teléfonos celulares
© 18 de julio de 2001 Para datos actualizados: http://www.fda.gov/cdrh/phones
Datos actualizados para el consumidor de teléfonos celulares U.S. Food and Drug Administration
1. ¿Significan un peligro para la salud los teléfonos celulares?
La evidencia científica disponible no muestra que ningún problema de salud
tiene relación con el uso de teléfonos celulares. No hay pruebas, sin embargo,
que los teléfonos celulares son absolutamente seguros. Los teléfonos celulares
emiten niveles bajos de radiofrecuencia (RF) en la gama de microonda durante
el uso. También emiten niveles muy bajos de RF en modalidad de inactividad.
Mientras que los niveles altos de RF pueden influir la salud (por calentamiento)
la exposición a un nivel bajo de RF no produce efectos de calentamiento y no
causa efectos adversos a la salud. Muchos estudios sobre exposiciones a
nivel bajo de RF no han encontrado efectos biológicos. Ciertos estudios han
sugerido que podrían resultar en ciertos efectos biológicos, pero tales
encuestas no han sido confirmadas por estudios adicionales. En ciertos casos,
otros investigadores han tenido dificultades para reproducir tales estudios o
determinar las causas de los resultados inconsistentes.
2. ¿Cuál es el papel de la FDA concerniente a la seguridad
de los teléfonos celulares?
Bajo la ley, la FDA no revisa la seguridad de los productos que generan
radiación, tales como, teléfonos celulares antes de su venta, como se hacen
con medicamentos o dispositivos médicos nuevos. Sin embargo, la agencia
tiene la autoridad para realizar una accion si es mostrado que el nivel de la
radiofrecuencia (RF) emitida por los teléfonos celulares muestra algún peligro
para el usuario. En tal caso, la FDA podría requerir a los fabricantes de teléfonos
celulares que avisen a los usuarios del peligro de los celulares para la salud, y
que reparen, o devuelvan los teléfonos para que el peligro no exista.
Aunque los datos científicos existentes no justifican las acciones reglamentarias
de la FDA, la FDA le exige a la industria de teléfonos celulares que establezca
medidas, que incluyan las siguientes:
• Respaldar la investigación necesaria hacia los posibles efectos biológicos
del tipo de RF generada por teléfonos celulares;
• Fabricar los teléfonos celulares de tal manera que minimicen la exposición
del usuario a un nivel RF necesario para el funcionamiento del dispositivo;
221
Información adicional de seguridad
• Colaborar en la tarea de proveerles a los usuarios de teléfonos celulares
la mayor información posible sobre los resultados generados por el uso
de los teléfonos celulares en cuanto a la salud.
La FDA pertenece a un grupo de interagencias de las agencias federales que
se encargan de los distintos aspectos de la seguridad de la RF para asegurar
los esfuerzos coordinados al nivel federal. Las agencias siguientes
pertenecen a este grupo:
• National Institute for Occupational Safety and Health
• Environmental Protection Agency
• Federal Communications Commission
• Occupational Safety and Health Administration
• National Telecommunications and Information Administration
El National Institutes of Health participa también en actividades del
grupo interagencia.
La FDA comparte con la Federal Communications Commission (FCC) las
responsabilidades para teléfonos celulares. Todos los teléfonos vendidos en
los Estados Unidos deben cumplir con los reglamentos establecidos por la FCC
que limitan la exposición RF. La FCC depende de la FDA y otras agencias
sanitarias sobre los asuntos de seguridad de los teléfonos celulares. La FCC
también regulariza las estaciones bases de donde dependen las redes de
teléfonos celulares. Mientras estas estaciones base funcionan con una
potencia más alta que los propios teléfonos celulares, la exposición a la
RF que el usuario podría recibir de dichas estaciones bases son en general
mucha más reducida que la RF generada por los teléfonos celulares.
Entonces, las estaciones bases no son el asunto de las preguntas de
seguridad tratadas en este documento.
3. ¿Cuáles son los tipos de teléfonos que constituyen el asunto de este dato
de actualización?
En este documento la palabra teléfono celular se refiere a los teléfonos
celulares portátiles con antena interior, normalmente denominados
teléfonos móviles o teléfonos PCS. Estos tipos de teléfonos celulares pueden
exponer al usuario a un nivel importante de energía de radiofrecuencia (RF)
debido a la distancia corta entre el teléfono y la cabeza del usuario. Estas
exposiciones a la RF fueron limitadas por las normas de la FCC que fueron
desarrolladas bajo el consejo de la FDA y otras agencias federales de sanidad
y seguridad. Cuanto más lejos la distancia entre el teléfono y el usuario,
menos será la exposición a la RF, puesto que la exposición a la RF disminuye
cuando el origen de la frecuencia se encuentra más lejos de la persona. Los
222
Información adicional de seguridad
denominados teléfonos inalámbricos con una unidad base conectada a la
cablería telefónica de una casa funcionan, en general a unos niveles de
potencia más bajos, y entonces la exposición a la RF es mucho más baja que
las límites de los reglamentos sanitarios de la FCC.
4. ¿Cuáles son los resultados de las investigaciones realizadas?
Las investigaciones han producido resultados conflictivos, y muchos estudios
han sufrido los errores en los métodos usados para las investigaciones. Los
experimentos efectuados con animales para investigar los efectos de la
exposición a la radiofrecuencia (RF) que son típicos de los teléfonos celulares
han producido resultados conflictivos que no se pueden repetir en otros
laboratorios. Unos estudios de los animales, sin embargo, han sugerido que
los niveles bajos de RF podrían acelerar el desarrollo de cáncer en animales
de laboratorios. Mas, la mayoría de las investigaciones han mostrado el creciente
desarrollo de tumor en los animales que fueron tratados genéticamente con
sustancias anticancerosas para hacerlos propensos al desarrollo de cáncer
sin ponerlos expuestos a la RF. Los otros estudios expusieron los animales a
la RF hasta 22 horas por día. Estas condiciones no son iguales a las
condiciones de los usuarios de teléfonos celulares, así que no sabemos con
certeza cuáles son los resultados de tales estudios que significan para la
salud humana.
Tres investigaciones de epidemiología han sido publicadas desde diciembre
del 2000. Entre ellos, las encuestas investigaron la existencia de cualquier
posibilidad relacionada entre el uso de teléfonos celulares y el cáncer
cerebral primario, glioma, meningioma o neuroma acústica, tumores
cerebrales o de las glándulas salivales, leucemia o otros tipos de cáncer.
Ninguno de estos estudios demostró la existencia de cualquier resultado
peligroso a la salud debido a la exposición a la radiofrecuencia generada por
los teléfonos celulares. Sin embargo, ninguna de estas investigaciones pueden
contestar la exposición de largo plazo, puesto que el período medio de
exposición es de unos tres años.
5. ¿Qué tipo de investigación es necesaria para determinar si la exposición
a la RF genera un riesgo para la salud?
Una combinación de estudios de laboratorios y estudios epidemiológicos de
los usuarios actuales de teléfonos celulares podrían proveer ciertos datos
necesarios. Los estudios sobre exposición de por vida del animal podrían ser
completados dentro de pocos años. Sin embargo, una gran cantidad de
animales podrían ser necesaria para proveer pruebas fiables de los efectos
cancerosos. Los estudios epidemiológicos pueden proveer los datos
directamente aplicables a la demográfica humana, sin embargo necesitarían
223
Información adicional de seguridad
un seguimiento de 10 años o más para conseguir las respuestas sobre los
resultados en la salud, tales como el cáncer. Esto es debido al intervalo entre
la hora de exposición al agente que causa el cáncer y la hora del desarrollo del
tumor, si hubiera, que podría significar muchos años. El significado de los
estudios epidemiológicos es obstaculizado por las dificultades en el proceso
de medir la exposición RF actual del uso diario de los teléfonos celulares. La
mayoría de estos factores afecta esta medida, tales como el ángulo de sujetar
el teléfono o el modelo de teléfono usado.
6. ¿Qué está realizando la FDA para obtener los resultados posibles en la
salud causados por teléfonos celulares?
La FDA está trabajando junto con la entidad U.S. National Toxicology
Program y con otros grupos de investigadores mundiales para asegurar que
se están conduciendo estudios con animales los cuales son altamente
prioritarios para dirigir preguntas importantes sobre los efectos de la
exposición a la radiofrecuencia (RF).
La FDA ha sido el participante líder en el proyecto de la entidad World Health
Organization International Electromagnetic Fields (EMF) Project desde su inicio
en el 1996. Como resultante poderoso de este trabajo se desarrolló una agenda
detallada de las necesidades en la investigación que propulsó el establecimiento
de programas nuevos de investigaciones por todo el mundo. El proyecto
también ha ayudado el desarrollo de una serie de documentos de información
pública sobre los asuntos EMF.
La FDA y la Cellular Telecommunications & Internet Association (CTIA) conducen
un acuerdo formal denominado Cooperative Research and Development
Agreement (CRADA) para realizar investigaciones de la seguridad en el uso
del teléfono celular. La FDA provee una vista científica, consiguiendo las
opiniones de los expertos de las organizaciones académicas, industriales y
gubernamentales. La investigación financiada por la CTIA es realizada por
contratos con investigadores independientes. La investigación inicial
incluirá tanto los experimentos en laboratorios como los estudios sobre
usuarios de teléfonos celulares. El proyecto CRADA también va a asesorar
ampliamente los requerimientos en los estudios bajo el contexto de los
desarrollos de las investigaciones más recientes por todo el mundo.
7. ¿Cómo puedo saber el nivel de exposición a la energía de radiofrecuencia
que puedo recibir usando mi teléfono celular?
Todos los teléfonos vendidos en los Estados Unidos deberán reunir las
normas establecidas por la Federal Communications Commission (FCC) que
limitan la exposición a la energía de radiofrecuencia. La FCC estableció estas
normas tras haber consultado con la FDA y otras agencias de seguridad y
224
Información adicional de seguridad
sanitarias. El límite por la FCC para la exposición RF de los teléfonos celulares
es establecido a una Tasa de Absorción Específica (TAE), en Specific
Absorption Rate (SAR) es de 1.6 vatios por kilogramo (1.6 W/kg). El límite
FCC coincide con las normas de seguridad desarrolladas por las entidades
Institute of Electrical and Electronic Engineering (IEEE) y National Council
on Radiation Protection and Measurement. El límite de exposición considera
la habilidad del cuerpo para librar el calor de los tejidos que absorben la
energía del teléfono celular y está fijado a niveles mucho más bajos que los
niveles que produzcan resultados.
Los fabricantes de teléfonos celulares deberán entregar al FCC el nivel
de exposición RF de cada modelo de teléfono. La página web de FCC
(http://www.fcc.gov/oet/rfsafety) provee las direcciones para localizar el
número de identificación de la FCC en su teléfono para que usted pueda
localizar el nivel de exposición de RF de su teléfono en la lista en línea.
8. ¿Qué ha realizado la FDA para medir la tasa de energía de radiofrecuencia
que procede de los teléfonos celulares?
Junto con la participación y el liderazgo de los ingenieros y científicos de la
FDA, la entidad Institute of Electrical and Electronic Engineers (IEEE) está
desarrollando el estándar técnico para medir la tasa de energía de
radiofrecuencia RF emitida por los teléfonos celulares y otros microteléfonos
portátiles. La norma denominada en inglés, Recommended Practice for
Determining the Spatial-Peak Specific Absorption Rate (SAR) in the Human
Body Due to Wireless Communications Devices: Experimental Techniques,
establece la primera metodología de prueba consistente para medir la tasa a
la cual la energía RF queda depositada en la cabeza de los usuarios de
teléfonos celulares. El método de prueba utiliza un modelo imitado de un
tejido de la cabeza humana. Se espera que la metodología de la prueba SAR
(TAE) pueda mejorar a un nivel importante la consistencia en las medidas
hechas en los diferentes laboratorios para el mismo teléfono. El SAR ((TAE)
es la medida de la cantidad de energía que el tejido absorbe, sea por el
cuerpo entero o por una parte del mismo. Se mide en unidad de vatios/kg
(o milivatios/g) de la materia. Esta medida se usa para determinar si un
teléfono celular cumple con las normas de seguridad.
9. ¿Qué medidas puedo realizar para reducir mi exposición a la energía de
radiofrecuencia de mi teléfono celular?
Si existe algún riesgo de estos productos - y en este momento desconocemos
tal existencia - probablemente será muy mínimo. Sin embargo, si le
concierne la prevención de posibles riesgos, haga estos pasos sencillos para
minimizar su exposición a la energía de radiofrecuencia (RF). Puesto que el
225
Información adicional de seguridad
tiempo es un factor clave, en cuanto al nivel de la exposición que una persona
pueda recibir, minimizar el tiempo de uso del teléfono celular reducirá la
exposición a la RF.
Si tiene que extender su tiempo de conversación usando su teléfono celular,
podrá aumentar la distancia entre su cuerpo y el origen de la RF, puesto que
el nivel de exposición RF reducirá dependiendo de la distancia. Por ejemplo,
podrá utilizar un auricular y llevar el celular apartado de su cuerpo o usar un
teléfono celular conectado a una antena remota.
Se reitera que los datos científicos no muestran que los teléfonos celulares
son peligrosos. Sin embargo, si le concierne la prevención de posibles riesgos,
podrá adoptar las medidas antes mencionadas para reducir el nivel de
exposición a la RF que se origina de los teléfonos celulares.
10. ¿Significa un riesgo para los niños el uso de teléfonos celulares?
Las evidencias científicas no muestran peligro a los usuarios el uso de teléfonos
celulares, incluso para los niños y jóvenes. Si desea realizar las medidas para
reducir la exposición a la energía de radiofrecuencia (RF), las medidas
anteriormente mencionadas servirían para los niños y jóvenes que usan
teléfonos celulares. Limitar el tiempo de uso del teléfono celular e incrementar
la distancia entre el usuario y el origen de la energía de radiofrecuencia
reducirán la exposición a la RF. Ciertos grupos patrocinados por otras
entidades gubernamentales han aconsejado que los niños eviten totalmente
el uso de teléfonos celulares. Por ejemplo, en diciembre 2000, el gobierno del
Reino Unido distribuyó folletos conteniendo dicha recomendación. Se han dado
cuenta que no existen ninguna evidencia que el uso de teléfonos celulares
pueda causar tumores cerebrales u otras enfermedades. Su recomendación
para limitar el uso de los teléfonos celulares de parte de los niños fue
solamente a efecto preventivo; no fue basada en ninguna evidencia de
peligros para la salud.
11. ¿Qué significa la interferencia entre teléfonos celulares y equipos médicos?
La radiofrecuencia (RF) que emana de los teléfonos celulares puede interactuar
con ciertos dispositivos electrónicos. Por esta razón, la entidad FDA ha ayudado
a desarrollar un método de prueba detallada para medir la interferencia
electromagnética (EMI) de los marcapasos cardiacos injertos y desfibriladores
de teléfonos celulares. Este método de prueba ya forma parte de una norma
patrocinada por la entidad Association for the Advancement of Medical
instrumentation (AAMI). El borrador final fue completado en el año 2000 por
parte de la FDA, los fabricantes de equipos médicos y otros grupos que
aportaron sus esfuerzos. Esta norma permitirá a los fabricantes de teléfonos
celulares a asegurar que los marcapasos cardiacos y defibriladores no tienen
226
Información adicional de seguridad
peligro ante el uso de teléfonos celulares EMI. La FDA ha realizado ensayos
de auxiliares auditivos para estudiar la interferencia que pueda originarse de
los teléfonos celulares, y ha ayudado a desarrollar un estándar voluntario
patrocinado por la entidad Institute of Electrical and Electronic Engineers
(IEEE). Esta norma especifica los métodos de pruebas y requerimientos para el
uso de aparatos auditivos para que no existan interferencias cuando el
usuario usa un teléfono compatible y un aparato auditivo al mismo tiempo.
Esta norma fue aprobada por la IEEE en el año 2000.
La FDA continúa a monitorear el uso de teléfonos celulares referente a
interacciones con otros equipos médicos. En caso de que existan
interferencias peligrosas, la FDA va a seguir conduciendo las pruebas para
asesorar la interferencia y solucionar el problema.
12. ¿Dónde puedo conseguir información adicional?
Para más información, refiérase a las siguientes fuentes:
• Página web de FDA sobre teléfonos celulares
http://www.fda.gov/cdrh/phones/index.html
• Página web de Federal Communications Commission (FCC) RF Safety
Program http://www.fcc.gov/oet/rfsafety
• Página web de International Commission on Non-Ionizing Radiation
Protection http://www.icnirp.de
• Página web de World Health Organization (WHO) International EMF
Project http://www.who.int/emf
• Página web de National Radiological Protection Board (UK)
http://www.nrpb.org.uk/
July 18, 2001 Para datos actualizados: http://www.fda.gov/cdrh/phones
227
Índice
Índice
A
accesorios 202
agenda (Calendario) 187
altavoz 126
antena 122
apagar el teléfono 124
atención al cliente 116
auricular 124, 177
automatizar correo de voz 142
ayuda 115
B
batería
autenticación 204
cargar 124
reemplazar 123
remover 123
tiempos de carga 212
tiempos de conversación y
de reserva 212
baterías y cargadores 203
bloqueo de teclas 128
bloqueo de teléfono 178
cambiar código de bloqueo 179
C
calculadora 191
cambiar hora 193
cargador
conectar 124
información 203
tiempos 212
cargar la batería 122, 125
carpetas 161
carpetas de mensajes 143
código de bloqueo 179
códigos de marcación 151
códigos de opción 182
colecciones 198
228
compartir información
de ubicación 169
conectividad infrarroja 184
conectividad PC 199
configuración de accesorios 176
auricular 177
extensión inductiva 177
manos libres 177
soporte musical 178
TTY/TDD 177
configuración de fecha 169
configuración de llamadas 169
configuración de tonos 168, 180, 181
configuraciones 166
configuraciones de hora y fecha 169
configuraciones de pantalla 167
configuraciones de seguridad 178
configuraciones de teléfono 173
configurar
hora 169
contactos 150
agregar 150
editar 154
eliminar 155
enviar 157
ver 156
convertidor de divisas 192
correo de voz 142
cronómetro 193
cubierta posterior
reemplazar 123
remover 123
cuidado y mantenimiento 206
D
designación de tipo 212
desvío de llamadas 182
dimensiones 212
duración de las llamadas 147
Índice
E
eliminar registros de llamadas 147
encender el teléfono 124
enviar propia ID al llamar 183
esquemas de colores 167
extensión inductiva 177
F
listas de distribución 133
llamada en espera 183
llamadas
contestar 126
opciones durante llamada 127
llamadas de datos o fax 172
llamadas de emergencia 209
mientras usa el Internet móvil 196
función ir a 120
M
G
manos libres 177
marcación de 1 toque
(marcación rápida) 152
marcación por voz 153, 175
marcación rápida 171
memoria 174
memoria compartida 114
mensajes 132
eliminar 144
mensajes de miniexplorador 143
mensajes de texto 132
mensajes de voz 142
mensajes de gráficos 136
mensajes de miniexplorador 143
mensajes de texto 132
mensajes de voz 142
mensajes multimedia 137
miniexplorador 195
modalidad estándar 129
galería 161, 163
garantía 115, 213
grabador de voz 165
grupos de llamantes 152
I
idioma de pantalla 173
idiomas 173
imagen de fondo 167
indicadores e íconos 118
información de certificado
(SAR-TAE) 210
información de la batería 212
información de patente 212
información FCC 210
información técnica 212
ingreso de texto 129
estándar 129
predecible 130
Internet móvil 195
conectarse 195
desconectarse 197
hacer llamada de emergencia 196
recibir llamada en línea 196
J
juegos 198
L
límite de tiempo luces de fondo 168
lista de tareas 190
O
organizador 186
organizar funciones ’Ir a’ 121
P
pantalla inicial 117
perfiles 149
perfiles programados 167
plantillas 134
prefijo internacional 172
R
radio 163
229
Índice
recorrer 120
redes celulares 212
registro 146
reloj despertador 186
remarcado automático 170
restaurar configuraciones
de fábrica 184
restricciones de llamadas 180
S
sacar fotos 158
seguridad 112
información importante
de seguridad 207
servicios de red 113
soporte musical 178
T
tarjeta de llamada 171
tarjetas de negocios 157
teclas rápidas 118
temporizador 192
texto de ayuda 175
texto predictivo 130
textos de ayuda 121
230
tiempos de conversación
y de reserva 212
título 175
tono de inicio 174
tonos DTMF 174
transferir datos USB 199
TTY/TDD 177
V
vaciar el caché 197
ver
duración de llamadas 147
duración llamadas datos/fax 148
duración miniexplorador 149
horas de llamadas 147
llamadas perdidas 146
llamadas recibidas 146
mensajes guardados 144
número de teléfono propio 183
números marcados 147
volumen
ajustar 126
con el altavoz 126
voz confidencial 180
NOTAS
231
NOTAS
232