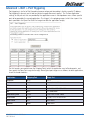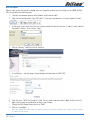
1
User Guide NB9, NB9W ADSL2+ VoIP Modem Router Did you know your phones will disrupt your ADSL2+ connection... Even If You Have Older ADSL Filters? Due to faster ADSL speeds, an inline ADSL2+ Microfilter stops your ADSL connection being disrupted by telephones connected to the same line. Older filters cannot handle these speeds. A high-quality Microfilter from NetComm will ensure you have a stable broadband Internet connection with no reduction in the quality of your telephone service. Having one easy to install Microfilter for every telephone type device, including dial up modems and Foxtel, is essential to reducing voice and data service problems and interruptions. NetComm EM1550 ADSL2+ Microfilters conform to relevant ACA requirements and Telstra specifications and will: • Help you obtain faster technical support from your ISP • Minimise unexplained disruption of your ADSL connection • Work with all current ADSL connection speeds • Microfilters are also splitters which allow you to connect the line between phone and modem Grab your NetComm Microfilters today, either: Visit a retailer closest to you... Order direct... Harvey Norman, Officeworks or Harris Technology. Visit www.netcomm.com.au/ADSL/EM1550.php Phone (02) 9424-2055 (Quote Ref No - 1550) NB9/NB9W ADSL2+ VoIP Router YML790 Rev8 Contents Overview...................................................................................................................................................... 5 NB9/NB9W Package Contents................................................................................................................. 6 Selected terminology used in this manual................................................................................................. 6 Do I need a micro filter?........................................................................................................................... 6 Multi-purpose Gateways and In-line Splitters............................................................................................. 6 Minimum System Requirements:................................................................................................................ 7 Getting to Know the NB9/NB9W.................................................................................................................. 8 Back Panel Ports..................................................................................................................................... 9 Default Settings......................................................................................................................................... 10 Restore Factory Default Setting.............................................................................................................. 10 Connecting the NB9/NB9W . ..................................................................................................................... 11 1. Connecting the Cables....................................................................................................................... 12 2. Establishing an ADSL connection via PPPoE........................................................................................ 13 3. Establishing your Wireless Connection (for NB9W only)........................................................................ 15 4. Setting up your VoIP account.............................................................................................................. 16 Computer Hardware Configuration............................................................................................................ 18 Digging Deeper – Advanced Settings........................................................................................................ 21 Basic.................................................................................................................................................... 22 Basic>Home.................................................................................................................................. 22 Basic>ADSL Quick Setup................................................................................................................ 23 Voice.................................................................................................................................................... 24 About SIP & VoIP............................................................................................................................. 24 Voice Menu 1................................................................................................................................. 25 Voice > Dial Plan............................................................................................................................ 29 Voice > Dial Plan > Outgoing.......................................................................................................... 29 Voice > Dial Plan > Incoming.......................................................................................................... 30 Voice > Dial Plan > Advance........................................................................................................... 31 Wireless (NB9W only)............................................................................................................................ 33 Wireless Setup............................................................................................................................... 33 Wireless Security Quick Setup......................................................................................................... 34 Wireless Security in Detail............................................................................................................... 37 Wireless Configuration.................................................................................................................... 41 Wireless > Mac Filter...................................................................................................................... 43 Wireless > Bridge........................................................................................................................... 44 Wireless > Station Info.................................................................................................................... 44 Management......................................................................................................................................... 45 Management > Device Settings > Backup....................................................................................... 45 Management > Device Settings > Update........................................................................................ 45 Management > Device Settings > Restore Default............................................................................ 45 Management > Device Settings > Update Firmware......................................................................... 46 Management > SNMP.................................................................................................................... 47 Management > SNTP..................................................................................................................... 48 Access Control > Services.............................................................................................................. 49 Access Control > IP Addresses........................................................................................................ 50 Access Control > Password............................................................................................................. 51 NB9/NB9W ADSL2+ VoIP Router YML790 Rev8 Save & Reboot................................................................................................................................ 51 Advanced.............................................................................................................................................. 52 Advanced > WAN........................................................................................................................... 52 Advanced > LAN............................................................................................................................ 54 Advanced > NAT > Port Forwarding................................................................................................. 57 Advanced > NAT > Port Triggering................................................................................................... 59 Advanced > NAT > DMZ................................................................................................................. 60 Advanced > Security > IP Filtering................................................................................................... 61 Advanced > Security > Parental Control........................................................................................... 62 Advanced > QoS............................................................................................................................ 63 Advanced > Routing > Default Gateway........................................................................................... 65 Advanced > Routing > Static Route................................................................................................. 66 Advanced > DNS > DNS Server....................................................................................................... 68 Advanced > DNS > Dynamic DNS................................................................................................... 69 Advanced > DSL............................................................................................................................ 70 Status................................................................................................................................................... 71 Status > Diagnostics....................................................................................................................... 71 Status > System Log...................................................................................................................... 72 Status > Statistics.......................................................................................................................... 72 Status > WAN................................................................................................................................. 73 Status > Route............................................................................................................................... 74 Status > ARP.................................................................................................................................. 75 Status > DHCP............................................................................................................................... 76 Status > Bridging........................................................................................................................... 77 Status > IGMP Proxy....................................................................................................................... 78 Appendix A: Troubleshooting..................................................................................................................... 79 Problems with LAN................................................................................................................................ 79 Problems with WAN............................................................................................................................... 79 Problem with Wireless........................................................................................................................... 80 Appendix B: Establishing your wireless connection (for NB9W only)....................................................... 81 Windows XP service pack 2................................................................................................................... 81 Mac OSX 10.4...................................................................................................................................... 84 Windows Vista....................................................................................................................................... 86 Appendix C: How to change Wireless Security on your NB9W.................................................................. 91 Appendix D: Glossary................................................................................................................................. 94 Appendix E: Registration and Warranty Information............................................................................... 104 WARNING For your safety the Antenna must be fitted before any cables are connected to the unit, and all cables should be removed before the Antenna is removed. All replacement Antennas should be of a type approved by NetComm. VERY IMPORTANT NOTE: 1. The NB9/NB9W is equipped with an automatic ‘back-up’ telephone line which will connect you to the emergency operator when 000 is dialled on the handset. For this feature to function correctly, you need a functioning telephone line and that line needs to be correctly connected to the NB9/NB9W’s line port. NetComm will not be liable to any person for any expenses, losses, damages or costs if the emergency operator cannot be reached for any reason beyond NetComm’s control, including but not limited to the non-existent or incorrect connection of the telephone line to the NB9/NB9W; faults in line cords, plugs or other cabling/exchange faults; lightning strikes disabling the NB9/NB9W line circuits; the user disabling the LifeLine support in the NB9/NB9W advanced features; problems with the user’s handset or damage caused to the NB9/NB9W by it; the user not having a valid account with the telephone service providers for a regular telephone service; and the ‘000’ service being congested or not operational. 2. NetComm will not be liable for any expenses, losses, damages or costs from a user inadvertently using the PSTN Service to make calls. NB9/NB9W ADSL2+ VoIP Router YML790 Rev8 Overview Thank you for purchasing the NetComm NB9/NB9W ADSL2+ VoIP Router. NetComm is proud to introduce this entirely new class of all-in-one device incorporating ADSL2+, VoIP and Wireless in a single compact unit. The NB9/NB9W is truly a ‘broadband communications gateway’ that, when attached to the appropriate ISP services, will enable multiple broadband communications streams to run concurrently into your home or office. Data and voice services can be delivered and distributed to multiple PCs at the same time, while the data packets can be managed via ‘Quality of Service’ (QoS) controls to ensure that priority is given to voice traffic, or to the traffic of your choice. The VoIP ‘terminal adaptor’ capability enables you to connect existing telephones to the device to make inexpensive or free VoIP phone calls to any destination, while simultaneously providing internet connectivity for multiple computers. Let’s look at some of the capabilities offered by the NB9/NB9W in brief: ADSL Broadband The NB9/NB9W offers the next generation of broadband ADSL technology with ADSL2/2+, which boosts ADSL’s performance significantly, improves interoperability, and supports new applications, services and deployment conditions. VoIP (Voice over Internet Protocol) The NB9/NB9W connects one or two analogue telephones to a VoIP service as well as providing a pass through connection for your existing landline. The two Phone (FXS) ports even allow two separate VoIP numbers with a VoIP Service Provider (VSP). The PSTN Line (FXO) port provides telephone back-up should your VSP, ADSL service or power to the NB9/NB9W fail. Wireless (NB9W only) In addition to fast, standard 802.11g-based wireless, the NB9W incorporates Broadcom’s state-of-the-art XPress and Afterburner technology* to radically improve the performance of wirelessly-connected devices. * Your wireless device must have a suitable wireless card to take advantage of these technologies. QoS With the addition of bandwidth-hungry applications to the SOHO/Home network the NB9/NB9W has not overlooked one of the most important features for a home Internet gateway – Quality of Service (QoS) The QoS implementation in the NB9/NB9W is extremely sophisticated allowing you to prioritise data on your network according to rules you make. NB9/NB9W ADSL2+ VoIP Router YML790 Rev8 NB9/NB9W Package Contents Your NB9/NB9W contains the following items: • NB9 or NB9W ADSL2+ Modem Router • 15VDC 1.6 Amps power supply • RJ-11 ADSL Line connection cable • RJ-45 10/100 Ethernet cable • Removable Antenna • User Guide (on CD) • Quick Start Guide Selected terminology used in this manual POTS A telephone line used for a standard phone-line and service will be referred to as POTS (=Plain Old Telephone Service) Pass-through Line The line that connects the NB9/NB9W to a POTS line may be referred to as a pass-through line RJ11 Telephone cables may be referred to as RJ11 which is the format of the connection plug used for telephones Ethernet Local area network traffic will be carried by standard Category 5 cable referred to as Ethernet RJ45 Ethernet cables may also be referred to as ‘RJ45’ which is the format of the connection plug used for network devices LAN Local Area Network WLAN Wireless Local Area Network VSP VoIP Service provider Do I need a micro filter? Micro filters are used to prevent interference between phones and fax machines, and your ADSL service. If your ADSL-enabled phone line is being used with any equipment other than your ADSL Modem then you will need to use one Micro filter for each phone device in use. Telephones and/or facsimiles in other rooms that are using the same line will also require Microfilters. A suitable Microfilter can be purchased from NetComm or your Service Provider, if required. Multi-purpose Gateways and In-line Splitters The multi-purpose ADSL/VoIP gateway uses a different micro filter configuration to an ADSL modem/router. With the NB9/NB9W, an in-line splitter is placed between a telephone outlet and the NB9/NB9W. One RJ11 cable is then connected from the splitter’s Phone port to the NB9/NB9W LINE port. Another is connected from the splitters ADSL or MODEM port to the NB9/NB9W ADSL port. This is to allow the ‘pass-through’ line to connect via the POTS if necessary. (See diagram on page 9) NB9/NB9W ADSL2+ VoIP Router YML790 Rev8 Minimum System Requirements: Different aspects of the NB9/NB9W have different requirements, so let’s look at them in turn. We’ll start with your computer, which ought to match the following requirements if you are to enjoy the benefits of a highspeed ADSL connection and use of VoIP and Wireless Networking. PC Requirements: • Any computer running Windows 98/2000/Me/XP/Vista or Macintosh OSX • Ethernet or Wireless Network card • CD-ROM drive • Web browser e.g. • Internet Explorer 5.1 (or better) • Netscape Navigator • Mozilla FireFox 1.0.4 ADSL Requirement: • ADSL broadband connection to an ISP (Internet Service Provider) • ADSL In-line Splitter/Filter (Please refer to Do I need a micro filter? for more information) Note: Connection at ADSL2 or 2+ rate depends on the service offered by your ISP; the device will operate at standard ADSL rates in the absence of the 2 or 2+ service. Consult your ISP for details. VoIP Requirements: • One or two telephone handsets for VoIP service Note: The NB9/NB9W serves as an Analogue Terminal Adaptor so any touch-tone phone may be used for VoIP services. • Account with a VoIP Service Provider (VSP) including relevant account details Wireless Requirements (for NB9W only): • Wireless Network Interface Card (NIC) for each intended computer NB9/NB9W ADSL2+ VoIP Router YML790 Rev8 Getting to Know the NB9/NB9W It is recommended that you take a moment to acquaint yourself with the indicator lights, ports and default settings of the NB9/NB9W prior to commencing with installation. LED Indicators Function LED Colour Mode POWER Green On The router is powered up Off The router is powered down On The ADSL Link is established Off The ADSL Link is not established Green Blink The ADSL line is training or traffic is passing through Green On FXO (Pass through) Line is off hook Off FXO Line is on hook On FXS (VoIP) Phone 1 is off hook Off FXS Phone 1 is on hook On FXS Phone 2 is off hook Off FXS Phone 2 is on hook On Ethernet link is established Off Ethernet link is not established Green Blink Data transmitting/receiving over Ethernet Green On Wireless module is ready Off Wireless module is not installed Blink Data transmitting/receiving over Wireless ADSL LINE PHONE1 PHONE2 LAN 1x ~4x Green Green Green Green NB9W only WLAN Green WLAN ACC See User Guide WLAN Access Control NB9/NB9W ADSL2+ VoIP Router YML790 Rev8 Back Panel Ports Port Name Function WLAN ACC (for NB9W only) WLAN Access Control. Antenna (for NB9W only) Wireless LAN antenna. 4 x LAN 4 x 10/100 Base-T Ethernet jack (RJ-45) to connect to your Ethernet Network card or Ethernet Hub / Switch. ADSL Telephone jack (RJ-11) to connect to your Telephone Wall Socket (ADSL line). Line Telephone jack (RJ-11) to connect to your Telephone Wall Socket (note you will require an in-line splitter to split your telephone line if one wall point is used for both your ADSL and telephone service). Power Connect the power adaptor that comes with your NB9/NB9W. Reset Reset button. Depress for 10 seconds to return your NB9/NB9W to its default settings. NB9/NB9W ADSL2+ VoIP Router YML790 Rev8 Default Settings The following are the default LAN (Local Area Network) and WAN (Wide Area Network). LAN (Management) • Static IP Address: 192.168.1.1; • Subnet Mask: 255.255.255.0; • Default Gateway: blank; WAN (Internet) • Empty: Once you have run through ‘ADSL Quick Setup’ you will have a saved WAN connection; • Default connection type: PPPoE (most common for Australian ISPs); • VPI / VCI: 8 / 35; Modem Access • Username: admin • Password: admin Restore Factory Default Setting Restore Factory Defaults will reset the NB9/NB9W to its factory default configuration.Occasionsmay present themselves where you need to restore the factory defaults on your NB9/NB9W such as: • You have lost your username and password and are unable to login to your NB9/NB9W’s web configurationpage; • You have purchased your NB9/NB9W from someone else and need to reconfigurethedevice to work with your ISP; • You are asked to perform a factory reset by NetComm Support staff In order to restore your NB9/NB9W to its factory default settings, please follow these steps: • Ensure that your NB9/NB9W is powered on (for at least 10 seconds); • Use a paper clip or a pencil tip to depress the reset button for ten seconds and release. At this point, the reset is in progress. Do not power off the unit at this point; • When indicator lights return to steady green, reset is complete. The default settings are now restored. The entire process takes about 45 seconds to complete; • Once you have reset your NB9/NB9W to its default settings you will be able to access the device’s configuration web interface using http://192.168.1.1 with username ‘admin’ and password ‘admin’; 10 NB9/NB9W ADSL2+ VoIP Router YML790 Rev8 Connecting the NB9/NB9W Follow the steps in this section to configure ADSL, VoIP, Wireless, only one, or any combination of these. The diagram below shows you how to connect the NB9/NB9W to your PC, ADSL and POTS service. Laptop Computer connected wirelessly 1 or 2 Analogue Telephones Telephone Socket Phone ADSL/Modem Computer connected via Ethernet Computer connected via Ethernet Computer connected via Ethernet Computer connected via Ethernet RJ-11 Telephone line RJ-45 Ethernet cable NB9/NB9W ADSL2+ VoIP Router YML790 Rev8 11 1. Connecting the Cables Note: If you wish to link to the NB9W wirelessly at the outset, see Establishing a Wireless Connection below. 1. Connect your PC using Ethernet cable to one of the LAN ports of your NB9/NB9W; 2. Connect the POTS pass-through line ; i. Connect telephone wall-socket to port on in-line splitter called LINE; ii. Connect one end of an RJ11 (telephone) cable to PHONE port of the in-line splitter and connect the other end to the LINE port on NB9/NB9W; 3. Connect the ADSL service - connect one end of a second RJ11 (telephone) cable to the ADSL/Modem port of the in-line splitter and connect the other end to the ADSL port of the NB9/NB9W; 4. Connect the power cable to the Power socket and plug into a power source; 5. Switch your NB9/NB9W on at the powerpoint; 6. Switch on your PC. Make sure the LAN LED (light) on your NB9/NB9W is on, which indicates that network function is active. Note that the pass-through service is provided as a back-up and that calls made through this line are not the same VoIP calls and will be subject to normal telecommunications charges. The next section explains how to establish your ADSL connection to the Internet. 12 NB9/NB9W ADSL2+ VoIP Router YML790 Rev8 2. Establishing an ADSL connection via PPPoE Having physically connected your NB9/NB9W, the next step is to establish your ADSL connection to the Internet, via your ISP. Nearly all Australian ISPs connect their clients via a standard method called PPPoE (Point-to-Point Protocol over Ethernet). Your NB9/NB9W has a ‘Quick Setup’ page configured for easy access via PPPoE, so all you need to do is enter the Username and Password issued by your ISP, click the ‘Save & Reboot’ button and connection will follow. This sequence will be explained here. Note: If you are not using a PPPoE connection type, please consult the User Guide (on CD) for details on changing your connection type. If unsure, follow the steps in this section first. At this point you must have your NB9/NB9W connected according to Section 5.1, with your PC connected to the NB9/NB9W via Ethernet cable (or wireless link for NB9W only). You must also have your ISP-supplied username and password on hand. 1. For Windows users, insert the accompanying CD into your CD-ROM drive. An autorun screen should appear. Click the ‘Configure NB9/NB9W’ button; Note: If you do not have a CD-ROM or are running a non-Windows OS, you can access the NB9/NB9W Configuration page by opening a web browser and entering http://192.168.1.1 into the Address / Location field. If you are not able to access the login screen by this means, go to the section titled ‘Computer Hardware Configuration’ in the User Guide (on CD) for instructions and come back here when this is completed. Otherwise, proceed to next. 2. Enter the username ‘admin’ and password ‘admin’ and click ‘OK’; 3. The following web page is displayed: NB9/NB9W ADSL2+ VoIP Router YML790 Rev8 13 4. Enter your PPPoE Username and PPPoE Password and click the Save & Reboot. The NB9/NB9W will apply all of the settings in approximately 2 minutes. 5. After several minutes, you should then see the Basic>Home page indicating your ADSL service is connected. Proceed to configure VoIP and Wireless, if required. 14 NB9/NB9W ADSL2+ VoIP Router YML790 Rev8 3. Establishing your Wireless Connection (for NB9W only) Wireless networking provides an alternative connection to using Ethernet cable. Wireless access is enabled by default on your NB9W with the following default settings: • Wireless network name (SSID): ‘wireless’; • Security: WEP (64-bit) HEX key: ‘a1b2c3d4e5’; Note: For advanced wireless settings of your NB9W refer to the User Guide included on your NB9/NB9W CD ROM. If you have a wireless Ethernet card on your PC, you can connect to your NB9W by following these steps: 1. Connect the NB9W as in the diagram on page 9; 2. Enable the wireless connectivity of your PC; 3. Search for available wireless networks; 4. The default name (SSID) of the NB9W’s wireless network, ‘wireless’, will appear; 5. Connect to the SSID ‘wireless’ and when prompted, enter the default HEX password which is A1B2C3D4E5; 6. Proceed with ‘Establishing an ADSL connection via PPPoE’ above. NB9/NB9W ADSL2+ VoIP Router YML790 Rev8 15 4. Setting up your VoIP account Once you have successfully connected to the Internet you are ready to setup your VoIP account to start making telephone calls over the Internet. This section will deal with setting up a single VoIP account with standard settings. Note: Make sure you get all your necessary VoIP account details from your VSP (VoIP Service Provider) before you begin. These details are not your ADSL User Name and Password. Your VoIP checklist includes: • • • • • • • VoIP/DID Phone Number; VoIP account username (known as ‘Auth. ID’ in your NB9/NB9W); VoIP account password (known as ‘Auth. Password’ in your NB9/NB9W); SIP Proxy Server IP address; SIP Proxy Port; SIP Proxy Domain; Register Expire Time. Once you have the above settings (crucial ones being VoIP/DID Phone Number, Auth. ID, Auth. Password and SIP proxy) you are ready to start setting up your VoIP service on your NB9/NB9W. 1. If you are not already logged into your NB9/NB9W, open a web browser and navigate to http://192.168.1.1 and login with the NB9/NB9W username & password (admin / admin); 2. Click on the ‘Voice’ menu to access the VoIP setup page; Note: Settings will vary from those shown below depending on your VoIP provider 16 NB9/NB9W ADSL2+ VoIP Router YML790 Rev8 3. Interface Name: Don’t change the ‘Interface name’ setting; 4. Priority Codec: The priority codec is set to ‘G729’ which means your NB9/NB9W will firstly choose this codec when communicating with your SIP proxy from your VSP (VoIP Service Provider); 5. Ptime: The ‘ptime’ is the time delay (milliseconds) between voice packets sent. Do not change this value unless your VSP has asked you to; 6. SIP Proxy: Check the ‘use SIP proxy’ checkbox the enter the SIP Proxy IP address (issued by your VSP); 7. SIP Proxy Port: The default is port 5060, but your VSP may ask you to change this; 8. SIP Proxy Domain: In most cases this is the same value as the SIP Proxy IP address (check with your VSP if unsure); 9. Register Expire Time: Default is 60 seconds. Don’t change this value unless your VSP instructs you to; 10. DispName: This is the user-defined ‘extension number’ that will display on the other phone connected to the NB9/NB9W; 11. VoIP Phone Number: issued by VSP 12. AuthID: same as above 13. Auth. Password: VoIP password issued by VSP 14. Once VoIP settings have been entered, click on Apply and Save all VoIP Parameters. 15. Once your SIP client has started, click on the ‘Basic > Home’ to see what the status of your Voice service is: 16. Pick up your telephone, make sure you have dial tone and can make a call. Note: If you experience any failure in setting up your VoIP, please refer to the User Guide included on your CD ROM for more information. NB9/NB9W ADSL2+ VoIP Router YML790 Rev8 17 Computer Hardware Configuration This section provides instructions for configuring the TCP/IP (Network) settingson your computer to work with your Modem. These steps are only required if you are having trouble accessing your Modem. Windows® XP PCs 1. In the Windows task bar, click the Start button, and then click Control Panel. 2. Click on Network & Internet Connections icon. (Category mode only). 3. Click the Network Connections icon. 4. In the LAN or High-Speed Internet window, right-click on the icon corresponding to your network interface card (NIC) and select Properties. (Often, this icon is labelled Local Area Connection). 5. The Local Area Connection dialog box displays with a list of currently installed network items. Ensure that the check box to the left of the item labelled Internet Protocol (TCP/IP) is checked. Select Internet Protocol TCP/IP and click on Properties. 6. In the Internet Protocol (TCP/IP) Properties dialog box, click the radio button labelled Obtain an IP address automatically. Also click the radio button labelled Obtain DNS server address automatically. 7. Click OK twice to confirm your changes, and close the Control Panel. Windows 2000 PCs First, check for the IP protocol and, if necessary, install it: 1. In the Windows task bar, click the Start button, point to Settings, and then click Control Panel. 2. Double-click the Network and Dial-up Connections icon. 3. In the Network and Dial-up Connections window, right-click the Local Area Connection icon, and then select Properties. 4. In the Local Area Connection Properties dialog box, select Internet Protocol (TCP/IP), and then click Properties 5. In the Internet Protocol (TCP/IP) Properties dialog box, click the radio button labelled Obtain an IP address automatically. Also click the radio button labelled Obtain DNS server address automatically. 6. Click OK twice to confirm and save your changes, and then close the Control Panel. Windows Me PCs 1. In the Windows task bar, click the Start button, point to Settings, and then click Control Panel. 2. Click on View All Control Panel Options. 3. Double-click the Network icon. 4. The Network Properties dialog box displays with a list of currently installed network components. If the list includes Internet Protocol (TCP/IP), then the protocol has already been enabled. Skip to step 10. 5. If Internet Protocol (TCP/IP) does not display as an installed component, click Add… 6. In the Select Network Component Type dialog box, select Protocol, and then click Add… 7. Select Microsoft in the Manufacturers box. 8. Select Internet Protocol (TCP/IP) in the Network Protocols list and then click OK. You may be prompted to install files from your Windows ME installation CD or other media. Follow the instructions to install the files. If prompted ,click OK to restart your computer with the new settings. Next, configure the PC to accept IP information assigned by the modem: 9. Follow steps 1 – 4 above.. 10. In the Network Properties dialog box, select TCP/IP, and then click Properties. If you have multiple TCP/IP listings, select the listing associated with your network card or adapter. 11. In the TCP/IP Settings dialog box, click the radio button labelled Obtain an IP address automatically. 12. Click OK twice to confirm and save your changes, and then close the Control Panel. 18 NB9/NB9W ADSL2+ VoIP Router YML790 Rev8 Windows 95, 98 PCs First, check for the IP protocol and, if necessary, install it: 1. In the Windows task bar, click the Start button, point to Settings, and then click Control Panel. 2. Double-click the Network icon. 3. The Network dialog box displays with a list of currently installed network components. If the list includes TCP/IP, and then the protocol has already been enabled. Skip to step 9. 4. If TCP/IP does not display as an installed component, click Add… The Select Network Component Type dialog box displays. 5. Select Protocol, and then click Add… The Select Network Protocol dialog box displays. 6. Click on Microsoft in the Manufacturers list box, and then click TCP/IP in the Network Protocols list box. 7. Click OK to return to the Network dialog box, and then click OK again. You may be prompted to install files from your Windows 95/98 installation CD. Follow the instructions to install the files. 8. Click OK to restart the PC and complete the TCP/IP installation. Next, configure the PCs to accept IP information assigned by the Modem: 9. Follow steps 1 – 3 above. 10. Select the network component labelled TCP/IP, and then click Properties. If you have multiple TCP/IP listings, select the listing associated with your network card or adapter. 11. In the TCP/IP Properties dialog box, click the IP Address tab. 12. Click the radio button labelled Obtain an IP address automatically. 13. Click OK twice to confirm and save your changes. You will be prompted to restart Windows. 14. Click Yes. Mac OSX 10.4 1. Click the Apple icon and choose on “System Preferences”. 2. Click on “Network” icon. 3. Set “Location” to “Automatic and “Show” to “Built In Ethernet”. 4. Click on “TCP/IP” tab. 5. In the “Configure” option, choose “Use DHCP with automatic address”. 6. Click on “Apply Now”. Windows Vista 1. In the Windows task bar, click on Start and then click Control Panel. 2. Click on Network and Sharing Center. 3. Click on Manage Network Connection on the left menu. 4. Right click on Local Area Connection and click on Properties 5. The Local Area Connection dialog box will display a list of currently installed network items. Ensure that the check box to the left of the item labeled Internet Protocol Version 4 (TCP/IPv4) is checked. Select Internet Protocol Version 4 (TCP/IPv4) and click on Properties. 6. In the Internet Protocol Version 4 (TCP/IPv4) properties dialog box, click the radio button labeled “Obtain an IP address automatically”. Also click the radio button labeled “Obtain DNS server address automatically”. 7. Click OK twice to confirm your changes and close the Control Panel. Note: For detailed information regarding the advanced features of this product, refer to the Advanced Settings sections. NB9/NB9W ADSL2+ VoIP Router YML790 Rev8 19 Digging Deeper – Advanced Settings Your NB9/NB9W has many advanced features that you may want or need to use in the future. Let’s start by taking a look at the menus in the web interface. 1. Login to the NB9/NB9W web interface (http://192.168.1.1); 2. Enter your username & password (default is ‘admin’ / ‘admin’); The NB9/NB9W has the following main menu items: • Basic • Voice • Wireless (NB9W only) • Management • Advanced • Status Let’s explore these menus in detail. 20 NB9/NB9W ADSL2+ VoIP Router YML790 Rev8 Basic Basic>Home The first page you see after you have successfully setup your NB9/NB9W is the Basic > Home which provides a summary of the status of your NB9/NB9W: Field Description Uptime System: Uptime status for various connections. Software Version The current version of software (firmware) loaded into your NB9/NB9W Bootloader (CPE) Version The version of the bootloader Wireless Driver Version The version of the wireless driver Line Rate – Upstream The upstream line rate in Kbps (e.g. 256Kbps) Line Rate – Downstream The downstream line rate in Kbps. (e.g. 1500 Kbps) LAN IP Address The IP address to access the NB9/NB9W on the LAN side Default Gateway The default gateway that your NB9/NB9W communicates with Primary DNS Server The primary DNS server IP address Secondary DNS Server The secondary DNS server IP address VoIP Current Status The status of your VoIP service NB9/NB9W ADSL2+ VoIP Router YML790 Rev8 21 Basic>ADSL Quick Setup The NB9/NB9W web configuration page can be opened in a Web Browser window of a computer attached to the device by entering the Web address http://192.168.1.1. Enter User ID: admin and password: admin. The ‘ADSL Quick Setup’ page will then be displayed when the device is first started, or if you have deleted your WAN connection settings or reset the NB9/NB9W to factory defaults. The ‘ADSL Quick Setup’ screen appears as follows: Field Description User Id The PPPoE username issued by your ISP (e.g. [email protected]) Password The PPPoE password issued by your ISP Save & Reboot This button saves your settings, reboots the NB9/NB9W and connects to the Internet. Once completed you will be returned to the ‘Basic > Home’ page Type in the User ID and Password and click on Save/Reboot, close the browser and wait several minutes. Then re-open browser window and log into NB9/NB9W again following steps above. You will then see the Basic>Home page indicating your ADSL service is connected. Proceed to configure VoIP and Wireless, if required. NOTES: * PPPoE (Point to Point Protocol over Ethernet) is the standard connection method for Australian ISPs. ** ADSL is ‘UP’: this means the ADSL Synch Light must be steady green 22 NB9/NB9W ADSL2+ VoIP Router YML790 Rev8 Voice About SIP & VoIP Voice Settings The NB9/NB9W has the ability to connect two regular telephones via the Phone1 and Phone2 ports on the rear of the unit and provides a number of sophisticated call-management functions such as call forward, call waiting, call transfer and so on. The following section provides further details of how to set up VoIP services, and then how to use the advanced telephony functions offered by the NB9/NB9W. Note: You can use separate VoIP accounts from your VoIP Service Provider but not separate accounts with different VSPs. This means that you can configure your NB9/NB9W to provide two telephone extensions. VoIP services are usually provided through a standard technology called SIP, briefly described as follows. About SIP SIP, the Session Initiation Protocol, is a signalling protocol for Internet conferencing, telephony, presence, events notification and instant messaging. SIP is the Internet Engineering Task Force standard for multimedia conferencing over the Internet. SIP is designed to address the functions of signalling and session management within a packet-switched network. Signalling allows call information to be carried across network boundaries while session management provides the ability to control the qualities and attributes of an end-to-end call. The Session Initiation Protocol is a peer-to-peer protocol. There are four components in the SIP standard: • User Agent (UA) • Proxy Server • Registrar Server • Redirect Server In effect, this means that when you sign up for a VoIP account based on a SIP server, your ‘VoIP’ number and account details are managed by the SIP server at the VoIP Service Provider premises; by entering your SIP details (e.g. ‘sip.serviceprovider.com’) along with your VoIP/SIP account number and your account password, you are ‘registered’ with the service and able to make VoIP calls in practically the same way as with a traditional phone service (but for a much lower cost.) NB9/NB9W ADSL2+ VoIP Router YML790 Rev8 23 Voice Menu 1 Enter your VoIP details in the NB9/NB9W through the Voice menu. Clicking on the Voice Menu will retrieve the following screen: Entries in these fields are as follows: Field Value Interface name Current WAN connection; if you have set up your PPPoE connection to your ISP, this will display the current WAN connection. Preferred codec Value recommended by your VSP; default is G.729. Preferred ptime Value recommended by your VSP; default is 20. Use SIP proxy This box must be checked to activate the SIP registration process. SIP Proxy Enter SIP proxy IP address provided by your VSP. SIP proxy port Default is 5060. Leave as default unless directed to enter another value by VSP. SIP proxy Domain Set SIP proxy domain name; usually the same as SIP Proxy unless directed otherwise by VSP. SIP Outbound Proxy: Leave disable unless directed by VSP. Enable SIP tag Matching: Remote server for SIP Message: This box must be checked to activate the SIP Message logging. Leave as default unless directed otherwise by VSP. Register Expire Time Value recommended by your VSP; default is 60 (seconds). 24 NB9/NB9W ADSL2+ VoIP Router YML790 Rev8 Voice Menu 2 The lower part of the Voice entries screen provides fields in which details of your VoIP telephone number(s) are entered, along with several other VoIP parameters. The NB9/NB9W provides for two telephone ‘extensions’. If you have one VoIP number and one telephone handset, plug this phone into Port 1 and enter the VoIP details in fields labelled with 1… . If you have two handsets and one VoIP number then enter the same details in fields 1. and 2., above. In this configuration, both handsets will operate in tandem in the same way as two handsets on an ordinary POTS line. Notes: for 1 account and 2 handsets. Not all VoIP Service Provider support that function. If you have two different VoIP numbers from the same VSP a separate ‘extension number’ may be entered for each handset and calls Field Means DispName Will appear in telephone LCD display (if present) Extension VoIP Phone Number. The SIP client phone number. Auth Id VoIP account ID, a.k.a. SIP ID or VoIP Phone Number Auth Password Account password PSTN Call Route Incoming PSTN calls to ring on. Set the PSTN to ring on phone1 or phone2. Emergency Calls: Emergency calls default to PSTN connection. Max Digits Leave as default – refers to maximum length of digit string RFC2833 Outband DTMF Value recommended by your VSP; default is Auto Negotiation RTP Payload Type for RFC2833 Value recommended by your VSP; default is 101 Enable Phone Hotline (1&2) Hotline function will automatically connect to a stipulated VoIP or PSTN phone number; if the box is checked and a number is entered, the nominated phone will ring as soon as the handset is lifted. Enable pass “*”Call Feature to SIP Proxy: Tick to enable the NB9W to pass “*” key press to the SIP Proxy FAX Mode: Leave as default unless directed by VSP Differentiating PSTN & VoIP Ring Tone. To differentiate ring tone for PSTN and VoIP calls. Differentiating PSTN & VoIP Dial Tone. To differentiate dial tone for PSTN and VoIP calls. NB9/NB9W ADSL2+ VoIP Router YML790 Rev8 25 Field Means Enable Phone 1 call waiting. To enable Call waiting feature on Phone 1. Enable Phone 2 call waiting. To enable Call waiting feature on Phone 2. Call forward Type:. To enable call forward on phone1 and 2. Calls to the account will be forwarded to the nominated phone number in “Call Forward Phone Number” field. Signaling and Media QoS. Leave as default unless instructed by your VoIP Service Provider. Once you have input these settings, click Apply and Save VoIP Parameters which will save your settings and attempt to register the NB9/NB9W with your VSP. Click on Basic>Home to check the status of your VoIP service. In the Basic-Status window, you will see the following status indicators: VoIP Status Indicator Means Direct Mode VoIP is available but you are not connected to a SIP service. You are only able to make VoIP calls by entering IP details of remote device. SIP Registration Fail Usually indicates Invalid VoIP/SIP User ID and Password (= VoIP phone number and Authorisation Code). Check VoIP entries and try again. SIP Registration Success Connected to VSP; ready for VoIP phone calls. In this case you will hear a normal dial-tone. 26 NB9/NB9W ADSL2+ VoIP Router YML790 Rev8 Voice > Dial Plan The NB9W supports two types of Dial Plan. Outgoing Dial Plan works for both VoIP and PSTN connection and Incoming Dial Plan that only works for VoIP connection. Click on their respective link on the menu to access the configuration page. Voice > Dial Plan > Outgoing Click the Add button to add a new Outgoing Dial Plan Rule. Voice > Dial Plan > Incoming Click the Add button to add a new Incoming Dial Plan Rule. NB9/NB9W ADSL2+ VoIP Router YML790 Rev8 27 Voice > Dial Plan > Advance This feature allows you to set advance Dial Plan. Click the Add button to add a new rule. Priority: The value can be ranged from 0-32767. The lower number is the higher priority. Each call will be checked gradually according to the priority, once the call meets one of the rule, it will stop checking and take the action. Prefix: When the input numbers match the prefix numbers of the rule, the system will first delete the number of prefix defined in the DeleteDigit on the input number and then insert the digital numbers defined in the InsertDigit prior to the left number, and then call out with the recombination number. MinDigit and MaxDigit: The value can be ranged from 1-24. It defined the range of the number of the final adding number, for example, if the prefix is “123”, the DeleteDigit is 1, and InsertDigit is “29998261”. The system will firstly delete the number of the prefix, then the number will become as 23, and then insert 29998261 prior to 23, then the number will be “2999826123”. Therefore, the MinDigit can be configured from 1 to 10 and the MaxDigit can be configured bigger than 10. DeleteDigit: Enter the number of prefix digit that you want to delete. InsertDigit: Enter the number you want to insert. Examples: index Priority Prefix MinDigit MaxDigit DeleteDigit 10 1 2 8 1 29998261 20 23 1 8 2 29998261 30 4567 1 9 3 29998261 InsertDigit Example 1: when the user enter 123, the system will firstly delete the first number of the prefix, then the number will become as 23, and then insert 29998261 prior to 23, then the call-out number will be 2999826123. Example 2: when the user enter 234, the system will firstly delete the first 2 number of the prefix, then the number will become as 4, and then insert 29998261 prior to 4, then the call-out number will be 299982614. Example 3: when the user enter 456789, the system will firstly delete the first 3 number of the prefix, then the number will become as 789, and then insert 29998261 prior to 789, then the call-out number will be 29998261789. 28 NB9/NB9W ADSL2+ VoIP Router YML790 Rev8 Wireless (NB9W only) Wireless Setup The NB9W serves as an 802.11g Wireless Access Point, with enhanced capabilities provided by Broadcom’s XPressTM technology. The first screen in the Wireless menus is as follows: Field Enter Enable Wireless Check Enable Wireless to turn on wireless transmission Hide Access Point If this is checked, wireless clients will need to know the SSID (=wireless network name) if they wish to join the network. If Hide Access point is unchecked, the SSID will be broadcast to any wireless client in range SSID ‘Station Set Identifier’, or network name; replace with name of your choice. All stations must be configured with the correct SSID to access the WLAN. If the SSID does not match, the wireless client will not be able to join the network. Min one character, max 32. BSSID The BSSID is a 48-bit identity used to identify a particular BSS (Basic Service Set) within an area. In Infrastructure BSS networks, the BSSID is the MAC (Media Access Control) address of the AP (Access Point) and in Independent BSS or ad-hoc networks, the BSSID is generated randomly. Country Defaults to Australia When settings are entered, click Save/Apply NB9/NB9W ADSL2+ VoIP Router YML790 Rev8 29 Wireless Security Quick Setup Security settings are used to prevent unauthorised connection to your network. This can be as basic as a neighbouring user who detects and is able to connect through your wireless network, right through to actual malicious interference or ‘hacking’. Whatever the case, it is a good practise to be aware of and to use wireless network security to safeguard your data and your network Prior to considering the details of wireless security – provided later – the Quick Security Setup explains how to implement basic security on your NB9W wireless network. Quick Security Setup 1: WEP Security Your NB9W has WEP (Wired Equivalent Privacy) encryption enabled by default. Your network will not be available to passer-by or non-authorised users, and any workstation wishing to connect to your NB9W must know the SSID (wireless network name) and WEP key values. Turn on wireless, and set the SSID or wireless network name in the Wireless Setup Screen: Default SSID: wireless. This can continue to be used or changed to the name of your choice. Next, click on Wireless>Security. You should see that WEP encryption is enabled by default. This page will also allow you to change the Network Authentication and encryption key. Default WEP Key: A1B2C3D4E5 You are able to change these values however it is strongly recommended that security is not turned off. It is also recommended that your SSID or network name not advertise your actual name but be kept ‘generic’ or anonymous. Note: 30 WEP Security is the appropriate choice if the network clients that wish to connect include 802.11b standard NICs. NB9/NB9W ADSL2+ VoIP Router YML790 Rev8 Quick Security Setup 2 – WPA-PSK If a stronger network security settings is required, go to Wireless>Security and select WPA-PSK from the Network Authentication drop-down menu. Enter a network key of your choice in the WPA Pre-Shared Key field; this can be from 8 to 63 characters and contain special characters and spaced. And change the WPA Group Rekey Interval to 3600. Select TKIP for WPA Encryption and leave WEP Encryption as disabled. Users wishing to connect to your network will need to know the SSID name and the WPA Pre-Shared Key. Note: Wireless client network cards must be WPA-compliant to connect to your network; if in doubt check the wireless client network card documentation, or use WEP security (above). NB9/NB9W ADSL2+ VoIP Router YML790 Rev8 31 Wireless Security in Detail The following provides a detailed summary of wireless terms and acronyms and more in-depth explanations of the topic. It assumes little prior knowledge of wireless networking and is aimed at providing background for the terminology used in the NB9W Wireless Security screens. Warning: Wireless Networking is a technically challenging subject! Authentication and Encryption The two major aims of wireless network security are: (1) to prevent unauthorised persons from joining the network and (2) to prevent interception of network data or ‘eavesdropping’. These aims are accomplished by: • Authentication: establishes the identity of those seeking to join the network • Encryption: ensures that data is protected in such a way that those outside the network cannot access it. Network Keys The term ‘network key’ is often used in the context of wireless networking. The Network Key can be a text string, although in some systems network keys are generated from a ‘pass-phrase’ which is entered in one field from which up to four keys are derived in fields underneath the entry field. In all cases, the Wireless Router/Access Point and the workstations wishing to connect must use the same Network Key which needs to be communicated to clients prior to connection. ‘Re-keying’ refers to the frequency with which network keys are changed; for security purposes, they need to be changed frequently in case they re-occur frequently enough to identify them. In some wireless systems, network keys are entered by a variety of means including: • ASCII – any letter, number, or punctuation mark but no special characters • Hex – Letters A-F, Numbers 0-9 only • Pass phrase – enter a phrase in the top field of a set of fields, an algorithm then generates a series of keys based on the entered values. These methods have been standardised in the later implementations of Wireless Security and are easier to use in WPA. 32 NB9/NB9W ADSL2+ VoIP Router YML790 Rev8 WEP and WPA “WEP” stands for Wired Equivalent Privacy and was the original wireless security method. Over time it was found to be vulnerable to attacks based on de-coding the ‘keys’ used to encrypt the data. While no longer recommended for enterprise-level security, WEP is certainly secure from casual interception and will repel any non-specialised attempt to join the network or intercept data; it can be penetrated with various kinds of software tools and techniques but these are beyond the capability of the average computer user. ‘WPA’ stands for Wi-Fi Protected Access and is an improvement on WEP. WPA2 offers further refinements to WPA. WPA and WPA2 both comprise a number of different wireless security elements and methods that can be adapted to a variety of situations depending on the requirements. A lot of what is provided is applicable to enterpriselevel wireless networking, in other words, suitable for businesses who wish to deploy strict security methods and policies for their employees. Accordingly, these technologies will exceed the requirements of home users. An important element of WPA security is a RADIUS server (stands for Remote Access Dial-in User Service). The RADIUS server typically sits in the server room of a business or department and authenticates and manages user requests for connection. Home users will generally never have to bother about RADIUS server details. In nearly all cases, the default security method, which is WEP, or WPA-PSK will provide adequate security for home wireless networks. Other wireless security elements shall be explained in context below. Network Authentication Network Authentication specifies the type of network authentication. The default value is ‘Shared’. Open: Under Open System authentication, any wireless station can request authentication. Shared: Under Shared Key authentication, each wireless station is assumed to have received a secret shared key over a secure channel that is independent from the 802.11 wireless network communications channel (i.e. verbally). To use Shared Key authentication, you must have a network key assigned to the clients trying to connect to your NB9W. 802.1X 802.1X security requires the presence of a RADIUS server, and specification of the IP address of a RADIUS server, the port on which to connect to it, and the Shared Key used to authenticate with it. Disregard this security setting unless you are setting up or connecting to a RADIUS server. NB9/NB9W ADSL2+ VoIP Router YML790 Rev8 33 WPA WPA requires a RADIUS server to provide client authentication. WPA also requires specification of the ‘WPA Group Rekey Interval’ which is the rate that the RADIUS server sends a new Group Key out to all clients. The Re-Keying process is part of WPA’s enhanced security. This method also requires specification of the IP address of a RADIUS server, the port on which to connect to the RADIUS server, and the shared key used to authenticate with the RADIUS server. WPA-PSK WPA-PSK is a special mode of WPA providing strong encryption without access to a RADIUS server. In this mode encryption keys are automatically changed (rekeyed) and authentication re-established between devices after a specified period referred to as the ‘WPA Group Rekey Interval’. WPA-PSK is far superior to WEP and provides stronger protection for the home/SOHO user for two reasons: first, the process used to generate the encryption key is very rigorous and second, the rekeying (or key changing) is done very quickly. This stops even the most determined hacker from gathering enough data to identify the key and so break the encryption. WEP is confusing because of the various types of ‘network keys’ vendors use (HEX, ASCII, or passphrase) and because home users mix and match equipment from multiple vendors, all using different types of keys. But WPA-PSK employs a consistent, easy to use method to secure your network. This method uses a passphrase (also called a shared secret) that must be entered in both the NB9W and the wireless clients. This shared secret can be between 8 and 63 characters and can include special characters and spaces. For maximum security, the “WPA Pre-Shared Key” should be a random sequence of either keyboard characters (upper and lowercase letters, numbers, and punctuation) at least 20 characters long, or hexadecimal digits (numbers 0-9 and letters A-F) at least 24 hexadecimal digits long. Note: The less obvious, longer and more ‘random’ your ‘WPA Pre-Shared Key’, the more secure your network. Note the following ‘WPA Encryption’ options: TKIP: The Temporal Key Integrity Protocol (TKIP) takes over after the initial shared secret is entered in your wireless devices and handles the encryption and automatic rekeying. AES: WPA defines the use of Advanced Encryption Standard (AES) as an additional replacement for WEP encryption. Because you may not be able to add AES support through a firmware update to your existing wireless clients / equipment, support for AES is optional and is dependent on vendor driver support. TKIP+AES: This will allow either TKIP or AES wireless clients to connect to your NB9W. 34 NB9/NB9W ADSL2+ VoIP Router YML790 Rev8 WPA2 ‘WPA Pre-authentication’ support in WPA2 allows a client to pre-authenticate with the NB9W toward which it is moving, while maintaining a connection to the access point it’s moving away from. This new capability allows the roaming to occur in less than 1/10th of a second while a traditional roam without PMK caching and pre-authentication would take more than one second. Time-sensitive applications like Citrix, video, or VoIP will all break without fast roaming. ‘Network Re-Auth Interval’ is the interval specified (seconds) that the wireless client needs to re-authenticate with the NB9W. For the remainder of the fields required, see above. WPA2-PSK: Same as WPA-PSK, but you can only use AES with WPA2 and not WPA. Mixed WPA2/WPA: Enables WPA2 or WPA wireless clients to connect to the NB9W. Requires a RADIUS server to authenticate the wireless clients. Mixed WPA2/WPA-PSK: Enables WPA2 and WPA clients to authenticate using a PSK (Pre-Shared Key) instead of a RADIUS server. NB9/NB9W ADSL2+ VoIP Router YML790 Rev8 35 Wireless Configuration To enter advanced settings for the wireless network hosted by the NB9W, click on Wireless > Configuration: Many of these fields may not need to be altered and may require interpretation by a network engineer. Field Name About AP Isolation ‘On’: ’wireless clients associated with the access point will only be able to communicate with the Access Point ‘Off’: wireless clients associated with the Access Point will be able to connect to each other ‘peer-to-peer Band [Not alterable by end-user] Channel The default channel is 11. The 802.11b/g network is divided into 14 channels in Australia. Each channel broadcasts on a slightly different frequency; if you are getting interference from adjacent wireless networks, make a note of the channels that these are operating on and change your channel accordingly. For best compatibility, only use channel 1 to 11 as some wireless client does not work on channel 12 and 13. Rate Default rate is ‘Auto’ and operates at the 54 Mbps data rate when possible but drops to lower rates when necessary, dependent on signal strength and the capacity of the client stations. Multicast Rate Leave at default setting ‘Auto’ unless there is a specific requirement for multicast. Basic Rate Leave as default 36 NB9/NB9W ADSL2+ VoIP Router YML790 Rev8 Fragmentation Threshold Enter a value between 256 (min) and 2346 (max). A threshold, specified in bytes, that determines whether packets will be fragmented and at what size. On an 802.11 WLAN, packets that exceed the fragmentation threshold are fragmented, i.e., split into smaller units suitable for the circuit size. Packets smaller than the specified fragmentation threshold value are not fragmented. If you experience a high packet error rate, try to slightly increase your ‘Fragmentation Threshold’. The value should remain at its default setting of 2346 unless you are troubleshooting wireless network issues. Setting the ‘Fragmentation Threshold’ too low may result in poor performance. RTS Threshold Request To Send, set in bytes, specifies the packet size beyond which the WLAN Card invokes its RTS/CTS (Clear To Send) mechanism. Packets that exceed the specified RTS threshold trigger the RTS/CTS mechanism. The NIC (Network Interface Card) transmits smaller packet without using RTS/CTS. The default setting of 2347 (maximum length) disables RTS Threshold. DTIM Interval Delivery Traffic Indication Message (DTIM), also known as Beacon Rate. The entry range is a value between 1 and 65535. A DTIM is a countdown informing clients of the next window for listening to broadcast and multicast messages. When the NB9W has buffered broadcast or multicast messages for associated clients, it sends the next DTIM with a DTIM Interval value. AP Clients hear the beacons and awaken to receive the broadcast and multicast messages. The default is 1. Beacon Interval The amount of time between beacon transmissions. Each beacon transmission identifies the presence of an wireless client (or access point). By default, WLAN passively scan all RF channels and listen for beacons coming from access points to find a suitable access point. Before a station (wireless client) enters power save mode, the station needs the beacon interval to know when to wake up to receive the beacon (and learn whether there are buffered frames at the access point). The entered value is represented in ms. Default is 100. Acceptable entry range is 1 to 0xffff (65535). 1. XpressTM Technology Select ‘enable’ to activate in-built XpressTM Technology 1 54gTM Mode Select the mode to ‘54g Auto’ for the widest compatibility. Select the mode to ‘54g Performance’ for the fastest performance with 54g certified equipment. Set the mode to ‘54g LRS’ if you are experiencing difficulty communicating with legacy 802.11b equipment. 54g Protection In ‘Auto’ mode the NB9W will use RTS/CTS to improve 802.11g performance in mixed 802.11g/802.11b networks. Turn protection ‘Off’ to maximize 802.11g throughput under most conditions. WMM (Wi-Fi Multimedia) WMM stands for Wi-Fi Multimedia, that provides features that improve the user experience for audio, video and voice applications over a Wi-Fi networks. About XpressTM Technology XpressTM Technology is a Broadcom innovation that dramatically improves wireless performance for suitably equipped client workstations while ensuring compatibility with 802.11b and 802.11g devices. Basically, XpressTM will communicate at the maximum rate sustainable for each class of device, and also provide very fast data transfer rates with other XpressTM-compatible network devices allowing a total theoretical bandwidth of 108Mbps. If you are communicating with XpressTM-equipped wireless network client machines, enable XpressTM ; otherwise, don’t enable. NB9/NB9W ADSL2+ VoIP Router YML790 Rev8 37 Wireless > Mac Filter The Wireless > MAC Filter page displays the following: This function allows wireless access to be restricted or allowed based on the MAC address of the client device. When MAC address filtering is set to “Allow”, access to the wireless is allowed only to the clients that are listed in the list. When set to “Deny”, access to the wireless is restricted only to the clients that are listed in the list. Note: PROCEED CAREFULLY with this feature because if you deny or exclude your own MAC address you will lose contact with the device and need to re-set the device and restore your details. Field Name Comment MAC Restrict Mode Off – disables MAC filtering. Allow – permits access for the specified MAC address. Deny – Rejects access for specified MAC address. Press the Add button to add a new MAC address to the list and Remove to remove selected entry in the list. Pressing the Add button will give you a page to enter the MAC address. How to find your MAC address Go to Start>Run. Enter CMD and press enter. At the command prompt, type IPCONFIG/ALL. The MAC address is referred to as a ‘physical address’ by Windows. It is always in the format of six groups of two characters separated by a hyphen. If the NB9W does not recognise the address as valid, enter the values separated by a colon : instead of a hyphen. 38 NB9/NB9W ADSL2+ VoIP Router YML790 Rev8 Wireless > Bridge Wireless bridge mode is used to provide a wireless link between WLAN segments to provide greater coverage or to extend network size and reach. If a wireless router is used in bridge mode, then Access Point functionality is disabled. Network Bridges operate to ‘bridge’ two network segments on the ‘physical’ or MAC link layer. This section describes how to configure the NB9W in bridge mode. To access the Wireless Bridge feature click on Wireless> Wireless Bridge: Above, default setting for NB9W to act as Access Point. Field Name Comment AP Mode Allows you to choose between Access Point or Wireless Bridge mode. Bridge Restrict If AP Mode is set to Bridge, and this field set to Enabled, it allows you to specify from choice of available bridge(s). Bridge Restrict disabled Any wireless bridge within range may connect. Enabled (Scan) Scans for available wireless bridges and displays MAC address of any that it has found. Click ‘Refresh’ to initiate scan if required, then select bridge of choice. Wireless > Station Info This page shows the MAC address of authenticated wireless stations that are connected to the NB9W and their status. In the example below there is one workstation attached to the wireless network. NB9/NB9W ADSL2+ VoIP Router YML790 Rev8 39 Management Management > Device Settings > Backup Backup enables you to save a copy of the NB9/NB9W configuration file. This can be re-loaded to restore your settings should you need to reset the device to its factory defaults. Click on “Backup Settings” button to start the backup process. The default file name is backupsettings.conf, or give it an explanatory name (e.g. NB9WHome.conf) and save it to somewhere safe on your computer. Click on “Backup Settings” button to start the backup process. Management > Device Settings > Update The Update option under ‘Management > Device Settings’ enables you to load a previously saved configuration file. Click on browse, navigate to the .config file and then click on update settings to restore settings. Management > Device Settings > Restore Default Clicking the ‘Restore Default Configuration’ button in the Management > Restore Settings screen will restore the original factory default settings on your NB9/NB9W. Note 1: This entry has the same effect as the hardware reset-to-default button on the rear of the NB9/NB9W. The NB9/NB9W hardware and the boot loader support the reset to default button. If the reset button is continuously pushed for more than 5 seconds, the boot loader will erase the entire configuration data saved on the flash memory. Note 2: Restoring system settings requires a system reboot. This necessitates that the current Web UI session be closed and restarted. 40 NB9/NB9W ADSL2+ VoIP Router YML790 Rev8 Management > Device Settings > Update Firmware The ‘Update Firmware’ screen allows you to obtain an updated firmware image file from NetComm. Manual software upgrades from a locally stored file can be uploaded using this screen by selecting a firmware file saved to your hard-disk and clicking the ‘Update Firmware’ button. Notes: Please make sure that any firewall or anti virus program is turn off before updating the firmware. Management > SNMP The Simple Network Management Protocol (SNMP) allows a network administrator to monitor a network by retrieving settings on remote network devices. To do this, the administrator typically runs an SNMP management station program such as MIB browser on a local host to obtain information from the SNMP agent, in this case the NB9/NB9W (if SNMP enabled). An SNMP ‘community’ performs the function of authenticating SNMP traffic. A ‘community name’ acts as a password that is typically shared among SNMP agents and managers. To enable SNMP, change the setting for “SNMP Agent” to “Enable”. Field Means Read Community Read device settings. Set Community Read and change device settings. System Name Default = NB9/NB9W. System Location User-defined value. System Contact User-defined value. Trap Manager IP IP Address of admin machine. NB9/NB9W ADSL2+ VoIP Router YML790 Rev8 41 Management > SNTP The SNTP option under Management menu configures the NB9/NB9W’s time automatically by synchronizing with Internet time servers. Note: The NB9/NB9W is configured to Australian EST by default. Tick the corresponding box displayed on the screen. Then click Save/Apply. Access Control > Services The Services Option limits or enables selective access via the LAN or WAN via the following services: Enable the service by checking the corresponding box and clicking SAVE/APPLY. You will note that all services are enabled for LAN clients and disabled for WAN clients by default. CAUTION: If you disable HTTP access from the LAN then you may not be able to open the NB9/NB9W in your Web Browser! EXAMPLE 1: You need to access your NB9/NB9W via the Internet from a remote location through a Web browser. Method: enable WAN access for HTTP and click Save and Apply. Then enter the address http://[WAN_ IP_NB9/NB9W] in the browser address bar of the remote machine. EXAMPLE 2: Assume that you already have a web server on your LAN behind the NB9W that people connect to from the Internet. You have entered a ‘Port Forwarding’ entry that forwards incoming traffic on the WAN on port 80 to the LAN IP of the web server on port 80 (default for HTTP traffic). If you enable HTTP WAN access to the NB9/NB9W you will be notified that the default port to access the NB9/NB9W has been updated to port 8080. Therefore, your web server will not need to be reconfigured, and you can access your NB9/NB9W on the WAN side using address http://WAN_IP_OF_NB9/NB9W:8080. The same applies for other services that use conflicting ports setup in your NB9/NB9W. 42 NB9/NB9W ADSL2+ VoIP Router YML790 Rev8 Access Control > IP Addresses The IP Addresses option limits the Access>Services by IP address. If the Access Control Mode is enabled, only the listed IP addresses can access the NB9/NB9W for the specified services. Before the service is enabled, specify the IP addresses by clicking the Add button and entering the address details. Enter the IP address and click Apply to allow access. Access Control > Password This page allows you to change the password for all users account. Please choose the account you want to change, type in the old password and put in the new password. Save & Reboot The Save/Reboot option saves the current configuration and reboots the NB9/NB9W. Close the NB9/NB9W’s Configuration window and wait for 2 minutes before reopening your web browser. If necessary, reconfigure your PC’s IP address to match your new configuration if you have disabled the DHCP server running in your NB9/NB9W (see Computer Hardware Configuration). NB9/NB9W ADSL2+ VoIP Router YML790 Rev8 43 Advanced Advanced > WAN Clicking on the ‘Advanced’ menu displays the following: This screen provides a summary of the current WAN interfaces you have configured. If you have connected the NB9/NB9W to ADSL through the ADSL Quick Setup interface, details of the connection will be summarised here. Setting up a WAN profile goes through a set of steps which establishes connection parameters covering the following: Field Means VPI/VCI Always 8/35 in Australia Con. ID Sequence number of connection (e.g. 1,2…) Category ATM Service Category; leave as default Service Name of connection: give this a name you will recognise (e.g. ISP name) Interface Current WAN interface name Protocol Bridge or Router Mode IGMP Enable/Disable IGMP proxy NAT Enable/Disable NAT (leave enabled unless advised otherwise by tech support) Firewall Enable/Disable Firewall (leave enabled unless advised otherwise by tech support) QoS Enable/Disable QoS; enable if VoIP services are being used. State Enable/Disable this WAN connection Once settings are entered, click Save. Connection status can be checked under Status>Diagnostics. Choosing a WAN Profile In the event that you wish to set up several connection profiles on your NB9/NB9W for use in different locations OR with different ADSL services • click ‘Add’ to add the next connection profile • Repeat set up steps above You are able to cycle through connection profiles in the Status>Diagnostics window; if more than one WAN profile exists, a button will displayed for Next Connection in the sequence. 44 NB9/NB9W ADSL2+ VoIP Router YML790 Rev8 Alternative Connection Types (Inc PPPoA) In the event that you wish to set up an alternative connection type, for example a PPPoA connection rather than the more common PPPoE type, this is done in the following screen which is accessed from Advanced>WAN>New. Select required connection type, click on Next and follow the prompts. NB9/NB9W ADSL2+ VoIP Router YML790 Rev8 45 Advanced > LAN Configure the NB9/NB9W’s LAN IP address and subnet mask. Save button only saves the LAN configuration data. Save/Reboot button saves the LAN configuration data and reboots the NB9/NB9W to make the new configuration effective. Field Means LAN IP Address Default: 192.168.1.1. The LAN IP address of your NB9/NB9W. LAN Subnet Mask Default: 255.255.255.0. The subnet mask of your NB9/NB9W. A subnet mask is used to determine what subnet an IP address belongs to. For more information on subnetting see http://www.ralphb.net/IPSubnet/. Enable UPnP Universal plug and play (UPnP) allows traffic to pass through the NB9/NB9W for applications using the UPnP protocol. This feature requires one active WAN connection. In addition, the client connecting to the NB9/NB9W should support this feature. UPnP also supports NAT Traversal which can automatically solve many NAT-related communications problems. UPnP enables applications to assign dynamic port mappings to the NB9/NB9W and delete them when connections are complete. A typical example is the MSN Messenger application that runs on Windows. Instead of manually setting up the port mappings UPnP enables MSN Messenger to make the request to the NB9/NB9W which will setup these ports dynamically. When MSN Messenger is closed the port openings will be removed from the NB9/NB9W’s configuration. Configure the second IP address and subnet mask for LAN interface. It is possible to configure the second IP address to access the NB9/NB9W on. Once this box is checked you are able to enter the IP address and subnet mask. Disable DHCP Server Disables the DHCP server. Only to be done if Static IP address is set up. Enable DHCP Server Default: Enabled. Start IP Address Default: 192.168.1.2. The first IP address that will be issued to the first DHCP client connecting to the NB9/NB9W using Ethernet cable or wirelessly. End IP Address Default: 192.168.1.254. The last IP address in the DHCP pool to be issued to DHCP clients connecting to the NB9/NB9W. Lease Time Default: 24 hours. The time an IP address is assigned to a client before being renewed. 46 NB9/NB9W ADSL2+ VoIP Router YML790 Rev8 Enable IGMP Snooping IGMP specifies how a host can register a router in order to receive specific multicast traffic. IGMP Snooping allows the NB9/NB9W to capture IGMP frames. When your NB9/NB9W hears an IGMP report from a host for a given multicast group it adds the host’s port number for that group. When the NB9/NB9W hears an IGMP Leave, it removes the host’s port from the table entry. Without IGMP snooping, multicast traffic is treated in the same manner as broadcast traffic - that is, it is forwarded to all ports. With IGMP snooping, multicast traffic of a group is only forwarded to ports that have members of that group. IGMP Snooping generates no additional network traffic, allowing you to significantly reduce multicast traffic passing through your NB9/NB9W. Save Save the settings. Save / Reboot Save and reboot with the settings applied. NB9/NB9W ADSL2+ VoIP Router YML790 Rev8 47 Advanced > NAT > Explanation NAT stands for Network Address Translation, a process which converts private IP addresses of a computer on the internal private network to one or more public IP addresses for the Internet. NAT changes the packet headers to the new address and keeps track of each session; when packets come back from the Internet, it performs the reverse conversion to the IP address of the client machine. Web applications operate through ‘open ports’ on devices attached to the Internet by initiating a query which opens a ‘communication session’ with the host through the open port. The presence of the NAT device prevents this process from occurring, as the NAT only admits incoming packets that have been elicited by an outgoing request; other packets are discarded. However this causes connectivity problems, as any requests originating from applications on the other side of the NAT device - such as requests generated by network gaming and conferencing applications - will not be able to locate a port, and therefore a host, with which to communicate, as their requests are discarded by the NAT. Hence the terms ‘opening’, ‘forwarding’ and ‘mapping’ ports: these processes add information to the NAT table which allows the NAT router to direct incoming requests from selected applications to the appropriate port. So Port Mapping tells the NAT router: ‘when a request arrives which is intended for TCP port 1357, don’t discard it, but direct it to such-and-such a port’. The port-mapping process invokes advanced routing functionality to ‘bind’ the Port Mapping request to the LAN client from which it originated. A basic NAT operation is depicted in this illustration: 48 NB9/NB9W ADSL2+ VoIP Router YML790 Rev8 Advanced > NAT > Port Forwarding Note: This option is not available if your NB9/NB9W is in Bridge mode. To display the NAT function, you need to have enabled the NAT feature in the WAN Setup. By default, NAT is enabled on your NB9/NB9W Clicking on Advanced > NAT displays the following: The Port Forwarding feature allows you to direct incoming traffic from WAN side (identified by Protocol and External port) to the internal server with private IP address on the LAN side. The Internal port is required only if the external port needs to be converted to a different port number used by the server on the LAN side. A maximum of 32 entries can be configured. Press Add to add a new port forwarding rule. To remove, please check rules that you want to remove and click on Remove. For example, you may want to setup an FTP server with IP address 192.168.1.110 on your LAN for people to connect to. The default port that an FTP server listens on is port 21. So, for this set this up you would do the following: Click on ‘Add’. NB9/NB9W ADSL2+ VoIP Router YML790 Rev8 49 If you are setting up a common server (e.g FTP) you can select the type of server from the dropdown list. Selecting the server will automatically configure the necessary ports. For custom service, you need to enter the External Port Start and External Port End for the service. Enter the Server’s IP address (e.g. 192.168.1.110) Click ‘Save / Apply’ Let’s take a detail look at the fields on this page. Field Means Select a Service Select a type of service you wish to host on your LAN. Custom Server Input the name for the custom server. Server IP address The IP address of the server on your LAN. You will notice that the first 3 octets of the address are automatically input. (e.g. 192.168.1)56 NB9/NB9W ADSL2+ VoIP Router External Port Start The external port on the WAN side of your NB9/NB9W that clients try to connect to. (e.g. port 80 on the WAN side for clients trying to connect to a web server). External Port End The external port end on the WAN side of your NB9/NB9W that clients try to connect to. (e.g. if you are running a service that requires a range of ports to be open you would enter the last port in the range here). Protocol Select the protocol from the dropdown list. (E.g. if you were hosting a video service you would select UDP). Internal Port Start The internal port refers to the port on the server that clients try to connect to. (e.g. port 80 on the WAN side for clients trying to connect to a web server). Internal Port End The internal port end on the server that clients try to connect to. (e.g. if you are running a service that requires a range of ports to be open you would enter the last port in the range here). Save / Apply Save and Apply the settings. 50 NB9/NB9W ADSL2+ VoIP Router YML790 Rev8 Advanced > NAT > Port Triggering Port triggering is similar to Port Forwarding however where port forwarding is tied to a specific IP address, Port triggering is dynamic and is tied to a particular application event request. The ‘Custom Application’ settings, or the pre-sets that are provided by the application names in the drop-down menu, allows specific ports to be opened by the named applications. The ‘trigger’ is the outgoing request, which then ‘opens’ the ports specified in the Open Port Start-End range to enable the application to reply. For this to work, you need to know the Outgoing Port(s) which the application uses to Send requests, and then specify the Open Port range for the reply. Some typical port ranges are as follows; for other applications, check the vendor websites. Application Outgoing Port Reply Port Battle.net 6112 6112 DialPad 7175 51200, 51201,51210 ICQ 4000 4000 ICU II 2019 2000-2038, 2050-2051, 2069, IRC 6667 531, 6666, 6667 MSN Gaming Zone 47624 2300-2400, 28800-29000 PC to Phone 12053 12120,12122, 24150-24220 Quick Time4 554 6970-6999 wowcall 8000 4000-4020 NB9/NB9W ADSL2+ VoIP Router YML790 Rev8 51 Advanced > NAT > DMZ A DMZ Host PC is set up ‘between’ your (private) LAN and the (public) WAN to allow access from the outside world to a specified and isolated zone on your network. It is most commonly used to provide access to a Web server or Game server without exposing the rest of your computers to the Internet. Enter the IP address of the DMZ computer and click ‘Save/Apply’. The computer with that IP address can then serve web pages or games to the outside world, while the rest of your network remains private. 52 NB9/NB9W ADSL2+ VoIP Router YML790 Rev8 Advanced > Security > IP Filtering IP filtering allows you to deny or permit any packet from passing through the modem explicitly. You can set either incoming filtering or outgoing filtering. Outgoing means the data is transferred from your computer onto the internet while Incoming means the data is transferred from outside onto your computer. Notes: By default, all outgoing traffic is allowed and all incoming traffic is blocked. However they can be change accordingly by setting up filters. To set up outgoing filtering, click on Outgoing menu on the left and click the Add button. To set up incoming filtering, click on Incoming menu on the left and click the Add button. The screen for Incoming and outgoing filter is basically the same. You need to specify a name, protocol, source and destination IP address and their respective ports. Field Name Comment Filter Name Enter name for this filter/rule Protocol Choose UDP/TCP or both Source IP address Source Subnet Mask Source Port Either port or port range Destination IP address Destination Subnet Mask Destination Port NB9/NB9W ADSL2+ VoIP Router YML790 Rev8 Either port or port range 53 Advanced > Security > Parental Control Parental Control allows NB9/NB9W administrator to restrict access according to hours of the day. To add a new rule click on the Add button and the following page will appear. Enter target machine’s MAC address and create a Rule Name (called ‘User Name’) and a time range. If you wish to restrict access from, say, 10:00pm until 6:30 in the morning, create two rules to cover the period 10:00-Midnight and midnight – 6:30 Parental Control: here the PC with MAC address 00:13:D3:06:DE:9B cannot access the NB9/NB9W between 10:00pm and 12:00am. 54 NB9/NB9W ADSL2+ VoIP Router YML790 Rev8 Advanced > QoS Quality of Service offers a defined level of performance in a data communications system - for example the ability to guarantee that voice traffic is given priority over other network traffic to ensure that conversations are not disrupted by other network requirements. This means that should you be talking via the VoIP facility and someone else in the house starts downloading a big file, the download won’t disrupt the flow of voice data. To add a new QoS rule, click the Add button and enter the necessary information. QoS controls allow you to assign priority to different data types according to their TOS flag. Field Enter Traffic Class Name Create a descriptive Rule Name i.e. ‘VoIP’ Priority Assign High Priority to VoIP IP Precedence Leave blank unless advised by VSP or Network Administrator IP Type of Service Leave blank unless advised by VSP or Network Administrator Protocol UDP Source IP Address LAN IP address of NB9/NB9W i.e. 192.168.1.1 Source Subnet Mask Source Subnet Mask of same i.e. 255.255.255.0 Source Port Leave blank unless advised by VSP or Network Administrator Destination IP Address Leave blank unless advised by VSP or Network Administrator Destination Subnet Mask Leave blank unless advised by VSP or Network Administrator Destination Port Leave blank unless advised by VSP or Network Administrator 802.1p Priority Leave blank unless advised by VSP or Network Administrator NB9/NB9W ADSL2+ VoIP Router YML790 Rev8 55 For example, to set up QoS for VoIP traffic for the NB9W you need to set it according to the screenshot below: 56 NB9/NB9W ADSL2+ VoIP Router YML790 Rev8 Advanced > Routing > Default Gateway Default Gateway is checked by default and ensures that the NB9/NB9W will accept the first received IP address assigned to it by the DHCP server to which it connects. This will generally be the ISP’s server. You would only uncheck this if the NB9/NB9W was being used in Static Routing mode (see below). NB9/NB9W ADSL2+ VoIP Router YML790 Rev8 57 Advanced > Routing > Static Route Static routing allows computers that are connected to the NB9/NB9W to communicate with computers on another LAN segment which are connected to the NB9/NB9W via another router. See diagram below for example setup: To set a static route, click add and enter the relevant details in the fields e.g. 192.168.1.2 Field Entry Destination Network Address LAN IP of destination address Subnet Mask Enter Subnet Mask for same Use Gateway IP Address Remote router gateway address 58 NB9/NB9W ADSL2+ VoIP Router YML790 Rev8 Advanced > Routing > Dynamic Route Dynamic routing makes use of the RIP protocol to allow the NB9/NB9W to adapt to changes in the network. RIP enables the device to determine the best route for each packet based on the ‘hop count’ or number of hops between Source and Destination. Advanced > DNS > DNS Server This page allows user to enable automatic DNS from the ISP or specify their own DNS server address manually. By default, the NB9/NB9W is set up as “Enable Automatic Assigned DNS” NB9/NB9W ADSL2+ VoIP Router YML790 Rev8 59 Advanced > DNS > Dynamic DNS Dynamic DNS allows users to create a static hostname for their dynamic IP address. This service will allow easier access to the DSL router from the internet. In order to use this service, you need to register with the service provider such as DDNS.org or TZO. Click the Add button to add a dynamic DNS. Advanced > DSL This page allows user to modify the DSL modulation settings on the unit. By changing the settings, the user can specify which DSL modulation that the modem will use. 60 NB9/NB9W ADSL2+ VoIP Router YML790 Rev8 Status Status > Diagnostics Self explanatory. A series of indicators about various parameters of your broadband connection. Use to troubleshoot connection problems; in event of a fail signifier, click on Help and follow troubleshooting instructions. Note the Ping Default Gateway is an optional parameter and fail may not affect connection. Status > System Log Click on View System Log to view entries or on “Configure System Log” to set parameters for log entries. Applicable to network or device engineers and administrators. Field Description Configure>Log Level Select level of application event to log Display Level Select level of application event to display Mode Remote admin, local admin or both Log Enable or disable System log. NB9/NB9W ADSL2+ VoIP Router YML790 Rev8 61 Status > Statistics Display the statistics for LAN, WAN, ATM and ADSL connection. Applicable to network or device engineers and administrators. Status > WAN Displays summary of current WAN connection including your ‘Public’ WAN IP (last cell in display). Status > Route Summarises parameters of IP route for device. Status > ARP Display the ARP table on the device. 62 NB9/NB9W ADSL2+ VoIP Router YML790 Rev8 Status > DHCP Provides summary of DHCP leases provisioned by NB9/NB9W. Useful source to find client machine MAC addresses. Status > Bridging Display the bridging information on the device. Status > IGMP Proxy Display the IGMP Proxy table. NB9/NB9W ADSL2+ VoIP Router YML790 Rev8 63 Appendix A: Troubleshooting Problems with LAN PCs on the LAN cannot get IP addresses from the ADSL Router. The chances are that the interface used as DHCP server is modified and the client PCs does not renew IP addresses. If your DHCP server is enabled on Private IP Address previously and you modify the interface to Public IP Address, the client PCs should renew IP addresses. The PC on the LAN cannot access the Web page of the ADSL Router. Check that your PC is on the same subnet with the ADSL Router. The virtual server can’t be access after setting virtual server. Check the filter rule of the port that virtual server service setting for example, the virtual server service set FTP 21 you need update the filter rule of the ftp 21 Direction setting: Choose filter the packets that incoming action (In Bound) are Allow on the interface. Problems with WAN You cannot access the Internet. • Check the physical connection between the ADSL Router and the LAN. If the LAN LED on the front panel is off or keeps blinking, there may be problem on the cable connecting to the ADSL Router. At the DOS prompt, ping the IP address of the ADSL Router, e.g, ping 192.168.1.1. If the following response occurs: Relay from 192.168.1.1 bytes=32 time=100ms TTL=253 Then the connection between the ADSL Router and the network is OK. If you get a failed ping with the response of: Request time out Then the connection is fail. Check the cable between the ADSL Router and the network. • Check the DNS setting of the ADSL Router. At the DOS prompt, ping the IP address of the DNS provided by your ISP. For example, if your DNS IP is 168.95.1.1, then ping 168.95.1.1. If the following response occurs: Relay from 168.95.1.1 bytes=32 time=100ms TTL=253 Then the connection to the DNS is OK. If you get a failed ping with the response of: Request time out Then the DNS is not reachable. Check your DNS setting on the ADSL Router. 64 NB9/NB9W ADSL2+ VoIP Router YML790 Rev8 Problem with Wireless Windows can not configure this wireless connection (Windows XP). Enable Wireless Zero Configuration by following these steps: 1. Click on the Start Menu. Click on Run, type in “services.msc” (without the quotes). Press OK. 2. Scroll down to the bottom of the list, locate the service named Wireless Zero Configuration and doubleclick on it. 3. Change the Startup type to Automatic and check the “Service status”. 4. If the Status is Started, simply press the Apply button at the bottom of the window, and then press OK. 5. If the Status is Stopped, press the Start button. Wait until the service has started, then press the Apply button, and then press OK. 6. Close the Services window. 7. Click on the Start Menu. Click on Run, type in “ncpa.cpl” (without the quotes). Press OK. 8. Right-click on the Wireless Network Connection, choose Properties. 9. Click on the Wireless Networks tab at the top of the window. 10. Make sure the tick-box for Use Windows to configure my wireless network settings is TICKED. Then press OK. Wireless drop outs and low signal quality. There are a few things that can cause wireless drops out and low signal quality 1. Interference on the wireless signal from other wireless devices 2. Other wireless network that use the same channel. 3. Obstruction between the modem and the wireless computer. The first thing to do is to change the wireless channel. Please change the wireless channel and see if it improves the quality or reduce the drop outs. Please follow these steps to change the wireless channel: 1. Open http://192.168.1.1/ from internet explorer or any web browser. 2. Type in “admin” for both username and password. 3. Click on Wireless ->Configuration. 4. Change the channel from 6 to any number from 1 to 11. 5. Click on Save/Apply. NB9/NB9W ADSL2+ VoIP Router YML790 Rev8 65 Appendix B: Establishing your wireless connection (for NB9W only) The following examples use the default wireless configuration. Windows XP service pack 2 Follow these steps: 1. Open Network Connections (Start > Control Panel > Network Connections): 2. Right-click on your Wireless Network Connection and select View Available Wireless Networks: 3. Select the wireless network you want to connect to and click Connect: 66 NB9/NB9W ADSL2+ VoIP Router YML790 Rev8 4. Enter the network key (default network key is “A1B2C3D4E5”) and click Connect: 5. The connection will show Connected. NB9/NB9W ADSL2+ VoIP Router YML790 Rev8 67 Mac OSX 10.4 Follow these steps: 1. Click on the Airport icon on the top right menu. 2. Click on the network name that you want to connect. The default wireless network name is “wireless”. 3. On the new window, tick on Show Password and type in the network key in the Password field. The default network key is “A1B2C3D4E5”. After that, click on OK. 4. To check the connection, click on the Airport icon and there should be a tick on the wireless name. 68 NB9/NB9W ADSL2+ VoIP Router YML790 Rev8 Windows Vista Follow these steps: 1. Open Network and Sharing Center (Start > Control Panel > Network and Sharing center). 2. Click on “Connect to a network”. NB9/NB9W ADSL2+ VoIP Router YML790 Rev8 69 3. Choose “Connect to the Internet” and click on “Next”. 4. Choose “Wireless”. 70 NB9/NB9W ADSL2+ VoIP Router YML790 Rev8 5. Click on the wireless network name. In this example, the wireless network name is “wireless” and click “Connect”. The default wireless network name is “wireless”. If you have not change the wireless network name, please click on “wireless”. 6. Tick on “Display Characters” and type in the network key. The default network key is “A1B2C3D4E5” and this example use the default key. Click “Next” after that. NB9/NB9W ADSL2+ VoIP Router YML790 Rev8 71 7. Select the appropriate location. This will affect the firewall settings on the computer. 8. Tick on both “Save this network” and “Start this connection automatically” and click on “Next”. 72 NB9/NB9W ADSL2+ VoIP Router YML790 Rev8 9. Now the connection is ready. Notes: For other operating system such as Windows 98SE, Windows ME and Windows 2000 or if you use the wireless adaptor utility to configure your wireless connection, please consult the wireless adaptor documentation respectively. NB9/NB9W ADSL2+ VoIP Router YML790 Rev8 73 Appendix C: How to change Wireless Security on your NB9W WEP encryption The NB9W has the WEP encryption enabled by default. To change the encryption key, please follow the following steps: 1. Connect the computer directly to the modem using Ethernet cable. 2. Open the web configuration, http://192.168.1.1/ from your web browser i.e. Internet explorer, Firefox. 3. At the log in screen, enter the Username and password. The default Username is “admin” and the default Password is “admin”. Then click on “Login”. 4. Click on “Wireless” and then click on “Security” 5. Change the Encryption Strength to either 64 bit or 128 bit. 128bit Cipher is more secure however it will lower the data transfer speed compare to 64bit. For most home user, 64bit Cipher is adequate. Note: 64 bit Cipher needs 10 digits Encryption key and 128 bit Cipher needs 26 digits Encryption key. 6. Change the Network key 1 from “a1b2c3d4e5” to the new key. Please note that WEP Encryption key can only use numbers from 0 to 9 and letters from A to F. 64 bit Cipher needs 10 digits Encryption key and 128 bit Cipher needs 26 digits Encryption key. 7. Click on “Save/Apply” Notes: After changing the security settings, you need to remove the old wireless settings and reconfigure the wireless computer according to the new settings. 74 NB9/NB9W ADSL2+ VoIP Router YML790 Rev8 WPA encryption When a more secure connection is needed, you can change the wireless security settings on the NB9W to WPAPSK. Please follow the following steps: 1. Connect the computer directly to the modem using Ethernet cable. 2. Open the web configuration, http://192.168.1.1/ from your web browser i.e. Internet explorer, Firefox. 3. At the log in screen, enter the Username and password. The default Username is “admin” and the default Password is “admin”. Then click on “Login”. 4. Click on “Wireless” and then click on “Security” 5. In the Wireless > Security page, change Network Authentication to “WPA-PSK” 6. Enter the key in “WPA Pre-Shared Key” field. The key needs to be more then 8 digits and less then 63 digits and it can be any combination of letters and numbers. 7. Change the WPA Group Rekey Interval to “3600” 8. Click on “Save/Apply” Notes: After changing the security settings, you might need to remove the old wireless settings and reconfigure the wireless computer according to the new settings. NB9/NB9W ADSL2+ VoIP Router YML790 Rev8 75 Appendix D: Glossary 10BASE-T A designation for the type of wiring used by Ethernet networks with a data rate of 10 Mbps. Also known as Category 3 (CAT 3) wiring. See also data rate, Ethernet. 100BASE-T A designation for the type of wiring used by Ethernet networks with a data rate of 100 Mbps. Also known as Category 5 (CAT 5) wiring. See also data rate, Ethernet. ADSL Asymmetric Digital Subscriber Line. The most commonly deployed type of DSL for home users. The term asymmetrical refers to its unequal data rates for downloading and uploading (the download rate is higher than the upload rate). The asymmetrical rates benefit home users because they typically download much more data from the Internet than they upload. analog Of data, having a form is analogous to the data’s original waveform. The voice component in DSL is an analog signal. See also digital. ATM Asynchronous Transfer Mode A standard for high-speed transmission of data, text, voice, and video, widely used within the Internet. ATM data rates range from 45 Mbps to 2.5 Gbps. See also data rate. authenticate To verify a user’s identity, such as by prompting for a password. binary The “base two” system of numbers, that uses only two digits, 0 and 1, to represent all numbers. In binary, the number 1 is written as 1, 2 as 10, 3 as 11, 4 as 100, etc. Although expressed as decimal numbers for convenience, IP addresses in actual use are binary numbers; e.g., the IP address 209.191.4.240 is 11010001.10111111.00000100. 11110000 in binary. See also bit, IP address, network mask. bit Short for “binary digit,” a bit is a number that can have two values, 0 or 1. See also binary. bps bits per second bridging Passing data from your network to your ISP and vice versa using the hardware addresses of the devices at each location. Bridging contrasts with routing, which can add more intelligence to data transfers by using network addresses instead. The My ADSL Modem can perform both routing and bridging. Typically, when both functions are enabled, the device routes IP data and bridges all other types of data. See also routing. broadband A telecommunications technology that can send different types of data over the same medium. DSL is a broadband technology. Broadcast To send data to all computers on a network. CO Central Office A circuit switch that terminates all the local access lines in a particular geographic serving area; a physical building where the local switching equipment is found. xDSL lines running from a subscriber’s home connect at their serving central office. DHCP Dynamic Host Configuration Protocol DHCP automates address assignment and management. When a computer connects to the LAN, DHCP assigns it an IP address from a shared pool of IP addresses; after a specified time limit, DHCP returns the address to the pool. DHCP relay Dynamic Host Configuration Protocol relay. A DHCP relay is a computer that forwards DHCP data between computers that request IP addresses and the DHCP server that assigns the addresses. Each of the My ADSL Modem’s interfaces can be configured as a DHCP relay. See DHCP. DHCP server Dynamic Host Configuration Protocol server. A DHCP server is a computer that is responsible for assigning IP addresses to the computers on a LAN. See DHCP. digital Of data, having a form based on discrete values expressed as binary numbers (0’s and 1’s). The data component in DSL is a digital signal. See also analog. DNS Domain Name System. The DNS maps domain names into IP addresses. DNS information is distributed hierarchically throughout the Internet among computers called DNS servers. When you start to access a web site, a DNS server looks up the requested domain name to find its corresponding IP address. If the DNS server cannot find the IP address, it communicates with higher-level DNS servers to determine the IP address. See also domain name. domain name A domain name is a user-friendly name used in place of its associated IP address. For example, www.globespan.net is the domain name associated with IP address 209.191.4.240. Domain names must be unique; their assignment is controlled by the Internet Corporation for Assigned Names and Numbers (ICANN). Domain names are a key element of URLs, which identify a specific file at a web site, e.g., http://www.netcomm.com.au. See also DNS. download To transfer data in the downstream direction, i.e., from the Internet to the user. 76 NB9/NB9W ADSL2+ VoIP Router YML790 Rev8 DSL Digital Subscriber Line A technology that allows both digital data and analog voice signals to travel over existing copper telephone lines. Ethernet The most commonly installed computer network technology, usually using twisted pair wiring. Ethernet data rates are 10 Mbps and 100 Mbps. See also BASE-T,100BASE-T, twisted pair. Filtering To screen out selected types of data, based on filtering rules. Filtering can be applied in one direction (upstream or downstream), or in both directions. filtering rule A rule that specifies what kinds of data a routing device will accept and/or reject. Filtering rules are defined to operate on an interface (or multiple interfaces) and in a particular direction (upstream, downstream, or both). Firewall Any method of protecting a computer or LAN connected to the Internet from intrusion or attack from the outside. Some firewall protection can be provided by packet filtering and Network Address Translation services. FTP File Transfer Protocol - A program used to transfer files between computers connected to the Internet. Common uses include uploading new or updated files to a web server, and downloading files from a web server. GGP Gateway to Gateway Protocol. An Internet protocol that specifies how gateway routers communicate with each other. Gbps Abbreviation for Gigabits (GIG-uh-bits) per second, or one billion bits per second. Internet data rates are often expressed in Gbps. GRE Generic Routing Encapsulation. TCP/IP protocol suite, transport layer encapsulation protocol. hop When you send data through the Internet, it is sent first from your computer to a router, and then from one router to another until it finally reaches a router that is directly connected to the recipient. Each individual “leg” of the data’s journey is called a hop. hop count The number of hops that data has taken on its route to its destination. Alternatively, the maximum number of hops that a packet is allowed to take before being discarded , See also TTL. host A device (usually a computer) connected to a network. HTTP Hyper-Text Transfer Protocol HTTP is the main protocol used to transfer data from web sites so that it can be displayed by web browsers. See also web browser ICMP Internet Control Message Protocol An Internet protocol used to report errors and other network-related information. The ping command makes use of ICMP. IGMP Internet Group Management Protocol An Internet protocol that enables a computer to share information about its membership in multicast groups with adjacent routers. A multicast group of computers is one whose members have designated as interested in receiving specific content from the others. Multicasting to an IGMP group can be used to simultaneously update the address books of a group of mobile computer users or to send company newsletters to a distribution list. in-line filter See Microfilter Internet The global collection of interconnected networks used for both private and business communications. intranet A private, company-internal network that looks like part of the Internet (users access information using web browsers), but is accessible only by employees. IP See TCP/IP. IP address Internet Protocol address The address of a host (computer) on the Internet, consisting of four numbers, each from 0 to 255, separated by periods, e.g., 209.191.4.240. An IP address consists of a network ID that identifies the particular network the host belongs to, and a host ID uniquely identifying the host itself on that network. A network mask is used to define the network ID and the host ID. Because IP addresses are difficult to remember, they usually have an associated domain name that can be specified instead. See also domain name, network mask. ISP Internet Service Provider A company that provides Internet access to its customers, usually for a fee. LAN Local Area Network A network limited to a small geographic area, such as a home, office, or small building. LED Light Emitting Diode An electronic light-emitting device. The indicator lights on the front of the My ADSL Modem are LEDs. MAC address Media Access Control address The permanent hardware address of a device, assigned by its manufacturer. MAC addresses are expressed as six pairs of characters. mask See network mask. Mbps Abbreviation for Megabits per second, or one million bits per second. Network data rates are often expressed in Mbps. NB9/NB9W ADSL2+ VoIP Router YML790 Rev8 77 Microfilter In splitterless deployments, a microfilter is a device that removes the data frequencies in the DSL signal, so that telephone users do not experience interference (noise) from the data signals. Microfilter types include in-line (installs between phone and jack) and wall-mount (telephone jack with built-in microfilter). See also splitterless. NAT Network Address Translation A service performed by many routers that translates your network’s publicly known IP address into a Private IP address for each computer on your LAN. Only your router and your LAN know these addresses; the outside world sees only the public IP address when talking to a computer on your LAN. NAT rule A defined method for translating between public and private IP addresses on your LAN. network A group of computers that are connected together, allowing them to communicate with each other and share resources, such as software, files, etc.A network can be small, such as a LAN, or very large, such as the Internet. network mask A network mask is a sequence of bits applied to an IP address to select the network ID while ignoring the host ID. Bits set to 1 mean “select this bit” while bits set to 0 mean “ignore this bit.” For example, if the network mask 255.255.255.0 is applied to the IP address 100.10.50.1, the network ID is 100.10.50, and the host ID is 1. See also binary, IP address, subnet NIC Network Interface Card An adapter card that plugs into your computer and provides the physical interface to your network cabling, which for Ethernet NICs is typically an RJ-45 connector. See Ethernet, RJ-45. packet Data transmitted on a network consists of units called packets. Each packet contains a payload (the data), plus overhead information such as where it came from (source address) and where it should go (destination address). ping Packet Internet (or Inter-Network) Groper A program used to verify whether the host associated with an IP address is online. It can also be used to reveal the IP address for a given domain name. port A physical access point to a device such as a computer or router, through which data flows into and out of the device. POTS Plain Old Telephone Service Traditional analog telephone service using copper telephone lines. Pronounced pots. See also PSTN. POTS splitter See splitter. PPP Point-to-Point Protocol A protocol for serial data transmission that is used to carry IP (and other protocol) data between your ISP and your computer. The WAN interface on the My ADSL Modem uses two forms of PPP called PPPoA and PPPoE. See also PPPoA, PPPoE. PPPoA Point-to-Point Protocol over ATM One of the two types of PPP interfaces you can define for a Virtual Circuit (VC), the other type being PPPoE. You can define only one PPPoA interface per VC. PPPoE Point-to-Point Protocol over Ethernet One of the two types of PPP interfaces you can define for a Virtual Circuit (VC),the other type being PPPoA. You can define one or more PPPoE interfaces per VC. protocol A set of rules governing the transmission of data. In order for a data transmission to work, both ends of the connection have to follow the rules of the protocol. remote In a physically separate location. For example, an employee away on travel who logs in to the company’s intranet is a remote user. RIP Routing Information Protocol The original TCP/IP routing protocol. There are two versions of RIP: version and version II. RJ-11 Registered Jack Standard-11 The standard plug used to connect telephones, fax machines, modems, etc. to a telephone jack. It is a 6-pin connector usually containing four wires. RJ-45 Registered Jack Standard-45 The 8-pin plug used in transmitting data over phone lines. Ethernet cabling usually uses this type of connector. routing Forwarding data between your network and the Internet on the most efficient route, based on the data’s destination IP address and current network conditions. A device that performs routing is called a router. rule See filtering rule, NAT rule. SDNS Secondary Domain Name System (server) A DNS server that can be used if the primary DSN server is not available. See DNS. SNMP Simple Network Management Protocol The TCP/IP protocol used for network management. splitter A device that splits off the voice component of the DSL signal to a separate line, so that data and telephone service each have their own wiring and jacks. The splitter is installed by your telephone company where the DSL line enters your home. The CO also contains splitters that separate the voice and data signals, sending voice to the PSTN and data on high-speed lines to the Internet. See also CO, PSTN, splitterless, microfilter. 78 NB9/NB9W ADSL2+ VoIP Router YML790 Rev8 splitterless A type of DSL installation where no splitter is installed, saving the cost of a service call by the telephone company. Instead, each jack in the home carries both voice and data, requiring a microfilter for each telephone to prevent interference from the data signal. ADSL is usually splitterless; if you are unsure if your installation has a splitter, ask your DSL provider. See also splitter, microfilter. subnet A subnet is a portion of a network. The subnet is distinguished from the larger network by a subnet mask which selects some of the computers of the network and excludes all others. The subnet’s computers remain physically connected to the rest of the parent network, but they are treated as though they were on a separate network. See also network mask. subnet mask A mask that defines a subnet. See also network mask. TCP See TCP/IP. TCP/IP Transmission Control Protocol/Internet Protocol The basic protocols used on the Internet. TCP is responsible for dividing data up into packets for delivery and reassembling them at the destination, while IP is responsible for delivering the packets from source to destination. When TCP and IP are bundled with higher-level applications such as HTTP, FTP, Telnet, etc., TCP/IP refers to this whole suite of protocols. Telnet An interactive, character-based program used to access a remote computer. While HTTP (the web protocol) and FTP only allow you to download files from a remote computer, Telnet allows you to log into and use a computer from a remote location. TFTP Trivial File Transfer Protocol. A protocol for file transfers, TFTP is easier to use than File Transfer Protocol (FTP) but not as capable or secure. TTL Time To Live A field in an IP packet that limits the life span of that packet. Originally meant as a time duration, the TTL is usually represented instead as a maximum hop count; each router that receives a packet decrements this field by one. When the TTL reaches zero, the packet is discarded. twisted pair The ordinary copper telephone wiring long used by telephone companies. It contains one or more wire pairs twisted together to reduce inductance and noise. Each telephone line uses one pair. In homes, it is most often installed with two pairs. For Ethernet LANs, a higher grade called Category 3 (CAT 3) is used for 10BASE-T networks, and an even higher grade called Category 5 (CAT 5) is used for 100BASE-T networks. See also 10BASE-T, 100BASE-T, Ethernet. upstream The direction of data transmission from the user to the Internet. USB Universal Serial Bus A serial interface that lets you connect devices such as printers, scanners, etc. to your computer by simply plugging them in. The My ADSL Modem is equipped with a USB interface for connecting to a stand-alone PC. VC Virtual Circuit A connection from your ADSL router to your ISP. VCI Virtual Circuit Identifier Together with the Virtual Path Identifier (VPI), the VCI uniquely identifies a VC. Your ISP will tell you the VCI for each VC they provide. See also VC. VPI Virtual Path Identifier Together with the Virtual Circuit Identifier (VCI), the VPI uniquely identifies a VC. Your ISP will tell you the VPI for each VC they provide. See also VC. WAN Wide Area Network Any network spread over a large geographical area, such as a country or continent. With respect to the My ADSL Modem, WAN refers to the Internet. Web browser A software program that uses Hyper-Text Transfer Protocol (HTTP) to download information from (and upload to) web sites, and displays the information, which may consist of text, graphic images, audio, or video, to the user. Web browsers use Hyper-Text Transfer Protocol (HTTP). Popular web browsers include Netscape Navigator and Microsoft Internet Explorer. See also HTTP, web site, WWW. Web page A web site file typically containing text, graphics and hyperlinks (cross-references) to the other pages on that web site, as well as to pages on other web sites. When a user accesses a web site, the first page that is displayed is called the Home page. See also hyperlink, web site. Web site A computer on the Internet that distributes information to (and gets information from) remote users through web browsers. A web site typically consists of web pages that contain text, graphics, and hyperlinks. See also hyperlink, web page. WWW World Wide Web Also called (the) Web. Collective term for all web sites anywhere in the world that can be accessed via the Internet. NB9/NB9W ADSL2+ VoIP Router YML790 Rev8 79 Appendix F: Registration and Warranty Information All NetComm Limited (“NetComm”) products have a standard 12 month warranty from date of purchase against defects in manufacturing and that the products will operate in accordance with the specifications outlined in the User Guide. However some products have an extended warranty option (please refer to your packaging). To be eligible for the extended warranty you must supply the requested warranty information to NetComm within 30 days of the original purchase by registering on-line via the NetComm web site at: www.netcomm.com.au Contact Information If you have any technical difficulties with your product, please do not hesitate to contact NetComm’s Customer Support Department. Email: [email protected] Fax: (+612) 9424-2010 Web: www.netcomm.com.au Copyright Information This manual is copyright. Apart from any fair dealing for the purposes of private study, research, criticism or review, as permitted under the Copyright Act, no part may be reproduced, stored in a retrieval system or transmitted in any form, by any means, be it electronic, mechanical, recording or otherwise, without the prior written permission of NetComm Limited. NetComm Limited accepts no liability or responsibility, for consequences arising from the use of this product. Please note that the images used in this document may vary slightly from those of the actual product. Specifications are accurate at the time of the preparation of this document but are subject to change without notice. NetComm Limited reserves the right to change the specifications and operating details of this product without notice. NetComm is a registered trademark of NetComm Limited. All other trademarks are acknowledged the property of their respective owners. Customer Information ACA (Australian Communications Authority) requires you to be aware of the following information and warnings: (1) This unit shall be connected to the Telecommunication Network through a line cord which meets the requirements of the ACA TS008 Standard. (2) This equipment has been tested and found to comply with the Standards for C-Tick and or A-Tick as set by the ACA. These standards are designed to provide reasonable protection against harmful interference in a residential installation. This equipment generates, uses, and can radiate radio noise and, if not installed and used in accordance with the instructions detailed within this manual, may cause interference to radio communications. However, there is no guarantee that interference will not occur with the installation of this product in your home or office. If this equipment does cause some degree of interference to radio or television reception, which can be determined by turning the equipment off and on, we encourage the user to try to correct the interference by one or more of the following measures: • Change the direction or relocate the receiving antenna. • Increase the separation between this equipment and the receiver. • Connect the equipment to an alternate power outlet on a different power circuit from that to which the receiver/TV is connected. • Consult an experienced radio/TV technician for help. (3) The power supply that is provided with this unit is only intended for use with this product. Do not use this power supply with any other product or do not use any other power supply that is not approved for use with this product by NetComm. Failure to do so may cause damage to this product, fire or result in personal injury. 80 NB9/NB9W ADSL2+ VoIP Router YML790 Rev8 Product Warranty The warranty is granted on the following conditions: 1. This warranty extends to the original purchaser (you) and is not transferable; 2. This warranty shall not apply to software programs, batteries, power supplies, cables or other accessories supplied in or with the product; 3. The customer complies with all of the terms of any relevant agreement with NetComm and any other reasonable requirements of NetComm including producing such evidence of purchase as NetComm may require; 4. The cost of transporting product to and from NetComm’s nominated premises is your responsibility; and, 5. NetComm does not have any liability or responsibility under this warranty where any cost, loss, injury or damage of any kind, whether direct, indirect, consequential, incidental or otherwise arises out of events beyond NetComm’s reasonable control. This includes but is not limited to: acts of God, war, riot, embargoes, acts of civil or military authorities, fire, floods, electricity outages, lightning, power surges, or shortages of materials or labour. 6. The customer is responsible for the security of their computer and network at all times. Security features may be disabled within the factory default settings. NetComm recommends that you enable these features to enhance your security. The warranty is automatically voided if: 1. You, or someone else, use the product, or attempts to use it, other than as specified by NetComm; 2. The fault or defect in your product is the result of a voltage surge subjected to the product either by the way of power supply or communication line, whether caused by thunderstorm activity or any other cause(s); 3. The fault is the result of accidental damage or damage in transit, including but not limited to liquid spillage; 4. Your product has been used for any purposes other than that for which it is sold, or in any way other than in strict accordance with the user manual supplied; 5. Your product has been repaired or modified or attempted to be repaired or modified, other than by a qualified person at a service centre authorised by NetComm; and, 6. The serial number has been defaced or altered in any way or if the serial number plate has been removed. Limitations of Warranty The Trade Practices Act 1974 and corresponding State and Territory Fair Trading Acts or legalisation of another Government (“the relevant acts”) in certain circumstances imply mandatory conditions and warranties which cannot be excluded. This warranty is in addition to and not in replacement for such conditions and warranties. To the extent permitted by the Relevant Acts, in relation to your product and any other materials provided with the product (“the Goods”) the liability of NetComm under the Relevant Acts is limited at the option of NetComm to: • Replacement of the Goods; or • Repair of the Goods; or • Payment of the cost of replacing the Goods; or • Payment of the cost of having the Goods repaired. GNU General Public License This product includes software code that is subject to the GNU General Public License (“GPL”) or GNU Lesser General Public License (“LGPL”). This code is subject to the copyrights of one or more authors and is distributed without any warranty. A copy of this software can be obtained by contacting NetComm Limited on +61 2 9424 2070.” NB9/NB9W ADSL2+ VoIP Router YML790 Rev8 81 82 NB9/NB9W ADSL2+ VoIP Router YML790 Rev8 Want to network your home quickly and easily without any hassles? NetComm HomePlugs are the simplest method available to set up a home network, without any of the hassle of laying meters of cable or drilling holes into walls. Simply put, a NetComm HomePlug turns the existing electrical wiring in your home into a network capable of transmitting data at up to 200Mbps. Setting up a network couldn’t be easier. Simply plug a Homeplug into an available power socket near a computer, attach it to the computer with a short ethernet cable. Then plug in and connect a second homeplug with your second home computer and that’s it, you’ve successfully networked two computers. HomePlugs are extremly versatile and suit any number of tasks • Internet sharing and On-line Gaming - Connect your broadband modem to a HomePlug and then every other PC or ethernet capable gaming console on your HomePlug network can access your internet connection • Wireless Access Point - With a Wireless HomePlug you can create a wireless access point anywhere you want • VoIP - Place a VoIP ATA anywhere in your home for big savings on your phone bill • Home Entertainment - Stream high-def movies, audio or photos from a media server to set-top boxes or HTPCs Another added bonus of a Homeplug network is that it moves with you. If you’re moving home or apatments, or simply doing some redecorating and need to move your PC, you can take your HomePlug with you and have your network up and running again in seconds. Try doing that with cables embedded in the wall! And as your network grows, HomePlugs make it easy to add new network points, simply plug in a new HomePlug and you’re ready to go. Grab your NetComm HomePlug today, either: Buy Online Purchase by Phone http://www.netcomm.com.au/EOP/ Tel – (02) 9424-2055 and click on the Buy Now button (Quote Ref - Home-2) NB9/NB9W ADSL2+ VoIP Router YML790 Rev8 83 Product Warranty NetComm products have a standard 12 months warranty from date of purchase. However some products have an extended warranty option, via registering your product online at the NetComm website www.netcomm.com.au. Refer to the User Guide for complete product warranty conditions, limitations of warranty and other legal and regulatory information. Contact Information If you have any technical difficulties with your product, please do not hesitate to contact NetComm’s Customer Support Department. Email: [email protected] www.netcomm.com.au Note: NetComm Technical Support for this product only covers the basic installation and features outlined in the Quick Start Guide. For further information regarding the advanced features of this product, please refer to the configuring sections in the User Guide or contact a Network Specialist. NetComm Limited ABN 85 002 490 486 PO Box 1200, Lane Cove NSW 2066 Australia E – [email protected] W – www.netcomm.com.au