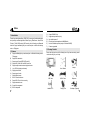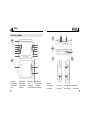
1
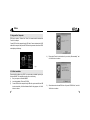
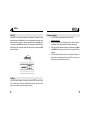
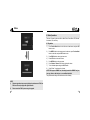
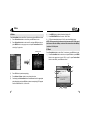
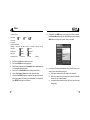
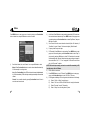
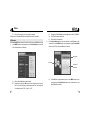
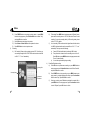
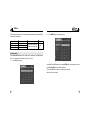
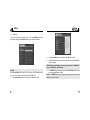
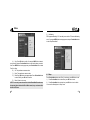
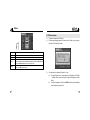
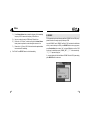
Notice
This manual contains information protected by copyright law. All rights are reserved. No
part of this document may be used or reproduced in any form or by any means, or stored
in a database/retrieval system without prior written permission from Netac Technology
Co., Ltd.
Netac provides the repair service during warranty period in promised support range. This
product is not guaranteed for its compatibility with all kinds of computers and Operating
System. Netac Technology Co., Ltd. is not responsible for any loss arising out of using this
product. The governing laws for this product are laws of the People’
s Republic of China.
Netac reserves the rights to update user’s manual based on the application upgrade
without prior notice. All changes will be put into the new edition manual. Please visit
website http://www.netac.com to download the latest user’
s manual.
iMuve
C)
Remarks
1)
A)
B)
C)
2)
Don’
t use chemicals, such as gasoline or other diluents, upon iMuve surface.
Wipe the iMuve with a dry, soft cloth to keep in clean condition.
Please disconnect iMuve from the computer before maintenances or
cleaning.
F)
5)
Others
A)
It’
s suggested that don’t delete the following system folder for better
management files, the details are as the following:
NOTE: “Auto-generated default titles” can’t be delete or cut in “File” menu.
Type of files
Auto-generated default titles
Type of files
Auto-generated default titles
Battery
Built-in Memory
internal_memory
SD/MMC Card
SD_MMC
A)
Backup Files
Movie Files
SDMMC_BACKUP
Movie
Firmware Upgraded Files
Music Files
FWUpgrade
Music
Photo Files
Photo
Game Files
Game
eBook Files
eBook
Recorded Files
Recorder
Accessories
Accessories
B)
C)
4)
Please avoid placing iMuve directly in the sunshine or dusty place.
Please avoid dropping or impact upon iMuve.
Don’t let liquid or objects into iMuve.
Cleanup
A)
B)
C)
3)
D)
E)
Storage
Please don’
t unplug iMuve while data is transferring with the computer,
otherwise the data may be lost.
Please don’
t judder, otherwise iMuve may be damaged.
Please don’
t unplug the LINE-IN cable during Line In recording, otherwise
the recording would be failure.
Please ensure that iMuve has space enough to save the new recorded files.
When start using the unit, please fully charge and discharge the battery for
about 2 ~ 3 times to ensure maximum battery life and power capacity.
Please don’
t dispose the unit into fire to avoid the battery exploding.
Please don’
t disassemble any part of the unit, any unauthorized disassembling
will cause termination of Netac official warranty.
B)
Usage
A)
B)
Please don’t upgrade firmware when the battery is exhausted, otherwise
iMuve’
s file system may be damaged.
Please don’
t use wet hand to plug/unplug or contact iMuve for preventing
shock or damage.
C)
“Fm****-******.wav”/ “Lin****-******.wav”/ “Mic****-******.wav”are auto-generated
default titles for FM, Line In and MIC recorded files. “****-******”Presents
“date _ time”.
Files or data stored in iMuve cannot completely avoid being destroyed or
lost due to improper use or other reasons. Please backup files and data
when necessary.
iMuve
Catalog Listing
4. Mode Operations .................................................................................... 16
2.1 Utilities Installation .................................................................................. 5
2.2 Data Transferring .................................................................................... 7
2.3 Disconnecting ........................................................................................ 8
4.1 Keystroke ..............................................................................................
4.2 Movie .....................................................................................................
4.3 Music .....................................................................................................
4.4 Photo .....................................................................................................
4.5 Game ....................................................................................................
4.6 eBook ....................................................................................................
4.7 FM .........................................................................................................
4.8 Recorder ................................................................................................
4.9 Accessories ...........................................................................................
4.10 File ......................................................................................................
4.11 Setup ...................................................................................................
3. Basic Operations .................................................................................... 10
5. FM Transmission ................................................................................... 44
1. Introduction ............................................................................................ 1
1.1 Features ................................................................................................ 1
1.2 Package Checklist .................................................................................. 2
1.3 Functions and Buttons ............................................................................ 3
2. Usage on the Computer .......................................................................... 5
3.1 Battery ................................................................................................... 10
2.2 Power On/Off .......................................................................................... 11
3.3 LCD On/Off ............................................................................................. 11
3.4 SD/MMC Card ........................................................................................ 12
3.5 HOLD ..................................................................................................... 13
3.6 Reset ..................................................................................................... 13
3.7 Firmware Upgrade .................................................................................. 14
16
17
18
21
24
24
28
31
35
37
40
6. BACKUP ................................................................................................ 46
7. Specifications ........................................................................................ 47
8. FAQ ........................................................................................................ 49
9. RMA Service .......................................................................................... 50
10. Contact Netac ...................................................................................... 52
iMuve
1. Introduction
Thanks for purchasing Netac iMuve (P200). P200 is a new type of portable media player,
which perfectly combines digital Movie & Music Playing, Photo browse, Game, eBook,
FM radio, FM Out, FM Recording, MIC Recording, Line In Recording, and Removable
hard disk. Support multitasking that you can browse photo or eBook while listening
music or FM program.
1.1 Features
A)
B)
C)
D)
E)
F)
G)
H)
I)
J)
K)
L)
M)
N)
1
Support multitasking that you can browse photo or eBook while listening music or
FM program
Support FM transmission
Support movie files as MPEG, MPG and AVI
Support MP3, WMA, WAV and OGG music files
Support multiple sound modes and playback modes
Lyric (LRC file) display synchronously
Support photo browse
Support game function
Support eBook browse
Built-in FM radio with stereo
Support FM, MIC and Line In recording
Support calendar browse
Support file management
Built-in loudspeaker
O)
P)
Q)
R)
S)
T)
Support SD/MMC Card
Support backup data/files quickly
User-defined power off
Effectively prevent misoperation with HOLD switch
No driver installation required (except on Windows 98/98SE)
Firmware upgradable
1.2 Package Checklist
Please check that you have all of the following items. If any items are missing, contact
vendor who selling it to you for help.
P200
User’
s Manual
Adapter
USB Cable
LINE-IN Cable
Earphones
Installation CD
Carrying Case
Car Adapter (*Optional)
2
iMuve
1.3 Functions and Buttons
17 18
19
Top
Front
1
2
3
4
5
6
8
9
10
11
12
7
13
Bottom
20
Right
Left
Back
14
16
22
15
21
1. Rope Hole
2. REPEAT Button
3. Buckup Button
5. FM OUT Button
9. Previous Button
13. LED
6. MENU Button
10. Volume+ Button
14. Backstop
7. MIC
8. Volume- Button
11. Next Button
12. OK Button
15. RESET Hole (Below the backstop)
3
23
4. BACK Button
16. Speaker
17. POWER Button
18. LCD Button
19. SD/MMC Card Slot and Mini USB Port
20. HOLD Switch
21. Adapter Jack
22. Earphone Jack
23. LINE IN Jack
4
iMuve
2. Usage on the Computer
P200 has two styles as “Fashion”and “Classic”, this manual would be introduced as
“Fashion”for example.
Connect P200 with the computer through USB cable, Connect standard port of USB
cable with the computer, Mini port with P200. After being connected, the screen of P200
would displayed as following:
4)
Please select “Search for the best driver for your device. (Recommended)”, and
click “Next”button to continue.
5)
Wizard shows where to locate P200 driver. Only select “CD-ROM drive”, and click
“Next”button to continue.
Fig. 1
2.1 Utilities Installation
Please install driver before using P200, if your system has not installed it previously on
Windows 98/98SE. The installation processes are as the following:
1)
Boot your system on Windows 98/98SE.
2)
Insert the installation CD into the CD-ROM.
3)
Connect P200 with the computer through USB cable, system would find an USB
device automatically. “Add New Hardware Wizard”dialog appears, click “Next”
button to continue.
5
6
iMuve
Mac OS 9.0 or above (Mac OS 10.3.2 e.g.): You would find two new icons named
“NO_NAME”that would appear on the desktop of your computer, and the first icon
represents P200, the second icon represents SD/MMC Card.
NOTE: Under the system of Mac OS 10.3.2 or above, only one disk letter would
appear, if SD/MMC Card is not plugged into P200.
6)
System would automatically detect the driver. Please click “Next”button in the
following steps and click “Finish”button in the last step to finish the installation.
2.2 Data Transferring
1)
2)
Boot your computer, connect P200 with the computer.
The screen of P200 would display as “Fig. 1”to prompt the connection status after
been connecting.
Windows 98/98SE/Me/2000/XP/Server 2003: Double click “My Computer”, you would
find two new icons named “Removable Disk”, and the first icon represents P200, the
second icon represents SD/MMC Card. A new icon
would appear at the taskbar on
Windows Me/2000/XP/Server 2003.
7
Linux 2.4.x or above: Enter the system by user ID “root”and input the command
“mount /dev/sda /mnt”. This command is to create a directory where P200 would be
mounted.
NOTE: “sda” is an unfixed input item, please make relevant changes according to
Linux operating discipline.
3)
Then you can copy, delete or edit data, just as on a traditional hard disk.
2.3 Disconnecting
Please don’t unplug P200 while data is transferring between P200 and the computer,
otherwise the transferring data may be lost.
8
iMuve
1)
Windows 98/98SE: Unplug P200 from USB port of the computer after stop
transferring.
Windows Me/2000/XP/Server 2003 (Windows 2000 e.g.): Click the icon
at the
2)
taskbar, then click the “Stop USB Mass Storage Device - Driver”, and click “OK”
button in the pop-up window “The ‘
USB Mass Storage Device’device can now be
safely removed from the system”, then you can unplug P200 from the computer
safely.
3. Basic Operations
3.1 Battery
: The battery is full.
: The battery is exhausted. Screen would prompt “Low power, please recharge”about
5 seconds and power off automatically when the battery is extremely low.
P200 powered by lithium battery. Please connect P200 to adapter for charging, or
connect car adapter with cigar-lighter adapter of car to charge for the battery. When
the battery is charging, the LED is red, and green represents finished charge.
Cigar-lighter adapter of car
3)
Mac OS 9.0 or above (Mac OS 10.3.2 e.g.): Select the icon(s) representing P200,
and click “File”to select “Exit NO NAME”or “Exit”(if SD/MMC card is plugged into
P200), then you can disconnect P200 from the computer.
Tips: Please drag P200 icon into Trash, then unplug it on Mac OS 9.0.
4)
Linux 2.4.x or above: Input the command “umount /mnt”before unplugging P200.
The “/mnt”directory is corresponding with the “/mnt”mentioned above.
9
Please connect the car adapter to cigar-lighter adapter of car, please refer to the
figure. Netac Technology Co., Ltd. is not responsible for any loss arising out of using
this cigar-lighter adapter of car.
10
iMuve
3.2 Power On/Off
3.4 SD/MMC Card
To power on P200, please hold POWER button, P200 would enter main menu
automatically.
To power off P200, please hold POW ER button.
If you set “Time Off”, P200 would power off automatically when the time duration exceeds
the setup time. When P200 is in non playing/playing pause/receiving/recording/playing
game modes, P200 would power off automatically if you set “Auto Off”and there is no
operation during the time (Please refer to “4.11 Setup”for details).
Open the slot covert and insert the SD/MMC Card into P200.
SD/MMC Card Slot
Hold
Press
3.3 LCD On/Off
After being inserted the SD/MMC Card, for example, press Previous/Next button to
select “Movie”in main menu, press OK button to enter, press Previous/Next button to
select “SD_MMC”folder, now you can copy, delete or edit data, just as on a traditional
hard disk. Please refer to “4. Mode Operations and 6. BACKUP”for details.
Press LCD button to turn on/off the screen of P200. After being turn off the screen, the
LED is green and flash slowly, please refer to “4.11 Setup”for details.
Press
11
12
iMuve
3.5 HOLD
3.7 Firmware Upgrade
This function is used to prevent the buttons from being operated accidentally. To lock all
buttons please simply lock HOLD switch, a lock icon would appear on the screen, and no
button would be able to operate. To release the lock status, please unlock HOLD switch.
If try to power on while HOLD switch is locked, P200 would power off automatically shortly
after displaying “Keys locked, please set the HOLD switch to unlock”, please unlock HOLD
switch, then try again.
Push
1)
2)
3)
4)
You can download the latest firmware file from the website
http://www.netac.com.
Copy the firmware file which download from the website into directory
“\FWUpgrade”of P200, and disconnect P200 from the computer safely.
P200 would upgrade firmware automatically when synchronously hold BACK
and POWER button while power on. Please do not any operate P200 during
upgrading.
P200 would delete firmware file in directory “\FWUpgrade”and power off
automatically when upgrade has been finished. P200 would be run new
firmware program when P200 powered on again.
3.6 Reset
In case P200 doesn’
t response to any operation, poke the RESET hole where back of
P200 to reboot system. You need to restart P200 after rebooting, the settings of P200
would return to the last effective settings before rebooting.
13
14
iMuve
4. Mode Operations
There are 10 menus in main menu: Movie, Music, Photo, Game, eBook, FM, Recorder,
Accessories, File, and Setup.
4.1 Keystroke
1)
Press Previous/Next button to select the menu in main menu, and press OK
button to enter.
2)
Press MENU button to enter popup menu in main menu, press Previous/Next
button to select item, and press OK button to enter.
3)
Press BACK button to return to previous menu.
4)
Press LCD button to turn on/off screen.
5)
Press MENU button to exit popup menu.
6)
Press Volume+ / Volume- button to turn up/down the volume.
7)
To lock all buttons please simply lock HOLD switch.
8)
Select “Return”to main menu in sub menu.
NOTE: P200 supports SD/MMC Card, after being inserted the SD/MMC Card, you
can copy, delete or edit data, just as on a traditional hard disk.
The operations and settings would be introduced as the following.
NOTE:
1)
Firmware upgrade can improve and optimize the performances of P200, but
P200 can also work properly with original firmware.
2)
Please ensure that P200 is power enough to upgrade.
15
16
iMuve
4.2 Movie
Press Previous/Next button to select “Movie”in main menu, and press OK button to enter.
1)
Press Previous/Next button to select folder, press OK button to enter.
2)
Press Previous/Next button to select movie file, and press OK button to play, or
press MENU button to enter popup menu, and press Previous/Next button to
select “play”to play movie.
6)
Press MENU button to display information of playing file.
7)
Press BACK/POWER button to return to “Movie”menu.
8)
P200 would automatically return to “Movie”menu when finished playing.
NOTE: P200 supports the best format of audio stream as MP3: Code rate of
audio stream is less than 160Kbps, code rate of video stream is less than 400Kbps,
resolution: 320 X 240 pixels.
4.3 Music
Information of file
Press Previous/Next button to select “Music”in main menu, press OK button to enter.
1)
Press Previous/Next button to select item, and press OK button or press MENU
button to enter popup menu to select “Play”to play. Or press Previous/Next
button to select folder, press OK button to enter.
13
12
3)
4)
5)
Press OK button to pause/resume playing.
Press Volume+ / Volume- button to turn up/down the volume.
Continuously press Previous/Next button to rewind/forward track to the appropriate
place during playing, and press OK button to return to normal playing. P200 supports
level of rewind/forward as 2x, 4x, 8x and 16x.
11
1
2
3
10
4
17
5
6
7
8 9
18
iMuve
1. Information of track
2. Play Status
Play
3. Lyric Shows
4. A-B Repeat
5. Track No./Total Track No.
6. Equalizer
NOR: Normal
7. Play Mode
Pause
BAS: Bass
ROC: Rock
CLA: Classic
: Play One
8. Repeat Mode
: Repeat
: Repeat Offf
9. Play Order
: Sequence
2)
3)
4)
5)
6)
7)
19
11. Date & Time
Popup menu: Press MENU button to enter popup menu in “Music”sub menu,
press Previous/Next button to select item, press OK button to confirm, and press
MENU button to exit popup menu or select “Return”to main menu.
9)
Lyric showing: P200 would automatically search the lyric file (LRC format, you can
make by yourself, download from Internet, etc.).
A)
Copy the track and the lyric file (LRC format) into the same folder.
B)
Make sure the name of the lyric file is the same as the name of the track,
otherwise the lyric can not be displayed.
C)
Lyric would be shown synchronously in the “Lyric Shows”area of the screen
during playing.
Stop
: Play All
10. Elapse/Total Time
8)
JAZ: Jazz
POP: Pop
: Shuffle
12. Volume
13. Battery
Play/Pause: Press OK button to pause/resume track.
Stop: Press POWER button to stop playing track.
Rewind/Forward: Continuously press Previous/Next button to rewind/forward track
to the appropriate place during playing.
Select track: Press Previous/Next button to switch previous/next track.
Volume: Press Volume+ / Volume- button to turn up/down the volume.
A-B repeat: Press REPEAT button twice to decide A (start) spot and B (end) spot
while in playing status, P200 would play the track between A and B repeatedly.
Press REPEAT button again to exit A-B repeat.
20
iMuve
10)
Multitasking:
A)
Enter to “Photo/eBook”menu for browse.
B)
Enter to “File”menu for viewing the information.
C)
Enter to “Setup”menu for setting items of system.
D)
Enter to “Accessories”menu for viewing the calendar.
Press MENU button to enter popup menu of “Photo/eBook/File/Accessories”, press
Previous/Next button to select item (please refer to “Photo/eBook/File/Accessories”
for details).
In main menu you can press BACK button to return to sub menu of “Music”while playing
track, and press MENU button to enter popup menu, then press Previous/Next button to
select item.
1)
2)
3)
5)
Press Previous/Next button to select folder, and press OK button to enter.
Press Previous/Next button to select photo.
Press OK button to display, or press MENU button to enter popup menu to select
“Open”, press OK button to display.
Press MENU button to enter popup menu, press Previous/Next button to select
item, and press OK button to confirm, the details are as the following:
4.4 Photo
Press Previous/Next button to select “Photo”in main menu, and press OK button to
enter.
Zoom
Preview
Information of
photo
21
Normal: Cancel all of the browse modes.
Zoom In/Out: Press Previous/Next button to zoom in/out photo.
Up-Down: Press Previous/Next button to shift up/down.
22
iMuve
Left-Right: Press Previous/Next button to left/right shift.
Rotate: Press Previous/Next button to counterclockwise/clockwise rotation with 90°.
Slide Show/Manu View: Press OK button to select display mode.
Return: Return to main menu.
NOTE: If the resolution of the photo is less than 320 X 240 pixels, the photo
would be displayed with original size in the middle, otherwise, the photo would
be displayed compression size with full screen.
6)
Press BACK button to return to previous menu.
7)
Multitasking:
If you browse photo while listening music, you can press MENU button to enter popup
menu, press Previous/Next button to select “Stop/Previous/Next”, and press OK button
to confirm.
4.5 Game
Press Previous/Next button to select “Game”in main menu, and press OK button to enter.
1)
Press Previous/Next button to select game, press OK button to enter.
2)
Press POWER button to return to “Game”menu while playing game.
Keystroke Definition:
Up: BUCKUP button
Down/Squat: FM OUT button
Previous: REPEAT button
Move Back: BACK button
Jump: Next/Volume+ button
Shoot or Active Attack: Previous/Volume- button
Pause/Resume: OK button
Exit: POWER button
NOTE:
1)
Please copy the NES format of game into “Game”folder of P200 at first, otherwise
the game can’
t be played in another folder.
2)
When you playing the game, please lock HOLD switch, and press LCD button to
save the current process of game that would save as “.sav”under “Game”folder.
To continue the game, unlock HOLD switch and press LCD button, the playing
place is the time spot saved before last time, just as like playing after paused.
4.6 eBook
Press Previous/Next button to select “eBook”in main menu, press OK button to enter.
1)
Press Previous/Next button to select folder, and press OK button to enter.
2)
Press Previous/Next button to select item, and press OK button to browse, or
press MENU button to enter popup menu, press Previous/Next button to select
“Browse”to confirm.
23
24
iMuve
3)
4)
Normal Screen
5)
PressBACK button to return to previous menu.
Press Previous/Next button to page up/down, and press OK button to switch
normal screen to full screen.
Press MENU button to enter popup menu, press Previous/Next button to select
item, and press OK button to confirm.
Label
Full Screen
25
A)
Full Screen: Switch to display modes of the text. This item would display “Normal
Screen”while in “Full Screen”status.
B)
Set as label: Insert label in current page.
NOTE: You can only set one label in a text. The label of current page would delete
automatically, when you set a label in another page.
26
iMuve
C)
Go to label: Display the page that has set label.
D)
Remove Label: Remove the label from current text.
E)
Return: Return to main menu.
6)
Multitasking:
If you browse eBook while listening music, you can press MENU button to enter popup
menu, and press Previous/Next button to select “Stop/Previous/Next”.
4.7 FM
Press Previous/Next button to select “FM”in main menu, press OK button to enter.
Press BACK button or press MENU button to enter popup menu to select “Return”to
main menu.
Frequency
Channel No./Total
Channels No.
Press Previous/Next button to select channel, please refer to “Scan Mode”for details.
Press Volume+ / Volume- button to turn up/down the volume while listening FM program.
27
28
iMuve
Press MENU button to enter popup menu in receiving status, press Previous/Next
button to select item, and press OK button to set item or confirm.
1)
29
Scan Mode: Manual, Auto, and Channel. You can press OK button to select.
Manual: Press Previous/Next button to search channel ahead/backwards by
0.1MHz manually in receiving status.
Auto: Press Previous/Next button, P200 would search channel ahead/backwards
by 0.1MHz automatically. P200 would stop searching automatically while searched
channel.
Channel: You can switch channel by pressing Previous/Next button if there is
more than one channel saved.
2)
Auto Search: Press OK button to start searching automatically, P200 would save
the searched channels automatically. Press MENU button to enter popup menu
in searching status, press Previous/Next button to select “Stop/Return”, and press
OK button to confirm.
3)
Save Channel: Save the current channel to channel list (Max. 100 channels). If
“Scan Mode”is set as “Channel”, this item would display “Delete Channel”.
4)
Frequency band: Europe and Japan.
5)
FM Recording: Press OK button to start recording. Press MENU button to enter
popup menu in recording status, press Previous/Next button to select “Stop”to
stop recording, and press OK button to confirm. P200 would save the recorded
file automatically under “Recorder”folder after being stop recording, and name for
the recorded file as “Fm****-******.wav”and played it in “Recorder”menu. Please
refer to “4.8 Recorder”for details.
NOTE: P200 would stop recording and save the recorded file automatically in FM
recording status, while exit FM menu.
6)
Return: Return to main menu.
7)
Press POWER button to turn off FM radio. Press MENU button to enter popup
menu, press Previous/Next button to select “FM ON”in “FM”menu.
8)
P200 supports multitasking in FM receiving status, the details are as the following:
A)
Enter to “Photo”or “eBook”menu for browse.
B)
Enter to “File”menu of P200 or SD/MMC Card for viewing the information.
C)
Enter to “Recorder”menu for FM recording.
D)
Enter to “Setup”menu for setting items of system.
30
iMuve
E)
Enter to “Accessories”menu for viewing the calendar.
Please refer to “Photo/eBook/File/Recorder/Setup/ Accessories”for details.
4.8 Recorder
Press Previous/Next button to select “Recorder”in main menu, press OK button to enter.
1)
Press MENU button to enter popup menu, press Previous/Next button to select
item, the details are as the following:
2)
C)
Storage Site: Press OK button to select storage site as “Flash”or “SD/MMC”.
D)
Play: Play the select recorded file.
E)
Return: Return to main menu.
Press Previous/Next button to select recorded files, press OK button to play
recorded file, or press MENU button to enter popup menu, press Previous/Next
button to select “Play”, and press OK button to confirm.
Playing Time
Play Status
Information of
recorded file
A)
A)
B)
31
Record: Press OK button to start recording.
Recording Source: Press OK button to select recording source as Auto,
MIC, Line In, and FM. When you select the item as “Auto”, the priority level
of recording source is “FM”> “Line In”> “MIC”.
Press OK button to pause/resume track, or press MENU button to enter
popup menu, press Previous/Next button to select “Pause/Continue”, and
press OK button to confirm.
32
iMuve
B)
3)
Press POWER button to stop playing in playing status, or press MENU
button to enter popup menu, press Previous/Next button to select “Stop”,
and press OK button to confirm.
C)
Press OK button to start playing in stop status.
D) Press Volume+ / Volume- button to turn up/down the volume.
E)
Press BACK button to return to previous menu.
Recording:
A)
MIC recording: Please set the recording source as “MIC”at first, then you
can recording through the MIC of P200. P200 would save the recorded file
as “Mic****-******.wav”automatically.
B)
4)
Recording Time
Recording Status
Information of
recorded file
33
FM recording: Press MENU button to enter popup menu in “Recorder”menu,
please set the recording source as “FM”first, then select “Record”to start
recording. You can also recording directly in FM receiving status, please
refer to “4.7 FM”for details.
C)
Line In recording: P200 would record audio signal from audio/video device
via LINE-IN cable and would save the recorded file as “Lin****-******.wav”
automatically. The steps are as the following:
a)
Connect P200 with audio/video device through LINE-IN cable.
b)
Turn up/down the volume and set the recording source as “Line In”.
Press OK button or press MENU button to enter popup menu to select
“Record”to start recording.
d)
You can listen synchronously during recording.
Pause/Stop/Playback recording
A)
Press OK button to pause/resume recording, or press MENU button to
enter popup menu, press Previous/Next button to select “Pause/Continue”,
and press OK button to confirm.
B)
Press POWER button to stop recording, or press MENU button to enter
popup menu in recording/recording pause status, press Previous/Next
button to select “Stop”, press OK button to confirm.
C)
After stop recording, press OK button to playback the recorded file, or
press MENU button to enter popup menu, press Previous/Next button
to select “Playback”, press OK button to confirm.
34
iMuve
P200 can name and save for the recorded files automatically when finish recording. The
details are as the following:
Recorded Mode
MIC Recording
FM Recording
Line In Recording
Name of Recorded files Locations for Saving
Mic****-******
“Recorder”folder under root of
Fm****-******
SD/MMC Card or built-in Flash.
Lin****-******
2)
Press MENU button to enter popup menu.
Playing Menu
“Music”and
“Recorder”
menu
4.9 Accessories
Press Previous/Next button to select “Accessories”in main menu, press OK button to
enter. You can browse the Calendar in “Accessories”menu.
1)
Press OK button to enter.
Year/Month: Press OK button to select, press MENU button to exit popup menu, and
press Previous/Next button to switch year/month.
Today: Press OK button to return to the day that you have set.
Return: Return to main menu.
35
36
iMuve
3)
Multitasking:
If you browse calendar while listening music, you can press MENU button to enter
popup menu, and press Previous/Next button to select “Stop/Previous/Next”.
2)
3)
4.10 File
Press Previous/Next button to select “File”in main menu, press OK button to enter.
Then you can copy, delete or edit data in P200 and SD/MMC Card.
1)
Press Previous/Next button to select folder, press OK button to enter.
37
Press Previous/Next button to select item, press OK button to enter.
Press OK button to play the movie/music/recorded file or browse the photo/eBook
which you selected.
NOTE: After been entered playing or browse menu, please refer to “Movie/Music”
menu or “Photo/eBook” menu for details.
4)
Press MENU button to enter popup menu, press Previous/Next button to select
item, and press OK button to confirm.
NOTE: Press POWER button to stop copying in copy process menu, but the copied
data/files has not been deleted.
38
iMuve
5)
Multitasking:
P200 supports multitasking in “File”menu that you can view the “File”menu while listening
music. You can press MENU button to enter popup menu, and press Previous/Next button
to select “Stop/Previous/Next”.
A)
Copy: Press OK button to confirm. You can press BACK button to return to
previous menu, and press Previous/Next button to select location where you want to
save. Press MENU button to enter popup menu, press Previous/Next button to select
“Paste”to confirm.
B)
Cut: The operations are same as above.
C)
Paste: The operations are same as above.
D)
Delete: Press OK button to enter popup window. Press Previous/Next button
to select “Yes/No”, press OK button to confirm.
E)
Return: Return to main menu.
NOTE: You can only browse relevant files in Movie/Photo/eBook/Recorder menu,
browse and play music/recorded files in Music menu, but you can browse all of
the files in File menu.
39
4.11 Setup
Press Previous/Next button to select “Setup”in main menu, press OK button to enter.
1)
Press Previous/Next button to select item, press OK button to enter.
2)
Press Previous/Next button to select item, press OK button to set or confirm.
You can set the following items in “Setup”menu:
40
iMuve
Items
Descriptions
Set the language as 中文 and English.
Set the style as Fashion and Classic.
Press OK button to enter sub menu. Press Previous/Next button to select item, press
OK button to enter. Press Previous/Next button to set, press OK button to confirm.
To set the continuous illumed time of backlight if there is no operation exceed the time
Backlight
which is set as 5, 10, 15, 20, 25, 30, 35, 40, 45, 50, 55, 60 seconds and AlwaysOn.
“AlwaysOn”represents the backlight is on anytime.
To set the continuous illumed time of key light if there is no operation exceed the time
Key Light
which is set as 5, 10, 15, 20, 25, 30, 35, 40, 45, 50, 55, 60 seconds and AlwaysOn.
“AlwaysOn”represents the key light is on anytime.
P200 would turn off screen if there is no operation exceed the time which is set as 5,
Screen Off 10, 15, 20, 25, 30 minutes and Disable, press LCD button to turn on the screen.
“Disable”represents the screen can’
t turn off.
Brightness To set the brightness as 10 ~ 100.
P200 would power off automatically if there is no operation in non playing/pause playing/
Auto Off
receiving/recording/playing game status during the time which is set as 10 ~ 120 minutes
and Disable. “Disable”represents P200 can not power off automatically.
Language
Style
Date &
Time
41
Items
Time Off
EQ
Play Mode
Repeat Mode
Play Order
Rec. Source
FM Band
Scan Mode
Descriptions
P200 would power off automatically after powering on during the time which is set
as 10, 20, 30, 40, 50, 60, 70, 80, 90, 100, 110, 120 minutes and Disable. “Disable”
represents P200 can not power off automatically.
There are 6 equalizer modes: Normal, Bass, Rock, Classic, Jazz, and Pop.
There are 2 play modes: All, One.
There are 2 repeat modes: Repeat, Once.
There are 2 play orders: Sequence, Shuffle.
There are 4 rec. sources: Auto, MIC, Line In, FM.
There are 2 FM bands: Europe, Japan.
There are 3 scan modes: Manual, Auto, Channel.
42
iMuve
5. FM Transmission
Items
Descriptions
FM Out
Upgrade
To set the earphone whether has sound when FM outing: Soundable, Silent.
Browse the upgrade information, press BACK or OK button to return to “Setup”menu.
To browse the system information, which includes Company, name and type of product,
hardware and firmware version, available and total capacity of flash, and SD/MMC Card
status. Press BACK or OK button to return to “Setup”menu.
To set as default value, press OK button to enter, press Previous/Next button to select
“Yes/No”, press OK button to confirm.
About
Default
43
1)
2)
Connect the earphone to P200 at first.
P200 can send the playing music to FM radio of car or FM radio, so you can enjoy
the music in P200 through FM radio.
3)
The steps are as the following (FM radio of car e.g.)
A)
Turn on the FM radio of car, change the range of FM frequency in 87.5MHz
~ 108MHz. (Please choose the frequency without FM program for better
effect.)
B)
Connect the earphone to P200, press FM OUT button to enter transmitting
status while playing music/movie.
44
iMuve
C)
D)
E)
F)
4)
45
Exit
Press Volume+/Volume- button to adjust the frequency, till the transmitting
frequency of P200 is same as the frequency of FM radio of car.
Now you can enjoy the music in P200 through FM radio of car.
Please refer to “4.3 Music”for details, except for the Volume+/Volumebutton, please turn up/down the volume through the stereo set of car.
Please refer to “4.11 Setup -> FM Out”for details to set the earphone whether
has sound when FM transmitting,
FM Out: Press FM OUT button to exit while transmitting.
6. BACKUP
P200 supports backup function that backup data/files of SD/MMC Card into P200 quickly,
please ensure there is enough capacity for backup in P200.
Insert the SD/MMC Card to SD/MMC Card Slot of P200, and select the data/folders
which you want to backup into P200, press BACKUP button to enter popup menu,
press Previous/Next button to select “Yes”, and press OK button to confirm, P200
would save the data/folders under “SDMMC_BK****_******” folder automatically.
“****_******”represents “date_time”.
If you want to backup all of the date/folders in SD/MMC Card into P200, please simply
press BACKUP button in main menu.
46
iMuve
Items
7. Specifications
*The actual usable capacity may not be identical as labeled.
Netac reserves the rights to make changes on any specification without prior notice.
Items
Descriptions
Dimension
Net Weight
Capacity of memory *
Capacity of SD/MMC Card
Power Supply
133.7mm x 78mm x 21mm
195g approximately
256MB~ 2GB
16MB~ 2GB
Powered by built-in lithium battery. 2500mAh
40mW + 40mW, 32ohm
Earphone Output
8Kbps ~ 384Kbps
Bit Rate
8KHz ~ 48KHz
Sampling Rate
Earphone Output
40mW + 40mW, 32ohm
Bit Rate
8Kbps ~ 128Kbps
Sampling Rate
44.1KHz
Earphone Output
40mW + 40mW, 32ohm
Bit Rate
8Kbps ~ 320Kbps
Sampling Rate
8 or 16 line sample rate, 8KHz ~ 48KHz
Support earlier version and all of bit rate and sampling rate as used by
Version 10, bit rate is less than 320Kbps.
87.5MHz ~ 108MHz (Europe)
Range of frequency
76MHz ~ 91MHz (Japan)
Preservable Stations
100
Earphone Output
40mW + 40mW, 32ohm
MP3
WMA
WAV
OGG
FM radio
47
Descriptions
Range of frequency
FM Out
Movie file
Music file
Photo file
Game file
eBook file
Working Temperature
Storage and Transportation
Temperature
Relative Humidity under
Working
Relative Humidity under
Storage and Transportation
Atmospheric Pressure
Language
Style
Operating System
87.5MHz ~ 108MHz (Europe)
87.5MHz ~ 91MHz (Japan)
-10dBm
10 M
Transmission Power
Effective Range
AVI, MPEG, MPG
MP3, WMA, WAV, OGG
BMP, JPEG, JPG
NES
TXT, “中文”only supports Simple Chinese as GB2312.
-10°C ~ 55°C
-40°C ~ 70°C
20% ~ 80% (40°C)
20% ~ 80% (40°C)
86 KPa ~ 106 KPa
中文 and English
Fashion and Classic
Windows 98/98SE/Me/2000/XP/Server 2003, Mac OS 9.0 or above,
Linux 2.4.x or above.
48
iMuve
8. FAQ
9. RMA Service
If you experience any of the following difficulties in using P200, use the following guide
for help. Should any problem persist, contact with Netac Customer Service.
1)
Symptoms
Fail to power on.
Power off shortly
while power on.
No sound
output.
Keystroke void.
Fail to connect
with the
computer.
Possible Reasons Analysis
Low Power.
Low Power.
HOLD switch locked.
The volume is 0.
Earphone isn’
t connected well.
HOLD switch locked.
USB Cable isn’
t connected correctly.
Driver hasn’
t been installed on
Windows 98/98SE.
Fail to
copy files.
Cannot record.
Low Power.
Space insufficient.
Recorded files have exceeded the
maximum limit.
Remedy
Charge battery through (Car) Adapter.
Charge battery through (Car) Adapter.
Unlock HOLD switch.
Turn up the volume.
Connect earphone correctly.
Unlock the HOLD switch.
Connect USB Cable correctly.
Install the driver. (Please refer to
“2.1 Utilities Installation”for details.)
Check the system settings whether be
accordance with requirements.
Format P200 and try again.
Charge battery through Adapter.
Delete some files.
No sound output
LINE-IN cable isn’
t connected well Connect LINE-IN cable correctly and
of Line In
restart recording.
when recording.
recorded files.
FM transmitting
Insert earphone into P200 and try again.
Earphone isn’
t insert into P200.
isn’
t well.
49
Self check (Over 50% claimed fault can be fixed easily).
A)
Please check the manual and FAQ on our website http:// www.netac.com to
double-check the failure symptoms you are facing.
B)
Please check if there is any latest update of software or firmware to your
product, especially format tools. If you didn’
t purchase directly from Netac,
please return the goods to the vendor where you purchased from for
repair or replacement.
ANY PHYSICAL DAMAGE, MISUSAGE, OR UNAUTHORIZED DISASSEMBLING OF
ANY PORT OF THE PRODUCTS WILL LEAD TO WARRANTY VOID. By default, the
product is only available for personal and office.
2)
Obtain RMA (Return to Manufacturer Authorization) number from Netac (Only for
Authorized Dealers).
A)
We send you a RMA Request Form by E-mail upon request.
B)
Please fill in all related items, like items number, failure symptom(s), purchase
date and invoice number on RMA Request Form, E-mail or Fax back to Netac.
C)
Upon receiving the filled RMA Request Form, we will check the form and
warranty period. A RMA number will be issued within 2 working days.
D)
Any RMA number is only valid for 14 days, other than that a new application
needs to be filled again.
50
iMuve
ANY RETURN WITHOUT PRE-APPROVED RMA NUMBER WILL BE REJECTED OR
DELAYED. IT IS A MUST-HAVE FOR ALL RETURN OR REPAIRING OR EXCHANGE
OR MISSING ISSUES.
3)
4)
51
How to send the defective product(s) to Netac?
The “Netac RMA Request Form”must NOT be enclosed in the RMA package sent
to Netac, but the RMA number is REQUIRED to be written on the top of the box
when you send it/them back. The defective product(s) sent to Netac without RMA
number will NOT be received, repaired and/or returned.
A)
Netac don’
t accept any collect shipment. All RMA shipment must be prepaid.
B)
Don’t make any shipment until having the Shipping Instruction from Netac.
Please ask further advice from Netac Customer Service Dept. as bellow
before you send out the defective products.
Contact information
E-mail: [email protected]
Contact: Byele Yu, Coudy Wu (Customer Service Dept.)
Contact phone: +86-755-26727573, 26727336
Company line: +86-755-26727800
Fax: +86-755-26727610
Business hour: 08:30 - 17:40 Beijing Time, Mon.- Fri.
10. Contact Netac
Netac Technology Co., Ltd.
6F, Incubator Building,
China Academy of Science & Tech Development,
No.1 High-tech South St,
Shenzhen, China 518057
Tel: +86-755-26727800
+86-755-26727520, 26727510, 26727500
Fax: +86-755-26727610
Website: http://www.netac.com
E-mail:
[email protected]
[email protected]
[email protected]
(Switchboard)
(Technical Support)
(Sales)
(Technical Support)
(Feedback)
52