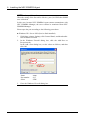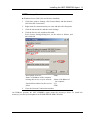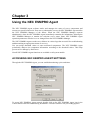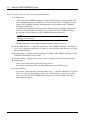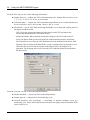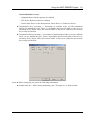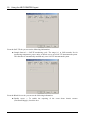
1
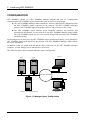
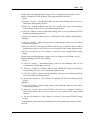
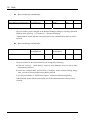
NEC Express5800 Series NEC ESMPRO Agent User's Guide 12-2006 ONL-4156aN-COMMON-126-99-0612 PROPRIETARY NOTICE AND LIABILITY DISCLAIMER The information disclosed in this document, including all designs and related materials, is the valuable property of NEC, Inc. (NEC) and/or its licensers. NEC and/or its licensers, as appropriate, reserve all patent, copyright and other proprietary rights to this document, including all design, manufacturing, reproduction, use, and sales rights thereto, except to the extent said rights are expressly granted to others. The NEC product(s) discussed in this document are warranted in accordance with the terms of the Warranty Statement accompanying each product. However, actual performance of each such product is dependent upon factors such as system configuration, customer data, and operator control. Since implementation by customers of each product may vary, the suitability of specific product configurations and applications must be determined by the customer and is not warranted by NEC. To allow for design and specification improvements, the information in this document is subject to change at any time, without notice. Reproduction of this document or portions thereof without prior written approval of NEC is prohibited. Microsoft, Windows, Windows Server, Windows NT, and MS-DOS are registered trademarks or trademarks of Microsoft Corporation in the United States and other countries. All other product, brand, or trade names used in this publication are the trademarks or registered trademarks of their respective trademark owners. Windows Server 2003 R2 stands for Microsoft® Windows Server™ 2003 R2, Standard x64 Edition operating system, Microsoft® Windows Server™ 2003 R2, Enterprise x64 Edition operating system, Microsoft® Windows Server™ 2003 R2, Standard Edition operating system and Microsoft® Windows Server™ 2003 R2, Enterprise Edition operating system. Windows Server 2003 stands for Microsoft® Windows Server™ 2003, Standard x64 Edition operating system, Microsoft® Windows Server™ 2003, Enterprise x64 Edition operating system, Microsoft® Windows Server™ 2003, Standard Edition operating system, Microsoft® Windows Server™ 2003, Enterprise Edition operating system, Microsoft® Windows Server™ 2003, Enterprise Edition for 64-bit Itanium-based systems and Microsoft® Windows Server™ 2003, Datacenter Edition for 64-bit Itanium-based systems. Windows XP stands for Microsoft® Windows® XP Professional operating system. Windows 2000 stands for Microsoft® Windows® 2000 Professional operating system, Microsoft® Windows® 2000 Server operating system and Microsoft® Windows® 2000 Advanced Server operating system. z Contents Chapter 1 Introducing NEC ESMPRO ..............................................................................1 Functions and Features .................................................................................................................... 1 Configuration................................................................................................................................... 2 System Requirements ...................................................................................................................... 3 Installation ....................................................................................................................................... 4 Chapter 2 Installing the NEC ESMPRO Agent.................................................................5 Instructions ...................................................................................................................................... 5 Installing the NEC ESMPRO Agent Software............................................................................... 10 IP Address Confirmation ........................................................................................................... 10 Chapter 3 Using the NEC ESMPRO Agent ....................................................................11 Accessing NEC ESMPRO Agent Settings..................................................................................... 11 Accessing Storage Settings............................................................................................................ 19 Information Collection................................................................................................................... 23 NEC ESMPRO Agent Services ..................................................................................................... 24 Logging ..................................................................................................................................... 24 Appendix A..........................................................................................................................25 Note......................................................................................................................................25 About This Guide The NEC ESMPRO monitors the configuration, failures, and performance of systems across a network. This user's guide is intended for the system administrator and describes NEC ESMPRO capabilities, installation, features, and use. This manual is comprised of the following chapters. Chapter 1, Introducing NEC ESMPRO, describes NEC ESMPRO features, configuration and system requirements. Chapter 2, Installing the NEC ESMPRO Agent, details the procedures for verifying network settings and installing the NEC ESMPRO Agent software on remote servers running Windows systems. Chapter 3, Using the NEC ESMPRO Agent, describes how to access the NEC ESMPRO Agent, specify monitoring thresholds for the system, and interpret NEC ESMPRO Agent services on Windows systems. Appendix A, Note Chapter 1 Introducing NEC ESMPRO NEC ESMPRO lets a system administrator manage remote servers across a network. NEC ESMPRO monitors server hardware and software configurations, failures, and performance. With log data collected by NEC ESMPRO, a system administrator can track long-term and short-term performance, monitor server usage, create graphs to record trends, and check server failure rates. The administrator can use the information collected to create more efficient data routing procedures and optimize server usage. FUNCTIONS AND FEATURES NEC ESMPRO offers many functions and features for managing remote servers across a network. These features help the system administrator perform daily system operation, system extension, and transfer tasks. Some features of NEC ESMPRO Manager include: Hardware and software server configuration – Hardware resources mounted in servers, such as the CPU, memory, disks, disk arrays, and LAN boards. – Software resources, such as operating system information and drivers running on each server. Server failures – On-screen real-time displays provide the system administrator with the failure type, location, cause, and suggested corrective action. – Failure data includes hardware failure information such as system board temperature, memory failure, crashes, and software failure information. Performance – NEC ESMPRO monitors server performance and displays server usage on the screen and displays information, such as the rate of CPU load, memory usage, disk usage, and LAN traffic. Usage threshold values can help the system administrator monitor and prevent server overloads. 2 Introducing NEC ESMPRO CONFIGURATION NEC ESMPRO consists of a NEC ESMPRO Manager program that runs on a management computer and a NEC ESMPRO Agent program that runs on servers to be managed. The NEC ESMPRO Manager collects hardware, software, and firmware information from the NEC ESMPRO Agents connected to the network. The NEC ESMPRO Manager displays NEC ESMPRO Agent information, failures, and error logs on the screen. The NEC ESMPRO Agent monitors server hardware, software, and firmware and transmits the information over the network to the NEC ESMPRO Manager using SNMP. The NEC ESMPRO Agent lets you view system settings and reset some NEC ESMPRO thresholds locally. Each managed server must have the NEC ESMPRO Agent installed and running. Using SNMP, the NEC ESMPRO Agent sends data across the network to the NEC ESMPRO Manager, which collects the server information. In addition, when you install both IIS and the Web Component on the NEC ESMPRO Manager computer, you can manage servers through the web browser. The following figure shows a sample Manager/Agent Configuration. Agent Browser Agent Intranet / Internet Manager + IIS + Web Component Browser Figure 1-1 Manager/Agent Configuration Introducing NEC ESMPRO SYSTEM REQUIREMENTS NEC ESMPRO requires the following hardware and software: NEC ESMPRO Agent Hardware – This server – Memory : 30.0MB of free memory – Hard Disk space : 50.0MB NEC ESMPRO Agent Software (Windows) – Operating System : Windows Server 2003 R2 Windows Server 2003 R2 x64 Editions Windows Server 2003 Windows Server 2003 x64 Editions Windows XP Windows 2000 – Communications Protocol : TCP/IP (comes standard with respective OS) – SNMP installed with a community defined 3 4 Introducing NEC ESMPRO INSTALLATION Install the NEC ESMPRO Agent software first. Doing so allows you to run the Autodiscover function to collect NEC ESMPRO data as soon as the NEC ESMPRO Manager software is up and running. If you add an NEC ESMPRO Agent after installing the NEC ESMPRO Manager software, you can rerun Autodiscover or add the NEC ESMPRO Agent manually for proper monitoring. For installation procedures, go to Chapter 2, Installing the NEC ESMPRO Agent. Chapter 2 Installing the NEC ESMPRO Agent Installing the NEC ESMPRO Agent software in Windows systems involves the following procedures: – Ensuring that the TCP/IP protocol and SNMP services are running. – Configuring the SNMP Agent for NEC ESMPRO, including defining a community in SNMP and specifying the Manager IP address. – Installing System update. – Installing the NEC ESMPRO Agent software on each server you want to monitor. NOTE: Install the NEC ESMPRO Agent software on the servers before installing the NEC ESMPRO Manager software. This makes setup easier since it allows the NEC ESMPRO Manager to detect NEC ESMPRO Agents that is installed and running. INSTRUCTIONS Follow these steps to install the NEC ESMPRO Agent software on each remote server you want to monitor. Verify that TCP/IP is running on the system as follows: 1. Press the "Start" button, highlight "Settings", and select "Control Panel". 2. Double click on the "Network Connections" icon. 3. Double click on "Local Area Connection". 4. Click on "Properties". 5. Look at the components checked in "This connection uses the following items:" Verify that TCP/IP is installed. Verify that SNMP is running on the system as follows: 1. Press the "Start" button, highlight "Settings", and select "Control Panel". 2. Double click on the "Administrative Tools" icon. 3. Double click on the "Services" icon. 4. Look at the service list. Verify that SNMP Services is installed. 6 Installing the NEC ESMPRO Agent If TCP/IP and SNMP Service are installed, go to the next section, "Installing the NEC ESMPRO Agent Software". If they are not installed, continue as follows. Installing TCP/IP Protocol a) Press the "Start" button, highlight "Settings", and select "Control Panel". b) Double click on the "Network Connections" icon. c) Double click on the "Local Area Connection". d) Click on "Properties". e) Click on "Install". f) From the "Select Network Component Type" dialog box choose "Protocol" and press "Add…". g) From the "Select Network Protocol" dialog box choose "Internet Protocol [TCP/IP]" and press "OK". h) Highlight "Internet Protocol [TCP/IP]" in the "This connection uses the following items:" and click on "Properties". Set the following TCP/IP configuration parameters in "General" tab: – IP address – Subnet mask – Default gateway, if needed NOTE: Do not check "Obtain an IP address automatically" on the IP Address page since the NEC ESMPRO Manager already contains the Agent's IP address. Be careful that IP addresses and host names in the same network do not overlap. Installing SNMP Service a) Press the "Start" button, highlight "Settings", and select "Control Panel". b) Double click on the "Add or Remove Programs" icon. c) Click on the "Add/Remove Windows Components" button. d) From the "Windows Components Wizard", choose "Management and Monitoring Tools" and click the "Details…" button. e) Check the "Simple Network Management Protocol" check box, and click the "OK" button. f) Click the "Next" button. Installing the NEC ESMPRO Agent 7 Configuring of SNMP Service a) Press the "Start" button, highlight "Settings", and select "Control Panel". b) Double click on the "Administrative Tools" icon. c) Double click on the "Services" icon. d) Highlight "SNMP Service", select "Properties" from the "Action" menu. Set the following SNMP configuration parameters in the "Traps" page: – Community Name – Trap Destinations e) Set the following SNMP configuration parameters in the "Security" page: – Accepted community names – Accept SNMP packets from any host NOTE: When "Accept SNMP packets from these hosts" is checked on the "Security" page, please add the loop back IP address (127.0.0.1) in addition to the hosts to be added. When setting "Rights" of the "Accepted community names", please select "READ_WRITE" or "READ_CREATE". The NEC ESMPRO Agent needs to communicate with SNMP service through the loop back IP address locally. 8 Installing the NEC ESMPRO Agent NOTE: Setup of Firewall When the setting of the firewall is effective, port (161/UDP) that SNMP uses is blocked. In this case, because NEC ESMPRO Agent cannot communicate with NEC ESMPRO Manager, the server cannot be monitored from NEC ESMPRO Manager. Please open the port according to the following procedures. Windows XP / Server 2003 (Service Pack installed) 1. Click Start, point to Settings, click Control Panel, and then doubleclick Windows Firewall. 2. In the Windows Firewall dialog box, click the Add Port on Exceptions tab. In the Add a Port dialog box, set the values as follows, and then click OK. Name Port number Select 3. : snmp : 161 : UDP Close the Windows Firewall dialog box. Installing the NEC ESMPRO Agent 9 NOTE: Setup of Firewall Windows Server 2003 (Service Pack not installed) 1. Click Start, point to Settings, click Control Panel, and then doubleclick Network Connections. 2. Right-click the connection that you want, and then click Properties. 3. Click the Advanced tab, and then click Settings. 4. Click the Service tab, and then click Add. In the Service Settings dialog box, set the values as follows, and then click OK. Description of service : snmp Name or IP address of the computer hosting this service on your network : Name or IP address of the computer External Port number for this service : 161 Select : UDP 5. Close the Network Connections window. On Windows systems, the NEC ESMPRO Agent needs the necras.sys driver. To install the necras.sys, run the System update from EXPRESSBUILDER CD-ROM. 10 Installing the NEC ESMPRO Agent INSTALLING THE NEC ESMPRO AGENT SOFTWARE To install the NEC ESMPRO Agent software, you need to know the hardware model and the destination directory for NEC ESMPRO Agent software. 1. Insert the EXPRESSBUILDER CD into the CD-ROM drive. 2. Click on [Setup] on the EXPRESSBUILDER Master Control Menu, and select [NEC ESMPRO] from the pop-up menu appeared. NEC ESMPRO Setup will be displayed. 3. Click on [Agent]. 4. Enter the requested information when prompted. A progress gauge displays the names of the files being loaded and the percentage of completed installation. IP Address Confirmation If you have a problem with installation, confirm that cabling is connected correctly. Also verify that IP addresses are set up correctly as follows. 1. Press the "Start" button, highlight "Programs", "Accessories" and "Command Prompt". 2. Enter the following command, where xxx.xxx.xx.x is the system IP address. ping xxx.xxx.xx.x If TCP/IP is set up correctly, your screen will display four lines similar to the following. Reply from xxx.xxx.xx.x: bytes=32 time<10ms TTL=32 Reply from xxx.xxx.xx.x: bytes=32 time<10ms TTL=32 Reply from xxx.xxx.xx.x: bytes=32 time<10ms TTL=32 Reply from xxx.xxx.xx.x: bytes=32 time<10ms TTL=32 If TCP/IP is not set up correctly, your screen will display four lines similar to the following. Request timed out. Request timed out. Request timed out. Request timed out. If your system displays an invalid destination message, check cabling and the IP address assigned before continuing. Chapter 3 Using the NEC ESMPRO Agent The NEC ESMPRO Agent software tracks and manages the status of server components and resources at specified intervals. If an error or abnormality occurs, the NEC ESMPRO Agent notifies the NEC ESMPRO Manager of the failure. When the NEC ESMPRO Manager requests administrative data, the NEC ESMPRO Agent immediately transmits the information, allowing the NEC ESMPRO Manager to monitor the real-time server status. Some NEC ESMPRO Agent operation parameters can also be set or changed from the NEC ESMPRO Manager. The NEC ESMPRO Agent records server failures in various logs that are useful for troubleshooting and determining an appropriate means of recovery. You can assign threshold values to some monitored components. The NEC ESMPRO Agent periodically analyzes the component information according to the threshold values. This helps prevent server damage by fatal errors. Not all NEC ESMPRO Agent functions are available on all system models. ACCESSING NEC ESMPRO AGENT SETTINGS Through the NEC ESMPRO Agent, you can establish monitoring cycles and times. To access NEC ESMPRO Agent controls, double click on the NEC ESMPRO Agent icon in the Control Panel which was added during installation. A window similar to the proceeding appears. 12 Using the NEC ESMPRO Agent From the General tab you can set the following information: SNMP Setting – "Enable the NEC ESMPRO Manager to modify SNMP Setting" indicates whether the NEC ESMPRO Manager can modify server operation parameters via SNMP. A check enables NEC ESMPRO Manager modifications; no check disables NEC ESMPRO Manager modifications. – Permit Remote Shutdown/Reboot specifies whether the NEC ESMPRO Manager can perform a remote Shutdown or Reboot. A check gives the NEC ESMPRO Manager permission; no check denies the NEC ESMPRO Manager permission. NOTE: This field is inactive when Enable the NEC ESMPRO Manager is not checked. – SNMP Community is the SNMP community name to which you belong. Enable DMI function ⎯ indicates whether the NEC ESMPRO Manager can modify or view server operation parameters via DMI. A check enables DMI function; no check disables DMI function. Report Setting ⎯ Displays the Alert Manager. To change Alert Manager settings, see NEC ESMPRO AlertManager User's Guide. Storage Setting ⎯ Displays the "Storage" used to change setting of storage monitoring. Rack mount – Name: specifies the name of the rack mount system. The Operation Window will create a RackMount map by autodiscovering. Chassis Identify – To start the "chassis identify" function (lamp, beep….), click the [Identify Now] button. When you click the [Stop Identify] button, the "chassis identify" function is stopped. When you close the NEC ESMPRO Agent applet, the "chassis identify" function is automatically stopped. Using the NEC ESMPRO Agent 13 From the System tab you can set the following information: Monitor the memory dump settings To enable the memory dump settings monitoring function, check the box. Monitoring Disk Expansion – Enable Monitoring - To enable the Disk Expansion Unit monitoring function, check the box. – Sample Interval - Adjusts the Disk Expansion Unit monitoring cycle. 14 Using the NEC ESMPRO Agent From the CPU tab you can set the following information: Sample Interval ⎯ Adjusts the CPU load monitoring cycle. Sample Interval can be set to 1, 2, 3, 4, 5, 6, 10, 12, 15, 20, 30, or 60 seconds. Utilization Rate ⎯ Adjusts the CPU load monitoring utilization rate. Utilization Rate can be set to load for 1 min, 5 min, 30 min, 1 hour, 1 day, or 1 week. Thresholds ⎯ Set the CPU load monitoring thresholds (%) for fatal and warning alerts in the Report and Reset fields. – CPU: Select the appropriate button for individual or total CPU load and set the monitoring thresholds in the Thresholds section. – Enable thresholds: When checked, thresholds settings for the CPU load are active. – Fatal: The Report field specifies the high CPU load limit that generates a fatal alert. The Fatal alert is reset when the CPU load falls below the threshold in the Reset field. – Warning: This is similar to the Fatal fields, except a warning alert is generated or reset. When the CPU load exceeds the amount in the Report field, a Warning alert is generated. The Warning alert is reset when the CPU load falls below the threshold in the Reset field. From the LAN tab you can set the following information: Enable threshold ⎯ Specify the LAN monitoring function. Sample Interval ⎯ Adjusts the LAN monitoring cycle. Network hardware error percentage ⎯ Percentage of network hardware errors per monitoring cycle. Please check that the network cables are tightly connected and the HUB power switch is on. Using the NEC ESMPRO Agent 15 Network Hardware errors: – Alignment Errors: Broken packets for collision – FCS Errors: Broken packets for collision – Carrier Sense Errors: Cable disconnected, Cable defect, or Transceiver defect. Transmission retry percentage ⎯ Percentage of collision errors of total transmitted packets per monitoring cycle. There is a possibility that network traffic to this server is extremely heavy. Please reduce the network traffic to this server. Otherwise the network device may have defects. Transmission about percentage ⎯ Percentage of packets disposed due to excess collisions errors, etc. per monitoring cycle. There is a possibility that network traffic to this sever is extremely heavy. Please reduce the network traffic to this server. Otherwise the network device may have defects. From the HW eventlog tab you can set the following information: Sample Interval ⎯ HW eventlog monitoring cycle. The range is 1 to 9999 seconds. 16 Using the NEC ESMPRO Agent From the ESRAS tab you can set the following information: Off-line Maintenance Utility Settings – Start after a fault occurs - Starts the utility at reboot after a fault occurs. – Start Immediately - Specifies shutdown-reboot immediately and start the utility Using the NEC ESMPRO Agent 17 From the WDT tab you can set the following information: – Monitor System Hangs - To enable the hang monitoring function by Watch-dog timer, check the box. – Timeout - Specify the Watch-dog timer timeout. – Interval - Specify the Watch-dog timer reset interval. The interval ranges from a fifth of the Timerout to the Timeout. – Action at timeout - Specify the action at timeout. – Action after timeout - Specify the action after timeout. From the Shutdown tab you can set the following information: – Monitor System Hangs - To enable the shutdown hang monitoring function by Watchdog timer, check the box. – Timeout - Specify the Watch-dog timer timeout. – Action at timeout - Specify the action at timeout. – Action after timeout - Specify the action after timeout. 18 Using the NEC ESMPRO Agent From the SAF-TE tab you can set the following information: Sample Interval ⎯ SAF-TE monitoring cycle. The range is 1 to 3600 seconds. It's for monitoring temperature, power units, or chassis covers on a SAF-TE instrumented system. This function is automatically enabled only on a SAF-TE instrumented system. From the Blade Server tab you can set the following information: Enable report ⎯ To enable the reporting of the event about chassis sensors (Fan/PowerSupply), check the box. Using the NEC ESMPRO Agent 19 ACCESSING STORAGE SETTINGS To access storage monitoring control, click the [Storage Setting] button on General tab in NEC ESMPRO Agent Properties. A window similar to the following appears. From Polling Frequency tab you can change sampling interval of Storage Monitoring Service and File System Monitoring Service. Service List ⎯ Select a service to change sampling interval. NOTE: Only services that have been started are shown. Sample Interval ⎯ Shows current sampling interval (unit: second). If you want to change the sampling interval, set new value. You can also set the value within a range. Default button ⎯ Set default sampling interval value. 20 Using the NEC ESMPRO Agent From Free Space tab you can change threshold of free block monitoring. File System List ⎯ Select a file system to change threshold and/or monitoring mode. NOTE: You cannot select the following file systems: - network drives - on the removable drive - not assigned drive letter Capacity ⎯ Shows the capacity of the file system. Warning ⎯ Shows warning threshold. In case you want to change threshold, set new threshold value. You can refer also to the Enable range of threshold option on the Default tab. Fatal ⎯ Shows fatal threshold. In case you want to change threshold, set new threshold value. Please also see "The enable range of threshold" described below. – The enable range of threshold You can set the warning and fatal thresholds in the following order. 0(MB) < "Fatal" threshold <= "Warning" threshold < the capacity of file system (MB) Default button Set default threshold values to warning and fatal thresholds. – Default values Warning: 10 percent of the capacity Fatal: 1 percent of the capacity Using the NEC ESMPRO Agent 21 – How to monitor the free block by one level You can use only one level threshold. If the fatal threshold and warning threshold is equal, NEC ESMPRO Agent monitors at single level. In this case, the monitoring level is "Fatal" (no warning level). From Reset tab you can reset status of exchanged hard disk. Hard Disk List ⎯ Select a hard disk that needs to be reset. Reset button ⎯ Reset the status information of hard disk selected in "Hard Disk List". NEC ESMPRO Agent resets status information of hard disk as soon as you click the [Reset] button. 22 Using the NEC ESMPRO Agent From the HD Pre-failure tab you can change the mode of the hard disk pre-failure prediction function. Object List ⎯ Select the type of object. If you want to select the hard disk connected SCSI and/or IDE controller, select "Hard Disk." Enable Pre-failure Prediction ⎯ Select mode of the hard disk pre-failure prediction. In case you want to monitor the hard disk pre-failure prediction, turn on the check box. Turn off the check box if you do not want to monitor the hard disk pre-failure prediction. NOTE: The hard disk pre-failure prediction is necessary to guarantee system availability. – Hard disk pre-failure prediction NEC ESMPRO supports “Hard disk pre-failure prediction” using Self-Monitoring, Analysis and Reporting Technology (SMART). SMART is a function that allows a hard disk to monitor several items by itself. A hard disk gives alarm to NEC ESMPRO, when the hard disk itself predicts a potential serious problem. Using the NEC ESMPRO Agent 23 INFORMATION COLLECTION The NEC ESMPRO Agent periodically monitors and collects the status of server components and resources and passes this administrative data to the NEC ESMPRO Manager when requested. The NEC ESMPRO Agent collects and manages three types of information: Static information — Static information such as product and system name is defined during NEC ESMPRO Agent installation and never changes. This data is only collected when the NEC ESMPRO Manager requests it. Dynamic information — Dynamic information changes during system operation. This type of information includes the rate of CPU load, memory usage, and temperature of the server. The NEC ESMPRO Agent periodically checks the current state of the monitored components and collects the data. The NEC ESMPRO Agent then sends the latest information to the NEC ESMPRO Manager when requested. Monitoring and collection cycles for dynamic information are determined by a sampling interval timer set in the NEC ESMPRO Agent. Status information — Status information includes the operating state of the server components and the states of the system, storage, network, and expansion boards. The status can be one of the following: – Normal - The device is functioning within an acceptable operating range. – Warning - A device problem has caused a Warning (or minor) alert. Check the Alert Log and Error Log to determine the problem. – Fatal - A device problem has caused a Fatal (or major) alert. Check the Alert Log and Error Log to determine the problem. – Unknown - The NEC ESMPRO Agent cannot determine the current operating state of the server. The NEC ESMPRO Agent manages and assigns status information in a hierarchy. The hierarchy lets the NEC ESMPRO Manager quickly identify the overall status of the server and determine faulty locations quickly and precisely. The NEC ESMPRO Agent monitors and collects status information using a sampling interval timer. 24 Using the NEC ESMPRO Agent NEC ESMPRO AGENT SERVICES The NEC ESMPRO Agent offers the following services. The NEC ESMPRO Common Monitoring Service tracks the status of the system board, CPU boards, and server environment. The NEC ESMPRO System Management Service tracks the status of the system board, CPU boards, and server environment The NEC ESMPRO Storage Monitoring Service and the NEC ESMPRO File System Monitoring Service track the File System as well as the status of hard disks. The NEC ESMPRO Disk Array Service tracks the status of disk array controller and hard disks connected it. This service supports LSILogic MegaRAID and Promise Fasttrak SX4/SX4100, Promise SuperTrak EX8350/EX4350. NOTE: To use this function, please install disk array management utility to your system. LSILogic MegaRAID : Power Console Plus Promise Fasttrak SX4 : Promise Array Manager(PAM) Promise Fasttrak SX4100 : Web-Based Promise Array Manager(WebPAM) Promise Supertrak EX8350/EX4350 : Web-Based Promise Array Manager(WebPAM) The NEC ESMPRO LAN Monitoring Service tracks the status of the network (LAN) to which the server and the LAN controllers are connected. Alert Manager, Alert Manager Main Service, Alert Manager Socket Send Service manage the alerts occurring on the server. They notify the NEC ESMPRO Manager of the alerts using SNMP or TCP/IP, Mail, Pager, pop up message, or other method. They also record alert messages in the Windows event log. SNMP service The NEC ESMPRO Agent has its own MIB enhancement to the standard Windows SNMP service to implement information management. The NEC ESMPRO S/W Power Switch Service detects power switch off signal and then executes shutdown before having a server powered off. This service is not available for all server models since it depends on H/W capability to enable S/W to control power off. Logging Various hardware and software components of the server monitor the status of resources and record errors in log files such as the event log which is a standard feature in Windows. The NEC ESMPRO Agent references these logs and passes information to the NEC ESMPRO Manager, mail, pager, or other device. The contents of the event log can be viewed using the event viewer (also a standard feature of Windows system). Appendix A Note 1. About using [Hardware Management] on Windows Server 2003 R2 If you use "Hardware Management" provided by Windows Server 2003 R2, please use it according to the guidance. The guidance is published in the following URL. http://www.nec.co.jp/express/download/W2K3_R2 2. Information displayed in "Resource" of SCSI controller when x64 Edition OS is used When using x64 Edition OS, incorrect information may appear in [Resource] window from [SCSI Controller] of DataViewer. In such case, check the information of resource using "Device Manager" and "System Information(winmsd.exe)" of OS. 3. Install/uninstall ESMPRO Agent with the default Local Security Policy InstallShield may generate errors in Windows Server 2003 installation/uninstallation if Local Security Policy is changed from the default. 4. during SNMP community name When you change the community name accepting SNMP packets from "*" to any specific one, you need to register the community name to the SNMP community setting in the General tab of NEC ESMPRO Agent Control Panel. NEC ESMPRO Agent needs to communicate locally with SNMP service with the community name registered. 5. Event Log setting for event log monitoring AlertManager has a function to transfer an event log reported in the NT Event Log as an NEC ESMPRO alert. For this function to work, "Overwrite events as needed" in the NT Event Log settings dialog of Event Viewer needs to be selected. Otherwise, the function doesn't work. 26 Note 6. Affect on Disk administration When NEC ESMPRO Agent is running on the system, it's not possible to do the following operations. Format or remove a partition by NT Disk Administrator. Eject the removable media like MO, Zip, PD or DVD-RAM by means of software. In such a case, please take the following steps: – Stop ESMCommonService from the 'Service' dialog in the Control Panel. – Format or remove the partition with an appropriate tool such as 'format' command or eject the media. – Start ESMCommonService from the 'Service' dialog in the Control Panel. 7. Coexistence with SQL Server CPU utilization rate of NEC ESMPRO Agent may rise relatively higher on a system where Microsoft SQL Server6.5 runs with the SQL option, 'SQL perfmon integration', checked. It's strongly recommended that you do not check the option unless you have a special purpose to monitor the SQL performance. 8. On using NEC ESMPRO Agent on RackMount type Please set RackMount Name when you use NEC ESMPRO Agent on RackMount type chassis. Otherwise, the Operation Window will not create a RackMount map by autodiscovering. 9. Hard disk exchange If other systems use Hard disks used by the system by which NEC ESMPRO Agent Ver4.0 or later is installed, "Hard disk Pre-failure Prediction" function may not work correctly. Please do not connect such Hard disks to other systems. 10. Changing setting of storage monitoring The following setting will not take effect until one (old) monitoring interval cycle of each monitoring service passes after changes are made to setting. – sampling interval (Polling Frequency tab of storage setting) – reset (Reset tab of storage setting and Reset button on Hard Disk General view in Data Viewer) – hard disk pre-failure prediction mode (HD Pre-failure tab of storage setting) – thresholds of free block monitoring (Free Space tab of storage setting and threshold button on File System General view in Data Viewer) 11. Changing mode of hard disk pre-failure prediction Turning on/off the mode of hard disk pre-failure prediction, all hard disks work in the same mode in either case. You can not set the mode of each hard disk individually. Note 12. 27 Using IDE Mirroring Controller (Promise Fasttrak100/100LP) NEC ESMPRO manages IDE Mirroring Controller (Promise Fasttrak100/100LP) in a similar way as it manages SCSI and IDE devices except for the following points: – DataViewer All hard disk drives connected with disk mirroring controller are displayed on data viewer as one logical disk drive instead of displaying each hard disk drive. Also, disk mirroring controller is not displayed on DataViewer as "Disk Array". It is displayed as "SCSI Controller". – Pre-Failure function of hard disk drive The pre-failure function doesn't make any check on hard disk drives connected with disk mirroring controller. 13. Application log registered when system starting About the event of Perflib When system starting, Perflib log is registered to the application log. The detailed information about an event log described on Microsoft Product Support Services. Please check the contents. [INFO] Events for Performance Monitor Extensions http://support.microsoft.com/default.aspx?scid=kb;en-us;226494 Application Log Events Generated When You Start Performance Counter Query http://support.microsoft.com/default.aspx?scid=kb;EN-US;296187 Event ID 2003 Warning Message Logged When Loading Performance Counters http://support.microsoft.com/default.aspx?scid=kb;EN-US;267831 14. Coexistence with the Oracle products The installation of the Oracle products may change Startup Type of SNMP Service into "Manual". If so, return the setting to "Automatic" and set up correctly according to the description of the Oracle product. 15. About "NEC ESMPRO Agent ESMDiskArray" "NEC ESMPRO Agent ESMDiskArray" is installed also in the system in which a disk array controller does not exist, and adds [NEC ESMPRO Agent ESMDiskArray] to the [Start] menu. (Monitoring is not performed while the status of service "ESMDiskArray" is "Started.") In this case, please do not use the "NEC ESMPRO Agent ESMDiskArray Console" which performs of monitoring interval and maintenance of "NEC ESMPRO Agent ESMDiskArray". (When click a [Start] menu, [NEC ESMPRO Agent ESMDiskArray], and a [Console], the console displays the message which shows that the disk array controller for a monitor does not exist.) 28 Note 16. Monitoring LAN via IEEE1394 interface If you connect an IEEE1394 network adapter and an IEEE1394 network adapter on another equipment, NEC ESMPRO Agent could not monitor LAN activity. IEEE1394 connection Server 17. Server Uninstallation of NEC ESMPRO Agent It sometimes fail if uninstallation is executed immediately after the system start. Please try the uninstallation again after a while if any error message is displayed. One file named "AMIRTUpt.dll" might remain in the folder at the installation destination. In that case, please delete it manually. (But, please do NOT delete any file when any other files also remain.) 18. Ports used by NEC ESMPRO Manager and Agent NEC ESMPRO Manager and Agent use the following ports. If a firewall is placed between Manager and Agent, or if Windows Firewall is enabled, open the following ports. Between Manager and Agent Function Manager (Port) Direction Agent (Port) Protocol Remarks Operation Window (Autodiscovery) - → - icmp icmp 161 UDP snmp Undetermined UDP snmp-trap Undetermined TCP - ← Operation Window (Server Status Polling) / DataViewer / Server Down Detection Undetermined Report to Manager (SNMP) 162 → ← → ← Report to Manager (TCP/IP In-Band) Report to Manager (TCP/IP Out-of-Band) 31134 → ← – The upper direction shows the direction at start-up, and the lower shows the return. Note 29 – Change both Agent and Manager settings when you change the port number for the Report to Manager(TCP/IP In-Band). The setting method is as follows. <Agent> a) Click the “Setting” - “Destination Setting” menu on Alert Manager, then you can see Destination Setting dialog showed. b) Select the “TCP/IP In-Band” and Click the “Modify ID” button on Destination Setting dialog, then you can see ID Setting dialog showed. c) Click the “Address” button on ID Setting dialog, then you can see Manager(TCP/IP In-Band) Setting dialog showed. d) Set the port number to “Port Number” on Manager(TCP/IP In-Band) Setting dialog. <Manager> a) Click the “Setting” - “Base Setting” menu on Alert Manager, then you can see Base Setting dialog showed. b) Select the “Receive from Agent(TCP/IP)” and Click the “Configure” button on Base Setting dialog, then you can see Receive from Agent(TCP/IP) setting dialog showed. c) Set the port number to “Port Number” on Receive from Agent(TCP/IP) Setting dialog. – Change both Agent and Manager settings when you change the port number for the Report to Manager(TCP/IP Out-of-Band). <Agent> a) Click the “Setting” - “Destination Setting” menu on Alert Manager, then you can see Destination Setting dialog showed. b) Select the “TCP/IP Out-of-Band” and Click the “Modify ID” button on Destination Setting dialog, then you can see ID Setting dialog showed. c) Click the “Address” button on ID Setting dialog, then you can see Manager(TCP/IP Out-of-Band) Setting dialog showed. d) Set the port number to “Port Number” on Manager(TCP/IP Out-of-Band) Setting dialog. <Manager> a) Click the “Setting” - “Base Setting” menu on Alert Manager, then you can see Base Setting dialog showed. b) Select the “Receive from Agent(TCP/IP)” and Click the “Configure” button on Base Setting dialog, then you can see Receive from Agent(TCP/IP) setting dialog showed. c) Set the port number to “Port Number” on Receive from Agent(TCP/IP) Setting dialog. – "Undetermined" means that the unoccupied port at the communication start-up will be selected. 30 Note Between Manager and Manager Function Manager (Port) Direction Manager (Port) Protocol Remarks Inter-Manager Communication Undetermined → 8806 TCP - ← – The port number can be changed in the Remote Manager dialog by selecting Operation Window menu [Option] → [Customize] → [Remote Manager]. – "Undetermined" means that the unoccupied port at the communication start-up will be selected. Between Manager and Manager Function Manager(Port) or Agent(Port) Direction Mail Server(Port) Protocol Remarks Internet Mail Undetermined → 25 TCP smtp ← – The port number for the Internet Mail can be changed by following. a) Click the “Setting” - “Base Setting” menu on Alert Manager, then you can see Base Setting dialog showed. b) Select the “Internet Mail” and Click the “Configure” button on Base Setting dialog, then you can see Internet Mail setting dialog showed. c) Set the port number to “SMTP Port number” on Internet Mail Setting dialog. – Undetermined means that the unoccupied port at the communication start-up will be selected.