1
Cajun™ P550R®/P580/P880/P882
Switch Release Notes v5.2.2
Overview
These release notes support the Cajun switch software version
5.2.2 (v5.2.2) for the Cajun P550R, P580, P880, and P882 switches.
Release notes are periodically updated with pertinent information.
For detailed information about your product, refer to the basic set
of user documentation.
You can download software and access the latest release notes and
other documentation at:
http://www.avayanetwork.com/
These release notes cover the following topics:
610-0184-095
■
New Hardware and Software Features on page 2
■
Supported Product Binaries and Boot Codes on page 4
■
Queue Classification and Servicing Features on page 4
■
Enabling Option 82 for DHCP on page 12
■
Enabling Traps for Unknown Source Addresses on page 14
■
Enhancements on page 17
■
Changed CLI Commands on page 17
■
Corrected Problems on page 17
■
Known Problems and Workarounds on page 18
■
Functional Restrictions on page 28
■
Documentation Updates and Corrections on page 33
■
Technical Support on page 34
June 14, 2001
1
New Hardware and Software Features
Version 5.2.2 provides support for the following new hardware
software features.
Hardware
■
80-series, 48-port, 10/100 Ethernet Module with Telco
connectors (M8048R-100TC)
■
48-volt power supply for the P580
Software Features
Support for:
■
The following Queue Classification and Queue Servicing
features:
—
Classification of switch port traffic.
—
Classification of layer 2 tagging.
—
Classification of layer 3 traffic (by means of an access
control list).
—
Queue servicing by means of weighted fair queueing
(WFQ).
For more information about the Queue Classification and
Queue Servicing features that are implemented in this
release, see "Queue Classification and Servicing Features" on
page 4.
■
Port mirroring on 80-series modules in fabric mode 2. This
feature makes it possible for you to:
—
Monitor traffic that is received and transmitted from a
port.
—
Use of up to four monitor (sink) channels for monitoring
traffic.
For more information about the port mirroring on 80-series
module feature that is implemented in v5.2.2, see "Queue
Classification and Servicing Features" on page 4.
2
June 14, 2001
610-0184-095
■
Relay Agent Information option (option 82) for Dynamic
Host Configuration Protocol (DHCP). When forwarding
client-originated DHCP packets to a DHCP server, the Cajun
switch inserts this option, which contains information about
the switch. The DHCP server uses this information to
authenticate the client.
For information on how to enable option 82, see "Enabling
Option 82 for DHCP" on page 12 of this document.
■
Enhancement of the MAC Address Lock feature. This feature
has been available in all previous releases. If a source MAC
address is locked at a port (statically configured), a frame
with that source MAC will be filtered if received on any other
port on the same VLAN. With the enhancement, the feature
immediately generates traps to identify all unknown source
addresses. If, after sending a trap for an unknown source, the
switch continues to receive traffic from the source, the
feature generates a trap every 30 minutes until the traffic
stops.
* Note: You can set the trap timer within a range of 60 to
1800 seconds (default) in one second intervals.
For information on how to enable the MAC Address Lock
feature and traps for unknown source addresses, see
"Enabling Traps for Unknown Source Addresses" on page 14
of this document.
■
610-0184-095
Load MIB for the ATM Uplink module, v1.1. This feature
makes it possible for you to use SNMP commands to:
—
Upload the startup configuration file of the ATM Uplink
module to a TFTP server
—
Download the startup configuration file from a TFTP
server to the ATM Uplink module.
—
Download a software image to the ATM Uplink module.
June 14, 2001
3
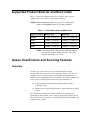
Supported Product Binaries and Boot Codes
Table 1 shows the product binary files and boot codes that are
supported by v5.2.2 of the Cajun switch software.
* Note: Before downloading and running v5.2.2, remove port
mirrors with piggyback ports on 80-series modules.
Table 1. v5.2.2 Product Binary and Boot Files
Type of Switch
Binary File
Boot File
P550R
m5500r_v5.02.02.bin
m550boot_v5.00.01.bin
P580
m8000r_v5.02.02.bin
m8000boot_v5.00.01.bin
P880
m8800_v5.02.02.bin
m880boot_v5.00.01.bin
P882
m8000r_v5.02.02.bin
m8000boot_v5.00.01.bin
* Note: The m8000r binary files run the supervisor module
on both the P580 and P882 switches. These files
replace the m8820_vx.x.x files.
Queue Classification and Servicing Features
Overview
Version v5.2.2 contains Queue Classification and Servicing
functionality that you can activate from the switch’s CLI. You can
configure Queue Classification and Servicing functionality for a
module, or for individual ports on a module. The main components
of the Queue Classification and Servicing functionality are:
■
A hierarchical classification mechanism that classifies
incoming traffic
■
Priority queues through which the switch forwards classified
traffic.
The switch first classifies the traffic and then, based upon the
classification of the traffic, stores it in the appropriate priority queue.
The switch services the queues according to the WFQ algorithm and
assigns queue weights.
4
June 14, 2001
610-0184-095
Classification of Traffic
You can classify traffic by:
■
802.1p tag priority (default)
■
Physical source port
■
IP characteristics of the frame (source address, destination
address, and so forth)
Frames are classified into eight priorities, or classes, ranging in
number from 0 to 7. By default, the switch uses the priority from
the 802.1p tag field, if present, to assign a priority to a frame.
You can alternately set each physical port with a priority that ranges
from 0 to 7. The switch then replaces the default 802.1p tag priority
with the port priority as the priority of the frame.
You can, as a third alternative, set classification to be performed by
the IP characteristics of packets, instead of 802.1 tag priority or port
priority. To classify frames by their IP characteristics, you set a rule
in an access control list (ACL). The rule can set a priority for traffic
with a specific IP source address or with a specific combination of IP
source address, IP destination address, IP protocol, TCP source port,
and TCP destination port.
The priority of a rule in an ACL takes precedence over all other
priorities in Queue Classification and Servicing classification.
Because of this precedence, the switch determines whether a rule in
an ACL exists for an IP frame in the final stage of classification. If a
rule does exist, the priority associated with the rule replaces the
current priority of the frame.
The switch then forwards the frames to the appropriate priority
queue based upon the priority that is assigned to the frames.
610-0184-095
June 14, 2001
5
WFQ Queue-Servicing Algorithm
You can configure the WFQ service policy. The WFQ policy
implemented in the Cajun II Queue Classification and Servicing
sub-system is a variation of the textbook WFQ algorithm. In Cajun II
WFQ, each queue is assigned a weight increment. The weight
increment never varies; however, each queue also maintains an
accumulated weight, which is updated after each queue service
cycle. Queues are serviced based upon their relative accumulated
weights. In each queue service cycle, only the queue with the
highest accumulated weight is serviced. If there is a tie, the queue
with the highest priority (0 – 7 highest) is serviced first. After each
queue service cycle, the accumulated weight for the queue that is
serviced is reset to the value of its weight increment, and the
accumulated weight for the other queues is increased by their
respective weight increments.
When you set a port for WFQ, the switch services priority queues
according to their assigned weight. The queue with the highest
weight is serviced first.
There are two levels to the WFQ command. The first level specifies
the modules/ports to be configured. The second level specifies the
queue weights.
Port Mirroring on 80-Series Modules
The port mirroring on 80-series modules that is implemented in
v5.2.2 provides the ability for the 80-series modules to monitor
traffic that a port transmits and receives. Four channels are provided
for monitoring traffic, so you can monitor four different ports or
port ranges simultaneously.
* Note: Your switch must be in fabric mode 2 to perform 80-series
port mirroring.
You can configure port mirroring on 80-series modules by using
either the command-line interface (CLI) or the Web Agent.
6
June 14, 2001
610-0184-095
Configuring Port Mirroring By Using the CLI
Use the following CLI commands to configure port mirroring on 80series modules. You must be in Global Configuration command
mode to enter these commands.
* Note: For information on how to enter Global Configuration
command mode, see “Accessing/Exiting the Command
Modes” in chapter 1 of Cajun P550R/P880/P882 Command
Reference Guide.
Setting Up Port
Mirroring
To set up port mirroring, use the following CLI command:
>(config)# set port mirror fabric_mode2
source-port <mod-port-range> mirror-port
<mod-port-spec> channel <channel> direction
{tx | rx | both} sampling {always | disable |
periodic} [max-packets=sec <max-packets-secvalue>]
where:
■
<mod-port-range> is either the single port or the range of
ports that you want to mirror.
See Table 2 on page 8 for the specific port ranges that you can
mirror.
610-0184-095
June 14, 2001
7
Table 2. Port Ranges for 80-Series Port Mirroring
Module
4-port gigabit modules
Port ranges that you can mirror
• 1–2
• 3–4
• Any single port
You can mirror any four single
ports simultaneously (one port per
channel). However you cannot
mirror a port range and a single
port within that range
simultaneously.
Example: You can mirror port 1
on channel 1, port 2 on channel 2,
and port 3 on channel 3
simultaneously. However, you
cannot mirror ports 1 through 2 on
channel 1 and port 2 on channel 2
simultaneously.
8-port gigabit modules
• 1–4
• 5–8
• Any single port
You can mirror any four single
ports simultaneously (one port per
channel). However you cannot
mirror a port range and a single
port within that range
simultaneously.
Example: You can mirror port 1
on channel 1, port 2 on channel 2,
and port 3 on channel 3
simultaneously. However, you
cannot mirror ports 1 through 4 on
channel 1 and port 2 on channel 2
simultaneously.
8
June 14, 2001
610-0184-095
Table 2. Port Ranges for 80-Series Port Mirroring
Module
24-port 10/100 modules
Port ranges that you can mirror
• 1–12 — any 1 port or the
entire range.
• 13–24 — any 1 port or the
entire range.
If you mirror a single port, you can
mirror only 1 port per range at a
time.
Example: You can mirror port 1
on channel 1 and port 13 on
channel 2 simultaneously.
However, you cannot mirror port 1
on channel 1 and port 2 on
channel 2 simultaneously.
48-port 10/100 modules
• 1–12 — any 1 port or the
entire range.
• 13–24 — any 1 port or the
entire range.
• 25–36 — any 1 port or the
entire range.
• 36–48 — any 1 port or the
entire range.
If you mirror a single port, you can
mirror only 1 port per range at a
time.
Example: You can mirror port 1
on channel 1 and port 13 on
channel 2 simultaneously.
However, you cannot mirror port 1
on channel 1 and port 2 on
channel 2 simultaneously.
* Note: You cannot mirror transmit traffic of multiple
source ports to one mirror port.
■
<mod-port-spec> is the port to which you want to mirror
traffic.
Both the source port and mirror port must either:
—
Be on the same vlan and have the same vlan binding
or
—
610-0184-095
Have vlan binding set to bind to all
June 14, 2001
9
* Note: Avaya recommends that you mirror traffic to a port
of the same speed or faster than the source port.
■
<channel> is the mirror channel that you want to use (1-4).
■
{TX| RX |Both} is the direction of traffic that you want to
mirror.
* Note: You can mirror transmit traffic of only one source
port to the mirror port. You cannot mirror transmit
traffic of multiple source ports to one mirror port.
Removing Port
Mirroring
■
{always | disable | periodic} is how often you
want the mirror port to receive traffic samples.
■
<max-packets-sec-value> is the maximum number of
packets per second that you want the mirror port to receive.
(Enter a value for this variable only if you set the sampling to
periodic.)
To remove port mirroring, use the following CLI command:
>(config)# clear port mirror fabric_mode2
channel <channel>
where <channel> is the mirror channel that you want to remove.
Viewing
Information
about Port
Mirroring
To view information about port mirroring, use the following CLI
command:
>(config)# show port mirror fabric_mode2
This command displays the source ports, mirror port, direction being
mirrored, sampler type, and maximum packet per second for all port
mirrors that are currently set up.
10
June 14, 2001
610-0184-095
Configuring Port Mirroring By Using the Web Agent
Setting Up Port
Mirroring
To use the Web Agent to set up port mirroring:
1. Expand the Modules & Ports folder.
2. Click Port Mirroring.
The Port Mirroring Information page opens.
3. In the Source Port column, select the port that you want to
mirror.
4. In the Mirror Port column, select the port to which you want to
mirror traffic.
Both the source port and mirror port must either:
—
Be on the same vlan and have the same vlan binding
or
—
Have vlan binding set to bind to all
5. In the Direction column, select the direction of traffic that you
want to mirror.
6. In the Sampler Type column, select how often you want the
mirror port to receive traffic samples.
7. Do one of the following:
IF you select . . .
THEN . . .
Periodic in the Sampler
Type column
In the Max Packets per
Second column, enter the
maximum number of packets
per second that you want the
mirror port to receive.
Disable or Always in the
Sampler Type column
Go to step 8.
8. Click Apply.
610-0184-095
June 14, 2001
11
Removing Port
Mirroring
To use the Web Agent to remove port mirroring:
1. Expand the Modules & Ports folder.
2. Click Port Mirroring.
The Port Mirroring Information page opens.
3. In the Source Port column, select None for the port mirror that
you want to remove.
4. Click Apply.
Viewing
Information
about Port
Mirroring
To use the Web Agent to view information about port mirroring:
1. Expand the Modules & Ports folder.
2. Click Port Mirroring.
The Port Mirroring Information page opens. This page displays
information about all port mirrors that are setup.
Enabling Option 82 for DHCP
Option 82 for DHCP includes two suboptions:
■
Suboption 1 identifies the slot and physical port number from
which the DHCP request was received.
■
Suboption 2 identifies the IP address and, if available, the
system name of the switch.
By default, both of these suboptions are enabled. You can change
the status of either or both suboptions by using the Web Agent,
Command Line Interface (CLI), or SNMP.
Changing the Status of Option 82 by Using the Web Agent
To use the Web Agent to change the status of option 82:
1. Open the IP Global Configuration page.
For information on how to open this page, see “Enabling IP
Routing” in chapter 9 of Cajun P550R/P880/P882 Switch User
Guide Version, v5.0.
12
June 14, 2001
610-0184-095
2. Enable or disable the suboptions as appropriate in the DHCP
Option - Circuit Info and DHCP Option 82 - Agent Info fields.
Changing the Status of Option 82 by Using the CLI
To use the CLI to change the status of option 82, enter Global
Configuration mode and use the following commands:
■
To enable suboption 1, use the following command:
>(config)# ip dhcp circuit-info
■
To enable suboption 2, use the following command:
>(config)# ip dhcp agent-info
■
To disable suboption 1, use the following command:
>(config)# no ip dhcp circuit-info
■
To disable suboption 2, use the following command:
>(config)# no ip dhcp agent-info
* Note: For information on how to enter Global Configuration
command mode, see “Accessing/Exiting the Command
Modes” in chapter 1 of Cajun P550R/P880/P882 Command
Reference Guide.
Changing the Status of Option 82 by Using SNMP
To change the status of option 82 by using SNMP, use the MIB items
that are listed in Table 3. These MIB items are defined in
cjnipv4serv.mib.
Table 3. MIB, MIB Items and OIDs for Option 82
MIB
MIB Item
OID
cjnipv4serv.mib
cjnDHCPOpt82Sub1Enabled
1.3.6.1.4.1.1751.2.43.2.5.5.1
cjnDHCPOpt82Sub2Enabled
1.3.6.1.4.1.1751.2.43.2.5.5.2
610-0184-095
June 14, 2001
13
Enabling Traps for Unknown Source Addresses
To enable traps for unknown source addresses, you must first enable
the MAC Address Lock feature. You can enable this feature and
traps for unknown source addresses by using the Web Agent, CLI, or
SNMP.
Enabling MAC Address Lock and Traps by
Using the Web Agent
To use the Web Agent to enable the MAC Address Lock feature and
traps for unknown source addresses:
1. Manually add the “permitted” MAC addresses to the Address
Forwarding Table (AFT).
For information on how to manually add MAC address to the
AFT, see “Adding Entries to the AFT Manually” in chapter 6 of
Cajun P550R/P880/P882 Switch User Guide, Version v5.0.
2. Enter the following information on the Switch Port
Configuration page for the port:
a. Set the Allow Learning field to Disable.
b. Set the Known Mode field to Enable.
Note: To prevent flooding of frames from unknown source
addresses, set the Known Mode field to Enable for all ports
on the same VLAN as the port for which you are enabling
MAC address lock.
c. Set the Intrusion Trap field to Enable.
d. Adjust the trap timer, if desired.
See “Configuring Switch Port Parameters” in chapter 5 of Cajun
P550R/P880/P882 Switch User Guide Version 5.0, for
information on how to perform these procedures.
Enabling MAC Address Lock and Traps by Using the CLI
To use the CLI to enable the MAC Address Lock feature and traps for
unknown source addresses:
1. Enter Global Configuration mode.
The CLI displays the >(config)# prompt.
14
June 14, 2001
610-0184-095
2. Use the following command to manually add the “permitted”
MAC addresses to the Address Forwarding Table (AFT):
>(config)# set aft entry <mac address> vlan <vlan-id> portbinding forward <mod-port-spec>
3. Use the following command to disable learning on a port or port
range:
>(config)# set port allow-learning <modswport-range> disable
4. Use the following command to enable known-mode on a port
or port range:
>(config)# set port known-mode <mod-swport-range> enable
* Note: To prevent any flooding of frames from unknown
source addresses, enter all ports on the same
VLAN as the port for which you are enabling MAC
address lock.
5. Use the following command to enable intrusion traps on a port
or port range:
>(config)# set port intrusion-trap <mod-swport-range> enable
6. Use the following command to set the intrusion trap timer to
other than the default setting:
>(config)# set port intrusion-trap-timer <mod-swport-range>
<intrusion-trap-timer-value>
Enabling MAC Address Lock and Traps by Using SNMP
The MIB items that you use to perform this procedure are located in
ProminetMib.txt, version 5.2.
To use SNMP to enable the MAC Address Lock feature and traps for
unknown source addresses:
1. Use the MIB items that are listed in Table 4 to manually add the
“permitted” MAC addresses to the AFT.
610-0184-095
June 14, 2001
15
Table 4. MIB, MIB Items, and OIDs for MAC Address Lock
MIB
MIB Item
OID
ProminetMib.txt,
promL2AddressControlIndex
1.3.6.1.4.1.2167.5.1.4.3.1.1
promL2AddressControlMacAddress
1.3.6.1.4.1.2167.5.1.4.3.1.2
promL2AddressControlPortBinding
1.3.6.1.4.1.2167.5.1.4.3.1.3
promL2AddressControlVlanID
1.3.6.1.4.1.2167.5.1.4.3.1.4
promL2AddressControlPriority
1.3.6.1.4.1.2167.5.1.4.3.1.5
promL2AddressControlPersistence
1.3.6.1.4.1.2167.5.1.4.3.1.6
version 5.2
2. Use the MIB item that is listed in Table 5 to disable learning on a
port.
.
Table 5. MIB, MIB item, and OID for Disabling Learning
MIB
MIB Item
OID
ProminetMib.txt,
promSwitchPortLearningMode
1.3.6.1.4.1.2167.5.2.1.1.4
version 5.2
3. Use the MIB item that is listed in Table 6 to enable known mode
on a port.
Table 6. MIB, MIB item, and OID for Enabling Known Mode
MIB
MIB Item
OID
ProminetMib.txt,
promSwitchPortKnownMode
1.3.6.1.4.1.2167.5.2.1.1.7
version 5.2
4. Use the MIB item that is listed in Table 7 to enable intrusion traps
on a port.
Table 7. MIB, MIB Items, and OIDs for MAC Address Lock and Traps
MIB
MIB Item
OID
ProminetMib.txt,
promSwitchPortIntrusionTrap
1.3.6.1.4.1.2167.5.2.1.1.19
version 5.2
16
June 14, 2001
610-0184-095
Enhancements
The following events are now logged in the event log:
■
Saving the running configuration to the startup configuration
■
Creating an IP interface
■
Modifying an IP interface
■
Deleting an IP interface
Changed CLI Commands
■
The get Fabric_mode command replaces the get
Cajun_mode command.
■
The set Fabric_mode command replaces the set
Cajun_mode command.
Corrected Problems
The following problems have been corrected in this release:
610-0184-095
■
Pulling the base port on a hunt group no longer causes traffic
to lose duplexity and broadcast to all ports within the VLAN.
■
The SNMP error message no longer displays when you
perform a LOADMIB operation.
■
You can now create a row in the GenAppFile table in the
LOAD MIB.
■
A software modification has been implemented for the LEDS
on the 24-port, 10/100 Ethernet module with RJ45
connectors. The LEDs no longer illuminate when nothing is
connected to them.
■
The switch no longer stops learning remote MAC addresses
over the ATM link when 36 or more virtual switch ports
(VSPs) are configured.
■
When running AppleTalk Network Assistance, the switch no
longer stops forwarding layer 3 traffic.
June 14, 2001
17
Known Problems and Workarounds
The following known problems and workarounds apply to Cajun
P550R, P580, P880, and P882 switches that are running switch
software, v5.2.2. If a known problem has a viable workaround, it
immediately follows the Problem statement. If the known problem
has no viable workaround, it is listed as a bulleted statement.
ARP
Problem:
50-Series and 80-Series modules lose ARPs after you perform an
initialization of NVRAM (NVRAM init).
Workaround:
Reboot the switch twice after performing an NVRAM init.
ATM Uplink Modules
The following problem has no workaround:
■
The 50-series ATM Uplink modules do not work in slot 16 or
slot 17 if you are using an 80-Series Supervisor module in a
Cajun P882 switch.
Command Line Interface (CLI)
The following problem has no workaround
■
The “!” character, when used as part of a CLI command, is
considered a comment by the Cajun switch software:
—
If you type “!” BEFORE a CLI command, the switch
ignores the command and returns you to the CLI prompt.
—
If you type “!” after a CLI command, the switch displays
an Invalid Command or Syntax Error error message.
Flood Rate Limiting
Problem:
18
The options for setting flood rate limiting on 80-series, 10/100
Ethernet modules and on 80-series, 100 Base-FX Ethernet modules
are incorrect. The correct rates are not available from the Web Agent
or CLI.
June 14, 2001
610-0184-095
Workaround:
Use the following table to determine the option that corresponds to
the rate that you want to set.
Table 8. Flood Rate Limiting on 80-Series 10/100 Modules
Desired Rate
Web or CLI Setting
80%
10%
40%
5%
20%
2%
10%
1%
* Note: Do not use the 20%, 40%, or 80% options of the Web
Agent or CLI.
Frames Transmitted with Cyclic Redundancy Check (CRC)
Errors
Problem:
For certain revisions of the Cajun P550R/P580/P880/P882 switch
12- and 20-port module (Model M5520-100TX, module Type 9,
revision level A or B and M5512-100TX, Revision A), a temperature
sensitivity problem has been found when operating at 10 Mbps. This
sensitivity results in the port transmitting frames with CRC errors.
These frames, since they have CRC errors, are then dropped by the
receiving station.
Workaround:
The following legacy-cli command allows you to implement a new
configuration to disable the power saving mode of the Phy chip. This
has the same effect as moving the port’s operational temperature
past the problem range. The new configuration is saved only in
NVRAM:
> port set DisablePowerSave <port> on
* Note: Except for this command, the Legacy-CLI is not
supported by the Cajun Switch.
610-0184-095
June 14, 2001
19
Hot Swap Modules
The following problems have no workaround:
■
Hot swapping 50-series modules may cause SEPROM and
SMAC panic messages to appear in the event log. These
messages are for informational purposes only and should be
ignored.
■
When you insert a module into the switch, traffic may be
affected for up to seven seconds while the module performs
its hardware diagnostics.
IGMP Group Membership Table
Problem:
The IGMP Group Membership Table does not display all members
when viewed from the Web Agent if the members are on different
interfaces.
Workaround:
Use the following CLI command in User mode to view the members
of IGMP groups:
> show ip igmp groups
Intelligent Multicasting
The following problem has no workaround:
■
Problem:
20
Layer 2 Multicast data is not forwarded on slot 17 in the P882
chassis.
Intelligent Multicasting can block protocols to non-multicast
routers. If you have enabled Intelligent Multicasting and have
configured a VLAN to one or more non-multicast routers or
multicast-capable endstations, Intelligent Multicasting configures
router ports where multicast-enabled routers reside. These multicast
router ports allow all multicast packets to the adjacent multicast
routers. Ports connected to non-multicast enabled routers are not
considered router ports and do not receive multicast traffic. The
problem can arise when multiple IP multicast addresses are mapped
to the same multicast MAC address, resulting in protocol packets not
being sent to the adjacent non-multicast enabled routers.
June 14, 2001
610-0184-095
Example:
The unicast routing protocol in use on all connected routers is OSPF,
and all ports are on the same VLAN. An endstation joins the IP
multicast group 226.128.0.5 on port 1. The MAC address for the
group is 01:00:5E:00:00:05. IGMP snooping creates a session for this
MAC address, with port 1 as the client port. There is a non-multicast
OSPF router attached to port 2. OSPF uses the IP multicast
link scoped group 224.0.0.5, which also maps to a MAC address of
01:00:5E:00:00:05. Because port 2 is not considered a router port,
and it is not part of the 01:00:5E:00:00:05 session, the switch only
passes OSPF messages out port 1. Other protocols, such as the
Service Location Protocol (RFC 2608), use 224.0.1.22 and
224.0.1.35, which can be blocked by endstations joining sessions
that map to the same MAC address.
Note: This is the same problem that is discussed in the Microsoft
Product Support Article Q223136 that can be found at:
http://support.microsoft.com/support/kb/articles/Q223/1/ 36.asp
involving RRAS setup. This specific issue, however, should not break
routing protocols as suggested in this article because the Cajun
switch ignores joins for local multicast groups (224.0.0.x).
Workaround:
Check that all ports that are connected to the router are configured
as router ports. This prevents all router-to-router messages from
being blocked.
If other non-router protocols, such as the Server Location Service,
are in use, create static sessions as needed. Do not create static
sessions that conflict with the protocols used on your network.
Refer to the following web site for a complete list of internet
multicast addresses recognized by the IANA:
http://www.isi.edu/in-notes/iana/assignments/ multicast-addresses
Note: Enable is the default state for “Rate Limiting” on 10/100
Mbps ports. Multicast traffic and broadcast traffic is rate-limited (to
20%) on 10/100 Mbps ports.
Multicast traffic is rate-limited unless Intelligent Multicasting is
enabled. Multicast traffic for which the Intelligent Multicast session
was created is not subject to rate limiting unless the rate limiting
610-0184-095
June 14, 2001
21
state is set to Enable (all multicasts included). If you do not want to
enable rate limiting of multicast traffic on a port, either:
■
Disable Intelligent Multicasting
or
■
Disable Rate-limiting on the port.
IP
The following problems have no workaround:
■
If you create overlapping IP interfaces (interfaces in the same
subnet), the state of the second interface is INACTIVE.
■
If you enter a non-numeric value in either the Network
Address or Mask fields on the IP Static Route page, all of the
numbers are rejected and the field converts back to 0.
IPX
Problem:
802.3 IPX routed frames are sometimes padded in such a way that
they are incompatible and discarded by older IPX clients and drivers.
Workaround:
Use newer client software (v2.5 or later) or use a frame format other
than 802.3 (Avaya recommends that you use format 802.2). If you
cannot use new client software or a newer frame format, use the
following CLI commands to allow 802.3 IPX clients to connect:
■
IPX Forward Set
■
IPX Forward Get
Refer to the Cajun P550R/P880/P882 Switch Command Line Reference
guide for more details about these new commands.
L3 Forwarding Cache
Problem:
22
Attempting to change the maximum number of entries in the L3
Forwarding Cache while you are using a licensed 80-Series module
will cause the switch to stop responding, if the switch is configured
with 10,000 entries or more. The CLI or the Web interface will not
respond and the scrolling text on the supervisor will stop.
June 14, 2001
610-0184-095
Workaround:
Flush the L3 Forwarding Table before changing the L3 Forwarding
Cache Max Entries value.
Option 82 for DCHP
The following problems have no workarounds:
■
The switch does not add relay agent information (option 82)
to a BOOTP request.
■
The option 82 relay agent does not check frames for the
IPSEC authentication header or IPSEC encapsulating security
payload.
PCMCIA
The following problem has no workaround:
■
Text files copied from the PCMCIA card cannot be read.
Problem:
The 80-Series Supervisor module will not fully reset if you initiate a
reset from either the CLI or the web agent after you perform a
command that involves reading from, or writing to, the PCMCIA
card.
Workaround:
Power the switch off and then on after you read from or write to the
PCMCIA card.
Point-to-Point Protocol (PPP) and Telnet
The following problems have no workaround:
610-0184-095
■
A Telnet session to the serial port via PPP may time out
during attempts to transfer large files, such as executable
images, to a Trivial File Transfer Protocol (TFTP) server. This
does not terminate the file transfer. An in-progress TFTP file
transfer ends only after the file transfer is completed.
■
A new baud rate may take effect before the current PPP
connection is terminated if the baud rate change command is
entered more than once. This results in the termination of
the PPP connection. This requires re-establishment of a PPP
connection.
June 14, 2001
23
Port Mirroring
80-Series
Modules
The following problem has no workaround:
■
Removing a port mirror causes an interface to stay in the
“UP” state with no connections to the interface.
Problem:
If you mirror multiple ports, the switch monitors both transmit and
receive traffic regardless of the direction of traffic that you specify.
The switch continues to monitor both directions of traffic even if
you remove the port mirror with multiple source ports and set up a
new port mirror with a single source port.
Workaround:
Reset the switch before setting up a port mirror with a single source
port.
Problem:
Version 5.2.2 of the switch software does not support piggyback
ports on 80-series modules. If your switch is running a version
earlier than 5.2.2 and you set up a port mirror with a piggyback port
on an 80-series module and you then download 5.2.2, specify 5.2.2
as the startup configuration, and reset the switch, the switch retains
the port mirroring information and will reset repeatedly as long as
the port mirror exists.
Workaround:
Before downloading and running v5.2.2, remove port mirrors with
piggyback ports on 80-series modules.
50-Series
Modules
The following problems have no workaround:
■
When you try to mirror a blocked port, the Web Agent
displays the port as forwarding, but it is blocked. When you
remove the blocked port from being mirrored, you receive
panic messages on the console. The problem does not
interrupt traffic or cause any other problems in the network.
■
If a standby supervisor module installed in slot 2 has become
the Active supervisor (CPU) due to a failover, the web agent
shows the supervisor module in slot 1 as available for
mirroring during a port mirroring operation. This is incorrect.
This problem does not affect traffic running in the network.
* Note: The Supervisor module should not be configured
for port mirroring even if it displays as available for
port mirroring.
24
June 14, 2001
610-0184-095
■
If a router port for intelligent multicasting is mirrored with a
piggyback port, the piggyback port is listed instead of the
router port.
Redundant Switch Controller
The following problem has no workaround:
■
Do not enable redundancy unless you have a redundant
switch controller.
■
On a P880 with an 80-series supervisor module, the
redundant switch controller may not take over when the
active switch controller fails.
Remote Monitoring (RMON)
The following problems have no workaround:
■
30 minute RMON statistics always show utilization as 0
(Zero) on a heavily used Gigabit Ethernet port.
■
Statistics for unicast frames do not work when using
multilayer (ISL) tagging.
Simple Network-Management Protocol (SNMP)
The following problems have no workaround:
Problem:
Workaround:
610-0184-095
■
Cold start traps cannot be transmitted out of inband
interfaces after you enable Spanning Tree.
■
ipAddrTable does not display inactive interfaces (VLANs). An
inactive interface occurs when there are no active ports on a
VLAN.
■
If you use the CLI to perform either of the following
commands, the supervisor module stops responding and
resets:
—
snmp walk aarpNetAddress
—
snmp walk cjnAtEchoSend
Use SNMP from a management station to access these MIB items.
June 14, 2001
25
Problem:
If you remove the Public community string from the SNMP
Community Management, save the running config to the startup
config and then reset the switch, the Public community string you
removed is not deleted.
Workaround:
Change the Public Community string to a different name.
P580/P882 Chassis Slot 2
The following problem has no workaround:
■
Cajun P580/P882 switches running in Fabric 2 mode will not
route inbound multicast traffic received by an unlicensed 80Series module when installed in slot 2.
Downloading the Startup Configuration File
Problem:
Downloading the startup configuration file produces panic messages
in the CLI of the supervisor module and ATM Uplink module.
Workaround:
Ignore these messages.
Supervisor Module
80-Series
Supervisor
Module
The following problem has no workaround:
Problem:
Panic messages display on the CLI and on the Primary Supervisor
LED readout after you install a second Supervisor module for
redundancy.
Workaround:
Ignore these messages.
26
■
To successfully synchronize two 80-Series Supervisor
modules (M8000R-SUP), both modules must be in 48-port
mode and in the same fabric mode.
June 14, 2001
610-0184-095
Problem:
When the 80-series Supervisor module boots, the switch displays
the following error message in the CLI:
Undefined Error -- FILE:gqswport.cLINE:449 Value
0xfffffffc: Error changing the GQ ‘port use
diffserv’ flag
Workaround:
Ignore this message.
50-Series
Supervisor
Module
The following problem has no workaround:
■
The display on the P880 switch M5500R-SUPA supervisor
module may not initialize properly. However, if it becomes
the active supervisor module, the display becomes functional
and displays the proper information.
Switch Ports
The following problem has no workaround:
■
Problem:
While switch port parameters are reflected across all ports of
a Hunt group, spanning tree parameters are not. If you
change the spanning tree priority of the flood port of a Hunt
group, but that port does not come up first when bringing up
the Hunt group, the spanning tree priority for the group
reverts to the default.
If a switch port is moved from Bind to Receive to Static, all
previously bound VLANs are not removed.
* Note: This is NOT a problem with the Bind to All setting.
Workaround:
Remove VLANs manually from a port when changing a switch port
connection from Bind to Receive to Static.
RIP
Problem:
Configuring a RIP V1/V2 interface sends V2 packets to a V1
interface.
Workaround:
If the corresponding interface is in RIP v1, configure your interface
to RIP v1.
610-0184-095
June 14, 2001
27
VLAN Issues
The following problem has no workaround:
■
If you want a port to use both the VLAN auto-learning
feature and VLAN binding type of Bind to Received or
Bind to All, make sure that you set the VLAN binding type
before you set Auto-learn to Enable or else the port may not
be automatically added to the VLAN.
Web AFT Issues
Problem:
The Web Address Forwarding Table (AFT) search does not return all
entries that meet your search criteria when you search by status of
entries.
Workaround:
Use the CLI to search the AFT by the status of entries.
Functional Restrictions
This section provides the functional restrictions for version 5.2.2 of
the switch software.
Auto-Negotiation
Problem:
28
■
M5520-TX (P/N M5520-100TX) boards manufactured with a
Quality Phy do not auto-negotiate with Xircom brand
adapter cards. If you are having this problem, disable autonegotiation on the affected ports, and set the port speed and
duplex state manually.
■
Auto-negotiation should be disabled only on 50-series
modules that have remote fault detection enabled.
You may experience difficulties with auto-negotiation between
some releases of the 10/100Base-TX Module (M5510-100TX,
M5520-100TX, M5510R-100TX, M5512R-100TX) and adapter cards
using physical interfaces manufactured by National Semiconductor.
The symptom is loss of connectivity.
June 14, 2001
610-0184-095
Workaround:
Either:
■
Disable auto-negotiation
■
Use a patch cable that is longer that 5 meters
■
Enter the following Enhanced CLI command in legacy mode:
> port set NationalPhyMode <slot>.<port> enable
The factory default for the National Phy Mode is Enable.
Checksum Error Message
Problem:
The following checksum error displays after you upgrade from 4.3.x
code to v5.x code:
Bad file header compressed checksum...transfer cancelled.
Workaround:
Ignore the checksum error and reboot the switch to upgrade the
software.
CajunView v3.0
CajunView v3.0 does not support 80-series hardware. CajunView
v4.0 will support 50-series hardware and 80-series hardware on
Cajun switch software code version 5.1 and later.
CPU Synchronization
Problem:
If you attempt to synchronize the active supervisor and redundant
supervisor while the supervisor is being heavily used, TFTP transfers
from the active supervisor to the redundant supervisor may time out
and fail.
Workaround:
Repeat the synchronization when use of the supervisor has
decreased.
Legacy CLI
Problem:
610-0184-095
The Legacy CLI setup command does not save information that you
enter.
June 14, 2001
29
Workaround:
The Legacy CLI is no longer supported in this release except for the
following command that allows you to implement a new
configuration to disable the power saving mode of the Phy chip
(refer to the Frames Transmitted with Cyclic Redundancy Check (CRC)
Errors section on page 3 under Known Problems and Workarounds:
> port set DisablePowerSave <port> on
Distance Vector Multicast Routing Protocol (DVMRP)
The switch may lose a small number of DVMRP neighbor-toneighbor probe messages which may cause multicast routing
instability under heavy loads.
IEEE 802.1Q
Packets
Problem:
When a tagged IEEE 802.1Q packet arrives on a port that is set to
“bind-to-all” and the VLAN does not exist on the switch, the packet
is forwarded to that port’s default VLAN.
Workaround:
To prevent unintended forwarding of unknown VLAN traffic to the
port’s default VLAN, configure the port default VLAN to “discard”.
* Note: Automatic VLAN creation does not work if the port default
VLAN is “discard”, because the switch does not learn this
VLAN.
Hunt Groups
■
Hunt groups can only consist of all layer 2 or all layer 3
modules. Hunt groups do not support a mixture of layer 2
and layer 3 modules.
■
When 48-port mode is enabled on the switch, you can
configure a maximum of thirteen hunt groups on the switch.
Link Status
When a large number of VLANs or endstations are on a hunt group,
it may take several seconds for the link status LED to change upon
failure.
30
June 14, 2001
610-0184-095
Loopback Tests
Loopback tests on ports may fail when traffic is present on the link
at start-up.
Netscape 6.0
Do not use Netscape 6.0 as a browser with the Cajun Switch Web
Agent.
Oversized Packets
Oversized packets are not counted in itemized statistics if the packet
size is between 1519 and 1548 bytes.
PCMCIA
Only PCMCIA memory cards purchased from Avaya Inc. are
supported in the PCMCIA slot of the M800R-SUP supervisor
module.
Port Mirroring
■
When using 80-series port mirroring, you cannot mirror
transmit traffic of multiple source ports to one mirror port.
■
When you use 80-series port mirroring, both the source port
and mirror port must either:
—
Be on the same vlan and have the same vlan binding
or
—
610-0184-095
Have vlan binding set to bind to all
■
Your switch must be in fabric mode 2 to perform 80-series
port mirroring.
■
If you use port mirroring, the port Frame Tag field on the
Switch Port Configuration page must be set to Use frames
(default).
June 14, 2001
31
Redundant Controller Support
In the event that a Layer 3 redundant switch controller or element
fails, the switch resets itself and records an entry of the event in the
event log.
SNMP
To disable SNMP, you must set the access for all community strings
to None. You cannot disable SNMP by deleting all community
strings because the public community string is restored when you
reboot the switch.
Software License Keying
Field upgradeable software features, such as routing, are supported
only by v5.1.0 and later.
Spanning Tree Protocol (STP)
■
In release 4.1 and later, the STP Port Priority range has been
changed. The values are now 1 to 15. If you changed the
default range in an earlier release, you should verify that the
priority is within the allowed range.
■
When the STP mode is set to IEEE 802.1D, Bridge Protocol
Data Units (BPDUs) are sent out ports that are configured as
Clear (non-trunked) even if the port is configured as a trunk
(3Com, IEEE 802.1Q, or Dual-Layer) port. To alleviate this
problem, disable STP for that port.
3Com Tagging
3Com tagging is not supported for this release.
TFTP File Naming Standard for Embedded NVRAM File System
* Note: All NVRAM files must use an 8.3 format for file names.
When downloading code to the NVRAM file system, use standard
8.3 file naming conventions.
32
June 14, 2001
610-0184-095
TFTP Download Status Delay
It takes a few seconds before the Status button on the TFTP
Download screen returns accurate information.
VLAN Issues
■
Automatic VLAN creation on P880 50-series supervisor
module (M5500R-SUPA) does not work if the port default
VLAN is set to “discard”. The switch does not learn VLANs
with this setting.
■
Automatic VLAN creation on an 80-series supervisor module
(M8000R-SUP) does work if the port default VLAN is set to
“discard”.
■
If you set a port’s VLAN trunking mode to Clear, you must set
the VLAN Binding Type to Static (default).
■
You may receive an error message stating that the VLAN
name is already in use after you add a VLAN and refresh your
browser.
Web Agent
Problem:
If you click the Back button after you change a variable from the
“Switch Port Config” screen, the variable will change back to the
previous setting and the switch will reset. If you change a number of
variables and click the Back button, the last variable will change
back to the original value and the switch will reset.
Workaround:
This only happens on Microsoft Internet Explorer, version
5.00.2919.6307. Use a later version of Microsoft Internet Explorer.
Documentation Updates and Corrections
The following problems were found in the Cajun P550R/P880/P882
Switch documentation for release v5.0 and will be fixed in release
v6.0.
Cajun P550R/P880/P882 Switch User Guide
The following problem was found in the Cajun P550R/P880/P882
Switch User Guide for release v5.0 and will be fixed in release v6.0.
610-0184-095
June 14, 2001
33
The steps in ”Modifying OSPF Interfaces” of chapter 11,
“Configuring the OSPF Routing Protocol” should read as follows:
1. Administratively disable the interface on which you want to
modify OSPF.
* Note: You must disable the interface to perform any
OSPF modifications to the interface.
2. In the navigation pane of the Web Agent window, expand the
Routing > IP > OSPF folders.
3. Click Interfaces.
The OSPF Interfaces page opens (Figure 11-4).
4. Modify the OSPF interface parameters. Refer to Table 11-3 for an
explanation of these parameters.
5. Administratively enable the modified interface.
* Note: You must reenable the interface for the switch to
accept the modifications.
Technical Support
To contact Avaya’s technical support:
* Note: These are new phone numbers as of October 1,
2000.
■
From the United States:
1-800-237-0016
■
From North America:
1-800-242-2121
■
Outside North America:
Contact your distributor
34
June 14, 2001
610-0184-095
Appendix A: CLI Commands for
Queue Classification and Servicing
Overview
This appendix contains the CLI commands that you use to
configure the Queue Classification and Queue Servicing
functionality in Version 5.2 of the Cajun switch software. CLI
commands exist for the following tasks:
■
"Setting the Priority of a Port" on page A-1
■
"Setting a Port to Ignore Tag Priority" on page A-2
■
"Displaying the Port Settings" on page A-3
■
"Setting a Rule in an Access Control List" on page A-4
■
"Displaying Access Control Lists" on page A-6
■
"Setting WFQ" on page A-7
■
"Displaying the Queue Service Settings" on page A-9
* Note: In this release, you can configure the Queue Classification
and Queue Servicing features only by using the CLI. The
features are not available in the Web Agent or SNMP.
Setting the Priority of a Port
Command
Use the set port priority command to set the priority of a
port. The syntax of the command is:
set port default-priority {<slot>|<slot-swportrange>}[...,{<slot-num>|<slot-swport-range>}]
<priority>
610-0184-095
June 14, 2001
A-1
where
<slot> is the slot number. If you specify this parameter, then all
ports on the module in slot <slot> are set the same way.
<slot-swport-range> is a slot and port range in the form of 3/1 or
3/1-5. If you specify this parameter, then only the ports <swportrange> on the module in slot <slot> are set.
<priority> is the priority that you want to assign to the port. Enter a
number between 0 and 7. The highest priority is 7.
Examples
■
To set the port priority to 0 for all ports on the module in slot
3, enter:
set port default-priority 3 0
■
To set the port priority to 5 for ports 1 through 5 on the
module in slot 3, enter:
set port default-priority 3/1-5 5
■
To set the port priority to 2 for ports 1 through 5 on the
module in slot 3 and for port 1 on the module in slot 6, enter:
set port default-priority 3/1-5,6/1 2
Setting a Port to Ignore Tag Priority
Command
Use the set port ignore-tag priority command to set a port
to ignore the 802.1p tag priority. The syntax of the command is:
set port ignore-tag-priority {<slot>|<slot-swportrange>}[...,{<slot>|<slot-swport-range>}] {on|off}
A-2
June 14, 2001
610-0184-095
where
<slot> is the slot number. If you specify this parameter, then all
ports on the module in slot <slot> are set the same way.
<slot-swport-range> is a slot and port range in the form of 3/1
or 3/1-5. If you specify this parameter, then only ports <swportrange> on the module in slot <slot> are set.
{on|off} indicates whether you want the port to ignore tag
priority. Enter on for the port to ignore the tag priority.
Examples
■
To set all ports on the module in slot 3 to ignore the 802.1p
tag priority, enter:
set port ignore-tag-priority 3 on
■
To set ports 1 through 5 on the module in slot 3 to not ignore
the 802.1p tag priority, enter:
set port ignore-tag-priority 3/1-5 off
■
To set ports 1 through 5 on the module in slot 3 and port 1 on
the module in slot 6 to ignore the 802.1p tag priority, enter:
set port ignore-tag-priority 3/1-5,6/1 on
Displaying the Port Settings
Command
Use the show port command to display the settings of a port. The
syntax of the command is:
show port [{<slot>|<slot-swport-range>}
[...,{<slot>|<slot-swport-range>}]]
where
<slot> is the slot number. If you specify this parameter, then the
settings of all the ports on the module in slot <slot> are displayed.
<slot-swport-range> is a slot and port range in the form of 3/1
or 3/1-5. If you specify this parameter, then settings for only the
ports <swport-range> on the module in slot <slot> are displayed.
610-0184-095
June 14, 2001
A-3
Examples
■
To display the settings of all of the ports on the module in slot
3, enter:
show port 3
■
To display the settings of ports 1 through 5 on the module in
slot 3, enter:
show port 3/1-5
■
To display the settings of ports 1 through 5 on the module in
slot 3 and of port 1 on the module in slot 6, enter:
show port 3/1-5,6/1
Setting a Rule in an Access Control List
Command
Use the access list command to set a rule on an access control
list. The rule that you set will be applied on all of the ports on the
switch. The command syntax is:
* Note: You must enable the access control list on which you want
to set a rule. Only one access control list can be enabled at
a time.
> configure)# access-list <access-list-name>
<access-list-index>
{permit|deny|fwd1|fwd2|fwd3|fwd4|fwd5|fwd6|fwd7|
fwd8} <protocol-id> {<source-ip-addr> <sourcewildcard>|any|host <source-ip-addr>}
[{lt|eq|gt|range} <port> [<port>]] {<dest-ip-addr>
<dest-wildcard>|any|host <dest-ip-addr>}
[{lt|eq|gt|range} <port> [<port>]] [established]
A-4
June 14, 2001
610-0184-095
where:
<access-list-name> is a unique name that identifies the access
control list.
<access-list-index> is the rule number within the access list.
{permit|deny|fwd1|fwd2|fwd3|fwd4|fwd5|fwd6|
fwd7|fwd8} is the priority that you want to set. The number
following the fwd option specifies the priority.
In other words, {permit|deny} are not valid selections. The fwdx
arguments are "1" based, while the queue priorities are "0" based.
Consequently, the "1" based priorities are converted to "0" based
priorities by the Queue Classification and Queue Servicing features.
For example, to specify a priority of 0, enter fwd1. You must enter a
value for this argument. You cannot omit a fwdx argument from the
access-list command.
<protocol-id> is the ID of the protocol to which you want to
assign a priority. RFC791 defines the protocol IDs.
<source-ip-addr> is the source IP address to which you want to
assign a priority.
<source-wildcard> is the inverse of a network mask.
any indicates a source and source-wildcard of 0.0.0.0.255.255.
255.255
host <source-ip-addr> is the IP address of the host for the
access list. The source ip address range is 0 to 255.
[{lt|eq|gt|range} <port> [<port>]]is a range of source
ports that pass between two hosts or switches using the
Transmission Control Protocol (TCP) or the User Datagram Protocol
(UDP).
<dest-ip-addr> is the destination IP to which you want to assign
a priority.
<dest-wildcard> is the inverse of a network mask.
any indicates a destination and destination-wildcard of
0.0.0.0.255.255.255.255
610-0184-095
June 14, 2001
A-5
host <dest-ip-addr> is the destination IP address of the host.
The destination IP address range is 0 to 255.
[{lt|eq|gt|range} <port> [<port>]] is a range of
destination ports that pass data between two hosts or switches using
the Transmission Control Protocol (TCP) or the User Datagram
Protocol (UDP).
[established] permits TCP connections to be established that
match the rule.
* Note: You can also configure access control lists by using the
Web Agent. For information on how to use the Web Agent
to perform this task, see “Creating Standard Access Rules”
and “Creating Extended Access Rules” in Chapter 9 of
Cajun P550R/P880/P882 Switch User Guide, Version 5.0.
Examples
■
To assign all traffic whose source IP address is 192.188.10.1 a
priority of 0, enter:
access-list MyAccessList 1 fwd1 192.188.10.1
■
To assign all traffic whose source IP address is 192.188.10.2 a
priority of 1, enter:
access-list MyAccessList 2 fwd2 192.188.10.2
■
To assign all traffic whose source IP address is 192.188.10.3 a
priority of 2, enter:
access-list MyAccessList 3 fwd3 192.188.10.3
Displaying Access Control Lists
Use the show access-lists command to display one or more
access control lists. The correct command syntax is:
> (configure)# show access-lists [<access-listname>]
where:
[<access-list-name>] specifies the name of the access control
list that you want to view. If you do not specify a access control list,
the switch displays all of the access control lists.
A-6
June 14, 2001
610-0184-095
Setting WFQ
Overview
Setting the weighted fair queuing (WFQ) service policy involves two
commands. In the first command, you specify the queue policy, the
modules and ports for which you want to set the policy, and
whether you want to set the queue service policy for ingress traffic,
egress traffic, or both. In the second command, you specify the
queue weights.
Command 1
The correct syntax for Command 1 is:
> (configure)# set queue-service {<slot>|<slotswport-range>}[...,{<slot>|<mod-port-range>}] wfq
egress
where:
<slot> is the slot number.
<slot-swport-range> is a slot and port range in the form of 3/1
or 3/1-5. If you specify this parameter, then only the ports
<swport-range> on the module in slot <slot> are set.
egress is the direction of traffic for which the policy is set.
610-0184-095
June 14, 2001
A-7
Command 2
The correct syntax for Command 2 is:
> queue <queue> weight <weight>
where
<queue> is the queue number, which can range from 0 to 7.
<weight> is the weight that you want to assign to the queue.
Weights can range from 0 to 255.
Examples
■
To set WFQ for egress traffic on ports 1 through 4 on the
module in slot 3, enter:
> (configure)# set queue-service 3/1-4 wfq
egress
■
To assign a weight of 1 to queue 0, enter:
> queue 0 weight 1
■
To assign a weight of 2 to queue 1, enter:
> queue 1 weight 2
■
To assign a weight of 3 to queue 2, enter:
> queue 2 weight 3
■
To assign a weight of 4 to queue 3, enter:
> queue 3 weight 4
A-8
June 14, 2001
610-0184-095
■
To assign a weight of 5 to queue 4, enter:
> queue 4 weight 5
■
To assign a weight of 6 to queue 5, enter:
> queue 5 weight 6
■
To assign a weight of 7 to queue 6, enter:
> queue 6 weight 7
■
To assign a weight of 8 to queue 7, enter:
> queue 7 weight 8
Displaying the Queue Service Settings
Command
Use the show queue-service command to display the settings for
queue service. The correct syntax for this command is:
> show queue-service {<slot>|<mod-port-range>}
[...,{<slot>|<mod-port-range>}]
where
<slot> is a slot number
<mod-port-range> is 0-7
If you specify this parameter, then the settings for all of the ports on
the module in slot <slot> are displayed.
<slot-swport-range> is a slot and port range in the form of 3/1
or 3/1-5. If you specify this parameter, then the queue service
settings for ports <swport-range> on the module in slot <slot>
are displayed.
Examples
To display the queue service settings for port 1 on the module in slot
3, enter:
> show queue-service 3/1
610-0184-095
June 14, 2001
A-9