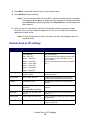
1
3100, 3200 MFP options
User’s Guide
3100
3200
October 2002
Click here for
Quick Reference
www.lexmark.com
Edition: October 2002
The following paragraph does not apply to any country where such provisions are inconsistent with local law: LEXMARK
INTERNATIONAL, INC., PROVIDES THIS PUBLICATION “AS IS” WITHOUT WARRANTY OF ANY KIND, EITHER EXPRESS OR
IMPLIED, INCLUDING, BUT NOT LIMITED TO, THE IMPLIED WARRANTIES OF MERCHANTABILITY OR FITNESS FOR A
PARTICULAR PURPOSE. Some states do not allow disclaimer of express or implied warranties in certain transactions; therefore, this
statement may not apply to you.
This publication could include technical inaccuracies or typographical errors. Changes are periodically made to the information herein;
these changes will be incorporated in later editions. Improvements or changes in the products or the programs described may be made
at any time.
Comments about this publication may be addressed to Lexmark International, Inc., Department F95/032-2, 740 West New Circle Road,
Lexington, Kentucky 40550, U.S.A. In the United Kingdom and Eire, send to Lexmark International Ltd., Marketing and Services
Department, Westhorpe House, Westhorpe, Marlow Bucks SL7 3RQ. Lexmark may use or distribute any of the information you supply in
any way it believes appropriate without incurring any obligation to you. You can purchase additional copies of publications related to this
product by calling 1-800-553-9727. In the United Kingdom and Eire, call +44 (0)8704 440 044. In other countries, contact your point of
purchase.
References in this publication to products, programs, or services do not imply that the manufacturer intends to make these available in all
countries in which it operates. Any reference to a product, program, or service is not intended to state or imply that only that product,
program, or service may be used. Any functionally equivalent product, program, or service that does not infringe any existing intellectual
property right may be used instead. Evaluation and verification of operation in conjunction with other products, programs, or services,
except those expressly designated by the manufacturer, are the user’s responsibility.
Lexmark and Lexmark with diamond design, MarkNet and MarkVision are trademarks of Lexmark International, Inc., registered in the
United States and/or other countries. MarkTrack and ScanBack are trademarks of Lexmark International, Inc.
PostScript® is a registered trademark of Adobe Systems Incorporated.
Other trademarks are the property of their respective owners.
© Copyright 2002 Lexmark International, Inc.
All rights reserved.
UNITED STATES GOVERNMENT RESTRICTED RIGHTS
This software and documentation are provided with RESTRICTED RIGHTS. Use, duplication or disclosure by the Government is subject
to restrictions as set forth in subparagraph (c)(1)(ii) of the Rights in Technical Data and Computer Software clause at DFARS 252.2277013 and in applicable FAR provisions: Lexmark International, Inc., Lexington, KY 40550.
Contents
Chapter 1: Making copies.............................................................. 1
Quick copies................................................................................................... 1
Examples of typical jobs................................................................................. 1
Adjust copy quality ......................................................................................... 4
Select the content........................................................................................... 5
Set the duplex option...................................................................................... 6
Set Collation/Finishing features...................................................................... 6
Save paper when you print............................................................................. 6
Select your copy media .................................................................................. 7
Chapter 2: Sending faxes .............................................................. 8
Examples of typical fax jobs ........................................................................... 9
Chapter 3: Scanning to PC.......................................................... 12
Create a scan profile .................................................................................... 12
Custom Scan to PC settings ........................................................................ 14
Chapter 4: Scanning to e-mail .................................................... 16
Create a scan to e-mail profile ..................................................................... 16
Scan to permanent e-mail destinations ........................................................ 17
Chapter 5: Scanning to FTP ........................................................ 18
Scan to an FTP destination .......................................................................... 18
Chapter 6: Using the MFP control panel.................................... 19
Button and menu key ................................................................................... 19
Function modes............................................................................................ 22
Contents
iii
Chapter 7: Customizing your MFP configuration ..................... 23
Customize copy settings .............................................................................. 23
Restore factory default settings.................................................................... 23
Manually set basic fax information ............................................................... 24
Create permanent fax destinations .............................................................. 25
Change fax send and receive settings ......................................................... 25
Adjust analog send fax options .................................................................... 26
Adjust analog receive fax options................................................................. 27
Adjust analog fax log options ....................................................................... 27
Adjust fax server options .............................................................................. 29
Scan to E-mail General Setup...................................................................... 29
Create permanent e-mail destinations ......................................................... 30
Create FTP destinations............................................................................... 31
Create an external destinations file .............................................................. 32
Disable scan functions ................................................................................. 33
Configure Job Accounting ............................................................................ 34
Use Validation mode to limit usage .............................................................. 37
Chapter 8: Solving copy problems............................................. 38
Common problems and solutions................................................................. 38
Copy status messages ................................................................................. 39
Copy error messages ................................................................................... 39
Chapter 9: Solving fax problems ................................................ 41
Common fax questions................................................................................. 41
Solve problems sending faxes ..................................................................... 41
Solve problems receiving faxes.................................................................... 42
Send fax status............................................................................................. 43
Receive fax status ........................................................................................ 43
Send fax errors............................................................................................. 44
Receive fax errors ........................................................................................ 44
Work with destination lists ............................................................................ 44
Chapter 10: Solving network scan problems ............................ 46
Common problems and solutions................................................................. 46
Contents
iv
Scan to e-mail status.................................................................................... 46
Scan to FTP status....................................................................................... 47
Job Accounting status .................................................................................. 48
Scan to e-mail errors .................................................................................... 48
Scan to FTP errors ....................................................................................... 50
Work with destination lists ............................................................................ 50
Chapter 11: Solving scanning problems ................................... 52
Preventing paper jams ................................................................................. 52
Solve scanner problems............................................................................... 53
Index............................................................................................... 54
Contents
v
1
Making copies
Quick copies
1 Make sure the MFP (Multifunction Printer) control panel is in copy mode and the Ready status
message is displayed. If necessary, press Stop/Clear to return to copy mode.
2 Load all pages in the automatic document feeder of the scanner. Place the pages according
to the drawing on the scanner.
3 Enter the number of copies you want to make using the numeric keypad.
4 Press Go/Send to start scanning your documents.
Note: If you are using the flatbed of the scanner, watch the control panel for messages.
If prompted to Place Next Or Stop, place the next page on the flatbed and then
press Go/Send to continue scanning. Press Stop/Clear when all the pages have
been scanned.
Examples of typical jobs
The following examples explain how to change the settings on the control panel to perform specific
copying jobs. Each of the examples assumes the necessary features (duplex, color, and so on) are
installed on the scanner and printer.
Make sure you are in copy mode and the Ready status message is displayed. If necessary, press
Stop/Clear to reset the control panel to copy mode.
Note: If you are using the flatbed of the scanner, watch the control panel for messages.
If prompted to Place Next Or Stop, place the next page on the flatbed and then
press Go/Send to continue scanning. Press Stop/Clear when all the pages have
been scanned.
Job 1: single page
1 Place the document on the flatbed of the scanner.
2 Make sure 1 appears on the control panel display as the copy count (default). If it does not,
press Stop/Clear to reset the control panel to copy mode.
3 Press Go/Send.
Making copies
1
Job 2: mixed content
Make eight copies of a two-page, letter-size document containing one drawing within the text.
1 Load all pages in the automatic document feeder of the scanner. Place the pages according
to the drawing on the scanner.
2 Press Collation/Finishing until you see Collate appear on the control panel display.
3 Press Content until the mixed light comes on.
4 Press 8 on the keypad, and then press Go/Send.
Job 3: use 2-up to save paper
Make three copies of a four-page document which has some text in color, but minimize paper usage.
1 Load all pages in the automatic document feeder of the scanner. Place the pages according
to the drawing on the scanner.
2 Press 3 on the keypad.
3 Press Paper Saver until the 2-up light comes on. If the scanner and printer support duplex,
you could also choose Duplex to save paper.
4 Press Collation/Finishing until you see Collate on the control panel display.
5 Press Content until the mixed light comes on, and then press Go/Send.
Job 4: duplex copies
Make a legal-size, two-page document fit on a duplexed, letter-size page for insertion in a
standard-size notebook. The original documents contain several color photographs as well as some
text.
1 Load all pages in the automatic document feeder of the scanner. Place the pages according
to the drawing on the scanner.
2 Press Content until the mixed light is on.
3 Press Duplex until the
light is on.
4 Press Original Size until the legal light is on.
5 Press Copy Size until the letter light is on.
6 Press Go/Send.
Examples of typical jobs
2
Job 5: enlarge copies
Enlarge a black-and-white drawing so you can see it better and make annotations.
1 Place the document on the flatbed of the scanner.
2 Press Enlarge. Hold down the button to rapidly increase the scaling factor.
3 Release the button when 125% appears on the control panel display. You may need to
experiment to get the copy just the way you want it.
4 Press Go/Send.
Job 6: document with color
Make copies of a one page letter-size document containing several small, color photographs.
1 Place the document on the flatbed of the scanner.
2 Press Content until the photo light is on, and then press Go/Send to print a copy.
Note: Photo mode is intended to be used to copy actual photographs or similar high
quality images. Photos printed on a printer should be copied using mixed mode.
3 Press Content until the mixed light comes on, and then press Go/Send to print a second
copy.
4 Compare the two copies to the original, and then decide which setting produces the best
quality of the photograph. Reset Content to the best choice (photo or mixed).
5 Enter the number of copies you want using the numeric keypad.
6 Return the page with the photograph to the scanner, and then press Go/Send.
Examples of typical jobs
3
Adjust copy quality
You can use the settings in the following tables to adjust the output quality of your copies.
Change the brightness
Feature
Description
Lighter
Produces lighter copies.
Darker
Produces darker copies.
Set the copy size
Feature
Description
Copy Size
Selects the size of the copy being made from the available paper sizes in
the printer.
Note: If a particular paper size is not properly loaded into the printer, no
indication appears on the display for that paper size.
Original Size -Letter, Legal, A4
Scroll to specify different paper sizes for the original. The paper size is
shown on the display and the indicator light is on.
Original Size -- Other
Scrolls through paper sizes other than letter, legal, and A4.
Reduce or enlarge
Feature
Description
Reduce
Press once to decrease the scaling factor by 1%. Hold button down to rapidly
decrease the scaling factor.
• If either Reduce or Enlarge is pressed, the Original Size light is turned off.
• Automatic scaling between the original and the copy is used if the paper
size selections have been set.
Enlarge
Press once to increase the scaling factor by 1%. Hold button down to rapidly
increase the scaling factor.
• If either Reduce or Enlarge is pressed, the Original Size light is turned off.
• Automatic scaling between the original and the copy is used if the paper
size selections have been set.
Adjust copy quality
4
Select the content
Content defines what kind of original is being copied. One of the content features is always selected.
The current selection is indicated by one of the three content lights being on.
Feature
Description
text
Original document is composed entirely of text, simple line-art graphics, or
a combination of both. This choice is the default.
The highest possible scan speed is used. Copies are black and white only,
even if the original is color.
mixed
Original document contains a mix of both text and graphics.
If both the scanner and printer are color-capable, this choice produces
color copies.
photo
Original document contains extremely fine details and graphics. Use with
actual photographs or similar high quality images.
If both the scanner and printer are color-capable, this choice produces
color copies. The highest scan resolution is used.
mixed mono
Original document contains a mix of both text and graphics.
(only available with
color scanner/color
printer
combinations)
Copies are black-and-white only, even if the original is color.
mixed image
Original document has a mix of both text and graphics, but image quality
is the highest priority.
(only available with
some color
scanners)
If both the scanner and printer are color-capable, this choice produces
color copies.
photo mono
Select if your original is an actual photograph or similar high quality image.
(only available with
color scanner/color
printer
combinations)
Copies are black and white only, even if the original is color. The highest
resolution is used.
Select the content
5
Set the duplex option
Duplex option
Description
Display message
Two single-sided originals are copied
to one two-sided copy (long edge or
short edge).
1>2
One double-sided original is copied to
two single-sided copies.
2>1
A double-sided original is copied to a
double-sided copy.
2>2
1 > 2 short edge
(available only if scanner
supports duplex)
(available only if scanner
supports duplex)
Note: If you press Duplex and no duplex lights come on, no duplex functions can be
performed. This response occurs if the printer does not have duplex capabilities.
Set Collation/Finishing features
Collation is turned off by default. To turn collation on, press Collation/Finishing until you see
Collate in the control panel display, and then press Select. Turning collation on produces complete,
ordered copies of the original.
Finishing features (such as stapling or hole punch) are only available if your printer supports finishing
functions. If your printer does not support finishing, only collation is supported.
Save paper when you print
This process of saving paper is sometimes referred to as N-up. Some features share a panel light.
For example, the same panel light is on for both 4-up and 4-up Landscape printing.
Set the duplex option
6
There are five choices available in the Paper Saver menu. Press Paper Saver until your selection
appears in the control panel display.
Feature
Description
Off
N-up copying is turned off (no choices lit). This is the default setting. You
can turn the N-up frame On or Off in the Copy menu on the Copy Setting
configuration page located on the resident Web page.
2-up copying transfers two originals to one copy. The two originals are
rotated and reduced in size to fit onto a single sheet.
2-up Landscape reduces your two landscape originals to fit on a single
sheet of paper.
4-up copying saves even more paper by transferring four originals to one
single-sided copy. Your four originals are reduced to fit on a single sheet of
paper in portrait mode.
4-up Landscape reduces your four originals to fit on a single sheet of
paper in landscape mode.
Note: If you want to have each page surrounded by a border, select Solid Border for
Paper Saver in the Copy menu.
Select your copy media
The printer may be capable of using media types other than plain paper for your copies.
Media type describes the kind of material being printed on, such as plain paper, transparencies, card
stock, and bond paper.
Feature
Description
Plain paper
Plain paper is the default for copy media type.
Transparency
Choose transparency to draw from the tray loaded with transparencies.
Transparency +
Separators
Press Copy Media until the transparency light is lit, and then press it
again until Transparency+Sep appears on the control panel display.
This choice inserts a plain sheet of paper between transparencies if the
transparencies and paper are correctly loaded in the printer. The Plain
Paper source must be an automatic tray and the size must be set to be the
same size as the loaded transparencies.
Other
Select from other possible copy media. Press this button repeatedly to
scroll through the other choices.
Only properly loaded media types are presented as choices. Refer to your
printer documentation for help in loading paper properly.
Select your copy media
7
2
Sending faxes
There are three ways to send an outgoing fax using the MFP control panel. You can manually enter
the telephone number to the receiving fax machine and then transmit your fax. Create shortcut
numbers and then select the shortcut number and transmit your fax.
Note: If you use the flatbed of the scanner, watch the control panel for messages. If
prompted to Place Next Or Stop, place the next page and then press Go/Send
to continue scanning. Press Stop/Clear when all the pages have been scanned.
Entering a fax recipient number
1 Load all pages in the automatic document feeder of the scanner. Place the pages according
to the drawing on the scanner.
2 Press Fax/Scan Mode repeatedly until you see Enter Phone # on the control panel display.
3 Use the numeric keypad to enter the telephone number of the person receiving the fax.
Note: Press Pause to insert a two second delay during dialing.
4 Press Go/Send. The fax modem dials the number and sends the fax once the connection is
made.
Using fax destination shortcuts
1 Load all pages in the automatic document feeder of the scanner. Place the pages according
to the drawing on the scanner.
2 Press # on the numeric keypad, and then enter the shortcut number of the fax destination.
For information on creating shortcut numbers, see “Create permanent fax destinations” on
page 25.
3 Press Go/Send. The fax modem dials the number and sends the fax once the connection is
made.
Sending faxes
8
Select a Scan to Fax destination
1 Load all pages in the automatic document feeder of the scanner. Place the pages according
to the drawing on the scanner.
2 Press Fax/Scan Mode repeatedly until you see SCAN → Fax on the control panel display.
3 Press Menu > until you see the correct fax destination.
Note: If you want to send to multiple fax destinations at the same time, you must create
a permanent destination containing all the fax numbers of the group. See your
network administrator for help.
4 Press Go/Send. The fax modem dials the number and sends the fax once the connection is
made.
Cancel an outgoing fax
There are two ways to cancel an outgoing fax:
•
While the original documents are still scanning, press Stop/Clear to cancel sending the fax.
•
After the original documents have been scanned to memory, press Menu > repeatedly until
you see Cancel Fax, and then press Select. Press Menu > repeatedly until you see the
phone number of the outgoing fax you want to cancel, and then press Select.
When you cancel an outgoing fax, the MFP control panel resets to copy mode. You must restart the
fax sending process.
Examples of typical fax jobs
You can send an outgoing fax using any of the three methods already mentioned. The examples
below show manually entering the fax number on the numeric keypad.
Note: If you are using the flatbed of the scanner, watch the control panel display for
messages. If prompted to Place Next Or Stop, place the next page and then
press Go/Send to continue scanning. Press Stop/Clear when all the pages have
been scanned.
Job 1: one page
1 Place the document on the flatbed of the scanner.
2 Press Fax/Scan Mode repeatedly until Enter Phone # appears on the control panel display.
3 Enter the fax recipient phone number on the numeric keypad.
4 Press Go/Send.
Examples of typical fax jobs
9
Job 2: multiple pages
1 Load all pages in the automatic document feeder of the scanner. Place the pages according
to the drawing on the scanner.
2 Press Fax/Scan Mode repeatedly until Enter Phone # appears on the control panel display.
3 Enter the fax recipient phone number on the numeric keypad.
4 Press Go/Send.
Job 3: mixed content (text and graphics)
1 Place the document on the flatbed of the scanner.
2 Press Fax/Scan Mode repeatedly until Enter Phone # appears on the control panel display.
3 Enter the fax recipient phone number on the numeric keypad.
4 Press Content repeatedly until mixed is selected.
5 Press Fax Resolution repeatedly until fine is selected.
6 Press Go/Send.
Job 4: photo (400 x 400 dpi)
1 Place the photo on the flatbed of the scanner.
2 Press Fax/Scan Mode repeatedly until Enter Phone # appears on the control panel display.
3 Enter the fax recipient phone number on the numeric keypad.
4 Press Content repeatedly until photo is selected.
5 Press Fax Resolution, and then select ultra fine.
6 Press Go/Send.
Job 5: colored original (credit card receipt)
1 Make a black and white copy of your original. This often produces a document that is much
clearer and more easily faxed.
2 Place the copy on the flatbed of the scanner.
3 Press Fax/Scan Mode repeatedly until Enter Phone # appears on the control panel display.
4 Enter the fax recipient phone number on the numeric keypad.
5 Press Content repeatedly until mixed is selected.
Examples of typical fax jobs
10
6 Press Fax Resolution, and then select fine.
7 Press Go/Send.
Examples of typical fax jobs
11
3
Scanning to PC
Create a scan profile
A scan profile includes all the necessary information about your originals and presets the MFP
control panel to those settings. Lexmark™ ScanBack™ Utility is an easy way to create Scan to PC
profiles. You can also browse to the IP address of the MFP to create Scan to PC or Scan to e-mail
profiles.
Use ScanBack utility
The ScanBack Utility is shipped on the MFP CD.
Step 1: Set up your Scan to PC profile
1 Launch the ScanBack Utility. If you installed the software using the default directories, click
Start, Programs, Lexmark, MFP, and then ScanBack Utility.
2 Select the MFP you want to use. If none are listed, see your systems person to obtain a list,
or click the Setup button to manually search for an IP address or hostname. You must select
at least one MFP to continue creating a profile.
3 Follow the instructions on the screens to define the type of document being scanned and
what kind of output you want to create. Available settings are determined by the capabilities
of the MFP you select.
4 Make sure to check:
•
•
Show MFP Instructions -- if you want to view or print the final directions
Create Shortcut -- if you want to save this group of settings to use again
5 Click Finish. A dialog box displays your scan profile information and the status of the
received images.
Step 2: Scan your original documents
1 Locate the MFP you specified in the scan profile.
2 Load all pages in the automatic document feeder of the scanner. Place the pages according
to the drawing on the scanner.
Scanning to PC
12
3 On the control panel, press Fax/Scan Mode repeatedly until you see SCAN → PROFILE.
4 Press Menu > repeatedly until you see your scan profile name.
5 Press Go/Send to start scanning.
Note: If you are using the flatbed of the scanner, watch the control panel for messages.
If prompted to Place Next Or Stop, place the next page on the flatbed and then
press Go/Send to continue scanning. Press Stop/Clear when all the pages have
been scanned.
6 Return to your computer. Your output file is saved in a directory or launched in the application
you specified.
Use the MarkNet Web pages
The MarkNet™ resident Web pages are stored on the MarkNet print server installed in your MFP.
Step 1: Set up your scan profile
1 Type the IP address of the MFP in the URL field of your browser, and then press Enter.
2 Click Create Scan Profiles.
3 Click PC Scan Profile.
4 Select your scan settings. For more explanation about the settings, see “Custom Scan to PC
settings” on page 14.
5 Click Next.
Step 2: Select a storage location
1 Specify a path and file name for saving the scan output file somewhere on your PC. For
example, browse to your desktop, find the appropriate directory, and type in a file name.
2 Assign a Profile Name. This is the name that appears in the SCAN → PROFILE list on the
MFP control panel.
3 Click Submit. A Receiving Image window appears on your desktop indicating that your PC is
waiting to receive the scan output file.
Step 3: Scan your original documents
1 Locate the MFP you specified in the scan profile.
2 Load all pages in the automatic document feeder of the scanner. Place the pages according
to the drawing on the scanner.
3 On the control panel, press Fax/Scan Mode repeatedly until you see SCAN → PROFILE.
Create a scan profile
13
4 Press Menu > repeatedly until you see your scan profile name.
5 Press Go/Send to start scanning.
Note: If you are using the flatbed of the scanner, watch the control panel for messages.
If prompted to Place Next Or Stop, place the next page on the flatbed and then
press Go/Send to continue scanning. Press Stop/Clear when all the pages have
been scanned.
6 Return to your PC when the job is finished. The job status window changes to Image
Received. Once your scan output file appears in the list, you can select it and launch an
application to open the file.
Note: PC Scan Profiles are not stored. Once they are used, they disappear from the
control panel list.
Custom Scan to PC settings
Menu
Settings
Description
Quick Setup
Custom
Lets you customize the scan job settings.
Text --BW PDF
Lists preset formats.
Text -- BW TIFF
Lets you customize the brightness, set the size
of your originals, and the orientation of your
scan file output.
Mixed -- Gray PDF
Mixed -- Color PDF
Photo -- Color JPEG
(Color is only available if your scanner supports
color.)
Photo -- Color TIFF
Photo -- Gray JPEG
Photo -- Gray TIFF
Format Type
JPEG, PDF, TIFF and
PostScript (PS)
Determines the final output format of the
scanned document.
Compression
None, JPEG, ZLib, G4
Determines the compression format used to
compress the scanned document output file.
Contrast
Text, Mixed, Photo
Describes the content of the originals being
scanned.
Scan Depth
RGB (available only with color
scanners)
Describes the color scale of the originals being
scanned.
Gray, BW (Black and White)
Resolution
75, 150, 200, 300, 400, and
600 dpi
Sets the resolution of the scanned document
output file.
Original Size
Letter, Legal, A4, and so on.
Tells the scanner the paper size of the originals
being scanned.
Orientation
Portrait, Landscape
Determines the orientation of your scanned
document output file.
Custom Scan to PC settings
14
Menu
Settings
Description
Save to
Type in the path or browse to
the location
Location path where scanned file is to be
located.
Profile Name
Type in a unique name
Name that appears in the MFP control panel.
Select this name in the MFP control panel to
activate the scan profile.
Duplex
Both or Single (only available
with duplex scanners)
Specifies the original is a duplex page.
Custom Scan to PC settings
15
4
Scanning to e-mail
Create a scan to e-mail profile
A scan profile includes all the necessary information about your originals and presets the MFP
control panel to those settings.
Scan profiles are temporary destinations. A maximum of ten scan profiles can be stored. When the
eleventh profile is created, the oldest is discarded.
Step 1: Set up your scan profile
1 Type the IP address of the MFP in the URL field of your browser, and then press Enter.
2 Click Create Scan Profiles.
3 Click E-mail Scan Profile.
4 Specify the recipient and the sender. You can assign a subject and add a message to the
content of the e-mail.
5 Select the scan type, resolution, and size of the original.
6 Specify whether the file is to be sent as an e-mail attachment or as a Web link.
•
•
Attachment -- a copy of the scanned document is sent attached to the e-mail message
Web link -- the scanned document is sent to a storage area on a Web site and a Web link
to that site is sent to the e-mail recipient
7 Assign a profile name.
8 Click Submit.
Step 2: Scan your original documents
1 Locate the MFP. This must be the same MFP where the scan profile is stored.
2 Load all pages in the automatic document feeder of the scanner. Place the pages according
to the drawing on the scanner.
3 On the control panel, press Fax/Scan Mode repeatedly until you see SCAN → PROFILE.
4 Press Menu > repeatedly until you see your scan profile name.
Scanning to e-mail
16
5 Press Go/Send to start scanning.
Note: If you are using the flatbed of the scanner, watch the control panel for messages.
If prompted to Place Next Or Stop, place the next page on the flatbed and then
press Go/Send to continue scanning. Press Stop/Clear when all the pages have
been scanned.
Scan to permanent e-mail destinations
For e-mail addresses you frequently use, permanent e-mail destinations can be set up by your
network administrator. Once a permanent destination is created, it is available on the MFP control
panel.
1 Locate the MFP where the permanent destinations are stored.
2 Load all pages in the automatic document feeder of the scanner. Place the pages according
to the drawing on the scanner.
3 On the control panel, press Fax/Scan Mode repeatedly until you see SCAN → EMAIL.
4 Press Menu > repeatedly until you see your e-mail destination.
Note: If you want to send to multiple e-mail destinations, press Select when you see each
destination, and then Menu > until you see your next choice. An asterisk appears
beside your selections. Your e-mail is sent to each destination you selected and the
last destination appearing in the control panel display.
5 Press Go/Send to start scanning.
Note: If you are using the flatbed of the scanner, watch the control panel for messages.
If prompted to Place Next Or Stop, place the next page on the flatbed and then
press Go/Send to continue scanning. Press Stop/Clear when all the pages have
been scanned.
Scan to permanent e-mail destinations
17
5
Scanning to FTP
Scan to an FTP destination
Once an FTP destination has been configured by your systems person, the name of the destination
becomes available as a network scanning choice in the MFP control panel.
1 Locate the MFP you want to use. This must be the MFP configured with your FTP destination.
2 Load all pages in the automatic document feeder of the scanner. Place the pages according
to the drawing on the scanner.
3 Press Fax/Scan Mode repeatedly until you see SCAN → FTP.
4 Press Menu > repeatedly until you see the name of your FTP destination, and then press
Select.
5 Press Go/Send to start scanning.
Note: If you are using the flatbed of the scanner, watch the control panel for messages.
If prompted to Place Next Or Stop, place the next page on the flatbed and then
press Go/Send to continue scanning. Press Stop/Clear when all the pages have
been scanned.
After the job is finished, an FTP confirmation page is printed. The confirmation page includes
the FTP server, directory, and the file name.
FTP confirmation page
FTP server: rome.gre.kidnet.bigcity.com
Directory: web/scans
Save Scan File (s)
pic2000-03-13_131942.pdf
Scanning to FTP
18
6
Using the MFP control panel
Button and menu key
12
13
Key
1
15
14
17
16
11
1
3
4
9
2
5
6
8
7
10
Function in copy
mode
Function in fax mode
Function in scan to
network mode
Control panel status
displays for copying and
a Ready message.
Manual fax: Control panel status
displays a prompt to Enter
Phone #.
Control panel status displays
for scanning and current
scan to network destination.
Scan to Fax: Control panel
displays SCAN → Fax
2
3
Keypad for entering
number of copies to be
made.
Manual fax: Keypad for entering
outgoing fax phone numbers.
Menu> and <Menu
moves you forward and
backward in copy
menus.
Manual fax: Menu> does not
apply. Backspace (<Menu) lets
you move backward to reenter
information.
Scan to Fax: Keypad lets you
move around in destinations lists.
Keypad for entering numbers
lets you move around in
destination lists.
Menu> and <Menu moves
you forward and backward in
destination lists.
Scan to Fax: Menu > and < Menu
moves you forward and backward
in destination lists.
4
Select makes your
choice active and saves
your setting.
Pause lets you insert a two second
dial out pause in an outgoing fax
phone number.
Using the MFP control panel
19
Select makes your choice
active and saves your
setting.
Function in copy
mode
Function in fax mode
5
Return takes you back
to previous menu
choice.
Redial sets the fax modem to
redial the last outgoing fax phone
number.
Return takes you back to
previous menu choice.
6
Original Size defines
the size of the original
(letter, legal, A4, other).
Original Size defines the size of
the original (letter, legal, A4,
other).
Original Size defines the
size of the original (letter,
legal, A4, other).
7
Copy Size specifies the
size of the copy (letter,
legal, A4, other).
Copy Size does not apply to fax
mode.
Copy Size changes the size
setting for the scanned file
(letter, legal, A4, other).
8
Control panel displays a
Ready status message
indicating you are in
copy mode (default).
Manual fax: Control panel
displays an Enter Phone #
prompt.
Control panel displays your
custom scan profile name or
a list of e-mail and FTP
destinations.
Stop/Clear clears the
number of copies so
you can start over or
cancels the copy job
being sent.
Stop/Clear stops a fax from being
sent or cancels a fax that is
already being sent. Control panel
returns to copy mode.
10
Go/Send starts the
process of scanning an
original and sending the
copy to the printer.
Go/Send activates the fax dial out
process.
Go/Send starts the process
of scanning a document and
sending it to a file, as an
e-mail, or to a designated
FTP server.
11
<Lighter or Darker>
adjusts the darkness of
the copy being made.
<Lighter or Darker> adjusts the
darkness of the fax being sent.
<Lighter or Darker> adjusts
the darkness of the copy
being made.
12
<Reduce or Enlarge>
adjusts the size of the
copy being made.
<Reduce or Enlarge> does not
apply to fax mode.
<Reduce or Enlarge> does
not apply to scan to network
mode.
13
Collation/Finishing
collates the copies
being made or applies
finishing options (if
available).
Collation/Finishing does not
apply to fax mode.
Collation/Finishing does
not apply to scan to network
mode.
14
Duplex specifies the
type of duplex copies
being made.
Duplex does not apply to fax
mode, unless you have duplex
capabilities on your scanner.
Duplex does not apply to
scan to network mode,
unless you have duplex
capabilities on your scanner.
15
Paper Saver lets you
print copies 2-up or
4-up in order to save
paper.
Paper Saver does not apply to fax
mode.
Paper Saver specifies the
orientation (portrait or
landscape) of your original
documents (applies only to
PDFs).
Key
9
Scan to Fax: Control panel
displays SCAN → Fax.
Note: Faxes already scanned to
memory cannot be canceled by
pressing Stop/Clear. Click the
“Send faxes” link for more
information.
Button and menu key
20
Function in scan to
network mode
Stop/Clear stops the scan
and returns the control panel
to copy mode.
Faxes, e-mails, and all other
network scans must be
resubmitted.
Key
16
Function in copy
mode
Copy Media specifies
the type of media for
your printed copies
(plain paper,
transparencies, other).
Function in fax mode
Fax Resolution specifies the
resolution of your fax (standard,
fine, super fine, ultra fine).
Standard is the default (no lights).
Function in scan to
network mode
Fax Resolution specifies
the resolution and JPEG
quality of your scan to
network job (standard, fine,
super fine, ultra fine).
Standard is the default (no
lights).
17
Content lets you
specify the content of
your original being
copied (text, mixed,
photo).
Content lets you specify the
content of your outgoing fax (text,
mixed, photo).
Button and menu key
21
Content lets you specify the
content of the original being
scanned.
Function modes
Control panel
mode
Copy
When it appears on the control panel
Message displayed
Default mode (you do not need to press Fax/Scan
Mode)
Ready
In copy mode, you can make a copy by placing the
document in the scanner and pressing Go/Send on the
MFP control panel.
Fax
If you have set the basic fax information during setup,
(manually enter the press Fax/Scan Mode once to move the control panel
into this mode.
outgoing fax phone
number)
In fax mode, enter the fax phone number of the recipient
using the numeric keypad on the MFP control panel, and
then press Go/Send to send the fax.
Enter Phone #
Scan to Fax
SCAN → Fax
(permanent
destinations)
If you have set the basic fax information during setup,
and you have created fax destinations, press Fax/Scan
Mode repeatedly until you see SCAN → Fax in the MFP
control panel display.
Note: To send faxes to multiple destinations, you must
create a permanent destination containing the group of
numbers you want to fax. See “Sending faxes” on page 8
for more information.
Scan to Profile
(back to PC or to
an e-mail)
For your scan profiles to appear on the MFP control
panel, you must define both your Scan to PC and
Scan to e-mail job profiles using the MarkNet resident
Web pages.
SCAN → PROFILE
In Scan to Profile mode to see your profiles, you must
press Fax/Scan Mode repeatedly until you see
SCAN → PROFILE, and then Menu > to advance through
your profile names.
Scan to e-mail
(permanent
destinations)
For a list of permanent e-mail destinations to appear on
the MFP control panel, you must set up each e-mail
recipient using the MarkNet resident Web pages.
SCAN → EMAIL
In Scan to e-mail mode to see your e-mail destination
list, you must press Fax/Scan Mode repeatedly until you
see SCAN → EMAIL, and then Menu > to advance
through your permanent destinations.
Note: To send to multiple e-mail destinations, press
Select to add an asterisk to your choices. Press Go/
Send when you have finished.
Scan to FTP
(FTP servers)
For a list of Scan to FTP destinations to appear on the
control panel, you must set up the FTP destinations
using the MarkNet resident Web pages.
In Scan to FTP mode to see a list of your configured FTP
servers, you must press Fax/Scan Mode repeatedly until
you see SCAN → FTP, and then Menu > to advance
through your FTP destinations.
Note: You can create multiple FTP servers, but you can
only scan to one server at a time.
Function modes
22
SCAN ® FTP
7
Customizing your MFP configuration
Customize copy settings
There are two ways to set up the default settings for making copies:
You can manually define default settings for making copies at the control panel.
1 Set Content, Duplex and all the other settings the way you typically do.
2 Press Menu > until Copy Menu appears, and then press Select.
3 Press Menu > until Save Settings appears, and then press Select.
4 Press Menu > until =Save appears, and then press Select.
Saving Settings appears briefly on the display to confirm the settings have been entered
correctly. The normal display showing Ready, scaling percentage, and number of copies reappears.
You can also set default settings for making copies at the resident Web page.
1 Type the IP address of the MFP in the URL field of your browser (for example,
http://192.168.236.24), and then press Enter.
2 Click Configuration.
3 Select Copy Settings from the MFP menu.
Note: Many of the available settings depend on the type of printer and scanner you have.
Restore factory default settings
To restore the default settings manually:
1 Press Menu > until Copy Menu appears, and then press Select.
2 Press Menu > until you see Factory Defaults displayed, and then press Select.
3 Press Menu > until you see =Restore, and then press Select.
Restoring Factory Defaults appears briefly on the display to confirm the settings have been
entered correctly. The control panel displays the Ready status, scaling percentage, and number of
copies.
Customizing your MFP configuration
23
To restore the default settings through the resident Web page:
1 Type the IP address of the MFP in the URL field of your browser (for example,
http://192.168.236.24), and then press Enter.
2 Click Configuration.
3 Select Copy Setup from the MFP menu.
4 Find the Factory Defaults drop-down box, and select Restore.
5 Click Submit.
Manually set basic fax information
If you have purchased a MarkNet N2501e print server, during power up the message Please Set
Time appears. This is the prompt to begin the required fax setup.
Special tips for using the numeric keypad
•
Repeatedly pressing each button changes it from a number, to the uppercase
character, to the lowercase character, and then to the next character.
•
Pressing Menu> or <Menu scrolls through all choices. This method offers you
additional characters not found on the numeric keypad, such as left and right
parenthesis, dashes, quotes, and so on.
•
Press Copy Size to move to the next field or Original Size to move to the
previous field.
1 On the control panel, press Menu> repeatedly until you see Fax Quick Setup, and then
press Select.
2 When Country/Zone appears, use Menu> to find your country and time zone (for example,
Eastern), and then press Select to save your choice.
3 Set the current date and time:
•
•
If the correct date and time appear on the display, press Return to go to the next menu
item.
If the default date and time appear (1900-01-01 15:35) on the display, use the numeric
keypad to change the numbers in each field. After the date and time are set, the next
menu item appears.
4 When you see Station Name, enter your name or company name using the numeric keypad
on the panel.
5 Press Return when you have finished entering your Station Name. SAVED briefly appears.
6 When you see Station Number, enter your fax phone number using the numeric keypad.
Manually set basic fax information
24
7 Press Return after entering your Station Number. SAVED briefly appears. After the last menu
item has been entered, Setup Complete appears.
Create permanent fax destinations
Instead of entering the phone numbers of fax recipients each time you send a fax, you can create
permanent fax destinations that appear in the MFP control panel.
1 Type the IP address of the MFP in the URL field of your browser, and then press Enter. The
destinations you create are stored only on this MFP.
2 Click Configuration.
3 Click Manage Destinations.
4 Click Fax Destinations Setup.
5 Enter a unique name for the fax recipient and specify their fax number (for example,
John_Acct 555-1212). If you want to create a group fax destination, place a comma after
each fax recipient number entered. Make sure your destination name identifies it as group fax
or a fax distribution list.
6 If you want, you can assign a shortcut number (1—245). Assigning a shortcut lets you
press # on the numeric keypad, and then the shortcut number to activate your scan.
Note: If you try to assign a shortcut number already in use, you are prompted to select
another number.
7 Click Submit.
Change fax send and receive settings
When incoming faxes are sent to your printer, they are documented in a Receive Fax Log. For more
information about this log, see “Adjust analog fax log options” on page 27.
1 Type the IP address of the MFP in the URL field of your browser, and then press Enter. The
destinations you create are stored only on this MFP.
2 Click Configuration.
3 Under the MFP heading, click Fax Setup.
4 Select either fax server or analog (only available on the MarkNet N2501e). For more
information, see “Adjust analog send fax options” on page 26.
5 Click Submit if you are changing the mode. If not, click Configuration.
6 Make changes and click Submit.
Create permanent fax destinations
25
Adjust analog send fax options
Option
Description
Auto Redial
Sets the number of redial attempts the modem makes if the phone line
is busy.
This can be set for 0 through 14 attempts. The default is 5 redials.
Redial Frequency
Sets the number of minutes between redial attempts (1—200 minutes).
The factory default is set to redial every three minutes repeatedly until
the number of attempts defined in Auto Redial have been made.
Fax Resolution
Adjusts the resolution of the fax being sent.
The choices are:
•
•
•
•
Standard 200 x 100 dpi (204 x 98 metric)
Fine 200 x 200 dpi (204 x 196 metric)
Super Fine 300 x 300 dpi (204 x 391 metric)
Ultra Fine 400 x 400 dpi (408 x 391 metric)
Faxes are sent in the specified resolution if that resolution is supported
by the receiving fax machine.
Default Content
Defines the content of the original document being faxed.
The choices are:
• Text
• Mixed
• Photo
Default Darkness
Lightens or darkens the outgoing fax.
Press Menu> to darken and <Menu to lighten.
(-) . . . .* . . . .(+)
Dialing Mode
Sets the fax modem to dial out using Tone or Pulse.
The default setting is Tone. Pulse dialing is not available in Europe.
Adjust analog send fax options
26
Adjust analog receive fax options
Option
Description
Fax Storage
Determines whether or not the incoming faxes are stored if they cannot
immediately be printed.
The settings are ON or OFF. The default setting is ON.
Fax Paper Size
Defines the size of paper on which incoming faxes are to be printed
(letter, legal and so on) if the requested size is not available.
Fax Paper Type
Defines the type of paper on which incoming faxes are to be printed
(plain paper, card stock, and so on). If the requested type is not
available, the printer prompts for the correct paper to be loaded.
Output Bin
Defines the output bin where incoming faxes are to be printed (standard
bin, bin 1, or bin 2).
Auto Reduction
Sets the printer to fit incoming faxes to the available Fax Paper Size.
The choices are YES and NO.
Rings to Answer
Lets you set the number of times the phone rings before the fax
answers.
The default for the fax modem port is to answer incoming calls on the
first ring. Other choices range from 1 through 25.
Distinctive Ring Feature
Three options are available:
• Enable Single Ring Pattern
• Enable Double Ring Pattern
• Enable Triple Ring Pattern
All options are enabled by default. By changing these settings, you
control which type of ring the MFP answers.
Adjust analog fax log options
Option
Description
Print Send Log
Prints a list of faxes sent.
Print Rcv Log
Prints a list of received faxes.
Auto Print Logs
Automatically prints both fax logs when the log is full. The setting must
be ON (default).
When the setting is OFF, the log is maintained, but not automatically
printed. Also, the oldest log entries are removed when the log becomes
full.
Clear Logs
Removes all entries from the send and receive logs.
Transmission Log
Specifies that when you send a fax, a transmission log is printed to
verify the fax was sent correctly.
The settings are Always (default), Never, or Error Only.
Adjust analog receive fax options
27
Option
Description
Log Paper Size
Selects an output paper size (Letter, Legal, and so on) for the log.
Log Paper Size is only used if the setting for Log Paper Type is not
available.
The choices vary from printer to printer. For information about what your
printer supports, refer to your printer documentation.
Log Paper Type
Selects an output paper type (Plain, Card stock, and so on) for the log.
The choices vary from printer to printer. For information about what your
printer supports, refer to your printer documentation.
Log Output Bin
Selects an output bin (Standard, Bin 1, or Bin 2) for the log.
The choices vary from printer to printer. For information about what your
printer supports, refer to your printer documentation.
Adjust analog fax log options
28
Adjust fax server options
Option
Description
To Field
Refer to your fax server documentation for the exact format for the
e-mail address field.
Use [NUMBER] where the phone number should appear on the address
line.
Reply Address
Sets the e-mail from address used for all fax server jobs.
Note: Most fax server software sends confirmations to this address.
Refer to your fax server documentation to decide on a reply address.
Subject
Sets the subject text to use for all fax server e-mail jobs.
Message
The text body sent with each fax server e-mail job.
Scan Type
The format to use for image attachments sent to the fax server.
Refer to your fax server documentation to find a supported format.
Paper Size
Sets the default paper size to use for scanning original documents to be
faxed.
Fax Resolution
Sets the resolution used to scan the original documents to be faxed.
Note: The fax resolution used for the actual analog fax call is set on
your fax server software.
Default Content
Defines the content of the original document being faxed.
The choices are:
• Text
• Mixed
• Photo
Default Darkness
Lightens or darkens the outgoing fax.
Original Orientation
Sets the orientation of the original document being faxed.
Scan to E-mail General Setup
In addition to identifying your SMTP gateway, you can also enter a generic subject and message that
will be included on all scanned e-mail.
1 Type the IP address of the MFP in the URL field of your browser, and then press Enter.
2 Click Configuration.
3 Under the MFP heading, click Scan to E-mail General Setup.
4 Specify the SMTP gateway of your network or internet service provider, plus your e-mail
address for the reply line of the message.
Note: You may want to use the network administrator’s address as the default address.
When an e-mail cannot be sent, notification is returned to this address.
Adjust fax server options
29
5 Enter a subject (descriptive name) and a generic message. This information appears on all
e-mail scanned to permanent e-mail destinations.
6 To store scanned documents on a Web site and send only a Web link in the e-mail, complete
the Web link section.
7 After entering your choices, click Submit.
Create permanent e-mail destinations
When creating an e-mail destination, you must decide what kind of e-mail the recipient will receive.
You can send a document scanned to e-mail as an:
•
Attachment -- a copy of the scan output file is sent attached to the e-mail message
•
Web link -- scan output file is sent to a Web site and only a Web link is sent in the e-mail
Create a separate recipient entry for each e-mail type and give them unique names easily identified
in the e-mail destinations list.
1 Type the IP address of the MFP in the URL field of your browser, and then press Enter.
2 Click Configuration.
3 Click Manage Destinations.
4 Click E-mail Destinations Setup.
5 Enter a unique name for the e-mail recipient and specify the e-mail address.
Note: You can create an e-mail distribution list by creating a destination containing
multiple e-mail recipients. Place a comma after each e-mail address you enter.
Assign a unique name to the destination that identifies it as an e-mail distribution
list.
6 Select which type of Scan to e-mail you want to send. Attachment is the most common
choice, but you can avoid attaching large scan output files to e-mail if you use a Web link.
Here is an example of one e-mail recipient with two unique names.
Name
Address
Type
Shortcut
Smith, Jane
[email protected]
Attachment
5
Smith, Jane2
[email protected]
Web link
6
7 Select scan type and resolution.
8 If you want, enter a shortcut number (1—245) to identify the recipient. A shortcut number lets
you rapidly find your e-mail recipient by pressing # on the numeric keypad, and entering the
Create permanent e-mail destinations
30
number. If you attempt to assign a shortcut number that is already in use, you are prompted
to make another selection.
9 Click Add/Modify to add the name to the available list of e-mail addresses. This new
recipient is now visible in the e-mail destination list (and the entry is also available for
selection from the MFP control panel menu).
Create FTP destinations
Note: Although you can create multiple FTP server destinations, you can only scan to one
destination at a time.
1 Type the IP address of the MFP in the URL field of your browser, and then press Enter.
2 Click Configuration.
3 Click Manage Destinations.
4 Click FTP Destinations Setup.
5 Assign a name to the FTP destination. This is the name that appears in the MFP control
panel display.
6 Enter Server name, Log-in, Password, and Filename.
7 Select scan type and resolution.
8 If you want, enter a shortcut number (1—245) to identify the recipient. A shortcut number lets
you rapidly find your FTP destination by pressing # on the numeric keypad, and entering the
number. If you attempt to assign a shortcut number that is already in use, you are prompted
to make another selection.
9 After entering your choices, click Submit.
Create FTP destinations
31
Create an external destinations file
Instead of creating individual e-mail, FTP, or fax destinations, you can create multiple destinations
and store them in an external ASCII text file. You can store a large list of addresses in a good location
on a network FTP server, rather than storing them as permanent destinations in the MFP hardware.
A file of permanent destinations (e-mail, FTP, and fax) can be created manually in any text editor
using the following entries as guides:
% Permanent Destinations List From 192.168.236.24
DESTEMAILADD 1 "NAME=Smith,
Jane;[email protected];TYPE=1;SCAN=4;RES=150;SHORT=1;"
DESTEMAILADD 1
"NAME=Robb;[email protected];TYPE=1;SCAN=4;RES=150;SHORT=50;"
DESTEMAILADD 1 "NAME=Doe,
John;[email protected];TYPE=1;SCAN=1;RES=200;SHORT=0;"
DESTEMAILADD 1 "NAME=Doe,
John2;[email protected];TYPE=2;SCAN=4;RES=150;SHORT=0;”
DESTFTPADD 1
“NAME=smith;SERVER=smith.com;LOGIN=bob;PASS1=sno;PASS2=sno;FN=scan;SCAN=8;RES=300;SHORT
=20;”
DESTFAXADD 1 “NAME=Sheila;NUMBER=5544;SHORT=88;”
Valid values for an external destinations file:
•
Type=1 entries are e-mail attachments.
•
Type=2 are set up to be Web links.
•
Short=You may assign a shortcut number from 1—245; 0 means no shortcut number has
been assigned.
•
Scan=Values are listed in the following table:
Scan value
Content and output file
0
Text content - BW PDF
1
Text content - BW TIFF
4
Text content - BW PS
5
Mixed content - BW PDF
6
Mixed content - BW TIFF
7
Mixed content - Gray PDF
8
Mixed content - RGB PDF
9
Mixed content - Gray PS
10
Photo content - Gray JPEG
11
Photo content - Gray TIFF
Create an external destinations file
32
•
Scan value
Content and output file
12
Photo content - RGB JPEG
13
Photo content - RGB TIFF
14
Photo content - RGB PS
Res= Resolution values can equal 75, 150, 200, 300, 400, or 600 dpi.
Specify the external file
1 Type the IP address of the MFP in the URL field of your browser, and then press Enter.
2 Click Configuration.
3 Click Manage Destinations.
4 Click Specify External Destinations File.
5 Specify the FTP server where the file is stored, plus the login and password necessary to
gain access to the server. Specify the full path and name of the file.
6 Click Submit. The file is accessed from the server location. The e-mail and FTP destinations
stored in the external file are added to the current list of permanent destinations.
7 Check the process worked by clicking Back on the Browser menu until you see one of the
destinations setup links, such as E-mail Destinations Setup.
Note: The process works the same for FTP and fax entries.
8 Click E-mail Destinations Setup. The e-mail destinations stored in the file now appear in the
e-mail destination list. You may have to scroll through the list to find them.
The external destinations file is refreshed every 24 hours, on MFP power up, or by re-submitting the
file (steps 1 through 6).
Disable scan functions
You can limit the scan to network functions available on a particular MFP control panel. You can
disable any scan to network mode without affecting the others.
Disabling Scan to e-mail or Scan to FTP lets you create or add permanent destinations, but the mode
is not visible in the control panel, so the scan output file cannot be sent.
Disabling Scan to Profile prevents anyone from creating a profile, plus the function is not visible in the
MFP control panel.
Disabling the multipage TIFF function places each page of a scan in an individual TIFF file rather
than placing all pages in a single, multipage TIFF file.
Disable scan functions
33
Disabling the Scan to FTP confirmation page stops the confirmation page from being printed.
1 Type the IP address of the MFP in the URL field of your browser, and then press Enter.
2 Click Configuration.
3 Under the MFP heading, click Scan to Network General Setup.
4 Remove the check mark from any function you want to disable.
5 Click Submit.
Configure Job Accounting
Track MFP usage
MarkTrack™ is software that combines the unique capabilities of Lexmark network printers and
MarkVision™ software with an Oracle database.
MFP Job Accounting provides MarkTrack users with the ability to accumulate statistics on copy jobs,
outgoing faxes, and scan to network jobs by requiring users to enter a Job Account number on the
control panel.
Note: To count outgoing faxes, you must be using a MarkNet N2501e print server
containing a fax modem port.
Create accounts
To use Job Accounting, you must create a Job Account for each authorized MFP user. You must also
notify each user that they must enter the assigned Job Account number on the control panel before
they are allowed to scan.
1 Type the IP address of the MFP in the URL field of your browser, and then press Enter.
2 Click Configuration.
3 Click MFP Job Accounting.
4 Click Manage Job Accounts.
5 Enter a name for the Job Account and assign an account number.
6 Click Add/Modify. The new Job Account appears in the list.
Configure Job Accounting
34
Protect the Job Account list
To prevent the Job Account list from being modified by unauthorized individuals, set a password to
protect the information stored on the print server.
1 Type the IP address of the MFP in the URL field of your browser, and then press Enter.
2 Click Configuration.
3 Under the Other heading, click Security.
4 Enter a user name and a password.
Note: The user name is MarkNet. The password is whatever you assign. You must type
it a second time for verification.
5 Click Submit.
Select a tracking mode
1 Type the IP address of the MFP in the URL field of your browser, and then press Enter.
2 Click Configuration.
3 Click MFP Job Accounting.
4 Select one of the tracking modes. For a list of available tracking modes, see “List of tracking
modes” on page 36.
5 Specify a timeout. The timeout is the amount of time that passes after a scan is completed
before the control panel is relocked.
6 Click Submit.
Configure Job Accounting
35
List of tracking modes
Mode
Description
Job Acntg. Off
This is the default mode.
Courtesy I
Enter an account number on the keypad before the control panel accepts the
job information.
The number is not checked against the master Job Account list.
Courtesy II
There are two methods of entering Job Account information:
• Enter an account number on the keypad before the control panel accepts the
job information.
• Select a name from the active Job Account menu on the MFP control panel.
Press Menu > or < Menu repeatedly until the name associated with the
account is displayed in the control panel, and then press Select.
Courtesy III
There are two methods of entering Job Account information on the control
panel:
• Enter an account number on the control panel keypad; however, for
increased security the account is checked against the master list and
validated.
• Select a name from the active Job Account menu on the MFP control panel.
Press Menu > or < Menu repeatedly until the name associated with the
account is displayed in the control panel, and then press Select.
Validation
Sets the most security for using the MFP control panel.
Enter an account number using the keypad on the MFP control panel. The
account is checked against the master Job Account list and validated before
the control panel accepts a scan. This choice does not allow a name to be
selected from the Job Account menu.
Configure Job Accounting
36
Use Validation mode to limit usage
Validation mode, when used with MarkTrack, collects statistical data about copy jobs, network scans,
and outgoing faxes. However, even if you do not use MarkTrack, Validation mode can be used to limit
MFP usage to authorized individuals.
When Validation mode is active, the MFP control panel displays an Enter Account # prompt. To
unlock the control panel, a user must enter a valid account number using the keypad on the control
panel, and then press Select.
1 Type the IP address of the MFP in the URL field of your browser, and then press Enter.
2 Click Configuration.
3 Click MFP Job Accounting.
4 Select Validation mode.
5 Specify a timeout. The timeout is the amount of time that passes after a scan is completed
before the control panel is relocked.
6 Click Submit.
Job Accounting status messages
Message
Description
<Date Time>
Message appears instead of the Ready message when Job Accounting
modes Courtesy II or Courtesy III are set.
Select Account
<Date Time>
Enter Account #
Select Account
Account Name
Message appears instead of the Ready message when Job Accounting
modes Courtesy I or Validation are set.
Message appears instead of the Ready message when Job Accounting is
active. A valid account name must be selected from the Job Account
active list.
1 Press Fax/Scan Mode until you see Job Acct.
2 Press Menu> until you see your Account Name, and then press Select.
After a correct account is selected, the control panel resets to copy mode
and the Ready message appears. Start your scan as usual.
Enter Account #
XXX_
Job Accounting is active. A valid account number must be entered on the
numeric keypad of the control panel.
After a correct account number is entered and validated, the control panel
resets to copy mode and the Ready message appears. Start your scan as
usual.
Account #
Rejected
Applies to Courtesy III or Validation mode. Message indicates that an
invalid account number has been entered.
If you have questions regarding valid account numbers, see your network
administrator for assistance.
Use Validation mode to limit usage
37
8
Solving copy problems
Common problems and solutions
For additional help solving printer problems, refer to the documentation that shipped with your printer.
Problem
Solution
Copy printed on the wrong kind of paper
Wrong type of paper is loaded in the paper tray you
selected, or the printer may not be set up for
automatically selecting the paper type.
1 Put the correct paper or other media in the tray.
2 Check the paper type setting on the paper menu of
the printer.
3 Try sending the copy again.
Warning displays on printer operator panel
about collation area
The printer does not have enough memory. You may
have to turn collation off and manually sort your copies.
I pressed Continue on the printer operator
panel, but my copies were not in correct
sequence
Installing additional memory helps alleviate this
problem.
Color page came out black and white
1 This happens if the scanner or printer (or both) can
only produce black and white. Check to see if your
MFP has color capabilities.
2 If your MFP is capable of color copies, make sure
Content is set to mixed or photo (not text), and try
again.
Duplex does not work
This usually means the scanner or printer (or both) is
not capable of duplex. Check the documentation that
shipped with your MFP to see if it has duplex
capabilities.
Duplex lights do not come on
Cannot select duplex settings
Ready status message is not displayed in
control panel
The control panel and the printer are not talking to each
other or the printer may be turned off.
1 Try turning the printer off and back on.
2 Trying turning off the scanner and the printer. Make
sure you power back on in the correct sequence. First
turn on the scanner, and then turn on the printer.
Control panel buttons do not respond
The printer is turned off. Turn the printer back on.
Solving copy problems
38
Problem
Solution
Unwanted black lines print on my copy
Clean the entire top cover and the document flatbed.
Also clean the automatic document feeder.
Paper does not feed through the automatic
document feeder
Make sure the paper support is open.
Make sure the pages to be copied are not damaged or
stapled together.
Copy status messages
Message
Ready
Description
100%
1
Copy job is printing. If a copy job is printing, this message appears even
when a fax is being sent or received.
Copying…
Busy
♦
100%
1
Copy job is being canceled.
Copy Halted…
Wait
100%
MFP is set for copy mode. This is the default setting for the control panel.
1
Place Next
1 Place the next page on the flatbed.
Or Stop
2 Press Go/Send to continue sending pages.
3 Press Stop/Clear to end the scan.
The control panel resets to copy mode and the Ready message appears
on the display.
Copy error messages
Error
Description
Check
There is a problem with the printer, such as a paper jam, open door,
missing tray, or toner problem. Check the printer operator panel for a
detailed message.
Printer
For more help solving the problem, refer to the documentation that
shipped with the printer.
Check Scanner
There is a problem with the scanner.
Press Return
1 Check that all the cables and power cords are still correctly plugged
into the scanner.
2 Turn off the MFP hardware, then power back up. First, turn on the
scanner, then turn the printer back on.
3 If you are unable to reset the MFP, contact Lexmark Customer Support.
On the MFP CD, click Contact Lexmark.
Copy status messages
39
Error
Description
Close Door
Message appears in the top line of the control panel display. Toner
cartridge door is open. This message does not display for all scanner and
printer combinations.
No Duplex Option
Message appears if user presses Duplex on the MFP control panel, but
the duplex option is not installed correctly on the printer.
Installed
Check printer documentation for information about installing the duplex
option.
Copy error messages
40
9
Solving fax problems
Common fax questions
Problem
Solution
Can I create a fax distribution
list?
Group faxing is supported. When you create a permanent fax
destination, separate multiple entries with a comma.
How do I enter a pause in the fax
recipient phone number?
• If you are manually dialing using the numeric keypad, press
Pause on the control panel to enter a two second pause. The
pause appears as a dash (-).
• If you are creating a fax destination using the MarkNet
resident Web pages, type a dash (-) in the phone number
(9-1-555-444-2222).
Solve problems sending faxes
Problem
Solution
Some pages were not sent
1 Check the transmission log for information about the
problem. The status column provides information about the
sending problem. The pages column tells you how many
pages were sent successfully.
No pages were sent
2 Resend the pages that did not get sent, or resend the entire
fax job.
No dial tone for the modem
1 Check your fax phone line and the cable hookup to the
MarkNet N2501e card. Try resending.
2 Check the transmission log for information about the
problem.
Fax was illegible when received
Receiving fax unit may not support high quality faxes. It may be
automatically reducing the resolution.
Adjust the resolution and the content setting, then try resending
the fax.
Solving fax problems
41
Problem
Solution
Data was missing
Receiving fax unit may not have automatic reduction turned on.
Try resending fewer pages at once.
When sending a large fax,
scanning stalls in the middle of
the scan
MFP first scans all the fax pages to memory.
If you do not have a hard disk installed in your printer, using
high resolution settings or sending lots of pages at once can
rapidly fill up the available printer memory. When the printer
memory is full, MFP dials and attempts to send the fax pages
already in memory. After those pages are sent, scanning
resumes.
If your fax fails to send correctly, you can try either sending
fewer pages at once or sending them at a lower resolution.
If you frequently send large faxes, or faxes requiring high
resolutions, you may want to add a printer hard disk or more
memory to your MFP.
Solve problems receiving faxes
Problem
Solution
Fax was not received
Have the sender resend the fax.
Make sure you have not disabled receiving. If you are attached
to a network, browse to the IP address of the MarkNet N2501e
and check the setting. (Hint: Setting/Configuration, Advanced
Settings, and then check the Enable Receive box.)
Fax was printed on two pages
Automatic reduction is turned off.
Turn automatic reduction on and have the fax resent.
Fax quality is poor
Have the fax sent at a higher resolution.
Solve problems receiving faxes
42
Send fax status
Message
Description
Enter phone #
xxx-xxx
Prompt to use the numeric keypad to enter the fax recipient
phone number.
Scanning to Mem
Original documents are being scanned to memory.
Busy ¨
Fax recipient number is being dialed.
Dialing…
Ready
100%
1
Connect <Baud><ECM>
Ready
100%
1
Page X is currently being sent.
Sending Page X
Ready
100%
1
Call Complete
Ready
100%
Shows connection and baud rate with the receiving fax
machine. If error correction mode is being used, ECM is
displayed on the control panel.
1
All the pages of the fax have been sent and the phone line
connection has hung up.
Fax shortcut has been initiated by pressing #, and then entering
the shortcut number on the numeric keypad. Destination Name
is the name assigned to the fax recipient.
Shortcut xx Fax
Destination Name
Place Next
1 Place the next page on the flatbed.
Or Stop
2 Press Go to continue sending pages.
3 Press Stop to end the fax transmission.
The control panel resets to copy mode and the Ready message
appears on the display.
Receive fax status
Message
Description
Receiving Fax…
MFP is receiving an incoming fax.
Ready
100%
1
Connect <Baud><ECM>
Ready
100%
1
Sender Name
Ready
100%
1
100%
1
Call Complete
Ready
100%
Station name of sending fax machine displays (right justified) on
top line.
Page X is currently being received.
Receiving Page X
Ready
Shows connection and baud rate with the sending fax machine.
If error correction mode is being used, ECM is displayed on the
control panel.
1
All the pages of the fax have been received and the phone line
connection has hung up.
Send fax status
43
Send fax errors
Error message
Description
No Dial Tone
Appears in top line of control panel display. Modem cannot
detect a dial tone.
No Answer
Appears in top line of control panel display. Receiving fax
machine failed to answer.
Line Busy
Appears in top line of control panel display. Phone line of
receiving fax machine is busy.
Line Dropped
Appears in top line of control panel display. During a fax, the
message displays when the phone connection is lost.
No Phone Number
Appears when Go/Send is pressed before the fax number to be
dialed has been entered.
Entered
Appears when a fax is attempted to let the user know that Scan
to Fax function is disabled for this MFP.
Scan to Fax Mode
Is Disabled
Out of Memory
Appears in top line of control panel display. Some older printers
display this message when the printer memory is full.
PS Error
Appears in top line of control panel display. Fax is being sent
using Print to Fax and the job encountered a PostScript error.
Receive fax errors
Error message
Description
Load Paper
Appears in top line of control panel display. Printer is out of paper.
Printer Offline
Appears in top line of control panel display. Printer is not ready.
Printer Error
Appears in top line of control panel display. Printer has a door open or a
tray missing.
Work with destination lists
You can view or print lists of the permanent fax destinations that have been configured for an MFP.
This is a useful way to check for fax recipients that you send information to on a regular basis.
View the destination lists
1 Type the IP address of the MFP in the URL field of your browser, and then press Enter.
2 Click Reports.
3 Under the MFP heading, click the link of the list you want to view, such as Fax Destinations
List. Information about each destination is displayed.
Send fax errors
44
Print the destination lists
1 Locate the MFP. This must be the same MFP with the IP address where the destination lists
were created and stored.
2 Press Menu > repeatedly until you see Destinations, and then press Select.
3 Press Menu > repeatedly until you see the list you want to print (for example, Print Fax List),
and then press Select. Information about each destination is contained in the list. The
following illustration is an example of one type of list.
Fax Destinations
NameFax NumberShortcut #
-----------------------------------------------------------------------------------------------------Smith, Jane555-121231
Smith, Jane21-666-555-123332
Doe, John1-666-444-778835
Print the shortcut list
When creating permanent destinations for an MFP, your systems person may have assigned
shortcut numbers. A shortcut lets you send to a destination by pressing # and entering the shortcut
number on the numeric keypad of the MFP control panel.
Posting a printed shortcut list close to the MFP can reduce the time spent searching for destinations
in the control panel menus.
1 Locate the MFP. This must be the same MFP with the IP address where the destination lists
were created and stored.
2 Press Menu > repeatedly until you see Shortcuts, and then press Select.
3 Press Menu > repeatedly until you see Print List, and then press Select.
Work with destination lists
45
10
Solving network scan problems
Common problems and solutions
Problem
Solution
Scan profile name does not
appear on the control panel
display.
1 Make sure you are looking at the correct control panel menu.
Press Fax/Scan Mode repeatedly until you see
SCAN → PROFILE. Press Menu > until you see your profile
name.
2 Make sure the MFP you are trying to use is the same MFP
where the profile is stored. Each MFP has a unique network
address. If you are not sure, see your network administrator
for help.
3 Create your scan profile again.
Can I create an e-mail distribution
list?
Create a permanent e-mail destination and place a comma
after each e-mail address.
Make sure you assign a unique name to the destination that
identifies it as an e-mail distribution list.
Scan to e-mail status
Message
Description
SCAN → EMAIL
Prompts you to select the e-mail destination. Press Menu > repeatedly
until you see your e-mail destination name displayed in the second line.
Press Go/Send to start the scan.
Destination name
To select multiple e-mail destinations, press Menu > repeatedly until you
see your first e-mail selection, and then press Select. An asterisk appears
by the selection. Repeat this process until all e-mail destinations have
been selected. Press Go/Send to start the scan.
Please Wait
Message indicates the MFP is trying to make a connection with the SMTP
server.
EML → Destination
Message indicates the MFP is scanning and sending the document.
Connecting
Busy ♦
100%
Solving network scan problems
46
Message
Description
Shortcut #xx EML
E-mail shortcut has been initiated by pressing #, and then entering the
shortcut number on the numeric keypad. Destination Name is the name
assigned to the e-mail destination.
Destination Name
Place Next
1 Place the next page on the flatbed.
Or Stop
2 Press Go/Send to continue sending pages.
3 Press Stop/Clear to end the scan.
The control panel resets to copy mode and the Ready message appears.
Scan to FTP status
Message
Description
SCAN → FTP
Destination name
Prompts you to select the FTP destination. Press Menu >
repeatedly until you see your FTP destination name on the
second line of the control panel display. Press Go/Send to start
scanning.
Connecting
Please Wait
Indicates the MFP is trying to make a connection with the FTP
server.
FTP → Destination
Indicates the MFP is scanning and sending the document.
Busy ♦
100%
Destination Name
FTP destination shortcut has been initiated by pressing #, and
then entering the shortcut number on the numeric keypad.
Destination Name is the name assigned to the FTP server
destination.
Place Next
1 Place the next page on the flatbed.
Or Stop
2 Press Go/Send to continue sending pages.
Shortcut #xx FTP
3 Press Stop/Clear when all pages have finished scanning.
The control panel resets to copy mode and the Ready status
message appears on the display.
S-cut Disabled
Message appears on the second line of the display when a
shortcut is entered for a network scan function that has been
disabled.
One or all of the network scan functions (SCAN → PROFILE,
SCAN → EMAIL, and SCAN → FTP) can be disabled. See
your network administrator for assistance.
Shortcut not set
Message appears on the second line of the display when an
invalid shortcut number is entered.
The list of configured shortcuts can be viewed or printed. See
“Print the shortcut list” on page 51.
Scan to FTP status
47
Job Accounting status
Message
Description
<Date Time>
Appears in the Idle/Ready state when Courtesy II or
Courtesy III modes are active.
Select Account
<Date Time>
Enter Account #
Select Account
Account Name
Enter Account #
xxx_
Account #
Rejected
Appears in the Idle/Ready state when Courtesy I or Validation
modes are active.
Appears when user is selecting an account from the list of
possible accounts. This applies to Courtesy II or Courtesy III
modes.
Appears when the user manually enters an account number
using the numeric keypad on the control panel. This applies to
all Job Accounting modes.
Appears when the user attempts to enter an invalid account
number. This applies to Courtesy III and Validation modes.
Scan to e-mail errors
Message
Description
Connection
MFP is unable to find the e-mail server and deliver the file.
Failed
S-cut Disabled
Appears on the second line of the control panel display when a
shortcut is entered for a disabled network scan function.
One or all of the network scan functions (SCAN →PROFILE,
SCAN → EMAIL, and SCAN → FTP) can be disabled. See
your network administrator for assistance.
Shortcut not set
Appears on the second line of the control panel display when
an invalid shortcut number is entered.
The list of configured shortcuts can be viewed or printed. See
“Print the shortcut list” on page 51.
SMTP Setup Error
SMTP server has not been set up.
A timeout occurred waiting
for a response from the
server
MFP timed out waiting for a response from the SMTP server.
Could not resolve the
e-mail server address
• DNS server could not resolve the SMTP gateway address.
• DNS server is not correctly set up for use with MFP. Check
DNS server address.
Unable to make a TCP
connection to the server
Make sure the server address is correct.
TCP connection to server
was lost
Check your network connection.
Job Accounting status
48
Message
Description
Mail server refused to
accept mail from us
• Mail server refused to start the e-mail sending process.
• Mail server could not be set up to accept e-mail from the
MFP IP address.
• Mail server is down.
• Mail server is busy.
Mail server rejected your
reply address
Make sure your reply address has been set up correctly.
Mail server rejected one
of the recipients
Mail server determined that one of the recipient addresses is
bad. Correct the address or remove it from the e-mail
destination list.
Scan to e-mail errors
49
Scan to FTP errors
Message
Description
<452> FTP Disk quota
reached
User account for this scan has run out of disk space on the FTP
server.
<550> Unable to put file
(no access)
• User account for this scan does not have write access to the
specified directory.
• A file already exists with the same name and the user
account does not have permission to overwrite it.
<553> Put failed, file or
directory does not exist
Directory specified in the file name does not exist on the FTP
server.
Could not resolve the
server name
• DNS server could not resolve the FTP server address.
Check SMTP gateway address.
• DNS server is not correctly set up for use with MFP. Check
DNS server address.
Could not log in to the
FTP server
Username, password, or both have been refused by the FTP
server.
Could not make a TCP
connection to the FTP
server
Check the FTP server address.
Undefined FTP error has
occurred
See the FTP scan error log that prints for information about this
error.
S-cut Disabled
Message appears on the second line of the display when a
shortcut is entered for a network scan function that has been
disabled.
One or all of the network scan functions (SCAN →PROFILE,
SCAN → EMAIL, and SCAN → FTP) can be disabled. See
your network administrator for assistance.
Shortcut not set
Message appears on the second line of the display when an
invalid shortcut number is entered.
The list of configured shortcuts can be viewed or printed. See
“Print the shortcut list” on page 51.
Work with destination lists
You can view or print lists of the permanent destinations that have been configured for MFP. This is a
useful way to check for destinations that you send information to on a regular basis.
View the destination lists
1 Type the IP address of the MFP in the URL field of your browser, and then press Enter.
2 Click Reports.
3 Under the MFP heading, click the link of the list you want to view such as E-mail
Destinations List. Information about each destination is displayed.
Scan to FTP errors
50
Print the destination lists
1 Locate the MFP. This must be the same MFP with the IP address where the destination lists
were created and stored.
2 Press Menu > repeatedly until you see Destinations, and then press Select.
3 Press Menu > repeatedly until you see the list you want to print (for example, Print E-mail
List), and then press Select. Information about each destination is contained in the list. The
following illustration is an example of one type of list.
E-Mail Destinations
NameAddressTypeShortcut #
-------------------------------------------
---------------------------------------------- ---------------
Smith, [email protected]
Smith, [email protected] Link6
Doe, [email protected] Link12
Print the shortcut list
When creating permanent destinations for the MFP, your systems person may have assigned
shortcut numbers. A shortcut lets you send to a destination by pressing # and entering the shortcut
number on the numeric keypad of the MFP control panel.
Posting a printed shortcut list close to the MFP can reduce the time spent searching for destinations
in the control panel menus.
1 Locate the MFP. This must be the same MFP with the IP address where the destination lists
were created and stored.
2 Press Menu > repeatedly until you see Shortcuts, and then press Select.
3 Press Menu > repeatedly until you see Print List, and then press Select.
Work with destination lists
51
11
Solving scanning problems
Preventing paper jams
Your automatic document feeder is designed to handle most paper types. However, if you are unsure
if your document will cause a jam in the automatic document feeder, we recommend that you scan it
using the flatbed.
The following cannot be properly fed by the automatic document feeder:
•
Paper with clip or staple attached
•
Paper with ink not totally dry
•
Paper with inconsistent thickness, such as envelopes
•
Paper with wrinkles, curls, folds, or tears
•
Tracing paper, coated paper, carbonless paper
•
Paper that is too large or too small (use flatbed instead)
•
Items other than papers, such as cloth, metal, or OHP film
•
Notched paper
•
Paper with an odd (non-rectangular) shape
•
Photographic paper
•
Paper with perforations on its side
•
Very thin paper
Solving scanning problems
52
Solve scanner problems
Problem
Solution
Paper jams during scanning
1 Open the automatic document feeder.
2 Pull out the jammed paper carefully.
3 Close the automatic document feeder.
More than one sheet of paper was
fed into the scanner
1 Open the automatic document feeder.
2 Remove the multifed sheets of paper.
3 Close the automatic document feeder.
4 Flatten the paper corners and edges; loosen the paper
before reloading it in the paper guide.
5 Check the feeding roller condition. Clean if necessary.
6 Replace the pad assembly.
Paper skewed in the scanner
• Clean the paper feed roller.
• Use the paper guide when feeding the paper.
Paper does not feed through the
automatic document feeder
Make sure the paper support is open.
When I power on, the scanner
makes noises and will not stand
ready
• Make sure the lock switch is unlocked. Refer to the MFP
Setup documentation that shipped with your hardware.
• Place the scanner on a flat desktop surface.
The scanner power is on but the
scanner will not operate
• Check the switch settings on the rear of the scanner.
Make sure the pages to be copied are not damaged or stapled
together.
Note: Some scanners do not have switches.
Solve scanner problems
53
Index
C
collating copy jobs 6
control panel
adding scan modes 22
keypad 19
tracking usage 34
control panel modes
Copy 22
Fax 22
Scan (e-mail) 22
Scan (FTP) 22
Scan (Profile) 22
copy content
mixed 5
mixed image 5
mixed mono 5
photo 5
photo mono 5
text 5
copy media
collating 6
finishing 6
selecting 7
copy settings
restoring factory defaults 23
copying
adjusting copy size 4
changing copy brightness 4
examples
2-up job 2
colored original job 3
duplex job 2
enlargement job 3
mixed content job 2
single copy job 1
N-up 6
problem solving
collation area warning 38
color 38
control panel not
responding 38
duplex lights 38
duplexing 38
Ready never appears 38
selecting content 5
selecting media 7
D
destination lists 50
duplex option, setting 6
F
factory defaults, restoring copy
settings 23
Fax log menu
Log Output Bin 28
Log Paper Size 28
Log Paper Type 28
Fax send menu
Automatic Redial 26
Default Content 26
Default Darkness 26
Dialing Mode 26
Fax Resolution 26
Redial Frequency 26
faxing
examples
400 x 400 dpi photo 10
colored original job 10
mixed content job 10
multiple originals job 10
single original job 9
Fax log menu 27
Fax send menu 26
problem solving
no incoming fax 42
Index
54
finishing copy jobs 6
J
job accounts
setting a password 35
K
keypad description, control
panel 19
M
MarkNet print server 13, 24
MarkTrack software 34
MarkVision software 34
menus
Fax log 27
Fax send 26
N
N-up copying 6
P
paper jams 52
print server 13, 24
problem solving
copying 38
multiple pages feed 53
no duplex lights on 6
paper jam 53
paper skew 53
receiving faxing 42
scan unit is noisy 53
sending faxing 41
S
Scan to e-mail
creating permanent
destinations 30
profile 16
setup 16
Scan to PC
customizing settings 14
profile 13
setup 13
scanning
control panel modes 22
selecting
copy content 5
copy media 7
setting a password for job
accounts 35
setting duplex option 6
shortcut list 51
T
tracking usage 34
troubleshooting
copying 38
faxing, receiving 42
faxing, sending 41
job accounting 48
network scanning 46
scan to e-mail 46, 48
scan to FTP 47, 50
Index
55
Lexmark and Lexmark with diamond design are trademarks of Lexmark International, Inc.,
registered in the United States and/or other countries.
© 2002 Lexmark International, Inc.
740 West New Circle Road
Lexington, Kentucky 40550
www.lexmark.com