1
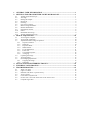
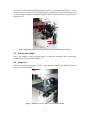
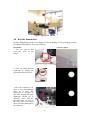
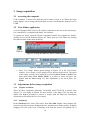
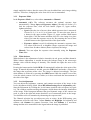
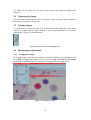
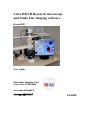
Leica DB LB Research microscope
and Studo Lite Imaging software
Room B523
User Guide
Molecular Imaging Unit
University of Helsinki
www.miu.helsinki.fi
9.4.2008
1
2
GENERAL USER INFORMATION .............................................................................. 1
SETTINGS FOR TRANSMITTED LIGHT MICROSCOPY...................................... 1
2.1
2.2
2.3
2.4
2.5
2.6
2.7
2.8
2.9
2.10
2.11
2.12
3
IMAGE ACQUISITION ................................................................................................ 10
3.1
3.2
3.3
3.3.1
3.3.2
3.3.3
3.3.4
3.3.5
3.3.6
3.3.7
3.3.8
3.4
3.5
3.6
3.6.1
3.6.2
4
5
6
Turning on the microscope .................................................................................................... 1
XY-stage................................................................................................................................ 1
Placing the sample................................................................................................................. 2
Objectives.............................................................................................................................. 2
Focusing ................................................................................................................................ 3
Eye pieces (oculars)............................................................................................................... 4
Dual viewing attachment ....................................................................................................... 4
Koehler illumination.............................................................................................................. 6
Polarization contrast .............................................................................................................. 8
Filters..................................................................................................................................... 8
Dark-field microscopy........................................................................................................... 9
Turning off the microscope ................................................................................................... 9
Accessing the computer....................................................................................................... 10
View Finder application ...................................................................................................... 10
Adjustments before image acquisition................................................................................. 10
Capture resolution........................................................................................................... 10
Sensitivity ....................................................................................................................... 10
Exposure Mode............................................................................................................... 11
White balance ................................................................................................................. 11
Levels adjustment ........................................................................................................... 11
Focus tool ....................................................................................................................... 12
Over/Underexposure....................................................................................................... 12
Averaging ....................................................................................................................... 12
Capturing the image ............................................................................................................ 13
Viewing images ................................................................................................................... 13
Post-imaging adjustments.................................................................................................... 13
Cropping the image......................................................................................................... 13
Scale bars........................................................................................................................ 14
SAVING AND TRANSFERRING IMAGES ............................................................... 14
FINISHING YOUR IMAGING..................................................................................... 14
TROUBLESHOOTING ................................................................................................. 15
6.1
6.2
6.3
6.4
6.5
6.6
6.7
There is no light................................................................................................................... 15
Light is too dark .................................................................................................................. 15
Problems with focus or picture clarity................................................................................. 15
View is partial ..................................................................................................................... 15
Colors have red/yellow tint ................................................................................................. 15
Ocular view is not at the same focus as the camera view.................................................... 15
Computer login fails ............................................................................................................ 16
1 General user information
Leica DM LB research microscope is only for the Molecular Cancer Biology (MCBP)
and Genome-scale Biology (GSB) research programs internal use. It is a transmitted
light microscope that cannot be used for fluorescence microscopy. Bright-field,
polarization contrast, and low-quality dark-field illumination are available. There are
no oil objectives available, thus the resolution of the objectives is lower than that of
the Axioplans. There is a Leica manual on a shelf near the microscope.
Reservations for the microscope are made through the Scheduler. Access to the
reservation system and instructions for its use are at MIU web page:
http://www.miu.helsinki.fi/reservations.htm. MIU website has information about the
instruments available, sample preparation, imaging techniques etc. Every user of
instruments maintained by MIU is expected to be familiar with the information on the
MIU user info web page: http://www.miu.helsinki.fi/userinfo.htm. In particular, if you
use any MIU instruments or services for your publication, you are expected to
acknowledge MIU.
2 Settings for transmitted light microscopy
2.1 Turning on the microscope
Turn on the microscope by using a switch located on the left-hand side of the
microscope (Figure 1). This turns on the transmitted light source (halogen lamp). If
the light is too dim or bright this can be corrected by adjusting the brightness control
(Figure 1). For other light intensity problems, see the troubleshooting section on page
15.
Figure 1. Power switch (red circle) and brightness control for halogen lamp (red arrow)
2.2 XY-stage
Move the specimen stage in the XY-direction to center the sample or wanted detail in
the field of view. This is achieved by turning the two adjustment wheels connected to
the stage on the right-hand side (arrows in Figure 2). Upper wheel controls the
1
movement in y-direction (back and forth), lower in x-direction (side to side). If you
need to rotate the stage to get the image in any wanted angle, open the rotation lock
by unscrewing it and then rotating the stage by hand (circle in Figure 2). Re-screw the
lock after use!
Figure 2. Adjustment wheels for stage control (arrows) and rotation lock (circle)
2.3 Placing the sample
Place your sample on the specimen stage by manually widening and releasing the
spring-operated object holder (Figure 3).
2.4 Objectives
Select an appropriate objective (Table 1) by manually turning the black rim of the
objective revolver (Figure 3).
Figure 3. Objective revolver (red arrow) and sample holder
2
Objective
Numerical
Aperture
(NA)
Color
ring
Coverglass (c.g.) Position
for
thickness
condensor lens
N Plan 2.5x
0.07
Brown
Any/without c.g.
off
N Plan 5x
0.12
Red
Any/without c.g.
off
N Plan 10x
0.25
Yellow
Any/without c.g.
on
N Plan 20x
0.4
Green
0.17 mm
on
N Plan 40x
0.65
Blue
0.17 mm
on
C Plan 63x
0.75
Black
0.17 mm
on
auxiliary
Table 1. Objectives in Leica DM LB
N Plan stands for planachromat and C Plan for achromat objectives. The achromatic
objectives are corrected for axial chromatic aberration in two wavelengths (blue and
red; about 486 and 656 nanometers, respectively). Furthermore, achromatic objectives
are corrected for spherical aberration for the green color (546 nanometers). If focus is
chosen in the green region of the spectrum, images will have a reddish-magenta halo.
Achromatic objectives yield their best results with light passed through a green filter.
Planachromat is a flat-field corrected achromat objective, which corrects the field
curvature.
NA indicates the numerical aperture of an objective. This determines the resolving
power of the objective. The higher the NA, the better the resolution. None of the
objectives are to be used with immersion oil.
For wider illumination when using 2.5x and 5x objectives, move the auxiliary
condensor lens out of the light path by swinging the rod connected to the lens (Figure
4).
Figure 4. Auxiliary condenser lens switch
2.5 Focusing
Focus on the sample by turning either of the focusing wheels located identically on
both sides of the microscope (Figure 5). Focusing raises or lowers the specimen stage;
the outer wheel is for coarse focusing, and the inner one for fine focus adjustment.
3
The fine focus has two modes: when the left focus wheel is pulled out, each line on
the wheel equals 1 µm of movement. When it is pushed in, each line equals 4 µm of
movement.
Figure 5. Focusing wheels
2.6 Eye pieces (oculars)
Adjust the folding bridge of the oculars until you see, using both eyes, only one
circular field of view through the oculars. Use the diopter adjustment on the oculars to
match your vision (Figure 6, part B). Initial setting for the diopter is 0 for both eyes,
which is set when the edge of the ocular is on the silver ring (Figure 6, part A). People
with strong astigmatism should wear their eyeglasses when looking through the eye
pieces.
Figure 6. Diopter adjustment. A, setting for 0 diopter; B, diopter adjustment
2.7 Dual viewing attachment
Dual viewing attachment allows two people to observe a sample at the same time
(Figure 7). Light path in the microscope is divided into two, and a sample can be
viewed also in the eyepieces on the left side of the microscope. Distance of the
oculars can be adjusted and, as a whole, the eyepieces swivel to facilitate optimum
viewing angle.
4
Figure 7. Dual viewing attachment
Figure 8. Power source for the light pointer
There is a light pointer in the viewing attachment that uses an external power source.
Thus, you need to connect the transformer into a power outlet before using the pointer
(Figure 8). After use, disconnect the transformer. Notice that you can use the monitor
instead of the dual viewing attachment.
On the back side of the viewing attachment, there are two control knobs for the light
pointer (Figure 9).
•
Control A:
o Move up or down to control position horizontally
o Push or pull to control position vertically
o Rotate to change color from yellow or red
•
Control B:
o Rotate to change brightness of the pointer
5
Figure 9. Light pointer controls
2.8 Koehler illumination
Koehler illumination needs to be adjusted in the beginning of every imaging session
for optimal illumination. Proceed as follows:
Instruction
View in eyepiece
1. Use 10x objective and
front lens. Focus on the
sample.
2. Close the luminous-field
diaphragm by turning the
adjustment wheel clockwise.
3. Move the condenser up or
down so that the diaphragm
edges are in focus. The
microscope is designed so
that in the imaging path, field
diaphragm should be in
conjugate plane with the
specimen plane (in focus at
the same time). You adjust
this by adjusting the height of
the condenser.
6
Instruction
View in eyepiece
4. Center the diaphragm in
the field of view by rotating
the condenser adjusting
screws. In other words, you
adjust the illuminating path
so that it is properly aligned
along the optical axis of the
microscope.
5. Open the luminous-field
diaphragm by turning the
adjustment wheel counterclockwise until the edges just
disappear from the field of
view. This step ensures that
you only illuminate the fieldof-view.
6. Pull out one ocular and
look through the eyepiece
tube. Close the aperture
diaphragm by turning the
wheel in the condenser until
the aperture is about 80% of
the diameter of the objective
pupil. Replace the eyepiece.
Another way of adjusting the
aperture is by looking at your
specimen and closing the
diaphragm until resolution
and contrast are optimal.
Diaphragm too open: poor
contrast. Diaphragm too
closed: poor resolution.
When adjusting Koehler illumination for higher magnification objectives, repeat the
procedure. For lower magnifications (5x and 2.5x), the condenser performance is
changed by the removal of the swing-out lens from the light pathway, and the
condenser aperture diaphragm no longer controls the numerical aperture. Fully open
the aperture diaphrgam and control the contrast by opening/closing the field
diaphragm.
7
2.9 Polarization contrast
Figure 10. Analyzer for polarization contrast imaging
Figure 11. Polarizer
For polarization contrast microscopy, an analyzer (a polarizing filter) is inserted in the
light path by pushing it all the way in (Figure 10), and another polarizing filter
(polarizer) is placed labeled side upwards in a holder below the condenser (Figure
11). The round polarizer is on the shelf above the microscope.
To cross the polarizing filters, remove your sample and turn the round polarizer until
the maximum extinction position is reached, i.e. the view in the oculars is as dark as
possible.
2.10 Filters
On the right side of the microscope, there are controls for three filters (Figure 12):
•
DLF: a blue daylight filter which was mainly used for photography with
daylight film
•
NI6: a grey (neutral density) filter that attenuates light to 6.25 % transmission
without interfering color
8
•
Grun: a green panchromatic filter that was used for contrast enchantment for
B/W photography
These filters were used for film photography and are not useful for digital
photography. However, when using low intensity light (yellowish), DLF-filter adjusts
the light back to the direction of blue, making the image more pleasant to view.
Figure 12. Filter controls marked with red arrows
2.11 Dark-field microscopy
The microscope can be equipped with a dark-field ring that can be used for lowquality dark-field microscopy. The ring is on the shelf above the microscope. The
installation of the filter is shown in Figure 13. Note that the short label side is facing
up when inserting.
Figure 13. Insertion of the dark-field ring
2.12 Turning off the microscope
When you have finished using the microscope you should:
•
Turn off the microscope (Figure 1 on page 1)
•
Clean the microscope if needed
•
Cover the microscope with the red dust cover
9
3 Image acquisition
3.1 Accessing the computer
If the computer is turned off, push the power button to turn it on. When the login
screen appears, log in using your hyad login account. Check that the domain is set to
LTDK.
3.2 View Finder application
A 10-bit Olympus DP50 color CCD camera is attached on the top of the microscope.
It is controlled by a computer and Studio Lite software.
To capture an image, open the Pixera Corporation Studio Lite program by doubleclicking its icon on the desktop (Figure 14). Then, open up View Finder by clicking
the camera button in the menu at the top.
Figure 14. Starting the Studio Lite and View Finder applications
Figure 15. Adjustments in View finder window
•
Press ‘Live image’ button (green triangle in Figure 15) in the View Finder
window. A live image of your sample will be shown on the screen. The speed
of the image refresh can be adjusted by selecting Fast, Zoom, or Full in the
main menu under View Finder Mode. It is easier to focus and move the
sample with the Fast setting. For fine adjustment of the focal plane, use
Zoom.
3.3 Adjustments before image acquisition
3.3.1
Capture resolution
There are three resolutions (640x480, 1392x1040, and 2776x2074) to choose from
(Figure 15). Use higher resolution for more details, if the bigger file size does not
matter. The highest resolution is slower to acquire than the other two. Resolution
selection does not affect the live view image.
3.3.2
Sensitivity
In the Sensitivity box, select ISO values from 50 to 400. Higher value shortens the
exposure time but increases background noise and decreases image quality. In digital
imaging, ISO 100 is the level of intensity read from the sensor. Everything else is
10
simply multiplied values, thus the same effect can be added later on in image editing
software. Therefore, changing the value from 100 is not recommended.
3.3.3
Exposure Mode
In the Exposure Mode box, select either Automatic or Manual:
•
Automatic (AE): The software measures the optimal exposure time
automatically. Change Spot and Exposure Adjust if needed (see below). To
lock the exposure time, click AE lock button (Figure 15, upper toolbar,
rightmost button).
o Spot defines the size of an area from which exposure time is measured.
Choose 30 %, 1 % or 0.1 % of picture area. To move the spot, there is
a button in the upper toolbar (Figure 15, upper toolbar, third button
from right). Click the button and then click live view image in a place
where you want the exposure area to be. Re-centering the area is done
with the button on the right-hand side of the Spot button.
o Exposure Adjust is used for adjusting the automatic exposure time.
Use values from 0 to 2 to brighten (longer exposure) the image and
values from -2 to 0 to darken (shorter exposure) the image.
•
3.3.4
Manual: You can adjust the exposure time manually using the Exposure
Time slider.
White balance
White balance is the adjustment of relative intensities in red, green, and blue channels.
White balance adjustment is needed because the halogen lamp in the microscope
changes color with the change of intensity. The dimmer the light, the more red it
becomes.
Pressing the button marked with OWB will automatically adjust the white point of the
image. If manual adjustment is needed, press the WB-button and make a selection in
the image that represents white color. The image is adjusted accordingly. The best
white balance is achieved by pressing the OWB-button while the sample is out of the
view (the whole camera view area is white) so it does not disturb the measurement of
the color of the light.
3.3.5
Levels adjustment
You can adjust the brightness, contrast, and gamma correction of the image in the
levels adjustment dialog (Main Menu/BF-button/Settings/Level Adjustment tab).
Start the adjustment by clicking the levels button (marked with red square in Figure
16). The window contains an image histogram, which shows the intensity distribution
of the image. Wide histogram indicates that good dynamic range of the camera was
used. A peak at the right end means that there are oversaturated pixels in the image.
You should avoid over saturation by shortening the exposure time.
The Channel selection lets you adjust one color at a time. In the RGB setting, your
adjustments will affect all colors. Adjust Shadow and Highlight for brightness and
contrast, and Gamma for gamma correction. Note that Gamma is a non-linear
change and has to be mentioned in the legend when the image is published.
11
Figure 16. Histogram level adjustment. Red square: levels button
3.3.6
Focus tool
Focusing tool assists you in focusing. If the focusing toolbar is not visible, enable it in
the Options menu. Once activated, two bars appear (Figure 17). The blue one shows
the current focus value, and the red one a history of the best level reached since last
reset. When you focus up and down, you should try to hit the highest level (match the
blue and red bars). Click the green rectangle icon when you want to mark in the image
the area the focus value is calculated from. The button with the red arrow lets you
move the area.
Figure 17. Focusing toolbar
3.3.7
Over/Underexposure
The over/underexposure indicator only works under automatic exposure mode (Figure
15 lower right corner). If the overexposure is checked, exposure time is too long.
Decrease the automatic exposure by selecting a negative number in the selection box
left from the indicator. In the case of underexposure, choose a positive number.
3.3.8
Averaging
The averaging operation calculates the mean of the given number of images reducing
random noise generated by long exposure times (The number “1” at the top of Figure
12
15). Make sure the stage does not move at all between the images or image quality
decreases.
3.4 Capturing the image
Press the Camera button next to the Live button to take an image. After acquisition,
the image will appear in Studio Lite.
3.5 Viewing images
To zoom in or out, select the zoom tool in the toolbar at the right edge of the screen
(Figure 18, middle button). When zoomed in, you can pan around the view with the
panning tool (Figure 18, bottom button).
Figure 18. Selection, Zoom and Panning tools
3.6 Post-imaging adjustments
3.6.1
Cropping the image
To crop the image, mark the area with the selection tool (Figure 18, top button). Then
go to Edit – Crop menu (Figure 18). You can use Copy and Paste as New Image
commands in the Edit menu for creating a new image from the cropped area.
Figure 19. Cropping an image
13
3.6.2
Scale bars
The Studio Lite software does not provide means to insert scale bars. They can be
added later on in any image editing software such as Adobe Photoshop. Ready-made
scale
bars
for
the
full
resolution
images
are
available
at
http://www.miu.helsinki.fi/instruments/LeicaDMLB/scale_pictures.htm (in Photoshop
format). The page also contains the scaling information (i.e. how many micrometers
each pixel represents), so you can draw the scale bars yourself.
4 Saving and transferring images
Save images using the TIFF format to prevent image data loss. The default save
format is JPEG, which discards color information invisible to human eye, thus
decreasing image quality and making quantitative analysis unreliable.
None of the image formats save the metadata i.e. objectives, exposure times,
microscope model etc. You should always write down this information, as you will
need it when you want to publish your images.
Images can be saved through network in a temporary disk space: Images –folder in
Snap Server (Mcbserver1). The network drive is mounted as drive I: Images on
Mcbserver1 (Figure 20). Note that this disk space is occasionally emptied on
Mondays without announcement, so do not use it for long-term storage.
At your own computer, connect to Mcbserver1 as follows:
•
Windows - by writing in the Explorer location bar: \\mcbserver1\images
•
Mac - by connecting to the server in Finder using the address:
smb://mcbserver1/images
The password needed in both cases is provided by the MIU staff.
Figure 20. Mcbserver1 (Snap server) icon
Files can also be saved locally and transferred to a USB stick. There is a USB
extension cable next to the keyboard. Remember to delete locally stored images once
you have transferred them to your own computer.
5 Finishing your imaging
When you have finished your imaging session you should:
•
Log off the computer
•
Shut down the computer if you are the last user of the day
•
Turn off the microscope (Figure 1 on page 1) and clean it if necessary
14
•
Cover the microscope with the red hood
6 Troubleshooting
6.1 There is no light
•
Microscope is not turned on (see Section 2.1)
•
Light intensity set too low (see 2.1 on page 1)
•
Do you see any light in the lamp chamber? If not, the halogen bulb may need
to be changed - contact MIU
6.2 Light is too dark
Check:
•
whether the polarizer or other filters are on the light path (Section 2.9 on page
8)
•
that aperture diaphragm is not too closed (Section 2.8 on page 6)
6.3 Problems with focus or picture clarity
Check that:
•
no filters are on the light pathway
•
Koehler illumination is correctly done (Section 2.8 on page 6)
•
objective is not dirty
•
oculars are not dirty
•
oculars are correctly adjusted (Section 2.6)
If image quality does not satisfy you, you should take your images with AxioPlan
microscope, which has better optics and camera
6.4 View is partial
Check that:
•
none of the filters are partially on the light path
•
the polarizer is not partially on the light path
•
the objective is correctly in place
•
the field diaphragm is not too closed
6.5 Colors have red/yellow tint
•
Check the white balance
•
For other color errors, check the color filters (Section 2.10)
6.6 Ocular view is not at the same focus as the camera view
•
Check ocular adjustment (Section 2.6)
15
6.7 Computer login fails
Check that:
•
domain is LTDK
•
use are using your hyad account user ID and password - the same ones you are
using for accessing your university e-mail account
16