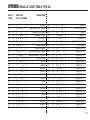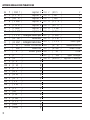
1
Visual Touch TTY
Model: KVT100
INSTRUCTION MANUAL
First Edition 2005
Krown Visual Touch TTY |
Instructions | 1st Edition | April 2005
Krown Manufacturing, Inc.
3408 Indale Road, Fort Worth, Texas 76116
voice: (817) 738-2485 | TTY: (817) 738-8993 | Fax: (817) 738-1970
E-mail: [email protected] | Web site: www.krownmfg.com
FCC REQUIRED INFORMATION
The Federal Communications Commission under Part 68 Rules and Regulations has granted your Braille-TTY
KVT100 a registration number for direct connection to the telephone lines. The FCC requires that you be
advised of the requirements involved with owning a telecommunications device.
1. Connect your KVT100 to the nationwide telephone network through a telephone company-provided
registered jack.Your
KVT100 cannot be plugged into a party line or directly connected to coin operated telephone service; you
must use the acoustic coupler in these instances.
2. Before connecting your KVT100, the FCC requires that you notify your local phone company business office.
Call or write your TDD operator. The phone number and address is in the front of your phone book
Your phone company will want to know:
• Your phone numberProduct name:
• Krown Visual Touch 100FCC registration number: BG487D-71481-DTE
• Ringer equivalence: 0.4A 0.7B
• Jack: RJ11 RJ13
The FCC requires that you notify your local telephone company when you move your phone permanently.
3. Repairs may be made only by Krown Manufacturing or authorized Krown service agencies. This applies at
any time during or after warranty. If such unauthorized repair is performed, the warranty becomes null
and void.
4. If your KVT100 causes harm to the telephone network, the telephone company may temporarily discontinue
your service. If possible, they will notify you in advance. If advanced notice is not practical, you will be
notified as soon as possible. You will be given the opportunity to correct the situation, and you will be
informed of your right to file a complaint with the FCC.
1
FCC REQUIRED INFORMATION
5. Your telephone company may make changes in its facilities, equipment, operations or procedures that
could affect the proper functioning of your KVT100. If changes occur, you will be notified in advance to
give you an opportunity to maintain uninterrupted service.
SERVICE REQUIREMENTS
If your KVT100 needs repair, pack it in the original shipping box along with the adapter/charger. Please be
sure to enclose a note describing the problem you are having.
You may send the unit to:
Krown Manufacturing, Inc.
3408 Indale Road
Fort Worth, Texas 76116
Copyright 1999-2005 Krown Manufacturing Inc.
2
INTRODUCTION
Welcome to state-of-the-art Telecommunications Devices for the Deaf, Deaf Blind and Hearing Impaired
manufactured by the industry pioneer: Krown Manufacturing Inc. We have provided a full line of telephone
devices to meet the many individual needs. Expert craftsmanship, superior design and affordable prices are
what Krown Manufacturing stands for.
Your new Visual Touch Braille-TTY KVT100 is the very latest from Krown Manufacturing Inc. This manual is set
up so that you are able to begin using your KVT100 immediately, while you take your time and become familiar
with its many unique features, which will enhance its usefulness.
The KVT100 consists of two units connected by a cable. One unit is the modified Krown TTY PortaView Plus
with a computer keyboard and a visual display. The second unit is Visual Touch Braille display with
20-character Braille refreshable and a Face-To-Face keyboard. The KVT100 can be set on top of the Visual
Touch with an optional stand or side by side, at will, for greatest convenience.
A Quick Reference Guide is located on pages 21 and 22 of this manual for your convenience. It provides a
summary of the features that your KVT100 offers. If you have any questions that this manual does not
answer, feel free to call our Customer Service Department 817-738-2485.
YOUR VISUAL TOUCH BRAILLE-TTY PHONE KVT100 COMES WITH:
•
•
•
•
•
•
KVT100 TTY
Visual Touch Braille refreshable display
Power cord with AC/DC Adapter 48DT-7 for KVT100
Modular cord
Instruction manualWarranty/registration form
DB25 cable
3
TABLE OF CONTENTS
FCC Requirements.............................................................................................................................................1
Service Requirements .......................................................................................................................................2
Introduction ........................................................................................................................................................3
Table of Contents ..............................................................................................................................................4
I.Getting Started..............................................................................................................................................6
• Setting Up Your Visual Touch Braille-TTY Phone
• Keyboard Layout
• Acoustic/Direct Connect Modes
• Use of Braille codeBaudot Code
• Perkins-Style and Full-Type Modes
• Electronic Voice
• Battery Power Information
II. Using Your Krown Visual Touch Braille-TTY phone .............................................................................11
• Read-Back Function
• Link and unlink Visual Touch Braille display from the Braille-TTY
• Making a Call In Acoustic Mode
• Telephone Conversations
• Answering a Call In Acoustic Mode
• Making an Overseas Call
III. The Memory .............................................................................................................................................14
• Memory Areas
• Entering and Saving a Message
• Sending, Deleting, and Viewing a Stored Message
• Using the Phone Directory
• Displaying the Entire Phone Directory
• Creating a Password
• Clearing the Phone Directory
4
Table of Contents
IV. Direct Connect .......................................................................................................................................20
• Direct Connect Modes
• Keyboard Dialing
• Memory Dialing
• Call Progress Indicators
• Answer a Call in Direct Connect Mode
• Tone/Pulse Dialing
• Auto Answer
• Remote Message Retrieva
V. Important Information ............................................................................................................................26
• Taking Care of Your Visual Touch Braille-TTY Phone
• Troubleshooting
• Warranty
VI. Commonly Used TTY Abbreviations ...................................................................................................28
Appendix: Braille Code Table....................................................................................................................29
5
CHAPTER 1
GETTING STARTED
SETTING UP YOUR VISUAL TOUCH BRAILLE-TTY PHONE
Place your Visual Touch Braille refreshable (Vtouch) and the KVT100 TDD on a table in front of you. Have
the KVT100 and the Vtouch keyboard facing you either side by side or the KVT100 on top of the Vtouch near
your telephone outlet. Turn OFF the power switch on the KVT100. Plug the adaptor to the electric outlet.
Plug the other end of the adaptor to the KVT100 power connector. Let the machine charge up to 24 hours
before use for the first time.
Use the DB25 connecting cable to attach the KVT100 and Vtouch. Once the connectors fit together, gently
tighten the screws. Your KVT100 is ready to connect to the telephone line. Plug one end of the telephone
cord into the telephone wall jack. Plug the other end into the jack on the back of your KVT100. First, turn on
the KVT100, you should see a message appear on the Vtouch that reads:
“BRAILLE TTY READY”
If you did not read the above message, recheck the connection between Vtouch and the KVT100 then
try again.
KEYBOARD LAYOUT
The TDD and Face-to-Face keyboards are laid out like a standard keyboard with these exceptions:
•
•
•
•
•
Top row: last key on the right (after 0) is DIAL
2nd row: last key on the right (after P) is BACKSPACE.
3rd row: first key (before A) is CONTROL.
4th row : First and last key is SHIFT
Space Bar row: first key (left of Space Bar) is LEFT ARROW. Last key (right of Space Bar) is
RIGHT ARROW.
Shift and control keys are keys used with another key to perform a function or a set of particular features.
The key must be pressed first and held while another key is pressed.
6
CHAPTER 1: GETTING STARTED
ACOUSTIC/DIRECT CONNECT MODES
Acoustic coupling:
Place the telephone hand set on top of the TDD with the cord on the left hand side. Type your greeting
message and finish with a GA (Go Ahead).To check KVT100 status, press CTRL-P. If the KVT100 is in
ACOUSTIC MODE the display will read as:
“ACOUSTIC”
If you read:
“ONLINE READY”
or
“OFF LINE”
Press, at the same time, the CTRL-DIAL keys to change mode to acoustic.
USE OF BRAILLE CODE
KVT100 uses Braille code in the basic telephone mode. It allows each character to be represented by a single Braille cell (See the Appendix for a full description). The letters of the alphabet are the same as in Grade
I (Uncontracted) Braille. Numbers will be preceded and ended by a number sign and be written on the lower
four dots of the cell. Thus, number one is dot two.
Number two is dots 2-3. Number zero is dots 356. See the Appendix for Braille Code punctuation marks.
You cannot use upper or lower case when using the KVT100. The use of Grade II (Contracted) Braille is not
supported by the standard Baudot code. This means that no double letters or any contractions can be used.
However, you can use Grade II to communicate face to face with another user when sharing the same Visual
touch Braille display. You will lose some characters that are not supported by the Relay center.
7
CHAPTER 1: GETTING STARTED
BAUDOT CODE
The standard 45.5 Baud Baudot code is used For North America. The rest of the world uses 50 Baud baudot.
To make a call outside of the country, press and hold the CTRL key then tap the LEFT ARROW key. By
pressing “Y” on your keyboard, you choose to change speed of your TTY to make an international call.
PERKINS-STYLE MODE AND FULLTYPE MODE
The KVT100 has 2 keyboard typing modes - Perkins-Style Mode and Full-T ype mode. To switch between
these two modes, press these three keys: CTRL-SHIFT-RETURN.
Perkins-style Keyboard:
If the display reads:
“BRAILLE MODE READY”.
The KVT100 is in Perkins-style mode. If you know the Braille cell dots are:
Then:
1
2
3
4
5
6
The F, D and S keys produce dots 1-2-3.
The J, K and L keys produce dots 4-5-6.
The F and J keys are located on the home row with a bump on the key cap.
Full-Type Keyboard:
If you feel more comfortable with a conventional typing configuration keyboard, you can switch to
Full-Type keyboard mode by pressing CTRL-SHIFT-RETURN. A message on the display will read:
“TTY MODE READY”
8
You can now type and send information using the full keyboard.
CHAPTER 1: GETTING STARTED
ELECTRONIC VOICE
The Electronic Voice is a single unchangeable voice message that is stored in the memory of your TDD. The
message is used for calling hearing people at a VOICE/TDD number. It tells them by electronic voice: “Please
use TDD for hearing-impaired caller.”
The voice message will be repeated until your TDD conversation begins (when your TDD receives a signal
from another TDD). As soon as the other person begins to type, the electronic voice message stops.
To turn the Electronic Voice ON or OFF
• Press CTRL-SPACE BAR to turn your Electronic Voice on. The message:
“VOICE ON”
will appear on the display.
• Press CTRL-SPACE BAR to turn your Electronic Voice off. The message:
“VOICE OFF”
will appear on the display.
NOTE: It is recommended to set electronic voice off when not dialing to a voice/TDD number. Turn your electronic voice off before using any control key operations.
BATTERY POWER INFORMATION
KVT100 is designed to operate from battery or AC (house electricity) power. To use the battery power, unplug
the AC charger/adapter from the KVT100.
9
CHAPTER 1: GETTING STARTED
The Ni-Cad batteries will operate for approximately 3 hours when fully charged. The batteries will automatically recharge whenever the units are plugged into the AC charger/adapter. To help the battery last longer, let
the units run down until the KVT100 stops working. When this happens, you must charge the battery by
using AC power.You can continue to use the KVT100 until you recharge the battery. It is suggested that you
use the Braille-TTY battery power in a regular cycle. That is, operate the unit on battery power until it needs
recharging. Recharge the batteries by plugging the KVT100 into the AC charger/adapters for 12 to 14 hours.
(The units must be turned OFF in order to recharge.)
A “BATTERY LOW” message on the VTouch display is used to indicate the KVT100 battery is low. You
need to recharge the batteries as soon as possible.
CAUTION: The adapter/chargers are NOT interchangeable. Use the adaptor that was issue with your purchase.
10
CHAPTER 2
USING YOUR VISUAL TOUCH BRAILLE-TTY PHONE
After setting up and turning on your KVT100 you see the message “BRAILLE MODE READY” or “TTY MODE
READY” on both units. The machine is ready to use.
Try brailing or typing some characters. For example: “abcdef.” You will see the characters you brailled displayed from left to right and ended by six lower dots of a Braille cell. This cell is called the “cursor”. It shows
you the next character position. When the 20th character is filled, then cursor will move to the 1st cell on the
left to continue.
READ-BACK FUNCTION
If you have difficulty reading the Braille as fast as it appears, you can press LEFT ARROW to scan the text
from the current incoming message back 19 characters.
Continuing to press the left arrow key, will take you back 19 characters each time.
To move forward to the next 19 characters, press the RIGHT ARROW key. You can use this read-back function by pressing these arrow keys in either on-line or off-line mode.
To read from the beginning of the memory, press CTRL-B.
Press CTRL-E to jump to the end of the memory or current position of the conversation.
After CTRL E or CTRL B is pressed, the LEFT and RIGHT ARROWS will move to next left/right 19 characters
from the beginning/end of memory.
LINK AND UNLINK VISUAL TOUCH BRAILLE DISPLAY FROM BRAILLE-TTY
When you use the read-back function (LEFT ARROW or CTRL-B), the Visual Touch will automatically be in
UNLINK mode. It will not display any new information from the KVT100 and you will have time to read back, at
your speed, the conversation in memory.
11
CHAPTER 2: USING YOUR VISUAL TOUCH BRAILLE-TTY PHONE
Continuing to press RIGHT ARROW toward the end of conversation will link the two units back together
automatically when cursor hits the current position.
If you want to exit this function without having to browse to the end of the message, press RETURN any time
to force the KVT100 to link to the Visual Touch Braille Display.
NOTE: Do not forget to quit UNLINK mode after you used the read-back function.
It is faster if you use CTRL-E to jump to the current position of the conversation and press RIGHT ARROW
to link two units together.
Pressing the SHIFT-DIAL keys is another way to bring you back to LINK mode without disconnecting the
current call or the conversation.
MAKING A CALL IN ACOUSTIC MODE
1. Turn on KVT100.
2. Check status of the KVT100 by pressing CTRL-P to make sure your TDD is in acoustic mode. If it is
not, press CTRL-DIAL to change it to acoustic mode.
3. Place the telephone receiver down firmly in the rubber acoustic cups with the telephone cord on
the LEFT.
4. Dial the telephone number on your telephone numeric keypad, NOT on your KVT1005. Watch the
Vtouch after you dial the number for the call progress and the answer from the other party. Begin typing
your greeting message to start the conversation.
TELEPHONE CONVERSATIONS
1. When someone answers your TDD call with his/her TDD, the person’s response will end with GA (Go
Ahead). You now type back. Typing GA is like saying, “OK it is your turn to talk now.”
2. When both people are ready to hang up, type SK (instead of GA). This means “Stop Keying. “ When
both have typed SK the conversation is finished. Hang up the telephone by putting the handset back on
the phone. Turn the power switch to off.
NOTE: See back page of Quick Guide for more commonly used TTY abbreviations.
12
CHAPTER 2: USING YOUR VISUAL TOUCH BRAILLE-TTY PHONE
ANSWERING A CALL IN ACOUSTIC MODE
1. Turn the Power Switch on.
2. Pick up and place your telephone handset firmly into the acoustic cups of the KVT100 with the cord to
the LEFT.
3. By pressing the SPACE BAR, you start the conversation. Type your greeting message.
For example: “BARBARA HERE GA”
4. When both people have finished the conversation, place your telephone handset back on the phone.
5. Turn OFF power switch.
MAKING AN OVERSEAS CALL
To place a call outside of the country, you will need to change the transmission speed (Baud rate) at which your
Braille-TTY sends messages. In the United States, the standard rate for TDD/TTY transmissions is 45.5 Baud,
while the International Standard is 50 Baud.
Press CTRL-LEFT ARROW. The display will show:
“INT’L SPEED? Y/N”.
Press “Y” to select international speed.
“INTERNATIONAL ON” is displayed.
To change back to the domestic TDD/TTY code after your call, press CTRL-LEFT ARROW at same time. The
display shows:
“INT’L SPEED? Y/N”.
Press “N” to select standard 45.5 Baud.
“INTERNATIONAL OFF” is displayed.
13
CHAPTER 3
THE MEMORY
The TTY has a 32K (32768 characters) memory. The memory feature can save you time by letting you save
often used
messages, prepare a message before making a call to save on long distance charges, and to save
frequently called numbers.
MEMORY AREAS
The KVT100 memory is divided into 6 blocks, consisting of 5 “areas” labeled M1 to M5 plus a directory for
phone numbers:
• M1 and M2 can hold 32 characters each. These are suitable for short messages such as a greeting that
might be used for any incoming call.
• M3 holds 256 characters, for somewhat longer messages like the answering machine message.
• M4 holds approximately 1200 characters. This area can be used to store a message that will be sent as
an outgoing call.
• M5 stores all outgoing and incoming data automatically, using the remaining available space. If the
space available to store messages runs out during a conversation, new data will overwrite the old data
in this memory area, beginning with the oldest message. This will not affect stored messages in any
other area. Information in area 5 cannot be sent to another TDD/TTY.
• A PHONE DIRECTORY (with labels D1-D9) provides 9 locations plus one password (D0) of 24
characters each, which can be used to store and view frequently dialed phone numbers.
ENTERING AND SAVING A MESSAGE
1. Press CTRL-5 to access the memory areas you want to use. The display will show:
“MEM#1#-#5# D(DIR)”
2. Press the number of the memory area you want to select.
For example press 1 to choose area M1.
14
CHAPTER 3: THE MEMORY
3. Type the message you want to store with a full-type keyboard. Do not use 6 keys in Braille mode. Your
message will be displayed as you type with a space between each character on your Braille display.
These extra spaces will not appear when your message is sent.
4. Press CTRL-9 to save. The message will be stored and the display shows:
“MEMORY SAVED”.
5. Press CTRL-1 to check the message you typed. If it is not correct, repeat steps from 1 to 5. Use the same
method for the other memory areas.
NOTE: To delete the character in front of the cursor press CTRL-7. Press Ctrl-6 to turn on insert mode.
SENDING A STORED MESSAGE
Press CTRL key and the memory area (1-4) in which your message is stored. Your message will be sent. To
interrupt sending a message, press CTRL- 4.
DELETING A STORED MESSAGE
You can erase (or “clear”) all of the information in a memory area by typing CTRL- 8 (CLEAR). You will be
prompted to enter the number of the area to be cleared, and then asked to confirm (Y or N).
If you type “Y”, the memory area will be cleared. You can type a new message in the memory area you just
cleared.
Pressing CTRL-9 to save your new message. “MEMORY SAVED” will appear on the display.
For better memory performance, clear memory area 5 before making any phone calls to save space for next
conversation or after you check the old answering messages to prepare for next time. To clear conversation
memory, press CTRL-C (clear communication memory).
15
CHAPTER 3: THE MEMORY
VIEWING A STORED MESSAGE
To read a message stored in memory, you must first access the memory areas by pressing CTRL-5, then
type a number to tell the KVT100 where the message is stored. The area name (for example, M2) will be
shown on the right side of the display, and the message will be shown in the center of the KVT100 display.
The Visual Touch starts the message from the left hand side.
Press RIGHT ARROW, you will notice the cursor moves to the first cell. As you continue pressing RIGHT
ARROW the cursor moves to the right.
Press LEFT ARROW, you will notice the display returns to the beginning of your message with the cursor in
the last cell.
To move quickly in a stored message, press and hold CTRL and an ARROW KEY at the same time. The
display will keep showing more text on the side of the arrow until you release the key. When you are finished
looking at the message, press CTRL-9 (SAVE) to store the message again and clear the screen.
“MEMORY SAVED” is displayed.
USING THE PHONE DIRECTORY
You can store phone numbers in any of 9 memory locations. Add a phone number to directory:
1. Press CTRL-5 to access the memory areas. Type “D” to choose the telephone directory.
2. The screen will first show the message
“KEY PH LOC#0#-#9”
3. Select an entry from 1-9. Now the display shows:
“TYPE NAME & NO NOW”
16
CHAPTER 3: THE MEMORY
4. Press spacebar
The location’s label and the cursor will appear on the right end of the display.
5. Type the name and number
6. Press CTRL-9 to save.
“MEMORY SAVED” will appear on the display.
NOTE: Numbers can be separated with a “-” DASH but only numbers will be dialed. Letters and dashes will
not affect dialing. If needed for the operation of a special business system, a pause or delay in dialing string
can be inserted between numbers. Type a (+)PLUS for each one second delay needed .
DISPLAYING THE ENTIRE PHONE DIRECTORY
To display the entire phone directory
1. Press DIAL.
“TYPE NO., M(MEM)” will appear on the display.
2. Press “M” for memory.
“PH#1#-#9#, D(DIR)” appears.
3. Press “D” to display all the directory listings from 0-9. When finished, the display will read:
“PH#1#-#9#, K(KBD)”
4. Press CTRL-9 to exit.
17
CHAPTER 3: THE MEMORY
CREATING A PASSWORD
You will need a password to retrieve your message in your house answering machine when you are away
from home. Your password will be stored in location 0 (zero) of the Phone Directory. A password must be at
least five characters in length.
To create a password:
1. Press CTRL-5
2. Press “D” for directory
3. Press “0”
”TYPE PASSWORD” is shown.
4. Press the SPACE BAR then type your password.
5. Press CTRL-9 to save.
“MEMORY SAVED” is displayed.
CLEARING THE PHONE DIRECTORY
To delete a single entry in your phone directory
1. Press CTRL-8, you will read:
“CLR M#1#-#5#, D?”
2. Press “D” to choose phone directory. You will read:
“KEY PH LOC#0#-#9#”
18
CHAPTER 3: THE MEMORY
3. Select the location you want to delete. The display will show:
“TYPE NAME, NO NOW”
4. Press the SPACE BAR to delete the entry.
5. Press CTRL-9 to save. The display will show:
“MEMORY SAVED”
Note: that after pressing the space bar to delete an entry, you may type a new phone number. Press CTRL-9
to save.
To clear the entire phone directory
1. Press CTRL-8, you will read
“CLR M#1#-#5#, D?”
2. Press “D” to choose phone directory. You will read
“KEY PH LOC#0#-#9”
3. Press “D” again,
“KEY PH LOC#0#-#9” is still displayed.
4. Press CTRL-9. All directory locations are now empty (including the password).
19
CHAPTER 4
DIRECT CONNECT
The Direct Connect feature saves time, and more reliable for a connection. It also gives the choice of dialing
from the keyboard or from numbers stored in the Phone Directory. The user also can watch the progress of
the call when dialing a number. If the first cell rises up and down in 1-second cycles, you are receiving a
busy line. Hang up by pressing CTRL-9 and try calling again. If the first cell rises for 2 seconds on and 4
seconds off, the line is ringing. If the cell rises up and down with no pattern, someone has answered by
voice. The electronic voice (CTRL-SPACE BAR) can be used to ask them to use a TDD to answer you or try
to call you through Relay Services.
DIRECT CONNECT MODES
To use Direct Connect mode, the KVT100 must have access to a telephone line. Connect the KVT100 to the
telephone outlet by using the supplied module cable. Set direct connect mode by pressing CTRL-DIAL until
you see message
“DIRECT CONNECT” appear on the display.
NOTE: When in Direct Connect it is possible to make several phone calls without turning the KVT100 OFF
between each call. To hang-up (disconnect) between calls, press and hold CTRL- 9 for a couple seconds.
The KVT100 is then ready for you to make another call.
KEYBOARD DIALING
The KVT100 will accept “dial” key only when you are offline or ON HOOK. To check the current status of
KVT100, press CTRL-P. If you are ONLINE or off-hook, press CTRL-9 to hang up.
Press DIAL. The display now reads:
“TYPE NO.,M(MEM)”
20
CHAPTER 4: DIRECT CONNECT
Press the number you wish to dial. If you make a mistake, use the backspace to erase and type a correct
number. After you enter all numbers, press RETURN key to start the dialing process. The number you entered
will be dialed.
You can press CTRL-9 to disconnect. The display will show:
“DISCONNECTED”.
The phone line is now hung up and you may press DIAL key and begin dialing again.
MEMORY DIALING
To dial from the directory, press DIAL. The display shows:
“TYPE NO.,M(MEM)”
If you press “M” for directory dialing,
“PH#1#-#9#, D(DIR)” appears.
Choose the directory number you wish to dial or press “D” to list all numbers in the directory on the screen.
CALL PROGRESS INDICATORS
After the number is dialed, the Visual touch Braille display will be cleared to prepare for the call progress. The
first cell will be used for call progress indicator.
• If you notice a period of 2 second on and 4 second off raise up or down on the first cell, it is ringing.
• If you notice a cycle of 1 second on and 1 second off instead, it is busy.
21
CHAPTER 4: DIRECT CONNECT
ANSWER A CALL IN DIRECT CONNECT MODE
1. Press SHIFT-DIAL to connect your phone to the telephone line. Check the display to see if the
message “ONLINE READY” is shown on your Visual Touch.
2. Type your greeting message to start the conversation.
3. When you are ready to hang up, Press CTRL-9 to disconnect.
TONE/PULSE DIALING
Telephone companies offer both pulse and tone dialing. The KVT100 will use tone dialing unless you
manually change it. Most tone dialing services will allow you to use rotary (pulse) dialing, but some rotary
services will not allow you to use
tone dialing.
To set the KVT100 for pulse dialing, press the CTRL-RIGHT ARROW key. The KVT100 will ask:
“PULSE DIAL? Y/N”.
Press “Y” to choose pulse dial.
“PULSE DIAL ON” appears.
If you press “N” the unit remains in tone dialing mode.
“TONE DIAL ON” appears.
AUTO ANSWER
The KVT100 has an answering machine to take messages for you when you are away.
22
CHAPTER 4: DIRECT CONNECT
1. First, use memory bank3 to set up an outgoing message. (See Entering and Saving a Message page 15)
For example:
“HELLO. THIS IS JOHN’S ANSWERING MACHINE. PLEASE TYPE YOUR NAME AND PHONE
NUMBER AND I WILL RETURN YOUR CALL SK”
2. Set your TDD to Auto Answer:
Press CTRL-0 (zero) to enter auto answer mode. The KVT100 will asks:
“NO.RINGS #1#-#9#?”
Select the number of times you want the phone to ring before automatically answering by your TDD. After
you enter the number of rings, the machine asks to clear the old memory:
“CLR MEM?(Y/N)”
Press “Y” to clear the memory or “N” to keep the previous messages.
“AUTO ANSWER ON” appears on displays.
Auto Answer is now activated.
Your incoming TDD calls will be answered, and stored in memory bank 5.
3. Read your messages
If there is a message is waiting for you, the display will flash
“—CALL RECEIVED—”
23
CHAPTER 4: DIRECT CONNECT
Press CTRL-5 and select 5 to read messages.
After checking all messages, erase memory 5 by pressing CTRL-C (If you wish to delete all messages.)
Answering an Incoming Call with Auto Answer On
To answer an incoming call when Auto Answer is on, press SHIFT-DIAL before or after the auto answer message is sent.
Auto Answer is removed.
The KVT100 is now “on-line” with the caller.
Press “xxx” to alert the caller that you are answering the call. Then type your greeting.
Example: “XXX HELLO GA”
After you have finished the call, the KVT100 will wait for 60 seconds and return to Auto Answer mode.
“AUTO ANSWER ON” will appear.
If neither person is typing for 60 seconds, The KVT100 will automatically hang up. You will now be disconnected. To prevent this from happening, press CTRL-0.
“NOTIMEOUT” will be displayed.
IMPORTANT: To end your call and return to auto answer press CTRL-9. “AUTO ANSWER ON” appears.
To turn off Auto Answer mode, press CTRL-0. Display will show:
“AUTO ANSWER OFF”
24
CHAPTER 4: DIRECT CONNECT
REMOTE MESSAGE RETRIEVAL
The Remote Message Retrieval feature lets you retrieve your messages while away from home. Be sure to
store a password in location “0” (zero) of the Phone Directory (see page 14). Set your TDD to Auto Answer
mode by pressing CTRL-0. (See previous section.) You need to use another KVT100 or compatible product to
call home and retrieve your messages.
To retrieve your messages:
1. Dial your home phone number.
2. Auto Answer will answer with your personalized message.
3. After the message is finished, type your password with no spaces. All of your messages will be sent
to you.
25
CHAPTER 5
IMPORTANT INFORMATION
TAKING CARE OF VISUAL TOUCH BRAILLE-TTY PHONE
CAUTION: The adapters are NOT interchangeable. You MUST use the adapters that come with your
KVT100.
•
•
•
•
•
•
Be sure to turn your unit OFF when not in use. (Unless in Auto Answer mode)
Keep your machine away from extreme temperatures (120 degrees or above).
Avoid dropping or shaking the units. Electronic devices are very fragile.
Keep the units as dust-free as possible.
Do not spill liquids onto the units.
When traveling by air, carry your Visual Touch Braille-TTY as carry-on luggage. At the security check,
DO NOT LET YOUR VISUAL TOUCH BRAILLE-TTY PHONE GO THROUGH THE X-RAY. Ask for
visual inspection. DO NOT CHECK IT AS BAGGAGE.
TROUBLESHOOTING
Q.
A.
Sometimes when talking to a friend with an old TDD, I get only numbers and no messages.
This means that the other unit is in FIGURES mode.
Press the “X” key two or three times. It is best not to end a sentence with a period. Always end with the
GA or SK response.
Q.
A.
Sometimes nothing happens when my KVT100 is turned ON.
If you are in acoustic mode, verify the telephone cord. It must be on your LEFT. Check the AC
adapter/charger, and the data cable to make sure it is properly connected to both units. Restart KVT100.
Q.
A.
The battery runs down very quickly.
Exercise the batteries often by allowing them to run down completely. Recharge overnight (12-14
hours). The units must be turned OFF to recharge the batteries.
26
IMPORTANT INFORMATION: CHAPTER 5
Q.
A.
After I read back in a conversation, there’s nothing sent to the Braille display.
Make sure that you quit the unlink mode by pressing RETURN key several times or CTRL-E to reach the
current position of cursor then RIGHT ARROW key to link both units together.
Hit spacebar to see if your cursor moves. Now you are in link mode and the Visual Touch Braille display is
ready to display information from your TDD.
Q.
A.
After I dial a number nothing happens.
Press CTRL-9 to disconnect the telephone line from your machine. Check the number and dial again.
Q.
A.
I get nothing after I type my password on my KVT100 phone.
Retrieve Message is used when you are away from your KVT100. You need another TTY to check your
messages. After enter your password once, you can repeat typing the same password again one more
time if you did not receive your messages from your machine at home. Hang up and retry if you fail
both times.
Q.
A.
I receive the message “NO DIAL TONE”.
Check the telephone cable connecting your KVT100 to the telephone outlet. Make sure it is firmly
attached to both ends.
Press CTRL-9 to disconnect the telephone line, wait for 30 seconds and try your call again.
Q.
A.
I receive the message “BATTERY LOW”
Your KVT100 battery is low. Turn off your KVT100 and let them recharge for at least 12 hours.
WARRANTY
Your KVT100 and Visual Touch refreshable Braille display are covered for two full years from the date of purchase against all defects in materials or workmanship. Please fill out and send in the warranty cards as soon
as possible.
27
CHAPTER 6
COMMONLY USED TTY ABBREVIATIONS
TTY users often abbreviate commonly used words or expressions to save time. The following abbreviations
are a sampling of those most frequently used. It is also common to omit punctuation.
ANS....................................Answer
BRB.........................Be Right Back
CUD......................................Could
GA..................................Go Ahead
LTR .......................................Letter
MSG ................................Message
MIN......................................Minute
NBR...................................Number
NITE ......................................Night
OMG............................Oh My God
PLS .....................................Please
28
QQ ...................................Question
R...............................................Are
REC ..................................Receive
SK...............................Stop Keying
THRU................................Through
THX...............................Thank You
U ..............................................You
UR...........................................Your
WUD ....................................Would
XOX........................Hugs & Kisses
APPENDIX
BRAILLE CODE TABLE FOR US
ASCII
CODE
BRAILLE
DOT PATTERN
32
33
34
35
36
37
38
39
40
41
42
43
44
45
46
47
48
49
50
51
52
53
54
55
56
57
(
( 234 6
(
5
( 3456
(12 4 6
(1 4 6
(1234 6
( 3
(123 56
( 23456
(1
6
( 34 6
(
6
( 3 6
(
4 6
( 34
( 3 56
( 2
( 23
( 2 5
( 2 56
( 2
6
( 23 5
( 23 56
( 23 6
( 3 5
!
“
#
$
%
&
‘
(
)
*
+
,
.
/
0
1
2
3
4
5
6
7
8
9
)
)
)
)
)
)
)
)
)
)
)
)
)
)
)
)
)
)
)
)
)
)
)
)
)
)
CHARACTER
space
exclamation mark
double quotes
number sign
dollar
percent
ampersand
apostrophe
parenthesis open
parenthesis close
asterisk
plus
comma
minus
point
slash
zero
one
two
three
four
five
six
seven
eight
nine
58
59
60
61
62
63
64
65
66
67
68
69
70
71
72
73
74
75
76
77
78
79
80
81
82
83
:
;
<
=
>
?
@
A
B
C
D
E
F
G
H
I
J
K
L
M
N
O
P
Q
R
S
(1
56
(
56
(12
6
(123456
( 345
(1 456
(
4 7
(1
7
(12
7
(1 4 7
(1 45 7
(1
5 7
(12 4 7
(12 45 7
(12 5 7
( 2 4 7
( 2 45 7
(1 3
7
(123
7
(1 34 7
(1 345 7
(1 3 5 7
(1234 7
(12345 7
(123 5 7
( 234 7
)
)
)
)
)
)
)
)
)
)
)
)
)
)
)
)
)
)
)
)
)
)
)
)
)
)
colon
semi-colon
less
equal
greater
question mark
at sign
capital a
capital b
capital c
capital d
capital e
capital f
capital g
capital h
capital i
capital j
capital k
capital l
capital m
capital n
capital o
capital p
capital q
capital r
capital s
29
APPENDIX: BRAILLE CODE TABLE FOR US
84
85
86
87
88
89
90
91
92
93
94
95
96
97
98
99
100
101
102
103
104
105
106
107
108
109
110
111
112
113
30
T
U
V
W
X
Y
Z
[
\
]
^
_
`
a
b
c
d
e
f
g
h
i
j
k
l
m
n
o
p
q
( 2345 7
(1 3 67
(123 67
( 2 4567
(1 34 67
(1 34567
(1 3 567
( 2 4 67
(12 567
(12 4567
(
45 7
(
4567
(
4
(1
(12
(1 4
(1 45
(1
5
(12 4
(12 45
(12 5
( 2 4
( 2 45
(1 3
(123
(1 34
(1 345
(1 3 5
(1234
(12345
)
capital t
)
capital u
)
capital v
)
capital w
)
capital x
)
capital y
)
capital z
) rectangular bracket open
)
backslash
) rectangular bracket close
) accent circonflex
)
underline
)
accent grave
)
a
)
b
)
c
)
d
)
e
)
f
)
g
)
h
)
i
)
j
)
k
)
l
)
m
)
n
)
o
)
p
)
q
114
115
116
117
118
119
120
121
122
123
124
125
126
127
128
r
s
t
u
v
w
x
y
z
{
|
}
~
€
(123 5
( 234
( 2345
(1 3 6
(123 6
( 2 456
(1 34 6
(1 3456
(1 3 56
( 2 4 6
(12 56
(12 456
(
45
(
456
(1234 67
)
)
)
)
)
)
)
)
)
)
)
)
)
)
)
r
s
t
u
v
w
x
y
z
brace open
dashed vertical line
brace close
tilde
open triangle
capital c cedille
3408 Indale Road, Fort Worth, Texas 76116
Voice: (817) 738-2485 | TTY: (817) 738-8993 | Fax: (817) 738-1970
E-mail: [email protected] | Web site: www.krownmfg.com