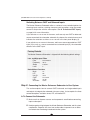
1
M
R
MASTER
REFERENCE
O
R
W
N
E
’
S
R
E
S
SUBWOOFER
F
E
R
E
N
C
E
Master Reference Subwoofer Owner’s Reference, v00.1
Krell Industries, Inc.
45 Connair Road
Orange, CT 06477-3650 USA
TEL 203-799-9954
FAX 203-891-2028
E-MAIL [email protected]
WEBSITE http://www.krellonline.com
This product complies with the EMC directive (89/336/EEC) and the low-voltage directive
(73/23/EEC).
WARNINGS
Do not place flammable material above or beneath the subwoofer.
Before making connections to the subwoofer, ensure that the back panel power switch is in the
down position. Make sure all cable terminations are of the highest quality, free from frayed ends,
short circuits, or cold solder joints.
Connecting non-CAST components to CAST inputs or outputs can damage your equipment and
void your warranty.
Do not attempt to change CAST cable terminations or CAST inputs or outputs to RCA or XLR
connectors. It is electrically impossible to convert CAST input or output connections for balanced
or single-ended voltage operation.
THERE ARE NO USER SERVICEABLE PARTS INSIDE THE MASTER REFERENCE SUBWOOFER.
Please contact Krell if you have any questions not addressed in this manual.
This product is manufactured in the United States of America. Krell® is a registered trademark of Krell Industries, Inc., and is restricted for use by
Krell Industries, Inc., its subsidiaries, and authorized agents. Krell CAST™ is a patent pending of Krell Industries, Inc. Krell Active Motion Control™,
Krell Current Mode™, and Krell Link™ are trademarks of Krell Industries, Inc. Manufactured under license from Dolby Laboratories. "Dolby," "Pro
Logic," and the double-D symbol are trademarks of Dolby Laboratories. Confidential Unpublished Works. Copyright 1992–1997 Dolby Laboratories,
Inc. All rights reserved. All other trademarks and tradenames are registered to their respective companies.
© 2000 by Krell Industries, Inc. All rights reserved
P/N 304372
Overview
This owner’s reference is written to assist you with the seamless integration of the
Master Reference Subwoofer into your audio/video system. Due to the size and
weight of the subwoofer, there are special placement and installation issues that
require your attention. In addition, to use the programmable electronic crossover,
you need to set system configurations before you play music. Please read and
follow this guide carefully to ensure safe installation, set-up, and operation of the
Master Reference Subwoofer in your listening environment.
This owner’s reference is divided into seven sections:
SECTION ONE: About Krell, pages 2-13
This section describes the Krell Legacy, Krell’s revolutionary CAST technology, and
defines key terms used in this reference.
Krell Legacy. Krell’s ongoing pursuit of high-end audio excellence.
Revolutionary Krell CAST Technology. Krell’s revolutionary method of connecting
analog audio components for unparalleled sonic performance.
Ensuring Maximum Performance. A description of Krell’s innovative technologies
and design for the Master Reference Subwoofer as well as the core technologies
developed for all Krell components.
Definition of Terms. Key terms used throughout the Master Reference Subwoofer
owner’s reference.
SECTION TWO: Unpacking and Placement, pages 14 -17
This section describes the procedures for unpacking and placement of the Master
Reference Subwoofer in the listening room.
Unpacking. Removing the subwoofer from its shipping crate and safely moving the
subwoofer into the listening room.
Placement. Options for placing the subwoofer in the listening room; and the AC
Power Guidelines.
SECTION THREE: Features, pages 18-29
This section provides illustrations of the Master Reference Subwoofer front panel,
back panel, and remote control, and descriptions of front panel, back panel, and
remote control features.
iii
1
continued 䊳
(Overview continued)
SECTION FOUR: Connections and Configurations, pages 30- 41
This section provides information on connecting and configuring the Master
Reference Subwoofer before playing music.
Connections. Integrating the Master Reference Subwoofer with other components
in your system using CAST, balanced, or single-ended connections, as well as
connecting the Master Reference Subwoofer (for stereo and low frequency effect
operation).
Configurations. Instructions for setting configurations before you play music and
how to save your settings to presets.
SECTION FIVE: Operation, pages 42-43
This section provides instructions for how to power on and power off manually.
SECTION SIX: Optional Connections, pages 44- 46
This section describes the remote connection options that enable you to power on
and control the Master Reference Subwoofer automatically.
Krell Link Connections and Operation. Describing how Krell Link works.
Connecting and operating components connected through Krell Link.
RS-232 Connection. Describing an additional remote connection for receiving
commands from a computer-based control system.
12 VDC (12 V Trigger) Connections. Describing an additional remote control option for
the Master Reference Subwoofer and other components that contain a 12 V trigger.
SECTION SEVEN: Optional Configurations, pages 47- 49
This section provides instructions for setting optional configurations, including
turning LEDs on and off and selecting AC Mains operation.
WARRANTY, pages 50-51
RETURN AUTHORIZATION PROCEDURE, page 52
iv
List of Illustrations
Figure 1, page 16
Master Reference Subwoofer Placement Options
Figure 2, page 18
Master Reference Subwoofer Front Panel
Figure 3, page 20
Master Reference Subwoofer Back Panel (Power)
Figure 4, page 21
Master Reference Subwoofer Back Panel (Inputs and Outputs)
Figure 5, page 25
Master Reference Subwoofer Remote Control
v
A Letter from Dan D’Agostino
Dear Audio Enthusiast,
Thank you for your purchase of the Master Reference Subwoofer.
The Master Reference Subwoofer is the result of my ongoing quest for designing
reference caliber audio components.
I have been designing audio amplifiers for high performance audio systems for more
than thirty years. The Master Reference Subwoofer represents the culmination of
many years of engineering research and discerning listening. All of my insights and
discoveries about the synergy between high performance amplifiers and low frequency
music reproduction have come together in the design of this component.
I developed this subwoofer to be compatible not only with Krell’s proprietary CAST
components but also with the wide range of loudspeakers that are preferred by
music enthusiasts. Krell’s one-of-a-kind programmable electronic crossover makes
this possible. The crossover includes three filters—Bessel, Butterworth, and LinkwitzRiley—that adjust and match the subwoofer to any system and loudspeaker configuration. No other subwoofer offers this level of refinement. The Master Reference
Subwoofer eliminates the loss of sound quality and power that occurs as music
moves between the high and low frequency ranges. This Krell subwoofer produces
low frequency sound the way it was meant to be heard—resonant, precise, and
utterly reliable—without compromising the fidelity of the performance.
To me, the Master Reference Subwoofer is the logical next step in my personal
passion for designing and developing high performance audio equipment. Innovative
software controls and proprietary circuitry in a custom-machined chassis add
dimension to your stereo and home theater systems, placing their low-end capability
at the very vanguard of technology.
Thank you again for your decision to purchase the Master Reference Subwoofer.
Designing and building the finest audio components continues to be my life’s work. I
am pleased to share my most recent triumph in audio engineering and design with you.
Sincerely,
Daniel D’Agostino
Chief Executive Officer
1
SECTION
ONE
About Krell
This section describes the Krell Legacy, Krell’s revolutionary CAST technology, and
defines key terms used in this reference.
The Krell Legacy
“I design every Krell component to set the standard
for workmanship, style, and performance.”
Dan D’Agostino
High-end audio is a demanding pursuit—an ongoing quest for excellence in
music reproduction that drives equipment manufacturers to strive for the absolute
in design and performance. With a keen understanding of this passionate drive,
Krell Industries, Inc. was founded in 1980.
Over the past two decades, Krell has earned a distinguished reputation for engineering
innovation and product excellence. The company’s history is replete with product
introductions that have deeply impacted the high-end audio industry. The most
discriminating audiophiles and product reviewers have consistently recognized Krell
components for standard-setting performance.
The Master Reference Subwoofer represents the next era at Krell Industries, Inc.—
the era of loudspeaker design and manufacture—which will join the ongoing legacy
of Krell amplifiers. For three decades, Krell C.E.O. Dan D’Agostino has built amplifiers
legendary for their ability to deliver optimum performance from any loudspeaker.
This experience has yielded invaluable insights about the nature of loudspeaker
design, which Krell has characteristically incorporated into its first subwoofer.
The Master Reference Subwoofer is a full-fledged, reference caliber subwoofer
that features a programmable crossover and proprietary circuit technology not
found in any other subwoofer. The result is a subwoofer that raises your music
and home theater systems to new levels of tonal quality, precision, and accuracy.
2
From the first Krell product — the KSA-100 — to the present, Dan D’Agostino has
continually “pushed the envelope” of performance in his search for greater amplifier
power and now, subwoofer power. His exploration of technologies, driven by his
never-ending quest to elevate the standard of excellence, has resulted in breakthrough audio designs. Over the years, the Krell line of power amplifiers, including
benchmark products such as the KRS-100, KRS-200, and the Audio Standard
models, has established a legacy of unparalleled sonic performance. The Master
Reference Subwoofer brings that level of performance to the low frequency range.
Dan D’Agostino remains committed to the development of new designs and technologies. And the Krell legacy will continue to evolve with products that deliver
innovative engineering, perfection in build quality, and outstanding audio performance.
3
continued 䊳
(SECTION ONE: About Krell continued)
Revolutionary Krell CAST Technology
The Master Reference Subwoofer is designed with Current Audio Signal Transmission
circuit technology, termed CAST. This circuitry is a revolutionary method of connecting analog audio components for unparalleled sonic performance. The innovative
use of the new Krell CAST in combination with existing Krell Current Mode technology
enables you to create entire CAST systems that reproduce music with incredible
range, tonality, and precision.
The Traditional Audio System and Voltage Signal Transmission
Signal is transmitted in the voltage domain between two components in a traditional
audio system. Each component is a discrete entity displaying unique characteristics
that affect the musical signal independently. Each component is unaware of the other
components in the system. The cables that connect the components also have
their own electrical characteristics that affect the sonic presentation of the audio
system.
A New Approach: Current Audio Signal Transmission
CAST circuitry recognizes signal transmitted between each component in the current domain instead of the voltage domain. CAST transmission unifies individual
components and their interconnects into an electrically linked whole. The sonic
presentation of the entire system remains intact.
The Basics of CAST
Here’s how a CAST audio system works with the Master Reference Subwoofer.
Each CAST source amplifies current internally, using Krell Current Mode circuitry.
CAST circuitry then outputs this current signal. When the signal is received by a
CAST input on a Master Reference Subwoofer, Krell Current Mode circuitry again
manages the signal until the signal reaches the loudspeaker. An entire CAST system
behaves as if it is one component because it maintains the musical signal in the
current domain from beginning to end. Anomalies of signal transmission between
components are eliminated. Cable impedances and their effects on the transmitted
signal are non-existent.
4
CAST and Krell Current Mode Combined
CAST technology combined with Krell Current Mode circuitry take signal transmission
to the next evolutionary level. Krell Current Mode is the technology developed to
transfer the musical signal within a component, used in Krell components since
1995. Krell has now added CAST technology, a new method of transferring the
musical signal between components. In essence, Krell Current Mode maintains
the integrity of the signal within the Master Reference Subwoofer and CAST preserves the transmitted signal between source components and the Master Reference
Subwoofer. Together, CAST and Krell Current Mode technologies unify separate Krell
components into a single global circuit.
CAST Cables
CAST systems use cables manufactured by Krell and made by other manufacturers specially licensed by Krell. Thin, flexible CAST cables are constructed with the
same build quality as Krell components and are aesthetically matched to the Krell
product line. An all-metal body and locking connectors with gold contacts are part
of the no-compromise specification developed as a standard for every CAST
cable made.
The Best Musical Performance
A CAST system brings you significant improvements in every performance area:
speed, precision, dynamic range, depth and width of the sound stage, transient
impact, tonal balance, harmonic distortion, and more. The goal behind designing
CAST into the Master Reference Subwoofer reflects the company goal for every
Krell product. Krell strives for the delivery of the best performance of a musical event
for you, using the full expression of technology to date.
Thank you for your appreciation of our research and development effort.
5
continued 䊳
(SECTION ONE: About Krell continued)
Ensuring Maximum Performance
The function of the Master Reference Subwoofer is to
reproduce, with unprecedented authority and fidelity, the
lowest reaches of the audio spectrum, thereby extending
the low frequency capabilities of even the finest music
and home theater systems.
The Krell Master Reference Subwoofer sets a new standard in powered subwoofer
design. At the heart of the Master Reference Subwoofer is its proprietary interface.
This programmable electronic crossover provides unparalleled matching for subwoofer
and system components and allows seamless integration with any loudspeaker
configuration. Additional innovative technologies such as Active Motion Control are
specifically designed to unleash the full power of the built-in Krell amplifier while
assuring that the special characteristics of low frequency sound are meticulously
reproduced. Innovative technology teamed with Krell’s outstanding core technology
ensure maximum power, precision, and performance in the low frequency range.
Innovative Subwoofer Technology and Design
Programmable Electronic Crossover
The programmable electronic crossover is a design tour de force. It seamlessly
matches the Master Reference Subwoofer to the characteristics of your system.
You can select and adjust high-pass and low-pass filter profiles and parameters.
Three filter profiles with unique response characteristics integrate the Master
Reference Subwoofer with any loudspeaker and listening setup. Each filter profile
includes parameters for frequency, slope, and level, allowing you to further fine-tune
the subwoofer to your system. These adjustments are easy to select using the
Master Reference Subwoofer’s step-by-step menu and remote control.
Krell Active Motion Control
The traditional approach to subwoofer design is to incorporate a standard servo
circuit that uses feedback to control the drivers at higher output levels. Doing so
effectively controls the drivers, but it can also dampen the musical dynamics, losing
the visceral impact of the low frequency range.
6
Active Motion Control is a unique circuit topology developed by Krell specifically
for the Master Reference Subwoofer. An instrument grade accelerator, mounted to
one of the drivers, relays information about the driver’s position to the Active Motion
Control circuit, where it is compared to the musical waveform at the amplifier input
stage. Amplifier parameters are then adjusted to ensure that driver motion is faithful
to the input signal, and feedback is precisely applied to preserve sonic impact. Krell
Active Motion Control allows the Master Reference Subwoofer to achieve complete
driver control and deliver true-to-life low frequency sound at the same time.
Enclosure
The enclosure is an essential part of any loudspeaker and is particularly significant
in subwoofer design. Low frequency energy causes some of the most stable materials
to resonate. Enclosure resonance degrades performance and destroys linearity. Krell
engineering has attacked these design challenges with a vigorous application of
technology, know-how, and innovative build materials.
The enclosure for the Master Reference Subwoofer is made of 1 in. thick, aircraftaluminum billet. Each of the two driver baffles is a substantive 2 1/4 in. thick. The
subwoofer assembly is held together by 68 machine screws, size 1/4 20 x 1 in. The
precision machine finish is black anodized to a pearl-like luster. Fully assembled, the
Master Reference Subwoofer weighs 396 pounds. This subwoofer does not resonate.
Drivers
The high performance demands of the Master Reference Subwoofer require drivers
of exceptional capability. Krell has researched every aspect of driver design and
construction to produce remarkable transducers. The Master Reference Subwoofer
contains two 15 in. drivers, which have been custom crafted to Krell’s own rigorous
specifications. The drivers are mounted at opposite ends of the case, firing outward,
away from one another. They are wired in phase: One driver’s motion has the effect
of canceling the motion of the other, rendering the enclosure free of operationally
induced vibrations.
7
continued 䊳
(SECTION ONE: About Krell continued)
(Drivers continued)
Two 80 oz. strontium ferrite magnets are affixed to the custom-made, cast
magnesium speaker frame. The magnet assembly has been contoured to produce
a powerful, focused, magnetic field. A robust, doped (reinforced) paper cone,
chosen for its high strength and low weight, is affixed at one end to the speaker
frame via a special rubber surround. This surround has a unique geometry that
resists cavitating (turning inside out) under high pressures. At the other end of
the cone, Krell utilizes a dual-spider arrangement in order to maintain the superior alignment of the concentric mechanical assembly under all performance conditions. An extra-long voice coil controls the drivers even at maximum excursion.
Krell Core Technologies
Krell CAST and Krell Current Mode
These circuit topologies combine to transmit audio waveforms between components in the current rather than the voltage domain. Krell components using Krell
Current Mode circuitry and CAST technology perform as if they are part of a single
circuit. The resulting speed and bandwidth produce outstanding accuracy and
realism in music reproduction.
Krell Proprietary Output Devices
Loudspeaker control is paramount in any audio system. Control is even more critical
in subwoofers, in which the audio band is limited to the extreme low frequencies.
Krell amplifiers are known for the control they exert on even the most complex
loudspeaker loads. Part of this capacity is a result of the proprietary output devices
used in all Krell amplifiers. These devices, manufactured for Krell by Motorola,
allow for high gain and low output impedance. These circuits enable the amplifier
to deliver enormous amounts of current with relative ease and with less distortion.
8
Totally Balanced Operation
Balanced circuits ensure optimum signal to noise ratios, signal preservation, and
accuracy of delivery under every condition; however, the primary benefit of balanced
circuitry is loudspeaker control. The Master Reference Subwoofer finesses the low
frequency range with totally balanced operation from input to output, employing
CAST or XLR inputs. In the output stage of each Master Reference Subwoofer,
independent circuit paths amplify the positive and negative output signals to exercise
absolute control over loudspeaker systems and force the loudspeakers to generate
music and low frequency effects that are precisely representative of the original
signal.
The Input Stage. The input stage of each subwoofer accepts signals in two ways:
The CAST input accepts signals in the current domain, or the XLR input accepts
signals in the voltage domain.
We recommend using CAST inputs, for the best subwoofer
performance. When the CAST connection is used, the signal
received by each amplifier remains in the current domain and
is transmitted unchanged through the Krell Current Mode
input and output stages, with absolutely no degradation.
Krell CAST and Krell Current Mode are more fully explained
on pages 4-5.
When the XLR connection is used, a signal in the voltage domain is delivered to
the input stage. Each amplifier converts this signal to the current domain. The
signal in the current domain is then sent through the output stage of the subwoofer
without alteration.
9
continued 䊳
(SECTION ONE: About Krell continued)
(Totally Balanced Operation continued)
The Output Stage. In the output stage of a conventional amplifier, loudspeaker
control is accomplished by driving the positive speaker terminal only. Each Master
Reference Subwoofer uses two Krell Current Mode circuit paths, one to drive the
positive and one to drive the negative terminals of the loudspeakers. These signals
work together to drive the loudspeakers in a precise “push-pull” dialogue that
preserves all the characteristics of the recording.
The Master Reference Subwoofer sets a new standard for ultimate subwoofer
power and performance. Its ability to reproduce the impact and tonal quality of
low frequency sound is unparalleled, as is the ease with which it can match any
system or speaker configuration. The Master Reference Subwoofer represents the
culmination of the latest research and development from Krell Industries, Inc.
and represents the next exciting innovation in the long line of exceptional audio
components from The Leader in Audio Engineering—Krell.
10
(SECTION ONE: About Krell continued)
Definition of Terms
Following are the definitions of key terms used in your owner’s reference manual.
Configurations
Krell Link
A method of configuring multiple Krell preamplifiers, amplifiers,
and associated components and synchronizing their stand-by/
operational modes. Using Krell Link in/out connections and
MIDI cables, the remote capabilities of the linked components
are controlled by one component, called the control component.
The linked components respond to stand-by and operational
mode commands from the control component.
Inputs and Outputs
Balanced
A symmetrical input or output circuit that has equal impedance
from both input terminals to a common ground reference point.
The industry standard for professional and sound recording
installations, balanced connections have 6 dB more gain than
single-ended connections and allow the use of long interconnect cables.
By-pass Output
An output that allows you to integrate additional Master Reference
Subwoofers into your system. The input signal of a component
connected to the by-pass output passes directly through the
subwoofer with no modification.
High-pass Output
An output that transmits the signal from the high-pass filter of
the programmable electronic crossover to the amplifiers driving
the main left and right loudspeakers.
Note
There is no low-pass (subwoofer) connector on the Master Reference
Subwoofer. The low-pass output is connected directly to the internal
amplifier.
11
continued 䊳
(SECTION ONE: About Krell continued)
(Definition of Terms continued)
Krell CAST
Current Audio Signal Transmission (CAST) is a proprietary Krell
circuit technology for connecting analog components, in which
the audio waveform is transmitted between components in the
current rather than the voltage domain. The speed and bandwidth that CAST provides yield astounding levels of accuracy
and realism. Krell components connected via CAST perform as
if they are all part of a single circuit.
Low Frequency Effect
(LFE) Input
LFE enriches the low end of a musical score and enhances
nearly subsonic content, such as explosions or other special
effects. It is part of the Dolby 5.1 specification, with a bandwidth
of 5 to 120 Hz.
Single-ended
A two-wire input or output circuit in which the ground connection
is made last and broken first. Use care when using single-ended
connections. Turn the system off prior to making or breaking
single-ended connections. Single-ended connections are not
recommended for configurations requiring long cable runs.
Operation
Off
When the power switch on the rear panel is placed in the down
position and the red stand-by LED turns off, the component is off.
Operational Mode
When the power button on the front panel is pressed and the
blue power LED illuminates, the component is in the operational mode and ready to play music.
Stand-by Mode
A low power consumption status that keeps the audio and regulator circuits at idle. Krell recommends leaving the component
in the stand-by mode when it is not playing music.
Technology
Krell Active Motion
Control
A proprietary Krell circuit designed to continuously compare the
position of a loudspeaker to the analog waveform at the amplifier
input. Active Motion Control provides an extra measure of
loudspeaker control without the transient distortion associated
with simple servo designs.
12
Krell Current Mode
A proprietary Krell circuit topology in which the audio gain stages
operate in the current domain. Krell Current Mode provides
speed and bandwidth performance that is not possible with
less sophisticated voltage designs.
Programmable
Electronic Crossover
A proprietary full-function crossover designed for the Master
Reference Subwoofer. The crossover is comprised of two
sections: the high-pass filter and the low-pass, or sub, filter.
The user fine-tunes each section by selecting the filter type
(profile), and adjusting the profile’s parameters including slope,
frequency, and level, to enhance low frequency reproduction.
13
SECTION
TWO
Unpacking and Placement
This section describes the procedures for safely unpacking and placing the Master
Reference Subwoofer.
Unpacking
Each Master Reference Subwoofer shipping crate measures 26 in. (66 cm) wide
x 32 in. (81.3 cm) high x 35 in. (88.9 cm) deep and contains one Master Reference
Subwoofer. The combined weight of the crate and subwoofer is 494 lb. (224.5 kg).
Each Master Reference Subwoofer is 18.8 in. (47.8 cm) wide x 20.1 in. (51.1 cm) high
x 28.5 in. (72.4 cm) deep, and weighs 396 lb. (180 kg). Krell recommends that you
have four people to safely lift the subwoofer to its place in the listening area. Two
people are needed to remove the shipping crate top from the base.
The shipping crate is specially constructed to open safely and easily. Inside, the
subwoofer rests on the reinforced base of the crate. The crate top is fastened to
the base with Phillips head screws. The only tools you need to remove the subwoofer from the crate are a Phillips head screwdriver and a flat blade screwdriver.
The steps below provide procedures for unpacking the Master Reference
Subwoofer.
To Unpack the Master Reference Subwoofer:
1. Locate the gold screws at the bottom of the shipping crate.
2. Completely remove all screws.
3. Insert the head of a flat blade screwdriver between the crate top and base,
just enough to loosen the top.
1 person needed
4. With one person grasping each end of the shipping crate, pull steadily straight
up. The crate top will slowly slide up and off. Set aside.
2 people needed
Do not remove the plastic wrapping from the unit at this time.
14
In the packing crate you will find:
1 Master Reference Subwoofer
In the space underneath the subwoofer, you will find:
1 power cord
1 remote control
2 AAA-size 1.5 volt batteries for the remote control
1 T-10 Torx wrench for the remote control
To Remove the Subwoofer from the Packing Crate:
1. Remove all accessories from the packing crate.
1 person needed
2. Lift the subwoofer off the crate base and gently place it on the floor. Set the
crate base aside.
4 people needed
3. Move the subwoofer to the desired location.
4 people needed
IMPORTANT
Do not attempt to lift the subwoofer by the grill on the side of the unit.
15
continued 䊳
(SECTION TWO: Unpacking and Placement continued)
Figure 1 Master Reference Subwoofer Placement Options
Scenario 1: Stereo
3
1
2
1 Left Loudspeaker
2 Right Loudspeaker
3 Master Reference
Subwoofer
4 Optimum Listening
Position
4
Scenario 2: Home Theater, Rear Projection
1 Left Front
Loudspeaker
2 Center Speaker
3 Master Reference
Subwoofer
4 Right Front
Loudspeaker
5 Rear Projection TV
6 Left Rear
Loudspeaker
7 Right Rear
Loudspeaker
8 Optimum Listening
Position
3
2
5
1
4
8
6
7
Scenario 3: Home Theater, Front Projection
1 Left Front
Loudspeaker
2 Center Speaker
3 Master
Reference
Subwoofer
4 Screen
5 Right Front
Loudspeaker
6 Left Rear
Loudspeaker
7 Right Rear
Loudspeaker
8 Optimum
Listening Position
4
3
2
1
8
6
16
5
7
Placement
Before you install the Master Reference Subwoofer, review the following guidelines to
choose the location for the subwoofer. This facilitates a clean, trouble-free installation.
Make sure the Master Reference Subwoofer, in addition to other items (amplifiers,
other system components, furniture) in the listening room, does not exceed the
listening room’s maximum floor load.
Each Master Reference Subwoofer requires at least two inches (5 cm) of clearance
on each side and in front, and at least two inches (5 cm) of clearance above and
to the rear of the subwoofer for adequate ventilation.
IMPORTANT
For optimum sound quality, place your subwoofer at least one foot away from any wall.
Your Master Reference Subwoofer can operate from a number of positions in
your listening room. The range of control provided by the programmable electronic
crossover, plus the subwoofer size and construction, help ensure excellent performance from nearly any location. Figure 1, on page 16, illustrates three possible
placement options, which are described below.
Option 1: Stereo. Place the Master Reference Subwoofer midway between the left
and right loudspeakers.
Option 2: Home Theater, Rear Projection. Place the Master Reference Subwoofer
between the center and left front or between the center and right front loudspeakers,
preferably one foot from any wall.
Option 3: Home Theater, Front Projection. Place the Master Reference Subwoofer
midway between the left and right front loudspeakers and between the center speaker
and the screen.
If you employ Krell CAST technology, you can use CAST interconnect cables of any
length. Try to keep cable length to a minimum if you select single-ended operation.
AC Power Guidelines
The Master Reference Subwoofer should be operated from a dedicated AC power
line rated at a minimum of 20 amps.
Please contact your authorized Krell dealer, distributor, or Krell before using any
devices to alter or stabilize the AC power for the Master Reference Subwoofer.
17
1
SECTION
THREE
Features
This section provides illustrations of the Master Reference Subwoofer front panel,
back panel, and remote control, and descriptions of front panel, back panel, and
remote control features.
Front Panel Description
See Figure 2.
The Master Reference Subwoofer front panel provides power on and subwoofer
status displays. Front panel features and their descriptions follow.
Figure 2 Master Reference Subwoofer Front Panel
2 3
5
4
STAND-BY
POWER
1
2
3
4
5
Power Button
Power LED
Stand-by LED
Front Panel Display
Infrared Sensor
Master Reference Subwoofer
1
18
1 Power Button
Use this button to switch the Master Reference Subwoofer from the stand-by to
the operational mode.
2 Power LED
The blue power LED illuminates when the Master Reference Subwoofer is in the
operational mode and flashes when any remote control key is pressed.
3 Stand-by LED
The red stand-by LED illuminates when the back panel power switch is in the up
position and the Master Reference Subwoofer is in the stand-by mode.
4 Front Panel Display
The front panel display provides operating status messages, including power,
crossover filter selection and status, phase, and menu options and settings.
5 Infared Sensor
The infrared sensor, located inside the front panel display, receives commands
from the Master Reference Subwoofer remote control. For proper remote control
operation, make sure the infrared sensor is not covered or obstructed.
19
continued 䊳
(SECTION THREE: Features continued)
Figure 3 Master Reference Subwoofer Back Panel (Power)
76
Figure 3
Power
6 Power Switch
7 AC Input Specification
8 IEC Power Connector
Figure 4
Back Panel Remote Connections
9 Krell Link In and Out
10 12 VDC In and Out
11 12 VDC LFE In
12 RC-5 In
13 RS-232
50/60 Hz
Inputs
14 Left and Right CAST Inputs
15 Left and Right Balanced Inputs
16 Left and Right Single-ended
Inputs
17 LFE CAST Input
18 LFE Balanced Input
19 LFE Single-ended Input
KRELL INDUSTRIES, INC.
45 CONNAIR ROAD
ORANGE, CT 06477-3650
USA
MADE IN USA
8
Outputs
20 Left and Right CAST High-pass
Outputs
21 Left and Right Balanced
High-pass Outputs
22 Left and Right Single-ended
High-pass Outputs
23 Left and Right CAST By-pass
Outputs
24 Left and Right Balanced By-pass
Outputs
25 Left and Right Single-ended
By-pass Outputs
20
Figure 4 Master Reference Subwoofer Back Panel (Inputs and Outputs)
9
11 12 13
10
IN
LINK
RC-5
12VDC
KRELL OUT
IN
OUT
LFE
IN
IN
RS-232
14
17
16
INPUT
LEFT
19
INPUT
LFE
INPUT
RIGHT
18
15
20
22
HIGH-PASS
HIGH-PASS
OUTPUT
OUTPUT
LEFT
RIGHT
BY-PASS
BY-PASS
OUTPUT
OUTPUT
LEFT
RIGHT
21
23
25
Master Reference Subwoofer
24
NO USER SERVICEABLE PARTS INSIDE
CAST PAT. PENDING
21
continued 䊳
(SECTION THREE: Features continued)
Back Panel Description
See Figures 3 and 4.
The Master Reference Subwoofer back panel provides input and output connections,
remote connections, and power. Back panel features and their descriptions follow.
Power
6 Power Switch
Use this switch to power the Master Reference Subwoofer from off to the stand-by
mode.
7 AC Input Specification
The Master Reference Subwoofer is designed to be used with 50/60 Hz power lines
only.
8 IEC Power Connector
The Master Reference Subwoofer is equipped with a standard female IEC power
connector, for use with the provided AC power cord.
Back Panel Remote Connections
9 Krell Link In and Out
The Master Reference Subwoofer is equipped with a Krell Link communications
input and output data port. Krell Link allows synchronized remote power on and
off of other components with Krell Link, such as Master Reference Amplifiers or
Full Power Balanced Stereo or Monaural Amplifiers. See Krell Link, on page 44,
for more information.
10 12 VDC In and Out
The Master Reference Subwoofer is equipped with an input that receives and an
output that sends 12 VDC power on/off (12 V trigger) signals from and to other Krell
components and other devices that incorporate a 12 V trigger. See 12 VDC (12 V
Trigger), on page 46, for more information. Also consult the owner’s reference manual
of each component used in a custom installation to take full advantage of the remote
capabilities of the Master Reference Subwoofer.
11 12 VDC LFE In
The Master Reference Subwoofer is equipped with a 12 VDC (12 V trigger) LFE input.
This input allows you to activate low frequency effect using the 12 V trigger setup of
another preamplifier or preamp/processor. Both the Krell Home Theater Standard
Surround preamp/processor and the Krell Current Tunnel CAST preamplifier have
12 V trigger setups.
22
12 RC-5 In
The Master Reference Subwoofer is equipped with an RC-5 input that makes
custom installation easy and secure by accepting baseband RC-5 input commands
from hardwired remote controllers. The RC-5 input can be used, for example, when
the subwoofer’s IR sensor (5) is obscured from direct view.
13 RS-232
The Master Reference Subwoofer is equipped with an RS-232 port, which receives
messages from a computer-based control system, providing integrated control of
all subwoofer functions. See RS-232, on page 46, and the RS-232 Port: Sending
Commands and Interpreting Data developer’s reference for more information.
Notes
The 12 VDC output current is limited to 30 ma.
If the subwoofer is powered on via the 12 V trigger and the signal is active, the front panel
power button (1) or RS-232 cannot power it off. You must use the 12 V trigger.
Inputs
14 Left and Right CAST Inputs
The Master Reference Subwoofer is equipped with one pair of left and right CAST
inputs via 4-pin bayonet connectors for use with Krell CAST-equipped preamplifiers
or surround preamp/processors.
15 Left and Right Balanced Inputs
The Master Reference Subwoofer is equipped with one pair of left and right balanced
inputs via XLR connectors.
16 Left and Right Single-ended Inputs
The Master Reference Subwoofer is equipped with one pair of left and right singleended inputs via RCA connectors.
17 LFE CAST Input
The Master Reference Subwoofer is equipped with a low frequency effect (LFE) CAST
input. This input is connected to a CAST-equipped surround preamp/processor,
for use with Dolby 5.1 and DTS encoded software.
18 LFE Balanced Input
The Master Reference Subwoofer is equipped with a low frequency effect ( LFE )
balanced input. This input is connected to a preamp/processor, for use with Dolby
5.1 and DTS encoded software.
23
continued 䊳
(SECTION THREE: Features continued)
(Inputs continued)
19 LFE Single-ended Input
The Master Reference Subwoofer is equipped with a low frequency effect ( LFE )
single-ended input. This input is connected to a surround preamp/processor, for
use with Dolby 5.1 and DTS encoded software.
Outputs
20 Left and Right CAST High-pass Outputs
The Master Reference Subwoofer is equipped with left and right CAST high-pass
outputs, for connection to the CAST inputs of a Full Power Balanced Amplifier
or Master Reference Amplifier.
21 Left and Right Balanced High-pass Outputs
The Master Reference Subwoofer is equipped with left and right balanced high-pass
outputs, for connection to the balanced inputs of an amplifier.
22 Left and Right Single-ended High-pass Outputs
The Master Reference Subwoofer is equipped with left and right single-ended
high-pass outputs, for connection to the single-ended inputs of an amplifier.
23 Left and Right CAST By-pass Outputs
The Master Reference Subwoofer is equipped with left and right CAST by-pass
outputs, for connection to the CAST inputs of another Master Reference Subwoofer.
24 Left and Right Balanced By-pass Outputs
The Master Reference Subwoofer is equipped with left and right balanced
by-pass outputs, for connection to the balanced inputs of another Master Reference
Subwoofer.
25 Left and Right Single-ended By-pass Outputs
The Master Reference Subwoofer is equipped with left and right single-ended
by-pass outputs, for connection to the single-ended inputs of another Master
Reference Subwoofer.
Note
You can connect to any input (CAST, balanced, or single-ended) and output at any high-pass
output. All high-pass outputs are active at once. For example, a signal from a source connected to the Master Reference Subwoofer through a CAST input can be output as CAST,
balanced, and single-ended.
While you can connect at any input, you can output only at one by-pass output. By-pass
outputs are active only one-at-a-time. For example, the CAST input is available only at the
CAST by-pass output. The balanced input is available only at the balanced by-pass output.
The single-ended input is available only at the single-ended by-pass output.
24
Figure 5 Master Reference Subwoofer Remote Control
CAST PHASE
POWER
28
27
26
PRESET
1
29
2
3
THTR
4
SAVE
31
30
Power
26 Power Key
UNIT
1
2
3
4
32
Operation Keys
27 CAST Key
28 Phase Key
29 Preset Key
30 Thtr (Theater) Key
31 Save Key
32 Unit Key
33 All Key
34 Mute Key
ALL
MUTE
34
33
SECTION
SUB
35
36
HIGH
MENU ENTER
38
37
PARAMETER
TYPE SLOPE FREQ
39
40
ADJUST
Filter Selection Keys
35 Section Sub Key
36 Section High Key
LEVEL
42
41
43
Menu Keys
37 Menu Key
38 Enter Key
Filter Parameter Keys
39 Type Key
40 Slope Key
41 Freq(uency) Key
42 Level Key
MRS
Level Adjust Keys
43 Adjust Up and Down Keys
25
continued 䊳
(SECTION THREE: Features continued)
Remote Control Description
Battery Installation and Removal
The Master Reference Subwoofer control uses two AAA-size 1.5 Volt batteries.
Batteries are included with the shipment. To install the batteries:
1. Remove the backplate, using the supplied T-10 Torx wrench.
2. Install the batteries, following the battery position diagram on the plastic
battery receptacle.
3. Replace and secure the backplate.
The remote control is ready for operation.
Replace the batteries when the remote control functions intermittently. Remove the
batteries if the remote control is not used for a long period of time. Battery leakage
can damage the remote control.
26
Remote Control Functions
See Figure 5.
The Master Reference Subwoofer remote control provides power, subwoofer
functions, and menu and programming options, as well as stand-by and operational
mode commands for components connected through Krell Link. Remote control
features and their descriptions follow.
Power
26 Power Key
Use this key to switch the Master Reference Subwoofer from the stand-by to the
operational mode.
Operation Keys
27 CAST Key
Use this key to select CAST operation for an available input. The front panel
display (4) will indicate when CAST is selected. See Step II. Connecting the
Master Reference Subwoofer to Your System, on page 32, for information on
CAST input options.
Note
The Master Reference Subwoofer will not switch to CAST unless a CAST input is connected.
28 Phase Key
Use this key to invert the phase of the low-pass filter output.
29 Preset Keys
Use these keys to store and select customized menu settings. See Step VI. Saving
Your Settings to Presets, on page 40, for more information.
30 Thtr (Theater) Key
Use this key to store and select customized menu settings. Krell recommends
reserving this preset for the stereo/LFE combination or LFE only connection options.
See Step VI. Saving Your Settings to Presets, on page 40, for more information.
31 Save Key
Use this key to save menu settings. The front panel display (4) shows SAVE and
the selected preset number when this feature is activated.
27
continued 䊳
(SECTION THREE: Features continued)
(Operation Keys continued)
32 Unit Keys
Use these keys to assign an ID to each component when multiple subwoofers
are installed in a configuration. For instructions on assigning an ID, see Optional
Configurations, on page 48, for more information.
33 All Key
Use this key to control all subwoofers at once, for example, to mute, power on, or
set preset configurations for all subwoofers in a configuration.
34 Mute Key
Use this key to mute the low-pass (sub) and the high-pass filter output. To unmute,
press the mute key again. To customize the mute key operation, see Optional
Configurations, on page 48.
Filter Selection Keys
35 Section Sub Key
Use this key to access the low-pass (sub) filter parameters for your system. The
filter’s type, frequency, slope, and level can be adjusted. See Steps III and IV, on
pages 36-40, for more information.
36 Section High Key
Use this key to access the high-pass filter parameters for your system. The filter’s
type, frequency, slope, and level can be adjusted. See Steps III and IV, on pages
36-40, for more information.
Menu Keys
37 Menu Key
Use this key to activate the menu system, to customize subwoofer settings. The
front panel display (4) shows MENU when the menu key is pressed. Use the adjust
up and down keys (43) to scroll through menu selections.
38 Enter Key
Use this key to set a menu selection or to access a submenu selection.
28
Filter Parameter Keys
39 Type Key
Use this key to select the filter profile desired. The front panel display (4) shows
the current selection. See Step III. Configure the Programmable Electronic
Crossover, on page 36, for filter options and instructions.
40 Slope Key
Use this key to adjust the slope of the high-pass or low-pass filter. The front panel
display (4) shows the selected setting. See Step III. Configure the Programmable
Electronic Crossover, on page 36, for slope adjustment instructions.
41 Freq(uency) Key
Use this key to select the cutoff frequency for the high-pass or low-pass filter. The
front panel display (4) shows the selected setting. See Step III. Configure the
Programmable Electronic Crossover, on page 36, to select the desired frequency setting.
42 Level Key
Use this key to adjust the level of the high-pass or low-pass filter. The front panel
display (4) shows the selected setting. See Step IV. Match the High-pass and
Low-pass Filter Levels, on page 38, for more information.
Level Adjust Keys
43 Adjust Up and Down Keys
Use these keys to adjust volume levels and to scroll through filter and menu selections.
29
SECTION
FOUR
Connections and Configurations
See Figures 3 and 4.
Overview
This page outlines the connections (Steps I and II ) and configurations ( Steps III
through VI ) for the Master Reference Subwoofer. These instructions let you set up your
subwoofer for optimum performance. Detailed instructions begin on page 31.
Krell recommends that you configure your Master Reference Subwoofer in the
following order.
Step I. Choose the Connections
This step discusses the CAST, balanced, and single-ended connections
that are available on the Master Reference Subwoofer, explains switching
between CAST and balanced inputs, and lists factory defaults.
Step II. Connecting the Master Reference Subwoofer to Your System
This step explains how to connect CAST, balanced, and single-ended inputs
and outputs, to integrate the subwoofer into your system. It also explains the
three connection options available: stereo, LFE, and stereo/LFE.
Step III. Configure the Programmable Electronic Crossover
This step explains how to configure the subwoofer’s low-pass and high-pass
filters, by selecting the appropriate filter profile (Butterworth, Bessel, or
Linkwitz-Riley), and adjusting the slope, frequency, and level parameters for
each filter profile.
Step IV. Match the High-pass and Low-pass Filter Levels
This step explains how to match the high-pass and low-pass filter levels using
the Master Reference Subwoofer’s built-in noise generator.
Step V. Select the Phase
This step explains how to select normal or inverted phase, to complete the
configuration and ensure optimum music quality.
Step VI. Saving Your Settings to Presets
This step explains how to save configuration settings to presets and how to
recall presets.
30
Connections and Configurations
The remote control is the main input device for the Master Reference Subwoofer.
All initial setup and subsequent system configuration adjustments must be made
through the remote control or via the RS-232 port.
For maximum performance, the Master Reference Subwoofer must be connected
to other components in the system via the appropriate CAST, balanced, or singleended inputs and outputs; connected for stereo and low frequency effect; and the
low-pass and high-pass filters configured to fit your system.
Step I. Choose the Connections
This section discusses the CAST, balanced, and single-ended connections that are
available on the Master Reference Subwoofer, explains switching between CAST
and balanced inputs, and lists factory defaults.
CAST and Balanced Connections
Krell recommends using its proprietary Krell CAST system for unparalleled sonic
performance for connections between the Master Reference Subwoofer and other
CAST-equipped components. The Master Reference Subwoofer also offers balanced
and single-ended operation.
IMPORTANT
Connecting non-CAST components to CAST inputs or outputs can damage your
equipment and void your warranty.
Do not attempt to change CAST cable terminations or CAST inputs or outputs to
RCA or XLR connectors. It is electrically impossible to convert CAST input or
output connections for balanced or single-ended voltage operation.
Please read the Warranty, on pages 50-51, to understand the warranty limitations of
the Master Reference Subwoofer.
31
continued 䊳
(SECTION FOUR: Connections and Configurations continued)
Switching Between CAST and Balanced Inputs
The Master Reference Subwoofer offers a number of user-controlled options for
choosing inputs and for switching from one input to another, using the remote
control in conjunction with the menu option. See B. To Activate CAST Inputs,
on page 34 for more information.
If you activate CAST or VOLTAGE in the menu, and have only one CAST or balanced
source connected, the subwoofer automatically chooses the selected source and
indicates the selection as either CAST or VOLTAGE in the front panel display (4).
If you activate CAST or VOLTAGE in the menu, and have a source connected to a CAST
input (14) as well as a source connected to a balanced input (15), the subwoofer
defaults to the CAST input.
Factory Defaults
The Master Reference Subwoofer is shipped with the following default settings.
Low- and High-pass Filters
Filter
Frequency
Slope
Level
BUTTERWORTH
100 HZ
6 DB/OCT.
0
Default Menu Functions
Mute
LFE
Unit ID
CAST
LED
AC Mains
ALL
OFF
UNIT 0
CAST NONE
LED ON
AC OFF
Step II. Connecting the Master Reference Subwoofer to Your System
This section explains how to connect CAST, balanced, and single-ended inputs
and outputs to integrate the subwoofer into your system. It also explains the three
connection options available: stereo, LFE, and stereo/LFE.
A. To Connect the Subwoofer
1. Make sure that all power sources and components are off before connecting
inputs and outputs.
2. Neatly organize wiring between the Master Reference Subwoofer and all system
components. Separate AC wires from audio cables to prevent hum or other
unwanted noise from being introduced into the system.
32
3. Connect the cables from the left and right Krell CAST 4-pin inputs (14) on the
back panel to the left and right main preamplifier or processor outputs. For balanced or single-ended operation, connect the interconnect cables from either the
left and right balanced (15) or the single-ended inputs (16) on the Master Reference
Subwoofer back panel to your left and right preamplifier or processor outputs.
4. Connect the cable from the Krell CAST 4-pin LFE input (17) on the back panel
to the sub(woofer) output of your processor. For balanced or single-ended
operation, connect the interconnect cables from either the balanced LFE input
(18) or the single-ended LFE input (19) on the subwoofer back panel to the
sub(woofer) output of your processor.
5. Connect the cables from the left and right Krell CAST 4-pin high-pass outputs
(20) on the back panel to the left and right CAST-equipped inputs of your power
amplifier. For balanced or single-ended operation, connect the interconnect
cables from either the left and right balanced high-pass outputs (21) or the left
and right single-ended high-pass outputs (22) on the back panel to the left
and right balanced or single-ended inputs of your power amplifier.
Notes
The Master Reference Subwoofer allows the connection of two independent preamplifier/source
components to the CAST and either the balanced or the single-ended inputs. For example, you
may want to connect two discrete front-end systems: Use the CAST input as the connection
to a dedicated two-channel system in which the KPS 25sc Krell Playback System is the CAST
source. Use the balanced input as the connection to a home theater system.
You cannot connect the balanced input and the single-ended input at the same time.
6. If you have more than one subwoofer, connect the cables from the left and
right Krell CAST 4-pin by-pass outputs (23) on the back panel to the left and
right CAST-equipped inputs on another subwoofer. For balanced or singleended operation, connect the interconnect cables from either the left and
right balanced by-pass outputs (24) or the left and right single-ended by-pass
outputs (25) on the back panel to the left and right balanced or single-ended
inputs of another subwoofer.
See Unit ID Menu, on page 48, for information on assigning ID numbers for
controlling multiple subwoofers in a system.
33
continued 䊳
(SECTION FOUR: Connections and Configurations continued)
(Step II. Connecting the Master Reference Subwoofer to Your System continued)
7. Plug the AC power cord into the IEC connector on the subwoofer back panel.
Plug the other end into the AC outlet.
IMPORTANT
The CAST and LFE inputs must be enabled through the menu to be operational. To
activate the low frequency effect (LFE), see Choosing Stereo, LFE, or Stereo/LFE,
below.
B. To Activate CAST Inputs
Use the menu to select which CAST inputs to enable.
1. Press the menu key (37).
2. Use the adjust keys (43) to select the CAST menu. The front panel display (4)
shows CAST.
3. Press the enter key (38). The front panel display shows CAST MAIN.
4. Use the adjust keys to select the preferred setting. Options are:
CAST MAIN
CAST LFE
CASTNONE
CASTALL
Enables CAST for the main input.
Enables CAST for the LFE input.
No CAST inputs are enabled.
Enables all CAST inputs.
5. Press the enter key to set the selection and return to the main menu.
6. Press the menu key to exit the menu mode.
Note
All CAST inputs specified in the selected menu must be present before the Master Reference
Subwoofer will switch to CAST. For example, if the system is set for CASTALL but there are
no connections to the LFE input, no CAST switching will occur.
34
C. Choosing Stereo, LFE, or Stereo/LFE
Your Master Reference Subwoofer can operate in stereo mode, low frequency effect
(LFE) mode, or stereo/LFE mode. For optimum subwoofer performance, Krell
recommends using the stereo/LFE combination.
The connections and configurations described above in Connecting the Master
Reference Subwoofer to Your System and Configuring the Programmable
Electronic Crossover connect and configure your subwoofer to operate in stereo
mode. To add the LFE enhancement, follow these steps:
1. Make sure the cable from the sub output on your processor is connected to the
LFE input (17, 18, or 19) on the Master Reference Subwoofer.
2. Activate the LFE input, using the menu function.
3. Press the menu key (37).
4. Use the adjust keys (43) to select the LFE menu. The front panel display (4)
shows LFE ON.
5. Use the adjust keys to select the preferred LFE setting. Options are:
LFE ON
LFE OFF
LFE AUTO
The LFE input is enabled. If you choose this setting, Krell
recommends saving it using the Theater preset (30).
The LFE input is disabled.
The LFE input is controlled by the LFE 12 VDC (12 V trigger)
input. If you choose this option, Krell recommends saving it
as part of the listening room setup on your surround processor.
You must connect a 12 V trigger cable.
6. Press the enter key to set the selection and return to the main menu.
7. Press the menu key to exit the menu mode.
Notes
To confirm that the Master Reference Subwoofer output is operational, activate the noise
generator for the sub output of your surround sound preamplifier/processor.
Krell recommends configuring one of the triggers on the Home Theater Standard to turn off the
LFE when the surround processor is in stereo mode, to avoid generating unwanted noise.
D. When to Use LFE Only Option
Use the LFE only option, without stereo, if you wish to bypass the programmable
electronic crossover.
35
continued 䊳
(SECTION FOUR: Connections and Configurations continued)
Step III. Configure the Programmable Electronic Crossover
This section explains how to configure the subwoofer’s two sections, the low-pass (sub)
and high-pass filters, by selecting the appropriate filter profile (Butterworth, Bessel,
or Linkwitz-Riley), and adjusting the slope, frequency, and level parameters for each
filter profile.
Configuring the programmable electronic crossover is required for stereo and
stereo/LFE operation. Krell recommends performing the configuration in the order
indicated below.
A. Select the Low-pass Filter
Press the section sub key (35) on the remote control to access the low-pass filter
parameters. The front panel display (4) shows SUB ADJ.
B. Select the Low-pass Filter Profile
Press the type key (39) to access the filter profile. Press the adjust keys (43) to
select the profile you want. The Master Reference Subwoofer has three low-pass
filter profiles available: Bessel, Butterworth and Linkwitz-Riley.
C. Adjust the Low-pass Filter Parameters
IMPORTANT
Adjust the parameters in this order: slope, frequency, and level.
1. Low-pass Filter Slope
a. Press the slope key (40).
b. Use the adjust keys (43) to adjust the slope (in 6 dB increments). The
low-pass filter has a range from 6 dB to 48 dB.
2. Low-pass Filter Frequency
a. Press the frequency key (41).
b. Use the adjust keys (43) to select the desired frequency setting (in 10 Hz
increments). The frequency selectable ranges from 30 to 100 Hz.
36
3. Low-pass Filter Level
a. Press the level key (42).
b. Use the adjust keys (43) to select the desired level setting (in 1 dB increments). Level range is ± 6 dB.
Note
See Step IV. Match the High-pass and Low-pass Filter Levels, on page 38, for more
information on level matching.
D. Select the High-pass Filter
Press the section high key (36) on the remote control to select the high-pass
filter. The front panel display (4) shows HIGH ADJ.
E. Select the High-pass Filter Profile
Press the type key (39) to access the filter profile. Press the adjust keys (43) to
select the profile you want. The Master Reference Subwoofer has three filters
profiles available: Bessel, Butterworth and Linkwitz-Riley.
F. Adjust the High-pass Filter Parameters
IMPORTANT
Adjust the parameters in this order: slope, frequency, and level.
1. High-pass Filter Slope
a. Press the slope key (40).
b. Use the adjust keys (43) to adjust the slope (in 6 dB increments). The
high-pass filter has a range from 6 dB to 24 dB.
2. High-pass Filter Frequency
a. Press the frequency key (41).
b. Use the adjust keys (43) to select the desired frequency setting (in 10 Hz
increments). The frequency selectable ranges from 30 Hz to 100 Hz.
3. High-pass Filter Level
a. Press the level key (42).
b. Use the adjust keys (43) to select the desired level setting (in 1 dB
increments).
37
continued 䊳
(SECTION FOUR: Connections and Configurations continued)
Step IV. Match the High-pass and Low-pass Filter Levels
This section explains how, once the programmable electronic crossover has been
configured, to match the high-pass and low-pass filter levels using the Master
Reference Subwoofer’s built-in noise generator.
Step A describes muting the low-pass filter while adjusting the high-pass flter level.
Step B describes muting the high-pass filter while adjusting the low-pass filter level.
You can choose to match the high-pass to the low-pass or vice versa. Either is
correct. Make sure that the amplifier connected to the high-pass outputs is on and
in the operational mode.
A. Adjust the High-pass Filter
1. Press the menu key (37). The front panel display (4) shows MENU.
2. Use the up adjust key (43) to select NOISEGEN.
3. Press the enter key (38). The display shows NOISEOFF.
4. Press the up adjust key to select NOISE ON.
5. Press the enter key. After a two second delay, you will hear noise generator
output through both the Master Reference Subwoofer and your front speakers.
6. Use the up adjust key to select MUTE. The front panel display shows MUTE.
7. Press the enter key. The front panel display shows the current setting for mute.
8. Press the up adjust key to select LPF ONLY.
9. Press the enter key.
10. Press the menu key to exit the menu mode.
11. Press the mute key (34) on the remote control to mute the low-pass filter. You
hear noise only from the high-pass filter.
12. Press the section high key (36).
13. Press the level key (42).
14. Use the adjust keys to raise or lower the high-pass filter level so that it matches
that of the low-pass filter (sub).
15. Make sure you unmute the low-pass filter, after you have adjusted the
high-pass filter.
38
Notes
You can switch the low-pass filter on and off using the mute key, to help compare the filter
levels. Every time you adjust the level, the front panel display shows the numeric value of the
level. After three seconds of inactivity, the screen becomes blank. You have adjusted the
high-pass filter.
You can also use a sound pressure level meter for this process; however, it is not required.
B. Adjust the Low-pass Filter
1. Press the menu key (37).
2. Press the up adjust key (43) to select MUTE.
3. Press the enter key (38). The front panel display (4) shows the current settings
for mute.
4. Press the up adjust key to select HPF ONLY.
5. Press the enter key.
6. Press the menu key to exit the menu mode.
7. Press the mute key (34) to mute the high-pass filter. You hear noise only from
the Master Reference Subwoofer.
8. Press the section sub key (35).
9. Press the parameter level key (42).
10. Use the adjust keys to raise or lower the low-pass filter level so that it matches
that of the high-pass filter.
11. Make sure you unmute the high-pass filter, after you have adjusted the
low-pass filter.
Notes
You can switch the high-pass filter on and off using the mute key, to help compare the filter
levels. Every time you adjust the level, the front panel display shows the numeric value of
the level. After three seconds of inactivity, the screen becomes blank. You have adjusted
the low-pass filter.
You can use this process to adjust your system level for individual CDs or DVDs.
When the noise generator is on, all other inputs are turned off and the by-pass output is
muted to keep loud noise from going to the next device.
39
continued 䊳
(SECTION FOUR: Connections and Configurations continued)
C. To End Noise Generation
1. Press the menu key (37) to select the main menu.
2. Press the up adjust key (43) to select NOISEGEN.
3. Press the enter key (38), then press the up adjust key to select NOISE OFF.
4. Press the enter key to end noise generation and return to the main menu.
5. Press the menu key to exit the menu mode.
Step V. Select the Phase
This section explains how to select normal or inverted phase, to complete the
configuration and ensure optimum music quality.
1. With the subwoofer in the stand-by mode, press the power button (1) or power
key (26).
2. Begin playing a music or video selection.
3. Press the phase key (28) to switch between normal and inverted phases.
4. Listen for when the sound is clearer. You do not have to press the enter key to
set the phase.
Your subwoofer is ready to play music.
Step VI. Saving Your Settings to Presets
You can save the settings selected in Steps I – V in the subwoofer memory, using
one of the five presets (29, 30) on the Master Reference Subwoofer Remote Control.
Notes
Krell recommends using preset Thtr (30), the theater key, to save your stereo/LFE configuration
settings. Use presets 1 through 4 to save other desired settings.
Settings stored in preset 1 become the default when the subwoofer is turned off and
returned to the operational mode.
40
To save a setting configuration to a preset:
1. Press the save key (31).
2. Press the preset number to which the settings will be assigned. The front panel
display (4) shows SAVING then SAVED.
Note
If you press save then decide you do not wish to save, press the save key again before
pressing the preset key.
Recalling Presets
1. Press the preset key (29, 30).
2. The preset number appears in the front panel display (4).
41
SECTION
FIVE
Operation
This section explains how to manually power on your system and subwoofer for
operation and explains the importance of powering on in the appropriate order.
After the subwoofer is connected with your system, you can power on the subwoofer
for operation. The order in which you power on your system is critical. To avoid the
possibility of system-damaging transients, always turn on sources first, followed by
preamplifiers/processors, the amplifiers, and finally the Master Reference Subwoofer.
The Steps for Subwoofer Operation follow:
1. Power on your source components (for example, CD, DVD).
2. Power on the preamplifier and surround processor.
3. Power on your amplifiers.
4. Move the power switch (6) on the back panel of the Master Reference Subwoofer
to the up position. You will hear a series of clicks. The red stand-by LED (3) on
the front panel illuminates.
5. Press the power button (1) on the front panel or the power key (26) on the
remote control to switch between the stand-by and the operational mode.
The blue power LED (2) illuminates. The subwoofer is now ready to play music.
6. To return to the stand-by mode, press the power button again. The red stand-by
LED illuminates.
Krell recommends leaving the Master Reference Subwoofers in the stand-by
mode between listening sessions.
Note
See Krell Link, on pages 44-45, for information on operating the Master Reference
Subwoofer using Krell Link.
42
If You Wish to Turn Your System Off:
Turn your system off if it will not be used for a long period of time. It is critical that
you turn off your system in the following order.
1. Press the power button (1) to return the Master Reference Subwoofer to the
stand-by mode. The red stand-by LED illuminates (2).
2. Move the power switch (6) on the back panel to the down (off) position.
3. Turn off the amplifiers.
4. Turn off the preamplifier(s) and surround processor.
5. Turn off the source components.
System Protection
The Master Reference Subwoofer incorporates a complement of sophisticated
protection circuits to safeguard your system. This circuitry constantly evaluates
the operation of the Master Reference Subwoofer and provides protection
against potentially damaging DC input or output. Regulator operation is also
continuously monitored to ensure constant voltage to the output stage. These
protective systems are designed to prevent damage to the Master Reference
Subwoofer or loudspeakers caused by other defective components, faulty
wiring, system mishandling, or subwoofer failure.
Subwoofer Care
Because the Master Reference Subwoofer is capable of enormous power output,
it important to exercise care during system operation.
Avoid any action that can generate large transient signals. Always mute the
preamplifier output before switching between active sources or cueing a source
component.
Do not change inputs to the subwoofer while the subwoofer is on.
Use care when listening at high volume levels. Always lower the volume level at
the first sound of loudspeaker distress.
43
SECTION
SIX
Optional Connections
This section describes three optional connections for the Master Reference Subwoofer.
Krell Link connections (9) allow you to synchronize subwoofer operation with other
Krell components that have Krell Link in and out connectors. The RS-232 port (13)
allows you to connect the subwoofer to a computer-based control system. The 12
VDC (12 V trigger) input and output (10) allow you to integrate the subwoofer into
a system with other components that use a 12 Volt trigger.
Krell Link
Krell Link in/out connectors on the back panel allow you to integrate the Master
Reference Subwoofer into systems that include multiple preamplifiers, amplifiers
and associated components, to synchronize their operation with a remote control.
When the Krell Link in/out connectors are used, the remote capabilities of linked
components are controlled from one component, called the control component.
The linked components respond to stand-by and operational commands from the
control component via MIDI cables.
Notes
The Master Reference Subwoofer cannot be used as the control component.
The Master Reference Subwoofer remote control takes priority over Krell Link commands.
The CAST features of the Master Reference Subwoofer cannot be switched via Krell Link.
Krell Link uses standard five-pin MIDI communication cables, sometimes called MIDI Plus
cables. These MIDI cables can be purchased from your authorized distributor or dealer, or
from an audio supply store.
Connecting Components Through Krell Link
Use one or more five-pin MIDI cables (sometimes called MIDI Plus cables) to create
an active Krell Link with Master Reference Subwoofers.
1. Turn all components off. This ensures components are synchronized when the
MIDI cables are connected.
2. Select the control component. It must be in plain view for proper remote control
operation.
44
3. Connect one end of a MIDI cable to the Krell Link out connector, on the control
component back panel.
4. Connect the other end of a MIDI cable to the Krell Link in connector, on the back
panel of the next component.
5. To link another component, connect another MIDI cable to the Krell Link out
connector on the back panel of the second component. Connect the remaining
end of the MIDI cable to the Krell Link in connector, on the back panel of a
third component.
6. Link additional components, if desired.
The components are now ready for operation with Krell Link.
Krell Link Operation
1. When all components are linked, as described above, place each component
in the stand-by mode. This ensures all components are synchronized when
signals from the control component are sent to linked components.
2. Switch the control component to the operational mode using the component’s
power key on the remote control. The linked components simultaneously
switch to the operational mode.
An individual linked component can be manually switched between the stand-by
and the operational modes from its front panel. Switching a linked component
temporarily breaks the chain of linked components. To re-establish linked operation,
return all components to the stand-by mode.
Note
Other Krell components can be configured to allow you to disconnect or reconnect the
Krell Link feature without physically disconnecting or reconnecting the components and
MIDI cables. See the owner’s reference for your Krell component.
45
continued 䊳
(SECTION SIX: Optional Connections continued)
RS-232
The RS-232 port (13) allows you to send operational instructions directly into the
Master Reference Subwoofer from a computer-based control system, providing
integrated control of all subwoofer functions. This feature also allows the Master
Reference Subwoofer to report operational status, through the RS-232 status feedback system.
For information on how to send RS-232 commands to operate the Master Reference
Subwoofer, see the RS-232 Port: Sending Commands and Interpreting Data
developer’s reference.
12 VDC (12 V Trigger)
The 12 VDC (12 V trigger) output (10) on the Master Reference Subwoofer allows
you to turn other components on or off, or to and from stand-by automatically,
through the remote control. The 12 V trigger input (10) allows you to turn the subwoofer on using the remote control of another component with a 12 V trigger. This
feature allows whole systems or parts of systems to be easily coordinated.
The 12 VDC LFE input (11) for the Master Reference Subwoofer can be used to
turn the LFE inputs (17, 18, 19) on or off. See C. Choosing Stereo, LFE, or
Stereo/LFE, on page 35, for more information.
46
SECTION
SEVEN
Optional Configurations
Five optional configurations are available on the Master Reference Subwoofer, to
further customize subwoofer operation. Instructions for optional configurations follow.
AC Mains Menu
This option allows the Master Reference Subwoofer to be powered on from an AC
wall receptacle with a dedicated switch, rather than from the back panel switch or
other remote option.
1. Press the menu key (37).
2. Use the adjust keys (43) to select the AC Mains menu. The front panel display (4)
shows AC MAINS.
3. Press the enter key (38). The front panel display shows AC OFF.
4. Use the adjust keys to select AC ON or AC OFF.
5. Press the enter key to set the selection and return to the main menu.
6. Press the menu key to exit the menu mode and return to normal operation.
LED Menu
This option allows you to turn front panel LEDs (2,3) on and off.
1. Press the menu key (37).
2. Use the adjust keys (43) to select the LED menu. The front panel display (4)
shows LED.
3. Press the enter key (38). The front panel display shows LED ON.
4. Use the adjust keys to select ON or OFF.
5. Press the enter key to set the selection and return to the main menu.
6. Press the menu key to exit the menu mode and return to normal operation.
47
continued 䊳
(SECTION SEVEN: Optional Configurations continued)
Mute Menu
This option allows you to customize the mute key to mute all subwoofer outputs or
only selected outputs. Also see Step IV. Match the High-pass and Low-pass
Filter Levels, on page 38, for more information on mute key configuration.
1. Press the menu key (37).
2. Use the adjust keys (43) to select the mute menu. The front panel display (4)
shows MUTE.
3. Press the enter key (38). The front panel display shows LPF ONLY.
4. Use the adjust keys to select the preferred muting configuration for high-pass
filter (hpf), low-pass filter (lpf), or by-pass filter (byp). Muting options are: LPF ONLY,
HPF ONLY, BYP ONLY, LPF + HPF, LPF + BYP, HPF + BYP, and ALL.
5. Press the enter key to set the selection and return to the main menu.
6. Press the menu key to exit the menu mode and return to normal operation.
Unit ID Menu
The Unit ID menu allows you to set a unit ID for each subwoofer, when you use
multiple subwoofers in your system. Different unit IDs let you control each subwoofer
separately by pressing one of the unit keys (32) (1, 2, 3, 4) on the remote control.
You can also control all subwoofers at once by pressing the all key (33) on the
remote control.
Note
Once you assign an ID to a subwoofer, you must use one of the unit keys on the remote
control to control the subwoofer.
1. Press the menu key (37).
2. Use the adjust keys (43) to select the Unit ID menu. The front panel display (4)
shows UNIT ID.
3. Press the enter key (38). The front panel display shows UNIT 0.
4. Use the adjust keys to scroll through available options ( UNIT 0 through UNIT 4).
5. Press the enter key to set the preferred selection and return to the main menu.
6. Press the menu key to exit the menu mode and return to normal operation.
48
Exit Menu
This option allows you to exit the menu mode.
1. Press the menu key (37) or use the adjust keys (43) to select the exit menu.
The front panel display (4) shows EXIT.
2. Press the enter key (38). You exit the menu mode.
49
Warranty
Each Krell Master Reference Subwoofer has a limited warranty of five years for parts
and labor on circuitry, for all sections except the loudspeaker driver assemblies. The
loudspeaker driver assemblies have a warranty of one year, for defects due to manufacture only. Should this product fail to perform at any time during the warranty,
Krell will repair it at no cost to the owner, except as set forth in this warranty.
This warranty does not apply to damage caused by acts of God or nature.
The warranty described on this page shall be in lieu of any other warranty, expressed
or implied, including, but not limited to, any implied warranty of merchantability or
fitness for a particular purpose. There are no warranties which exceed beyond
those described in this document. If this product does not perform as warranted
herein, the owner’s sole remedy shall be repair. In no event will Krell be liable for
incidental or consequential damages arising from purchase, use, or inability to use
this product, even if Krell has been advised of the possibility of such damages.
Proof of purchase in the form of a bill of sale or receipted invoice substantiating that
the unit is within the warranty period must be presented to obtain warranty service.
The warranty begins on the date of the original retail purchase, as noted on the bill
of sale or receipted invoice from an authorized Krell dealer or distributor. Previously
owned equipment, when re-purchased from an authorized Krell dealer or distributor,
has the balance of the original warranty, based on the original date of manufacture.
The warranty for Krell products is valid only in the country to which they were
originally shipped, through the authorized Krell distributor for that country, and at
the factory. There may be restrictions on or changes to Krell’s warranty because
of regulations within a specific country. Please check with your distributor for a
complete understanding of the warranty in your country.
If a unit is serviced by a distributor who did not import the unit, there may be a
charge for service, even if the product is within the warranty period.
Freight to the factory is your responsibility. Return freight within the United States
(U.S.A.) is included in the warranty. If you have purchased your Krell product outside
the U.S.A. and wish to have it serviced at the factory, all freight and associated
charges to the factory are your responsibility.
Krell will pay return freight to the U.S.A.-based freight forwarder of your choice.
Freight and other charges to ship the unit from the freight forwarder to you are also
your responsibility.
50
Krell is not responsible for any damage incurred in transit. Krell will file claims
for damages as necessary for units damaged in transit to the factory. You are
responsible for filing claims for shipping damages during the return shipment.
Krell does not supply replacement parts and/or products to the owner of the unit.
Replacement parts and/or products will be furnished only to the distributor performing service on this unit on an exchange basis only; any parts and/or products
returned to Krell for exchange become the property of Krell.
No expressed or implied warranty is made for any Krell product damaged by
accident, abuse, misuse, natural or personal disaster, or unauthorized modification.
Any unauthorized voltage conversion, disassembly, component replacement,
perforation of chassis, updates, or modifications performed to the unit will
void the warranty.
IMPORTANT
Connecting non-CAST components to CAST inputs or outputs can damage your
equipment and void your warranty. Do not attempt to change CAST cable terminations or CAST inputs or outputs to RCA or XLR connectors. It is electrically
impossible to convert CAST input or output connections for balanced or singleended voltage operation.
The operating voltage of this unit is determined by the factory and can only be
changed by an authorized Krell distributor or at the factory. The voltage for this
product in the U.S.A. cannot be changed until six months from the original
purchase date.
In the event that Krell receives a product for warranty service that has been modified
in any way without Krell authorization, all warranties on that product will be void.
The product will be returned to original factory layout specifications at the owner’s
expense before it is repaired. All repairs required after the product has been returned
to original factory specifications will be charged to the customer, at current parts
and labor rates.
All operational features, functions, and specifications and policies are subject to
change without notification.
To register your product for warranty benefits, please complete and return
the Warranty Registration Card enclosed in the shipping box within 15 days
of purchase. Thank you.
51
Return Authorization Procedure
If you believe there is a problem with your component, please contact your dealer,
distributor, or the Krell factory to discuss the problem before you return the component
for repair. To expedite service, you may wish to complete and e-mail the Service
Request Form in the Service Section of our website at:
http://www.krellonline.com
To contact the Krell Service Department
TEL
203-799-9954, Monday-Friday
9:00 am to 5:00 PM EST
FAX
203-799-9796
E-MAIL
[email protected]
WEBSITE http://www.krellonline.com
Krell Master Reference Subwoofer
PRODUCT
SERIAL NUMBER
To return a product to Krell, please follow this procedure so that we may
serve you better.
1. Obtain a Return Authorization Number (R/A number) and shipping address from
the Krell Service Department.
2. Insure and accept all liability for loss or damage to the product during shipment
to the Krell factory and ensure all freight (shipping) charges are prepaid.
The product may also be hand delivered if arrangements with the Service Department
have been made in advance. Proof of purchase will be required for warranty validation
at the time of hand delivery.
IMPORTANT
Use the original packaging to ensure the safe transit of the product to the factory,
dealer, or distributor. Krell may, at its discretion, return a product in new packaging
and bill the owner for such packaging if the product received by Krell was boxed in
nonstandard packaging or if the original packaging was so damaged that it was
unusable. If Krell determines that new packaging is required, the owner will be
notified before the product is returned.
To purchase additional packaging, please contact your authorized Krell dealer,
distributor, or the Krell Service Department for assistance.
52