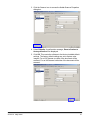
1
i30 / i40 Scanners User’s Guide A-61512 Contents 1 Introduction . . . . . . . . . . . . . . . . . . . . . . . . . . . . . . . . . . . . . . . . . . . . . . . . . Scanner features . . . . . . . . . . . . . . . . . . . . . . . . . . . . . . . . . . . . . . . . . . . . . Safety information . . . . . . . . . . . . . . . . . . . . . . . . . . . . . . . . . . . . . . . . . . . . MSDS . . . . . . . . . . . . . . . . . . . . . . . . . . . . . . . . . . . . . . . . . . . . . . . . . . . Safety and regulatory agency approvals . . . . . . . . . . . . . . . . . . . . . . . . Environmental information . . . . . . . . . . . . . . . . . . . . . . . . . . . . . . . . . . . EMC statements . . . . . . . . . . . . . . . . . . . . . . . . . . . . . . . . . . . . . . . . . . . . . United States . . . . . . . . . . . . . . . . . . . . . . . . . . . . . . . . . . . . . . . . . . . . . . . . Japan . . . . . . . . . . . . . . . . . . . . . . . . . . . . . . . . . . . . . . . . . . . . . . . . . . . . . . Acoustic emission . . . . . . . . . . . . . . . . . . . . . . . . . . . . . . . . . . . . . . . . . . . . Power system connection . . . . . . . . . . . . . . . . . . . . . . . . . . . . . . . . . . . . . . European Union. . . . . . . . . . . . . . . . . . . . . . . . . . . . . . . . . . . . . . . . . . . . 1 2 3 3 3 3 4 4 4 5 5 5 2 Getting Started . . . . . . . . . . . . . . . . . . . . . . . . . . . . . . . . . . . . . . . . . . . . . . . 6 What’s in the box . . . . . . . . . . . . . . . . . . . . . . . . . . . . . . . . . . . . . . . . . . . . . 6 System requirements . . . . . . . . . . . . . . . . . . . . . . . . . . . . . . . . . . . . . . . . . . 6 Installing the scanner . . . . . . . . . . . . . . . . . . . . . . . . . . . . . . . . . . . . . . . . . . 7 Assembling the scanner . . . . . . . . . . . . . . . . . . . . . . . . . . . . . . . . . . . . . 7 Installing the Kodak Driver Software . . . . . . . . . . . . . . . . . . . . . . . . . . . . 8 Verifying for a USB port . . . . . . . . . . . . . . . . . . . . . . . . . . . . . . . . . . . . .11 Connecting the power cord to the scanner . . . . . . . . . . . . . . . . . . . . . . 12 Connecting the USB cable . . . . . . . . . . . . . . . . . . . . . . . . . . . . . . . . . . 13 Turning on the scanner and finalizing Kodak Driver Software installation. . . . . . . . . . . . . . . . . . . . . . . . . . . . . . . . . . . . . . . . . . . . . . . 13 Installing application software . . . . . . . . . . . . . . . . . . . . . . . . . . . . . . . . 15 Scanner components . . . . . . . . . . . . . . . . . . . . . . . . . . . . . . . . . . . . . . . . . 16 A-61512 May 2006 3 Using the Scanner . . . . . . . . . . . . . . . . . . . . . . . . . . . . . . . . . . . . . . . . . . . Turning the scanner on and off . . . . . . . . . . . . . . . . . . . . . . . . . . . . . . . . . Adjusting the input and output trays . . . . . . . . . . . . . . . . . . . . . . . . . . . . . . Start and stop scanning . . . . . . . . . . . . . . . . . . . . . . . . . . . . . . . . . . . . . . . Document preparation . . . . . . . . . . . . . . . . . . . . . . . . . . . . . . . . . . . . . . . . Verifying your scanner installation . . . . . . . . . . . . . . . . . . . . . . . . . . . . . . . Viewing test images . . . . . . . . . . . . . . . . . . . . . . . . . . . . . . . . . . . . . . . . . . Application software . . . . . . . . . . . . . . . . . . . . . . . . . . . . . . . . . . . . . . . . . . Kodak Button Manager. . . . . . . . . . . . . . . . . . . . . . . . . . . . . . . . . . . . . . . . Configuring functions . . . . . . . . . . . . . . . . . . . . . . . . . . . . . . . . . . . . . . . Installing and configuring Readiris. . . . . . . . . . . . . . . . . . . . . . . . . . . . . Assigning function numbers . . . . . . . . . . . . . . . . . . . . . . . . . . . . . . . . . Using function numbers . . . . . . . . . . . . . . . . . . . . . . . . . . . . . . . . . . . . . Scanning your documents . . . . . . . . . . . . . . . . . . . . . . . . . . . . . . . . . . . . . Scanning documents using the special document feeder . . . . . . . . . . . . . 18 18 18 19 19 20 23 23 24 24 26 29 30 30 31 4 Image Processing . . . . . . . . . . . . . . . . . . . . . . . . . . . . . . . . . . . . . . . . . . . . Overview . . . . . . . . . . . . . . . . . . . . . . . . . . . . . . . . . . . . . . . . . . . . . . . . . . Common terms . . . . . . . . . . . . . . . . . . . . . . . . . . . . . . . . . . . . . . . . . . . . . Making camera selections . . . . . . . . . . . . . . . . . . . . . . . . . . . . . . . . . . . Starting the Scan Validation Tool . . . . . . . . . . . . . . . . . . . . . . . . . . . . . . . . Scan Validation Tool dialog box . . . . . . . . . . . . . . . . . . . . . . . . . . . . . . . . . 32 32 32 33 33 34 i Using the TWAIN Datasource . . . . . . . . . . . . . . . . . . . . . . . . . . . . . . . . . . Kodak Scanner Properties dialog box . . . . . . . . . . . . . . . . . . . . . . . . . . Buttons on the Kodak Scanner Properties dialog box. . . . . . . . . . . The Imaging tab. . . . . . . . . . . . . . . . . . . . . . . . . . . . . . . . . . . . . . . . . . . Scanning bi-tonal images . . . . . . . . . . . . . . . . . . . . . . . . . . . . . . . . Scanning color images . . . . . . . . . . . . . . . . . . . . . . . . . . . . . . . . . . Scanning grayscale images . . . . . . . . . . . . . . . . . . . . . . . . . . . . . . The Paper tab . . . . . . . . . . . . . . . . . . . . . . . . . . . . . . . . . . . . . . . . . Cropping values . . . . . . . . . . . . . . . . . . . . . . . . . . . . . . . . . . . . . . . Additional paper selections . . . . . . . . . . . . . . . . . . . . . . . . . . . . . . . The Compression tab . . . . . . . . . . . . . . . . . . . . . . . . . . . . . . . . . . . . . . . . . The Dropout tab. . . . . . . . . . . . . . . . . . . . . . . . . . . . . . . . . . . . . . . . . . . The Multifeed tab . . . . . . . . . . . . . . . . . . . . . . . . . . . . . . . . . . . . . . . . . . The Options tab . . . . . . . . . . . . . . . . . . . . . . . . . . . . . . . . . . . . . . . . . . . The Setup tab . . . . . . . . . . . . . . . . . . . . . . . . . . . . . . . . . . . . . . . . . . . . The Info tab . . . . . . . . . . . . . . . . . . . . . . . . . . . . . . . . . . . . . . . . . . . . . . Using the ISIS Driver . . . . . . . . . . . . . . . . . . . . . . . . . . . . . . . . . . . . . . . . . Scanner Settings dialog box . . . . . . . . . . . . . . . . . . . . . . . . . . . . . . . . . Buttons on the Scanner Settings dialog box . . . . . . . . . . . . . . . . . . Image Processing settings. . . . . . . . . . . . . . . . . . . . . . . . . . . . . . . . Page size and layout . . . . . . . . . . . . . . . . . . . . . . . . . . . . . . . . . . . . More Scanner Settings dialog box. . . . . . . . . . . . . . . . . . . . . . . . . . . . . Image Control options . . . . . . . . . . . . . . . . . . . . . . . . . . . . . . . . . . . Color Dropout options . . . . . . . . . . . . . . . . . . . . . . . . . . . . . . . . . . . Scanner Control dialog box. . . . . . . . . . . . . . . . . . . . . . . . . . . . . . . Multi-Feed Detection options . . . . . . . . . . . . . . . . . . . . . . . . . . . . . Energy Saving features of the scanner . . . . . . . . . . . . . . . . . . . . . . Transport timeout . . . . . . . . . . . . . . . . . . . . . . . . . . . . . . . . . . . . . . Blank image detection. . . . . . . . . . . . . . . . . . . . . . . . . . . . . . . . . . . Defining the Scan area . . . . . . . . . . . . . . . . . . . . . . . . . . . . . . . . . . . . . Scan Area dialog box . . . . . . . . . . . . . . . . . . . . . . . . . . . . . . . . . . . . . . 36 36 36 37 38 42 43 44 44 46 47 48 49 50 51 52 53 53 53 55 56 59 61 62 63 63 64 64 64 64 65 5 Maintenance . . . . . . . . . . . . . . . . . . . . . . . . . . . . . . . . . . . . . . . . . . . . . . . . Cleaning the scanner . . . . . . . . . . . . . . . . . . . . . . . . . . . . . . . . . . . . . . . . . Replacing the feed module. . . . . . . . . . . . . . . . . . . . . . . . . . . . . . . . . . . . . Supplies and consumables . . . . . . . . . . . . . . . . . . . . . . . . . . . . . . . . . . . . 66 66 69 70 6 Troubleshooting . . . . . . . . . . . . . . . . . . . . . . . . . . . . . . . . . . . . . . . . . . . . . Indicator lights and error codes . . . . . . . . . . . . . . . . . . . . . . . . . . . . . . . . . Clearing a document jam . . . . . . . . . . . . . . . . . . . . . . . . . . . . . . . . . . . . . Problem solving . . . . . . . . . . . . . . . . . . . . . . . . . . . . . . . . . . . . . . . . . . . . . Scanner not working . . . . . . . . . . . . . . . . . . . . . . . . . . . . . . . . . . . . . . Testing for a USB connection . . . . . . . . . . . . . . . . . . . . . . . . . . . . . . . USB connection issues. . . . . . . . . . . . . . . . . . . . . . . . . . . . . . . . . . . . 71 71 71 72 74 77 78 Appendix A ii Specifications . . . . . . . . . . . . . . . . . . . . . . . . . . . . . . . . . . . . . . 80 A-61512 May 2006 1 Introduction The Kodak i30 and i40 Scanners are compact document scanners perfect for workgroups and other decentralized applications.These scanners have a 50-page automatic document feeder that scans 25 lettersize, 200 dpi, pages per minute. For your image processing needs, the TWAIN Datasource and ISIS Driver are included with the Kodak i30/i40 Scanners. • Kodak i30 Scanner — desktop simplex color scanner Kodak i40 Scanner with output tray Kodak i40 Scanner with special document feeder • Kodak i40 Scanner — desktop duplex color scanner. The Kodak i40 Scanner also has an optional special document feeder which allows you to manually feed small-sized documents. The special document feeder is designed to scan documents such as credit cards, checks, identifications card, prescription forms, etc. This User’s Guide provides information and procedures for the Kodak i30 and i40 Scanners using the TWAIN Datasource and ISIS Driver. The information in this guide is for use with both scanner models unless otherwise noted. A-61512 May 2006 1 Scanner features • Easy to use • Small, compact size • Scans up to 21.6 x 86 cm / 8.5 x 34 inches using the automatic document feeder when the host PC is configured with adequate memory. See the section entitled, “System requirements” for more information. • Optional special document feeder provides easy manual feeding of small-sized documents, such as checks, credit cards, etc. one at a time. • Scans 25 ppm (200 dpi, bi-tonal, duplex, portrait orientation) lettersize documents • Choose color, bi-tonal, grayscale, simultaneous bi-tonal and grayscale, or simultaneous bi-tonal and color • Easy cleaning and maintenance • Output resolutions from 75 to 600 dpi • Bundled ISIS and TWAIN drivers • High speed USB 2.0 interface 2 A-61512 May 2006 Safety information MSDS Material Safety Data Sheets (MSDS) for chemical products are available on the Kodak website at: www.kodak.com/go/msds. When accessing the MSDSs from the website, you will be required to provide the catalog number of the consumable you want the Material Safety Data Sheet for. See the section entitled, “Supplies and consumables” later in this guide for supplies and catalog numbers. Safety and regulatory agency approvals The Kodak i30 and i40 Scanners conform to applicable national and international product safety and electronic emission regulatory requirements. This includes, but is not limited to, the following: Country or Region Safety Approval Safety Mark Australia Canada Electromagnetic Compatibility EMC Mark AS/NZS CISPR 22 Class B C-Tick CAN/CSA-C22.2 No. 60950 C - UL Canada ICES - 003 Issue 3 Class B GB4943 CCC “S&E” GB 9254 Class B GB 17625.1 Harmonics CCC “S&E” CE EN 55022 ITE Emissions Class B EN61000-3-2 Powerline harmonics EN 61000-3-3 Flicker EN 55024 ITE Immunity CE China European Union Germany EN 60950 International IEC 60950 TUV GS CISPR 22 Class B Japan VCCI Class B VCCI Taiwan CNS 13438 Class B BSMI United States Environmental information UL 60950 UL CFR 47 Part 15 Subpart B FCC Class B • The Kodak i30 and i40 Scanners are designed to meet worldwide environmental requirements. • Guidelines are available for the disposal of consumable items that are replaced during maintenance or service; follow local regulations or contact Kodak locally for more information. • The Kodak i30 and i40 Scanners contain lead in the circuit board solder, glass lens, mercury in the lamps, and Chromium VI used as corrosion protection on the metal frame. Disposal of this material may be regulated due to environmental considerations. For disposal or recycling information, contact your local authorities or, in the USA, visit the Electronics Industry Alliance website: www.eiae.org. • The product packaging is recyclable. • The Kodak i30 and i40 Scanners are Energy Star compliant and are shipped from the factory with the default time set to 15 minutes. A-61512 May 2006 3 EMC statements United States This equipment has been tested and found to comply with the limits for a Class B digital device pursuant to Part 15 of the FCC rules. These limits are designed to provide reasonable protection against harmful interference in a residential installation. This equipment generates, uses, and can radiate radio frequency energy and, if not installed and used in accordance with the instruction manual, may cause harmful interference to radio communications. However, there is no guarantee that interference will not occur in a particular installation. If this equipment does cause harmful interference to radio or television reception, which can be determined by turning the equipment off and on, the user is encouraged to try to correct the interference by one or more of the following measures: - Reorient or relocate the receiving antenna. - Increase the separation between the equipment and receiver. - Connect the equipment into an outlet on a circuit different from that to which the receiver is connected. - Consult the dealer or an experienced radio/TV technician for additional suggestions. Any changes or modifications not expressly approved by the party responsible for compliance could void the user’s authority to operate the equipment. Where shielded interface cables have been provided with the product or specified additional components or accessories elsewhere defined to be used with the installation of the product, they must be used in order to ensure compliance with FCC regulation. Japan 4 This is a Class B product based on the standard of the Voluntary Control Council for interference by information Technology Equipment (VCCI). If this is used near a radio or television receiver in a domestic environment, it may cause radio interference. Install and use the equipment according to the instruction manual. A-61512 May 2006 Acoustic emission Maschinenlärminformationsverordnung – 3, GSGV Der arbeitsplatzbezogene Emissionswert beträgt <70 db(A). [Machine Noise Information Ordinance — 3, GSGV The operator-position noise emission value is <70 dB(A).] Power system connection This product is also designed for Norwegian IT power system with phase-to-phase voltage 230V. European Union This symbol indicates that when the last user wishes to discard this product, it must be sent to appropriate facilities for recovery and recycling. Please contact your local Kodak representative or refer to www.kodak.com/go/recycle for additional information on the collection and recovery programs available for this product. A-61512 May 2006 5 2 Getting Started What’s in the box Before you begin open the box and check the contents: • • • • • • • • • System requirements Kodak i30 or i40 Scanner Input tray Special document feeder (Kodak i40 Scanners only) Output tray Feed module(s) USB 2.0 cable Power supply AC power cord bundles Welcome Folio which includes: - Bundled installation and application CDs - Registration sheets - Printed User’s Guide, English - Service Contact sheets - Quick Installation Guide - Quick Tips Guide - Miscellaneous flyers Following is the minimum recommended system configuration to run Kodak i30 and i40 Scanners. • Intel Pentium IV, 2.5 GHz processor: - 512 MB RAM for scanning documents no longer than 35.56 cm (14 in.) in length in color, grayscale or bi-tonal up to 400 dpi. - 2 GB RAM for scanning documents no longer than 86.36 cm (34 in.) in length in color, grayscale or bi-tonal up to 400 dpi. - 2 GB RAM for scanning documents no longer than 35.56 cm (14 in.) in length in color, grayscale or bi-tonal at 600 dpi. - 3 GB RAM for scanning documents no longer than 86.36 cm (34 in.) in length grayscale or bi-tonal at 600 dpi. • USB port 2.0 (compatible with USB 1.1) • Windows 2000 Professional, Windows ME*, Windows 98SE, Windows XP (Professional/Home) • 100 MB free hard disk space • CD-ROM drive NOTE: The ability to scan longer documents or very high resolutions is somewhat dependent on the available host PC memory. Differences in memory used between scanning applications may account for some issues scanning a long document at very high resolution. While the memory guidelines above are conservative, your experience may vary depending on your host PC configuration and scanning application. * Kodak Button Manager is not supported for Windows ME. 6 A-61512 May 2006 Installing the scanner Install the scanner in the following order: 1. Assemble the scanner 2. Install the Kodak Driver Software 3. Verify that you have a USB port 4. Connect the power cord to the scanner 5. Connect the USB cable between your scanner and PC 6. Turn on scanner power and finalize the Kodak Driver Software installation 7. Install other supplied applications (optional) IMPORTANT: • Install the Kodak Driver Software on the host PC before you connect the scanner. • Some operating systems will only support USB 2.0, and others only support USB 1.1. For best performance, use USB 2.0 when possible. Assembling the scanner The input and output trays snap into place. They may also be adjusted to fit different document sizes. Attaching the input tray 1. Locate the input tray slots on the scanner. 2. Align the input tray pins with the slots. 3. Push down on the input tray until it snaps into place. A-61512 May 2006 7 Attaching the output tray and special document feeder 1. Locate the output tray holes on the scanner. 2. Insert the pin on the left side of the output tray/special document feeder in the hole, then press the ribbed button on the right side of the output tray/special document feeder and insert the pin in the hole on the right side of the scanner. Installing the Kodak Driver Software Install the driver software before connecting the scanner to your PC. 1. Insert the Kodak i30/i40 Scanner Installation CD in the CD-ROM drive. The installation program starts automatically. NOTE: If the CD does not start automatically, open the My Computer icon on your desktop. Double-click the icon for your CD-ROM drive, then double-click on Setup.exe. 2. Select Install Scanner Software. 3. The Kodak i30/i40 Scanner Installation window will be displayed. 8 A-61512 May 2006 NOTE: This window may or may not be displayed depending upon what was previously installed on your computer. 4. Click Yes. The Welcome window will be displayed: 5. Click Next. The Software License Agreement window will be displayed: 6. After reading the agreement, click I Agree to continue. A-61512 May 2006 9 7. Enter your name and company name and click Next. 8. When the installation is complete, the following dialog box will be displayed. 9. Click Finish. 10 A-61512 May 2006 Verifying for a USB port After you install the Kodak Driver Software, check for the presence of a USB port. • Select USB Test. The USB verification tool will check your operating system and hardware capability to determine if you need to install the USB card. • If a functioning USB 2.0 port is present, the following window will be displayed. Click OK and proceed with the next section. • If your PC does not have a USB 2.0 port installed the following window will be displayed, you should install a USB 2.0 Accessory card. • If you get any message other than either of the messages above, see the section entitled, “USB connection issues” in Chapter 6 Troubleshooting. A-61512 May 2006 11 Connecting the power cord to the scanner When the drivers have been installed, connect the power supply and power cord to the scanner. Make sure that the power outlet is located within 1.52 metres (5 feet) of the scanner and is easily accessible. 1. Select the appropriate AC power cord for your region from the supply of power cords packed with your scanner. NOTE: The power cord for the United States/Canada and China look very similar. The difference is the United States/ Canadian power cord has holes in the prongs, and the Chinese power cord does not. United States and Canada China power cord 2. Attach the power cord for your power type to the power supply. 3. Plug the output power cord from the power supply into the power port on the scanner. 4. Plug the other end of the power cord into the wall outlet. 12 A-61512 May 2006 Connecting the USB cable IMPORTANT: If you have not installed the Kodak Driver Software, do that now before proceeding. The following instructions explain the connection of the USB cable between your scanner and PC. You need to identify the USB port on your PC. If you installed the USB 2.0 card, use that port, otherwise use the USB port on your PC. The USB cable supplied with your scanner has two different ends. A B 1. Attach the B end of the USB cable to the scanner USB port, located on the back of the scanner. 2. Attach the A end of the USB cable to the proper USB port on your PC. NOTE: If you installed a USB card, use one of those ports, or use your PC’s USB port. See your PC manufacturer’s documentation for the location of the USB port. Turning on the scanner and finalizing Kodak Driver Software installation A-61512 May 2006 When the USB cable and power connections have been made, and the Kodak Software Drivers have been properly installed, the installation will be complete when the scanner is turned on. 13 1. Use the power switch on the back of the scanner to turn the scanner on (I). When you turn on the scanner, the scanner goes through a series of self tests, the green indicators will flash. When it is finished and ready to scan, the LED indicator will stop flashing and stay green. NOTES: • If the scanner does not pass the self test, refer to Chapter 6, Troubleshooting. • The following screens are based on Windows 2000. However, depending on the computer operating system you are using, these screens may be different. Your operating software will now auto detect the scanner. During the final installation process, this screen may be displayed: 2. If the above screen is displayed, select Yes. The installation of the Kodak device driver for the scanner is complete. To test the scanner, refer to the section entitled, “Verifying your scanner installation” in Chapter 3. If the driver installation was unsuccessful, see the section entitled, “Scanner not working” in Chapter 6, Troubleshooting. 14 A-61512 May 2006 Installing application software The following Kodak scanning applications are available on the CDs packed with your scanner. • Kodak Capture Lite Software. • Kodak Scan Validation Tool. Refer the section entitled, “Verifying your scanner installation” in Chapter 3 for installation instructions and use. Other scanning applications are also provided on the CDs packed with your scanner. Review these CDs for the other applications that are included. You may also use other capture applications not provided. See the User Guides provided with these applications for instructions on how to install and use the software. A-61512 May 2006 15 Scanner components Front view Input tray Function window Arrow button Scanner cover release button Scanner cover Start button Indicator LED light Output tray or special document feeder Output tray extension Input tray — holds up to 50 documents in place. Adjusts to fit the document size. Function window — displays 1 through 9. These numbers correspond to a predefined function of an associated application of your choice. See the section entitled, “Kodak Button Manager” in Chapter 3 for more information. The function window will also display error codes. See Chapter 6, Troubleshooting for a listing of these error codes. Arrow button — allows you to select or scroll through predefined functions 1 through 9. Start button — launches the selected application that is associated with the displayed number in the function window. Indicator LED light — illuminates or flashes indicating scanner status. • Steady green: ready to scan • Flashing green: preparing to scan • Flashing red: error indication such as, Scanner Cover Open, in conjunction with the Function window displaying an “E”. See Chapter 6, Troubleshooting for a listing of these error codes. Output tray — collects the scanned documents. Special document feeder (not shown in illustration above) — for Kodak i40 Scanners only, this shelf provides a flat work surface for scanning small-sized documents one at a time. Output tray extension — unfold this extension when scanning documents longer than 8.5 x 11 inches (A4). Scanner cover release button — opens the cover on the automatic document feeder for clearing documents. Scanner cover — provides access to the internal components of the scanner, such as the imaging guides and feed module. 16 A-61512 May 2006 Inside view Feed module Paper present sensor Rollers Left-edge sensor Calibration guides Rollers — provides smooth document feeding of various sizes, thicknesses and textures of documents. Calibration guides — for optimum image quality, keep the calibration guides clean. There are two guides - one upper and one lower. Feed module — provides smooth document feeding and separation of various sizes, thicknesses and textures of documents. Paper present sensor/Left-edge sensor — detects the presence of documents in the paper path during feeding and imaging. Back view Power switch Power port USB port Power switch — turns the scanner on and off. Power port — connects the power cord to the scanner. USB port — connects the scanner to the PC. A-61512 May 2006 17 3 Using the Scanner Turning the scanner on and off • Press the button on the back of the scanner to turn the scanner on (I) or off (O). After you turn on the scanner, wait for it to complete the self-test. When completed, the green indicator light will remain on and constant. Adjusting the input and output trays The input tray has side guides that allow you to adjust the feeder to fit different document sizes. • Grasp the side guides and slide them to the desired position. If you are scanning documents longer than 8.5 x 11 inches (A4), open the extender on the output tray. NOTE: The special document feeder requires no special adjustments. 18 A-61512 May 2006 Start and stop scanning Before you start scanning, make sure the scanner is on and ready for operation, which is indicated by the green indicator light being on and constant. Scanning is controlled by software developed for your application. To start and stop scanning, refer to the documentation provided with your application software. Document preparation • A batch of documents to be fed into the scanner must be arranged so the leading edges of all documents are aligned and centered in the input tray; this allows the feeder to introduce documents into the scanner one at a time. • Staples and paper clips on documents may damage the scanner and documents. Remove all staples and paper clips before scanning. • Documents should be in good condition. Paper Types: Bond, Laser, Inkjet, Offset NOTE: Chemically coated papers may cause excessive wear/swelling of the rollers. Paper inks: All inks on the paper must be dry before scanning is started. This includes: Standard offset printing, Inkjet printer, Thermal transfer, Handwriting inks. Correction Fluids: Liquid Paper®, Tipp-Ex®, Wite-out®, and other similar correction fluids. Paper Weights: 7.3 to 12.7 kg (16 to 28 lbs.) NOTE: Thicker paper weights can be fed through the special document feeder. Documents up to 95 mm (3.74 in.) wide can be up to 1 mm (0.039 in.) thick. Maximum Document Size: 21.6 x 86.36 cm (8.5 x 34 in.) NOTE: Long Paper mode will scan document lengths from 35.56 cm (14 in.) to 86.36 cm (34 in.) when the host PC is configured with adequate memory (see “System requirements” for more information regarding memory requirements). Minimum Document Size: 8.9 x 5 cm (3.5 x 2 in.) special document feeder only: Front-feed minimum/center alignment: 6.35 x 5.08 cm (2.5 x 2.0 in.) A-61512 May 2006 19 Verifying your scanner installation Kodak provides a test application called the Kodak Scan Validation Tool. This section describes how to use this tool to perform a basic scan function which includes feeding paper and viewing captured images on your PC. The following steps help you to verify that your scanner installation was successful. If this procedure is successful, you will be ready to use your scanner. If it is not successful, go back and review the installation procedures outlined in the section entitled, “Installing the scanner” in Chapter 2. NOTE: Detailed descriptions of all the options on the Scan Validation Tool dialog boxes can be found in Chapter 4, Image Processing. Before you begin, be sure the scanner is on and ready to scan. 1. Select Start>Programs>Kodak>Document Imaging>Scan Validation Tool or click the Scan Validation Tool icon. The Scan Validation Tool dialog box will be displayed. 2. Select TWAIN (or ISIS) for the Driver Types and Kodak Scanner i30/i40 as the Driver. The Scan Validation Tool dialog box will be displayed. 20 A-61512 May 2006 3. Click the Scanner icon to access the Kodak Scanner Properties dialog box. 4. Select Defaults. A confirmation message, Reset all values to factory defaults will be displayed. 5. Click OK. This resets the software to the factory-installed default settings. The factory default settings are set to capture color images. For an i30 Scanner one side of the document will be scanned. For an i40 Scanner both sides of the document will be scanned. A-61512 May 2006 21 6. Click OK on the Kodak Scanner Properties dialog box. The Scan Validation Tool screen will be displayed: 7. Place some test application documents into the input tray of the scanner. The documents should be placed upside down in the input tray. If you are scanning one-sided documents or if you have a Kodak i30 Scanner, be sure the side you want to scan is facing the input tray. 8. Click the Start button on the Scan Validation Tool. The documents will be scanned and displayed in the Scan Validation Tool window. NOTE: If the scanner is in lamp saver mode, a message will be displayed that the lamps need sufficient time to warm up. After the images have been displayed, your scanner installation verification is completed. 9. Click the Close box 22 to exit the Scan Validation Tool. A-61512 May 2006 Viewing test images The images you scanned can be found in the TWAIN folder on the C drive. Files will be named using the following naming convention: image0000001A.jpg is a front image; image0000001B.jpg is a back image. Double-click on this file to open and view the captured image. Because factory default settings were used, the image quality may not be optimized to meet your needs. To learn more about image processing features, go to Chapter 4, Image Processing. When testing has been completed, delete the test images. Application software Some scanning applications are available on the CDs packed with your scanner. You may also use other capture applications. See the User’s Guide provided with these applications for instructions on how to use the software. A-61512 May 2006 23 Kodak Button Manager Kodak Button Manager allows you to assign an associated application with the numbers (1 through 9) displayed in the function window on the scanner. Once the numbers are assigned, you can launch scanning applications and utilities by using the Start button on the control panel. Up to 9 different applications can be launched. After the scanner, software drivers, and application software are properly installed and the PC has been rebooted, a scanner icon will be displayed on the system tray. • Click on the scanner icon to display a listing of the predefined button assignments. You can click on one of the functions to launch the application or you can select Configure to assign or reassign a function. Configuring functions The Configuration dialog box allows you to set or change the applications associated with the function number. When you select Configure from the Kodak Button Manager menu, the Configuration dialog box will be displayed. Select a Scanner Event — select the number (1 through 9) that you want to assign an application to. 24 A-61512 May 2006 Select an Application for the event — provides a listing of all applications currently available. The application highlighted in this box is associated with the function number displayed in the Select a Scanner Event box. Four types of applications are supported: • Special Kodak applications — Readiris Pro 9 Corporate Edition is included with the scanner. If this software is installed on the host PC, Readiris: Create PDF will be displayed in the text box. If you want Readiris: Create PDF to be your primary scanning application, you must install and configure the Readiris application. For more information see the next section, “Installing and configuring Readiris”. • Kodak installed applications — lists the applications that have been included with the scanner and installed (i.e.,Kodak Capture Software, Kodak Scan Validation Tool). • Registered applications — lists the applications that have been registered with Windows. (i.e,. Paint Shop Pro) • Other — lists the applications that you have previously browsed to. If you select Other, the Open dialog box will be displayed allowing you to browse to the desired application and select it. Once the application is selected, the application will be added to the list and will be assigned to the current button function (1-9). As you add applications, the list will continue to grow until the Configuration dialog box is closed. When the Configuration dialog box is reopened, only applications that you assigned to a function number will be listed. Minimize and Close buttons — if you select either the Minimize or Close button, the system will save the changes you have made on the Configuration dialog box. OK — accepts the changes made on the Configuration dialog box. Cancel — closes the Configuration dialog box without saving any changes. If you made changes in the Configuration dialog box and you click Cancel, this message will be displayed: A-61512 May 2006 25 Installing and configuring Readiris 1. Insert the Readiris installation CD in the CD-ROM drive. The installation program starts automatically. NOTE: If the CD does not start automatically, open the My Computer icon on your desktop. Double-click the icon for your CD-ROM drive, then double-click on Setup.exe. The Readiris registration dialog box will be displayed: 2. Click Register now. You must be connected to the internet to register this software. A registration key will be provided via email. NOTE: If you do not register the software now, a reminder box will continue to be displayed every time you launch the Kodak Button Manager and/or the Readiris application. There is no charge for registration. 3. Once you have registered the software, the OCR wizard box is displayed, click Cancel. 26 A-61512 May 2006 The main Readiris dialog box will be displayed: 4. Click on the Scanner button to display the Scanner dialog box. 5. Select Scanner Model. A-61512 May 2006 27 The Type dialog box will be displayed: 6. Select either Kodak i30 (TWAIN) or Kodak i40 (TWAIN) from the Type dialog box. IMPORTANT:Do not select Kodak i30 (User Interface) (TWAIN) or Kodak i40 User Interface (TWAIN). 7. Click OK on the Type dialog box. 8. On the Scanner dialog box, select the appropriate scanning parameters for your scanning needs (e.g., Resolution [300 dpi is best for OCR], black-and-white, Duplex [Kodak i40 Scanner only]). 9. Click OK. 10. Save the configuration by selecting File>Save Settings. The configuration should be saved to: C:\program files\Kodak\Document Imaging\KDSi3040.IBT. 11. Close the application. The Readiris: Create PDF application is now ready to use. 28 A-61512 May 2006 Assigning function numbers 1. Click the Scanner icon on the system tray to display the Kodak Button Manager and select Configure. The Configuration dialog box will be displayed. 2. Select the function number from the Select a Scanner Event dropdown box you want to associate with a particular application. 3. Select the desired application from the Select an application for the event list box. 4. Assign as many function numbers (up to 9) by repeating Steps 2 and 3. 5. When finished, click OK. IMPORTANT: • Readiris Pro 9 Corporate Edition is included with the scanner. If this software is installed on the host PC, Readiris: Create PDF will be displayed in the application list box. If you want Readiris: Create PDF to be your primary scanning application, you must install and configure the Readiris application. See the section entitled, “Installing and configuring Readiris” for more information. • You can assign any scanning application using the Kodak Button Manager by selecting the Other... option and browse to that application. A-61512 May 2006 29 Using function numbers When you have assigned the function numbers, they can be easily launched by using the Start button on the control panel. 1. Use the arrow button to scroll through the function numbers and select the desired function. 2. Press the Start button. The application associated with the selected function number will be launched and ready to use. NOTE: If you select Readiris: Create PDF, all pages in the scanner will be scanned, converted to text via OCR, and placed as a PDF file in a desktop folder called “Kodak Scanned Documents”. Scanning your documents Standard paper size documents should feed easily through the scanner. • Place the documents you want to scan into the input tray of the scanner. The documents should be placed upside down in the input tray. If you are scanning one-sided documents or if you have a Kodak i30 Scanner, be sure the side you want to scan is facing the input tray. NOTE: Notebook paper with holes on the side should be fed into the scanner with the holes next to side guides. 30 A-61512 May 2006 Scanning documents using the special document feeder To scan documents using the special document feeder: • Place the documents you want to scan onto the special document feeder. The documents should be placed face down on the special document feeder. The document will be drawn into the scanner, scanned, and deposited back onto the special document feeder. NOTES: • Be sure the Transport Timeout value that is set up on the Options tab (TWAIN driver) or the Scanner Control dialog box (ISIS driver) provides sufficient time for you to position the document on the feed shelf after pressing the Start button. See Chapter 4, Image Processing for more information about Transport Timeout. • When using the special document feeder, if a document has a high reflective area (such as a hologram on a credit card), feed the document face down. • When you are feeding small documents, be sure you feed the document in the center of the special document feeder to ensure that the document passes over the left-edge sensor. A-61512 May 2006 31 4 Image Processing Overview This chapter introduces concepts that may be new to many users. The Kodak i30 and i40 Scanners provide the ability to process scanned images to improve their quality. Using these features the scanner can sometimes make the scanned image look better than the original document. Basic image processing concepts are reviewed in this chapter to help you take advantage of these powerful features. Image processing refers to several separate features of the scanner that allow you to automatically adjust each image in a certain way that may improve the resulting images. Common examples of image processing features are correcting any skew in the fed document, cutting the edges of the image off to remove any unneeded border or cleaning up extraneous “noise” on the image. The idea is to do this automatically so you can get better images with a minimum amount of rework. The information that follows describes the image processing features by walking you through the Scan Validation Tool. The same options should be available on the user interface of the software application you are using (i.e., Kodak Capture Software). All fields on the Scan Validation Tool are described in this chapter. Common terms Following are a few common terms that are used throughout this chapter: Bi-tonal or Binary — black-and-white. Simplex — indicates that only one side of the document (the front side) will be scanned, creating a single page image. Duplex — indicates that both sides of the document will be scanned, creating two page images. Cameras — it is important to understand the concept of “cameras”. The Kodak i30 Scanner is a simplex scanner. The camera has the ability to separate color and bi-tonal/binary data simultaneously. This means it scans one-sided documents; a front color camera and a front bi-tonal/binary image, allowing you to capture one side of a document either in color/grayscale or black-and-white with a single scan. The Kodak i40 Scanner is a duplex scanner. The cameras have the ability to separate color and bi-tonal/binary data simultaneously. This means it scans both sides of a two-sided document; a front color image, a rear color image, a front bi-tonal/binary image, and a rear bitonal/binary image, allowing you to capture both sides of a document in either color/grayscale, black-and-white, or a combination of color/ grayscale and black-and-white with a single scan. When you use the Kodak Scan Validation Tool, you will need to select which camera(s) you want to use to scan your document to get the desired results. You can use the following examples as a guide when making camera selections. 32 A-61512 May 2006 Making camera selections When you launch the Kodak Scan Validation Tool, you will be making selections on the dialog boxes to set up your images for scanning test documents. Both TWAIN and ISIS have camera selection boxes that refer to the cameras within the scanners. Following are some examples of choosing the correct camera for the desired results. For the purpose of these examples, the TWAIN Datasource has been used. Example 1: scanning a two-sided color document both sides in color If you want to scan a two-sided color document, make your camera selections as follows: Camera selection Result - Side 1 Result - Side 2 • Select both Front Color and Rear Color. Depending on which camera (in this example, Front Color) is highlighted, will depend on which side of the document is scanned first. The result is two images in color. Example 2: scanning a two-sided color document, front side only in bi-tonal If you want to scan only the front side of a color document in black-andwhite, make your camera selections as follows: Camera selection Original - Side 1 Result - Side 1 • Select and highlight Front Bitonal. The resultant image will be the front side of the document in black-and-white. A-61512 May 2006 33 Starting the Scan Validation Tool 1. Select Start>Run or select Programs>Kodak>Document Imaging>Scan Validation Tool. Enter the filename or choose Browse to locate the ScanValidation.exe file. 2. Select TWAIN (or ISIS) for the Driver Type and the Kodak Scanner i30/40 Scanner as the Driver. The Scan Validation Tool dialog box will be displayed. 3. Double-click the Scanner icon to access the Kodak Scanner Properties dialog box. 34 A-61512 May 2006 Scan Validation Tool dialog box The Scan Validation Tool (SVT) is a diagnostic application that Kodak provides with most Kodak scanners. The SVT user interface allows access to all the features of the scanner and is a good way to verify that the scanner is working properly. The Scan Validation Tool allows you to verify scanner functionality using both the TWAIN Datasource and the ISIS Driver. Displays the user interface for the selected driver. Disables the scanner Displays four images at a time Enables the scanner Closes the image viewer (no images will be displayed) Enables to scanner to feed one page Allows you to select the directory to store scanned images and their file names. Only available when Save Images to Files is selected. Displays eight images at a time Displays two images at a time Displays one image at a time Displays the License Key window Display Every enter the sampling rate of the images you wish to display while scanning. For example, to see every image, enter a value of 1. To see every 10th image, enter a value of 10. Last File displays the full path and file name for the last stored image. Total displays the total number of images scanned during the current Scan Validation Tool session. A-61512 May 2006 35 Using the TWAIN Datasource The TWAIN Datasource is a piece of software that communicates with your scanner. It is provided by Kodak with the i30 and i40 Scanners. Many scanning applications support the TWAIN standard and this datasource can be used to interface with these applications. This section provides descriptions of the scanner features using options on the TWAIN tabs and how to set these options. If you are using the TWAIN Datasource, follow the procedures in this section to set up your scanner. If you are using the ISIS Driver, see the section entitled, “Using the ISIS Driver” later in this chapter. For the purpose of this manual, all displayed dialog boxes assume the features available on the Kodak i40 Scanner (duplex scanner). If you have a Kodak i30 Scanner (simplex scanner) all options are limited to simplex scanning only. Kodak Scanner Properties dialog box The Kodak Scanner Properties dialog box allows you to review and configure the scanner’s settings. It consists of several tabbed windows each of which will be described within this chapter. Click on each tab to set all the desired values. You do not have to click OK until you have made all selections on all of the tabs. Buttons on the Kodak Scanner Properties dialog box Following are descriptions of the buttons located at the bottom of the dialog box. Defaults when you select Defaults, the message Reset all values to factory defaults? will be shown. Clicking Yes on this message will reset all values on all tabs to the factory default settings. Copy copies the settings of the front camera to the rear camera for the selected camera (bi-tonal, color or grayscale). For example, if you have Front Bi-tonal highlighted, these values will be copied to the Rear Bi-tonal camera. If you have Front Color highlighted, these values will be copied to the Rear Color camera. This option is only available for the Kodak i40 Scanner. OK saves the values set on all tabs. Cancel closes the dialog box without saving any changes. 36 A-61512 May 2006 The Imaging tab The Imaging tab allows you to define several image processing values that can be applied to your scanner. The Camera Selection box lists the available sides (front and rear) of any document where you can define individual image processing values. For detailed information about the cameras, refer to the beginning of this chapter, “Making camera selections”. On the Kodak i40 Scanner (duplex) there is a separate camera for each side of the document being scanned. The Kodak scanner drivers allow you to control the camera settings independently. Some settings apply only to bi-tonal images, other apply to color images. By selecting the appropriate camera and image type you can control the scanner’s output. • If you have a Kodak i40 Scanner, you can select any individual camera (i.e., Front Color, Rear Color, Front Bi-tonal and/or Rear Bi-tonal) or any combination of the cameras. This means you can do the front side, rear side or both sides of a document. • If you have a Kodak i30 Scanner, you can select either Front Color and/or Front Bi-tonal. This means you can do the front side of a document depending on how the documents are placed in the feeder. • Whatever is highlighted in the Camera Selection box determines the values available on the Imaging, Paper, Compression and Dropout tabs. NOTE: Whatever is checked in the Camera Selection box determines what the image output will be. Be sure not to confuse the “highlighted” camera with the “selected” camera. They may not be the same. A-61512 May 2006 37 Scanning bi-tonal images Bi-tonal images are scanned images that are made up of only blackand-white elements.The descriptions below are for bi-tonal images only. Binarization is the process of converting a grayscale or color image to a bi-tonal image. There are several different methods of performing this conversion. Two of the options are iThresholding and Adaptive Threshold Processing. These options are applied to grayscale scanned images and outputs a bi-tonal electronic image. Thresholding and Adaptive Threshold Processing separate the foreground information from the background information even when the background color or shading varies, and the foreground information varies in color quality and darkness. Different types of documents may be scanned using the same image processing parameters and still result in excellent scanned images. • iThresholding: selecting iThresholding allows the scanner to dynamically evaluate each document to determine the optimal threshold value to produce the highest quality image. This allows scanning of mixed document sets with varying quality (i.e., faint text, shaded backgrounds, color backgrounds) to be scanned using a single setting thus reducing the need for document sorting. When using iThresholding, only Contrast may be adjusted. • Adaptive Thresholding (ATP): the Adaptive Threshold Processor separates the foreground information in an image (i.e., text, graphics, lines, etc.) from the background information (i.e., white or non-white paper background). When using Adaptive Thresholding, Threshold and Contrast may be adjusted. 38 A-61512 May 2006 When Adaptive Thresholding is selected, Contrast values may range from 1 to 100. Fixed thresholding ATP disabled ATP enabled Fixed Processing used for black-and-white and other high contrast documents. A single level is set to determine the black-and-white transition. The threshold is programmable over the entire density range. Fixed thresholding sets Contrast to 0. If Fixed Processing is selected, Contrast is not available. 64-Level Bayer Dither, 64-Level 45 Degree Clustered Dot Screen and 64-Level Dispersed Dot Screen represent alternative screening options to emulate gray. Noise Filter occasionally small dots or specks appear in the background of a scanned image. These specks increase file compression size and usually contain no image information. Using the Noise Filter on documents containing very fine detail (e.g., the dot on an "i" in 4-point type) may cause information to be lost. It is recommended that you do not use Noise Filter when scanning documents with text smaller than 7-point type. Noise Filter can be used with bi-tonal images only and is front/rear independent. Choose (none), Lone Pixel or Majority Rule. • Lone Pixel reduces random noise on bi-tonal images by converting a single black pixel surrounded by white to white or by converting a single white pixel surrounded by black to black. A-61512 May 2006 39 • Majority Rule sets the central pixel value in a matrix according to the majority of white or black pixels in a matrix. No Noise Filter Used Lone Pixel Image Filter used to enhance images containing dot matrix text and/ or images printed with shaded or colored backgrounds using halftone screens. This filter effectively eliminates noise caused by the halftone screen. Choose (none) or Halftone Removal. • Halftone Removal is used to enhance images containing dot matrix text and/or images with shaded or colored backgrounds using halftone screens. This filter effectively eliminates noise caused by the halftone screen. Contrast % sets the image contrast by adjusting the difference between black-and-white, thereby making an image sharper or softer. In a low contrast setting, the difference between black-and-white is small, so the image is softer. In a high contrast setting, the difference between black-and-white is large, so the image is clearer. Select a contrast value from 1 to 100. The default is 50. Contrast 1 Contrast 60 Contrast 100 Adjust the contrast setting by dragging the Contrast sliding bar to the left or right to achieve the desired contrast setting, or you can enter a value (1 to 100) in the Contrast text box. Scan the document to check the contrast. 40 A-61512 May 2006 Threshold used to convert a grayscale image to a bi-tonal image. The thresholding value is an integer ranging from 0 to 255. A low threshold value produces a lighter image, and can be used to subdue backgrounds and subtle, unneeded information. A high threshold value produces a darker image, and can be used to help pick up faint images. Adjust the threshold setting by dragging the Threshold sliding bar to the left or right to achieve the desired threshold setting, or you can enter a value (0 to 255) in the Threshold text box. Scan the document to check the threshold. 200 dpi; 80 Threshold 20 Contrast 200 dpi; 80 Threshold 100 Contrast Resolution or dots per inch (dpi) indicates the scanning resolution, which largely determines the quality of the scanned image. The greater the resolution, the better the reproduction. However, scanning at a higher resolution also increases scanning time and file size. The industry standard is 200 dpi (about 8 pixels/mm). Choose a resolution value from the drop down list. The default value is 200 dpi. Available resolutions are 75, 100, 150, 200, 240, 300, 400 or 600. Polarity the host PC provides information to the scanner defining whether the image should be stored in standard or reverse polarity. The default polarity is Black on a White background. Reverse polarity is White on a Black background. Black on White polarity White on Black polarity Color Table Not applicable for bi-tonal images. See the next section “Scanning color images”. A-61512 May 2006 41 Scanning color images The descriptions below are for scanning color images only. Resolution or dots per inch (dpi) indicates the scanning resolution, which largely determines the quality of the scanned image. The greater the resolution, the better the reproduction. However, scanning at a higher resolution also increases scanning time and file size. Choose a resolution value from the drop down list. The default is 200 dpi. Available resolutions are: 75, 100, 150, 200, 240, 300, 400 or 600. Color Tables the selection of a color table effects how the scanner reproduces the color of a scanned document. Color Tables are look-up tables that store color descriptions which can be used for gamma correction of images being transferred between different equipment (i.e., scanners, printers, monitors, etc.). You can choose from the three Kodak default color tables: Pictures, Text and Text with Pictures, or if you have created your own custom color tables using the Brightness and Contrast Control, these tables will also be available. For more information on the Brightness and Contrast Control, see the Reference Guide, A-61506. 42 A-61512 May 2006 Scanning grayscale images The descriptions below are for scanning grayscale images only. Resolution or dots per inch (dpi) indicates the scanning resolution, which largely determines the quality of the scanned image. The greater the resolution, the better the reproduction. However, scanning at a higher resolution also increases scanning time and file size. Choose a resolution value from the drop down list. The default is 200 dpi. Available resolutions are: 75, 100, 150, 200, 240, 300, 400 or 600. Color Tables the selection of a color table effects how the scanner reproduces the color of a scanned document. Color Tables are look-up tables that store color descriptions which can be used for gamma correction of images being transferred between different equipment (i.e., scanners, printers, monitors, etc.). The selection of a color table effects how the scanner reproduces the color of a scanned document. You can choose from the three Kodak default color tables: Pictures, Text and Text with Pictures, or if you have created your own custom color tables using the Brightness and Contrast Control, these tables will also be available. For more information on the Brightness and Contrast Control, see the Reference Guide, A-61506. Convert Color to Grayscale enable this option when you want the captured image to be 8-bit grayscale instead of 24-bit color. A-61512 May 2006 43 The Paper tab The Paper tab allows you to define values relating to image output (i.e., cropping values, rotation, paper size and units of measure). Camera selection box lists the available sides of an image that you can define individual image processing values. The display window on the right will display the cropping area you are altering. The cropping area will change as values are being altered. Cropping values Cropping allows you to capture a portion of the document being scanned. Cropping options can be used independently with color/ grayscale and bi-tonal images and are also front and rear side independent, however for simultaneous output scanning color/ grayscale and bi-tonal cropping must be the same per side. • On an i40 Scanner two cropping options can be set per document. • On an i30 Scanner one cropping option can be assigned per document. Cropping select one of the following options: • Automatic: dynamically adjusts the cropping window for different document sizes based upon the edges of the image. Use this option for batches of mixed-sized documents. • Aggressive: selecting this option will eliminate any residual white/ gray border on any image edges. When using Aggressive cropping, there is a possibility that a small amount of image data from the edge of the document may be lost. 44 A-61512 May 2006 • Relative to Document: (zone processing): (used for batches of same-sized documents) — zone processing is a floating fixed crop window (the zone) located relative to the upper left corner of a document. It allows you to select an area on the document to be delivered in either color/grayscale or bi-tonal format (a separate window for both bi-tonal and color/grayscale may be defined). Different parameters may be selected for both the front and rear of the image. This option may be used in conjunction with Automatic cropping where a separate color/grayscale or bi-tonal area to be saved is desired. It is useful in applications where a photograph, signature, embossment or seal appears in a consistent area for an application (you may want that small area in color/grayscale and the rest in bitonal). • Fixed to Transport: (used for batches of same-sized documents) allows you to define the area or zone to be imaged. If you select this option, enter the x and y offset values, width and length. You can enter the desired values in the fields or use the arrow keys to define the desired area. The Display window will show image placement as you change the values. The following options are only available when Fixed to Transport or Relative to Document is selected. - X-Offset the distance from the left end of the scanner to the left edge of the scanning area. - Y-Offset — the position from the top end of the document to the top end of the scanning area. - Width — the width of the scanning area. - Length — the length of the scanning area. - Center Frame automatically calculates the x-offset for centerfed feeding based upon document size selected. - Rotate Frame automatically calculates the offset values based upon feed orientation of the document size selected (landscape vs. portrait). NOTE: You can scan documents longer than 35.56 cm (14 in.) and less than 86.36 cm (34 in.) when the host PC is configured with adequate memory (see “System requirements” for more information). A-61512 May 2006 45 Automatic Deskew select this option to automatically deskew a document within ±0.3 degrees of the leading edge of the document. This option is only available if you have Automatic cropping selected. NOTE: If the skew angle is too great, some of the image may be cut off. Image Edge Fill — fills the edges of a scanned image, after all other image processing options have been applied, by covering the area in Black or White (as selected). Select a value in the Top, Left, Right and/or Bottom area(s) from each side of the scanned image to be filled. NOTE: When using this option, be careful not to enter a value too large as it could fill in image data that you want to keep. Additional paper selections In addition to cropping values that can be applied using the Paper tab, the following options are available: Preset Front/Rear Size the default paper size is set when a scanner is first selected. You can choose a different paper size using the dropdown list box. Units defines the primary measurement system. Inches, Centimeters, Picas, Points, 20th of Points, and Pixels are available. 46 A-61512 May 2006 The Compression tab Compression squeezes a file to decrease the total size. Bi-tonal images are normally compressed using a CCITT standard called Group IV, often used in conjunction with TIFF files. Color and grayscale images are often compressed using JPEG techniques. TIFF (Tagged Image File Format) is a file format standard commonly used for bi-tonal images. It is often used in conjuction with the CCITT Group IV compression standard to reduce image file size. Color and grayscale images can be saved in this format too, but they are usually found uncompressed and are, therefore, quite large. Use the Compression tab to select compression settings. JPEG (Joint Photographic Editor Group). This group developed and lent their name to a file compression standard for color and grayscale images that is widely used by scanners, digital cameras and software applications. On Microsoft Windows-based systems, a file with the extension .jpg has normally been compressed using this standard. Camera Selection box lists the available sides (Front Color, Rear Color, etc.) of an image that you can define individual image processing values. Compression the i30/i40 Scanners can be configured to output bitonal, grayscale, and color images in various supported formats and resolutions independent of each other and each side of the image. These options vary based on the type of scanner. For bi-tonal scanning the following compressions are available: • CCITT Group 4 • (none) A-61512 May 2006 47 The following color/grayscale compression options are available: • JPEG — JPEG compression offers a JPEG quality of Draft, Good, Better, Best, Superior. - Draft: smallest file size with draft image quality - Good: larger file size with good image quality - Better: larger file size with better image quality - Best: larger file size with the best image quality - Superior: largest file size with superior image quality • (none) produces an uncompressed bitmap The Dropout tab Electronic Color Dropout is used to eliminate a form’s background so that a document management system may automatically — through OCR (Optical Character Recognition) and ICR (Intelligent Character Recognition) technology — read pertinent data without interference from the lines and boxes of the form. The i30/i40 Scanners can dropout either red, green or blue. The Dropout tab allows you to select the desired dropout color and alter the filter threshold and background. Camera Selection box lists available sides (Front Color, Rear Color, etc.) of an image that you can define individual image processing values. Color Dropout choose the color you want to eliminate: (none) Remove Red, Remove Green, Remove Blue. 48 A-61512 May 2006 Filter Threshold the value that is used to identify the color which will be dropped out. This value is applied to the color area. Color with a Red/Green/Blue component more than the entered value is dropped. This setting determines how much of the selected color is dropped out. A lower value will leave more of the selected color in, while a higher value will drop more of the selected color out. Background this value will be substituted in the grayscale (prethresholded) image for the color being removed. Therefore, this value should be higher than the threshold value selected on the Imaging tab for this pixel to become the background color. For example, if you are scanning a white document with a green form and you have selected a bi-tonal threshold value of 127, you should choose an electronic color drop-out background value greater than 127 so the substituted pixel will be white in the dropped-out image. The Multifeed tab Multi-feed Detection aids in document processing by detecting documents that may go through the feeder overlapped. Length Detection choose the minimum length of the document that can be scanned with a multi-feed being detected. The Display window will show the size of the document as you change the value. You can select to display this amount in Inches, Centimeters, Picas, Points, 20th of Points or Pixels. A value of 0 indicates no length detection. Length detection is best used when scanning same-sized documents. The maximum value is 14 inches. Multifeed Stops Scanning if this option is not selected, the scanner will log the condition but continue to operate. If selected, the scanner will log the condition and stop the feeder (the scanner will be disabled). When an overlap or multi-feed is detected, the scanner stops the feeder, clears the transport of all pages and then the documents can be refed. A-61512 May 2006 49 The Options tab The Options tab allows you to set Image Transfer and Transport control. Image Transfer Order if you are using simultaneous output scanning (bi-tonal and color/grayscale) for either side, this option controls the order in which the scanner returns image data. For example, if you are scanning color and bi-tonal and you select Bi-tonal Image, the scanner will return the bi-tonal front image, then the front color image. Transport Timeout allows you to set a transport timeout value. This value is the amount of time the scanner will wait after the last document enters the transport before the transport timeout action is taken. You can specify a time delay setting from 1 to 30 seconds. Energy Saving Features of Scanner allows you to set the amount of time the scanner will remain inactive before the scanner goes into an idle state. Choices are: (none) and 5 to 60 minutes. The default is 15 minutes. Blank Image Detection — use the slider bar to specify the image size (KB), below which an image is determined to be blank. Images with sizes less than the size number you select will not be created. If you use this option, you must specify a blank image size for each image type (Bi-tonal, Gray and Color) you want to delete. The default for this option is None, which means that you will keep all images. 50 A-61512 May 2006 The Setup tab The Setup tab allows you to download firmware and set the scanner clock. The Setup tab is only available when running the Scan Validation Tool, via the TWAIN Datasource. Package the scanner firmware runs your Kodak i30/i40 Scanners. The value displayed in the Current field is the version of firmware currently in use by your scanner. Periodically Kodak releases updated versions of firmware which are available through Kodak Service and Support website (www.Kodak.com/go/docimaging). Download… this option is used to download the latest version of firmware to your scanner. When Download is selected, the Select Scanner Firmware dialog box will be displayed. Configure displays the local time, UTC (Universal Time Clock) and the scanner serial number. A-61512 May 2006 51 The Info tab 52 The Info tab displays the following scanner information. A-61512 May 2006 Using the ISIS Driver The ISIS Driver is a piece of software that communicates with the scanner. This driver is created and maintained by Pixel Translations, Inc. and is provided with the scanner by Kodak. Many scanning applications support ISIS drivers and this driver can be used to interface with them. This section provides descriptions of the options on the ISIS dialog boxes and how to set these options. For the purpose of this manual, all displayed dialog boxes assume the features available on the Kodak i40 Scanner. If you have a Kodak i30 Scanner all options are limited to simplex scanning only. Scanner Settings dialog box See the section entitled, “Starting the Scan Validation Tool” earlier in this chapter to access the Scanner Settings dialog box. Buttons on the Scanner Settings dialog box Following are descriptions of the buttons located at the bottom of the dialog box. More displays the More Scanner Settings dialog box. This dialog box provides additional image processing settings unique to i30 and i40 Scanners. Area displays the Scan Area dialog box. Copy this function is only available when using the scanner in duplex mode. The Copy button provides a convenient way to set up the color, grayscale or binary image settings on one side and transfer them to the other. For example, if you highlight and set up Front Binary, you can use the Copy button to duplicate those settings for Rear Binary. About displays the About dialog box. The About dialog box provides detailed information such as the driver version number, certification status and the version of QuickDriver used to develop this driver. A-61512 May 2006 53 Default when you select Default, the values will be reset to the factory defaults. OK saves the values set on all dialog boxes. Cancel closes the dialog box without saving any changes. Camera Settings area The selections in the Camera area list the available sides (front and back) of an image where you can define individual image processing values. Options include: Front Color, Front Binary, Back Color and Back Binary. For detailed information about Camera selection, see the section entitled, “Making camera selections” earlier in Chapter 4. On the Kodak i40 Scanner there is a separate camera for each side of the document being scanned. The Kodak scanner drivers allow you to control the camera settings independently. Some settings apply only to binary (black-and-white) images, others apply to color/grayscale images. By selecting the appropriate camera and image type, you can control the scanner’s output. When starting the configuration process, use the steps below as a guide: 1. Check the images you wish to capture (Enable camera settings). 2. Select the order to transfer the images (Color First or Binary First). 3. Configure each image by highlighting it (Configure). Enable camera settings select the desired checkbox to enable the Front Color, Front Binary, Back Color or Back Binary settings as desired. This indicates the images you wish to capture and transfer to the host PC. (It is possible to capture only rear images.) Enable your selection by putting a checkmark in the desired box. Color First/Binary First define the transfer order by selecting the Color First or Binary First radio button. This determines which image is transferred to the host PC first when using simultaneous output scanning. For example, if you are scanning front color and front binary and you select Binary First the scanner will return the front binary image, then the front color image. 54 A-61512 May 2006 Configure highlight the image you want to setup. As you select the image, other options will become available on the Scanner Settings dialog box. The availability of these options is dependent upon the selection you make. Convert Color to Grayscale this option is only available when configuring color cameras. When selected, the scanner will convert the color image data to grayscale before making it available to the host PC. Image Processing settings The other options on this dialog box allow you to define image processing values that can be applied to your scanner. Scan Source the host PC provides information to the scanner defining whether to scan one or both sides of the document. Simplex indicates that only one side (front side) of the document will be scanned. Simplex – Back indicates that only one side (back side) of the document will be scanned. Duplex indicates that both sides of the document will be scanned. Dots per inch (dpi) or Resolution indicates the scanning resolution, which largely determines the quality of the scanned image. The greater the resolution, the better the reproduction. However, scanning at a higher resolution also increases scanning time and file size. Choose a resolution value from the drop-down list. The default is 200 dpi. Available resolutions are: 75, 100, 150, 200, 240, 300, 400 and 600. Cropping allows you to capture a portion of the document being scanned. All cropping options can be used with color/grayscale and binary images. Front and Rear cropping are independent, however, for simultaneous output scanning, color/grayscale and binary cropping must be the same per side. Only one cropping option can be assigned per image. Select one of the following options: • Automatic: dynamically adjusts the cropping window for different document sizes based on the edges of the image. Use this option for batches of mixed-sized documents. A-61512 May 2006 55 • Aggressive: selecting this option will eliminate any residual black border on any image edges. In order to achieve this, there is a possibility that a small amount of image data from the edge of the document may be lost • Fixed to Transport: (used for batches of same-sized documents) allows you to define the area or zone to be imaged. Fixed to Transport cropping is used in conjunction with paper size and page layout and assumes you are center-feeding your documents. If you are not using center feeding, you must select the Area button to define your scan area. See the section entitled “Defining the Scan area” later in this chapter. • Relative to Document: (zone processing): (used for batches of same-sized documents) — zone processing is a floating fixed crop window (the zone) located relative to the upper left corner of a document. It allows you to select an area on the document to be delivered in either color/grayscale or binary format (a separate window for both binary and color/grayscale may be defined). Different parameters may be selected for both the front and rear of the image. This option may be used in conjunction with Automatic cropping where a separate color/grayscale or binary area to be saved is desired. It is useful in applications where a photograph, signature, embossment or seal appears in a consistent area for an application (you may want that small area in color/grayscale and the rest in binary). To define a zone, select Area to display the Scan Area dialog b box. See the section entitled, “Defining the Scan area” later in this chapter for more information. NOTE: You can scan documents longer than 35.56 cm (14 in.) and less than 86.36 cm (34 in.) when the host PC is configured with adequate memory (see “System requirements” for more information). Page size and layout The default paper size is set when a scanner is first selected. You can choose a different paper size using the drop-down list box. NOTE: The Page Size and Page Layout selections also appear on the Scan Area dialog box. If you make a change on the Scanner Settings dialog box, the same selections will appear on the Scan Area dialog box and vice versa. The Page Layout area allows you to select either Portrait or Landscape. • Portrait will display the image orientation in the shape of a conventional portrait, where height is greater than width. • Landscape will display the image orientation in the shape of a conventional landscape painting, where width is greater than height. 56 A-61512 May 2006 Binarization the following descriptions are for binary images only. The following binarization options work on grayscale scanned images and outputs a bi-tonal electronic image. Their strength lies in the ability to separate the foreground information from the background information even when the background color or shading varies, and the foreground information varies in color quality and darkness. Different types of documents may be scanned using the same image processing parameters and results in excellent scanned images. Available binarization options are: • iThresholding: selecting iThresholding allows the scanner to dynamically evaluate each document to determine the optimal threshold value to produce the highest quality image. This allows scanning of mixed document sets with varying quality (i.e., faint text, shaded backgrounds, color backgrounds) to be scanned using a single setting thus reducing the need for document sorting. When using iThresholding, only Contrast may be adjusted. • Fixed Processing (FP): used for black-and-white and other high contrast documents. A single level is set to determine the black-andwhite transition. The threshold is programmable over the entire density range. Fixed thresholding sets the contrast to 0. If Fixed Processing is selected, Contrast is not available. • Adaptive Thresholding (ATP): the Adaptive Threshold Processor separates the foreground information in an image (i.e., text, graphics, lines, etc.) from the background information (i.e., white or non-white paper background). When using Adaptive Thresholding, Threshold and Contrast may be adjusted. Contrast values may range from 1 to 100. A Contrast value of 100 is considered fully adaptive thresholding. Fixed thresholding ATP disabled ATP enabled Dithering a method used to simulate gray levels. When selected, the Dithering options are available. • 64-Level Bayer Dither, 64-Level 45 Degree Clustered Dot Screen and 64-Level Dispersed Dot Screen: these represent alternative screening options to emulate gray. A-61512 May 2006 57 Contrast % sets the image contrast by adjusting the difference between black-and-white, thereby making an image sharper or softer. Contrast is only available for binary images. In a low contrast setting, the difference between black-and-white is small, so the image is softer. In a high contrast setting, the difference between black-and-white is large, so the image is clearer. Select a contrast value from 1 to 100. The default is 50. Contrast 1 Contrast 60 Contrast 100 Manual is always selected for binary images. Adjust the Contrast setting by dragging the Contrast sliding bar to the left or right to achieve the desired Contrast setting. Scan the document to check the contrast. Threshold thresholding is used to convert a grayscale image into a binary (1 bit/pixel) image. The thresholding value ranges from 0 to 255. The default is 90. A low threshold value will produce a lighter image, and can be used to subdue backgrounds and subtle, unneeded information. A high threshold value will produce a darker image, and can be used to help pick up faint images. Adjust the Threshold setting by dragging the Threshold sliding bar to the left or right to achieve the desired Threshold setting. Scan the document to check the threshold. 200 dpi; 80 Threshold; 20 Contrast 200 dpi; 80 Threshold; 100 Contrast Lighten, Normal and Darken are used as quick sets to adjust the threshold. Lighten = 72, Normal = 90 and Darken = 128. 58 A-61512 May 2006 More Scanner Settings dialog box Additional image processing values unique to the i30/i40 Scanners are available when you choose the More button on the Scanner Settings dialog box. Camera settings area The selections in the Camera area list the available sides (front and back) of an image where you can define individual image processing values. When starting the configuration process, use the steps below as a guide: 1. Check the images you wish to capture (Enable camera settings). 2. Select the order to transfer the images (Color First/Binary First). 3. Configure each image by highlighting it (Configure). Enable camera settings select the desired checkbox to enable the Front Color, Front Binary, Back Color or Back Binary settings as desired. This indicates the images you wish to capture and transfer to the host PC. (It is possible to capture only rear images.) You can enable your selection by putting a checkmark in the desired box. Color First/Binary First define the transfer order by selecting the Color First or Binary First radio button. This determines which image is transferred to the host PC first when using simultaneous output scanning. For example, if you are scanning front color and front binary and you select Binary First the scanner will return the front binary image, then the front color image. Configure highlight the image you want to setup. As you select the image, other options will become available on the More Scanner Settings dialog box. The availability of these options is dependent upon the selection you make. A-61512 May 2006 59 Convert Color to Grayscale this option is only available when configuring color cameras. When selected, the scanner will convert the color image data to grayscale before making it available to the host. Scan Source the host PC provides information to the scanner defining whether to scan one or both sides of the document. Simplex indicates that only one side (front side) of the document will be scanned. Simplex – Back indicates that only one side (rear side) of the document will be scanned. Duplex indicates that both sides of the document will be scanned. JPEG (Joint Photographic Editor Group) Quality — this group developed and lent their name to a file compression standard for color and grayscale images that is widely used by scanners, digital cameras and software applications. On Microsoft Windows-based systems, a file with the extension .jpg has normally been compressed using this standard. JPEG compression offers a JPEG quality of Draft, Good, Better, Best and Superior. • Draft smallest file size with draft image quality. • Good larger file size with good image quality. • Better larger file size with better image quality. • Best larger file size with the best image quality. • Superior largest file size with superior image quality. Image Edge Fill — fills the edges of a scanned image, after all other image processing options have been applied, by covering the area in Black or White (as selected). Select a value in the Top, Left, Right and/or Bottom area(s) from each side of the scanned image to be filled. NOTE: When using this option, be careful not to enter a value too large as it could fill in image data that you want to keep. Image Control options The following Image Control options are available: Deskew check this option to automatically deskew a document within ±0.3 degrees of the leading edge of the document. Automatic deskew can detect up to a 45-degree skew and correct up to a 24degree angle at 200 dpi or a 10-degree skew angle at 300 dpi. This option is not available when you have Fixed to Transport or Relative to Document cropping selected. NOTE: To prevent data loss, the document must have all four corners within the image path. 60 A-61512 May 2006 Halftone Removal used to enhance images containing dot matrix text and/or images with shaded or colored backgrounds using halftone screens. This filter effectively eliminates noise caused by the halftone screen. This option is only applied to binary images. Polarity the host PC provides information to the scanner defining whether the image should be stored in standard or reverse polarity. The default polarity is Black on a White background. Reverse polarity is White on a Black background. Black on White polarity White on Black polarity Noise filter — Occasionally small dots or specks appear in the background of a scanned image. These specks increase file compression size and usually contain no image information. Using the Noise Filter on documents containing very fine detail (e.g., the dot on an "i" in 4-point type) may cause information to be lost. It is recommended that you do not use the Noise Filter when scanning documents with text smaller than 7-point type. Noise Filter can be used with binary images only and is Front/Rear independent. Choose None, Lone Pixel or Majority Rule. • Lone Pixel reduces random noise on binary images by converting a single black pixel surrounded by white to white or by converting a single white pixel surrounded by black to black. • Majority Rule sets the central pixel value in a matrix according to the majority of white or black pixels in a matrix. No Noise Filter Used A-61512 May 2006 Lone Pixel 61 Color Dropout options Electronic color dropout is used to eliminate a form’s background so that a document management system may automatically — through OCR (Optical Character Recognition) and ICR (Intelligent Character Recognition) technology — read pertinent data without interference from the lines and boxes of the form. You can select the desired dropout color, and alter the filter threshold and background. Dropout Color the i30/i40 Scanners can drop out red, green or blue. None is the default. Background Value this value will be substituted in the grayscale (pre-thresholded) image for the color being removed. Therefore, this value should be higher than the threshold value selected on the Scanner Settings dialog box for this pixel to become the background color. The default value is 245. For example, if you are scanning a white document with a green form and you have selected a binary threshold value of 127, you should choose an electronic color dropout background value greater than 127 so the substituted pixel will be white in the dropped-out image. Threshold value the value that is used to identify the color which will be dropped out. This value is applied to the color area. Color with a Red/Green/Blue component more than the entered value is dropped. This setting determines how much of the selected color is dropped out. A lower value will leave more of the selected color in, while a higher value will drop more of the selected color out. The default value is 175. 62 A-61512 May 2006 Scanner Control dialog box Selecting the Scanner Control button on the More Scanner Settings dialog box displays the Scanner Control dialog box. This dialog box allows you to set multi-feed detection, transport control, enable/disable lamp saver and set the programmable key functions. The settings in this dialog box do not effect the quality of the image. See the section entitled, “Setting scanner controls” later in this chapter. OK saves the values set on the dialog box. Cancel closes the dialog box without saving any changes. Multi-Feed Detection options Length Detection this option can be enabled or disabled. The default is disabled. If Length Detection is enabled, enter the maximum length. This is the minimum length of the document that can be scanned with a multi-feed being detected. Length detection is used when scanning same-sized documents to check for overlap. For example, if you are scanning 8.5 x 11-inch (A4) documents in portrait mode, you may want to enter a value of 11.25 inches (28.57 cm) in the Maximum Length field. The maximum value is 13.99 inches (35.56 cm). Units — defines the primary measurement system. Pixels, Inches, and Centimeters are available. Auto Set when enabled, will automatically set the maximum length value to .50-inch (1.27 cm) greater than the length of the currently selected page size. Sound — select this option to choose the sound you would like your PC to make to alert you of a multifeed. To choose a sound: 1. Click on the Sound button to display the Open dialog box. 2. Choose the desired .wav file. 3. Click Open on the dialog box and the sound will be saved. A-61512 May 2006 63 Energy Saving features of the scanner Energy Star allows you to set the amount of time the scanner will remain inactive before the scanner goes into an idle state (sleep mode). Choices are: 0 to 60 minutes. Transport timeout This feature allows you to set a transport timeout value. This value is the amount of time the scanner will wait after the last document enters the transport before the transport timeout action is taken. You can specify a time delay setting from 1 to 300 seconds. The default is 10 seconds. Blank image detection Use the slider bar to specify the image size (KB), below which an image is determined to be blank. Images with sizes less than the size number you select will not be created. If you use this option, you must specify a blank image size for each image type (Bi-tonal, Gray and Color) you want to delete. The default for this option is None, which means that you will keep all images. Defining the Scan area The Scan Area dialog box is only available for images when the Cropping option selected on the Scanner Settings dialog box is either Fixed to Transport or Relative to Document cropping. To access the Scan Area dialog box, select Area on the ISIS Scanner Settings window. NOTE: Select the side and image to be defined by highlighting Front Color (Grayscale), Front Binary, Back Color (Grayscale), or Back Binary as appropriate based on the cropping option selected for each of these in the Scanner Settings dialog box. The scan areas defined for all camera selections are independent. 64 A-61512 May 2006 Scan Area dialog box The Scan Area dialog box allows you to define the amount of image data which is returned to the host. The area can be defined in Pixels, Inches or Centimeters. The Scan Area dialog box is only available when Fixed to Transport or Relative to Document is selected on the Scanner Settings dialog box. Page size and layout the default paper size is set when a scanner is first selected. You can choose a different paper size using the dropdown list box. NOTE: The Page Size and Page Layout selections also appear on the Scanner Settings dialog box. If you make a change on the Scan Area dialog box, the same selections will appear on the Scanner Settings dialog box and vice versa. The Page Layout area allows you to select either Portrait or Landscape. Portrait will display the image orientation in the shape of a conventional portrait, where height is greater than width. Landscape will display the image orientation in the shape of a conventional landscape painting, where width is greater than height. Area: X the distance from the left end of the scanner to the left-edge of the scanning area. Y — the position from the top end of the document to the top end of the scanning area. Width — the width of the scanning area. Height — the height of the scanning area. Snap causes the dimensions of the Area box to be controlled in fixed 1/8-inch increments. This option is not available in Pixels mode. A-61512 May 2006 65 5 Maintenance Cleaning the scanner Your scanner needs to be cleaned periodically. If your documents do not feed easily, if several documents feed at the same time or if streaks appear on your images, it is time to clean your scanner. The section entitled, “Supplies and consumables” at the end of this chapter provides a listing of the supplies required to clean your scanner. IMPORTANT: Use only non-flammable cleaners such as those provided through Kodak Parts Services. Do not use household cleaners. Do not use cleaners in confined areas, use with adequate ventilation. Do not use cleaners on hot surfaces. Allow surfaces to cool to ambient temperature before use. • Open the scanner cover by pressing the release lever. 66 A-61512 May 2006 Cleaning the rollers 1. With a roller cleaning pad, wipe the feed roller from side to side. Rotate the feed rollers to clean the entire surface. IMPORTANT: The roller cleaning pad contains sodium lauryl ether sulfate which can cause eye irritation. Refer to the MSDS for more information. 2. Dry the rollers with a lint-free cloth. Cleaning the feed module • Wipe the feed module from top to bottom with a roller cleaning pad. A-61512 May 2006 67 Cleaning the calibration area 1. Remove dust and debris from this area by using a Staticide wipe or a small brush. Be careful not to scratch the glass when cleaning. IMPORTANT: Staticide wipes contain isopropanol which can cause eye irritation and dry skin. Wash your hands with soap and water after performing maintenance procedures. Refer to the MSDS for more information. 2. Wipe the upper and lower calibration area again with an almost-dry Staticide wipe to remove any streaks. 3. When finished, close the scanner cover. 68 A-61512 May 2006 Replacing the feed module Degradation of feeder performance, multiple feeds, stoppages, etc. indicate a need to change the feed module. Certain paper types such as carbonless paper or newsprint, or failure to clean regularly, and/or use of non-recommended cleaning solvents can shorten the feed module life. For additional feed modules, see the next section “Supplies and consumables”. 1. Open the scanner cover by pressing the release lever. 2. Squeeze the plastic clamps that hold the feed module in place and lift the feed module out of position. 3. Insert the new feed module into position, aligning the new module into the slots, and pushing it in until it snaps into place. 4. Close the scanner cover. A-61512 May 2006 69 Supplies and consumables Contact your scanner supplier to order supplies. Description CAT No. Kodak Feed Module / for i30/i40 Scanners 174 7849 Kodak Digital Science Roller Cleaning Pads 853 5981 Staticide Wipes for Kodak Scanners 896 5519 NOTE: Items and catalog numbers are subject to change. 70 A-61512 May 2006 6 Troubleshooting Occasionally you may encounter a situation with your scanner where it may not function properly. Refer to the information in this chapter to help you resolve the situation before calling Technical Support. Indicator lights and error codes The indicator lights provide information on the current state of the scanner. Flashing green: indicates the scanner is initializing from powering on or warming up from a power saving mode and preparing to scan. Steady green: indicates the scanner is ready to scan. Flashing red: indicates a scanner error, such as the scanner cover is open. Following is a listing of the error codes that may be displayed in the function window. When an error is indicated, the indicator light will blink the same number of times as the number displayed in the function window. Therefore, if the scanner cover is open, the number “6” will be displayed in the function window and the indicator will flash red and blink six times. Clearing a document jam 0 USB cable is not connected. 1 - 5, 7 and 8 Call Service. 6 The scanner cover is open. 9 There is a document jam. If your scanner stops scanning due to a document jam, follow the procedures below: 1. Open the scanner cover. 2. Remove any jammed documents from inside the scanner. 3. Close the cover. A-61512 May 2006 71 Problem solving Use the chart below as a guide to check possible solutions to problems you may encounter when using the Kodak i30/i40 Scanner. Problem Scanner will not scan/feed documents Possible Solution Make sure that: • the power cord is plugged securely into the back of scanner and the wall outlet. • the power supply, green LED is lit. • the power switch is on. • the wall outlet is not defective (call a licensed electrician). • the PC was restarted after installing the software. • document(s) is making contact with the feed rollers. • if you are feeding a small document, be sure that the document passes over the left-edge sensor. Image quality is poor or has decreased • Clean the scanner. See the procedures in Chapter 5, Maintenance. Documents are jamming or multiple documents are feeding Make sure that: • the input tray and side guides are adjusted for the width of the documents you are scanning. • the output tray is adjusted for the length of the documents you are scanning. • all documents meet the specifications for size, weight and type as outlined in the section entitled, “Document preparation”. • the scanner is clean. • the feed module is installed properly and securely in place. • if you are feeding a small document, be sure that the document passes over the left-edge sensor. Distorted images The feeder holds up to 50 documents in the input tray. While scanning is taking place, you cannot add documents to the feeder. If you do add documents, your images may be distorted. Scanning multiple pages in “Single Page mode” • When scanning multiple pages using Single Page mode, the scanner will pre-feed the next document and the last document scanned will stay in the transport until the next page is scanned. This is a normal scanner process. The document that remains in the transport can be safely pulled out if you want, however, it will automatically be completely fed through the transport and into the output tray when the next page or last page is scanned. No images are being displayed • Documents should only be inserted in the feeder after the scanner is powered up and ready. If you place documents in the input tray before the scanner is powered up, the documents will be feed, but no images will be displayed. • If you are scanning one side of a document, or if you have a Kodak i30 Scanner, be sure the side you want to scan is placed toward the feed tray (not facing you). For more information, see the section entitled, “Scanning your documents” in Chapter 3. Image has clipped corners If your images have clipped corners, the skew angle was too large for the scanner to handle. Be sure documents are placed in the input tray with the edges aligned and the side guides positioned correctly to accommodate the size documents you are feeding to avoid large skew angles. 72 A-61512 May 2006 First image in a batch appears “washed If the scanned documents in a batch have more than a 25 degree skew, the first image in the batch may appear washed out. Be sure that out” documents are placed in the input tray with the edges aligned and the side guides positioned correctly to accommodate the size documents you are feeding to avoid large skew angles. Image appears to be cut off If you are scanning a document with a reflective area (such as a hologram on a credit card), and this reflective area is fed “face up” and off-center such that it passes over the left-edge sensor, the sensor will be triggered as if it were the end of the page and will result in a cut-off image. • Rescan the document by feeding it face down. Images are not being cropped correctly • If auto or aggressive cropping is enabled, and your images are not being cropped correctly, clean the white background strips in the imaging area. See the procedures in Chapter 5, Maintenance “Cleaning the imaging area. Roller marks appear on the document after scanning Clean the rollers. See the procedures in Chapter 5, Maintenance. Images have black background bleedthrough When scanning translucent documents, black bleed-through may be displayed on the image. To minimize this, adjust the Contrast value or select Fixed Processing to improve the image. For more information on Contrast and Fixed Processing, see Chapter 4, Image Processing. A-61512 May 2006 73 Scanner not working If your scanner is not working, you may have to reinstall the drivers. To verify this: 1. Click on My Computer and select Properties. 2. Click on the Hardware tab and select Device Manager. 3. From the Device Manager screen, select Imaging devices. If the Kodak i30/i40 Scanner appears, with a ? before the name, you need to reinstall the driver software. 74 A-61512 May 2006 4. Double-click on the Kodak Scanner i40 (or i30). The Scanner Properties dialog box will be displayed. Select the Driver tab. 5. Click Update Driver. The Upgrade Device Driver Wizard will be displayed. 6. Click Next. A-61512 May 2006 75 7. Click Next. 8. Insert the Installation CD in the CD-ROM drive and locate the kdssti.in file. 9. Click Open and proceed with the prompts to install the driver. 76 A-61512 May 2006 Testing for a USB connection When the Kodak device drivers for the Kodak i30 and i40 Scanners are installed, a copy of the USB test software will also be installed. It will be located in this folder (by default) along with the Kodak Scan Validation Tool software: C:\program files\Kodak\Document Imaging\usbtst.exe If you run this executable (usbtst.exe), it will display a set of USB values and protocols. At this time, the software application will function in all operating systems, but will only be valid with Windows XP. If a shortcut of the executable is created, and the /test switch is added to the end of the “Target:” path (to the right of the quotes), then when it is launched from the shortcut it will run the dialog boxes as listed above and function accordingly with all the operating systems. To verify USB port speed with the scanner, run the Scan Validation Tool software, and select the Info tab. USBSCAN/x.x will be displayed in parentheses in the Driver: box. x.x is the speed the scanner is actually communicating. A-61512 May 2006 77 USB connection issues The USB verification tool will check your operating system and hardware capability to determine if you have a functioning USB 2.0 or if you need to install a USB card. Your operating system is correctly configured to support USB 2.0. If a functioning USB 2.0 port is present, this dialog box will be displayed. Your operating system supports USB 2.0, however, a USB 1.1 port was found. • If your PC does not have a USB 2.0 port installed, you should install a USB 2.0 Accessory card. • If a USB 2.0 port or card is installed and the USB test tool does not recognize the USB card as 2.0, try installing or updating the drivers for that card. Your operating system only supports USB 1.1 There are some host PC operating systems that will not support USB 2.0, but support USB 1.1 (e.g., Windows 98SE). The Kodak i30 and i40 Scanners are rated and designed to operate with USB 2.0, but will function in a USB 1.1 port, however, the scanner will only perform at a USB 1.1 speed. Solutions: • Update your operating system to one that supports USB 2.0, such as, Windows 2000 or Windows XP. • You may add a USB 2.0 card, however, the scanner will only perform at a USB 1.1 speed. 78 A-61512 May 2006 You do not need to install any additional USB card(s) The host PC operating system will only support USB 1.1 and will not support USB 2.0, but did find a USB port. The Kodak i30 and i40 Scanners are rated and designed to operate with USB 2.0, but will function in a USB 1.1 port, however, the scanner will only perform at a USB 1.1 speed. Solution: Update your operating system to one that supports USB 2.0. such as, Windows 2000 or Windows XP. You can also verify what the scanner port speed is running at by running the Scan Validation Tool application with the scanner. USB will not work This operating system will not support a USB port. It is recommended to upgrade the operating system to support USB, such as, Windows 2000 or Windows XP. A-61512 May 2006 79 Appendix A Specifications Scanner Type/Speed • i30 Scanner: simplex color scanner with an automatic document feeder, 25 pages per minute (landscape) • i40 Scanner: duplex color scanner with an automatic document feeder, 25 pages per minute (landscape) Scanning Technology CCD type Grayscale output bit depth is: 16 Color capture bit depth is: 16 Color output bit depth is: 8 Output Resolutions 75, 100, 150, 200, 240, 300, 400 and 600 dpi File Format Output BMP, TIFF, JPEG, PDF (with bundled software) Scan Area Scans up to 21.6 x 86 cm / 8.5 x 34 inches using the automatic document feeder when the host PC is configured with adequate memory. See the section entitled, “System requirements” for more information. ADF Capacity 50 sheets Recommended Daily Volume 1,000 Illumination Fluorescent Electrical requirements 100 - 240 V (international), 50/60 Hz Scanner Dimensions Height: 16.23 cm / 6.4 in. (not including input tray) Width: 33.72 cm / 13.3 in. (not including input and output trays) Depth: 16.78 cm / 6.6 in. Scanner Weight i30: 3.6 kg / 8 lbs. i40: 4.1 kg / 9 lbs. Host Connection USB 2.0 Operating Temperature 10°C to 35°C Humidity 10 to 85% Environmental Factors Energy Star qualified scanners Power Consumption i30 Standby: <20 watts i30 Running: <30 watts i40 Standby: <25 watts i40 Running: <40 watts Acoustic Noise (Sound Power level) Operating: less than 58 dB Standby: less than 46 dB Bundled software Kodak Capture Software, Lite Readiris Pro 9 Corporate Edition Kofax Capio (in United States only) 80 A-61512 May 2006 EASTMAN KODAK COMPANY Document Imaging Rochester, New York 14650 www.kodak.com/go/docimaging Kodak is a trademark of Eastman Kodak Company. A-61512 5/2006 © Eastman Kodak Company, 2006