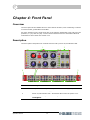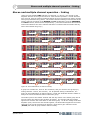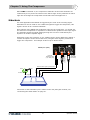
1
DN540
Creative Quad Compressor
Operator Manual
Klark Teknik,
Klark Industrial Park,
Walter Nash Road,
Kidderminster.
Worcestershire.
DY11 7HJ.
England.
Tel: +44 1562 741515
Fax: +44 1562 745371
Email: [email protected]
Website: www.klarkteknik.com
DN540 Creative Quad Compressor — Operator Manual
DOC02-DN540 Issue B — February 2011
© Red Chip Company Ltd.
In line with the company’s policy of continual improvement, specifications and function may be
subject to change without notice. This Operator Manual was correct at the time of writing. E&OE.
IMPORTANT SAFETY INSTRUCTIONS
The lightning flash with arrowhead symbol within an equilateral triangle is
intended to alert the user to the presence of uninsulated “dangerous voltage”
within the product's enclosure that may be of sufficient magnitude to constitute a
risk of electric shock to persons.
The exclamation point within an equilateral triangle is intended to alert the user
to the presence of important operating and maintenance (servicing) instructions
in the literature accompanying the product.
1
Read these instructions.
2
Keep these instructions.
3
Heed all warnings.
4
Follow all instructions.
5
Do not use this apparatus near water.
6
Clean only with a dry cloth.
7
Do not block any of the ventilation
openings. Install in accordance with the
manufacturer’s instructions.
8
Do not install near any heat sources such
as radiators, heat registers, stoves, or
other apparatus (including amplifiers) that
produce heat.
9
Do not defeat the safety purpose of the
polarized or grounding-type plug. A
polarized plug has two blades with one
wider than the other. A grounding type
plug has two blades and a third grounding
prong. The wide blade or the third prong
are provided for your safety. If the
provided plug does not fit into your outlet,
consult an electrician for replacement of
the obsolete outlet.
10 Protect the power cord from being walked
on or pinched particularly at plugs,
convenience receptacles and the point
where they exit from the apparatus.
11 Only use attachments/accessories
specified by the manufacturer.
12 Unplug this apparatus during lightning
storms or when unused for long periods of
time.
13 Refer all servicing to qualified personnel.
Servicing is required when the apparatus
has been damaged in any way, such as
power-supply cord or plug is damaged,
liquid has been spilled or objects have
fallen into the apparatus, the apparatus
has been exposed to rain or moisture,
does not operate normally, or has been
dropped.
14 Use the mains plug to disconnect the
apparatus from the mains.
15 Warning: To reduce the risk of fire or
electric shock, do not expose this
apparatus to rain or moisture.
16 Warning: Do not expose this
equipment to dripping or splashing
and ensure that no objects filled with
liquids, such as vases, are placed on
the equipment.
17 Warning: The mains plug of the power
supply cord shall remain readily
operable.
INSTRUCTIONS DE SÉCURITÉ IMPORTANTES
Le symbole représentant un éclair fléché dans un triangle équilatéral a pour but
d'alerter l'utilisateur de la présence d'une "tension dangereuse" non isolée à
l'intérieur du boîtier, pouvant être d'une force suffisante pour constituer un risque
d'électrocution.
Le point d'exclamation dans un triangle équilatéral a pour but d'alerter
l'utilisateur de la présence d'instructions importantes concernant le
fonctionnement et la maintenance, dans la documentation qui accompagne
l'appareil.
1
Veuillez lire ces instructions.
2
Conservez ces instructions.
3
Respectez toutes les consignes de
sécurité.
4
Suivez scrupuleusement toutes les
instructions.
5
N'utilisez pas cet appareil près d'un point
d'eau.
6
Utilisez uniquement un chiffon sec pour le
nettoyer.
7
N'obstruez aucune des ouïes de
ventilation. Installez-le en respectant les
instructions du fabricant.
8
Ne l'installez pas près de sources de
chaleur tels que radiateurs, panneaux
chauffants, étuves, ou autres appareils
produisant de la chaleur (dont les
amplificateurs).
9
Ne pas utiliser d'adaptateur pour
supprimer la prise de terre des prises à
trois fiches. Si la prise fournie ne peut pas
être branchée dans la prise électrique,
adressez-vous à un électricen qui
remplacera la prise obsolète.
10 Protégez le cordon secteur afin que l'on ne
marche pas dessus et qu'il ne soit pas
pincé, surtout au niveau des prises, ou à
l'endroit où il sort de l'appareil.
11 Utilisez exclusivement des fixations et des
accessoires recommandés par le fabricant.
12 Débranchez l'appareil en période d'orage
ou s'il doit rester inutilisé pendant
longtemps.
13 Confiez toutes les réparations et
interventions à un personnel qualifié. Une
intervention est nécessaire si l'appareil a
été endommagé d'une façon ou d'une
autre, si son cordon ou sa prise secteur
ont été endommagés, si du liquide a été
renversé ou si des objets sont tombés à
l'intérieur, ou encore si l'appareil a été
exposé à la pluie ou à l'humidité, s'il ne
fonctionne pas normalement, ou s'il est
tombé.
14 Débrancher l'appareil du réseau électrique
par la prise de secteur.
15 Avertissement : afin de réduire le
risque d'incendie ou de choc
électrique, ne pas exposer cet
appareil à la pluie ou à de l'humidité.
16 Avertissement : n'exposez pas cet
équipement aux éclaboussures et
veillez à ce qu'aucun récipient rempli
de liquide, verre ou vase, ne soit posé
dessus.
17 Avertissement : la prise secteur doit
toujours rester directement
accessible.
EC-Declaration of Conformity
Klark Teknik
EC-Declaration of Conformity
The undersigned, representing the following manufacturer
Manufacturer:
Address:
Midas Klark Teknik Ltd.
Klark Industrial Park, Walter Nash Road,
Kidderminster. Worcestershire. DY11 7HJ.
hereby declares that the following product
Product Type Number
Product Description
Nominal Voltage(s)
Current
Freq.
DN540
Creative Quad Compressor
115V AC
230V AC
200mA
100mA
50/60Hz
is in conformity with the regulations of the following marked EC-directives and bears the
-mark accordingly
reference number
title
2004/108/EC
EMC Directive (EMC)
2006/95/EC
Low-Voltage Directive (LVD)
The conformity of the product with EC directives for use in environments E1, E2, E3 and E4 is provided by
the compliance with the following standards:
Standards/date:
reference number
EN 60065:2002
title
Audio, video and similar electronic apparatus. Safety requirements.
Applied EMC immunity test standards:
Applied EMC emission test standards:
w
ref. no.
EN 55103-1:1996
Class B
title
ref. no.
EN 55103-1 Annex A: Radiated
magnetic disturbance, 50Hz-50kHz
EN 55103:1996
Class B
title
EN 61000-4-2:1995 Electrostatic
discharge
CISPR 22: Radiated disturbance,
30-1000MHz
EN 61000-4-3:1996: Radiated RF
disturbance, 80-1000MHz
EN 55103-1 Annex E: Conducted
disturbance, ac & signal ports
EN 55103-2 Annex A: Magnetic LF
disturbance, 50Hz-10kHz
EN 61000-3-2:2006 Mains
harmonics
EN 61000-4-4:1995: Fast transient
bursts, ac & signal ports
EN 61000-3-3:1995 Mains voltage
flicker
EN 61000-4-5:1995: Surge, ac port
EN 61000-4-6:1996: Conducted RF
field, ac & signal ports
EN 61000-4-11:1994: Mains voltage
dips and interruptions
Place, date: Kidderminster, UK
9th February 2011
SVP, Midas Klark Teknik
Printed name: John Oakley
DOC04-DN540ECDOC Rev. C
AVP, Product Development
Printed name: Alex Cooper
Precautions
Before installing, setting up or operating this equipment please ensure that you have read
and fully understand all of this section and the “IMPORTANT SAFETY INSTRUCTIONS” at
the front of this manual.
This equipment is supplied by a mains voltage that can cause electric shock injury!
The following special limitations must be observed in order to maintain safety and electromagnetic
compatibility performance.
Safety warnings
testing and servicing must ONLY be carried out
by approved service engineers.
This equipment is fitted with a mains
power socket. For safety reasons the
earth leads must not be disconnected.
This apparatus should only be operated with
the power supply connected to ground via the
ground in the mains connector.
Signal 0V is connected internally to the
chassis.
The internal power supplies are of the switch
mode type that automatically sense the
incoming mains voltage and will work where
the nominal voltage is in the range 100VAC to
240VAC.
To completely disconnect this equipment
from the AC mains, while observing full
safety precautions (see “Power” on
page vii), switch off the mains at the
mains outlet. It is now safe to isolate the
unit by unplugging the mains lead from
its rear panel.
When removing the equipment’s electric plugs
from the outlets, always hold the plug itself
and not the cable. Pulling out the plug by the
cable can damage it.
To avoid electrical shock do not remove
covers. Refer servicing to qualified
personnel only.
Never insert or remove an electric plug with
wet hands.
The power supplies — even the DC ones —
have a high current!
Handling the equipment
Completely isolate the equipment electrically
and disconnect all cables from the equipment
before moving it.
General precautions
The following information gives basic safety
precautions that should be observed to reduce
the risk of fire, electric shock and personal
injury:
•
•
When lifting or moving the equipment, always
take its size and weight into consideration.
Do not insert your fingers or hand in any gaps
or openings on the equipment, for example,
vents.
Never operate damaged equipment and
never operate equipment with damaged
cables.
Avoid inserting or dropping foreign objects,
such as paper, plastic, metal etc., into any
gaps or openings on the equipment, for
example, vents. If this happens, immediately
disconnect the equipment from the mains (see
“Safety warnings” on page vii). Then, have
the equipment inspected by the
manufacturer's qualified service personnel.
Do not remove, obscure or deface any
warnings or cautions.
Power
Please note that the system power supplies
contain LETHAL VOLTAGES greatly in excess of
the mains voltage and that its rails can
produce extremely large currents that could
burn out equipment and wiring if shorted. All
DN540
Operator Manual
vii
Precautions
Installation
Radio frequency
interference - Class B
device
Before installing the equipment:
•
Power plugs must be inserted in socket
outlets provided with protective earth
contacts. The electrical supply at the
socket outlets must provide appropriate
over-current protection.
•
Both the mains supply and the quality of
earthing must be adequate for the
equipment.
•
Before connecting up the equipment, check
that the mains power supply voltage rating
corresponds with the local mains power
supply. The rating of the mains power
supply voltage is printed on the equipment.
This equipment has been tested and found to
comply with the limits for a Class B digital
device, pursuant to part 15 of the FCC Rules.
These limits are designed to provide
reasonable protection against harmful
interference in a residential installation. This
equipment generates, uses, and can radiate
radio frequency energy and, if not installed
and used in accordance with the instructions,
may cause harmful interference to radio
communications. However, there is no
guarantee that interference will not occur in a
particular installation. If this equipment does
cause harmful interference to radio or
television reception, which can be determined
by turning the equipment off and on, the user
is encouraged to try to correct the interference
by one or more of the following measures:
Location
•
Ideally a cool area is preferred, away from
power distribution equipment or other
potential sources of interference.
•
Reorient or relocate the receiving antenna.
•
Do not install the equipment in places of
poor ventilation.
•
Increase the separation between the
equipment and receiver.
•
Do not install this equipment in a location
subjected to excessive heat, dust or
mechanical vibration. Allow for adequate
ventilation around the equipment, making
sure that its vents are not obstructed. To
prevent excessive heating of the
equipment, avoid mounting it directly
above power amplifiers or other devices
that radiate significant amounts of heat,
such as radiators and heaters. Keep the
equipment out of direct sunlight.
•
Connect the equipment into an outlet on a
circuit different from that to which the
receiver is connected.
•
Consult the dealer or an experienced radio
TV technician for help.
•
Electric fields
Caution:
In accordance with Part 15 of the FCC
Rules & Regulations, “… changes or
modifications not expressly approved by
the party responsible for compliance
could void the user's authority to operate
the equipment.”
Make sure that the mains voltage and fuse
rating information of the equipment will be
visible after installation.
Audio connections
Should this product be used in an
electromagnetic field that is amplitude
modulated by an audio frequency signal (20Hz
to 20kHz), the signal to noise ratio may be
degraded. Degradation of up to 60dB at a
frequency corresponding to the modulation
signal may be experienced under extreme
conditions (3V/m, 90% modulation).
To ensure the correct and reliable operation of
the equipment, only high quality balanced,
screened, twisted pair audio cable should be
used.
XLR connector shells should be of metal
construction so that they provide a screen
when connected to a console and, where
appropriate, they should have Pin 1 connected
to the cable screen.
Operation
In the event of ground loop problems,
disconnect the signal screen at one end of the
connecting cables. Note that this can only be
done when the equipment is used within a
balanced system.
To avoid electrical shock, never operate the
equipment with the covers removed.
viii
DN540
Operator Manual
Precautions
Safety equipment
Special accessories
Never remove, for example, covers, housings
or any other safety guards. Do not operate
the equipment or any of its parts if safety
guards are ineffective or their effectiveness
has been reduced.
To comply with part 15 of the FCC Rules, any
special accessories (that is, items that cannot
be readily obtained from multiple retail
outlets) supplied with this equipment must be
used with this equipment; do not use any
alternatives, as they may not fulfil the RF
requirement.
Optional equipment
Unless advised otherwise, optional equipment
must only be installed by service personnel
and in accordance with the appropriate
assembly and usage regulations.
DN540
Operator Manual
ix
Precautions
x
DN540
Operator Manual
Contents
Chapter 1
Introduction . . . . . . . . . . . . . . . . . . . . . . . . . . . . . . . . . 1
Overview . . . . . . .
Applications . . . . .
Features . . . . . . .
About this manual
Chapter 2
.
.
.
.
.
.
.
.
.
.
.
.
.
.
.
.
.
.
.
.
.
.
.
.
.
.
.
.
.
.
.
.
.
.
.
.
.
.
.
.
.
.
.
.
.
.
.
.
.
.
.
.
.
.
.
.
.
.
.
.
.
.
.
.
.
.
.
.
.
.
.
.
.
.
.
.
.
.
.
.
.
.
.
.
.
.
.
.
.
.
.
.
.
.
.
.
.
.
.
.
.
.
.
.
.
.
.
.
.
.
.
.
.
.
.
.
.
.
.
.
.
.
.
.
.
.
.
.
.
.
.
.
.
.
.
.
.
.
.
.
.
.
.
.
.
.
.
.
.1
.2
.3
.3
What Is A Compressor? . . . . . . . . . . . . . . . . . . . . . . . . 5
Principles of compression . . . . . . . . . . . . . . . . . . . . . . . . . . . . . . . . . 5
Uses of compression . . . . . . . . . . . . . . . . . . . . . . . . . . . . . . . . . . . . . 6
Unwanted side effects . . . . . . . . . . . . . . . . . . . . . . . . . . . . . . . . . . . . 6
Chapter 3
Getting Started. . . . . . . . . . . . . . . . . . . . . . . . . . . . . . . 9
Unpacking . . . . . . . . . . . . . . . . . . . . .
Checking the mains fuse . . . . . . . . . . .
Installation . . . . . . . . . . . . . . . . . . . .
Connecting the power cable . . . . . . . . .
Connecting the audio cables . . . . . . . .
Channel I/O pin-outs . . . . . . . . . . .
Sidechain inputs . . . . . . . . . . . . . .
Connecting to unbalanced equipment
Powering the unit . . . . . . . . . . . . . . . .
Chapter 4
.
.
.
.
.
.
.
.
.
.
.
.
.
.
.
.
.
.
.
.
.
.
.
.
.
.
.
.
.
.
.
.
.
.
.
.
.
.
.
.
.
.
.
.
.
.
.
.
.
.
.
.
.
.
.
.
.
.
.
.
.
.
.
.
.
.
.
.
.
.
.
.
.
.
.
.
.
.
.
.
.
.
.
.
.
.
.
.
.
.
.
.
.
.
.
.
.
.
.
.
.
.
.
.
.
.
.
.
.
.
.
.
.
.
.
.
.
.
.
.
.
.
.
.
.
.
.
.
.
.
.
.
.
.
.
.
.
.
.
.
.
.
.
.
.
.
.
.
.
.
.
.
.
.
.
.
.
.
.
.
.
.
.
.
.
.
.
.
.
.
.
.
.
.
.
.
.
.
.
.
. .9
. .9
. .9
. 10
. 10
. 10
. 11
. 12
. 12
Front Panel. . . . . . . . . . . . . . . . . . . . . . . . . . . . . . . . . 13
Overview . . . . . . . .
Description . . . . . .
Compressor section
Switch section . . . .
Chapter 5
.
.
.
.
.
.
.
.
.
.
.
.
.
.
.
.
.
.
.
.
.
.
.
.
.
.
.
.
.
.
.
.
.
.
.
.
.
.
.
.
.
.
.
.
.
.
.
.
.
.
.
.
.
.
.
.
.
.
.
.
.
.
.
.
.
.
.
.
.
.
.
.
.
.
.
.
.
.
.
.
.
.
.
.
.
.
.
.
.
.
.
.
.
.
.
.
.
.
.
.
.
.
.
.
.
.
.
.
.
.
.
.
.
.
.
.
.
.
.
.
.
.
.
.
.
.
.
.
.
.
.
.
.
.
.
.
.
.
.
.
.
.
.
.
.
.
.
.
.
. 13
. 13
. 14
. 15
Rear Panel . . . . . . . . . . . . . . . . . . . . . . . . . . . . . . . . . 17
Mains input . . . . . . . . . . . . . . . . . . . . . . . . . . . . . . . . . . . . . . . . . . 17
Channel connector section . . . . . . . . . . . . . . . . . . . . . . . . . . . . . . . . 17
Chapter 6
Compressor Control Functions . . . . . . . . . . . . . . . . . . 19
Attack . . . . . . . . . . . . .
Make up gain . . . . . . . .
Release . . . . . . . . . . . .
Ratio . . . . . . . . . . . . . .
Threshold . . . . . . . . . .
Presence . . . . . . . . . . .
Soft knee and hard knee
Chapter 7
.
.
.
.
.
.
.
.
.
.
.
.
.
.
.
.
.
.
.
.
.
.
.
.
.
.
.
.
.
.
.
.
.
.
.
.
.
.
.
.
.
.
.
.
.
.
.
.
.
.
.
.
.
.
.
.
.
.
.
.
.
.
.
.
.
.
.
.
.
.
.
.
.
.
.
.
.
.
.
.
.
.
.
.
.
.
.
.
.
.
.
.
.
.
.
.
.
.
.
.
.
.
.
.
.
.
.
.
.
.
.
.
.
.
.
.
.
.
.
.
.
.
.
.
.
.
.
.
.
.
.
.
.
.
.
.
.
.
.
.
.
.
.
.
.
.
.
.
.
.
.
.
.
.
.
.
.
.
.
.
.
.
.
.
.
.
.
.
.
.
.
.
.
.
.
.
.
.
.
.
.
.
.
.
.
.
.
.
.
.
.
.
.
.
.
.
.
.
.
.
.
.
.
.
.
.
.
.
.
.
.
.
.
.
.
.
.
.
.
.
.
.
.
.
. 19
. 19
. 19
. 20
. 21
. 21
. 22
Using The Compressor . . . . . . . . . . . . . . . . . . . . . . . . 23
Modes of operation . . . . . . . . . . . . . . . . . . . . . . . . . . . . . . . . . . . . . 23
Manual mode with soft knee (linear peak) . . . . . . . . . . . . . . . . . . . 23
Manual mode with hard knee (linear peak) . . . . . . . . . . . . . . . . . . 24
DN540
Operator Manual
xi
Contents
Auto mode with hard knee (exponential RMS) . . . .
Auto mode with soft knee (exponential RMS) . . . . .
Limiter . . . . . . . . . . . . . . . . . . . . . . . . . . . . . . .
Simple compression (auto mode) . . . . . . . . . . . . . . .
Advanced compression (manual mode) . . . . . . . . . . .
Stereo and multiple channel operation - linking . . . . .
Sidechain . . . . . . . . . . . . . . . . . . . . . . . . . . . . . . . .
Appendix A
....
....
....
....
....
....
....
.
.
.
.
.
.
.
.
.
.
.
.
.
.
.
.
.
.
.
.
.
.
.
.
.
.
.
.
.
.
.
.
.
.
.
.
.
.
.
.
.
.
.
.
.
.
.
.
.
.24
.24
.24
.26
.26
.27
.28
Application Notes . . . . . . . . . . . . . . . . . . . . . . . . . . . 29
Drums and percussive instruments
Stringed acoustic instruments . . . .
Stringed electric instruments . . . .
Brass instruments . . . . . . . . . . . .
Vocals . . . . . . . . . . . . . . . . . . . .
Presence accentuation . . . . . . . . .
.
.
.
.
.
.
.
.
.
.
.
.
.
.
.
.
.
.
.
.
.
.
.
.
.
.
.
.
.
.
.
.
.
.
.
.
.
.
.
.
.
.
.
.
.
.
.
.
.
.
.
.
.
.
.
.
.
.
.
.
.
.
.
.
.
.
.
.
.
.
.
.
.
.
.
.
.
.
.
.
.
.
.
.
.
.
.
.
.
.
.
.
.
.
.
.
.
.
.
.
.
.
.
.
.
.
.
.
.
.
.
.
.
.
.
.
.
.
.
.
.
.
.
.
.
.
.
.
.
.
.
.
.
.
.
.
.
.
.
.
.
.
.
.
.
.
.
.
.
.
.29
.29
.29
.29
.29
.29
Appendix B
Functional Block Diagram . . . . . . . . . . . . . . . . . . . . . 31
Appendix C
Balanced/Unbalanced Audio . . . . . . . . . . . . . . . . . . . 33
Appendix D
Technical Specification . . . . . . . . . . . . . . . . . . . . . . . 35
Appendix E
Crib Sheet . . . . . . . . . . . . . . . . . . . . . . . . . . . . . . . . . 37
Appendix F
Service Information . . . . . . . . . . . . . . . . . . . . . . . . . 39
Routine maintenance . . .
Cleaning . . . . . . . . . . . .
Replacing the mains fuse
Equipment disposal . . . .
xii
.
.
.
.
.
.
.
.
.
.
.
.
.
.
.
.
.
.
.
.
.
.
.
.
.
.
.
.
.
.
.
.
.
.
.
.
.
.
.
.
.
.
.
.
.
.
.
.
.
.
.
.
.
.
.
.
.
.
.
.
.
.
.
.
.
.
.
.
.
.
.
.
.
.
.
.
.
.
.
.
.
.
.
.
.
.
.
.
.
.
.
.
.
.
.
.
.
.
.
.
.
.
.
.
.
.
.
.
.
.
.
.
.
.
.
.
.
.
.
.
.
.
.
.
.
.
.
.
.39
.39
.39
.40
DN540
Operator Manual
Chapter 1: Introduction
Thank you for purchasing a Klark Teknik DN540 Creative Quad Compressor. The
DN540 is a user-friendly, high-performance, four-channel (quad) analogue compressor
designed for live sound reinforcement primarily on tour, in theatres and at corporate
events, with applications in both front-of-house and monitoring situations. Other
possible areas for use include broadcasting, the recording studio and installation.
The DN540 provides a wide variety of easy-to-use controls for the precise manipulation
of compression parameters. These enable you to, for example, alter the character of an
instrument that is being processed or make sounds seemingly louder, but without
distortion. Other features include channel linking for stereo and multiple channel
operation, and a presence control for protecting vocals.
Your DN540 was conceived by Klark Teknik to offer audio professionals
high-performance audio equipment, designed to provide no-compromise sonic quality
with a feature set that offers all essential facilities and functions. It represents the very
best of British design and engineering combined with contemporary, efficient
manufacturing methods, and will give you many years of reliable service.
All this is backed up, of course, by the standard Klark Teknik three year warranty.
Please take the time to complete and return the registration card or fill in the Warranty
Registration Form online by visiting our website at www.klarkteknik.com and, to obtain
the best results with a minimum of effort, also read this operator manual.
Finally, enjoy your Klark Teknik DN540!
Overview
The DN540 consists of four linkable channels of compression that provide full control of
all essential audio-compression parameters. All this is housed in a compact 1U high
rack-mount unit.
Front panel
Rear panel
The main compressor controls consist of continuously adjustable threshold, ratio and
make up gain, and a bypass switch and a hard knee switch. Used in auto mode, these
controls are all that are required to set up simple transparent RMS compression suited
to normal (not difficult) signals.
The envelope time constant controls (attack and release) are activated by disabling
auto mode and operating the DN540 in manual mode. The DN540 can then be used for
creative compression effects using a semi-linear attack shape.
DN540
Operator Manual
1
Chapter 1: Introduction
The presence control progressively reduces compression in the 5kHz region.
Attenuation depth and input level meters are provided, plus a switch that changes the
output level meter to monitor the input signals.
A external sidechain input on the rear panel is switchable via the front panel.
Applications
The DN540 provides a quality, cost effective and compact compressor unit presented in
a traditional 1U quad channel format. This makes it ideally suited to applications where
space is limited or when there is no need for eight channels.
The default compressor mode (manual) is ideal for creative compression, whereby the
manual envelope controls for attack and release can be adjusted as necessary. This
mode provides a semi-linear type of compression, which is suited to percussive
instruments (especially thickening drums) and difficult instruments, or for more
advanced effects where the added manual control gives vastly superior results, as
compared to auto mode.
The auto compressor mode (with the pushbutton AUTO on) provides a
root-mean-square (RMS) type of compression. This mode is easy to use because the
envelope time constants (attack and release) are automatically adjusted, taking into
account threshold and ratio settings relative to signal levels and transients. This makes
the DN540 ideal for the novice user or for situations where there is not enough time to
set up the envelope manually.
The presence control will be especially useful on vocals to eliminate pumping effects
caused by, for example, cymbal spill — because singers typically stand with their
microphones (mics) pointing directly at the drum riser — and to add air to the sound
without introducing noise.
The DN540 has been primarily designed for the following main application areas:
•
Touring live sound In applications where analogue consoles are still required due
to their ease of use. Here the DN540 can be used for channel inserts on drums, bass
guitars and other instruments. The compressor can be used to control both the
dynamic range and to generate musical effects. The presence control reduces
pumping on vocals and also increases brightness to a desired level without
increasing the risk of squealing if mics are held too close to monitor speakers.
•
Theatre live sound Theatres can make use of the compressor in the same way as
touring live sound, for vocals and orchestra, but in this case they can probably make
more use of the compressor’s more transparent linear style. The presence masking
is useful, increasing vocal brightness without bringing up the noise floor, which may
be quite poor due to the use of radio mics and mic placement limitations.
•
Corporate live event
channel inserts.
As above, transparent control and effects can be used on
2
DN540
Operator Manual
Features
Features
The DN540 has the following features:
•
Great sounding compressor that provides good audio performance at extremely low
noise and distortion levels.
•
Easy to use basic compressor, requiring minimum set up to produce excellent
results.
•
Advanced envelope generator with manual controls that can be easily switched in or
out to produce transparency or creative dynamic effects, as required, for any given
source material.
•
Extremely transparent compression.
•
Multiple compression styles that are easily matched to the programme material
and/or generate dynamic effects.
•
Unique and intuitive presence control that improves the high frequency sound
quality without increasing noise or squealing (howl-round).
•
Intuitive ‘turn it up, turn it down’ control knob labelling avoids confusion during fast
adjustment. Also, good control status visibility enables you to see the status of all
pushbuttons, which are boldly presented to avoid mistakes.
•
Comprehensive metering, making set up simple and intuitive.
•
Totally analogue, which precludes the use of complex set up menus and means that
there is absolutely no audio delay. Thus, compressed and non-compressed signals
can be recombined without producing comb filter effects.
•
Stereo and multiple channel linking. Linking has true power summing, so that it
always provides true threshold setting for stereo material. For example, for using
the compressor across a stereo group.
•
Housed in a compact 1U high unit.
•
Puts back dynamics and punch for creative effects.
About this manual
This is the operator manual for the DN540. It is intended to help get your DN540
installed and in operation as quickly as possible by giving you unpacking, installation,
connection and setting up instructions. To help familiarise you with the DN540 there is
a description of the front and rear panels, along with easy-to-follow user instructions.
DN540
Operator Manual
3
Chapter 1: Introduction
4
DN540
Operator Manual
Chapter 2: What Is A Compressor?
The natural sounds of everyday life, which can be caused by anything from, say, the
falling of a leaf to the roar of a jet engine, vary extremely widely in sound level. This
variance is known as the “dynamic range” and is the difference — expressed in
decibels (dB) — between the loudest and quietest sounds in a piece of audio, such as
music or speech, or that can be reproduced by a piece of audio equipment without
distortion.
The human ear has an automatic gain control that enables it to accommodate all of the
sounds ranging from the threshold of hearing to near the threshold of pain, a dynamic
range of approximately 120dB. However, a dynamic range of this magnitude, even if it
were possible in audio equipment, is not required in practice for comfortable listening.
A sound pressure level (SPL) of 96dB would, in a domestic environment, almost
certainly annoy the neighbours. While, at the other end of the dynamic scale, a typical
ambient noise level of at least 40dB SPL makes it impossible to use very quiet levels in
recorded or broadcast sound media. So, it is almost always necessary to compress the
dynamic range of natural sounds to fit them into a window (usually about 30dB to
40dB) suitable both for the equipment and for comfortable listening.
The compressor is a valuable tool for the control of the dynamic range.
Principles of compression
Signal level
Signal level
Signal level
One of the principal uses of compression is the control of level in vocals. Many singers
train for years to achieve the degree of breath control necessary for an even tone and
expressive performance. Whereas, other vocalists rely on an instinctive voice
production technique, which may need technological assistance to maintain a consistent
level that sits correctly in the programme.
Threshold level
Unprocessed signal
Time
3:1 Compression above threshold
Time
Threshold level
Threshold level
With make up gain added
Figure 1: Compression - signal level graphs
DN540
Operator Manual
5
Time
Chapter 2: What Is A Compressor?
The level of a vocal may vary widely. As shown in the typical example in Figure 1
“Compression - signal level graphs”, the unprocessed signal has a large dynamic range
between the highest and lowest levels. Applying compression reduces the highest
levels, thus reducing the dynamic range, while leaving the signal below threshold
relatively unaltered. Because the peak level of the signal is now lower, make up gain is
added to restore the original peak level. The result is a much more controlled and
usable sound.
Uses of compression
Compressors were originally devised to reduce the dynamic range of audio signals. To
do this they use a gain cell that makes adjustments to signal levels automatically,
dependent on the level and dynamic of the signal itself, and depending on the character
and control settings of the particular compressor unit.
Over the years many different brands of compressor have been produced using many
different types of gain cell technology, each with a distinctive sound. Users have found
applications that suit many of these, taking the use of compressors far beyond simple
dynamic range reduction and sometimes even generating the complete reverse —
dynamic enhancement. Typical applications include:
•
Protecting systems from amplitude overload.
•
Improving the power of signals when an artiste’s performance is inconsistent.
•
Maintaining a stable signal level to help an instrument sit better within a mix.
•
Changing the percussive timbre of an instrument to produce more punch.
•
Compressing a mix so that it maintains a stable signal level, typically trying to make
it sound louder.
•
Changing the percussive timbre of a mix to make it sound more whole and add
punch.
•
Frequency-conscious compression to remove unwanted sibilance or popping.
Unwanted side effects
Very often the process of compression produces unwanted side effects, especially if the
chosen compressor does not match the application it is being put to very well. These
can include:
•
Breathing — when high frequency environmental or processing noise levels jump
up and down, sounding similar to someone breathing in the background.
•
Pumping — when level modulation can be heard on an instrument, making it sound
unnatural.
•
Amplitude flutter — a faster oscillating modulation that makes sounds gritty.
•
Source inter-modulation — when one sound source within a mix causes amplitude
changes to another, for example, the natural decay of cymbals can be modulated by
the crack of a snare drum in a drum mix.
•
Transient enhancement — unwanted accentuation clicks at the start of a sound.
•
Dull sound — when all the natural attack and brilliance is stripped away from the
sound source.
6
DN540
Operator Manual
Unwanted side effects
Providing controls for threshold, attack, release and ratio, and providing responsive
metering can go along way towards helping with suitable parameter set up for any
signal source, such that most of the negative effects above can be reduced or
eliminated. However, this is a complex and critical task that often involves a degree of
compromise between the desired compression effects and the unwanted side effects,
which can be time consuming.
DN540
Operator Manual
7
Chapter 2: What Is A Compressor?
8
DN540
Operator Manual
Chapter 3: Getting Started
Observing the IMPORTANT SAFETY INSTRUCTIONS at the front of the manual and the
guidelines in "Precautions" on page vii, carry out the following to get your DN540 unit
fully operational.
Unpacking
Carefully unpack your DN540 equipment package.
Then, inspect the DN540 unit carefully for any signs of damage that may have occurred
during transit and notify the courier immediately if you discover any.
Check the contents of your DN540 equipment package. If there are any parts missing,
incorrect or faulty, please contact your local distributor or Klark Teknik at the address at
the front of this manual. The following is a list of the main items contained in the
DN540 package.
Quantity
Description
Part number
1
DN540 unit
Not applicable
1
DN540 Operator Manual (this document)
DOC02-DN540
1
Warranty card
DOC04-WARRANTY
1
Mains lead
PWR21-MAINSLEAD
Please retain the original packing in case you should need to return the equipment to
the manufacturer or supplier, or transport or ship the unit later.
Checking the mains fuse
Before installing the equipment you need to make sure that the mains fuse fitted is of
the correct type and rating for your unit. To do this refer to “Replacing the mains fuse”
on page 39.
Installation
This unit is designed for mounting in any 19” EIA standard rack. Four rack-mount holes
in the front panel are provided for rack mounting and are designed to fully support the
weight of the unit in the rack.
Note: Avoid over-tightening the rack-mount screws, as this could damage the front
panel.
The position of the unit will depend upon how it is to be used. However, when
positioning the unit, avoid placing it where the control knobs may be damaged by being
accidentally knocked or snapped off. Also, try to avoid placing the unit directly near or
on any power distribution units or power amplifiers.
DN540
Operator Manual
9
Chapter 3: Getting Started
Connecting the power cable
Making sure that the mains power at the power outlet is off, connect the mains cable
supplied with your DN540 to the mains power outlet and then to the mains socket at
the rear of your unit.
Connecting the audio cables
Making sure that all equipment is switched off, connect your DN540 to the rest of your
audio equipment as shown in the following subsections. For more information on
balancing, see “Balanced/unbalanced audio” on page 37.
Channel I/O pin-outs
The following shows the channel I/O pin-outs for the male and female XLR connectors,
on both balanced and unbalanced circuits.
Male XLR
chassis
connector
Female XLR
chassis
connector
Rear of DN540
1
1
3
3
2
2
Pin-out
Balanced I/O
Unbalanced I/O
1
Screen/ground
Screen/ground (not connected
at unbalanced end)
2
Hot signal
Hot signal
3
Cold signal
Ground at unbalanced end
10
DN540
Operator Manual
Connecting the audio cables
Sidechain inputs
The electronically balanced sidechain inputs are on stereo 1/4” TRS connectors.
Inserting a mono jack plug will automatically unbalance the input. The following
diagram shows the sidechain input connection details.
Sleeve
Ring
Tip
To external sidechain
socket
DN540
Female XLR
Tip
2
Ring
Sleeve
3
Console
1
Female XLR
The 1/4” TRS connector wiring details are as follows:
Sleeve: ground/shield
Tip: hot
Strain relief clamp
Ring: Cold
DN540
Operator Manual
11
Chapter 3: Getting Started
Connecting to unbalanced equipment
Ideally, you will be making the best use of the DN540’s low-noise high-headroom
balanced inputs by connecting to similarly balanced equipment. However, if you do
have to connect to unbalanced devices, the following wiring is recommended for best
results (see Figure 3):
•
Connect the +ve (pin 2) of the balanced connection to the +ve terminal on the
unbalanced connector.
•
Connect the -ve (pin 3) of the balanced connection to the common (ground) terminal
on the unbalanced connector.
•
Connect the ground (pin 1) of the balanced connection to the common (ground)
terminal on the unbalanced connector.
The following diagram shows the wiring details for the insert send/return 1/4” TRS
connector/XLRs.
DN540 (rear panel)
Sleeve
Ring
Single channel
connections on
rear of unit
Tip
To external sidechain
socket
Console
Female XLR
Male XLR
1
Tip
Ring
Sleeve
3
2
3
2
Female XLR
1
Male XLR
Powering the unit
To power up the unit, switch on the power at the mains power outlet. The blue power
LED on the front of the unit (far right) will illuminate to show that power is on.
Your unit is now ready to operate.
To switch off the DN540, switch off the mains at the mains power outlet. Then, to
electrically isolate the unit, remove the mains cable from the mains IEC socket on the
rear panel.
12
DN540
Operator Manual
Chapter 4: Front Panel
Overview
The front panel of the DN540 has four main channel sections, each containing a number
of control knobs, pushbuttons and LEDs.
All of the switches on the front panel are of the latching pushbutton type and have two
positions, in (on) and out (off). Each of these switches have an associated LED that
illuminates to show when the switch is on.
Description
The front panel comprises four channel sections and a power on/off indicator LED.
1
2
4
3
Channel 1
Channel 2
Channel 3
Channel 4
Item
Description
1
Compressor section (see “Compressor section” on page 14).
2
See “Switch section” on page 15.
3
Power on/off indicator LED. Illuminates blue when the power is on.
4
Four rack mounting holes for securing the unit in a rack. Do not
overtighten.
DN540
Operator Manual
13
Chapter 4: Front Panel
Compressor section
Each compressor section houses six compressor parameter control knobs, a bypass
switch and a hard knee switch, and two sets of six-LED meters (attenuation and level).
9
10
11
1
3
12
8
7
6
5
4
2
Item
Type
Label
Function
1
Control knob
ATTACK
Adjusts the time taken for the compressor to respond
after an over threshold signal. (Envelope time
constant.)
2
Control knob
GAIN
Provides adjustment of up to 18dB of make up gain,
so that the level of the outgoing signal can be
matched to the incoming uncompressed signal.
3
Control knob
RELEASE
Adjusts the time taken for the compressor to recover
after an over threshold signal. (Envelope time
constant.)
4
Control knob
PRESENCE
Reduces compression at the mid-high frequencies
(vocal range), while allowing the low and high
frequencies to be compressed normally.
5
Pushbutton
HARD
Switches the compressor to hard knee. When this
button is switched off, the knee type is soft knee.
6
LED
(orange)
Not applicable
On/off status indicator for the HARD knee
pushbutton.
7
Control knob
RATIO
Controls the amount of compression applied to over
threshold signals.
8
LED meter
ATTEN
Gain reduction meter. The compressor meter has
1dB, 2dB, 3dB, 6dB, 10dB and 20dB LEDs. No
additional time constants are applied to the meter, so
that the actual envelope speeds can be easily seen.
The gain reduction meter continues to function
normally when the DN540 is set in bypass. The
bypass indictors are illuminated boldly to signal this
fact to the user.
9
Control knob
THRESHOLD
Adjusts the operating point of the compressor.
10
Pushbutton
BYPASS
Removes the compressor/dynamic filter from the
signal path.
14
DN540
Operator Manual
Switch section
Item
Type
Label
Function
11
LED (red)
Not applicable
On/off status indicator for the BYPASS pushbutton.
12
LED meter
LEVEL
Signal level meter. The meter has +18dB, +12dB,
+6dB, 0dB, -6dB and -12dB LEDs for displaying the
output signal level (default). When the MTR I/P
pushbutton is on, the meter displays the input signal
level.
Switch section
The switch section has four switches for:
changing the compressor mode; switching the
signal level meter from output signal to input
signal; external sidechain; and channel linking.
8
1
7
2
6
3
5
4
Item
Type
Label
Function
1
LED (green)
Not applicable
On/off status indicator for the MTR I/P pushbutton.
2
Pushbutton
MTR I/P
Switches the LEVEL meter to monitor the output
signal (off) or the input signal (on).
3
LED (yellow)
Not applicable
On/off status indicator for the LINK pushbutton.
4
Pushbutton
LINK
Links the channel to the adjacent channel on the
right. (There is no LINK button on channel 4.)
5
Pushbutton
EXT
When this button is off, the sidechain signals are
sourced from the incoming compressor signal, as
normal. When this button is on, these signals are
sourced from elsewhere via the external sidechain
input connector (rear panel).
6
LED (yellow)
Not applicable
On/off status indicator for the EXT pushbutton.
7
Pushbutton
AUTO
Selects the compressor mode, where manual
mode = off (default) and auto mode = on. For more
information, see “Modes of operation” on page 23.
8
LED (green)
Not applicable
On/off status indicator for the AUTO pushbutton.
DN540
Operator Manual
15
Chapter 4: Front Panel
16
DN540
Operator Manual
Chapter 5: Rear Panel
The rear panel of the DN540 (shown below) has a mains input section and four channel
connector sections.
Mains input
Four channels
Note: Although the rear panel of the DN540 has cutouts for two solo bus connectors,
these are unused on this unit and are therefore blanked off.
Mains input
The mains input section has a mains
IEC socket, below which is a fuse
drawer. Printed just to the right are
the mains supply voltage and fuse
details.
The mains input is an auto voltage
sensing, switch mode power supply
that operates where normal mains
voltage is in the range 100V AC to
240V AC.
Mains IEC socket
Fuse drawer
The fuse drawer houses the mains fuse
at the rear of a two-compartment drawer. The front compartment provides room for a
spare. Always replace the mains fuse with one of the same type of and rating, as
printed to the right of the fuse drawer.
Channel connector section
There are four similar channel sections on the
rear of the DN540. Each section comprises a
male (output) and a female (input) XLR chassis
connector, and a 1/4” TRS connector. These are
for connecting to external line level signals, such
as a mixing console’s insert connections.
DN540
Operator Manual
17
Chapter 5: Rear Panel
18
DN540
Operator Manual
Chapter 6: Compressor Control
Functions
This chapter explains the control functions of the DN540 compressor.
Attack
Attack is the time it takes for the compressor to respond once the threshold has been
exceeded. Attack may be set so that the initial transient of the instrument passes
through unaltered, or set to a faster value so that the very start of the sound is
compressed. Particularly with drum sounds, careful adjustment of attack time can
make the sound more punchy and driving.
Make up gain
As compression reduces the gain (level) of the signal, the gain control lets you add a
fixed amount of make up gain, so as to achieve an optimum output signal level.
Release
Release is the time the compressor takes to recover after the programme material falls
back below threshold. Both attack and release also respond to changes in programme
level that remains over threshold. For example, a signal that reduces in level but
remains above threshold will still trigger a release. However, in this case it will only be
a partial release because the compressor is still required to generate gain reduction,
albeit for the new lower signal level.
Input signal
Signal level
Threshold
Output signal
Time
Fast release
Input signal
Signal level
Threshold
Output signal
Slow release
Figure 2: Compression fast and slow release signal envelope graphs
DN540
Operator Manual
19
Time
Chapter 6: Compressor Control Functions
Release time plays a very important role in compression. During periods of high signal
level, gain is reduced. When the signal level falls below the threshold, the gain will
increase at a rate determined by the RELEASE control knob. If the release time is
short, the gain will rise quickly. A long release time will mean that the gain will stay at
its reduced level, only recovering gradually, see Figure 2 “Compression fast and slow
release signal envelope graphs”.
The setting of the correct release time is a compromise. If it is too short, background
noise can cause effects such as breathing and pumping. A release time that is too long
results in a signal that is not compressed, but merely reduced in level. For effective
compression the release time must be set as short as possible before modulation of the
background noise becomes too noticeable. The ATTEN gain reduction meter will show
how much actual compression is occurring. If it is steady, there is little active
compression, just a steady-state reduction in level. The faster the meter level moves
up and down, the harder the compressor is working.
Ratio
Ratio is the strength of compression above the threshold level and controls the amount
of compression applied to signals that are over threshold. Ratio is expressed as a ratio
of signal level changes from input to output. For example, when the compressor is set
to 2:1, every 2dB input level change will only generate a 1dB output level change,
assuming the signal levels are over threshold. The highest ratios are achieved when
the ratio control is fully anti-clockwise.
Note: Although the RATIO control knob on the DN540 operates in the opposite way to
more conventional units, that is, the ratio is increased by turning it anti-clockwise
rather than clockwise, we feel this is better ergonomically. This is because turning the
control anti-clockwise results in less output, which matches the threshold and make up
gain.
-20
Output level (dB)
+10
-10
+10
+10
Input level (dB)
+20
-20
Output level (dB)
+20
+20
Input level (dB)
+10
+20
-10
-10
-10
-20
-20
12:1
2:1
Figure 3: Compression ratio graphs of 2:1 and 12:1
As can be seen from the graphs in Figure 3 “Compression ratio graphs of 2:1 and 12:1”,
the higher the ratio, the greater the effect.
At a compression ratio of up to 2:1, the effect is mild and suitable for the subtle
compression of vocals or of a complete mix. At 3:1, compression is becoming stronger
and more noticeable. Ratios between 3:1 and 5:1 are suitable for the compressor
sound, which is used as an effect in its own right. Higher ratios are used for the control
of extremely peaky signals.
20
DN540
Operator Manual
Threshold
Threshold
The compression threshold is the point at which the compressor begins to operate.
Signals that exceed this point, that is, go over threshold, will be affected by compressor
actions. However, signals below the threshold do not trigger any compression, but may
still be affected by compression releases from previous over threshold signals.
If the compressor is being used as a limiter, the threshold level is the level at which the
limiter begins to operate.
Presence
The presence function protects the mid-high frequencies during compression. It does
this progressively, so that the compressor appears to operate with two different ratios,
one for low frequencies (normal) and the other for mid-high frequencies (reduced
ratio). The primary effects of this are:
•
Heavy compression and dynamic control can be applied without the programme
sounding unnatural. Reduced compression in the presence band where the ear is
most sensitive (and where there is comparatively little acoustic energy) masks the
dynamic control that is applied to the high energy high and low frequency signals.
•
The compressed material sounds brighter. However, because no high frequency gain
is added when compression is not required, noise during quiet passages is reduced
and the tendency for high frequency howl-round (which can often be a problem if air
brightness is added by conventional EQ post compression) is also reduced.
•
Side effects of this approach are that the high frequency content of spill remains
more consistent, and pumping is therefore much less noticeable.
Some DN540 frequency response curves are shown in Figure 4, “Presence frequency
response curves,” on page 21, which help to illustrate the effect of the presence
function. The curves were produced with the compressor at -50dB attenuation, and
with the PRESENCE control knob set to MIN, MAX and an intermediate value. Note
how the MIN setting produces the flat line towards the bottom of the graph. At this
setting all audio frequencies are attenuated by the same amount as set by the
threshold, ratio and input signal level, which effectively defeats the presence feature
completely. As PRESENCE is turned clockwise the protective filter is activated. At the
MAX setting, which is -3dB at 5kHz, the frequencies around 5kHz are hardly reduced in
level at all, whereas the lower frequencies and very high frequencies are still
compressed significantly.
+10
+0
MAX
-10
dBu
-20
-30
-40
MIN
-50
-60
10
20
50
100
200
500
1k
Hz
Figure 4: Presence frequency response curves
DN540
Operator Manual
21
2k
5k
10k
20k
50k
100k
Chapter 6: Compressor Control Functions
Soft knee and hard knee
The point where the slope of the compressor curve changes is known as the “knee”.
The DN540 can be set to operate as either a soft knee or hard knee compressor; the
effects of both can be seen in Figure 5 “Soft knee and hard knee graphs”.
10:1
Threshold
Soft knee
1:1
Hard knee
Output signal
1:1
10:1
Output signal
Threshold
Increasing input signal level
Increasing input signal level
Figure 5: Soft knee and hard knee graphs
Soft knee compression gives a more gradual transition as the signal passes the
threshold (ratio changeover point). The ratio value of signals approaching threshold
increase exponentially in proportion to the input signal level. At threshold the ratio
level becomes that selected via the RATIO control knob. Soft knee is useful on
high-ratio compression or limiting, as it is less obtrusive than hard knee.
Most compression sounds more natural in soft knee mode and thus this is the default
setting. Soft knee compression blurs the distinction between over threshold and under
threshold signals, such that signals that are a long way below threshold remain
unaffected by compression and signals that near the threshold get compressed, but at
greatly reduced ratios. When signals are just over threshold the compressor ratios are
still somewhat reduced and it is only when signals go well over threshold that full ratio
compression is applied.
The soft knee character is produced after the envelope generation such that it also
modifies the envelope shapes and typically slows attacks on the programme when it is
in the knee area. This effect is similar to many vintage compressors (where they
exhibit soft knee characteristics due to non-linearities in the gain reduction element)
and provides a very natural sounding compression, generating more full bodied punch
and definition when attack times are deliberately set very slow.
In hard knee mode the compressor operates as soon as the input signal reaches
threshold level and is better suited to a limiting style of compression. This gives a more
defined transition between under threshold and over threshold, imposing the new ratio
— selected via the RATIO control knob — on the signal. This mode is useful as a brick
wall limiter, which stops transients without affecting the lower level signals. In this
mode a small amount of soft knee is still retained — to keep the sound reasonably
natural — but it does not modify or slow down the envelope, allowing fast acting
limiting if desired.
The difference in the effect produced by soft knee and hard knee compression is more
noticeable at higher ratios.
22
DN540
Operator Manual
Chapter 7: Using The Compressor
The DN540 is a dynamics processor that utilises premium quality, high precision
components to achieve a high degree of accuracy and control. The DN540 has been
designed primarily for creative use as front of house (FOH) or monitor. However, it is
just as effective when used in the studio while broadcasting or recording. The DN540
processors offer, in a compact unit, control over the dynamic range for creative and
corrective purposes.
Modes of operation
The compressor has the following two modes of operation, which are selectable via the
AUTO pushbutton.
•
Manual mode (AUTO off) Linear type of compression, where the attack and
release time constants can be adjusted manually (via the ATTACK and RELEASE
control knobs). This provides a more advanced style of compressor operation,
typically to produce creative effects.
•
Auto mode (AUTO on) RMS type of compression, where the attack and release
envelope time constants are adjusted automatically, taking into account threshold
and ratio settings relative to signal levels and transients.
Both of the compressor modes operate in either soft knee or hard knee.
Manual mode with soft knee (linear peak)
With the AUTO and HARD pushbuttons
switched off, the compressor is peak sensing
with manually adjustable attack and release
envelope characteristics. The soft knee affects
the attack shape, which noticeably slows the
onset of compression. This can be particularly
useful on drums to emphasise transients by
giving them more punch, while retaining a good
deal of artistic dynamic from the drummer.
The compressor normally sounds best on
applications that require slower attack time settings. If faster attacks are needed it is
normally best to switch on the hard knee.
DN540
Operator Manual
23
Chapter 7: Using The Compressor
Manual mode with hard knee (linear peak)
With the HARD pushbutton switched on, the
compressor is peak sensing with manually
adjustable linear attack and second order
release envelope characteristics. For limiter
applications, a high ratio combined with fast
attack times are best; set the release slow to
minimise distortion on low frequency
instruments. Lower ratios with slow attack and
relatively fast release provide transparent
compression with some dynamic control, which
does not unduly affect the intentional dynamic
content of the source material. This can be used with difficult instruments like acoustic
guitar to keep equal perceived loudness within a mix, without producing excessive
flutter or distortion.
Auto mode with hard knee (exponential RMS)
With both the AUTO and HARD pushbuttons
switched on, the compressor is RMS sensing
using exponential attack and release. The RMS
averaging process defines the attack and release
times to produce a very adaptive envelope
character. This provides faster attacks on large
(over threshold) signal changes and produces
slower attacks on small signal changes. The lack
of manual time constant settings makes this
mode very fast and simple to set up on most
programme material. It is also sonically
accurate and works well for limiting of vocals and compression of many other sources.
Auto mode with soft knee (exponential RMS)
With the AUTO pushbutton switched on, the
compressor is RMS sensing with an underlying
exponential attack and release characteristic
that is slightly modified by the soft knee
curvature. This produces extremely natural
results, even with higher compression ratios,
and is especially suited for vocals.
Limiter
A limiter is essentially an extreme form of compressor that only affects signals above a
selected threshold level (dB). This is particularly useful for limiting only peaks in the
signal, while leaving the rest of the signal alone. A limiter acts as a last check on signal
level. If the level goes over threshold, fast acting, high ratio compression is applied to
bring it back within bounds.
To set up the DN540 as a limiter, select the compressor to operate in manual and hard
knee mode (see “Manual mode with hard knee (linear peak)” on page 24) with attack
set to fastest (20ms) and the ratio set to infinity to one (4:1). Adjust release to suit
the programme and set threshold as required.
24
DN540
Operator Manual
Modes of operation
Unprocessed
signal
Signal level
Threshold level
Time
Limiting
Signal level
Threshold level
Time
Figure 6: Compression - limiting signal level graphs
If a compression effect is required together with limiting of high level transients, two
channels of the DN540 may be cascaded. The output of Channel 1 (compression) is fed
to the input of Channel 2 (limiting), which gives powerful two stage control over gain.
+10
Output level (dB)
+20
Compressor 2 threshold
Compressor 1 threshold
-20
-10
+10
Input level (dB)
+20
1:1
-10
-20
Figure 7: Limiting and compression graph
Below the compression threshold, the signal is unaltered. In the example shown in
Figure 7 “Limiting and compression graph”, the first threshold is compressed at a mild
2:1 ratio. Whereas, at the second threshold it is firmly limited at a ratio of 20:1.
DN540
Operator Manual
25
Chapter 7: Using The Compressor
Simple compression (auto mode)
For many every day compression jobs an RMS compressor with automatic time
constant set up (attack and release) is the best solution, providing quick and easy set
up. The RMS compressor slows the time constants on relatively steady state signals,
reducing distortion and pumping, and when large signal changes occur they
automatically speed up, capturing and constraining the bulk of any large sound level
variations.
Very often, combining the automatic time constant adjustment with ratio and threshold
is all you need to set up a good sounding compression. The DN540 auto compressor
operates in exactly this way, providing simple fast set up on straight forward
compression jobs.
Advanced compression (manual mode)
RMS compressors are not fast enough to capture everything on transient material
because the averaging process always adds some delay; thus they are not suitable for
ultimate protection against system overloads etc. Also, their creative use to tailor
percussive instruments is very threshold dependent and often results in attacks that are
either too fast or too slow for the desired effect (unless the sound source is extremely
regular, which is not typical with most musicians).
For more difficult compression duties a compressor with fully adjustable attack and
release is a better choice. With this style of compressor there is no averaging process
delay, so that the action of attack or release can start the instant there is a change in
signal amplitude that requires it. The user must define the rate of response and can
adjust this precisely to match the sonic effect required on the source material.
Normally, this also results in high distortion on constant signal levels because the
compressor attacks and releases on every cycle, but advanced compressors utilise
windowing methods whereby the time constants set are greatly increased on steady
state material. Another technique used is to automatically apply a little hold before any
release commences.
The above techniques are integral to the semi-linear attack and second order release
characteristics of the DN540 normal mode compressor.
Linear attack provides a constant rate of attack (in dB against time) such that large
changes in programme signal level take a little longer to compress than smaller ones.
However, on material with more constant signal levels the attack rate of the DN540
manual mode compressor automatically reduces. This appears as a curvature in the
linear attack rate characteristic as it nears completion, hence the term “semi-linear”.
This makes the compression very transparent providing some dynamic control, but
without unduly affecting the intentional dynamic content of the source material.
This type of compression can be used on difficult instruments, such as acoustic guitars,
with slower attack time settings and relatively fast release to keep an equal perceived
loudness within a mix without producing excessive amplitude flutter or distortion. It
can also be used with faster attack times to capture dynamic instruments like electric
bass guitar without adding excessive distortion on constantly compressed passages.
Adding soft knee noticeably delays the onset of attacks, which can be particularly useful
on drums where compression can be applied to emphasise transients giving more
punch while retaining a good deal of artistic dynamic from the drummer.
Thus, when suitably adjusted the manual compression mode is suitable for any task,
such as to capture fast transients in order to provide system protection, producing
subtle compression of dynamic range without changing timbre or removing intentional
accents made by the artiste or to deliberately thicken transient sounds.
26
DN540
Operator Manual
Stereo and multiple channel operation - linking
Stereo and multiple channel operation - linking
Using the intermediate LINK switches (in channels 1, 2 and 3), you can link to the
adjacent channel on the right for stereo or multi-channel operation. Linked channels
form a group, with the lowest numbered channel in the group being the master and the
other group members being slaves. The master channel’s settings override those of the
slaves, with the exception of the BYPASS and EXT pushbuttons, and the PRESENCE
and GAIN controls, which still act independently. (The external sidechain still functions
when linked because the slave channel sidechain is summed with the master and any
other slaves within the group.)
Master
Slave
Master
Slave
Master
Slave
Master
Slave
Slave
Master
Slave
Master
Slave
Master
Slave
Slave
Slave
Slave
Slave
Master
Figure 8: All combinations of channel linking
A group can contain two, three or four members, and you can have two groups (by
linking channels 1 and 2, and 3 and 4). For all possible linking combinations, see
Figure 8 “All combinations of channel linking”, which also illustrates that the master is
always the lowest numbered channel within the group.
The audio inputs to the master channel and also any slaves in the linked group are all
used to control the action of the dynamic processor. The channel with the highest
signal level will have the most effect on the linked group. As all the voltage controlled
amplifier (VCA) controls are also linked together, the attenuation applied to the linked
channels in the group will always be identical. Each slave’s gain reduction meter
(ATTEN) will track its group master channel exactly.
DN540
Operator Manual
27
Chapter 7: Using The Compressor
When LINK is switched on, the compressor sidechains of the linked channels are
combined by a true power law summer such that a single source panned from left to
right will not change the compression levels that have been applied to it.
Sidechain
For most applications the DN540 is triggered by the level of the incoming signal.
Sometimes it can be useful to use a different signal to trigger the compressor; this
signal is known as an “external sidechain”.
Each channel of the DN540 has a sidechain input for the compressor. In normal use,
the amount of compression or expansion is related to the dynamics of the input signal.
The sidechain allows the signal passing through the unit to be controlled by the
dynamics of another separate signal.
Particularly in the case of drums, a very reliable trigger can be obtained by taping a
contact microphone to the shell of the drum, using the clean signal it produces to
trigger the compressor. An example of this set up is shown below.
External
sidechain input
(1/4” TRS jack)
Input (female
XLR connector)
DN540 (rear panel)
Output
(male XLR
connector)
Channel insert point (contact mic)
Snare
Mic
Mic inputs
Return
Contact mic
(snare mic)
Send
Send
(snare mic)
Console
Connection to the sidechain input is made via the rear panel jack sockets, see
“Connecting the audio cables” on page 10.
28
DN540
Operator Manual
Appendix A: Application Notes
The compressor of the DN540 can perform various compression styles for different
applications.
Drums and percussive instruments
Drums require a slow attack time to thicken the sound. Try the compressor in manual
mode with high ratios, slow attack, medium release and soft knee.
Stringed acoustic instruments
Acoustic instruments benefit from subtle processing. Settings that are too aggressive
can sound unnatural. For best level control try using auto mode and soft knee, with
high ratio and the threshold set quite high. For more control of instrument timbre try
manual mode set to slow attack and medium release, with a low ratio and the threshold
set a little lower. Experiment with the presence accentuation.
Stringed electric instruments
Here the compression process can become an integral part of the instrument’s sound.
Try aggressive compression on electric bass and guitars. Use manual mode and hard
knee set up with fast attack and release on a medium to high ratio (around 3:1). To
accentuate the leading edge of sounds, slow the attack a little.
Brass instruments
Compression is useful for thickening thin sounding instruments and compensating for
less than perfect mic technique. Try auto mode and soft knee with high ratios (4:1).
Vocals
Try the compressor in auto mode with a ratio of around 2:1, or soft knee with 3:1 ratio.
Presence accentuation will allow the threshold to be brought much lower — or the ratio
raised — for increased compression, while retaining intelligibility.
Presence accentuation
Many instruments have a percussive start to notes that are played. These contain the
bulk of the signal harmonics that are recognisable and that we use to distinguish one
instrument from another. Without this initial attack most instruments sound quite
similar, and very dull! Unfortunately this is what tends to happen when they are
compressed, as compressors capture much of the percussive start and reduce it in level
more than they reduce the remainder of the sound. Although it is not as extreme as
totally removing the start of notes, it still strips much of the harmonic content and
removes presence from the sound.
This can be corrected by using equalisation to boost the upper frequencies. However,
this is dangerous in sound reinforcement because when the instrument is silent and the
DN540
Operator Manual
29
Application Notes
compressor relaxes there is no gain reduction — but the upper frequency boost
remains, increasing noise and making microphonic feedback much more likely.
The DN540’s presence accentuation corrects the tendency for dull sound during
compression, without changing the sound of uncompressed signals. It reduces the ratio
of the compressor in a relatively broad range of frequencies centred on 5kHz, and the
effect is continuously variable, so as much presence accentuation can be added as
needed or to suit taste.
When presence accentuation is applied, any compression acts on the high frequencies
to a lesser extent than the low frequencies, by an amount set by the user. The
transient at start of a sound is greatly reduced in the low frequency content, which is
where all the power that needs to be controlled lies, but the harmonic content is
preserved in a more natural and dynamic state.
The presence band has been specifically located in an area where we are most
perceptive to sounds, so that reducing compression ratios in this area allows much
greater compression to be applied at the other frequencies without sounding unnatural.
Presence accentuating compression can produce results that are very similar to
multi-band compression, but with only one additional control required (as opposed to
many) it is much more straightforward to set up and uses far less rack space.
Some additional corrective benefits from presence accentuation are:
•
Reduction of source inter-modulation It is very common for pop/rock singers
to stand in front of drum kits, and unless suitable screens are placed between them
there will be a lot of spill from the kit. Often you can hear the compressor on the
vocalist modulating the spill from cymbals, which sounds very unnatural. This can
be eliminated by using the presence accentuation to stabilise the higher frequencies,
and if that makes the vocals sound too bright the high frequencies can be reduced a
little using EQ, thus reducing the spill and reducing the chances of high frequency
howl-round.
•
Reduction of breathing Most processing noise occurs in the presence band and it
is much more noticeable when it is modulated by the compression of a sound source.
Similarly for the reduction of source inter-modulation, presence masking can
eliminate this effect.
•
Reduction of pumping Because human hearing is so sensitive to presence band
frequencies, stabilising their dynamic response with presence accentuation can mask
the pumping effects at lower frequencies.
•
Reduction of dull sound and increased brilliance It is often tempting to boost
high frequencies to get sounds to cut through a mix, but in sound reinforcement this
increases the likelihood of howl-round. Presence accentuation can help to increase
the brilliance of compressed sounds by correcting their tendency to sound dull, and
with increased use it can be used creatively to add even more high frequency energy
without increasing the risk of howl-round.
Thus, the presence accentuation feature of the DN540 adds another tool for the sound
engineer that can be used to enhance and compliment the application of many types of
compression.
30
DN540
Operator Manual
Appendix B: Functional Block Diagram
The following page contains the signal flow diagram for the DN540.
DN540
Operator Manual
31
32
EXTERNAL
SIDECHAIN 2
PUSH
IN 2
EXTERNAL
SIDECHAIN 1
PUSH
IN 1
_
+
_
+
_
+
_
+
Block Diagram
QUAD COMP
CREATIVE
RMS
Detector
RMS
Detector
DN540
EXT
EXT
20ms
Auto Attack/Release
2s
0.8
RELEASE
50ms
0.2
Envelope control
20ms
6ms
ATTACK
0.1ms
25
-50
THRESHOLD
1ms
0dB
-20
COMPRESSOR - CHANNEL 2
Auto Attack/Release
2s
0.8
RELEASE
50ms
0.2
Envelope control
ATTACK
0.1ms
25
-50
THRESHOLD
6ms
1ms
0dB
-20
COMPRESSOR - CHANNEL 1
Peak Cap
AUTO
Peak Cap
AUTO
Knee
HARD
MAX
PRESENCE
MIN
Knee
HARD
MAX
PRESENCE
MIN
:1
5:1
:1
5:1
RATIO
RATIO
1:1
2:1
1:1
2:1
From Comp. 3
From Comp. 3
LINK
1-2
VCA
VCA
MTR I/P
To Comp. 3
MTR I/P
ATTEN
20
10
To Comp. 3
LEVEL
-12
-6
0
6
3
6
18
_
+
12
2-3
18
1
LINK
0dB
LEVEL
-12
-6
2
ATTEN
20
10
0
6
6
3
_
+
18
BYPASS
BYPASS
12
12
18
1
GAIN
GAIN
12
2
6
0dB
6
OUT 2
OUT 1
Functional Block Diagram
DN540
Operator Manual
Appendix C: Balanced/Unbalanced
Audio
Balancing refers to the type of input or output signal connections in an audio system.
These connections are specifically designed to reject external noise, such as from mains
wiring and internal interference from adjacent signal cables. Unlike unbalanced lines,
which are more susceptible to noise, balancing is especially useful when long cable runs
are used between pieces of equipment and can also provide other benefits, including an
increase in line signal level and a decreased possibility of ground loops. Balanced
connections are typically employed on long cable runs, such as to amplifiers, or for
cables carrying sensitive or low level signals, for example, mics. A balanced line
typically employs connectors of the XLR and 1/4” TRS jack plug types.
The basic principle of balanced interconnection is the cancelling out of any electrical
noise by means of a three-cable connection to achieve the required signal. Two of the
cables, called “hot” and “cold”, are used to carry signals, and the third is a grounded
shield that surrounds the hot and cold cables. (An unbalanced connection only has two
cables, one of which, the grounded shield, is also used for signal return.) As the hot
and cold cables are of equal voltage (and the same source impedance), but of opposite
polarity, when they are subtracted any noise voltages — caused by interference and
noise pick-up — appearing identically on both cables is cancelled out; the difference
between them being the resultant signal.
However, in practice the electrical noise on both cables will never be identical, and the
degree to which it is reduced is measured by the common mode rejection ratio (CMRR).
The electronically balanced input and output connections of the DN540 have the benefit
of high common mode rejection (CMR), which eliminates externally induced
interference such as mains hum etc. CMR is the ability of a balanced input to reject the
part of the incoming signal that has the same amplitude and opposite phase on both
input terminals, referenced to ground. As a specification, CMR is usually stated as a dB
ratio, called CMRR, at a given frequency.
Note: On balanced circuits, the ‘hot’ signal is also known as “+ve” and “in phase”, while
the ‘cold’ signal is also known as “-ve” and “out of phase”.
DN540
Operator Manual
33
Balanced/Unbalanced Audio
34
DN540
Operator Manual
Appendix D: Technical Specification
This appendix contains the technical specifications specific to the DN540.
Inputs
Four
Type
Impedance
Maximum input level
Common mode rejection
Outputs
Four
Type
Signal drive capability
Output impedance
Maximum output level
External
sidechain
inputs
Four
Type
Impedance
Maximum input level
Common mode rejection
Performance
Maximum signal level any
input or output
Frequency response
Dynamic range
Noise at main output with
unity gain
Distortion at 1kHz 0dBu
with steady unity gain
condition
Signal delay
Compressor
Threshold
Ratio
Attack
Release
Presence
Analogue, electronically balanced
male XLRs (Pin 2 hot)
<600 ohms
<60 ohms
+22dBu
Analogue, electronically balanced
Jack sockets
20k ohms
+22dBu
Typically -60dB at 1kHz
+22dBu
±0.5dBu (input to output), 20Hz to
20kHz
>116dB (22Hz to 22kHz unweighted)
-94dBu
<0.05%
0 seconds
Scale = -50dB to +25dB
Scale = 4 (infinity):1 to 1:1
Scale = 0.1ms to 20ms
Scale = 50ms to 2s
Scale = minimum (flat) to maximum
(-3dB at 5kHz)
Scale = 0dB to +18dB
Gain
Terminations
Analogue, electronically balanced
female XLRs (Pin 2 hot)
10k ohms
+22dBu
Typically, -80dB at 1kHz
Power
3-pin XLRs (male and female) and
1/4” TRS balanced Jack sockets
3-pin IEC
Power
Requirements
Voltage
Frequency
Consumption
100VAC to 240VAC ±10%
50Hz to 60Hz
<25W
Dimensions
Height
Width
Depth
44.5 mm (1.75”), 1U high
483 mm (19”)
305 mm (12”)
DN540
Operator Manual
Audio
35
Technical Specification
Weight
Net
Shipping
4.6 kg
5.6 kg
Operation
Temperature
+5°C to +45°C
Storage
Temperature
-20°C to +60°C
Due to a policy of continual improvement, Klark Teknik reserves the right to alter the
function or specification at any time without notice.
36
DN540
Operator Manual
Appendix E: Crib Sheet
The following page contains a crib sheet, which you can photocopy (or print) if you want
more copies.
DN540
Operator Manual
37
38
QUAD COMP
CREATIVE
DN540
QUAD COMP
CREATIVE
DN540
QUAD COMP
CREATIVE
DN540
BYPASS
0.8
3
6
MAX
PRESENCE
MIN
0dB
GAIN
18
12
RELEASE
AUTO MTR I/P
0.2
0.8
AUTO MTR I/P
RATIO
HARD
MAX
PRESENCE
MIN
GAIN
18
EXT
LINK
ATTEN
20
10
6
3
:1
5:1
RATIO
1:1
2:1
25
HARD
MAX
PRESENCE
MIN
20ms
BYPASS 0.1ms
THRESHOLD
ATTACK
-50
GAIN
18
12
2s
RELEASE
0dB
6
50ms
AUTO MTR I/P
LINK
ATTEN
20
10
EXT
-6
-12
LEVEL
6
3
0
6
2
0.8
12
0.2
2
6ms
20
ATTEN
1
1ms
COMPRESSOR - CHANNEL 1
0dB
18
0dB
1:1
1
-20
:1
-12
LEVEL
ATTEN
20
3
6
12
RELEASE
6
10
6
2s
0
2:1
50ms
-6
5:1
25
20ms
BYPASS 0.1ms
THRESHOLD
ATTACK
-50
10
6
3
2
6ms
ATTEN
1
1ms
HARD
MAX
PRESENCE
MIN
GAIN
12
RELEASE
0
6
RATIO
:1
5:1
RATIO
18
1ms
6ms
HARD
MAX
PRESENCE
MIN
GAIN
18
-12
LEVEL
-6
0
6
12
HARD
BYPASS
MAX
PRESENCE
MIN
0dB
6
GAIN
-12
LEVEL
-6
0
6
12
18
Application:
18
12
2s
0.8
RELEASE
0.2
20ms 50ms
6ms
ATTACK
0.1ms
1ms
COMPRESSOR - CHANNEL 2
Location:
1:1
2:1
25
0dB
Application:
18
12
2s
0.8
RELEASE
0dB
6
50ms
0.2
COMPRESSOR - CHANNEL 2
Location:
1:1
2:1
25
0dB
Application:
THRESHOLD
-50
-20
:1
5:1
0dB
Location:
1:1
20ms
BYPASS 0.1ms
THRESHOLD
ATTACK
-50
-20
:1
-12
LEVEL
RATIO
6
20
LINK
ATTACK
12
18
-12
LEVEL
EXT
BYPASS
2s
0.8
-6
2:1
0.2
20ms 50ms
6ms
6
5:1
THRESHOLD
0.1ms
1ms
COMPRESSOR - CHANNEL 2
10
3
25
0dB
0
6
-50
-20
-6
COMPRESSOR - CHANNEL 1
HARD
6
2s
18
0dB
1:1
ATTACK
20ms 50ms
12
RATIO
2:1
0.1ms
2
-20
:1
5:1
THRESHOLD
25
1
ATTEN
20
10
-50
2
0.2
12
6ms
2
1ms
COMPRESSOR - CHANNEL 1
1
0dB
18
-20
1
LINK
LINK
EXT
LINK
AUTO MTR I/P
EXT
AUTO MTR I/P
EXT
AUTO MTR I/P
ATTEN
20
10
6
3
2
1
ATTEN
20
10
6
3
2
1
ATTEN
20
10
6
3
2
1
RATIO
RATIO
:1
5:1
RATIO
1:1
2:1
25
0dB
1:1
2:1
THRESHOLD
-50
-20
:1
5:1
25
0dB
1:1
2:1
MAX
PRESENCE
MIN
ATTACK
0dB
6
GAIN
18
12
2s
0.8
RELEASE
0.2
20ms 50ms
6ms
-12
LEVEL
-6
0
6
12
18
1ms
6ms
MAX
PRESENCE
MIN
0dB
GAIN
18
12
RELEASE
2s
0.8
18
-12
LEVEL
-6
0
6
12
HARD
BYPASS
MAX
PRESENCE
MIN
0dB
6
GAIN
18
12
2s
0.8
RELEASE
0.2
20ms 50ms
6ms
ATTACK
0.1ms
1ms
-12
LEVEL
-6
0
6
12
18
COMPRESSOR - CHANNEL 3
HARD
6
50ms
0.2
COMPRESSOR - CHANNEL 3
HARD
BYPASS
0.1ms
1ms
COMPRESSOR - CHANNEL 3
20ms
BYPASS 0.1ms
THRESHOLD
ATTACK
-50
-20
:1
5:1
25
0dB
THRESHOLD
-50
-20
LINK
LINK
EXT
LINK
AUTO MTR I/P
EXT
AUTO MTR I/P
EXT
AUTO MTR I/P
ATTEN
20
10
6
3
2
1
ATTEN
20
10
6
3
2
1
ATTEN
20
10
6
3
2
1
RATIO
RATIO
:1
5:1
RATIO
1:1
2:1
25
0dB
1:1
2:1
THRESHOLD
-50
-20
:1
5:1
25
0dB
1:1
2:1
MAX
PRESENCE
MIN
ATTACK
GAIN
18
12
18
-12
LEVEL
-6
0
6
12
Date:
0dB
6
2s
0.8
RELEASE
0.2
20ms 50ms
6ms
1ms
6ms
MAX
PRESENCE
MIN
GAIN
18
18
-12
LEVEL
-6
0
6
12
Date:
0dB
12
RELEASE
2s
0.8
HARD
BYPASS
MAX
PRESENCE
MIN
GAIN
18
12
18
-12
LEVEL
-6
0
6
12
Date:
0dB
6
2s
0.8
RELEASE
0.2
20ms 50ms
6ms
ATTACK
0.1ms
1ms
COMPRESSOR - CHANNEL 4
HARD
6
50ms
0.2
COMPRESSOR - CHANNEL 4
HARD
BYPASS
0.1ms
1ms
COMPRESSOR - CHANNEL 4
20ms
BYPASS 0.1ms
THRESHOLD
ATTACK
-50
-20
:1
5:1
25
0dB
THRESHOLD
-50
-20
EXT
AUTO MTR I/P
EXT
AUTO MTR I/P
EXT
AUTO MTR I/P
Crib Sheet
DN540
Operator Manual
Appendix F: Service Information
This appendix contains routine service and maintenance instructions.
Routine maintenance
To help keep your DN540 unit in good working order and to make sure it gives you
optimum performance, we recommend that you carry out the following at monthly
intervals:
•
Clean the unit (see “Cleaning” below).
•
Check the controls for freedom of operation.
•
Check the functionality of all controls, that is, control knobs, pushbuttons and LEDs.
You can carry out a visual check of all illuminated items (LEDs etc.) by switching the
unit off and then on again, as they should all illuminate during power up.
•
Check the functionality of the equipment.
Cleaning
Switch off the unit and electrically isolate it from the mains before cleaning.
Clean the DN540 using a dry, lint-free cloth. Do not use harsh abrasives or solvents.
When cleaning the unit, take great care not to damage control knobs, pushbuttons etc.
Replacing the mains fuse
The equipment must be independently isolated from the mains voltage supply
before any attempt is made to change the protective fuse. The fuse and its
cover must always be replaced before the equipment is reconnected to the
mains voltage supply.
Only use the correct replacement type when changing the fuse. Fuse specification is
printed on the rear cover.
To remove the fuse, pull out the fuse drawer (see “Mains input” on page 17). Then,
prise out the fuse from the furthest compartment (the nearest compartment is for a
spare fuse); a small, flat-bladed screwdriver may be useful for this.
Insert a new fuse in the furthest fuse compartment and close the drawer.
After replacing a fuse, check that the unit i-s working properly.
Always ensure that there is a spare fuse available.
DN540
Operator Manual
39
Service Information
Equipment disposal
When this equipment has come to the end of its useful life, its disposal may come under
the DIRECTIVE 2002/96/EC OF THE EUROPEAN PARLIAMENT AND OF THE COUNCIL of
27 January 2003 on waste electrical and electronic equipment (WEEE).
Hazardous substances in WEEE contaminate water, soil and air and ultimately put at
risk our environment and health. The directive aims to minimize the impacts of WEEE
on the environment during their life times and when they become waste.
The WEEE directive addresses the disposal of products when they have reached the end
of their life and contributes to the reduction of wasteful consumption of natural
resources. This will help to reduce pollution, and protect the environment and
ourselves.
If this equipment carries a ‘crossed-out wheelie bin’ (shown left), please
do not dispose of WEEE as unsorted municipal waste but collect and
dispose of in accordance with local WEEE legislation. The horizontal bar
underneath indicates that the product was placed on the EU market after
13th August 2005.
For WEEE disposal, see our website at www.klarkteknik.com for
information.
40
DN540
Operator Manual
Thank you for reading through this Operator Manual.
We hope you found it useful.
Please feel free to send us your comments.
Our contact details and website address can be found
at the front of this manual.
© 2011 Red Chip Company Ltd.
Klark Teknik
Klark Industrial Park, Walter Nash Road,
Kidderminster. Worcestershire. DY11 7HJ. England.
Tel: +44 1562 741515, Fax: +44 1562 745371
Email: [email protected]
Website: www.klarkteknik.com