1
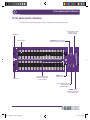
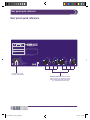
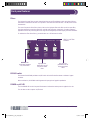
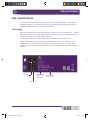
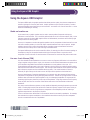
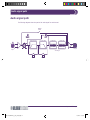
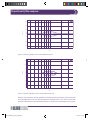
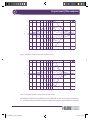
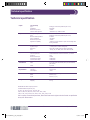
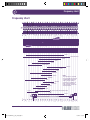
graphic
operator
manual
DOC02-SQ1GRAPHIC_Op_IssE_printdata.pdf 1
27/04/2010 10:06:44
DOC02-SQ1GRAPHIC_Op_IssE_printdata.pdf 2
27/04/2010 10:06:44
graphic
OPERATOR MANUAL
Midas Klark Teknik Limited
Klark Industrial Park
Walter Nash Road
Kidderminster
Worcestershire
DY11 7HJ
England
Tel: +44 1562 741515
Fax: +44 1562 745371
Email: [email protected]
Website: www.ktsquareone.com
Square ONE Graphic Equaliser — Operator Manual
DOC02-SQ1GRAPHIC Issue E — April 2010
© Red Chip Company Ltd.
In line with the company’s policy of continual improvement, specifications and function may be
subject to change without notice. This Operators Manual was correct at the time of writing. E&OE.
DOC02-SQ1GRAPHIC_Op_IssE_printdata.pdf 3
27/04/2010 10:06:44
DOC02-SQ1GRAPHIC_Op_IssE_printdata.pdf 4
27/04/2010 10:06:44
IMPORTANT SAFETY INSTRUCTIONS
The lightning flash with arrowhead symbol
within an equilateral triangle, is intended to
alert the user to the presence of uninsulated
“Dangerous Voltage” within the product's
enclosure that may be of sufficient magnitude
to constitute a risk of electric shock to persons.
1
Read these instructions.
2
Keep these instructions.
3
Heed all warnings.
4
Follow all instructions.
5
Do not use this apparatus near water.
6
Clean only with a dry cloth.
7
Do not block any of the ventilation openings. Install
in accordance with the manufacturer’s instructions.
8
Do not install near any heat sources such as
radiators, heat registers, stoves, or other apparatus
(including amplifiers) that produce heat.
9
10
Do not defeat the safety purpose of the polarized or
grounding-type plug. A polarized plug has two
blades with one wider than the other. A grounding
type plug has two blades and a third grounding
prong. The wide blade or the third prong are
provided for your safety. If the provided plug does
not fit into your outlet, consult an electrician for
replacement of the obsolete outlet.
Protect the power cord from being walked on or
pinched particularly at plugs, convenience
receptacles, and the point where they exit from the
apparatus.
DOC02-SQ1GRAPHIC_Op_IssE_printdata.pdf 5
The exclamation point within an equilateral
triangle, is intended to alert the user to the
presence of important operating and
maintenance (servicing) instructions in the
literature accompanying the product.
11
Only use attachments/accessories specified by the
manufacturer.
12
Unplug this apparatus during lightning storms or
when unused for long periods of time.
13
Refer all servicing to qualified personnel. Servicing is
required when the apparatus has been damaged in
any way, such as power supply cord or plug is
damaged, liquid has been spilled or objects have
fallen into the apparatus, the apparatus has been
exposed to rain or moisture, does not operate
normally, or has been dropped.
14
Use the mains plug to disconnect the apparatus from
the mains.
15
Warning: To reduce the risk of fire or electric
shock, do not expose this apparatus to rain or
moisture.
16
Do not expose this equipment to dripping or
splashing and ensure that no objects filled with
liquids, such as vases, are placed on the
equipment.
17
The mains plug of the power supply cord shall
remain readily operable.
27/04/2010 10:06:44
DOC02-SQ1GRAPHIC_Op_IssE_printdata.pdf 6
27/04/2010 10:06:44
Klark Teknik
EC-Declaration of Conformity
The undersigned, representing the following manufacturer
Manufacturer:
Address:
Midas Klark Teknik Limited
Klark Industrial Park, Walter Nash Road,
Kidderminster, Worcestershire DY11 7HJ
hereby declares that the following product
Product Type Number
Product Description
Nominal Voltage(s)
Current
Freq.
Square ONE Graphic
Graphic Equaliser
115V AC
230V AC
314mA
155.2mA
50/60Hz
is in conformity with the regulations of the following marked EC-directive(s) and bears the
accordingly
Reference Number
Title
2004/108/EC
EMC Directive (EMC)
2006/95/EC
Low-Voltage Directive (LVD)
-mark
The conformity of the product with EC Directives for use in environments E1, E2, E3 and E4 is provided by the compliance
with the following standards:
Standards/date
Reference Number
Title
EN50081/1
Generic Standard Using EN55103 Limits and Methods
EN55103
Class B Conducted Emissions PAVI
EN55103
Class B Radiated Emissions PAVI
EN61000-3-3:2000
Voltage Fluctuation and Flicker
EN61000-3-2:1995
Harmonic Current Emissions
EN60065:2002
Electrical Safety
Place, date: Kidderminster, UK
15th April 2010
General Manager
Printed name: John Oakley
DOC02-SQ1GRAPHIC_Op_IssE_printdata.pdf 7
AVP, Product Development
Printed name: Alex Cooper
27/04/2010 10:06:44
DOC02-SQ1GRAPHIC_Op_IssE_printdata.pdf 8
27/04/2010 10:06:44
Page i
Contents
Welcome! __________________________________________ 1
Safety precautions ___________________________________ 2
Safety warnings
General precautions
Power
Handling the equipment
Installation
Location
Audio connections
Radio frequency interference
2
2
3
3
4
4
4
4
Class B device
4
Electric fields
Operation
Safety equipment
Optional equipment
Special accessories
5
5
5
5
5
Unpacking
Checking the mains fuse
Installation
Connecting the power cable
Connecting the audio cables
7
7
7
7
8
Features ___________________________________________ 6
Getting started______________________________________ 7
Balanced I/O
Unbalanced I/O
Unbalanced inserts
Connecting to unbalanced equipment
8
8
9
10
Powering up the unit
10
Signal level
Graphic EQ section
Gain control
Filters
BYPASS switch
POWER on/off LED
13
13
13
14
14
14
Front panel quick reference ___________________________ 11
Rear panel quick reference ___________________________ 12
Front panel features ________________________________ 13
Square ONE Graphic
DOC02-SQ1GRAPHIC_Op_IssE_printdata.pdf 9
i
27/04/2010 10:06:44
Rear panel features _________________________________ 15
Mains supply
Audio connections
15
16
Audio inputs
Audio outputs
16
16
Power-off bypass relays
16
Studio and creative use
Live use - front of house (FOH)
Live use - monitors
18
18
19
Preparing for equalisation
Equalisation using an RTA
20
20
Effects of equalisation on voice reproduction
Effects of equalisation on music reproduction
22
23
Other features _____________________________________ 16
Example of system connection_________________________ 17
Using the Square ONE Graphic_________________________ 18
Equalising a system _________________________________ 20
Effects of equalisation _______________________________ 22
Audio signal path ___________________________________
Proportional-Q filter response _________________________
Balanced/unbalanced audio __________________________
Square ONE Graphic application notes___________________
Front-of-house
Monitors
High pass filter (HPF)
Low pass filter (LPF)
Technical specification_______________________________
Frequency chart ____________________________________
Crib sheet_________________________________________
Service information _________________________________
Routine maintenance
Cleaning the unit
Checking/replacing the mains fuse
31
31
31
31
32
33
34
35
35
35
35
ii
DOC02-SQ1GRAPHIC_Op_IssE_printdata.pdf 10
24
25
30
31
Square ONE Graphic
27/04/2010 10:06:44
Welcome!
Welcome!
Thank you for purchasing a Klark Teknik Square ONE Graphic graphic equaliser.
Klark Teknik has conceived the Square ONE range to offer audio professionals a range of easily accessible,
high-performance audio equipment, designed to provide no-compromise sonic quality with a feature set
which offers all essential facilities.
Your Square ONE Graphic equaliser represents the very best of British design and engineering, combined with
contemporary, efficient manufacturing methods, and will give you many years of reliable service.
The Square ONE Graphic is a dual, 30-band, third octave graphic equaliser. It incorporates long throw
45 mm faders and has high and low pass filters on each channel.
All backed up, of course, by the standard Klark Teknik three year warranty.
Please take the time to complete and return the registration card or fill in the Warranty Registration Form
online by visiting our website at www.ktsquareone.com and, to obtain the best results with a minimum of
effort, also read this operators manual.
Finally, enjoy your Klark Teknik Square ONE Graphic!
Square ONE Graphic
DOC02-SQ1GRAPHIC_Op_IssE_printdata.pdf 11
1
27/04/2010 10:06:44
Safety precautions
Safety precautions
Before installing, setting up or operating this equipment please ensure that you have read and
fully understand all of this section and the “IMPORTANT SAFETY INSTRUCTIONS” at the front of
this manual.
This equipment is supplied by a mains voltage that can cause electric shock injury!
The following special limitations must be observed in order to maintain safety and electromagnetic
compatibility performance.
Safety warnings
This equipment is fitted with a 3-pin power socket. For safety reasons the earth lead must not be
disconnected.
Signal 0V is connected internally to the chassis.
To completely disconnect this equipment from the AC mains, unplug the mains lead from the
power outlet.
Do not expose this equipment to dripping or splashing and ensure that no objects filled with
liquids, such as vases, are placed on the equipment.
To prevent shock or fire hazard, do not expose the equipment to rain or moisture. To avoid
electrical shock do not remove covers. Refer servicing to qualified personnel only.
The power supplies - even the DC ones - have a high current!
General precautions
The following information gives basic safety precautions that should be observed to reduce the risk of fire,
electric shock and personal injury:
•
Only properly trained service personnel familiar with this manual and with the generally applicable
safety regulations should service the equipment.
•
Safety instructions detailed in the manual should be understood and properly implemented.
•
In the event of ground loop problems, disconnect the signal screen at one end of the connecting
cables. Note that this can only be done when the equipment is used within a balanced system.
•
Never operate damaged equipment and never operate equipment with damaged cables.
•
Any part that is damaged should be properly repaired or replaced. This must be done by a fully
trained and authorised service engineer.
•
Observe all warnings, cautions etc. on any part of the equipment.
•
Do not remove, hide or deface any warnings or cautions.
2
DOC02-SQ1GRAPHIC_Op_IssE_printdata.pdf 12
Square ONE Graphic
27/04/2010 10:06:44
Safety precautions
Power
THE POWER SUPPLY SHOULD NEVER BE OPERATED WITH THE MAINS EARTH DISCONNECTED!
This unit should only be operated with the power supply connected to ground via the ground in the mains
connector.
The internal power supply is a switch mode type that automatically senses the incoming mains voltage and
will work where the nominal voltage is in the range 100-240 VAC.
A single, fused IEC mains inlet is provided on the rear panel. The correct lead for connection in the area to
which the unit was shipped is supplied with the unit. The equipment should only be plugged into the mains
outlet using the supplied lead.
Please note that the power supply contains LETHAL VOLTAGES greatly in excess of the mains voltage and that
its rails can produce extremely large currents that could burn out equipment and wiring if shorted. All testing
and servicing must ONLY be carried out by approved service engineers.
We strongly recommend that, for safety and to optimise the life and performance of the equipment, the
mains cable plug is removed from the power outlet when the equipment is not to be used for extended
periods of time or during electrical storms.
When removing the equipment’s electric plug from an outlet, always hold the plug itself and not the cable.
Pulling out the plug by the cable can damage it.
Never insert or remove an electric plug with wet hands.
Handling the equipment
Completely isolate the equipment electrically and disconnect all cables from the equipment before moving it.
When lifting or moving the equipment, take its weight into consideration.
Do not insert your fingers or hand in any gaps or openings on the equipment, for example, vents.
Avoid inserting or dropping foreign objects, such as paper, plastic, metal etc., into any gaps or openings on
the equipment, for example, vents. If this happens, turn off the power immediately and unplug the power
from the AC outlet. Then have the equipment inspected by the manufacturer's qualified service personnel.
Square ONE Graphic
DOC02-SQ1GRAPHIC_Op_IssE_printdata.pdf 13
3
27/04/2010 10:06:44
Safety precautions
Installation
Before installing the equipment:
•
Make sure the equipment is correctly connected to the protective earth conductor of the mains voltage
supply of the system installation through the mains lead.
•
Power to the equipment must be via a fused spur.
•
The power plug must be inserted in a socket outlet provided with a protective earth contact. The
electrical supply at the socket outlet must provide appropriate over-current protection.
•
Both the mains supply and the quality of earthing must be adequate for the equipment.
•
Before connecting up the equipment, check that the mains power supply voltage rating corresponds
with the local mains power supply and that the mains fuse is of the correct type and rating.
•
Ideally a cool area is preferred not in close proximity to power distribution equipment or other
potential sources of interference.
•
Do not install the equipment in places of poor ventilation.
•
Do not install this equipment in a location subjected to excessive heat, dust or mechanical vibration.
Allow for adequate ventilation around the equipment, making sure that its fans and vents are not
obstructed. To prevent excessive heating of the equipment, avoid mounting it directly above power
amplifiers or other devices that radiate significant amounts of heat such as, radiators and heaters.
Keep the equipment out of direct sunlight. Where necessary use fan cooled racks.
•
Do not place equipment in an unstable condition where it might accidentally fall over.
•
Make sure that the mains voltage and fuse rating information of the equipment will be visible after
installation.
•
Do not use the equipment in the vicinity of electrical devices, such as computer monitors or mobile
phones, which may generate electrical noise.
Location
Audio connections
To ensure the correct and reliable operation of your Square ONE Graphic, only high quality balanced,
screened, twisted pair audio cable should be used.
XLR connector shells should be of metal construction so that they provide a screen when connected to the
unit and should have Pin 1 connected to the cable screen.
Radio frequency interference
Class B device
This equipment has been tested and found to comply with the limits for a Class B digital device, pursuant to
part 15 of the FCC Rules. These limits are designed to provide reasonable protection against harmful
interference in a residential installation. This equipment generates, uses, and can radiate radio frequency
energy and, if not installed and used in accordance with the instructions, may cause harmful interference to
4
DOC02-SQ1GRAPHIC_Op_IssE_printdata.pdf 14
Square ONE Graphic
27/04/2010 10:06:44
Safety precautions
radio communications. However, there is no guarantee that interference will not occur in a particular
installation. If this equipment does cause harmful interference to radio or television reception, which can be
determined by turning the equipment off and on, the user is encouraged to try to correct the interference by
one or more of the following measures:
•
Reorient or relocate the receiving antenna.
•
Increase the separation between the equipment and receiver.
•
Connect the equipment into an outlet on a circuit different from that to which the receiver is
connected.
•
Consult the dealer or an experienced radio TV technician for help.
Electric fields
Caution:
In accordance with Part 15 of the FCC Rules & Regulations, “… changes or modifications not
expressly approved by the party responsible for compliance could void the user's authority to
operate the equipment.”
Should this product be used in an electromagnetic field that is amplitude modulated by an audio frequency
signal (20Hz to 20kHz), the signal to noise ratio may be degraded. Degradation of up to 60dB at a frequency
corresponding to the modulation signal may be experienced under extreme conditions (3V/m, 90%
modulation).
Operation
To avoid electrical shock, never operate the equipment with the covers removed.
Safety equipment
Never remove, for example, covers, housings or any other safety guards. Do not operate the equipment or
any of its parts if safety guards are ineffective or their effectiveness has been reduced.
Optional equipment
Unless advised otherwise, optional equipment must only be installed by service personnel and in accordance
with the appropriate assembly and usage regulations.
Special accessories
To comply with part 15 of the FCC Rules, any special accessories (that is, items that cannot be readily
obtained from multiple retail outlets) supplied with this equipment must be used with this equipment; do not
use any alternatives as they may not fulfil the RF requirement.
Square ONE Graphic
DOC02-SQ1GRAPHIC_Op_IssE_printdata.pdf 15
5
27/04/2010 10:06:44
Features
Features
The Square ONE Graphic 1/3 octave, analogue equaliser performs graphic equalisation and filtering, and has
the following features:
•
Two channels.
•
30 bands of proportional-Q equalisation per channel via long throw, 45 mm faders.
•
Electrically balanced input and output per channel via female and male XLR connectors, respectively.
•
1/4” TRS-balanced jack socket for each input and output.
•
Level metering per channel is provided by SIGNAL and CLIP LEDs.
•
Gain control per channel for continuous adjustment of channel gain.
•
Fixed 80Hz high pass filter per channel.
•
Fixed 12kHz low pass filter per channel.
•
Input gain, filters and graphic equalisation on each channel can be bypassed.
•
Power-off bypass relays to avoid audible thumps when unit is switched off or if a power rail fails.
•
Pushbutton switch operation for high and low pass filters and bypass.
•
LEDs for power, high and low pass filters, and bypass that provide on/off status indication.
•
Mains supplied via an IEC socket on rear panel.
•
Fuse drawer contains easily replaceable mains fuse with a compartment for a spare.
6
DOC02-SQ1GRAPHIC_Op_IssE_printdata.pdf 16
Square ONE Graphic
27/04/2010 10:06:44
Getting started
Getting started
Observing the guidelines in “Safety precautions” on page 2, carry out the following to get your Square ONE
Graphic unit fully operational.
Unpacking
Carefully unpack your Square ONE Graphic equipment package.
Then please inspect the Square ONE Graphic unit carefully for any signs of damage that may have occurred
during transit and notify the courier immediately if you discover any.
Check the contents of your Square ONE Graphic equipment package. If there are any parts missing,
incorrect or faulty, please contact your local distributor or Klark Teknik at the address at the front of this
manual.
Please retain the original packing in case you should need to return the equipment to the manufacturer or
supplier, or transport or ship the unit later.
Checking the mains fuse
Before installing the equipment you need to make sure that the mains fuse fitted is of the correct type and
rating for your unit. To do this follow the instructions in “Checking/replacing the mains fuse” on page 35.
Installation
This unit is designed for mounting in any 19” EIA standard rack. Four rack-mount holes in the front panel are
provided for rack mounting and are designed to fully support the weight of the unit in the rack.
The position of the unit will depend upon how it is to be used. However, when positioning the unit, avoid
placing it where the faders may be damaged by being accidentally knocked or snapped off. Also, try to avoid
placing the unit directly near or on any power distribution units or power amplifiers.
Connecting the power cable
Making sure that the mains power at the power outlet is off, connect the mains cable supplied with your
Square ONE Graphic to the mains power outlet and then to the mains socket at the rear of your unit.
Square ONE Graphic
DOC02-SQ1GRAPHIC_Op_IssE_printdata.pdf 17
7
27/04/2010 10:06:45
Getting started
Connecting the audio cables
This section gives the connection details for balanced/unbalanced I/O and unbalanced inserts. For more
details on balancing, see “Balanced/unbalanced audio” on page 30.
Balanced I/O
For balanced I/O, connect the audio cables as shown below.
Male XLR
1
Pin 1:
Screen/Ground
2
Female XLR
2
3
1
Pin 1:
Screen/Ground
3
Pin 3: Cold signal
Pin 3: Cold signal
Pin 2: Hot signal
Pin 2: Hot signal
Unbalanced I/O
For unbalanced I/O, connect the audio cables as shown below.
Male XLR
1
Pin 1:
Screen/Ground
(not connected at
unbalanced end)
2
2
3
1
Pin 1:
Screen/Ground
(not connected at
unbalanced end)
3
Pin 3: Ground at
unbalanced end
Pin 3: Ground at
unbalanced end
Pin 2: Hot signal
8
DOC02-SQ1GRAPHIC_Op_IssE_printdata.pdf 18
Female XLR
Pin 2: Hot signal
Square ONE Graphic
27/04/2010 10:06:45
Getting started
Unbalanced inserts
For unbalanced inserts, connect the audio cables as shown in Figure 2, below. Figure 1 shows the
construction of a 1/4” TRS connector.
Sleeve: ground/shield
Tip: send (out)
Strain relief
clamp
Ring: return (in)
Note: Connect insert send with input and insert return with output of effects device.
Figure 1: Insert send/return 1/4” TRS connector details
Tip
Ring
Sleeve
Tip
Sleeve
Tip
Sleeve
Tip (send)
Sleeve (ground/shield)
Tip
Ring
Sleeve
Tip (return)
Sleeve (ground/shield)
Figure 2: Insert send/return 1/4” TRS connectors - wiring details
Square ONE Graphic
DOC02-SQ1GRAPHIC_Op_IssE_printdata.pdf 19
9
27/04/2010 10:06:45
Getting started
Connecting to unbalanced equipment
Ideally, you will be making the best use of the Square ONE Graphic’s low-noise high-headroom balanced
inputs by connecting to similarly balanced equipment. However, if you do have to connect to unbalanced
devices, the following wiring is recommended for best results (see Figure 3):
•
Connect the +ve (pin 2) of the balanced connection to the +ve terminal on the unbalanced connector.
•
Connect the -ve (pin 3) of the balanced connection to the common (ground) terminal on the
unbalanced connector.
•
Connect the ground (pin 1) of the balanced connection, to the common (ground) terminal on the
unbalanced connector.
Male XLR
Ring
Tip
Sleeve
Female
1
Tip
3
2
Male XLR
Ring
2
Sleeve
3
1
Female XLR
Figure 3: Insert send/return 1/4” TRS connector/XLRs - wiring details
Powering up the unit
To power up the unit, switch on the power at the mains power outlet. The POWER LED on the front of the
unit will illuminate to indicate that power is on.
Your unit is now ready to operate.
10
DOC02-SQ1GRAPHIC_Op_IssE_printdata.pdf 20
Square ONE Graphic
27/04/2010 10:06:45
Front panel quick reference
Front panel quick reference
The Klark Teknik Square ONE Graphic is a dual, 30-band, third octave graphic equaliser.
Low pass filter switch
with LED on/off
indicator (above)
Channel A
BYPASS filter switch with
LED on/off indicator (above)
45 mm faders
+12
+12
0 GAIN
-
-12
-12
6
BYPASS
80
12k
A
SIGNAL CLIP
graphic
+12
POWER
B
+12
0 GAIN
-
-12
Channel B
6
BYPASS
80
12k
-12
Level metering with
SIGNAL and CLIP LED
on/off indicators
GAIN rotary
control knob
High pass filter switch
with LED on/off
indicator (above)
POWER on/off
indicator: illuminates
to show power is on
Square ONE Graphic
DOC02-SQ1GRAPHIC_Op_IssE_printdata.pdf 21
11
27/04/2010 10:06:45
Rear panel quick reference
Rear panel quick reference
RISK OF ELECTRIC SHOCK
DO NOT OPEN
WARNING: TO REDUCE THE RISK OF ELECTRIC SHOCK,
DESIGNED AND ENGINEERED IN ENGLAND
DO NOT EXPOSE THIS APPLIANCE TO RAIN OR MOISTURE
AVIS: RISQUE DE CHOC ELECTRIQUE. NE PAS OUVRIR.
ASSEMBLED IN CHINA
NO USER SERVICEABLE PARTS INSIDE. REFER SERVICING TO
QUALIFIED SERVICE PERSONNEL.
CAUTION: FOR CONTINUED PROTECTION AGAINST RISK OF
FIRE REPLACE WITH THE SAME TYPE AND VALUE FUSE INDICATED.
ATTENTION: REMPLACER PAR UN FUSIBLE DE MÊME TYPE
COMME INDIQUÉ.
THIS DEVICE COMPLIES WITH PART 15 OF THE FCC RULES. OPERATION IS SUBJECT TO THE FOLLOWING CONDITIONS:
(1) THIS DEVICE MAY NOT CAUSE HARMFUL INTERFERENCE, AND
(2) THIS DEVICE MUST ACCEPT ANY INTERFERENCE RECEIVED, INCLUDING INTERFERENCE THAT MAY CAUSE UNDESIRED OPERATION.
OUTPUT B
SUPPLY
VOLTAGE
INPUT B
R
C
US
OUTPUT A
INPUT A
PUSH
100-240V
AC~50-60Hz 25W
FUSE: 5x20mm
T800mA L250V
PUSH
TO REDUCE RISK OF FIRE,
REPLACE WITH SAME TYPE OF FUSE.
MOUNT IN RACK ONLY
B
Mains power socket
and fuse compartment
Channels A and B: input and output
audio connections, comprising a male
and a female XLR socket each with a
1/4”, TRS-balanced jack socket
12
DOC02-SQ1GRAPHIC_Op_IssE_printdata.pdf 22
A
Square ONE Graphic
27/04/2010 10:06:45
Front panel features
Front panel features
The Klark Teknik Square ONE Graphic is a dual-channel, 30-band, third octave analogue graphic equaliser. In
addition to the graphic equaliser itself, high and low pass filters are provided per channel and an equaliser in/
out switch to bypass the effect of the equaliser and filter stages. Power is supplied to the unit via the rear
panel; an LED on the front panel provides power on/off indication.
Signal level
The Square ONE Graphic provides a SIGNAL and a CLIP LED per channel for the purpose of level metering.
The levels are as follows:
•
SIGNAL (Green):
-40dBu
•
CLIP (Red):
+20dBu
SIGNAL LED (green): illuminates to show the input signal has exceeded -40dBu. The signal is pre-EQ (but
post-gain control).
A
SIGNAL CLIP
B
CLIP LED (red): illuminates to show the maximum output level of the unit has been achieved, that is,
+20dBu has been exceeded, and the unit has entered clipping. This LED is sourced post-EQ (and post-gain
control) such that internal clipping due to excessive EQ, that is, if a high input level is further boosted by the
use of EQ, will also be shown.
Graphic EQ section
The graphic EQ section of the Square ONE Graphic features long throw 45 mm faders to allow fine
adjustment of each frequency band. Each fader has a centre detent (’click stop’) to denote the 0dB (unity
gain of the band) point of the scale. The Square ONE Graphic uses standard ISO third octave standard
frequency centres.
+12
The range of the faders is ±12dB. Placing the fader of any band at the extreme upwards position will apply
12dB gain to the frequencies in that band. While, conversely, placing the fader of any band at the extreme
downwards position will apply 12dB attenuation to the frequencies in that band.
-12
Gain control
0 GAIN
-
The gain control provides continuous adjustment of the channel gain from minus infinity (off) to +6dB with a
centre detent at 0dB (unity gain). When using EQ with large amounts of cut or boost, it may be necessary to
use the gain to make up or attenuate the signal.
6
Square ONE Graphic
DOC02-SQ1GRAPHIC_Op_IssE_printdata.pdf 23
13
27/04/2010 10:06:45
Front panel features
Filters
The high and low pass filters on each channel both have an on/off pushbutton switch and yellow LED that
illuminates to indicate that the filter is in operation. Both filters are fixed and have a 12 dBu/octave roll-off
characteristic.
The corner frequencies of the filters, that is, 80Hz on the high pass filter and 12kHz on the low pass filter,
have been selected to match the typical low- and high-end responses, respectively, of monitor wedges in
applications where they are being driven full-range to aid intelligibility and allow higher gain before feedback.
To audition the effect of the filters, just switch them on or off and note the effect.
LEDs for on/off filter
indication
BYPASS filter
pushbutton bypasses
any active filters
High pass filter
pushbutton cuts off
frequencies below
80Hz
Low pass filter
pushbutton cuts off
frequencies above
12kHz
BYPASS switch
Each channel has BYPASS pushbutton on/off switch with red LED that illuminates to indicate a bypass
condition.
When switched on, the BYPASS switch bypasses the input gain and graphic equalisation.
POWER on/off LED
The blue POWER LED on the front panel illuminates to indicate that mains power is applied to the unit.
The unit does not have a power on/off switch.
14
DOC02-SQ1GRAPHIC_Op_IssE_printdata.pdf 24
Square ONE Graphic
27/04/2010 10:06:45
Rear panel features
Rear panel features
The rear panel provides the power and audio connections to the Square ONE Graphic. You will also find
important information, such as warnings and cautions, power supply and fuse specifications, safety and
compliance standards markings etc., printed on the rear panel.
Mains supply
Mains power is supplied to the Square ONE Graphic by a fused IEC socket on the rear of the unit. The Square
ONE Graphic contains an auto voltage sensing switching mode power supply that will operate where the
nominal mains voltage is in the range 100VAC to 240VAC.
The correct mains lead for the country to which the unit was shipped is supplied with the unit.
The mains fuse is located in a fuse drawer, directly underneath the mains socket. The drawer has two
compartments, the rear containing the working fuse while the front provides room for a spare. Always
replace the mains fuse with the same type and rating; see “Checking/replacing the mains fuse” on page 35
for details.
IEC socket
Supply voltage
and fuse
specifications
Fuse warning
information
Fuse drawer
Square ONE Graphic
DOC02-SQ1GRAPHIC_Op_IssE_printdata.pdf 25
15
27/04/2010 10:06:45
Other features
Audio connections
Audio input and output connections to the two channels, A and B, are electronically balanced and clearly
labelled.
The audio connections for channel B are shown below; please refer to “Audio connections” on page 4 for pin
assignments.
Channel B
Female XLR - input
Male XLR - output
1/4” TRS, balanced
jack socket - output
1/4” TRS, balanced
jack socket - input
Audio inputs
The audio inputs comprise two parallel connected, series AA, female XLR chassis connectors and two 1/4”
TRS, balanced jack sockets.
Audio outputs
The audio outputs comprise two parallel connected, series AA, male XLR chassis connectors and two 1/4”
TRS, balanced jack sockets.
Other features
Power-off bypass relays
The Square ONE Graphic incorporates a fail-safe hardware bypass to prevent audible thumps when the unit is
switched off or if any of its internal power rails should fail.
The bypass comprises relays that directly connect the inputs and outputs of each channel. The relays
disconnect the outputs and switch to bypass every time the unit is switched off or on power rail failure.
On power up, the unit waits for about one second before the relays are switched. This gives enough time for
the power rails to rise and the circuits to stabilise to allow normal operation of the unit.
16
DOC02-SQ1GRAPHIC_Op_IssE_printdata.pdf 26
Square ONE Graphic
27/04/2010 10:06:45
Example of system connection
Example of system connection
EQUALISER
X-Over &
Amplifiers
EQUALISER
X-Over &
Amplifiers
Centre Cluster
Delay FoH
Delay FoH
Main FOH
Main FOH
Stage Monitors
EQUALISER
X-Over &
Amplifiers
X-Over &
Amplifiers
Monitor
Console
Delay Line
FOH Console
Square ONE Graphic
DOC02-SQ1GRAPHIC_Op_IssE_printdata.pdf 27
17
27/04/2010 10:06:45
Using the Square ONE Graphic
Using the Square ONE Graphic
The Square ONE Graphic is a graphic equaliser that utilises premium quality, low tolerance components to
achieve a high degree of accuracy and control. Graphic equalisers may be used for corrective or creative
purposes depending upon whether they are to be used live - as monitors or for front of house FOH - or in the
studio for broadcasting or recording.
Studio and creative use
In the control room, a graphic equaliser may be used to remove problem frequencies and improve
deficiencies in room acoustics. This is commonly achieved with the use of a real time analyser (RTA). As the
frequency centres of the Square ONE Graphic conform to ISO standards, corrections can be made by sight
directly from the RTA to the graphic.
However, it is important to mention that graphic equalisers can only compensate a limited amount for a room
with severe acoustic problems, in which case further remedial treatment work may be required. Graphic
equalisers can only help to reduce the audible effects of standing waves and resonances and cannot
overcome the loss of clarity due to rooms with long reverberation times.
The Square ONE Graphic can be used to create filter effects, for example, the effect of someone speaking on
the telephone, using the 30 equaliser bands and the high and low pass filters in conjunction with a
compressor to create a de-esser for tonal correction of instruments or vocals and many other creative uses.
Live use - front of house (FOH)
It is often desirable to add equalisation to a venue to remove any frequency deficiencies in the room before
trying to engineer using the system. Again, it is common to use an RTA and measurement microphone to set
up the equaliser using additive and subtractive equalisation to correct problems in the room. It is
recommended to attenuate peaks in the room’s response to the level of the surrounding frequencies rather
than boost the lower bands to meet the highest. This will help to retain headroom in the equaliser and slight
dips in frequency response are less noticeable than large peaks. If an overall reduction in volume is
observed, the gain make-up can be used to return the output of the equaliser to the desired level.
However, please beware of excessive equalisation by, for example, using large amounts of boost at lower
frequencies to compensate for poorly performing bass enclosures. This will use up large amounts of system
headroom that could cause the system amplifiers to clip, thus damaging loudspeaker HF components and
introducing high frequency harmonics, which may sound unpleasant. Using large amounts of low frequency
boost may also cause the over-excursion of bass drivers and result in their mechanical and electrical
breakdown.
Also, many sound reinforcement systems are only capable of adequately producing frequencies up to around
18kHz. Providing high levels of boost at 20kHz to extend the frequency response of the system is likely to
result in a reduction in the life of high frequency components in the loudspeaker, while not achieving a
significant improvement in the frequency response.
There are occasions where deficiencies in room acoustics cannot be corrected by equalisation. For example,
bass reduction due to phase cancellation or the cancellation around the crossover point of a loudspeaker
must be corrected before the use of equalisation.
18
DOC02-SQ1GRAPHIC_Op_IssE_printdata.pdf 28
Square ONE Graphic
27/04/2010 10:06:45
Using the Square ONE Graphic
Live use - monitors
Monitors used on stage often need equalisation to remove any peaks in their frequency response in order to
prevent feedback from on-stage microphones where those frequencies exceed the maximum gain before
feedback level. Further equalisation may be required to remove similar peaks from the characteristics of the
microphones in use.
A monitor engineer may use an RTA to detect these peaks but, more often than not, monitor engineers have
a developed sense of hearing that enables them to remove these frequencies by ear. The Square ONE
Graphic’s 30 EQ bands allow a majority of feedback to be removed from the monitors. High and low pass
filters are provided that can be used to remove high frequency feedback and bass rumble or over-excursion
of bass drivers. It may also be undesirable to have large amounts of bass in the on-stage monitors. In vocal
monitors, bass does not assist projection of vocals and can make the stage sound unbearable, hence, the
bass element can be rolled off at the desired frequency. The fundamentals of vocals are transmitted in a
narrow audible range and will appear unaffected.
Square ONE Graphic
DOC02-SQ1GRAPHIC_Op_IssE_printdata.pdf 29
19
27/04/2010 10:06:45
Equalising a system
Equalising a system
As discussed before, the fundamental benefits of equalisation are:
•
Improved intelligibility and natural sound of the sound system.
•
An increase in the gain available in the system before feedback.
In some circumstances, it may not be possible to achieve a natural sounding system that is completely
intelligible due to poor acoustics or high levels of background noise. In such cases, a compromise must be
struck by the engineer depending upon the use to which the system will be put. It may be argued that in the
case of a vocalist, intelligibility must be sought at all costs. However, for dance music reproduction a more
natural approach, with no real concern for intelligibility of the individual lyrics, may be preferred.
Please remember, the equaliser is not a ‘cure all’ device and will not solve the problems of a poor sound
system, installation or venue acoustics but, when used carefully, can bring out significant improvements in
the quality of reproduction of a system.
Preparing for equalisation
Before starting to equalise the system, it is worthwhile checking that the system is performing correctly.
Listening to the system without any equalisation may reveal underlying distortion or artefacts of the room,
for example, lengthy reverberation, which may need to be rectified before trying to equalise the room.
It may also be worthwhile using a sine tone sweep so that problems at certain frequencies, which may not be
immediately noticeable with pink noise, can be detected and corrected before equalisation. Especially, check
the system’s crossover points as these may reveal problems with the system. Note that poor coverage
cannot be rectified through the use of equalisation.
When you are satisfied with the basic system performance, equalisation can begin.
Equalisation using an RTA
The measurement microphone should, ideally, have a flat response or be calibrated to the RTA and placed in
a sensible position where it will not be affected by nearby objects that may interfere with the local acoustics,
such as within one metre of a rear or side wall, or in a balcony opening.
Using the RTA and a pink noise source, adjust the level of the frequency bands on the graphic equaliser
inversely to that shown on the RTA display. Do it so that the peaks in frequency response are reduced to the
level of the other bands and, conversely, the deficient bands are increased. You will need to perform the test
at a reasonable level approaching normal usage volume so that the equalisation can take into account the
response of the loudspeakers at normal operating level (versus low level). It may also be desirable to take
measurements at points throughout the area. Although it may not be possible to get perfect equalisation
throughout an entire area, it may be preferable to obtain a good equalisation of the whole area rather than a
perfect equalisation at a single point with poor performance at all other points. A compromise may need to
be made in an effort to equalise the sound for the whole area rather than just the centre FOH position.
20
DOC02-SQ1GRAPHIC_Op_IssE_printdata.pdf 30
Square ONE Graphic
27/04/2010 10:06:45
Equalising a system
EQUALISER
CALIBRATED MEASUREMENT
MICROPHONE
Note: When using an RTA, ensure that
it has averaging capability so that fluctuations
are smoothed out giving a good representation
of the sonic performance of the system.
l ab c
PINK NOISE
REAL TIME ANALYSER
When equalising the room, bear in mind the effect upon the electronics and mechanics of the system caused
by the equalisation process. If excessive equalisation is required at certain bands, consider the effect upon
amplifier headroom and loudspeaker driver excursion that will result. It may not be possible to produce the
response required within the limitations of the system. Excessive equalisation should act as a warning that
there may be an underlying problem which may need rectifying first, for example, phase cancellation, blown
drivers etc.
During the performance, the FOH or monitor engineer may want to have a microphone or solo signal feed for
the RTA so that feedback may be easily detected and rectified.
Square ONE Graphic
DOC02-SQ1GRAPHIC_Op_IssE_printdata.pdf 31
21
27/04/2010 10:06:46
Effects of equalisation
Effects of equalisation
Effects of equalisation on voice reproduction
1/3 Octave Centre Frequency
Effect On Voice
40, 50, 63, 80, 100, 125
Sense of power in some outstanding bass singers.
160, 200, 250
Voice fundamentals.
315, 400, 500
Important for voice quality.
630, 800, 1k
Important for voice naturalness. Too much boost in the 315 to
1k range produces a telephone-like quality.
1k25 to 4k
Vocal fricatives. Accentuation and clarity of voice.
Important to speech intelligibility. Too much boost between
2kHz and 4kHz can mask certain speech sounds, for example,
‘m’, ‘b’ and ‘v’, which can become indistinguishable. Too much
boost anywhere between 1kHz and 4kHz can produce listener
fatigue. Vocals can be highlighted by slightly boosting vocals at
3kHz whilst simultaneously slightly cutting instruments at that
frequency.
5k, 6k3, 8k
Accentuation and clarity of voice.
10k, 12k5, 16k
Too much boost causes sibilance (’sss’).
22
DOC02-SQ1GRAPHIC_Op_IssE_printdata.pdf 32
Square ONE Graphic
27/04/2010 10:06:46
Effects of equalisation
Effects of equalisation on music reproduction
1/3 Octave Centre Frequency
31, 40, 50, 63
Effect On Music
Fundamentals of bass drum, tuba, bass and organ. These give
music a sense of power but excessive use can leave the sound
‘muddy’.
Mains Hum (50-60Hz).
80, 100, 125
Too much boost produces ‘boom’. (Fundamentals of tympani
and toms.)
Higher harmonics of mains hum (100-120Hz).
160, 200, 250
Drum and lower bass. Too much boost produces ‘boom’.
3rd Harmonics of Mains Hum.
315, 400, 500
Fundamentals of strings and percussion.
630, 800, 1k
Fundamentals and harmonics of strings, keyboards and
percussion.
Boosting 600-1kHz range can make instruments sound
horn-like.
1k25 to 4k
Drums, guitar, accentuation of vocals, strings and brass.
Excessive boost around 1-2kHz can make instruments sound
‘tinny’.
Excessive boost around 1-4kHz can produce ‘listening fatigue’.
5k, 6k3, 8k
Accentuation of percussion, cymbals and snare drum.
Reduction at 5kHz makes overall sound more distant and
transparent.
Reduction of tape hiss and system noise. 1k25 to 8k governs
overall clarity and definition.
10k, 12k5, 16k
Cymbals and overall brightness. Too much boost causes
sibilance.
Reduction of tape hiss and system noise.
Square ONE Graphic
DOC02-SQ1GRAPHIC_Op_IssE_printdata.pdf 33
23
27/04/2010 10:06:46
Audio signal path
Audio signal path
The following diagram shows the path of the audio signal for each channel.
BYPASS
Switch
-40dBu
+22dBu
High pass filter
Low pass filter
Graphic EQ
Graphic EQ
PUSH
Input
Two stages
80
Switch
12k
Switch
24
DOC02-SQ1GRAPHIC_Op_IssE_printdata.pdf 34
Output
Square ONE Graphic
27/04/2010 10:06:46
Proportional-Q filter response
Proportional-Q filter response
The most important design decision for the Square ONE Graphic was determining the equaliser response.
Proportional-Q equalisation, as used on previous Klark Teknik analogue graphic equalisers, offers some key
advantages over the more numerous Constant-Q equalisers on the market. Namely, at low amounts of cut or
boost, the width of the filter is relatively broad and becomes narrower as the amount of boost or cut is
increased, giving a more 'focused' response. This differs from a Constant-Q response, which boosts or cuts
an increasingly wide band of frequencies. This is an important consideration in applications, such as cutting
particular problem frequencies, as more of the frequency spectrum is scooped out when using Constant-Q
equalisation. Whereas, Proportional-Q equalisers are much better at cutting just the problem frequency
band. On Constant-Q equalisers the Q is measured 3dB up from the point of maximum attenuation when in
cut, rather than the correct definition of 3dB down from the point of maximum gain (0dB when cutting),
which results in a notch filter response.
In all types of graphic equalisers, one of the key issues is how the summing of adjacent EQ bands alters the
frequency response. Lower-Q filters will blend together more smoothly, but higher-Q filters provide more
selective control of problems - at the expense of more frequency response ripple. A weakness of the
Constant-Q approach is that for small amounts of boost and cut (a very typical situation), the EQ bands have
to be comparatively broad to blend smoothly so as to avoid excessive ripple in the frequency response.
However, as the Q of the EQ bands remains constant, larger amounts of boost or cut will affect an
increasingly wide range of frequencies, thus limiting the precision and usefulness of the equaliser.
Figure 4 and Figure 5 show the responses of a leading Constant-Q equaliser in both its 'wide' and 'narrow'
modes of operation for 2dB of boost and cut, which is typical of the small adjustments made in corrective EQ
applications. The 'wide' response gives a very smooth combined response for the three bands shown.
However, the 'narrow' response shows significant ripple in the combined response which will lead to audible
artefacts such as phase distortion.
Square ONE Graphic
DOC02-SQ1GRAPHIC_Op_IssE_printdata.pdf 35
25
27/04/2010 10:06:46
Proportional-Q filter response
+15
+10
+5
d
B
u
+0
-5
-10
-15
300
400
500
600
700 800 900 1k
2k
3k
4k
2k
3k
4k
Hz
Figure 4: Constant-Q equaliser ‘wide’ mode ±2dB boost and cut
+15
+10
+5
d
B
u
+0
-5
-10
-15
300
400
500
600
700 800 900 1k
Hz
Figure 5: Constant-Q equaliser ‘narrow’ mode ±2dB boost and cut
While the 'wide' response is obviously preferable for small amounts of boost and cut, Figure 6 and Figure 7
show the problem that occurs with using this response for full boost and cut. Here, far more of the audio
spectrum is affected due to each band being broader as a consequence of maintaining the same Q value.
26
DOC02-SQ1GRAPHIC_Op_IssE_printdata.pdf 36
Square ONE Graphic
27/04/2010 10:06:46
Proportional-Q filter response
+15
+10
+5
d
B
u
+0
-5
-10
-15
300
400
500
600
700 800 900 1k
2k
3k
4k
2k
3k
4k
Hz
Figure 6: Constant-Q equaliser ‘wide’ mode full boost and cut
+15
+10
+5
d
B
u
+0
-5
-10
-15
300
400
500
600
700 800 900 1k
Hz
Figure 7: Constant-Q equaliser ‘narrow’ mode full boost and cut
The advantage of Proportional-Q equalisation is that the EQ bands are wider at lower amounts of boost and
cut. They become narrower as greater amounts are applied, thus giving the optimum balance of smoothness
Square ONE Graphic
DOC02-SQ1GRAPHIC_Op_IssE_printdata.pdf 37
27
27/04/2010 10:06:46
Proportional-Q filter response
and accuracy over the entire fader travel. Extensive listening tests were carried out during the development
of the Square ONE Graphic to obtain the optimum response. This has resulted in a very musical sounding
equaliser that maintains the highest level of accuracy without ever sounding harsh.
Figure 8 and Figure 9 show the Square ONE Graphic responses for both 2dB and full scale boost and cut.
Note that the smooth combining of the bands for small amounts of boost and cut is very similar to that of the
Constant-Q equaliser in its 'wide' mode. However, as more boost or cut is applied the response becomes
sharper, giving much more precise control of problem frequencies.
+15
+10
+5
d
B
u
+0
-5
-10
-15
300
400
500
600
700 800 900 1k
2k
3k
4k
Hz
Figure 8: Square ONE Graphic response ±2dB boost and cut
28
DOC02-SQ1GRAPHIC_Op_IssE_printdata.pdf 38
Square ONE Graphic
27/04/2010 10:06:46
Proportional-Q filter response
+15
+10
+5
d
B
u
+0
-5
-10
-15
300
400
500
600
700 800 900 1k
2k
3k
4k
Hz
Figure 9: Square ONE Graphic response full boost and cut
In addition to the graphic equaliser section, the Square ONE Graphic also provides high pass and low pass
filters. These can be used to enhance the intelligibility of wedge monitors by cutting out extraneous low and
high frequency noise and therefore allowing higher SPLs to be used.
Square ONE Graphic
DOC02-SQ1GRAPHIC_Op_IssE_printdata.pdf 39
29
27/04/2010 10:06:46
Balanced/unbalanced audio
Balanced/unbalanced audio
Balancing refers to the type of input or output signal connections in an audio system. These connections are
specifically designed to reject external noise, for example, from mains wiring, and internal interference from
adjacent signal cables. Unlike unbalanced lines, which are more susceptible to noise, balancing is especially
useful when long cable runs are used between pieces of equipment and can also provide other benefits,
including an increase in line signal level and a decreased possibility of ground loops. Balanced connections
are typically employed on long cable runs, for example, to amplifiers, or for cables carrying sensitive or low
level signals, for example, mics. A balanced line typically employs connectors of the XLR and 1/4” TRS jack
plug types.
The basic principle of balanced interconnection is the cancelling out of any electrical noise by means of a
three-cable connection to achieve the required signal. Two of the cables, called “hot” and “cold”, are used to
carry signals and the third is a grounded shield that surrounds the hot and cold cables. (An unbalanced
connection only has two cables, one of which, the grounded shield, is also used for signal return.) As the hot
and cold cables are of equal voltage (and the same source impedance) but of opposite polarity, when they
are subtracted, any noise voltages - caused by interference and noise pick-up - appearing identically on both
cables is cancelled out; the difference between them being the resultant signal.
However, in practice the electrical noise on both cables will never be identical, and the degree to which it is
reduced is measured by the common mode rejection ratio (CMRR). The electronically balanced input and
output connections of the Square ONE Graphic have the benefit of high common mode rejection (CMR),
which eliminates externally induced interference such as mains hum etc. CMR is the ability of a balanced
input to reject the part of the incoming signal that has the same amplitude and opposite phase on both input
terminals, referenced to ground. As a specification, CMR is usually stated as a dB ratio, called CMRR, at a
given frequency.
Note: On balanced circuits, the ‘hot’ signal is also known as “+ve” and “in phase”, while the ‘cold’ signal is
also known as “-ve” and “out of phase”.
30
DOC02-SQ1GRAPHIC_Op_IssE_printdata.pdf 40
Square ONE Graphic
27/04/2010 10:06:46
Square ONE Graphic application notes
Square ONE Graphic application notes
Front-of-house
The graphic EQ filters of the Square ONE Graphic have been carefully selected to allow tonal correction with a
minimum of ripple between adjacent bands. While, at the same time the proportional-Q nature of the filters
ensures that in the event of acoustic feedback a tightly-focussed cut response is instantly available just by
moving the fader.
The ±12dB, 45 mm long-throw faders provide superb control resolution and excellent visibility of control
settings. The high and low-pass filters allow the frequency extremes to be matched to the capabilities of the
loudspeaker system in use, leaving all the graphic EQ faders available for acoustic management of the music.
Positive in/out switching for all the filter sections is combined with LEDs to give instant ‘at a glance’ status
indication.
Monitors
The design of the graphic filters with carefully selected Proportional-Q responses ensures that problem
frequencies can be attenuated quickly and effectively. Long-throw faders allow excellent control resolution
even when using all of the available 12dB of attenuation. Interaction with adjacent bands is minimised,
ensuring that more of the musical content is preserved. The filter pushbutton switches allow the filters to be
switched easily in and out, for example, when an artist is using different instruments during a show. LEDs
above the filter pushbuttons ensure that the filter status is always visible at a glance. High and low pass
filters allow the frequency limits to be accurately controlled for each output. This last feature, while very
useful for conventional wedge monitors, really comes into its own when combining in-ear and wedge
monitors, allowing the response of each monitor subsystem to be tailored to the artist’s requirements.
High pass filter (HPF)
High pass filters (HPFs) on graphic equalisers are used to remove unwanted subsonic frequencies
(traditionally about 30Hz). The HPF on the Square ONE Graphic is set at 80Hz. If using your Square ONE
Graphic with a large speaker system, you will almost certainly be using an active crossover, which should
provide appropriate subsonic protection. In this case, leave the HPF out of circuit.
When using more compact loudspeakers, use the 80Hz knee of the Square ONE Graphic’s HPF for maximising
their headroom and efficiency. If using your Square ONE Graphic with monitor (foldback) loudspeakers that
have an extended bass response, the HPF can still be used; in fact, useful results can be obtained by
“bending” the knee of the HPF by boosting the 63Hz fader on the Square ONE Graphic.
Low pass filter (LPF)
The Square ONE Graphic’s low pass filter (LPF) is fixed at 12kHz. This is optimal for stage monitoring
applications - both loudspeaker and in-ear monitor (IEM) systems - and will increase available headroom as
well as providing high frequency (HF) drivers with some thermal protection against ultrasonic frequencies.
When engaged simultaneously, the Square ONE Graphic’s HPF and LPF give optimal control of the operating
bandwidth of most foldback (floor wedge and IEM) transducer systems.
Square ONE Graphic
DOC02-SQ1GRAPHIC_Op_IssE_printdata.pdf 41
31
27/04/2010 10:06:46
Technical specification
Technical specification
Inputs
Two (A and B)
Type
Impedance
Maximum input level
Common mode rejection
Outputs
Two (A and B)
Type
Minimum load impedance
Source impedance
Maximum output level
Signal drive capability
Performance
Frequency response
Dynamic range
Noise floor
Gain
±0.5dBu (input to output), 20Hz to 20kHz
>112dB (22Hz to 22kHz unweighted)
Lower than -90dBu (22Hz to 22kHz unweighted)
-infinity (off) to +6dBu, with centre detent at 0dB
Equalisation
30 Bands
Centre Frequencies
Tolerance
Maximum Boost/Cut
High Pass Filter Slope
Low Pass Filter Slope
To BS EN ISO 266:1997 25Hz to 20kHz, 1/3 octave
±5%
±12dB
12dB/octave
12dB/octave
Terminations
Audio
Analogue, electronically balanced (Pin 2 hot)
20k Ohms
+22dBu
>80dB at 1kHz, >60dB at 10kHz
Analogue, electronically balanced (Pin 2 hot)
2k Ohms
<60 Ohms
+22dBu
<3dB drop in level relative to open circuit voltage when
driving 200 Ohms
Power
3-pin XLRs (male and female) and 1/4” TRS balanced
jack sockets
3-pin IEC
Power
Requirements
Voltage
Frequency
Consumption
100VAC to 240VAC ±10%
50Hz to 60Hz
<25W
Dimensions
Height
Width
Depth
133 mm (5.25”), 3U high
483 mm (19”)
200 mm (7 7/8”)
Weight
Net
Shipping
4.4 kg
5.4 kg
BS EN ISO 266:1997 Frequency Centres:
The ISO standard frequencies (Hz):
25, 31.5, 40, 50, 63, 80, 100, 125, 160, 200,
250, 315, 400, 500, 630, 800, 1.00k, 1.25k, 1.60k, 2.00k,
2.50k, 3.15k, 4.00k, 5.00k, 6.30k, 8.00k, 10.0k, 12.5k, 16.0k, 20.0k
Due to a policy of continual improvement, Klark Teknik reserves the right to alter the function or specification
at any time without notice.
32
DOC02-SQ1GRAPHIC_Op_IssE_printdata.pdf 42
Square ONE Graphic
27/04/2010 10:06:46
Frequency chart
Frequency chart
12
12
#
b
C E
#
#
b
#
F G B
C E
b
#
#
20k
16k
12k5
8k
10k
5k
6k3
4k
3k15
2k
2k5
1k6
1k
1k25
800
630
500
400
315
250
200
160
125
80
100
63
50
40
25
12
31.5
(Hz)
12
b
F G B
C D E F G A B C D E F G A B C
PIANO
LARGE PIPE ORGAN
VIOLIN
VIOLA
CELLO
DOUBLE BASS
PICCOLO
FLUTE
OBOE
BASSOON
TRUMPET
Note:
This information is provided
as a rough guide to the range
of fundamental frequencies
used by various common
instruments. In addition to
these, various amounts of
higher harmonic content will
also be produced.
TROMBONE
TUBA
SOPRANO
CONTRALTO
BARITONE
BASS
SNARE & TOMS
BASS DRUM
DRUM KIT (BASS DRUM/SNARE+TOMS)
GUITAR
Square ONE Graphic
DOC02-SQ1GRAPHIC_Op_IssE_printdata.pdf 43
20k
16k
12k5
8k
10k
6k3
5k
4k
3k15
2k
2k5
1k6
1k
1k25
Square 1 Graphic LOW PASS FILTER
800
630
500
400
315
250
200
160
125
80
100
63
50
40
31.5
25
(Hz)
Square 1 Graphic HIGH PASS FILTER
33
27/04/2010 10:06:47
Crib sheet
Crib sheet
+12
+12
0 GAIN
-
graphic
-12
-12
+12
+12
6
BYPASS
A
SIGNAL CLIP
B
80
12k
POWER
0 GAIN
-
-12
6
BYPASS
80
12k
BYPASS
80
12k
-12
Location:
Date:
Application:
+12
+12
0 GAIN
-
graphic
-12
-12
+12
+12
6
A
SIGNAL CLIP
B
POWER
0 GAIN
-
-12
6
BYPASS
80
12k
-12
Location:
Date:
Application:
34
DOC02-SQ1GRAPHIC_Op_IssE_printdata.pdf 44
Square ONE Graphic
27/04/2010 10:06:47
Service information
Service information
The service manual for this equipment is available for purchase. Please contact your local distributor for
details.
Routine maintenance
To help keep your Square ONE Graphic unit in good working order and to make sure it gives you optimum
performance, we recommend that you carry out the following about once every month:
•
Clean the unit, as detailed in “Cleaning the unit” on page 35.
•
Check controls for freedom of operation. As the controls are ‘self-cleaning’, this operation will help to
prevent them from sticking.
•
Check functionality of all controls, that is, faders, pushbuttons, LEDs etc.
•
Check functionality of equipment.
Cleaning the unit
Switch off the unit and electrically isolate it from the mains before cleaning.
Clean the unit using a dry, lint-free cloth. Do not use harsh abrasives or solvents. When cleaning the unit,
take great care not to damage faders, pushbuttons etc.
Checking/replacing the mains fuse
The equipment must be independently isolated from the mains voltage supply before any attempt
is made to change or check the protective fuse. The fuse and its cover must always be replaced
before the equipment is reconnected to the mains voltage supply.
Only use the correct replacement type when changing the fuse. Fuse specification is printed on the rear
cover.
To remove the fuse, pull out the fuse drawer (see “Mains supply” on page 15). Then, prise out the fuse from
the furthest compartment (the nearest compartment is for a spare fuse); a small, flat-bladed screwdriver
may be useful for this.
Insert new or existing fuse in the furthest fuse compartment and close drawer.
After replacing a fuse, check that the unit is working properly.
Square ONE Graphic
DOC02-SQ1GRAPHIC_Op_IssE_printdata.pdf 45
35
27/04/2010 10:06:47
Service information
36
DOC02-SQ1GRAPHIC_Op_IssE_printdata.pdf 46
Square ONE Graphic
27/04/2010 10:06:47
DOC02-SQ1GRAPHIC_Op_IssE_printdata.pdf 47
27/04/2010 10:06:47
© 2010 Red Chip Company Ltd.
Midas Klark Teknik Limited
Klark Industrial Park, Walter Nash Road,
Kidderminster. Worcestershire. DY11 7HJ. England.
Tel: +44 1562 741515, Fax: +44 1562 745371
Email: [email protected]
Website: www.ktsquareone.com
DOC02-SQ1GRAPHIC_Op_IssE_printdata.pdf 48
27/04/2010 10:06:47