1
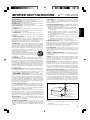
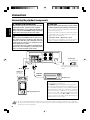
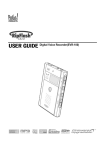
ENGLISH
KA-S10
STEREO INTEGRATED AMPLIFIER
INSTRUCTION MANUAL
FRANÇAIS
DEUTSCH
NEDERLANDS
ITALIANO
LA DICHIARAZIONE DI CONFORMITA' "CE" DI QUESTO
PRODOTTO E' DEPOSITATA PRESSO:
KENWOOD ELECTRONICS EUROPE B.V.
B61-1287-00 00
(E,X) KW 0508
ESPAÑOL
AMSTERDAMSEWEG 37
1422 AC UITHOORN
THE NETHERLANDS
Before applying power
Caution : Read this page carefully to ensure safe operation.
Units are designed for operation as follows.
Australia .............................................. AC 240 V only
Europe . ............................................... AC 230 V only
ENGLISH
Information on Disposal of Old Electrical and Electronic Equipment (applicable for EU countries that have adopted separate waste collection systems)
Products with the symbol (crossed-out wheeled bin) cannot be disposed as household waste.
Old electrical and electronic equipment should be recycled at a facility capable of handling these
items and their waste byproducts.
Contact your local authority for details in locating a recycle facility nearest to you.
Proper recycling and waste disposal will help conserve resources whilst preventing detrimental
effects on our health and the environment.
Safety precautions
WARNING : TO PREVENT FIRE OR ELECTRIC SHOCK, DO NOT
EXPOSE THIS APPLIANCE TO RAIN OR MOISTURE.
CAUTION
RISK OF ELECTRIC SHOCK
DO NOT OPEN
CAUTION: TO REDUCE THE RISK OF ELECTRIC SHOCK, DO NOT REMOVE COVER (OR BACK). NO USER-SERVICEABLE PARTS INSIDE.
REFER SERVICING TO QUALIFIED SERVICE PERSONNEL.
THE LIGHTNING FLASH WITH ARROWHEAD SYMBOL, WITHIN AN EQUILATERAL TRIANGLE, IS INTENDED TO ALERT THE USER TO THE PRESENCE OF UNINSULATED "DANGEROUS VOLTAGE" WITHIN
THE PRODUCT’S ENCLOSURE THAT MAY BE OF SUFFICIENT MAGNITUDE TO CONSTITUTE A RISK OF
ELECTRIC SHOCK TO PERSONS.
THE EXCLAMATION POINT WITHIN AN EQUILATERAL TRIANGLE IS INTENDED TO ALERT THE
USER TO THE PRESENCE OF IMPORTANT OPERATING AND MAINTENANCE (SERVICING) INSTRUCTIONS IN THE LITERATURE ACCOMPANYING THE APPLIANCE.
2
ENGLISH
IMPORTANT SAFETY INSTRUCTIONS
Read Instructions – All the safety and operating instructions
should be read before the product is operated.
Retain Instructions – The safety and operating instructions
should be retained for future reference.
Heed Warnings – All warnings on the product and in the
operating instructions should be adhered to.
Follow Instructions – All operating and use instructions
should be followed.
12.Servicing – Do not attempt to service this product yourself as opening or removing covers may expose you to dangerous voltage or other hazards. Refer all servicing to qualified service personnel.
13.Damage Requiring Service – Unplug this product from
the wall outlet and refer servicing to qualified service personnel under the following conditions:
a) When the power-supply cord or plug is damaged,
b) If liquid has been spilled, or objects have fallen into
the product,
c) If the product has been exposed to rain or water,
d) If the product does not operate normally by following
the operating instructions.
e) If the product has been dropped or damaged in any
way, and
f) When the product exhibits a distinct change in performance – this indicates a need for service.
g) If an abnormal smell or smoke is detected.
14.Replacement Parts – When replacement parts are required, be sure the service technician has used replacement
parts specified by the manufacturer or have the same characteristics as the original part. Unauthorized substitutions may
result in fire, electric shock, or other hazards.
15.Safety Check – Upon completion of any service or repairs to this product, ask the service technician to perform
safety checks to determine that the product is in proper operating condition.
16.Wall or Ceiling Mounting – This product should be
mounted to a wall or ceiling only as recommended by the
manufacturer.
17. Heat – This product should be situated away from heat
sources such as radiators, heat registers, stoves, or other
products that produce heat. Do not place a flaming object,
such as a candle or lantern, or near the product.
18.Power Lines – An outside antenna system should not be
located in the vicinity of overhead power lines or other electric light or power circuits, or where it can fall into such power
lines or circuits. When installing an outside antenna system,
extreme care should be taken to keep from touching such
power lines or circuits as contact with them might be fatal.
19.Outdoor Antenna Grounding – If an outside antenna or
cable system is connected to the product, be sure the antenna or cable system is grounded so as to provide some
protection against voltage surges and built-up static charges.
Article 810 of the National Electrical Code, ANSI/NFPA 70,
provides information with regard to proper grounding of the
mast and supporting structure, grounding of the lead-in wire
to an antenna discharge unit, size of grounding conductors,
location of antenna-discharge unit, connection to grounding
electrodes, and requirements for the grounding electrode.
EXAMPLE OF ANTENNA
GROUNDING AS PER NATIONAL
ELECTRICAL CODE
ANTENNA
LEAD IN WIRE
GROUND
CLAMPS
ANTENNA
DISCHARGE UNIT
(NEC SECTION 810-20)
ELECTRIC
SERVICE
EQUIPMENT
GROUNDING CONDUCTORS
(NEC SECTION 810-21)
GROUND CLAMP
NEC – NATIONAL ELECTRICAL CODE
POWER SERVICE GROUNDING
ELECTRODE SYSTEM
(NEC ART 250, PART H)
Notes:
1. Item 7 is not required except for grounded or polarized
equipment.
2. Item 19 complies with UL in the U.S.A.
ENGLISH
3
ENGLISH
1. Cleaning – Unplug this product from the wall outlet before cleaning. Do not use liquid cleaners or aerosol cleaners.
Use a damp cloth for cleaning.
2. Attachments – Do not use attachments not recommended by the product manufacturer as they may cause
hazards.
3. Water and Moisture – This product shall not be exposed
to dripping and splashing - for example, near a bath tub, wash
bowl, kitchen sink, or laundry tub; in a wet basement; or near
a swimming pool; and the like. Do not place an object containing liquid, such as a flower vase, on the appliance.
4. Accessories – Do not place this product on an unstable
cart, stand, tripod, bracket, or table. The product may fall,
causing serious injury to a child or adult, and serious damage
to the product. Use only with a cart, stand, tripod, bracket, or
table recommended by the manufacturer. Any mounting of
the product should follow the manufacturer’s instructions,
and should use a mounting accessory recommended by the manufacturer.
A product and cart combination should be moved
with care. Quick stops, excessive force, and uneven surfaces may cause the product and cart
combination to overturn.
5. Ventilation – Slots and openings in the cabinet are provided for ventilation and to ensure reliable operation of the
product and to protect it from overheating, and these openings must not be blocked or covered. The openings should
never be blocked by placing the product on a bed, sofa, rug,
or other similar surface. This product should not be placed in
a built-in installation such as a bookcase or rack unless proper
ventilation is provided or the manufacturer’s instructions have
been adhered to.
6. Power Sources – This product should be operated only
from the type of power source indicated on the product. If
you are not sure of the type of power supply to your home,
consult your product dealer or local power company.
7. CAUTION - Polarization – This product may be
equipped with a polarized alternating-current line plug (a plug
having one blade wider than the other). This plug will fit into
the power outlet only one way. This is a safety feature. If you
are unable to insert the plug fully into the outlet, try reversing
the plug. If the plug should still fail to fit, contact your electrician to replace your obsolete outlet. Do not defeat the safety
purpose of the polarized plug.
8. Power Cord Protection – Power-supply cords should be
routed so that they are not likely to be walked on or pinched
by items placed upon or against them, paying particular attention to cords at plugs, convenience receptacles, and the
point where they exit from the product.
9. Lightning – For added protection for this product during
a lightning storm, or when it is left unattended and unused
for long periods of time, unplug it from the wall outlet and
disconnect the antenna or cable system. This will prevent
damage to the product due to lightning and power-line surges.
10. Overloading – Do not overload wall outlets, extension
cords, or integral convenience receptacles as this can result
in a risk of fire or electric shock.
11. Object and Liquid Entry – Never push objects of any
kind into this product through openings as they may touch
dangerous voltage points or short-out parts that could result
in a fire or electric shock. Never spill liquid of any kind on the
product.
Caution : Read this page carefully
to ensure safe operation.
Special features
Three sets of input connectors
Considering connection with a portable component with a low audio output level, an analog input with high
input gain (D.AUDIO) is provided in addition to two analog inputs for ordinary desktop components (CD,
AUX).
Subwoofer output connector
ENGLISH
A subwoofer with built-in amplifier and pin jack input can be connected to this unit.
N.B. (Natural Bass) circuit
The bass sounds can be selected from three presets featuring different amplification center frequencies and
levels according to the installation environment and size of the speakers.
Either vertical or horizontal installation
A pair of stands is provided for installing this unit vertically or on its side.
Important items
Reference
Caution on condensation
Condensation (of dew) may occur inside the unit when there is a great difference in temperature between this unit and
the outside.
This unit may not function properly if condensation occurs. In this case, leave the unit for a few hours and restart the
operation after the condensation has dried up.
Be specially cautious against condensation in a following circumstances:
When this unit is carried from one place to another across a large difference in temperature, when the humidity in the
room where this unit is installed increases, etc.
Maintenance
Maintenance of the unit
In regard to contact cleaner
When the front panel or case becomes dirty, wipe with a
soft, dry cloth. Do not use thinner, benzine, alcohol, etc.
for these agents may cause discoloration.
Do not use contact cleaners because it could cause a
malfunction. Be specially careful not to use contact cleaners containing oil, for they may deform the plastic component.
ENGLISH
5
Connections
Connecting the playback components
CAUTION
CONNECTION PRECAUTIONS
ENGLISH
Do not connect the power cord plug into the power
outlet until all other connections are complete.
Before unplugging a cord or cable from the unit, be
always sure to set the POWER switch to OFF and
unplug the power plug from the power outlet.
CAUTION
Simply setting the POWER switch to OFF does not
shut down the power supplied to the unit completely. To isolate this unit completely from the
power supply, it is necessary to unplug the power
cord from the power outlet.
To shut down the power supply to the unit immediately in case of an emergency, connect the power
plug to an easily accessible power outlet.
Be sure to adhere to the following, or proper ventilation will be blocked causing damage or fire hazard.
÷ Do not place any objects impairing heat radiation
onto the top of the unit.
÷ Leave some space around the unit (from the largest
outside dimension including projection) equal to or
greater than, shown below.
Top panel : 50 cm Back panel : 10 cm
÷ Do not place the equipment onto a bed, a sofa, a
carpet, or similar. Sucked-in dust can cause fire.
Power plug
To AC wall outlet
White
Audio cord
(provided
accessory)
Insert the power plug all the
way and securely into a power
outlet.
Red
AUDIO OUT
(LINE OUT)
CD player etc.
HDD audio player etc.
Select the input connectors according to the type of
the component connected to it.
The D.AUDIO input is provided with high input gain so
that it can accept the input from the headphones output of a portable component such as a HDD (Hard Disc
Drive) audio player. If the line output from a desktop
component such as a CD player is connected to these
connectors, the audio is played at a larger volume than
when it is connected to the CD or AUX connectors. In
this case, however, the audio may be distorted if the
listening volume is set too high.
÷ In case an associated system component is connected, also read the instruction manual of the component.
÷ Be sure to insert all connection cords securely. If their connections are imperfect, the sound may not be
produced or noise may interfere.
6
ENGLISH
Connections
Connecting the speakers
CONNECTION PRECAUTIONS
Powerd subwoofer
Speakers
(Impedance 6 Ω - 16 Ω)
Left
1 Strip coating
2 Loosen
3 Insert
4 Secure
Right
÷ Never short-circuit the "+" and "–" speaker cords. It may cause malfunction.
÷ If the "+" and "–" polarity are inverted, the sound will be unnatural with unclear positioning of musical instruments, etc.
÷ Be sure to insert all connection cords securely. If their connections are imperfect, the sound may not be produced
or noise may interfere.
ENGLISH
7
ENGLISH
Do not connect the power cord plug into the power outlet until all other connections are complete.
Before unplugging a cord or cable from the unit, be always sure to set the POWER switch to OFF and unplug the
power plug from the power outlet.
Be careful so that the conductors of speaker wires do not contact other terminals or the case of the unit.
Controls and indicators
VOLUME
INPUT SELECTOR
POWER
N.B.CIRCUIT
AUX
ON
1
OFF
2
OFF
3
ENGLISH
CD
D.AUDIO
MIN
MAX
STEREO INTEGRATED AMPLIFIER KA-S10
1
2
3
1 POWER switch
Switches the power ON and OFF.
2 VOLUME knob
Rotating the knob clockwise increases the volume level,
and rotating the knob counterclockwise decreases the
volume level.
4
5
4 INPUT SELECTOR knob
Selects the input source (D.AUDIO, CD or AUX).
5 N.B. CIRCUIT knob
Adjusts the bass tone in three steps.
Select the position according to the speakers in use or
your liking.
3 Input indicator
The indicator for the input source selected with the
INPUT SELECTOR knob lights up.
All of the indicators are extinguished when the power
is switched OFF.
Vertical installation
The unit can be installed vertically, or on its left side, by using the pair of stands provided with it.
STEREO INTEGRATED AMPLIFIER KA-S10
OFF
÷ When installing the unit vertically, position it so that
the POWER switch comes at the lower position as
shown in the illustration.
ON
POWER
MIN
VOLUME
MAX
D.AUDIO
CD
AUX
INPUT SELECTOR
OFF
1
2
3
N.B.CIRCUIT
CAUTION
Be sure to observe the following cautions when installing the unit. Incorrect installation may cause the
unit to turn over or topple down and cause injuries.
÷ Always use the provided stands when installing the
unit vertically.
CAUTION
POWER switch
8
ENGLISH
When installing the unit, be careful not to block the
ventilation openings to ensure sufficient heat radiation. Otherwise, the heat pooled inside the unit may
cause malfunction or a fire hazard.
Operation
1. Switching the power on (off).
POWER
ON
2. Selecting the desired input sources.
When CD is selected.
Turn the INPUT SELECTOR knob in either direction to select the
source.
The input indicator for the selected input source lights up.
INPUT SELECTOR
AUX
CD
D.AUDIO
3. Adjusting volume.
Decrease
volume
Increase
volume
VOLUME
MIN
Turn the VOLUME knob in either direction to adjust the volume.
Turning the knob clockwise increases the listening volume and
turning the knob clockwise decreases it.
MAX
Adjusting the bass tone with N.B. (Natural Bass) CIRCUIT knob
Turn the N.B. CIRCUIT knob in either direction to adjust the low frequencies if necessary.
N.B.CIRCUIT
1
OFF
2
3
OFF : Normal playback (The N.B. circuit function is deactivated.)
1
: Enhances the low frequencies around 60 Hz.
2
: Enhances the low frequencies around 70 Hz.
3
: Enhances the low frequencies around 100 Hz.
Image of enhancement effects of N.B. circuit
Level
In general, the bass adjustment using the N.B. circuit is
most effective when using compact speakers because
the bass is often insufficient with these kinds of
speakers. The N.B. CIRCUIT knob should be set to OFF
with a subwoofer.
Frequency
ENGLISH
9
ENGLISH
Press the POWER switch to switch the unit ON.
One of the input indicators light up when the power is switched
ON.
To switch the unit OFF, press the POWER switch again. The input
indicators should turn off when the power is OFF.
OFF
Contents
Caution : Read the pages marked
carefully to ensure safe operation.
Before applying power ............................................ 2
Connections ..................................................................... 6
Safety precautions ............................................................... 2
Connecting the playback components .................................... 6
Connecting the speakers ........................................................... 7
IMPORTANT SAFETY INSTRUCTIONS ................... 3
Contents ............................................................................ 4
ENGLISH
Accessories .................................................................................. 4
Special features .............................................................. 5
Important items................................................................ 5
Reference ...................................................................................... 5
Maintenance ................................................................................ 5
Controls and indicators.................................................. 8
Vertical installation .................................................................... 8
Operation .......................................................................... 9
In case of difficulty ....................................................... 10
Specifications ................................................................ 10
Accessories
Unpacking
Unpack the unit carefully and make sure that all the accessories are present.
Audio cord (1)
(RCA plug - Φ3.5 mm plug)
Stand (2)
If any accessories are missing, or if the unit is damaged or fails to operate, notify your dealer immediately. If the unit
was shipped to you directly, notify your shipper immediately. Kenwood recommends that you retain the original carton
and packing materials in case you need to move or ship the unit in the future.
Keep this manual handy for future reference.
For your records
Record the serial number, found on the back of the unit, in the spaces designated on the warranty card, and in the space
provided below. Refer to the model and serial numbers whenever you call upon your dealer for information or service on
this product.
Model KA-S10
4
ENGLISH
Serial Number
In case of difficulty
What seems to be a malfunction is not always so. Before calling for service, check the following table according to the symptom of your trouble.
Symptom
Remedy
ENGLISH
Sound is not produced.
÷ Connect properly referring to "Connections".
67
÷ Adjust to a required volume.
9
÷ Select the desired input source with the INPUT SELECTOR
knob.
9
No sound is output or noise interferes.
÷ The speaker protection circuit may be activated. Read “Speaker
protection circuit” below and remove short-circuiting of the
speaker cords.
0
Sound is not produced from the left or right
speaker.
÷ Connect properly referring to "Connections".
Sound volume is too low.
Sound is too loud and distorted.
67
÷ Connect properly referring to "Connections".
67
÷ If the headphones output of a portable component is connected
to the CD or AUX input connectors, reconnect it to the D.AUDIO
input connectors.
6
÷ Connect properly referring to "Connections".
67
÷ If the line output of a desktop component such as a CD player is
connected to the D.AUDIO input connectors, reconnect it to the
CD or AUX input connectors.
6
Speaker protection circuit
The speaker protection circuit is activated when the unit is switched ON while the + and – speaker cords are shorted.
When activated, the speaker protection circuit shuts off the audio output to protect both the unit and speakers.
If the speaker cords are shorted, switch the unit OFF, unplug the power cord from the power outlet, and then reconnect
the speaker cords properly by removing the short-circuiting. Plug the power plug into the power outlet and set the
POWER switch to ON to reuse the unit.
Specifications
[Audio section]
[General]
Effective output power during STEREO operation
(1 kHz, 10 % T.H.D., at 8 Ω) ...... 12 W + 12 W (RMS)
(1 kHz, 10 % T.H.D., at 6 Ω) ...... 13 W + 13 W (RMS)
Rated output power during STEREO operation
(63 Hz ~ 12.5 kHz, at 8 Ω) ........... 10 W + 10 W (DIN)
(63 Hz ~ 12.5 kHz, at 6 Ω) ........... 11 W + 11 W (DIN)
Total harmonic distortion
............................. 0.03 % (AUX IN, 1 kHz, 6 W, 8 Ω)
N.B. Circuit
N.B. 1 ............................................. +3.0 dB (at 60 Hz)
N.B. 2 ............................................. +5.0 dB (at 70 Hz)
N.B. 3 ........................................... +7.5 dB (at 100 Hz)
Input (Sensitivity / Impedance)
LINE (CD, AUX) ............................... 250 mV / 22 kΩ
LINE (D.AUDIO) ............................... 140 mV / 48 kΩ
Output (Level / Impedance)
SUBWOOFER PREOUT ....................... 1.8 V / 2.9 kΩ
Power consumption .............................................. 28 W
Dimensions
Horizontal installation ............ W 171 mm (6-3/4 ")
H 67 mm (2-5/8 ")
D 207 mm (8-1/8 ")
Vertical installation ................. W 89 mm (3-1/2 ")
H 182 mm(7-3/16 ")
D 207 mm (8-1/8 ")
Weight (net) .................................................. 2 kg (4.4 lb)
10
ENGLISH
Notes : KENWOOD follows a policy of continuous
advancements in development. For this reason specifications may be changed without notice.
÷ Sufficient performance may not be exhibited at extremely cold locations (where water freezes).